
Venturing into the kitchen for two? You’re in luck! We’ve gathered 20 delicious, healthy dinner recipes that are quick, easy, and perfect for busy weeknights. From vibrant veggie bowls to cozy one-pan wonders, these meals prove that eating well doesn’t have to be complicated. Let’s dive in and discover your new favorite go-to dinners!
Garlic Butter Salmon with Asparagus

Bold flavors and minimal effort make this garlic butter salmon with asparagus a weeknight winner. This one-pan meal delivers restaurant-quality results in under 30 minutes. Perfectly cooked salmon and crisp-tender asparagus soak up a rich, savory garlic butter sauce.
Serving: 4 | Pre Time: 10 minutes | Cooking Time: 15 minutes
Ingredients
– 4 salmon fillets (6 oz each)
– 1 lb asparagus, trimmed
– 4 tbsp unsalted butter
– 4 cloves garlic, minced
– 2 tbsp olive oil
– 1 tsp kosher salt
– 1/2 tsp black pepper
– 1 tbsp fresh lemon juice
– 2 tbsp chopped fresh parsley
Instructions
1. Preheat oven to 400°F and line a baking sheet with parchment paper.
2. Pat salmon fillets dry with paper towels to ensure crispy skin.
3. Arrange salmon and asparagus in a single layer on the baking sheet.
4. Drizzle olive oil evenly over salmon and asparagus.
5. Season both sides of salmon with kosher salt and black pepper.
6. Roast in preheated oven for 12 minutes at 400°F.
7. While roasting, melt butter in a small saucepan over medium heat.
8. Add minced garlic to melted butter and cook for 1 minute until fragrant.
9. Remove saucepan from heat and stir in fresh lemon juice.
10. Check salmon internal temperature with a meat thermometer; remove from oven when it reaches 145°F.
11. Spoon garlic butter sauce over hot salmon and asparagus.
12. Garnish with chopped fresh parsley before serving.
A flaky, moist texture contrasts beautifully with crisp asparagus spears. The garlic butter sauce adds a luxurious richness that coats every bite. Serve immediately over rice or with crusty bread to soak up the extra sauce.
Lemon Herb Chicken with Roasted Vegetables
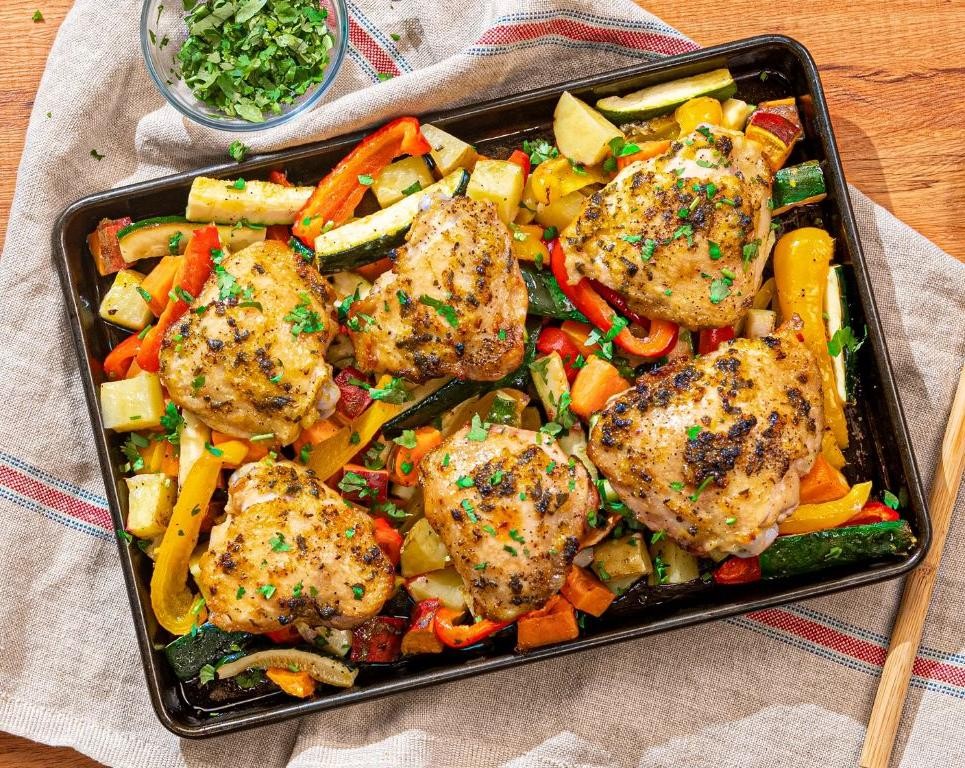
Ultimate weeknight dinner solution: Lemon Herb Chicken with Roasted Vegetables delivers bright flavor and minimal cleanup. This one-pan meal balances juicy chicken with caramelized vegetables for a satisfying, healthy option.
Serving: 4 | Pre Time: 15 minutes | Cooking Time: 35 minutes
Ingredients
– 4 boneless, skinless chicken breasts
– 1 lb baby potatoes, halved
– 2 cups broccoli florets
– 1 red bell pepper, sliced
– 1 yellow onion, sliced
– 3 tbsp olive oil, divided
– 2 tbsp fresh lemon juice
– 4 cloves garlic, minced
– 1 tbsp fresh rosemary, chopped
– 1 tbsp fresh thyme, chopped
– 1 tsp salt
– ½ tsp black pepper
Instructions
1. Preheat oven to 425°F.
2. Pat chicken breasts dry with paper towels to ensure even browning.
3. In a small bowl, whisk 2 tbsp olive oil, lemon juice, garlic, rosemary, thyme, salt, and pepper.
4. Place chicken in a large bowl and pour half the marinade over it, coating thoroughly.
5. Toss potatoes, broccoli, bell pepper, and onion with remaining 1 tbsp olive oil in a separate bowl.
6. Arrange vegetables in a single layer on a rimmed baking sheet.
7. Place marinated chicken breasts on top of vegetables.
8. Roast in preheated oven for 20 minutes.
9. Flip chicken and stir vegetables to promote even cooking.
10. Continue roasting for 15 minutes or until chicken reaches 165°F internally.
11. Let chicken rest 5 minutes before slicing to retain juices.
12. Serve chicken alongside roasted vegetables.
Aromatic herbs and lemon create a vibrant, zesty coating that permeates the tender chicken. The vegetables develop sweet, caramelized edges while staying crisp-tender. For a fresh twist, garnish with extra lemon zest or serve over quinoa to soak up the pan juices.
Baked Cod with Tomato and Olive Tapenade
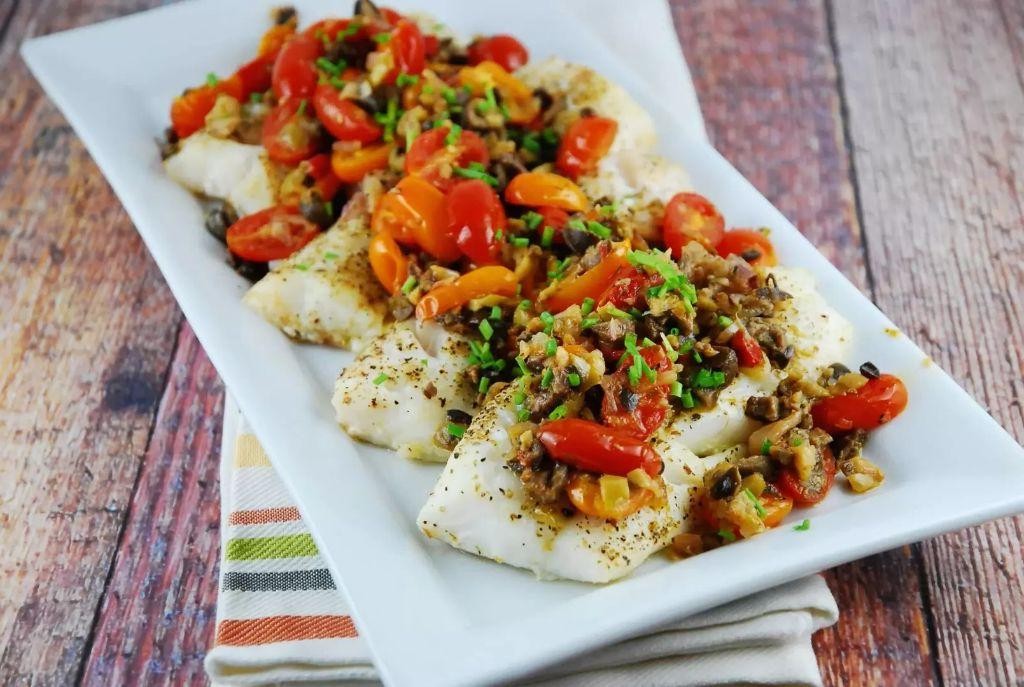
Dinner just got easier with this flavorful baked cod. This recipe combines tender fish with a bright tomato-olive topping for a quick, impressive meal. It’s perfect for a busy weeknight or casual entertaining.
Serving: 4 | Pre Time: 15 minutes | Cooking Time: 15 minutes
Ingredients
– 4 (6-ounce) cod fillets
– 1/2 teaspoon kosher salt
– 1/4 teaspoon black pepper
– 1 tablespoon olive oil
– 1 cup cherry tomatoes, halved
– 1/2 cup pitted Kalamata olives, chopped
– 2 cloves garlic, minced
– 1 tablespoon capers, drained
– 1 tablespoon fresh lemon juice
– 2 tablespoons fresh parsley, chopped
Instructions
1. Preheat your oven to 400°F.
2. Pat the 4 cod fillets completely dry with paper towels.
3. Place the dried fillets on a parchment-lined baking sheet.
4. Season the fillets evenly with 1/2 teaspoon kosher salt and 1/4 teaspoon black pepper.
5. Drizzle 1 tablespoon of olive oil over the seasoned fillets.
6. Bake the cod in the preheated oven for 10 minutes.
7. While the cod bakes, combine 1 cup halved cherry tomatoes, 1/2 cup chopped Kalamata olives, 2 minced garlic cloves, 1 tablespoon drained capers, and 1 tablespoon fresh lemon juice in a medium bowl.
8. After 10 minutes, remove the baking sheet from the oven.
9. Spoon the tomato-olive mixture evenly over the partially baked cod fillets.
10. Return the baking sheet to the oven and bake for an additional 5 minutes, or until the fish flakes easily with a fork and reaches an internal temperature of 145°F.
11. Remove the baking sheet from the oven.
12. Sprinkle 2 tablespoons of chopped fresh parsley over the finished dish.
Perfectly baked cod flakes into large, tender pieces beneath the chunky tapenade. The salty olives and briny capers balance the sweet, burst tomatoes for a vibrant flavor. Serve it over a bed of lemon-herb quinoa or with crusty bread to soak up the juices.
Turkey and Spinach Stuffed Sweet Potatoes
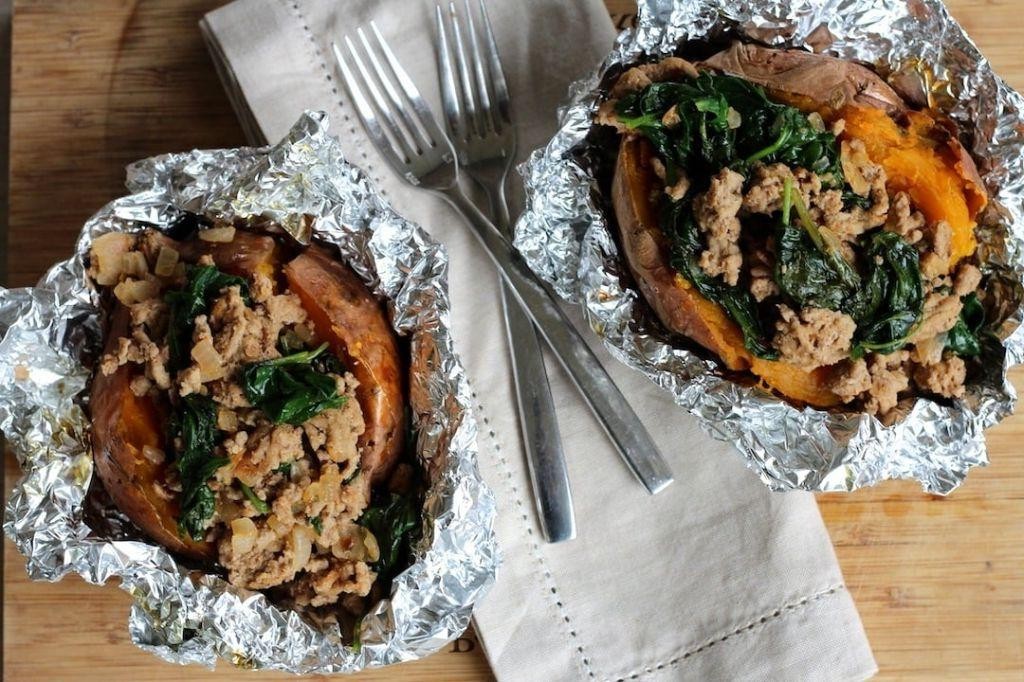
Gather around for a simple yet satisfying meal that transforms humble sweet potatoes into a complete dinner. Ground turkey and fresh spinach create a savory filling that’s both nutritious and flavorful. This hands-on recipe delivers comfort without the fuss.
Serving: 4 | Pre Time: 15 minutes | Cooking Time: 60 minutes
Ingredients
– 4 medium sweet potatoes
– 1 tablespoon olive oil
– 1 pound ground turkey
– 1/2 teaspoon salt
– 1/4 teaspoon black pepper
– 1/2 teaspoon garlic powder
– 1/2 teaspoon onion powder
– 4 cups fresh spinach
– 1/2 cup shredded cheddar cheese
Instructions
1. Preheat your oven to 400°F (200°C).
2. Scrub the sweet potatoes thoroughly and pat them dry with a paper towel.
3. Prick each sweet potato several times with a fork to allow steam to escape.
4. Place the sweet potatoes directly on the oven rack and bake for 45-50 minutes, until they are tender when pierced with a fork.
5. While the sweet potatoes bake, heat the olive oil in a large skillet over medium-high heat.
6. Add the ground turkey to the skillet, breaking it apart with a wooden spoon.
7. Cook the turkey for 5-7 minutes, until it is no longer pink. Tip: Avoid overcrowding the pan to ensure proper browning.
8. Season the cooked turkey with salt, black pepper, garlic powder, and onion powder, stirring to combine.
9. Add the fresh spinach to the skillet with the turkey.
10. Cook for 2-3 minutes, stirring constantly, until the spinach is wilted. Remove the skillet from the heat.
11. Once the sweet potatoes are baked, carefully remove them from the oven and let them cool for 5 minutes. Tip: Letting them cool slightly makes them easier to handle.
12. Slice each sweet potato open lengthwise and gently fluff the insides with a fork.
13. Evenly divide the turkey and spinach mixture among the four sweet potatoes, spooning it into the center.
14. Top each stuffed sweet potato with 2 tablespoons of shredded cheddar cheese.
15. Return the stuffed sweet potatoes to the oven and bake for an additional 5-7 minutes, just until the cheese is melted and bubbly. Tip: Watch closely to prevent the cheese from burning.
16. Carefully remove the stuffed sweet potatoes from the oven. Creamy sweet potato flesh contrasts with the savory, well-seasoned turkey filling, while the melted cheese adds a rich finish. For a fresh twist, serve with a dollop of Greek yogurt or a sprinkle of green onions.
Cauliflower Fried Rice with Shrimp

You’ve probably tried cauliflower rice before, but this shrimp version takes it to another level. It’s a low-carb, high-flavor dinner that comes together in under 30 minutes. Perfect for busy weeknights when you want something healthy but satisfying.
Serving: 4 | Pre Time: 15 minutes | Cooking Time: 12 minutes
Ingredients
– 1 lb raw shrimp, peeled and deveined
– 1 large head cauliflower, riced (about 4 cups)
– 2 tbsp vegetable oil
– 3 cloves garlic, minced
– 1 tbsp fresh ginger, grated
– 2 large eggs, beaten
– 1 cup frozen peas and carrots mix
– 3 tbsp low-sodium soy sauce
– 1 tbsp sesame oil
– 2 green onions, sliced
– 1 tsp red pepper flakes (optional)
Instructions
1. Pat the shrimp completely dry with paper towels to ensure a good sear.
2. Heat 1 tbsp vegetable oil in a large skillet or wok over medium-high heat until shimmering.
3. Add the shrimp in a single layer and cook for 2 minutes per side until pink and opaque; transfer to a plate.
4. Add the remaining 1 tbsp vegetable oil to the same skillet.
5. Sauté the garlic and ginger for 30 seconds until fragrant but not browned.
6. Push the aromatics to the side and pour the beaten eggs into the empty space; scramble for 1 minute until just set.
7. Add the frozen peas and carrots mix and cook for 2 minutes, stirring frequently.
8. Increase heat to high and add the riced cauliflower; cook for 5 minutes, stirring occasionally, until tender and any moisture evaporates.
9. Stir in the cooked shrimp, soy sauce, and sesame oil; toss everything together for 1 minute to combine and heat through.
10. Remove from heat and fold in the green onions and red pepper flakes if using.
11. Serve immediately while hot.
Serve this dish straight from the skillet for maximum freshness. The cauliflower rice has a satisfying, slightly crisp texture that mimics traditional fried rice, while the shrimp adds a sweet, briny flavor. For a fun twist, spoon it into lettuce cups or top with a fried egg for extra richness.
Mediterranean Chickpea Salad Wraps
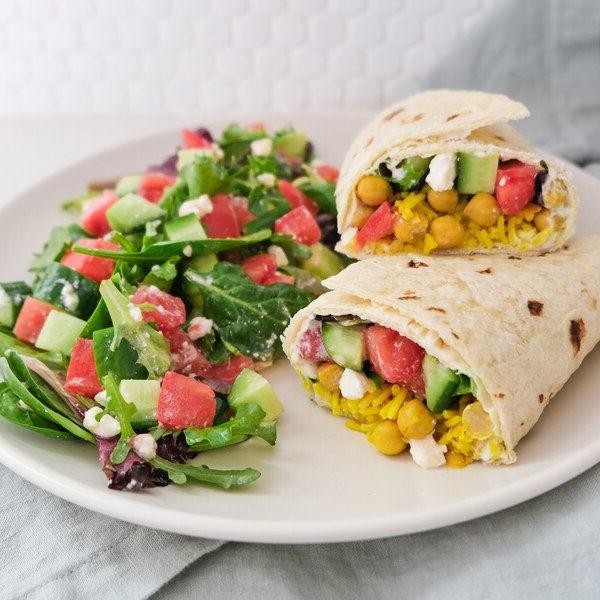
Mediterranean flavors shine in these quick wraps, perfect for busy weeknights or meal prep. They combine creamy chickpeas, crisp vegetables, and tangy dressing in a portable package that’s both satisfying and nutritious.
Serving: 4 | Pre Time: 15 minutes | Cooking Time: 0 minutes
Ingredients
– 2 (15-ounce) cans chickpeas, drained and rinsed
– 1 cup English cucumber, diced
– 1 cup cherry tomatoes, halved
– 1/2 cup red onion, finely chopped
– 1/4 cup Kalamata olives, pitted and sliced
– 1/4 cup fresh parsley, chopped
– 1/3 cup feta cheese, crumbled
– 4 large whole-wheat tortillas (10-inch)
– 1/4 cup extra-virgin olive oil
– 3 tablespoons lemon juice
– 2 cloves garlic, minced
– 1 teaspoon dried oregano
– 1/2 teaspoon salt
– 1/4 teaspoon black pepper
Instructions
1. In a large bowl, combine chickpeas, cucumber, tomatoes, red onion, olives, parsley, and feta cheese.
2. In a small bowl, whisk together olive oil, lemon juice, garlic, oregano, salt, and pepper until emulsified.
3. Pour dressing over chickpea mixture and toss gently to coat evenly.
4. Let salad rest for 10 minutes to allow flavors to meld.
5. Warm tortillas in a dry skillet over medium heat for 30 seconds per side until pliable.
6. Divide salad mixture evenly among tortillas, placing it in the center of each.
7. Fold bottom edge of tortilla over filling, then fold sides inward and roll tightly to seal.
8. Slice wraps in half diagonally for easier serving.
All wraps feature a satisfying crunch from fresh vegetables against creamy chickpeas and briny olives. The lemon-garlic dressing adds a bright, zesty note that balances the richness. For a creative twist, serve them with a side of tzatziki or hummus for dipping, or pack them whole for a mess-free lunch on the go.
Grilled Chicken and Veggie Skewers
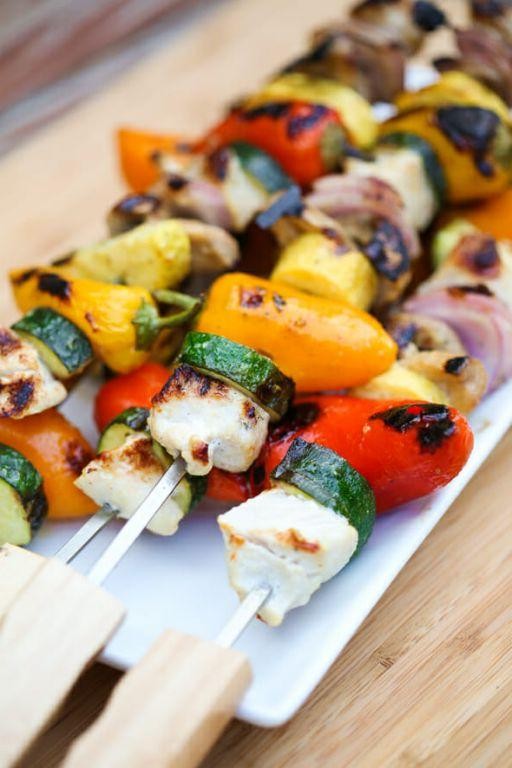
Everyone needs a simple, healthy meal that delivers big flavor without the fuss. Grilled chicken and veggie skewers are exactly that—a colorful, customizable dinner ready in under 30 minutes.
Serving: 4 | Pre Time: 15 minutes | Cooking Time: 10 minutes
Ingredients
– 1.5 lbs boneless, skinless chicken breasts
– 1 red bell pepper
– 1 yellow bell pepper
– 1 red onion
– 1 zucchini
– 2 tbsp olive oil
– 2 tbsp lemon juice
– 2 cloves garlic, minced
– 1 tsp dried oregano
– 1/2 tsp salt
– 1/4 tsp black pepper
Instructions
1. Cut the chicken breasts into 1-inch cubes.
2. Chop the red bell pepper, yellow bell pepper, red onion, and zucchini into 1-inch pieces.
3. In a large bowl, whisk together the olive oil, lemon juice, minced garlic, dried oregano, salt, and black pepper to create the marinade.
4. Add the chicken cubes to the marinade, tossing to coat evenly, and let sit for 10 minutes.
5. Preheat a grill or grill pan to medium-high heat (400°F).
6. Thread the marinated chicken and chopped vegetables alternately onto metal or soaked wooden skewers.
7. Place the skewers on the preheated grill and cook for 8-10 minutes, turning every 2 minutes, until the chicken reaches an internal temperature of 165°F and the vegetables are charred and tender.
8. Remove the skewers from the grill and let them rest for 3 minutes before serving.
Nothing beats the smoky char on the veggies paired with juicy, herb-infused chicken. Serve these skewers over a bed of quinoa or with a side of tzatziki for a complete meal that’s as vibrant as it is satisfying.
One-Pan Lemon Garlic Shrimp and Broccoli
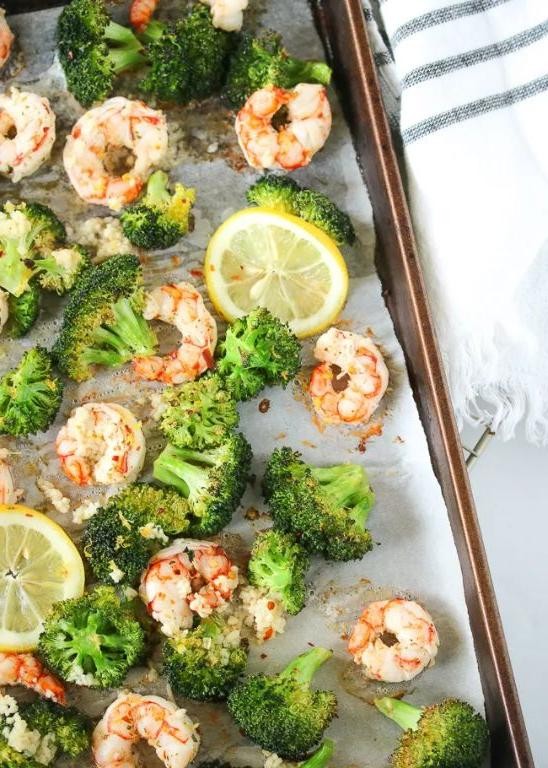
Make weeknight dinners effortless with this vibrant one-pan wonder. Minimal cleanup meets maximum flavor in under 30 minutes. It’s a protein-packed, veggie-loaded meal that feels fresh and satisfying.
Serving: 4 | Pre Time: 10 minutes | Cooking Time: 15 minutes
Ingredients
– 1.5 lbs large shrimp, peeled and deveined
– 4 cups broccoli florets
– 3 tbsp olive oil, divided
– 4 cloves garlic, minced
– 1 lemon, juiced and zested
– 1/4 cup chicken broth
– 2 tbsp unsalted butter
– 1/4 tsp red pepper flakes
– Salt and black pepper
Instructions
1. Pat the shrimp completely dry with paper towels to ensure a good sear.
2. Season the shrimp evenly with salt and black pepper on both sides.
3. Heat 2 tbsp olive oil in a large skillet over medium-high heat until shimmering, about 2 minutes.
4. Add the shrimp in a single layer and cook for 2 minutes per side until pink and opaque, then transfer to a plate.
5. Add the remaining 1 tbsp olive oil to the same skillet.
6. Add the broccoli florets and cook for 5 minutes, stirring occasionally, until bright green and slightly tender.
7. Push the broccoli to the sides of the skillet and add the minced garlic and red pepper flakes to the center.
8. Cook the garlic for 30 seconds until fragrant, then stir it into the broccoli.
9. Pour in the chicken broth and lemon juice, scraping up any browned bits from the pan bottom.
10. Simmer the mixture for 3 minutes until the broccoli is crisp-tender and the liquid reduces slightly.
11. Reduce the heat to low and stir in the butter until melted and creamy.
12. Return the cooked shrimp to the skillet and toss everything together to coat evenly.
13. Stir in the lemon zest and cook for 1 final minute to warm through.
14. Remove from heat and serve immediately.
With juicy shrimp and crisp-tender broccoli coated in a bright, garlicky sauce, this dish delivers balanced texture and zesty flavor. Serve it over quinoa or crusty bread to soak up every drop, or add extra red pepper flakes for a spicy kick.
Black Bean and Sweet Potato Tacos
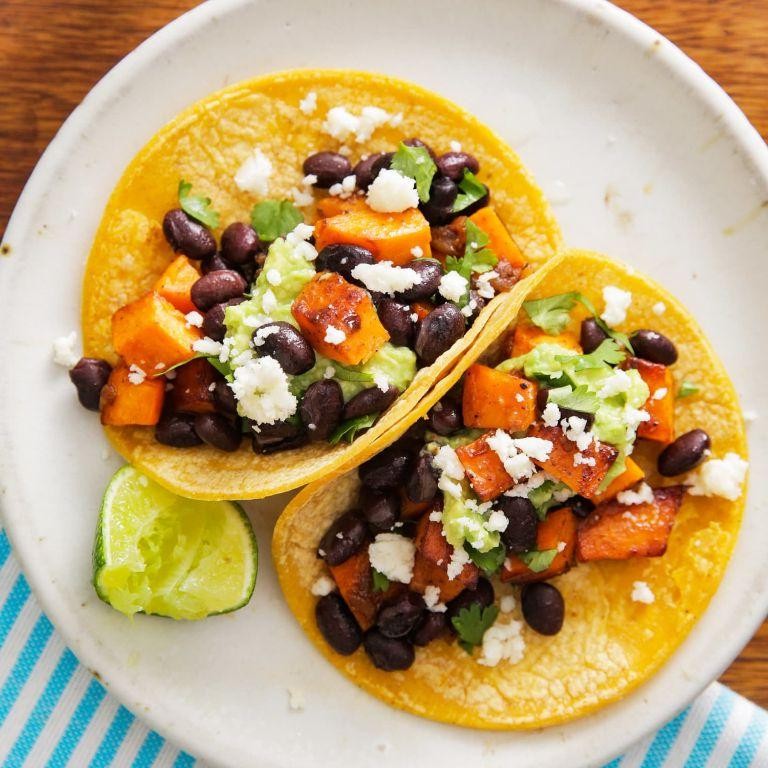
Satisfying and nutritious, these vegetarian tacos combine smoky black beans with sweet roasted potatoes. They come together quickly for a weeknight meal that everyone will enjoy.
Serving: 4 | Pre Time: 15 minutes | Cooking Time: 25 minutes
Ingredients
– 2 medium sweet potatoes, peeled and diced into 1/2-inch cubes
– 2 tbsp olive oil
– 1 tsp ground cumin
– 1/2 tsp smoked paprika
– 1/4 tsp salt
– 1 (15 oz) can black beans, rinsed and drained
– 1/2 cup corn kernels (fresh, frozen, or canned)
– 1/4 cup chopped red onion
– 1 jalapeño, seeded and finely chopped
– 8 small corn tortillas
– 1/2 cup crumbled queso fresco
– 1/4 cup chopped fresh cilantro
– 1 lime, cut into wedges
Instructions
1. Preheat your oven to 425°F and line a baking sheet with parchment paper.
2. In a large bowl, toss the diced sweet potatoes with 1 tbsp olive oil, cumin, smoked paprika, and salt until evenly coated.
3. Spread the sweet potatoes in a single layer on the prepared baking sheet.
4. Roast for 20-25 minutes, flipping halfway through, until the potatoes are tender and caramelized at the edges.
5. While the potatoes roast, heat the remaining 1 tbsp olive oil in a skillet over medium heat.
6. Add the red onion and jalapeño to the skillet; sauté for 3-4 minutes until softened.
7. Stir in the black beans and corn; cook for 5-6 minutes until heated through, mashing some beans slightly with the back of a spoon to create a thicker texture.
8. Warm the corn tortillas in a dry skillet over medium heat for 30 seconds per side, or wrap them in a damp paper towel and microwave for 30 seconds until pliable.
9. To assemble, divide the black bean mixture among the warm tortillas.
10. Top each taco with roasted sweet potatoes, crumbled queso fresco, and chopped cilantro.
11. Serve immediately with lime wedges on the side for squeezing.
Enjoy the contrast of creamy beans, sweet caramelized potatoes, and fresh, bright toppings. For a fun twist, serve the components in bowls and let everyone build their own tacos at the table.
Baked Chicken Parmesan with Zucchini

Dinner just got easier with this baked chicken parmesan paired with zucchini. This one-pan meal delivers crispy chicken and tender veggies without the usual frying mess. It’s a weeknight lifesaver that feels special enough for guests.
Serving: 4 | Pre Time: 15 minutes | Cooking Time: 25 minutes
Ingredients
– 1.5 lbs boneless, skinless chicken breasts
– 1 cup Italian-seasoned breadcrumbs
– 1/2 cup grated parmesan cheese
– 2 large eggs
– 2 medium zucchinis
– 1 cup marinara sauce
– 1 cup shredded mozzarella cheese
– 2 tbsp olive oil
– 1 tsp garlic powder
– 1/2 tsp salt
– 1/4 tsp black pepper
Instructions
1. Preheat oven to 425°F and line a baking sheet with parchment paper.
2. Slice chicken breasts into 1-inch thick cutlets using a sharp knife for even cooking.
3. Whisk eggs in a shallow bowl until fully combined.
4. Mix breadcrumbs, parmesan cheese, garlic powder, salt, and pepper in a separate shallow bowl.
5. Dip each chicken cutlet in egg, then coat thoroughly in breadcrumb mixture, pressing gently to adhere.
6. Place coated chicken on one side of the prepared baking sheet, leaving space between pieces.
7. Slice zucchinis into 1/2-inch thick rounds and toss with olive oil in a bowl.
8. Arrange zucchini rounds on the other side of the baking sheet in a single layer.
9. Bake for 15 minutes at 425°F until chicken is golden and zucchini is tender.
10. Remove baking sheet from oven and spoon 2 tbsp marinara sauce over each chicken cutlet.
11. Sprinkle mozzarella cheese evenly over sauced chicken.
12. Return to oven and bake for 8-10 minutes at 425°F until cheese is melted and bubbly.
13. Let rest for 5 minutes before serving to allow juices to redistribute.
Nothing beats the contrast of crispy, cheesy chicken against the soft, caramelized zucchini. The zucchini soaks up savory pan juices while keeping its slight crunch. Try serving over spaghetti or with a simple arugula salad for a complete meal.
Avocado and Tuna Stuffed Tomatoes
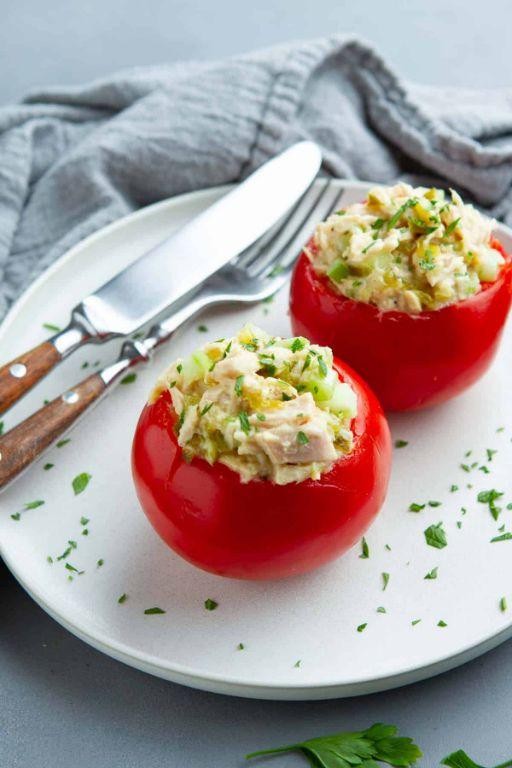
A fresh, protein-packed appetizer that’s perfect for summer gatherings or a light lunch. Avocado and tuna stuffed tomatoes combine creamy, savory flavors in a vibrant, edible vessel. They come together quickly with minimal cooking required.
Serving: 4 | Pre Time: 15 minutes | Cooking Time: 0 minutes
Ingredients
– 4 large beefsteak tomatoes
– 1 ripe avocado
– 1 (5 oz) can solid white tuna in water, drained
– 1/4 cup mayonnaise
– 1 tbsp fresh lemon juice
– 1/4 tsp salt
– 1/8 tsp black pepper
– 1 tbsp chopped fresh parsley
Instructions
1. Slice the top 1/4 off each tomato horizontally.
2. Use a spoon to scoop out the seeds and pulp, leaving a 1/4-inch thick shell.
3. Place the hollowed tomatoes cut-side down on a paper towel to drain for 5 minutes.
4. Halve the avocado, remove the pit, and scoop the flesh into a medium bowl.
5. Mash the avocado with a fork until mostly smooth.
6. Flake the drained tuna into the bowl with the avocado.
7. Add the mayonnaise, lemon juice, salt, and black pepper to the bowl.
8. Stir all ingredients together until fully combined.
9. Spoon the tuna-avocado mixture evenly into the four tomato shells.
10. Garnish each stuffed tomato with the chopped parsley.
11. Serve immediately or refrigerate for up to 1 hour before serving.
What you get is a cool, creamy filling contrasted by the firm, juicy tomato shell. The lemon brightens the rich avocado and tuna, while the parsley adds a fresh finish. For a creative twist, serve these on a bed of mixed greens or alongside crispy pita chips.
Lentil and Mushroom Bolognese

Unbelievably rich and hearty, this plant-based Bolognese swaps traditional meat for earthy lentils and savory mushrooms. It simmers into a thick, satisfying sauce perfect for pasta night. You’ll love how the flavors deepen as it cooks.
Serving: 6 | Pre Time: 15 minutes | Cooking Time: 45 minutes
Ingredients
– 2 tbsp olive oil
– 1 medium yellow onion, diced
– 2 medium carrots, diced
– 2 celery stalks, diced
– 4 garlic cloves, minced
– 8 oz cremini mushrooms, finely chopped
– 1 cup dry brown lentils, rinsed
– 1 (28 oz) can crushed tomatoes
– 2 cups vegetable broth
– 1 tbsp tomato paste
– 1 tsp dried oregano
– 1 tsp dried thyme
– 1/2 tsp red pepper flakes
– 1/2 tsp salt
– 1/4 tsp black pepper
– 1 lb dried spaghetti
– 1/4 cup fresh parsley, chopped
Instructions
1. Heat 2 tbsp olive oil in a large Dutch oven or heavy pot over medium heat for 1 minute.
2. Add 1 diced onion, 2 diced carrots, and 2 diced celery stalks. Cook for 8-10 minutes, stirring occasionally, until vegetables soften.
3. Stir in 4 minced garlic cloves and cook for 1 minute until fragrant.
4. Add 8 oz chopped mushrooms. Cook for 6-8 minutes, stirring occasionally, until mushrooms release their liquid and brown slightly.
5. Mix in 1 cup rinsed lentils, 1 can crushed tomatoes, 2 cups vegetable broth, 1 tbsp tomato paste, 1 tsp oregano, 1 tsp thyme, 1/2 tsp red pepper flakes, 1/2 tsp salt, and 1/4 tsp black pepper.
6. Bring the mixture to a boil, then reduce heat to low. Cover and simmer for 35-40 minutes, stirring every 10 minutes, until lentils are tender and sauce has thickened.
7. While the sauce simmers, bring a large pot of salted water to a rolling boil. Add 1 lb spaghetti and cook according to package directions until al dente, about 9-11 minutes.
8. Drain the spaghetti, reserving 1/2 cup of pasta water.
9. Stir the cooked spaghetti into the finished sauce, adding reserved pasta water 1 tbsp at a time if needed to loosen the sauce.
10. Remove from heat and stir in 1/4 cup chopped fresh parsley.
Outstandingly thick and meaty, this sauce clings perfectly to every strand of pasta. The lentils provide a satisfying bite while the mushrooms add an umami depth that rivals traditional Bolognese. For a creative twist, try it over creamy polenta or stuffed into roasted bell peppers.
Grilled Steak with Chimichurri and Roasted Carrots
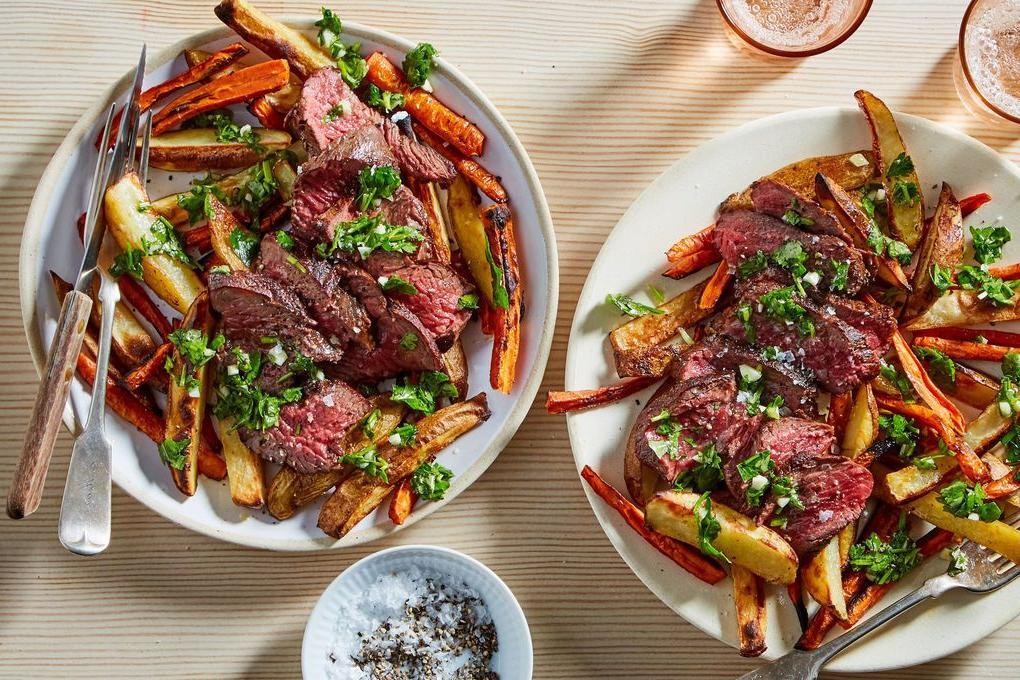
Finally, a steak dinner that feels special without the fuss. This grilled steak with chimichurri and roasted carrots delivers bold flavor with minimal effort. It’s perfect for a weeknight treat or a casual weekend gathering.
Serving: 4 | Pre Time: 20 minutes | Cooking Time: 25 minutes
Ingredients
– 2 lbs flank steak
– 1 cup fresh parsley
– 1/2 cup fresh cilantro
– 4 cloves garlic
– 1/3 cup red wine vinegar
– 1/2 cup olive oil
– 1 tsp red pepper flakes
– 1 tsp kosher salt
– 1/2 tsp black pepper
– 1 lb carrots
– 2 tbsp olive oil
– 1/2 tsp salt
Instructions
1. Preheat your grill to 450°F for direct high-heat cooking.
2. Peel 1 lb carrots and cut them into uniform 3-inch sticks.
3. Toss the carrot sticks with 2 tbsp olive oil and 1/2 tsp salt on a rimmed baking sheet.
4. Roast the carrots in a 400°F oven for 20 minutes, or until tender and lightly caramelized at the edges.
5. Pat the 2 lbs flank steak completely dry with paper towels to ensure a good sear.
6. Season the steak generously on both sides with 1 tsp kosher salt and 1/2 tsp black pepper.
7. Place the seasoned steak on the preheated grill and cook for 5 minutes without moving it to develop grill marks.
8. Flip the steak and cook for another 5 minutes for medium-rare, or until an instant-read thermometer inserted into the thickest part reads 130°F.
9. Transfer the grilled steak to a cutting board and let it rest for 10 minutes; this allows the juices to redistribute.
10. While the steak rests, finely chop 1 cup fresh parsley, 1/2 cup fresh cilantro, and 4 cloves garlic.
11. Combine the chopped herbs and garlic in a medium bowl with 1/3 cup red wine vinegar, 1/2 cup olive oil, and 1 tsp red pepper flakes.
12. Stir the chimichurri sauce vigorously until well combined and slightly emulsified.
13. Slice the rested steak thinly against the grain for maximum tenderness.
14. Arrange the sliced steak and roasted carrots on a serving platter.
15. Drizzle the chimichurri sauce generously over the steak and carrots.
You’ll love the contrast between the juicy, charred steak and the sweet, tender carrots. The bright, herby chimichurri cuts through the richness beautifully. Try serving it over a bed of quinoa or with crusty bread to soak up every last drop of sauce.
Spinach and Feta Stuffed Chicken Breast
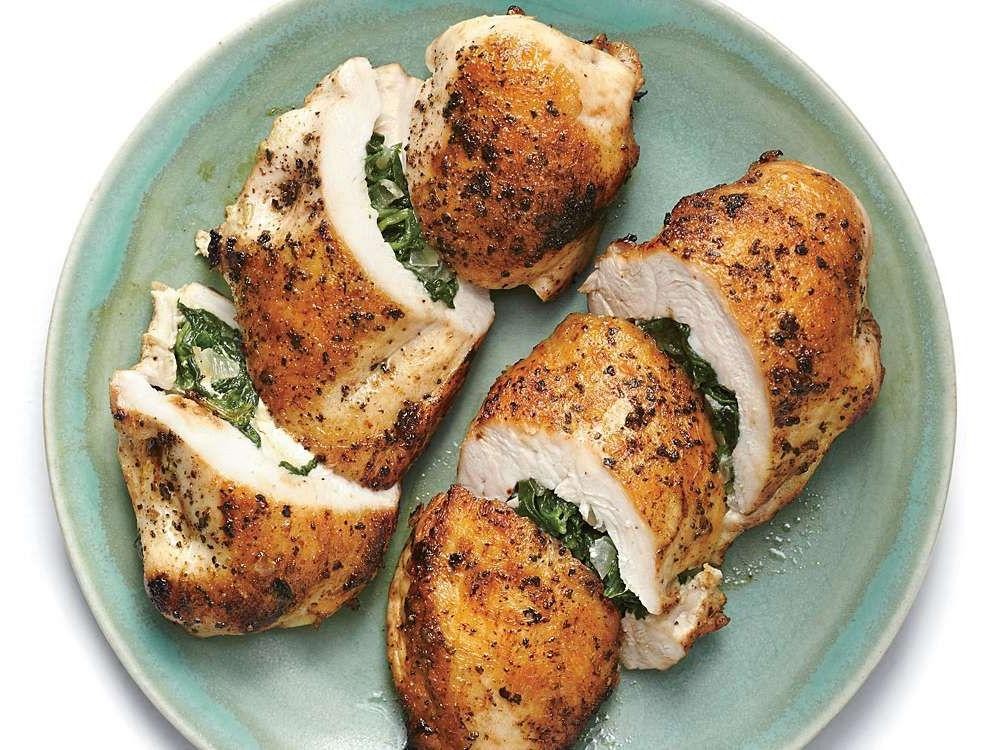
You’ve probably stared at plain chicken breasts wondering how to make them exciting. This spinach and feta stuffed version is your answer, delivering a juicy, flavorful center in every bite. It’s a simple technique with a restaurant-quality result you can easily achieve at home.
Serving: 4 | Pre Time: 15 minutes | Cooking Time: 25 minutes
Ingredients
– 4 boneless, skinless chicken breasts (about 6 oz each)
– 1 tbsp olive oil
– 1/2 tsp kosher salt
– 1/4 tsp black pepper
– 1 tsp dried oregano
– 5 oz fresh spinach
– 4 oz crumbled feta cheese
– 2 cloves garlic, minced
– 1 tbsp lemon juice
Instructions
1. Preheat your oven to 400°F (200°C).
2. Pat the chicken breasts completely dry with paper towels to ensure a good sear.
3. Using a sharp knife, carefully cut a horizontal pocket into the thickest side of each chicken breast, being careful not to cut all the way through.
4. Season the outside of each chicken breast evenly with the salt, pepper, and dried oregano.
5. Heat the olive oil in a large, oven-safe skillet over medium-high heat.
6. Add the fresh spinach and minced garlic to the skillet and cook for 2-3 minutes, just until the spinach is wilted.
7. Transfer the spinach and garlic mixture to a bowl and let it cool for 2 minutes.
8. Stir the crumbled feta cheese and lemon juice into the cooled spinach mixture until well combined.
9. Divide the spinach and feta mixture evenly, stuffing it firmly into the pocket of each seasoned chicken breast.
10. Secure the opening of each chicken breast with 2-3 toothpicks to prevent the filling from leaking.
11. Place the stuffed chicken breasts in the hot skillet and sear for 3-4 minutes per side, until a golden-brown crust forms.
12. Transfer the entire skillet to the preheated oven and bake for 18-20 minutes, or until the internal temperature of the chicken reaches 165°F (74°C) when measured with an instant-read thermometer.
13. Remove the skillet from the oven and let the chicken rest for 5 minutes before carefully removing the toothpicks.
Golden and juicy from the oven, the chicken stays incredibly moist thanks to the sealed-in filling. The creamy, tangy feta perfectly balances the earthy spinach, creating a burst of flavor in the center. Get creative by slicing it and serving over a lemony orzo salad or alongside roasted potatoes for a complete meal.
Teriyaki Glazed Tofu with Stir-Fry Vegetables

Looking for a quick, flavorful weeknight dinner? This teriyaki glazed tofu with stir-fry vegetables delivers savory-sweet satisfaction in under 30 minutes. Let’s get cooking.
Serving: 4 | Prep Time: 10 minutes | Cooking Time: 15 minutes
Ingredients
– 1 (14 oz) block extra-firm tofu
– 2 tbsp cornstarch
– 2 tbsp vegetable oil
– 1 red bell pepper, sliced
– 1 cup broccoli florets
– 1 carrot, julienned
– 3 cloves garlic, minced
– 1 tbsp fresh ginger, grated
– 1/2 cup teriyaki sauce
– 1 tbsp sesame oil
– 2 green onions, sliced
– 1 tbsp sesame seeds
Instructions
1. Press the tofu block between paper towels with a heavy plate for 10 minutes to remove excess water, then cut into 1-inch cubes.
2. Toss tofu cubes with 2 tbsp cornstarch until evenly coated.
3. Heat 2 tbsp vegetable oil in a large skillet or wok over medium-high heat until shimmering.
4. Add tofu cubes in a single layer and cook for 3-4 minutes per side until golden brown and crispy.
5. Transfer tofu to a plate and set aside.
6. In the same skillet, add 1 red bell pepper, 1 cup broccoli florets, and 1 carrot.
7. Stir-fry vegetables for 4-5 minutes until crisp-tender.
8. Add 3 cloves minced garlic and 1 tbsp grated ginger, cooking for 30 seconds until fragrant.
9. Return tofu to the skillet and pour in 1/2 cup teriyaki sauce.
10. Cook for 2-3 minutes, stirring constantly, until sauce thickens and coats everything evenly.
11. Remove from heat and stir in 1 tbsp sesame oil.
12. Garnish with 2 sliced green onions and 1 tbsp sesame seeds.
Vibrant and satisfying, this dish features crispy tofu with a glossy, sticky glaze against fresh, crunchy vegetables. Serve it over steamed rice or quinoa for a complete meal, or try it tucked into lettuce wraps for a lighter option.
Caprese Stuffed Portobello Mushrooms
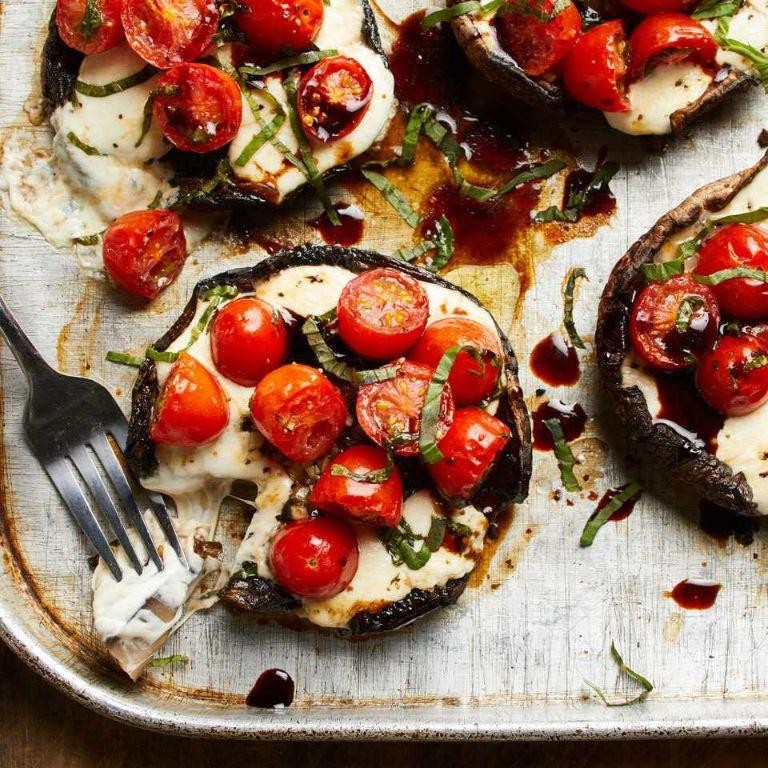
Savor a low-carb twist on the classic Italian salad with these hearty, oven-baked mushrooms. They’re perfect for a quick weeknight dinner or an impressive appetizer, delivering all the fresh flavors of Caprese in a satisfying, hands-off package. You’ll need just a handful of ingredients and about 30 minutes from start to finish.
Serving: 4 | Pre Time: 10 minutes | Cooking Time: 20 minutes
Ingredients
– 4 large portobello mushroom caps
– 2 tbsp olive oil
– 1/2 tsp salt
– 1/4 tsp black pepper
– 8 oz fresh mozzarella cheese, sliced into 8 pieces
– 2 medium tomatoes, sliced into 8 pieces total
– 1/4 cup fresh basil leaves
– 2 tbsp balsamic glaze
Instructions
1. Preheat your oven to 400°F and line a baking sheet with parchment paper.
2. Use a spoon to gently scrape out the gills from each mushroom cap—this prevents excess moisture and ensures even cooking.
3. Place the mushroom caps gill-side up on the prepared baking sheet.
4. Drizzle 1 tablespoon of olive oil evenly over the mushrooms.
5. Sprinkle the salt and black pepper directly onto the oiled mushroom caps.
6. Bake the mushrooms at 400°F for 10 minutes to soften them and release some liquid.
7. Remove the baking sheet from the oven and carefully pour off any accumulated liquid from the mushroom caps.
8. Layer 2 slices of mozzarella and 2 slices of tomato inside each par-baked mushroom cap.
9. Return the baking sheet to the oven and bake at 400°F for 8–10 minutes, until the cheese is fully melted and bubbly.
10. Remove the stuffed mushrooms from the oven and let them rest for 3 minutes—this allows the cheese to set slightly for easier serving.
11. Top each mushroom with fresh basil leaves just before serving to preserve their bright color and flavor.
12. Drizzle 1/2 tablespoon of balsamic glaze over each stuffed mushroom as a finishing touch.
Out of the oven, these mushrooms offer a juicy, meaty texture that contrasts beautifully with the creamy mozzarella and fresh tomato. The balsamic glaze adds a sweet-tart note that ties all the elements together. For a heartier meal, serve them over a bed of arugula or alongside grilled chicken.
Spicy Black Bean and Corn Quesadillas

Make these spicy black bean and corn quesadillas for a quick, satisfying meal that packs bold flavor. They’re perfect for busy weeknights when you need something delicious fast. Customize the heat level to your preference with the jalapeños.
Serving: 4 | Pre Time: 10 minutes | Cooking Time: 15 minutes
Ingredients
– 1 tbsp olive oil
– 1/2 cup diced yellow onion
– 1 jalapeño, minced
– 1 (15 oz) can black beans, rinsed and drained
– 1 cup corn kernels
– 1 tsp ground cumin
– 1/2 tsp chili powder
– 1/4 tsp salt
– 8 (8-inch) flour tortillas
– 2 cups shredded Monterey Jack cheese
– 1/4 cup chopped fresh cilantro
– 1/2 cup sour cream
– 1/2 cup salsa
Instructions
1. Heat 1 tbsp olive oil in a large skillet over medium heat until shimmering, about 1 minute.
2. Add 1/2 cup diced yellow onion and 1 minced jalapeño to the skillet. Cook for 3–4 minutes until softened, stirring occasionally.
3. Stir in 1 can rinsed black beans, 1 cup corn kernels, 1 tsp ground cumin, 1/2 tsp chili powder, and 1/4 tsp salt. Cook for 2 minutes until heated through, then remove from heat.
4. Lay 4 flour tortillas flat on a clean work surface. Divide the bean mixture evenly among them, spreading it to within 1/2 inch of the edges.
5. Sprinkle 2 cups shredded Monterey Jack cheese and 1/4 cup chopped cilantro evenly over the bean mixture on each tortilla.
6. Top each with another tortilla, pressing down gently to adhere.
7. Heat a clean skillet or griddle over medium heat. Cook each quesadilla for 2–3 minutes per side until golden brown and the cheese is fully melted, flipping once with a spatula.
8. Transfer cooked quesadillas to a cutting board and let rest for 1 minute before slicing into wedges.
9. Serve immediately with 1/2 cup sour cream and 1/2 cup salsa on the side.
Ready to serve, these quesadillas feature a crispy exterior with a gooey, flavorful filling. The black beans and corn provide a satisfying texture, while the spices add warmth without overwhelming heat. For a creative twist, try adding sliced avocado or a squeeze of lime juice just before eating.
Summary
Ultimately, these 20 healthy dinners for two prove that eating well doesn’t have to be complicated or time-consuming. We hope you find some new favorites to add to your rotation! Give a recipe a try this week, then drop a comment below to let us know which one you loved most. If you enjoyed this roundup, we’d be so grateful if you pinned it to your Pinterest boards to save for later. Happy cooking!


