Mmm, who says healthy dinners have to be boring? Whether you’re cooking for a busy weeknight, a special occasion, or just craving some wholesome comfort food, we’ve got you covered. Dive into these 20 delicious gluten-free recipes that are sure to please every palate and make dinner time something to look forward to!
Lentil and Vegetable Curry
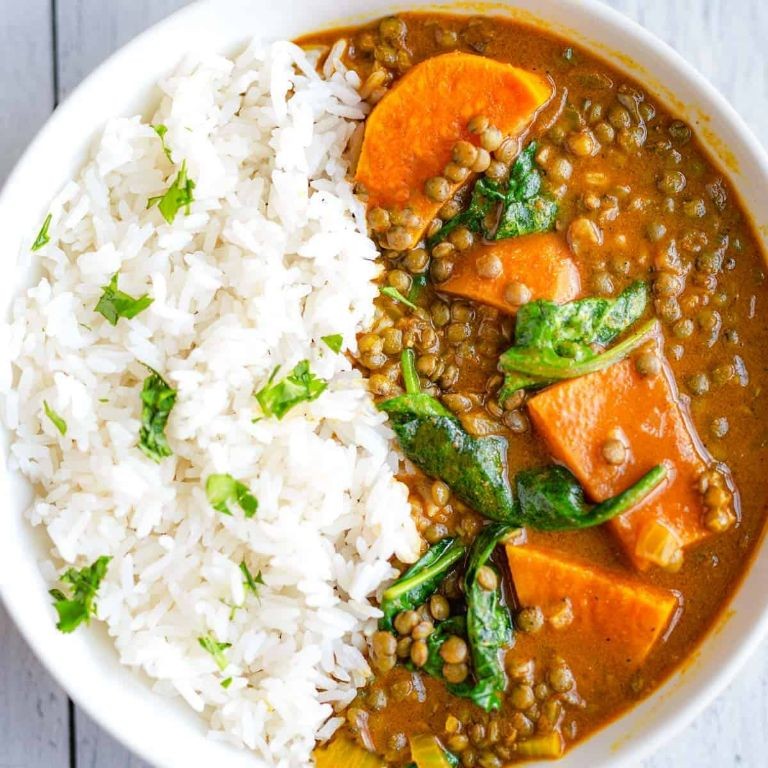
Mmm, is there anything more comforting than a big pot of curry simmering on the stove? This Lentil and Vegetable Curry is your ticket to a flavor-packed, one-pot wonder that’s as easy on the wallet as it is on your schedule. Let’s get that pot bubbling!
Serving: 4 | Pre Time: 15 minutes | Cooking Time: 35 minutes
Ingredients
– 1 tbsp olive oil (or any neutral oil)
– 1 medium yellow onion, diced
– 3 cloves garlic, minced
– 1 tbsp fresh ginger, grated
– 1 tbsp curry powder (adjust to taste)
– 1 tsp ground cumin
– 1/2 tsp ground turmeric
– 1 (14.5 oz) can diced tomatoes, undrained
– 1 cup dried brown lentils, rinsed
– 3 cups vegetable broth
– 2 medium carrots, peeled and sliced into 1/2-inch rounds
– 1 medium sweet potato, peeled and cut into 1-inch cubes
– 1 (13.5 oz) can full-fat coconut milk
– 1/2 tsp salt (adjust to taste)
– Fresh cilantro, chopped (for garnish)
Instructions
1. Heat 1 tbsp olive oil in a large pot or Dutch oven over medium heat.
2. Add 1 diced yellow onion and cook for 5 minutes, stirring occasionally, until softened and translucent.
3. Add 3 minced garlic cloves and 1 tbsp grated ginger, cooking for 1 minute until fragrant.
4. Stir in 1 tbsp curry powder, 1 tsp ground cumin, and 1/2 tsp ground turmeric, toasting the spices for 30 seconds to bloom their flavors.
5. Pour in 1 can of undrained diced tomatoes, scraping the bottom of the pot to deglaze any browned bits.
6. Add 1 cup rinsed brown lentils and 3 cups vegetable broth, stirring to combine.
7. Bring the mixture to a boil, then reduce the heat to low, cover, and simmer for 15 minutes.
8. Add 2 sliced carrots and 1 cubed sweet potato to the pot, stirring to submerge them in the liquid.
9. Cover and simmer for an additional 15 minutes, or until the lentils and vegetables are tender.
10. Stir in 1 can of full-fat coconut milk and 1/2 tsp salt, heating for 2-3 minutes until warmed through.
11. Remove from heat and garnish with fresh chopped cilantro.
Cozy up to a bowl of this hearty curry, where the lentils melt into a creamy base and the sweet potatoes offer pockets of soft sweetness. For a fun twist, serve it over a bed of fluffy quinoa or with a side of warm naan for dipping—perfect for soaking up every last bit of that aromatic, coconut-infused sauce.
Gluten Free Pasta with Marinara and Veggies
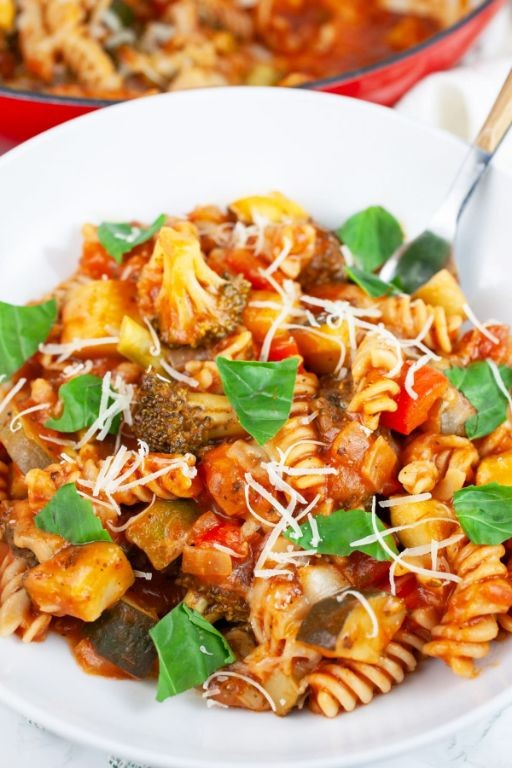
So, you’ve decided to ditch the gluten but not the flavor—smart move! This vibrant, veggie-packed pasta is here to rescue your weeknight dinner from the same-old-same-old, proving that gluten-free can be gloriously delicious. Let’s get cooking!
Serving: 4 | Pre Time: 15 minutes | Cooking Time: 25 minutes
Ingredients
– 12 oz gluten-free pasta (like brown rice or quinoa blend)
– 2 tbsp olive oil (or any neutral oil)
– 1 medium yellow onion, diced
– 3 cloves garlic, minced
– 1 medium zucchini, sliced into half-moons
– 1 red bell pepper, sliced into strips
– 1 (24 oz) jar marinara sauce (no-sugar-added for a brighter taste)
– 1 tsp dried oregano
– ½ tsp red pepper flakes (adjust to heat preference)
– Salt and black pepper (to season throughout)
– Fresh basil leaves, for garnish (optional but highly recommended)
– Grated Parmesan cheese, for serving (use a vegan alternative if needed)
Instructions
1. Bring a large pot of salted water to a rolling boil over high heat.
2. Add the gluten-free pasta to the boiling water and cook according to package directions, usually 8–10 minutes, until al dente (tip: gluten-free pasta can turn mushy fast, so set a timer!).
3. While the pasta cooks, heat the olive oil in a large skillet over medium heat.
4. Add the diced onion to the skillet and sauté for 4–5 minutes, until softened and translucent.
5. Stir in the minced garlic and cook for 1 minute, just until fragrant—don’t let it burn!
6. Add the sliced zucchini and red bell pepper to the skillet, seasoning with a pinch of salt and black pepper.
7. Cook the veggies for 6–8 minutes, stirring occasionally, until they’re tender-crisp and slightly charred at the edges.
8. Pour the marinara sauce into the skillet, then sprinkle in the dried oregano and red pepper flakes.
9. Reduce the heat to low and let the sauce simmer for 5 minutes, allowing the flavors to meld (tip: a quick simmer deepens the sauce without overcooking the veggies).
10. Drain the cooked pasta and add it directly to the skillet with the sauce and veggies.
11. Toss everything together gently until the pasta is evenly coated, adding a splash of pasta water if the sauce seems too thick.
12. Taste and adjust seasoning with more salt, black pepper, or red pepper flakes as desired.
13. Serve immediately, topped with fresh basil leaves and grated Parmesan cheese.
Craving a cozy yet lively meal? This dish delivers with tender pasta, a robust marinara hug, and veggies that add a satisfying crunch. Try it with a side of garlic bread for dipping, or toss in some cooked chickpeas to bulk it up—leftovers taste even better the next day, if they last that long!
Turkey Meatballs with Zucchini Spaghetti
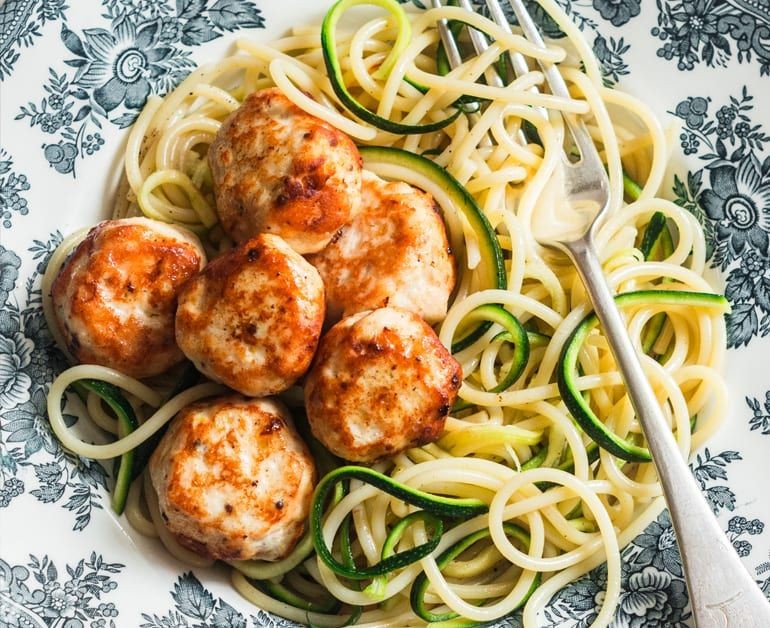
Sick of the same old spaghetti night? Let’s twist it up with these juicy turkey meatballs lounging on a bed of fresh zucchini noodles—a lighter, brighter take that’ll have you forgetting all about that heavy pasta coma. It’s a weeknight win that’s secretly packed with veggies and flavor, without any of the guilt.
Serving: 4 | Pre Time: 15 minutes | Cooking Time: 20 minutes
Ingredients
– 1 lb ground turkey (93% lean works great for juicy meatballs)
– 1 large egg, lightly beaten
– 1/2 cup panko breadcrumbs (or regular breadcrumbs for a finer texture)
– 1/4 cup grated Parmesan cheese, plus extra for serving
– 2 cloves garlic, minced (about 2 tsp)
– 1 tsp dried oregano
– 1/2 tsp salt
– 1/4 tsp black pepper
– 2 tbsp olive oil (or any neutral oil)
– 2 medium zucchinis (about 1 lb total)
– 1 (24 oz) jar marinara sauce (your favorite brand)
– Fresh basil leaves, for garnish (optional, but highly recommended)
Instructions
1. In a large bowl, combine the ground turkey, beaten egg, panko breadcrumbs, 1/4 cup Parmesan cheese, minced garlic, dried oregano, salt, and black pepper. Use your hands to mix gently until just combined—overmixing can make the meatballs tough.
2. Shape the mixture into 16 equal-sized meatballs, about 1 1/2 inches in diameter, and place them on a plate.
3. Heat 2 tbsp olive oil in a large skillet over medium-high heat until shimmering, about 1-2 minutes.
4. Add the meatballs to the skillet in a single layer, working in batches if needed to avoid crowding. Cook for 3-4 minutes per side, turning gently with tongs, until golden brown on all sides. Tip: Don’t move them too soon—let them form a nice crust for better texture.
5. Reduce the heat to medium-low and pour the entire jar of marinara sauce over the meatballs. Cover the skillet with a lid and let simmer for 10 minutes, until the meatballs are cooked through (internal temperature should reach 165°F).
6. While the meatballs simmer, use a spiralizer or vegetable peeler to turn the zucchinis into long, thin noodles. Tip: If you don’t have a spiralizer, a julienne peeler works too—just aim for ribbon-like strands.
7. After 10 minutes, remove the lid and gently stir the meatballs in the sauce. Add the zucchini noodles to the skillet, tossing them in the sauce for 1-2 minutes just until slightly softened but still al dente. Tip: Don’t overcook the zucchini—it should have a bit of crunch to mimic real spaghetti.
8. Remove from heat and divide among plates. Garnish with fresh basil leaves and extra Parmesan cheese if desired.
Kick back and dig into those tender, herb-infused meatballs nestled in a vibrant, garlicky marinara—the zucchini spaghetti adds a fresh, crisp bite that’s downright addictive. Serve it straight from the skillet for a cozy family dinner, or fancy it up with a sprinkle of red pepper flakes for a spicy kick. Leftovers? They’re even better the next day, cold from the fridge or gently reheated.
Stuffed Portobello Mushrooms with Quinoa
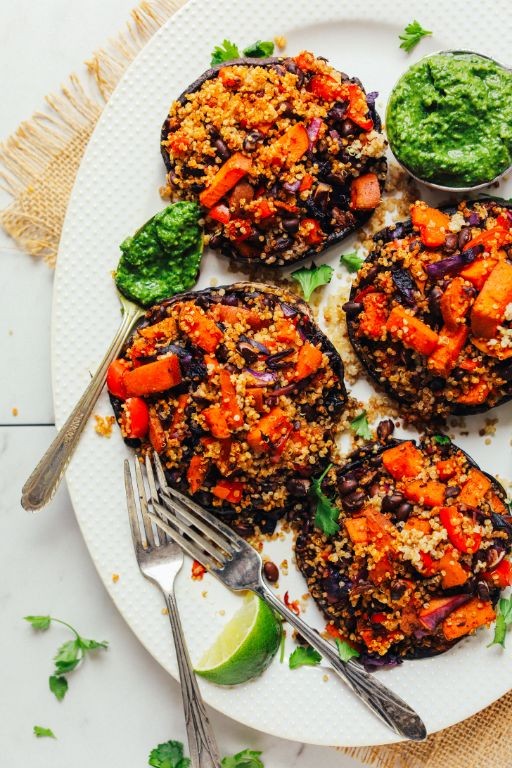
Mushrooms, those meaty umami bombs, are about to get a major glow-up in this quinoa-stuffed extravaganza that’s so satisfying, you might just forget there’s no meat involved. We’re taking humble portobellos and transforming them into hearty, flavor-packed vessels perfect for a cozy dinner or an impressive vegetarian main. Get ready to stuff, bake, and devour your way to veggie bliss.
Serving: 4 | Pre Time: 15 minutes | Cooking Time: 30 minutes
Ingredients
– 4 large portobello mushroom caps, stems removed
– 1 cup uncooked quinoa, rinsed
– 2 cups vegetable broth
– 1 tbsp olive oil (or any neutral oil)
– 1/2 cup finely chopped onion
– 2 cloves garlic, minced
– 1 cup fresh spinach, roughly chopped
– 1/2 cup grated Parmesan cheese
– 1 tsp dried thyme
– 1/4 tsp black pepper
– 1/4 tsp salt (adjust based on broth saltiness)
Instructions
1. Preheat your oven to 400°F (200°C) and line a baking sheet with parchment paper.
2. Place the portobello mushroom caps gill-side up on the prepared baking sheet.
3. In a medium saucepan, combine the rinsed quinoa and vegetable broth, then bring to a boil over high heat.
4. Once boiling, reduce the heat to low, cover the saucepan, and simmer the quinoa for 15 minutes until all the liquid is absorbed. (Tip: Don’t peek—keeping the lid on ensures fluffy quinoa!)
5. While the quinoa cooks, heat the olive oil in a large skillet over medium heat.
6. Add the chopped onion to the skillet and sauté for 5 minutes until it becomes translucent and soft.
7. Stir in the minced garlic and cook for 1 more minute until fragrant.
8. Add the chopped spinach to the skillet and cook for 2-3 minutes until it wilts down completely.
9. Remove the skillet from the heat and set it aside.
10. Once the quinoa is cooked, fluff it with a fork and transfer it to a large mixing bowl.
11. Add the sautéed onion, garlic, and spinach mixture to the bowl with the quinoa.
12. Stir in the grated Parmesan cheese, dried thyme, black pepper, and salt until everything is well combined. (Tip: Taste the filling now and adjust seasoning if needed—it’s easier before stuffing!)
13. Evenly divide the quinoa mixture among the portobello mushroom caps, packing it down gently into each cap.
14. Bake the stuffed mushrooms in the preheated oven for 20-25 minutes until the mushroom caps are tender and the filling is lightly golden on top. (Tip: For extra browning, broil for the last 2-3 minutes, but watch closely to avoid burning!)
15. Remove the baking sheet from the oven and let the mushrooms cool for 5 minutes before serving.
Zesty and utterly satisfying, these stuffed portobellos boast a tender, juicy mushroom base cradling a fluffy, savory quinoa filling with pops of Parmesan. Serve them alongside a crisp green salad for a light meal, or get creative by slicing them up and tucking them into warm pita bread with a drizzle of tahini for a handheld feast.
Chicken and Vegetable Stir Fry with Tamari Sauce
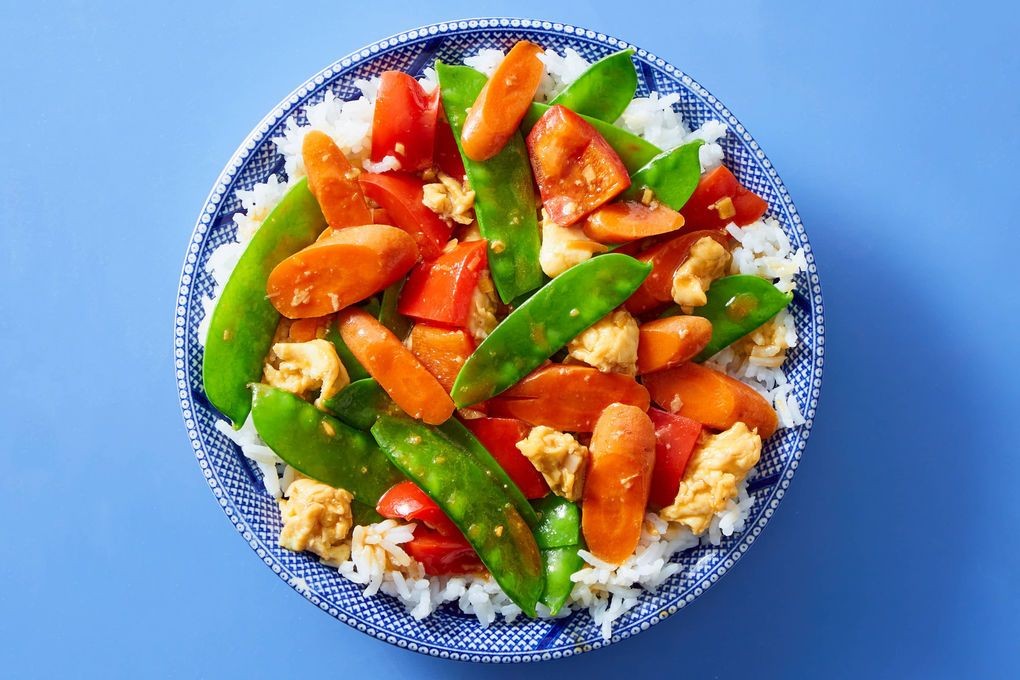
Heads up, kitchen adventurers! If you’re staring at a fridge full of random veggies and some chicken, wondering how to turn them into a meal that doesn’t scream “desperation dinner,” you’ve hit the jackpot. This stir-fry is your ticket to a vibrant, saucy dish that’s faster than deciding what to watch on streaming tonight.
Serving: 4 | Pre Time: 15 minutes | Cooking Time: 15 minutes
Ingredients
- 1.5 lbs boneless, skinless chicken breasts, cut into 1-inch pieces (or thighs for more flavor)
- 2 tbsp vegetable oil (or any neutral oil like canola)
- 1 red bell pepper, sliced into thin strips
- 1 yellow bell pepper, sliced into thin strips
- 1 cup broccoli florets (fresh or frozen, thawed)
- 1 medium carrot, julienned or thinly sliced
- 3 cloves garlic, minced
- 1 tbsp fresh ginger, grated (or 1 tsp ground ginger in a pinch)
- 1/3 cup tamari sauce (or soy sauce for a gluten-free option)
- 2 tbsp honey (or maple syrup to make it vegan)
- 1 tbsp rice vinegar
- 1 tsp sesame oil (for that nutty finish)
- 2 green onions, sliced (for garnish)
- 1 tbsp sesame seeds (optional, for crunch)
- Cooked rice or noodles, for serving (about 4 cups cooked)
Instructions
- Pat the chicken pieces dry with paper towels to ensure a good sear—this prevents steaming and adds texture.
- Heat 1 tbsp of vegetable oil in a large skillet or wok over medium-high heat until it shimmers, about 1-2 minutes.
- Add the chicken to the hot skillet in a single layer, cooking for 5-7 minutes until browned on all sides and cooked through (internal temperature should reach 165°F).
- Transfer the cooked chicken to a plate and set aside, covering loosely to keep warm.
- Add the remaining 1 tbsp of vegetable oil to the same skillet, still over medium-high heat.
- Toss in the bell peppers, broccoli, and carrot, stirring frequently for 4-5 minutes until the veggies are crisp-tender and slightly charred at the edges.
- Push the vegetables to the sides of the skillet, creating a well in the center.
- Add the minced garlic and grated ginger to the center, cooking for 30-60 seconds until fragrant—be careful not to burn them, as this can turn bitter.
- Pour in the tamari sauce, honey, and rice vinegar, stirring to combine everything into a glossy sauce, about 1 minute.
- Return the cooked chicken to the skillet, tossing with the vegetables and sauce until evenly coated and heated through, 1-2 minutes.
- Drizzle with sesame oil and give it one final stir to incorporate.
- Remove from heat and garnish with sliced green onions and sesame seeds, if using.
Every bite bursts with a savory-sweet tamari glaze clinging to tender chicken and crunchy veggies. Serve it over a fluffy bed of rice or twirl it into noodles for a meal that’s as colorful as it is comforting—perfect for a weeknight win or impressing last-minute guests without breaking a sweat!
Gluten Free Chicken and Broccoli Casserole

You know that feeling when you’re craving something cozy, cheesy, and comforting, but your gluten-free lifestyle gives you the side-eye? Yeah, me too—until this glorious gluten-free chicken and broccoli casserole swooped in to save dinner (and my sanity). It’s the kind of dish that makes you forget you’re even eating gluten-free, with a creamy sauce, tender chicken, and crispy topping that’ll have everyone fighting for seconds.
Serving: 6 | Pre Time: 20 minutes | Cooking Time: 35 minutes
Ingredients
– 1.5 lbs boneless, skinless chicken breasts, cut into 1-inch cubes (or use pre-cooked rotisserie chicken for a shortcut)
– 4 cups fresh broccoli florets (about 1 large head, trimmed into bite-sized pieces)
– 1 cup gluten-free all-purpose flour (like Bob’s Red Mill, for thickening the sauce)
– 2 cups whole milk (or unsweetened almond milk for a dairy-free option)
– 1 cup shredded cheddar cheese (sharp works best for maximum flavor)
– 1/2 cup grated Parmesan cheese (the real stuff, not the powdered kind)
– 1/4 cup unsalted butter (or olive oil for a lighter touch)
– 2 cloves garlic, minced (about 1 tbsp, or use 1 tsp garlic powder in a pinch)
– 1 tsp salt (adjust to taste, but don’t skimp—it brings out the flavors)
– 1/2 tsp black pepper (freshly ground if you have it)
– 1 cup gluten-free breadcrumbs (or crush gluten-free crackers for a crunchy topping)
Instructions
1. Preheat your oven to 375°F (190°C) and lightly grease a 9×13-inch baking dish with butter or non-stick spray.
2. In a large skillet over medium-high heat, melt 1/4 cup unsalted butter until it sizzles lightly, about 1-2 minutes.
3. Add 1.5 lbs cubed chicken breasts to the skillet and cook for 6-8 minutes, stirring occasionally, until the chicken is no longer pink and reaches an internal temperature of 165°F (74°C).
4. Tip: Don’t overcrowd the skillet—cook in batches if needed to ensure the chicken browns nicely instead of steaming.
5. Remove the cooked chicken from the skillet and set it aside on a plate, leaving any drippings in the pan.
6. In the same skillet, add 2 cloves minced garlic and sauté for 30 seconds until fragrant, being careful not to burn it.
7. Sprinkle 1 cup gluten-free all-purpose flour into the skillet and whisk continuously for 1-2 minutes to form a roux, which should look like a thick, pale paste.
8. Gradually pour in 2 cups whole milk while whisking constantly to prevent lumps, and cook for 3-4 minutes until the sauce thickens to a gravy-like consistency.
9. Tip: If the sauce seems too thick, add a splash more milk; if too thin, let it simmer a bit longer—it should coat the back of a spoon.
10. Stir in 1 cup shredded cheddar cheese, 1/2 cup grated Parmesan cheese, 1 tsp salt, and 1/2 tsp black pepper until the cheeses melt completely and the sauce is smooth.
11. Add the cooked chicken and 4 cups broccoli florets to the sauce, gently folding everything together until evenly coated.
12. Transfer the mixture to the prepared baking dish and spread it out into an even layer.
13. Sprinkle 1 cup gluten-free breadcrumbs evenly over the top of the casserole for a crispy crust.
14. Tip: For extra crunch, drizzle a little olive oil over the breadcrumbs before baking.
15. Bake in the preheated oven for 25-30 minutes, until the topping is golden brown and the casserole is bubbling around the edges.
16. Remove from the oven and let it cool for 5-10 minutes before serving to allow the sauce to set slightly.
So, what’s the verdict? This casserole emerges from the oven with a golden, crackly top that gives way to a velvety, cheesy interior where the broccoli stays tender-crisp and the chicken soaks up all that savory goodness. Serve it straight from the dish with a simple side salad for a weeknight win, or get fancy by scooping it into individual ramekins for a dinner party that’ll have guests begging for the recipe—gluten-free or not!
Shrimp and Avocado Salad with Lime Dressing
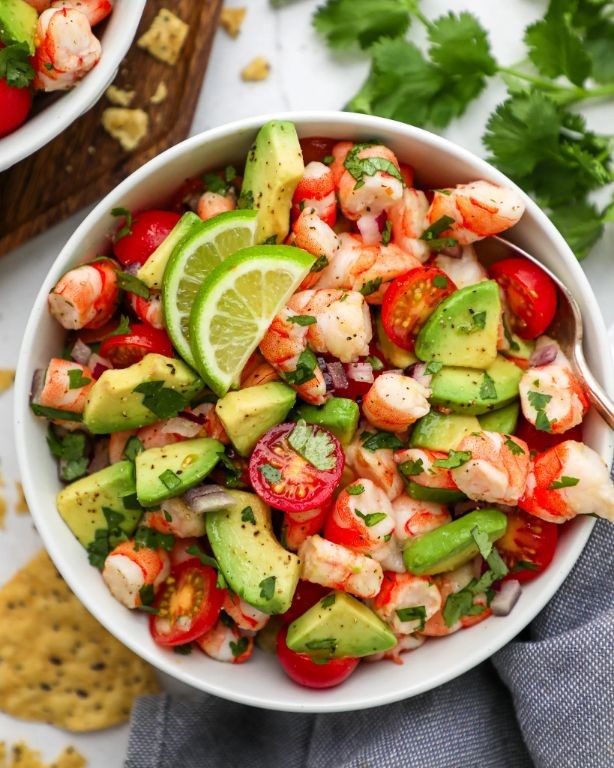
Now, let’s be real: you’ve probably stared at a sad desk salad and dreamed of something that actually tastes like vacation. This zesty, creamy, protein-packed bowl is your ticket to flavor town—no passport required. It’s the kind of dish that makes you feel fancy without the fuss, perfect for when you want to impress your taste buds (or a last-minute guest) in under 30 minutes.
Serving: 4 | Pre Time: 15 minutes | Cooking Time: 10 minutes
Ingredients
– 1 lb large shrimp, peeled and deveined (fresh or thawed frozen)
– 2 ripe avocados, diced (choose ones that yield slightly to gentle pressure)
– 4 cups mixed greens (like romaine and spinach, or a pre-washed bag for convenience)
– 1/4 cup fresh lime juice (about 2-3 limes, squeezed for maximum zest)
– 2 tbsp olive oil (or any neutral oil, such as avocado oil)
– 1 tsp honey (adjust to taste, or substitute with maple syrup for a vegan option)
– 1/4 tsp salt (I use kosher salt for even seasoning)
– 1/4 tsp black pepper (freshly ground if you have it)
– 2 tbsp chopped fresh cilantro (optional, but highly recommended for a herby kick)
Instructions
1. Pat the shrimp dry with paper towels to ensure they sear nicely without steaming.
2. Heat a large skillet over medium-high heat and add 1 tbsp of the olive oil, swirling to coat the pan evenly.
3. Add the shrimp to the skillet in a single layer, cooking for 2-3 minutes per side until they turn pink and opaque—avoid overcrowding to get a good sear.
4. Remove the shrimp from the skillet and let them rest on a plate for 5 minutes to lock in juices before slicing.
5. In a small bowl, whisk together the remaining 1 tbsp olive oil, lime juice, honey, salt, and pepper until fully emulsified.
6. Slice the cooked shrimp into bite-sized pieces for easier mixing into the salad.
7. In a large serving bowl, combine the mixed greens, diced avocados, and chopped cilantro (if using).
8. Drizzle the lime dressing over the salad ingredients and toss gently to coat everything evenly without crushing the avocados.
9. Add the sliced shrimp to the bowl and give one final, light toss to distribute them throughout.
10. Serve immediately to enjoy the crisp greens and creamy avocados at their peak freshness.
Oh, the magic here is in the contrast: the cool, buttery avocados melt against the tender, savory shrimp, all zipped up with that tangy lime dressing. Try piling it into lettuce wraps for a handheld feast, or top it with crunchy tortilla strips if you’re feeling extra—it’s a vibrant, no-fuss meal that’s as fun to eat as it is to make.
Vegetable and Tofu Stir Fry with Rice Noodles

Zesty, zippy, and ready to zip from wok to plate in a flash, this vegetable and tofu stir-fry with rice noodles is your weeknight superhero—saving you from the dreaded ‘what’s for dinner?’ panic with a rainbow of crisp veggies and savory bites that’ll make your taste buds do a happy dance. It’s the kind of meal that says, “Yes, I cooked,” without requiring a culinary degree or a magic wand, just a trusty skillet and a dash of fun.
Serving: 4 | Pre Time: 15 minutes | Cooking Time: 15 minutes
Ingredients
– 8 oz rice noodles (soak in hot water for 10 minutes until pliable, then drain)
– 14 oz firm tofu, pressed and cubed (pat dry for better browning)
– 2 tbsp vegetable oil (or any neutral oil)
– 1 red bell pepper, sliced into thin strips
– 1 cup broccoli florets (cut into bite-sized pieces)
– 1 carrot, julienned (use a peeler for quick ribbons)
– 3 cloves garlic, minced
– 1 tbsp fresh ginger, grated (or 1 tsp ground ginger)
– ¼ cup soy sauce (use low-sodium if preferred)
– 1 tbsp rice vinegar
– 1 tsp sesame oil (adds a nutty finish)
– 2 green onions, sliced (for garnish)
– 1 tsp red pepper flakes (optional, for a spicy kick)
Instructions
1. Soak the rice noodles in hot water for 10 minutes until softened, then drain and set aside—this prevents them from sticking later.
2. Heat 1 tablespoon of vegetable oil in a large wok or skillet over medium-high heat until shimmering, about 2 minutes.
3. Add the tofu cubes in a single layer and cook for 4–5 minutes, flipping halfway, until golden brown on all sides; remove and set aside on a plate.
4. In the same wok, add the remaining 1 tablespoon of vegetable oil and toss in the garlic and ginger, stirring for 30 seconds until fragrant to avoid burning.
5. Add the bell pepper, broccoli, and carrot, stir-frying for 4–5 minutes until the veggies are crisp-tender with bright colors.
6. Return the tofu to the wok along with the drained rice noodles, soy sauce, rice vinegar, and sesame oil, tossing everything together for 2–3 minutes to coat evenly.
7. Sprinkle in red pepper flakes if using, and stir for another minute to let the flavors meld.
8. Remove from heat and garnish with sliced green onions.
Mouthwatering and ready to devour, this stir-fry boasts a delightful contrast: the tofu is crispy on the outside yet tender inside, while the rice noodles soak up the savory sauce for a slurp-worthy bite. Serve it straight from the wok for a family-style feast, or pack it cold for a next-day lunch that’s even more flavorful—trust me, it’s a texture party in every forkful!
Herb Roasted Chicken with Sweet Potatoes
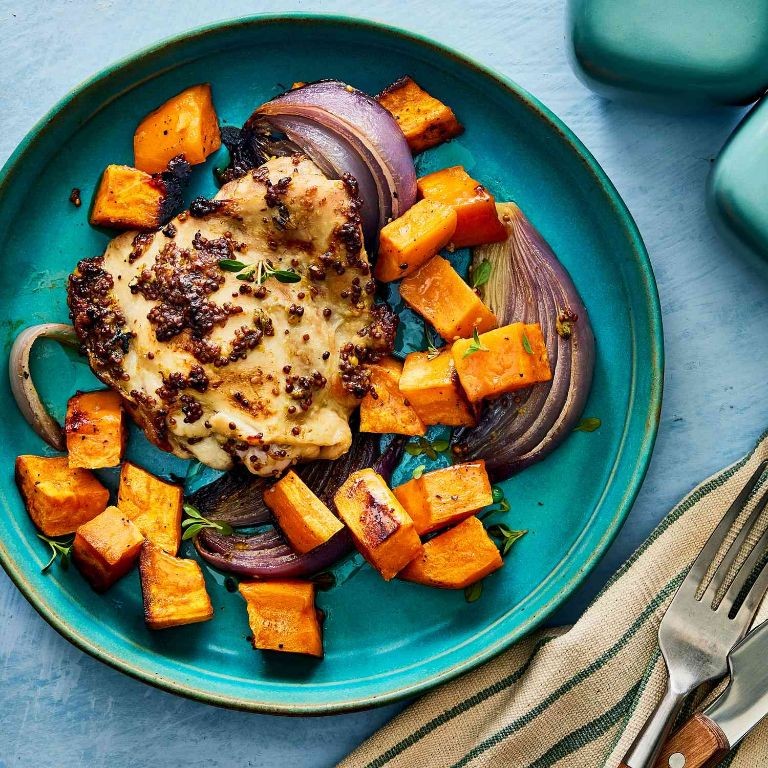
You know those days when you want a cozy, impressive meal without the fuss of a culinary circus? Yeah, me too. That’s where this glorious, one-pan wonder swoops in to save your weeknight—and your sanity—with minimal cleanup and maximum flavor fireworks.
Serving: 4 | Pre Time: 15 minutes | Cooking Time: 55 minutes
Ingredients
– 1 whole chicken (about 4 lbs), patted dry with paper towels (trust me, crisp skin starts here!)
– 2 large sweet potatoes, peeled and cut into 1-inch cubes (or leave the skins on for extra texture)
– 3 tbsp olive oil, or any neutral oil you have on hand
– 4 cloves garlic, minced (fresh is best, but 1 tsp garlic powder works in a pinch)
– 1 tbsp fresh rosemary, chopped (or 1 tsp dried rosemary, crumbled between your fingers)
– 1 tbsp fresh thyme leaves (or 1 tsp dried thyme)
– 1 tsp salt, adjust to your preference
– ½ tsp black pepper, freshly ground if possible
– 1 lemon, halved (for zesty brightness)
Instructions
1. Preheat your oven to 425°F (218°C) and grab a large rimmed baking sheet or roasting pan.
2. In a small bowl, whisk together the olive oil, minced garlic, rosemary, thyme, salt, and pepper until well combined.
3. Place the patted-dry chicken in the center of the baking sheet and rub the herb-oil mixture all over the skin, getting into every nook and cranny for maximum flavor.
4. Arrange the sweet potato cubes around the chicken in a single layer, then drizzle any remaining herb-oil mixture over the potatoes and toss to coat evenly.
5. Tuck the lemon halves into the cavity of the chicken—this steams the bird from the inside, keeping it juicy and infusing it with citrusy notes.
6. Roast in the preheated oven for 55 minutes, or until the chicken skin is golden brown and crispy, and a meat thermometer inserted into the thickest part of the thigh reads 165°F (74°C).
7. Tip: If the sweet potatoes aren’t tender yet, remove the chicken to a cutting board to rest and pop the potatoes back in the oven for 5–10 more minutes until fork-tender.
8. Let the chicken rest for 10 minutes before carving—this allows the juices to redistribute, so every bite stays succulent.
9. Tip: While it rests, squeeze the roasted lemon halves over the sweet potatoes for an extra zing that balances the richness.
10. Carve the chicken and serve it alongside the sweet potatoes, drizzling any pan juices over the top for a flavor boost.
Kick back and savor the crispy, herb-speckled skin giving way to tender, juicy meat, while the sweet potatoes caramelize into soft, savory-sweet bites. For a fun twist, shred any leftovers into tacos the next day or toss them into a hearty salad—this dish is as versatile as it is delicious!
Summary
Versatile and vibrant, this collection proves gluten-free dinners can be delicious for any occasion. We hope these 20 recipes inspire your kitchen adventures! Try them out, leave a comment with your favorite, and don’t forget to share this roundup on Pinterest to spread the goodness. Happy cooking!


