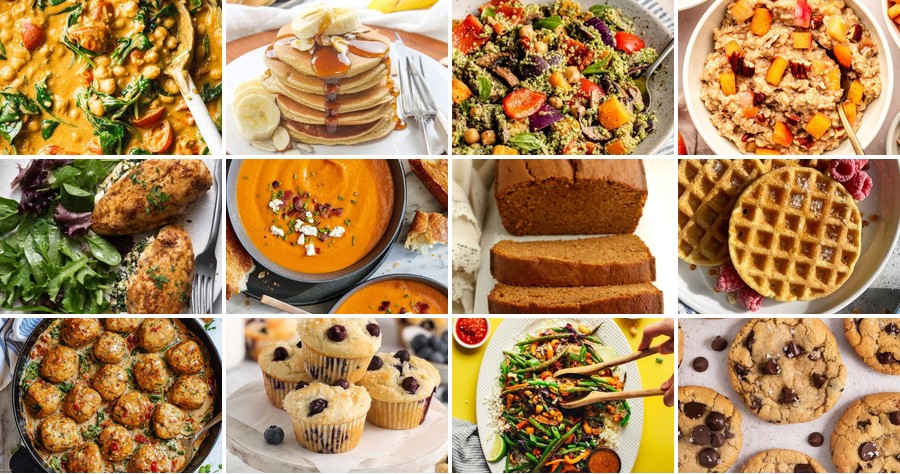
Navigating gluten-free cooking doesn’t mean sacrificing flavor or variety—it’s an exciting culinary adventure! Whether you’re whipping up a quick weeknight dinner, planning a festive gathering, or craving some wholesome comfort food, these recipes prove that healthy eating can be absolutely delicious. Get ready to discover mouthwatering dishes that will become new favorites for every occasion on your calendar!
Gluten Free Banana Almond Pancakes

Venture into a breakfast revolution where gluten-free meets gourmet, and your overripe bananas finally get the starring role they deserve—these fluffy, nutty pancakes are about to make your spatula swoon with joy. Forget the sad, dense gluten-free bricks of yore; we’re crafting clouds of almond-infused delight that’ll have you flipping with glee (and maybe a little pancake-induced pride).
Serving: 4 | Pre Time: 10 minutes | Cooking Time: 15 minutes
Ingredients
– 2 large overripe bananas, mashed to a smooth puree
– 2 pasture-raised eggs, lightly beaten
– 1 cup almond flour
– 1/4 cup tapioca starch
– 1 tsp baking powder
– 1/2 tsp fine sea salt
– 1 tsp pure vanilla extract
– 2 tbsp pure maple syrup
– 2 tbsp clarified butter, plus extra for greasing
– Fresh berries and additional maple syrup for serving
Instructions
1. In a large mixing bowl, combine the mashed banana puree and lightly beaten pasture-raised eggs, whisking vigorously until fully incorporated and slightly frothy.
2. Add the almond flour, tapioca starch, baking powder, and fine sea salt to the wet mixture, folding gently with a spatula until just combined to avoid overmixing, which can lead to tough pancakes.
3. Stir in the pure vanilla extract and pure maple syrup until the batter is smooth and uniform in texture.
4. Heat a non-stick skillet or griddle over medium-low heat (approximately 325°F) and lightly grease the surface with clarified butter using a pastry brush.
5. Pour 1/4 cup portions of batter onto the heated surface, spacing them 2 inches apart to allow for spreading.
6. Cook the pancakes for 2–3 minutes, or until bubbles form on the surface and the edges appear set and lightly golden.
7. Carefully flip each pancake with a thin spatula and cook for an additional 1–2 minutes until the underside is golden brown and the center springs back lightly to the touch.
8. Transfer the cooked pancakes to a wire rack in a single layer to prevent sogginess, repeating the process with the remaining batter and greasing the skillet as needed.
9. Serve immediately while warm, topped with fresh berries and a drizzle of maple syrup.
Kick back and savor the tender, moist crumb that melts in your mouth, thanks to the banana’s natural sweetness and almond flour’s rich, nutty depth. For a playful twist, stack them high with a dollop of coconut whipped cream or crumble them over yogurt for a deconstructed pancake parfait—because why should brunch have all the fun?
Cauliflower Rice Stir Fry
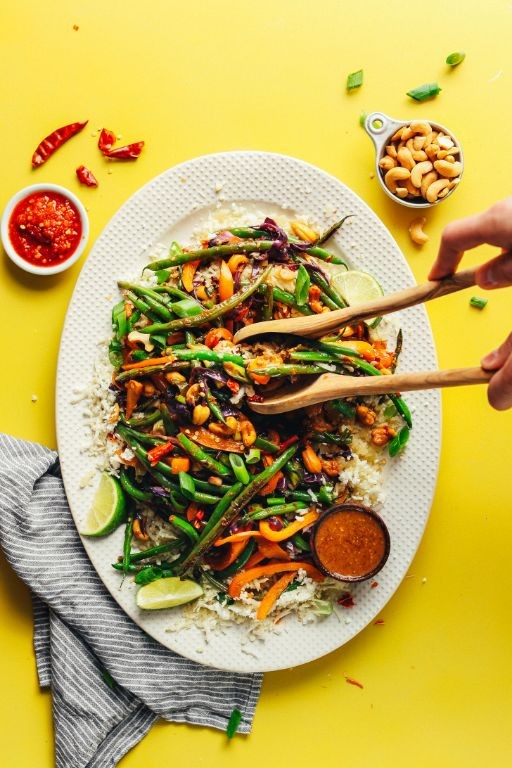
Hear ye, hear ye, all you carb-conscious foodies and veggie lovers! Let’s ditch the grains and dive fork-first into a stir-fry that’s so clever, it’ll make your regular rice weep with envy. This cauliflower rice stir-fry is the weeknight hero you never knew you needed—quick, customizable, and packed with enough flavor to silence even the loudest ‘but where’s the real rice?’ critic at the table.
Serving: 4 | Pre Time: 15 minutes | Cooking Time: 15 minutes
Ingredients
– 1 large head of cauliflower, riced (about 4 cups)
– 2 tbsp avocado oil
– 1 medium yellow onion, finely diced
– 3 cloves garlic, minced
– 1 tbsp fresh ginger, grated
– 1 red bell pepper, julienned
– 1 cup snap peas, trimmed
– 2 large pasture-raised eggs, lightly beaten
– 3 tbsp tamari
– 1 tbsp toasted sesame oil
– 2 green onions, thinly sliced
– 1 tsp toasted sesame seeds
Instructions
1. Prepare the cauliflower rice by pulsing cauliflower florets in a food processor until they resemble coarse grains, about 4-5 pulses. Tip: Do not over-process, or it will become mushy.
2. Heat 1 tablespoon of avocado oil in a large wok or skillet over medium-high heat until shimmering, about 1 minute.
3. Add the finely diced yellow onion and sauté until translucent and slightly golden, about 3-4 minutes.
4. Stir in the minced garlic and grated ginger, cooking until fragrant, about 30 seconds.
5. Add the julienned red bell pepper and trimmed snap peas, stir-frying until crisp-tender, about 3-4 minutes.
6. Push the vegetable mixture to the sides of the wok, creating a well in the center.
7. Pour the remaining 1 tablespoon of avocado oil into the center and allow it to heat for 15 seconds.
8. Add the lightly beaten pasture-raised eggs to the center and scramble until just set, about 1-2 minutes. Tip: Stir constantly for fluffy, small curds.
9. Incorporate the scrambled eggs with the vegetables, mixing thoroughly.
10. Add the riced cauliflower to the wok, spreading it in an even layer.
11. Cook undisturbed for 2 minutes to allow slight browning, then stir-fry for another 3-4 minutes until heated through and tender-crisp.
12. Drizzle the tamari and toasted sesame oil evenly over the mixture, tossing to coat completely.
13. Remove from heat and garnish with thinly sliced green onions and toasted sesame seeds. Tip: For extra crunch, sprinkle sesame seeds just before serving.
14. Serve immediately while hot.
Vibrant and satisfying, this dish offers a delightful contrast of textures—from the tender-crisp veggies to the fluffy, grain-like cauliflower. The umami-rich tamari and aromatic sesame oil create a savory depth that’s utterly addictive. For a creative twist, pile it into lettuce cups or top with a fried egg for an extra protein punch that’ll make your taste buds do a happy dance.
Roasted Vegetable and Quinoa Salad
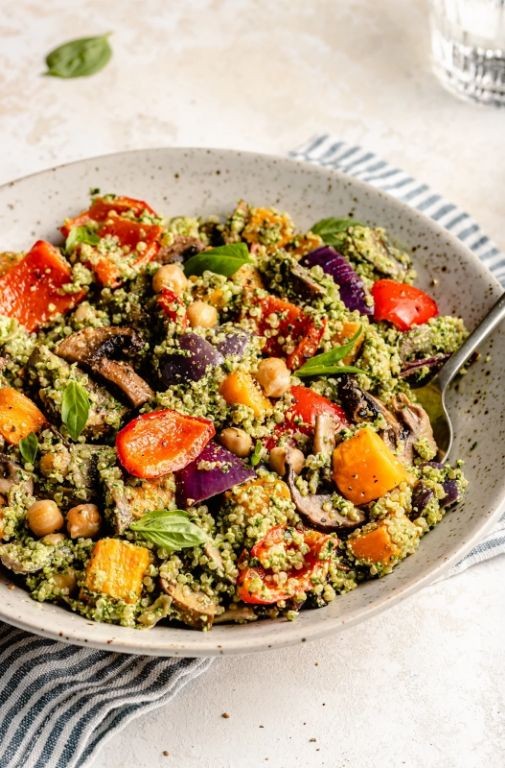
Feast your eyes, friends, because we’re about to turn your oven into a veggie disco and your quinoa into a flavor sponge. This isn’t just a salad; it’s a vibrant, textural fiesta that makes eating your greens feel like a party, not a chore.
Serving: 4 | Pre Time: 15 minutes | Cooking Time: 35 minutes
Ingredients
– 1 cup uncooked quinoa, rinsed
– 2 cups low-sodium vegetable broth
– 1 medium sweet potato, peeled and diced into ½-inch cubes
– 1 large red bell pepper, seeded and sliced into ½-inch strips
– 1 medium red onion, sliced into ½-inch wedges
– 3 tablespoons extra-virgin olive oil, divided
– 1 teaspoon kosher salt, divided
– ½ teaspoon freshly cracked black pepper, divided
– 5 ounces baby arugula
– ¼ cup toasted pine nuts
– 3 tablespoons freshly squeezed lemon juice
– 2 tablespoons pure maple syrup
– 1 teaspoon Dijon mustard
Instructions
1. Preheat your oven to 425°F (218°C) and line a large, rimmed baking sheet with parchment paper.
2. In a medium saucepan, combine the rinsed quinoa and vegetable broth. Bring to a boil over high heat.
3. Immediately reduce the heat to low, cover the saucepan, and simmer the quinoa for 15 minutes, or until all the liquid is absorbed. (Tip: Let it steam off the heat, covered, for 5 minutes for fluffier grains).
4. While the quinoa cooks, toss the diced sweet potato, bell pepper strips, and onion wedges with 2 tablespoons of olive oil, ½ teaspoon of kosher salt, and ¼ teaspoon of black pepper on the prepared baking sheet.
5. Spread the vegetables in a single layer and roast for 25-30 minutes, stirring once halfway through, until the sweet potato is fork-tender and the peppers have caramelized edges.
6. Whisk together the remaining 1 tablespoon of olive oil, lemon juice, maple syrup, Dijon mustard, and the remaining ½ teaspoon of salt and ¼ teaspoon of pepper in a small bowl to create the dressing.
7. Fluff the cooked quinoa with a fork and transfer it to a large serving bowl.
8. Add the roasted vegetables, baby arugula, and toasted pine nuts to the bowl with the quinoa.
9. Pour the prepared dressing over the salad and toss gently until everything is evenly coated. (Tip: Add the arugula last to prevent wilting from the warm ingredients).
10. Serve immediately. (Tip: For a heartier meal, top with crumbled feta cheese or grilled chicken).
But behold the masterpiece: you get the creamy, nutty quinoa, the sweet, caramelized veg, and the peppery arugula all tied together with that bright, tangy-sweet dressing. The toasted pine nuts add a crucial, buttery crunch in every bite. Try it piled into a wrap with some hummus for a seriously satisfying lunch on the go.
Chicken and Broccoli Stir Fry
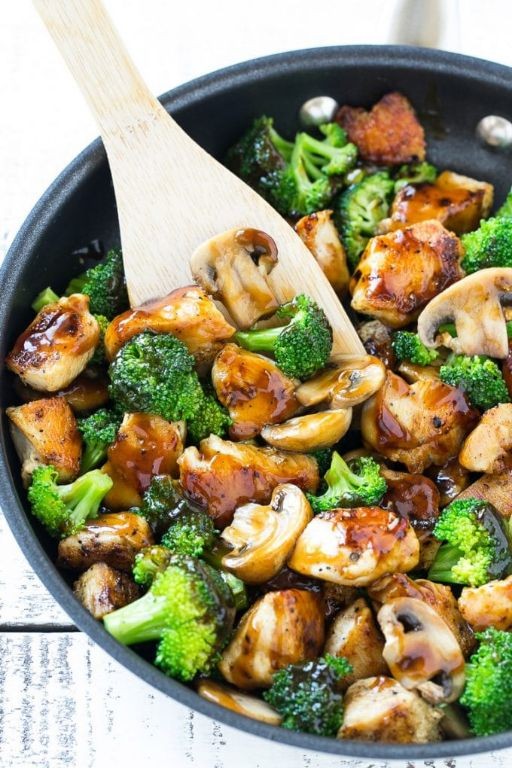
Let’s be real—some days you need dinner to be fast, fabulous, and not fussy. Enter this Chicken and Broccoli Stir Fry: your ticket to a vibrant, flavor-packed meal that’s quicker than deciding what to stream tonight. It’s the weeknight hero we all deserve, with a saucy, savory punch that’ll make you forget takeout ever existed.
Serving: 4 | Pre Time: 15 minutes | Cooking Time: 15 minutes
Ingredients
– 1.5 lbs boneless, skinless chicken thighs, cut into 1-inch cubes
– 3 cups broccoli florets, cut into bite-sized pieces
– 2 tbsp avocado oil, divided
– 4 cloves garlic, finely minced
– 1 tbsp fresh ginger, grated
– 1/3 cup low-sodium soy sauce
– 2 tbsp rice vinegar
– 1 tbsp honey
– 1 tsp toasted sesame oil
– 2 tsp cornstarch
– 1/4 cup water
– 2 green onions, thinly sliced
– 1 tbsp toasted sesame seeds
Instructions
1. In a small bowl, whisk together the soy sauce, rice vinegar, honey, toasted sesame oil, cornstarch, and water until fully combined and no lumps remain; set this sauce aside.
2. Pat the chicken cubes completely dry with paper towels to ensure a proper sear.
3. Heat 1 tablespoon of avocado oil in a large wok or skillet over high heat until shimmering, about 1–2 minutes.
4. Add the chicken cubes in a single layer, working in batches if needed to avoid overcrowding, and sear undisturbed for 3–4 minutes until golden brown on one side.
5. Flip the chicken pieces and cook for an additional 2–3 minutes until cooked through and no longer pink inside; transfer to a clean plate.
6. Reduce the heat to medium-high and add the remaining 1 tablespoon of avocado oil to the same wok.
7. Add the broccoli florets and stir-fry for 4–5 minutes until bright green and crisp-tender, with slight char marks.
8. Push the broccoli to the sides of the wok, add the minced garlic and grated ginger to the center, and sauté for 30–45 seconds until fragrant.
9. Return the cooked chicken to the wok and pour in the prepared sauce, stirring continuously to coat everything evenly.
10. Simmer the mixture for 2–3 minutes, stirring occasionally, until the sauce thickens to a glossy, clingy consistency that coats the back of a spoon.
11. Remove from heat and garnish with sliced green onions and toasted sesame seeds.
Get ready for a texture fiesta: tender chicken mingles with crisp-tender broccoli, all draped in a glossy, umami-rich sauce that’s subtly sweet and tangy. Serve it over a bed of jasmine rice or cauliflower rice for a low-carb twist, or wrap it in lettuce cups for a fun, hands-on meal that’s as vibrant as it is delicious.
Turkey and Spinach Meatballs
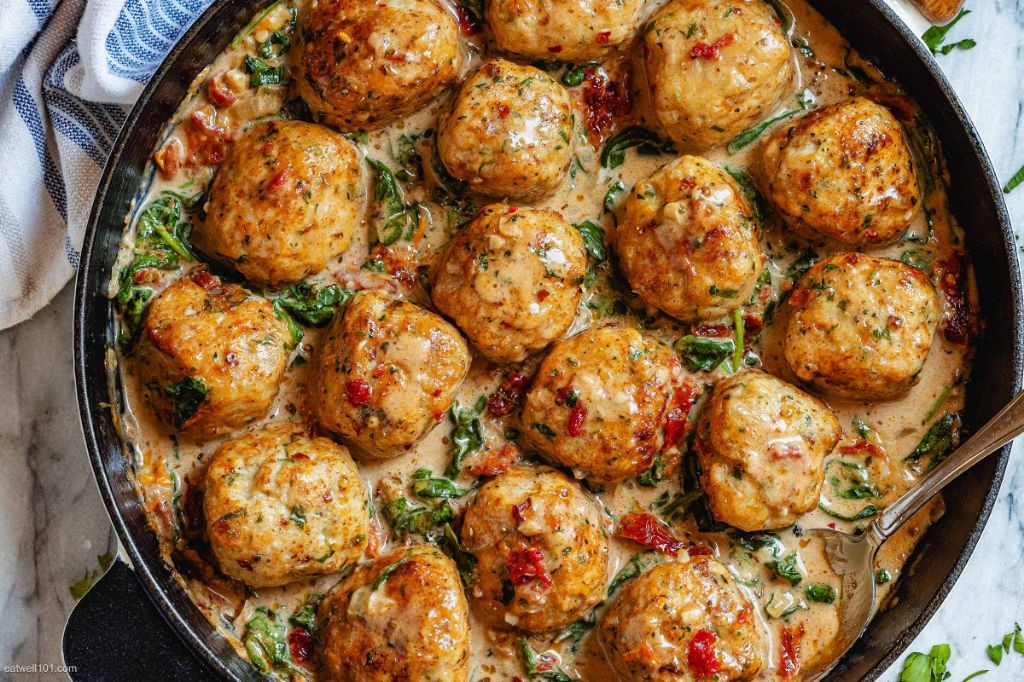
Who says healthy eating has to be a snooze-fest? These Turkey and Spinach Meatballs are here to prove that nutritious can be downright delicious—and they’re so easy to whip up, you’ll be wondering why you ever settled for bland, dry meatballs before. Let’s get rolling!
Serving: 4 | Pre Time: 15 minutes | Cooking Time: 20 minutes
Ingredients
– 1 lb ground turkey (93% lean)
– 1 cup fresh spinach, finely chopped
– ½ cup panko breadcrumbs
– ¼ cup whole milk
– 1 large pasture-raised egg, lightly beaten
– 2 tbsp extra-virgin olive oil
– 2 cloves garlic, minced
– 1 tsp kosher salt
– ½ tsp freshly ground black pepper
– ¼ tsp red pepper flakes
– 2 tbsp clarified butter
Instructions
1. In a small bowl, combine the panko breadcrumbs and whole milk, allowing them to soak for 5 minutes until the breadcrumbs are fully hydrated.
2. In a large mixing bowl, add the ground turkey, finely chopped spinach, soaked breadcrumb mixture, lightly beaten pasture-raised egg, minced garlic, kosher salt, black pepper, and red pepper flakes.
3. Using your hands, gently mix the ingredients until just combined, being careful not to overwork the meat to keep the meatballs tender.
4. Portion the mixture into 1½-inch balls, rolling them gently between your palms to form 16 uniform meatballs.
5. In a large skillet, heat the extra-virgin olive oil and clarified butter over medium-high heat until shimmering, about 2 minutes.
6. Add the meatballs to the skillet in a single layer, ensuring they are not touching to allow for even browning.
7. Cook the meatballs for 8–10 minutes, turning them every 2 minutes with tongs until they are golden brown on all sides and reach an internal temperature of 165°F when checked with an instant-read thermometer.
8. Transfer the cooked meatballs to a plate lined with paper towels to drain any excess grease, letting them rest for 3 minutes before serving. Resting allows the juices to redistribute, keeping them moist.
Ready to dig in? These meatballs boast a juicy, tender interior with a crisp, golden crust, thanks to the clarified butter, while the spinach adds a subtle earthiness that balances the turkey’s mild flavor. Serve them over zucchini noodles for a low-carb twist, or tuck them into a warm pita with tzatziki for a quick, satisfying meal that’ll have everyone asking for seconds.
Avocado and Black Bean Salad
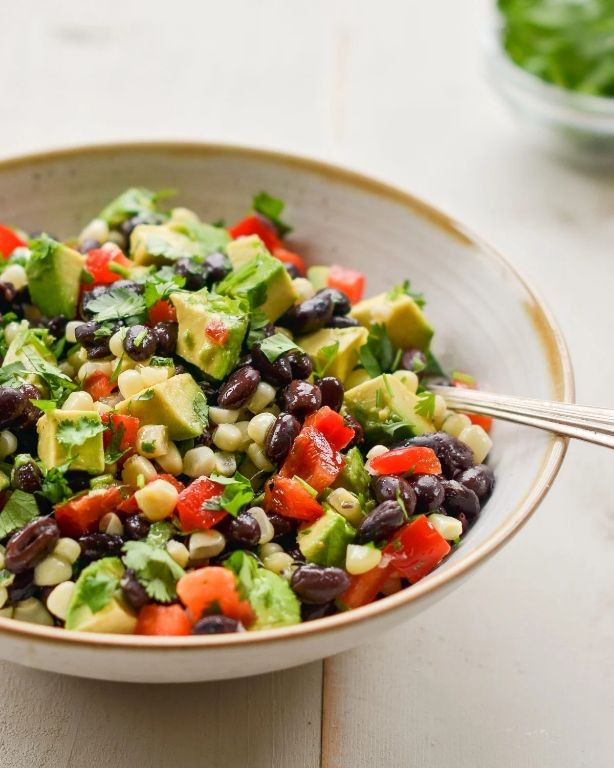
Savor this vibrant, no-cook wonder that’s as effortless as it is delicious—perfect for when you want something fresh, filling, and fabulously fuss-free. Seriously, it’s the salad that practically assembles itself while you take the credit.
Serving: 4 | Pre Time: 15 minutes | Cooking Time: 0 minutes
Ingredients
– 2 ripe Hass avocados, diced into ½-inch cubes
– 1 (15-ounce) can of black beans, thoroughly rinsed and drained
– 1 cup cherry tomatoes, halved
– ½ cup finely diced red onion
– ¼ cup freshly chopped cilantro
– 3 tablespoons extra-virgin olive oil
– 2 tablespoons freshly squeezed lime juice
– 1 teaspoon ground cumin
– ½ teaspoon kosher salt
– ¼ teaspoon freshly cracked black pepper
Instructions
1. In a large mixing bowl, combine the rinsed black beans, halved cherry tomatoes, diced red onion, and chopped cilantro.
2. Gently fold in the diced Hass avocados to avoid mashing them—this keeps the texture delightfully chunky.
3. In a small bowl, whisk together the extra-virgin olive oil, freshly squeezed lime juice, ground cumin, kosher salt, and freshly cracked black pepper until fully emulsified.
4. Pour the dressing over the avocado and bean mixture, then toss carefully with a silicone spatula until everything is evenly coated.
5. Let the salad rest at room temperature for 10 minutes to allow the flavors to meld, which enhances the overall taste.
6. Serve immediately, or for a cooler option, refrigerate for up to 1 hour before serving—any longer and the avocados may brown.
Perfectly creamy avocados mingle with hearty beans for a satisfying bite, while the zesty lime dressing adds a bright, tangy kick. Pile it onto toasted tortillas for quick tacos, or scoop it over grilled chicken for an instant upgrade—this salad’s versatility is its secret superpower.
Gluten Free Pumpkin Spice Bread
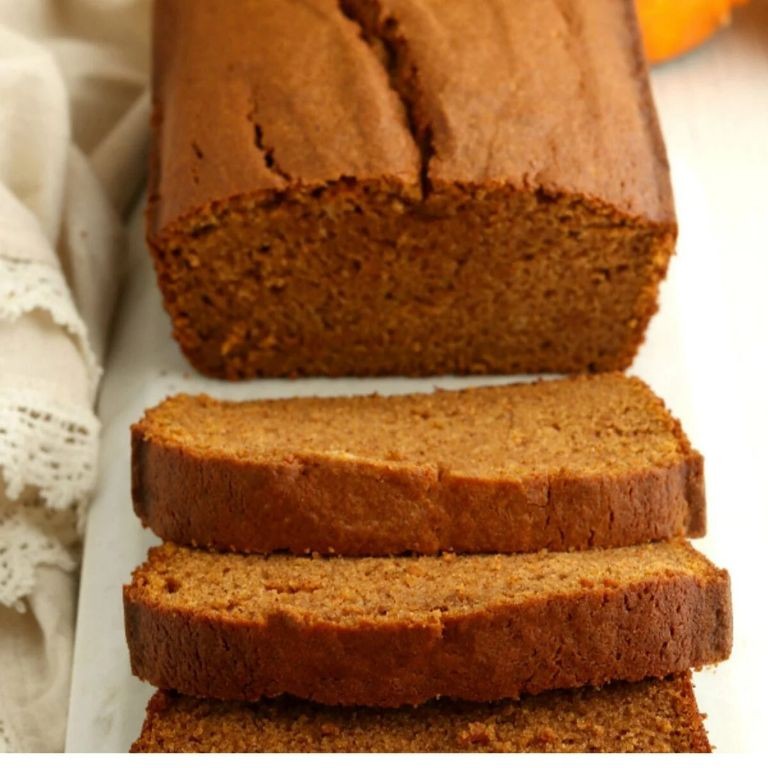
Mmm, can you smell that? It’s the scent of cozy autumn afternoons and the promise of a treat that won’t send your gluten-free friends into a sad spiral. This pumpkin spice bread is here to save your holiday brunch from being a total snooze-fest, delivering all the warm, spiced vibes without the glutenous guilt. Consider it your edible hug in loaf form.
Serving: 10 | Pre Time: 15 minutes | Cooking Time: 60 minutes
Ingredients
– 2 cups gluten-free all-purpose flour blend
– 1 teaspoon baking soda
– ½ teaspoon baking powder
– 1 teaspoon fine sea salt
– 2 teaspoons ground cinnamon
– 1 teaspoon ground ginger
– ½ teaspoon ground nutmeg
– ¼ teaspoon ground cloves
– 1 cup granulated sugar
– ½ cup light brown sugar, packed
– ½ cup avocado oil
– 3 large pasture-raised eggs, lightly beaten
– 1 (15-ounce) can pure pumpkin purée
– 1 teaspoon pure vanilla extract
Instructions
1. Preheat your oven to 350°F (175°C) and generously grease a 9×5-inch loaf pan with avocado oil, then line it with parchment paper for easy removal.
2. In a medium mixing bowl, whisk together the gluten-free all-purpose flour blend, baking soda, baking powder, fine sea salt, ground cinnamon, ground ginger, ground nutmeg, and ground cloves until fully combined and no lumps remain.
3. In a large mixing bowl, vigorously whisk the granulated sugar, packed light brown sugar, and avocado oil for about 1 minute until the mixture is smooth and slightly thickened.
4. Add the lightly beaten pasture-raised eggs to the sugar mixture and whisk for another 30 seconds until fully incorporated and the batter appears creamy.
5. Fold in the pure pumpkin purée and pure vanilla extract with a rubber spatula until the mixture is uniformly orange and no streaks remain.
6. Gradually add the dry flour mixture to the wet ingredients, folding gently with the spatula just until the batter is combined and no dry pockets are visible; overmixing can lead to a dense loaf.
7. Pour the batter into the prepared loaf pan and use the spatula to spread it evenly into the corners.
8. Bake in the preheated oven for 55 to 65 minutes, or until a toothpick inserted into the center comes out completely clean with no wet crumbs attached.
9. Remove the pan from the oven and let the bread cool in the pan on a wire rack for 15 minutes to set its structure.
10. Carefully lift the bread out using the parchment paper and transfer it to the wire rack to cool completely for at least 1 hour before slicing to prevent crumbling.
Glory be! This loaf emerges with a tender, moist crumb that practically melts in your mouth, thanks to the pumpkin purée acting as a natural humectant. The warm spices create a symphony of autumnal flavor that’s perfectly balanced—not too sweet, with just the right kick of ginger and cloves. Slice it thick for a decadent breakfast toast slathered with almond butter, or cube it up for a playful bread pudding that’ll have everyone asking for seconds.
Grilled Shrimp with Mango Salsa
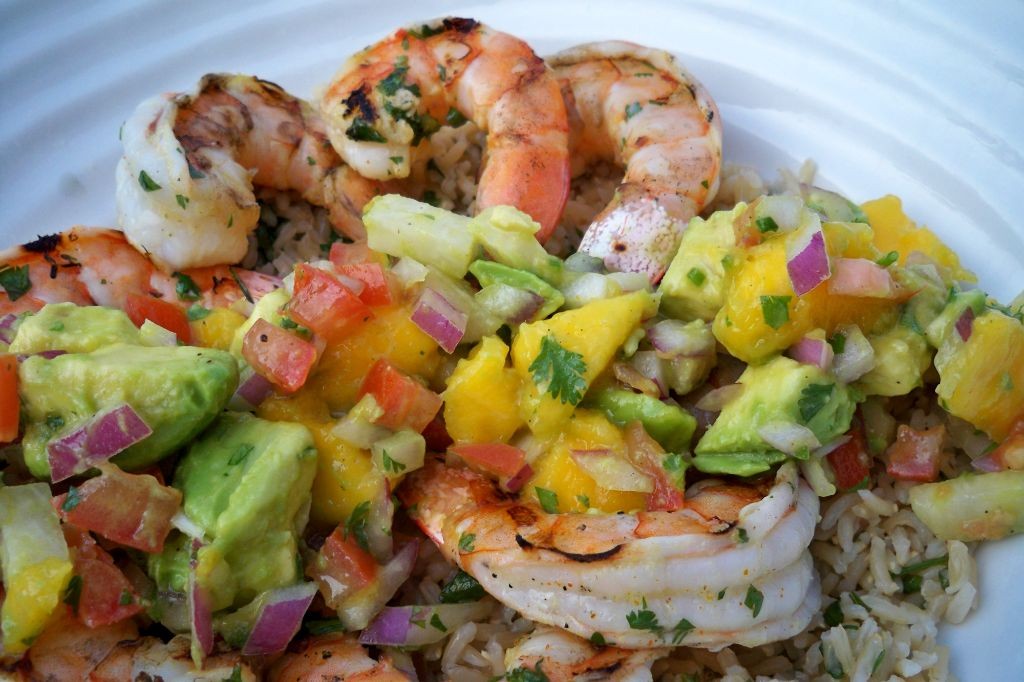
Miraculously, this grilled shrimp with mango salsa is the culinary equivalent of putting on sunglasses indoors—unexpectedly cool and guaranteed to make you look good. It’s the kind of dish that whispers ‘beach vacation’ while you’re standing by your backyard grill, and honestly, we’re here for that delicious deception. Let’s turn up the heat and get those tropical vibes sizzling.
Serving: 4 | Pre Time: 20 minutes | Cooking Time: 8 minutes
Ingredients
- 1 ½ pounds large wild-caught shrimp, peeled and deveined
- 3 tablespoons clarified butter, melted
- 2 teaspoons smoked paprika
- 1 teaspoon fine sea salt
- ½ teaspoon freshly cracked black pepper
- 2 large ripe mangoes, peeled and finely diced
- ½ cup finely diced red onion
- ¼ cup finely chopped fresh cilantro
- 1 jalapeño pepper, seeds removed and finely minced
- 2 tablespoons freshly squeezed lime juice
- 1 tablespoon extra-virgin olive oil
Instructions
- Pat the shrimp completely dry with paper towels to ensure a proper sear.
- In a medium bowl, combine the shrimp, melted clarified butter, smoked paprika, sea salt, and black pepper, tossing until evenly coated.
- Preheat a grill or grill pan to medium-high heat, approximately 400°F.
- While the grill heats, prepare the salsa by combining the diced mango, red onion, cilantro, minced jalapeño, lime juice, and olive oil in a separate bowl.
- Place the shrimp on the preheated grill in a single layer, cooking for 3 minutes.
- Flip each shrimp using tongs and cook for an additional 2-3 minutes until opaque and firm to the touch.
- Tip: For perfect grill marks, avoid moving the shrimp for the first 2 minutes of cooking.
- Immediately remove the shrimp from the grill to prevent overcooking.
- Tip: Let the salsa rest for 10 minutes before serving to allow the flavors to meld.
- Arrange the grilled shrimp on a platter and top generously with the mango salsa.
- Tip: For an extra burst of freshness, garnish with additional cilantro leaves just before serving.
Just imagine the textural symphony: succulent, smoky shrimp yielding to a vibrant, chunky salsa that pops with sweet mango and a whisper of heat. This dish shines as a stunning appetizer on a large platter, but honestly, we won’t judge if you skip the plates and eat it straight from the grill with a cold drink in hand—it’s that kind of effortless magic.
Gluten Free Apple Cinnamon Oatmeal
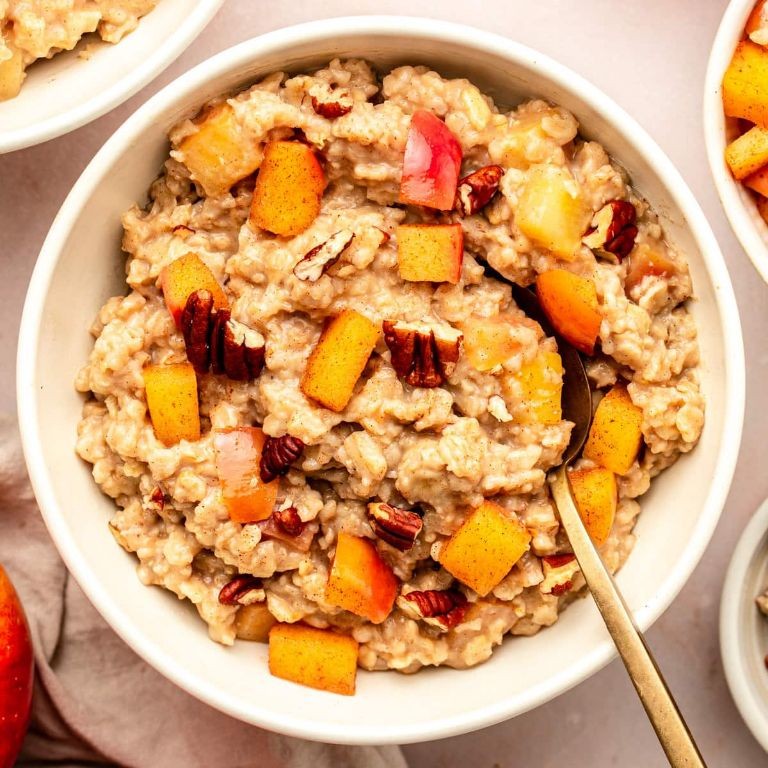
Unbelievably, you’ve found the ultimate cozy breakfast hack that’ll make your taste buds do a happy dance—this gluten-free apple cinnamon oatmeal is basically a hug in a bowl, perfect for those chilly mornings when you need a little extra pep in your step. It’s a fuss-free, flavor-packed delight that even your pickiest eaters will devour without a second thought, blending sweet, tart, and warmly spiced notes into one irresistible dish. Trust me, this recipe is so simple, you’ll be whipping it up on autopilot while still half-asleep!
Serving: 2 | Pre Time: 5 minutes | Cooking Time: 15 minutes
Ingredients
– 1 cup gluten-free rolled oats
– 2 cups unsweetened almond milk
– 1 large Honeycrisp apple, peeled, cored, and finely diced
– 2 tablespoons pure maple syrup
– 1 teaspoon ground cinnamon
– 1/4 teaspoon ground nutmeg
– 1/4 teaspoon kosher salt
– 1 tablespoon unsalted butter
– 1/2 teaspoon pure vanilla extract
Instructions
1. In a medium saucepan over medium heat, melt 1 tablespoon unsalted butter until it sizzles lightly.
2. Add 1 large Honeycrisp apple, peeled, cored, and finely diced, and sauté for 3–4 minutes, stirring occasionally, until the apple softens and releases its juices—this builds a flavorful base.
3. Tip: For extra depth, let the apples caramelize slightly by cooking an additional minute until golden edges appear.
4. Pour in 2 cups unsweetened almond milk and bring the mixture to a gentle simmer over medium-high heat, watching for small bubbles around the edges.
5. Stir in 1 cup gluten-free rolled oats, 1 teaspoon ground cinnamon, 1/4 teaspoon ground nutmeg, and 1/4 teaspoon kosher salt, ensuring all ingredients are well combined.
6. Reduce the heat to low, cover the saucepan, and let it cook for 10–12 minutes, stirring every 3 minutes to prevent sticking—the oats should absorb most of the liquid and become tender.
7. Tip: If the oatmeal thickens too quickly, add a splash more almond milk to reach your desired creamy consistency.
8. Remove the saucepan from the heat and stir in 2 tablespoons pure maple syrup and 1/2 teaspoon pure vanilla extract until fully incorporated.
9. Tip: Let the oatmeal rest, covered, for 2 minutes off the heat to allow the flavors to meld beautifully.
10. Serve immediately while warm. Aromatic and utterly comforting, this oatmeal boasts a velvety texture with tender apple bits that melt in your mouth, all wrapped in a cozy cinnamon-spiced embrace. For a fun twist, top it with a dollop of Greek yogurt or a sprinkle of toasted pecans to add a delightful crunch—it’s the kind of breakfast that’ll have you savoring every spoonful!
Gluten Free Coconut Flour Waffles

Crisp, golden, and gloriously gluten-free, these coconut flour waffles are about to become your new breakfast obsession—they’re so delightfully fluffy, you might just forget they’re missing the usual suspects. With a subtle tropical sweetness and a texture that’s tender yet satisfyingly crisp, they’re the perfect canvas for all your favorite toppings, from fresh berries to a generous drizzle of maple syrup. Trust me, your taste buds won’t know what hit them, and neither will your gluten-free friends who’ve been craving a waffle worth waking up for!
Serving: 4 | Pre Time: 10 minutes | Cooking Time: 15 minutes
Ingredients
– 1 cup coconut flour, sifted
– 4 pasture-raised eggs, lightly beaten
– 1 ½ cups unsweetened almond milk
– ¼ cup clarified butter, melted and cooled
– 2 tablespoons pure maple syrup
– 1 teaspoon baking powder
– ½ teaspoon fine sea salt
– ½ teaspoon pure vanilla extract
– Non-stick cooking spray (for greasing)
Instructions
1. Preheat your waffle iron to 375°F, ensuring it reaches the correct temperature for optimal crispness.
2. In a large mixing bowl, combine the sifted coconut flour, baking powder, and fine sea salt, whisking until fully incorporated to avoid lumps.
3. In a separate bowl, whisk together the lightly beaten pasture-raised eggs, unsweetened almond milk, melted clarified butter, pure maple syrup, and pure vanilla extract until smooth and emulsified.
4. Gradually pour the wet ingredients into the dry ingredients, folding gently with a spatula until just combined—do not overmix to maintain a light texture.
5. Allow the batter to rest for 5 minutes, letting the coconut flour absorb the liquid and thicken slightly for better consistency.
6. Lightly coat the preheated waffle iron with non-stick cooking spray to prevent sticking and ensure easy release.
7. Spoon about ½ cup of batter onto the center of the waffle iron, spreading it evenly with the back of a spoon for uniform cooking.
8. Close the lid and cook for 4–5 minutes, or until the waffles are golden brown and crisp on the outside, with steam visibly subsiding.
9. Carefully remove the waffle using a fork or tongs, and repeat with the remaining batter, respraying the iron as needed between batches.
10. Serve immediately while hot for the best texture and flavor.
Yes, these waffles boast a delicate crumb and a hint of coconut essence that pairs beautifully with tangy yogurt or a dollop of whipped cream. For a creative twist, try stacking them with sliced bananas and a sprinkle of toasted nuts, turning breakfast into a decadent treat that’s as Instagram-worthy as it is delicious!
Summary
You’ve now discovered 20 delicious, healthy gluten-free recipes perfect for any occasion! Whether you’re cooking for a weeknight dinner, a special celebration, or just craving something wholesome, this roundup has you covered. We’d love to hear which recipes become your favorites—leave a comment below and share this article on Pinterest to spread the gluten-free love!


