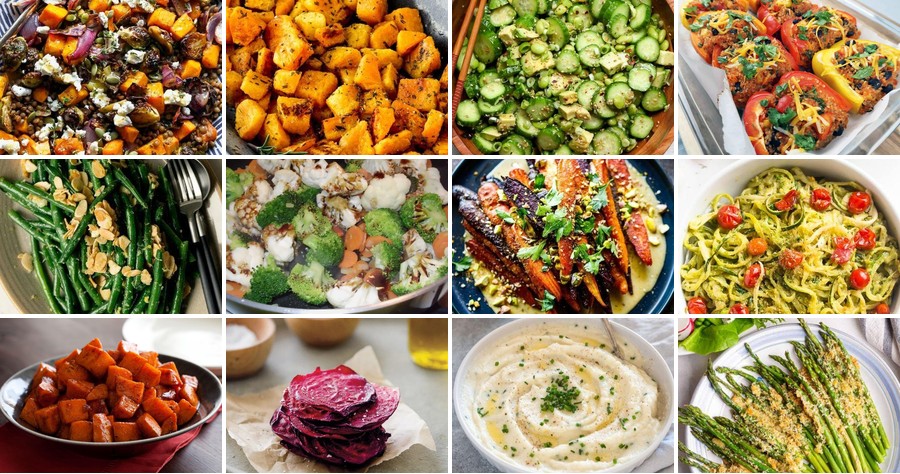
Welcome to your new favorite collection of side dishes! We’ve gathered 20 nutritious recipes that prove healthy eating can be absolutely delicious. Whether you’re looking for quick weeknight solutions or impressive options for guests, these vibrant sides will complement any main course. Get ready to transform your meals with flavors that satisfy both your taste buds and your wellness goals. Let’s dive in!
Garlic Roasted Brussels Sprouts with Balsamic Glaze
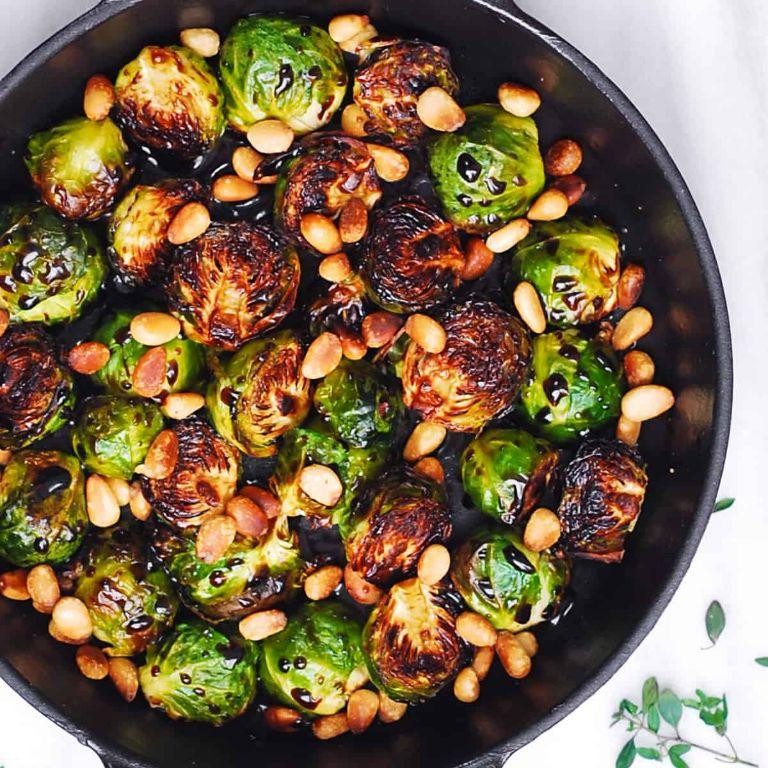
Hear ye, hear ye, holiday heroes and weeknight warriors! Let’s transform those often-maligned mini-cabbages into crispy, caramelized nuggets of glory that will make even the most ardent sprout skeptic swoon. This recipe is your secret weapon for a side dish that steals the show, proving that with enough garlic and a slick of balsamic, anything is possible.
Serving: 4 | Pre Time: 10 minutes | Cooking Time: 25 minutes
Ingredients
– 1 ½ pounds Brussels sprouts, trimmed and halved
– 3 tablespoons extra-virgin olive oil
– 6 large garlic cloves, thinly sliced
– 1 teaspoon flaky sea salt
– ½ teaspoon freshly cracked black pepper
– 3 tablespoons aged balsamic vinegar
– 1 tablespoon pure maple syrup
Instructions
1. Preheat your oven to 425°F (218°C) and position a rack in the center.
2. On a large, rimmed baking sheet, toss the halved Brussels sprouts with extra-virgin olive oil, flaky sea salt, and freshly cracked black pepper until evenly coated. Tip: For maximum crispiness, ensure the sprouts are completely dry before tossing and arrange them cut-side down in a single layer.
3. Roast the sprouts for 15 minutes, until the cut sides develop a deep golden-brown sear.
4. Carefully remove the baking sheet from the oven. Scatter the thinly sliced garlic cloves evenly over the sprouts.
5. Return the sheet to the oven and roast for an additional 8-10 minutes, until the garlic is fragrant and lightly golden and the sprouts are tender. Tip: Watch the garlic closely to prevent burning, as it can turn bitter if over-toasted.
6. While the sprouts finish roasting, prepare the glaze by combining aged balsamic vinegar and pure maple syrup in a small saucepan over medium heat.
7. Bring the mixture to a simmer, then reduce the heat to medium-low. Cook for 3-4 minutes, stirring frequently, until the liquid reduces by half and thickens to a syrup consistency that coats the back of a spoon. Tip: The glaze will continue to thicken as it cools, so remove it from the heat just before it reaches your desired thickness.
8. Transfer the roasted Brussels sprouts and garlic to a serving bowl. Drizzle the warm balsamic glaze over the top and toss gently to combine.
A symphony of textures and tastes awaits: crackly, almost burnt edges give way to tender centers, all slicked with a glossy, sweet-tart glaze that clings to every nook. For a show-stopping presentation, finish with a final sprinkle of flaky salt and serve immediately alongside a perfectly seared steak or piled high on a creamy polenta.
Quinoa and Avocado Salad with Lemon Dressing
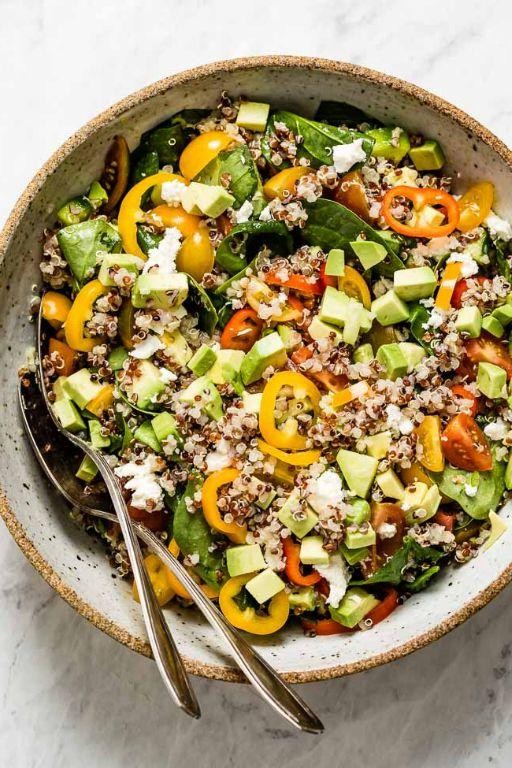
Brace yourselves, salad skeptics—this isn’t your average, sad desk lunch. We’re talking a vibrant, protein-packed powerhouse that’s as satisfying as it is Instagram-worthy, perfect for when you want to feel virtuous without sacrificing flavor.
Serving: 4 | Pre Time: 15 minutes | Cooking Time: 15 minutes
Ingredients
- 1 cup tri-color quinoa, rinsed
- 2 cups filtered water
- 1/2 teaspoon fine sea salt
- 2 ripe Hass avocados, diced
- 1 cup English cucumber, finely diced
- 1/2 cup cherry tomatoes, halved
- 1/4 cup red onion, finely minced
- 1/4 cup fresh cilantro, roughly chopped
- 1/4 cup extra-virgin olive oil
- 3 tablespoons freshly squeezed lemon juice
- 1 teaspoon Dijon mustard
- 1 small garlic clove, finely grated
- 1/4 teaspoon freshly cracked black pepper
Instructions
- In a medium saucepan, combine 1 cup rinsed tri-color quinoa, 2 cups filtered water, and 1/2 teaspoon fine sea salt. Bring to a boil over high heat.
- Reduce heat to low, cover the saucepan tightly, and simmer for 15 minutes, or until the quinoa has absorbed all the water and the grains appear translucent with visible spirals.
- Tip: Fluff the cooked quinoa immediately with a fork to prevent clumping and spread it on a baking sheet to cool completely—this stops it from overcooking and keeps the salad light.
- While the quinoa cools, prepare the lemon dressing: In a small bowl, whisk together 1/4 cup extra-virgin olive oil, 3 tablespoons freshly squeezed lemon juice, 1 teaspoon Dijon mustard, 1 finely grated small garlic clove, and 1/4 teaspoon freshly cracked black pepper until emulsified.
- In a large mixing bowl, combine the cooled quinoa, 2 diced ripe Hass avocados, 1 cup finely diced English cucumber, 1/2 cup halved cherry tomatoes, 1/4 cup finely minced red onion, and 1/4 cup roughly chopped fresh cilantro.
- Tip: Gently fold in the avocados last to maintain their creamy texture and prevent mashing.
- Pour the prepared lemon dressing over the salad mixture and toss gently with a spatula until all ingredients are evenly coated.
- Tip: For optimal flavor, let the salad rest at room temperature for 10 minutes before serving to allow the quinoa to absorb the dressing.
- Divide the salad among four serving bowls or plates.
What you get is a delightful contrast of fluffy quinoa against creamy avocado, with a zesty lemon punch that brightens every bite. For a creative twist, serve it in hollowed-out bell peppers or top with grilled shrimp for a heartier meal—it’s versatile enough to steal the show at any gathering.
Steamed Green Beans with Almonds and Lemon Zest
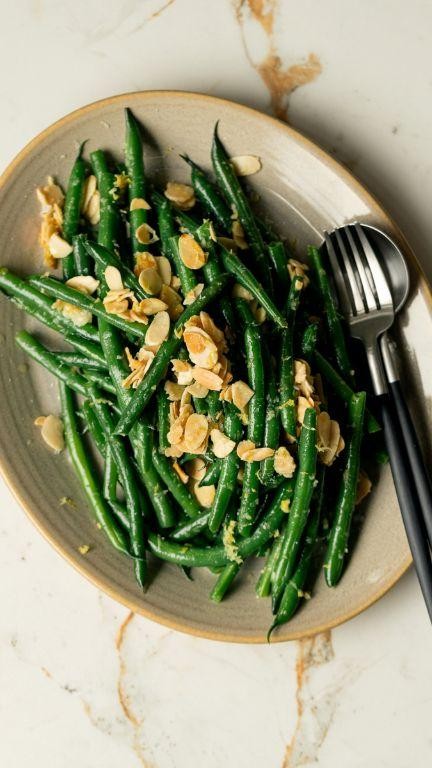
Picture this: you’re staring at a mountain of green beans, wondering how to make them exciting enough to steal the spotlight from the holiday ham. Fear not, because this simple, elegant side dish is about to become your new secret weapon—it’s so good, you might just forget there’s a main course.
Serving: 4 | Pre Time: 10 minutes | Cooking Time: 8 minutes
Ingredients
- 1 pound fresh green beans, trimmed
- 1/4 cup sliced almonds
- 1 tablespoon extra-virgin olive oil
- 1 teaspoon lemon zest, finely grated
- 1/2 teaspoon kosher salt
- 1/4 teaspoon freshly cracked black pepper
Instructions
- Bring 1 inch of water to a rolling boil in a large pot fitted with a steamer basket.
- Place the trimmed green beans in the steamer basket in a single layer.
- Cover the pot and steam the beans for 5–7 minutes, until they are bright green and tender-crisp (a tip: test one bean—it should snap, not mush).
- Immediately transfer the steamed beans to a large bowl of ice water to halt the cooking process, preserving their vibrant color and crisp texture.
- Heat the extra-virgin olive oil in a medium skillet over medium heat.
- Add the sliced almonds to the skillet and toast for 2–3 minutes, stirring constantly, until they are fragrant and golden brown (watch closely, as nuts can burn quickly).
- Drain the green beans thoroughly and pat them dry with a clean kitchen towel to ensure the dressing adheres properly.
- Return the dried beans to the large bowl.
- Pour the toasted almonds and any residual oil from the skillet over the beans.
- Sprinkle the finely grated lemon zest, kosher salt, and freshly cracked black pepper evenly over the mixture.
- Toss everything gently but thoroughly until the beans are evenly coated.
The result is a symphony of textures: crisp-tender beans meet the satisfying crunch of almonds, all brightened by that zesty lemon kiss. Serve it warm as a sleek side, or chill it for a refreshing picnic salad—either way, it’s guaranteed to vanish before you can say “seconds, please.”
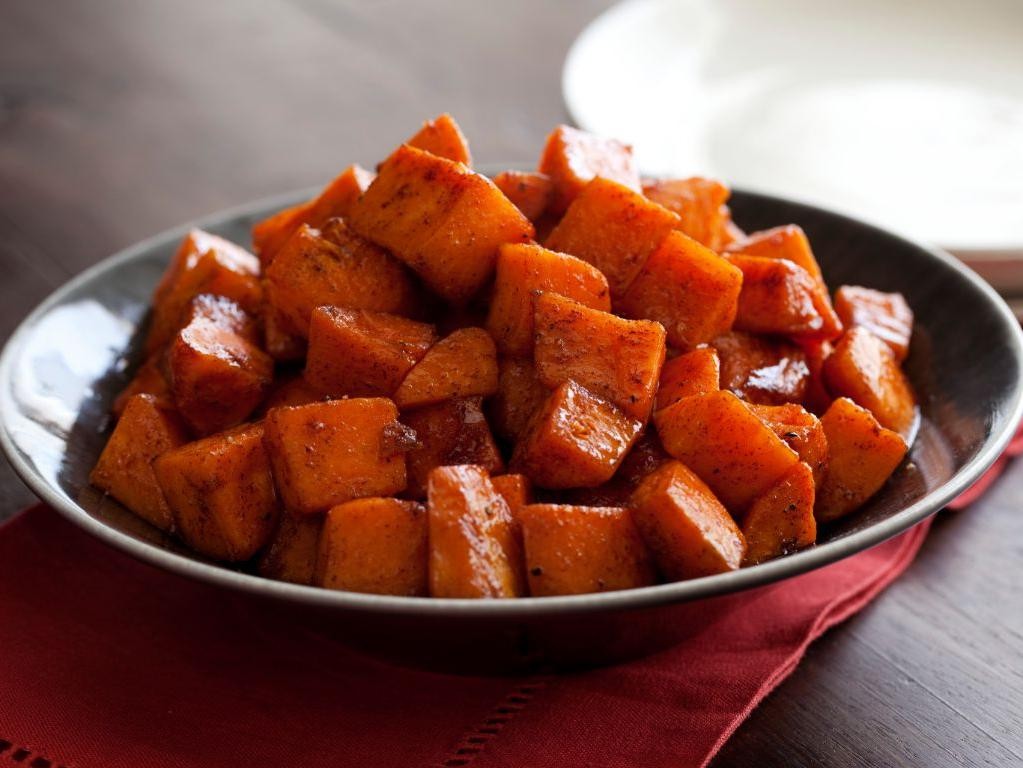
Roasted Sweet Potatoes with Cinnamon and Honey
Tired of the same old side dishes that make your taste buds yawn louder than a catnap on a Sunday afternoon? Let’s jazz up your table with these Roasted Sweet Potatoes with Cinnamon and Honey—a dish so delightfully simple, it’s basically a culinary magic trick where you toss a few things together and end up with a sweet, savory, and utterly irresistible masterpiece. Perfect for holiday feasts or just because you deserve something fabulous, these potatoes are about to become your new favorite kitchen sidekick.
Serving: 4 | Pre Time: 10 minutes | Cooking Time: 30 minutes
Ingredients
– 2 large sweet potatoes, peeled and cut into 1-inch cubes
– 2 tablespoons extra-virgin olive oil
– 1 tablespoon unsalted butter, melted
– 2 tablespoons raw honey
– 1 teaspoon ground cinnamon
– ½ teaspoon kosher salt
– ¼ teaspoon freshly ground black pepper
Instructions
1. Preheat your oven to 400°F (204°C) and line a rimmed baking sheet with parchment paper.
2. In a large mixing bowl, combine the sweet potato cubes, extra-virgin olive oil, and melted unsalted butter, tossing until evenly coated.
3. Add the raw honey, ground cinnamon, kosher salt, and freshly ground black pepper to the bowl, stirring vigorously to ensure each cube is fully glazed.
4. Spread the coated sweet potatoes in a single layer on the prepared baking sheet, ensuring they are not overcrowded for optimal roasting.
5. Roast in the preheated oven for 15 minutes, then remove and use a spatula to flip each piece for even browning.
6. Return the baking sheet to the oven and continue roasting for an additional 15 minutes, or until the potatoes are fork-tender and the edges are caramelized to a golden brown.
7. Remove from the oven and let rest for 5 minutes on the baking sheet to allow the flavors to meld.
8. Transfer the roasted sweet potatoes to a serving dish, drizzling any remaining pan juices over the top for added richness.
9. Serve immediately while warm, garnishing with an extra sprinkle of cinnamon if desired.
Absolutely divine in texture, these potatoes boast a crispy exterior that gives way to a creamy, melt-in-your-mouth center, with the honey and cinnamon weaving a warm, aromatic sweetness that’s downright addictive. Try them as a standout side for roasted meats or crumbled over a bed of greens for a surprising salad twist—they’re so good, you might just forget there’s a main course!
Grilled Asparagus with Parmesan and Olive Oil

Mmm, let’s be real—sometimes you need a side dish that’s so easy it practically makes itself, yet so elegant it could win over your mother-in-law. This grilled asparagus with Parmesan and olive oil is that magical unicorn: crisp-tender spears kissed by fire, showered with nutty cheese, and glistening with golden oil. It’s the vegetable upgrade your dinner table has been dreaming of, and it’s ready in a flash.
Serving: 4 | Pre Time: 5 minutes | Cooking Time: 10 minutes
Ingredients
– 1 pound fresh asparagus spears, woody ends trimmed
– 2 tablespoons extra-virgin olive oil
– 1/4 cup finely grated Parmigiano-Reggiano cheese
– 1/2 teaspoon kosher salt
– 1/4 teaspoon freshly cracked black pepper
Instructions
1. Preheat a gas or charcoal grill to medium-high heat (approximately 400°F).
2. In a large bowl, toss the trimmed asparagus spears with the extra-virgin olive oil until evenly coated.
3. Sprinkle the kosher salt and freshly cracked black pepper over the asparagus, tossing again to distribute the seasonings.
4. Place the asparagus spears perpendicular to the grill grates to prevent them from falling through.
5. Grill the asparagus for 5–7 minutes, turning once halfway through, until they are bright green with visible char marks and tender when pierced with a fork. Tip: For even cooking, select spears of similar thickness.
6. Transfer the grilled asparagus to a serving platter using tongs.
7. Immediately sprinkle the finely grated Parmigiano-Reggiano cheese over the hot asparagus, allowing the residual heat to melt it slightly. Tip: Grate the cheese fresh for optimal flavor and texture.
8. Drizzle any remaining olive oil from the bowl over the top for added richness. Tip: Serve promptly to maintain the asparagus’s crisp-tender bite.
You’ll love the contrast of smoky, charred edges against the tender, juicy interiors, all brought together by the savory, umami-rich Parmesan. Yes, this dish shines as a simple side, but get creative—toss it into a grain bowl, top it with a poached egg for brunch, or serve it alongside grilled steak for a show-stopping meal.
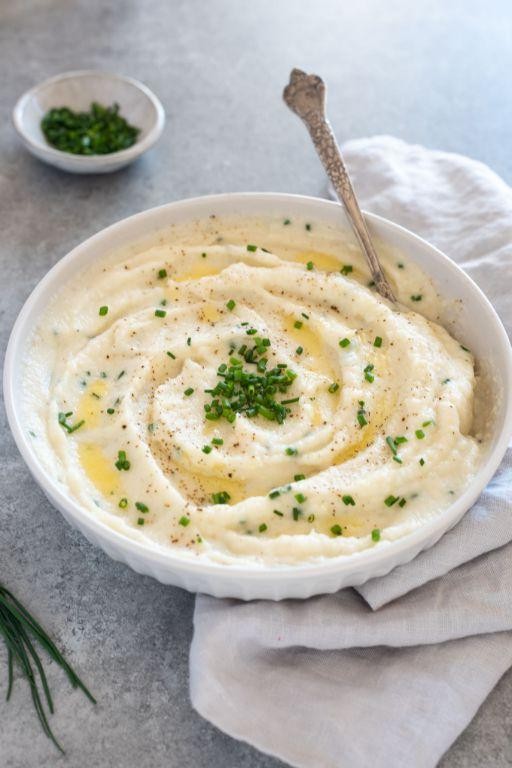
Cauliflower Mash with Garlic and Chives
Picture this: a creamy, dreamy mash that’s so velvety, you’ll forget potatoes ever existed. This cauliflower mash with garlic and chives is the low-carb hero your holiday table deserves—fluffy, flavorful, and ready to steal the spotlight from any starch.
Serving: 4 | Pre Time: 10 minutes | Cooking Time: 25 minutes
Ingredients
- 1 large head of cauliflower, cored and cut into 1-inch florets
- 4 cloves of garlic, peeled and smashed
- 1/4 cup of heavy cream, warmed to 110°F
- 3 tablespoons of unsalted butter, at room temperature
- 2 tablespoons of fresh chives, finely minced
- 1/2 teaspoon of kosher salt
- 1/4 teaspoon of freshly ground black pepper
Instructions
- Place the cauliflower florets and smashed garlic cloves in a large steamer basket set over a pot of boiling water.
- Cover and steam the cauliflower and garlic for 12–15 minutes, until the florets are fork-tender and easily pierced.
- Transfer the steamed cauliflower and garlic to a high-powered blender or food processor, discarding any excess liquid from the pot.
- Add the warmed heavy cream, room-temperature butter, minced chives, kosher salt, and black pepper to the blender.
- Blend the mixture on high speed for 45–60 seconds, scraping down the sides once, until completely smooth and creamy.
- For a silkier texture, pass the mash through a fine-mesh sieve using a rubber spatula to remove any fibrous bits.
- Taste and adjust seasoning with an additional pinch of salt if needed, blending briefly to incorporate.
- Transfer the mash to a serving bowl and garnish with extra minced chives before serving immediately.
Expect a luxuriously smooth puree with a subtle sweetness from the cauliflower, balanced by the pungent kick of garlic and the fresh, oniony notes of chives. Serve it as a sophisticated side to roasted meats, or get creative by using it as a base for a grain-free shepherd’s pie—it’s versatile enough to elevate any meal from ordinary to extraordinary.
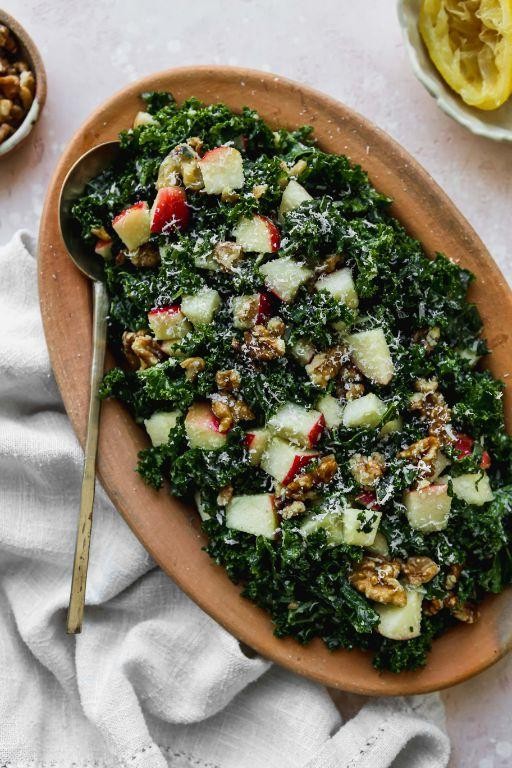
Kale and Apple Salad with Walnuts
Who says healthy eating has to be boring? This kale and apple salad with walnuts is the superhero of side dishes—it’s crunchy, sweet, and packed with enough pizzazz to make even the most skeptical vegetable-avoider do a happy dance. Trust me, your taste buds will thank you for this vibrant, flavor-packed creation.
Serving: 4 | Pre Time: 15 minutes | Cooking Time: 0 minutes
Ingredients
– 1 large bunch of lacinato kale, stems removed and leaves finely chopped
– 2 crisp Honeycrisp apples, cored and thinly sliced
– 1 cup raw walnut halves, roughly chopped
– ½ cup crumbled aged goat cheese
– ¼ cup extra-virgin olive oil
– 2 tablespoons freshly squeezed lemon juice
– 1 tablespoon pure maple syrup
– 1 teaspoon Dijon mustard
– ½ teaspoon fine sea salt
– ¼ teaspoon freshly ground black pepper
Instructions
1. Place the finely chopped lacinato kale in a large mixing bowl.
2. Add the extra-virgin olive oil, freshly squeezed lemon juice, pure maple syrup, Dijon mustard, fine sea salt, and freshly ground black pepper to a small jar.
3. Secure the lid on the jar and shake vigorously for 30 seconds until the dressing is fully emulsified. Tip: Emulsifying the dressing ensures it coats the kale evenly without separating.
4. Pour the dressing over the kale in the bowl.
5. Using clean hands, massage the kale with the dressing for 2–3 minutes until the leaves soften and turn a darker green. Tip: Massaging breaks down the kale’s tough fibers, making it tender and more palatable.
6. Add the thinly sliced Honeycrisp apples and roughly chopped raw walnut halves to the bowl.
7. Gently toss all ingredients together until evenly combined.
8. Transfer the salad to a serving platter or individual plates.
9. Sprinkle the crumbled aged goat cheese evenly over the top of the salad. Tip: Adding the cheese last prevents it from becoming soggy and maintains its creamy texture.
10. Serve immediately.
Hearty and refreshing, this salad boasts a delightful contrast of textures—from the crisp apples and crunchy walnuts to the tender massaged kale. The tangy goat cheese and sweet-maple dressing create a balanced flavor profile that’s both sophisticated and utterly craveable. For a creative twist, try serving it alongside grilled chicken or as a bed for roasted salmon to turn it into a satisfying main course.
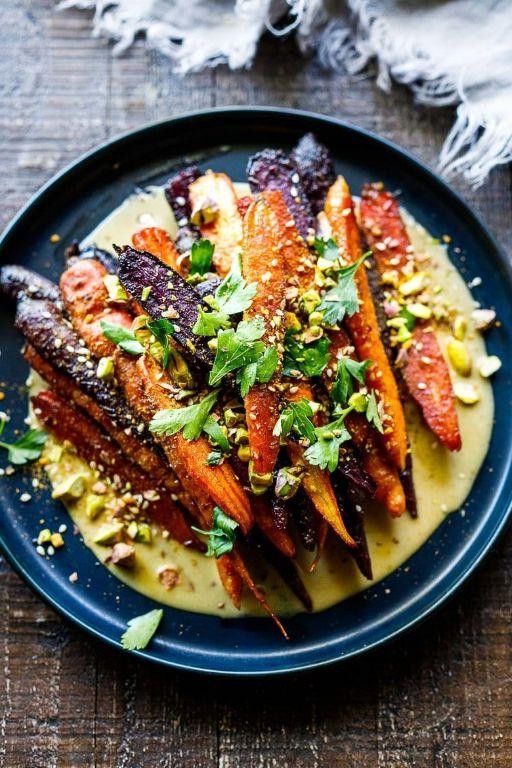
Spicy Roasted Carrots with Tahini Drizzle
Let’s be real: your average carrot side dish is about as exciting as watching paint dry. But these spicy roasted carrots with a creamy tahini drizzle? They’re the culinary equivalent of putting a disco ball in your vegetable drawer—suddenly, everything is vibrant, flavorful, and ready to party. This recipe transforms humble roots into a show-stopping side with minimal effort and maximum wow factor.
Serving: 4 | Pre Time: 10 minutes | Cooking Time: 25 minutes
Ingredients
– 1.5 lbs fresh carrots, peeled and cut into 3-inch batons
– 2 tbsp extra-virgin olive oil
– 1 tsp smoked paprika
– 1/2 tsp cayenne pepper
– 1/2 tsp fine sea salt
– 1/4 tsp freshly cracked black pepper
– 1/3 cup well-stirred tahini paste
– 2 tbsp freshly squeezed lemon juice
– 1 small garlic clove, finely minced
– 3-4 tbsp ice water
– 2 tbsp chopped fresh parsley leaves
Instructions
1. Preheat your oven to 425°F and position a rack in the center.
2. In a large mixing bowl, toss the carrot batons with extra-virgin olive oil until evenly coated.
3. Sprinkle the smoked paprika, cayenne pepper, fine sea salt, and freshly cracked black pepper over the carrots, then toss vigorously to distribute the spices uniformly.
4. Arrange the seasoned carrots in a single layer on a rimmed baking sheet, ensuring they are not touching to promote even caramelization.
5. Roast the carrots at 425°F for 20-25 minutes, flipping them once halfway through, until they are tender and the edges are deeply caramelized and slightly charred.
6. While the carrots roast, prepare the tahini drizzle: in a medium bowl, whisk together the tahini paste and freshly squeezed lemon juice until smooth and creamy.
7. Whisk in the finely minced garlic clove until fully incorporated.
8. Gradually add ice water, one tablespoon at a time, whisking continuously, until the sauce reaches a pourable, drizzle-consistency (tip: the cold water prevents the tahini from seizing and creates a smoother emulsion).
9. Transfer the roasted carrots to a serving platter and drizzle generously with the prepared tahini sauce.
10. Garnish immediately with chopped fresh parsley leaves for a pop of color and freshness (tip: adding the parsley just before serving preserves its vibrant hue and delicate flavor).
Here’s the delicious payoff: you get tender, caramelized carrots with a smoky kick, perfectly balanced by the rich, nutty tahini drizzle that clings to every nook. Serve them warm alongside grilled meats for a hearty meal, or pile them onto a grain bowl with a fried egg for an instant upgrade—they’re so good, you might just forget other vegetables exist.
Baked Beet Chips with Sea Salt
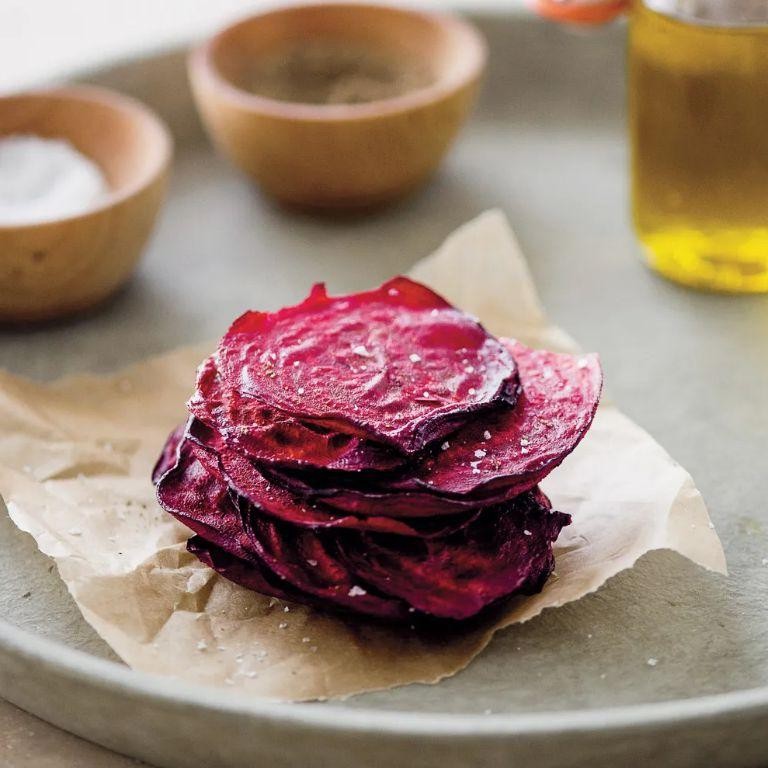
Brace yourselves, snack enthusiasts—these vibrant, crispy beet chips are about to become your new pantry obsession, offering a guilt-free crunch that’s as delightful to munch as it is dazzling to behold. With just a handful of wholesome ingredients and a bit of oven magic, you’ll transform humble beets into a snack that’s both nutritious and irresistibly tasty, perfect for satisfying those midday cravings without any of the usual junk-food guilt. So, roll up your sleeves and let’s bake up some colorful, crunchy goodness that’ll have everyone asking for seconds (and maybe even thirds!).
Serving: 4 | Pre Time: 15 minutes | Cooking Time: 25 minutes
Ingredients
– 2 large red beets, peeled and thinly sliced to 1/16-inch thickness
– 1 tablespoon extra-virgin olive oil
– 1 teaspoon fine sea salt
– 1/2 teaspoon freshly ground black pepper
Instructions
1. Preheat the oven to 375°F and line two large baking sheets with parchment paper.
2. Using a mandoline slicer, slice the peeled beets uniformly to 1/16-inch thickness for even baking; pat the slices dry with paper towels to remove excess moisture.
3. In a large mixing bowl, toss the beet slices with 1 tablespoon of extra-virgin olive oil until evenly coated.
4. Arrange the beet slices in a single layer on the prepared baking sheets, ensuring they do not overlap.
5. Sprinkle the slices evenly with 1 teaspoon of fine sea salt and 1/2 teaspoon of freshly ground black pepper.
6. Bake in the preheated oven for 20–25 minutes, rotating the sheets halfway through, until the edges curl and the chips are crisp.
7. Remove the baking sheets from the oven and let the chips cool completely on the sheets for 10 minutes to crisp further.
8. Transfer the cooled chips to an airtight container for storage, if not serving immediately.
Yielding a satisfyingly crisp texture with a subtle earthy sweetness, these baked beet chips are a vibrant snack that pairs wonderfully with creamy dips or crumbled over salads for an extra crunch. For a creative twist, serve them alongside a tangy yogurt-based dip or sprinkle with a pinch of smoked paprika before baking to add a smoky depth that elevates their natural flavor profile.
Broccoli and Cauliflower Stir-Fry with Ginger
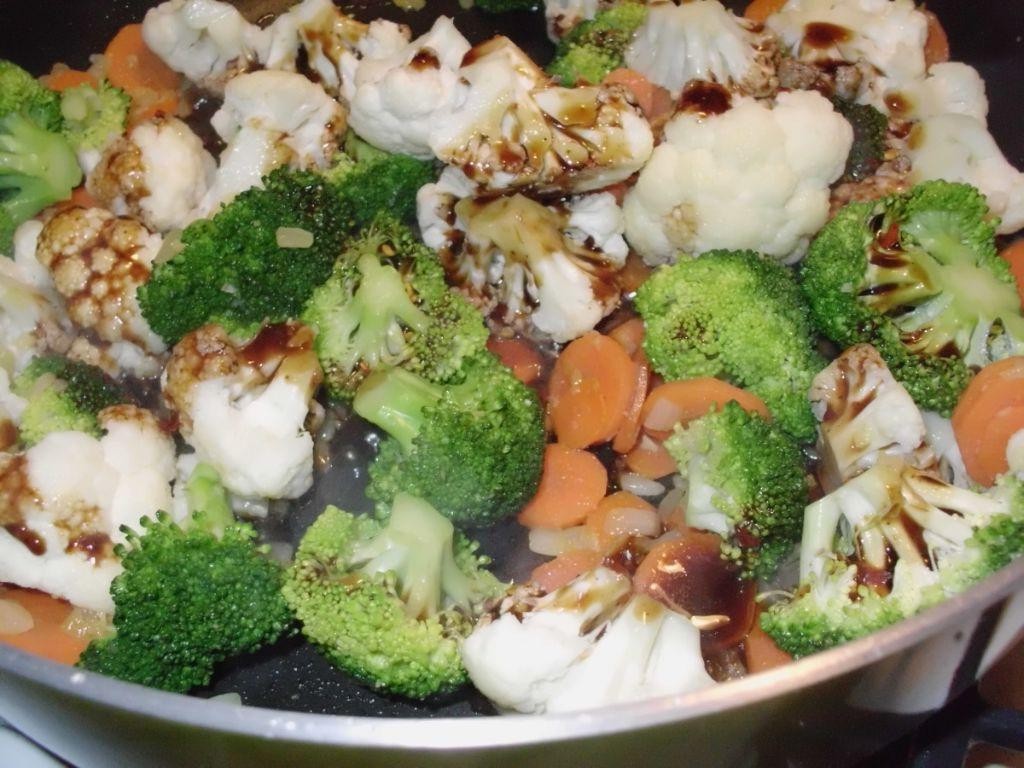
Unbelievably, we’ve cracked the code to making cruciferous veggies the star of your dinner table—no boring steamed florets allowed! This Broccoli and Cauliflower Stir-Fry with Ginger is a vibrant, flavor-packed escape from the ordinary, ready to rescue your weeknight routine with a sizzle and a smile. It’s the kind of dish that makes you wonder why you ever settled for less.
Serving: 4 | Pre Time: 15 minutes | Cooking Time: 10 minutes
Ingredients
– 1 large head of broccoli, cut into bite-sized florets
– 1 large head of cauliflower, cut into bite-sized florets
– 3 tablespoons avocado oil, divided
– 1 tablespoon freshly grated ginger root
– 3 cloves garlic, minced
– ¼ cup low-sodium soy sauce
– 1 tablespoon rice vinegar
– 1 teaspoon toasted sesame oil
– 2 teaspoons cornstarch
– ¼ cup cold water
– 2 green onions, thinly sliced
– 1 tablespoon toasted sesame seeds
Instructions
1. In a small bowl, whisk together the soy sauce, rice vinegar, toasted sesame oil, cornstarch, and cold water until fully combined and lump-free to create the sauce.
2. Heat a large wok or skillet over high heat for 1 minute until a drop of water sizzles and evaporates immediately.
3. Add 2 tablespoons of avocado oil to the hot wok, swirling to coat the surface evenly.
4. Add the broccoli and cauliflower florets to the wok in a single layer, stirring constantly for 4–5 minutes until the edges are lightly charred and the vegetables are crisp-tender.
5. Push the vegetables to the sides of the wok, creating a well in the center.
6. Pour the remaining 1 tablespoon of avocado oil into the center well and add the grated ginger and minced garlic, stirring for 30 seconds until fragrant but not browned.
7. Pour the prepared sauce into the wok, stirring continuously for 1–2 minutes until the sauce thickens to a glossy, coating consistency.
8. Toss the vegetables thoroughly with the sauce to ensure even coating, cooking for an additional 1 minute.
9. Remove the wok from the heat and immediately garnish with the sliced green onions and toasted sesame seeds.
Brace yourself for a texture that’s perfectly crisp-tender, with each floret clinging to a glossy, umami-rich sauce. The ginger adds a bright, warming kick that cuts through the richness, making it ideal for piling over a bed of jasmine rice or stuffing into warm tortillas for an unexpected twist.
Stuffed Bell Peppers with Quinoa and Black Beans

Ever had a vegetable so eager to be the main event that it volunteers as a serving dish? Enter the bell pepper, nature’s most vibrant, edible bowl, ready to be stuffed with a hearty, wholesome filling that’s as satisfying as it is colorful. This quinoa and black bean combo is the weeknight hero you didn’t know you needed—simple, nutritious, and packed with flavor that’ll make your taste buds do a happy dance.
Serving: 4 | Pre Time: 20 minutes | Cooking Time: 35 minutes
Ingredients
– 4 large bell peppers (any color), tops removed and seeds discarded
– 1 cup uncooked quinoa, rinsed
– 2 cups low-sodium vegetable broth
– 1 (15-ounce) can black beans, drained and rinsed
– 1 cup fire-roasted diced tomatoes, with juices
– 1 medium yellow onion, finely diced
– 3 cloves garlic, minced
– 2 tablespoons extra-virgin olive oil
– 1 teaspoon ground cumin
– 1 teaspoon smoked paprika
– ½ teaspoon kosher salt
– ½ cup shredded Monterey Jack cheese
– 2 tablespoons fresh cilantro, chopped
Instructions
1. Preheat your oven to 375°F (190°C) and lightly grease a 9×13-inch baking dish with olive oil.
2. In a medium saucepan, combine the rinsed quinoa and vegetable broth; bring to a boil over high heat, then reduce to a simmer, cover, and cook for 15 minutes until the liquid is absorbed and the quinoa is fluffy.
3. While the quinoa cooks, heat the extra-virgin olive oil in a large skillet over medium heat; add the finely diced yellow onion and sauté for 5-7 minutes until translucent and fragrant.
4. Add the minced garlic to the skillet and cook for 1 minute, stirring constantly to prevent burning.
5. Stir in the ground cumin, smoked paprika, and kosher salt, toasting the spices for 30 seconds until aromatic.
6. Fold in the drained black beans and fire-roasted diced tomatoes with their juices; simmer the mixture for 5 minutes to meld the flavors, then remove from heat.
7. In a large mixing bowl, combine the cooked quinoa with the skillet mixture, half of the shredded Monterey Jack cheese, and the chopped fresh cilantro, stirring until evenly incorporated.
8. Spoon the quinoa filling generously into the hollowed bell peppers, packing it down lightly, and place them upright in the prepared baking dish.
9. Sprinkle the remaining Monterey Jack cheese evenly over the tops of the stuffed peppers.
10. Cover the baking dish with aluminum foil and bake at 375°F for 25 minutes, then remove the foil and bake for an additional 10 minutes until the peppers are tender and the cheese is golden and bubbly.
11. Let the stuffed peppers rest for 5 minutes before serving to allow the filling to set.
Outrageously satisfying, these peppers offer a delightful contrast: the tender, slightly sweet pepper shell gives way to a fluffy, savory filling with a subtle smokiness from the paprika. Serve them atop a bed of crisp greens for a textural twist, or drizzle with a creamy avocado crema to elevate the dish into a true centerpiece.
Greek Yogurt Coleslaw with Fresh Herbs
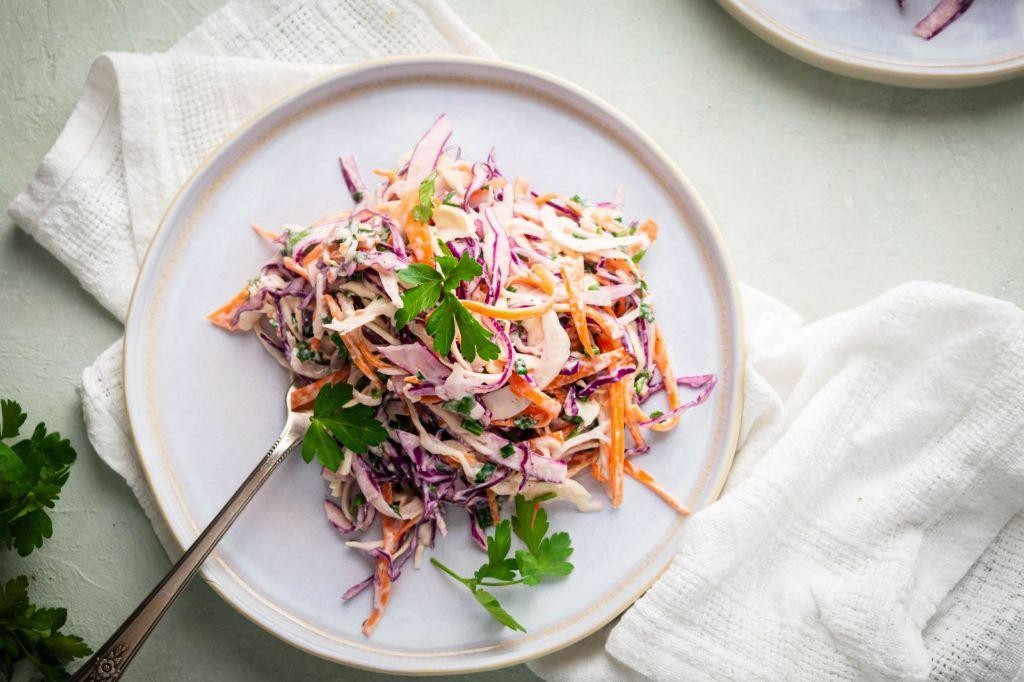
Yikes, is that coleslaw looking sadder than a wilted salad at a summer picnic? Fear not, because this Greek Yogurt Coleslaw with Fresh Herbs is about to become the star of your table—it’s crisp, herby, and so refreshing you’ll forget all about those mayo-heavy imposters. Let’s whip up some magic that’ll have your taste buds doing a happy dance!
Serving: 6 | Pre Time: 20 minutes | Cooking Time: 0 minutes
Ingredients
– 1 medium head of green cabbage, finely shredded
– 2 large carrots, julienned
– 1/2 cup full-fat Greek yogurt
– 1/4 cup extra-virgin olive oil
– 2 tbsp freshly squeezed lemon juice
– 1 tbsp Dijon mustard
– 1/2 tsp kosher salt
– 1/4 tsp freshly ground black pepper
– 1/4 cup fresh dill, finely chopped
– 2 tbsp fresh mint, finely chopped
– 2 tbsp fresh parsley, finely chopped
Instructions
1. Place the finely shredded green cabbage and julienned carrots in a large mixing bowl.
2. In a separate medium bowl, whisk together the full-fat Greek yogurt, extra-virgin olive oil, freshly squeezed lemon juice, and Dijon mustard until fully emulsified and smooth.
3. Season the dressing with kosher salt and freshly ground black pepper, whisking to incorporate evenly.
4. Add the finely chopped fresh dill, mint, and parsley to the dressing, stirring gently to distribute the herbs without bruising them.
5. Pour the herbed dressing over the cabbage and carrot mixture in the large bowl.
6. Using clean hands or tongs, toss the coleslaw thoroughly for about 2 minutes, ensuring every strand is lightly coated with the dressing.
7. Cover the bowl with plastic wrap and refrigerate the coleslaw for at least 30 minutes to allow the flavors to meld and the vegetables to slightly soften.
8. After chilling, give the coleslaw one final gentle toss before serving to redistribute any settled dressing.
Oh, the payoff is pure delight—this coleslaw boasts a creamy yet light texture from the Greek yogurt, with a bright tang from the lemon and a fragrant herbaceous kick. Serve it alongside grilled meats for a cool contrast, or pile it onto a pulled pork sandwich to add a refreshing crunch that cuts through the richness. Trust me, it’s the side dish that’ll steal the spotlight at any gathering!
Roasted Butternut Squash with Rosemary
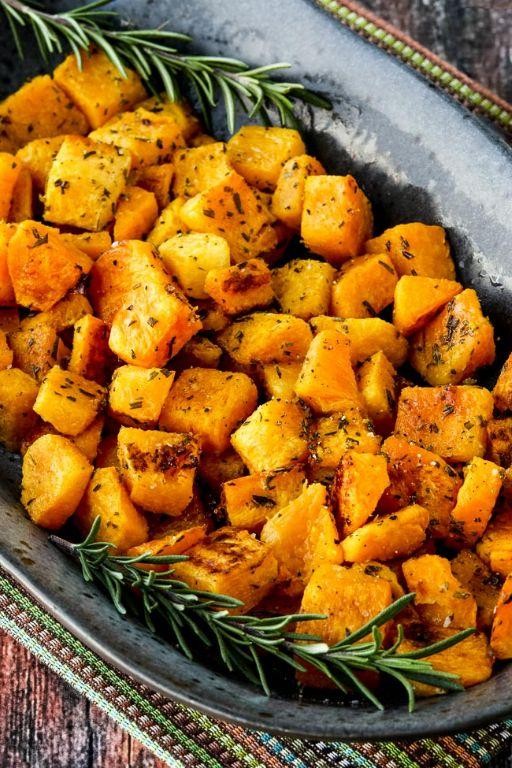
Hark! The holiday season is upon us, and your oven is probably feeling a bit left out of the festive fun. Let’s fix that with a dish that’s as easy on the eyes as it is on your schedule—a golden, caramelized masterpiece that practically sings with autumnal joy.
Serving: 4 | Pre Time: 15 minutes | Cooking Time: 45 minutes
Ingredients
– 1 large butternut squash (about 3 lbs), peeled, seeded, and cut into 1-inch cubes
– 3 tablespoons extra-virgin olive oil
– 1 tablespoon fresh rosemary leaves, finely chopped
– 2 teaspoons pure maple syrup
– 1 teaspoon kosher salt
– 1/2 teaspoon freshly cracked black pepper
– 1/4 teaspoon freshly grated nutmeg
Instructions
1. Preheat your oven to 425°F (218°C) and position a rack in the center of the oven.
2. In a large mixing bowl, combine the cubed butternut squash, extra-virgin olive oil, finely chopped fresh rosemary leaves, pure maple syrup, kosher salt, freshly cracked black pepper, and freshly grated nutmeg.
3. Toss the ingredients thoroughly until every cube of squash is evenly and generously coated with the oil and seasoning mixture.
4. Arrange the seasoned squash cubes in a single, uncrowded layer on a large, rimmed baking sheet lined with parchment paper. Tip: Avoid overcrowding to ensure proper caramelization and even roasting.
5. Place the baking sheet in the preheated oven and roast for 25 minutes.
6. After 25 minutes, carefully remove the baking sheet from the oven. Using a spatula, flip each piece of squash to expose a new surface to the heat.
7. Return the baking sheet to the oven and continue roasting for an additional 20 to 25 minutes. Tip: Roast until the squash is fork-tender and the edges are deeply caramelized and slightly crisp.
8. Remove the baking sheet from the oven and let the roasted squash rest for 5 minutes on the sheet. Tip: This brief rest allows the flavors to settle and the squash to achieve its ideal creamy-yet-firm texture.
9. Transfer the roasted butternut squash to a serving dish.
Unbelievably creamy interiors give way to delightfully crisp, caramelized edges in every bite, with the aromatic rosemary and hint of maple creating a symphony of sweet and savory notes. Try serving it over a bed of creamy polenta for a comforting meal, or toss it into a hearty grain bowl for a vibrant, nutrient-packed lunch that’s anything but boring.
Edamame and Cucumber Salad with Sesame Dressing

Dazzlingly simple yet sophisticated enough to impress your most discerning guests, this edamame and cucumber salad is the refreshing hero your holiday table desperately needs. Forget those heavy, sleep-inducing sides—this vibrant bowl brings a crisp, playful energy that’ll have everyone reaching for seconds (and maybe thirds).
Serving: 4 | Pre Time: 15 minutes | Cooking Time: 5 minutes
Ingredients
– 12 ounces frozen shelled edamame
– 1 English cucumber, thinly sliced into half-moons
– 2 tablespoons toasted sesame oil
– 1 tablespoon rice vinegar
– 1 teaspoon freshly grated ginger root
– 1 teaspoon honey
– ½ teaspoon kosher salt
– ¼ teaspoon freshly ground black pepper
– 2 tablespoons toasted sesame seeds
– ¼ cup thinly sliced scallions
Instructions
1. Bring a medium saucepan of salted water to a rolling boil over high heat.
2. Add the frozen shelled edamame to the boiling water and cook for 4 minutes, until tender but still bright green.
3. Immediately drain the edamame in a colander and rinse under cold running water for 1 minute to halt the cooking process—this preserves their vibrant color and crisp texture.
4. Pat the cooled edamame completely dry with a clean kitchen towel to prevent the dressing from diluting.
5. In a small mixing bowl, whisk together the toasted sesame oil, rice vinegar, freshly grated ginger root, honey, kosher salt, and freshly ground black pepper until fully emulsified.
6. Combine the dried edamame, thinly sliced English cucumber half-moons, and thinly sliced scallions in a large serving bowl.
7. Pour the prepared sesame dressing over the vegetable mixture and toss gently with a silicone spatula until evenly coated.
8. Sprinkle the toasted sesame seeds over the salad and toss once more to distribute.
9. Let the salad rest at room temperature for 10 minutes before serving to allow the flavors to meld.
10. Transfer the salad to a chilled serving platter for optimal freshness.
Outrageously crisp and bursting with nutty, tangy flavors, this salad offers a delightful textural contrast between the tender edamame and crunchy cucumber. Serve it alongside grilled salmon for a light dinner, or pack it for a picnic where its bright, refreshing qualities truly shine.
Baked Parmesan Zucchini Fries

Sick of soggy fries? Let’s turn that zucchini into a crispy, cheesy, oven-baked marvel that’ll have you forgetting the drive-thru ever existed. These Baked Parmesan Zucchini Fries are the golden, guilt-free crunch you’ve been craving, ready to dunk, devour, and declare your new favorite snack.
Serving: 4 | Pre Time: 15 minutes | Cooking Time: 20 minutes
Ingredients
– 2 medium zucchini, cut into 3-inch by ½-inch fry-shaped batons
– ½ cup all-purpose flour
– 2 large pasture-raised eggs, lightly beaten
– 1 cup panko breadcrumbs
– ½ cup finely grated Parmigiano-Reggiano cheese
– 1 teaspoon garlic powder
– ½ teaspoon smoked paprika
– ½ teaspoon fine sea salt
– ¼ teaspoon freshly cracked black pepper
– 2 tablespoons extra-virgin olive oil
– ½ cup marinara sauce, for serving
Instructions
1. Preheat your oven to 425°F (218°C) and line a large, rimmed baking sheet with parchment paper.
2. Pat the zucchini batons completely dry with paper towels to ensure maximum crispiness.
3. Place the all-purpose flour in a shallow dish.
4. In a second shallow dish, add the lightly beaten pasture-raised eggs.
5. In a third shallow dish, combine the panko breadcrumbs, finely grated Parmigiano-Reggiano, garlic powder, smoked paprika, fine sea salt, and freshly cracked black pepper.
6. Dredge each zucchini baton first in the flour, shaking off any excess.
7. Next, dip the floured baton into the beaten eggs, allowing any excess to drip back into the dish.
8. Finally, press the baton firmly into the panko-Parmesan mixture, coating it evenly on all sides.
9. Arrange the coated batons in a single layer on the prepared baking sheet, ensuring they do not touch.
10. Drizzle the extra-virgin olive oil evenly over the tops of the coated fries.
11. Bake for 18 to 22 minutes, flipping the fries halfway through, until they are deeply golden brown and crispy.
12. Serve immediately with the marinara sauce for dipping.
Outrageously crunchy on the outside with a tender, savory center, these fries offer a perfect textural contrast. The nutty Parmigiano-Reggiano and smoky paprika create a deeply flavorful crust that pairs brilliantly with the bright marinara. For a fun twist, try serving them stacked like a savory Jenga tower or alongside a creamy garlic aioli for dipping.
Spinach and Mushroom Sauté with Garlic
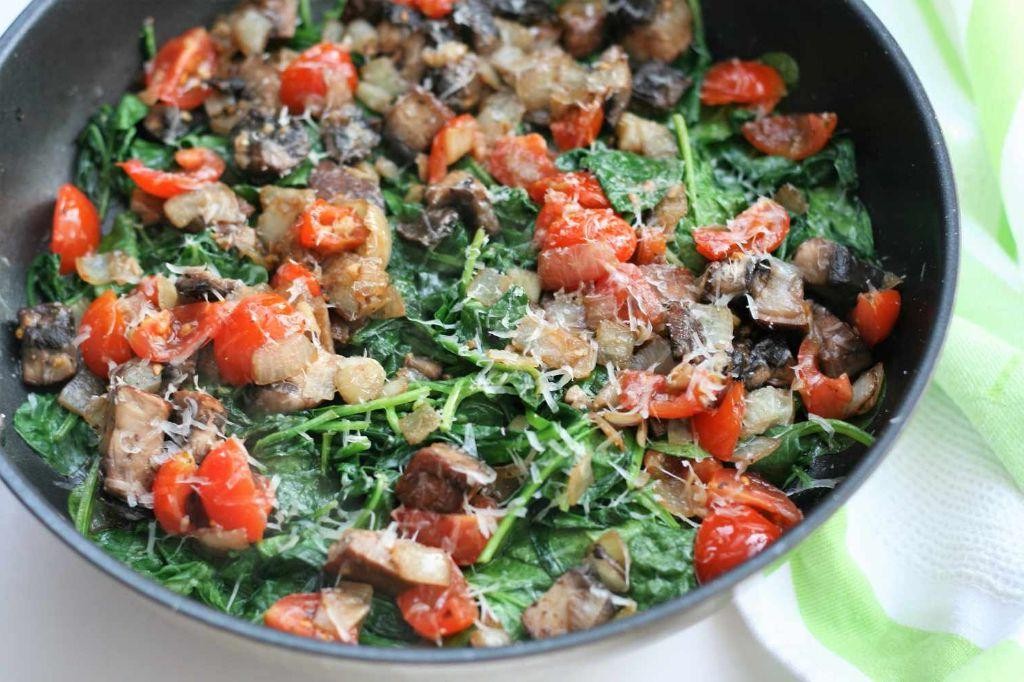
Ever find yourself staring at the fridge, wondering how to turn those forgotten mushrooms and slightly-wilted spinach into something spectacular? Enter this garlicky sauté—the weeknight hero that transforms humble ingredients into a vibrant, flavor-packed side dish in minutes. It’s the culinary equivalent of a magic trick, minus the top hat.
Serving: 4 | Pre Time: 10 minutes | Cooking Time: 15 minutes
Ingredients
– 2 tablespoons clarified butter
– 4 cloves garlic, minced
– 8 ounces cremini mushrooms, thinly sliced
– 10 ounces fresh spinach leaves, stems removed
– ¼ cup dry white wine
– ½ teaspoon fine sea salt
– ¼ teaspoon freshly cracked black pepper
– 1 tablespoon fresh lemon juice
Instructions
1. Heat the clarified butter in a large skillet over medium-high heat until it shimmers, about 1 minute.
2. Add the minced garlic and sauté, stirring constantly, until fragrant and just beginning to turn golden, about 30 seconds—watch closely to prevent burning.
3. Incorporate the thinly sliced cremini mushrooms in a single layer, cooking undisturbed for 2 minutes to develop a golden-brown sear.
4. Stir the mushrooms and continue cooking until they release their moisture and become tender, about 4–5 minutes.
5. Deglaze the skillet with the dry white wine, scraping up any browned bits from the bottom with a wooden spoon to build depth of flavor.
6. Add the fresh spinach leaves in batches, wilting each addition before adding more, about 3 minutes total.
7. Season with fine sea salt and freshly cracked black pepper, tossing to combine evenly.
8. Remove from heat and drizzle with fresh lemon juice, gently folding it in to brighten the dish.
Vibrant and savory, this sauté offers tender mushrooms with a meaty bite against the delicate, wilted spinach, all wrapped in a pungent garlic aroma. Serve it over creamy polenta for a comforting meal, or alongside a seared steak to let those garlicky juices mingle—leftovers (if any!) make a stellar omelette filling the next morning.
Lentil and Roasted Vegetable Medley
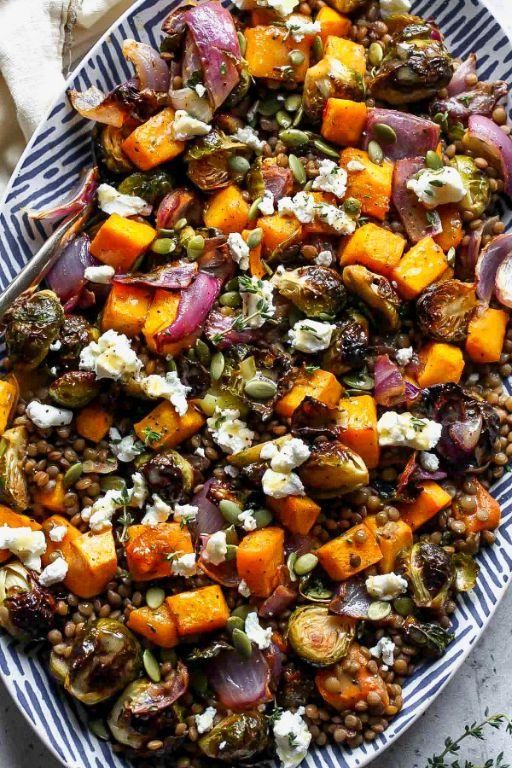
Gather ’round, hungry friends, because we’re about to transform humble pantry staples into a symphony of flavor that will make your taste buds do a happy dance. This dish is the ultimate cozy hug in a bowl, perfect for when you want something hearty, healthy, and ridiculously satisfying without spending hours in the kitchen. Let’s get roasting!
Serving: 4 | Pre Time: 15 minutes | Cooking Time: 45 minutes
Ingredients
– 1 cup dried green lentils, rinsed and picked over
– 2 cups low-sodium vegetable broth
– 1 large sweet potato, peeled and diced into 1/2-inch cubes
– 1 medium red bell pepper, seeded and cut into 1-inch strips
– 1 medium yellow onion, cut into 1-inch wedges
– 3 tablespoons extra-virgin olive oil, divided
– 1 tablespoon fresh thyme leaves
– 2 teaspoons smoked paprika
– 1 teaspoon fine sea salt
– 1/2 teaspoon freshly cracked black pepper
– 2 tablespoons freshly squeezed lemon juice
– 1/4 cup finely chopped fresh flat-leaf parsley
Instructions
1. Preheat your oven to 425°F (218°C) and line a large, rimmed baking sheet with parchment paper.
2. In a large bowl, combine the diced sweet potato, bell pepper strips, and onion wedges.
3. Drizzle the vegetables with 2 tablespoons of the extra-virgin olive oil, ensuring all pieces are lightly coated.
4. Sprinkle the thyme leaves, smoked paprika, sea salt, and black pepper over the vegetables, then toss vigorously until evenly seasoned. Tip: For maximum flavor, let the seasoned vegetables sit for 5 minutes before roasting to allow the spices to bloom.
5. Spread the vegetables in a single, uncrowded layer on the prepared baking sheet.
6. Roast the vegetables on the middle oven rack for 25-30 minutes, or until the sweet potato cubes are fork-tender and the pepper and onion edges are caramelized and slightly charred.
7. While the vegetables roast, combine the rinsed lentils and vegetable broth in a medium saucepan.
8. Bring the mixture to a boil over high heat, then immediately reduce the heat to maintain a gentle simmer.
9. Cover the saucepan and simmer the lentils for 20-25 minutes, or until they are tender but still hold their shape. Avoid stirring to prevent them from becoming mushy. Tip: Check for doneness at 20 minutes; perfectly cooked lentils should be soft with a slight bite, not disintegrating.
10. Once cooked, drain any excess liquid from the lentils and transfer them to a large serving bowl.
11. When the roasted vegetables are finished, immediately add them to the bowl with the warm lentils.
12. Drizzle the remaining 1 tablespoon of extra-virgin olive oil and the freshly squeezed lemon juice over the lentil and vegetable mixture.
13. Add the chopped fresh parsley and gently fold all ingredients together until just combined. Tip: Folding, rather than stirring, helps maintain the integrity of the roasted vegetables and prevents the lentils from breaking down.
14. Taste and adjust seasoning with an additional pinch of salt or pepper if desired.
This medley achieves a wonderful textural contrast between the creamy, earthy lentils and the sweet, caramelized vegetables with a slight char. The smoked paprika and fresh lemon juice create a bright, deeply savory flavor profile that is both comforting and complex. For a creative twist, serve it warm over a bed of peppery arugula or stuff it into warmed pita pockets with a dollop of tangy Greek yogurt.
Herbed Brown Rice Pilaf with Toasted Almonds
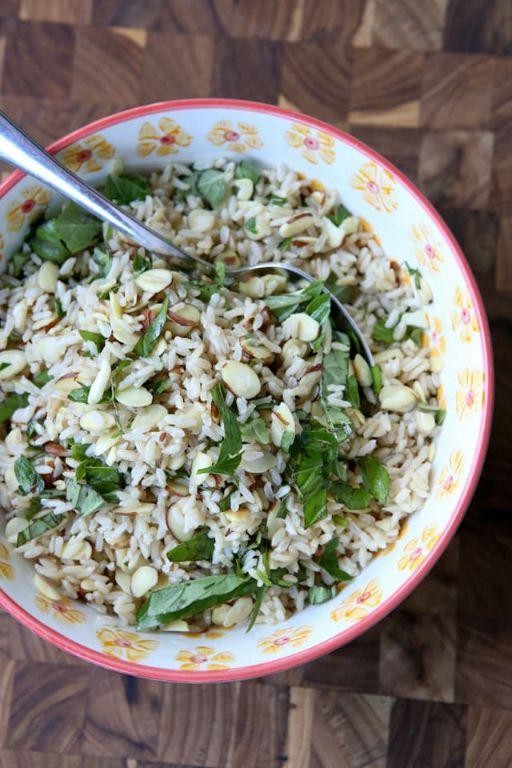
Venture beyond boring side dishes with this herbed brown rice pilaf that’s about to become your go-to for everything from weeknight dinners to holiday feasts—it’s so flavorful, you might just forget there’s a main course!
Serving: 6 | Pre Time: 10 minutes | Cooking Time: 45 minutes
Ingredients
– 2 cups long-grain brown rice, rinsed and drained
– 4 cups low-sodium chicken broth
– 3 tablespoons clarified butter
– 1 large yellow onion, finely diced
– 3 cloves garlic, minced
– 1 teaspoon fine sea salt
– ½ teaspoon freshly ground black pepper
– ¼ cup fresh flat-leaf parsley, finely chopped
– 2 tablespoons fresh thyme leaves
– 1 tablespoon fresh rosemary, minced
– ⅔ cup slivered almonds
Instructions
1. Preheat a large, heavy-bottomed pot or Dutch oven over medium heat for 2 minutes.
2. Add the clarified butter to the pot and swirl to coat the bottom evenly.
3. Sauté the finely diced yellow onion for 5–7 minutes, stirring occasionally, until translucent and lightly golden.
4. Stir in the minced garlic and cook for 1 minute, just until fragrant.
5. Add the rinsed brown rice to the pot and toast for 3 minutes, stirring constantly, to enhance its nutty flavor.
6. Pour in the low-sodium chicken broth, ensuring it covers the rice completely.
7. Season with fine sea salt and freshly ground black pepper, stirring once to combine.
8. Bring the mixture to a boil over high heat, then immediately reduce to a low simmer.
9. Cover the pot tightly with a lid and cook for 40 minutes, without stirring, until the liquid is fully absorbed and the rice is tender.
10. While the rice cooks, toast the slivered almonds in a dry skillet over medium-low heat for 4–5 minutes, shaking the pan frequently, until golden and aromatic.
11. Remove the pot from heat and let it rest, covered, for 10 minutes to allow the rice to steam and fluff up.
12. Gently fold in the chopped flat-leaf parsley, thyme leaves, and minced rosemary using a fork to avoid mashing the grains.
13. Stir in the toasted almonds just before serving to maintain their crunch.
Uncover a pilaf with a delightfully chewy texture from the brown rice, balanced by the buttery richness of toasted almonds and the bright, earthy notes of fresh herbs. Serve it alongside roasted chicken or as a base for grilled vegetables, and watch it steal the spotlight with every savory, aromatic bite.
Grilled Eggplant with Mint and Feta
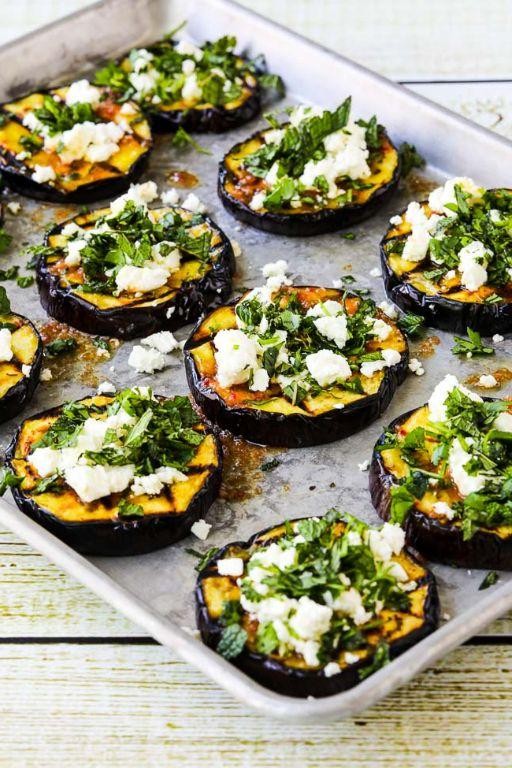
Gather ’round, grill enthusiasts and veggie skeptics alike, because we’re about to transform that humble purple orb into a smoky, creamy, herby masterpiece that’ll make you forget meat ever existed. This isn’t your average soggy side dish; it’s a textural triumph of charred edges, melt-in-your-mouth flesh, and briny, bright pops of flavor that screams summer sophistication with zero fuss.
Serving: 4 | Pre Time: 15 minutes | Cooking Time: 10 minutes
Ingredients
- 2 large globe eggplants (about 2 lbs total), sliced into 1/2-inch thick rounds
- 3 tablespoons extra-virgin olive oil, divided
- 1 1/2 teaspoons kosher salt
- 1/2 teaspoon freshly cracked black pepper
- 4 ounces high-quality feta cheese, crumbled
- 1/4 cup fresh mint leaves, finely chiffonaded
- 1 tablespoon fresh lemon juice
- 1 small garlic clove, finely minced
Instructions
- Preheat a gas grill or grill pan to medium-high heat (approximately 400°F).
- Arrange the eggplant rounds in a single layer on a large baking sheet.
- Brush both sides of each eggplant round evenly with 2 tablespoons of the extra-virgin olive oil.
- Season both sides of the oiled eggplant rounds uniformly with the kosher salt and freshly cracked black pepper.
- Place the seasoned eggplant rounds directly onto the preheated grill grates. Tip: Ensure the grates are clean and lightly oiled to prevent sticking.
- Grill for 4-5 minutes, undisturbed, until deep grill marks form and the underside is tender.
- Using tongs, carefully flip each eggplant round.
- Grill for an additional 4-5 minutes until the second side is equally charred and the eggplant is completely tender when pierced with a fork.
- Transfer the grilled eggplant rounds to a serving platter, arranging them in a single layer.
- In a small bowl, whisk together the remaining 1 tablespoon of extra-virgin olive oil, the fresh lemon juice, and the finely minced garlic clove to create a dressing.
- Drizzle the garlic-lemon dressing evenly over the warm grilled eggplant.
- Immediately scatter the crumbled feta cheese evenly over the dressed eggplant. Tip: Adding cheese while the eggplant is warm helps it soften slightly.
- Garnish the entire platter with the finely chiffonaded fresh mint leaves. Tip: Chiffonading (rolling and thinly slicing) the mint prevents bruising and releases maximum aroma.
This dish is a masterclass in contrasts. The smoky, silky eggplant provides a lush base for the salty, crumbly feta and the bright, almost peppery kick of fresh mint, all tied together with the sharp tang of lemon. Try serving it piled high on grilled sourdough for an open-faced sandwich, or alongside simply grilled lamb chops for a show-stopping Mediterranean feast.
Summary
Lovely, isn’t it? This collection proves healthy sides can be delicious and easy. I hope you find a new favorite to brighten your meals. Please, give a recipe a try, leave a comment with what you loved, and if you found this helpful, share it on Pinterest to spread the inspiration. Happy cooking!