
Snack attacks can derail even the best intentions on hectic days, but you don’t have to choose between convenience and nutrition. We’ve gathered 20 delicious, healthy snack recipes that are perfect for busy schedules—think quick bites that satisfy cravings and fuel your day. Get ready to discover simple, tasty solutions that will make snack time both easy and nourishing. Let’s dive into these lifesaving ideas!
Avocado and Chickpea Toast
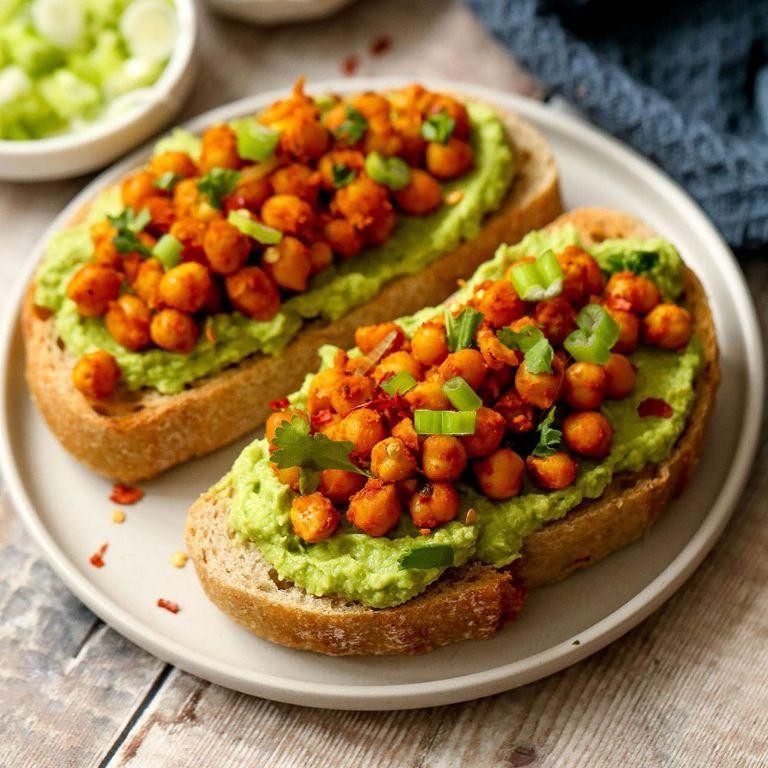
Dusk settles softly outside my window, and in this quiet kitchen moment, I find myself reaching for simple comforts—a humble toast transformed into something nourishing and bright. This avocado and chickpea mash, spiked with lemon and garlic, feels like a gentle embrace after a long day, a reminder that the most satisfying meals often come from just a few thoughtful ingredients.
Serving: 2 | Pre Time: 10 minutes | Cooking Time: 5 minutes
Ingredients
– 4 slices sourdough bread
– 1 ripe avocado
– 1/2 cup canned chickpeas, rinsed and drained
– 1 tablespoon fresh lemon juice
– 1/2 teaspoon garlic powder
– 1/4 teaspoon salt
– 1/8 teaspoon black pepper
– 1 tablespoon olive oil
– 2 tablespoons crumbled feta cheese
– 1 tablespoon chopped fresh parsley
Instructions
1. Preheat your oven to 375°F (190°C).
2. Place the 4 slices of sourdough bread on a baking sheet in a single layer.
3. Toast the bread in the preheated oven for 5 minutes, or until the edges are golden and crisp.
4. While the bread toasts, halve the ripe avocado and remove the pit.
5. Scoop the avocado flesh into a medium bowl and mash it smoothly with a fork.
6. Add the 1/2 cup of rinsed chickpeas to the bowl with the avocado.
7. Gently mash the chickpeas into the avocado, leaving some texture for a rustic feel.
8. Stir in the 1 tablespoon of fresh lemon juice to prevent browning and add brightness.
9. Mix in the 1/2 teaspoon of garlic powder, 1/4 teaspoon of salt, and 1/8 teaspoon of black pepper until evenly combined.
10. Remove the toasted bread from the oven and let it cool slightly on a wire rack for 1 minute.
11. Drizzle the 1 tablespoon of olive oil evenly over the toasted bread slices.
12. Divide the avocado-chickpea mixture evenly among the 4 bread slices, spreading it to the edges.
13. Sprinkle the 2 tablespoons of crumbled feta cheese over the top of each toast.
14. Garnish with the 1 tablespoon of chopped fresh parsley for a fresh finish.
15. Serve immediately while the bread is still warm and crisp.
Zesty lemon cuts through the creamy avocado, while the chickpeas add a satisfying, hearty bite that contrasts with the crisp toast. For a creative twist, try drizzling with a touch of hot honey or serving alongside a simple arugula salad—it’s a versatile base that welcomes little improvisations, making each bite uniquely yours.
Greek Yogurt with Honey and Berries
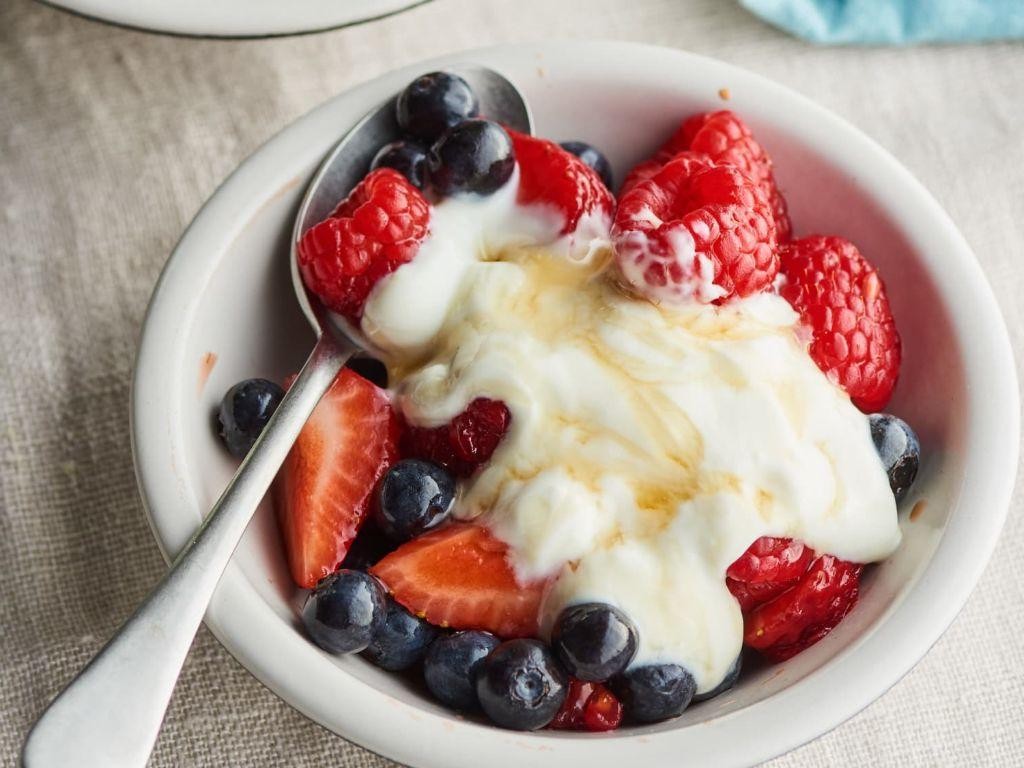
Zestfully simple yet profoundly satisfying, this Greek yogurt bowl feels like a quiet morning ritual. Zen-like in its preparation, it transforms humble ingredients into a creamy, sweet-tart delight that nourishes both body and spirit. Sometimes the most comforting meals are the ones that require little more than assembly and a moment of appreciation.
Serving: 1 | Pre Time: 5 minutes | Cooking Time: 0 minutes
Ingredients
– 1 cup plain Greek yogurt
– 2 tablespoons honey
– 1/2 cup mixed fresh berries (such as strawberries, blueberries, and raspberries)
– 1 tablespoon chopped walnuts
– 1 teaspoon chia seeds
Instructions
1. Place 1 cup of plain Greek yogurt into a medium-sized serving bowl, using the back of a spoon to create a smooth, even layer.
2. Drizzle 2 tablespoons of honey evenly over the surface of the yogurt in a slow, circular motion.
3. Rinse 1/2 cup of mixed fresh berries under cool running water for about 30 seconds, then pat them completely dry with a clean kitchen towel to prevent the yogurt from becoming watery.
4. Arrange the dried berries artfully on top of the honey-drizzled yogurt, distributing them evenly across the bowl.
5. Sprinkle 1 tablespoon of chopped walnuts over the berries, ensuring they are scattered for a consistent crunch in every bite.
6. Finish by sprinkling 1 teaspoon of chia seeds evenly over the entire bowl, which will add a subtle texture and nutritional boost without altering the flavor.
7. Serve immediately, as the berries are best enjoyed fresh and crisp against the creamy yogurt.
Silky yogurt melds with the floral sweetness of honey, while bursts of juicy berries and the earthy crunch of walnuts create a delightful contrast. Serve it in a clear glass to showcase the beautiful layers, or enjoy it straight from the bowl with a slow, mindful savoring—each spoonful is a gentle reminder of simplicity’s elegance.
Baked Sweet Potato Fries

Evenings like this, when the light fades softly through the kitchen window, call for something simple and grounding to prepare. Baked sweet potato fries offer that quiet comfort, transforming humble roots into crisp, caramel-edged wedges with minimal fuss. They’re a gentle reminder that the most satisfying meals often start with just a few whole ingredients.
Serving: 4 | Pre Time: 15 minutes | Cooking Time: 25 minutes
Ingredients
– 2 large sweet potatoes (about 1.5 lbs)
– 2 tbsp olive oil
– 1 tsp cornstarch
– 1/2 tsp smoked paprika
– 1/2 tsp garlic powder
– 1/4 tsp fine sea salt
– 1/4 tsp black pepper
Instructions
1. Preheat your oven to 425°F and line a large, rimmed baking sheet with parchment paper.
2. Scrub the sweet potatoes thoroughly under cool running water to remove any dirt, then pat them completely dry with a clean kitchen towel.
3. Trim off the ends of each sweet potato, then slice them lengthwise into 1/4-inch thick planks.
4. Stack a few planks and cut them lengthwise again into 1/4-inch wide fry-shaped batons, aiming for uniform thickness so they bake evenly.
5. Place the cut fries into a large, dry mixing bowl and sprinkle the cornstarch evenly over them.
6. Toss the fries in the bowl for about 30 seconds until the cornstarch forms a light, invisible coating on all surfaces, which will help them crisp.
7. Drizzle the olive oil over the fries, then add the smoked paprika, garlic powder, salt, and black pepper.
8. Use your hands to toss and massage the fries for a full minute, ensuring every piece is evenly coated with the oil and seasonings.
9. Arrange the fries in a single, uncrowded layer on the prepared baking sheet, making sure none are touching or overlapping.
10. Bake on the center rack for 15 minutes, then carefully remove the sheet and flip each fry using tongs for even browning.
11. Return the sheet to the oven and bake for another 8-12 minutes, watching closely until the fries are deeply golden at the edges and tender in the center.
12. Let the fries rest on the baking sheet for 5 minutes after baking; this allows them to firm up slightly and become perfectly crisp.
The fries emerge with a delicate, shatteringly crisp exterior that gives way to a creamy, sweet interior. Their natural sugars caramelize into subtle notes of molasses, beautifully balanced by the smoky paprika and garlic. For a delightful twist, try serving them alongside a cool, herby yogurt dip or scattered over a hearty grain bowl for added texture and warmth.
Homemade Trail Mix with Nuts and Seeds

A quiet afternoon in the kitchen often calls for something simple to make with your hands, something you can assemble slowly while the light fades outside. This homemade trail mix is just that—a gentle, mindful process of toasting nuts and seeds to bring out their deepest flavors, then combining them with a touch of sweetness for a snack that feels both nourishing and comforting.
Serving: 8 | Pre Time: 5 minutes | Cooking Time: 15 minutes
Ingredients
– 1 cup raw almonds
– 1 cup raw cashews
– 1/2 cup raw pepitas
– 1/2 cup raw sunflower seeds
– 1/4 cup pure maple syrup
– 1 tbsp coconut oil, melted
– 1 tsp ground cinnamon
– 1/4 tsp fine sea salt
– 1/2 cup dried cranberries
Instructions
1. Preheat your oven to 325°F and line a large, rimmed baking sheet with parchment paper.
2. In a large mixing bowl, combine the almonds, cashews, pepitas, and sunflower seeds.
3. In a small bowl, whisk together the maple syrup, melted coconut oil, cinnamon, and sea salt until fully blended.
4. Pour the maple syrup mixture over the nuts and seeds in the large bowl, and stir gently with a spatula until everything is evenly coated—a tip here is to stir slowly to avoid breaking the nuts.
5. Spread the coated mixture in a single, even layer on the prepared baking sheet.
6. Bake in the preheated oven for 12–15 minutes, stirring halfway through, until the nuts are fragrant and lightly golden; watch closely near the end to prevent burning, as nuts can toast quickly.
7. Remove the baking sheet from the oven and let the mixture cool completely on the sheet for about 30 minutes—it will crisp up as it cools, so don’t rush this step.
8. Once cooled, transfer the mixture to a clean bowl and gently fold in the dried cranberries.
9. Store the trail mix in an airtight container at room temperature for up to two weeks.
Just out of the oven, this trail mix offers a warm, toasty aroma with a satisfying crunch from the nuts and a subtle sweetness from the maple glaze. The cranberries add a chewy, tart contrast that brightens each handful, making it perfect for packing into small jars for hikes or scattering over morning yogurt for a cozy breakfast treat.
Apple Slices with Almond Butter

Maybe it’s the quiet hum of the afternoon, or the way the light slants across the kitchen counter, but there’s something deeply comforting about returning to the simplest of snacks. This pairing feels less like a recipe and more like a gentle pause, a small act of care assembled with just a few honest ingredients.
Serving: 1 | Pre Time: 5 minutes | Cooking Time: 0 minutes
Ingredients
– 1 medium apple
– 2 tablespoons almond butter
– 1 teaspoon honey
– 1 pinch ground cinnamon
Instructions
1. Rinse the apple under cool running water and pat it completely dry with a clean kitchen towel.
2. Using a sharp knife on a stable cutting board, slice the apple vertically from top to bottom, cutting around the core to create even wedges; for a more elegant presentation, you can also slice it horizontally into thin rounds.
3. Arrange the apple slices on a small plate or a piece of parchment paper.
4. Spoon the almond butter into a small bowl; if it’s very thick or separated, stir it gently with a spoon until it’s smooth and creamy—this makes it much easier to spread.
5. Using a butter knife or a small spoon, spread a thin, even layer of almond butter onto one side of each apple slice.
6. Drizzle the honey lightly over the almond butter-covered slices, aiming for a delicate, zigzag pattern.
7. Finish by sprinkling the ground cinnamon evenly over the top, using just a pinch so it doesn’t overwhelm the other flavors.
8. Serve immediately to prevent the apple from browning and to enjoy the crisp contrast against the creamy spread.
Because the apple stays cool and crisp, it provides a refreshing crunch that plays beautifully against the rich, velvety almond butter. The honey adds a floral sweetness that mellows the nuttiness, while the cinnamon offers a warm, aromatic whisper in the background. For a different twist, try arranging the slices on a board with a drizzle of melted dark chocolate or a sprinkle of flaky sea salt for a more decadent, shareable treat.
Roasted Chickpeas with Smoked Paprika

Gently, as the afternoon light fades on this quiet December day, I find myself drawn to the simple alchemy of the pantry—turning humble chickpeas into something crisp, smoky, and deeply satisfying. It’s a quiet kitchen ritual, perfect for a moment of reflection.
Serving: 4 | Pre Time: 10 minutes | Cooking Time: 30 minutes
Ingredients
– 2 (15-ounce) cans chickpeas
– 2 tablespoons olive oil
– 1 teaspoon smoked paprika
– 1/2 teaspoon garlic powder
– 1/2 teaspoon kosher salt
– 1/4 teaspoon black pepper
Instructions
1. Preheat your oven to 400°F and line a large, rimmed baking sheet with parchment paper.
2. Drain and rinse the 2 (15-ounce) cans chickpeas in a colander under cool running water.
3. Pat the chickpeas completely dry with a clean kitchen towel or paper towels, rolling them gently to remove any loose skins—this helps them crisp up evenly.
4. In a medium bowl, combine the dried chickpeas with 2 tablespoons olive oil, 1 teaspoon smoked paprika, 1/2 teaspoon garlic powder, 1/2 teaspoon kosher salt, and 1/4 teaspoon black pepper.
5. Toss the mixture until every chickpea is lightly and evenly coated with the oil and spices.
6. Spread the chickpeas in a single, uncrowded layer on the prepared baking sheet.
7. Roast the chickpeas at 400°F for 25–30 minutes, shaking the pan halfway through, until they are golden brown and crisp to the touch.
8. Remove the baking sheet from the oven and let the chickpeas cool on the pan for 5–10 minutes; they will continue to crisp as they cool.
9. Transfer the cooled roasted chickpeas to a serving bowl.
Truly, these transform into little crunchy gems with a warm, smoky depth. I love them sprinkled over a creamy soup for texture or simply savored by the handful, their gentle spice lingering as the evening settles in.
Kale Chips with Sea Salt
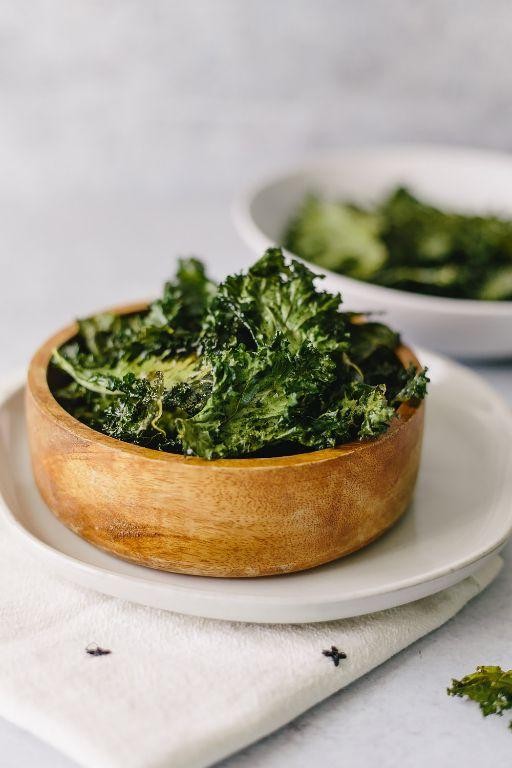
Evenings like this, when the light fades gently and the kitchen grows quiet, I find myself craving something simple yet deeply satisfying—a snack that feels both nourishing and indulgent. Kale chips, with their crisp texture and whisper of sea salt, are just that: a humble transformation of greens into something quietly magical.
Serving: 4 | Pre Time: 10 minutes | Cooking Time: 15 minutes
Ingredients
– 1 large bunch curly kale
– 1 tablespoon olive oil
– 1 teaspoon sea salt
Instructions
1. Preheat your oven to 300°F and line two large baking sheets with parchment paper.
2. Rinse the kale thoroughly under cold water, then pat it completely dry with clean kitchen towels or a salad spinner—any lingering moisture will steam the kale instead of crisping it.
3. Tear the kale leaves into 2-inch pieces, discarding the tough central stems.
4. In a large bowl, combine the kale pieces and olive oil, using your hands to massage the oil evenly onto every leaf until they are lightly coated but not soggy.
5. Arrange the kale in a single layer on the prepared baking sheets, ensuring the pieces do not overlap to allow for even airflow and crisping.
6. Sprinkle the sea salt evenly over the kale.
7. Bake for 12–15 minutes, rotating the pans halfway through, until the kale is crisp and the edges are lightly browned but not burnt—watch closely in the final minutes as they can quickly go from perfect to overdone.
8. Remove the baking sheets from the oven and let the kale chips cool completely on the pans for about 5 minutes; they will crisp up further as they cool.
You’ll find these chips shatter delicately with each bite, releasing a savory, oceanic hint from the salt against the kale’s earthy base. Try crumbling them over a bowl of creamy soup for a surprising crunch, or enjoy them alone as a quiet moment of savoring.
Quinoa Energy Balls
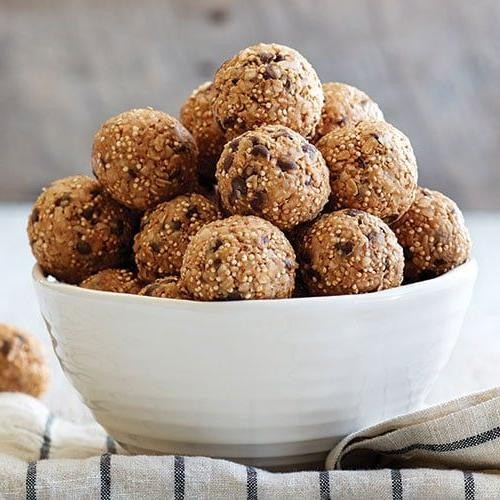
Facing the quiet hum of the kitchen this evening, I find myself reaching for ingredients that feel like a gentle promise—a small, nourishing bite to carry through the busy days ahead. These little quinoa energy balls are just that: a simple, wholesome treat born from a moment of quiet reflection.
Serving: 12 | Pre Time: 15 minutes | Cooking Time: 0 minutes
Ingredients
– 1 cup cooked quinoa, cooled
– 1/2 cup creamy peanut butter
– 1/3 cup pure maple syrup
– 1/2 cup old-fashioned rolled oats
– 1/4 cup mini dark chocolate chips
– 1/4 cup unsweetened shredded coconut
– 1 tsp vanilla extract
– 1/2 tsp ground cinnamon
– 1/8 tsp fine sea salt
Instructions
1. In a large mixing bowl, combine the cooled cooked quinoa, creamy peanut butter, and pure maple syrup.
2. Stir the mixture with a rubber spatula until it forms a thick, sticky paste with no dry streaks of quinoa visible.
3. Add the old-fashioned rolled oats, mini dark chocolate chips, unsweetened shredded coconut, vanilla extract, ground cinnamon, and fine sea salt to the bowl.
4. Fold all ingredients together until they are evenly distributed and the mixture holds together when pressed.
5. Line a baking sheet with parchment paper for easy cleanup and to prevent sticking.
6. Scoop about 1 1/2 tablespoons of the mixture and roll it firmly between your palms to form a compact, round ball.
7. Place the formed ball onto the prepared baking sheet and repeat with the remaining mixture, spacing the balls about 1 inch apart.
8. Transfer the baking sheet to the refrigerator and chill the balls for at least 30 minutes, which helps them set and develop a firmer texture.
9. Once chilled, transfer the energy balls to an airtight container, separating layers with parchment paper if stacking to avoid sticking.
10. Store the container in the refrigerator for up to one week for optimal freshness.
Gently textured with a pleasant chew from the oats and quinoa, these bites offer a subtle sweetness from the maple syrup, balanced by the rich depth of peanut butter and dark chocolate. For a creative twist, roll the chilled balls in extra shredded coconut or a dusting of cocoa powder before serving, or enjoy them straight from the fridge as a quick, satisfying snack.
Celery Sticks with Hummus
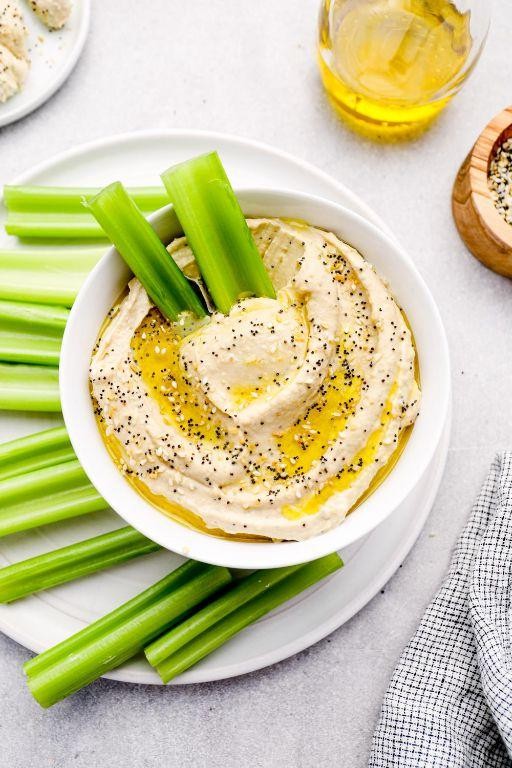
Gently, as the afternoon light fades on this quiet December day, I find myself drawn to the simplest of comforts—a pairing so humble yet deeply satisfying. It’s a quiet nod to nourishment, a pause in the rush, where crispness meets creamy warmth.
Serving: 4 | Pre Time: 15 minutes | Cooking Time: 0 minutes
Ingredients
– 1 bunch celery
– 1 15-ounce can chickpeas, drained and rinsed
– 1/4 cup tahini
– 3 tablespoons fresh lemon juice
– 2 tablespoons extra-virgin olive oil
– 1 clove garlic, minced
– 1/2 teaspoon ground cumin
– 1/4 teaspoon salt
– 2 tablespoons ice water
Instructions
1. Rinse 1 bunch celery under cold running water to remove any dirt.
2. Pat the celery dry completely with a clean kitchen towel to ensure the hummus adheres well.
3. Trim off the leafy tops and tough base of each celery stalk using a sharp knife.
4. Cut each celery stalk crosswise into 3-inch-long sticks, aiming for about 4 sticks per stalk.
5. Place the celery sticks in a single layer on a serving plate and set aside.
6. In a food processor, combine 1 15-ounce can of drained and rinsed chickpeas, 1/4 cup tahini, 3 tablespoons fresh lemon juice, 2 tablespoons extra-virgin olive oil, 1 minced garlic clove, 1/2 teaspoon ground cumin, and 1/4 teaspoon salt.
7. Process the mixture on high speed for 1 minute, scraping down the sides with a rubber spatula to incorporate all ingredients evenly.
8. With the processor running, slowly drizzle in 2 tablespoons of ice water through the feed tube and continue processing for 2 more minutes until the hummus is smooth and creamy, adding more ice water 1 tablespoon at a time if it seems too thick.
9. Taste the hummus and adjust the seasoning with a pinch more salt only if necessary, avoiding over-salting.
10. Transfer the hummus to a small serving bowl and place it alongside the celery sticks on the plate.
11. Serve immediately, or cover and refrigerate the hummus for up to 3 days if making ahead, bringing it to room temperature before serving for best flavor.
As the celery’s clean crunch gives way to the hummus’s velvety richness, a subtle garlic and lemon brightness lingers. Try sprinkling the hummus with smoked paprika or serving it with a drizzle of olive oil for an elegant touch on a cozy evening.
Dark Chocolate Covered Banana Bites

Cradling a simple bowl of these treats, I’m reminded how the quietest moments often hold the sweetest rewards—a gentle pause in the holiday rush, where melting chocolate meets cool, creamy fruit.
Serving: 4 | Pre Time: 15 minutes | Cooking Time: 0 minutes
Ingredients
– 2 large ripe bananas
– 1 cup dark chocolate chips
– 1 tbsp coconut oil
– 1/4 cup chopped walnuts
Instructions
1. Line a baking sheet with parchment paper.
2. Peel the 2 large ripe bananas and slice them into 1/2-inch thick rounds.
3. Arrange the banana slices in a single layer on the prepared baking sheet.
4. Place the baking sheet in the freezer for 10 minutes to firm up the bananas, which helps prevent them from becoming mushy when dipped.
5. Combine 1 cup dark chocolate chips and 1 tbsp coconut oil in a microwave-safe bowl.
6. Microwave the mixture on high power for 30 seconds, then stir thoroughly with a fork.
7. Continue microwaving in 15-second intervals, stirring after each, until the chocolate is completely smooth and liquid, about 60-90 seconds total.
8. Remove the banana slices from the freezer using tongs to keep your hands clean.
9. Dip each banana slice halfway into the melted chocolate, letting excess drip back into the bowl.
10. Immediately sprinkle the chocolate-dipped portion with the 1/4 cup chopped walnuts before the chocolate sets.
11. Return each coated slice to the parchment-lined baking sheet.
12. Place the baking sheet back in the freezer for 5 minutes to allow the chocolate to harden completely.
13. Transfer the bites to an airtight container, separating layers with parchment paper to prevent sticking.
14. Store the container in the freezer until ready to serve.
Zesty with a hint of bitterness from the dark chocolate, these bites offer a satisfying crunch from the walnuts against the frozen, custard-like banana. Try serving them straight from the freezer on a chilled plate for a refreshing contrast to warm holiday desserts, or let them sit for a minute to soften slightly for a creamier texture.
Oatmeal and Chia Seed Pudding
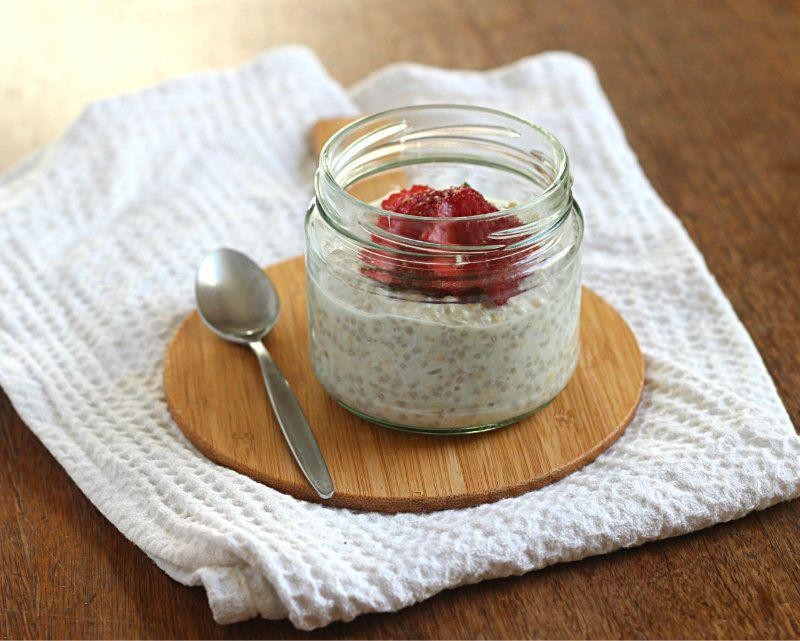
As the winter light fades on this quiet December evening, I find myself craving something simple and nourishing—a gentle dish that feels like a warm embrace after a long day. This oatmeal and chia seed pudding is just that, a humble blend of textures and flavors that comes together with little effort, perfect for a slow morning or a comforting dessert.
Serving: 4 | Pre Time: 5 minutes | Cooking Time: 0 minutes
Ingredients
– 1 cup old-fashioned rolled oats
– ¼ cup chia seeds
– 2 cups unsweetened almond milk
– 2 tablespoons maple syrup
– 1 teaspoon vanilla extract
– ½ teaspoon ground cinnamon
– Pinch of salt
Instructions
1. In a medium mixing bowl, combine 1 cup old-fashioned rolled oats and ¼ cup chia seeds.
2. Pour in 2 cups unsweetened almond milk, stirring gently to ensure all dry ingredients are fully submerged.
3. Add 2 tablespoons maple syrup, 1 teaspoon vanilla extract, ½ teaspoon ground cinnamon, and a pinch of salt to the bowl.
4. Whisk the mixture thoroughly for about 30 seconds until the maple syrup is evenly distributed and no clumps remain.
5. Cover the bowl tightly with plastic wrap or a lid to prevent a skin from forming on the surface.
6. Place the covered bowl in the refrigerator to chill for at least 4 hours, or ideally overnight, allowing the oats and chia seeds to fully absorb the liquid and soften.
7. After chilling, remove the bowl from the refrigerator and give the pudding a good stir to break up any thickened areas and create a uniform consistency.
8. Divide the pudding evenly among four serving bowls or jars for individual portions.
9. Serve immediately, or store covered in the refrigerator for up to 3 days.
Chilled and creamy, this pudding develops a delightful thickness with a subtle chew from the oats, while the chia seeds add a pleasant pop of texture. The maple syrup and cinnamon weave in a gentle sweetness that feels rustic and comforting, perfect topped with fresh berries or a drizzle of honey for a touch of brightness.
Air-Fried Zucchini Chips
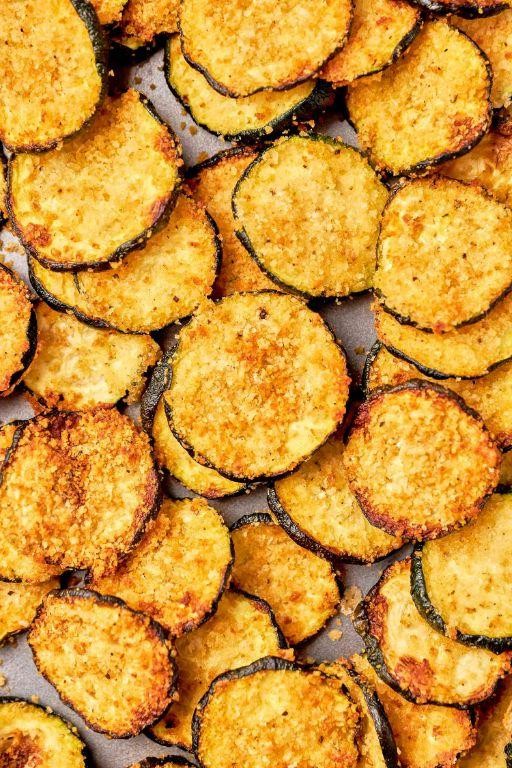
Perhaps it’s the quiet hum of the air fryer on a winter afternoon that makes these feel so comforting, a simple act of slicing and seasoning turning the humble zucchini into something crisp and golden, a small, warm ritual against the chill.
Serving: 4 | Pre Time: 15 minutes | Cooking Time: 12 minutes
Ingredients
- 2 medium zucchini
- 1/2 cup all-purpose flour
- 2 large eggs
- 1 cup panko breadcrumbs
- 1/2 cup grated Parmesan cheese
- 1 tsp garlic powder
- 1 tsp paprika
- 1/2 tsp salt
- 1/4 tsp black pepper
- cooking spray
Instructions
- Preheat your air fryer to 400°F for 5 minutes.
- Wash and dry 2 medium zucchini thoroughly with a clean towel.
- Trim the ends from each zucchini and slice them into uniform 1/4-inch thick rounds. A mandoline slicer ensures even thickness for consistent cooking.
- Set up a breading station with three shallow bowls: place 1/2 cup all-purpose flour in the first bowl.
- In the second bowl, whisk 2 large eggs until fully blended.
- In the third bowl, combine 1 cup panko breadcrumbs, 1/2 cup grated Parmesan cheese, 1 tsp garlic powder, 1 tsp paprika, 1/2 tsp salt, and 1/4 tsp black pepper, mixing well with a fork.
- Dredge a zucchini round in the flour, coating it lightly and shaking off any excess.
- Dip the floured round into the whisked eggs, letting any excess drip back into the bowl.
- Press the round firmly into the panko-Parmesan mixture, ensuring an even, complete coating on both sides.
- Place the breaded round on a parchment-lined tray or plate and repeat with all remaining zucchini slices.
- Lightly spray the air fryer basket with cooking spray to prevent sticking.
- Arrange the breaded zucchini rounds in the preheated air fryer basket in a single layer without overlapping; work in batches if necessary.
- Lightly mist the tops of the rounds with cooking spray to help them crisp and brown evenly.
- Air fry at 400°F for 6 minutes.
- Carefully open the air fryer and flip each chip using tongs. For extra crispness, you can give them another light spray after flipping.
- Air fry for an additional 5-6 minutes at 400°F, or until the chips are deeply golden brown and crisp to the touch.
- Transfer the cooked chips to a wire rack immediately; this keeps them crisp by allowing steam to escape instead of making them soggy.
- Repeat the cooking process with any remaining batches of breaded zucchini.
Delightfully crisp and light, these chips offer a satisfying crunch that gives way to the tender, almost sweet zucchini within, the Parmesan and paprika creating a savory, warm depth. Serve them straight from the rack, still faintly warm, alongside a cool ranch dip or simply scattered over a winter salad for a contrasting texture.
Edamame with Himalayan Salt
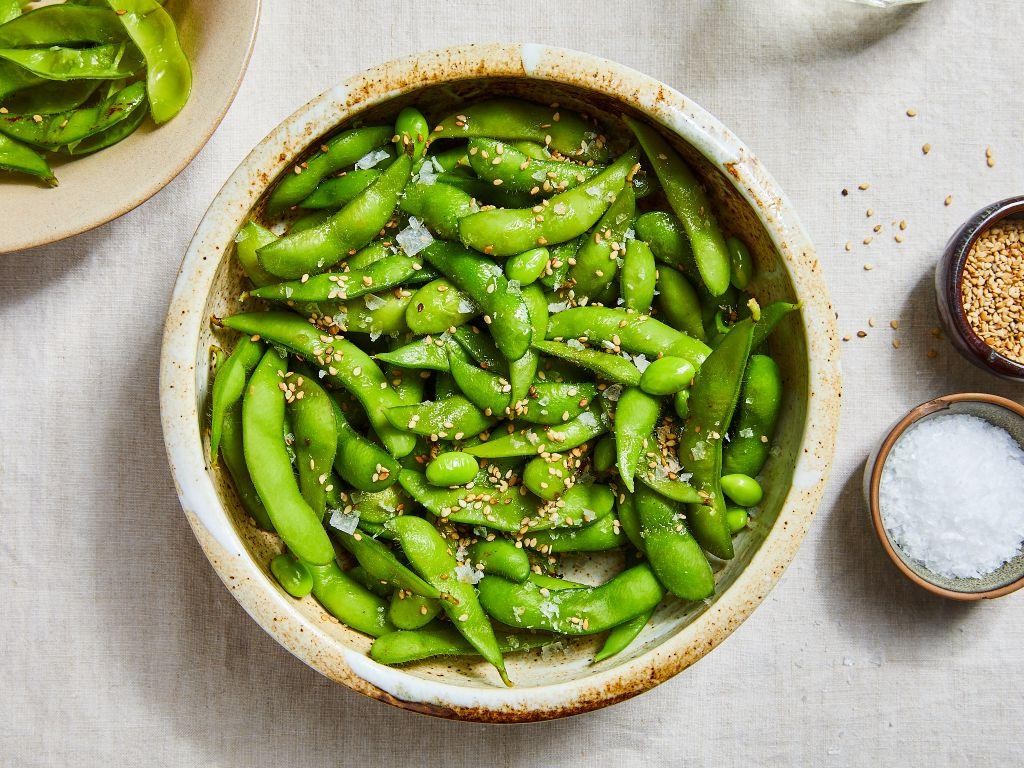
Maybe it’s the quiet of a winter evening, the soft glow of kitchen lights, or simply the need for something grounding and gentle. This simple bowl of edamame, kissed with Himalayan salt, feels like a small, mindful pause—a humble ritual that turns a basic snack into a moment of calm.
Serving: 4 | Pre Time: 5 minutes | Cooking Time: 10 minutes
Ingredients
– 1 pound frozen edamame in pods
– 2 tablespoons Himalayan pink salt
– 4 cups water
Instructions
1. Place a large pot on the stove and add 4 cups of water.
2. Turn the burner to high heat and bring the water to a rolling boil, which should take about 5–7 minutes.
3. Carefully add 1 pound of frozen edamame in pods to the boiling water, stirring gently to submerge them completely.
4. Reduce the heat to medium-high to maintain a steady simmer, and cook the edamame for 5 minutes exactly, setting a timer to ensure they don’t overcook and become mushy.
5. While the edamame cooks, place a colander in the sink to prepare for draining.
6. After 5 minutes, turn off the heat and immediately pour the edamame and water into the colander to drain completely, shaking it lightly to remove excess moisture.
7. Transfer the drained edamame to a large, dry bowl, spreading them out in a single layer to cool slightly for 1–2 minutes, which helps the pods dry for better salt adherence.
8. Sprinkle 2 tablespoons of Himalayan pink salt evenly over the warm edamame, tossing gently with your hands or a spoon to coat each pod thoroughly, as the residual heat helps the salt crystals cling.
9. Serve the edamame immediately in a communal bowl for sharing.
During that first bite, the pods yield with a satisfying pop, releasing tender beans that carry the subtle, mineral-rich crunch of the salt. This dish pairs beautifully with a chilled glass of white wine or as a prelude to a larger meal, inviting everyone to slow down and savor each pod together.
Whole Grain Crackers with Guacamole
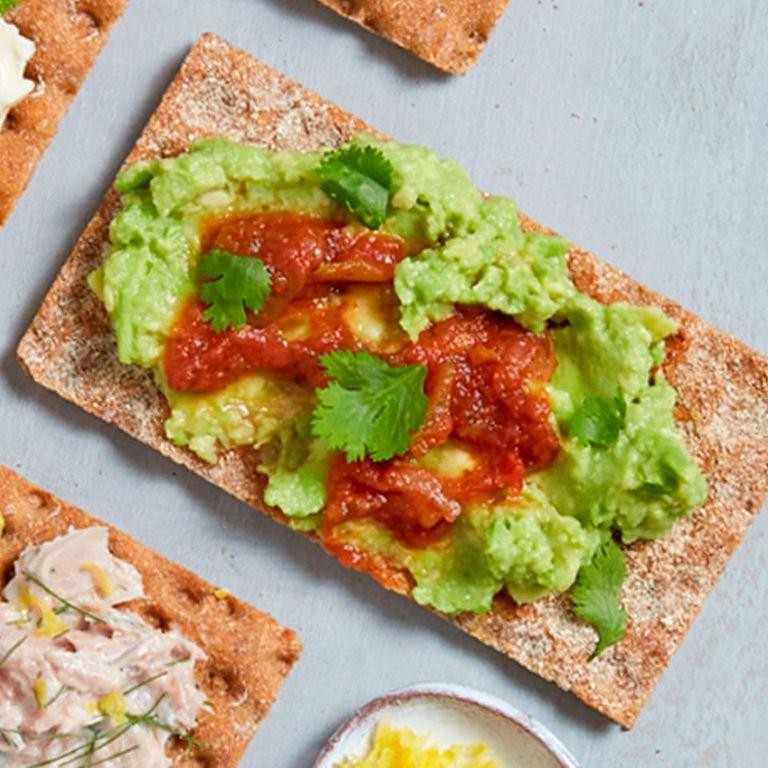
Kindly, as the evening light fades on this December day, I find myself craving something simple yet nourishing—a quiet moment with crisp crackers and creamy guacamole, a humble pairing that feels both grounding and celebratory. It’s a snack that whispers of freshness and whole ingredients, perfect for unwinding alone or sharing softly with a loved one.
Serving: 4 | Pre Time: 15 minutes | Cooking Time: 20 minutes
Ingredients
– 1 cup whole wheat flour
– 1/4 cup rolled oats
– 1/2 teaspoon salt
– 3 tablespoons olive oil
– 1/4 cup water
– 2 ripe avocados
– 1 lime
– 1/4 cup finely chopped red onion
– 1/4 cup chopped fresh cilantro
– 1 jalapeño pepper
Instructions
1. Preheat the oven to 350°F and line a baking sheet with parchment paper.
2. In a medium bowl, combine 1 cup whole wheat flour, 1/4 cup rolled oats, and 1/2 teaspoon salt.
3. Add 3 tablespoons olive oil to the dry ingredients and mix with a fork until crumbly.
4. Gradually pour in 1/4 cup water, stirring until a dough forms, then knead gently for 1 minute until smooth.
5. Roll the dough out on a floured surface to 1/8-inch thickness, using a rolling pin for evenness.
6. Cut the dough into 2-inch squares with a knife or cookie cutter and place them on the prepared baking sheet.
7. Prick each cracker 2-3 times with a fork to prevent puffing during baking.
8. Bake at 350°F for 15-20 minutes, until the edges turn golden brown and the crackers are crisp.
9. While the crackers bake, halve 2 ripe avocados, remove the pits, and scoop the flesh into a bowl.
10. Juice 1 lime directly over the avocados to prevent browning and add brightness.
11. Mash the avocados with a fork until slightly chunky, leaving some texture for interest.
12. Stir in 1/4 cup finely chopped red onion, 1/4 cup chopped fresh cilantro, and 1 finely diced jalapeño pepper, removing seeds for milder heat if desired.
13. Season the guacamole with a pinch of salt, mixing gently to combine all ingredients evenly.
14. Remove the crackers from the oven and let them cool on the baking sheet for 5 minutes to crisp up fully.
15. Serve the whole grain crackers warm or at room temperature alongside the guacamole.
Here, the crackers offer a sturdy, nutty crunch that contrasts beautifully with the guacamole’s creamy, tangy richness, while a hint of jalapeño adds a gentle warmth. For a creative twist, try topping them with extra cilantro or a sprinkle of smoked paprika, making each bite a quiet celebration of texture and flavor.
Hard-Boiled Eggs with Everything Bagel Seasoning

Unwrapping a hard-boiled egg feels like a small, quiet ritual, a moment of simplicity in a noisy world. Today, I’m elevating that humble staple with a sprinkle of everything bagel seasoning, turning a basic snack into something delightfully savory and textured. It’s a minimalist recipe that asks for little but delivers a comforting, flavorful bite perfect for a reflective pause.
Serving: 4 | Pre Time: 5 minutes | Cooking Time: 12 minutes
Ingredients
– 4 large eggs
– 2 tbsp everything bagel seasoning
– 1 tbsp olive oil
– 1 tsp salt
Instructions
1. Place 4 large eggs in a single layer in a medium saucepan.
2. Add enough cold water to cover the eggs by 1 inch.
3. Add 1 tsp salt to the water, which helps prevent cracking during boiling.
4. Bring the water to a rolling boil over high heat.
5. Once boiling, immediately remove the saucepan from the heat and cover it with a lid.
6. Let the eggs sit in the hot water for 12 minutes for fully set yolks.
7. While waiting, prepare an ice bath by filling a large bowl with cold water and ice cubes.
8. After 12 minutes, transfer the eggs to the ice bath using a slotted spoon.
9. Let the eggs cool in the ice bath for at least 5 minutes to stop the cooking process and make peeling easier.
10. Gently tap each egg on a hard surface to crack the shell all over.
11. Peel the eggs under cool running water to help remove the shell smoothly.
12. Pat the peeled eggs dry with a paper towel.
13. Drizzle 1 tbsp olive oil evenly over the eggs to help the seasoning adhere.
14. Sprinkle 2 tbsp everything bagel seasoning generously over the eggs, rolling them to coat all sides.
15. Slice the eggs in half lengthwise to serve.
Vibrant with garlic, onion, sesame, and poppy seeds, the seasoning creates a crunchy, aromatic crust against the smooth, creamy interior of the egg. Serve these halves atop a simple green salad for a protein boost, or enjoy them solo as a savory, satisfying snack that feels both nostalgic and new.
Carrot Sticks with Tahini Dip

Dipping into a quiet afternoon, the simplicity of fresh carrot sticks paired with a creamy tahini dip offers a moment of calm, grounding nourishment. This humble snack, with its earthy sweetness and nutty richness, feels like a gentle pause in the day—a small, mindful ritual to savor slowly.
Serving: 4 | Pre Time: 15 minutes | Cooking Time: 0 minutes
Ingredients
– 1 pound carrots
– 1/2 cup tahini
– 1/4 cup water
– 2 tablespoons lemon juice
– 1 clove garlic
– 1/2 teaspoon salt
– 1/4 teaspoon ground cumin
– 2 tablespoons olive oil
– 1 tablespoon chopped fresh parsley
Instructions
1. Wash and peel 1 pound of carrots thoroughly under cold running water.
2. Trim the ends off the carrots and cut them into uniform 3-inch sticks about 1/2-inch thick for even crunch.
3. Place the carrot sticks in a bowl of ice water for 10 minutes to crisp them up, then pat dry with a clean kitchen towel.
4. In a medium mixing bowl, combine 1/2 cup tahini, 1/4 cup water, and 2 tablespoons lemon juice, whisking vigorously until smooth and creamy.
5. Mince 1 clove garlic finely and add it to the tahini mixture along with 1/2 teaspoon salt and 1/4 teaspoon ground cumin, stirring to incorporate evenly.
6. Drizzle in 2 tablespoons olive oil while whisking continuously to emulsify the dip for a silky texture.
7. Taste the dip and adjust seasoning if needed, remembering that flavors will meld as it rests.
8. Transfer the dip to a serving bowl and garnish with 1 tablespoon chopped fresh parsley for a fresh, colorful touch.
9. Arrange the carrot sticks on a platter alongside the tahini dip for serving.
Just as the carrots retain a satisfying snap, the dip offers a velvety contrast with hints of garlic and cumin that deepen over time. For a creative twist, sprinkle the platter with toasted sesame seeds or serve alongside pita chips for added texture, making it a versatile centerpiece for quiet gatherings or solo reflection.
Roasted Almonds with Cinnamon

Kindling the oven on a quiet evening, I find myself drawn to the simple alchemy of transforming raw almonds into something warmly spiced and fragrant. There’s a gentle rhythm to roasting, a patient unfurling of flavor that feels like a quiet conversation with the kitchen. This recipe for Roasted Almonds with Cinnamon is that conversation—a slow, thoughtful process yielding a snack that’s both comforting and elegantly spiced.
Serving: 4 | Pre Time: 5 minutes | Cooking Time: 25 minutes
Ingredients
– 2 cups raw whole almonds
– 1 tablespoon avocado oil
– 2 tablespoons granulated sugar
– 1 teaspoon ground cinnamon
– 1/4 teaspoon fine sea salt
Instructions
1. Preheat your oven to 325°F and line a large, rimmed baking sheet with parchment paper.
2. In a medium mixing bowl, combine the raw whole almonds and avocado oil, tossing until the almonds are evenly and lightly coated.
3. In a separate small bowl, whisk together the granulated sugar, ground cinnamon, and fine sea salt until fully combined.
4. Sprinkle the cinnamon-sugar mixture over the oiled almonds and toss vigorously for about 1 minute to ensure every almond is thoroughly coated.
5. Spread the coated almonds in a single, even layer on the prepared baking sheet, ensuring they are not touching or piled up.
6. Place the baking sheet in the preheated oven and roast for 15 minutes.
7. After 15 minutes, remove the baking sheet from the oven. Using a thin spatula, carefully stir and flip the almonds to promote even roasting and prevent burning.
8. Return the baking sheet to the oven and roast for an additional 8-10 minutes, until the almonds are deeply fragrant and the sugar coating has caramelized into a light golden glaze.
9. Immediately transfer the hot almonds to a clean plate or a fresh sheet of parchment paper, spreading them out to cool completely and crisp up, which takes about 30 minutes.
A warm, toasty aroma fills the kitchen as these almonds cool, their surfaces glazed with a delicate, crackly shell of caramelized cinnamon sugar. The texture is wonderfully dual—crisp on the outside with a satisfying, hearty crunch within. Try serving them slightly warm in a small bowl for a cozy treat, or sprinkle over morning yogurt for a spiced, crunchy contrast.
Peanut Butter and Banana Roll-Ups
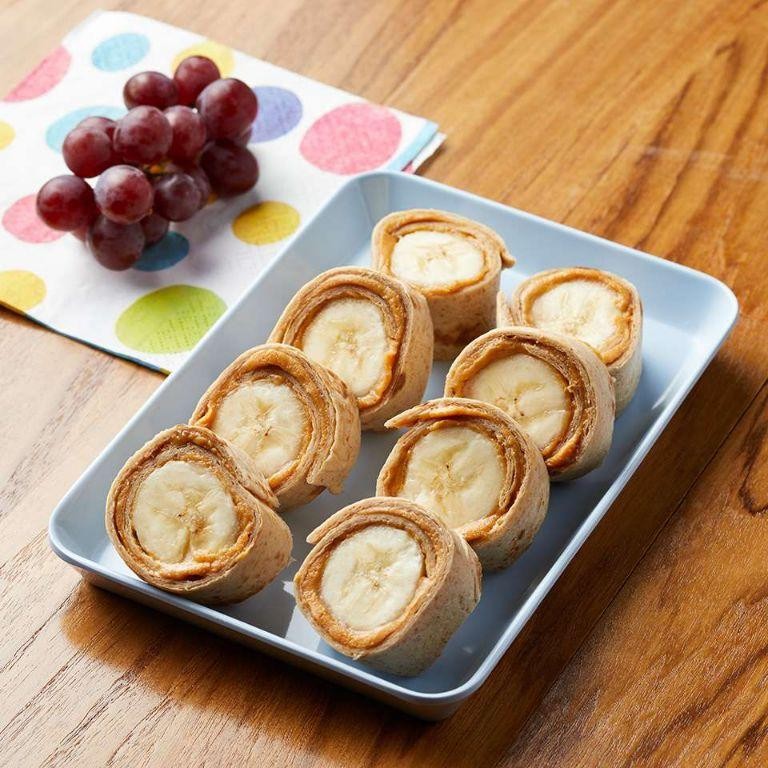
Cradling a warm tortilla in my hands, I remember how these simple roll-ups first appeared in my kitchen on a quiet winter afternoon, offering a sweet and creamy escape from the holiday bustle outside. They are a humble, no-bake treat that feels like a comforting hug, blending familiar flavors into something effortlessly delightful.
Serving: 4 | Pre Time: 10 minutes | Cooking Time: 0 minutes
Ingredients
– 4 large flour tortillas (8-inch diameter)
– 1/2 cup creamy peanut butter
– 2 medium bananas
– 2 tbsp honey
Instructions
1. Lay the 4 large flour tortillas flat on a clean work surface.
2. Evenly spread 2 tablespoons of creamy peanut butter onto each tortilla, leaving a 1/2-inch border around the edges to prevent spillage.
3. Peel the 2 medium bananas and slice them lengthwise into quarters.
4. Place 2 banana quarters side-by-side down the center of each peanut butter-covered tortilla.
5. Drizzle 1/2 tablespoon of honey evenly over the bananas on each tortilla.
6. Tightly roll each tortilla from one edge to the other, pressing gently to seal.
7. Slice each rolled tortilla diagonally into 1-inch pieces using a sharp knife for clean cuts.
8. Arrange the roll-up pieces on a serving plate.
9. Serve immediately to enjoy the soft, pliable texture of the tortilla.
Vividly soft and subtly sweet, these roll-ups offer a delightful contrast between the creamy peanut butter and the tender banana slices, all wrapped in a pillowy tortilla. For a festive twist on a quiet evening, try arranging the pieces in a spiral pattern on a plate and dusting them lightly with cinnamon.
Cucumber Slices with Cottage Cheese
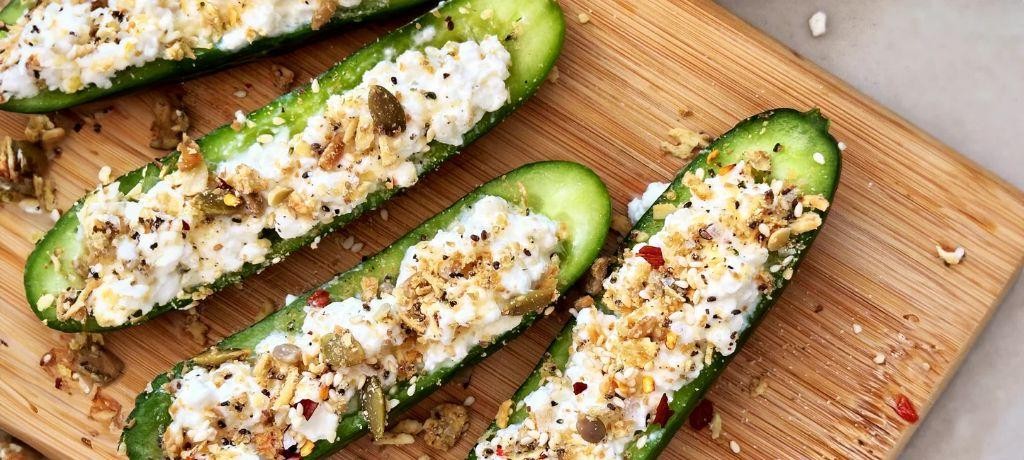
Just now, as the evening light softens outside my kitchen window, I find myself reaching for the simplest of comforts—crisp cucumber and cool cottage cheese, a quiet pairing that feels like a gentle pause in the rush of the season. It’s a humble, no-cook assembly that whispers of freshness and ease, perfect for when you need something light yet satisfying. This recipe is my little refuge, a way to savor stillness with minimal effort.
Serving: 2 | Pre Time: 15 minutes | Cooking Time: 0 minutes
Ingredients
– 1 large English cucumber
– 1 cup cottage cheese
– 1 tbsp fresh dill, finely chopped
– 1 tbsp extra virgin olive oil
– 1/2 tsp kosher salt
– 1/4 tsp black pepper, freshly ground
– 1/4 tsp garlic powder
Instructions
1. Wash the English cucumber under cool running water, then pat it completely dry with a clean kitchen towel to ensure crisp slices.
2. Using a sharp knife, trim off both ends of the cucumber, then slice it into 1/4-inch thick rounds, aiming for uniform pieces to promote even texture.
3. In a small mixing bowl, combine the cottage cheese, fresh dill, extra virgin olive oil, kosher salt, black pepper, and garlic powder, stirring gently with a spoon until fully blended.
4. Arrange the cucumber slices in a single layer on a serving platter or two individual plates, leaving a little space between each for easy topping.
5. Spoon approximately 1 teaspoon of the cottage cheese mixture onto the center of each cucumber slice, distributing it evenly across all slices.
6. Let the assembled slices rest at room temperature for 5 minutes to allow the flavors to meld slightly before serving.
7. Serve immediately, as the cucumber can release moisture over time, which might soften the crispness.
Ultimately, this dish offers a delightful contrast: the cool, crunchy cucumber against the creamy, tangy cottage cheese, with the dill and garlic adding subtle herbal notes. For a creative twist, try sprinkling a pinch of smoked paprika on top or serving it alongside grilled chicken for a light summer meal—it’s versatile enough to adapt to any moment of calm.
Summary
Whether you’re rushing between meetings or need a quick energy boost, these 20 healthy snack recipes are here to save your busy days. We hope you find some new favorites to fuel your week! Give a few a try, then drop a comment below to tell us which ones you loved—and don’t forget to share this roundup on Pinterest to help other busy folks snack smart.


