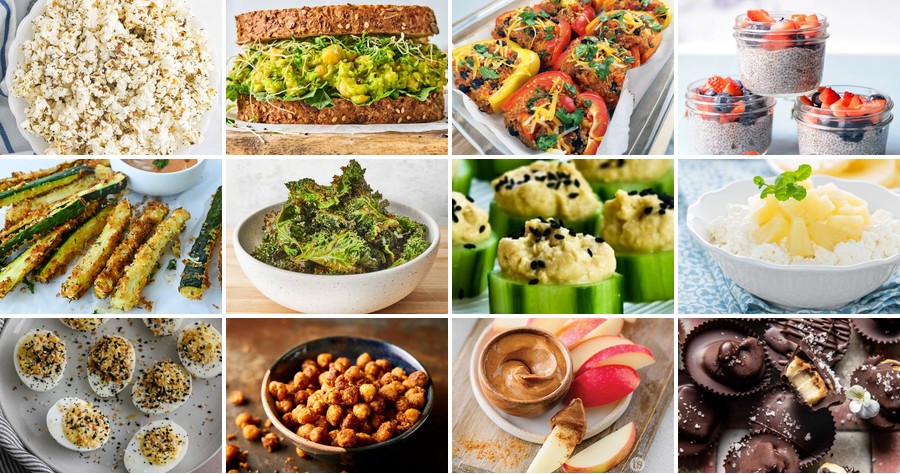
Zipping through your busy day doesn’t mean sacrificing your health goals! We’ve gathered 20 delicious, healthy snack recipes perfect for weight loss on the go. These quick, satisfying bites are designed to fuel your body and keep you energized, proving that smart snacking can be both easy and incredibly tasty. Dive in to discover your new favorite grab-and-go treats!
Avocado and Chickpea Smash Toast
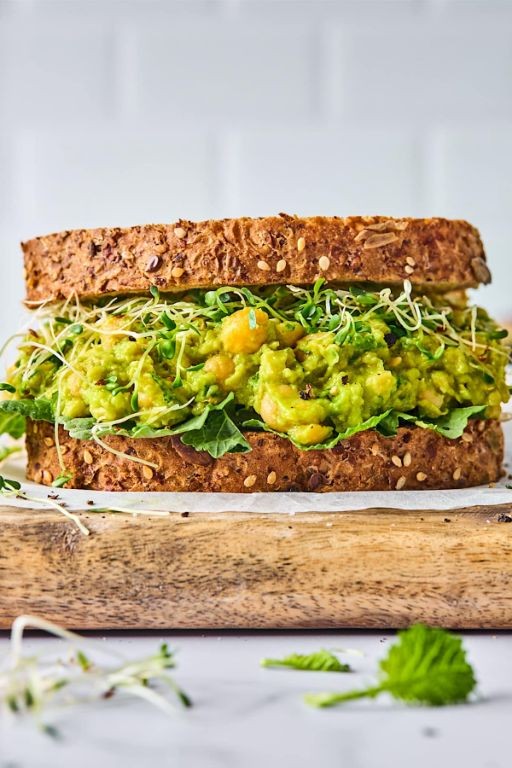
Perfect for a quick, nutritious meal that feels both satisfying and fresh, this Avocado and Chickpea Smash Toast combines creamy textures with bright, zesty flavors. Let’s walk through each step together to create this simple yet delicious dish, starting with gathering your ingredients and moving methodically through preparation to plating.
Serving: 2 | Pre Time: 10 minutes | Cooking Time: 0 minutes
Ingredients
– 2 slices of hearty whole-grain bread
– 1 large ripe avocado, halved and pitted
– 1 cup canned chickpeas, drained and rinsed
– 2 tablespoons fresh lemon juice, squeezed from a bright, juicy lemon
– 1 tablespoon rich extra virgin olive oil
– 1 small garlic clove, minced to a fine paste
– 1/4 teaspoon finely ground black pepper
– 1/4 teaspoon sea salt flakes
– 2 tablespoons chopped fresh cilantro leaves
Instructions
1. Place the 2 slices of hearty whole-grain bread into a toaster and toast on medium setting until golden brown and crisp, about 3-4 minutes.
2. While the bread toasts, scoop the flesh from the 1 large ripe avocado into a medium mixing bowl.
3. Add the 1 cup canned chickpeas to the bowl with the avocado.
4. Using a fork or potato masher, smash the avocado and chickpeas together until mostly smooth but with some chunky texture remaining.
5. Stir in the 2 tablespoons fresh lemon juice, 1 tablespoon rich extra virgin olive oil, 1 small minced garlic clove, 1/4 teaspoon finely ground black pepper, and 1/4 teaspoon sea salt flakes until well combined.
6. Gently fold in the 2 tablespoons chopped fresh cilantro leaves until evenly distributed.
7. Once the toast is ready, immediately spread the avocado-chickpea mixture evenly onto each slice, using all of the mixture.
8. Serve the toast right away while the bread is still warm and crisp.
You’ll love the contrast between the creamy, slightly chunky smash and the crunchy toast, with the lemon and garlic adding a vibrant kick. Try topping it with a sprinkle of red pepper flakes for heat or a drizzle of tahini for extra richness, making it a versatile base for your favorite additions.
Greek Yogurt with Berries and Honey
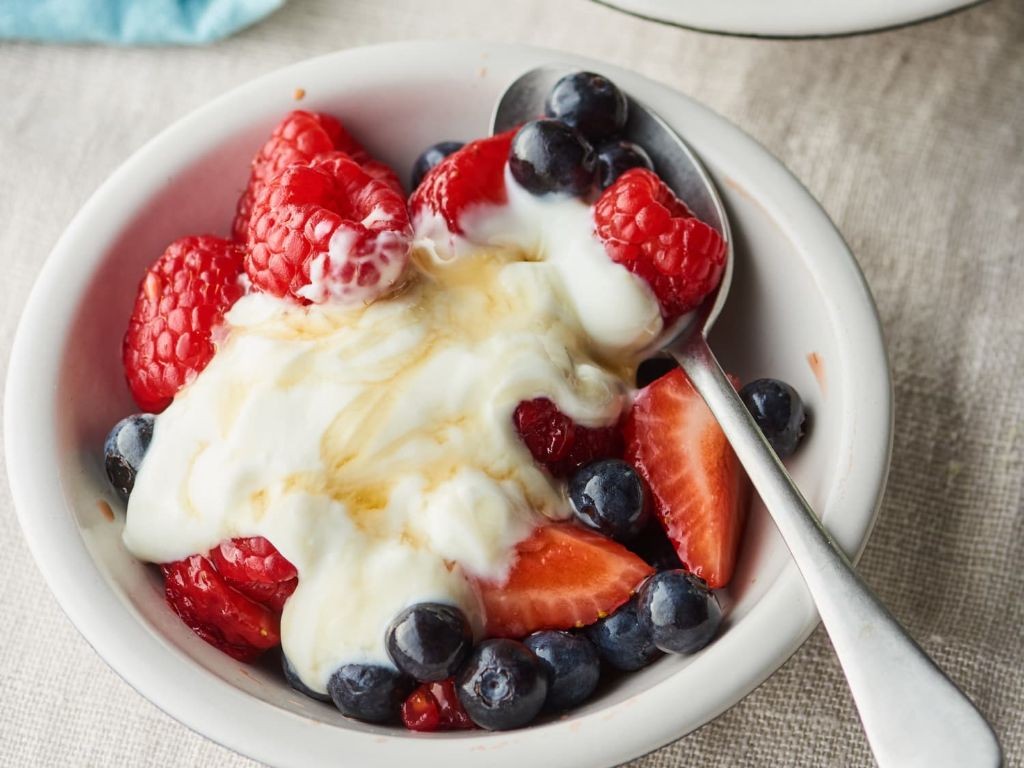
Sometimes the simplest breakfasts are the most satisfying, and this Greek Yogurt with Berries and Honey is a perfect example. Start your morning with this creamy, sweet, and tart combination that comes together in minutes, offering a refreshing and protein-packed way to begin your day.
Serving: 1 | Pre Time: 5 minutes | Cooking Time: 0 minutes
Ingredients
– 1 cup of thick, creamy plain Greek yogurt
– 1/2 cup of fresh, plump mixed berries (such as strawberries, blueberries, and raspberries)
– 1 tablespoon of golden, runny honey
– 1 tablespoon of crunchy, toasted sliced almonds
Instructions
1. Measure 1 cup of thick, creamy plain Greek yogurt into a serving bowl.
2. Rinse 1/2 cup of fresh, plump mixed berries under cool water and pat them completely dry with a clean kitchen towel to prevent the yogurt from becoming watery.
3. Slice any large strawberries into bite-sized pieces for even distribution.
4. Arrange the prepared berries evenly over the surface of the Greek yogurt in the bowl.
5. Drizzle 1 tablespoon of golden, runny honey in a zigzag pattern over the berries and yogurt.
6. Sprinkle 1 tablespoon of crunchy, toasted sliced almonds on top as the final garnish.
Enjoy the delightful contrast between the cool, tangy yogurt and the sweet, juicy berries, all brought together by the floral honey. For a creative twist, try layering the ingredients in a clear glass to showcase the beautiful colors, or add a sprinkle of cinnamon for a warm, aromatic note.
Baked Kale Chips with Sea Salt
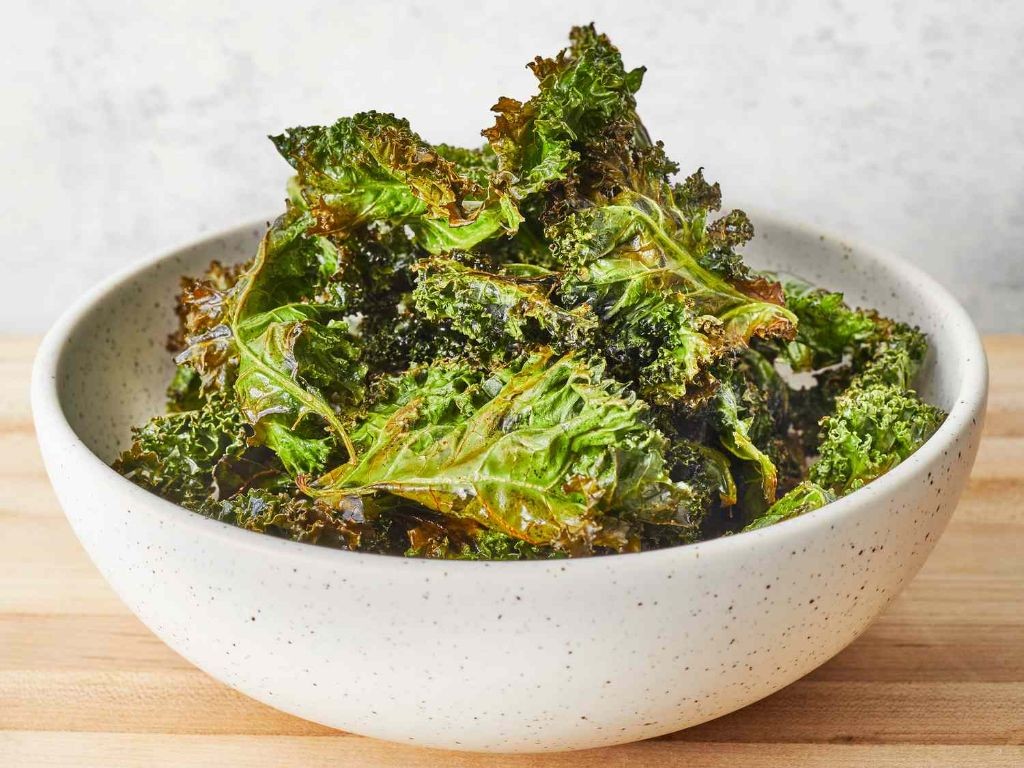
Many home cooks overlook kale’s crispy potential, but this simple recipe transforms sturdy leaves into a satisfyingly crunchy snack. Mastering baked kale chips requires just three key ingredients and a methodical approach that ensures perfect results every time.
Serving: 4 | Pre Time: 10 minutes | Cooking Time: 15 minutes
Ingredients
– 1 large bunch of fresh curly kale, thoroughly washed and completely dried
– 1 tablespoon of golden extra virgin olive oil
– ½ teaspoon of flaky sea salt
Instructions
1. Preheat your oven to 300°F (150°C) and position the racks in the upper and lower thirds of the oven.
2. Tear the completely dried kale leaves into 2-inch pieces, discarding the tough central stems.
3. Place the kale pieces in a large mixing bowl and drizzle with the golden extra virgin olive oil.
4. Use your hands to gently massage the oil onto every surface of each kale piece until they are lightly and evenly coated. (Tip: Massaging helps the oil adhere and promotes even crisping.)
5. Arrange the kale pieces in a single, uncrowded layer on two large, ungreased baking sheets.
6. Sprinkle the flaky sea salt evenly over the kale on both baking sheets.
7. Place both baking sheets in the preheated oven and bake for 10 minutes.
8. After 10 minutes, carefully rotate the baking sheets from top to bottom rack and front to back to ensure even cooking.
9. Continue baking for another 3 to 5 minutes, watching closely until the edges are deeply curled and the leaves are crisp but not browned. (Tip: They crisp further as they cool, so remove them before they look completely done.)
10. Immediately transfer the baked kale chips to a wire cooling rack. (Tip: Cooling on a rack prevents steam from making them soggy.)
Zesty and light, these chips offer a delicate, glass-like crunch that shatters with each bite, revealing a savory, almost nutty flavor from the baked kale. For a creative twist, try crumbling them over a creamy soup just before serving to add a surprising textural contrast.
Air-Fried Zucchini Fries
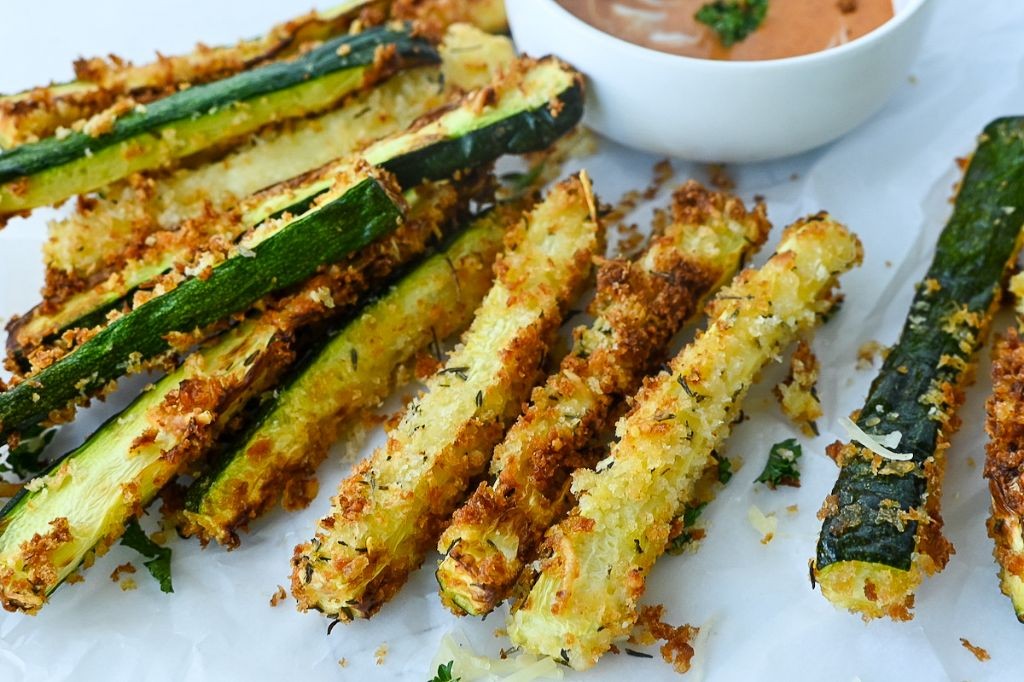
Mastering crispy, guilt-free snacks just got easier with these air-fried zucchini fries. Many home cooks struggle with soggy vegetable fries, but this method delivers golden perfection every time. Let’s walk through the simple steps to transform humble zucchini into a crave-worthy treat.
Serving: 4 | Pre Time: 15 minutes | Cooking Time: 12 minutes
Ingredients
– 2 medium firm zucchini, ends trimmed
– 1 cup fine Italian-style breadcrumbs
– ½ cup freshly grated Parmesan cheese
– 2 large farm-fresh eggs
– ½ cup all-purpose flour
– 1 teaspoon garlic powder
– 1 teaspoon smoked paprika
– ½ teaspoon coarse kosher salt
– Cooking spray (like avocado oil spray)
Instructions
1. Preheat your air fryer to 400°F for 5 minutes to ensure even cooking from the start.
2. Slice each firm zucchini into ½-inch thick fry-shaped sticks, patting them completely dry with paper towels to remove excess moisture—this prevents sogginess.
3. In a shallow bowl, whisk 2 large farm-fresh eggs until smooth and frothy.
4. In a separate shallow bowl, combine ½ cup all-purpose flour, 1 teaspoon garlic powder, 1 teaspoon smoked paprika, and ½ teaspoon coarse kosher salt.
5. In a third shallow bowl, mix 1 cup fine Italian-style breadcrumbs with ½ cup freshly grated Parmesan cheese for a crispy, flavorful coating.
6. Dredge each zucchini stick first in the flour mixture, shaking off any excess.
7. Dip the floured zucchini into the whisked eggs, letting any drips fall back into the bowl.
8. Press the zucchini firmly into the breadcrumb-Parmesan mixture, coating all sides evenly for maximum crunch.
9. Arrange the coated zucchini fries in a single layer in the air fryer basket, leaving space between them to allow air circulation, and lightly spray with cooking spray.
10. Air fry at 400°F for 10–12 minutes, flipping halfway through, until the fries are golden brown and crisp to the touch.
11. Remove the fries from the air fryer and let them rest for 2 minutes on a wire rack—this helps the coating set and stay crispy.
What makes these fries irresistible is their contrast of a crunchy, Parmesan-infused exterior with a tender, slightly sweet zucchini center. They’re perfect for dipping into a cool ranch or spicy marinara sauce, or try serving them alongside grilled chicken for a light, satisfying meal that feels indulgent without the heaviness of deep-frying.
Cucumber and Hummus Bites

Zesty and refreshing, these cucumber and hummus bites are the perfect no-cook appetizer for busy weeknights or last-minute gatherings. They come together in minutes with just a few simple ingredients, offering a crisp, creamy, and satisfying snack. Let’s walk through the process step-by-step to ensure your bites are perfectly assembled every time.
Serving: 12 bites | Pre Time: 15 minutes | Cooking Time: 0 minutes
Ingredients
– 1 large English cucumber, firm and vibrant green
– 1 cup classic hummus, smooth and creamy
– 2 tbsp extra virgin olive oil, rich and fruity
– 1 tsp smoked paprika, finely ground
– 1/4 cup fresh parsley leaves, finely chopped
– 1/4 tsp sea salt, coarse
Instructions
1. Wash the large English cucumber under cool running water and pat it completely dry with a clean kitchen towel to ensure the hummus adheres well.
2. Using a sharp knife, trim off both ends of the cucumber and slice it crosswise into 12 even rounds, each about 1/2-inch thick, for a stable base.
3. Place the cucumber rounds flat on a serving platter or cutting board in a single layer to prevent them from rolling.
4. Spoon approximately 1 tablespoon of the smooth and creamy classic hummus onto the center of each cucumber round, spreading it gently with the back of the spoon to cover the surface evenly.
5. Drizzle the rich and fruity extra virgin olive oil lightly over the hummus-topped cucumber bites, using about 1/2 teaspoon per bite for a glossy finish.
6. Sprinkle the finely ground smoked paprika evenly across all the bites, aiming for a light dusting to add a hint of smoky flavor without overpowering.
7. Garnish each bite with a pinch of the finely chopped fresh parsley leaves, distributing it evenly for a pop of color and freshness.
8. Finish by sprinkling a small amount of the coarse sea salt over the assembled bites, using about 1/4 teaspoon total to enhance the flavors subtly.
9. Serve the cucumber and hummus bites immediately on the platter, or refrigerate them for up to 30 minutes if preparing ahead to keep them crisp.
A crisp cucumber base provides a refreshing crunch that contrasts beautifully with the smooth, savory hummus, while the smoked paprika adds a warm depth. For a creative twist, try swapping the parsley with fresh dill or mint, or add a sprinkle of toasted sesame seeds for extra texture. These bites are best enjoyed fresh to maintain their delightful contrast between the cool cucumber and creamy topping.
Protein-Packed Chia Pudding
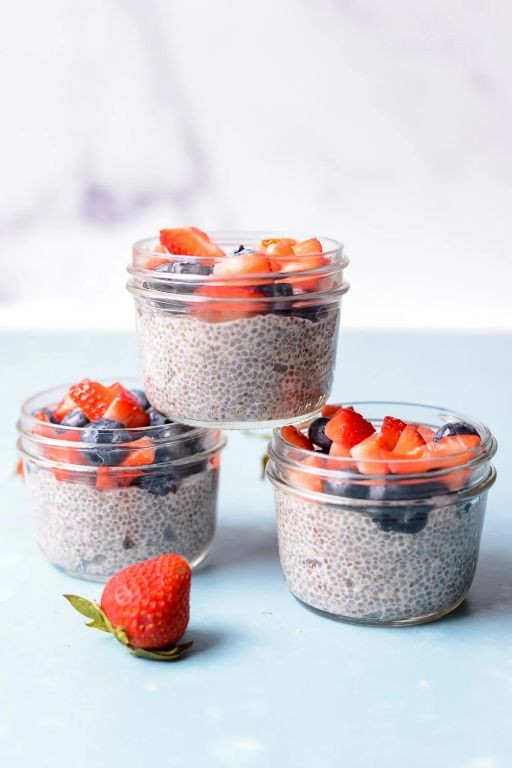
Let’s create a nutritious breakfast that feels indulgent yet keeps you energized all morning. This protein-packed chia pudding requires minimal effort but delivers maximum satisfaction with its creamy texture and customizable flavors. Perfect for meal prep or a quick morning treat, it’s a versatile base you can adapt to your preferences.
Serving: 2 | Pre Time: 5 minutes | Cooking Time: 0 minutes
Ingredients
– 1/2 cup of plump, high-quality chia seeds
– 1 1/2 cups of creamy, unsweetened almond milk
– 2 tablespoons of pure, golden maple syrup
– 1/2 teaspoon of fragrant vanilla extract
– 1/4 cup of vanilla-flavored protein powder
– 1/4 cup of fresh, ripe berries for topping
Instructions
1. In a medium-sized mixing bowl, combine 1/2 cup of plump, high-quality chia seeds and 1 1/2 cups of creamy, unsweetened almond milk.
2. Add 2 tablespoons of pure, golden maple syrup and 1/2 teaspoon of fragrant vanilla extract to the bowl, stirring gently to incorporate all ingredients evenly.
3. Sprinkle in 1/4 cup of vanilla-flavored protein powder, whisking vigorously for about 30 seconds to prevent clumping and ensure a smooth consistency.
4. Cover the bowl tightly with plastic wrap or a lid, and place it in the refrigerator to set for at least 4 hours or overnight for best results.
5. After chilling, remove the bowl from the refrigerator and stir the pudding thoroughly to break up any gel-like chunks, creating a uniform, creamy texture.
6. Divide the pudding evenly between two serving glasses or bowls using a spoon or spatula.
7. Top each serving with 1/4 cup of fresh, ripe berries, arranging them attractively on the surface for a burst of color and flavor.
8. Serve immediately, or store covered in the refrigerator for up to 3 days for easy grab-and-go meals.
As you enjoy this pudding, you’ll notice its thick, spoonable consistency that’s reminiscent of tapioca, with a subtle sweetness from the maple syrup. The vanilla protein powder adds a smooth, rich flavor that pairs beautifully with the tartness of fresh berries—try layering it with granola or drizzling with nut butter for extra crunch and depth.
Roasted Edamame with Chili Flakes
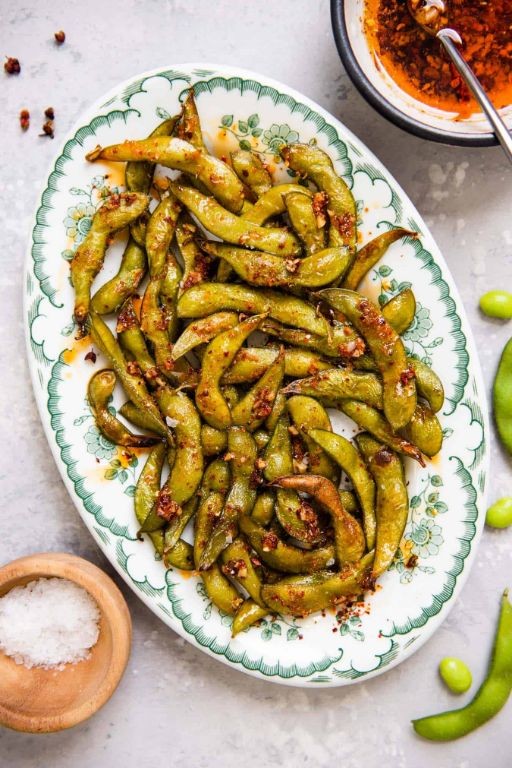
Just when you need a quick, satisfying snack that feels special enough for holiday gatherings but simple enough for a weeknight, roasted edamame comes to the rescue. This recipe transforms frozen soybeans into a crispy, savory treat with a spicy kick, perfect for sharing or keeping all to yourself.
Serving: 4 | Pre Time: 5 minutes | Cooking Time: 20 minutes
Ingredients
– 1 (12-ounce) bag of frozen shelled edamame
– 2 tablespoons of golden extra virgin olive oil
– 1 teaspoon of flaky sea salt
– 1/2 teaspoon of vibrant red chili flakes
– 1/4 teaspoon of freshly cracked black pepper
Instructions
1. Preheat your oven to 400°F and line a large, rimmed baking sheet with parchment paper for easy cleanup.
2. Place the frozen shelled edamame in a large mixing bowl, ensuring they are fully thawed and patted dry with a paper towel to remove excess moisture, which helps them crisp up better.
3. Drizzle the golden extra virgin olive oil over the edamame and toss thoroughly with your hands or a spoon until each bean is lightly and evenly coated.
4. Sprinkle the flaky sea salt, vibrant red chili flakes, and freshly cracked black pepper over the edamame, tossing again to distribute the seasonings uniformly.
5. Spread the seasoned edamame in a single, even layer on the prepared baking sheet, avoiding overcrowding to allow for proper roasting and browning.
6. Roast in the preheated oven for 15-20 minutes, shaking the pan halfway through, until the edamame are golden brown and slightly crispy at the edges.
7. Remove the baking sheet from the oven and let the edamame cool for 2-3 minutes on the pan; they will continue to crisp up as they cool, so resist the urge to eat them immediately.
8. Transfer the roasted edamame to a serving bowl and enjoy warm for the best texture and flavor.
Ultimately, you’ll be rewarded with a snack that boasts a delightful crunch on the outside while remaining tender inside, with a warm, smoky heat from the chili flakes that builds slowly. Serve it alongside a cold beer for game day, sprinkle it over salads for extra protein, or simply enjoy it straight from the bowl as a guilt-free indulgence.
Veggie Sticks with Greek Yogurt Dip
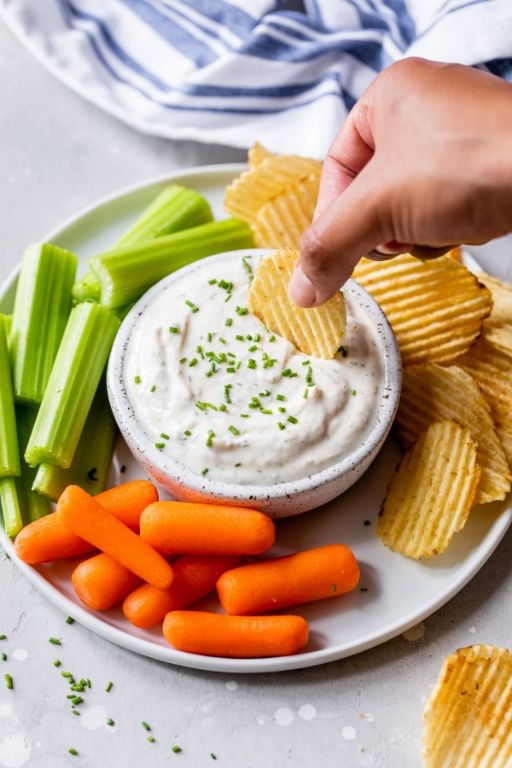
Now, let’s make a simple, healthy snack that’s perfect for any occasion—crisp veggie sticks paired with a creamy, tangy Greek yogurt dip. This recipe requires minimal prep and delivers maximum freshness, ideal for beginners looking to build confidence in the kitchen. You’ll appreciate how the cool dip complements the raw, crunchy vegetables, creating a balanced bite every time.
Serving: 4 | Pre Time: 15 minutes | Cooking Time: 0 minutes
Ingredients
– 2 large, crisp carrots
– 2 firm, fresh cucumbers
– 1 bunch of vibrant, leafy celery stalks
– 1 cup of thick, creamy plain Greek yogurt
– 2 tablespoons of bright, freshly squeezed lemon juice
– 1 tablespoon of fragrant, finely chopped fresh dill
– 1 teaspoon of aromatic garlic powder
– 1/2 teaspoon of coarse, flaky sea salt
– 1/4 teaspoon of finely ground black pepper
Instructions
1. Wash the 2 large, crisp carrots, 2 firm, fresh cucumbers, and 1 bunch of vibrant, leafy celery stalks thoroughly under cold running water to remove any dirt.
2. Pat the vegetables dry with a clean kitchen towel to ensure a firm grip while cutting, which helps prevent slips.
3. Trim the ends off the carrots, cucumbers, and celery stalks using a sharp chef’s knife on a stable cutting board.
4. Cut the carrots and cucumbers into uniform 3-inch-long sticks, about 1/4-inch thick, for even dipping and a pleasing presentation.
5. Cut the celery stalks into similar 3-inch-long sticks, removing any tough strings if desired for a smoother texture.
6. Arrange the veggie sticks on a large serving platter, grouping them by type for visual appeal and easy grabbing.
7. In a medium mixing bowl, combine 1 cup of thick, creamy plain Greek yogurt and 2 tablespoons of bright, freshly squeezed lemon juice, stirring until fully incorporated.
8. Add 1 tablespoon of fragrant, finely chopped fresh dill, 1 teaspoon of aromatic garlic powder, 1/2 teaspoon of coarse, flaky sea salt, and 1/4 teaspoon of finely ground black pepper to the yogurt mixture.
9. Whisk all the ingredients together vigorously for about 30 seconds until the dip is smooth, creamy, and evenly seasoned, with no lumps remaining.
10. Transfer the dip to a small serving bowl and place it in the center of the platter with the veggie sticks, ready for immediate enjoyment.
Ultimately, this snack offers a delightful contrast: the vegetables provide a satisfying, audible crunch, while the dip delivers a cool, tangy creaminess with herbal notes from the dill. For a creative twist, try sprinkling extra black pepper on top or serving it alongside whole-grain crackers for added texture.
Dark Chocolate-Covered Banana Bites

You’ve probably had chocolate-covered bananas at a fair or carnival, but making them at home is surprisingly simple and lets you control the quality of every ingredient. This recipe walks you through creating perfectly bite-sized frozen treats that are crisp, creamy, and deeply satisfying—ideal for a quick dessert or a fun snack project with kids.
Serving: 24 bites | Pre Time: 15 minutes | Cooking Time: 0 minutes
Ingredients
– 3 large ripe but firm bananas
– 8 ounces high-quality dark chocolate (70% cacao), finely chopped
– 1 tablespoon creamy natural peanut butter
– ¼ cup finely chopped roasted salted peanuts
– 1 teaspoon pure vanilla extract
– ½ teaspoon flaky sea salt
Instructions
1. Line a large baking sheet with parchment paper and set it aside.
2. Peel the 3 large ripe but firm bananas and slice them into ¾-inch thick rounds, placing them in a single layer on the prepared baking sheet.
3. Freeze the banana slices for 1 hour, or until they are completely firm to the touch—this prevents them from becoming mushy when dipped.
4. While the bananas freeze, place the 8 ounces of finely chopped high-quality dark chocolate in a microwave-safe bowl.
5. Microwave the chocolate in 30-second intervals, stirring thoroughly after each interval, until it is completely melted and smooth, about 1½ to 2 minutes total.
6. Stir the 1 tablespoon of creamy natural peanut butter and 1 teaspoon of pure vanilla extract into the melted chocolate until fully incorporated; this adds a subtle nutty flavor and helps the coating set with a slight sheen.
7. Remove the frozen banana slices from the freezer and, working quickly, dip each slice halfway into the melted chocolate mixture, allowing any excess to drip back into the bowl.
8. Immediately sprinkle the dipped portion with a pinch of the ¼ cup of finely chopped roasted salted peanuts and a tiny sprinkle of the ½ teaspoon of flaky sea salt before placing it back on the parchment paper.
9. Once all bites are coated, return the baking sheet to the freezer for at least 30 minutes, or until the chocolate shell is completely hard and snaps when tapped.
10. Transfer the bites to an airtight container, separating layers with parchment paper, and store them in the freezer for up to 1 month.
Snappy dark chocolate gives way to a sweet, creamy banana center, creating a delightful contrast in every bite. For a festive twist, try rolling the chocolate-dipped bites in crushed pretzels or colorful sprinkles before freezing—they make a stunning addition to any dessert platter.
Spiced Roasted Chickpeas
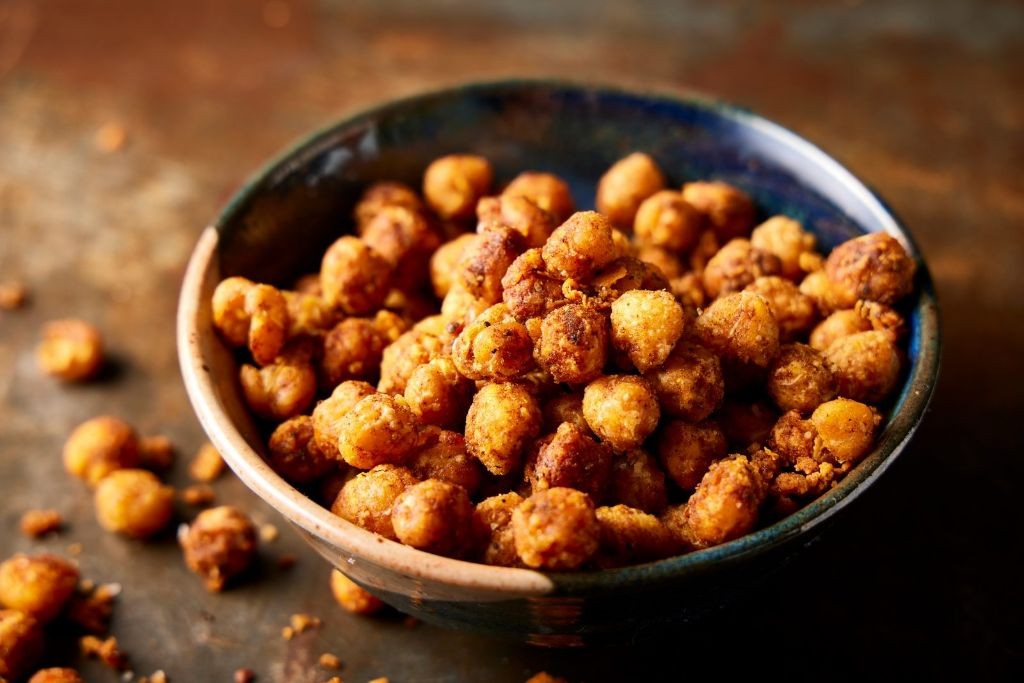
These crispy spiced roasted chickpeas transform a humble pantry staple into an irresistible snack or salad topper with just a few simple steps. They’re perfect for meal prep, offering a protein-packed crunch that’s far healthier than store-bought chips or nuts. Let’s walk through the process together, ensuring you get perfectly crisp results every time.
Serving: 4 | Pre Time: 10 minutes | Cooking Time: 30 minutes
Ingredients
– 2 (15-ounce) cans of plump chickpeas, drained and rinsed
– 2 tablespoons of golden extra virgin olive oil
– 1 teaspoon of warm, aromatic ground cumin
– 1 teaspoon of smoky, sweet paprika
– ½ teaspoon of finely ground garlic powder
– ½ teaspoon of coarse kosher salt
– ¼ teaspoon of freshly cracked black pepper
Instructions
1. Preheat your oven to 400°F (204°C) and line a large, rimmed baking sheet with parchment paper for easy cleanup.
2. Pat the drained and rinsed chickpeas completely dry with a clean kitchen towel or paper towels—this step is crucial for achieving maximum crispiness, as any moisture will steam them instead.
3. In a medium mixing bowl, combine the golden extra virgin olive oil, warm aromatic ground cumin, smoky sweet paprika, finely ground garlic powder, coarse kosher salt, and freshly cracked black pepper, stirring until a smooth, fragrant spice paste forms.
4. Add the thoroughly dried chickpeas to the bowl and toss them gently with the spice mixture until each chickpea is evenly coated, using your hands or a spoon to ensure no spots are missed.
5. Spread the coated chickpeas in a single, even layer on the prepared baking sheet, making sure they aren’t crowded to allow hot air to circulate and promote even roasting.
6. Roast the chickpeas in the preheated oven at 400°F for 25–30 minutes, shaking the pan halfway through to rotate them, until they turn a deep golden brown and feel crisp to the touch—listen for a light, hollow sound when tapped.
7. Remove the baking sheet from the oven and let the chickpeas cool completely on the pan for about 10 minutes; they’ll continue to crisp up as they cool, so resist the urge to sample them right away.
Crunchy and warmly spiced, these chickpeas develop a satisfying snap with a hint of smokiness from the paprika. Toss them over a fresh green salad for added texture, or enjoy them straight from the bowl as a guilt-free snack that’s packed with flavor and fiber.
Turkey and Avocado Roll-Ups

A simple yet satisfying lunch option, these Turkey and Avocado Roll-Ups are perfect for busy days when you want something fresh, protein-packed, and ready in minutes. Let’s walk through each step together to create these easy, no-cook wraps. Serving: 4 | Pre Time: 15 minutes | Cooking Time: 0 minutes
Ingredients
– 4 large, soft flour tortillas (about 10-inch diameter)
– 8 ounces thinly sliced roasted turkey breast
– 1 large, ripe Hass avocado
– 1/4 cup creamy mayonnaise
– 1 tablespoon freshly squeezed lime juice
– 1/4 teaspoon finely ground black pepper
– 1/4 teaspoon kosher salt
– 4 crisp green leaf lettuce leaves
Instructions
1. Place the 4 large, soft flour tortillas on a clean, dry work surface. 2. In a small bowl, mash the flesh of 1 large, ripe Hass avocado with a fork until mostly smooth but with some small chunks remaining for texture. 3. Add 1/4 cup creamy mayonnaise, 1 tablespoon freshly squeezed lime juice, 1/4 teaspoon finely ground black pepper, and 1/4 teaspoon kosher salt to the mashed avocado. 4. Stir the avocado mixture vigorously for about 30 seconds until all ingredients are fully combined and the mixture is uniformly creamy. 5. Spread approximately 2 tablespoons of the avocado mixture evenly over the entire surface of one flour tortilla, leaving a 1/2-inch border around the edges. 6. Arrange 2 ounces of thinly sliced roasted turkey breast in a single layer over the avocado spread on the tortilla. 7. Place 1 crisp green leaf lettuce leaf on top of the turkey layer, positioning it slightly off-center toward the edge closest to you. 8. Starting from the edge with the lettuce, tightly roll the tortilla away from you, applying gentle, even pressure to form a compact cylinder. 9. Repeat steps 5 through 8 with the remaining 3 tortillas, avocado mixture, turkey, and lettuce leaves. 10. Using a sharp serrated knife, carefully slice each rolled tortilla crosswise into 1-inch thick pinwheels, wiping the knife clean between cuts for neat edges. So tender and creamy from the avocado spread, these roll-ups offer a delightful contrast with the savory turkey and crisp lettuce. Serve them immediately on a platter for a light lunch, or pack them in a bento box for a portable, protein-rich snack that stays fresh for hours.
Cottage Cheese with Pineapple
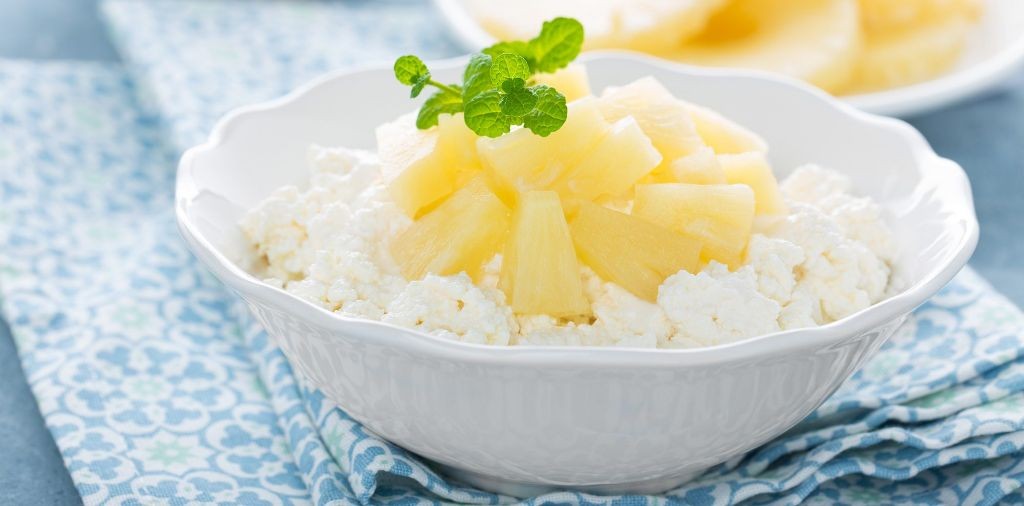
Zesty yet comforting, this cottage cheese with pineapple recipe transforms simple ingredients into a delightful snack or light meal. Perfect for beginners, it requires no cooking and comes together in minutes, offering a refreshing balance of creamy and tangy flavors that’s ideal for a quick bite or a healthy dessert. Let’s walk through each step methodically to ensure success.
Serving: 2 | Pre Time: 10 minutes | Cooking Time: 0 minutes
Ingredients
– 2 cups of creamy, full-fat cottage cheese
– 1 cup of sweet, juicy pineapple chunks (fresh or canned in juice, drained)
– 2 tablespoons of golden, raw honey
– 1 teaspoon of pure vanilla extract
– A pinch of flaky sea salt
Instructions
1. Place 2 cups of creamy, full-fat cottage cheese into a medium mixing bowl.
2. Add 1 cup of sweet, juicy pineapple chunks to the bowl with the cottage cheese.
3. Drizzle 2 tablespoons of golden, raw honey over the mixture.
4. Pour 1 teaspoon of pure vanilla extract into the bowl.
5. Sprinkle a pinch of flaky sea salt over the ingredients.
6. Gently fold all ingredients together with a spatula for about 30 seconds, until just combined to avoid overmixing and maintain texture.
7. Divide the mixture evenly between two serving bowls.
8. Serve immediately, or cover and refrigerate for up to 1 hour to allow flavors to meld for a cooler, more cohesive taste.
9. For an optional garnish, top with additional pineapple chunks or a drizzle of honey before serving to enhance visual appeal and sweetness.
Mouthwatering and satisfying, this dish boasts a creamy texture from the cottage cheese punctuated by the juicy bursts of pineapple, with the honey and vanilla adding subtle sweetness and depth. Try serving it over toasted whole-grain bread for a hearty twist or alongside a sprinkle of toasted coconut for extra crunch and tropical flair.
Almond and Date Energy Balls

Gathering wholesome ingredients for a quick energy boost has never been simpler than with these no-bake almond and date energy balls. Perfect for a post-workout snack or a midday pick-me-up, this recipe requires minimal effort and yields delicious, nutrient-packed results. Let’s walk through the process step by step to ensure your success in the kitchen.
Serving: 12 | Pre Time: 15 minutes | Cooking Time: 0 minutes
Ingredients
– 1 cup of plump, sticky Medjool dates, pitted
– 1 cup of raw, crunchy almonds
– 2 tablespoons of rich, creamy almond butter
– 1 tablespoon of pure, golden honey
– 1 teaspoon of fragrant, ground cinnamon
– A pinch of flaky, fine sea salt
Instructions
1. Place 1 cup of raw, crunchy almonds into a food processor and pulse for 30-45 seconds until they form a coarse, sandy texture, being careful not to over-process into almond butter.
2. Add 1 cup of plump, sticky Medjool dates, pitted, to the food processor with the ground almonds.
3. Pour in 2 tablespoons of rich, creamy almond butter and 1 tablespoon of pure, golden honey to help bind the mixture.
4. Sprinkle in 1 teaspoon of fragrant, ground cinnamon and a pinch of flaky, fine sea salt for enhanced flavor.
5. Process all ingredients on high speed for 60-90 seconds until the mixture clumps together into a sticky, uniform dough that holds its shape when pressed.
6. Scoop out approximately 1 tablespoon of the dough and roll it firmly between your palms for 10-15 seconds to form a smooth, round ball about 1 inch in diameter.
7. Repeat the rolling process with the remaining dough to make 12 total balls, lining them up on a parchment paper-lined baking sheet.
8. Transfer the baking sheet to the refrigerator and chill the energy balls for at least 30 minutes, or until firm to the touch, to set their shape.
9. Store the chilled energy balls in an airtight container in the refrigerator for up to 1 week for optimal freshness.
Keeping these energy balls on hand provides a chewy, satisfying texture with a sweet caramel-like flavor from the dates, balanced by the nutty crunch of almonds. For a creative twist, roll the finished balls in shredded coconut or cocoa powder before chilling, or enjoy them crumbled over yogurt for a delightful breakfast topping.
Tuna and Cucumber Lettuce Wraps
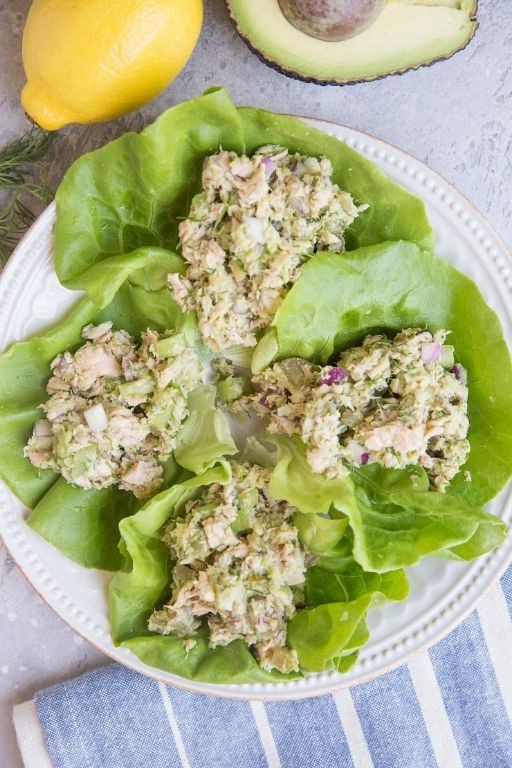
Let’s make a light, refreshing lunch that comes together in minutes—perfect for a busy day or a quick, healthy meal prep. These tuna and cucumber lettuce wraps are crisp, protein-packed, and endlessly customizable to suit your taste. I’ll walk you through each simple step so you can assemble them with confidence.
Serving: 4 | Pre Time: 15 minutes | Cooking Time: 0 minutes
Ingredients
– 2 (5-ounce) cans of solid white albacore tuna in water, drained
– 1/2 cup of creamy mayonnaise
– 1 tablespoon of tangy Dijon mustard
– 1/4 cup of finely chopped red onion
– 1/4 cup of fresh dill, finely chopped
– 1/2 teaspoon of finely ground black pepper
– 1/4 teaspoon of kosher salt
– 1 large English cucumber, thinly sliced into rounds
– 8 large, crisp butter lettuce leaves, rinsed and patted dry
Instructions
1. Place the drained solid white albacore tuna in a medium mixing bowl.
2. Add the creamy mayonnaise and tangy Dijon mustard to the bowl.
3. Use a fork to gently flake and mix the tuna with the mayonnaise and mustard until well combined, being careful not to overmix to keep the texture light.
4. Stir in the finely chopped red onion and fresh dill until evenly distributed.
5. Season the mixture with finely ground black pepper and kosher salt, mixing once more to incorporate.
6. Lay out the crisp butter lettuce leaves on a clean work surface or serving platter.
7. Arrange the thinly sliced English cucumber rounds in a single layer on top of each lettuce leaf, covering most of the surface.
8. Spoon approximately 2 tablespoons of the tuna mixture onto the center of each cucumber-topped lettuce leaf.
9. Fold or roll the lettuce leaves gently around the filling to form wraps, securing them with toothpicks if desired for easier handling.
10. Serve immediately, or cover and refrigerate for up to 2 hours to let the flavors meld slightly.
Keep these wraps chilled for a crisp, cool bite—the creamy tuna filling contrasts beautifully with the crunchy cucumber and tender lettuce. For a creative twist, drizzle with a squeeze of lemon juice or sprinkle with toasted sesame seeds just before serving to add a bright, nutty accent.
Garlic Herb Popcorn
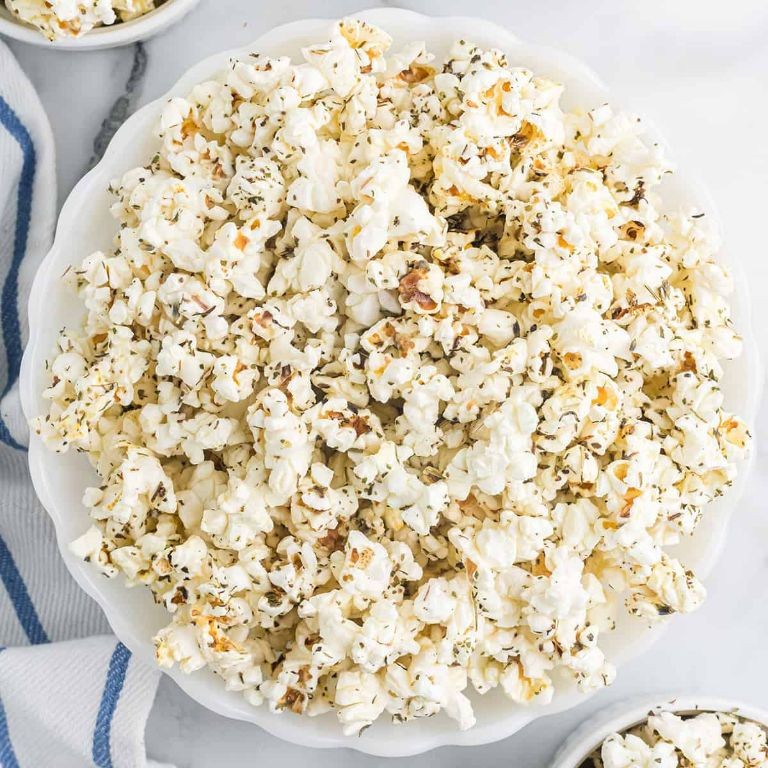
Sometimes the simplest snacks become the most memorable with just a few thoughtful additions, and this Garlic Herb Popcorn is a perfect example of that transformation. Starting with high-quality popcorn kernels ensures maximum fluffiness, while a blend of aromatic herbs and rich, melted butter creates a coating that’s impossible to resist. Follow these steps closely for a batch that’s evenly seasoned and perfectly crisp every time.
Serving: 4 | Pre Time: 5 minutes | Cooking Time: 10 minutes
Ingredients
– 1/2 cup of high-quality popcorn kernels
– 3 tbsp of unsalted butter
– 2 tbsp of rich extra virgin olive oil
– 3 cloves of fresh garlic, minced
– 1 tsp of dried rosemary, finely crushed
– 1 tsp of dried thyme
– 1/2 tsp of fine sea salt
– 1/4 tsp of freshly ground black pepper
Instructions
1. Place a large, heavy-bottomed pot with a lid over medium heat and add the 1/2 cup of high-quality popcorn kernels.
2. Pour in the 2 tbsp of rich extra virgin olive oil, swirling it to coat the kernels evenly for consistent popping.
3. Cover the pot with the lid and listen for the kernels to begin popping, which should start within 2–3 minutes; shake the pot gently every 30 seconds to prevent burning.
4. Once the popping slows to 2–3 seconds between pops, remove the pot from the heat immediately and transfer the popped popcorn to a large mixing bowl.
5. In a small saucepan over low heat, melt the 3 tbsp of unsalted butter completely, which should take about 2 minutes.
6. Add the 3 cloves of fresh garlic, minced, to the melted butter and cook for 1 minute until fragrant but not browned to avoid bitterness.
7. Stir in the 1 tsp of dried rosemary, finely crushed, the 1 tsp of dried thyme, the 1/2 tsp of fine sea salt, and the 1/4 tsp of freshly ground black pepper, mixing for 30 seconds to bloom the herbs.
8. Drizzle the warm garlic-herb butter mixture evenly over the popcorn in the bowl.
9. Using two large spoons or clean hands, toss the popcorn gently for 1–2 minutes until every piece is lightly coated, being careful not to crush the kernels.
10. Serve the popcorn immediately while warm for the best texture and aroma.
Delightfully crisp and light, each bite offers a savory burst of garlic softened by the earthy notes of rosemary and thyme. The butter and olive oil create a delicate sheen that clings perfectly without sogginess, making it ideal for movie nights or as a gourmet snack with a glass of chilled white wine. For a creative twist, try sprinkling it with a pinch of grated Parmesan cheese just before serving to add a salty, umami depth.
Peanut Butter and Flaxseed Smoothie
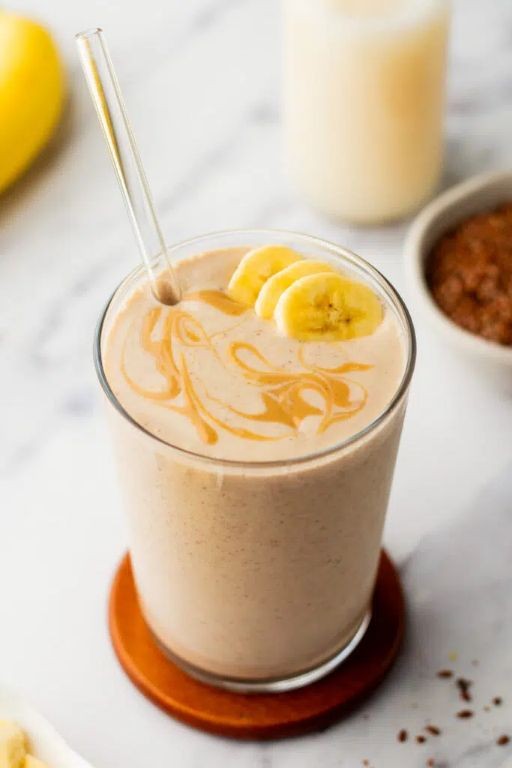
Haven’t you ever wished for a breakfast that’s both nourishing and effortless? This Peanut Butter and Flaxseed Smoothie delivers creamy satisfaction with a nutritional punch, blending wholesome ingredients into a drink that feels like a treat. Let’s walk through each simple step to create your new morning staple.
Serving: 1 | Pre Time: 5 minutes | Cooking Time: 0 minutes
Ingredients
– 1 cup of cold, unsweetened almond milk
– 1 ripe banana, peeled and sliced
– 2 tablespoons of creamy natural peanut butter
– 1 tablespoon of golden flaxseed meal
– 1 teaspoon of pure maple syrup
– ½ teaspoon of pure vanilla extract
– A pinch of fine sea salt
– 4-5 ice cubes
Instructions
1. Add 1 cup of cold, unsweetened almond milk to a high-speed blender.
2. Place 1 ripe banana, sliced, into the blender with the almond milk.
3. Spoon 2 tablespoons of creamy natural peanut butter into the blender.
4. Measure and add 1 tablespoon of golden flaxseed meal to the mixture.
5. Pour 1 teaspoon of pure maple syrup into the blender.
6. Add ½ teaspoon of pure vanilla extract to the blender.
7. Sprinkle a pinch of fine sea salt over the ingredients.
8. Drop 4-5 ice cubes into the blender last to help chill the smoothie evenly.
9. Secure the blender lid tightly to prevent spills.
10. Blend on high speed for 45-60 seconds, or until the mixture is completely smooth and frothy, with no visible chunks.
11. Pour the smoothie immediately into a tall glass to enjoy its creamy texture at its best.
12. Rinse the blender promptly with warm water to make cleanup easier.
Delight in the velvety, thick consistency that coats your spoon, with the rich nuttiness of peanut butter balanced by the subtle sweetness of banana and maple. For a creative twist, top it with a sprinkle of extra flaxseed meal or a drizzle of peanut butter, or serve it alongside whole-grain toast for a complete breakfast that keeps you satisfied all morning.
Summary
Keeping healthy while busy is easier with these 20 tasty, weight-loss-friendly snacks. I hope you find some new favorites to fuel your day! Give a few recipes a try, then drop a comment below telling me which one you loved. If this roundup helped you, please share it on Pinterest to help other home cooks too. Happy snacking!


