
Gearing up to boost your protein intake for muscle growth? You’re in the right place! We’ve rounded up 20 delicious bean recipes that are perfect for home cooks looking to fuel their fitness with tasty, satisfying meals. From quick weeknight dinners to hearty comfort food, these dishes make healthy eating a pleasure. Get ready to discover your new favorite high-protein meals—let’s dive into the list!
Lentil and Chickpea Curry
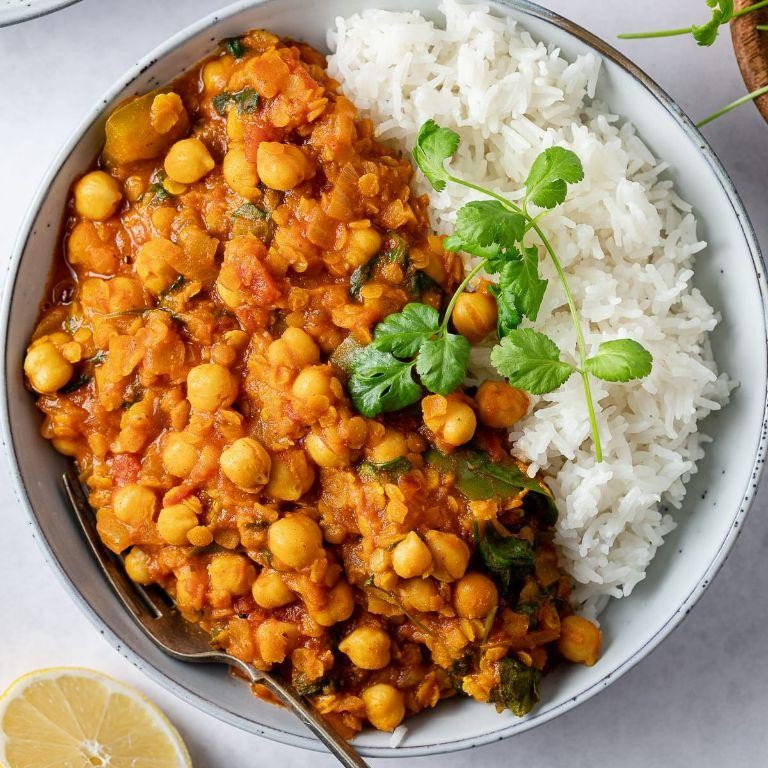
A cozy bowl of Lentil and Chickpea Curry has become my go-to comfort meal during chilly evenings—it’s hearty, nourishing, and surprisingly simple to whip up. I love how the spices fill my kitchen with an inviting aroma, reminding me of the times I’d cook this for friends on lazy weekends. Plus, it’s a fantastic way to use up pantry staples, making it both budget-friendly and deliciously satisfying.
Serving: 4 | Pre Time: 15 minutes | Cooking Time: 30 minutes
Ingredients
– 1 tablespoon olive oil (or any neutral oil)
– 1 medium onion, diced
– 3 cloves garlic, minced
– 1 tablespoon fresh ginger, grated
– 1 tablespoon curry powder (adjust to taste for more heat)
– 1 teaspoon ground cumin
– 1 (15-ounce) can chickpeas, drained and rinsed
– 1 cup dried brown lentils, rinsed
– 4 cups vegetable broth
– 1 (14-ounce) can diced tomatoes
– 1 (13.5-ounce) can coconut milk
– Salt, to taste (start with 1/2 teaspoon)
– Fresh cilantro, chopped (for garnish)
Instructions
1. Heat 1 tablespoon olive oil in a large pot over medium heat until shimmering, about 2 minutes.
2. Add 1 medium diced onion and cook, stirring occasionally, until softened and translucent, about 5 minutes.
3. Stir in 3 cloves minced garlic and 1 tablespoon grated ginger, cooking for 1 minute until fragrant.
4. Add 1 tablespoon curry powder and 1 teaspoon ground cumin, toasting the spices for 30 seconds to enhance their flavor.
5. Pour in 1 cup rinsed brown lentils and 1 can drained chickpeas, stirring to coat them in the spice mixture.
6. Add 4 cups vegetable broth and 1 can diced tomatoes, bringing the mixture to a boil over high heat.
7. Reduce the heat to low, cover the pot, and simmer for 20 minutes until the lentils are tender but not mushy.
8. Stir in 1 can coconut milk and simmer uncovered for 5 minutes to thicken the curry slightly.
9. Season with salt to taste, starting with 1/2 teaspoon and adjusting as needed.
10. Garnish with fresh chopped cilantro before serving.
During the final simmer, the curry develops a rich, creamy texture that clings perfectly to rice or naan. I adore how the chickpeas add a pleasant bite alongside the tender lentils, making each spoonful a comforting blend of flavors. For a creative twist, try serving it over roasted sweet potatoes or with a squeeze of lime to brighten the dish.
Edamame and Tofu Stir-Fry
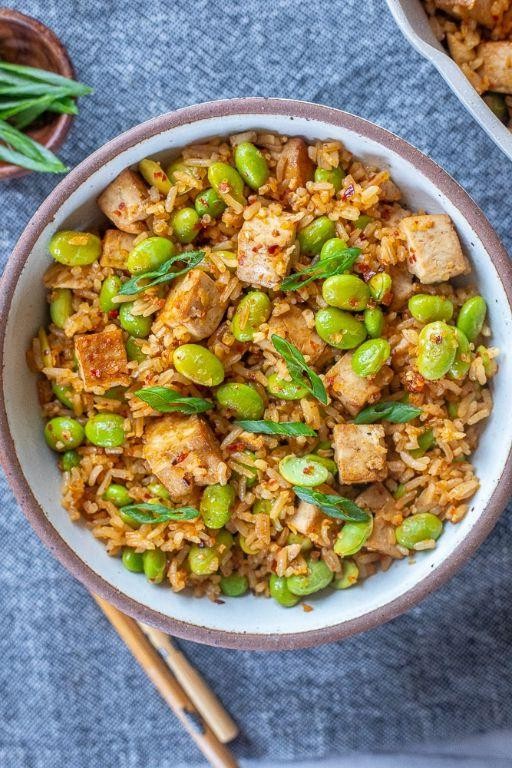
Every time I need a quick, healthy dinner that still feels satisfying, I turn to this Edamame and Tofu Stir-Fry. It’s become my go-to on busy weeknights when I want something colorful and packed with protein without spending hours in the kitchen—plus, it’s a great way to use up any veggies hiding in the fridge!
Serving: 4 | Pre Time: 15 minutes | Cooking Time: 15 minutes
Ingredients
– 1 (14-ounce) block extra-firm tofu, pressed and cubed (pressing removes excess water for better browning)
– 1 cup shelled edamame, thawed if frozen (I keep a bag in the freezer for convenience)
– 2 tablespoons vegetable oil, or any neutral oil like avocado oil
– 3 cloves garlic, minced (fresh garlic adds the best flavor, but 1 teaspoon jarred minced garlic works in a pinch)
– 1 tablespoon grated fresh ginger (or 1 teaspoon ground ginger, though fresh is more aromatic)
– 1/4 cup low-sodium soy sauce (adjust to taste if using regular soy sauce)
– 1 tablespoon rice vinegar (adds a bright, tangy note)
– 1 teaspoon sesame oil (for a nutty finish—don’t skip this!)
– 2 cups mixed vegetables, such as sliced bell peppers and broccoli florets (use whatever you have on hand)
– 2 green onions, thinly sliced (for garnish)
– 1 teaspoon cornstarch mixed with 2 tablespoons water (this slurry thickens the sauce nicely)
Instructions
1. Press the tofu for 10 minutes using a tofu press or by wrapping it in paper towels and placing a heavy pan on top to remove excess moisture, then cut it into 1-inch cubes.
2. Heat 1 tablespoon of vegetable oil in a large skillet or wok over medium-high heat until shimmering, about 1 minute.
3. Add the tofu cubes in a single layer and cook for 5–7 minutes, turning occasionally, until golden brown and crispy on all sides; remove from the skillet and set aside on a plate.
4. In the same skillet, add the remaining 1 tablespoon of vegetable oil and heat for 30 seconds over medium-high heat.
5. Add the minced garlic and grated ginger, stirring constantly for 1 minute until fragrant to prevent burning.
6. Toss in the mixed vegetables and cook for 4–5 minutes, stirring frequently, until they start to soften but remain crisp-tender.
7. Stir in the edamame and cook for 2 more minutes until heated through.
8. Pour in the soy sauce, rice vinegar, and sesame oil, stirring to coat the vegetables evenly.
9. Return the cooked tofu to the skillet and gently mix to combine with the sauce and vegetables.
10. Give the cornstarch slurry a quick stir and add it to the skillet, cooking for 1–2 minutes until the sauce thickens and coats everything evenly.
11. Remove from heat and garnish with sliced green onions before serving.
The tofu stays wonderfully crispy against the tender edamame and veggies, while the sauce brings a savory-sweet balance that’s not too heavy. I love serving this over a bed of fluffy brown rice or quinoa for a complete meal, and it reheats beautifully for lunch the next day—just store any leftovers in an airtight container in the fridge.
Three-Bean Chili with Lean Ground Turkey

Unbelievably, this is the chili recipe I make every single time a cold snap hits—it’s my go-to cozy meal that somehow manages to feel both hearty and healthy. I love that it comes together in one pot with minimal fuss, and the lean turkey keeps it light enough that I don’t feel weighed down after a big bowl. Honestly, I’ve been known to double the batch and freeze half for those nights when cooking feels impossible.
Serving: 6 | Pre Time: 15 minutes | Cooking Time: 45 minutes
Ingredients
– 1 tablespoon olive oil (or any neutral oil)
– 1 pound lean ground turkey (93/7 works great)
– 1 medium yellow onion, diced
– 1 medium green bell pepper, diced
– 3 cloves garlic, minced
– 1 (15-ounce) can black beans, rinsed and drained
– 1 (15-ounce) can kidney beans, rinsed and drained
– 1 (15-ounce) can pinto beans, rinsed and drained
– 1 (28-ounce) can crushed tomatoes
– 2 cups low-sodium chicken broth
– 2 tablespoons chili powder
– 1 teaspoon ground cumin
– 1 teaspoon dried oregano
– 1/2 teaspoon smoked paprika
– 1/4 teaspoon cayenne pepper (optional, for heat)
– 1 teaspoon kosher salt
– 1/2 teaspoon black pepper
– Optional toppings: shredded cheddar cheese, sour cream, sliced jalapeños, chopped cilantro
Instructions
1. Heat the olive oil in a large Dutch oven or heavy-bottomed pot over medium-high heat until shimmering, about 1 minute.
2. Add the ground turkey and cook, breaking it up with a wooden spoon, until no pink remains, about 5-7 minutes.
3. Add the diced onion and green bell pepper to the pot and cook, stirring occasionally, until the vegetables soften, about 5 minutes.
4. Stir in the minced garlic and cook until fragrant, about 30 seconds.
5. Add the chili powder, cumin, oregano, smoked paprika, cayenne pepper (if using), kosher salt, and black pepper to the pot. Stir to coat the meat and vegetables evenly, toasting the spices for 1 minute.
6. Pour in the crushed tomatoes and chicken broth, scraping the bottom of the pot to release any browned bits.
7. Add the rinsed and drained black beans, kidney beans, and pinto beans to the pot.
8. Bring the mixture to a boil, then reduce the heat to low and cover the pot with a lid.
9. Simmer the chili for 30 minutes, stirring occasionally, until the flavors meld and the chili thickens slightly.
10. Taste and adjust seasoning with more salt or pepper if desired.
11. Ladle the chili into bowls and serve hot with your choice of toppings.
During the simmer, the chili transforms into a rich, thick stew where the beans hold their shape but become tender. The lean turkey absorbs all the smoky, spicy flavors, making each bite deeply satisfying without being greasy. For a fun twist, I sometimes serve it over baked sweet potatoes or scoop it up with thick-cut tortilla chips for a heartier meal.
Hummus-Stuffed Bell Peppers

Zesty, vibrant, and perfect for a festive spread, these hummus-stuffed bell peppers have become my go-to for easy entertaining. I first whipped them up on a whim last holiday season when I needed a last-minute appetizer, and now they’re a requested staple at every gathering—trust me, they disappear fast!
Serving: 4 | Pre Time: 15 minutes | Cooking Time: 25 minutes
Ingredients
– 4 large bell peppers (any color, but red or yellow add sweetness)
– 2 cups prepared hummus (store-bought or homemade)
– 1 tbsp olive oil (or any neutral oil)
– 1 tsp smoked paprika
– 1/2 tsp garlic powder
– 1/4 cup crumbled feta cheese (optional, for topping)
– Fresh parsley, chopped (for garnish, adjust to taste)
Instructions
1. Preheat your oven to 375°F (190°C) and line a baking sheet with parchment paper.
2. Slice the bell peppers in half lengthwise and remove all seeds and membranes.
3. Brush the inside of each pepper half lightly with olive oil using a pastry brush—this helps prevent sticking and adds flavor.
4. In a medium bowl, mix the hummus with smoked paprika and garlic powder until fully combined.
5. Spoon the hummus mixture evenly into each pepper half, filling them to the top but not overflowing.
6. Place the stuffed peppers on the prepared baking sheet, spacing them about 1 inch apart.
7. Bake in the preheated oven for 20–25 minutes, until the peppers are tender and the edges start to lightly brown.
8. Remove from the oven and let cool for 5 minutes—this allows the filling to set slightly for easier handling.
9. Top with crumbled feta cheese and chopped parsley before serving.
Delightfully creamy and smoky, these peppers offer a satisfying contrast between the soft hummus and tender-crisp bell pepper shells. I love serving them warm with a side of pita chips or over a bed of greens for a light lunch—they’re as versatile as they are delicious!
Lima Bean and Quinoa Salad
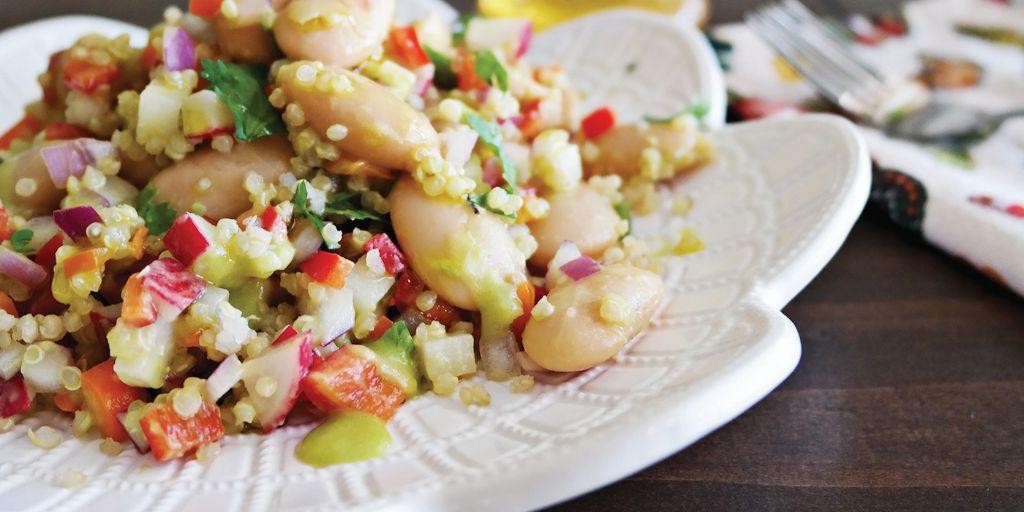
Lately, I’ve been craving something fresh and hearty that doesn’t weigh me down—enter this vibrant Lima Bean and Quinoa Salad, a dish I first whipped up after a busy farmers’ market run when I needed a quick, nutritious lunch. It’s become my go-to for meal prep because it holds up beautifully in the fridge, and I love how the textures and flavors meld together over time.
Serving: 4 | Pre Time: 15 minutes | Cooking Time: 20 minutes
Ingredients
– 1 cup quinoa, rinsed under cold water (this removes bitterness)
– 2 cups water
– 1 (15-ounce) can lima beans, drained and rinsed
– 1 cup cherry tomatoes, halved
– ½ cup red onion, finely diced (soak in cold water for 5 minutes to mellow the sharpness)
– ¼ cup fresh parsley, chopped
– 3 tablespoons olive oil (or any neutral oil)
– 2 tablespoons lemon juice, freshly squeezed
– 1 teaspoon salt
– ½ teaspoon black pepper
Instructions
1. In a medium saucepan, combine 1 cup rinsed quinoa and 2 cups water, then bring to a boil over high heat.
2. Reduce heat to low, cover the saucepan, and simmer for 15 minutes until the quinoa is tender and the water is absorbed; fluff with a fork and let it cool slightly.
3. While the quinoa cooks, drain and rinse 1 can of lima beans in a colander under cold running water to remove excess sodium.
4. In a large mixing bowl, combine the cooked quinoa, lima beans, 1 cup halved cherry tomatoes, ½ cup diced red onion, and ¼ cup chopped parsley.
5. In a small bowl, whisk together 3 tablespoons olive oil, 2 tablespoons lemon juice, 1 teaspoon salt, and ½ teaspoon black pepper until emulsified.
6. Pour the dressing over the salad mixture and toss gently to coat all ingredients evenly.
7. Let the salad sit at room temperature for 10 minutes to allow the flavors to blend before serving.
Perfectly balanced, this salad offers a delightful crunch from the veggies and a creamy bite from the lima beans, with the quinoa adding a light, fluffy base. I often serve it over a bed of greens for extra freshness or pack it for picnics—it’s versatile enough to pair with grilled chicken or enjoy on its own as a satisfying plant-based meal.
Black Bean and Egg Breakfast Burrito

Every morning, I’m on the hunt for a breakfast that’s both hearty and quick to pull together—this black bean and egg burrito has become my go-to. It’s packed with protein and flavor, and I love how customizable it is based on what’s in my fridge. Honestly, it’s saved me from many a rushed, unsatisfying morning!
Serving: 2 | Pre Time: 10 minutes | Cooking Time: 15 minutes
Ingredients
– 4 large eggs
– 1 tablespoon olive oil (or any neutral oil)
– 1/2 cup canned black beans, rinsed and drained
– 1/4 cup shredded cheddar cheese
– 2 large flour tortillas (10-inch size)
– 1/4 cup diced red bell pepper
– 1/4 teaspoon ground cumin
– 1/4 teaspoon chili powder
– Salt and black pepper, to taste (adjust as needed)
– Optional: salsa or hot sauce for serving
Instructions
1. Heat the olive oil in a non-stick skillet over medium heat until it shimmers, about 1 minute.
2. Add the diced red bell pepper to the skillet and cook, stirring occasionally, until softened, about 3–4 minutes.
3. Tip: If the peppers start to brown too quickly, reduce the heat slightly to prevent burning.
4. Crack the eggs into a bowl, whisk them with a fork until fully combined and slightly frothy.
5. Pour the whisked eggs into the skillet with the peppers, and let them sit undisturbed for 30 seconds to set the edges.
6. Gently scramble the eggs with a spatula, moving them around the skillet until they are fully cooked but still moist, about 2–3 minutes total.
7. Tip: For fluffier eggs, avoid over-stirring—let them form soft curds.
8. Add the black beans, ground cumin, and chili powder to the skillet, stirring to combine and heat through, about 1–2 minutes.
9. Season the mixture with salt and black pepper to your preference, then remove the skillet from the heat.
10. Warm the flour tortillas in a dry skillet over low heat for 20–30 seconds per side, or until pliable and lightly toasted.
11. Tip: Warming the tortillas prevents them from tearing when folded.
12. Divide the egg and bean mixture evenly between the two tortillas, placing it in the center of each.
13. Sprinkle the shredded cheddar cheese over the mixture on each tortilla.
14. Fold the sides of each tortilla inward, then roll tightly from the bottom to form a burrito.
15. Serve immediately, optionally with salsa or hot sauce on the side.
A warm, satisfying bite, this burrito boasts a creamy texture from the eggs and beans, with a subtle kick from the spices. I often enjoy it with a dollop of salsa for extra zest, or you can wrap it in foil for an easy on-the-go meal—perfect for busy mornings!
White Bean and Avocado Toast
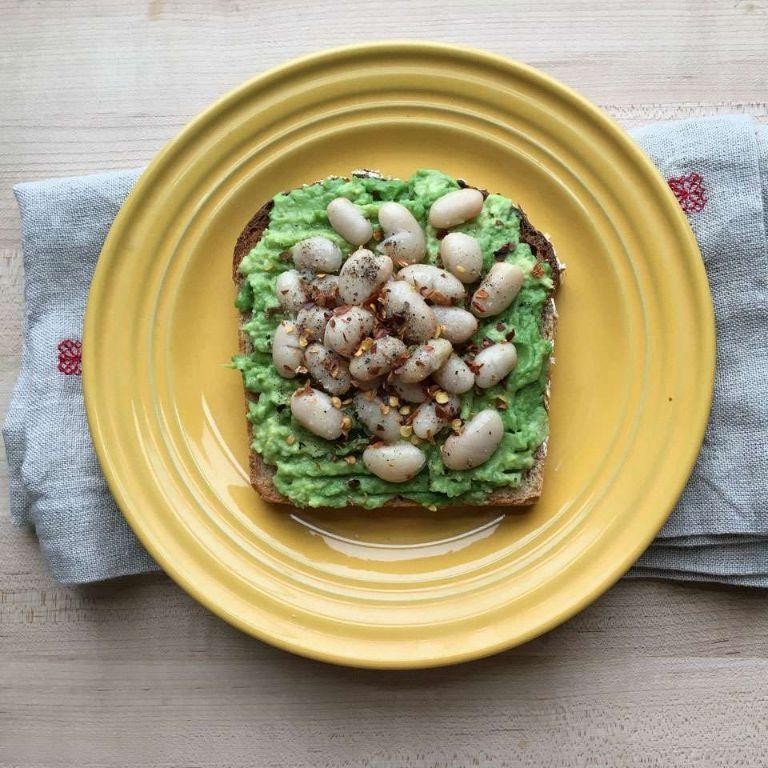
Gosh, I can’t believe it’s already Christmas Eve—2025 is flying by! As I’m rushing around wrapping last-minute gifts, I always crave something quick, nourishing, and downright delicious to keep me going. That’s where this white bean and avocado toast comes in: it’s my go-to for busy days when I want a meal that feels special without any fuss.
Serving: 2 | Pre Time: 10 minutes | Cooking Time: 5 minutes
Ingredients
– 4 slices sourdough bread (or any crusty bread you love)
– 1 (15-ounce) can white beans, drained and rinsed (I prefer cannellini for their creamy texture)
– 1 ripe avocado, pitted and peeled
– 2 tablespoons extra-virgin olive oil (or any neutral oil if you prefer)
– 1 tablespoon fresh lemon juice (adjust to taste—I like it zesty!)
– 1/4 teaspoon garlic powder (fresh minced garlic works too, but powder blends smoothly)
– Salt and black pepper, to season (I start with a pinch of each)
– Red pepper flakes, optional for a spicy kick
– Fresh parsley or microgreens, for garnish (adds a pop of color and freshness)
Instructions
1. Preheat your oven to 400°F (200°C) and place the sourdough slices on a baking sheet in a single layer.
2. Toast the bread in the oven for 4-5 minutes, until golden and crisp at the edges—keep an eye on it to avoid burning.
3. While the bread toasts, add the drained white beans, avocado, olive oil, lemon juice, and garlic powder to a medium bowl.
4. Mash the mixture with a fork or potato masher until it’s mostly smooth but still has some texture, about 2-3 minutes of mashing.
5. Season the bean-avocado mash with salt and black pepper, stirring to combine; taste and adjust seasoning if needed, adding a pinch of red pepper flakes if using.
6. Remove the toasted bread from the oven and let it cool for 1 minute so it’s warm but not too hot to handle.
7. Evenly divide the bean-avocado mash among the toasted slices, spreading it to the edges with a spoon or knife.
8. Garnish each toast with fresh parsley or microgreens for a vibrant finish.
Buttery avocado melds with the earthy beans for a creamy, satisfying bite that’s light yet filling. The crisp sourdough adds a perfect crunch, making this toast ideal for a lazy brunch or a speedy snack—try topping it with a fried egg or smoked salmon for an extra twist!
Chickpea and Tahini Power Wrap
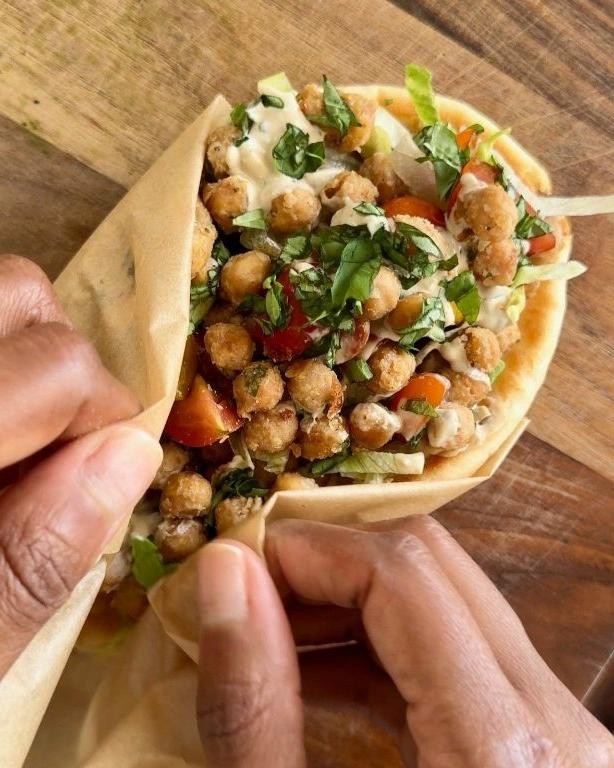
Over the holidays, I always crave something hearty yet healthy to balance out all the sweets—this wrap is my go-to solution. It’s packed with protein and flavor, and I love that I can prep the filling ahead for busy weeknights. Honestly, it’s become a staple in my kitchen because it’s so versatile and satisfying.
Serving: 4 | Pre Time: 15 minutes | Cooking Time: 10 minutes
Ingredients
– 1 (15-ounce) can chickpeas, drained and rinsed (or 1.5 cups cooked chickpeas)
– 1/4 cup tahini
– 2 tbsp lemon juice, freshly squeezed (adjust for tanginess)
– 1 tbsp olive oil (or any neutral oil)
– 1/2 tsp ground cumin
– 1/4 tsp smoked paprika
– 1/4 tsp salt (I use sea salt for better flavor)
– 4 large whole-wheat tortillas (about 10 inches each)
– 1 cup shredded carrots
– 1 cup baby spinach leaves (packed loosely)
– 1/4 cup chopped fresh parsley (optional, for garnish)
Instructions
1. In a medium bowl, combine the chickpeas, tahini, lemon juice, olive oil, cumin, smoked paprika, and salt.
2. Mash the mixture with a fork or potato masher for about 2 minutes until it’s chunky but holds together—this helps the filling stick better in the wrap.
3. Heat a large skillet over medium heat (around 350°F) and warm each tortilla for 30 seconds per side until pliable and lightly toasted.
4. Lay a warmed tortilla flat on a clean surface and spread 1/4 of the chickpea mixture evenly down the center, leaving a 1-inch border at the edges.
5. Top the chickpea mixture with 1/4 cup shredded carrots and 1/4 cup baby spinach leaves per wrap.
6. Fold the bottom edge of the tortilla up over the filling, then fold in the sides tightly to enclose it, rolling from the bottom to form a secure wrap.
7. Repeat steps 3–6 with the remaining tortillas and ingredients.
8. If desired, slice each wrap in half diagonally for easier serving and garnish with chopped parsley.
Finally, this wrap boasts a creamy, textured filling from the mashed chickpeas and tahini, balanced by the crunch of carrots and freshness of spinach. For a creative twist, try serving it with a side of extra tahini drizzled on top or alongside a simple cucumber salad—it’s perfect for a quick lunch or a light dinner that feels indulgent yet wholesome.
Kidney Bean and Brown Rice Casserole

Sometimes the coziest meals come from the simplest ingredients—like this hearty kidney bean and brown rice casserole that I’ve been making for years. It’s my go-to for busy weeknights when I want something filling, nutritious, and easy to throw together, and it always reminds me of those chilly evenings when comfort food is a must.
Serving: 6 | Pre Time: 15 minutes | Cooking Time: 45 minutes
Ingredients
– 1 cup brown rice (rinsed under cold water to remove excess starch)
– 2 cups vegetable broth (or water, but broth adds more flavor)
– 1 (15-ounce) can kidney beans, drained and rinsed
– 1 medium onion, diced (yellow or white works well)
– 2 cloves garlic, minced
– 1 tablespoon olive oil (or any neutral oil)
– 1 teaspoon smoked paprika
– 1/2 teaspoon dried thyme
– 1/4 teaspoon black pepper
– 1 cup shredded cheddar cheese (or a dairy-free alternative if preferred)
– Salt to taste (I usually add about 1/2 teaspoon after cooking)
Instructions
1. Preheat your oven to 375°F (190°C) and lightly grease a 9×13-inch baking dish with a bit of olive oil or non-stick spray.
2. In a medium saucepan over medium-high heat, combine the brown rice and vegetable broth, bring to a boil, then reduce the heat to low, cover, and simmer for 25 minutes until the rice is tender and the liquid is absorbed.
3. While the rice cooks, heat the olive oil in a large skillet over medium heat, add the diced onion, and sauté for 5-7 minutes until softened and translucent.
4. Add the minced garlic to the skillet and cook for 1 minute more, stirring constantly to prevent burning—this releases its aroma without turning bitter.
5. Stir in the drained kidney beans, smoked paprika, dried thyme, and black pepper, cooking for another 2-3 minutes to let the flavors meld.
6. Once the rice is done, fluff it with a fork and gently mix it into the skillet with the bean mixture until well combined.
7. Transfer the mixture to the prepared baking dish, spreading it evenly, and top with the shredded cheddar cheese.
8. Bake in the preheated oven for 15-20 minutes, or until the cheese is melted and bubbly with golden edges.
9. Remove from the oven and let it cool for 5 minutes before serving to allow the casserole to set slightly.
Overall, this casserole turns out wonderfully hearty with a creamy texture from the melted cheese and a smoky depth from the paprika. I love serving it with a side of steamed greens or a crisp salad for a complete meal, and it reheats beautifully for leftovers the next day—making it a true kitchen staple in my home.
Edamame and Brown Rice Sushi Rolls
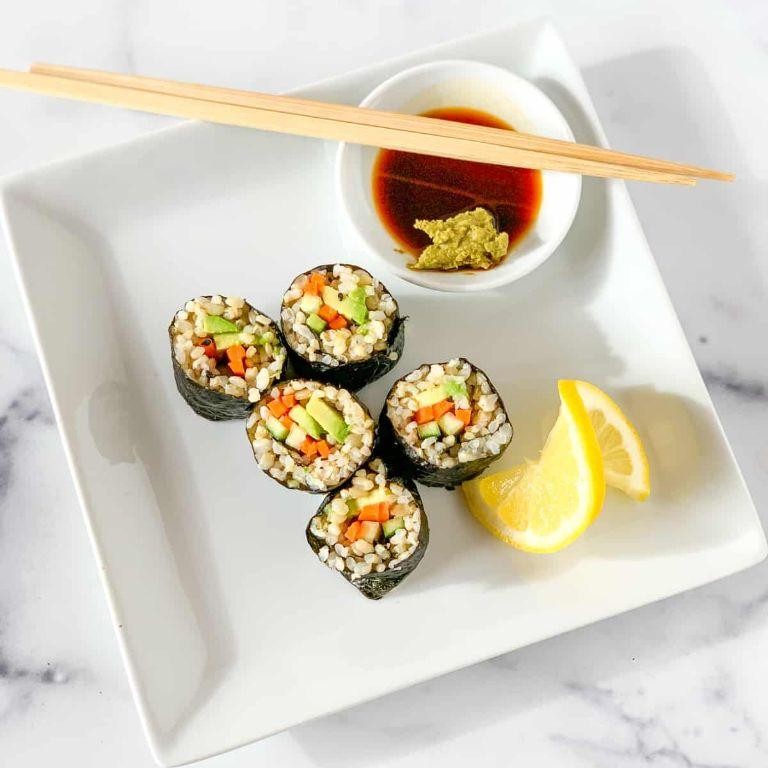
Sometimes the simplest ingredients create the most satisfying meals, and these Edamame and Brown Rice Sushi Rolls are a perfect example. I started making them on busy weeknights when I craved something fresh and wholesome but didn’t want to spend hours in the kitchen—they’ve since become a staple in my home.
Serving: 4 | Pre Time: 25 minutes | Cooking Time: 20 minutes
Ingredients
– 1 cup short-grain brown rice, rinsed well (I prefer Lundberg brand for its texture)
– 1 ¼ cups water
– 2 tablespoons rice vinegar
– 1 teaspoon granulated sugar
– ½ teaspoon salt
– 4 nori sheets (seaweed sheets)
– 1 cup shelled edamame, thawed if frozen
– 1 medium avocado, thinly sliced
– 1 small cucumber, julienned (peeled if you prefer less bitterness)
– 2 tablespoons low-sodium soy sauce, for serving (or tamari for gluten-free)
– Optional: 1 teaspoon sesame seeds, for garnish
Instructions
1. Combine the rinsed brown rice and water in a medium saucepan over high heat. Bring to a boil, then immediately reduce the heat to low, cover, and simmer for 20 minutes exactly—this ensures the rice is tender but not mushy. Tip: Don’t peek while it’s simmering to keep the steam trapped.
2. While the rice cooks, mix the rice vinegar, sugar, and salt in a small bowl until the sugar dissolves completely.
3. Transfer the cooked rice to a large, shallow bowl and gently fold in the vinegar mixture with a rice paddle or spatula, fanning the rice as you mix to help it cool faster and develop a glossy finish.
4. Place one nori sheet shiny-side down on a bamboo sushi mat. With damp hands, spread about ¾ cup of the seasoned rice evenly over the nori, leaving a 1-inch border at the top edge.
5. Arrange a quarter of the edamame, avocado slices, and cucumber strips horizontally across the center of the rice. Tip: Keep the fillings compact to prevent the roll from bursting.
6. Lift the edge of the mat closest to you and roll it away from you, pressing firmly to form a tight cylinder. Use the exposed nori border to seal the roll by moistening it lightly with water.
7. Repeat steps 4–6 with the remaining ingredients to make three more rolls.
8. With a sharp, wet knife, slice each roll into 8 even pieces, wiping the blade clean between cuts for neat edges. Tip: A serrated knife works wonders here without squishing the rolls.
9. Serve immediately with soy sauce for dipping, and sprinkle with sesame seeds if desired.
Freshly made, these rolls have a delightful contrast—the nutty brown rice and creamy avocado balance the crisp cucumber and tender edamame. For a fun twist, I love packing them for picnics or arranging them on a platter with pickled ginger and wasabi for a casual dinner party.
Black Bean and Quinoa Stuffed Peppers
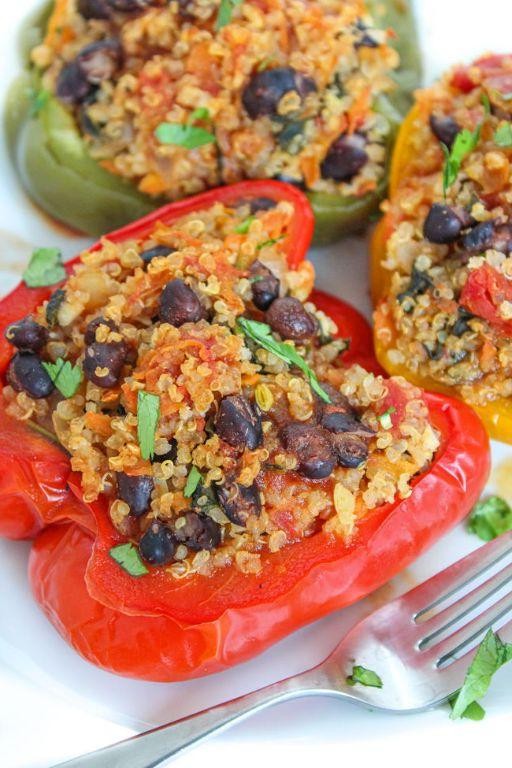
My kitchen has seen many stuffed pepper variations over the years, but this black bean and quinoa version has become my absolute favorite for busy weeknights. It’s the perfect cozy, one-pan meal that feels hearty and healthy, and I love that it makes fantastic leftovers for lunch the next day.
Serving: 4 | Pre Time: 15 minutes | Cooking Time: 45 minutes
Ingredients
– 4 large bell peppers, any color (tops cut off and seeds removed)
– 1 cup quinoa, rinsed
– 1 (15 oz) can black beans, drained and rinsed
– 1 cup corn kernels, fresh or frozen
– 1 small yellow onion, diced
– 2 cloves garlic, minced
– 1 (14.5 oz) can diced tomatoes, with juices
– 1 cup shredded Monterey Jack cheese (or cheddar)
– 2 tbsp olive oil (or any neutral oil)
– 1 tsp ground cumin
– 1 tsp chili powder
– 1/2 tsp smoked paprika
– Salt and black pepper, to taste
Instructions
1. Preheat your oven to 375°F (190°C).
2. Heat the olive oil in a large skillet over medium heat.
3. Add the diced onion and cook for 4-5 minutes, until softened and translucent.
4. Stir in the minced garlic and cook for 1 minute, just until fragrant.
5. Add the rinsed quinoa, cumin, chili powder, and smoked paprika to the skillet, stirring to coat the quinoa in the spices for about 30 seconds.
6. Pour in the diced tomatoes with their juices and 1 cup of water, then bring the mixture to a simmer.
7. Reduce the heat to low, cover the skillet, and let it cook for 15 minutes, until the quinoa is tender and has absorbed most of the liquid.
8. Remove the skillet from the heat and stir in the black beans, corn, and half of the shredded cheese.
9. Season the filling generously with salt and black pepper, tasting and adjusting if needed.
10. Arrange the prepared bell peppers upright in a baking dish.
11. Spoon the quinoa and black bean filling evenly into each pepper, packing it down lightly.
12. Top each stuffed pepper with the remaining shredded cheese.
13. Cover the baking dish tightly with aluminum foil and bake for 30 minutes.
14. Remove the foil and bake for an additional 10-15 minutes, until the peppers are tender and the cheese is bubbly and lightly browned.
15. Let the peppers rest for 5 minutes before serving to allow the filling to set.
Combining the fluffy quinoa with creamy black beans creates a wonderfully satisfying texture, while the melted cheese adds a gooey richness that’s hard to resist. For a fun twist, I sometimes serve these over a bed of crisp lettuce with a dollop of cool sour cream or avocado slices on the side.
Lentil and Mushroom Burgers

Kind of like that cozy, rainy-day feeling when you crave something hearty but don’t want to fuss with meat—these lentil and mushroom burgers have become my go‑to. I started making them a few winters back when my sister went vegetarian, and now they’re a staple in my freezer for quick weeknight dinners.
Serving: 4 | Pre Time: 20 minutes | Cooking Time: 15 minutes
Ingredients
– 1 cup brown lentils, rinsed (canned works too, just drain well)
– 8 oz cremini mushrooms, finely chopped (or any earthy mushroom you like)
– 1/2 cup rolled oats (quick oats are fine, or use breadcrumbs for a crispier texture)
– 1/4 cup finely chopped yellow onion
– 2 cloves garlic, minced
– 1 tbsp olive oil, plus extra for cooking (or any neutral oil)
– 1 tsp smoked paprika
– 1/2 tsp salt
– 1/4 tsp black pepper
– 4 burger buns, toasted (gluten-free if preferred)
– Toppings of choice: lettuce, tomato, avocado, etc.
Instructions
1. Cook the lentils: In a medium saucepan, combine 1 cup rinsed brown lentils with 2 cups water. Bring to a boil over high heat, then reduce heat to low, cover, and simmer for 15 minutes until tender but not mushy. Drain any excess water and let cool slightly.
2. Sauté the vegetables: While lentils cook, heat 1 tbsp olive oil in a large skillet over medium heat. Add 1/4 cup chopped onion and cook for 3 minutes until translucent. Add 8 oz chopped mushrooms and 2 minced garlic cloves, and cook for 5–7 minutes until mushrooms release their liquid and turn golden brown. Tip: Don’t rush this step—letting the mushrooms brown deeply builds flavor.
3. Combine the mixture: In a large bowl, mash the cooked lentils with a fork until about half are broken down. Stir in the sautéed mushroom mixture, 1/2 cup rolled oats, 1 tsp smoked paprika, 1/2 tsp salt, and 1/4 tsp black pepper. Mix well to combine. Tip: If the mixture feels too wet, add another tablespoon of oats; it should hold together when pressed.
4. Form the patties: Divide the mixture into 4 equal portions. Shape each into a 1/2-inch-thick patty, about 3 inches wide. Place on a parchment-lined plate. Tip: Chill the patties in the refrigerator for 10 minutes before cooking—this helps them firm up and hold their shape.
5. Cook the burgers: Wipe the skillet clean and heat 1 tbsp olive oil over medium heat. Add the patties and cook for 4–5 minutes per side, until golden brown and crispy on the outside. Avoid flipping too early; wait until they release easily from the pan.
6. Serve: Toast 4 burger buns lightly. Place each cooked patty on a bun and add toppings like lettuce, tomato, or avocado as desired.
Beyond just being a tasty meatless option, these burgers have a satisfyingly meaty texture from the mushrooms and a subtle smokiness from the paprika. I love serving them with sweet potato fries or a tangy slaw for a complete meal—they’re sturdy enough to hold up to all your favorite fixings without falling apart.
White Bean and Spinach Pasta
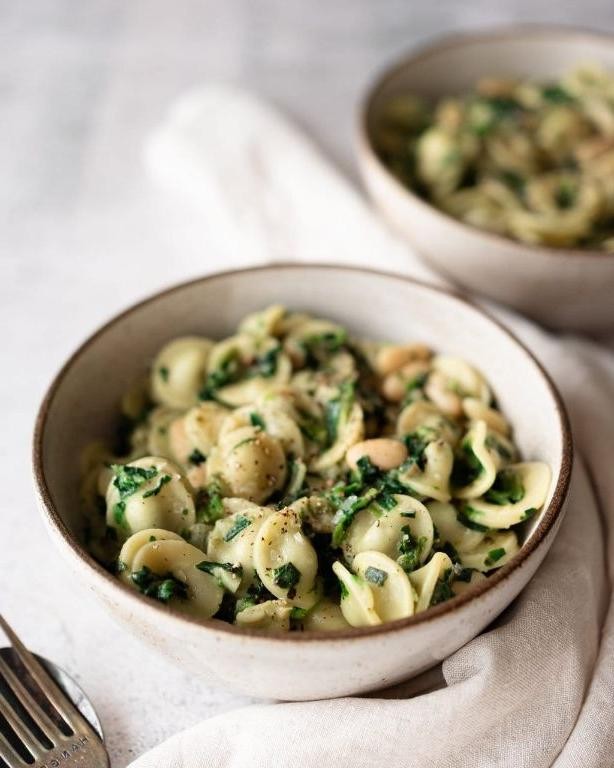
My kitchen was a disaster zone after holiday baking, but this white bean and spinach pasta saved the day—it’s my go-to when I crave something hearty yet healthy without spending hours cooking. I love how the creamy beans and fresh spinach come together in under 30 minutes, making it perfect for busy weeknights or lazy weekends.
Serving: 4 | Pre Time: 10 minutes | Cooking Time: 20 minutes
Ingredients
– 12 oz dried pasta, such as penne or fusilli
– 2 tbsp olive oil (or any neutral oil)
– 4 cloves garlic, minced
– 1 (15 oz) can white beans, drained and rinsed
– 4 cups fresh spinach, roughly chopped
– 1 cup vegetable broth
– ½ cup grated Parmesan cheese, plus extra for serving
– ¼ tsp red pepper flakes (adjust to taste)
– Salt and black pepper, to season
Instructions
1. Bring a large pot of salted water to a boil over high heat.
2. Add the pasta to the boiling water and cook according to package directions until al dente, about 10–12 minutes, stirring occasionally to prevent sticking.
3. While the pasta cooks, heat olive oil in a large skillet over medium heat until shimmering, about 1 minute.
4. Add minced garlic to the skillet and sauté until fragrant and lightly golden, about 1–2 minutes, stirring constantly to avoid burning.
5. Stir in drained white beans and cook for 2–3 minutes until warmed through, mashing a few beans slightly with a spoon to thicken the sauce.
6. Pour in vegetable broth and bring to a simmer, letting it reduce slightly for 3–4 minutes.
7. Add chopped spinach to the skillet and cook until wilted, about 2 minutes, stirring to combine.
8. Drain the cooked pasta, reserving ½ cup of pasta water, then add the pasta directly to the skillet.
9. Toss everything together, adding reserved pasta water a little at a time until the sauce coats the pasta evenly.
10. Remove from heat and stir in grated Parmesan cheese, red pepper flakes, salt, and black pepper.
11. Serve immediately, topped with extra Parmesan if desired.
Silky from the beans and bright from the spinach, this pasta has a comforting, creamy texture without any heavy cream. I often add a squeeze of lemon or serve it with crusty bread to soak up every last bit of sauce—it’s a simple dish that always feels special.
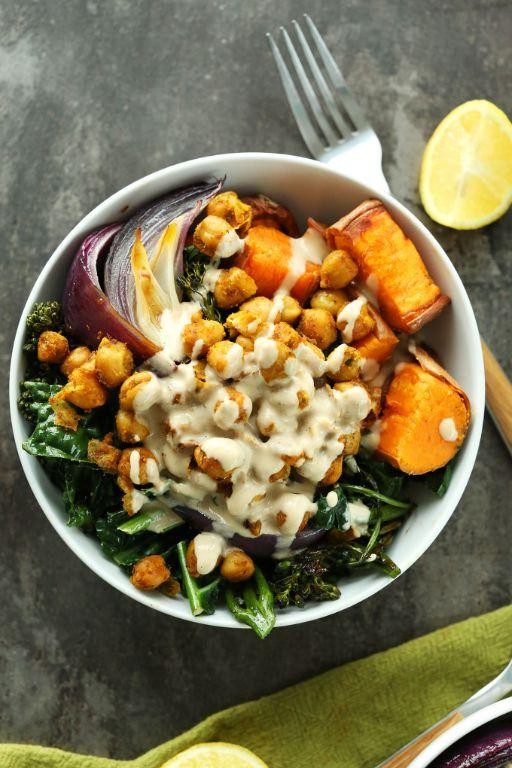
Chickpea and Sweet Potato Buddha Bowl
Whether you’re looking for a cozy winter meal or a vibrant lunch that doesn’t leave you in a food coma, this Chickpea and Sweet Potato Buddha Bowl has been my go-to lately. I started making it on busy weeknights when I wanted something nourishing but didn’t feel like following a complicated recipe, and now it’s a staple in my kitchen rotation.
Serving: 2 | Pre Time: 15 minutes | Cooking Time: 25 minutes
Ingredients
– 1 large sweet potato, peeled and diced into 1/2-inch cubes
– 1 (15 oz) can chickpeas, drained and rinsed
– 2 tbsp olive oil (or any neutral oil)
– 1 tsp smoked paprika
– 1/2 tsp garlic powder
– 1/4 tsp salt
– 1 cup uncooked quinoa
– 2 cups water or vegetable broth
– 1 ripe avocado, sliced
– 2 cups fresh baby spinach
– 2 tbsp tahini
– 1 tbsp lemon juice
– 1-2 tbsp water, to thin the tahini sauce as needed
Instructions
1. Preheat your oven to 400°F and line a baking sheet with parchment paper.
2. In a medium bowl, toss the diced sweet potato and chickpeas with 1 tbsp olive oil, smoked paprika, garlic powder, and salt until evenly coated.
3. Spread the sweet potato and chickpeas in a single layer on the prepared baking sheet.
4. Roast for 20-25 minutes, flipping halfway through, until the sweet potatoes are tender and the chickpeas are crispy.
5. While the vegetables roast, rinse the quinoa under cold water in a fine-mesh strainer to remove its natural bitterness.
6. In a small saucepan, combine the rinsed quinoa and 2 cups water or broth, then bring to a boil over high heat.
7. Reduce the heat to low, cover the saucepan, and simmer for 15 minutes until the quinoa has absorbed all the liquid and is fluffy.
8. Remove the quinoa from the heat and let it sit, covered, for 5 minutes before fluffing with a fork.
9. In a small bowl, whisk together the tahini, lemon juice, and 1-2 tbsp water until you achieve a smooth, drizzle-able consistency.
10. Divide the cooked quinoa between two bowls as the base.
11. Top each bowl evenly with the roasted sweet potatoes and chickpeas, fresh baby spinach, and avocado slices.
12. Drizzle the tahini sauce generously over each bowl before serving.
Keep in mind that the contrast between the creamy avocado, crispy chickpeas, and fluffy quinoa makes every bite interesting. I love adding a sprinkle of red pepper flakes for heat or swapping the tahini for a zesty cilantro-lime dressing when I’m feeling adventurous—it’s a versatile bowl that welcomes your own twist.
Three-Bean Protein-Packed Salad
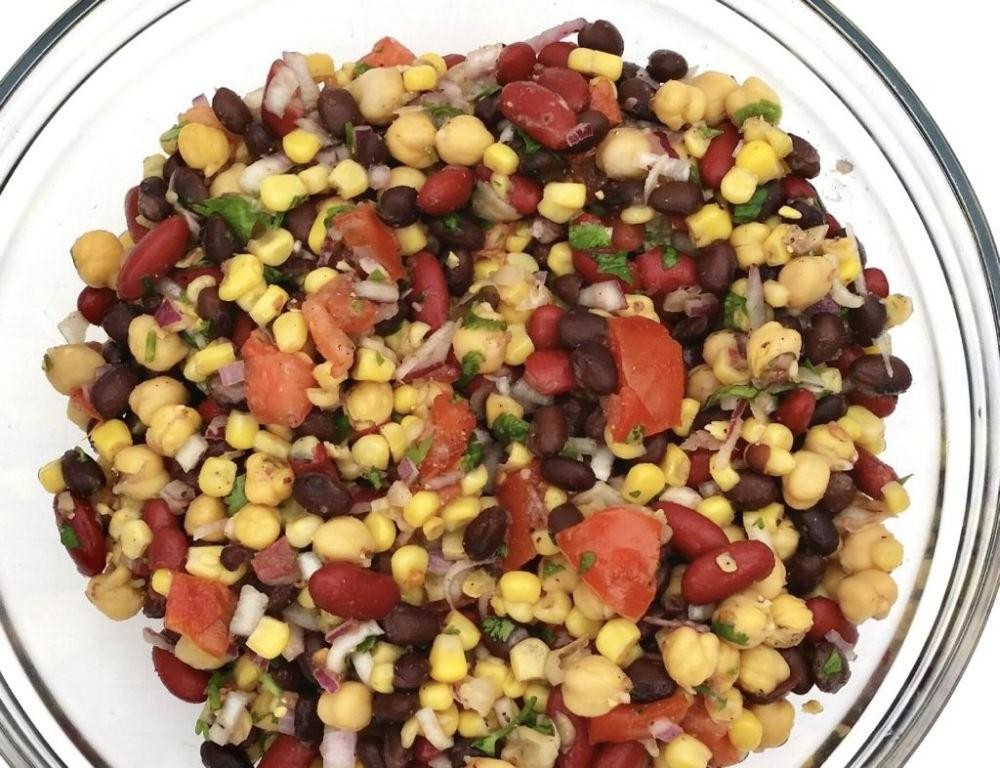
Every time I need a quick, healthy lunch that actually keeps me full through the afternoon, I turn to this salad. It’s a staple in my fridge, especially after a busy morning of recipe testing when I just want something satisfying without any fuss. I love how the different beans create a hearty texture that feels more like a meal than a side.
Serving: 4 | Pre Time: 15 minutes | Cooking Time: 0 minutes
Ingredients
– 1 (15 oz) can black beans, rinsed and drained (or use 1.5 cups cooked)
– 1 (15 oz) can kidney beans, rinsed and drained
– 1 (15 oz) can chickpeas, rinsed and drained
– 1/2 cup finely diced red onion (soak in cold water for 5 minutes to mellow the bite)
– 1/2 cup chopped fresh cilantro (or parsley if you dislike cilantro)
– 1/4 cup olive oil (or any neutral oil like avocado oil)
– 3 tbsp fresh lime juice (about 1 large lime)
– 1 tsp ground cumin
– 1/2 tsp smoked paprika
– 1/4 tsp salt
– 1/4 tsp black pepper
Instructions
1. In a large mixing bowl, combine the rinsed and drained black beans, kidney beans, and chickpeas.
2. Add the finely diced red onion and chopped fresh cilantro to the bowl with the beans.
3. In a small separate bowl, whisk together the olive oil and fresh lime juice until emulsified.
4. Whisk the ground cumin, smoked paprika, salt, and black pepper into the oil and lime juice mixture.
5. Pour the dressing over the bean and vegetable mixture in the large bowl.
6. Using a large spoon or spatula, gently toss all ingredients together for about 1 minute, ensuring everything is evenly coated with the dressing.
7. Let the salad sit at room temperature for 10 minutes to allow the flavors to meld.
8. Taste the salad and add an extra pinch of salt only if needed after the resting period.
9. Serve immediately or cover and refrigerate for up to 3 days.
So creamy chickpeas, firm kidney beans, and tender black beans come together in a bright, smoky dressing. I often scoop it into lettuce cups for a low-carb lunch or pile it onto toasted whole-grain bread for a hearty open-faced sandwich.
Summary
Brimming with flavor and muscle-building power, these 20 bean recipes are your tasty ticket to meeting your protein goals. We hope you find a new favorite to add to your weekly rotation! Give a few a try, then drop a comment below to tell us which one you loved most. If you found this roundup helpful, please share it on Pinterest to help other home cooks discover these delicious dishes.


