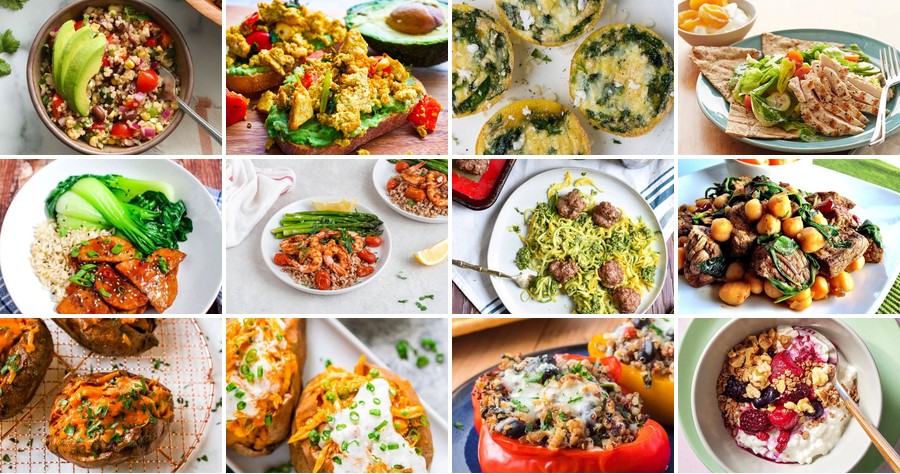
Wondering how to power through your busy week with delicious, protein-packed meals? You’re in the right place! We’ve gathered 17 flavorful recipes designed for easy meal prep, so you can enjoy satisfying dinners without the weekday stress. From hearty bowls to quick skillet meals, get ready to transform your routine. Let’s dive into these tasty solutions that will keep you fueled and excited for every meal!
Lemon Garlic Chicken with Quinoa and Roasted Vegetables
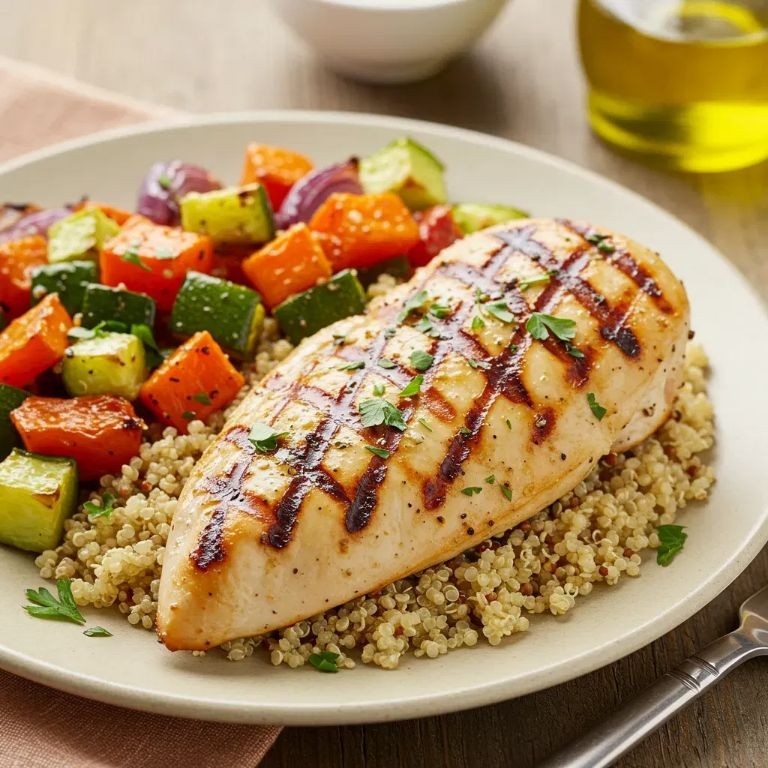
Feeling like your weeknight dinners need a zesty wake-up call? This lemon garlic chicken with quinoa and roasted veggies is here to rescue you from the mundane—it’s a vibrant, one-pan wonder that’s as easy to make as it is delicious to devour. Trust me, your taste buds will thank you for this flavor-packed fiesta!
Serving: 4 | Pre Time: 15 minutes | Cooking Time: 35 minutes
Ingredients
– 4 boneless, skinless chicken breasts (about 1.5 lbs total)
– 3 tbsp olive oil (or any neutral oil)
– 4 cloves garlic, minced
– 1 lemon, juiced and zested (about 3 tbsp juice)
– 1 tsp dried oregano
– 1 cup quinoa, rinsed
– 2 cups chicken broth (or water for a lighter option)
– 2 cups broccoli florets
– 1 red bell pepper, sliced
– 1 yellow onion, sliced
– Salt and black pepper (adjust to taste)
Instructions
1. Preheat your oven to 425°F (218°C) and line a baking sheet with parchment paper.
2. In a small bowl, whisk together 2 tbsp olive oil, minced garlic, lemon juice, lemon zest, and dried oregano to create a marinade.
3. Place the chicken breasts in a shallow dish, pour the marinade over them, and let sit for 10 minutes at room temperature—this helps the flavors penetrate deeply.
4. While the chicken marinates, toss the broccoli florets, sliced red bell pepper, and sliced yellow onion with the remaining 1 tbsp olive oil on the prepared baking sheet, seasoning with salt and black pepper.
5. Spread the vegetables in a single layer on the baking sheet and roast in the preheated oven for 20 minutes, or until they start to caramelize and soften.
6. Meanwhile, rinse the quinoa under cold water in a fine-mesh strainer to remove any bitterness.
7. In a medium saucepan, combine the rinsed quinoa and chicken broth, bring to a boil over high heat, then reduce to a low simmer, cover, and cook for 15 minutes, or until the liquid is absorbed and the quinoa is fluffy.
8. After the vegetables have roasted for 10 minutes, remove the baking sheet from the oven, push them to the sides, and add the marinated chicken breasts to the center, discarding any excess marinade.
9. Return the baking sheet to the oven and bake for an additional 15 minutes, or until the chicken reaches an internal temperature of 165°F (74°C) and is golden brown.
10. Let the chicken rest for 5 minutes before slicing to keep it juicy and tender.
11. Fluff the cooked quinoa with a fork and divide it among plates, topping with sliced chicken and roasted vegetables.
Just imagine that first bite: the chicken is irresistibly tender with a bright lemon-garlic kick, while the quinoa adds a nutty, fluffy base that soaks up all the savory juices. For a fun twist, serve it family-style in a big bowl and let everyone dig in, or pack the leftovers for a lunch that’ll make your coworkers jealous—it’s a meal that’s as versatile as it is vibrant!
Spicy Turkey and Black Bean Stuffed Peppers
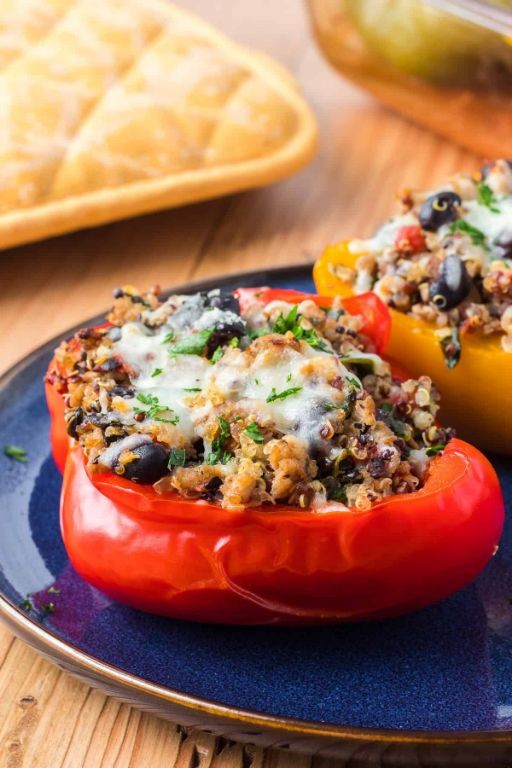
Hear that? It’s your taste buds cheering for a flavor fiesta! These Spicy Turkey and Black Bean Stuffed Peppers are the weeknight hero you didn’t know you needed, packing a punch that’ll make your boring dinner routine tap out. They’re basically a party in a pepper, and you’re invited.
Serving: 4 | Pre Time: 15 minutes | Cooking Time: 35 minutes
Ingredients
– 4 large bell peppers, any color (tops cut off and seeds removed)
– 1 lb ground turkey (93% lean works great)
– 1 (15 oz) can black beans, rinsed and drained
– 1 cup cooked white rice (or quinoa for a twist)
– 1 cup shredded Monterey Jack cheese (or a Mexican blend)
– 1/2 cup diced yellow onion
– 2 cloves garlic, minced
– 1 (10 oz) can diced tomatoes with green chilies, undrained (like Rotel)
– 2 tbsp olive oil (or any neutral oil)
– 1 tbsp chili powder
– 1 tsp ground cumin
– 1/2 tsp smoked paprika
– 1/4 tsp cayenne pepper (adjust for more or less heat)
– Salt and black pepper, to taste
Instructions
1. Preheat your oven to 375°F (190°C) and lightly grease a 9×13 inch baking dish with olive oil.
2. Place the prepared bell peppers upright in the baking dish; if they wobble, slice a thin piece off the bottom to create a flat base.
3. Heat 1 tablespoon of olive oil in a large skillet over medium-high heat for 1 minute until shimmering.
4. Add the diced onion to the skillet and cook for 3-4 minutes, stirring occasionally, until softened and translucent.
5. Stir in the minced garlic and cook for 30 seconds until fragrant—don’t let it burn!
6. Add the ground turkey to the skillet, breaking it up with a spoon, and cook for 5-7 minutes until no pink remains.
7. Tip: Drain any excess fat from the turkey for a less greasy filling.
8. Mix in the chili powder, cumin, smoked paprika, cayenne pepper, 1/2 teaspoon salt, and 1/4 teaspoon black pepper, stirring for 1 minute to toast the spices.
9. Add the undrained diced tomatoes with green chilies and rinsed black beans, then simmer for 3 minutes to blend the flavors.
10. Remove the skillet from heat and fold in the cooked white rice and 1/2 cup of the shredded cheese until evenly combined.
11. Tip: Let the filling cool slightly before stuffing to prevent the peppers from getting soggy.
12. Spoon the turkey mixture evenly into each bell pepper, packing it down gently and mounding it on top.
13. Sprinkle the remaining 1/2 cup of shredded cheese over the stuffed peppers.
14. Cover the baking dish loosely with aluminum foil and bake at 375°F for 25 minutes.
15. Remove the foil and bake for an additional 10 minutes until the cheese is bubbly and the peppers are tender when pierced with a fork.
16. Tip: For extra browning, broil for 1-2 minutes at the end, watching closely to avoid burning.
17. Let the stuffed peppers rest for 5 minutes before serving to set the filling.
Look at that cheesy, golden perfection! Each bite delivers a satisfying crunch from the tender pepper, followed by the hearty, spiced turkey and bean mixture that’s just bold enough to wake up your palate. Serve these beauties with a dollop of cool sour cream or a zesty avocado salsa to balance the heat—they’re so good, you might forget there are veggies involved!
Honey Sriracha Salmon with Brown Rice and Broccoli
Ready to transform your weeknight dinner from “meh” to “more, please!”? This honey sriracha salmon with brown rice and broccoli is the saucy, sweet-heat hero your taste buds have been begging for—no cape required, just a baking sheet and some serious flavor ambition.
Serving: 4 | Pre Time: 15 minutes | Cooking Time: 25 minutes
Ingredients
– 4 salmon fillets (about 6 oz each), skin-on or skinless
– 1/4 cup honey
– 2 tbsp sriracha sauce (adjust to taste for more or less heat)
– 2 tbsp soy sauce (low-sodium works great)
– 1 tbsp olive oil (or any neutral oil)
– 1 tsp minced garlic (fresh or jarred)
– 1 cup uncooked brown rice
– 2 cups water
– 4 cups broccoli florets (fresh or frozen)
– 1 tbsp sesame oil (for a nutty finish, optional but recommended)
– Salt and black pepper (to season)
Instructions
1. Preheat your oven to 400°F (200°C) and line a baking sheet with parchment paper or foil for easy cleanup.
2. In a small bowl, whisk together the honey, sriracha, soy sauce, olive oil, and minced garlic until smooth to create the glaze.
3. Place the salmon fillets on the prepared baking sheet, season both sides lightly with salt and black pepper, and brush half of the honey sriracha glaze evenly over the top of each fillet.
4. Bake the salmon in the preheated oven for 12-15 minutes, or until the internal temperature reaches 145°F (63°C) and the flesh flakes easily with a fork.
5. While the salmon bakes, rinse the brown rice under cold water in a fine-mesh strainer to remove excess starch.
6. In a medium saucepan, combine the rinsed brown rice and 2 cups of water, bring to a boil over high heat, then reduce the heat to low, cover, and simmer for 20-25 minutes until the water is absorbed and the rice is tender.
7. Steam the broccoli florets in a steamer basket over boiling water for 5-7 minutes until bright green and crisp-tender, or microwave them in a covered dish with 2 tablespoons of water for 3-4 minutes.
8. Remove the salmon from the oven and brush with the remaining glaze for an extra glossy finish.
9. Drizzle the steamed broccoli with sesame oil and toss gently to coat.
10. Serve the salmon immediately over the cooked brown rice with the broccoli on the side.
Just imagine that flaky, caramelized salmon melting into the nutty brown rice, with the broccoli adding a fresh crunch—it’s a flavor party where sweet, spicy, and savory all RSVP’d “yes.” Try topping it with sesame seeds or a squeeze of lime for an extra zing that’ll make your dinner guests ask for seconds!
Protein-Packed Egg Muffins with Spinach and Feta

Mornings got you dragging? These protein-packed egg muffins are your secret weapon against the breakfast blues—they’re like little edible energy shots disguised as fluffy, savory bites. Whip up a batch ahead of time, and you’ll have a grab-and-go breakfast that’s actually exciting (and won’t leave you hangry by 10 a.m.).
Serving: 6 | Pre Time: 10 minutes | Cooking Time: 20 minutes
Ingredients
– 6 large eggs
– 1/2 cup milk (whole or 2% for richness, or any milk you prefer)
– 1 cup fresh spinach, chopped (pack it lightly into the measuring cup)
– 1/2 cup crumbled feta cheese (about 2 oz; pre-crumbled works great)
– 1/4 cup diced red bell pepper (about 1/4 of a medium pepper)
– 1 tbsp olive oil (or any neutral oil for greasing)
– 1/4 tsp salt (adjust based on feta saltiness)
– 1/4 tsp black pepper (freshly ground adds a nice kick)
– Cooking spray (optional, for extra non-stick insurance)
Instructions
1. Preheat your oven to 350°F (175°C) and lightly grease a 6-cup standard muffin tin with olive oil or cooking spray to prevent sticking.
2. In a large mixing bowl, crack 6 large eggs and whisk them vigorously with 1/2 cup milk until fully combined and slightly frothy, about 30 seconds.
3. Stir in 1 cup chopped fresh spinach, 1/2 cup crumbled feta cheese, 1/4 cup diced red bell pepper, 1/4 tsp salt, and 1/4 tsp black pepper until evenly distributed.
4. Evenly pour the egg mixture into the prepared muffin cups, filling each about 3/4 full to allow room for rising.
5. Bake in the preheated oven for 18–20 minutes, or until the tops are lightly golden and a toothpick inserted into the center comes out clean.
6. Let the muffins cool in the tin for 5 minutes to set, then gently run a knife around the edges and transfer them to a wire rack.
7. Serve warm, or store cooled muffins in an airtight container in the refrigerator for up to 4 days.
Just out of the oven, these muffins boast a tender, almost custardy interior with pops of salty feta and fresh spinach. For a fun twist, top them with a dollop of Greek yogurt or hot sauce, or crumble them over a salad for a protein boost—they’re versatile enough to star at brunch or sneak into your lunchbox.
Beef and Mushroom Stir-Fry with Cauliflower Rice
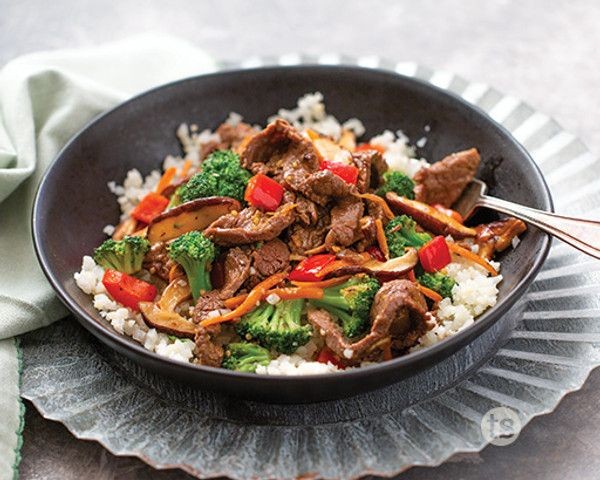
Let’s be real: sometimes you want a cozy, savory dinner that feels like a hug, but you don’t want to spend all night in the kitchen. This beef and mushroom stir-fry with cauliflower rice is your weeknight superhero—it’s hearty, packed with umami, and ready before your favorite show’s next episode.
Serving: 4 | Pre Time: 15 minutes | Cooking Time: 20 minutes
Ingredients
– 1 lb flank steak, thinly sliced against the grain (freeze for 15 minutes first for easier slicing)
– 8 oz cremini mushrooms, sliced (or any mushroom you love)
– 1 head cauliflower, riced (about 4 cups; or use pre-riced to save time)
– 2 tbsp soy sauce (low-sodium works too)
– 1 tbsp sesame oil (or any neutral oil for a milder flavor)
– 2 cloves garlic, minced (fresh is best, but jarred in a pinch)
– 1 tbsp ginger, grated (keep the peel on while grating for less mess)
– 2 tbsp vegetable oil, divided
– 1/4 cup green onions, sliced (for garnish, optional but recommended)
– Salt and black pepper, to taste (start with a pinch and adjust as you go)
Instructions
1. Pat the flank steak slices dry with paper towels to ensure a good sear, then season lightly with salt and pepper.
2. Heat 1 tablespoon of vegetable oil in a large skillet or wok over medium-high heat until shimmering, about 1–2 minutes.
3. Add the steak in a single layer, working in batches if needed to avoid overcrowding, and cook for 2–3 minutes per side until browned but still slightly pink inside. Transfer to a plate.
4. In the same skillet, add the remaining 1 tablespoon of vegetable oil and heat for 30 seconds.
5. Toss in the sliced mushrooms and cook, stirring occasionally, for 5–7 minutes until they release their juices and turn golden brown.
6. Stir in the minced garlic and grated ginger, cooking for 1 minute until fragrant to avoid burning.
7. Push the mushroom mixture to the side, then add the cauliflower rice to the center of the skillet. Cook for 4–5 minutes, stirring occasionally, until tender but not mushy.
8. Return the cooked steak to the skillet, pouring in the soy sauce and sesame oil. Toss everything together and heat for 2 minutes until warmed through.
9. Remove from heat and garnish with sliced green onions if using.
Hearty and satisfying, this dish delivers tender beef with earthy mushrooms over fluffy cauliflower rice—a low-carb twist that doesn’t skimp on flavor. Serve it straight from the skillet for a casual family dinner, or top with a fried egg for an extra protein kick that’ll make leftovers shine.
Greek Yogurt Chicken Salad with Whole Wheat Pita
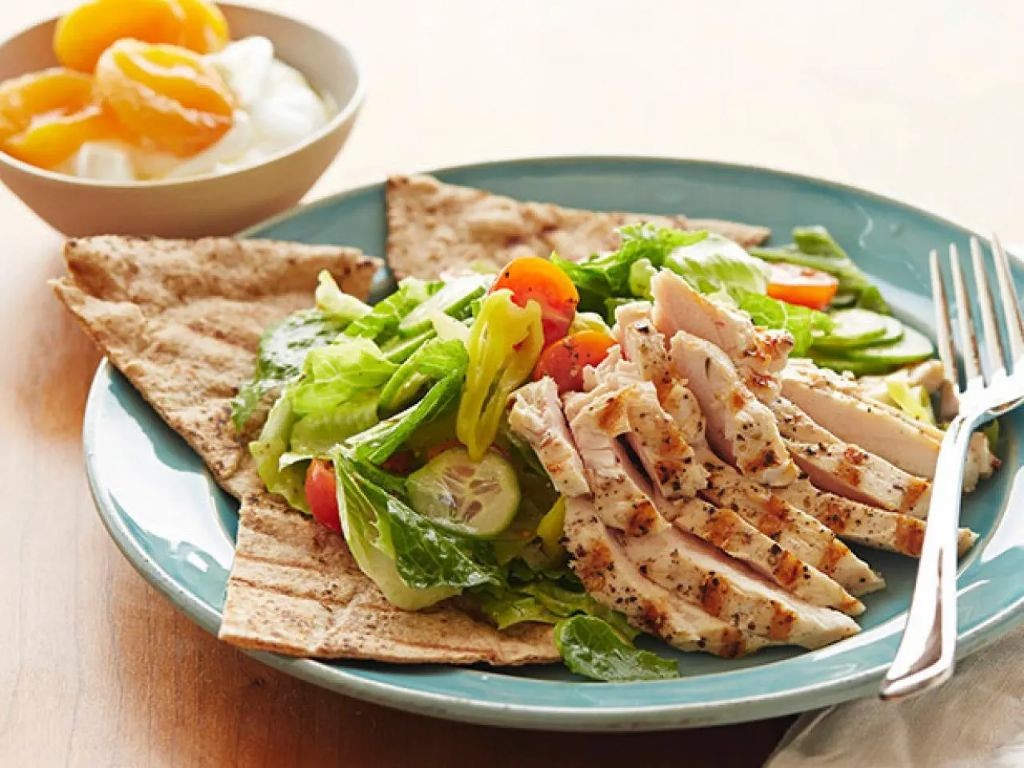
Gather ’round, salad skeptics, because this Greek Yogurt Chicken Salad is about to make your taste buds do a happy dance—no sad desk lunches allowed! It’s a creamy, tangy, protein-packed marvel that’s as easy to whip up as it is to devour, all tucked into a cozy whole wheat pita for the ultimate handheld feast.
Serving: 4 | Pre Time: 15 minutes | Cooking Time: 15 minutes
Ingredients
– 1 lb boneless, skinless chicken breasts
– 1 cup plain Greek yogurt (full-fat for extra creaminess, or low-fat if you prefer)
– 1/2 cup diced cucumber
– 1/4 cup diced red onion (soak in cold water for 5 minutes to mellow the bite)
– 2 tbsp fresh lemon juice
– 1 tbsp extra-virgin olive oil
– 1 tsp dried oregano
– 1/2 tsp garlic powder
– 1/4 tsp salt
– 1/4 tsp black pepper
– 4 whole wheat pitas
Instructions
1. Preheat a grill or skillet to medium-high heat (about 400°F).
2. Pat the chicken breasts dry with paper towels to ensure a good sear.
3. Brush the chicken lightly with 1/2 tbsp of the olive oil and season both sides with the salt and black pepper.
4. Cook the chicken for 6-7 minutes per side, or until the internal temperature reaches 165°F and the exterior is golden brown.
5. Remove the chicken from the heat and let it rest on a cutting board for 5 minutes to lock in juices.
6. While the chicken rests, in a medium bowl, whisk together the Greek yogurt, lemon juice, remaining 1/2 tbsp olive oil, dried oregano, and garlic powder until smooth.
7. Dice the cooked chicken into bite-sized pieces.
8. Add the diced chicken, cucumber, and red onion to the yogurt mixture.
9. Gently fold everything together until evenly coated.
10. Warm the whole wheat pitas in a toaster or oven at 350°F for 2-3 minutes until pliable.
11. Slice each pita open halfway to form a pocket.
12. Spoon the chicken salad mixture into the pita pockets.
Wrap it up with a wink: Who knew something so simple could taste so spectacular? The creamy yogurt melds with the tender chicken and crunchy veggies for a texture that’s pure bliss, while the lemon and oregano add a zesty Greek flair. Serve it with extra cucumber slices on the side or crumble some feta on top for an extra savory punch—your lunch game just leveled up!
Slow Cooker BBQ Pulled Chicken with Sweet Potatoes

Zesty and zero-fuss, this slow cooker wonder turns a few humble ingredients into a weeknight hero that practically cooks itself while you binge your favorite show. It’s the ultimate ‘set it and forget it’ meal where your biggest job is resisting the mouthwatering aroma for a few hours.
Serving: 6 | Pre Time: 15 minutes | Cooking Time: 4 hours
Ingredients
– 2 lbs boneless, skinless chicken breasts (or thighs for richer flavor)
– 1.5 lbs sweet potatoes, peeled and cut into 1-inch cubes
– 1 cup BBQ sauce (your favorite brand, or a smoky one works great)
– 1/2 cup chicken broth (low-sodium recommended)
– 1 tbsp olive oil (or any neutral oil)
– 1 tsp garlic powder
– 1/2 tsp smoked paprika (for a hint of depth)
– 1/4 tsp black pepper
Instructions
1. Place the chicken breasts in the bottom of a 6-quart slow cooker in a single layer.
2. In a small bowl, whisk together the BBQ sauce, chicken broth, olive oil, garlic powder, smoked paprika, and black pepper until smooth.
3. Pour the sauce mixture evenly over the chicken in the slow cooker, ensuring it’s mostly covered.
4. Arrange the cubed sweet potatoes around and on top of the chicken in the cooker.
5. Cover the slow cooker with its lid and cook on HIGH for 4 hours. (Tip: Avoid opening the lid during cooking to maintain heat and moisture.)
6. After 4 hours, carefully remove the lid. The chicken should shred easily with two forks—if it doesn’t, cook for an additional 15-30 minutes.
7. Using two forks, shred the chicken directly in the slow cooker until it’s in bite-sized pieces. (Tip: For extra flavor, let the shredded chicken sit in the sauce for 10 minutes before serving.)
8. Stir the shredded chicken and sweet potatoes together gently to coat everything in the sauce.
9. Serve immediately while hot. (Tip: If the sauce seems too thin, mix 1 tbsp cornstarch with 2 tbsp water, stir it in, and cook on HIGH for 10 more minutes to thicken.)
What you get is tender, juicy chicken with a sticky-sweet BBQ glaze and soft, caramelized sweet potatoes that soak up all that saucy goodness. Pile it high on buns for classic sliders, spoon it over rice for a hearty bowl, or get creative by stuffing it into tacos with a crunchy slaw—this dish is as versatile as it is delicious!
Peanut Butter Banana Overnight Oats with Chia Seeds
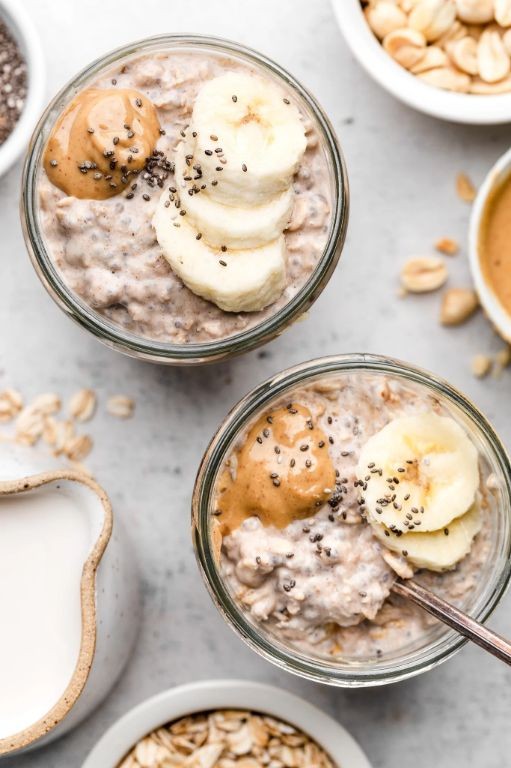
Mornings are basically a chaotic race against the snooze button, but this no-cook breakfast is your secret weapon for winning. Imagine creamy peanut butter and sweet banana getting cozy with hearty oats and chia seeds overnight—it’s like meal prep magic that actually tastes like dessert. Trust me, your future self will thank you for this deliciously lazy hack.
Serving: 1 | Pre Time: 5 minutes | Cooking Time: 0 minutes
Ingredients
– 1/2 cup old-fashioned rolled oats (not quick oats for better texture)
– 1/2 cup milk (dairy or unsweetened almond milk both work)
– 1 tbsp creamy peanut butter (or crunchy if you prefer a bit of crunch)
– 1 tbsp chia seeds (for a pudding-like thickness)
– 1/2 ripe banana, mashed (the spottier, the sweeter)
– 1 tsp maple syrup (adjust to taste, optional for extra sweetness)
– Pinch of salt (to balance the flavors)
Instructions
1. In a jar or airtight container, combine 1/2 cup old-fashioned rolled oats and 1/2 cup milk.
2. Add 1 tbsp creamy peanut butter and 1 tbsp chia seeds to the mixture.
3. Mash 1/2 ripe banana with a fork until smooth, then stir it into the jar.
4. Mix in 1 tsp maple syrup and a pinch of salt until everything is well incorporated.
5. Seal the jar tightly and refrigerate it for at least 6 hours, or overnight for best results.
6. After chilling, give the oats a good stir to check the consistency—add a splash more milk if it’s too thick.
7. Serve directly from the jar or transfer to a bowl for eating.
Awaken to a thick, pudding-like texture that’s irresistibly creamy with bursts of banana sweetness and a nutty peanut butter richness. For a fun twist, top it with a drizzle of honey or a sprinkle of chocolate chips before digging in—it’s the ultimate grab-and-go breakfast that feels indulgent yet keeps you fueled all morning.
Garlic Shrimp and Asparagus with Farro
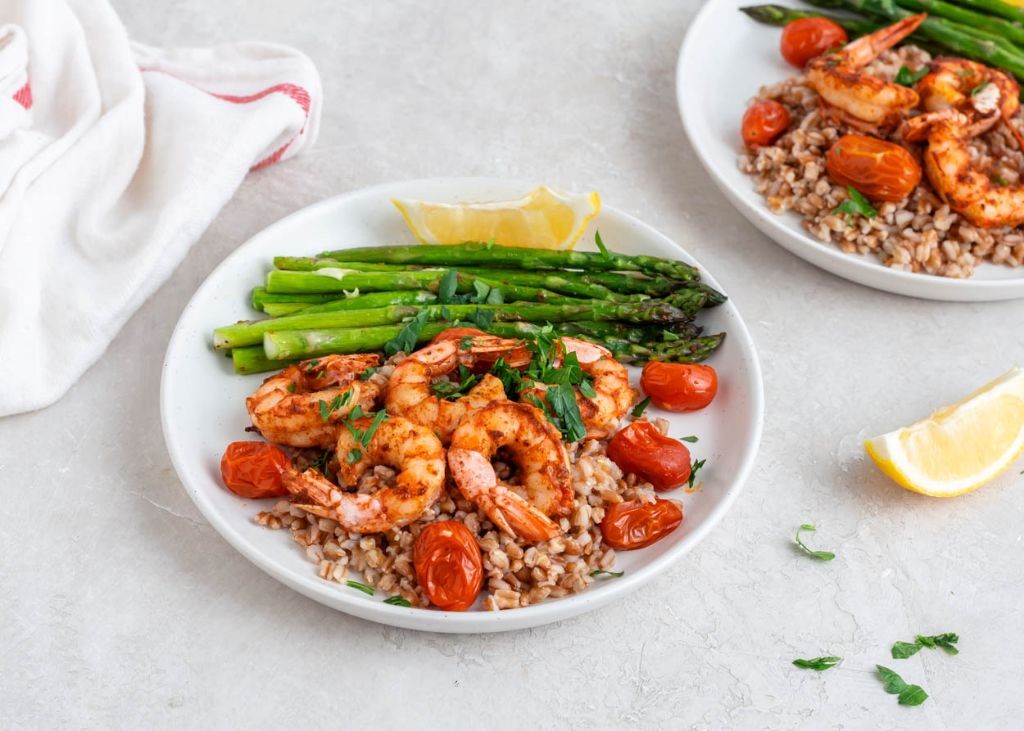
Gather ’round, food adventurers, because we’re about to turn a Tuesday into a taste-bud tango with a dish that’s as satisfying to make as it is to devour. This garlicky, lemony, one-pan wonder is your ticket to feeling like a kitchen rockstar without the stress of a million dishes to wash.
Serving: 4 | Pre Time: 15 minutes | Cooking Time: 25 minutes
Ingredients
– 1 cup farro
– 1 lb large shrimp, peeled and deveined
– 1 lb asparagus, woody ends trimmed
– 4 cloves garlic, minced
– 1 lemon, juiced (about 3 tbsp)
– 3 tbsp olive oil (or any neutral oil)
– 2 tbsp unsalted butter
– ¼ tsp red pepper flakes (adjust to taste)
– Salt and black pepper
Instructions
1. Rinse 1 cup of farro under cold water in a fine-mesh strainer.
2. In a medium saucepan, combine the rinsed farro with 2 cups of water and a pinch of salt.
3. Bring to a boil over high heat, then reduce heat to low, cover, and simmer for 25 minutes until tender but chewy (tip: check at 20 minutes to avoid mush).
4. While farro cooks, pat 1 lb of shrimp dry with paper towels and season lightly with salt and black pepper.
5. Heat 2 tbsp of olive oil in a large skillet over medium-high heat until shimmering, about 2 minutes.
6. Add the shrimp in a single layer and cook for 2 minutes per side until pink and opaque, then transfer to a plate.
7. In the same skillet, add 1 tbsp olive oil and 2 tbsp unsalted butter over medium heat.
8. Add 1 lb of trimmed asparagus and sauté for 5–7 minutes until bright green and tender-crisp (tip: listen for a slight sizzle).
9. Push asparagus to the side, add 4 cloves of minced garlic and ¼ tsp red pepper flakes, and cook for 1 minute until fragrant.
10. Return the cooked shrimp to the skillet and pour in 3 tbsp of fresh lemon juice, stirring to coat everything evenly.
11. Fluff the cooked farro with a fork and divide it among serving bowls.
12. Top the farro with the shrimp and asparagus mixture, scraping all the garlicky lemon butter from the skillet over the top.
Zesty and hearty, this dish delivers a delightful contrast: the farro’s nutty chew against the shrimp’s tender bite and asparagus’s crisp snap. For a fun twist, serve it family-style in the skillet with extra lemon wedges for squeezing, letting everyone dig in straight from the pan—because who needs extra plates when flavor’s this bold?
High-Protein Tofu Scramble with Avocado Toast

Mornings just got a major upgrade, folks! Forget those sad, rubbery scrambles of yesteryear—this high-protein tofu scramble is here to save your breakfast (and your muscles) with a flavor-packed punch that’ll make you forget eggs ever existed. Paired with creamy avocado toast, it’s the ultimate power duo to kickstart your day without weighing you down.
Serving: 2 | Pre Time: 10 minutes | Cooking Time: 15 minutes
Ingredients
– 1 (14-ounce) block firm tofu, drained and crumbled (press it lightly with a towel to remove excess moisture)
– 2 slices whole-grain bread, toasted (or your favorite bread, like sourdough)
– 1 ripe avocado, mashed (add a squeeze of lime juice to prevent browning)
– 1 tbsp olive oil, or any neutral oil like avocado oil
– 1/2 tsp turmeric powder (for that golden hue, but don’t skip it!)
– 1/4 tsp black salt, or regular salt if you don’t have it (black salt adds an eggy aroma)
– 1/4 tsp garlic powder
– 1/4 tsp onion powder
– 1/4 tsp black pepper, adjust to taste
– 2 tbsp nutritional yeast (for a cheesy, savory boost)
– Optional: chopped fresh herbs like chives or parsley for garnish
Instructions
1. Heat the olive oil in a non-stick skillet over medium heat until it shimmers, about 1–2 minutes.
2. Add the crumbled tofu to the skillet and cook for 5 minutes, stirring occasionally, until it starts to firm up and release moisture.
3. Sprinkle the turmeric, black salt, garlic powder, onion powder, and black pepper evenly over the tofu, then stir to coat every crumble—this ensures the spices don’t clump.
4. Cook the spiced tofu for another 5–7 minutes, stirring frequently, until it’s golden and slightly crispy at the edges; if it sticks, add a splash of water or oil.
5. Remove the skillet from heat and stir in the nutritional yeast until well combined, letting the residual heat melt it into the scramble.
6. While the tofu cooks, toast the bread until golden and crisp, then spread the mashed avocado evenly over each slice.
7. Divide the tofu scramble between the two avocado toasts, piling it high for a hearty serving.
8. Garnish with optional fresh herbs for a pop of color and freshness.
Looking at this masterpiece, you’ll love the scramble’s tender-yet-crumbly texture that soaks up all those savory spices, while the creamy avocado adds a cool, buttery contrast. Serve it with a dash of hot sauce or alongside fresh fruit for a brunch that’s as Instagram-worthy as it is delicious!
Cajun-Spiced Grilled Steak with Chickpea Salad
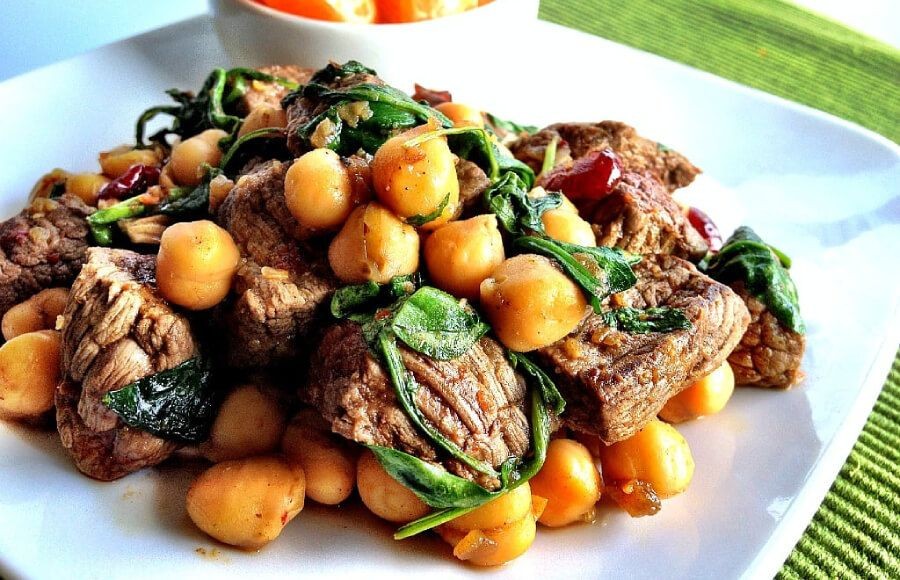
Sizzle up your Tuesday with a dish that’s part Mardi Gras parade, part backyard barbecue—this Cajun-spiced grilled steak with chickpea salad is here to rescue your taste buds from the ordinary. Think smoky, spicy, and seriously satisfying, all without requiring a culinary degree (or a trip to Louisiana). It’s the kind of meal that makes you feel like a grill master, even if your last ‘grilling’ adventure involved a toaster oven.
Serving: 4 | Pre Time: 15 minutes | Cooking Time: 10 minutes
Ingredients
– 1.5 lbs flank steak (or skirt steak for a quicker cook)
– 2 tbsp Cajun seasoning (store-bought or homemade, adjust to heat preference)
– 2 tbsp olive oil (or any neutral oil like avocado oil)
– 1 (15 oz) can chickpeas, rinsed and drained
– 1 cup cherry tomatoes, halved
– 1/2 red onion, thinly sliced
– 1/4 cup fresh parsley, chopped (cilantro works too for a twist)
– 2 tbsp lemon juice (freshly squeezed for best flavor)
– 1 tbsp honey (or maple syrup for a vegan option)
– Salt and black pepper, to taste (start with 1/2 tsp salt, 1/4 tsp pepper)
Instructions
1. Pat the flank steak dry with paper towels to ensure a good sear, then rub it evenly with 1 tbsp olive oil and the Cajun seasoning on both sides, pressing gently to adhere.
2. Preheat your grill or grill pan to high heat (about 450°F) for 5–10 minutes until it’s smoking hot—this prevents sticking and gives those beautiful grill marks.
3. Place the seasoned steak on the grill and cook for 4–5 minutes per side for medium-rare (130–135°F internal temperature), using a meat thermometer to avoid guesswork.
4. Transfer the grilled steak to a cutting board, tent it loosely with foil, and let it rest for 5 minutes to allow juices to redistribute for a tender bite.
5. While the steak rests, in a large bowl, combine the chickpeas, cherry tomatoes, red onion, and parsley for the salad.
6. In a small bowl, whisk together the remaining 1 tbsp olive oil, lemon juice, honey, 1/2 tsp salt, and 1/4 tsp black pepper until emulsified into a smooth dressing.
7. Pour the dressing over the chickpea salad mixture and toss gently to coat everything evenly, being careful not to crush the chickpeas.
8. Slice the rested steak thinly against the grain to maximize tenderness, then arrange it over the chickpea salad on a serving platter.
Now, dig into a plate where the smoky, spicy steak plays perfectly against the bright, crunchy chickpea salad—it’s a texture party in your mouth! Not only does this dish look gorgeous piled high, but it’s also sturdy enough to pack for a picnic or serve as a next-day lunch that’ll have coworkers eyeing your desk with envy.
Cottage Cheese and Berry Protein Bowl
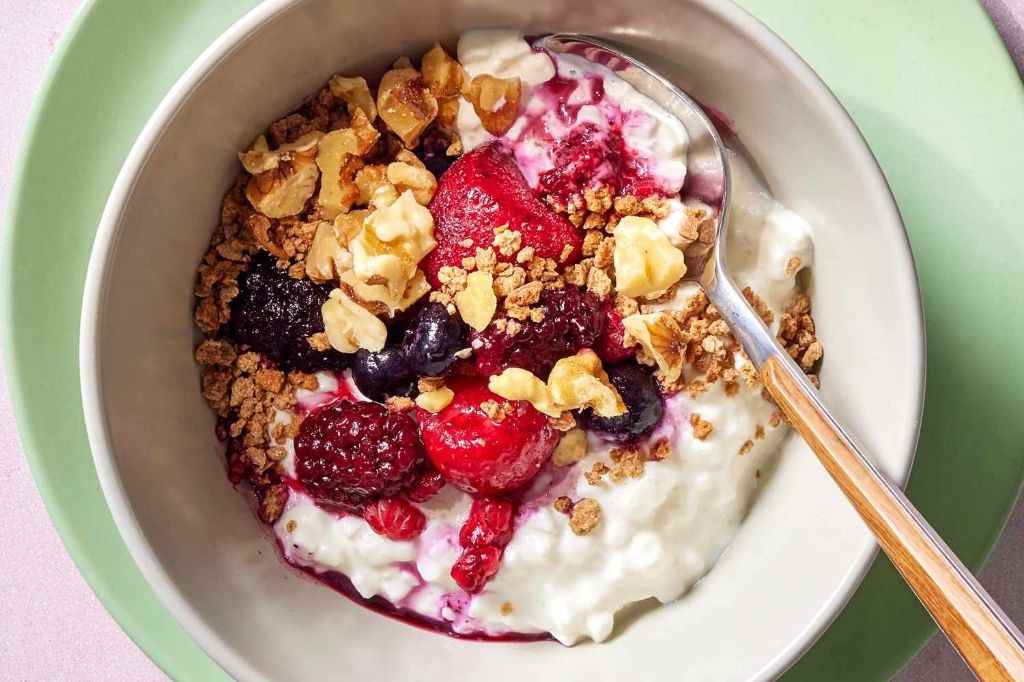
Oh, the humble cottage cheese—often relegated to sad diet plates—just got a glow-up worthy of a red carpet! This Cottage Cheese and Berry Protein Bowl is the breakfast (or snack) hero you didn’t know you needed, blending creamy, tangy goodness with sweet, juicy berries for a dish that’s as satisfying as it is Instagram-worthy. Let’s turn that fridge staple into your new obsession.
Serving: 1 | Pre Time: 10 minutes | Cooking Time: 0 minutes
Ingredients
– 1 cup cottage cheese (full-fat for extra creaminess, or low-fat if preferred)
– 1/2 cup mixed fresh berries (such as strawberries, blueberries, and raspberries, or frozen thawed)
– 1 tbsp honey (adjust to sweetness preference, or maple syrup for a vegan twist)
– 1/4 cup granola (any crunchy variety, like almond or oat-based)
– 1 tsp chia seeds (optional for added fiber and texture)
– Fresh mint leaves for garnish (a few sprigs, or skip if not available)
Instructions
1. Place 1 cup of cottage cheese into a medium-sized bowl, using a spoon to smooth it into an even layer at the bottom.
2. Wash 1/2 cup of mixed fresh berries under cold water, then pat them dry gently with a paper towel to prevent sogginess.
3. Slice any larger strawberries into halves or quarters to ensure bite-sized pieces throughout the bowl.
4. Arrange the prepared berries evenly over the cottage cheese, scattering them for a colorful, appealing look.
5. Drizzle 1 tbsp of honey directly over the berries and cottage cheese in a zigzag pattern for even distribution.
6. Sprinkle 1/4 cup of granola on top, aiming for a crunchy layer that covers most of the surface.
7. Add 1 tsp of chia seeds over the granola, if using, to incorporate extra nutrients and a slight gel-like texture when mixed.
8. Garnish with a few fresh mint leaves by placing them delicately on top for a pop of color and fresh aroma.
9. Serve immediately to maintain the crispness of the granola and the freshness of the berries.
Velvety and lush, the cottage cheese melds with the honey’s sweetness, while the berries burst with juicy tang in every spoonful. Try layering it in a mason jar for a portable parfait, or swap in seasonal fruits like peaches for a summer twist—this bowl’s versatility is its secret superpower!
Miso Glazed Cod with Edamame and Brown Rice
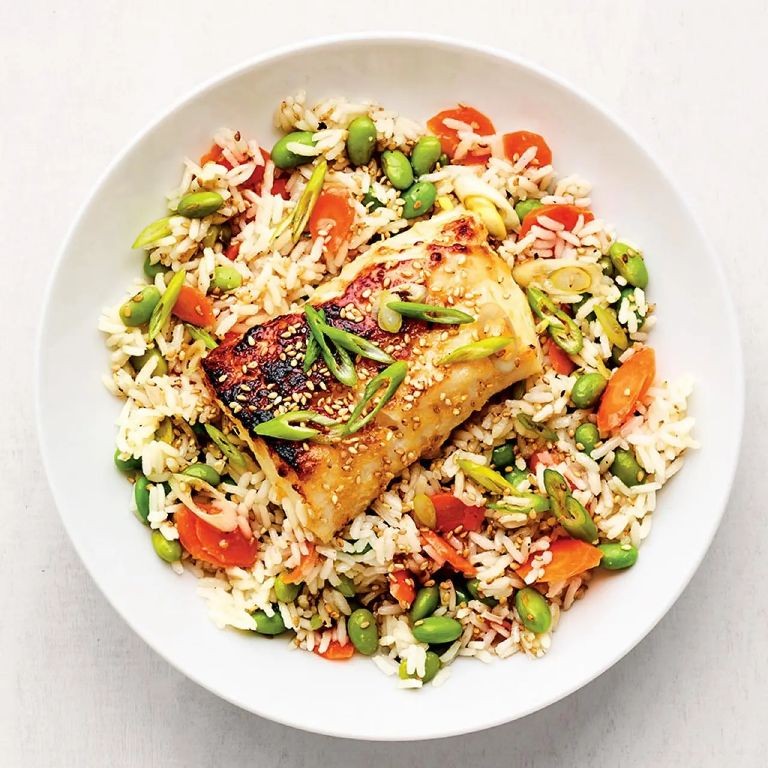
Zesty, umami-packed, and surprisingly simple—this miso-glazed cod transforms a weeknight dinner into a restaurant-worthy feast. With a sweet-savory glaze that caramelizes beautifully and a bed of nutty brown rice and vibrant edamame, it’s a balanced meal that’ll have you feeling like a culinary rockstar without the fuss. Let’s get cooking!
Serving: 4 | Pre Time: 15 minutes | Cooking Time: 25 minutes
Ingredients
– 4 (6-ounce) cod fillets, patted dry (skinless works best for even cooking)
– 1/4 cup white miso paste (or red miso for a deeper flavor)
– 2 tbsp honey (or maple syrup for a vegan twist)
– 1 tbsp rice vinegar
– 1 tbsp soy sauce (low-sodium is fine)
– 1 tbsp sesame oil (or any neutral oil like avocado oil)
– 1 cup brown rice, rinsed (use short-grain for a stickier texture)
– 2 cups water
– 1 cup shelled edamame, thawed if frozen
– 1 tbsp olive oil
– Salt to taste (start with 1/4 tsp)
– 2 green onions, thinly sliced (for garnish)
– 1 tsp sesame seeds (optional, for crunch)
Instructions
1. Preheat your oven to 400°F (200°C) and line a baking sheet with parchment paper.
2. In a small bowl, whisk together 1/4 cup white miso paste, 2 tbsp honey, 1 tbsp rice vinegar, and 1 tbsp soy sauce until smooth—this is your glaze. Tip: If the mixture is too thick, add a splash of water to loosen it.
3. Pat 4 cod fillets dry with paper towels to ensure the glaze sticks well, then brush each fillet generously with the miso mixture on all sides.
4. Place the glazed cod fillets on the prepared baking sheet and bake for 12-15 minutes, or until the fish flakes easily with a fork and the glaze is caramelized. Tip: Check at 12 minutes to avoid overcooking, as cod can dry out quickly.
5. While the cod bakes, combine 1 cup brown rice and 2 cups water in a medium saucepan, bring to a boil over high heat, then reduce to a low simmer, cover, and cook for 20-25 minutes until tender and water is absorbed.
6. In a skillet over medium heat, add 1 tbsp olive oil and sauté 1 cup edamame for 3-4 minutes until heated through, seasoning with a pinch of salt. Tip: Toss in a minced garlic clove here for extra flavor if you like.
7. Fluff the cooked brown rice with a fork and divide it among plates, topping with the sautéed edamame.
8. Remove the cod from the oven and place each fillet over the rice and edamame.
9. Garnish with sliced green onions and a sprinkle of sesame seeds if using.
Kick back and savor this dish—the cod is tender and flaky with a sticky-sweet glaze that’s downright addictive, while the brown rice adds a hearty chew and the edamame pops with freshness. Serve it with a squeeze of lime for a zesty kick or pair it with a simple cucumber salad to round out the meal.
Buffalo Chicken Stuffed Sweet Potatoes

Ever had a day where you crave the fiery kick of buffalo wings but also want something that won’t make your stomach stage a protest? Enter these Buffalo Chicken Stuffed Sweet Potatoes—a glorious mash-up that’s basically a cozy hug with a spicy side-eye. They’re the ultimate weeknight hero, turning humble spuds into a flavor-packed fiesta that’ll have you forgetting all about takeout menus.
Serving: 4 | Pre Time: 15 minutes | Cooking Time: 45 minutes
Ingredients
– 4 medium sweet potatoes (about 8 oz each, scrubbed clean)
– 1 tbsp olive oil (or any neutral oil)
– 1 lb boneless, skinless chicken breasts, diced into ½-inch pieces
– ½ cup buffalo sauce (like Frank’s RedHot, adjust to heat preference)
– ½ cup plain Greek yogurt (full-fat for creaminess, or light if preferred)
– ½ cup shredded cheddar cheese (sharp for extra tang)
– ¼ cup chopped green onions (for a fresh pop of color)
– ¼ tsp salt (to season, more if needed)
– ¼ tsp black pepper (freshly ground for best flavor)
Instructions
1. Preheat your oven to 400°F and line a baking sheet with parchment paper for easy cleanup.
2. Pierce each sweet potato several times with a fork to prevent steam buildup, then rub them all over with olive oil and place on the baking sheet.
3. Bake the sweet potatoes for 40-45 minutes, until they’re tender when pierced with a fork and the skins are slightly crispy.
4. While the sweet potatoes bake, heat a large skillet over medium-high heat and add the diced chicken, cooking for 6-8 minutes until no longer pink and lightly browned.
5. Reduce the heat to low and stir in the buffalo sauce, letting it simmer for 2-3 minutes to coat the chicken evenly and infuse the heat.
6. In a small bowl, mix the Greek yogurt with salt and pepper until smooth, which will add a cool, creamy contrast to the spicy chicken.
7. Once the sweet potatoes are done, carefully slice each one open lengthwise and fluff the insides with a fork to create a pocket for stuffing.
8. Divide the buffalo chicken mixture evenly among the sweet potatoes, spooning it into the centers.
9. Top each stuffed sweet potato with shredded cheddar cheese and return them to the oven for 3-5 minutes, just until the cheese is melted and bubbly.
10. Remove from the oven and garnish with chopped green onions for a bright, fresh finish.
Kick back and dig into this masterpiece—the sweet, tender potato balances the zesty buffalo chicken perfectly, with a creamy yogurt swirl that tames the heat. Serve it straight from the oven for a gooey cheese pull, or pair it with a crisp side salad to round out the meal. Trust me, your taste buds will be doing a happy dance with every forkful!
Loaded Black Bean and Quinoa Salad
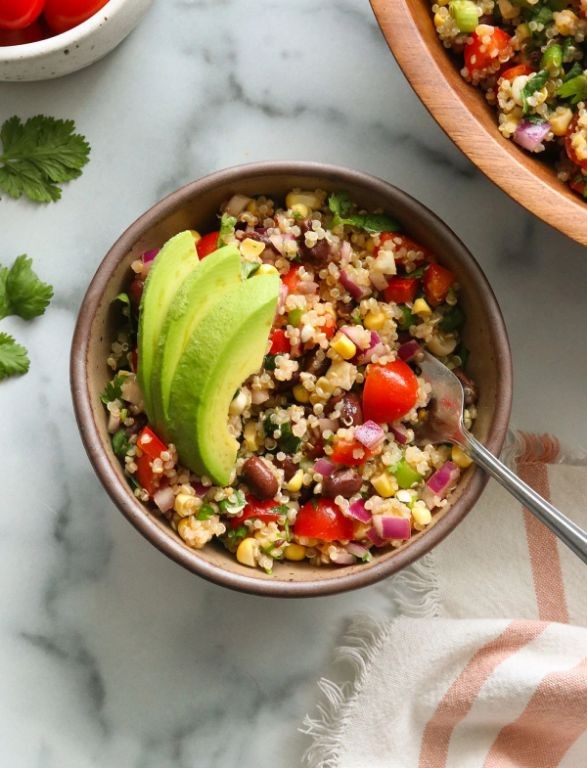
Kick off your meal prep with a salad that’s so loaded, it practically flexes. This black bean and quinoa powerhouse is the answer to your ‘what’s for lunch?’ woes, packing a punch of protein and flavor that’ll make your taste buds do a happy dance. Trust me, it’s the kind of dish that turns a simple salad into a main event.
Serving: 4 | Pre Time: 15 minutes | Cooking Time: 20 minutes
Ingredients
– 1 cup quinoa, rinsed well to remove bitterness
– 2 cups water
– 1 (15-ounce) can black beans, drained and rinsed
– 1 cup corn kernels, fresh or frozen (thawed if frozen)
– 1 red bell pepper, diced
– 1/2 red onion, finely chopped
– 1/4 cup fresh cilantro, chopped (or parsley for a milder flavor)
– 1 avocado, diced
– 3 tbsp lime juice, freshly squeezed for best flavor
– 2 tbsp olive oil, or any neutral oil
– 1 tsp ground cumin
– 1/2 tsp chili powder, adjust to taste for more heat
– Salt and black pepper, to season throughout
Instructions
1. In a medium saucepan, combine the rinsed quinoa and 2 cups of water, then bring to a boil over high heat. Tip: Rinsing quinoa removes its natural coating, which can taste bitter if skipped.
2. Reduce the heat to low, cover the saucepan, and simmer the quinoa for 15 minutes, or until all the water is absorbed and the grains are fluffy.
3. Remove the quinoa from the heat, fluff it with a fork, and let it cool to room temperature, about 10 minutes, to prevent the salad from getting soggy.
4. In a large mixing bowl, combine the cooled quinoa, drained black beans, corn kernels, diced red bell pepper, and finely chopped red onion.
5. In a small bowl, whisk together the lime juice, olive oil, ground cumin, and chili powder until well blended. Tip: Taste the dressing before adding it to adjust the seasoning—it should be tangy and slightly spicy.
6. Pour the dressing over the quinoa mixture and toss everything gently to coat evenly.
7. Fold in the chopped cilantro and diced avocado just before serving to keep them fresh and vibrant. Tip: Add the avocado last to prevent it from turning brown and mushy.
8. Season the salad with salt and black pepper to taste, tossing once more to distribute the flavors.
Now, this salad isn’t just a sidekick—it’s a texture party with creamy avocado, chewy quinoa, and crisp veggies that’ll have you coming back for seconds. Serve it chilled in a bowl, stuff it into a wrap for a portable lunch, or top it with grilled chicken to turn it into a hearty dinner. Naturally, it’s a crowd-pleaser that’s as versatile as it is delicious!
Teriyaki Tempeh with Steamed Bok Choy
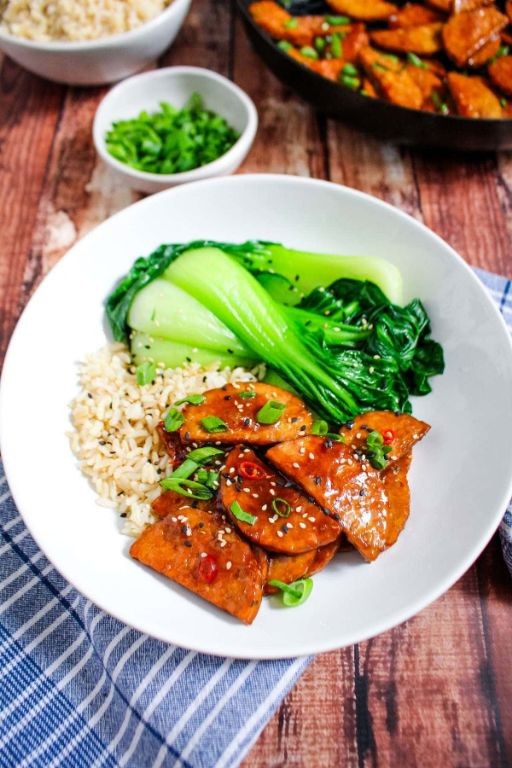
Aren’t you tired of tofu stealing all the plant-based glory? Let’s give tempeh its moment in the spotlight with a saucy, savory dish that’s so easy, you’ll have dinner ready before your next doomscroll session. This Teriyaki Tempeh with Steamed Bok Choy is your new weeknight warrior, packing a punch of flavor that will make you forget all about takeout menus.
Serving: 4 | Pre Time: 15 minutes | Cooking Time: 20 minutes
Ingredients
– 1 (8 oz) block tempeh, sliced into ½-inch thick strips
– ¼ cup low-sodium soy sauce (or tamari for gluten-free)
– 2 tbsp honey (or maple syrup for vegan)
– 1 tbsp rice vinegar
– 1 tsp freshly grated ginger
– 1 garlic clove, minced
– 1 tbsp cornstarch mixed with 2 tbsp water
– 2 tbsp avocado oil (or any neutral high-heat oil)
– 4 heads baby bok choy, halved lengthwise
– 2 tbsp water (for steaming)
– 1 tsp sesame seeds, for garnish
– 2 green onions, thinly sliced, for garnish
Instructions
1. Whisk together soy sauce, honey, rice vinegar, ginger, and garlic in a small bowl until the honey is fully dissolved.
2. Heat 1 tablespoon of avocado oil in a large non-stick skillet or wok over medium-high heat until it shimmers.
3. Arrange tempeh strips in the skillet in a single layer, working in batches if needed to avoid crowding.
4. Cook tempeh for 3-4 minutes per side until golden brown and crispy on the edges.
5. Tip: Don’t move the tempeh for the first few minutes—this helps develop that delicious crust!
6. Reduce heat to medium and pour the prepared teriyaki sauce over the tempeh.
7. Let the sauce simmer for 1 minute, then stir in the cornstarch slurry.
8. Cook, stirring constantly, for 2-3 minutes until the sauce thickens and coats the tempeh like a glossy jacket.
9. Tip: If the sauce thickens too quickly, add a splash of water to reach your desired consistency.
10. While the sauce thickens, place bok choy halves cut-side up in a separate skillet with a lid.
11. Add 2 tablespoons of water to the skillet with the bok choy and cover immediately.
12. Steam over medium heat for 4-5 minutes until the stems are tender-crisp and the leaves are vibrant green.
13. Tip: Check for doneness by piercing the stem with a fork—it should yield slightly but still have a pleasant crunch.
14. Divide steamed bok choy among four plates and top with the glazed teriyaki tempeh.
15. Garnish generously with sliced green onions and a sprinkle of sesame seeds.
Oh, the glorious contrast! You get the firm, nutty bite of tempeh swaddled in that sticky-sweet teriyaki glaze, perfectly balanced by the clean, crisp freshness of the bok choy. For a next-level experience, serve it over a mound of fluffy jasmine rice to soak up every last drop of that incredible sauce.
Summary
Hooray! You’re all set with a week’s worth of delicious, protein-packed meals that make busy days a breeze. We hope these 17 recipes bring flavor and ease to your kitchen. Give them a try, leave a comment with your favorite, and if you found this helpful, share it on Pinterest to help other busy cooks!


