
Nights can get hectic, but dinner doesn’t have to be! We’ve gathered 20 delicious homemade recipes perfect for busy weeknights. From quick one-pan wonders to comforting classics ready in under 30 minutes, these dishes will save you time without sacrificing flavor. Let’s make those evenings easier and tastier—dive into this roundup for your new go-to meals!
Garlic Butter Steak with Roasted Potatoes
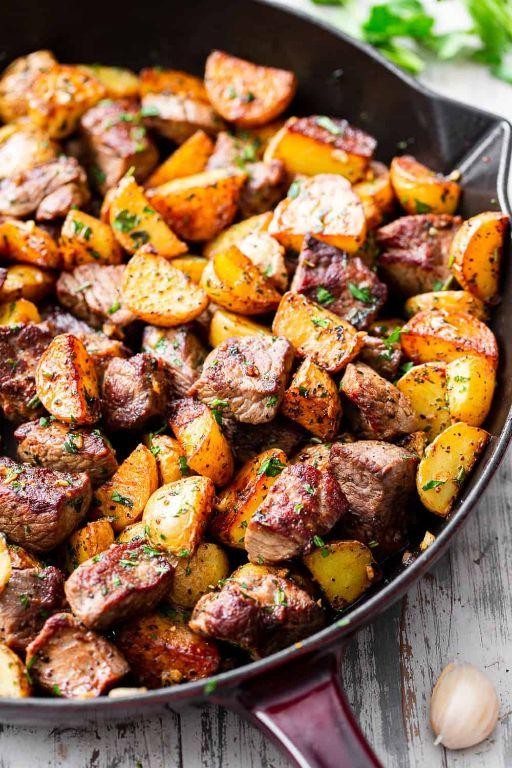
Now, as the evening settles in on this quiet December night, I find myself drawn to the kitchen, where the simple promise of garlic butter steak with roasted potatoes feels like a warm embrace after a long day. There’s something deeply comforting about this classic pairing—the rich, savory steak and the humble, crispy potatoes—that turns an ordinary meal into a moment of quiet satisfaction.
Serving: 2 | Pre Time: 15 minutes | Cooking Time: 30 minutes
Ingredients
– 2 (8-ounce) ribeye steaks, 1-inch thick
– 1.5 pounds Yukon Gold potatoes, cut into 1-inch cubes
– 3 tablespoons olive oil, divided
– 4 tablespoons unsalted butter
– 4 cloves garlic, minced
– 1 tablespoon fresh rosemary, chopped
– 1 teaspoon kosher salt, divided
– 1/2 teaspoon black pepper, divided
Instructions
1. Preheat your oven to 425°F and line a baking sheet with parchment paper.
2. In a large bowl, toss the potato cubes with 2 tablespoons of olive oil, 1/2 teaspoon of kosher salt, and 1/4 teaspoon of black pepper until evenly coated.
3. Spread the potatoes in a single layer on the prepared baking sheet and roast for 25-30 minutes, flipping halfway through, until golden brown and crispy on the edges.
4. While the potatoes roast, pat the steaks dry with paper towels to ensure a good sear, then season both sides with the remaining 1/2 teaspoon of kosher salt and 1/4 teaspoon of black pepper.
5. Heat a cast-iron skillet over medium-high heat and add the remaining 1 tablespoon of olive oil.
6. Sear the steaks for 4-5 minutes per side for medium-rare, or until the internal temperature reaches 135°F on an instant-read thermometer.
7. Transfer the steaks to a plate to rest for 5 minutes, which allows the juices to redistribute for a more tender bite.
8. In the same skillet, reduce the heat to low and melt the unsalted butter.
9. Add the minced garlic and chopped rosemary, sautéing for 1-2 minutes until fragrant but not browned, to avoid bitterness.
10. Return the rested steaks to the skillet, spooning the garlic butter sauce over them for 30 seconds to warm through.
11. Serve the steaks immediately with the roasted potatoes, drizzling any remaining sauce from the skillet over the top.
Savor the contrast of the juicy, buttery steak against the crispy potatoes, with the rosemary-infused garlic butter tying it all together in a fragrant, savory harmony. For a creative twist, try topping the steak with a sprinkle of flaky sea salt or serving it alongside a simple arugula salad dressed with lemon juice to cut through the richness.
Creamy Mushroom Chicken Pasta
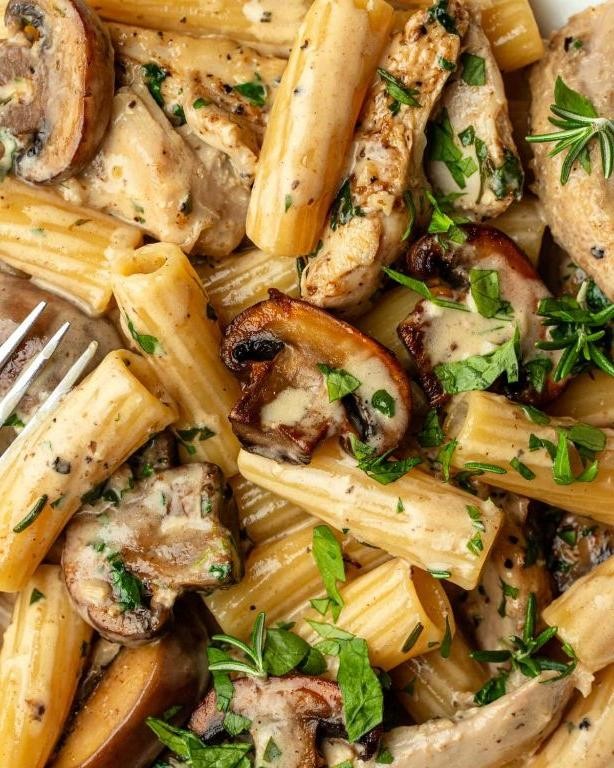
Wandering through the kitchen on this quiet evening, I find myself craving something that feels both comforting and special—a dish that wraps up the day with warmth. This creamy mushroom chicken pasta is exactly that, a simple yet satisfying meal that comes together with gentle stirring and patient simmering, filling the air with earthy, savory aromas that soothe the soul.
Serving: 4 | Pre Time: 15 minutes | Cooking Time: 25 minutes
Ingredients
– 1 pound boneless, skinless chicken breasts
– 1/2 teaspoon salt
– 1/4 teaspoon black pepper
– 2 tablespoons olive oil
– 8 ounces cremini mushrooms
– 3 cloves garlic
– 1/2 cup chicken broth
– 1 cup heavy cream
– 1/2 cup grated Parmesan cheese
– 12 ounces fettuccine pasta
– 2 tablespoons chopped fresh parsley
Instructions
1. Slice the chicken breasts into 1-inch strips and season evenly with salt and black pepper.
2. Heat olive oil in a large skillet over medium-high heat until it shimmers, about 2 minutes.
3. Add the chicken strips to the skillet and cook for 5-7 minutes, turning once, until golden brown and cooked through with no pink inside.
4. Transfer the cooked chicken to a plate and set aside, covering loosely to keep warm.
5. Slice the cremini mushrooms into 1/4-inch thick pieces.
6. In the same skillet, add the sliced mushrooms and cook over medium heat for 8-10 minutes, stirring occasionally, until they release their juices and turn deep brown.
7. Mince the garlic cloves finely.
8. Add the minced garlic to the skillet with the mushrooms and cook for 1 minute, stirring constantly, until fragrant but not browned.
9. Pour in the chicken broth and use a wooden spoon to scrape up any browned bits from the bottom of the skillet, which adds depth of flavor.
10. Stir in the heavy cream and bring the mixture to a gentle simmer over medium-low heat, letting it bubble softly for 3 minutes to thicken slightly.
11. Add the grated Parmesan cheese to the skillet and stir continuously for 2 minutes until the cheese melts fully and the sauce becomes smooth and creamy.
12. While preparing the sauce, cook the fettuccine pasta in a large pot of salted boiling water according to package instructions, usually 10-12 minutes, until al dente, then drain well.
13. Return the cooked chicken to the skillet with the sauce and stir to coat evenly, heating for 2 minutes until warmed through.
14. Chop the fresh parsley finely.
15. Add the drained pasta to the skillet and toss gently with the sauce and chicken until everything is well combined.
16. Sprinkle the chopped parsley over the pasta just before serving for a fresh, herbal note.
Rich and velvety, this pasta cradles tender chicken and earthy mushrooms in a sauce that clings perfectly to each strand of fettuccine. The creamy texture balances the savory notes from the Parmesan and garlic, making it ideal for a cozy dinner served with a simple green salad or crusty bread to soak up every last drop.
One-Pan Lemon Garlic Salmon with Asparagus

Sometimes, the simplest meals feel like the most profound gifts—a quiet kitchen, a single pan, and the gentle promise of lemon and garlic mingling with rich salmon and crisp asparagus. It’s a dish that asks for little but offers deep, comforting flavors, perfect for a reflective evening when time feels expansive and unhurried.
Serving: 4 | Pre Time: 10 minutes | Cooking Time: 20 minutes
Ingredients
– 4 (6-ounce) salmon fillets, skin-on
– 1 pound asparagus, trimmed
– 3 tablespoons olive oil
– 4 cloves garlic, minced
– 1 lemon, thinly sliced
– 2 tablespoons fresh lemon juice
– 1 teaspoon salt
– 1/2 teaspoon black pepper
– 1/4 teaspoon red pepper flakes
Instructions
1. Preheat your oven to 400°F and position a rack in the center.
2. Pat the salmon fillets dry with paper towels to ensure a crisp sear.
3. In a large oven-safe skillet, heat 2 tablespoons of olive oil over medium-high heat until shimmering, about 2 minutes.
4. Season the salmon fillets evenly with salt and black pepper on both sides.
5. Place the salmon skin-side down in the hot skillet and sear without moving for 4 minutes to develop a golden crust.
6. Arrange the trimmed asparagus around the salmon in the skillet.
7. Drizzle the remaining 1 tablespoon of olive oil over the asparagus.
8. Sprinkle the minced garlic and red pepper flakes evenly over the salmon and asparagus.
9. Arrange the lemon slices on top of the salmon fillets.
10. Pour the fresh lemon juice over everything in the skillet.
11. Transfer the skillet to the preheated oven and bake for 10–12 minutes, until the salmon flakes easily with a fork and the asparagus is tender-crisp.
12. Remove from the oven and let rest for 3 minutes before serving.
As you plate it, the salmon will be moist and flaky, its richness cut by the bright lemon and subtle heat from the pepper flakes. Serve it straight from the pan with crusty bread to soak up the garlic-infused juices, or over a bed of quinoa for a heartier meal—the asparagus, still vibrant and slightly crisp, adds a refreshing contrast that makes each bite feel complete.
Slow Cooker Beef Bourguignon

Perhaps there’s no better way to welcome a quiet evening than with the rich, comforting aroma of beef bourguignon slowly filling the kitchen. This classic French stew transforms humble ingredients into something deeply satisfying, its flavors melding together over hours like a well-kept secret. Letting the slow cooker do the work feels like a small gift to your future self, promising a warm, hearty meal with minimal fuss.
Serving: 6 | Pre Time: 20 minutes | Cooking Time: 8 hours
Ingredients
– 3 pounds beef chuck roast, cut into 2-inch cubes
– 6 slices thick-cut bacon, chopped
– 1 large yellow onion, diced
– 3 carrots, peeled and sliced into 1-inch pieces
– 8 ounces cremini mushrooms, halved
– 3 cloves garlic, minced
– 2 cups dry red wine
– 2 cups beef broth
– ¼ cup all-purpose flour
– 2 tablespoons tomato paste
– 1 tablespoon olive oil
– 2 teaspoons fresh thyme leaves
– 1 bay leaf
– 1 teaspoon salt
– ½ teaspoon black pepper
Instructions
1. Pat the beef chuck roast cubes completely dry with paper towels to ensure a good sear.
2. Heat 1 tablespoon olive oil in a large skillet over medium-high heat until shimmering, about 2 minutes.
3. Add the beef cubes in a single layer, working in batches to avoid overcrowding, and sear for 3–4 minutes per side until deeply browned.
4. Transfer the seared beef to the slow cooker insert.
5. In the same skillet, add the chopped bacon and cook over medium heat for 5–7 minutes until crispy, stirring occasionally.
6. Use a slotted spoon to transfer the bacon to the slow cooker, leaving the rendered fat in the skillet.
7. Add the diced onion and sliced carrots to the skillet and cook in the bacon fat for 5 minutes until slightly softened.
8. Stir in the minced garlic and cook for 1 more minute until fragrant.
9. Sprinkle ¼ cup all-purpose flour over the vegetables and cook, stirring constantly, for 2 minutes to form a roux and cook out the raw flour taste.
10. Whisk in 2 cups dry red wine and 2 cups beef broth, scraping up any browned bits from the bottom of the skillet.
11. Bring the mixture to a simmer and cook for 3 minutes until slightly thickened, then stir in 2 tablespoons tomato paste until fully incorporated.
12. Pour the entire wine-broth mixture over the beef and bacon in the slow cooker.
13. Add the halved cremini mushrooms, 2 teaspoons fresh thyme leaves, 1 bay leaf, 1 teaspoon salt, and ½ teaspoon black pepper to the slow cooker.
14. Gently stir everything to combine, ensuring the beef is mostly submerged.
15. Cover and cook on low for 8 hours, until the beef is fork-tender and easily shreds.
16. Discard the bay leaf before serving.
Ladle this bourguignon into shallow bowls, where the tender beef practically melts alongside the sweet carrots and earthy mushrooms. The red wine creates a velvety, deeply savory sauce that clings to every bite. For a cozy twist, serve it over a bed of creamy mashed potatoes or with a crusty baguette to soak up every last drop.
Vegetable Stir-Fry with Homemade Teriyaki Sauce
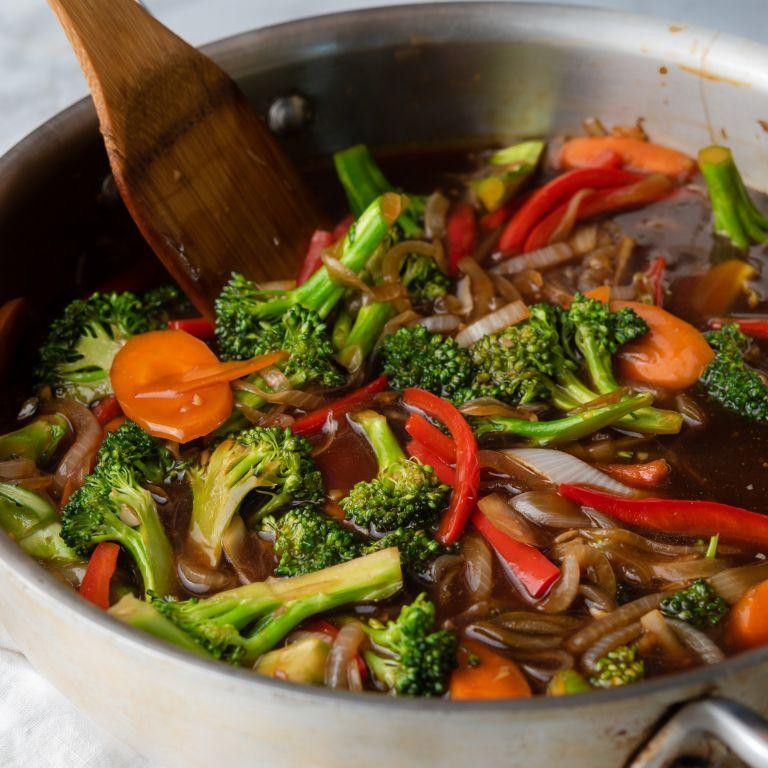
Sometimes, on quiet evenings like this one, the simplest meals feel like the most profound gifts—a colorful stir-fry that comes together with a gentle sizzle and the sweet-salty aroma of homemade teriyaki. It’s a dish that doesn’t demand perfection, just a bit of patience and a warm pan.
Serving: 4 | Pre Time: 15 minutes | Cooking Time: 15 minutes
Ingredients
– 1/4 cup low-sodium soy sauce
– 2 tablespoons honey
– 1 tablespoon rice vinegar
– 1 teaspoon grated fresh ginger
– 1 clove garlic, minced
– 1 tablespoon cornstarch
– 2 tablespoons water
– 2 tablespoons vegetable oil, divided
– 1 medium onion, thinly sliced
– 2 medium carrots, julienned
– 1 red bell pepper, thinly sliced
– 2 cups broccoli florets
– 1 cup snap peas, trimmed
– 2 cups cooked white rice
Instructions
1. In a small bowl, whisk together 1/4 cup low-sodium soy sauce, 2 tablespoons honey, 1 tablespoon rice vinegar, 1 teaspoon grated fresh ginger, and 1 clove minced garlic until fully combined.
2. In a separate small bowl, create a slurry by stirring 1 tablespoon cornstarch into 2 tablespoons water until no lumps remain.
3. Heat a large skillet or wok over medium-high heat and add 1 tablespoon vegetable oil, swirling to coat the surface evenly.
4. Add 1 medium thinly sliced onion and 2 medium julienned carrots to the skillet, stirring frequently for 4–5 minutes until the onions turn translucent and the carrots begin to soften.
5. Incorporate 1 thinly sliced red bell pepper, 2 cups broccoli florets, and 1 cup trimmed snap peas, cooking for another 5–6 minutes while stirring often until the vegetables are crisp-tender and bright in color.
6. Push the cooked vegetables to the sides of the skillet, then pour the remaining 1 tablespoon vegetable oil into the center.
7. Immediately add the soy sauce mixture from step 1 to the center oil, letting it bubble for 30 seconds to infuse the flavors.
8. Stir the cornstarch slurry from step 2 into the simmering sauce and cook for 1–2 minutes until it thickens noticeably and coats the back of a spoon.
9. Toss all the vegetables in the thickened teriyaki sauce until evenly coated, then remove the skillet from the heat.
10. Divide 2 cups cooked white rice among four bowls and top each with the vegetable stir-fry.
You’ll find the vegetables retain a pleasant crunch against the glossy, sticky sauce, with the ginger and garlic lending a warm depth. For a creative twist, try serving it over quinoa or alongside grilled tofu, letting the teriyaki pool invitingly at the bottom of the bowl.
Spicy Shrimp Tacos with Avocado Crema

Kindly, as the evening light fades on this December day, I find myself drawn to the warmth of the kitchen, where simple ingredients promise a vibrant escape. These tacos are a gentle dance of spice and cool creaminess, a quiet celebration of flavor that feels both familiar and new.
Serving: 4 | Pre Time: 15 minutes | Cooking Time: 10 minutes
Ingredients
– 1 lb large shrimp, peeled and deveined
– 2 tbsp olive oil
– 1 tsp chili powder
– 1/2 tsp smoked paprika
– 1/4 tsp cayenne pepper
– 1/2 tsp garlic powder
– 1/2 tsp salt
– 8 small corn tortillas
– 1 ripe avocado
– 1/4 cup sour cream
– 2 tbsp fresh lime juice
– 1/4 cup fresh cilantro, chopped
– 1/2 cup red cabbage, thinly sliced
– 1/4 cup red onion, finely diced
Instructions
1. Pat the shrimp completely dry with paper towels to ensure a good sear.
2. In a medium bowl, toss the shrimp with 1 tbsp olive oil, chili powder, smoked paprika, cayenne pepper, garlic powder, and salt until evenly coated.
3. Heat the remaining 1 tbsp olive oil in a large skillet over medium-high heat until it shimmers, about 1 minute.
4. Add the shrimp to the skillet in a single layer, cooking for 2-3 minutes per side until they turn pink and opaque.
5. While the shrimp cook, warm the corn tortillas directly over a low gas flame for 15-20 seconds per side until lightly charred, or heat them in a dry skillet.
6. For the avocado crema, scoop the avocado flesh into a blender or food processor.
7. Add the sour cream, lime juice, and half of the chopped cilantro to the blender.
8. Blend the mixture on high speed for 30-45 seconds until completely smooth and creamy.
9. Assemble the tacos by placing a few shrimp on each warmed tortilla.
10. Drizzle a generous spoonful of avocado crema over the shrimp.
11. Top each taco with a pinch of red cabbage, red onion, and the remaining fresh cilantro.
Each bite offers a delightful contrast—the tender, spiced shrimp against the cool, velvety crema, with the cabbage adding a gentle crunch. Enjoy them immediately, perhaps with an extra squeeze of lime for brightness, as the soft tortillas cradle the vibrant filling perfectly.
Homemade Margherita Pizza with Fresh Basil

Holding a warm slice of homemade Margherita pizza feels like a quiet celebration of simplicity, where the gentle tang of tomato meets the creamy stretch of mozzarella under a fragrant basil leaf. In my kitchen tonight, as the oven hums and flour dusts the counter, I’m reminded how this classic dish—with its crisp crust and fresh toppings—can turn an ordinary evening into something softly memorable. Let’s gather what we need and begin, step by reflective step.
Serving: 4 | Pre Time: 20 minutes | Cooking Time: 12 minutes
Ingredients
– 2 cups all-purpose flour
– 1 teaspoon active dry yeast
– 3/4 cup warm water (110°F)
– 1 teaspoon salt
– 1 tablespoon olive oil
– 1/2 cup tomato sauce
– 8 ounces fresh mozzarella cheese, sliced
– 1/4 cup fresh basil leaves
Instructions
1. In a large bowl, combine the warm water and active dry yeast, letting it sit for 5 minutes until frothy.
2. Add the all-purpose flour and salt to the yeast mixture, stirring until a shaggy dough forms.
3. Knead the dough on a floured surface for 8 minutes until smooth and elastic, then place it in an oiled bowl, cover with a damp cloth, and let it rise in a warm spot for 1 hour until doubled in size.
4. Preheat your oven to 475°F with a pizza stone or baking sheet inside to heat for at least 30 minutes.
5. Punch down the dough, then roll it out on a floured surface into a 12-inch circle about 1/4-inch thick.
6. Transfer the dough to a piece of parchment paper, then spread the tomato sauce evenly over the surface, leaving a 1/2-inch border around the edges.
7. Arrange the sliced mozzarella cheese on top of the sauce in an even layer.
8. Carefully slide the parchment paper with the pizza onto the preheated pizza stone or baking sheet in the oven.
9. Bake for 10–12 minutes, rotating halfway through, until the crust is golden brown and the cheese is bubbly and lightly browned.
10. Remove the pizza from the oven and immediately top it with the fresh basil leaves, then drizzle with the olive oil.
11. Let the pizza cool for 2 minutes on a wire rack before slicing and serving.
Remembering the first bite, the crust crackles softly underfoot, giving way to a tender crumb that cradles the bright, acidic tomato and milky mozzarella. For a creative twist, try scattering a few arugula leaves over the warm pizza just before serving, adding a peppery contrast that elevates this humble dish into a quiet feast for the senses.
Beef and Broccoli Stir-Fry

Tonight, as the winter evening settles in, I find myself craving the comforting warmth of a familiar stir-fry—a simple dish that transforms humble ingredients into something deeply satisfying. There’s something almost meditative about the sizzle of beef meeting a hot pan, the bright green of broccoli just tender-crisp, and the way a savory-sweet sauce brings it all together in minutes.
Serving: 4 | Pre Time: 15 minutes | Cooking Time: 15 minutes
Ingredients
– 1 lb flank steak, thinly sliced against the grain
– 4 cups broccoli florets
– 3 tbsp vegetable oil, divided
– 4 cloves garlic, minced
– 1 tbsp fresh ginger, grated
– 1/2 cup low-sodium soy sauce
– 1/4 cup brown sugar
– 2 tbsp rice vinegar
– 1 tbsp cornstarch
– 1/4 cup water
– 1 tsp sesame oil
– Cooked white rice, for serving
Instructions
1. In a small bowl, whisk together 1/2 cup low-sodium soy sauce, 1/4 cup brown sugar, 2 tbsp rice vinegar, 1 tbsp cornstarch, and 1/4 cup water until smooth to create the sauce; set aside.
2. Pat 1 lb flank steak slices dry with paper towels to ensure a good sear.
3. Heat 2 tbsp vegetable oil in a large skillet or wok over high heat until shimmering, about 1–2 minutes.
4. Add the steak slices in a single layer, working in batches if needed to avoid overcrowding, and cook undisturbed for 2 minutes until browned on one side.
5. Flip the steak and cook for 1 more minute until just cooked through, then transfer to a plate.
6. Reduce heat to medium-high and add 1 tbsp vegetable oil to the same skillet.
7. Add 4 cups broccoli florets and stir-fry for 3–4 minutes until bright green and slightly tender but still crisp.
8. Push broccoli to the sides of the skillet, add 4 cloves minced garlic and 1 tbsp grated ginger to the center, and cook for 30 seconds until fragrant.
9. Pour the prepared sauce into the skillet, stirring constantly, and bring to a simmer over medium heat for 1–2 minutes until thickened.
10. Return the cooked steak and any accumulated juices to the skillet, tossing to coat evenly in the sauce.
11. Remove from heat and stir in 1 tsp sesame oil for a nutty finish.
12. Serve immediately over cooked white rice.
Buttery-tender beef contrasts with the crisp-tender broccoli, all glazed in a glossy, savory-sweet sauce that clings to every bite. For a creative twist, try serving it over cauliflower rice or tossing in sliced bell peppers during the broccoli step for extra color and crunch—it’s a versatile dish that feels both nourishing and indulgent.
Spinach and Ricotta Stuffed Shells

There’s something quietly comforting about filling a kitchen with the scent of garlic and simmering tomatoes, especially on a chilly evening when the world outside feels a bit too hurried. This dish, with its tender pasta shells cradling a creamy, herbed filling, always feels like a gentle pause—a small, savory embrace after a long day.
Serving: 6 | Pre Time: 25 minutes | Cooking Time: 45 minutes
Ingredients
– 24 jumbo pasta shells
– 1 (15-ounce) container whole-milk ricotta cheese
– 10 ounces fresh spinach, chopped
– 1 large egg, lightly beaten
– 1 cup shredded mozzarella cheese, divided
– 1/2 cup grated Parmesan cheese
– 2 tablespoons chopped fresh basil
– 1 teaspoon dried oregano
– 1/2 teaspoon garlic powder
– 1/4 teaspoon ground black pepper
– 2 tablespoons olive oil
– 1 small yellow onion, finely diced
– 3 cloves garlic, minced
– 1 (28-ounce) can crushed tomatoes
– 1 teaspoon granulated sugar
Instructions
1. Preheat your oven to 375°F and lightly grease a 9×13-inch baking dish with olive oil or nonstick spray.
2. Bring a large pot of salted water to a rolling boil over high heat, then add the jumbo pasta shells and cook for 9 minutes until just al dente—they should still have a slight firmness to avoid tearing when stuffed.
3. Drain the shells in a colander and rinse briefly under cool water to stop the cooking process, then arrange them in a single layer on a baking sheet to prevent sticking.
4. In a large skillet, heat 2 tablespoons of olive oil over medium heat, then add the diced onion and cook for 5 minutes until softened and translucent.
5. Stir in the minced garlic and cook for 1 more minute until fragrant, being careful not to let it brown.
6. Add the crushed tomatoes and 1 teaspoon of granulated sugar to the skillet, then reduce the heat to low and simmer uncovered for 10 minutes, stirring occasionally, to allow the flavors to meld.
7. While the sauce simmers, combine the ricotta cheese, chopped spinach, beaten egg, 1/2 cup of the mozzarella cheese, Parmesan cheese, basil, oregano, garlic powder, and black pepper in a mixing bowl, folding gently until evenly incorporated—avoid overmixing to keep the filling light.
8. Spread 1 cup of the tomato sauce evenly across the bottom of the prepared baking dish.
9. Using a spoon or piping bag, fill each cooked pasta shell with about 2 tablespoons of the ricotta mixture, packing it gently without overfilling to prevent bursting during baking.
10. Arrange the stuffed shells in a single layer over the sauce in the baking dish.
11. Pour the remaining tomato sauce over the top of the shells, then sprinkle evenly with the remaining 1/2 cup of mozzarella cheese.
12. Cover the dish tightly with aluminum foil and bake in the preheated oven for 25 minutes.
13. Remove the foil and bake uncovered for an additional 15–20 minutes, until the cheese is bubbly and lightly golden brown on top.
14. Let the dish rest for 10 minutes after removing it from the oven to allow the filling to set slightly for easier serving.
Melted cheese forms a delicate crust over the shells, while the ricotta filling stays luxuriously creamy against the tangy tomato sauce. For a bright finish, garnish with extra fresh basil or a drizzle of olive oil just before serving, pairing it with a simple green salad to balance the richness.
Thai Red Curry with Coconut Milk and Vegetables

Cradling a warm bowl of Thai red curry on a quiet evening feels like a gentle embrace, the aromatic steam rising to meet the cool air as I reflect on how this dish transforms simple vegetables into something deeply comforting and vibrant. It’s a slow, mindful process that invites you to savor each step, from the sizzle of the paste to the final simmer, creating a meal that’s as nourishing for the soul as it is for the body.
Serving: 4 | Pre Time: 15 minutes | Cooking Time: 25 minutes
Ingredients
– 2 tbsp vegetable oil
– 3 tbsp Thai red curry paste
– 1 (13.5 oz) can coconut milk
– 2 cups vegetable broth
– 1 medium onion, sliced
– 2 bell peppers, sliced
– 2 carrots, sliced
– 1 cup broccoli florets
– 1 tbsp soy sauce
– 1 tbsp brown sugar
– 1 tbsp lime juice
– Fresh basil leaves for garnish
Instructions
1. Heat 2 tbsp vegetable oil in a large pot over medium heat until shimmering, about 2 minutes.
2. Add 3 tbsp Thai red curry paste and cook, stirring constantly, until fragrant and slightly darkened, about 3 minutes.
3. Pour in 1 (13.5 oz) can coconut milk and stir to combine with the paste, scraping the bottom of the pot to prevent sticking.
4. Add 2 cups vegetable broth and bring the mixture to a gentle simmer over medium-high heat.
5. Stir in 1 medium onion, sliced, 2 bell peppers, sliced, and 2 carrots, sliced, then reduce heat to medium-low.
6. Cover the pot and simmer for 10 minutes, stirring occasionally, until the vegetables begin to soften.
7. Add 1 cup broccoli florets, 1 tbsp soy sauce, and 1 tbsp brown sugar, stirring to incorporate evenly.
8. Cover again and simmer for an additional 8 minutes, or until all vegetables are tender but still slightly crisp.
9. Remove from heat and stir in 1 tbsp lime juice, adjusting the balance of flavors as needed.
10. Garnish with fresh basil leaves before serving.
Kindly ladle this curry over steamed jasmine rice, where the creamy coconut milk coats each vegetable with a rich, velvety texture that contrasts beautifully with the tender-crisp bites. The flavors meld into a harmonious blend of spicy, sweet, and tangy notes, making it perfect for a cozy dinner or a thoughtful meal shared with loved ones.
Classic Homemade Meatloaf with Mashed Potatoes

Cradling a warm plate of meatloaf and mashed potatoes feels like wrapping yourself in a familiar, comforting blanket. It’s a quiet, grounding meal for a winter evening, where the simple act of preparation becomes a gentle ritual. The rich, savory aroma fills the kitchen, promising a deeply satisfying end to the day.
Serving: 6 | Pre Time: 20 minutes | Cooking Time: 70 minutes
Ingredients
– 2 lbs ground beef (80/20 blend)
– 1 cup plain breadcrumbs
– 1 cup whole milk
– 2 large eggs
– 1 medium yellow onion, finely diced
– 2 cloves garlic, minced
– 1/2 cup ketchup
– 2 tbsp Worcestershire sauce
– 1 tsp dried thyme
– 1 1/2 tsp kosher salt
– 1/2 tsp black pepper
– 2 lbs russet potatoes, peeled and quartered
– 4 tbsp unsalted butter
– 1/2 cup heavy cream, warmed
– 1 tsp salt
– 1/4 tsp white pepper
Instructions
1. Preheat your oven to 350°F (175°C) and lightly grease a 9×5-inch loaf pan.
2. In a large mixing bowl, combine the ground beef, breadcrumbs, milk, eggs, diced onion, minced garlic, 1/4 cup of the ketchup, Worcestershire sauce, dried thyme, kosher salt, and black pepper.
3. Using clean hands, gently mix the ingredients until just combined, being careful not to overwork the meat, which can make the loaf dense.
4. Transfer the meat mixture to the prepared loaf pan and press it into an even layer.
5. Spread the remaining 1/4 cup of ketchup evenly over the top of the meatloaf.
6. Place the loaf pan in the preheated oven and bake for 60 to 70 minutes, or until the internal temperature reaches 160°F (71°C) when checked with an instant-read thermometer inserted into the center.
7. While the meatloaf bakes, place the quartered potatoes in a large pot and cover them with cold water by about an inch.
8. Bring the pot to a boil over high heat, then reduce the heat to maintain a simmer and cook the potatoes for 15 to 20 minutes, until they are fork-tender.
9. Drain the potatoes thoroughly and return them to the warm pot.
10. Add the butter, warmed heavy cream, 1 tsp salt, and white pepper to the potatoes.
11. Mash the potatoes with a potato masher or ricer until smooth and creamy; for extra fluffiness, avoid using a food processor, which can make them gluey.
12. Let the baked meatloaf rest in the pan for 10 minutes before slicing, which allows the juices to redistribute for a moist texture.
13. Slice the meatloaf and serve it warm alongside the mashed potatoes.
When you slice into the meatloaf, it should be firm yet tender, with a caramelized ketchup glaze that adds a touch of sweetness to the savory, herb-infused beef. The mashed potatoes are velvety and rich, providing a perfect, creamy contrast. For a cozy twist, try serving slices over the mashed potatoes, letting the juices mingle for a truly comforting bite.
Lemon Herb Grilled Chicken with Quinoa
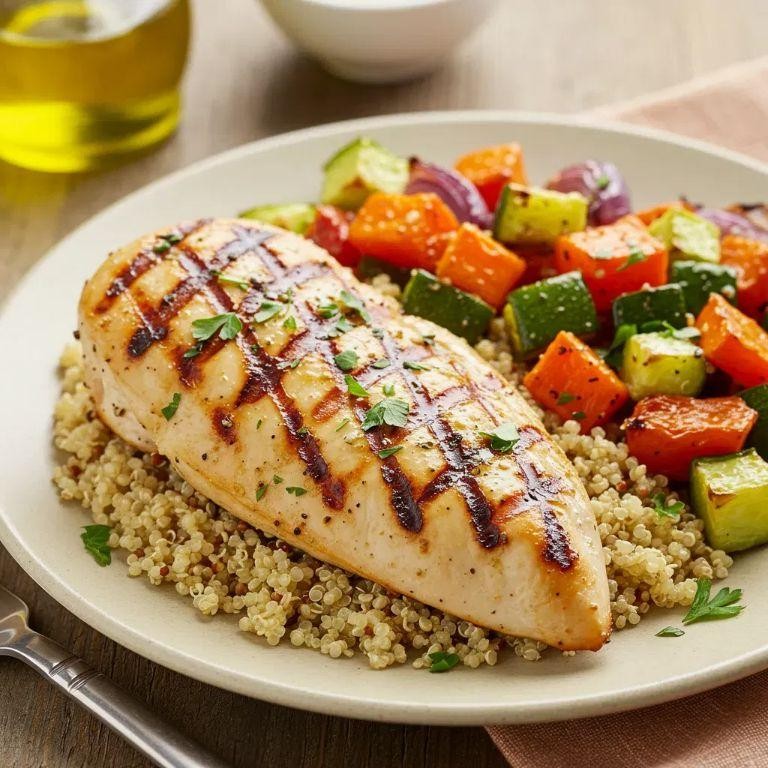
Lately, I’ve found myself craving something bright and wholesome, a dish that feels like a gentle embrace after a long day. This lemon herb grilled chicken with quinoa is just that—a simple yet satisfying meal that brings together zesty citrus and earthy herbs in perfect harmony. It’s the kind of food that reminds you to slow down and savor each bite, especially on a quiet evening like this.
Serving: 4 | Pre Time: 15 minutes | Cooking Time: 25 minutes
Ingredients
– 4 boneless, skinless chicken breasts
– 1 cup quinoa
– 2 cups water
– 2 lemons
– 3 tbsp olive oil
– 2 tbsp fresh rosemary, chopped
– 2 tbsp fresh thyme, chopped
– 3 cloves garlic, minced
– 1 tsp salt
– 1/2 tsp black pepper
Instructions
1. Rinse 1 cup quinoa under cold water in a fine-mesh strainer for 1 minute to remove bitterness.
2. Combine quinoa and 2 cups water in a medium saucepan, bring to a boil over high heat, then reduce heat to low, cover, and simmer for 15 minutes until water is absorbed and quinoa is fluffy.
3. Zest and juice 2 lemons into a small bowl, discarding seeds and pulp.
4. In a separate bowl, whisk together lemon zest, lemon juice, 3 tbsp olive oil, 2 tbsp fresh rosemary, 2 tbsp fresh thyme, 3 cloves minced garlic, 1 tsp salt, and 1/2 tsp black pepper to create a marinade.
5. Place 4 chicken breasts in a shallow dish, pour marinade over them, and let sit at room temperature for 10 minutes to enhance flavor absorption.
6. Preheat a grill or grill pan to medium-high heat, about 400°F, ensuring it’s hot before cooking.
7. Remove chicken from marinade, shaking off excess, and place on the grill.
8. Grill chicken for 6-7 minutes per side, flipping once, until internal temperature reaches 165°F and juices run clear.
9. Transfer chicken to a cutting board, tent with foil, and let rest for 5 minutes to retain moisture.
10. Slice chicken against the grain into 1/2-inch thick strips.
11. Fluff cooked quinoa with a fork and divide among 4 plates.
12. Top quinoa with sliced chicken, drizzling any remaining marinade over the dish for extra brightness.
This dish offers a delightful contrast of tender, juicy chicken with fluffy, nutty quinoa, all brightened by the citrusy marinade. The herbs infuse every bite with a subtle earthiness that feels both comforting and refreshing. Try serving it alongside a simple arugula salad or with roasted vegetables for a complete, nourishing meal that invites you to linger at the table.
Vegetable Lasagna with Béchamel Sauce

Kneading the dough of memory, this vegetable lasagna with béchamel sauce emerges from the quiet corners of my kitchen, a layered embrace of comfort that feels like a slow, warm exhale on a winter evening. It’s a dish that builds itself patiently, each component whispering of home and hearth, inviting you to linger over the process as much as the plate.
Serving: 8 | Pre Time: 45 minutes | Cooking Time: 60 minutes
Ingredients
– 12 lasagna noodles
– 2 tablespoons olive oil
– 1 large onion, diced
– 3 cloves garlic, minced
– 1 zucchini, diced
– 1 red bell pepper, diced
– 8 ounces cremini mushrooms, sliced
– 1 (28-ounce) can crushed tomatoes
– 1 teaspoon dried oregano
– 1 teaspoon salt
– 1/2 teaspoon black pepper
– 4 tablespoons unsalted butter
– 1/4 cup all-purpose flour
– 4 cups whole milk, warmed
– 1/4 teaspoon ground nutmeg
– 2 cups shredded mozzarella cheese
– 1 cup grated Parmesan cheese
Instructions
1. Bring a large pot of salted water to a boil over high heat.
2. Add the 12 lasagna noodles and cook for 8 minutes, stirring occasionally to prevent sticking.
3. Drain the noodles in a colander, rinse under cool water to stop the cooking, and lay them flat on a clean kitchen towel.
4. Heat 2 tablespoons olive oil in a large skillet over medium heat.
5. Add 1 diced onion and cook for 5 minutes, stirring frequently, until translucent.
6. Add 3 minced garlic cloves and cook for 1 minute until fragrant.
7. Add 1 diced zucchini, 1 diced red bell pepper, and 8 ounces sliced cremini mushrooms to the skillet.
8. Cook the vegetables for 10 minutes, stirring occasionally, until they soften and release their moisture.
9. Pour in 1 (28-ounce) can crushed tomatoes, 1 teaspoon dried oregano, 1 teaspoon salt, and 1/2 teaspoon black pepper.
10. Simmer the sauce uncovered for 15 minutes, stirring occasionally, until it thickens slightly.
11. In a separate saucepan, melt 4 tablespoons unsalted butter over medium heat.
12. Whisk in 1/4 cup all-purpose flour and cook for 2 minutes to form a pale golden roux.
13. Gradually whisk in 4 cups warmed whole milk, adding about 1/2 cup at a time to prevent lumps.
14. Cook the béchamel sauce for 8-10 minutes, whisking constantly, until it thickens enough to coat the back of a spoon.
15. Remove the béchamel from heat and stir in 1/4 teaspoon ground nutmeg.
16. Preheat your oven to 375°F.
17. Spread 1/2 cup of the vegetable tomato sauce in the bottom of a 9×13-inch baking dish.
18. Arrange 4 cooked lasagna noodles over the sauce in a single layer.
19. Spread 1/3 of the remaining vegetable tomato sauce over the noodles.
20. Drizzle 1/3 of the béchamel sauce over the vegetable layer.
21. Sprinkle 1/2 cup shredded mozzarella cheese and 1/4 cup grated Parmesan cheese over the sauces.
22. Repeat the layering process two more times: noodles, vegetable sauce, béchamel, and cheeses.
23. For the final layer, top with the remaining 4 noodles, any remaining béchamel, and the rest of the mozzarella and Parmesan cheeses.
24. Cover the baking dish tightly with aluminum foil.
25. Bake at 375°F for 30 minutes.
26. Remove the foil and bake for an additional 15 minutes until the cheese is bubbly and golden brown.
27. Let the lasagna rest for 15 minutes before slicing to allow the layers to set.
Nothing compares to the creamy, velvety béchamel that seeps between the tender noodles and hearty vegetables, creating a rich tapestry of flavor. The finished dish holds its shape beautifully when sliced, revealing distinct, comforting layers that pair wonderfully with a simple green salad dressed in lemon vinaigrette.
Pan-Seared Pork Chops with Apple Compote

Sometimes the simplest meals feel like coming home, especially on a quiet evening when the kitchen fills with the scent of searing pork and sweet apples. This dish balances savory and sweet in a way that feels both comforting and a little special, perfect for a small gathering or a thoughtful dinner for one. Let’s begin with what you’ll need.
Serving: 4 | Pre Time: 15 minutes | Cooking Time: 25 minutes
Ingredients
– 4 boneless pork chops, 1-inch thick
– 1 teaspoon kosher salt
– 1/2 teaspoon black pepper
– 2 tablespoons olive oil
– 2 tablespoons unsalted butter
– 2 large apples, peeled and diced
– 1/4 cup brown sugar
– 1/4 cup apple cider vinegar
– 1/2 teaspoon ground cinnamon
– 1/4 teaspoon ground nutmeg
Instructions
1. Pat the pork chops dry with paper towels to ensure a good sear.
2. Season both sides of the pork chops evenly with kosher salt and black pepper.
3. Heat olive oil in a large skillet over medium-high heat until it shimmers, about 2 minutes.
4. Place the pork chops in the skillet and sear without moving them for 4-5 minutes, until a golden-brown crust forms.
5. Flip the pork chops and cook for another 4-5 minutes, until the internal temperature reaches 145°F on an instant-read thermometer.
6. Transfer the pork chops to a plate and tent loosely with foil to rest.
7. Reduce the heat to medium and add unsalted butter to the same skillet.
8. Once the butter melts, add diced apples and cook, stirring occasionally, for 5 minutes until slightly softened.
9. Stir in brown sugar, apple cider vinegar, ground cinnamon, and ground nutmeg.
10. Simmer the mixture for 8-10 minutes, stirring frequently, until the apples are tender and the liquid thickens into a syrupy compote.
11. Spoon the warm apple compote over the rested pork chops to serve.
Zesty and tender, the pork chops pair beautifully with the soft, spiced apples, creating a harmony of textures from crisp edges to melt-in-your-mouth fruit. For a creative twist, serve alongside roasted Brussels sprouts or over a bed of creamy polenta to soak up the sweet-tart sauce.
Homemade Chicken Pot Pie with Flaky Crust

Just as the winter light fades outside my kitchen window, I find myself drawn to the warmth of the oven and the promise of a comforting meal. This homemade chicken pot pie, with its golden, flaky crust, feels like a quiet hug at the end of a long day, a simple ritual of chopping, stirring, and waiting that soothes the soul.
Serving: 6 | Pre Time: 30 minutes | Cooking Time: 45 minutes
Ingredients
– 1 tablespoon unsalted butter
– 1 cup diced yellow onion
– 1 cup diced carrot
– 1 cup diced celery
– 3 cups cooked, shredded chicken breast
– 1/4 cup all-purpose flour
– 2 cups chicken broth
– 1/2 cup heavy cream
– 1 cup frozen peas
– 1 teaspoon dried thyme
– 1/2 teaspoon salt
– 1/4 teaspoon black pepper
– 1 package (14.1 oz) refrigerated pie crusts (2 crusts)
– 1 large egg
– 1 tablespoon water
Instructions
1. Preheat your oven to 400°F (200°C).
2. In a large, deep skillet or Dutch oven, melt 1 tablespoon of unsalted butter over medium heat.
3. Add 1 cup of diced yellow onion, 1 cup of diced carrot, and 1 cup of diced celery to the skillet.
4. Sauté the vegetables for 8-10 minutes, stirring occasionally, until they soften and the onions become translucent.
5. Sprinkle 1/4 cup of all-purpose flour over the cooked vegetables and stir continuously for 1 minute to cook out the raw flour taste.
6. Gradually pour in 2 cups of chicken broth while whisking constantly to prevent lumps from forming.
7. Bring the mixture to a gentle simmer and cook for 3-4 minutes, until it thickens slightly.
8. Stir in 1/2 cup of heavy cream, 3 cups of cooked shredded chicken breast, 1 cup of frozen peas, 1 teaspoon of dried thyme, 1/2 teaspoon of salt, and 1/4 teaspoon of black pepper.
9. Remove the skillet from the heat and let the filling cool for 10 minutes; this prevents a soggy bottom crust.
10. Unroll one refrigerated pie crust and press it into the bottom and up the sides of a 9-inch pie dish.
11. Pour the cooled filling into the pie crust-lined dish.
12. Unroll the second refrigerated pie crust and place it over the filling.
13. Crimp the edges of the top and bottom crusts together with your fingers or a fork to seal them.
14. Cut four 1-inch slits in the center of the top crust to allow steam to escape during baking.
15. In a small bowl, whisk together 1 large egg and 1 tablespoon of water to create an egg wash.
16. Brush the egg wash evenly over the entire top crust with a pastry brush for a golden, shiny finish.
17. Place the pie dish on a baking sheet to catch any drips and bake in the preheated oven for 40-45 minutes.
18. Remove the pie from the oven when the crust is deeply golden brown and the filling is bubbling visibly through the slits.
19. Let the pie rest on a wire rack for 15 minutes before slicing to allow the filling to set.
Now, as you slice into that flaky, buttery crust, the steam rises with the rich aroma of thyme and cream. The filling is velvety and hearty, with tender vegetables and chicken in every bite, perfect for serving alongside a simple green salad to cut through the richness.
Black Bean and Sweet Potato Enchiladas

Kindly, as the evening light fades on this December day, I find myself drawn to the quiet comfort of assembling these enchiladas—a gentle process of layering earthy black beans, roasted sweet potatoes, and warm spices, all wrapped in soft tortillas and bathed in a rich sauce. It’s a dish that feels like a cozy embrace, perfect for a reflective winter night when you crave something nourishing and heartfelt.
Serving: 6 | Pre Time: 20 minutes | Cooking Time: 35 minutes
Ingredients
– 2 medium sweet potatoes, peeled and diced into 1/2-inch cubes
– 2 tablespoons olive oil
– 1 teaspoon ground cumin
– 1/2 teaspoon smoked paprika
– 1/4 teaspoon salt
– 1 (15-ounce) can black beans, rinsed and drained
– 1/2 cup diced yellow onion
– 2 cloves garlic, minced
– 1 (10-ounce) can red enchilada sauce
– 8 (6-inch) corn tortillas
– 1 cup shredded Monterey Jack cheese
– 1/4 cup chopped fresh cilantro
Instructions
1. Preheat the oven to 400°F and line a baking sheet with parchment paper.
2. In a medium bowl, toss the sweet potato cubes with 1 tablespoon of olive oil, cumin, smoked paprika, and salt until evenly coated.
3. Spread the sweet potatoes in a single layer on the prepared baking sheet and roast for 20 minutes, or until tender and lightly browned at the edges.
4. While the sweet potatoes roast, heat the remaining 1 tablespoon of olive oil in a large skillet over medium heat.
5. Add the diced onion and cook for 5 minutes, stirring occasionally, until softened and translucent.
6. Stir in the minced garlic and cook for 1 minute, just until fragrant.
7. Add the black beans to the skillet and cook for 2 minutes to warm through, then remove from heat.
8. In a 9×13-inch baking dish, spread 1/4 cup of the enchilada sauce evenly across the bottom.
9. Warm the corn tortillas by wrapping them in a damp paper towel and microwaving for 30 seconds to make them pliable and prevent cracking.
10. To assemble each enchilada, place a tortilla flat, spoon 1/4 cup of the black bean mixture and 2 tablespoons of roasted sweet potatoes down the center, then roll tightly and place seam-side down in the baking dish.
11. Repeat with the remaining tortillas and filling, arranging them snugly in the dish.
12. Pour the remaining enchilada sauce evenly over the rolled tortillas, ensuring they are fully covered to prevent drying out.
13. Sprinkle the shredded Monterey Jack cheese uniformly over the top.
14. Bake uncovered for 15 minutes, or until the cheese is melted and bubbly and the edges are lightly golden.
15. Remove from the oven and let rest for 5 minutes to allow the filling to set for easier serving.
16. Garnish with chopped fresh cilantro just before serving.
Soft and tender, these enchiladas offer a delightful contrast of creamy sweet potatoes and hearty beans, with a smoky undertone from the spices. Serve them warm with a side of avocado slices or a crisp green salad for a balanced, comforting meal that’s as satisfying to make as it is to enjoy.
Grilled Salmon with Mango Salsa

Evenings like this, with the light fading softly outside, call for something simple yet celebratory—a dish that feels like a quiet gift to oneself, where the grill’s warmth meets the bright, sweet tang of summer fruit.
Serving: 4 | Pre Time: 20 minutes | Cooking Time: 12 minutes
Ingredients
– 4 (6-ounce) salmon fillets, skin-on
– 2 tablespoons olive oil
– 1 teaspoon kosher salt
– ½ teaspoon black pepper
– 2 ripe mangoes, peeled and diced
– ½ red onion, finely chopped
– 1 jalapeño, seeded and minced
– ¼ cup fresh cilantro, chopped
– 2 tablespoons lime juice
– 1 tablespoon honey
Instructions
1. Preheat a grill or grill pan to medium-high heat (about 400°F).
2. Pat the salmon fillets dry with paper towels to ensure a crisp sear.
3. Brush both sides of the fillets evenly with olive oil.
4. Season the salmon on all sides with kosher salt and black pepper.
5. Place the salmon skin-side down on the grill and cook undisturbed for 6 minutes.
6. Gently flip the fillets using a spatula and cook for another 4–6 minutes until the internal temperature reaches 145°F.
7. While the salmon cooks, combine diced mangoes, chopped red onion, minced jalapeño, chopped cilantro, lime juice, and honey in a medium bowl.
8. Stir the salsa mixture gently until the honey dissolves and ingredients are evenly coated.
9. Remove the salmon from the grill and let it rest for 3 minutes to allow juices to redistribute.
10. Serve each fillet topped generously with mango salsa.
Momentarily, the contrast unfolds: the salmon flakes into moist, tender layers beneath its lightly charred crust, while the salsa bursts with juicy sweetness punctuated by the jalapeño’s subtle heat. Try spooning extra salsa alongside a bed of cilantro-lime rice or crisp greens, letting the colors mingle on the plate like a late December sunset.
Beef and Mushroom Stroganoff over Egg Noodles
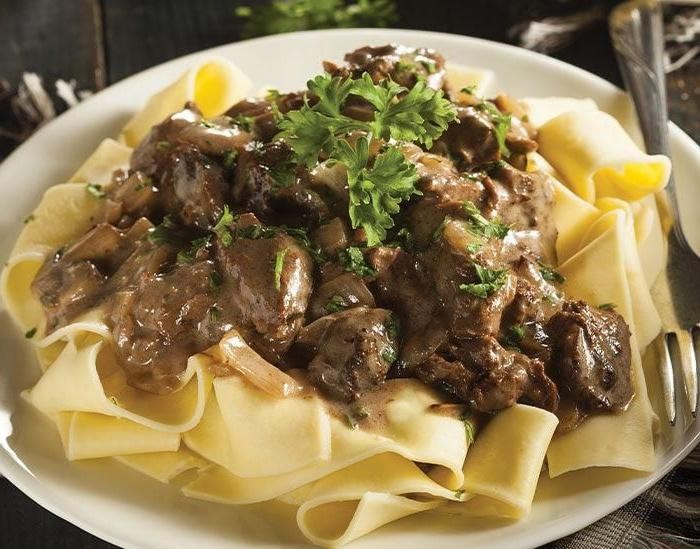
Gently, as the evening light fades on this quiet December day, I find myself drawn to the kitchen, craving the deep, earthy comfort of a classic dish that feels like a warm embrace after a long year. There’s something profoundly soothing about the slow simmer of beef and mushrooms, their rich aromas mingling with sour cream and herbs, promising a meal that’s both hearty and nostalgic, perfect for gathering close or savoring in solitude.
Serving: 4 | Pre Time: 15 minutes | Cooking Time: 30 minutes
Ingredients
– 1 pound sirloin steak, thinly sliced
– 8 ounces cremini mushrooms, sliced
– 1 medium yellow onion, diced
– 2 cloves garlic, minced
– 2 tablespoons unsalted butter
– 1 tablespoon olive oil
– 2 tablespoons all-purpose flour
– 2 cups beef broth
– 1 tablespoon Worcestershire sauce
– 1 teaspoon Dijon mustard
– 1/2 cup sour cream
– 1/4 cup fresh parsley, chopped
– 12 ounces egg noodles
– Salt and black pepper
Instructions
1. Bring a large pot of salted water to a boil over high heat for the egg noodles later.
2. Pat the sirloin steak slices dry with paper towels to ensure a good sear, then season generously with salt and black pepper.
3. Heat 1 tablespoon olive oil in a large skillet over medium-high heat until shimmering, about 2 minutes.
4. Add the steak slices in a single layer, working in batches if needed to avoid overcrowding, and sear for 2–3 minutes per side until browned but not cooked through. Transfer to a plate.
5. In the same skillet, melt 2 tablespoons unsalted butter over medium heat, then add the diced onion and cook for 4–5 minutes until softened and translucent.
6. Add the sliced cremini mushrooms and cook for 6–8 minutes, stirring occasionally, until they release their liquid and turn golden brown.
7. Stir in the minced garlic and cook for 1 minute until fragrant, being careful not to burn it.
8. Sprinkle 2 tablespoons all-purpose flour over the mushroom mixture and cook for 1–2 minutes, stirring constantly, to form a roux and eliminate the raw flour taste.
9. Gradually whisk in 2 cups beef broth, 1 tablespoon Worcestershire sauce, and 1 teaspoon Dijon mustard until smooth, scraping up any browned bits from the bottom of the skillet.
10. Bring the sauce to a gentle simmer over medium-low heat and cook for 8–10 minutes, stirring occasionally, until slightly thickened.
11. While the sauce simmers, cook the 12 ounces egg noodles in the boiling water according to package directions until al dente, about 8–10 minutes, then drain.
12. Reduce the heat under the skillet to low and stir in 1/2 cup sour cream until fully incorporated and creamy, which helps prevent curdling.
13. Return the seared steak and any accumulated juices to the skillet, along with 1/4 cup chopped fresh parsley, and simmer for 2–3 minutes just to heat through without overcooking the beef.
14. Taste and adjust seasoning with salt and black pepper if needed, then remove from heat.
15. Serve the stroganoff immediately over the drained egg noodles.
Comforting and velvety, this stroganoff wraps tender beef and earthy mushrooms in a luxuriously creamy sauce that clings perfectly to each noodle, offering a subtle tang from the sour cream and a bright finish of parsley. For a cozy twist, try topping it with an extra dollop of sour cream or serving it alongside a crisp green salad to balance the richness, making it ideal for a quiet winter evening or a small holiday gathering.
Roasted Vegetable and Chickpea Buddha Bowl
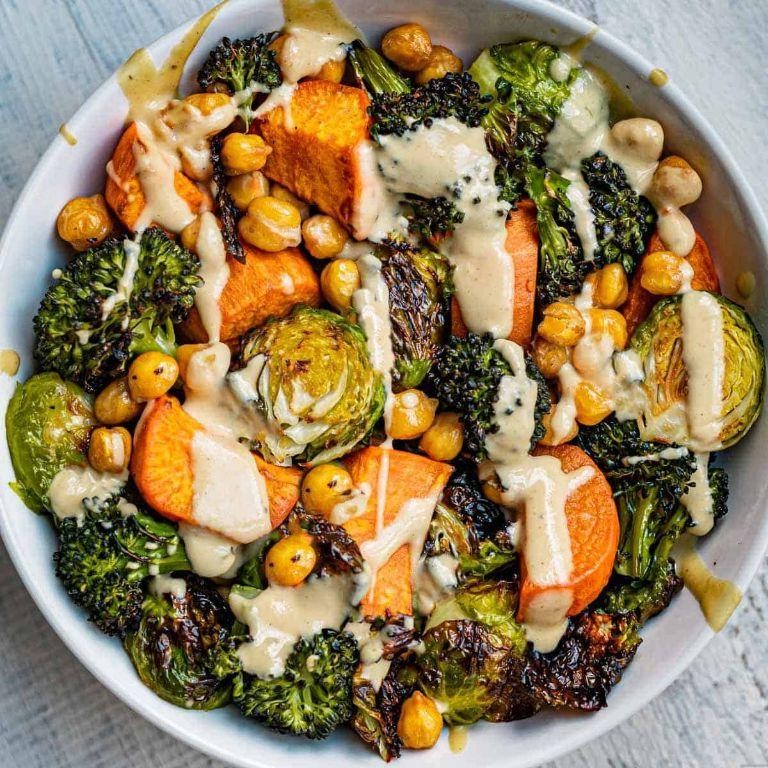
Remembering how the winter light fades early this time of year, I find myself drawn to meals that feel grounding and nourishing, a quiet celebration of color and warmth gathered in a single bowl.
Serving: 2 | Pre Time: 15 minutes | Cooking Time: 35 minutes
Ingredients
– 1 medium sweet potato, peeled and cubed into 1-inch pieces
– 1 cup broccoli florets
– 1 red bell pepper, sliced into strips
– 1 (15-ounce) can chickpeas, drained and rinsed
– 2 tablespoons olive oil
– 1/2 teaspoon garlic powder
– 1/2 teaspoon smoked paprika
– 1/4 teaspoon salt
– 1 cup cooked quinoa
– 1/2 avocado, sliced
– 2 tablespoons tahini
– 1 tablespoon lemon juice
– 2 tablespoons water
Instructions
1. Preheat your oven to 425°F and line a large baking sheet with parchment paper.
2. In a large bowl, combine the cubed sweet potato, broccoli florets, red bell pepper strips, and drained chickpeas.
3. Drizzle the vegetables and chickpeas with 1 1/2 tablespoons of olive oil, then sprinkle with the garlic powder, smoked paprika, and salt. Toss until everything is evenly coated. Tip: For crispier chickpeas, pat them completely dry with a paper towel before tossing.
4. Spread the mixture in a single layer on the prepared baking sheet.
5. Roast in the preheated oven for 30-35 minutes, stirring halfway through, until the sweet potatoes are fork-tender and the chickpeas are golden brown.
6. While the vegetables roast, prepare the tahini sauce by whisking together the tahini, remaining 1/2 tablespoon of olive oil, lemon juice, and water in a small bowl until smooth. Tip: If the sauce is too thick, add water one teaspoon at a time until it reaches a drizzle-able consistency.
7. Divide the cooked quinoa between two bowls.
8. Once the roasted vegetables and chickpeas are done, carefully divide them evenly over the quinoa in each bowl.
9. Top each bowl with sliced avocado. Tip: Drizzle the avocado with a little lemon juice to prevent browning if preparing ahead.
10. Drizzle the prepared tahini sauce generously over each assembled bowl.
Perhaps what I love most is the contrast: the creamy avocado and tahini against the hearty, caramelized vegetables and crisp chickpeas, with the quinoa providing a subtle, nutty base. It’s a meal that feels complete, best enjoyed slowly as the evening settles in.
Summary
Overall, these 20 delicious homemade dinner recipes are your secret weapon for busy weeknights—quick, tasty, and totally doable. I hope they make your evenings a little easier and a lot more flavorful! Give them a try, leave a comment below with your favorites, and don’t forget to share this roundup on Pinterest to help other busy home cooks. Happy cooking!


