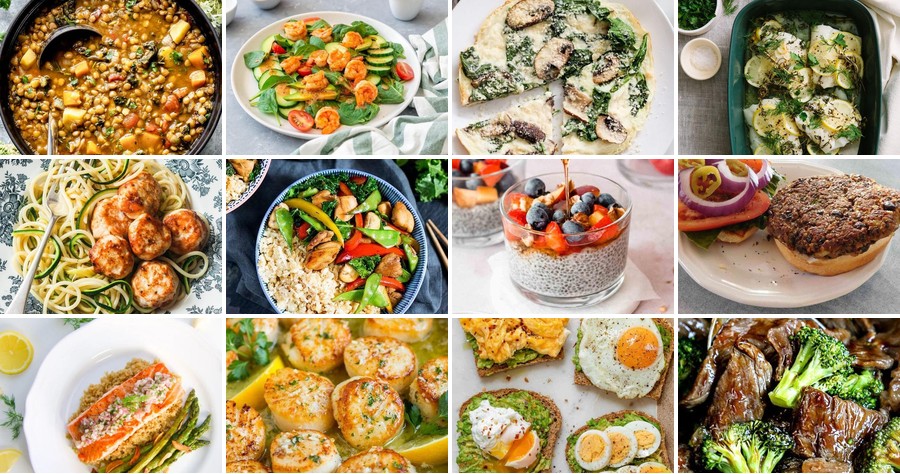
Gearing up for a healthier lifestyle doesn’t mean sacrificing flavor! Dive into our roundup of 20 delicious Ideal Protein recipes, perfect for anyone looking to eat well without the hassle. From quick, satisfying dinners to comforting classics with a nutritious twist, we’ve got your meal inspiration covered. Get ready to find your new favorite dish—let’s start cooking!
Grilled Lemon Herb Chicken with Steamed Vegetables
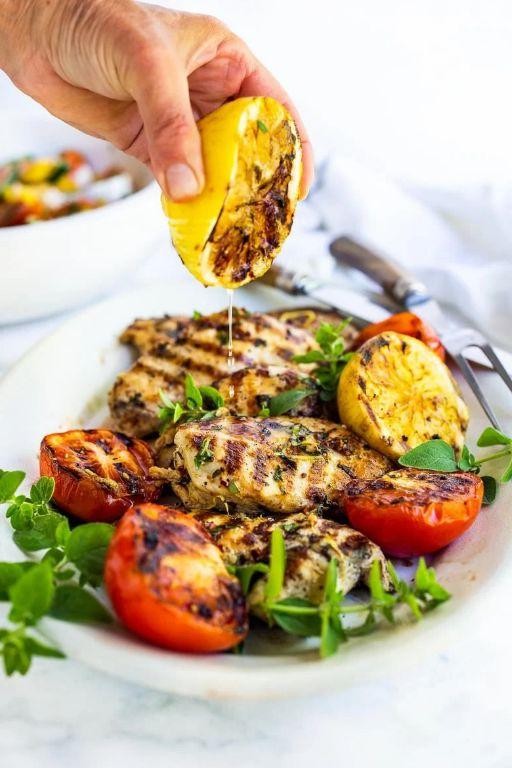
Razzle-dazzle your taste buds with this grilled lemon herb chicken and steamed veggies—it’s the weeknight hero that’s so easy, even your cat could probably make it (though we don’t recommend letting them near the grill). Perfect for when you want something healthy but refuse to sacrifice flavor, this dish is a zesty, herb-packed delight that’ll have you feeling like a culinary rockstar in no time.
Serving: 4 | Pre Time: 15 minutes | Cooking Time: 20 minutes
Ingredients
– Chicken breasts – 4 (about 6 oz each)
– Lemon juice – ¼ cup
– Olive oil – 2 tbsp
– Garlic cloves – 3, minced
– Dried oregano – 1 tsp
– Dried thyme – 1 tsp
– Salt – 1 tsp
– Black pepper – ½ tsp
– Broccoli florets – 2 cups
– Carrots – 2, sliced
– Water – ½ cup
Instructions
1. In a medium bowl, whisk together lemon juice, olive oil, minced garlic, dried oregano, dried thyme, salt, and black pepper until fully combined.
2. Place the chicken breasts in a shallow dish and pour the marinade over them, turning to coat evenly. Tip: Let it marinate for at least 10 minutes at room temperature for maximum flavor—no need to wait hours!
3. Preheat a grill or grill pan to medium-high heat, about 400°F.
4. Remove the chicken from the marinade, shaking off excess, and place it on the preheated grill. Discard the remaining marinade.
5. Grill the chicken for 6–8 minutes per side, or until the internal temperature reaches 165°F and the exterior is lightly charred. Tip: Avoid flipping too often to get those beautiful grill marks.
6. While the chicken grills, place broccoli florets and sliced carrots in a steamer basket over a pot with ½ cup of water.
7. Bring the water to a boil over high heat, then cover and steam the vegetables for 5–7 minutes, until tender-crisp. Tip: Check doneness by piercing a carrot with a fork—it should slide in easily but still have a slight crunch.
8. Remove the chicken from the grill and let it rest for 5 minutes before slicing.
9. Serve the sliced chicken alongside the steamed vegetables.
Unexpectedly juicy and bursting with citrusy-herb goodness, this chicken pairs perfectly with the crisp-tender veggies for a meal that’s both light and satisfying. Try drizzling any leftover pan juices over the top or tossing it all into a grain bowl for a next-day lunch upgrade—it’s so versatile, you might just make it twice in one week!
Baked Salmon with Asparagus and Quinoa
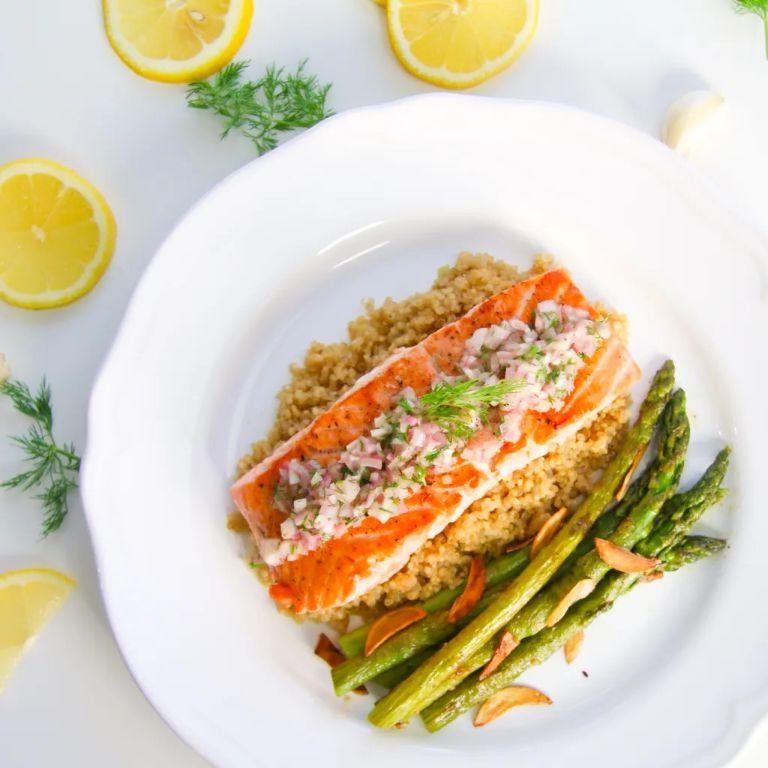
Aha! You’ve stumbled upon the perfect weeknight hero—a dish that’s so easy, even your oven will feel accomplished. This baked salmon with asparagus and quinoa is the culinary equivalent of a high-five, delivering flavor and nutrition without the fuss. Let’s get cooking before your stomach starts staging a protest!
Serving: 4 | Pre Time: 10 minutes | Cooking Time: 25 minutes
Ingredients
– Salmon fillets – 4 (6 oz each)
– Asparagus – 1 lb
– Quinoa – 1 cup
– Olive oil – 2 tbsp
– Lemon – 1
– Garlic – 2 cloves
– Salt – 1 tsp
– Black pepper – ½ tsp
Instructions
1. Preheat your oven to 400°F (tip: let it fully heat for even cooking—no cheating!).
2. Rinse 1 cup of quinoa under cold water in a fine-mesh strainer to remove bitterness.
3. In a saucepan, combine the rinsed quinoa with 2 cups of water and bring to a boil over high heat.
4. Reduce the heat to low, cover the saucepan, and simmer the quinoa for 15 minutes until all water is absorbed.
5. While the quinoa cooks, trim the tough ends from 1 lb of asparagus by snapping them off where they bend naturally.
6. Place the asparagus on a baking sheet, drizzle with 1 tbsp olive oil, and toss to coat evenly.
7. Arrange 4 salmon fillets on the same baking sheet next to the asparagus.
8. Drizzle the salmon with the remaining 1 tbsp olive oil and season everything with 1 tsp salt and ½ tsp black pepper.
9. Thinly slice 2 cloves of garlic and sprinkle them over the salmon and asparagus (tip: fresh garlic adds a punch without burning if kept moist).
10. Cut 1 lemon in half, squeeze the juice from one half over the salmon, and slice the other half into wedges for serving.
11. Bake in the preheated oven at 400°F for 12–15 minutes, until the salmon flakes easily with a fork and the asparagus is tender-crisp (tip: check at 12 minutes to avoid overcooking—salmon should be opaque).
12. Remove from the oven and let rest for 2 minutes before serving.
Zesty and satisfying, this dish boasts flaky salmon with a buttery texture, paired with crisp asparagus and fluffy quinoa that soaks up the lemony garlic notes. Try serving it over a bed of greens for a colorful twist, or pack leftovers cold for a next-day lunch that’ll make your coworkers jealous!
Turkey and Spinach Stuffed Bell Peppers

Now, if you’re tired of the same old weeknight dinners and want something that’s both a feast for the eyes and a party in your mouth, let me introduce you to these stuffed bell peppers. They’re like little edible bowls of joy, packed with all the good stuff to make your taste buds do a happy dance.
Serving: 4 | Pre Time: 15 minutes | Cooking Time: 30 minutes
Ingredients
– Bell peppers – 4 large
– Ground turkey – 1 lb
– Spinach – 2 cups, chopped
– Onion – ½ cup, diced
– Garlic – 2 cloves, minced
– Olive oil – 1 tbsp
– Tomato sauce – 1 cup
– Shredded mozzarella cheese – 1 cup
– Salt – ½ tsp
– Black pepper – ¼ tsp
Instructions
1. Preheat your oven to 375°F (190°C) and lightly grease a baking dish with olive oil.
2. Slice the tops off the bell peppers, remove the seeds and membranes, and place them upright in the baking dish. Tip: Choose peppers with flat bottoms so they stand steady while baking.
3. In a large skillet, heat 1 tbsp of olive oil over medium-high heat for 1 minute.
4. Add the diced onion and minced garlic to the skillet, and sauté for 3–4 minutes until the onion is translucent and fragrant.
5. Add the ground turkey to the skillet, breaking it up with a spoon, and cook for 5–7 minutes until it’s no longer pink.
6. Stir in the chopped spinach and cook for 2–3 minutes until wilted. Tip: Fresh spinach works best here—it adds a vibrant color and cooks down quickly without getting soggy.
7. Pour in the tomato sauce, and season with ½ tsp salt and ¼ tsp black pepper, stirring to combine everything evenly.
8. Simmer the mixture for 5 minutes over medium heat, allowing the flavors to meld together.
9. Spoon the turkey and spinach filling into each bell pepper, packing it down gently to fill them completely.
10. Top each stuffed pepper with shredded mozzarella cheese, dividing it evenly among them.
11. Bake in the preheated oven for 20–25 minutes until the peppers are tender and the cheese is bubbly and golden brown. Tip: Check at 20 minutes—if the cheese isn’t browned, broil for an additional 1–2 minutes, but watch closely to avoid burning.
12. Remove from the oven and let cool for 5 minutes before serving. Ready to dig in? These peppers boast a tender-crisp texture that gives way to a savory, cheesy filling, making every bite a delightful contrast. Serve them with a side salad for a complete meal, or get creative by drizzling with hot sauce for an extra kick—they’re versatile enough to steal the show at any dinner table.
Protein-Packed Greek Yogurt Parfait with Berries
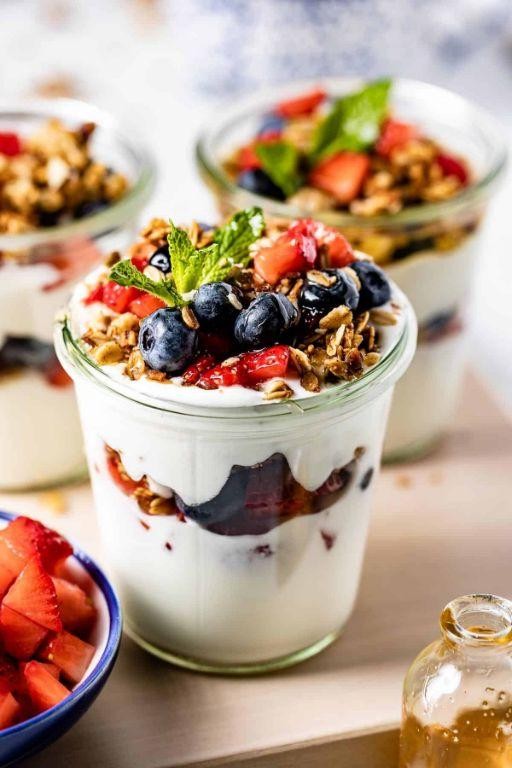
Just when you thought your breakfast routine couldn’t get any more boring, this protein-packed Greek yogurt parfait swoops in to save the day—like a superhero in a berry cape. It’s the ultimate ‘looks fancy but secretly easy’ hack for busy mornings, delivering a creamy, dreamy texture that’ll make you forget you’re actually being healthy. Seriously, who knew getting your protein could taste this indulgent?
Serving: 1 | Pre Time: 5 minutes | Cooking Time: 0 minutes
Ingredients
– Plain Greek yogurt – 1 cup
– Mixed berries (fresh or frozen) – ½ cup
– Honey – 1 tbsp
– Granola – ¼ cup
Instructions
1. In a small bowl, combine 1 cup of plain Greek yogurt with 1 tbsp of honey, stirring vigorously for about 30 seconds until fully blended and smooth—this prevents clumps and ensures even sweetness.
2. In a clear glass or jar, spoon half of the yogurt mixture to create an even base layer, about ½ inch thick.
3. Add ¼ cup of mixed berries on top of the yogurt layer, pressing them gently with the back of a spoon to release some juices for extra flavor.
4. Sprinkle 2 tbsp of granola evenly over the berries to add a satisfying crunch that contrasts with the creamy layers.
5. Repeat the layering process with the remaining yogurt, berries, and granola, ending with a final sprinkle of granola on top for visual appeal.
6. Let the parfait sit at room temperature for 2–3 minutes if using frozen berries, which helps them thaw slightly and blend flavors without making the yogurt watery.
7. Serve immediately, or cover and refrigerate for up to 2 hours to keep the granola from getting soggy—perfect for meal prepping ahead!
Craving a twist? This parfait boasts a luscious, velvety texture from the yogurt, punctuated by bursts of juicy berries and a hearty crunch from the granola. For a fun variation, try drizzling it with a bit of melted dark chocolate or swapping the berries for sliced bananas and a dash of cinnamon—it’s like dessert for breakfast, but you’re totally winning at adulting.
Slow Cooker Beef and Broccoli Stir-Fry
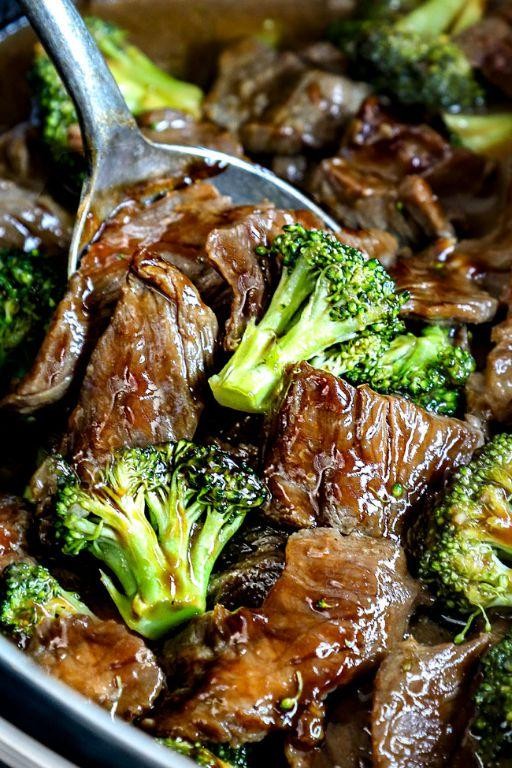
Let’s be real—some days, you want a cozy, savory stir-fry but can’t bear the thought of hovering over a sizzling wok. That’s where this slow-cooker magic comes in: tender beef and crisp broccoli, all while your crockpot does the heavy lifting. It’s basically a weeknight superhero in a bowl, saving you from takeout regret one delicious spoonful at a time.
Serving: 4 | Pre Time: 15 minutes | Cooking Time: 4 hours
Ingredients
– Beef chuck roast – 1.5 lbs
– Soy sauce – ½ cup
– Brown sugar – ¼ cup
– Garlic – 3 cloves, minced
– Ginger – 1 tbsp, grated
– Cornstarch – 2 tbsp
– Water – ¼ cup
– Broccoli florets – 4 cups
– Sesame oil – 1 tbsp
Instructions
1. Trim any excess fat from the beef chuck roast and cut it into 1-inch cubes.
2. In a medium bowl, whisk together the soy sauce, brown sugar, minced garlic, and grated ginger until the sugar dissolves.
3. Place the beef cubes in the slow cooker and pour the soy sauce mixture over them, tossing to coat evenly.
4. Cover the slow cooker and cook on low heat for 3.5 hours. Tip: Resist the urge to peek—keeping the lid on ensures steady heat and tender meat.
5. In a small bowl, mix the cornstarch and water until smooth to create a slurry.
6. After 3.5 hours, stir the cornstarch slurry into the slow cooker to thicken the sauce.
7. Add the broccoli florets to the slow cooker, stirring gently to combine with the beef and sauce.
8. Cover and cook on low heat for an additional 30 minutes, or until the broccoli is tender-crisp. Tip: For extra crunch, add the broccoli in the last 20 minutes if you prefer it less soft.
9. Drizzle the sesame oil over the mixture and stir once more before serving. Tip: Toasting the sesame oil lightly in a pan beforehand can deepen its nutty flavor.
10. Turn off the slow cooker and let it sit for 5 minutes to allow the flavors to meld.
Just imagine that first bite: the beef melts in your mouth, thanks to the slow simmer, while the broccoli adds a fresh, vibrant crunch. The sauce is a savory-sweet hug, perfect for spooning over fluffy rice or even stuffing into warm tortillas for a fun fusion twist.
Spicy Shrimp and Avocado Salad
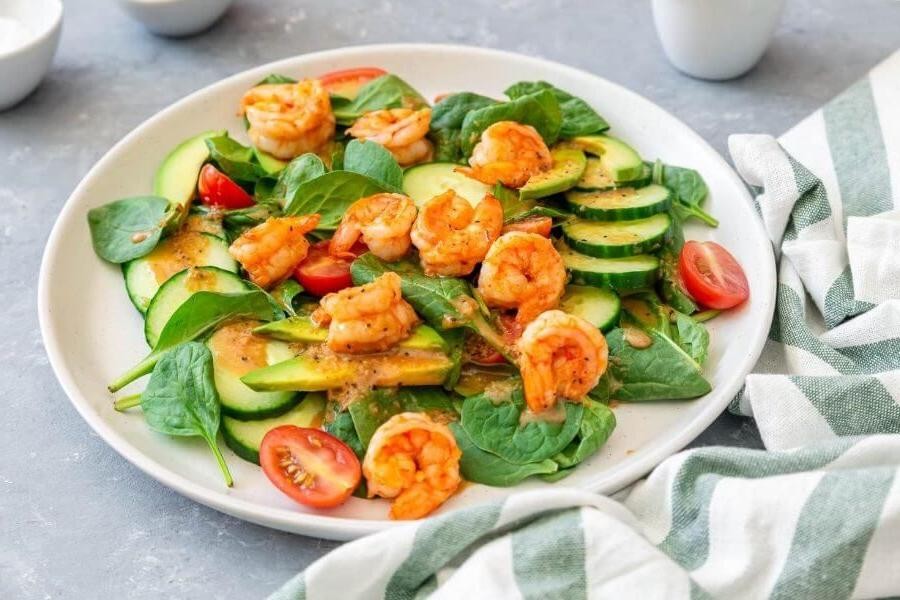
Zesty, zippy, and ready to zap your taste buds awake—this Spicy Shrimp and Avocado Salad is the no-fuss, flavor-packed hero your weeknight dinners have been dreaming of. It’s basically a party in a bowl that comes together faster than you can say “extra napkins, please.”
Serving: 4 | Pre Time: 15 minutes | Cooking Time: 5 minutes
Ingredients
– Raw shrimp, peeled and deveined – 1 lb
– Avocado – 2, diced
– Lime juice – ¼ cup
– Olive oil – 2 tbsp
– Garlic powder – 1 tsp
– Chili powder – 1 tsp
– Salt – ½ tsp
Instructions
1. Pat the raw shrimp dry with paper towels to ensure a good sear.
2. In a medium bowl, toss the shrimp with 1 tbsp olive oil, garlic powder, chili powder, and salt until evenly coated.
3. Heat a large skillet over medium-high heat until a drop of water sizzles, about 2 minutes.
4. Add the shrimp to the skillet in a single layer, cooking for 2 minutes per side until opaque and lightly browned.
5. Transfer the cooked shrimp to a plate and let cool for 5 minutes to prevent the avocado from wilting.
6. In a large serving bowl, combine the diced avocado and lime juice, gently tossing to coat and prevent browning.
7. Add the cooled shrimp to the avocado mixture.
8. Drizzle with the remaining 1 tbsp olive oil and toss everything together until well combined.
9. Serve immediately or chill in the refrigerator for up to 30 minutes for a cooler salad.
A creamy avocado base meets juicy, spice-kissed shrimp for a texture that’s both refreshing and satisfyingly hearty. The bright lime cuts through the richness, making each bite a zingy delight—try scooping it onto crispy tortilla chips or stuffing it into lettuce wraps for a fun, hands-on twist.
Egg White Omelet with Mushrooms and Spinach
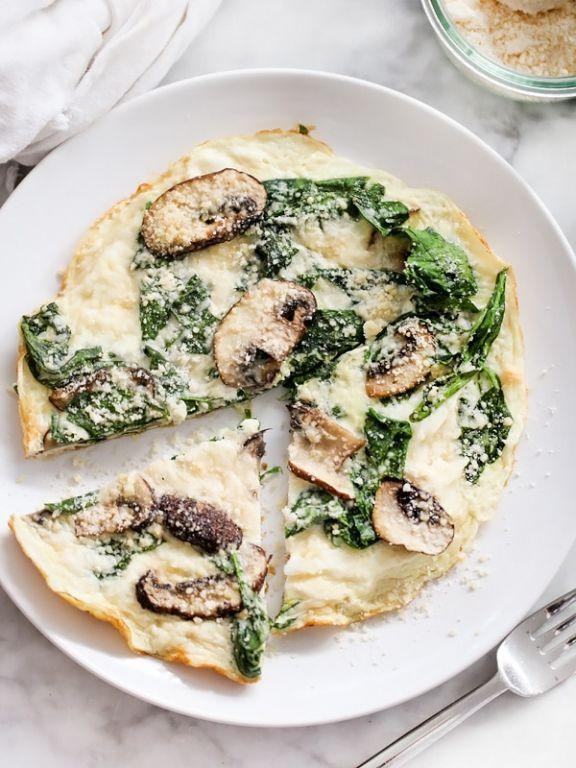
Aren’t you tired of the same old breakfast routine? Let’s shake things up with a protein-packed, veggie-loaded creation that’ll make your taste buds do a happy dance—no yolk about it! This fluffy masterpiece is perfect for when you want something light yet satisfying, and it comes together faster than you can say “good morning.”
Serving: 1 | Pre Time: 5 minutes | Cooking Time: 8 minutes
Ingredients
– Egg whites – ½ cup
– Mushrooms – ½ cup, sliced
– Spinach – 1 cup, fresh
– Olive oil – 1 tsp
– Salt – ¼ tsp
– Black pepper – ⅛ tsp
Instructions
1. Heat a non-stick skillet over medium heat (350°F) and add 1 tsp olive oil.
2. Add ½ cup sliced mushrooms to the skillet and cook for 4 minutes, stirring occasionally, until they turn golden brown and release their moisture.
3. Add 1 cup fresh spinach to the skillet and cook for 1 minute, just until wilted—this keeps the spinach vibrant and prevents sogginess.
4. Transfer the cooked mushrooms and spinach to a plate and set aside, wiping the skillet clean with a paper towel to remove any excess moisture.
5. In a medium bowl, whisk ½ cup egg whites with ¼ tsp salt and ⅛ tsp black pepper until frothy, about 30 seconds—this creates air pockets for a fluffier omelet.
6. Reheat the same skillet over medium-low heat (300°F) and pour in the whisked egg whites, tilting the pan to spread them evenly.
7. Cook the egg whites for 2 minutes without stirring, until the edges set and the center is slightly runny.
8. Spoon the mushroom-spinach mixture onto one half of the omelet, then gently fold the other half over using a spatula—press lightly to seal if needed.
9. Cook for another 1 minute to warm the filling, then slide the omelet onto a plate.
Unbelievably fluffy and packed with savory goodness, this omelet has a tender texture that melts in your mouth, with earthy mushrooms and fresh spinach adding a delightful crunch. Serve it alongside whole-grain toast or top with a sprinkle of hot sauce for an extra kick—it’s a breakfast win that’ll keep you energized all morning!
Black Bean and Quinoa Veggie Burgers
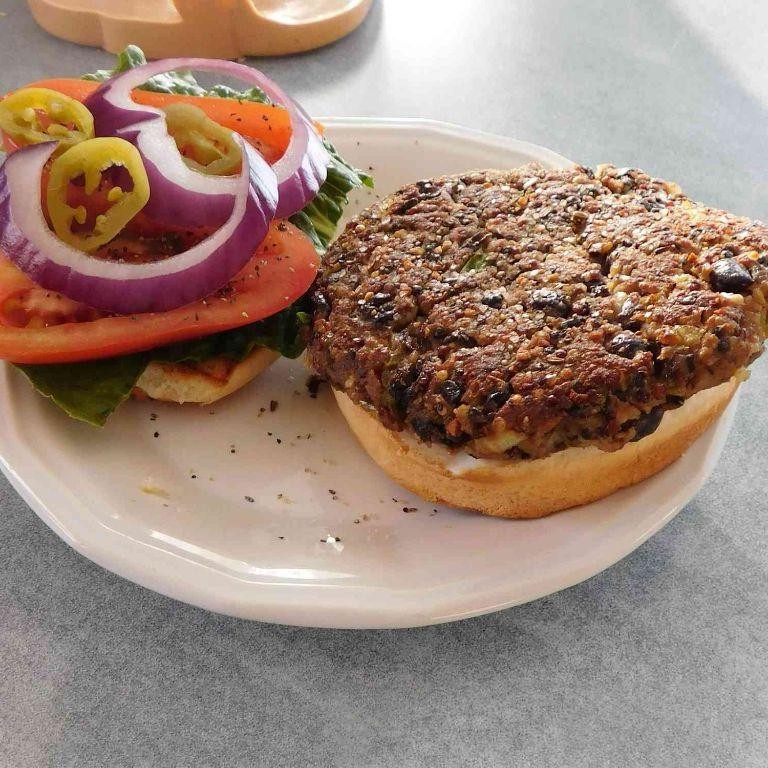
Muster your spatulas, burger buffs, because we’re trading beef for a brilliant, protein-packed patty that won’t leave you snoozing on the sofa. These Black Bean and Quinoa Veggie Burgers are the flavorful, freezer-friendly heroes your Meatless Monday dreams are made of—no sad, crumbly veggie puck in sight!
Serving: 4 | Pre Time: 15 minutes | Cooking Time: 10 minutes
Ingredients
– Canned black beans – 1 (15 oz) can, rinsed and drained
– Cooked quinoa – 1 cup
– Panko breadcrumbs – ½ cup
– Large egg – 1
– Chili powder – 1 tsp
– Ground cumin – ½ tsp
– Garlic powder – ½ tsp
– Salt – ½ tsp
– Olive oil – 2 tbsp
Instructions
1. Preheat a large skillet or griddle over medium heat.
2. In a large bowl, mash the rinsed black beans with a fork until mostly smooth but with some chunks remaining for texture.
3. Add the cooked quinoa, panko breadcrumbs, egg, chili powder, ground cumin, garlic powder, and salt to the bowl with the mashed beans.
4. Mix all ingredients thoroughly with your hands or a spatula until fully combined and the mixture holds together when pressed.
5. Divide the mixture into 4 equal portions and shape each into a ¾-inch thick patty, about 3.5 inches in diameter. Tip: Wet your hands slightly to prevent sticking while forming the patties.
6. Add 1 tablespoon of olive oil to the preheated skillet, swirling to coat the surface evenly.
7. Carefully place the patties in the skillet, leaving space between them.
8. Cook the patties for 4–5 minutes on the first side, until a deep golden-brown crust forms and the edges look set.
9. Flip the patties using a spatula and cook for another 4–5 minutes on the second side until firm and heated through. Tip: Avoid pressing down on the patties while cooking to keep them juicy.
10. Transfer the cooked patties to a plate and let them rest for 2–3 minutes before serving to allow them to firm up. Tip: For a crispier exterior, you can brush the patties lightly with olive oil and bake them on a parchment-lined sheet at 400°F for 20–25 minutes, flipping halfway.
These burgers boast a satisfyingly hearty texture from the quinoa and beans, with a warm, smoky kick from the spices. Try them stacked high with avocado and spicy mayo on a toasted brioche bun, or crumble one over a salad for a protein boost—leftovers (if you have any!) reheat beautifully for a quick lunch.
Grilled Tuna Steak with Mango Salsa
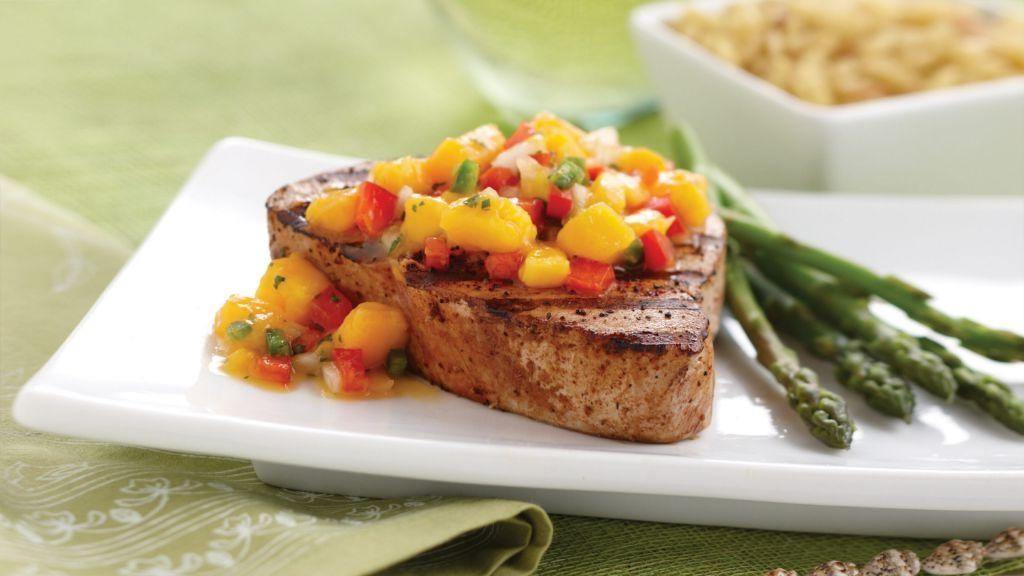
Sizzle up your dinner game with this grilled tuna steak that’s about to make your taste buds do a happy dance—paired with a zesty mango salsa that’s basically a tropical vacation on a plate. Forget boring weeknight meals; this dish is your ticket to feeling like a seaside chef without the pesky seagulls stealing your snacks. Trust me, it’s so good, you’ll want to grill it year-round, even if you have to shovel snow off the barbecue first!
Serving: 4 | Pre Time: 15 minutes | Cooking Time: 10 minutes
Ingredients
– Tuna steaks – 4 (6 oz each)
– Olive oil – 2 tbsp
– Salt – 1 tsp
– Black pepper – ½ tsp
– Mango – 1 large, diced
– Red onion – ¼ cup, finely chopped
– Jalapeño – 1, seeded and minced
– Lime juice – 2 tbsp
– Cilantro – 2 tbsp, chopped
Instructions
1. Pat the tuna steaks dry with paper towels to ensure a crisp sear.
2. Brush both sides of the tuna steaks evenly with olive oil.
3. Season the tuna steaks on both sides with salt and black pepper.
4. Preheat a grill or grill pan to high heat, aiming for 450°F.
5. Place the tuna steaks on the grill and cook for 2–3 minutes per side for medium-rare, or until the internal temperature reaches 125°F.
6. Remove the tuna steaks from the grill and let them rest for 5 minutes to lock in juices.
7. In a medium bowl, combine the diced mango, red onion, jalapeño, lime juice, and cilantro.
8. Stir the mango salsa mixture gently until well blended.
9. Slice the rested tuna steaks against the grain into ½-inch thick pieces.
10. Serve the sliced tuna steaks topped with the mango salsa immediately.
Mouthwatering and vibrant, this dish offers a buttery, tender texture from the tuna that melts in your mouth, perfectly balanced by the salsa’s sweet and spicy kick. Try it over a bed of greens or with crispy tortilla chips for a fun twist—it’s so refreshing, you might just forget you’re not on a beach somewhere!
Cauliflower Rice Stir-Fry with Chicken
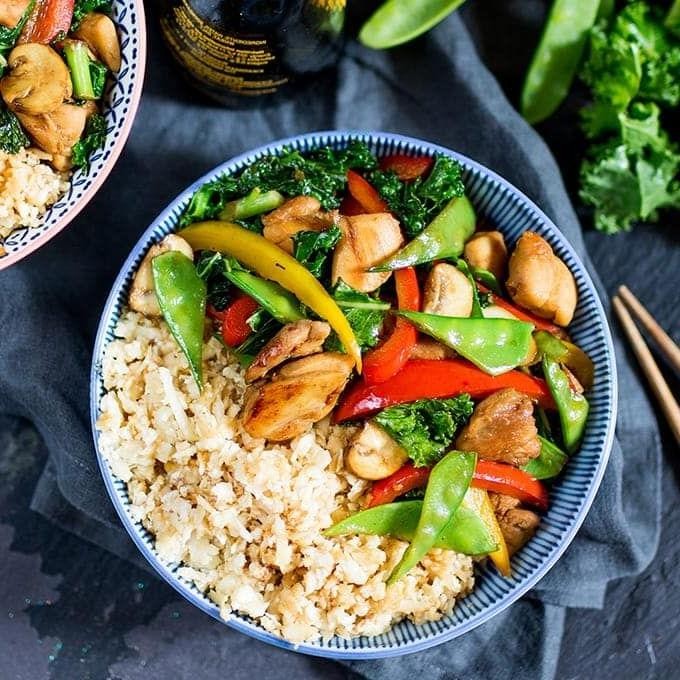
Crisp, colorful, and cleverly disguised as a carb-heavy classic, this cauliflower rice stir-fry with chicken is your ticket to a guilt-free feast that doesn’t skimp on flavor. It’s the kind of dish that makes you forget you’re eating vegetables while still letting you pat yourself on the back for being healthy—a true culinary magic trick. Let’s get wok-ing!
Serving: 4 | Pre Time: 15 minutes | Cooking Time: 15 minutes
Ingredients
– Boneless, skinless chicken breasts – 1 lb
– Cauliflower – 1 large head (about 6 cups riced)
– Soy sauce – ¼ cup
– Sesame oil – 2 tbsp
– Garlic – 3 cloves, minced
– Ginger – 1 tbsp, grated
– Frozen peas and carrots – 1 cup
– Green onions – 3, sliced
– Vegetable oil – 1 tbsp
Instructions
1. Cut the 1 lb of chicken breasts into ½-inch cubes.
2. Heat 1 tbsp of vegetable oil in a large wok or skillet over medium-high heat until it shimmers, about 1 minute.
3. Add the cubed chicken to the hot wok and cook for 5–7 minutes, stirring occasionally, until the pieces are golden brown and reach an internal temperature of 165°F. (Tip: Don’t crowd the pan to ensure a good sear.)
4. Remove the cooked chicken from the wok and set it aside on a plate.
5. In the same wok, add the minced garlic and grated ginger, and stir for 30 seconds until fragrant.
6. Add the 6 cups of riced cauliflower to the wok and stir-fry for 4–5 minutes until it softens and starts to turn lightly golden. (Tip: Use a food processor to rice the cauliflower quickly for a uniform texture.)
7. Pour in the ¼ cup of soy sauce and 2 tbsp of sesame oil, stirring to coat the cauliflower evenly.
8. Add the 1 cup of frozen peas and carrots to the wok and cook for 3–4 minutes until heated through and tender.
9. Return the cooked chicken to the wok and toss everything together for 1–2 minutes to combine and reheat. (Tip: Taste and adjust seasoning with a splash more soy sauce if needed, but avoid over-salting.)
10. Remove the wok from the heat and stir in the sliced green onions.
What you get is a vibrant, sizzling stir-fry where the cauliflower rice soaks up all the savory goodness, offering a satisfyingly tender yet slightly crisp bite. The chicken stays juicy, and the peas and carrots add pops of sweetness that play perfectly with the ginger and garlic. Serve it straight from the wok for a dramatic tableside presentation, or pack it cold for a lunch that’ll make your coworkers jealous.
Baked Cod with Lemon and Herbs
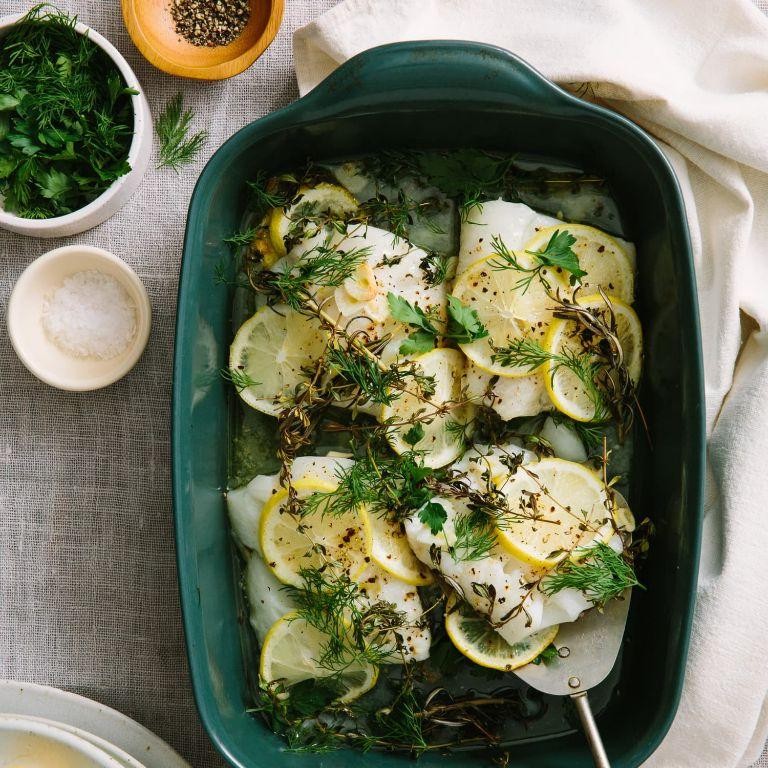
Ever have one of those days where you want something fancy but also want to be on the couch in 30 minutes? Enter this baked cod—your ticket to a lemony, herby, flaky-fish fantasy with minimal effort and maximum deliciousness.
Serving: 4 | Pre Time: 10 minutes | Cooking Time: 15 minutes
Ingredients
– Cod fillets – 4 (6 oz each)
– Olive oil – 2 tbsp
– Lemon – 1
– Garlic – 2 cloves
– Fresh parsley – ¼ cup, chopped
– Fresh dill – 2 tbsp, chopped
– Salt – 1 tsp
– Black pepper – ½ tsp
Instructions
1. Preheat your oven to 400°F and line a baking sheet with parchment paper for easy cleanup—trust me, you’ll thank yourself later.
2. Pat the cod fillets completely dry with paper towels; this helps them get a nice sear instead of steaming.
3. In a small bowl, zest the entire lemon, then juice half of it, saving the other half for garnish.
4. Mince the garlic cloves finely so they distribute evenly without burning.
5. Combine the olive oil, lemon zest, lemon juice, minced garlic, chopped parsley, chopped dill, salt, and black pepper in the bowl, whisking into a vibrant herb marinade.
6. Place the dried cod fillets on the prepared baking sheet and brush the herb mixture generously over the top and sides of each fillet.
7. Bake the cod in the preheated oven for 12–15 minutes, until the fish flakes easily with a fork and reaches an internal temperature of 145°F—no guesswork needed!
8. Remove the baking sheet from the oven and let the cod rest for 3 minutes; this allows the juices to redistribute, keeping it moist.
9. Slice the remaining lemon half into thin wedges for serving.
10. Plate the baked cod immediately, garnishing with extra fresh herbs and a lemon wedge on the side.
Perfectly flaky and infused with zesty lemon, this cod melts in your mouth with a bright, herby punch. Serve it over a bed of quinoa or with roasted asparagus for a complete meal that looks like you spent hours—but we’ll keep that our little secret.
Zucchini Noodles with Turkey Meatballs
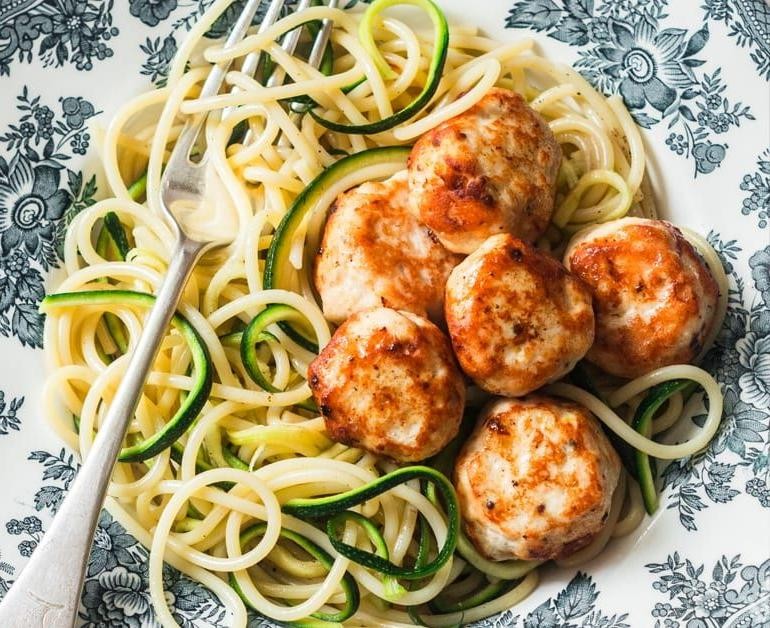
Whew, who knew that swapping out pasta for zucchini could feel like such a culinary victory? This dish is your ticket to a lighter, brighter plate that doesn’t skimp on the cozy, meatball-hug feeling we all crave. Let’s spiral our way to dinner!
Serving: 4 | Pre Time: 15 minutes | Cooking Time: 25 minutes
Ingredients
– Ground turkey – 1 lb
– Egg – 1 large
– Breadcrumbs – ½ cup
– Garlic – 2 cloves, minced
– Olive oil – 2 tbsp
– Zucchini – 4 medium
– Canned crushed tomatoes – 28 oz
– Salt – 1 tsp
– Black pepper – ½ tsp
Instructions
1. Preheat your oven to 400°F and line a baking sheet with parchment paper.
2. In a large bowl, combine the ground turkey, egg, breadcrumbs, minced garlic, ½ tsp salt, and ¼ tsp black pepper. Mix gently with your hands until just combined—overmixing can make the meatballs tough.
3. Shape the mixture into 20 meatballs, each about 1 inch in diameter, and place them on the prepared baking sheet.
4. Bake the meatballs for 20 minutes, or until they reach an internal temperature of 165°F and are golden brown.
5. While the meatballs bake, heat 1 tbsp olive oil in a large skillet over medium heat.
6. Add the canned crushed tomatoes, remaining ½ tsp salt, and ¼ tsp black pepper to the skillet. Simmer for 15 minutes, stirring occasionally, until the sauce thickens slightly.
7. Use a spiralizer to turn the zucchini into noodles, aiming for about 4 cups total.
8. In a separate pan, heat the remaining 1 tbsp olive oil over medium-high heat. Add the zucchini noodles and sauté for 2–3 minutes, just until tender but still crisp—this prevents them from getting soggy.
9. Stir the baked meatballs into the tomato sauce and heat through for 2 minutes.
10. Divide the zucchini noodles among four plates and top with the meatballs and sauce.
Vibrant and satisfying, this dish offers a delightful crunch from the zucchini against the juicy, herby meatballs, all swirled in a rich tomato embrace. Try serving it with a sprinkle of Parmesan or a side of garlic bread for an extra cozy twist—perfect for a weeknight win that feels anything but ordinary!
Avocado and Egg Breakfast Toast
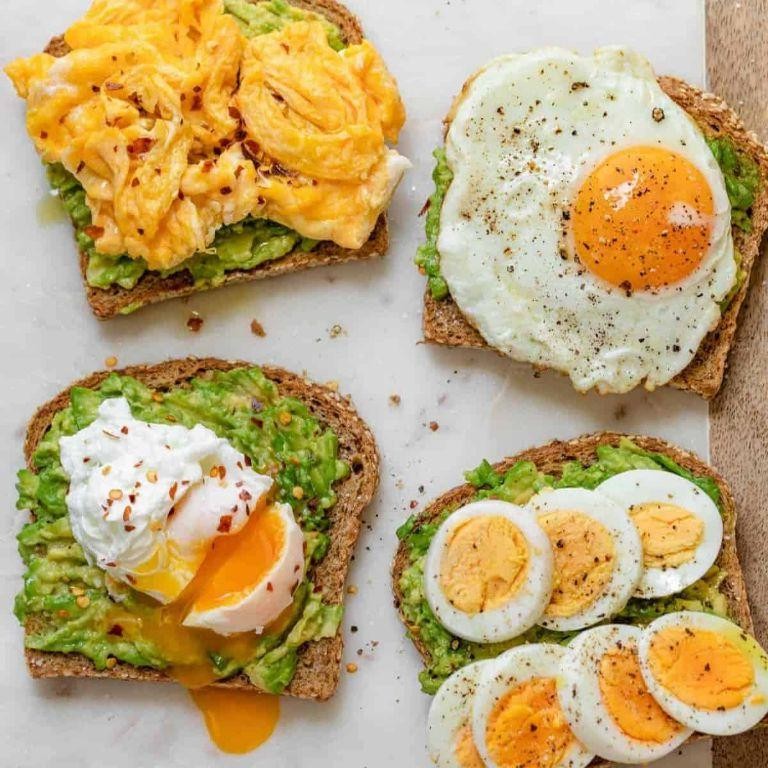
Let’s be real: mornings can be a struggle, but this Avocado and Egg Breakfast Toast is the superhero your sleepy self needs—it’s creamy, protein-packed, and ready faster than you can hit snooze. Seriously, it’s the ultimate no-fuss fuel to kickstart your day with a smile.
Serving: 1 | Pre Time: 5 minutes | Cooking Time: 5 minutes
Ingredients
– Bread – 1 slice
– Avocado – ½
– Egg – 1
– Salt – ¼ tsp
– Black pepper – ¼ tsp
– Olive oil – 1 tsp
Instructions
1. Toast the bread slice in a toaster until golden brown and crisp, about 2–3 minutes.
2. While the bread toasts, heat a nonstick skillet over medium heat and add 1 tsp of olive oil, swirling to coat the pan evenly.
3. Crack 1 egg into the skillet and cook for 2–3 minutes until the white is fully set but the yolk remains runny—tip: cover the skillet briefly to help the top cook without flipping.
4. Remove the toasted bread and place it on a plate.
5. Cut ½ avocado in half, remove the pit, and scoop the flesh into a small bowl.
6. Mash the avocado with a fork until mostly smooth but with some chunks for texture, then stir in ¼ tsp salt and ¼ tsp black pepper.
7. Spread the mashed avocado evenly over the toasted bread slice.
8. Carefully place the cooked egg on top of the avocado layer.
9. Sprinkle an extra pinch of black pepper over the egg for garnish, if desired.
Perfectly simple yet utterly satisfying, this toast boasts a creamy avocado base that contrasts with the crispy bread and oozy yolk—drizzle with hot sauce or top with microgreens for an extra kick. Honestly, it’s so good you might just start setting your alarm earlier.
Grilled Chicken Caesar Salad (Protein-Style)
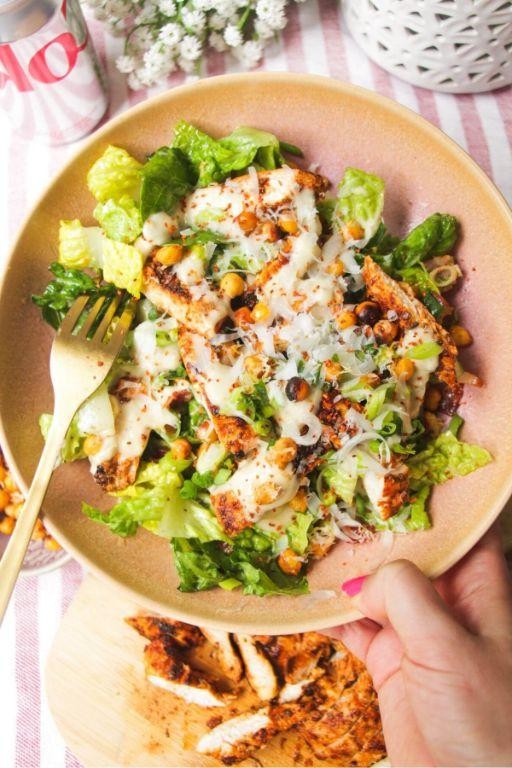
Muster your appetite, because we’re about to transform the classic Caesar from a sidekick into a protein-packed main event that’ll have your taste buds doing a victory dance. This isn’t your grandma’s salad—it’s a grilled chicken Caesar, ‘protein-style,’ meaning we’re ditching the croutons to let the juicy, smoky chicken and creamy dressing shine without the carb crash.
Serving: 2 | Pre Time: 15 minutes | Cooking Time: 12 minutes
Ingredients
– Boneless, skinless chicken breasts – 2 (about 1 lb total)
– Olive oil – 2 tbsp
– Garlic powder – 1 tsp
– Salt – ½ tsp
– Black pepper – ¼ tsp
– Romaine lettuce hearts – 2, chopped
– Caesar dressing – ½ cup
– Parmesan cheese – ¼ cup, grated
Instructions
1. Pat the chicken breasts completely dry with paper towels to ensure a good sear.
2. In a small bowl, whisk together 1 tbsp olive oil, garlic powder, salt, and black pepper.
3. Rub the oil and spice mixture evenly over all sides of the chicken breasts.
4. Preheat a grill or grill pan to medium-high heat (about 400°F).
5. Place the chicken on the hot grill and cook for 6 minutes without moving it to get defined grill marks.
6. Flip the chicken using tongs and cook for another 5-6 minutes, or until the internal temperature reaches 165°F when checked with a meat thermometer.
7. Transfer the grilled chicken to a clean cutting board and let it rest for 5 minutes; this keeps the juices inside when you slice it.
8. While the chicken rests, place the chopped romaine in a large salad bowl.
9. Pour the Caesar dressing over the lettuce and toss until every leaf is lightly coated.
10. Slice the rested chicken against the grain into ½-inch thick strips.
11. Arrange the sliced chicken on top of the dressed lettuce.
12. Sprinkle the grated Parmesan cheese evenly over the salad and chicken.
Here’s the glorious payoff: you get crisp, cool lettuce against warm, tender chicken with a smoky char, all brought together by that rich, tangy dressing. Heap it into a bowl for a satisfying solo dinner, or plate it up fancy to impress your last-minute holiday guests—no one will miss those croutons!
Protein Smoothie with Banana and Peanut Butter
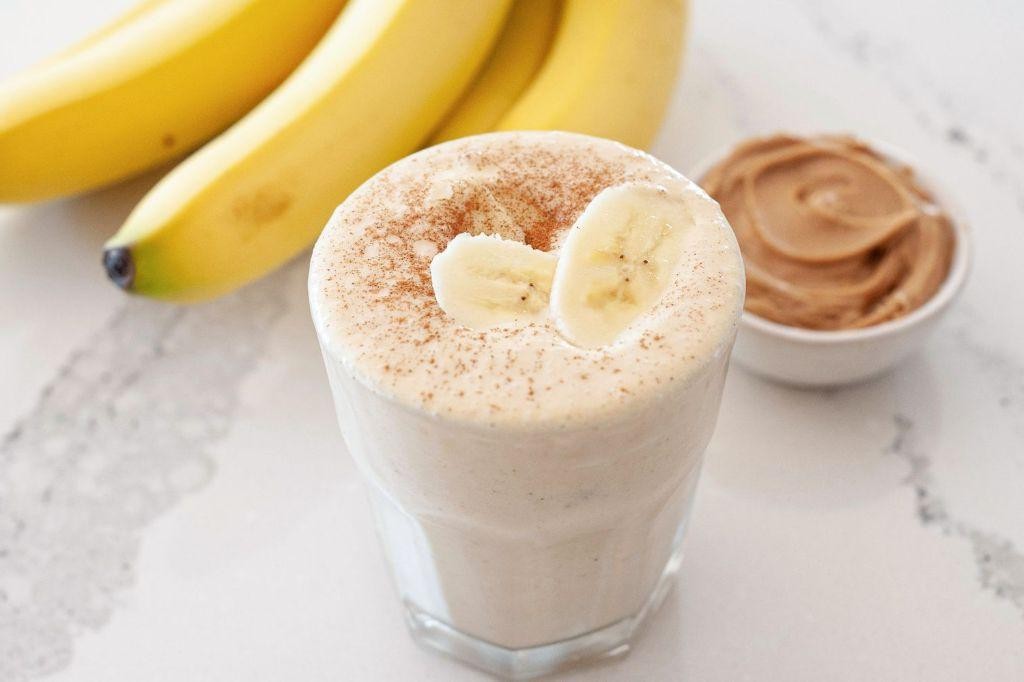
Kickstart your morning with a smoothie so satisfying, it might just replace your morning coffee—or at least give it a serious side-eye. This protein-packed powerhouse blends creamy peanut butter and sweet banana into a drink that’s basically a hug in a glass, perfect for fueling up without slowing down. Trust me, your taste buds (and muscles) will thank you.
Serving: 1 | Pre Time: 5 minutes | Cooking Time: 0 minutes
Ingredients
– Banana – 1 medium, peeled and sliced
– Peanut butter – 2 tbsp
– Vanilla protein powder – 1 scoop (about ¼ cup)
– Milk – 1 cup (any type)
– Ice cubes – ½ cup
Instructions
1. Place the sliced banana into a high-speed blender.
2. Add the peanut butter, vanilla protein powder, milk, and ice cubes to the blender.
3. Secure the blender lid tightly to prevent any messy escapes—tip: if your blender struggles with ice, let the milk sit for a minute to soften it slightly.
4. Blend on high speed for 45–60 seconds until the mixture is completely smooth and no ice chunks remain, scraping down the sides halfway through if needed.
5. Pour the smoothie immediately into a tall glass to enjoy its creamy texture at its best—tip: for a thicker shake-like consistency, add an extra ¼ cup of ice and blend again briefly.
6. Serve right away, optionally garnishing with a banana slice on the rim for a fun touch—tip: if you prefer it sweeter, blend in half a pitted date instead of extra sugar to keep it wholesome.
Pour this velvety blend and savor the rich, nutty sweetness that’s both indulgent and energizing. Its thick, frosty texture makes it ideal for sipping slowly or even turning into popsicles for a frozen treat later. Try drizzling with a bit of honey or sprinkling cinnamon on top to mix things up—because who says breakfast can’t be an adventure?
Baked Turkey Meatloaf with Mashed Cauliflower

Sick of the same old ground beef routine? This baked turkey meatloaf with mashed cauliflower is your deliciously sneaky escape from dinner boredom—think cozy comfort food that won’t weigh you down, topped with a tangy glaze that’ll have you licking the spoon. It’s the weeknight hero you didn’t know you needed, ready to save the day (and your taste buds).
Serving: 6 | Pre Time: 15 minutes | Cooking Time: 55 minutes
Ingredients
– Ground turkey – 1.5 lbs
– Cauliflower – 1 large head
– Ketchup – ½ cup
– Brown sugar – 2 tbsp
– Worcestershire sauce – 1 tbsp
– Egg – 1
– Breadcrumbs – ½ cup
– Onion – ½ cup, finely chopped
– Garlic – 2 cloves, minced
– Salt – 1 tsp
– Black pepper – ½ tsp
– Olive oil – 2 tbsp
– Milk – ¼ cup
– Butter – 2 tbsp
Instructions
1. Preheat your oven to 375°F and lightly grease a 9×5-inch loaf pan with olive oil.
2. In a large bowl, combine the ground turkey, breadcrumbs, chopped onion, minced garlic, egg, ½ tsp salt, and ¼ tsp black pepper until just mixed—overworking can make it tough.
3. Press the mixture firmly into the prepared loaf pan, smoothing the top with a spatula.
4. Bake the meatloaf uncovered for 40 minutes at 375°F, until the edges start to pull away from the pan.
5. While baking, chop the cauliflower into florets and steam them in a pot with 1 inch of water for 10–12 minutes, until fork-tender.
6. Drain the cauliflower thoroughly in a colander to avoid watery mash, then return it to the pot.
7. Add the milk, butter, remaining ½ tsp salt, and ¼ tsp black pepper to the cauliflower, and mash with a potato masher until smooth and creamy.
8. In a small bowl, whisk together the ketchup, brown sugar, and Worcestershire sauce for the glaze.
9. After 40 minutes, remove the meatloaf from the oven and spread the glaze evenly over the top using a spoon.
10. Return the meatloaf to the oven and bake for an additional 15 minutes at 375°F, until the internal temperature reaches 165°F on a meat thermometer.
11. Let the meatloaf rest for 10 minutes before slicing to keep it juicy, then serve alongside the mashed cauliflower.
Zesty and satisfying, this meatloaf boasts a tender, moist texture with a sweet-and-savory glaze that caramelizes into sticky perfection. Pair it with the fluffy, buttery mashed cauliflower for a low-carb twist that’s downright addictive—try topping leftovers with a fried egg for a next-level breakfast sandwich!
Seared Scallops with Garlic Butter and Greens

Fancy a dish that looks like it took hours but secretly comes together faster than you can say “holiday stress”? Meet your new weeknight hero: seared scallops with garlic butter and greens. It’s the kind of meal that’ll have you feeling like a Michelin-starred chef without the fuss—perfect for impressing guests or just treating yourself after a long day.
Serving: 2 | Pre Time: 10 minutes | Cooking Time: 10 minutes
Ingredients
– Sea scallops – 8 large
– Olive oil – 2 tbsp
– Unsalted butter – 4 tbsp
– Garlic – 3 cloves
– Baby spinach – 4 cups
– Lemon – 1
– Salt – ½ tsp
– Black pepper – ¼ tsp
Instructions
1. Pat the sea scallops completely dry with paper towels to ensure a perfect sear.
2. Season the sea scallops evenly on both sides with ½ tsp salt and ¼ tsp black pepper.
3. Heat 2 tbsp olive oil in a large skillet over medium-high heat until it shimmers, about 2 minutes.
4. Add the sea scallops to the skillet in a single layer, making sure they don’t touch.
5. Sear the sea scallops for 2 minutes without moving them, until a golden-brown crust forms.
6. Flip the sea scallops and cook for 1 more minute, then transfer them to a plate.
7. Reduce the heat to medium and add 4 tbsp unsalted butter to the same skillet.
8. Mince 3 cloves garlic and add them to the melted butter, cooking for 30 seconds until fragrant.
9. Add 4 cups baby spinach to the skillet, stirring until just wilted, about 1 minute.
10. Squeeze the juice from 1 lemon over the spinach and stir to combine.
11. Return the sea scallops to the skillet, spooning the garlic butter sauce over them to warm through for 30 seconds.
12. Serve immediately while hot.
Marvel at those caramelized edges giving way to tender, buttery centers, all nestled in garlicky greens. The bright lemon cuts through the richness, making each bite a delightful balance—try it over creamy polenta or with crusty bread to soak up every last drop of sauce.
Chocolate Peanut Butter Protein Balls

Zesty, zippy, and zero-bake—these Chocolate Peanut Butter Protein Balls are the snack superhero you didn’t know you needed, swooping in to save your hangry afternoons with a deliciously nutty punch. They’re so easy to whip up, you’ll be rolling them out faster than you can say “protein-packed perfection,” and trust me, your taste buds will thank you for this blissful bite-sized treat.
Serving: 12 | Pre Time: 15 minutes | Cooking Time: 0 minutes
Ingredients
– Peanut butter – ½ cup
– Honey – ¼ cup
– Vanilla protein powder – ½ cup
– Rolled oats – 1 cup
– Mini chocolate chips – ⅓ cup
Instructions
1. In a medium mixing bowl, combine the peanut butter and honey, stirring vigorously with a spatula for about 1 minute until fully blended and smooth.
2. Add the vanilla protein powder to the bowl, mixing thoroughly for another 1–2 minutes to ensure no dry pockets remain—this prevents a gritty texture.
3. Fold in the rolled oats, stirring until evenly distributed throughout the mixture, which should be thick and slightly sticky.
4. Gently incorporate the mini chocolate chips, mixing just until they’re dispersed to avoid melting from the warmth of your hands.
5. Using a tablespoon or small cookie scoop, portion the mixture into roughly 1-inch balls, rolling each between your palms for 20–30 seconds until firm and round; if it’s too sticky, chill the mixture in the refrigerator for 10 minutes first.
6. Place the rolled balls on a parchment-lined baking sheet, spacing them about 1 inch apart to prevent sticking.
7. Transfer the baking sheet to the refrigerator, chilling the balls for at least 30 minutes or until set and firm to the touch.
8. Store the chilled balls in an airtight container in the refrigerator for up to 1 week, or freeze for longer storage—they’re perfect for grabbing on the go.
They boast a chewy, satisfying texture with a rich peanut butter base that’s subtly sweetened by honey and studded with melty chocolate chips. Try serving them as a post-workout pick-me-up or crumbled over yogurt for a fun, protein-packed parfait twist—your snack game will never be the same!
Summary
Deliciously simple, these 20 Ideal Protein recipes make healthy eating a joy. We hope you’ve found some new favorites to try in your kitchen! Give them a whirl, then pop back to let us know which dish you loved most. If you enjoyed this roundup, we’d be so grateful if you’d share it on Pinterest to help other home cooks discover these tasty, healthy options. Happy cooking!


