Let’s face it: whether you’re planning a cozy weeknight dinner or prepping for a weekend gathering, having a go-to list of crowd-pleasing recipes is a game-changer. We’ve rounded up 18 incredible dishes for every occasion—from quick, comforting meals to impressive seasonal favorites. Get ready to bookmark your next culinary adventure!
Garlic Butter Herb Steak Bites
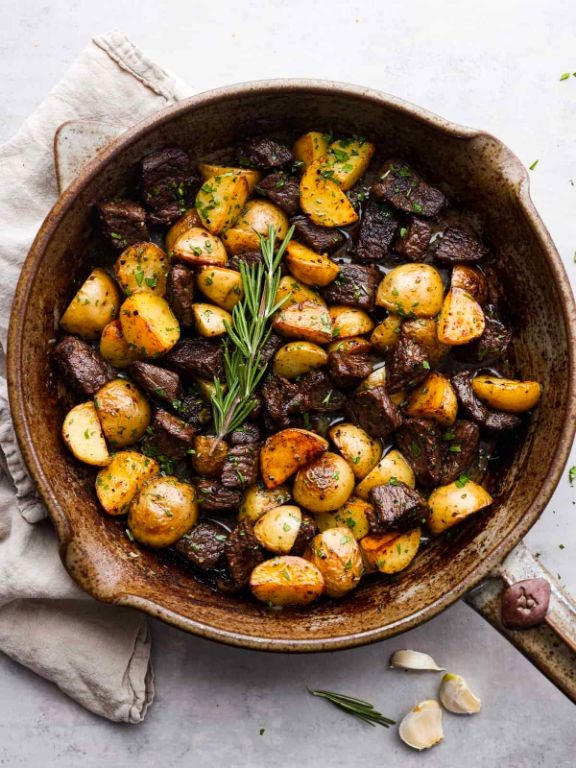
Perfectly seared steak bites swimming in garlicky herb butter—this 20-minute wonder transforms sirloin into juicy, flavor-packed morsels. Grab your skillet and let’s get sizzling!
Serving: 4 | Pre Time: 10 minutes | Cooking Time: 10 minutes
Ingredients
– 1.5 lbs sirloin steak, cut into 1-inch cubes (I trim excess fat, but keep some for flavor)
– 4 tbsp unsalted butter, divided (I always use real butter here—no substitutes!)
– 4 garlic cloves, minced (freshly minced makes all the difference)
– 2 tbsp fresh parsley, chopped (flat-leaf parsley is my go-to for its bright flavor)
– 1 tbsp fresh rosemary, finely chopped (rosemary from my garden adds an earthy punch)
– 1 tbsp olive oil (extra virgin olive oil for a fruity base)
– 1 tsp kosher salt (I prefer kosher for even seasoning)
– ½ tsp black pepper, freshly ground
– ¼ tsp red pepper flakes (optional, but I love a hint of heat)
Instructions
1. Pat the sirloin steak cubes completely dry with paper towels—this ensures a perfect sear without steaming.
2. Season the steak bites evenly with kosher salt and freshly ground black pepper on all sides.
3. Heat a large skillet over medium-high heat and add 1 tablespoon of olive oil until it shimmers, about 1 minute.
4. Add the steak bites in a single layer without overcrowding; cook for 2–3 minutes until deeply browned on one side.
5. Flip each steak bite using tongs and cook for another 2–3 minutes until browned on all sides and medium-rare (internal temperature of 130°F).
6. Transfer the steak bites to a plate and reduce the heat to medium-low.
7. Add 2 tablespoons of butter to the same skillet and let it melt completely.
8. Stir in the minced garlic and cook for 30–45 seconds until fragrant but not browned—watch closely to avoid burning.
9. Add the chopped rosemary and red pepper flakes (if using), stirring for 15 seconds to release their oils.
10. Return the steak bites to the skillet and toss to coat evenly in the garlic-herb butter.
11. Remove from heat and stir in the remaining 2 tablespoons of butter until melted and glossy.
12. Sprinkle with fresh parsley and toss one final time.
Nothing beats the tender, juicy texture of these steak bites, with the garlic butter clinging to every crevice. Serve them straight from the skillet over creamy mashed potatoes or toss into a salad for a protein boost—they’re so versatile, you’ll make them weekly!
Loaded Sweet Potato Skins

Packed with flavor and perfect for sharing, these loaded sweet potato skins are the ultimate crowd-pleaser. Crispy skins hold a creamy filling topped with melty cheese and crispy bacon—ideal for game day or cozy nights in. Get ready to bake, stuff, and devour!
Serving: 4 | Pre Time: 15 minutes | Cooking Time: 50 minutes
Ingredients
– 2 large sweet potatoes (I always pick ones with smooth, firm skins for the best texture)
– 2 tbsp extra virgin olive oil (my go-to for roasting—it adds a subtle fruity note)
– 1/2 tsp kosher salt (coarse salt clings perfectly to the skins)
– 1/4 tsp black pepper (freshly ground gives a brighter kick)
– 1/2 cup sour cream (full-fat for maximum creaminess)
– 1/2 cup shredded cheddar cheese (sharp cheddar melts like a dream)
– 4 slices bacon, cooked until crispy and crumbled (I bake mine at 400°F for 15 minutes for easy cleanup)
– 2 green onions, thinly sliced (the green parts add a fresh pop of color)
Instructions
1. Preheat your oven to 400°F and line a baking sheet with parchment paper.
2. Scrub the sweet potatoes thoroughly under cold water to remove any dirt, then pat them completely dry with paper towels.
3. Pierce each sweet potato 5–6 times all over with a fork to allow steam to escape during baking.
4. Rub the sweet potatoes evenly with 1 tbsp of olive oil, then sprinkle with 1/4 tsp of salt and 1/8 tsp of pepper.
5. Place the sweet potatoes directly on the prepared baking sheet and bake for 40–45 minutes, until they are tender when pierced with a fork and the skins are slightly puffed.
6. Remove the sweet potatoes from the oven and let them cool on the baking sheet for 10 minutes, until they are safe to handle.
7. Slice each sweet potato in half lengthwise, then use a spoon to carefully scoop out the flesh, leaving a 1/4-inch thick border of flesh attached to the skins to keep them sturdy.
8. Transfer the scooped-out flesh to a medium bowl and mash it with a fork until smooth.
9. Stir the sour cream, remaining 1/4 tsp of salt, and remaining 1/8 tsp of pepper into the mashed sweet potato until fully combined.
10. Brush the insides of the sweet potato skins with the remaining 1 tbsp of olive oil to help them crisp up.
11. Divide the sweet potato mixture evenly among the 4 skins, spreading it into an even layer.
12. Sprinkle the shredded cheddar cheese evenly over the filled skins.
13. Return the loaded skins to the baking sheet and bake at 400°F for 8–10 minutes, until the cheese is fully melted and bubbly.
14. Remove from the oven and immediately top with the crumbled bacon and sliced green onions.
15. Serve the loaded sweet potato skins hot directly from the baking sheet.
Flaky, crispy skins give way to a velvety-smooth filling that’s rich from the sour cream and sharp cheddar. The salty crunch of bacon and fresh bite of green onions balance each bite perfectly—try drizzling them with a little hot sauce or serving alongside a cool ranch dip for extra flair.
Roasted Red Pepper Pasta
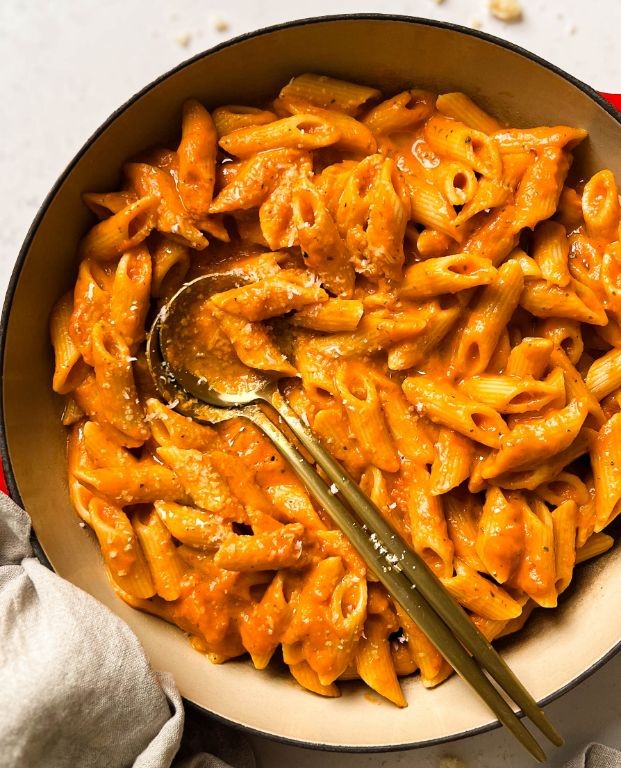
You’re craving that restaurant-quality pasta without the fuss. This roasted red pepper sauce is creamy, smoky, and comes together in under 30 minutes—perfect for a weeknight win.
Serving: 4 | Pre Time: 10 minutes | Cooking Time: 20 minutes
Ingredients
– 12 oz dried fettuccine (I always keep a box in the pantry for emergencies)
– 2 large red bell peppers, halved and seeded
– 3 tbsp extra virgin olive oil (my go-to for roasting)
– 4 cloves garlic, minced
– 1 cup heavy cream (full-fat makes it luxuriously smooth)
– 1/2 cup grated Parmesan cheese, plus extra for serving
– 1/4 tsp red pepper flakes (adjust if you like more heat)
– Salt and black pepper
– Fresh basil leaves for garnish (a handful torn right before serving)
Instructions
1. Preheat your oven to 425°F and line a baking sheet with parchment paper.
2. Place the bell pepper halves skin-side up on the sheet, drizzle with 1 tbsp olive oil, and roast for 20 minutes until the skins are charred and blistered.
3. While roasting, bring a large pot of salted water to a boil and cook the fettuccine according to package directions until al dente, about 10-12 minutes.
4. Remove the peppers from the oven, let them cool for 5 minutes, then peel off the skins—they should slide off easily.
5. In a large skillet, heat the remaining 2 tbsp olive oil over medium heat and sauté the garlic for 1 minute until fragrant, being careful not to burn it.
6. Transfer the peeled peppers and sautéed garlic to a blender, add the heavy cream, and blend on high for 30 seconds until completely smooth.
7. Pour the blended sauce back into the skillet, stir in the Parmesan cheese and red pepper flakes, and simmer over low heat for 3-4 minutes until slightly thickened.
8. Drain the cooked pasta, reserving 1/2 cup of the pasta water, and add the pasta directly to the skillet with the sauce.
9. Toss everything together, adding splashes of the reserved pasta water as needed to loosen the sauce until it coats every strand evenly.
10. Season with salt and black pepper to taste, then divide among bowls and top with torn basil and extra Parmesan.
This dish delivers a velvety texture with a sweet, smoky kick from the roasted peppers. Try serving it with a side of garlic bread to soak up every last drop of sauce, or add grilled chicken for a heartier meal.
Pesto Stuffed Mushrooms
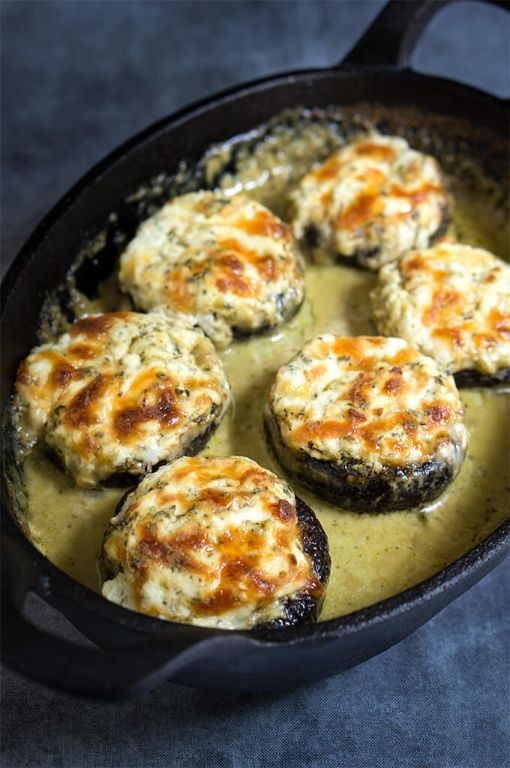
Savor these pesto-stuffed mushrooms—they’re the ultimate crowd-pleaser that’s as easy to make as it is to devour. With a crispy breadcrumb topping and a creamy, herby filling, they disappear faster than you can say “holiday appetizer.”
Serving: 4 | Pre Time: 15 minutes | Cooking Time: 20 minutes
Ingredients
– 16 large cremini mushrooms (about 1 lb)—wipe them clean with a damp paper towel, stems removed and saved
– ½ cup basil pesto (store-bought works great, but I always add an extra garlic clove if I’m blending my own)
– 4 oz cream cheese, softened to room temperature so it blends smoothly
– ¼ cup grated Parmesan cheese (the good stuff from the refrigerated section, not the shaker)
– ¼ cup panko breadcrumbs for that perfect crunch
– 2 tbsp extra virgin olive oil, my go‑to for roasting
– 1 tsp garlic powder (a little cheat that amps up the flavor)
– Salt and black pepper to season
Instructions
1. Preheat your oven to 400°F and line a baking sheet with parchment paper.
2. Gently twist off the mushroom stems and finely chop them—don’t toss them; they add great texture to the filling.
3. In a medium bowl, combine the softened cream cheese, pesto, chopped mushroom stems, Parmesan, garlic powder, and a pinch of salt and pepper. Mix until fully blended.
4. Spoon the filling evenly into each mushroom cap, mounding it slightly. Tip: Use a small cookie scoop for neat, uniform portions.
5. In a small bowl, toss the panko breadcrumbs with the olive oil until lightly coated.
6. Sprinkle the oiled panko over the stuffed mushrooms, pressing gently so it adheres.
7. Arrange the mushrooms on the prepared baking sheet, leaving a little space between each.
8. Bake at 400°F for 18–20 minutes, until the tops are golden brown and the mushrooms are tender. Tip: Rotate the sheet halfway through for even browning.
9. Let cool for 5 minutes before serving—they’re piping hot straight from the oven! Tip: If the breadcrumbs aren’t as crispy as you’d like, pop them under the broiler for 1–2 minutes, watching closely to prevent burning.
Out of the oven, these mushrooms boast a satisfying crunch that gives way to a velvety, garlicky center. Serve them warm alongside a crisp salad or as a standout starter at your next gathering—they’re so flavorful, you might skip the main course entirely.
Chicken and Waffles with Maple Syrup
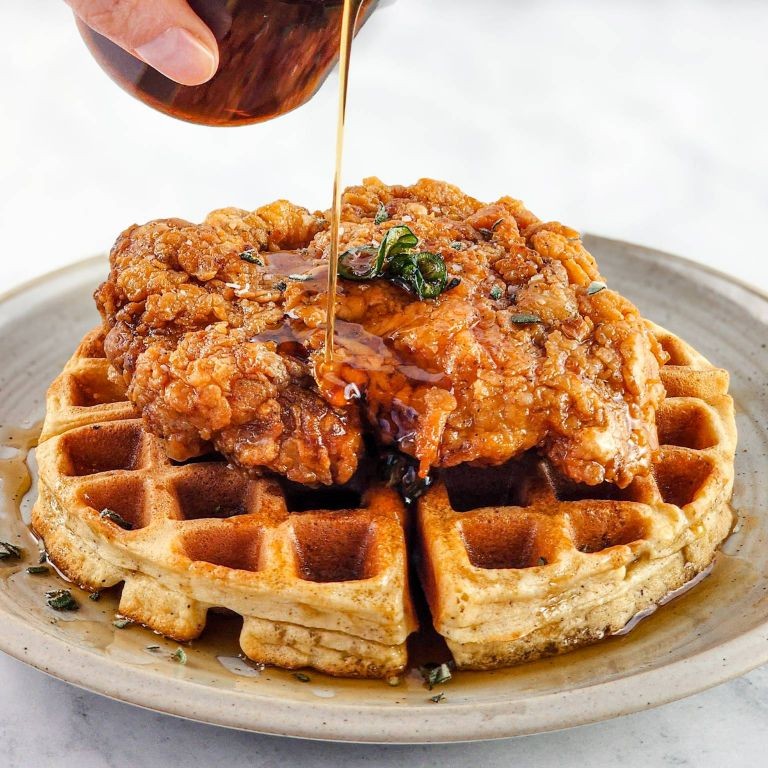
OBSESSED with this sweet-savory mashup? You should be. Crispy fried chicken meets fluffy waffles, all drenched in maple syrup—it’s the ultimate comfort food hack that’s totally worth the hype. Let’s make it happen.
Serving: 4 | Pre Time: 20 minutes | Cooking Time: 30 minutes
Ingredients
– 4 boneless, skinless chicken thighs (I like thighs for juiciness, but breasts work too)
– 1 cup buttermilk (the secret to tender chicken)
– 1 cup all-purpose flour
– 1 tsp paprika
– 1 tsp garlic powder
– 1 tsp salt
– 1/2 tsp black pepper
– Vegetable oil for frying (enough to fill a skillet 1/2 inch deep)
– 2 cups waffle mix (I use a store-bought mix for speed, but homemade batter is great)
– 1 large egg, room temp (helps the waffles rise better)
– 1 1/4 cups water
– 1/4 cup melted butter
– Maple syrup for serving (go for the real stuff—it makes all the difference)
Instructions
1. Place the chicken thighs in a bowl and pour the buttermilk over them, ensuring they’re fully coated. Let them soak for 15 minutes at room temperature to tenderize.
2. In a separate bowl, combine the all-purpose flour, paprika, garlic powder, salt, and black pepper. Mix well with a fork.
3. Remove one chicken thigh from the buttermilk, letting excess drip off, and dredge it in the flour mixture, pressing to coat evenly. Repeat for all thighs. Tip: Let the coated chicken sit on a wire rack for 5 minutes to help the coating adhere better during frying.
4. Heat vegetable oil in a large skillet over medium-high heat until it reaches 350°F on a thermometer. Carefully add the chicken thighs, frying for 6–8 minutes per side until golden brown and the internal temperature hits 165°F. Transfer to a paper towel-lined plate.
5. While the chicken fries, preheat a waffle iron to medium-high heat according to manufacturer instructions.
6. In a mixing bowl, whisk together the waffle mix, egg, water, and melted butter until just combined; small lumps are fine. Tip: Don’t overmix—it keeps the waffles light and fluffy.
7. Pour about 1/2 cup of batter into the hot waffle iron and cook for 4–5 minutes until golden and crisp. Repeat for 4 waffles total.
8. Serve each waffle topped with a fried chicken thigh and drizzle generously with maple syrup. Tip: For extra crunch, serve immediately while the chicken is still hot and the waffles are warm.
Juicy, savory chicken pairs perfectly with the soft, slightly sweet waffles, creating a textural dream. Drizzle that maple syrup all over for a sticky-sweet finish that’ll have everyone reaching for seconds. Try stacking it high for a fun brunch centerpiece!
Avocado and Shrimp Ceviche
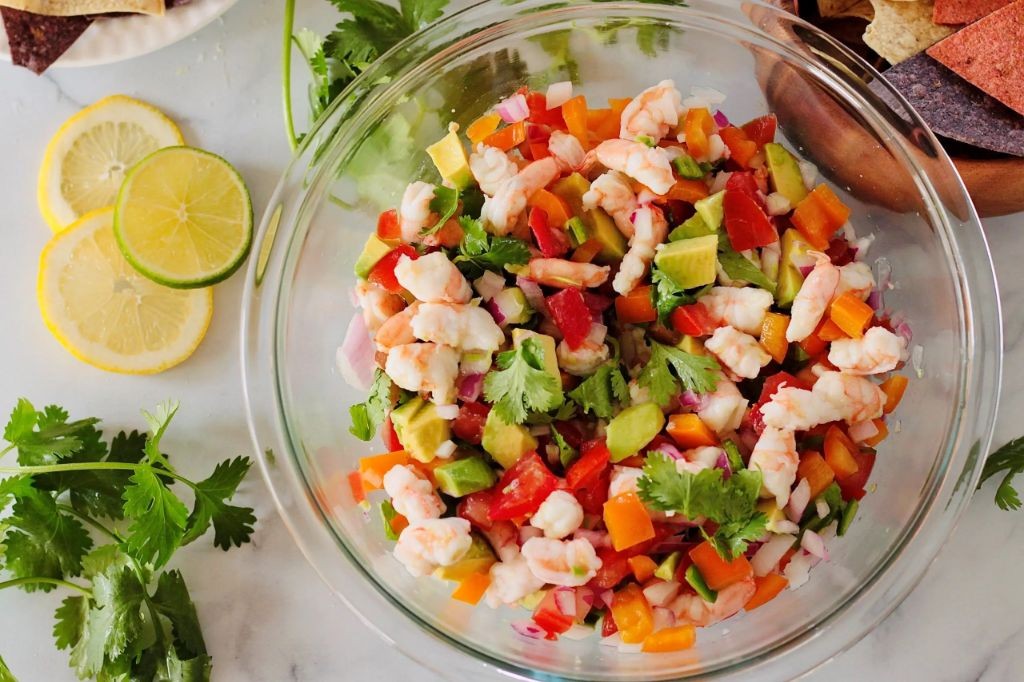
Grab your sharpest knife—this Avocado and Shrimp Ceviche is about to become your go-to summer refresher. It’s bright, zesty, and ready in minutes, perfect for impressing guests or treating yourself on a hot day. Think of it as a flavor-packed salad that requires zero cooking, just fresh ingredients and a little chopping.
Serving: 4 | Pre Time: 20 minutes | Cooking Time: 0 minutes
Ingredients
– 1 lb large raw shrimp, peeled and deveined (I always buy wild-caught for better flavor)
– 2 ripe avocados, diced (choose ones that yield slightly to pressure)
– 1 cup freshly squeezed lime juice (about 8–10 limes—bottled just won’t cut it here)
– 1/2 cup diced red onion, soaked in ice water for 5 minutes to mellow the bite
– 1/2 cup chopped cilantro, stems removed for a smoother texture
– 1 jalapeño, finely minced (seeds in if you like heat, out for milder)
– 1 tsp kosher salt, plus more for seasoning
– 1/4 tsp freshly ground black pepper
– Tortilla chips or tostadas for serving (my favorite crunchy pairing)
Instructions
1. Place the raw shrimp in a large glass or ceramic bowl—avoid metal to prevent any reaction with the acid.
2. Pour the freshly squeezed lime juice over the shrimp, ensuring they are fully submerged.
3. Cover the bowl with plastic wrap and refrigerate for exactly 15 minutes, until the shrimp turn opaque and pink (this “cooks” them in the acid).
4. While the shrimp marinate, dice the avocados into 1/2-inch cubes and set aside in a small bowl.
5. Drain the red onion from the ice water and pat dry with a paper towel to remove excess moisture.
6. Finely mince the jalapeño, wearing gloves if sensitive to capsaicin to avoid skin irritation.
7. Chop the cilantro leaves, discarding the stems for a cleaner flavor.
8. After 15 minutes, drain the shrimp from the lime juice, reserving 2 tablespoons of the juice for later.
9. Cut the shrimp into bite-sized pieces, about 1/2-inch chunks, and return them to the bowl.
10. Add the diced avocado, drained red onion, minced jalapeño, and chopped cilantro to the bowl with the shrimp.
11. Sprinkle in the kosher salt and black pepper, then drizzle the reserved 2 tablespoons of lime juice over the mixture.
12. Gently toss everything together with a large spoon until evenly combined, being careful not to mash the avocado.
13. Taste and adjust seasoning with more salt if needed, but avoid over-mixing to keep the texture intact.
14. Serve immediately in chilled bowls or over tostadas for a crisp contrast.
Now, dig into this vibrant dish—the creamy avocado melts into the tangy shrimp, with a kick from the jalapeño that keeps each bite exciting. For a fun twist, scoop it onto endive leaves or mix in diced mango for extra sweetness. No need to wait for a special occasion; it’s a weeknight winner that feels like a celebration.
Spinach and Artichoke Stuffed Shells
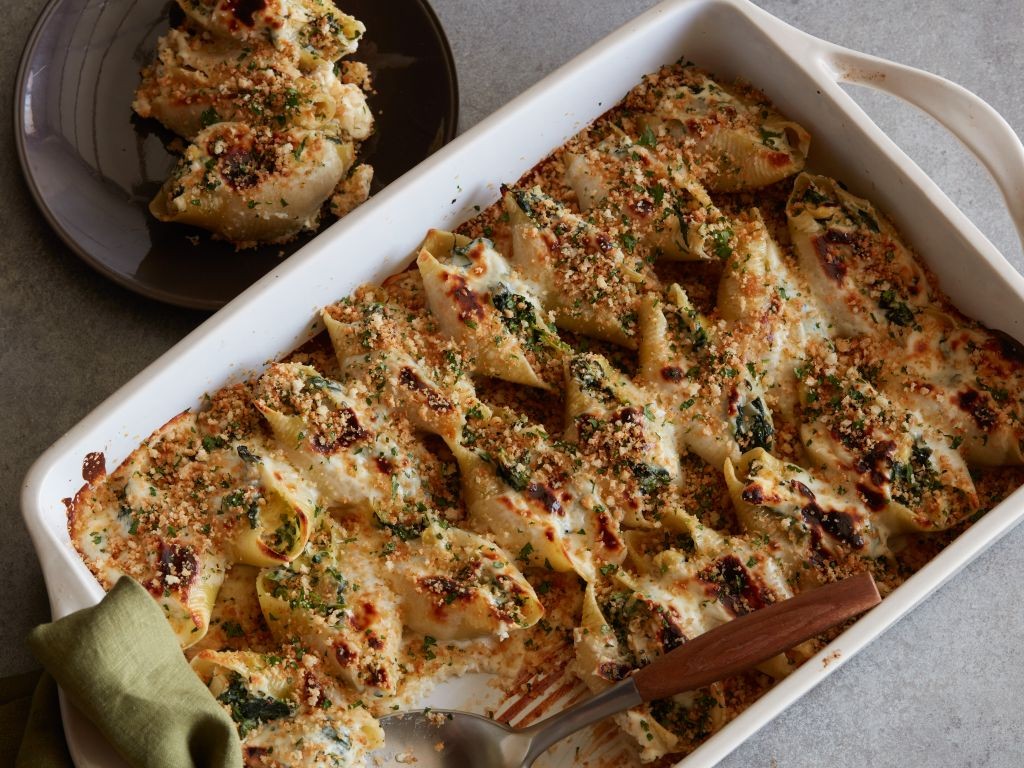
Craving a cozy, cheesy dinner that feels like a hug? These Spinach and Artichoke Stuffed Shells are your answer—creamy, dreamy, and perfect for feeding a crowd without the fuss.
Serving: 6 | Pre Time: 25 minutes | Cooking Time: 35 minutes
Ingredients
– 24 jumbo pasta shells (I always grab a few extra in case some tear)
– 1 (15-ounce) container whole-milk ricotta cheese (full-fat for maximum creaminess)
– 1 cup shredded mozzarella cheese, divided (I save a handful for the golden top)
– 1/2 cup grated Parmesan cheese
– 1 (10-ounce) package frozen chopped spinach, thawed and squeezed very dry (press it in a clean towel—trust me, no one wants watery filling)
– 1 (14-ounce) can artichoke hearts, drained and chopped
– 2 cloves garlic, minced (fresh is best here for that punchy flavor)
– 1 large egg, lightly beaten (room temp helps it blend smoothly)
– 1 teaspoon dried Italian seasoning
– 1/2 teaspoon kosher salt
– 1/4 teaspoon black pepper
– 2 cups marinara sauce (use your favorite jarred or homemade)
– 2 tablespoons extra virgin olive oil (my go-to for a light drizzle)
Instructions
1. Preheat your oven to 375°F (190°C).
2. Bring a large pot of salted water to a rolling boil over high heat.
3. Add the jumbo pasta shells and cook for 9 minutes exactly—they should be pliable but still firm (al dente) so they don’t fall apart when stuffed.
4. Drain the shells in a colander and rinse briefly under cool water to stop the cooking; set aside.
5. In a large mixing bowl, combine the ricotta cheese, 3/4 cup of the mozzarella cheese, Parmesan cheese, squeezed-dry spinach, chopped artichoke hearts, minced garlic, beaten egg, Italian seasoning, kosher salt, and black pepper.
6. Mix everything together with a spatula until fully incorporated and creamy.
7. Spread 1 cup of the marinara sauce evenly over the bottom of a 9×13-inch baking dish.
8. Using a spoon or your hands, stuff each cooked shell generously with the spinach-artichoke filling, pressing it in firmly.
9. Arrange the stuffed shells in a single layer in the prepared baking dish.
10. Pour the remaining 1 cup of marinara sauce over the top of the shells.
11. Sprinkle the reserved 1/4 cup of mozzarella cheese evenly over the sauce.
12. Drizzle the extra virgin olive oil lightly over the cheese for a golden finish.
13. Cover the dish tightly with aluminum foil and bake for 25 minutes.
14. Remove the foil and bake for an additional 10 minutes, or until the cheese is bubbly and lightly browned on top.
15. Let the dish rest for 5 minutes after removing it from the oven—this helps the filling set for cleaner slices.
Let these shells cool slightly; the filling firms up into a lush, velvety texture that pairs perfectly with the tender pasta and tangy marinara. Serve them straight from the dish for a family-style feast, or plate individually with a side salad for a restaurant-worthy touch—either way, expect zero leftovers.
Pumpkin Spice Pancakes with Cinnamon Butter
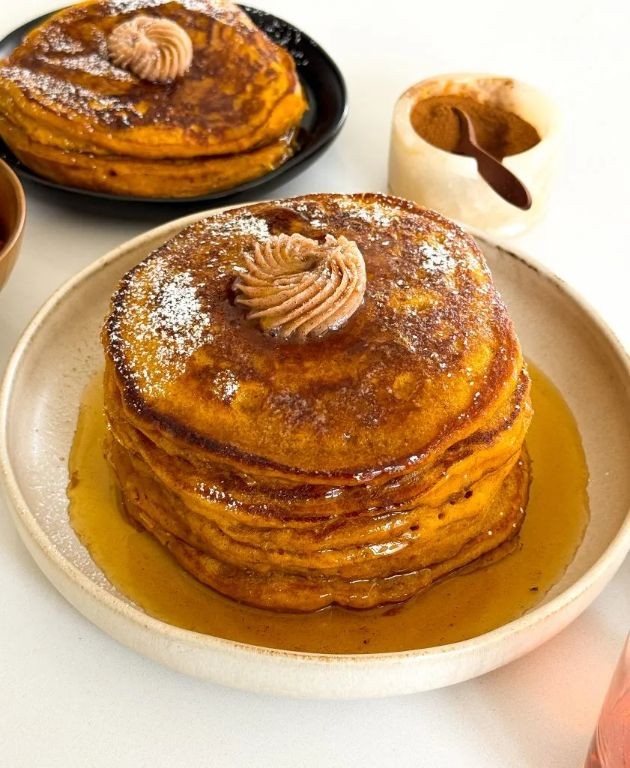
Fall just got a major upgrade with these cozy pumpkin spice pancakes. Forget basic breakfasts—this stack delivers autumn in every fluffy bite. Top them with homemade cinnamon butter for that irresistible sweet-spice finish.
Serving: 4 | Pre Time: 10 minutes | Cooking Time: 15 minutes
Ingredients
– 1½ cups all-purpose flour (I always spoon and level for accuracy)
– 2 tsp baking powder
– 1 tsp pumpkin pie spice
– ½ tsp salt
– 1 cup whole milk (room temp works best for smooth batter)
– ¾ cup canned pumpkin puree (not pumpkin pie filling!)
– 1 large egg, room temp (helps everything blend evenly)
– 2 tbsp melted unsalted butter, cooled slightly
– 2 tbsp granulated sugar
– ½ stick (4 tbsp) softened unsalted butter for cinnamon butter
– 1 tsp ground cinnamon
– 1 tbsp maple syrup for cinnamon butter
– Butter or oil for greasing the skillet
Instructions
1. In a large bowl, whisk together 1½ cups flour, 2 tsp baking powder, 1 tsp pumpkin pie spice, and ½ tsp salt until fully combined.
2. In a separate medium bowl, whisk 1 cup milk, ¾ cup pumpkin puree, 1 egg, 2 tbsp melted butter, and 2 tbsp sugar until smooth with no lumps.
3. Pour the wet ingredients into the dry ingredients and gently fold with a spatula until just combined—a few small lumps are fine to avoid tough pancakes.
4. Let the batter rest for 5 minutes at room temperature; this allows the baking powder to activate for fluffier results.
5. While the batter rests, make the cinnamon butter: in a small bowl, mix ½ stick softened butter, 1 tsp cinnamon, and 1 tbsp maple syrup until creamy and uniform.
6. Heat a non-stick skillet or griddle over medium heat (350°F if using an electric griddle) and lightly grease with butter or oil.
7. Pour ¼ cup batter per pancake onto the hot skillet, cooking 2-3 pancakes at a time without crowding.
8. Cook for 2-3 minutes until bubbles form on the surface and edges look set, then flip carefully with a spatula.
9. Cook the other side for 1-2 minutes until golden brown and cooked through—press gently; it should spring back.
10. Repeat with remaining batter, greasing the skillet as needed between batches.
11. Serve pancakes immediately topped with a dollop of cinnamon butter.
You’ll love the tender, cake-like texture with warm pumpkin spice notes throughout. Drizzle with extra maple syrup or add toasted pecans for crunch—perfect for lazy weekend mornings or a festive holiday brunch.
BBQ Pulled Pork Sliders
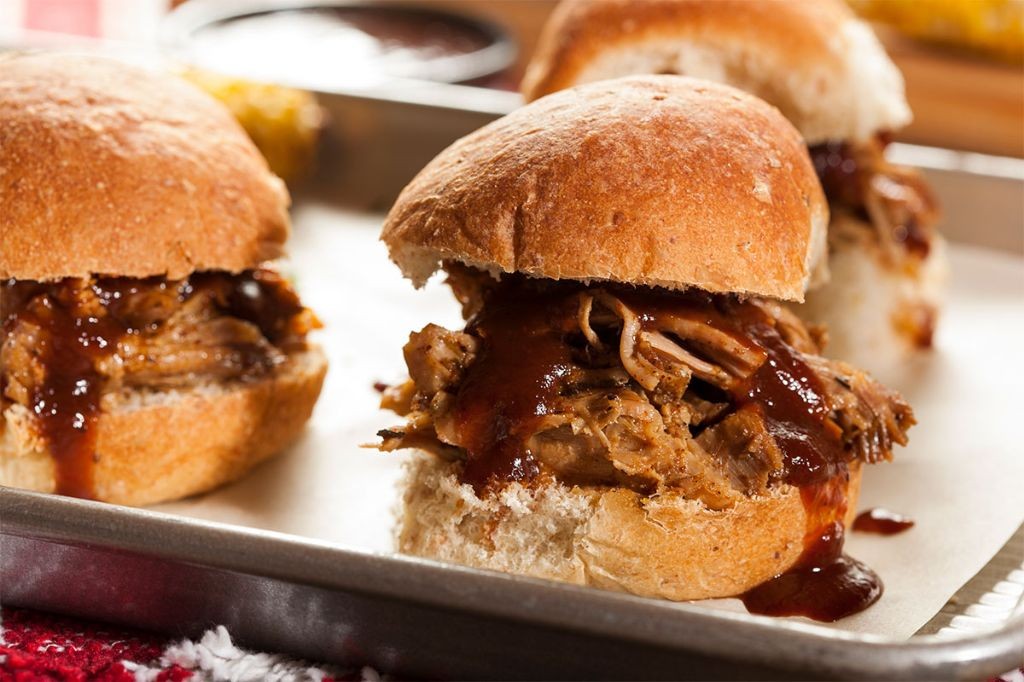
Unwrap your slow cooker and get ready for the easiest, most crowd-pleasing slider recipe you’ll make all season. These BBQ pulled pork sliders are the ultimate game-day, potluck, or lazy Sunday dinner hero—tender, smoky, and piled high on soft buns. Trust me, they disappear faster than you can say “seconds.”
Serving: 12 sliders | Pre Time: 15 minutes | Cooking Time: 8 hours
Ingredients
– 3 lbs pork shoulder (also called pork butt—look for a well-marbled cut for maximum juiciness)
– 1 cup ketchup (I always use the no-high-fructose-corn-syrup kind for a cleaner flavor)
– ½ cup apple cider vinegar (this adds the perfect tangy kick)
– ¼ cup brown sugar, packed (light or dark works, but dark gives a deeper molasses note)
– 2 tbsp Worcestershire sauce (a pantry staple that boosts umami)
– 1 tbsp smoked paprika (this is non-negotiable for that authentic BBQ smokiness)
– 1 tsp garlic powder (skip fresh here—it can burn during the long cook)
– 1 tsp onion powder (same reason as the garlic powder)
– ½ tsp black pepper, freshly ground (pre-ground is fine, but fresh has more punch)
– 12 slider buns (I prefer soft, potato-based buns—they hold up to the juicy pork without getting soggy)
– 1 cup coleslaw, store-bought or homemade (my go-to is a vinegar-based slaw for brightness)
Instructions
1. Trim any large pieces of fat from the 3 lbs pork shoulder, but leave some for flavor—this keeps it moist during cooking.
2. In a medium bowl, whisk together 1 cup ketchup, ½ cup apple cider vinegar, ¼ cup brown sugar, 2 tbsp Worcestershire sauce, 1 tbsp smoked paprika, 1 tsp garlic powder, 1 tsp onion powder, and ½ tsp black pepper until smooth.
3. Place the pork shoulder in a 6-quart slow cooker and pour the sauce mixture over it, coating evenly.
4. Cover the slow cooker and cook on LOW for 8 hours—no peeking! This low-and-slow method ensures the pork becomes fork-tender without drying out.
5. After 8 hours, use two forks to shred the pork directly in the slow cooker, mixing it with the accumulated juices for extra sauciness.
6. Let the shredded pork sit in the warm slow cooker for 10 minutes to absorb more flavor—this resting step makes a huge difference in texture.
7. While the pork rests, split 12 slider buns and lightly toast them in a 350°F oven for 3-5 minutes until just golden; this prevents sogginess when assembled.
8. Pile the pulled pork onto the toasted buns, top each with about 1 tbsp of 1 cup coleslaw, and serve immediately.
Zesty, smoky, and impossibly tender, these sliders boast a melt-in-your-mouth texture from the slow-cooked pork, balanced by the tangy slaw crunch. For a fun twist, serve them with pickle spears on the side or drizzle with extra BBQ sauce for die-hard fans—they’re guaranteed to be the star of any gathering.
Strawberry Basil Lemonade Sorbet

OBSESSED with this frozen treat that screams summer in every spoonful. It’s a vibrant, sweet-tart escape that’s ridiculously easy to make—no ice cream machine needed. Seriously, your blender is about to become your new best friend.
Serving: 6 | Pre Time: 15 minutes | Cooking Time: 0 minutes
Ingredients
– 1 lb fresh strawberries, hulled (frozen work too, but fresh give the brightest flavor)
– ¾ cup granulated sugar (I like it sweet, but you can reduce to ½ cup if you prefer tart)
– ¾ cup fresh lemon juice, about 4-5 lemons squeezed (strained to avoid seeds—trust me on this)
– ¼ cup fresh basil leaves, packed (don’t skimp; the herbaceous note is key)
– ½ cup cold water (helps everything blend smoothly)
– Pinch of fine sea salt (just a tiny bit to make the flavors pop)
Instructions
1. Combine the hulled strawberries, granulated sugar, fresh lemon juice, packed basil leaves, cold water, and pinch of fine sea salt in a high-speed blender.
2. Blend on high speed for 45-60 seconds until the mixture is completely smooth and no chunks remain. Tip: Scrape down the sides halfway through to ensure everything incorporates evenly.
3. Pour the blended mixture through a fine-mesh strainer into a shallow, freezer-safe dish (like a 9×9-inch pan) to remove any seeds or pulp for a silky texture.
4. Cover the dish tightly with plastic wrap, pressing it directly onto the surface of the liquid to prevent ice crystals from forming. Tip: This step is crucial for a creamy sorbet, so don’t skip it!
5. Freeze the dish for 4-6 hours, or until the mixture is solid but still slightly soft in the center. Tip: For faster freezing, place the dish in the coldest part of your freezer, usually the back.
6. Remove the dish from the freezer and let it sit at room temperature for 5-10 minutes to soften slightly for easier scooping.
7. Use a sturdy spoon or ice cream scoop to break the frozen mixture into chunks, then transfer them back to the blender.
8. Blend the chunks on medium-high speed for 30-45 seconds until smooth and creamy, scraping down the sides as needed.
9. Serve immediately in bowls or glasses, or return to the freezer for 15 minutes for a firmer texture if desired.
Decadently smooth with a bright, tangy kick from the lemon and a subtle herbal hint from the basil. The texture is luxuriously creamy without any dairy—perfect for scooping straight from the freezer. Try serving it in hollowed-out lemon halves for a stunning presentation, or layer it with fresh berries for an Instagram-worthy parfait.
Summary
Yay! This roundup offers delicious inspiration for any event, from cozy dinners to festive gatherings. We hope these 18 incredible recipes spark joy in your kitchen. Try one (or a few!), leave a comment with your favorite, and share this article on Pinterest to spread the culinary love. Happy cooking!


