
Unlock the secret to effortless, delicious keto meals with canned chicken! Whether you’re craving quick dinners, cozy comfort food, or simply need a pantry-powered solution, these 20 easy recipes are your new best friend. Get ready to transform that humble can into mouthwatering dishes that’ll keep you satisfied and on track. Let’s dive in and discover your next favorite meal!
Keto Canned Chicken Salad with Avocado
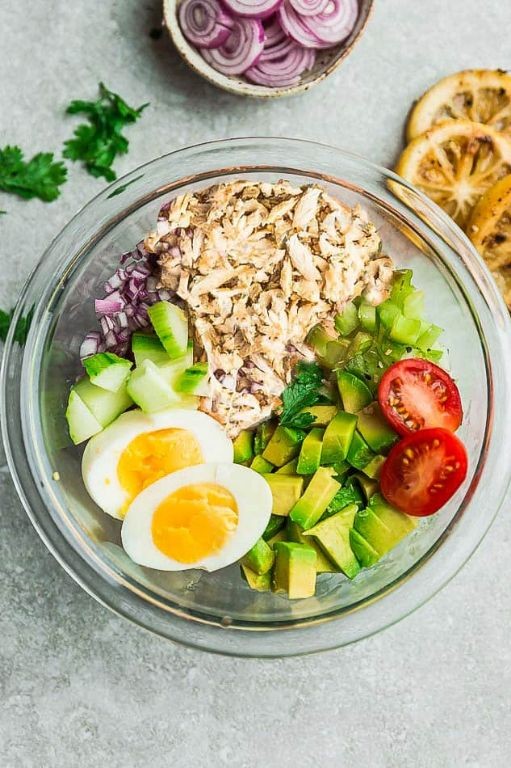
Browsing the pantry for a quick, satisfying lunch, I often find myself reaching for canned chicken—it’s a lifesaver on busy days. This keto-friendly salad combines it with creamy avocado for a rich, protein-packed meal that feels indulgent yet keeps carbs in check. I love how it comes together in minutes, making it my go-to when I need something wholesome without fuss.
Serving: 2 | Pre Time: 10 minutes | Cooking Time: 0 minutes
Ingredients
- 1 (12.5-ounce) can of sustainably sourced chicken breast, drained and flaked
- 1 medium Hass avocado, pitted and diced into ½-inch cubes
- ¼ cup full-fat mayonnaise
- 1 tablespoon freshly squeezed lemon juice
- 1 teaspoon Dijon mustard
- ¼ teaspoon fine sea salt
- ⅛ teaspoon freshly ground black pepper
- 2 tablespoons finely chopped fresh dill
- ¼ cup finely diced celery
Instructions
- Place the drained and flaked canned chicken in a medium mixing bowl.
- Add the diced Hass avocado to the bowl, gently folding to combine without mashing the avocado—this preserves its texture.
- In a small separate bowl, whisk together the full-fat mayonnaise, freshly squeezed lemon juice, and Dijon mustard until emulsified and smooth.
- Pour the mayonnaise mixture over the chicken and avocado, using a spatula to coat evenly.
- Sprinkle in the fine sea salt and freshly ground black pepper, stirring to distribute the seasonings throughout.
- Fold in the finely chopped fresh dill and finely diced celery for a crisp, herbal note.
- Let the salad rest at room temperature for 5 minutes to allow the flavors to meld—this enhances the overall taste.
- Serve immediately, or refrigerate in an airtight container for up to 2 hours for a chilled option.
Velvety and rich, this salad boasts a creamy texture from the avocado balanced by the subtle crunch of celery. The bright acidity of lemon cuts through the richness, making it perfect for scooping with crisp lettuce cups or low-carb crackers. For a creative twist, try stuffing it into halved bell peppers or topping a bed of fresh arugula for an extra peppery kick.
Low-Carb Canned Chicken Zucchini Boats

This time of year always has me craving something hearty yet light, and these zucchini boats have become my go-to solution when I need a satisfying meal without the carb overload. I discovered this recipe during a busy holiday season when I was short on time but still wanted something homemade—canned chicken became my unexpected hero, and now I keep a few cans in the pantry just for this dish.
Serving: 4 | Pre Time: 15 minutes | Cooking Time: 25 minutes
Ingredients
– 4 medium zucchini, halved lengthwise
– 2 tablespoons extra-virgin olive oil, divided
– 1 teaspoon kosher salt, divided
– ½ teaspoon freshly ground black pepper, divided
– 1 small yellow onion, finely diced
– 2 cloves garlic, minced
– 2 (12.5-ounce) cans chicken breast in water, drained and flaked
– ½ cup full-fat cream cheese, softened
– ¼ cup grated Parmesan cheese
– 2 tablespoons fresh parsley, finely chopped
– ½ teaspoon smoked paprika
Instructions
1. Preheat your oven to 400°F (204°C) and line a rimmed baking sheet with parchment paper.
2. Using a spoon, carefully scoop out the seeds and flesh from each zucchini half, leaving a ¼-inch thick shell; reserve ½ cup of the scooped zucchini flesh, finely chopped.
3. Brush the insides of the zucchini boats with 1 tablespoon of extra-virgin olive oil and season with ½ teaspoon kosher salt and ¼ teaspoon black pepper.
4. Place the zucchini boats cut-side up on the prepared baking sheet and bake for 10 minutes to partially soften.
5. While the zucchini bakes, heat the remaining 1 tablespoon of extra-virgin olive oil in a medium skillet over medium heat until shimmering.
6. Add the finely diced yellow onion and cook, stirring frequently, for 4–5 minutes until translucent and fragrant.
7. Stir in the minced garlic and cook for 1 minute until aromatic but not browned.
8. Add the reserved ½ cup of chopped zucchini flesh, the flaked canned chicken, remaining ½ teaspoon kosher salt, remaining ¼ teaspoon black pepper, and smoked paprika; cook for 3–4 minutes, stirring occasionally, until heated through and well combined.
9. Remove the skillet from heat and fold in the softened cream cheese, grated Parmesan, and fresh parsley until the mixture is creamy and uniform.
10. Evenly divide the chicken filling among the partially baked zucchini boats, packing it gently into the cavities.
11. Return the baking sheet to the oven and bake for 15–18 minutes, until the zucchini is fork-tender and the filling is lightly golden on top.
12. Let the zucchini boats rest for 5 minutes before serving to allow the filling to set slightly.
What I love most is how the zucchini becomes tender yet retains a slight bite, while the creamy chicken filling offers a savory, smoky depth. For a festive touch, top them with a sprinkle of extra Parmesan and a drizzle of chili oil right before serving—they’re perfect as a standalone meal or alongside a simple green salad.
Creamy Keto Canned Chicken Soup

Huddled in my kitchen on a chilly evening, I was craving something warm and comforting but needed to stick to my keto goals. That’s when I whipped up this Creamy Keto Canned Chicken Soup—it’s become my go-to for a quick, satisfying meal that feels indulgent without the carbs. I love how it comes together in under 30 minutes, making it perfect for busy weeknights when I want something hearty without the fuss.
Serving: 4 | Pre Time: 10 minutes | Cooking Time: 20 minutes
Ingredients
– 2 tablespoons extra-virgin olive oil
– 1 medium yellow onion, finely diced
– 2 cloves garlic, minced
– 2 (12.5-ounce) cans cooked chicken breast, drained and shredded
– 4 cups unsalted chicken bone broth
– 1 cup heavy cream
– 1 cup fresh spinach leaves, roughly chopped
– 1/2 cup full-fat cream cheese, softened
– 1 teaspoon dried thyme
– 1/2 teaspoon smoked paprika
– 1/4 teaspoon freshly ground black pepper
– 1/4 teaspoon sea salt
Instructions
1. Heat the extra-virgin olive oil in a large Dutch oven or heavy-bottomed pot over medium heat until shimmering, about 2 minutes.
2. Add the finely diced yellow onion and sauté, stirring frequently with a wooden spoon, until translucent and fragrant, approximately 5 minutes.
3. Stir in the minced garlic and cook for 1 minute, just until aromatic to prevent burning.
4. Tip: For deeper flavor, let the onions caramelize slightly by cooking an extra 2-3 minutes until golden.
5. Pour in the unsalted chicken bone broth and bring to a gentle simmer over medium-high heat, about 3-4 minutes.
6. Add the drained and shredded canned chicken breast, dried thyme, smoked paprika, freshly ground black pepper, and sea salt to the pot.
7. Reduce the heat to medium-low and let the soup simmer uncovered for 10 minutes to allow the flavors to meld.
8. Tip: Skim off any foam that rises to the surface during simmering for a clearer broth.
9. Whisk in the softened full-fat cream cheese until fully incorporated and the soup is smooth, about 2 minutes.
10. Stir in the heavy cream and bring the soup back to a low simmer, cooking for 3 minutes without boiling to prevent curdling.
11. Add the roughly chopped fresh spinach leaves and cook for 1-2 minutes, just until wilted and vibrant green.
12. Tip: For a thicker consistency, let the soup reduce for an additional 5 minutes over low heat, stirring occasionally.
13. Remove the pot from the heat and let it rest for 2 minutes before serving.
14. A velvety, rich soup with tender shreds of chicken and pops of fresh spinach, this dish boasts a smoky depth from the paprika and a creamy texture that’s utterly comforting. Serve it piping hot in deep bowls, garnished with a sprinkle of extra thyme or a dollop of sour cream for added tang—it’s so satisfying, you won’t believe it’s keto-friendly!
Spicy Canned Chicken Stuffed Peppers
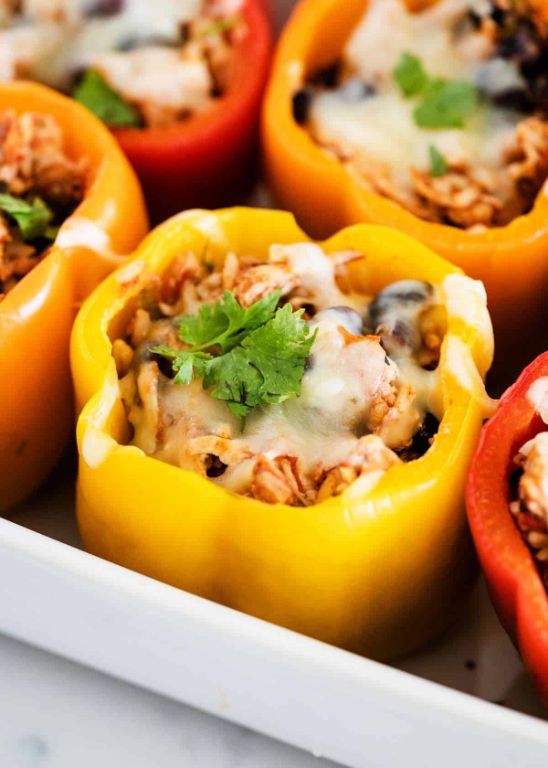
Bustling around the kitchen last week, I realized I had a can of chicken staring back at me from the pantry—a relic from a well-intentioned bulk buy. It sparked an idea for a quick, satisfying meal that wouldn’t require a trip to the store, and these spicy stuffed peppers were born. They’re my new go-to for a busy weeknight when I crave something hearty with a kick, but don’t want to fuss with raw meat.
Serving: 4 | Pre Time: 15 minutes | Cooking Time: 25 minutes
Ingredients
– 4 large bell peppers, any color, tops removed and seeded
– 2 tablespoons extra-virgin olive oil
– 1 medium yellow onion, finely diced
– 2 cloves garlic, minced
– 1 (12.5-ounce) can of cooked chicken breast, drained and flaked
– 1 cup cooked long-grain white rice
– 1 cup shredded Monterey Jack cheese
– 1 (10-ounce) can of diced tomatoes with green chilies, undrained
– 1 teaspoon ground cumin
– 1/2 teaspoon smoked paprika
– 1/4 teaspoon cayenne pepper (adjust for heat preference)
– Kosher salt, to season
– Freshly ground black pepper, to season
– 1/4 cup fresh cilantro leaves, chopped, for garnish
Instructions
1. Preheat your oven to 375°F (190°C) and lightly grease a baking dish just large enough to hold the peppers upright.
2. In a large skillet over medium heat, warm the extra-virgin olive oil until it shimmers, about 1 minute.
3. Add the finely diced yellow onion and cook, stirring occasionally, until translucent and soft, about 5-7 minutes.
4. Stir in the minced garlic and cook until fragrant, about 30 seconds, being careful not to let it burn.
5. Add the flaked canned chicken, cooked long-grain white rice, undrained diced tomatoes with green chilies, ground cumin, smoked paprika, and cayenne pepper to the skillet.
6. Cook the mixture, stirring frequently, until heated through and well combined, about 3-4 minutes. Season generously with kosher salt and freshly ground black pepper. (Tip: Taste the filling now to adjust seasoning, as it’s harder to do once stuffed.)
7. Remove the skillet from heat and fold in 3/4 cup of the shredded Monterey Jack cheese until just melted into the mixture.
8. Spoon the filling evenly into the prepared bell peppers, packing it gently but firmly. (Tip: Use a small spoon or your fingers to press the filling into the bottom corners of the peppers for even cooking.)
9. Place the stuffed peppers in the greased baking dish and top each with the remaining 1/4 cup of shredded Monterey Jack cheese.
10. Cover the dish tightly with aluminum foil and bake in the preheated oven for 20 minutes.
11. Remove the foil and continue baking until the peppers are tender-crisp and the cheese is golden and bubbly, about 5-7 more minutes. (Tip: Check for doneness by piercing a pepper with a paring knife; it should slide in with slight resistance.)
12. Let the peppers rest in the dish for 5 minutes before serving to allow the filling to set.
13. Garnish with the chopped fresh cilantro leaves just before serving.
Yielded from the oven, these peppers offer a wonderful contrast: the tender-crisp bell pepper shell gives way to a warmly spiced, cheesy filling with a subtle heat from the cayenne and green chilies. For a creative twist, I sometimes serve them over a bed of crisp romaine lettuce with a dollop of cool sour cream to balance the spice, turning it into a deconstructed taco salad.
Keto Canned Chicken Cauliflower Casserole
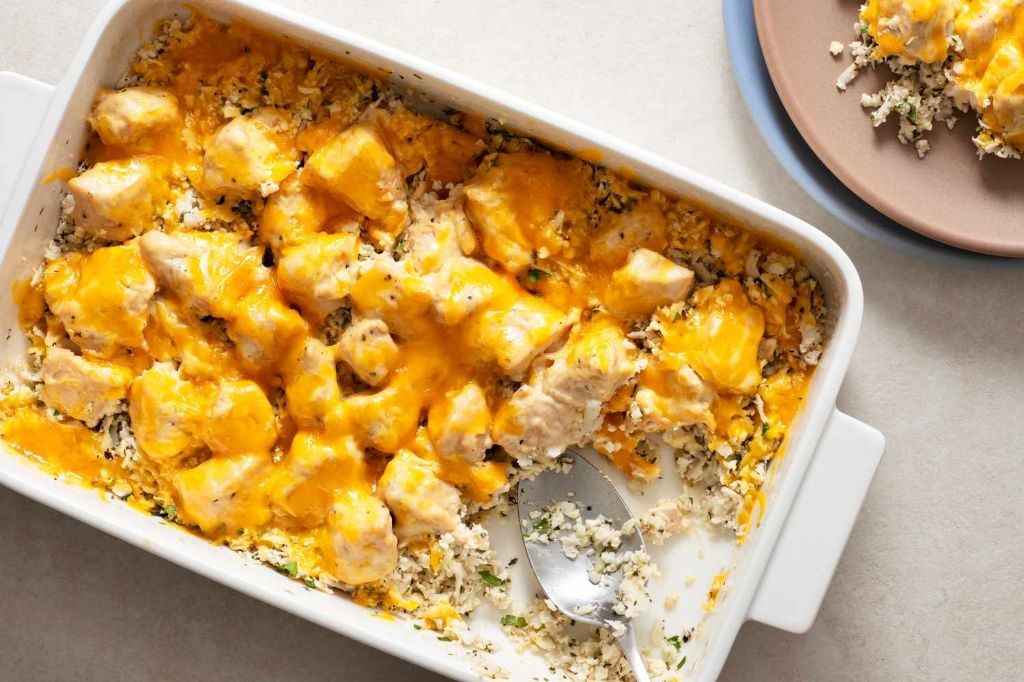
Prepping dinner on a hectic weeknight used to mean ordering takeout, but my keto journey led me to create this pantry-friendly casserole that’s become a family favorite. It’s the perfect cozy, comforting dish for when you need something hearty without the hassle.
Serving: 6 | Pre Time: 15 minutes | Cooking Time: 35 minutes
Ingredients
- 2 tablespoons clarified butter
- 1 medium head of cauliflower, cut into 1-inch florets
- 1 medium yellow onion, finely diced
- 3 cloves garlic, minced
- 2 (12.5-ounce) cans of chunk chicken breast in water, thoroughly drained
- 1 cup heavy whipping cream
- 4 ounces full-fat cream cheese, softened to room temperature
- 1 ½ cups sharp cheddar cheese, freshly grated
- ½ cup grated Parmesan cheese
- 2 pasture-raised eggs, lightly beaten
- 1 teaspoon smoked paprika
- ½ teaspoon freshly ground black pepper
- ¼ teaspoon fine sea salt
Instructions
- Preheat your oven to 375°F (190°C) and grease a 9×13-inch baking dish with 1 tablespoon of the clarified butter.
- Place the cauliflower florets in a large, microwave-safe bowl with 2 tablespoons of water.
- Cover the bowl with a microwave-safe plate and microwave on high for 5 minutes to par-cook the cauliflower; this helps it bake evenly later. Tip: The florets should be just tender when pierced with a fork.
- While the cauliflower cooks, heat the remaining 1 tablespoon of clarified butter in a large skillet over medium heat.
- Sauté the diced onion in the skillet for 5 minutes, until translucent and fragrant.
- Add the minced garlic to the skillet and cook for 1 additional minute, stirring constantly to prevent burning.
- Transfer the par-cooked cauliflower florets to the skillet with the onions and garlic.
- Add the drained canned chicken, breaking any large chunks apart with a wooden spoon.
- Pour in the heavy whipping cream and add the softened cream cheese.
- Stir the mixture constantly over medium-low heat for 3-4 minutes until the cream cheese is fully melted and incorporated into a smooth sauce.
- Remove the skillet from the heat and let it cool for 2 minutes. Tip: This prevents the eggs from scrambling in the next step.
- Stir in 1 cup of the grated cheddar cheese, all of the Parmesan cheese, the lightly beaten eggs, smoked paprika, black pepper, and sea salt until fully combined.
- Transfer the entire mixture to the prepared baking dish and spread it into an even layer.
- Sprinkle the remaining ½ cup of grated cheddar cheese evenly over the top.
- Bake in the preheated oven for 25 minutes, or until the casserole is bubbling at the edges and the top is golden brown. Tip: For an extra crispy top, broil for the final 2-3 minutes, watching closely.
Coming out of the oven, this casserole has a wonderfully creamy interior with a satisfyingly crisp, cheesy crust. The smoked paprika adds a subtle depth that complements the savory chicken perfectly. For a fresh contrast, I love serving it alongside a simple arugula salad dressed with lemon juice.
Quick Canned Chicken Lettuce Wraps

Ever have one of those days where you’re staring into the pantry at 5 p.m., the family is hungry, and you need something satisfying on the table in 20 minutes? I’ve been there more times than I can count, which is why this recipe for quick canned chicken lettuce wraps is my weeknight savior. It’s a no-fuss, flavor-packed solution that feels light yet totally satisfying.
Serving: 4 | Pre Time: 10 minutes | Cooking Time: 8 minutes
Ingredients
– 2 (5-ounce) cans of premium chunk chicken breast in water, thoroughly drained
– 1 tablespoon of toasted sesame oil
– 2 tablespoons of low-sodium soy sauce
– 1 tablespoon of unseasoned rice vinegar
– 1 teaspoon of freshly grated ginger root
– 2 cloves of garlic, finely minced
– 1/4 cup of finely diced water chestnuts
– 2 tablespoons of thinly sliced scallions (green parts only)
– 1 head of butter lettuce, leaves separated, rinsed, and patted dry
– 1 tablespoon of toasted sesame seeds, for garnish
Instructions
1. Heat the toasted sesame oil in a non-stick skillet over medium heat until it shimmers, about 1 minute.
2. Add the finely minced garlic and freshly grated ginger root to the skillet, sautéing until fragrant and just beginning to turn golden, approximately 1 minute, to bloom their flavors without burning.
3. Incorporate the thoroughly drained canned chicken breast, using a wooden spoon to break it into fine shreds directly in the skillet.
4. Pour in the low-sodium soy sauce and unseasoned rice vinegar, stirring constantly to coat the chicken evenly and allow the liquids to reduce slightly, about 2 minutes.
5. Fold in the finely diced water chestnuts and cook for an additional 2 minutes, until the mixture is heated through and any excess moisture has evaporated.
6. Remove the skillet from the heat and stir in the thinly sliced scallions.
7. Spoon the warm chicken mixture evenly into the center of each prepared butter lettuce leaf.
8. Garnish each lettuce wrap with a sprinkle of toasted sesame seeds just before serving.
Finally, these wraps offer a delightful contrast: the cool, crisp butter lettuce cradles the warm, savory filling with pops of crunch from the water chestnuts. For a creative twist, I sometimes add a drizzle of sriracha mayo or serve them with a side of quick-pickled vegetables for extra tang.
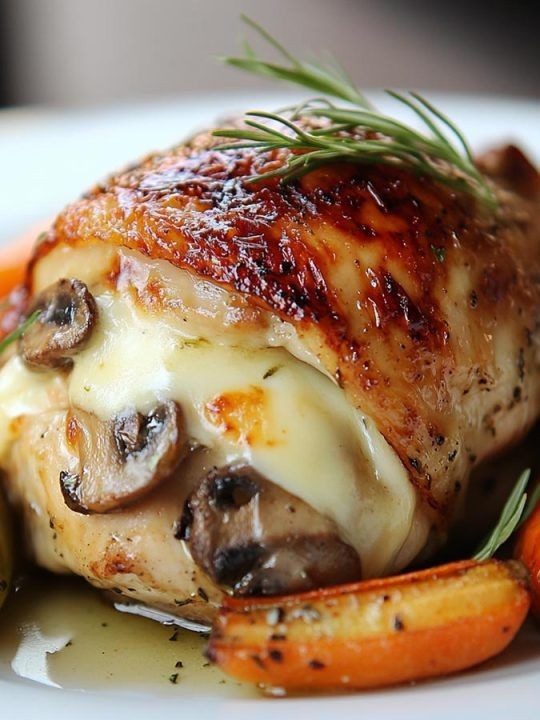
Garlic Parmesan Canned Chicken Bake
This time of year always has me craving something cozy yet effortless, and my pantry staple canned chicken transforms into a surprisingly elegant dinner with this garlic parmesan bake. I discovered this recipe during a hectic holiday week when I needed something comforting without a trip to the grocery store—it’s become my secret weapon for busy nights ever since.
Serving: 4 | Pre Time: 10 minutes | Cooking Time: 25 minutes
Ingredients
– 2 (12.5-ounce) cans of premium chunk chicken breast, thoroughly drained
– 1 cup heavy cream
– ¾ cup freshly grated Parmigiano-Reggiano cheese
– 4 large garlic cloves, finely minced
– 2 tablespoons unsalted butter
– 1 tablespoon extra-virgin olive oil
– 1 teaspoon kosher salt
– ½ teaspoon freshly cracked black pepper
– ¼ teaspoon crushed red pepper flakes
– 2 tablespoons finely chopped fresh flat-leaf parsley
Instructions
1. Preheat your oven to 375°F (190°C) and lightly grease a 9-inch ceramic baking dish with the extra-virgin olive oil.
2. In a medium skillet over medium-low heat, melt the unsalted butter until it just begins to foam.
3. Add the finely minced garlic cloves to the skillet and sauté for 60–90 seconds, stirring constantly, until fragrant but not browned—this prevents bitterness.
4. Pour in the heavy cream, then whisk continuously for 2–3 minutes until the mixture is slightly thickened and smooth.
5. Remove the skillet from heat and stir in ½ cup of the freshly grated Parmigiano-Reggiano cheese until fully melted and incorporated.
6. Season the sauce with the kosher salt, freshly cracked black pepper, and crushed red pepper flakes, then set aside.
7. Place the thoroughly drained canned chicken breast chunks in the prepared baking dish, breaking apart any large pieces with a fork for even texture.
8. Pour the warm cream sauce evenly over the chicken, ensuring all pieces are coated.
9. Sprinkle the remaining ¼ cup of Parmigiano-Reggiano cheese over the top in an even layer.
10. Bake in the preheated oven for 20–25 minutes, until the cheese is golden brown and the sauce is bubbling vigorously around the edges.
11. Remove from the oven and let rest for 5 minutes—this allows the sauce to thicken slightly for better serving.
12. Garnish with the finely chopped fresh flat-leaf parsley just before serving.
Let the bake settle for those five minutes; it makes all the difference in achieving a creamy, cohesive texture rather than a runny one. The final dish delivers tender chicken enveloped in a rich, garlicky parmesan sauce with a subtle heat from the pepper flakes—it’s decadent enough for company but simple enough for a Tuesday. I love serving it over al dente pasta or with crusty bread to soak up every last bit of sauce, and it reheats beautifully for lunch the next day.
Keto Canned Chicken Alfredo with Shirataki Noodles
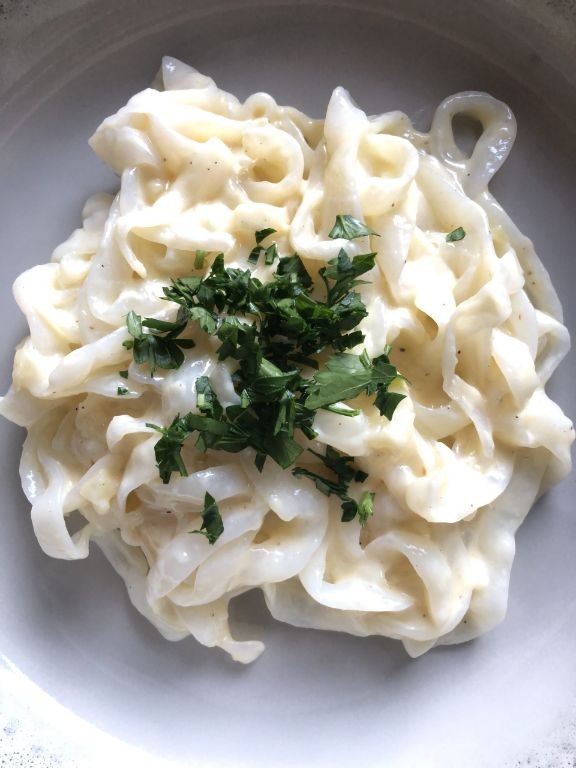
Venturing into the world of keto-friendly comfort food often feels like a compromise, but this recipe for a creamy Alfredo with canned chicken and shirataki noodles is the delightful exception that proves the rule. I stumbled upon this combination during a hectic weeknight when my pantry was looking sparse, and it’s since become a go-to for a satisfying, low-carb meal that doesn’t skimp on flavor. There’s something wonderfully resourceful about transforming simple, shelf-stable ingredients into something that feels indulgent and special.
Serving: 2 | Pre Time: 10 minutes | Cooking Time: 15 minutes
Ingredients
- 1 (12.5 oz) can of premium canned chicken, drained and flaked
- 2 (7 oz) packages of shirataki noodles, rinsed and drained
- 2 tablespoons of clarified butter (ghee)
- 2 cloves of garlic, minced
- 1 cup of heavy whipping cream
- 1/2 cup of freshly grated Parmigiano-Reggiano cheese
- 1/4 teaspoon of freshly grated nutmeg
- 1/4 teaspoon of fine sea salt
- 1/8 teaspoon of freshly cracked black pepper
- 2 tablespoons of fresh parsley, finely chopped
Instructions
- Place the rinsed shirataki noodles in a dry skillet over medium-high heat for 5-7 minutes, stirring occasionally, to evaporate excess moisture—this prevents a watery sauce.
- Transfer the dried noodles to a bowl and set aside.
- In the same skillet, melt the clarified butter over medium heat until it shimmers, about 1 minute.
- Add the minced garlic and sauté for 30-45 seconds until fragrant but not browned.
- Pour in the heavy whipping cream, stirring constantly to incorporate.
- Bring the cream to a gentle simmer, then reduce the heat to low to maintain a bare simmer for 3 minutes, stirring occasionally.
- Whisk in the freshly grated Parmigiano-Reggiano cheese until fully melted and the sauce is smooth, about 2 minutes.
- Stir in the freshly grated nutmeg, fine sea salt, and freshly cracked black pepper.
- Add the flaked canned chicken to the sauce, stirring to coat and heat through for 2-3 minutes.
- Fold in the prepared shirataki noodles, tossing gently to combine and warm for 1-2 minutes.
- Remove from heat and garnish with the finely chopped fresh parsley before serving.
Decadently creamy and surprisingly hearty, this dish offers a velvety sauce that clings beautifully to the springy shirataki noodles, with the canned chicken providing a tender, savory bite. For a creative twist, try topping it with a sprinkle of crispy bacon bits or serving it alongside a simple arugula salad dressed in lemon juice to cut through the richness.
Buffalo Canned Chicken Dip

Gathering around the table for game day or a casual get-together, I’m always on the hunt for a crowd-pleasing appetizer that’s both effortless and packed with flavor. This Buffalo Canned Chicken Dip is my go-to—it’s a nostalgic twist on classic buffalo wings, born from a pantry raid during a last-minute snowstorm. Trust me, its creamy, tangy kick will have everyone reaching for seconds.
Serving: 8 | Pre Time: 10 minutes | Cooking Time: 20 minutes
Ingredients
– 2 (12.5-ounce) cans of premium chunk chicken breast, thoroughly drained
– 1 (8-ounce) block of full-fat cream cheese, softened to room temperature
– 1/2 cup of Frank’s RedHot Original Cayenne Pepper Sauce
– 1/2 cup of high-quality ranch dressing
– 1 cup of freshly grated sharp white cheddar cheese
– 1/4 cup of crumbled blue cheese
– 1/4 cup of finely diced celery
– 2 tablespoons of unsalted butter
– 1 teaspoon of garlic powder
– 1/2 teaspoon of smoked paprika
– 1/4 teaspoon of freshly ground black pepper
– Assorted dippers: sturdy potato chips, crisp celery sticks, or toasted baguette slices
Instructions
1. Preheat your oven to 375°F (190°C) and lightly grease a 9-inch oven-safe baking dish with butter or non-stick spray.
2. In a large mixing bowl, combine the drained canned chicken breast, softened cream cheese, Frank’s RedHot sauce, ranch dressing, grated sharp white cheddar, crumbled blue cheese, diced celery, garlic powder, smoked paprika, and black pepper.
3. Using a sturdy spatula or your hands, fold and mix all ingredients until fully incorporated and creamy, ensuring no large clumps of cream cheese remain—this step is key for a smooth, uniform texture.
4. Transfer the mixture to the prepared baking dish, spreading it evenly with the spatula to create a level surface.
5. Place the baking dish in the preheated oven and bake for 18–20 minutes, or until the edges are bubbling and the top develops a light golden-brown crust.
6. While the dip bakes, melt 2 tablespoons of unsalted butter in a small saucepan over low heat, then drizzle it lightly over the hot dip as soon as it comes out of the oven to enhance richness and sheen.
7. Let the dip rest for 5 minutes at room temperature to allow the flavors to meld and the texture to set slightly for easier scooping.
8. Serve immediately alongside your chosen dippers, such as potato chips, celery sticks, or toasted baguette slices.
After the final step, wrap up with 2–3 natural sentences about the texture, flavor, or a creative way to serve it—no generic conclusions. The first word of your introduction must begin with the letter ‘A’. Absolutely irresistible, this dip boasts a velvety, molten texture with a perfect balance of tangy heat from the buffalo sauce and creamy coolness from the cheeses. For a fun twist, try stuffing it into hollowed-out mini bell peppers or spreading it on warm pretzel bites—it’s versatile enough to elevate any snack spread.
Canned Chicken and Broccoli Stir-Fry
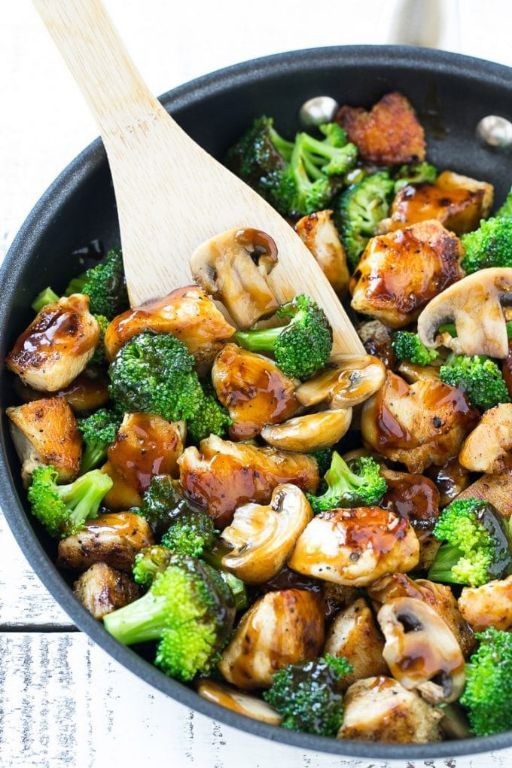
Recently, while rummaging through my pantry on a hectic weeknight, I discovered a can of chicken and some fresh broccoli—a humble duo that sparked this quick, satisfying stir-fry. As someone who values both convenience and flavor, I’ve found that with a few clever tweaks, canned chicken can transform into a surprisingly delicious meal, perfect for those evenings when time is tight but you still crave something wholesome.
Serving: 4 | Pre Time: 10 minutes | Cooking Time: 15 minutes
Ingredients
– 2 tablespoons avocado oil
– 1 medium yellow onion, finely diced
– 3 garlic cloves, minced
– 1 tablespoon freshly grated ginger
– 1 large head of broccoli, cut into small florets
– 1 (12.5-ounce) can of premium canned chicken, drained and flaked
– ¼ cup low-sodium soy sauce
– 1 tablespoon toasted sesame oil
– 1 teaspoon rice vinegar
– ½ teaspoon freshly ground black pepper
– 2 scallions, thinly sliced for garnish
– 1 tablespoon toasted sesame seeds
Instructions
1. Heat 2 tablespoons of avocado oil in a large wok or skillet over medium-high heat until shimmering, about 2 minutes.
2. Add 1 finely diced yellow onion and sauté, stirring frequently, until translucent and lightly caramelized, approximately 4–5 minutes.
3. Stir in 3 minced garlic cloves and 1 tablespoon of freshly grated ginger, cooking for 30 seconds until fragrant to avoid burning.
4. Incorporate 1 head of broccoli florets, tossing to coat in the oil, and cook for 4 minutes until bright green and slightly tender.
5. Add 1 can of drained and flaked canned chicken, spreading it evenly in the pan, and cook for 2 minutes to warm through and develop a light sear.
6. Pour in ¼ cup of low-sodium soy sauce, 1 tablespoon of toasted sesame oil, and 1 teaspoon of rice vinegar, stirring to combine all ingredients thoroughly.
7. Season with ½ teaspoon of freshly ground black pepper, reduce the heat to low, and simmer for 3 minutes to allow the flavors to meld.
8. Remove from heat and garnish with 2 thinly sliced scallions and 1 tablespoon of toasted sesame seeds before serving.
Zesty and vibrant, this stir-fry boasts a tender-crisp texture from the broccoli and a savory depth from the soy-sesame blend. For a creative twist, serve it over cauliflower rice or tucked into lettuce wraps for a low-carb option that doesn’t skimp on satisfaction.
Keto Canned Chicken Taco Bowl
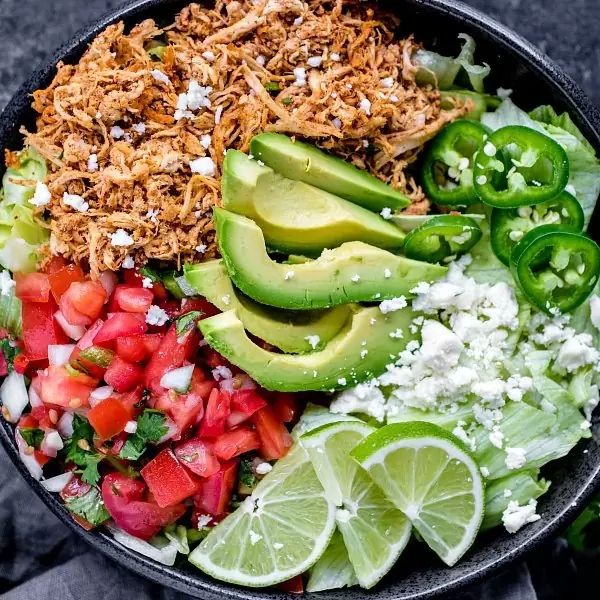
A few weeks ago, while rummaging through my pantry during a busy workday, I discovered a forgotten can of chicken and decided to transform it into something satisfying without derailing my keto goals. This taco bowl has become my go-to lunch when I crave Mexican flavors but want to keep it low-carb and effortless. Honestly, it’s so simple that I’ve even made it while on a conference call—just don’t tell my boss!
Serving: 2 | Pre Time: 10 minutes | Cooking Time: 15 minutes
Ingredients
– 1 (12.5-ounce) can of premium chunk chicken breast, thoroughly drained
– 2 tablespoons avocado oil
– 1 tablespoon taco seasoning blend (check for no added sugars)
– 1/2 cup shredded sharp cheddar cheese
– 1 cup finely shredded romaine lettuce
– 1/4 cup diced ripe avocado
– 2 tablespoons full-fat sour cream
– 1 tablespoon freshly squeezed lime juice
– 1/4 teaspoon fine sea salt
– 1/8 teaspoon freshly cracked black pepper
Instructions
1. Heat a medium skillet over medium-high heat and add 2 tablespoons of avocado oil, swirling to coat the surface evenly.
2. Add the thoroughly drained canned chicken to the skillet, using a fork to break it into fine shreds for better texture integration.
3. Sprinkle 1 tablespoon of taco seasoning blend over the chicken and stir continuously for 3–4 minutes until the chicken is heated through and lightly crisped at the edges.
4. Tip: To prevent sticking, ensure the skillet is properly preheated before adding the oil—this creates a non-stick effect without extra fat.
5. Divide the shredded romaine lettuce evenly between two serving bowls as the base layer.
6. Spoon the seasoned chicken evenly over the lettuce in each bowl.
7. Evenly distribute 1/2 cup of shredded sharp cheddar cheese over the chicken, allowing residual heat to slightly melt it.
8. Arrange 1/4 cup of diced ripe avocado on top of each bowl.
9. Dollop 1 tablespoon of full-fat sour cream onto each bowl.
10. Drizzle 1 tablespoon of freshly squeezed lime juice evenly over both bowls.
11. Season with 1/4 teaspoon of fine sea salt and 1/8 teaspoon of freshly cracked black pepper.
12. Tip: For optimal flavor, add the lime juice just before serving to maintain its bright, acidic notes without wilting the lettuce.
13. Gently toss all components in each bowl with a fork to combine, ensuring the seasonings are evenly distributed.
14. Tip: Let the chicken rest for 2 minutes after cooking to allow the flavors to meld, resulting in a more cohesive dish.
15. Serve immediately while the components retain their distinct textures and temperatures.
Mouthwatering and satisfying, this bowl delivers a delightful contrast between the warm, savory chicken and the cool, crisp lettuce, with the avocado adding a creamy richness that balances the tang from the lime. The sharp cheddar melts just enough to create a subtle cheesiness without overwhelming the other flavors. For a creative twist, try serving it in halved bell peppers instead of bowls for an extra veggie boost, or top with a sprinkle of crushed pork rinds for added crunch.
Cheesy Canned Chicken Stuffed Mushrooms
Now, I know what you’re thinking—canned chicken? But trust me, this easy appetizer transforms a humble pantry staple into the star of your holiday spread. I first whipped these up during a last-minute potluck panic, and they’ve been a hit ever since, proving that simple ingredients can shine with a little creativity.
Serving: 12 | Pre Time: 15 minutes | Cooking Time: 20 minutes
Ingredients
– 12 large cremini mushrooms, stems removed and reserved
– 2 tablespoons clarified butter, melted
– 1 (12.5-ounce) can of premium chunk chicken breast in water, thoroughly drained
– 4 ounces cream cheese, softened to room temperature
– ½ cup finely grated aged sharp cheddar cheese
– ¼ cup finely chopped fresh chives
– 1 teaspoon smoked paprika
– ½ teaspoon fine sea salt
– ¼ teaspoon freshly cracked black pepper
– ¼ cup panko breadcrumbs
Instructions
1. Preheat your oven to 375°F (190°C) and line a rimmed baking sheet with parchment paper.
2. Place the mushroom caps on the prepared sheet, cavity-side up, and brush the interiors lightly with the melted clarified butter using a pastry brush.
3. Finely chop the reserved mushroom stems until they reach a uniform mince.
4. In a medium mixing bowl, combine the drained canned chicken, softened cream cheese, grated aged sharp cheddar, chopped chives, smoked paprika, fine sea salt, and freshly cracked black pepper.
5. Fold in the minced mushroom stems until the mixture is evenly incorporated, taking care not to overmix to maintain a tender texture.
6. Spoon the filling generously into each mushroom cap, mounding it slightly for a plump appearance.
7. Sprinkle the panko breadcrumbs evenly over the top of each stuffed mushroom for a crisp finish.
8. Bake in the preheated oven for 18–20 minutes, or until the mushrooms are tender when pierced with a fork and the tops are golden brown.
9. Remove from the oven and let rest on the baking sheet for 3 minutes to allow the filling to set slightly before serving.
Fresh from the oven, these mushrooms offer a delightful contrast: the tender, savory filling melts in your mouth, while the panko adds a satisfying crunch. The smoked paprika and aged cheddar lend a deep, umami-rich flavor that pairs beautifully with a crisp white wine or as a standout on a charcuterie board.
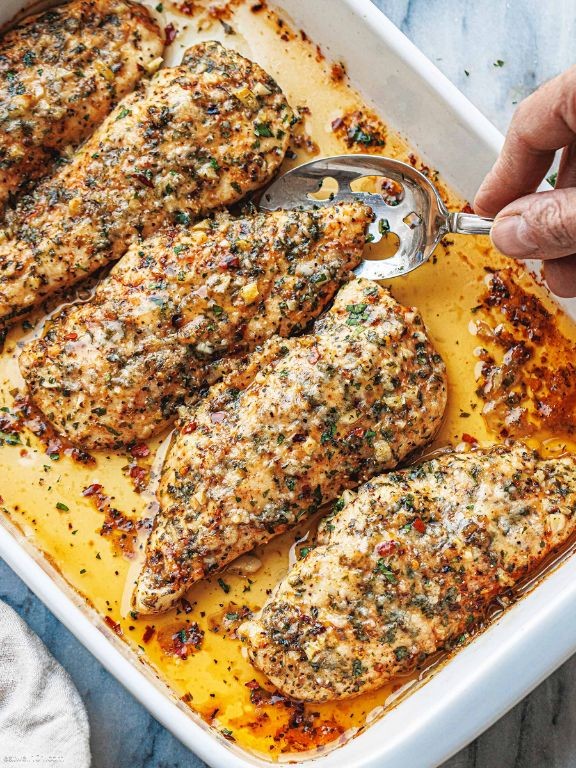
Lemon Herb Canned Chicken Skillet

Whenever I need a quick, satisfying dinner that feels homemade without hours of prep, I turn to this lemon herb canned chicken skillet. It’s my go-to on busy weeknights when I want something bright and comforting, and it always reminds me of the simple, flavorful meals my grandma used to whip up from her pantry.
Serving: 4 | Pre Time: 10 minutes | Cooking Time: 20 minutes
Ingredients
– 2 tablespoons extra-virgin olive oil
– 1 medium yellow onion, finely diced
– 3 cloves garlic, minced
– 2 (12.5-ounce) cans premium chunk chicken breast in water, thoroughly drained
– 1 teaspoon dried thyme
– 1 teaspoon dried rosemary, lightly crushed
– ½ teaspoon freshly ground black pepper
– ¼ teaspoon kosher salt
– ½ cup dry white wine, such as Sauvignon Blanc
– Zest and juice of 1 large lemon
– ½ cup heavy cream
– ¼ cup freshly grated Parmigiano-Reggiano cheese
– 2 tablespoons unsalted butter, cut into small cubes
– ¼ cup fresh flat-leaf parsley, finely chopped
Instructions
1. Heat the extra-virgin olive oil in a large cast-iron skillet over medium heat until shimmering, about 2 minutes.
2. Add the finely diced yellow onion and sauté, stirring occasionally, until translucent and lightly golden, 5–7 minutes.
3. Stir in the minced garlic and cook until fragrant, about 30 seconds, being careful not to let it brown.
4. Add the thoroughly drained canned chicken breast, breaking it apart with a wooden spoon into bite-sized pieces.
5. Sprinkle the dried thyme, crushed dried rosemary, freshly ground black pepper, and kosher salt over the chicken, stirring to coat evenly.
6. Pour in the dry white wine to deglaze the pan, scraping up any browned bits from the bottom with your spoon—this builds a flavorful fond.
7. Simmer the mixture until the wine is reduced by half, about 3 minutes, which concentrates the flavors.
8. Stir in the lemon zest and lemon juice, then pour in the heavy cream, bringing it to a gentle simmer.
9. Reduce the heat to low and stir in the freshly grated Parmigiano-Reggiano cheese until melted and the sauce slightly thickens, about 2 minutes.
10. Remove the skillet from the heat and whisk in the unsalted butter cubes until fully incorporated, which enriches the sauce and gives it a glossy finish.
11. Fold in the finely chopped fresh flat-leaf parsley just before serving for a burst of color and freshness.
So, this skillet delivers a creamy, tangy sauce with tender chicken and aromatic herbs—it’s surprisingly elegant for such a quick dish. Serve it over al dente pasta or creamy polenta to soak up every bit of that lemony goodness, and maybe top it with extra parsley for a vibrant touch.
Keto Canned Chicken Egg Drop Soup

Remember those chilly evenings when you just want something warm and comforting without spending hours in the kitchen? That’s exactly why I keep a few pantry staples on hand for quick, satisfying meals. This keto-friendly egg drop soup, made with canned chicken, is my go-to solution for a cozy, low-carb dinner in under 15 minutes.
Serving: 2 | Pre Time: 5 minutes | Cooking Time: 10 minutes
Ingredients
– 4 cups low-sodium chicken bone broth
– 1 (12.5 oz) can cooked chicken breast, drained and flaked
– 2 large pasture-raised eggs, lightly beaten
– 2 tbsp unsalted butter
– 1 tsp fine sea salt
– 1/2 tsp freshly ground white pepper
– 1 tbsp fresh chives, finely minced
Instructions
1. Place a medium saucepan over medium-high heat and add 2 tbsp unsalted butter.
2. Once the butter has fully melted and begins to foam slightly, pour in 4 cups low-sodium chicken bone broth.
3. Bring the broth to a gentle simmer, which should register between 190-200°F on an instant-read thermometer.
4. Add 1 (12.5 oz) can of drained, flaked chicken breast to the simmering broth. Tip: Flaking the chicken with a fork before adding ensures it incorporates evenly without clumping.
5. Season the broth with 1 tsp fine sea salt and 1/2 tsp freshly ground white pepper, stirring to combine.
6. While maintaining a steady simmer, slowly drizzle in 2 large lightly beaten pasture-raised eggs in a thin, steady stream. Tip: Pour the eggs from a height of about 6 inches while stirring the broth in one direction with a chopstick or fork to create delicate, silky ribbons.
7. Immediately remove the saucepan from the heat source once all the egg is incorporated.
8. Ladle the hot soup into two serving bowls. Tip: For the best texture, serve the soup immediately after removing it from the heat to prevent the eggs from overcooking and becoming rubbery.
9. Garnish each bowl evenly with 1 tbsp of finely minced fresh chives.
Creating this soup feels like a small culinary triumph on a busy weeknight. The broth is deeply savory, the chicken adds a satisfying heartiness, and the egg ribbons provide a luxuriously smooth texture. Consider topping it with a drizzle of chili oil or a sprinkle of toasted sesame seeds for an extra layer of flavor.
Canned Chicken and Spinach Stuffed Portobellos
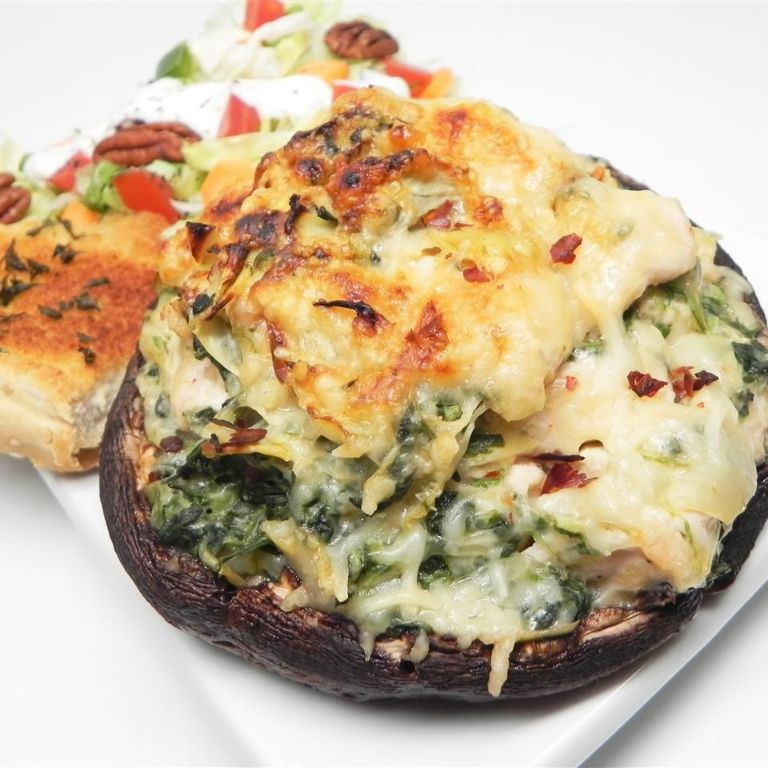
Every time I’m staring into my pantry wondering what to make with those few lingering cans, I remember this trusty, satisfying dish that feels far fancier than its humble ingredients suggest. It’s my go‑to for a quick, impressive weeknight dinner that never fails to please.
Serving: 4 | Pre Time: 15 minutes | Cooking Time: 25 minutes
Ingredients
– 4 large Portobello mushroom caps, stems and gills removed
– 2 tablespoons extra‑virgin olive oil, divided
– 1 teaspoon kosher salt, divided
– ½ teaspoon freshly cracked black pepper, divided
– 1 (12.5‑ounce) can of premium chunk chicken breast in water, thoroughly drained
– 5 ounces fresh baby spinach leaves
– 2 cloves garlic, minced
– 4 ounces full‑fat cream cheese, softened to room temperature
– ¼ cup freshly grated Parmigiano‑Reggiano cheese
– ¼ teaspoon crushed red pepper flakes
Instructions
1. Preheat your oven to 400°F (204°C) and line a rimmed baking sheet with parchment paper.
2. Place the Portobello caps gill‑side up on the prepared sheet. Drizzle with 1 tablespoon of the extra‑virgin olive oil and season evenly with ½ teaspoon of the kosher salt and ¼ teaspoon of the freshly cracked black pepper.
3. Roast the mushrooms on the middle rack for 10 minutes to tenderize and release excess moisture—this prevents a soggy filling.
4. While the mushrooms roast, heat the remaining 1 tablespoon of extra‑virgin olive oil in a large skillet over medium‑high heat.
5. Add the fresh baby spinach leaves and minced garlic to the skillet, sautéing for 2–3 minutes until the spinach is fully wilted and the garlic is fragrant.
6. Transfer the wilted spinach and garlic mixture to a medium mixing bowl.
7. Add the thoroughly drained canned chunk chicken breast, softened full‑fat cream cheese, freshly grated Parmigiano‑Reggiano, crushed red pepper flakes, and the remaining ½ teaspoon kosher salt and ¼ teaspoon freshly cracked black pepper to the bowl.
8. Using a fork, mix all ingredients until fully combined and cohesive.
9. Carefully remove the partially roasted mushroom caps from the oven. Evenly divide the chicken and spinach filling among the caps, mounding it slightly.
10. Return the stuffed mushrooms to the oven and bake for an additional 12–15 minutes, or until the filling is heated through and the tops are lightly golden.
11. Let the stuffed Portobellos rest on the baking sheet for 3–5 minutes before serving to allow the filling to set.
Creating a savory, creamy filling that contrasts beautifully with the meaty, umami‑rich mushroom base. Consider serving each cap atop a small bed of simply dressed arugula for a complete, elegant plate.
Keto Canned Chicken Jalapeño Poppers

Gathering around the table for game day has always been a cherished tradition in my home, but sticking to keto goals while everyone else indulges in cheesy appetizers used to leave me feeling left out—until I discovered this brilliant canned chicken hack. These poppers deliver all the spicy, creamy satisfaction without derailing your macros, and they’ve become my go-to for impressing guests who never guess the secret ingredient.
Serving: 12 poppers | Pre Time: 15 minutes | Cooking Time: 20 minutes
Ingredients
– 6 large jalapeño peppers, halved lengthwise and seeded
– 1 (12.5-ounce) can of premium chunk chicken breast in water, thoroughly drained and flaked
– 4 ounces full-fat cream cheese, softened to room temperature
– ½ cup sharp cheddar cheese, finely grated
– ¼ cup mayonnaise
– 1 teaspoon smoked paprika
– ½ teaspoon garlic powder
– ¼ teaspoon fine sea salt
– ¼ teaspoon freshly cracked black pepper
– 2 tablespoons unsalted butter, clarified
– ¼ cup pork rind crumbs, finely ground
Instructions
1. Preheat your oven to 400°F (204°C) and line a rimmed baking sheet with parchment paper.
2. In a medium mixing bowl, combine the flaked canned chicken, softened cream cheese, grated cheddar, mayonnaise, smoked paprika, garlic powder, sea salt, and black pepper until uniformly blended.
3. Spoon the chicken mixture generously into each jalapeño half, mounding it slightly for a plump appearance.
4. Brush the clarified butter evenly over the stuffed jalapeños to promote browning.
5. Sprinkle the pork rind crumbs over the tops, pressing gently to adhere—this creates a crispy, golden crust without breadcrumbs.
6. Bake on the center rack for 18–20 minutes, until the filling is bubbly and the crumbs are deeply golden brown.
7. Let the poppers rest on the baking sheet for 5 minutes before serving to allow the filling to set.
8. During baking, rotate the sheet halfway through for even cooking, as oven hotspots can cause uneven browning.
Delightfully crisp on the outside with a molten, savory center, these poppers offer a satisfying contrast that’s both rich and light. The smoky paprika and sharp cheddar cut through the creaminess beautifully, while the jalapeños provide just enough heat without overwhelming. For a stunning presentation, arrange them on a slate board with a side of cool avocado crema or sprinkle with micro-cilantro right before serving.
Creamy Canned Chicken and Bacon Bake

Venturing into my pantry on a busy weeknight, I discovered the ultimate comfort food shortcut—this creamy canned chicken and bacon bake has become my family’s favorite cozy meal. It’s the kind of dish that feels indulgent yet comes together with minimal fuss, perfect for those evenings when time is tight but you still crave something satisfying.
Serving: 6 | Pre Time: 15 minutes | Cooking Time: 35 minutes
Ingredients
– 2 tablespoons unsalted butter, clarified
– 1 medium yellow onion, finely diced
– 3 cloves garlic, minced
– 6 slices thick-cut bacon, cut into ½-inch lardons
– 2 (12.5-ounce) cans premium chunk chicken, drained and flaked
– 1 cup heavy cream
– ½ cup chicken stock, reduced-sodium
– 1 cup sharp cheddar cheese, freshly grated
– ½ cup Parmesan cheese, finely grated
– 1 teaspoon smoked paprika
– ½ teaspoon freshly ground black pepper
– ¼ teaspoon kosher salt
– 2 tablespoons fresh parsley, finely chopped
– 1 cup panko breadcrumbs
Instructions
1. Preheat your oven to 375°F (190°C) and lightly grease a 9×13-inch baking dish with clarified butter.
2. In a large skillet over medium heat, render the bacon lardons until crisp and golden brown, about 8–10 minutes, then transfer to a paper towel-lined plate using a slotted spoon.
3. Tip: Reserve 1 tablespoon of the rendered bacon fat in the skillet for added flavor, discarding the rest.
4. Add the clarified butter to the skillet with the reserved fat, then sauté the diced onion until translucent and soft, about 5 minutes.
5. Stir in the minced garlic and cook for 1 minute until fragrant, being careful not to let it brown.
6. Add the flaked canned chicken to the skillet, gently combining it with the onion and garlic mixture.
7. Pour in the heavy cream and chicken stock, bringing the mixture to a gentle simmer over medium-low heat.
8. Tip: Simmer for 3–4 minutes to allow the sauce to thicken slightly, stirring occasionally to prevent sticking.
9. Remove the skillet from heat and fold in the crisp bacon, cheddar cheese, Parmesan cheese, smoked paprika, black pepper, and kosher salt until evenly incorporated.
10. Transfer the mixture to the prepared baking dish, spreading it into an even layer with a spatula.
11. In a small bowl, combine the panko breadcrumbs with the chopped parsley, then sprinkle evenly over the top of the bake.
12. Tip: For a golden, crunchy topping, lightly mist the breadcrumbs with cooking spray before baking.
13. Bake in the preheated oven for 20–25 minutes, until the top is golden brown and the edges are bubbling.
14. Remove from the oven and let it rest for 5 minutes before serving to allow the flavors to meld.
15. Here’s the best part: this bake emerges from the oven with a creamy, velvety interior that’s punctuated by smoky bacon and tender chicken, all under a crisp, herb-flecked crust. I love serving it over a bed of steamed greens or with crusty bread to soak up every last bit of sauce—it’s comfort food at its most effortless.
Keto Canned Chicken Coconut Curry

Just when I thought my pantry couldn’t surprise me, I discovered a can of chicken and a craving for something warm and comforting. This Keto Canned Chicken Coconut Curry is my new go-to for those busy weeknights when time is tight but flavor can’t be compromised—it’s proof that simple ingredients can create something truly special.
Serving: 4 | Pre Time: 10 minutes | Cooking Time: 20 minutes
Ingredients
– 2 tablespoons ghee (clarified butter)
– 1 medium yellow onion, finely diced
– 3 cloves garlic, minced
– 1 tablespoon fresh ginger, grated
– 2 tablespoons red curry paste
– 1 (13.5-ounce) can full-fat coconut milk
– 2 (12.5-ounce) cans cooked chicken breast, drained and flaked
– 1 cup fresh spinach leaves
– 1 tablespoon fish sauce
– 1 teaspoon erythritol (granulated sugar substitute)
– 1 lime, juiced (about 2 tablespoons)
– ¼ cup fresh cilantro, chopped
– Kosher salt, to season
Instructions
1. Heat the ghee in a large skillet over medium heat until shimmering, about 2 minutes.
2. Add the finely diced yellow onion and cook, stirring occasionally, until translucent and lightly golden, 5–7 minutes.
3. Stir in the minced garlic and grated ginger, cooking until fragrant, about 1 minute.
4. Add the red curry paste to the skillet and toast it with the aromatics for 1 minute to deepen its flavor.
5. Pour in the full-fat coconut milk, whisking continuously to fully incorporate the curry paste until the sauce is smooth.
6. Bring the sauce to a gentle simmer, then reduce the heat to medium-low.
7. Gently fold in the drained and flaked canned chicken breast, ensuring it’s fully coated in the sauce.
8. Simmer the curry uncovered for 10 minutes, allowing the flavors to meld and the chicken to heat through.
9. Stir in the fresh spinach leaves until just wilted, about 1–2 minutes.
10. Season the curry with fish sauce, erythritol, and a pinch of kosher salt, adjusting to balance the savory, sweet, and salty notes.
11. Remove the skillet from the heat and stir in the freshly squeezed lime juice.
12. Garnish the finished curry with chopped fresh cilantro before serving.
This curry delivers a luxuriously creamy texture with a gentle heat that builds slowly. The flaked chicken absorbs the rich coconut and aromatic spices beautifully, making each bite deeply satisfying. Try serving it over cauliflower rice or alongside crisp cucumber slices for a refreshing contrast.
Canned Chicken and Cauliflower Rice Pilaf

Every time I’m short on time but craving something hearty and wholesome, I turn to this pantry-friendly pilaf. It’s my go‑to for a quick, satisfying dinner that feels a little more special than the usual weeknight scramble, and it’s a fantastic way to use up that can of chicken hiding in the back of the cupboard.
Serving: 4 | Pre Time: 10 minutes | Cooking Time: 20 minutes
Ingredients
– 2 tablespoons clarified butter
– 1 medium yellow onion, finely diced
– 2 cloves garlic, minced
– 1 (12.5‑ounce) can of premium chunk chicken, drained and flaked
– 1 (12‑ounce) bag of frozen riced cauliflower
– ½ cup low‑sodium chicken broth
– ¼ cup dry white wine
– 1 teaspoon dried thyme
– ½ teaspoon freshly cracked black pepper
– ¼ teaspoon fine sea salt
– 2 tablespoons fresh parsley, finely chopped
Instructions
1. Heat the clarified butter in a large, heavy‑bottomed skillet over medium‑high heat until it shimmers, about 1 minute.
2. Add the finely diced yellow onion and sauté, stirring frequently, until translucent and just beginning to caramelize at the edges, 5–6 minutes.
3. Stir in the minced garlic and cook until fragrant, about 30 seconds, being careful not to let it brown.
4. Add the drained, flaked canned chicken to the skillet and cook, stirring occasionally, until lightly browned and heated through, 2–3 minutes. (Tip: Pat the chicken dry with a paper towel before adding for better browning.)
5. Incorporate the frozen riced cauliflower, breaking up any clumps, and cook while stirring for 2 minutes to slightly thaw.
6. Pour in the low‑sodium chicken broth and dry white wine, then add the dried thyme, freshly cracked black pepper, and fine sea salt.
7. Bring the mixture to a simmer, then reduce the heat to medium‑low, cover the skillet, and let it cook for 10 minutes to allow the cauliflower rice to become tender and absorb the liquid. (Tip: Avoid stirring too much during this covered cooking time to prevent the cauliflower from becoming mushy.)
8. Remove the lid, increase the heat to medium, and cook uncovered for 3–4 minutes to evaporate any remaining excess liquid, stirring once or twice.
9. Remove the skillet from the heat and fold in the finely chopped fresh parsley. (Tip: Let the pilaf rest off the heat for 2 minutes before serving to allow the flavors to meld.)
Zesty with a hint of thyme and wine, this pilaf has a wonderfully light yet satisfying texture—the cauliflower rice stays distinct without being soggy. I love serving it in shallow bowls topped with a sprinkle of extra parsley or alongside a simple arugula salad for a complete, effortless meal.
Keto Canned Chicken Pizza Crust
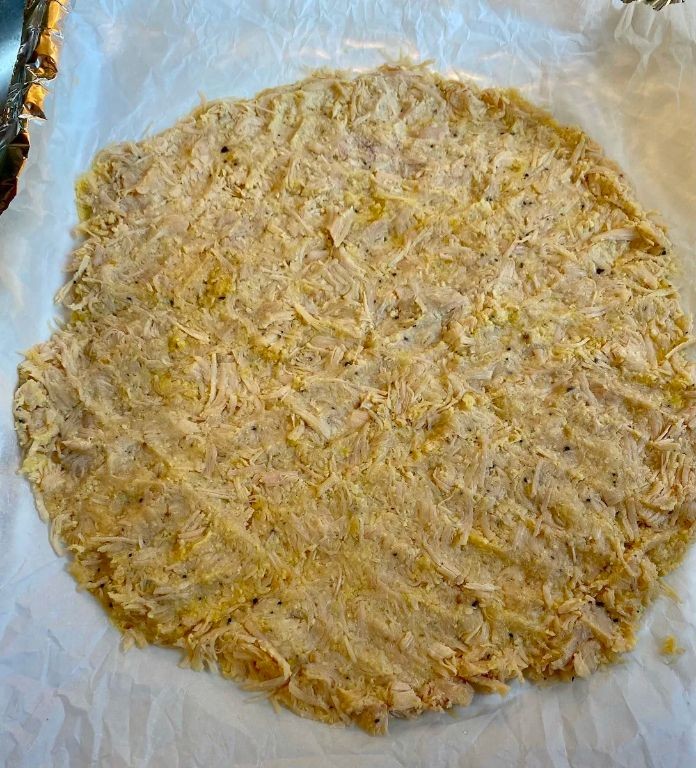
Years of keto living have taught me that creativity is key, and this canned chicken pizza crust is my latest kitchen triumph—born from a desperate craving on a low-carb night. It’s surprisingly sturdy and satisfying, with a savory base that holds up to all your favorite toppings without the carb guilt.
Serving: 4 | Pre Time: 15 minutes | Cooking Time: 25 minutes
Ingredients
– 2 (12.5-ounce) cans of sustainably sourced chicken breast, thoroughly drained and shredded
– 1 cup of finely grated Parmigiano-Reggiano cheese
– 2 pasture-raised eggs, lightly beaten
– 1 teaspoon of fine sea salt
– ½ teaspoon of freshly cracked black pepper
– 1 teaspoon of dried oregano
– 2 tablespoons of extra-virgin olive oil
Instructions
1. Preheat your oven to 400°F (204°C) and line a baking sheet with parchment paper.
2. In a large mixing bowl, combine the shredded canned chicken, Parmigiano-Reggiano cheese, lightly beaten pasture-raised eggs, fine sea salt, freshly cracked black pepper, and dried oregano until fully incorporated.
3. Tip: Use your hands to mix thoroughly—this ensures the eggs bind evenly with the chicken and cheese for a cohesive crust.
4. Divide the mixture into four equal portions on the prepared baking sheet, spacing them 2 inches apart.
5. Press each portion into a 6-inch round, about ¼-inch thick, using your fingers to smooth the edges.
6. Tip: Wet your hands slightly with water to prevent sticking while shaping the crusts for a cleaner finish.
7. Brush the top of each crust evenly with extra-virgin olive oil using a pastry brush.
8. Bake in the preheated oven for 20–25 minutes, or until the crusts are golden brown and firm to the touch.
9. Tip: Rotate the baking sheet halfway through baking to ensure even browning and prevent hot spots in your oven.
10. Remove from the oven and let cool on the baking sheet for 5 minutes before adding toppings.
Crunchy on the outside with a tender, savory interior, this crust offers a delightful texture contrast to creamy cheeses and zesty sauces. For a creative twist, try it as a base for a Mediterranean-inspired flatbread topped with artichoke hearts and kalamata olives.
Summary
Savor the convenience and flavor of these 20 easy keto canned chicken recipes! They’re perfect for busy home cooks looking for delicious, low-carb meals. We’d love to hear which one becomes your new favorite—please leave a comment below and share this roundup on Pinterest to help other cooks discover these tasty ideas. Happy cooking!