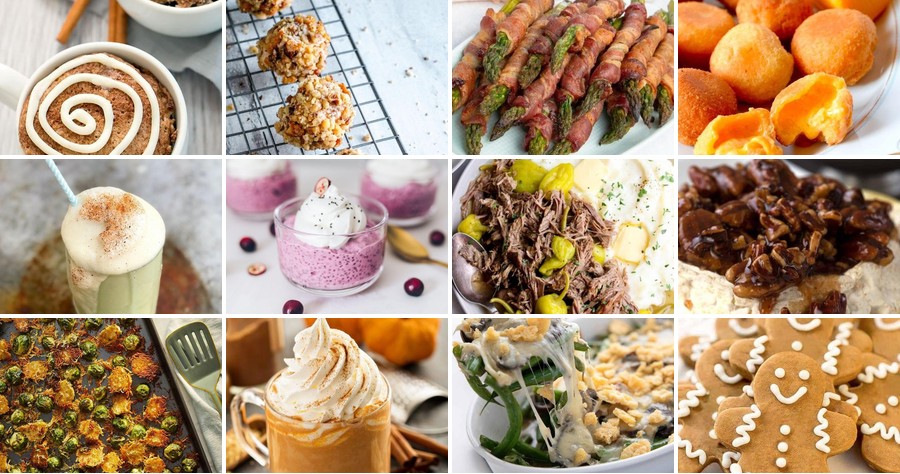
Unwrap the joy of a low-carb holiday with our 20 Festive Keto Christmas Recipes! Whether you’re hosting a gathering or cozying up at home, we’ve gathered delicious, guilt-free dishes that bring all the seasonal cheer without the sugar spike. From savory mains to sweet treats, get ready to make your celebrations merry and bright—let’s dive into these mouthwatering options!
Keto Christmas Cheese Ball with Almond Flour

Just as the quiet of a winter evening settles in, I find myself drawn to simple, comforting traditions. This keto cheese ball, with its nutty almond flour crust, feels like a gentle nod to holiday gatherings without the usual indulgence. It’s a small, thoughtful creation for sharing or savoring alone.
Serving: 8 | Pre Time: 15 minutes | Cooking Time: 0 minutes
Ingredients
– 8 ounces cream cheese, softened
– 1 cup shredded sharp cheddar cheese
– 1/4 cup chopped pecans
– 2 tablespoons unsalted butter, melted
– 1/2 cup almond flour
– 1/2 teaspoon garlic powder
– 1/4 teaspoon smoked paprika
– 1/4 teaspoon salt
Instructions
1. In a medium mixing bowl, combine 8 ounces of softened cream cheese and 1 cup of shredded sharp cheddar cheese using a hand mixer on low speed for 2 minutes, or until smooth and fully incorporated.
2. Add 1/2 teaspoon of garlic powder, 1/4 teaspoon of smoked paprika, and 1/4 teaspoon of salt to the cheese mixture, and mix on low for 30 seconds to distribute the spices evenly.
3. Tip: For easier shaping, chill the mixture in the refrigerator for 10 minutes if it feels too soft to handle.
4. Place 1/2 cup of almond flour in a shallow dish or plate for coating.
5. Shape the chilled cheese mixture into a ball using your hands, applying gentle pressure to form a compact sphere about 3 inches in diameter.
6. Brush the entire surface of the cheese ball with 2 tablespoons of melted unsalted butter using a pastry brush.
7. Roll the buttered cheese ball in the almond flour until it is fully and evenly coated, pressing lightly to help the flour adhere.
8. Tip: To prevent sticking, lightly oil your hands before shaping the ball.
9. Press 1/4 cup of chopped pecans onto the surface of the coated cheese ball, covering it completely for a textured finish.
10. Wrap the cheese ball tightly in plastic wrap and refrigerate for at least 1 hour to firm up before serving.
11. Tip: For best flavor, let the cheese ball sit at room temperature for 15 minutes after chilling to soften slightly.
Unexpectedly creamy inside with a crisp, nutty shell, this cheese ball offers a rich contrast that melts gently on the palate. Serve it alongside crisp celery sticks or keto-friendly crackers for a festive appetizer, or slice it into wedges to top a fresh green salad. Its savory depth, with hints of garlic and smoked paprika, makes it a versatile centerpiece for quiet holiday moments.
Low-Carb Bacon-Wrapped Asparagus
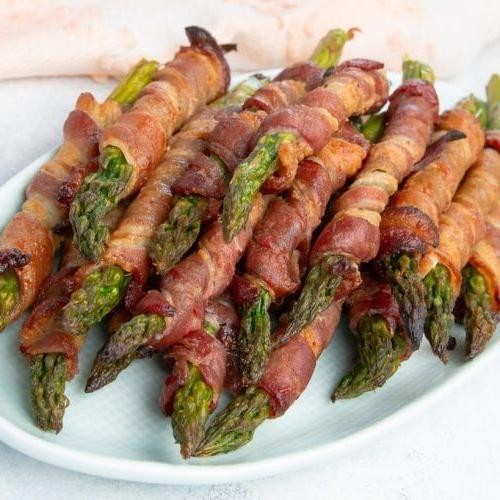
Kneeling before the oven’s warm glow, I find myself returning to this simple ritual each December evening—a quiet moment where crisp asparagus and smoky bacon transform into something greater than their parts. It’s a dish that feels both indulgent and nourishing, wrapping the season’s fleeting greens in a savory embrace, perfect for those seeking comfort without the carb-heavy sides. As the aroma fills the kitchen, I’m reminded how the smallest acts of preparation can anchor us in the present, turning a weeknight into a gentle celebration.
Serving: 4 | Pre Time: 10 minutes | Cooking Time: 20 minutes
Ingredients
– 1 pound fresh asparagus, trimmed
– 8 slices thick-cut bacon
– 2 tablespoons olive oil
– 1/2 teaspoon garlic powder
– 1/4 teaspoon black pepper
– 1/4 teaspoon sea salt
Instructions
1. Preheat your oven to 400°F and line a baking sheet with parchment paper.
2. Rinse 1 pound of fresh asparagus under cold water and pat dry thoroughly with paper towels to ensure crispiness.
3. Trim the tough ends from the asparagus by snapping each spear where it naturally breaks, discarding the woody bottoms.
4. Divide the asparagus into 8 equal bundles, each containing 4–5 spears.
5. Wrap 1 slice of thick-cut bacon snugly around the middle of each asparagus bundle, overlapping the ends slightly.
6. Place the wrapped bundles seam-side down on the prepared baking sheet, spacing them 1 inch apart.
7. Drizzle 2 tablespoons of olive oil evenly over the bundles.
8. Sprinkle 1/2 teaspoon of garlic powder, 1/4 teaspoon black pepper, and 1/4 teaspoon sea salt evenly across the bundles.
9. Bake at 400°F for 18–20 minutes, rotating the sheet halfway through, until the bacon is crispy and the asparagus is tender when pierced with a fork.
10. Remove from the oven and let rest for 3 minutes on the baking sheet to allow the bacon to crisp further.
Softly caramelized edges give way to tender-crisp asparagus beneath the bacon’s salty crunch, creating a delightful contrast in every bite. Serve these warm bundles alongside a creamy dip or atop a bed of mixed greens for a light, elegant appetizer that feels special yet effortlessly simple.
Keto Garlic Butter Roasted Turkey
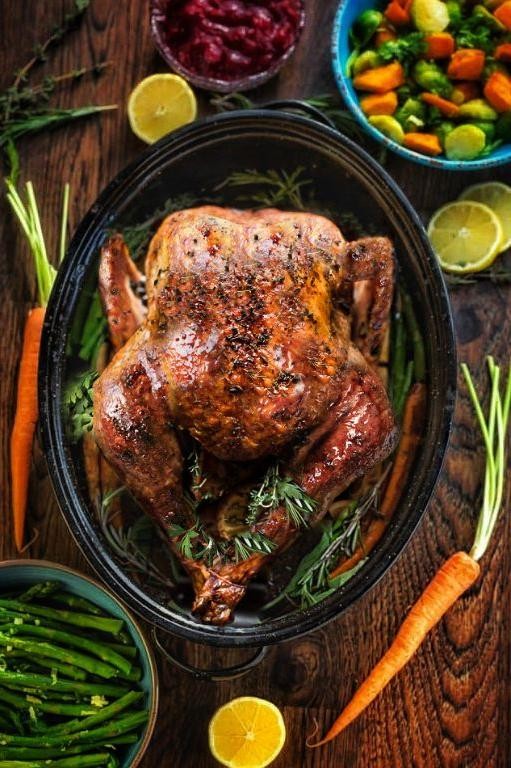
Flickering December light catches the kitchen window, and I find myself craving something both comforting and quietly celebratory—a centerpiece that feels indulgent yet aligns with a simpler way of eating. This roasted turkey, bathed in garlic and butter, is that quiet promise of warmth. It’s a dish for turning down the noise and savoring the slow, savory process itself.
Serving: 8 | Pre Time: 20 minutes | Cooking Time: 3 hours
Ingredients
– 1 (12-pound) whole turkey, thawed
– 1 cup unsalted butter, softened
– 8 cloves garlic, minced
– 2 tbsp fresh rosemary, finely chopped
– 1 tbsp fresh thyme, finely chopped
– 2 tsp kosher salt
– 1 tsp black pepper
– 1 cup chicken broth
Instructions
1. Preheat your oven to 325°F and position a rack in the lower third.
2. Pat the entire surface of the turkey completely dry with paper towels; this is crucial for crispy skin.
3. In a medium bowl, combine the softened butter, minced garlic, chopped rosemary, chopped thyme, kosher salt, and black pepper until a uniform herb butter forms.
4. Carefully loosen the skin over the turkey breast and thighs by gently sliding your fingers underneath it.
5. Spread about two-thirds of the herb butter directly onto the turkey meat under the loosened skin, massaging it evenly across the breast and thighs.
6. Rub the remaining one-third of the herb butter all over the outside of the turkey skin.
7. Place the turkey, breast-side up, on a rack set inside a large roasting pan.
8. Pour the chicken broth into the bottom of the roasting pan, not over the turkey, to create steam and prevent the drippings from burning.
9. Roast the turkey at 325°F for approximately 3 hours, or until a meat thermometer inserted into the thickest part of the thigh reads 165°F.
10. Baste the turkey with the pan juices every 45 minutes to keep the skin moist and flavorful.
11. Once the internal temperature reaches 165°F, remove the turkey from the oven and tent it loosely with aluminum foil.
12. Let the turkey rest for 30 minutes before carving to allow the juices to redistribute.
You’ll find the skin crisped to a perfect golden-brown, shattering delicately to reveal impossibly juicy, garlic-infused meat beneath. The aroma of rosemary and thyme lingers in the kitchen, a quiet herald of a meal meant to be shared slowly, perhaps with a simple side of roasted vegetables to soak up the glorious pan juices.
Cauliflower Mash with Cream Cheese
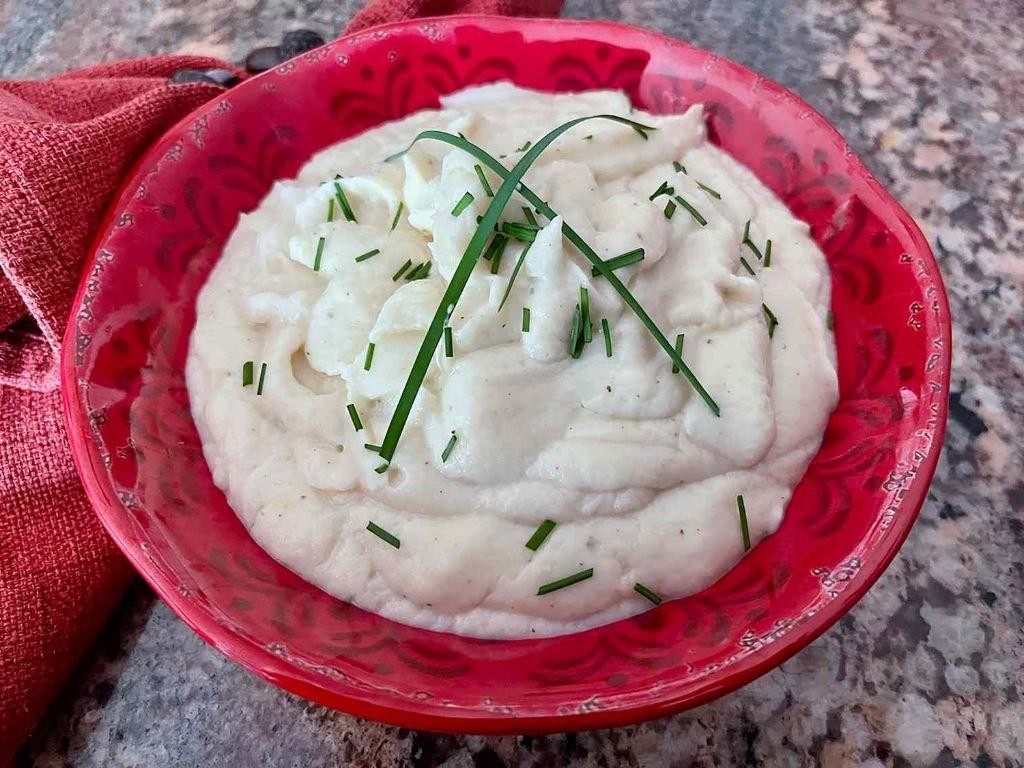
Sometimes, the simplest dishes offer the deepest comfort, especially on a quiet evening when the world outside feels a bit too loud. This creamy cauliflower mash, gently folded with cream cheese, transforms humble vegetables into a velvety, satisfying side that feels both nourishing and indulgent. It’s the kind of recipe that asks for little but gives so much in return, a quiet celebration of texture and subtle flavor.
Serving: 4 | Pre Time: 10 minutes | Cooking Time: 25 minutes
Ingredients
– 1 large head cauliflower, cut into florets
– 4 ounces cream cheese, softened
– 3 tablespoons unsalted butter
– 1/4 cup whole milk
– 1/2 teaspoon kosher salt
– 1/4 teaspoon freshly ground black pepper
Instructions
1. Place the cauliflower florets in a large pot and add enough water to cover them by 1 inch.
2. Bring the water to a boil over high heat, then reduce the heat to medium and simmer the cauliflower for 15-20 minutes, or until the florets are very tender when pierced with a fork.
3. Drain the cauliflower thoroughly in a colander, letting it sit for 2 minutes to release excess steam and moisture—this prevents a watery mash.
4. Transfer the drained cauliflower to a food processor or a large bowl if using a potato masher.
5. Add the softened cream cheese, unsalted butter, whole milk, kosher salt, and freshly ground black pepper to the cauliflower.
6. Process or mash the mixture on high speed for 1-2 minutes, scraping down the sides once, until completely smooth and creamy; for a chunkier texture, pulse briefly instead.
7. Taste the mash and adjust the seasoning with a pinch more salt if needed, but avoid over-processing to maintain a light consistency.
8. Transfer the mash to a serving bowl and serve immediately while warm.
Just as it settles on the plate, this mash reveals a luxuriously smooth texture that holds its shape without being heavy, with the cream cheese lending a subtle tang that balances the cauliflower’s natural sweetness. For a creative twist, try topping it with crispy fried shallots or a drizzle of truffle oil to elevate its comforting profile into something special for a holiday meal.
Keto Green Bean Casserole
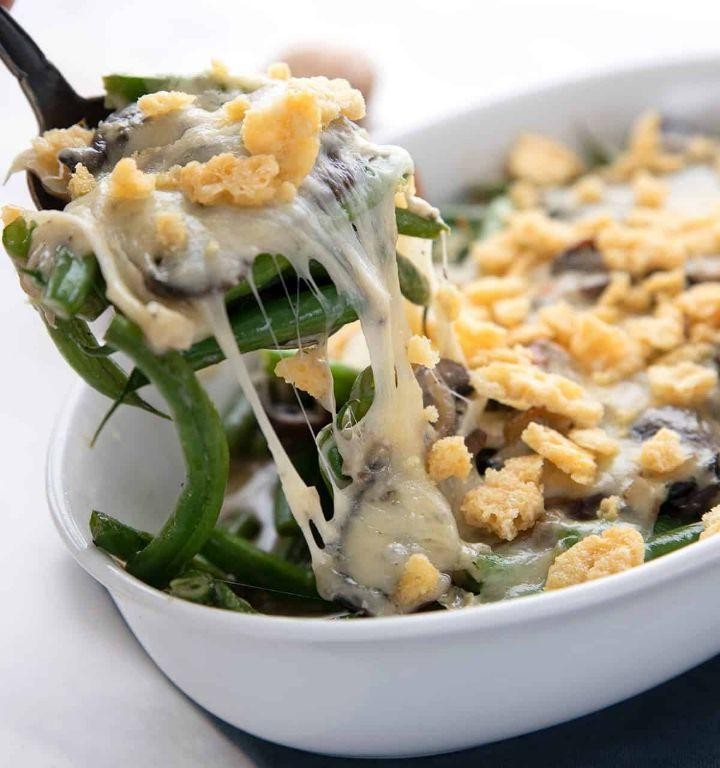
Perhaps there’s something quietly comforting about transforming humble ingredients into a dish that feels both nostalgic and nourishing, especially as the evening light fades on a December day. This keto-friendly take on green bean casserole swaps out the usual canned soup and fried onions for a creamy, from-scratch sauce and a crispy topping, making it a wholesome centerpiece or side that doesn’t skimp on coziness.
Serving: 6 | Pre Time: 15 minutes | Cooking Time: 35 minutes
Ingredients
– 1.5 pounds fresh green beans, trimmed
– 8 ounces cremini mushrooms, sliced
– 1 medium yellow onion, diced
– 3 cloves garlic, minced
– 1 cup heavy cream
– 1 cup chicken broth
– 4 ounces cream cheese, softened
– 1 cup shredded cheddar cheese
– 1/2 cup grated Parmesan cheese
– 1/2 cup almond flour
– 2 tablespoons unsalted butter
– 1 tablespoon olive oil
– 1 teaspoon dried thyme
– 1/2 teaspoon garlic powder
– 1/4 teaspoon black pepper
– 1/4 teaspoon salt
Instructions
1. Preheat your oven to 375°F and grease a 9×13-inch baking dish lightly with butter or oil.
2. Bring a large pot of salted water to a boil over high heat, then add the trimmed green beans and blanch for 4 minutes until bright green and slightly tender.
3. Immediately drain the green beans and transfer them to a bowl of ice water to stop the cooking process, which helps retain their crisp texture and vibrant color.
4. In a large skillet over medium heat, melt 1 tablespoon of butter with 1 tablespoon of olive oil, then add the diced onion and cook for 5 minutes until softened and translucent.
5. Add the sliced mushrooms to the skillet and cook for 8 minutes, stirring occasionally, until they release their moisture and turn golden brown.
6. Stir in the minced garlic and cook for 1 minute until fragrant, being careful not to let it burn, as this can impart a bitter flavor.
7. Pour in the chicken broth and heavy cream, then bring the mixture to a gentle simmer over medium-low heat, stirring occasionally.
8. Add the softened cream cheese, shredded cheddar cheese, dried thyme, garlic powder, black pepper, and salt, whisking continuously until the cheeses melt and the sauce thickens smoothly, about 5 minutes.
9. Drain the green beans from the ice water and pat them dry with a paper towel to remove excess moisture, which prevents the casserole from becoming watery.
10. Combine the blanched green beans and the creamy mushroom sauce in the prepared baking dish, stirring gently to coat the beans evenly.
11. In a small bowl, mix the almond flour and grated Parmesan cheese, then sprinkle this mixture evenly over the top of the casserole to form a crispy crust.
12. Dot the remaining 1 tablespoon of butter in small pieces over the topping to help it brown and crisp up in the oven.
13. Bake the casserole uncovered at 375°F for 25 minutes, or until the topping is golden brown and the sauce is bubbling around the edges.
14. Let the casserole rest for 10 minutes after removing it from the oven to allow the sauce to set slightly, making it easier to serve.
Layers of tender-crisp green beans nestle in a rich, savory sauce that’s deepened by earthy mushrooms and aromatic herbs, while the almond-Parmesan topping adds a satisfying crunch with every bite. For a creative twist, try serving it alongside roasted chicken or topping individual portions with a fried egg for a hearty brunch option.
Parmesan-Crusted Brussels Sprouts
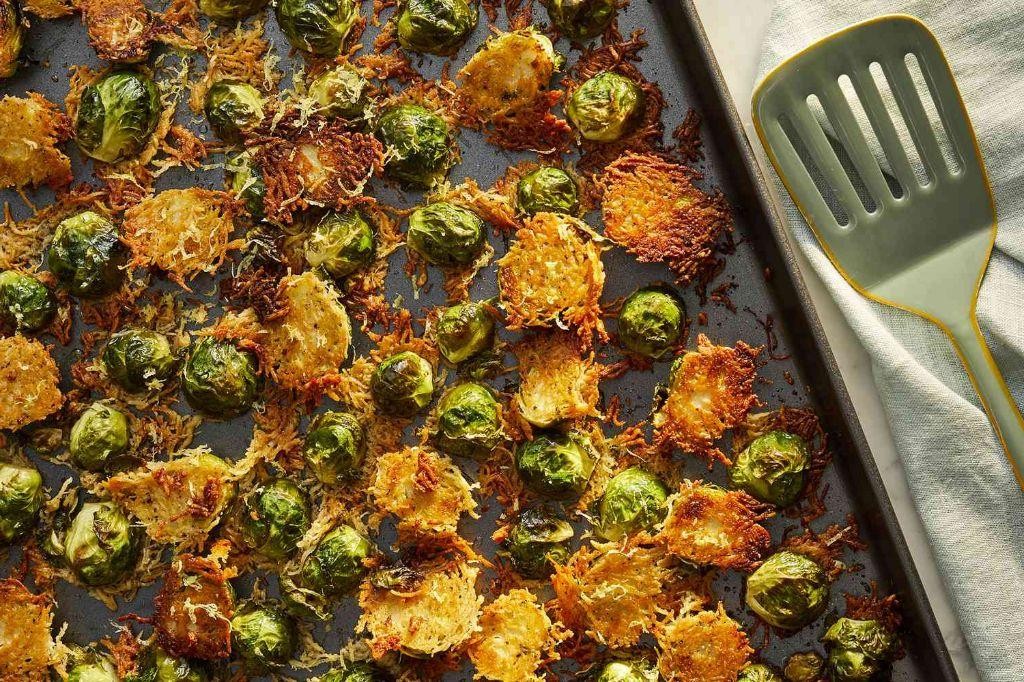
Crisp winter evenings call for something that feels both nourishing and indulgent, a quiet kitchen project that rewards patience with golden, savory bites. These Parmesan-Crusted Brussels Sprouts transform the humble vegetable into a crispy, cheesy delight, perfect for a simple side or a shareable appetizer that feels special without fuss.
Serving: 4 | Pre Time: 15 minutes | Cooking Time: 25 minutes
Ingredients
– 1 ½ pounds Brussels sprouts, trimmed and halved
– 3 tablespoons olive oil
– ¾ cup grated Parmesan cheese
– ⅓ cup panko breadcrumbs
– 1 teaspoon garlic powder
– ½ teaspoon smoked paprika
– ¼ teaspoon black pepper
– ¼ teaspoon salt
Instructions
1. Preheat your oven to 400°F (200°C) and line a large, rimmed baking sheet with parchment paper.
2. In a large bowl, toss the halved Brussels sprouts with 2 tablespoons of the olive oil until evenly coated.
3. Arrange the sprouts in a single layer on the prepared baking sheet, ensuring the cut sides face down for better caramelization.
4. Roast the sprouts for 15 minutes, until the bottoms are lightly browned and the edges begin to crisp.
5. While the sprouts roast, combine the grated Parmesan cheese, panko breadcrumbs, garlic powder, smoked paprika, black pepper, and salt in a medium bowl.
6. Drizzle the remaining 1 tablespoon of olive oil into the cheese mixture and stir with a fork until the mixture resembles coarse, moist crumbs.
7. Remove the baking sheet from the oven and carefully flip each sprout half over using tongs.
8. Evenly sprinkle the Parmesan-crumb mixture over the hot sprouts, pressing gently to help it adhere.
9. Return the baking sheet to the oven and bake for 8–10 minutes, until the topping is golden brown and crispy.
10. Let the sprouts cool on the baking sheet for 2–3 minutes before serving to allow the crust to set.
The Parmesan crust forms a delicate, shatteringly crisp shell that gives way to tender, slightly sweet centers. For a bright contrast, serve them with a squeeze of lemon or a drizzle of balsamic glaze, turning this simple side into a standout dish on any holiday table or weeknight dinner.
Keto Eggnog with Heavy Cream
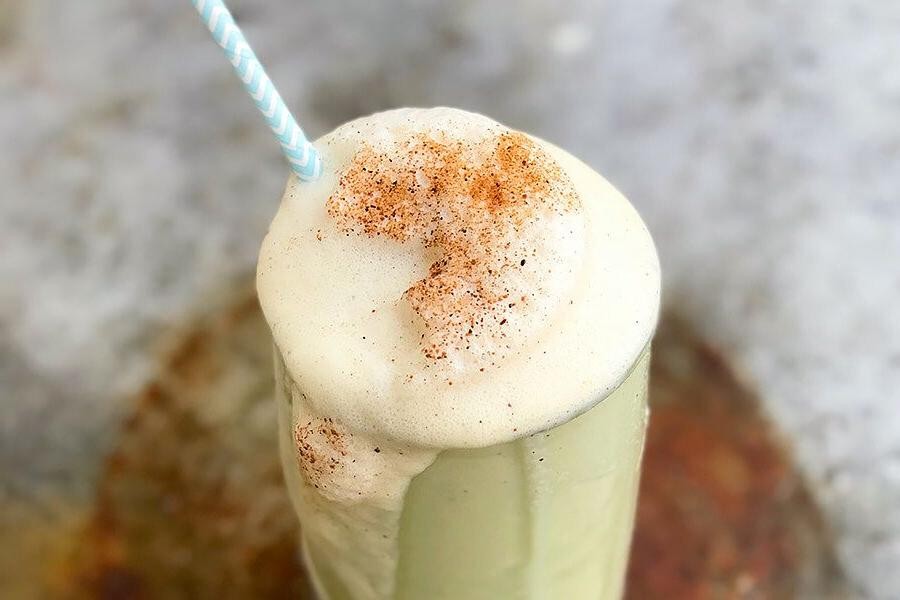
Yearning for a holiday treat that feels indulgent yet fits a mindful lifestyle, I find myself drawn to the kitchen as dusk settles. This keto eggnog, with its rich base of heavy cream, offers a creamy sanctuary from the season’s rush, a quiet moment to savor tradition reimagined. It’s a simple, stirring ritual that wraps the evening in warmth, one slow pour at a time.
Serving: 4 | Pre Time: 10 minutes | Cooking Time: 5 minutes
Ingredients
– 2 cups heavy cream
– 4 large eggs
– 1/3 cup granulated erythritol
– 1 tsp vanilla extract
– 1/2 tsp ground nutmeg
– 1/4 tsp ground cinnamon
– 1/8 tsp salt
Instructions
1. Separate 4 large eggs, placing the yolks in a medium heatproof bowl and reserving the whites for another use.
2. Add 1/3 cup granulated erythritol to the egg yolks and whisk vigorously for 2–3 minutes until pale and slightly thickened.
3. Gradually pour 2 cups heavy cream into the yolk mixture while whisking constantly to prevent curdling.
4. Transfer the mixture to a medium saucepan and cook over medium-low heat, stirring continuously with a wooden spoon for 4–5 minutes until it reaches 160°F on a kitchen thermometer and coats the back of the spoon.
5. Remove the saucepan from the heat and stir in 1 tsp vanilla extract, 1/2 tsp ground nutmeg, 1/4 tsp ground cinnamon, and 1/8 tsp salt until fully incorporated.
6. Strain the eggnog through a fine-mesh sieve into a pitcher to ensure a smooth texture, discarding any solids.
7. Cover the pitcher with plastic wrap, pressing it directly onto the surface of the eggnog to prevent a skin from forming, and refrigerate for at least 2 hours until chilled.
8. Pour the chilled eggnog into glasses and garnish lightly with an extra sprinkle of nutmeg before serving.
Ultimately, this eggnog emerges silky and lush, with the heavy cream lending a velvety body that whispers of nutmeg and cinnamon. Its subtly sweet flavor deepens as it chills, perfect for sipping by a flickering candle or pairing with a keto-friendly cookie for a cozy, guilt-free celebration.
Spicy Keto Sausage Stuffed Mushrooms

A quiet evening in December always feels like the right time to gather simple ingredients and transform them into something comforting. These spicy keto sausage stuffed mushrooms emerge from the oven with a warmth that fills the kitchen, their savory aroma a gentle promise of the rich, satisfying bite to come. They are a humble yet deeply flavorful dish, perfect for those moments when you crave something both indulgent and nourishing.
Serving: 4 | Pre Time: 15 minutes | Cooking Time: 25 minutes
Ingredients
– 16 large white mushrooms
– 1/2 lb Italian sausage
– 1/4 cup cream cheese
– 1/4 cup shredded Parmesan cheese
– 1 tbsp olive oil
– 1/2 tsp garlic powder
– 1/4 tsp red pepper flakes
– 1/4 tsp salt
Instructions
1. Preheat your oven to 375°F and line a baking sheet with parchment paper.
2. Gently wipe 16 large white mushrooms with a damp paper towel to clean them.
3. Carefully twist and remove the stems from each mushroom, setting the caps aside on the prepared baking sheet.
4. Finely chop the removed mushroom stems.
5. Heat 1 tablespoon of olive oil in a skillet over medium heat for 1 minute.
6. Add 1/2 pound of Italian sausage to the skillet, breaking it apart with a spoon, and cook for 5-7 minutes until it is no longer pink.
7. Stir the chopped mushroom stems into the cooked sausage and cook for an additional 3 minutes until the stems soften.
8. Transfer the sausage mixture to a mixing bowl and let it cool for 2 minutes.
9. Add 1/4 cup of cream cheese, 1/4 cup of shredded Parmesan cheese, 1/2 teaspoon of garlic powder, 1/4 teaspoon of red pepper flakes, and 1/4 teaspoon of salt to the bowl.
10. Mix all ingredients in the bowl until they are fully combined into a uniform stuffing.
11. Evenly spoon the stuffing mixture into each reserved mushroom cap, mounding it slightly.
12. Bake the stuffed mushrooms on the center rack for 20-25 minutes, until the tops are golden brown and the mushroom caps are tender.
13. Remove the baking sheet from the oven and let the mushrooms rest for 5 minutes before serving.
Here, the tender mushroom caps give way to a warmly spiced, creamy filling with a pleasant kick from the red pepper flakes. Their texture is wonderfully balanced—soft yet substantial—making them ideal for a cozy appetizer or a light main dish alongside a crisp green salad.
Keto Pecan Pie Fat Bombs

Kneading the dough of memory, I recall holiday tables laden with pecan pie—a tradition I’ve gently reshaped into these keto-friendly fat bombs. They’re little bites of nostalgia, crafted for slow savoring on a quiet winter afternoon.
Serving: 12 | Pre Time: 15 minutes | Cooking Time: 0 minutes
Ingredients
– 1 cup raw pecans
– ½ cup unsweetened shredded coconut
– ¼ cup coconut oil, melted
– 2 tbsp powdered erythritol
– 1 tsp vanilla extract
– ¼ tsp sea salt
Instructions
1. Place 1 cup raw pecans in a food processor and pulse for 30 seconds until finely chopped, but not pasty.
2. Add ½ cup unsweetened shredded coconut to the food processor and pulse for 15 seconds to combine evenly.
3. Pour ¼ cup melted coconut oil into the mixture, ensuring it’s liquid but not hot to avoid clumping.
4. Sprinkle in 2 tbsp powdered erythritol, 1 tsp vanilla extract, and ¼ tsp sea salt.
5. Process the mixture on low speed for 45 seconds until it forms a sticky, cohesive dough that holds together when pressed.
6. Line a baking sheet with parchment paper for easy cleanup and to prevent sticking.
7. Scoop 1-tbsp portions of the dough and roll them into 12 uniform balls between your palms, applying gentle pressure.
8. Arrange the balls on the prepared baking sheet, spacing them 1 inch apart.
9. Transfer the baking sheet to the freezer and chill the fat bombs for 1 hour until firm to the touch.
10. Store the chilled fat bombs in an airtight container in the refrigerator for up to 1 week.
These fat bombs emerge with a crumbly yet rich texture, releasing toasty pecan notes and a hint of coconut sweetness. Serve them slightly chilled alongside black coffee for contrast, or crumble one over keto-friendly yogurt for a decadent breakfast twist.
Cheesy Keto Pull-Apart Bread
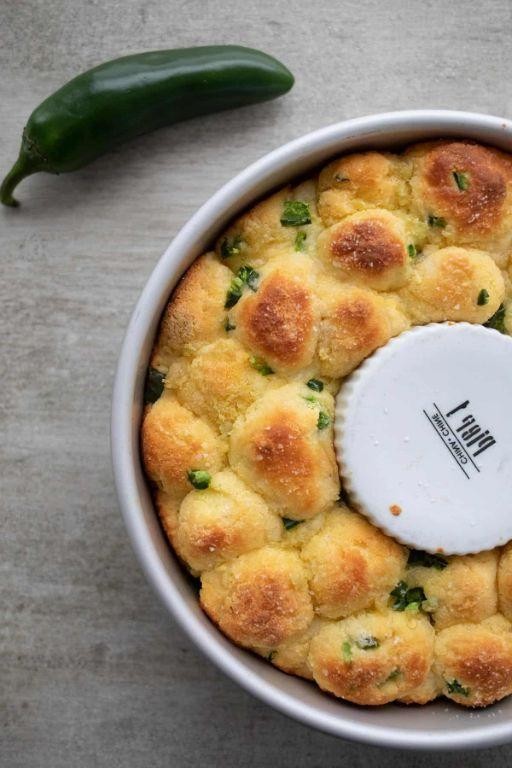
Kneading my way through the quiet afternoon, I find myself craving something warm and comforting—a simple pleasure that feels both indulgent and nourishing, like a soft embrace on a chilly day. This cheesy pull-apart bread, with its keto-friendly twist, offers just that: a cozy ritual of pulling apart tender, golden pieces, each bite melting with savory richness and a hint of garlic, perfect for savoring slowly by the fire or sharing with loved ones as the evening settles in.
Serving: 8 | Pre Time: 20 minutes | Cooking Time: 25 minutes
Ingredients
– 2 cups almond flour
– 1/4 cup coconut flour
– 1 tbsp baking powder
– 1/2 tsp salt
– 4 large eggs
– 1/2 cup unsalted butter, melted
– 1 cup shredded mozzarella cheese
– 1/2 cup shredded cheddar cheese
– 2 cloves garlic, minced
– 1 tbsp fresh parsley, chopped
Instructions
1. Preheat your oven to 350°F and grease a 9-inch round baking pan lightly with butter or oil.
2. In a large mixing bowl, whisk together 2 cups almond flour, 1/4 cup coconut flour, 1 tbsp baking powder, and 1/2 tsp salt until fully combined.
3. Add 4 large eggs and 1/2 cup melted unsalted butter to the dry ingredients, stirring with a spatula until a thick, cohesive dough forms—tip: if the dough feels too sticky, let it rest for 5 minutes to allow the flours to absorb moisture.
4. Fold in 1 cup shredded mozzarella cheese, 1/2 cup shredded cheddar cheese, 2 cloves minced garlic, and 1 tbsp chopped fresh parsley, mixing gently until evenly distributed throughout the dough.
5. Scoop the dough into the prepared baking pan, using your hands to press it into an even layer about 1-inch thick.
6. Score the top of the dough with a sharp knife into 8 equal wedges, cutting about halfway down—tip: this helps the bread pull apart easily after baking and ensures even cooking.
7. Bake in the preheated oven at 350°F for 25 minutes, or until the top is golden brown and a toothpick inserted into the center comes out clean.
8. Remove the bread from the oven and let it cool in the pan for 10 minutes—tip: cooling slightly allows the cheese to set, making it easier to handle without falling apart.
9. Gently pull apart the scored wedges and serve warm.
Finally, this bread emerges with a tender, slightly crumbly texture that yields to a gentle tug, each piece infused with the savory depth of melted cheeses and a subtle garlic aroma. For a creative twist, try dipping the warm pulls into a bowl of marinara sauce or pairing them with a crisp salad for a satisfying, low-carb meal that feels effortlessly special.
Slow-Cooker Keto Pot Roast
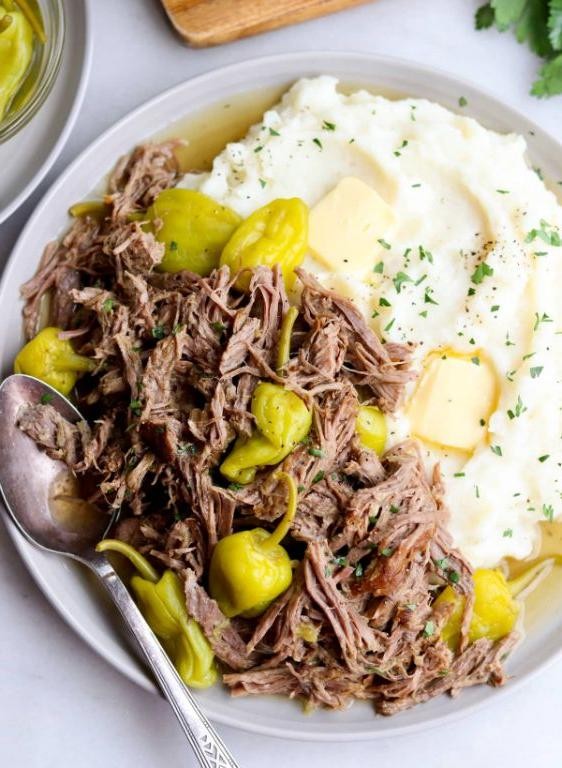
On this quiet December evening, as the winter light fades outside my window, I find myself drawn to the simple comfort of a meal that cooks itself, filling the kitchen with the kind of warmth that feels like a gentle embrace. This slow-cooker pot roast, crafted for a keto lifestyle, transforms humble ingredients into something deeply nourishing, a testament to patience and the quiet magic of low, slow heat.
Serving: 6 | Pre Time: 20 minutes | Cooking Time: 480 minutes
Ingredients
– 3 pounds chuck roast
– 2 tablespoons avocado oil
– 1 teaspoon kosher salt
– 1/2 teaspoon black pepper
– 1 large yellow onion, sliced
– 4 cloves garlic, minced
– 4 large carrots, cut into 2-inch pieces
– 4 stalks celery, cut into 2-inch pieces
– 2 cups beef broth
– 2 tablespoons tomato paste
– 2 sprigs fresh rosemary
– 3 sprigs fresh thyme
Instructions
1. Pat the 3 pounds chuck roast completely dry with paper towels.
2. Season all sides of the roast evenly with 1 teaspoon kosher salt and 1/2 teaspoon black pepper.
3. Heat 2 tablespoons avocado oil in a large skillet over medium-high heat until it shimmers, about 2 minutes.
4. Carefully place the seasoned roast in the hot skillet and sear for 4-5 minutes per side until a deep brown crust forms.
5. Transfer the seared roast to the insert of a 6-quart slow cooker.
6. In the same skillet, add the sliced yellow onion and cook over medium heat for 5 minutes until softened.
7. Add the 4 minced garlic cloves to the skillet and cook for 1 minute until fragrant.
8. Scatter the cooked onions, garlic, 4 carrots, and 4 celery stalks around the roast in the slow cooker.
9. In a small bowl, whisk together 2 cups beef broth and 2 tablespoons tomato paste until smooth.
10. Pour the broth mixture over the roast and vegetables in the slow cooker.
11. Place 2 sprigs fresh rosemary and 3 sprigs fresh thyme on top of the roast.
12. Cover the slow cooker and cook on the LOW setting for 8 hours.
13. After 8 hours, carefully remove the roast and vegetables to a serving platter using tongs and a slotted spoon.
14. For a thicker sauce, pour the cooking liquid into the skillet and simmer over medium heat for 10-15 minutes until reduced by half.
15. Slice the roast against the grain and serve with the vegetables and sauce.
But the true reward comes in the eating—the roast, now impossibly tender, pulls apart with the gentle nudge of a fork, its rich beef flavor deepened by the slow infusion of herbs and savory broth. The vegetables, having softened into sweet, yielding bites, carry the essence of the entire cook. For a delightful twist, shred any leftovers and serve them over a crisp bed of cauliflower rice or wrapped in large butter lettuce leaves for a hearty, low-carb meal.
Keto Chocolate Peppermint Bark
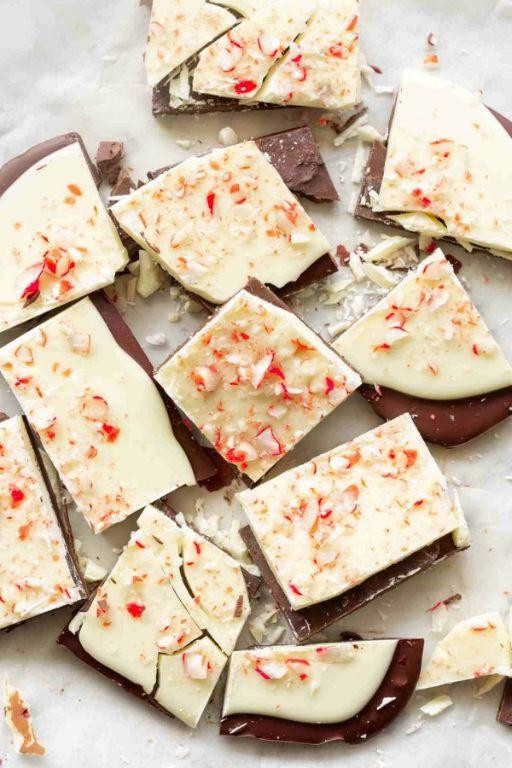
Perhaps, as the year draws to a close and the air turns crisp, there’s a quiet comfort in creating something simple yet indulgent. This bark, with its layers of rich chocolate and cool peppermint, feels like a whispered secret shared between you and the kitchen counter, a moment of calm amidst the holiday rush. It’s a treat that requires little fuss but yields a reward far greater than the effort spent.
Serving: 12 | Pre Time: 15 minutes | Cooking Time: 5 minutes
Ingredients
– 12 ounces sugar-free dark chocolate chips
– 12 ounces sugar-free white chocolate chips
– 1 teaspoon peppermint extract
– 1/4 teaspoon fine sea salt
– 2 tablespoons crushed sugar-free peppermint candies
Instructions
1. Line a 9×13-inch baking sheet with parchment paper, ensuring the paper lays flat without wrinkles to prevent the chocolate from seeping underneath.
2. Place the 12 ounces of sugar-free dark chocolate chips in a medium, microwave-safe bowl.
3. Microwave the dark chocolate chips on high power for 30 seconds, then remove the bowl and stir vigorously with a spatula.
4. Continue microwaving in 15-second intervals, stirring thoroughly after each interval, until the chocolate is completely melted and smooth, which typically takes about 60-90 seconds total.
5. Pour the melted dark chocolate onto the prepared baking sheet and use an offset spatula to spread it into an even layer about 1/4-inch thick.
6. Transfer the baking sheet to the refrigerator and chill the dark chocolate layer for 15 minutes, or until it is firm to the touch but not fully set.
7. Place the 12 ounces of sugar-free white chocolate chips in a clean, microwave-safe bowl.
8. Microwave the white chocolate chips on high power for 30 seconds, then remove the bowl and stir.
9. Continue microwaving in 15-second intervals, stirring after each, until the white chocolate is just melted and smooth, being careful not to overheat it as white chocolate can seize easily.
10. Stir the 1 teaspoon of peppermint extract and the 1/4 teaspoon of fine sea salt into the melted white chocolate until fully incorporated.
11. Remove the baking sheet from the refrigerator and immediately pour the peppermint white chocolate over the firm dark chocolate layer.
12. Quickly use the offset spatula to gently spread the white chocolate into a thin, even layer that completely covers the dark chocolate beneath it.
13. Sprinkle the 2 tablespoons of crushed sugar-free peppermint candies evenly over the entire surface of the soft white chocolate layer, pressing them in lightly so they adhere.
14. Return the baking sheet to the refrigerator and chill the bark for at least 1 hour, or until all layers are completely firm and set.
15. Remove the bark from the refrigerator, lift it from the pan using the parchment paper, and place it on a clean cutting board.
16. Use a sharp knife to break or cut the bark into approximately 12 irregular pieces, wiping the knife clean between cuts for smoother edges.
Here, the final texture is a delightful contrast: a firm, crisp snap from the dark chocolate gives way to the creamy, cool melt of the peppermint-infused white layer. The crushed candies provide a subtle, festive crunch that complements the smooth chocolate without overwhelming it. For a beautiful presentation, arrange the pieces on a chilled platter or package them in clear cellophane bags tied with a ribbon for thoughtful, homemade gifts.
Keto Cranberry Chia Pudding
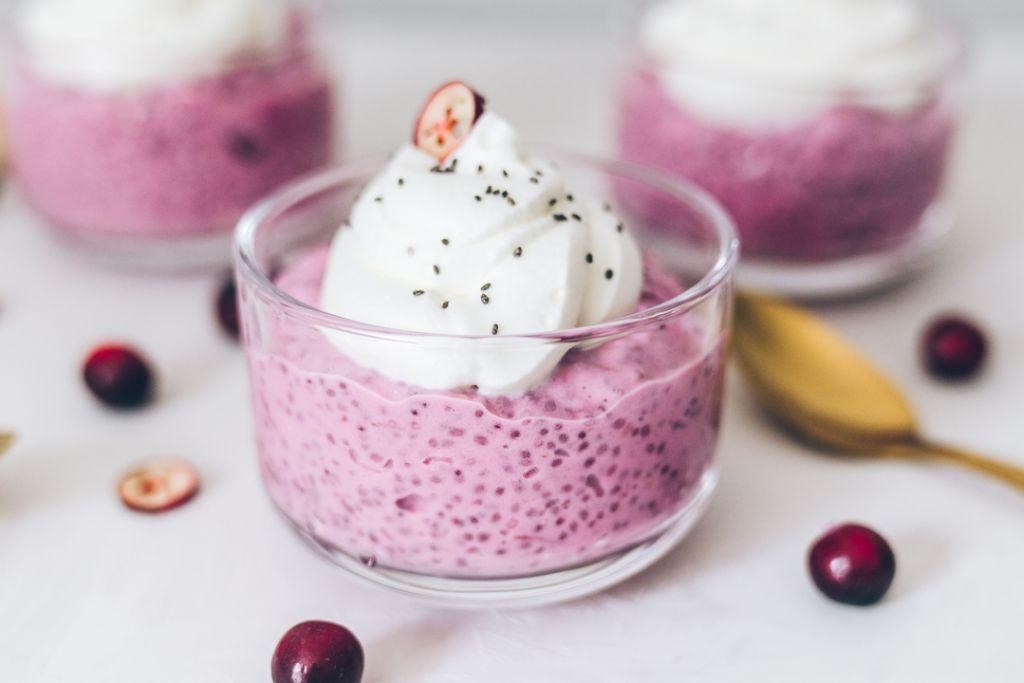
Kneading through holiday leftovers, I found myself craving something light yet festive—a quiet moment to savor the season’s end without the usual sugar rush. This keto cranberry chia pudding, with its tart berries and creamy texture, became my gentle refuge, a simple bowl to enjoy as the year winds down.
Serving: 4 | Pre Time: 10 minutes | Cooking Time: 0 minutes
Ingredients
– 2 cups unsweetened almond milk
– 1/2 cup chia seeds
– 1/2 cup fresh cranberries
– 1/4 cup erythritol
– 1 tsp vanilla extract
– 1/4 tsp ground cinnamon
Instructions
1. In a medium bowl, combine 2 cups unsweetened almond milk, 1/2 cup chia seeds, 1/4 cup erythritol, 1 tsp vanilla extract, and 1/4 tsp ground cinnamon.
2. Whisk the mixture vigorously for 1 minute to prevent clumping, ensuring the chia seeds are evenly distributed.
3. Cover the bowl with plastic wrap and refrigerate it for at least 4 hours or overnight, until the pudding thickens to a gel-like consistency.
4. While the pudding chills, rinse 1/2 cup fresh cranberries under cold water and pat them dry with a paper towel.
5. In a small saucepan over medium heat, cook the cranberries with 2 tbsp water for 5–7 minutes, stirring occasionally, until they burst and soften.
6. Remove the saucepan from heat and let the cranberry compote cool completely to room temperature, about 15 minutes.
7. Once the pudding has set, stir it gently to check for a smooth, thick texture without liquid separation.
8. Layer the chia pudding and cranberry compote in serving glasses, starting with a spoonful of pudding at the bottom.
9. Top each glass with extra cranberry compote and a sprinkle of cinnamon for garnish.
10. Serve immediately or refrigerate for up to 2 days, covering the glasses with lids to maintain freshness.
Offering a delightful contrast, the pudding’s creamy base melds with the tart cranberries, creating a silky texture that’s both refreshing and indulgent. For a creative twist, try layering it with toasted coconut flakes or drizzling with a touch of sugar-free chocolate sauce to enhance the festive feel.
Baked Brie with Keto Crackers
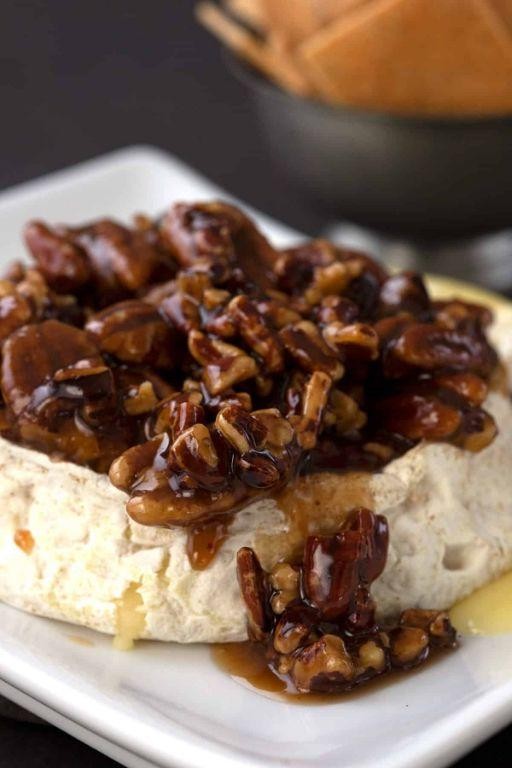
There’s something quietly magical about pulling a warm, gooey wheel of brie from the oven, its surface just beginning to bubble and brown. It feels like a small, comforting ritual, especially on a crisp evening when the light fades early and the kitchen fills with gentle heat. Paired with crisp, buttery keto crackers, it becomes a simple yet deeply satisfying treat that slows the world down for a moment.
Serving: 6 | Pre Time: 10 minutes | Cooking Time: 15 minutes
Ingredients
– 1 (8-ounce) wheel brie cheese
– 1 tablespoon olive oil
– 1/4 cup sliced almonds
– 2 tablespoons sugar-free maple syrup
– 1 teaspoon fresh thyme leaves
– 1/4 teaspoon sea salt
– 1/4 teaspoon black pepper
– 1 (5-ounce) package keto crackers
Instructions
1. Preheat your oven to 350°F (175°C) and line a small baking sheet with parchment paper.
2. Place the brie wheel on the prepared baking sheet, leaving any rind intact to hold the cheese together as it bakes.
3. Drizzle 1 tablespoon olive oil evenly over the top of the brie wheel.
4. Sprinkle 1/4 cup sliced almonds over the oiled surface, pressing them gently so they adhere.
5. In a small bowl, whisk together 2 tablespoons sugar-free maple syrup, 1 teaspoon fresh thyme leaves, 1/4 teaspoon sea salt, and 1/4 teaspoon black pepper until combined.
6. Spoon the maple-thyme mixture over the brie and almonds, coating them evenly.
7. Bake the brie in the preheated oven for 12–15 minutes, until the cheese is soft to the touch and the almonds are lightly toasted—a visual cue is when the edges bubble slightly.
8. Remove the baking sheet from the oven and let the brie rest for 5 minutes to firm up slightly, making it easier to slice without oozing.
9. Arrange 1 (5-ounce) package keto crackers on a serving platter around the warm brie.
10. Serve the brie immediately with the crackers for dipping or spreading.
As you slice into the brie, the creamy interior melds with the crunchy almonds and aromatic thyme, creating a rich, savory-sweet flavor. The keto crackers add a satisfying snap that contrasts beautifully with the soft cheese, making each bite a delightful balance. For a creative twist, drizzle a bit of extra sugar-free maple syrup over the top just before serving to enhance the sweetness.
Keto Gingerbread Cookies

Cradling a warm mug, I find myself drawn to the quiet ritual of holiday baking, where the scent of spices can transform even the simplest afternoon into something sacred. These keto gingerbread cookies offer that familiar comfort without the sugar crash, a gentle treat for savoring slowly by the firelight.
Serving: 24 | Pre Time: 15 minutes | Cooking Time: 10 minutes
Ingredients
– 2 cups almond flour
– 1/2 cup powdered erythritol
– 1/4 cup unsalted butter, softened
– 1 large egg
– 1 tbsp molasses
– 1 tsp ground ginger
– 1 tsp ground cinnamon
– 1/2 tsp baking soda
– 1/4 tsp ground cloves
– 1/4 tsp salt
Instructions
1. Preheat your oven to 350°F and line two baking sheets with parchment paper.
2. In a medium bowl, whisk together the almond flour, powdered erythritol, ground ginger, ground cinnamon, baking soda, ground cloves, and salt until fully combined.
3. In a separate large bowl, use an electric mixer on medium speed to cream the softened unsalted butter for about 1 minute until light and fluffy.
4. Add the large egg and molasses to the butter, and mix on low speed just until incorporated, scraping down the sides of the bowl with a spatula to ensure even blending.
5. Gradually add the dry ingredients to the wet mixture, mixing on low speed until a cohesive dough forms, which should take about 30 seconds.
6. Tip: If the dough feels too sticky, chill it in the refrigerator for 10 minutes to make rolling easier.
7. Place the dough between two sheets of parchment paper and roll it out to a 1/4-inch thickness using a rolling pin.
8. Use cookie cutters to cut shapes from the dough, and carefully transfer them to the prepared baking sheets, spacing them about 1 inch apart.
9. Tip: For crisp edges, avoid re-rolling the dough scraps more than once to prevent toughness.
10. Bake the cookies in the preheated oven for 8–10 minutes, or until the edges are lightly golden and firm to the touch.
11. Tip: Rotate the baking sheets halfway through baking to ensure even browning, especially if your oven has hot spots.
12. Remove the cookies from the oven and let them cool on the baking sheets for 5 minutes before transferring to a wire rack to cool completely.
Delicate yet sturdy, these cookies have a tender crumb that melts subtly with each bite, infused with the warm, earthy notes of ginger and cinnamon. Enjoy them plain for a cozy snack, or pair them with a dollop of whipped cream for an elegant dessert that feels indulgent without guilt.
Rosemary Garlic Butter Steak
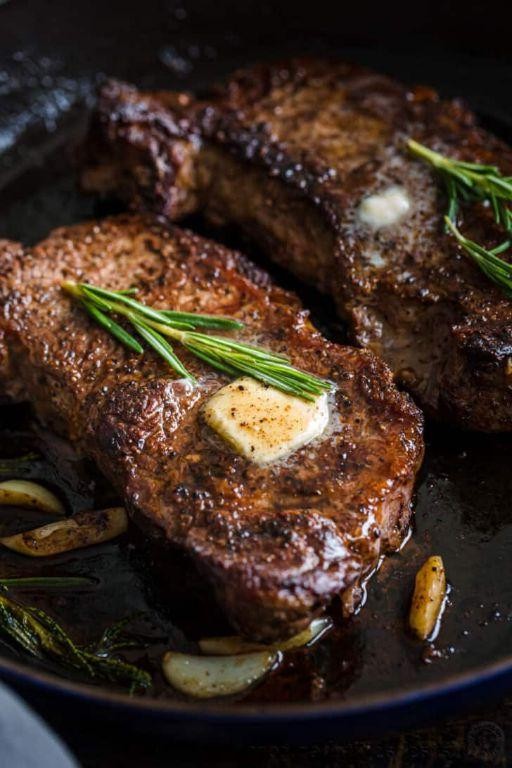
Often, as the year draws to a close and the light fades early, I find myself drawn to the kitchen, seeking the grounding ritual of preparing something simple yet deeply satisfying. On a quiet evening like this, the rich, savory aroma of rosemary and garlic sizzling in butter feels like a warm embrace, a promise of comfort on a plate.
Serving: 2 | Prep Time: 10 minutes | Cooking Time: 15 minutes
Ingredients
– 2 (8-ounce) ribeye steaks, 1-inch thick
– 1 teaspoon kosher salt
– 1/2 teaspoon freshly ground black pepper
– 2 tablespoons unsalted butter
– 3 cloves garlic, minced
– 2 sprigs fresh rosemary
– 1 tablespoon olive oil
Instructions
1. Pat the 2 ribeye steaks completely dry with paper towels.
2. Season both sides of the steaks evenly with 1 teaspoon kosher salt and 1/2 teaspoon freshly ground black pepper.
3. Heat 1 tablespoon olive oil in a heavy cast-iron skillet over medium-high heat until it shimmers, about 2 minutes.
4. Carefully place the steaks in the hot skillet; they should sizzle immediately upon contact.
5. Cook the steaks undisturbed for 4 minutes to develop a deep brown crust.
6. Using tongs, flip the steaks and cook for another 3 minutes for medium-rare, or until the internal temperature reaches 130°F on an instant-read thermometer.
7. Reduce the heat to low and add 2 tablespoons unsalted butter, 3 cloves of minced garlic, and 2 sprigs fresh rosemary to the skillet.
8. Tilt the skillet slightly and, using a spoon, continuously baste the steaks with the melted butter mixture for 1 full minute, ensuring the garlic and rosemary infuse the fat without burning.
9. Transfer the steaks to a cutting board, tent loosely with foil, and let them rest for 5 minutes to allow the juices to redistribute.
10. Slice the steaks against the grain and serve immediately, spooning the remaining garlic-rosemary butter from the skillet over the top.
Velvety and rich, the steak yields a tender, juicy interior framed by that perfect, crisp sear. The compound butter melts into every crevice, its herbal, aromatic notes softening the beef’s robust flavor. Consider serving it sliced over a bed of creamy mashed potatoes or alongside roasted winter vegetables to soak up every last drop of that fragrant sauce.
Avocado Deviled Eggs with Bacon
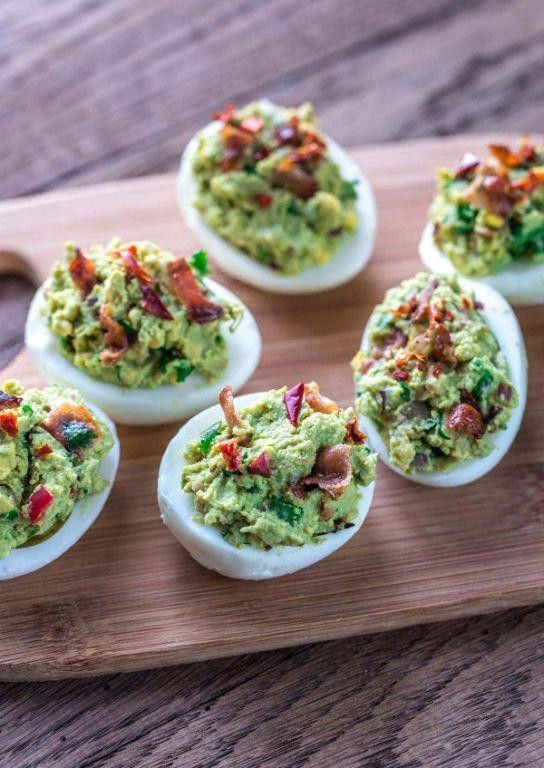
Remembering how my grandmother’s deviled eggs always anchored our holiday table, I’ve been quietly tinkering with a version that feels both nostalgic and new—a little richer, a little creamier, with a whisper of smoky crispness to balance the cool, velvety filling. It’s a small, thoughtful twist on a classic, perfect for those slow, reflective moments in the kitchen when you’re cooking not just to feed, but to gently savor the process itself.
Serving: 12 | Pre Time: 15 minutes | Cooking Time: 15 minutes
Ingredients
– 6 large eggs
– 1 ripe avocado
– 2 tbsp mayonnaise
– 1 tbsp fresh lime juice
– 1/4 tsp salt
– 1/8 tsp black pepper
– 4 slices bacon
– 1 tbsp chopped fresh chives
Instructions
1. Place 6 large eggs in a single layer in a saucepan and cover with cold water by 1 inch.
2. Bring the water to a rolling boil over high heat, then immediately cover the pan and remove it from the heat.
3. Let the eggs stand, covered, for 12 minutes to cook through completely.
4. While the eggs cook, arrange 4 slices of bacon in a single layer on a cold skillet.
5. Cook the bacon over medium heat for 8-10 minutes, flipping occasionally, until crisp and browned.
6. Transfer the cooked bacon to a paper towel-lined plate to drain and cool, then crumble it into small pieces.
7. After 12 minutes, transfer the eggs to a bowl of ice water using a slotted spoon and let them cool for 5 minutes to stop the cooking process and make peeling easier.
8. Gently tap each egg on a hard surface and peel under cool running water to remove the shell cleanly.
9. Slice each peeled egg in half lengthwise and carefully scoop the yolks into a medium bowl.
10. Arrange the 12 empty egg white halves on a serving plate.
11. Add 1 ripe avocado (peeled and pitted), 2 tbsp mayonnaise, 1 tbsp fresh lime juice, 1/4 tsp salt, and 1/8 tsp black pepper to the bowl with the yolks.
12. Mash and stir the mixture with a fork until completely smooth and well combined, ensuring no lumps remain for a creamy texture.
13. Spoon or pipe the avocado-yolk filling evenly into the hollows of the egg white halves.
14. Top each filled egg half with a sprinkle of the crumbled bacon and a pinch of 1 tbsp chopped fresh chives.
15. Serve immediately, or cover loosely and refrigerate for up to 1 hour before serving to allow the flavors to meld.
Cool and velvety from the avocado, the filling contrasts beautifully with the crisp, salty bacon and the tender egg whites. Consider serving these on a slate board garnished with extra chives for a simple, elegant presentation that lets the flavors shine quietly.
Keto Cinnamon Roll Mug Cake
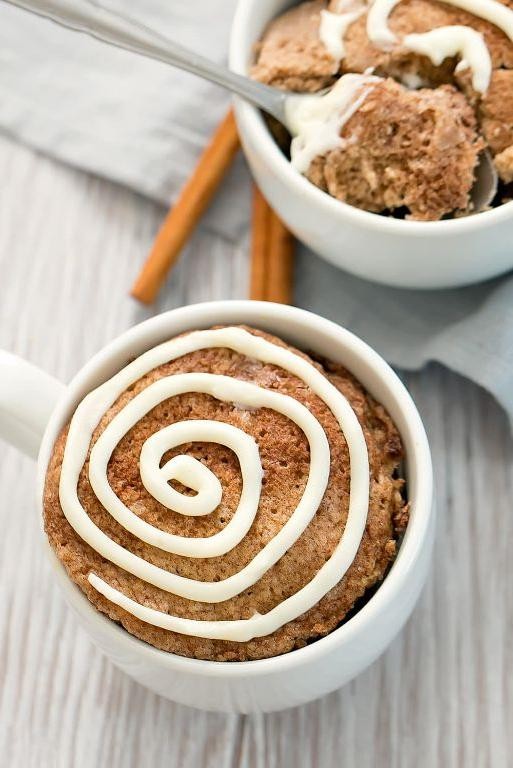
Nestled in the quiet of a December evening, with the clock nearing dinnertime, I found myself craving something warm and sweet—but simple enough to make without turning the kitchen upside down. This keto cinnamon roll mug cake emerged from that gentle yearning, a single-serving treat that fills the air with the cozy scent of cinnamon and vanilla, all while keeping things low-carb and comforting.
Serving: 1 | Pre Time: 5 minutes | Cooking Time: 2 minutes
Ingredients
– 1/4 cup almond flour
– 1 tbsp coconut flour
– 1/2 tsp baking powder
– 1/4 tsp ground cinnamon
– 1 large egg
– 1 tbsp unsalted butter, melted
– 1 tbsp granulated erythritol
– 1/2 tsp vanilla extract
– 1 tbsp cream cheese, softened
– 1 tsp powdered erythritol
Instructions
1. In a microwave-safe mug, whisk together 1/4 cup almond flour, 1 tbsp coconut flour, 1/2 tsp baking powder, and 1/4 tsp ground cinnamon until well combined.
2. Add 1 large egg, 1 tbsp melted unsalted butter, 1 tbsp granulated erythritol, and 1/2 tsp vanilla extract to the mug, stirring vigorously with a fork until a smooth batter forms with no lumps.
3. Microwave the mug on high for 60 seconds, then check for doneness by inserting a toothpick into the center—if it comes out clean, proceed; if not, microwave in 15-second intervals until fully cooked, being careful not to overheat as it can dry out the cake.
4. While the cake cools slightly, mix 1 tbsp softened cream cheese and 1 tsp powdered erythritol in a small bowl until creamy and smooth, using a fork to break up any clumps for a silky frosting.
5. Spread the cream cheese frosting evenly over the top of the warm mug cake, allowing it to melt slightly into the surface for a richer flavor.
6. Serve immediately, optionally sprinkling a pinch of extra cinnamon on top for added aroma.
Buttery and tender, this mug cake bakes up with a moist crumb that melts in your mouth, infused with the warm spice of cinnamon and a subtle sweetness from the erythritol. The cream cheese frosting adds a tangy contrast that balances the richness, making it perfect for enjoying straight from the mug with a spoon, or for pairing with a cup of herbal tea on a chilly evening.
Summary
Tis the season for delicious, guilt-free feasting! This festive keto recipe roundup proves you can savor every holiday flavor while staying on track. We hope you find new favorites to grace your table. Give these recipes a try, then let us know which ones you loved in the comments below. Don’t forget to share this article on Pinterest to spread the holiday cheer!