Welcome to a world where creamy ricotta cheese transforms your keto meals from ordinary to extraordinary! Whether you’re craving quick weeknight dinners, elegant party appetizers, or comforting desserts, this versatile ingredient is your secret weapon. Dive into our roundup of 20 delicious recipes that prove low-carb eating never has to be boring—get ready to be inspired and start cooking!
Keto Ricotta Pancakes with Blueberries
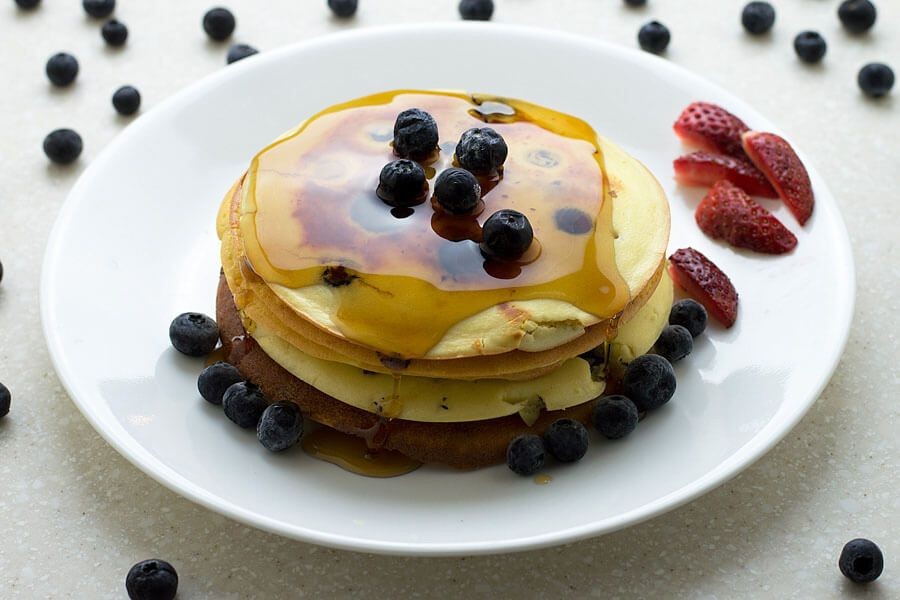
Wondering how to enjoy a cozy breakfast without the carb crash? These keto ricotta pancakes are fluffy, satisfying, and packed with protein. You’ll love how the blueberries burst with sweetness in every bite.
Serving: 4 | Pre Time: 10 minutes | Cooking Time: 15 minutes
Ingredients
– For the batter:
– 1 cup whole milk ricotta cheese
– 4 large eggs
– 1/2 cup almond flour
– 1 tsp baking powder
– 1/2 tsp vanilla extract
– Pinch of salt
– For cooking and serving:
– 2 tbsp unsalted butter
– 1/2 cup fresh blueberries
– Sugar-free maple syrup (optional)
Instructions
1. In a large bowl, whisk together 1 cup ricotta cheese and 4 eggs until smooth.
2. Add 1/2 cup almond flour, 1 tsp baking powder, 1/2 tsp vanilla extract, and a pinch of salt to the bowl.
3. Gently fold in 1/2 cup blueberries, being careful not to crush them.
4. Heat a non-stick skillet or griddle over medium-low heat (about 300°F).
5. Melt 1/2 tbsp butter in the skillet, swirling to coat the surface evenly.
6. For each pancake, scoop 1/4 cup of batter onto the skillet.
7. Cook for 3-4 minutes, until bubbles form on the surface and the edges look set.
8. Flip the pancakes carefully using a spatula.
9. Cook for another 2-3 minutes on the second side, until golden brown and cooked through.
10. Transfer the cooked pancakes to a plate and repeat with the remaining batter, adding more butter as needed.
11. Serve warm with extra blueberries and sugar-free maple syrup if desired.
Just out of the skillet, these pancakes have a tender, almost custard-like center from the ricotta, with a lightly crisp exterior. The blueberries add little pockets of juicy sweetness that balance the rich, creamy batter perfectly. For a fun twist, try layering them with a dollop of whipped cream and a sprinkle of cinnamon for a keto-friendly “shortcake” vibe.
Low-Carb Ricotta Cheesecake
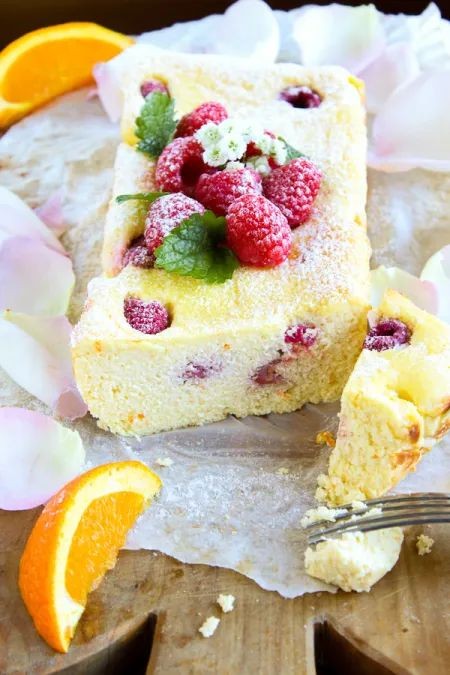
A low-carb dessert that doesn’t skimp on indulgence? You’ve found it. This ricotta cheesecake is creamy, satisfying, and perfect for when you want something sweet without the sugar crash. It’s surprisingly simple to make, too.
Serving: 8 | Pre Time: 20 minutes | Cooking Time: 50 minutes
Ingredients
For the crust:
– 1 1/2 cups almond flour
– 1/4 cup melted unsalted butter
– 2 tbsp granulated erythritol
For the filling:
– 2 cups (16 oz) whole-milk ricotta cheese, at room temperature
– 8 oz full-fat cream cheese, at room temperature
– 2/3 cup granulated erythritol
– 3 large eggs, at room temperature
– 1 tsp pure vanilla extract
– 1/4 tsp salt
Instructions
1. Preheat your oven to 350°F (175°C).
2. In a medium bowl, combine the 1 1/2 cups almond flour, 1/4 cup melted unsalted butter, and 2 tbsp granulated erythritol until the mixture resembles wet sand.
3. Press this crust mixture firmly and evenly into the bottom of a 9-inch springform pan. Tip: Use the bottom of a measuring cup to press it down for a compact, even layer.
4. Bake the crust for 10 minutes at 350°F, then remove it from the oven and set it aside to cool slightly. Reduce the oven temperature to 325°F (163°C).
5. In a large mixing bowl, beat the 2 cups ricotta cheese and 8 oz cream cheese with an electric mixer on medium speed until completely smooth and no lumps remain, about 2 minutes.
6. Add the 2/3 cup granulated erythritol, 1 tsp vanilla extract, and 1/4 tsp salt to the cheese mixture. Beat on medium speed until fully incorporated.
7. Add the 3 eggs one at a time to the filling, beating on low speed just until each egg is combined before adding the next. Tip: Over-beating the eggs can incorporate too much air and cause the cheesecake to crack.
8. Pour the filling over the pre-baked crust in the springform pan, smoothing the top with a spatula.
9. Place the springform pan on a baking sheet and bake at 325°F for 45-50 minutes. The edges should be set, but the center should still have a slight jiggle when you gently shake the pan.
10. Turn off the oven, crack the oven door open about an inch, and let the cheesecake cool inside the oven for 1 hour. Tip: This gradual cooling helps prevent the top from cracking.
11. Remove the cheesecake from the oven, run a knife around the edge to loosen it from the pan, and refrigerate it for at least 4 hours, or ideally overnight, before serving.
Keep in mind this cheesecake sets up beautifully in the fridge, becoming firm yet incredibly creamy. The ricotta gives it a slightly lighter, grainier texture than traditional versions, with a rich, tangy flavor that’s perfectly sweetened. Try serving it with a handful of fresh berries or a dollop of whipped cream for an extra treat.
Keto Ricotta Gnocchi with Pesto
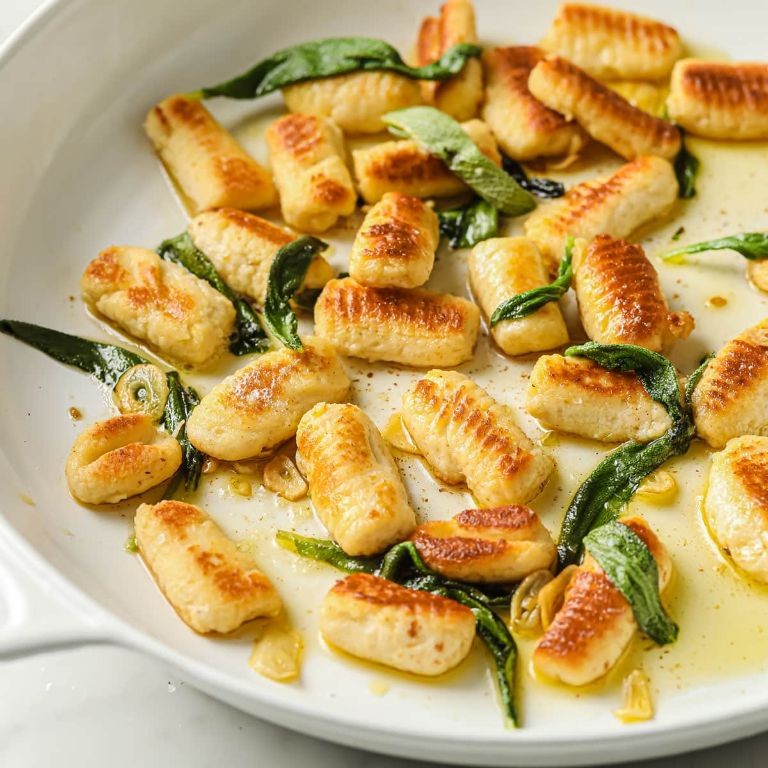
Picture this: you’re craving something comforting and pasta-like, but you’re sticking to keto. This ricotta gnocchi with pesto is your answer—it’s surprisingly simple to make and feels totally indulgent.
Serving: 4 | Pre Time: 20 minutes | Cooking Time: 5 minutes
Ingredients
For the gnocchi dough:
- 1 1/2 cups whole-milk ricotta cheese
- 1 large egg
- 1/2 cup grated Parmesan cheese
- 3/4 cup almond flour
- 1/2 tsp salt
For the pesto sauce:
- 2 cups fresh basil leaves, packed
- 1/3 cup extra virgin olive oil
- 1/4 cup pine nuts
- 2 cloves garlic
- 1/4 cup grated Parmesan cheese
- 1/4 tsp salt
Instructions
- Place 1 1/2 cups whole-milk ricotta cheese in a fine-mesh strainer over a bowl and let it drain for 10 minutes to remove excess moisture.
- In a large mixing bowl, combine the drained ricotta, 1 large egg, 1/2 cup grated Parmesan cheese, 3/4 cup almond flour, and 1/2 tsp salt.
- Mix with a fork until a soft, slightly sticky dough forms.
- Divide the dough into 4 equal portions on a clean surface lightly dusted with almond flour.
- Roll each portion into a rope about 1/2-inch thick, then cut into 1-inch pieces to form gnocchi.
- Bring a large pot of salted water to a boil over high heat.
- Gently drop the gnocchi into the boiling water and cook for 2-3 minutes, or until they float to the surface.
- While the gnocchi cooks, make the pesto by combining 2 cups fresh basil leaves, 1/3 cup extra virgin olive oil, 1/4 cup pine nuts, 2 cloves garlic, 1/4 cup grated Parmesan cheese, and 1/4 tsp salt in a food processor.
- Pulse the ingredients in the food processor until a smooth, vibrant green sauce forms, scraping down the sides as needed.
- Use a slotted spoon to transfer the cooked gnocchi directly from the boiling water to a large skillet over medium heat.
- Add the prepared pesto sauce to the skillet with the gnocchi and toss gently for 1-2 minutes until everything is heated through and well-coated.
Chewy and tender, these little pillows soak up the bright, herby pesto perfectly. For a fun twist, try topping them with crispy pancetta or a sprinkle of red pepper flakes before serving.
Keto Ricotta and Almond Flour Muffins
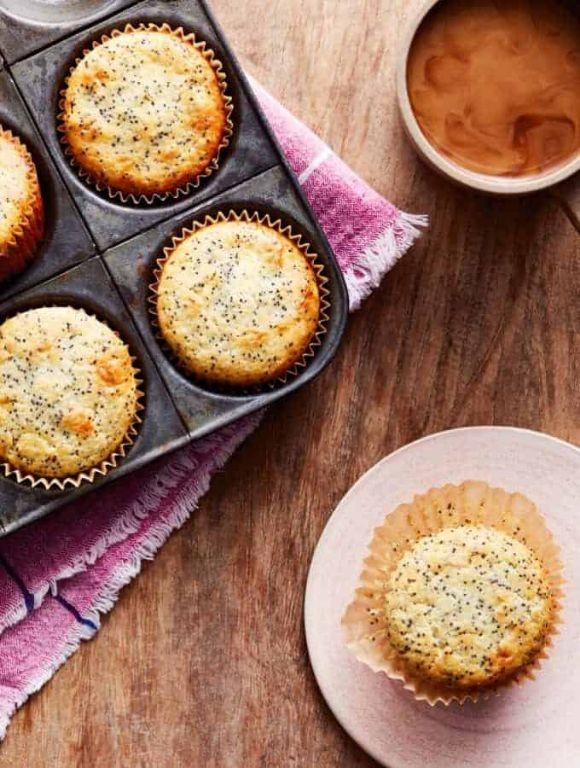
Sometimes you just need a quick, satisfying muffin that fits your keto lifestyle without sacrificing flavor. These ricotta and almond flour muffins are perfect for busy mornings or a cozy afternoon snack—they’re moist, slightly sweet, and totally guilt-free.
Serving: 12 | Pre Time: 10 minutes | Cooking Time: 25 minutes
Ingredients
For the dry ingredients:
– 2 cups almond flour
– 1/2 cup granulated erythritol (like Swerve)
– 1 tsp baking powder
– 1/2 tsp salt
For the wet ingredients:
– 1 cup whole milk ricotta cheese
– 3 large eggs
– 1/4 cup melted unsalted butter
– 1 tsp vanilla extract
Instructions
1. Preheat your oven to 350°F and line a 12-cup muffin tin with paper liners or grease it lightly with butter.
2. In a medium bowl, whisk together the almond flour, erythritol, baking powder, and salt until well combined.
3. In a separate large bowl, beat the ricotta, eggs, melted butter, and vanilla extract with a hand mixer or whisk until smooth and creamy.
4. Tip: If your ricotta seems lumpy, give it a quick stir before adding to ensure a uniform batter.
5. Gradually add the dry ingredients to the wet mixture, folding gently with a spatula until just incorporated—avoid overmixing to keep the muffins tender.
6. Divide the batter evenly among the prepared muffin cups, filling each about 3/4 full.
7. Bake in the preheated oven for 22-25 minutes, or until the tops are golden brown and a toothpick inserted into the center comes out clean.
8. Tip: Rotate the muffin tin halfway through baking for even browning if your oven has hot spots.
9. Remove from the oven and let the muffins cool in the tin for 5 minutes before transferring them to a wire rack to cool completely.
10. Tip: For extra flavor, sprinkle a pinch of cinnamon or chopped nuts on top before baking.
Buttery and rich, these muffins have a soft, cake-like crumb with a subtle tang from the ricotta. Enjoy them warm with a pat of butter or store in an airtight container for up to 3 days—they’re just as delicious toasted the next morning.
Ricotta-Stuffed Portobello Mushrooms
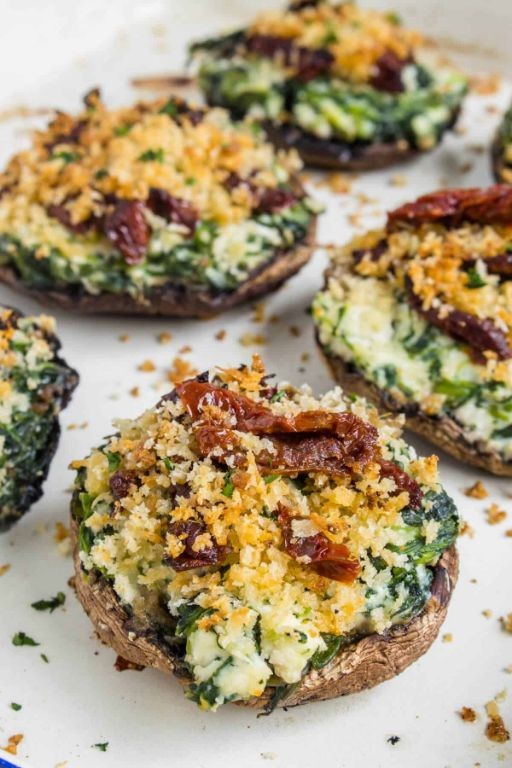
Craving something cozy and impressive but don’t want to spend all night in the kitchen? These ricotta-stuffed portobellos are your answer. They’re savory, cheesy, and feel fancy without any fuss.
Serving: 4 | Pre Time: 15 minutes | Cooking Time: 25 minutes
Ingredients
For the mushrooms:
– 4 large portobello mushroom caps
– 2 tablespoons olive oil
– 1/2 teaspoon salt
– 1/4 teaspoon black pepper
For the filling:
– 1 cup whole-milk ricotta cheese
– 1/2 cup grated Parmesan cheese
– 1 large egg
– 2 cloves garlic, minced
– 1 teaspoon dried oregano
– 1/4 teaspoon red pepper flakes (optional)
For topping:
– 1/2 cup marinara sauce
– 1/2 cup shredded mozzarella cheese
– Fresh basil leaves for garnish
Instructions
1. Preheat your oven to 400°F and line a baking sheet with parchment paper.
2. Using a spoon, gently scrape out the dark gills from the underside of each portobello mushroom cap. Tip: Removing the gills prevents the mushrooms from getting soggy during baking.
3. Place the cleaned mushroom caps on the prepared baking sheet, gill-side up.
4. Drizzle the 2 tablespoons of olive oil evenly over the mushroom caps.
5. Sprinkle the 1/2 teaspoon of salt and 1/4 teaspoon of black pepper over the mushrooms.
6. Bake the mushrooms at 400°F for 10 minutes to soften them and release some moisture.
7. While the mushrooms bake, make the filling. In a medium bowl, combine the 1 cup of ricotta, 1/2 cup of Parmesan, 1 large egg, 2 minced garlic cloves, 1 teaspoon of oregano, and 1/4 teaspoon of red pepper flakes (if using). Mix until fully combined.
8. Remove the par-baked mushrooms from the oven. Carefully tip each mushroom cap to pour out any liquid that has pooled inside. Tip: Draining this liquid is key for a filling that doesn’t get watery.
9. Divide the ricotta filling evenly among the four mushroom caps, mounding it slightly.
10. Spoon 2 tablespoons of marinara sauce over the top of the filling in each mushroom.
11. Sprinkle 2 tablespoons of shredded mozzarella cheese over the sauce on each mushroom.
12. Return the baking sheet to the oven and bake at 400°F for 15 minutes, or until the cheese is melted and bubbly and the filling is set. Tip: For extra color, broil for the final 1-2 minutes, watching closely to prevent burning.
13. Let the mushrooms rest for 5 minutes after removing them from the oven. Garnish with fresh basil leaves before serving.
After baking, the mushrooms are tender but still hold their shape, cradling the creamy, garlicky ricotta filling. The melted mozzarella and marinara on top add a gooey, savory finish that’s irresistible. Serve them as a hearty vegetarian main with a simple salad, or slice them up as a stunning appetizer for your next gathering.
Lemon Ricotta Fat Bombs
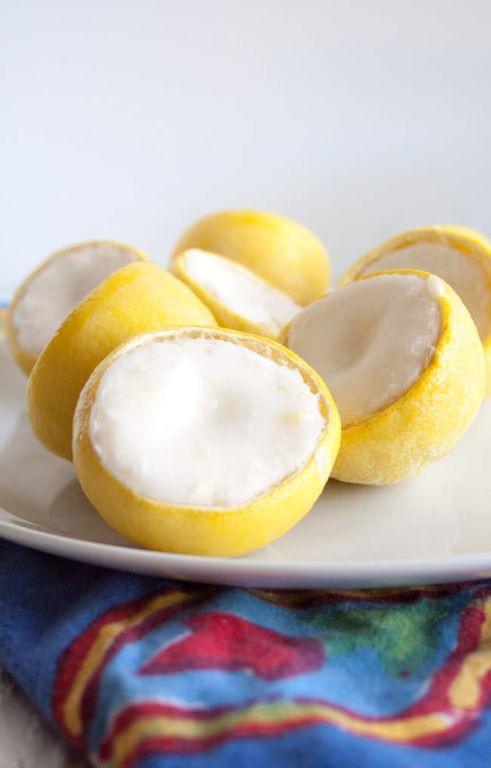
Sick of the same old snacks? You need something creamy, tangy, and totally satisfying without the guilt. These little bites are your new go-to treat when you want something indulgent but still on track.
Serving: 12 | Pre Time: 15 minutes | Cooking Time: 0 minutes
Ingredients
For the filling:
– 1 cup whole milk ricotta cheese
– 2 tbsp fresh lemon juice
– 1 tbsp lemon zest
– 2 tbsp powdered erythritol
– 1/2 tsp vanilla extract
For the coating:
– 1/2 cup unsweetened shredded coconut
– 2 tbsp crushed almonds
Instructions
1. Place the ricotta cheese in a fine-mesh strainer over a bowl and let it drain for 10 minutes to remove excess moisture—this prevents a watery texture.
2. In a medium mixing bowl, combine the drained ricotta, fresh lemon juice, lemon zest, powdered erythritol, and vanilla extract.
3. Use a hand mixer or whisk to blend the mixture on medium speed for about 2 minutes until it’s smooth and creamy, scraping down the sides as needed.
4. Cover the bowl with plastic wrap and refrigerate the mixture for 30 minutes to firm it up, making it easier to shape.
5. In a shallow dish, mix the unsweetened shredded coconut and crushed almonds together for the coating.
6. Remove the ricotta mixture from the refrigerator and use a tablespoon or small cookie scoop to portion out 12 equal balls.
7. Roll each portion between your palms into smooth, round balls, about 1 inch in diameter.
8. Roll each ball in the coconut-almond mixture, pressing gently to ensure an even coating all around.
9. Arrange the coated balls on a parchment-lined baking sheet or plate in a single layer.
10. Freeze the fat bombs for at least 1 hour until they are firm and set, which helps them hold their shape when served.
11. Transfer the frozen fat bombs to an airtight container and store them in the freezer for up to 2 weeks.
12. Serve chilled directly from the freezer for the best texture.
These fat bombs have a cool, creamy center with a bright lemon kick and a satisfying crunch from the coating. Try drizzling them with a little melted dark chocolate or serving them alongside fresh berries for a fancy twist.
Keto Ricotta and Berry Parfait
Feeling like you need a sweet treat that won’t derail your goals? This keto ricotta and berry parfait is your answer. It’s creamy, fruity, and ready in minutes, perfect for a quick breakfast or a satisfying dessert.
Serving: 2 | Pre Time: 10 minutes | Cooking Time: 0 minutes
Ingredients
– For the berry layer:
– 1 cup mixed fresh berries (like raspberries and blackberries)
– 1 tbsp fresh lemon juice
– 1 tbsp powdered erythritol
– For the ricotta layer:
– 1 cup whole-milk ricotta cheese
– 1/4 cup heavy whipping cream
– 1 tsp pure vanilla extract
– 2 tbsp powdered erythritol
– For assembly:
– 1/4 cup chopped pecans
Instructions
1. Rinse 1 cup of mixed fresh berries under cold water and pat them completely dry with a paper towel. (Tip: Drying the berries prevents the parfait from getting watery.)
2. In a small bowl, combine the dried berries, 1 tablespoon of fresh lemon juice, and 1 tablespoon of powdered erythritol. Gently stir with a spoon until the berries are lightly coated, then set the bowl aside.
3. In a medium mixing bowl, add 1 cup of whole-milk ricotta cheese, 1/4 cup of heavy whipping cream, 1 teaspoon of pure vanilla extract, and 2 tablespoons of powdered erythritol.
4. Use a hand mixer or whisk to beat the ricotta mixture on medium speed for about 2 minutes, until it becomes smooth, creamy, and slightly fluffy. (Tip: Whipping the ricotta ensures a light texture instead of a grainy one.)
5. Roughly chop 1/4 cup of pecans into small pieces with a knife on a cutting board.
6. Get out two serving glasses or jars. Spoon about 2 tablespoons of the berry mixture into the bottom of each glass.
7. Layer about 1/4 cup of the whipped ricotta mixture on top of the berries in each glass.
8. Repeat the layers by adding another 2 tablespoons of berries and another 1/4 cup of ricotta to each glass.
9. Top each parfait with the remaining berry mixture and a sprinkle of the chopped pecans. (Tip: For best results, assemble just before serving to keep the layers distinct.)
Now you have a delightful parfait ready to enjoy. Notice how the creamy ricotta perfectly balances the tart, juicy berries, with the pecans adding a nice crunchy finish. It’s so good you might want to make a double batch next time!
Cauliflower and Ricotta Mash
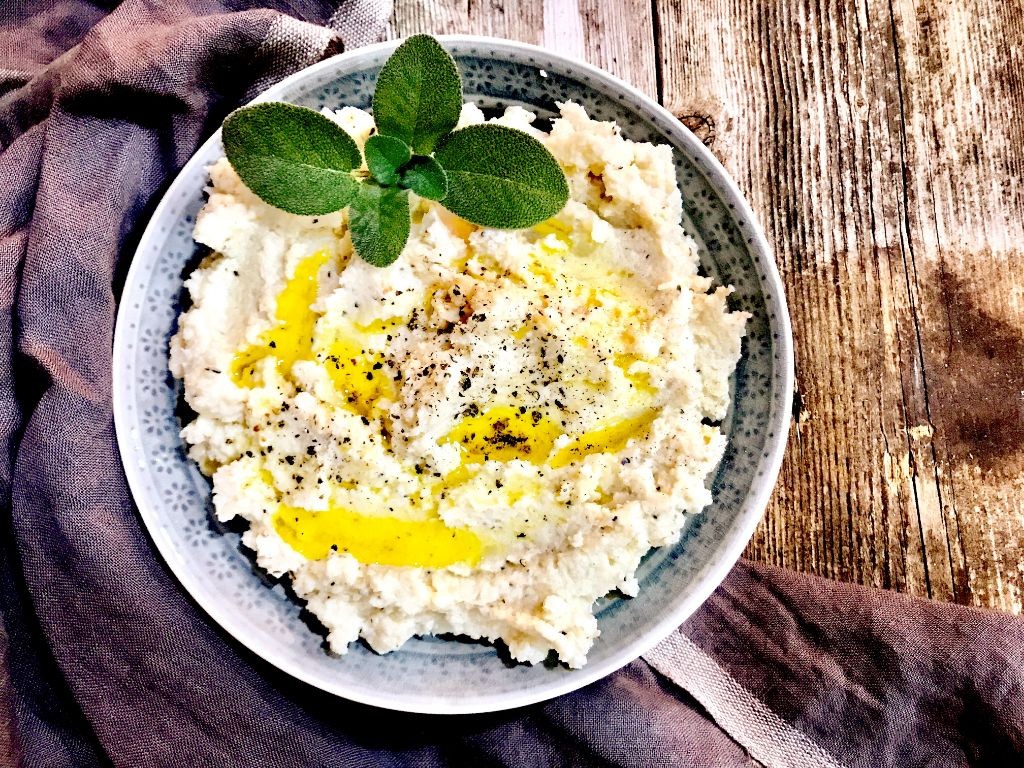
Perfect for a cozy winter evening, you’ll love this creamy cauliflower and ricotta mash. It’s a comforting side dish that comes together quickly with just a few simple ingredients. Let’s make it!
Serving: 4 | Pre Time: 10 minutes | Cooking Time: 20 minutes
Ingredients
For the mash:
– 1 large head cauliflower, cut into florets (about 6 cups)
– 1 cup whole milk ricotta cheese
– 2 tablespoons unsalted butter
– 1/4 cup grated Parmesan cheese
– 1/2 teaspoon garlic powder
– 1/4 teaspoon black pepper
– 1/2 teaspoon salt
Instructions
1. Place the cauliflower florets in a large pot and cover with water.
2. Bring the water to a boil over high heat, then reduce to a simmer.
3. Cook the cauliflower for 10-12 minutes, or until it is fork-tender and easily mashed.
4. Drain the cauliflower thoroughly in a colander to remove excess water, which prevents a watery mash.
5. Return the drained cauliflower to the pot and add the ricotta cheese, butter, Parmesan cheese, garlic powder, black pepper, and salt.
6. Use a potato masher or immersion blender to mash the mixture until smooth and creamy, about 2-3 minutes.
7. For extra creaminess, you can stir in an additional tablespoon of butter if desired.
8. Taste and adjust seasoning with more salt or pepper as needed, but avoid over-salting before tasting.
9. Serve the mash immediately while warm.
Rich and velvety, this mash has a subtle cauliflower flavor enhanced by the tangy ricotta and savory Parmesan. It pairs wonderfully with roasted chicken or grilled steak, and leftovers can be reheated gently on the stovetop with a splash of milk to restore creaminess.
Ricotta and Parmesan Stuffed Peppers

Holiday gatherings or cozy weeknights—these ricotta and parmesan stuffed peppers are your new go-to. They’re creamy, cheesy, and packed with flavor, yet simple enough to whip up any time you’re craving something comforting. You’ll love how the peppers soften just enough to cradle that rich filling.
Serving: 4 | Pre Time: 15 minutes | Cooking Time: 25 minutes
Ingredients
For the peppers:
– 4 large bell peppers (any color)
– 1 tbsp olive oil
For the filling:
– 2 cups whole-milk ricotta cheese
– 1 cup grated parmesan cheese
– 1 large egg
– 2 cloves garlic, minced
– 1 tsp dried oregano
– 1/2 tsp salt
– 1/4 tsp black pepper
For topping:
– 1/2 cup marinara sauce
– 1/4 cup shredded mozzarella cheese
Instructions
1. Preheat your oven to 375°F (190°C) and line a baking sheet with parchment paper.
2. Slice each bell pepper in half lengthwise and remove the seeds and white membranes.
3. Brush the inside of each pepper half lightly with 1 tbsp olive oil and place them cut-side up on the baking sheet.
4. In a medium bowl, combine 2 cups ricotta, 1 cup parmesan, 1 egg, 2 minced garlic cloves, 1 tsp oregano, 1/2 tsp salt, and 1/4 tsp black pepper. Mix until smooth.
5. Spoon the filling evenly into each pepper half, mounding it slightly. Tip: Let the ricotta drain in a fine-mesh strainer for 10 minutes first to avoid a watery filling.
6. Spread 1/2 cup marinara sauce over the top of the filled peppers.
7. Sprinkle 1/4 cup mozzarella cheese evenly over the sauce.
8. Bake at 375°F for 20–25 minutes, until the peppers are tender and the cheese is golden and bubbly. Tip: Check at 20 minutes—if the peppers aren’t soft yet, bake 5 minutes more.
9. Let the peppers cool for 5 minutes before serving. Tip: They’ll hold their shape better if you rest them briefly.
A creamy, savory bite with a hint of sweetness from the roasted peppers makes this dish irresistible. The filling stays wonderfully moist, while the melted mozzarella adds a gooey finish. Try serving them over a bed of greens or with crusty bread to soak up any extra sauce.
Keto Ricotta Pizza Crust
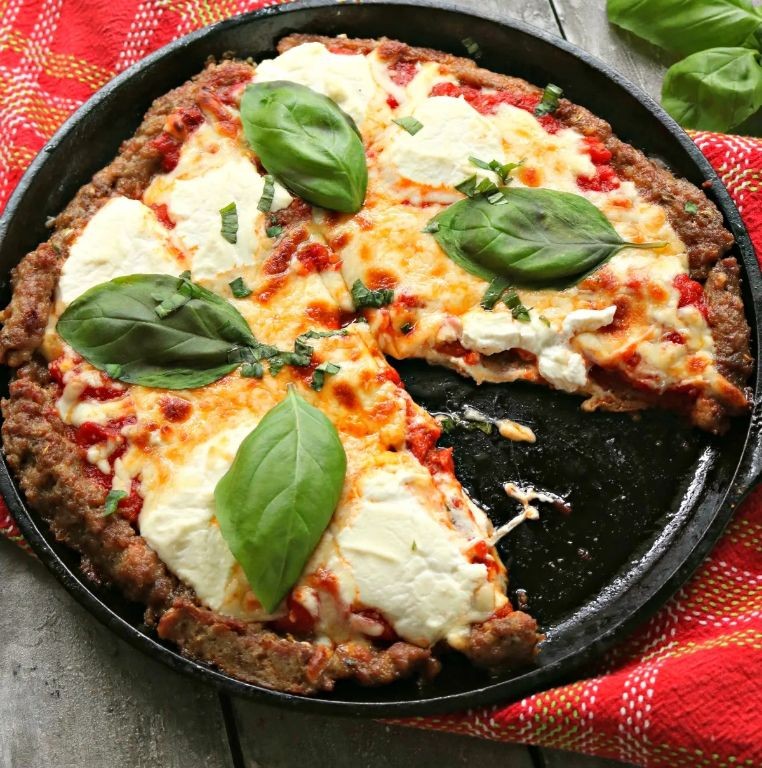
Zipping through holiday baking but still want pizza? This keto ricotta pizza crust is your new best friend—it’s low-carb, easy to whip up, and gives you that crispy, chewy base you crave without the guilt. Let’s get that pie in the oven!
Serving: 4 | Pre Time: 15 minutes | Cooking Time: 20 minutes
Ingredients
For the crust:
– 1 1/2 cups whole-milk ricotta cheese, drained
– 1 large egg
– 1 cup shredded mozzarella cheese
– 1/2 cup grated Parmesan cheese
– 1 tsp dried oregano
– 1/2 tsp garlic powder
– 1/4 tsp salt
For the sauce and toppings:
– 1/2 cup no-sugar-added marinara sauce
– 1 cup shredded mozzarella cheese
– Your favorite low-carb toppings (e.g., pepperoni, sliced mushrooms, bell peppers)
Instructions
1. Preheat your oven to 400°F and line a baking sheet with parchment paper.
2. In a large mixing bowl, combine 1 1/2 cups ricotta, 1 egg, 1 cup mozzarella, 1/2 cup Parmesan, 1 tsp oregano, 1/2 tsp garlic powder, and 1/4 tsp salt until a sticky dough forms.
3. Tip: If the dough feels too wet, pat the ricotta with a paper towel before mixing to remove excess moisture.
4. Place the dough onto the prepared baking sheet and use your hands to press it into a 12-inch circle, about 1/4-inch thick.
5. Bake the crust at 400°F for 15 minutes, or until the edges turn golden brown and the surface feels firm to the touch.
6. Remove the crust from the oven and let it cool for 5 minutes—this helps prevent sogginess when adding toppings.
7. Spread 1/2 cup marinara sauce evenly over the baked crust, leaving a small border around the edges.
8. Sprinkle 1 cup mozzarella cheese over the sauce, then add your chosen low-carb toppings.
9. Tip: For extra crispiness, place the toppings under the cheese layer to keep them from drying out.
10. Return the pizza to the oven and bake at 400°F for 5–7 minutes, until the cheese is melted and bubbly.
11. Tip: Broil for the final 1–2 minutes if you prefer a browned, crispy cheese top.
12. Let the pizza cool for 3–5 minutes before slicing to allow the crust to set.
A golden, crispy crust with a tender, cheesy bite makes this pizza a keto dream—serve it sliced with a side salad for a complete meal, or get creative by using it as a base for breakfast pizza with eggs and bacon!
Chocolate Ricotta Mousse
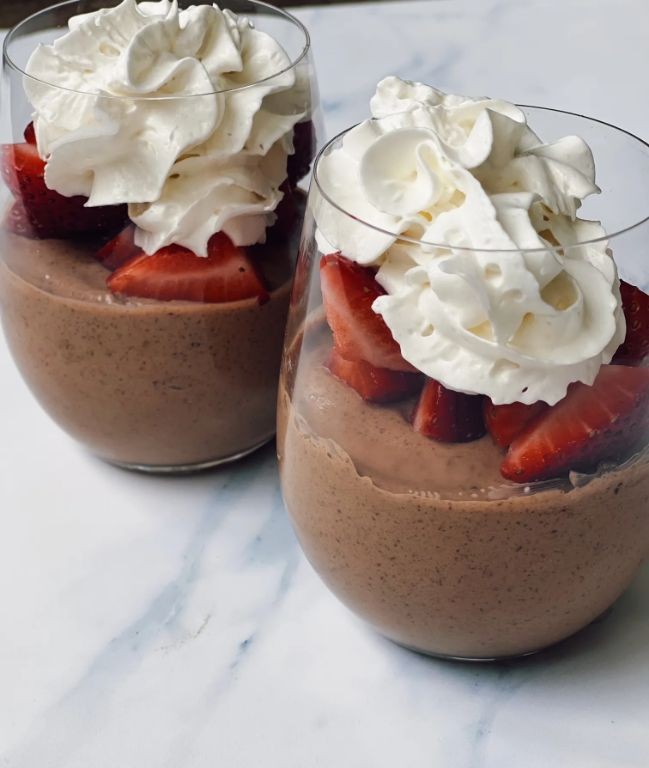
Haven’t you ever wanted a dessert that feels fancy but is secretly a breeze to make? This chocolate ricotta mousse is exactly that—a creamy, dreamy treat that comes together with minimal effort. You’ll love how the ricotta makes it light yet satisfying.
Serving: 6 | Pre Time: 15 minutes | Cooking Time: 0 minutes
Ingredients
– For the mousse base:
– 2 cups whole milk ricotta cheese
– 1/2 cup powdered sugar
– 1 teaspoon pure vanilla extract
– Pinch of salt
– For the chocolate mixture:
– 6 ounces semi-sweet chocolate chips
– 1/2 cup heavy cream
– For whipping:
– 1 cup heavy cream
– 2 tablespoons powdered sugar
Instructions
1. Place the 2 cups of ricotta, 1/2 cup powdered sugar, 1 teaspoon vanilla extract, and a pinch of salt in a food processor.
2. Process the mixture on high speed for 1 full minute, until completely smooth and no graininess remains. Tip: Scrape down the sides halfway through to ensure everything is incorporated.
3. Transfer the smooth ricotta mixture to a large mixing bowl and set it aside.
4. Combine the 6 ounces of chocolate chips and 1/2 cup of heavy cream in a microwave-safe bowl.
5. Microwave the chocolate and cream in 30-second intervals, stirring well after each, until the chocolate is fully melted and the mixture is glossy, about 1 to 1.5 minutes total.
6. Let the chocolate ganache cool for 5 minutes at room temperature so it’s warm but not hot.
7. Pour the slightly cooled chocolate ganache into the bowl with the ricotta mixture.
8. Use a spatula to fold the chocolate into the ricotta until just combined and no white streaks remain.
9. In a separate, clean bowl, pour the 1 cup of heavy cream and add the 2 tablespoons of powdered sugar.
10. Use a hand mixer on medium-high speed to whip the cream until it forms stiff peaks, about 2 to 3 minutes. Tip: Chill your bowl and beaters in the freezer for 10 minutes beforehand for faster, higher-volume whipping.
11. Gently fold the whipped cream into the chocolate-ricotta base in three additions, being careful not to deflate the mixture.
12. Divide the mousse evenly among 6 serving glasses or ramekins.
13. Cover the glasses with plastic wrap and refrigerate for at least 4 hours, or ideally overnight, to set. Tip: For the best texture, don’t skip the full chilling time—it allows the flavors to meld perfectly.
14. Serve the mousse chilled, optionally topped with fresh berries, a dusting of cocoa powder, or shaved chocolate.
Outrageously smooth and rich, this mousse has a decadent chocolate flavor balanced by the subtle tang of ricotta. The texture is luxuriously light and airy, almost like a cloud. Try layering it in a parfait with crushed cookies or serving it as an elegant, no-bake dessert for your next dinner party.
Ricotta and Herb Omelette

Craving something light yet satisfying? This ricotta and herb omelette is your answer. It’s fluffy, creamy, and packed with fresh flavor—perfect for a quick breakfast or a lazy weekend brunch.
Serving: 1 | Pre Time: 5 minutes | Cooking Time: 5 minutes
Ingredients
– For the omelette: 2 large eggs, 1 tbsp unsalted butter, 1/4 tsp salt, 1/8 tsp black pepper
– For the filling: 1/4 cup whole-milk ricotta cheese, 1 tbsp chopped fresh chives, 1 tbsp chopped fresh parsley
Instructions
1. Crack 2 large eggs into a small bowl and whisk vigorously with 1/4 tsp salt and 1/8 tsp black pepper until fully combined and slightly frothy.
2. Heat a nonstick skillet over medium-low heat and add 1 tbsp unsalted butter, swirling to coat the pan evenly as it melts.
3. Pour the egg mixture into the skillet and let it cook undisturbed for about 30 seconds until the edges just begin to set.
4. Gently lift the edges of the omelette with a spatula and tilt the pan to let any uncooked egg flow underneath—repeat this 2-3 times over 1-2 minutes until the top is mostly set but still slightly wet.
5. Spoon 1/4 cup whole-milk ricotta cheese, 1 tbsp chopped fresh chives, and 1 tbsp chopped fresh parsley evenly over one half of the omelette.
6. Carefully fold the empty half over the filling using the spatula, then cook for another 30-60 seconds until the ricotta is warmed through and the omelette is golden brown on the bottom.
7. Slide the omelette onto a plate and serve immediately.
Out of the pan, this omelette is delightfully tender with pockets of creamy ricotta. The fresh herbs add a bright, garden-fresh kick that balances the richness. Try it with a side of toasted sourdough or a simple arugula salad for a complete meal.
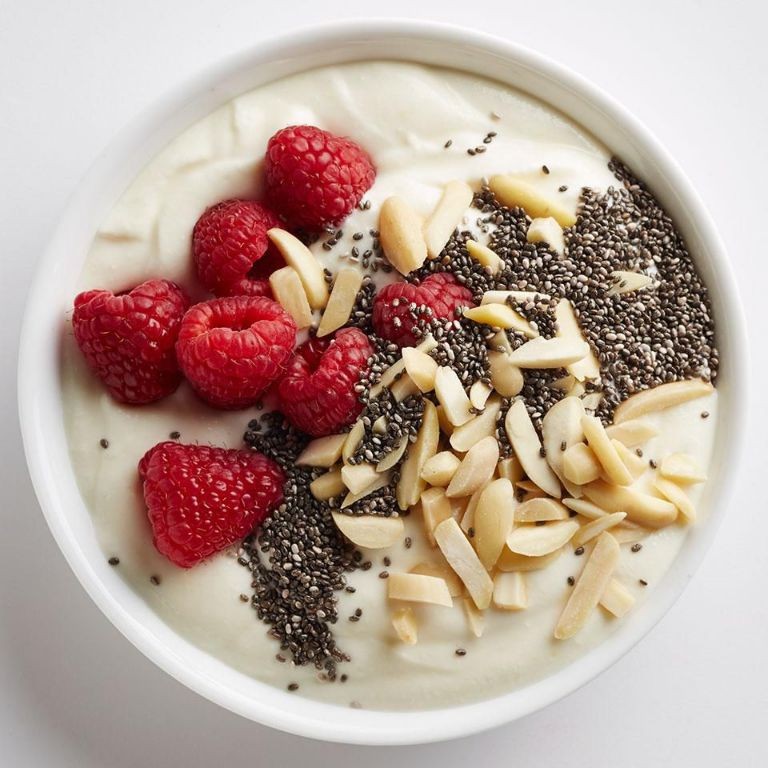
Keto Ricotta and Chia Pudding
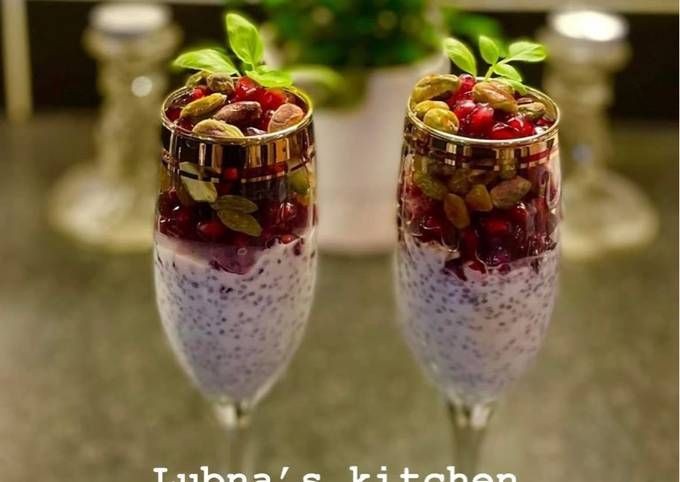
Gosh, you know those mornings when you want something creamy and satisfying but don’t want to derail your keto goals? This ricotta and chia pudding is your new best friend—it’s rich, protein-packed, and comes together with minimal effort.
Serving: 2 | Pre Time: 5 minutes | Cooking Time: 0 minutes
Ingredients
For the pudding base:
– 1 cup whole milk ricotta cheese
– 1/4 cup unsweetened almond milk
– 2 tablespoons chia seeds
– 1 tablespoon powdered erythritol
– 1/2 teaspoon vanilla extract
For topping (optional):
– 1/4 cup fresh berries
– 1 tablespoon sliced almonds
Instructions
1. In a medium mixing bowl, combine 1 cup whole milk ricotta cheese and 1/4 cup unsweetened almond milk.
2. Whisk the mixture vigorously for about 1 minute until it becomes smooth and creamy, with no lumps remaining.
3. Add 2 tablespoons chia seeds, 1 tablespoon powdered erythritol, and 1/2 teaspoon vanilla extract to the bowl.
4. Stir all ingredients together thoroughly until the chia seeds are evenly distributed throughout the mixture.
5. Divide the pudding evenly between two serving glasses or jars.
6. Cover the glasses tightly with plastic wrap or lids to prevent a skin from forming on top.
7. Refrigerate the pudding for at least 4 hours, or ideally overnight, to allow the chia seeds to fully absorb the liquid and thicken the pudding.
8. After chilling, remove the pudding from the refrigerator and give it a quick stir to check the consistency—it should be thick and spoonable, like a creamy mousse.
9. If using toppings, sprinkle 1/4 cup fresh berries and 1 tablespoon sliced almonds evenly over the top of each serving just before eating.
Let this pudding chill out in your fridge overnight for the best texture—it transforms into a luxuriously thick, almost cheesecake-like treat. The ricotta gives it a subtle tang that pairs perfectly with sweet berries, or try drizzling it with a bit of sugar-free chocolate sauce for a decadent dessert twist.
Baked Ricotta with Garlic and Rosemary

A creamy, savory dip that’s perfect for holiday gatherings or a cozy night in, this baked ricotta comes together with just a handful of pantry staples and minimal effort. You’ll love how the garlic and rosemary infuse the cheese with warm, aromatic flavor while it bakes into a golden, bubbly delight. It’s the ultimate crowd-pleaser that feels fancy but is seriously simple to make.
Serving: 6 | Pre Time: 10 minutes | Cooking Time: 25 minutes
Ingredients
For the ricotta mixture:
– 16 ounces whole-milk ricotta cheese
– 2 cloves garlic, minced
– 1 tablespoon fresh rosemary, finely chopped
– 1/4 teaspoon kosher salt
– 1/4 teaspoon black pepper
For topping:
– 1 tablespoon olive oil
– 1/4 cup grated Parmesan cheese
Instructions
1. Preheat your oven to 400°F and lightly grease a small baking dish or oven-safe skillet with olive oil.
2. In a medium bowl, combine the ricotta, minced garlic, chopped rosemary, salt, and pepper until fully blended.
3. Transfer the ricotta mixture to the prepared baking dish and spread it into an even layer with a spatula.
4. Drizzle the olive oil evenly over the top of the ricotta mixture.
5. Sprinkle the grated Parmesan cheese over the olive oil.
6. Bake in the preheated oven for 20–25 minutes, or until the edges are golden brown and the center is set but still slightly jiggly.
7. Remove from the oven and let it cool for 5 minutes before serving.
Warm from the oven, this baked ricotta has a wonderfully creamy interior with a lightly crisped, cheesy top. The garlic and rosemary meld into a savory, aromatic flavor that pairs beautifully with crusty bread, crackers, or fresh vegetables. Try spreading it on toasted baguette slices or dolloping it over a simple pasta for an easy, elegant meal.
Ricotta and Walnut Stuffed Eggplant
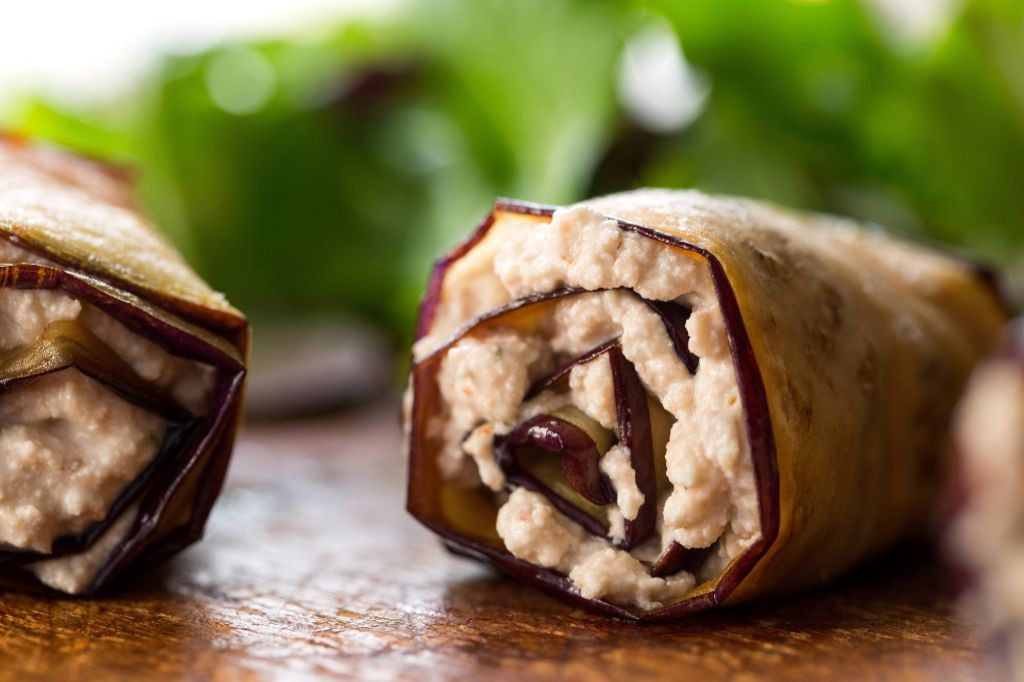
Zesty yet comforting, this stuffed eggplant is the cozy dinner you didn’t know you needed. It’s perfect for a quiet night in or a simple dinner party, and the ricotta-walnut filling is seriously addictive.
Serving: 4 | Pre Time: 15 minutes | Cooking Time: 40 minutes
Ingredients
For the Eggplant:
– 2 large eggplants
– 2 tbsp olive oil
– 1/2 tsp salt
For the Filling:
– 1 cup whole milk ricotta cheese
– 1/2 cup chopped walnuts
– 1/4 cup grated Parmesan cheese
– 1 large egg
– 1 clove garlic, minced
– 1/4 tsp black pepper
For the Topping:
– 1/2 cup marinara sauce
– 1/4 cup shredded mozzarella cheese
Instructions
1. Preheat your oven to 400°F (200°C).
2. Slice the 2 large eggplants in half lengthwise.
3. Use a spoon to carefully scoop out the flesh from each eggplant half, leaving a 1/4-inch thick border to create a sturdy shell. (Tip: Don’t discard the scooped flesh—you can chop and sauté it for another use).
4. Brush the insides of the 4 eggplant shells with the 2 tbsp olive oil and sprinkle with the 1/2 tsp salt.
5. Place the shells cut-side up on a baking sheet and bake for 15 minutes at 400°F to soften.
6. While the shells bake, make the filling. In a medium bowl, combine the 1 cup ricotta, 1/2 cup chopped walnuts, 1/4 cup Parmesan, 1 large egg, 1 minced garlic clove, and 1/4 tsp black pepper. Mix until fully incorporated.
7. Remove the softened eggplant shells from the oven. Reduce the oven temperature to 375°F (190°C).
8. Evenly divide the ricotta-walnut filling among the 4 eggplant shells, pressing it gently into the cavity.
9. Spoon 2 tbsp of the 1/2 cup marinara sauce over the filling in each shell. (Tip: Warming the sauce slightly makes it easier to spread).
10. Sprinkle the 1/4 cup shredded mozzarella cheese evenly over the top of each stuffed shell.
11. Return the baking sheet to the oven and bake at 375°F for 25 minutes, or until the cheese is melted and bubbly and the eggplant shell is tender when pierced with a fork.
12. Let the stuffed eggplants rest on the baking sheet for 5 minutes before serving. (Tip: This resting time helps the filling set for cleaner slices).
The baked eggplant becomes wonderfully tender, almost creamy, contrasting with the rich, slightly crunchy filling. Serve it with a simple green salad for a complete meal, or slice the halves into rounds for an elegant appetizer.
Keto Ricotta and Coconut Flour Bread
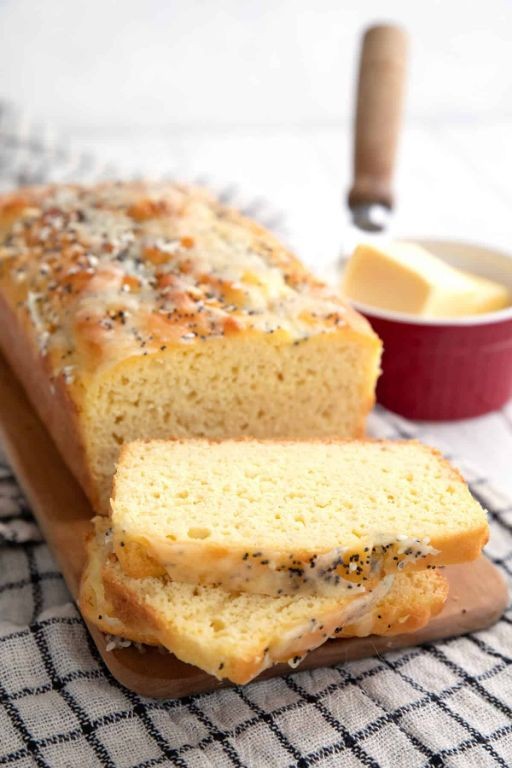
Perfect for those cozy mornings when you want something warm and satisfying without the carb crash. This keto ricotta and coconut flour bread is surprisingly easy to make and has a lovely, tender crumb. You’ll love how simple the ingredients are, too.
Serving: 8 | Pre Time: 10 minutes | Cooking Time: 45 minutes
Ingredients
For the bread batter:
– 1 cup full-fat ricotta cheese
– 4 large eggs
– 1/4 cup melted unsalted butter
– 1 teaspoon vanilla extract
For the dry mix:
– 1/2 cup coconut flour
– 1/4 cup granulated erythritol (or your preferred keto sweetener)
– 1 teaspoon baking powder
– 1/4 teaspoon salt
Instructions
1. Preheat your oven to 350°F (175°C) and grease a 9×5-inch loaf pan with butter or oil.
2. In a large mixing bowl, combine the ricotta cheese, eggs, melted butter, and vanilla extract. Whisk vigorously until the mixture is completely smooth and no lumps remain. Tip: Letting the eggs sit at room temperature for 10 minutes before using helps them incorporate more easily.
3. In a separate medium bowl, whisk together the coconut flour, erythritol, baking powder, and salt until evenly combined.
4. Gradually add the dry ingredients to the wet ingredients, stirring with a spatula until just incorporated and a thick batter forms. Do not overmix.
5. Pour the batter into the prepared loaf pan and use the spatula to spread it into an even layer.
6. Place the pan in the preheated oven and bake for 40-45 minutes. Tip: The bread is done when the top is golden brown and a toothpick inserted into the center comes out clean.
7. Remove the pan from the oven and let the bread cool in the pan for 10 minutes. Tip: This cooling period helps the bread set and makes it easier to remove without breaking.
8. After 10 minutes, carefully transfer the bread from the pan to a wire rack to cool completely before slicing.
Enjoy this bread toasted with a smear of butter for a delightful crunch on the outside and a soft, moist interior. Its subtly sweet, vanilla-kissed flavor pairs wonderfully with your morning coffee or as a base for avocado toast. You can even get creative by adding a handful of blueberries or a sprinkle of cinnamon to the batter before baking for a fun twist.
Ricotta and Spinach Stuffed Meatballs
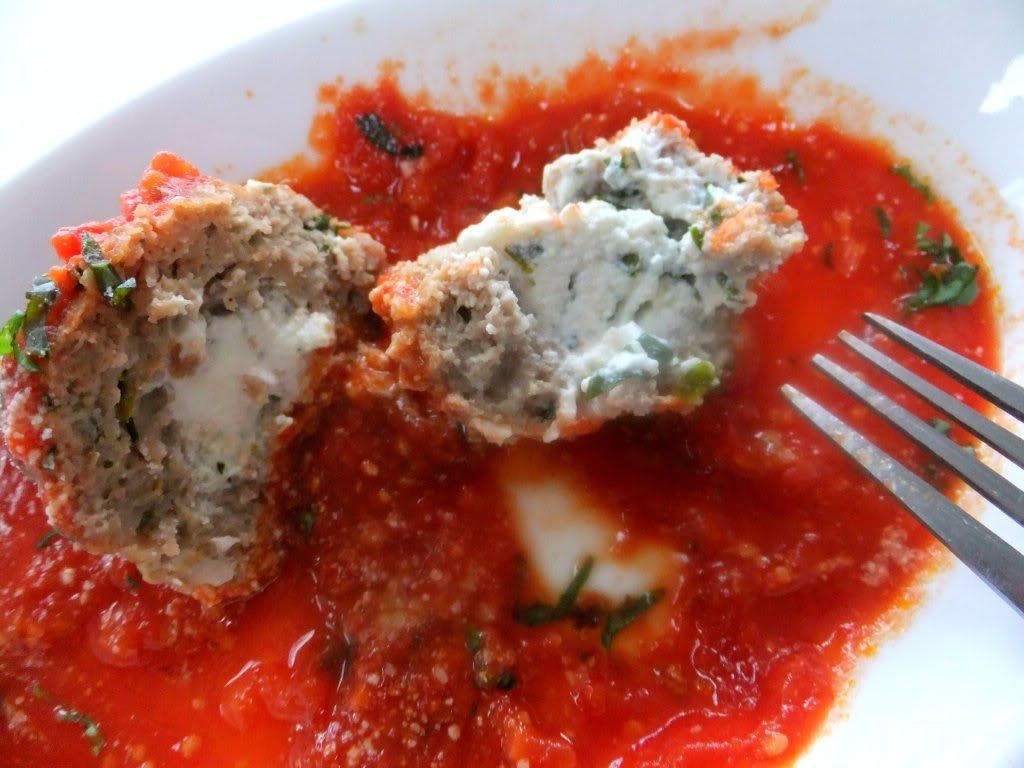
Okay, so picture this: you’re craving something cozy and impressive, but you don’t want to spend all day in the kitchen. On a chilly evening, these little flavor-packed bundles are just the thing to warm you up from the inside out. They’re surprisingly simple to make, and the cheesy, herby filling is a total game-changer.
Serving: 4 | Pre Time: 20 minutes | Cooking Time: 25 minutes
Ingredients
For the meatballs:
– 1 lb ground beef (80/20 blend)
– 1/2 cup Italian-style breadcrumbs
– 1 large egg
– 2 cloves garlic, minced
– 1 tsp dried oregano
– 1/2 tsp salt
– 1/4 tsp black pepper
For the filling:
– 1 cup whole-milk ricotta cheese
– 1/2 cup frozen chopped spinach, thawed and squeezed very dry
– 1/4 cup grated Parmesan cheese
– 1/4 tsp ground nutmeg
For the sauce:
– 2 tbsp olive oil
– 1 (24 oz) jar marinara sauce
Instructions
1. Preheat your oven to 400°F and line a rimmed baking sheet with parchment paper.
2. In a large bowl, combine the ground beef, breadcrumbs, egg, minced garlic, oregano, salt, and black pepper. Mix gently with your hands just until combined—overmixing makes tough meatballs.
3. In a separate medium bowl, stir together the ricotta, squeezed-dry spinach, Parmesan, and nutmeg until smooth.
4. Take about 2 tablespoons of the meat mixture and flatten it in your palm. Place 1 heaping teaspoon of the ricotta filling in the center.
5. Carefully fold the meat around the filling, pinching to seal completely into a smooth ball. Tip: Wetting your hands slightly prevents sticking.
6. Place each stuffed meatball seam-side down on the prepared baking sheet, spacing them about 1 inch apart.
7. Bake the meatballs for 15 minutes at 400°F, until they are firm and just starting to brown.
8. While the meatballs bake, heat the olive oil in a large skillet over medium heat.
9. Pour the marinara sauce into the skillet and let it simmer gently for 5 minutes.
10. Remove the meatballs from the oven and carefully transfer them to the skillet with the sauce. Tip: Use a slotted spoon to leave any fat behind on the baking sheet.
11. Spoon some sauce over each meatball, cover the skillet, and simmer on low heat for 10 minutes. Tip: The meatballs are done when their internal temperature reaches 165°F on an instant-read thermometer.
12. Remove the skillet from the heat and let it rest, covered, for 5 minutes before serving.
My favorite part is cutting into one and seeing that creamy, green-flecked center ooze out. The ricotta keeps everything incredibly moist, while the nutmeg adds a subtle warmth that plays so nicely with the savory beef and garlic. Try serving them over a big pile of creamy polenta or tucking them into a toasted hoagie roll for the ultimate meatball sub.
Keto Ricotta and Cinnamon Crepes
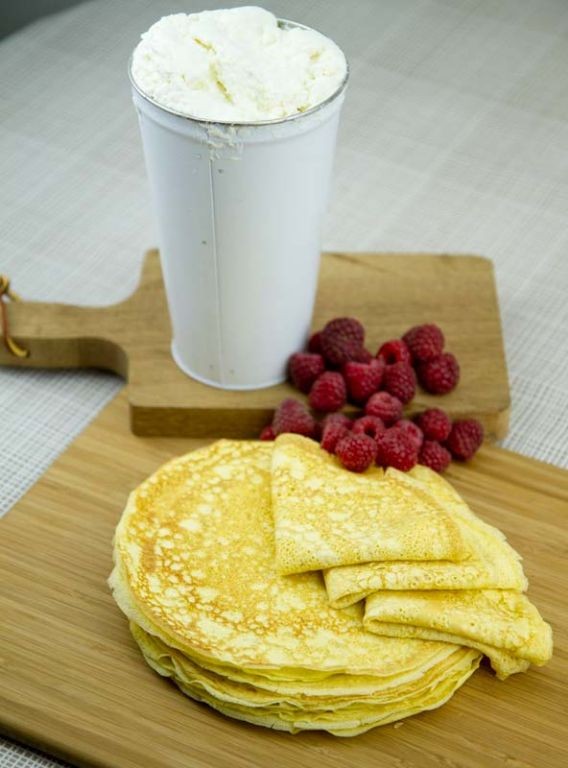
Venturing into keto breakfasts doesn’t have to mean giving up your favorite cozy flavors. These ricotta and cinnamon crepes are surprisingly simple to whip up and taste like a warm, comforting hug in food form. You’ll love how the creamy ricotta filling pairs with the sweet, spiced cinnamon.
Serving: 4 | Pre Time: 10 minutes | Cooking Time: 15 minutes
Ingredients
For the Crepe Batter:
– 4 large eggs
– 1/2 cup almond flour
– 1/4 cup ricotta cheese
– 2 tbsp unsalted butter, melted
– 1/4 tsp salt
For the Filling:
– 1 cup ricotta cheese
– 1 tsp ground cinnamon
– 2 tbsp powdered erythritol (or your preferred keto-friendly sweetener)
For Cooking & Serving:
– 1 tbsp unsalted butter (for the pan)
– Extra powdered erythritol and cinnamon for dusting (optional)
Instructions
1. In a medium mixing bowl, whisk the 4 large eggs until smooth and slightly frothy.
2. Add the 1/2 cup almond flour, 1/4 cup ricotta cheese, 2 tbsp melted butter, and 1/4 tsp salt to the bowl.
3. Whisk all ingredients together vigorously until you have a smooth, lump-free batter. Let it rest for 5 minutes to allow the almond flour to hydrate—this helps prevent tearing.
4. While the batter rests, make the filling by combining 1 cup ricotta cheese, 1 tsp ground cinnamon, and 2 tbsp powdered erythritol in a small bowl. Mix until fully incorporated and set aside.
5. Heat a non-stick skillet or crepe pan over medium heat and add 1 tsp of the 1 tbsp butter, swirling to coat the surface.
6. Pour about 1/4 cup of batter into the center of the hot pan, immediately tilting and rotating the pan to spread it into a thin, even circle.
7. Cook the crepe for 60-90 seconds, until the edges look set and the bottom is lightly golden. A good tip is to wait for small bubbles to form on the surface before flipping.
8. Carefully flip the crepe using a thin spatula and cook the other side for another 30-45 seconds until set. Transfer to a plate and repeat with the remaining batter, adding more butter to the pan as needed to prevent sticking.
9. Spoon 2-3 tbsp of the ricotta-cinnamon filling onto one half of each cooked crepe.
10. Fold the crepe in half over the filling, then fold it in half again to form a quarter-circle. Serve immediately.
11. For a finishing touch, dust the crepes lightly with extra powdered erythritol and a sprinkle of cinnamon if desired.
Really, the magic is in that soft, tender crepe wrapped around the sweet, spiced ricotta. They have a wonderfully delicate texture that’s sturdy enough to hold the filling without falling apart. Try serving them with a side of fresh berries for a pop of color and a hint of tartness to balance the sweetness.
Summary
Brimming with versatility, this collection proves keto can be deliciously diverse. Whether you’re craving a cozy dinner or a sweet treat, there’s a ricotta recipe here for you. We’d love to hear which one becomes your new favorite—drop a comment below! If you found these ideas helpful, please share the love and pin this article on Pinterest to save for your next kitchen adventure. Happy cooking!


