
Let’s be real—after a long day, the last thing you want is a complicated keto dinner. That’s why we’ve gathered 20 super-easy, lazy keto recipes perfect for busy weeknights. Think quick skillet meals, sheet pan dinners, and comforting soups that come together in a flash. Get ready to ditch the stress and enjoy delicious, low-carb meals without the fuss!
Cheesy Bacon and Egg Muffins

Forget boring breakfasts—these cheesy bacon and egg muffins are the handheld heroes your mornings have been dreaming of! They’re like a cozy diner breakfast decided to get fancy and put on a tuxedo, delivering all the savory, cheesy, bacon-y goodness in one perfectly portable package. Seriously, your fork might feel a little left out, but your taste buds will throw a party.
Serving: 12 | Pre Time: 15 minutes | Cooking Time: 20 minutes
Ingredients
– 12 slices thick-cut applewood-smoked bacon
– 1 tablespoon clarified butter
– 12 large pasture-raised eggs, lightly beaten
– 1 cup shredded sharp white cheddar cheese
– ½ cup finely diced yellow onion
– ¼ cup whole milk
– 1 teaspoon kosher salt
– ½ teaspoon freshly cracked black pepper
– ¼ teaspoon smoked paprika
– Non-stick cooking spray
Instructions
1. Preheat your oven to 375°F (190°C) and generously spray a standard 12-cup muffin tin with non-stick cooking spray.
2. In a large skillet over medium-high heat, cook the 12 slices of thick-cut applewood-smoked bacon until crisp, about 8-10 minutes, turning occasionally for even rendering.
3. Transfer the cooked bacon to a paper towel-lined plate to drain, then crumble it into small pieces once cool enough to handle.
4. In the same skillet, discard all but 1 tablespoon of the rendered bacon fat and add 1 tablespoon of clarified butter.
5. Sauté the ½ cup of finely diced yellow onion in the fat mixture over medium heat until translucent and fragrant, about 5 minutes, then remove from heat. Tip: Using the residual bacon fat adds a deep, smoky base flavor to the onions.
6. In a large mixing bowl, combine the 12 lightly beaten pasture-raised eggs, 1 cup of shredded sharp white cheddar cheese, the crumbled bacon, sautéed onions, ¼ cup of whole milk, 1 teaspoon of kosher salt, ½ teaspoon of freshly cracked black pepper, and ¼ teaspoon of smoked paprika. Whisk vigorously until fully incorporated and slightly frothy.
7. Evenly divide the egg mixture among the 12 prepared muffin cups, filling each about three-quarters full. Tip: Avoid overfilling to prevent spillage and ensure even cooking.
8. Bake in the preheated oven for 18-20 minutes, or until the tops are golden brown and a toothpick inserted into the center of a muffin comes out clean.
9. Allow the muffins to cool in the tin for 5 minutes before gently loosening the edges with a butter knife and transferring to a wire rack. Tip: This resting time helps them set for easy removal without breaking.
10. Serve warm. These muffins boast a fluffy, tender interior with crispy bacon bits and pockets of melted cheddar, all wrapped in a golden, slightly crisp exterior. For a brunch upgrade, drizzle with a touch of hot honey or serve alongside a zesty avocado salsa—they’re deliciously versatile straight from the oven or chilled for an on-the-go snack.
Keto Taco Soup

Aren’t you tired of the same old keto meals that feel more like a chore than a treat? Let’s shake things up with a soup that packs all the bold, zesty flavors of your favorite tacos into a cozy, low-carb bowl—perfect for those chilly evenings when you crave something hearty without the carb coma. This Keto Taco Soup is a flavor fiesta that’ll have you forgetting it’s even diet-friendly, with a rich, savory broth and tender chunks that come together in a flash, making it the ultimate weeknight lifesaver for busy foodies who still want to eat like royalty.
Serving: 4 | Pre Time: 15 minutes | Cooking Time: 25 minutes
Ingredients
– 1 lb ground beef (preferably 80/20 blend)
– 1 tbsp avocado oil
– 1 medium yellow onion, finely diced
– 2 cloves garlic, minced
– 1 tbsp chili powder
– 1 tsp ground cumin
– 1/2 tsp smoked paprika
– 4 cups beef bone broth
– 1 (14.5 oz) can diced tomatoes, undrained
– 1/2 cup heavy cream
– 1/2 cup shredded sharp cheddar cheese
– 1/4 cup fresh cilantro, chopped
– Sea salt and freshly ground black pepper, to taste
Instructions
1. Heat the avocado oil in a large Dutch oven over medium-high heat until shimmering, about 2 minutes.
2. Add the ground beef to the pot, breaking it apart with a wooden spoon, and cook until browned and no pink remains, approximately 5–7 minutes.
3. Stir in the finely diced yellow onion and minced garlic, cooking until the onion is translucent and fragrant, about 3–4 minutes.
4. Sprinkle in the chili powder, ground cumin, and smoked paprika, toasting the spices for 30 seconds to release their aromas.
5. Pour in the beef bone broth and undrained diced tomatoes, bringing the mixture to a gentle boil.
6. Reduce the heat to low, cover the pot, and simmer for 15 minutes to allow the flavors to meld.
7. Stir in the heavy cream and shredded sharp cheddar cheese until fully incorporated and the cheese is melted, about 2 minutes.
8. Season with sea salt and freshly ground black pepper to taste, adjusting as needed.
9. Ladle the soup into bowls and garnish with the chopped fresh cilantro.
10. Serve immediately while hot.
What you’ll love is the velvety texture from the cream and cheese, which balances the smoky spices and tangy tomatoes for a deeply satisfying bowl. Try topping it with a dollop of sour cream or sliced avocado for an extra creamy twist—it’s so good, you might just skip the tacos altogether!
Slow Cooker Pulled Pork
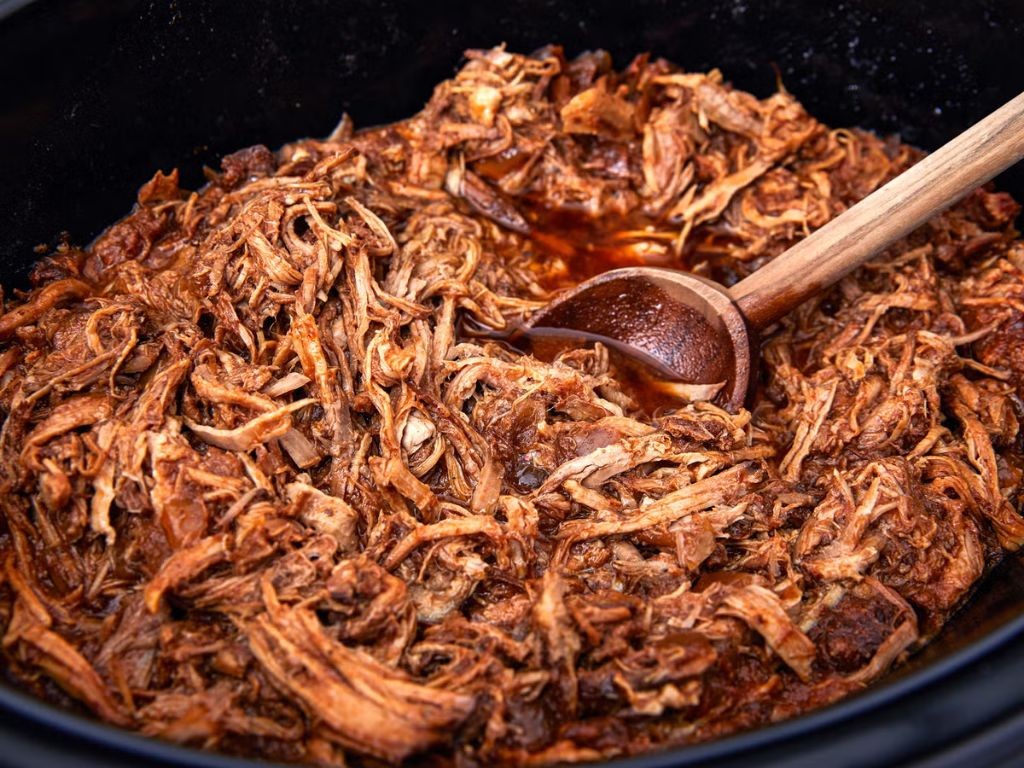
Gather ’round, slow-cooker enthusiasts and busy-foodie friends, because we’re about to turn a humble hunk of pork into a legendary, melt-in-your-mouth masterpiece with minimal effort and maximum flavor payoff. This recipe is your secret weapon for feeding a crowd or stocking the freezer with deliciousness, all while your trusty appliance does the heavy lifting.
Serving: 8 | Pre Time: 15 minutes | Cooking Time: 480 minutes
Ingredients
– 4 pounds boneless pork shoulder roast, trimmed of excess fat
– 1 tablespoon extra-virgin olive oil
– 1 large yellow onion, finely diced
– 4 cloves garlic, minced
– 1 cup low-sodium chicken stock
– ¾ cup apple cider vinegar
– ½ cup dark brown sugar, packed
– ¼ cup tomato paste
– 2 tablespoons smoked paprika
– 1 tablespoon Dijon mustard
– 2 teaspoons kosher salt
– 1 teaspoon freshly cracked black pepper
– 1 teaspoon ground cumin
– ½ teaspoon cayenne pepper
– 8 soft brioche buns, for serving
Instructions
1. Pat the 4-pound pork shoulder roast completely dry with paper towels to ensure a proper sear.
2. Heat 1 tablespoon of extra-virgin olive oil in a large skillet over medium-high heat until it shimmers, about 2 minutes.
3. Sear the pork roast on all sides until a deep golden-brown crust forms, approximately 3-4 minutes per side. (Tip: Don’t rush this step—the Maillard reaction here builds foundational flavor.)
4. Transfer the seared pork roast to the insert of a 6-quart or larger slow cooker.
5. In the same skillet, reduce heat to medium and sauté 1 finely diced large yellow onion until translucent and soft, about 5 minutes.
6. Add 4 minced cloves of garlic to the skillet and cook for 1 minute until fragrant.
7. Pour in 1 cup of low-sodium chicken stock to deglaze the skillet, scraping up all the flavorful browned bits from the bottom.
8. Whisk in ¾ cup apple cider vinegar, ½ cup packed dark brown sugar, ¼ cup tomato paste, 2 tablespoons smoked paprika, 1 tablespoon Dijon mustard, 2 teaspoons kosher salt, 1 teaspoon cracked black pepper, 1 teaspoon ground cumin, and ½ teaspoon cayenne pepper until fully combined.
9. Bring the sauce mixture to a simmer for 2 minutes to allow the flavors to meld, then pour it over the pork in the slow cooker.
10. Cover and cook on LOW heat for 8 hours until the pork is fork-tender and easily shreds. (Tip: Resist the urge to lift the lid; maintaining a consistent temperature is key.)
11. Carefully transfer the cooked pork to a large cutting board or bowl, preserving the cooking liquid in the slow cooker.
12. Using two forks, shred the pork into bite-sized pieces, discarding any large pieces of fat.
13. Skim excess fat from the surface of the cooking liquid in the slow cooker with a spoon.
14. Return the shredded pork to the slow cooker and stir to coat thoroughly with the reduced sauce. (Tip: For a thicker sauce, simmer uncovered on HIGH for 15-20 minutes.)
15. Serve the pulled pork piled high on 8 soft brioche buns.
Heavenly, right? The pork transforms into impossibly tender strands with a perfect balance of smoky sweetness and tangy vinegar kick. For a next-level twist, pile it onto crispy potato skins or fold it into warm corn tortillas with a crunchy cabbage slaw.
Keto Cheese Chips

Yikes, your snack drawer is judging you—but these Keto Cheese Chips are here to save the day! Imagine crispy, cheesy perfection that’s so low-carb, your fitness tracker might just applaud. Let’s turn that shredded cheese into a crunchy obsession that’ll make kale chips blush with envy.
Serving: 4 | Pre Time: 10 minutes | Cooking Time: 15 minutes
Ingredients
– 2 cups shredded sharp cheddar cheese, finely grated
– 1/4 cup grated Parmesan cheese
– 1/2 teaspoon smoked paprika
– 1/4 teaspoon garlic powder
– 1/4 teaspoon onion powder
– 1 tablespoon clarified butter, melted
– 1/4 teaspoon sea salt, finely ground
Instructions
1. Preheat your oven to 375°F and line two baking sheets with parchment paper.
2. In a medium mixing bowl, combine the shredded sharp cheddar cheese, grated Parmesan cheese, smoked paprika, garlic powder, and onion powder until evenly distributed.
3. Drizzle the melted clarified butter over the cheese mixture and toss gently to coat, ensuring no clumps form.
4. Using a tablespoon measure, scoop portions of the cheese mixture onto the prepared baking sheets, spacing them 2 inches apart to allow for spreading.
5. Flatten each portion with the back of a spoon into thin, even circles approximately 2 inches in diameter.
6. Sprinkle the finely ground sea salt evenly over the tops of the cheese circles for enhanced flavor.
7. Bake in the preheated oven for 12–15 minutes, or until the edges turn golden brown and the centers appear firm and crisp.
8. Remove the baking sheets from the oven and let the chips cool on the sheets for 5 minutes to crisp up further—this prevents breakage.
9. Transfer the cooled chips to a wire rack to cool completely, about 10 minutes, before serving.
Kick back and savor these golden delights: they’re shatteringly crisp with a rich, smoky depth from the paprika, perfect for dipping into guacamole or crumbling over a salad for an extra cheesy punch. Store any leftovers in an airtight container to maintain that addictive crunch!
One-Pan Garlic Butter Salmon
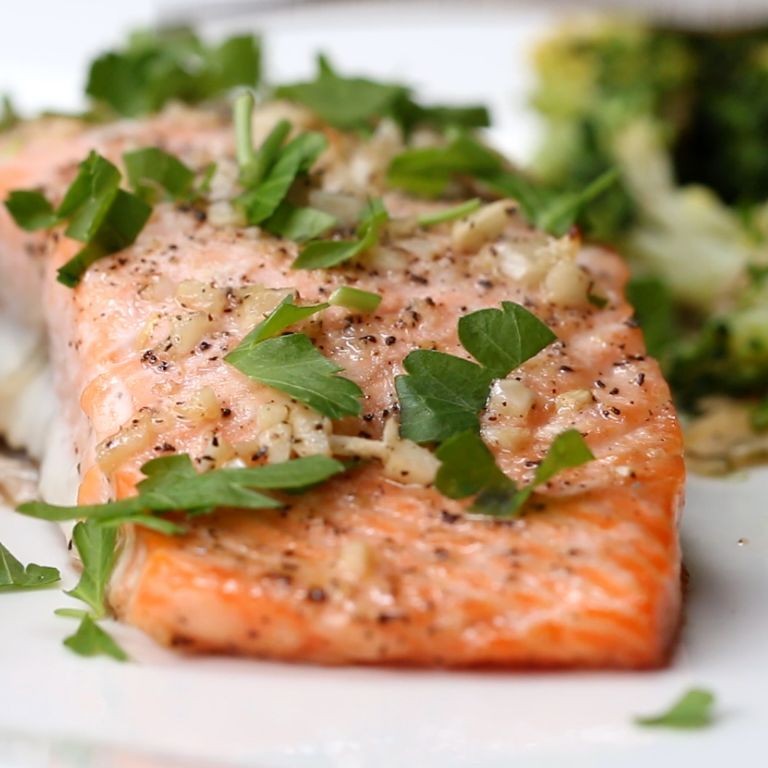
Rally your taste buds, folks, because we’re about to make your weeknight dinner dreams come true with minimal cleanup and maximum flavor. This one-pan wonder is the culinary equivalent of a superhero swooping in to save your hungry, time-crunched soul—no cape required, just a trusty skillet and a serious love for garlic butter.
Serving: 4 | Pre Time: 10 minutes | Cooking Time: 15 minutes
Ingredients
– 4 (6-ounce) skin-on salmon fillets
– 4 tablespoons unsalted European-style butter, divided
– 3 tablespoons extra-virgin olive oil
– 6 large garlic cloves, finely minced
– 1 tablespoon fresh lemon juice
– 1 teaspoon kosher salt
– ½ teaspoon freshly cracked black pepper
– ¼ cup dry white wine (such as Sauvignon Blanc)
– 2 tablespoons finely chopped fresh Italian parsley
Instructions
1. Pat the salmon fillets completely dry with paper towels to ensure a crisp sear.
2. Season both sides of the fillets evenly with the kosher salt and freshly cracked black pepper.
3. Heat a large, heavy-bottomed skillet (like cast iron or stainless steel) over medium-high heat for 2 minutes until hot.
4. Add 2 tablespoons of the extra-virgin olive oil to the skillet, swirling to coat the surface.
5. Carefully place the salmon fillets in the skillet, skin-side down, and cook undisturbed for 5 minutes to crisp the skin.
6. Gently flip each fillet using a fish spatula and cook for an additional 3–4 minutes until the internal temperature reaches 125°F for medium-rare.
7. Transfer the cooked salmon to a clean plate and tent loosely with aluminum foil to rest.
8. Reduce the skillet heat to medium-low and add the remaining 2 tablespoons of extra-virgin olive oil.
9. Add the finely minced garlic and sauté for 45–60 seconds until fragrant but not browned.
10. Pour in the dry white wine to deglaze the pan, scraping up any browned bits from the bottom with a wooden spoon.
11. Simmer the wine for 2 minutes until reduced by half.
12. Whisk in the unsalted European-style butter, one tablespoon at a time, until fully melted and emulsified into a glossy sauce.
13. Stir in the fresh lemon juice and remove the skillet from the heat.
14. Return the rested salmon fillets to the skillet, spooning the garlic butter sauce over the top to coat.
15. Garnish with the finely chopped fresh Italian parsley just before serving.
Consider the buttery, garlicky sauce your new best friend—it clings to the perfectly flaky, medium-rare salmon like a flavor blanket. Serve this beauty over a bed of creamy mashed potatoes or with crusty bread to sop up every last drop, because wasting that sauce is a culinary crime.
Keto Fat Bombs

Ready to ditch the holiday sugar crash and embrace a snack that’s as indulgent as it is virtuous? Meet your new best friends: Keto Fat Bombs—the bite-sized, energy-packed treats that’ll make you forget you’re even on a diet. Think of them as your secret weapon for staying keto without sacrificing flavor, because who says healthy can’t be deliciously decadent?
Serving: 12 | Pre Time: 15 minutes | Cooking Time: 0 minutes
Ingredients
– 1 cup full-fat cream cheese, softened to room temperature
– ½ cup unsalted almond butter, smooth and creamy
– ¼ cup coconut oil, refined and melted
– ¼ cup powdered erythritol, finely sifted
– 1 teaspoon pure vanilla extract
– ¼ teaspoon sea salt, finely ground
– 2 tablespoons unsweetened cocoa powder, Dutch-processed
– ¼ cup chopped pecans, toasted lightly
Instructions
1. In a medium mixing bowl, combine 1 cup softened full-fat cream cheese, ½ cup unsalted almond butter, and ¼ cup melted refined coconut oil using a hand mixer on medium speed until fully incorporated and smooth, about 2 minutes.
2. Add ¼ cup finely sifted powdered erythritol, 1 teaspoon pure vanilla extract, and ¼ teaspoon finely ground sea salt to the bowl, then mix on low speed for 1 minute until the sweetener is evenly distributed and no lumps remain.
3. Divide the mixture evenly into two portions: transfer one half to a separate small bowl and set aside.
4. To the remaining half in the original bowl, fold in 2 tablespoons Dutch-processed unsweetened cocoa powder with a spatula until the mixture is uniformly chocolate-colored and no streaks appear, about 30 seconds.
5. Line a baking sheet with parchment paper. Using a small cookie scoop or tablespoon, portion the plain mixture into 6 rounded balls, each about 1 inch in diameter, and place them on the prepared sheet, spacing them 1 inch apart.
6. Repeat with the chocolate mixture to form 6 additional balls, placing them on the same sheet. Tip: If the mixture becomes too soft, chill it in the refrigerator for 5 minutes to firm up for easier handling.
7. Roll each ball between your palms to smooth the surface and ensure a round shape, then gently press ¼ cup lightly toasted chopped pecans onto the tops of all 12 balls, coating them evenly.
8. Transfer the baking sheet to the freezer and chill the fat bombs until firm to the touch, about 30 minutes. Tip: For best texture, avoid over-chilling beyond 1 hour to prevent excessive hardness.
9. Once set, transfer the fat bombs to an airtight container, layering them between sheets of parchment paper to prevent sticking, and store in the refrigerator for up to 1 week. Tip: Serve chilled for optimal consistency, as they may soften at room temperature after 10 minutes.
Vibrantly rich and satisfying, these fat bombs boast a creamy, fudgy interior that melts luxuriously with a subtle crunch from the pecans. Their balanced sweetness, derived from erythritol, avoids any artificial aftertaste, making them perfect for a quick energy boost or a guilt-free dessert—try pairing them with a hot cup of black coffee for an elevated keto-friendly treat.
Egg Roll in a Bowl

Nervous about deep-frying but craving those crispy, savory egg roll flavors? Let’s skip the wrapper drama and dive straight into the good stuff with this deconstructed delight that delivers all the satisfaction without the splatter. It’s the weeknight hero you didn’t know you needed, ready faster than you can say ‘takeout.’
Serving: 4 | Pre Time: 15 minutes | Cooking Time: 20 minutes
Ingredients
– 1 tablespoon toasted sesame oil
– 1 pound ground pork (80/20 blend)
– 1 medium yellow onion, finely diced
– 3 cloves garlic, minced
– 1 tablespoon freshly grated ginger
– 1/2 head green cabbage, thinly sliced (about 6 cups)
– 2 large carrots, julienned
– 3 tablespoons low-sodium soy sauce
– 1 tablespoon rice vinegar
– 1 teaspoon Sriracha sauce
– 2 green onions, thinly sliced
– 1 tablespoon toasted sesame seeds
Instructions
1. Heat the toasted sesame oil in a large skillet or wok over medium-high heat until it shimmers, about 1 minute.
2. Add the ground pork to the skillet, breaking it apart with a wooden spoon, and cook until no pink remains and it begins to brown, 5–7 minutes.
3. Stir in the finely diced yellow onion and cook until translucent and fragrant, about 3 minutes.
4. Add the minced garlic and freshly grated ginger, stirring constantly for 30 seconds until aromatic to prevent burning.
5. Incorporate the thinly sliced green cabbage and julienned carrots, tossing to combine with the pork mixture.
6. Cook the vegetables, stirring occasionally, until the cabbage wilts and the carrots soften but retain a slight crunch, 6–8 minutes.
7. Pour in the low-sodium soy sauce, rice vinegar, and Sriracha sauce, stirring to coat all ingredients evenly.
8. Continue cooking for 2–3 minutes to allow the flavors to meld and the liquid to reduce slightly.
9. Remove the skillet from heat and fold in the thinly sliced green onions.
10. Transfer the mixture to serving bowls and garnish generously with toasted sesame seeds.
Perfectly balanced between savory pork, crisp-tender veggies, and a tangy-spicy sauce, this bowl offers a satisfying texture contrast in every bite. For a fun twist, serve it over cauliflower rice for a low-carb option or top with a fried egg for extra richness—it’s endlessly adaptable to your cravings!
Buffalo Chicken Dip

Gather ’round, hungry humans, because we’re about to transform your holiday party from ‘meh’ to ‘more, please!’ with a dip so legendary it deserves its own fan club. Forget subtlety—this is a flavor fiesta where spicy, creamy, and cheesy collide in the most glorious way possible.
Serving: 8 | Pre Time: 15 minutes | Cooking Time: 25 minutes
Ingredients
– 2 cups shredded, cooked chicken breast
– 8 oz full-fat cream cheese, softened to room temperature
– 1/2 cup Frank’s RedHot Original Cayenne Pepper Sauce
– 1/2 cup ranch dressing
– 1/2 cup sharp cheddar cheese, freshly grated
– 1/4 cup blue cheese crumbles
– 2 tbsp unsalted butter
– 1/4 cup finely diced celery
– 2 tbsp thinly sliced green onions, for garnish
– Tortilla chips, for serving
Instructions
1. Preheat your oven to 350°F (177°C) and position a rack in the center.
2. In a medium saucepan over low heat, melt 2 tbsp of unsalted butter.
3. Add 8 oz of softened, full-fat cream cheese to the saucepan, stirring constantly with a silicone spatula until completely smooth and no lumps remain, about 3-4 minutes. Tip: Softening the cream cheese prevents a grainy texture—if you forgot, microwave it in 15-second bursts until pliable.
4. Stir in 1/2 cup of Frank’s RedHot Original Cayenne Pepper Sauce and 1/2 cup of ranch dressing until fully incorporated and the mixture is uniformly orange.
5. Fold in 2 cups of shredded, cooked chicken breast and 1/4 cup of finely diced celery until evenly coated.
6. Transfer the mixture to an 8×8-inch baking dish, spreading it into an even layer with the spatula.
7. In a small bowl, combine 1/2 cup of freshly grated sharp cheddar cheese and 1/4 cup of blue cheese crumbles.
8. Sprinkle the cheese mixture evenly over the top of the dip.
9. Bake at 350°F (177°C) for 20-25 minutes, or until the cheese is fully melted, bubbly, and the edges are lightly golden brown. Tip: For extra browning, switch to broil for the final 1-2 minutes, but watch closely to avoid burning.
10. Remove the dip from the oven and let it rest for 5 minutes to allow the flavors to meld and prevent scorching your tongue.
11. Garnish with 2 tbsp of thinly sliced green onions just before serving. Tip: Serve immediately with sturdy tortilla chips that can scoop up the thick, hot dip without breaking.
Kick back and watch this dip disappear faster than holiday cookies. The texture is luxuriously creamy with tender chicken bits, while the flavor delivers a perfect tangy-spicy punch mellowed by cool ranch and funky blue cheese. For a next-level move, stuff it into slider buns or spoon it over baked potatoes—your guests will declare you the MVP of munchies.
Keto Avocado Smoothie

Kicking off the holiday season with a creamy, dreamy keto delight that’s so smooth, it might just replace your morning coffee—or at least make it jealous! This Keto Avocado Smoothie is the ultimate guilt-free indulgence, blending rich avocado with a touch of sweetness for a sip that’s as satisfying as it is sneaky (shh, we won’t tell it’s healthy). Perfect for those post-holiday-feast mornings when you need something light yet luxurious to keep those resolutions intact.
Serving: 2 | Pre Time: 10 minutes | Cooking Time: 0 minutes
Ingredients
– 1 large ripe avocado, peeled and pitted
– 1 cup unsweetened almond milk
– 2 tablespoons MCT oil
– 1 tablespoon pure vanilla extract
– 1 teaspoon ground cinnamon
– ½ teaspoon pure stevia powder
– 1 cup ice cubes
Instructions
1. Place the peeled and pitted avocado into a high-speed blender.
2. Add the unsweetened almond milk to the blender.
3. Pour in the MCT oil for a creamy, energy-boosting base.
4. Incorporate the pure vanilla extract to enhance the aromatic profile.
5. Sprinkle in the ground cinnamon for a warm, spiced note.
6. Measure and add the pure stevia powder for sweetness without carbs.
7. Drop in the ice cubes to chill and thicken the mixture.
8. Secure the blender lid tightly to prevent any spills during blending.
9. Blend on high speed for 45 seconds, or until the mixture is completely smooth and no chunks remain.
10. Check the consistency by pausing the blender and scraping down the sides with a spatula if needed.
11. Blend again for an additional 15 seconds to ensure a velvety texture.
12. Pour the smoothie immediately into two chilled glasses to serve.
Yielding a lusciously thick and frothy treat, this smoothie boasts a velvety texture that clings to your spoon with a subtle sweetness from the stevia, balanced by the earthy richness of avocado and a hint of cinnamon spice. For a creative twist, garnish with a sprinkle of extra cinnamon or a few crushed nuts, or serve it as a frosty dessert in a fancy glass to impress your brunch guests—because who says keto can’t be decadent?
Keto Cloud Bread

Venture into the fluffy, low-carb wonderland of this magical bread alternative that’s so light, it practically floats off the plate—perfect for when you’re craving a sandwich but your carb count is giving you the side-eye. With just a handful of simple ingredients, you’ll whip up a batch of these airy delights that are as versatile as they are delicious, proving that keto eating doesn’t have to be a drag. Get ready to say goodbye to bread envy and hello to cloud-like bliss that’ll make your taste buds do a happy dance!
Serving: 6 | Pre Time: 10 minutes | Cooking Time: 25 minutes
Ingredients
– 3 large pasture-raised eggs, separated
– 3 ounces full-fat cream cheese, softened to room temperature
– ¼ teaspoon cream of tartar
– ¼ teaspoon fine sea salt
Instructions
1. Preheat your oven to 300°F and line a baking sheet with parchment paper.
2. In a large mixing bowl, combine the egg yolks, softened cream cheese, and fine sea salt, whisking vigorously until the mixture is smooth and fully incorporated, with no lumps remaining.
3. In a separate, clean, dry bowl, add the egg whites and cream of tartar, then use an electric mixer on high speed to beat until stiff peaks form, which should take about 3–4 minutes and result in a glossy, firm meringue that holds its shape when the beaters are lifted.
4. Gently fold the egg yolk mixture into the meringue using a rubber spatula, taking care to maintain as much air as possible by using broad, sweeping motions until just combined and no white streaks remain.
5. Spoon the batter onto the prepared baking sheet, forming 6 equal mounds spaced about 2 inches apart, then use the back of the spoon to smooth each into a round, about ½-inch thick.
6. Bake in the preheated oven for 25 minutes, or until the tops are lightly golden and the edges are firm to the touch, avoiding opening the oven door during baking to prevent collapse.
7. Remove from the oven and let the cloud bread cool completely on the baking sheet for at least 30 minutes to set its structure before handling.
Here’s the delightful payoff: these cloud bread rounds boast a tender, slightly chewy texture with a subtle tang from the cream cheese, making them ideal for stacking with your favorite keto-friendly fillings like avocado and smoked salmon. Serve them warm as a base for eggs Benedict or let them cool to use in sandwiches—either way, they’re a game-changer for low-carb living that’ll have you floating on air!
Lazy Keto Pizza Casserole
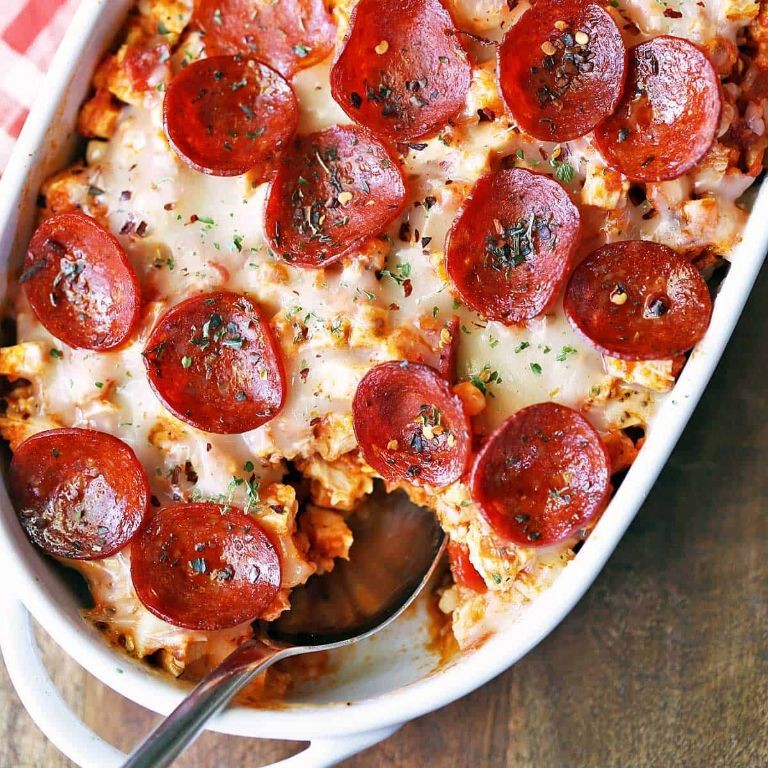
Miraculously, we’ve cracked the code on a keto-friendly pizza that ditches the dough-making drama entirely—welcome to a casserole that’s so indulgent, you’ll forget it’s low-carb. Think melty mozzarella, savory pepperoni, and a rich tomato base all baked into one glorious, fork-friendly dish that’s perfect for those lazy nights when you’re craving pizza without the carb crash. It’s the ultimate cheater’s meal that’ll have you wondering why you ever bothered with a pizza stone in the first place!
Serving: 6 | Pre Time: 15 minutes | Cooking Time: 25 minutes
Ingredients
– 1 pound ground Italian sausage, browned and crumbled
– 2 cups shredded low-moisture mozzarella cheese
– 1 cup sugar-free marinara sauce
– 4 ounces sliced pepperoni
– ½ cup grated Parmesan cheese
– 3 large pasture-raised eggs, lightly beaten
– ¼ cup heavy cream
– 1 teaspoon dried oregano
– ½ teaspoon garlic powder
– ¼ teaspoon red pepper flakes
– 2 tablespoons extra-virgin olive oil
– Fresh basil leaves, for garnish
Instructions
1. Preheat your oven to 375°F (190°C) and lightly grease a 9×13-inch baking dish with 1 tablespoon of extra-virgin olive oil, ensuring even coverage to prevent sticking.
2. In a large skillet over medium-high heat, brown 1 pound of ground Italian sausage for 8–10 minutes until fully cooked and crumbled, then drain any excess fat using a slotted spoon.
3. In a medium mixing bowl, whisk together 3 large pasture-raised eggs, lightly beaten, ¼ cup heavy cream, 1 teaspoon dried oregano, ½ teaspoon garlic powder, and ¼ teaspoon red pepper flakes until smooth and well-combined.
4. Spread the browned sausage evenly across the bottom of the prepared baking dish as the first layer.
5. Pour 1 cup of sugar-free marinara sauce over the sausage, using the back of a spoon to spread it into a thin, uniform coat.
6. Sprinkle 2 cups of shredded low-moisture mozzarella cheese evenly over the marinara layer, ensuring full coverage for optimal melt.
7. Arrange 4 ounces of sliced pepperoni in a single layer on top of the mozzarella, slightly overlapping for even distribution.
8. Gently pour the egg and cream mixture over the pepperoni layer, tilting the dish to allow it to seep into the gaps for a cohesive bind.
9. Top with ½ cup of grated Parmesan cheese, sprinkling it evenly for a golden, crispy finish.
10. Drizzle the remaining 1 tablespoon of extra-virgin olive oil over the Parmesan to enhance browning.
11. Bake in the preheated oven at 375°F (190°C) for 25 minutes, or until the top is bubbly and golden brown with edges slightly crisp.
12. Remove from the oven and let it rest for 5 minutes to set, which prevents it from becoming soggy when sliced.
13. Garnish with fresh basil leaves just before serving to add a bright, aromatic touch.
Zesty and satisfying, this casserole emerges from the oven with a gooey, cheese-pull center and a crispy, golden top that mimics the best parts of a pizza crust. Serve it straight from the dish for a family-style feast, or pair it with a simple arugula salad dressed in lemon vinaigrette to cut through the richness—either way, it’s a keto win that’ll have everyone asking for seconds!
Keto Chocolate Mousse

Tired of holiday treats that leave you feeling like a stuffed turkey? This keto chocolate mousse is your decadent, guilt-free escape hatch—a silky, dreamy dessert that proves you can have your chocolate and eat it too, without a carb in sight. Let’s whip up some magic that’s so good, you’ll forget it’s actually good for you.
Serving: 4 | Pre Time: 15 minutes | Cooking Time: 0 minutes
Ingredients
– 8 ounces high-quality dark chocolate (at least 85% cacao), finely chopped
– 1 cup heavy whipping cream, chilled
– 3 large pasture-raised eggs, separated, at room temperature
– 1/4 cup powdered erythritol
– 1 teaspoon pure vanilla extract
– 1/4 teaspoon fine sea salt
Instructions
1. Place the finely chopped dark chocolate in a heatproof bowl.
2. In a small saucepan, gently heat 1/4 cup of the heavy whipping cream over medium-low heat until it just begins to simmer, about 2-3 minutes.
3. Immediately pour the hot cream over the chopped chocolate and let it sit undisturbed for 1 minute to melt.
4. Whisk the chocolate and cream mixture until completely smooth and glossy, ensuring no lumps remain.
5. In a separate large mixing bowl, combine the egg yolks, powdered erythritol, vanilla extract, and fine sea salt.
6. Whisk the yolk mixture vigorously until pale and slightly thickened, about 2 minutes.
7. Gradually pour the melted chocolate mixture into the yolk mixture, whisking constantly to temper the eggs and prevent curdling.
8. In another clean, dry bowl, use an electric mixer on high speed to whip the remaining 3/4 cup of chilled heavy whipping cream to stiff peaks, about 3-4 minutes.
9. Gently fold one-third of the whipped cream into the chocolate mixture using a spatula to lighten it.
10. Fold in the remaining whipped cream until just combined, being careful not to deflate the mixture.
11. In a final clean, dry bowl, whip the egg whites with a pinch of salt on high speed until they form stiff peaks, about 2-3 minutes.
12. Fold the whipped egg whites into the chocolate mixture in two additions until fully incorporated and no white streaks remain.
13. Divide the mousse evenly among four serving glasses or ramekins.
14. Chill the mousse in the refrigerator for at least 4 hours, or until set and firm to the touch.
Buttery smooth and luxuriously rich, this mousse delivers an intense chocolate flavor with a melt-in-your-mouth texture that’s pure indulgence. Serve it topped with a sprinkle of flaky sea salt or a few fresh raspberries for a stunning, restaurant-worthy finish that’ll have everyone asking for seconds.
Simple Green Beans with Almonds
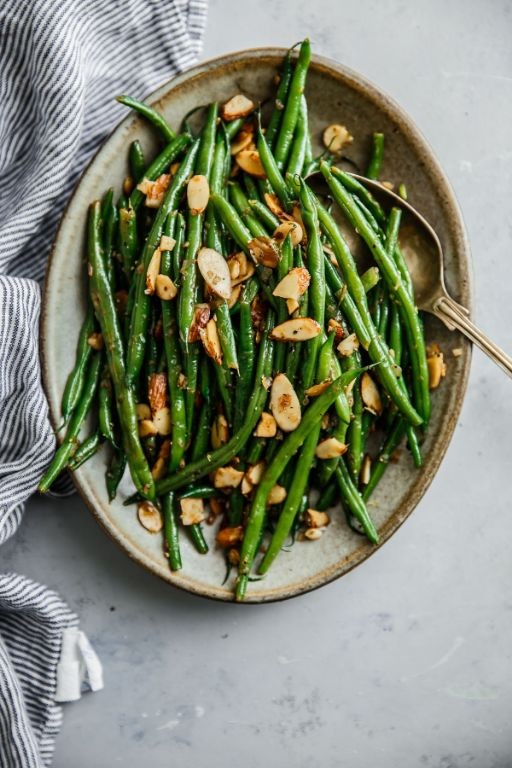
Dazzlingly simple yet secretly sophisticated, this green bean dish is the culinary equivalent of putting on sweatpants that somehow make you look chic—it’s effortless elegance on a plate, ready to rescue your weeknight dinners from monotony. With a satisfying crunch from toasted almonds and a glossy, garlicky finish, it transforms humble veggies into a side dish that might just steal the spotlight from the main event.
Serving: 4 | Pre Time: 10 minutes | Cooking Time: 15 minutes
Ingredients
– 1 pound fresh green beans, trimmed
– 2 tablespoons clarified butter
– 3 garlic cloves, minced
– ½ cup sliced almonds
– 1 tablespoon fresh lemon juice
– ½ teaspoon fine sea salt
– ¼ teaspoon freshly cracked black pepper
Instructions
1. Bring a large pot of salted water to a rolling boil over high heat.
2. Add the trimmed green beans and blanch for 3 minutes until bright green and crisp-tender.
3. Immediately transfer the beans to an ice bath to halt the cooking process, preserving their vibrant color and texture—this quick chill is your secret weapon against mushy veggies.
4. Drain the beans thoroughly and pat them dry with a clean kitchen towel to ensure they sauté properly without steaming.
5. Heat the clarified butter in a large skillet over medium heat until it shimmers, about 2 minutes.
6. Add the sliced almonds to the skillet and toast, stirring frequently, for 3–4 minutes until golden brown and fragrant, watching closely to prevent burning.
7. Stir in the minced garlic and cook for 1 minute until aromatic but not browned, as burnt garlic can turn bitter.
8. Increase the heat to medium-high and add the blanched green beans, tossing to coat evenly in the butter-almond mixture.
9. Sauté the beans for 5–7 minutes, stirring occasionally, until they develop slight char marks and are heated through.
10. Remove the skillet from the heat and drizzle with fresh lemon juice, then season with fine sea salt and freshly cracked black pepper, tossing gently to combine.
11. Transfer to a serving dish immediately to maintain optimal texture and warmth.
Mouthwateringly crisp-tender beans mingle with buttery, toasted almonds in every bite, offering a delightful contrast that’s both rustic and refined. Serve it alongside roasted chicken for a classic pairing, or get creative by tossing it into a grain bowl with quinoa and a soft-boiled egg for a vibrant, protein-packed lunch.
Summary
Ready to simplify your keto journey? This collection proves that delicious, healthy dinners don’t have to be complicated. We hope these 20 easy recipes bring joy and ease to your busy evenings. Give them a try, and let us know which one becomes your new weeknight hero in the comments below! If you found this helpful, please share it with your friends on Pinterest.


