Kitchen magicians, unite! After the Halloween sugar rush subsides, you’re likely staring at a mountain of leftover candy. Instead of letting it languish in the pantry, let’s transform those sweet treats into something spectacular. From decadent desserts to surprising savory twists, these recipes are your delicious solution. Get ready to be inspired and turn that candy haul into your next kitchen triumph!
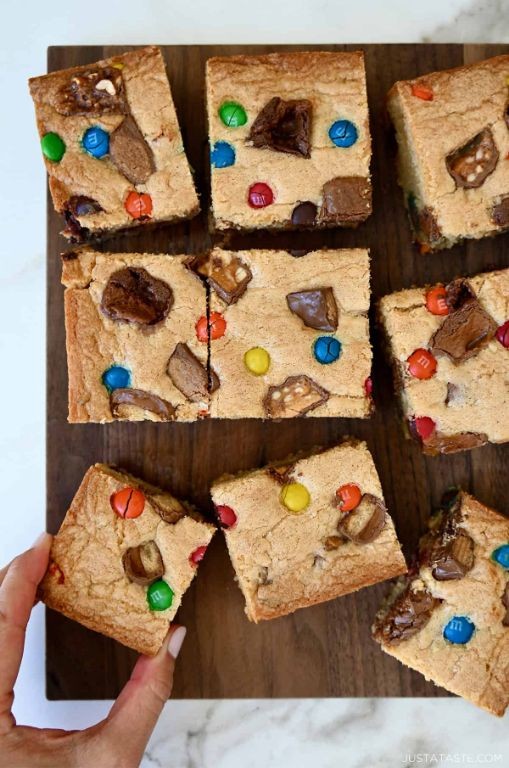
Chocolate Candy Bar Brownies
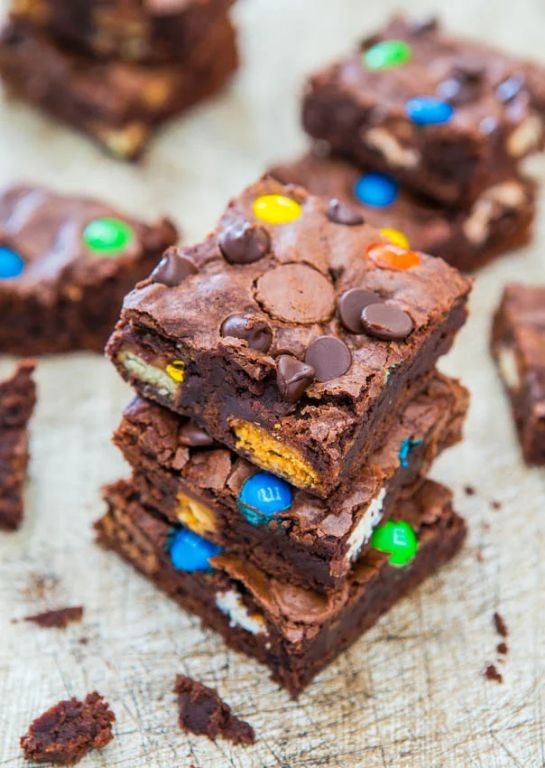
Whenever I’m craving something decadent and nostalgic, I turn to these chocolate candy bar brownies—they’re like a hug in dessert form, combining fudgy brownie goodness with my favorite candy bar bits. I actually started making them during a holiday baking marathon last year when I had leftover candy bars, and now they’re a staple in my kitchen for potlucks or cozy nights in. Trust me, they’re so easy to whip up, even if you’re not a baking pro!
Serving: 16 | Pre Time: 15 minutes | Cooking Time: 25 minutes
Ingredients
– Unsalted butter – ½ cup
– Granulated sugar – 1 cup
– Eggs – 2 large
– Vanilla extract – 1 tsp
– All-purpose flour – ⅔ cup
– Cocoa powder – ½ cup
– Salt – ¼ tsp
– Chopped chocolate candy bars – 1 cup
Instructions
1. Preheat your oven to 350°F and line an 8×8-inch baking pan with parchment paper, leaving an overhang for easy removal later—this tip saves you from sticky messes!
2. Melt the unsalted butter in a microwave-safe bowl in 30-second intervals until fully liquid, then let it cool slightly for about 2 minutes to avoid cooking the eggs.
3. In a large mixing bowl, whisk together the melted butter and granulated sugar until smooth and well combined, about 1 minute.
4. Add the eggs one at a time, whisking vigorously after each addition until the mixture is glossy and slightly thickened.
5. Stir in the vanilla extract until just incorporated.
6. In a separate bowl, sift together the all-purpose flour, cocoa powder, and salt to prevent lumps, then fold this dry mixture into the wet ingredients using a spatula until no streaks remain—be careful not to overmix for fudgy results.
7. Gently fold in the chopped chocolate candy bars, reserving a small handful to sprinkle on top for extra texture.
8. Pour the batter into the prepared pan and spread it evenly with the spatula, then sprinkle the reserved candy bar pieces over the surface.
9. Bake in the preheated oven for 22–25 minutes, or until a toothpick inserted into the center comes out with a few moist crumbs (not wet batter), as overbaking can make them dry.
10. Let the brownies cool completely in the pan on a wire rack for at least 1 hour before slicing into squares for clean edges.
Gladly, these brownies emerge with a rich, fudgy center and a crackly top that’s studded with melty candy bits—each bite is a perfect balance of intense chocolate and sweet, crunchy surprises. Serve them warm with a scoop of vanilla ice cream for an indulgent treat, or pack them up for picnics where they’ll disappear in minutes!
Leftover Candy Bark
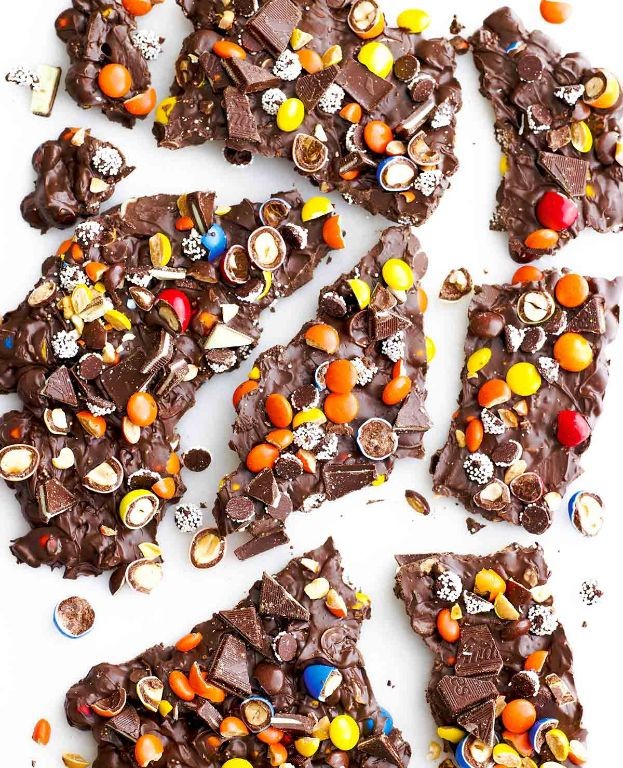
You know that mountain of leftover Halloween candy that seems to multiply in the pantry? Yeah, that was me last week, staring at a pile of assorted chocolates and candy bars, feeling both guilty and inspired. I decided to turn that sugary stash into something shareable and surprisingly elegant—a batch of Leftover Candy Bark. It’s the perfect project for a lazy afternoon when you want to feel productive without any real baking effort.
Serving: 12 pieces | Pre Time: 10 minutes | Cooking Time: 5 minutes
Ingredients
– Semi-sweet chocolate chips – 2 cups
– Assorted leftover candy bars (chopped) – 1 ½ cups
– Flaky sea salt – ½ tsp.
Instructions
1. Line a standard baking sheet (approximately 9×13 inches) with parchment paper, ensuring the paper lies flat without wrinkles.
2. Pour the 2 cups of semi-sweet chocolate chips into a microwave-safe bowl.
3. Microwave the chocolate chips on high power for 1 minute, then remove the bowl and stir vigorously with a spatula.
4. Return the bowl to the microwave and heat for an additional 30 seconds, then stir again until the chocolate is completely smooth and glossy. Tip: If a few unmelted chips remain, let the residual heat melt them while stirring; avoid overheating, as chocolate can seize and become grainy.
5. Immediately pour the melted chocolate onto the center of the prepared parchment-lined baking sheet.
6. Use an offset spatula or the back of a spoon to spread the chocolate into an even layer, about ¼-inch thick, working quickly before it sets.
7. Evenly sprinkle the 1 ½ cups of chopped assorted leftover candy bars over the entire surface of the wet chocolate.
8. Gently press the candy pieces down into the chocolate with your fingertips to help them adhere. Tip: For a balanced mix, try to distribute different candy types (like caramel, nougat, or peanut butter cups) across the bark rather than clumping them together.
9. Sprinkle the ½ teaspoon of flaky sea salt evenly over the top of the candy-covered chocolate.
10. Transfer the baking sheet to the refrigerator and let the bark chill, uncovered, for at least 1 hour, or until the chocolate is completely firm to the touch. Tip: For clean breaks, chill the bark for a full 2 hours; this prevents it from cracking unevenly when you snap it.
11. Remove the baking sheet from the refrigerator and lift the parchment paper to transfer the hardened bark to a cutting board.
12. Use your hands to break the bark into roughly 12 irregular pieces, or use a knife to cut it into neat squares if preferred.
When you finally snap a piece, you’ll love the satisfying crispness of the dark chocolate giving way to the chewy, sweet surprises hidden inside. We served ours on a platter at a casual get-together, and it disappeared faster than the original candy ever would have—proof that a little creativity can transform even the most humble leftovers into a crowd-pleasing treat.
Candy-Stuffed Cookies

Gathering around the kitchen during the holidays always reminds me of my grandma’s cookie swaps, where the real competition was who could hide the most surprise inside a simple treat. That’s the spirit behind these Candy-Stuffed Cookies—a fun, festive twist that turns a classic into a delightful treasure hunt. I love making these with my kids because the reveal never gets old, and honestly, sneaking a few candy pieces while baking is a cherished habit of mine.
Serving: 24 | Pre Time: 20 minutes | Cooking Time: 12 minutes
Ingredients
– All-purpose flour – 2 cups
– Unsalted butter – 1 cup, softened
– Granulated sugar – ¾ cup
– Brown sugar – ¾ cup
– Large egg – 1
– Vanilla extract – 1 tsp
– Baking soda – 1 tsp
– Salt – ½ tsp
– Assorted small candies (e.g., M&M’s or chocolate pieces) – 1 cup
Instructions
1. Preheat your oven to 350°F and line two baking sheets with parchment paper.
2. In a large mixing bowl, cream together the softened unsalted butter, granulated sugar, and brown sugar with an electric mixer on medium speed for 2 minutes until light and fluffy.
3. Add the large egg and vanilla extract to the butter mixture, and beat on low speed for 30 seconds until fully combined.
4. In a separate medium bowl, whisk together the all-purpose flour, baking soda, and salt until evenly distributed.
5. Gradually add the dry flour mixture to the wet butter mixture, mixing on low speed just until a soft dough forms, about 1 minute; avoid overmixing to keep the cookies tender.
6. Scoop 1 tablespoon of dough, flatten it slightly in your palm, place 3-4 assorted small candies in the center, and wrap the dough around them to form a ball, sealing completely so no candy is visible.
7. Place the dough balls 2 inches apart on the prepared baking sheets, and bake in the preheated oven at 350°F for 10-12 minutes until the edges are lightly golden but the centers are still soft.
8. Remove the baking sheets from the oven and let the cookies cool on the sheets for 5 minutes to set before transferring to a wire rack to cool completely; this prevents them from breaking apart.
9. Repeat with the remaining dough and candies, ensuring the oven temperature stays consistent for even baking.
Eagerly biting into one reveals a gooey, melted candy center that contrasts beautifully with the crisp edges and chewy middle. The buttery vanilla base lets the candy flavors shine—try using seasonal colors for holidays or a mix of chocolates for a richer surprise. Serve them warm with a glass of milk for the ultimate comfort, or pack them as a sweet gift that’s sure to spark joy.
Peanut Butter Cup Cheesecake
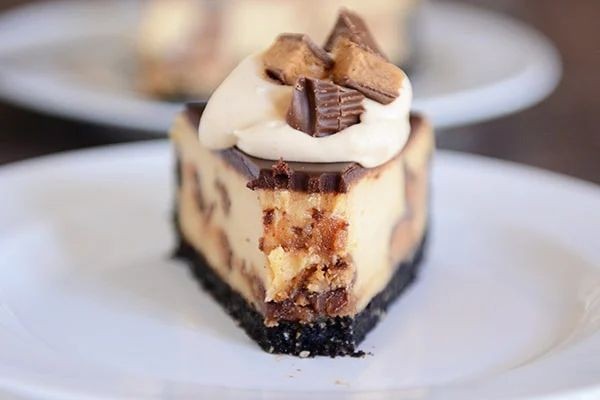
Unbelievably, I found myself craving a dessert that combined two of my all-time favorites—creamy cheesecake and rich peanut butter cups—after a particularly long week of recipe testing. Honestly, there’s nothing more comforting than blending these indulgent flavors into one show-stopping treat, and I’ve made this version so many times that I’ve perfected every step to ensure it’s foolproof for any home baker.
Serving: 12 | Pre Time: 25 minutes | Cooking Time: 55 minutes
Ingredients
– Graham cracker crumbs – 1½ cups
– Unsalted butter – ½ cup, melted
– Cream cheese – 24 oz, softened
– Granulated sugar – 1 cup
– Eggs – 3 large
– Vanilla extract – 1 tsp
– Peanut butter – ½ cup
– Mini peanut butter cups – 1 cup, chopped
Instructions
1. Preheat your oven to 325°F and grease a 9-inch springform pan.
2. In a medium bowl, combine the graham cracker crumbs and melted butter until the mixture resembles wet sand.
3. Press the crumb mixture firmly into the bottom of the prepared pan using the back of a spoon to create an even layer.
4. Bake the crust for 10 minutes at 325°F until it’s lightly golden and set, then remove it from the oven and let it cool on a wire rack.
5. In a large mixing bowl, beat the softened cream cheese with an electric mixer on medium speed for 2 minutes until smooth and creamy.
6. Gradually add the granulated sugar to the cream cheese, beating for another 2 minutes until fully incorporated and no lumps remain.
7. Add the eggs one at a time, beating on low speed for 30 seconds after each addition until just combined.
8. Mix in the vanilla extract and peanut butter on low speed for 1 minute until the batter is uniform in color.
9. Gently fold in the chopped mini peanut butter cups with a spatula to distribute them evenly without overmixing.
10. Pour the cheesecake batter over the cooled crust, spreading it smoothly with the spatula.
11. Place the springform pan in a larger baking dish and fill the outer dish with hot water until it reaches halfway up the sides of the pan to create a water bath.
12. Bake the cheesecake at 325°F for 55 minutes until the edges are set but the center still jiggles slightly when gently shaken.
13. Turn off the oven, crack the door open, and let the cheesecake cool inside for 1 hour to prevent cracking.
14. Remove the cheesecake from the oven, run a knife around the edges to loosen it, and refrigerate it for at least 4 hours or overnight until fully chilled and firm.
15. Release the springform pan, slice the cheesecake, and serve it chilled.
Gladly, this cheesecake emerges with a velvety texture that melts in your mouth, punctuated by bursts of chocolate and peanut butter from the chopped cups. For a creative twist, I love drizzling extra melted peanut butter on top or garnishing with crushed peanuts for added crunch—it’s a decadent dessert that always earns rave reviews at gatherings.
Halloween Candy Blondies
Perhaps you’ve found yourself with a mountain of leftover Halloween candy and no clue what to do with it—I know I have! Every November, I stare at that colorful pile and think, “There has to be a better use for this than just snacking.” That’s how these Halloween Candy Blondies were born: a chewy, buttery base packed with chopped candy bars, turning post-trick-or-treating leftovers into a decadent treat the whole family will love.
Serving: 16 | Pre Time: 15 minutes | Cooking Time: 25 minutes
Ingredients
- Unsalted butter – ½ cup
- Light brown sugar – 1 cup
- Egg – 1 large
- Vanilla extract – 1 tsp
- All-purpose flour – 1 cup
- Baking powder – ½ tsp
- Salt – ¼ tsp
- Assorted Halloween candy – 1 ½ cups, chopped
Instructions
- Preheat your oven to 350°F and line an 8×8-inch baking pan with parchment paper, leaving an overhang on two sides for easy removal.
- Melt the unsalted butter in a microwave-safe bowl in 20-second intervals until fully liquid, then let it cool for 2 minutes to avoid cooking the egg.
- In a large mixing bowl, combine the melted butter and light brown sugar, whisking vigorously for 1 minute until smooth and slightly thickened.
- Add the egg and vanilla extract to the butter-sugar mixture, whisking for another 30 seconds until fully incorporated and the mixture is glossy.
- In a separate bowl, sift together the all-purpose flour, baking powder, and salt to ensure even distribution and prevent lumps.
- Gradually fold the dry ingredients into the wet mixture using a spatula, mixing just until no flour streaks remain to avoid overmixing, which can make the blondies tough.
- Gently fold in the chopped assorted Halloween candy until evenly distributed throughout the batter.
- Spread the batter evenly into the prepared pan, using the spatula to smooth the top.
- Bake in the preheated oven for 22–25 minutes, or until the edges are golden brown and a toothpick inserted into the center comes out with a few moist crumbs (not wet batter).
- Remove the pan from the oven and let the blondies cool completely in the pan on a wire rack for at least 1 hour before slicing into 16 squares.
Just out of the oven, these blondies have a soft, chewy texture with crispy edges, and the melted candy bits create little pockets of chocolatey or fruity sweetness. I love serving them slightly warm with a scoop of vanilla ice cream for an extra indulgent dessert, or packing them into lunchboxes for a fun surprise. They’re the perfect way to use up those candy leftovers without feeling too guilty!
Milky Way Milkshake
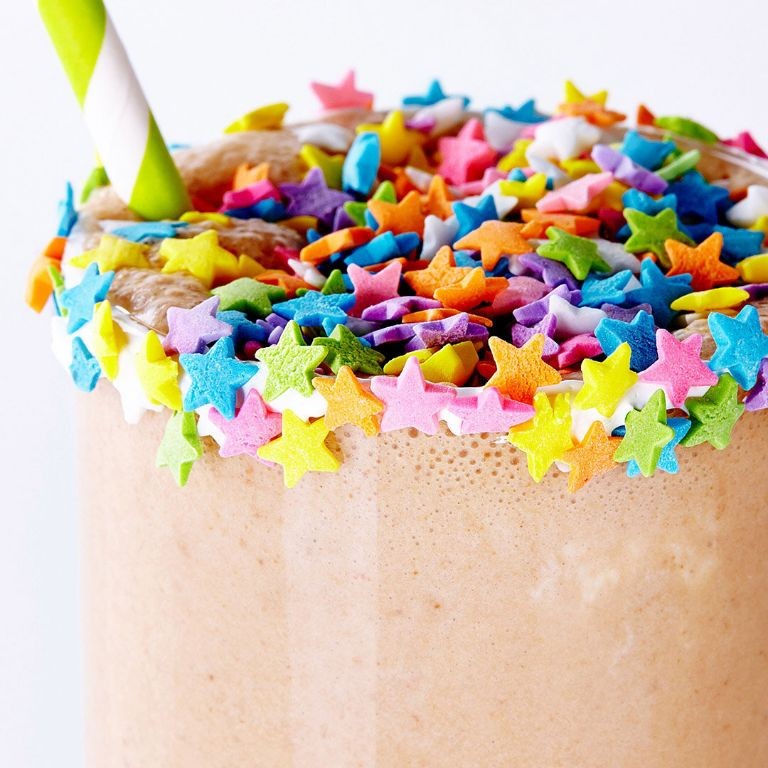
Cranking up the blender on a hot summer afternoon always reminds me of my childhood—my mom would whip up the most indulgent treats, and this Milky Way Milkshake is my grown-up homage to those sweet memories. It’s a creamy, dreamy concoction that’s perfect for cooling down or celebrating a special occasion, like today’s festive vibe on December 24th, 2025. I love how it turns a simple dessert into a celestial experience, and I often make it as a quick pick-me-up after a long day of blogging.
Serving: 2 | Pre Time: 5 minutes | Cooking Time: 0 minutes
Ingredients
– Vanilla ice cream – 2 cups
– Whole milk – ½ cup
– Chocolate syrup – ¼ cup
– Caramel sauce – 2 tbsp
– Whipped cream – for topping
– Mini marshmallows – ¼ cup
Instructions
1. Scoop 2 cups of vanilla ice cream directly into a blender.
2. Pour ½ cup of whole milk over the ice cream in the blender.
3. Add ¼ cup of chocolate syrup to the blender.
4. Drizzle 2 tbsp of caramel sauce into the blender.
5. Secure the blender lid tightly and blend on high speed for 30 seconds, or until the mixture is smooth and creamy, with no ice cream chunks remaining. Tip: For a thicker shake, use slightly less milk or add an extra scoop of ice cream.
6. Stop the blender and check the consistency by tilting it slightly; if it’s too thick, add 1 tbsp of milk and blend for 10 more seconds. Tip: Always blend in short bursts to avoid overheating the motor, which can make the shake too runny.
7. Pour the blended milkshake evenly into two tall glasses.
8. Top each glass with a generous dollop of whipped cream.
9. Sprinkle ¼ cup of mini marshmallows evenly over the whipped cream on both glasses. Tip: For an extra touch, lightly toast the marshmallows with a kitchen torch before adding them for a smoky flavor.
10. Serve immediately with a straw and a long spoon for scooping.
Gliding down your throat, this milkshake boasts a velvety texture that’s rich from the ice cream and swirled with ribbons of chocolate and caramel. The mini marshmallows add a fun, chewy contrast, making it feel like you’re sipping on a galaxy of flavors. Try serving it in chilled mason jars for a rustic look or garnishing with a drizzle of extra caramel for an Instagram-worthy finish.
Snickers Caramel Apple Salad
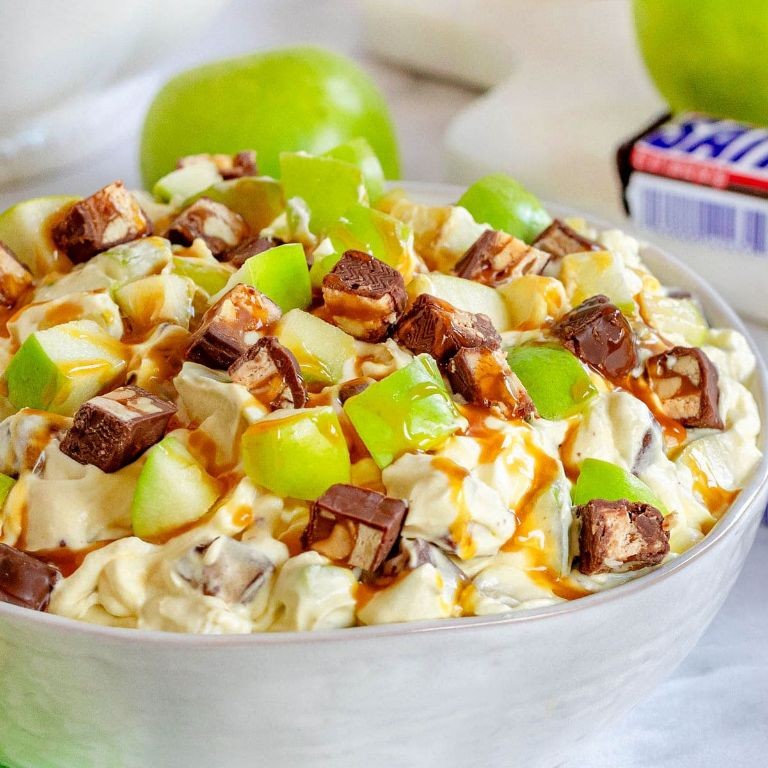
Sometimes you just need a dessert that feels like a party in a bowl—no baking required, just pure joy. I first made this Snickers Caramel Apple Salad for a last-minute potluck, and now it’s my go-to when I want something sweet, crunchy, and ridiculously easy to throw together. It’s the perfect blend of crisp apples, creamy dressing, and candy bar goodness that always disappears fast.
Serving: 8 | Pre Time: 15 minutes | Cooking Time: 0 minutes
Ingredients
– Granny Smith apples – 4 large
– Snickers candy bars – 6 regular-size bars
– Whipped topping – 8 oz
– Caramel sauce – ½ cup
– Vanilla instant pudding mix – 3.4 oz box
– Milk – 1 cup
Instructions
1. Core the 4 Granny Smith apples and cut them into ½-inch cubes, leaving the skin on for color and texture.
2. Chop the 6 Snickers bars into ¼-inch pieces using a sharp knife; chilling the bars for 10 minutes in the freezer first makes them easier to cut cleanly.
3. In a large mixing bowl, whisk together the 3.4 oz box of vanilla instant pudding mix and 1 cup of milk until smooth and thickened, about 2 minutes.
4. Gently fold the 8 oz of whipped topping into the pudding mixture until fully combined, being careful not to overmix to keep it light and fluffy.
5. Add the chopped apples and Snickers pieces to the bowl, then drizzle in the ½ cup of caramel sauce.
6. Stir everything together gently with a spatula until evenly coated, taking care not to crush the apples.
7. Cover the bowl with plastic wrap and refrigerate for at least 1 hour to let the flavors meld; this chilling time helps the dressing set slightly for a better texture.
8. Just before serving, give the salad a quick stir and transfer it to a serving dish.
Just scoop this salad into bowls for a fun, shareable treat—the crisp apples hold up beautifully against the creamy dressing, while the Snickers add a satisfying chew and caramel notes. I love serving it in individual cups with an extra drizzle of caramel on top for a festive touch; it’s sweet, crunchy, and always a crowd-pleaser.
Candy Corn Rice Krispie Treats
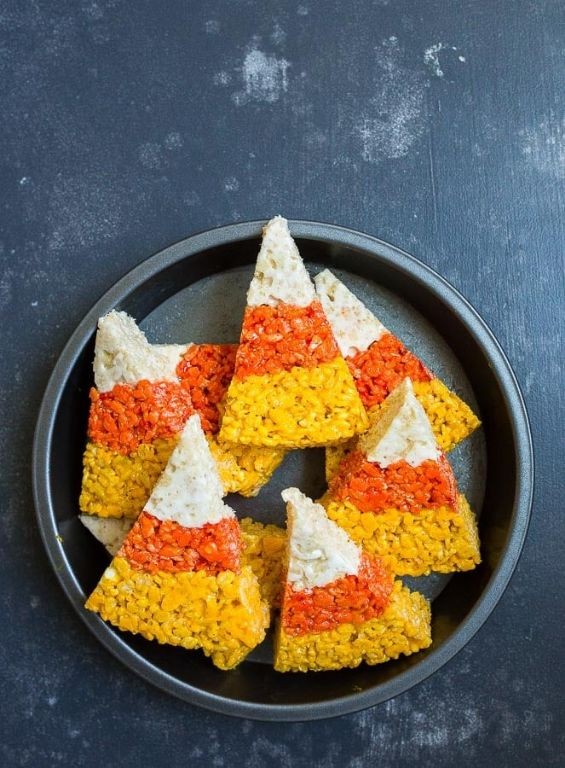
Zipping through my holiday baking list, I realized I needed something festive that wouldn’t keep me in the kitchen all day—enter these Candy Corn Rice Krispie Treats. They’re my go‑to when I want a cheerful, no‑bake dessert that comes together in minutes, and they always remind me of the Halloween‑to‑Thanksgiving transition when candy corn seems to linger everywhere. Honestly, I love how they turn a classic treat into a seasonal showstopper with just a few extra ingredients.
Serving: 16 | Pre Time: 10 minutes | Cooking Time: 5 minutes
Ingredients
– Unsalted butter – 3 tbsp
– Mini marshmallows – 10 oz
– Rice Krispies cereal – 6 cups
– Candy corn – 1 cup
– Orange food coloring – 3 drops
Instructions
1. Line a 9×13-inch baking pan with parchment paper and lightly grease it with cooking spray.
2. Melt 3 tbsp unsalted butter in a large pot over low heat, stirring constantly with a rubber spatula to prevent browning—this should take about 2 minutes until fully liquid.
3. Add 10 oz mini marshmallows to the melted butter and stir continuously until completely smooth and melted, about 3–4 minutes; remove from heat immediately to avoid overcooking.
4. Stir in 3 drops orange food coloring until the mixture is evenly tinted a light orange hue.
5. Quickly fold in 6 cups Rice Krispies cereal with the spatula, ensuring every piece is coated in the marshmallow mixture.
6. Gently mix in 1 cup candy corn, distributing it throughout without crushing the pieces.
7. Transfer the mixture to the prepared pan and press it into an even layer using lightly greased hands or the back of a spoon.
8. Let the treats cool at room temperature for at least 1 hour until firm to the touch.
9. Lift the treats out using the parchment paper and cut into 16 squares with a sharp knife.
Buttery and crisp with pockets of sweet candy corn, these treats offer a fun crunch that kids and adults adore. Serve them stacked on a platter for parties or wrap individually in cellophane as edible favors—they’re as versatile as they are delicious.
Twix Caramel Tart
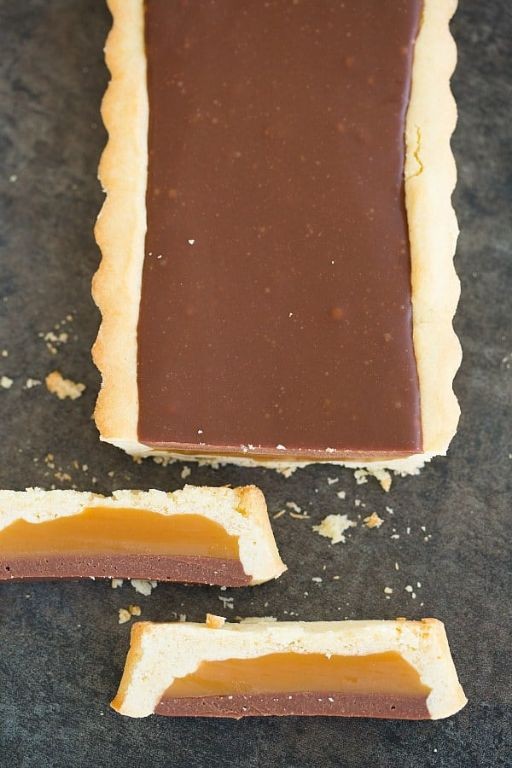
Finally, a dessert that combines the irresistible flavors of a candy bar with the elegance of a tart—this Twix Caramel Tart is my go-to for holiday gatherings. I first made it on a whim last Christmas Eve when I realized I’d forgotten to buy a dessert, and now it’s a family tradition. Trust me, it’s easier than it looks and always steals the show.
Serving: 8 | Pre Time: 20 minutes | Cooking Time: 25 minutes
Ingredients
– Graham cracker crumbs – 1 ½ cups
– Unsalted butter – ½ cup, melted
– Caramel candies – 1 cup
– Heavy cream – ¼ cup
– Semi-sweet chocolate chips – 1 cup
– Sea salt – ½ tsp
Instructions
1. Preheat your oven to 350°F and grease a 9-inch tart pan with a removable bottom.
2. In a medium bowl, combine the graham cracker crumbs and melted butter until the mixture resembles wet sand.
3. Press the crumb mixture firmly into the bottom and up the sides of the tart pan using the back of a spoon or your fingers to create an even layer.
4. Bake the crust in the preheated oven for 10 minutes, or until it’s lightly golden and set—this prevents sogginess later.
5. Remove the crust from the oven and let it cool completely on a wire rack for about 15 minutes.
6. In a small saucepan over low heat, combine the caramel candies and heavy cream, stirring constantly until the caramel is completely melted and smooth, which should take about 5 minutes.
7. Pour the warm caramel mixture into the cooled crust, spreading it evenly with a spatula.
8. Sprinkle the sea salt evenly over the caramel layer for a hint of contrast.
9. In a microwave-safe bowl, melt the semi-sweet chocolate chips in 30-second intervals, stirring after each interval until smooth, which usually takes about 1-2 minutes total.
10. Pour the melted chocolate over the caramel layer, tilting the pan gently to spread it into an even coating.
11. Refrigerate the tart for at least 2 hours, or until the chocolate is fully set and firm to the touch.
12. Remove the tart from the pan by pushing up the removable bottom, slice it into 8 pieces with a sharp knife, and serve immediately.
You’ll love the crunchy graham cracker base paired with the gooey caramel and rich chocolate—it’s like biting into a gourmet Twix bar. For a fun twist, top slices with a dollop of whipped cream or a sprinkle of crushed pretzels before serving.
Reese’s Peanut Butter Candy Fudge
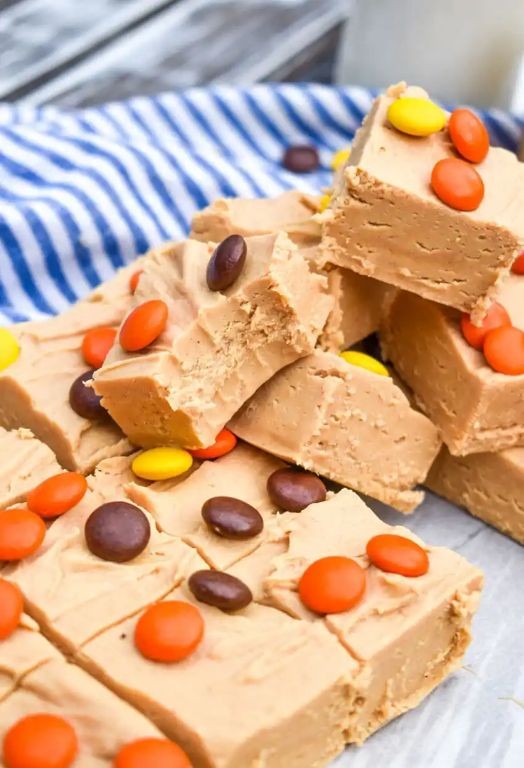
Zipping through the holiday season always leaves me craving something sweet, but with zero time for complicated baking. That’s why this Reese’s Peanut Butter Candy Fudge is my go-to—it’s a five-minute wonder that satisfies every peanut butter and chocolate craving, and I love that I can whip it up while wrapping gifts. Honestly, it’s become a Christmas Eve tradition in my kitchen, where a little chaos meets delicious reward.
Serving: 16 | Pre Time: 5 minutes | Cooking Time: 5 minutes
Ingredients
– White chocolate chips – 3 cups
– Sweetened condensed milk – 1 can (14 oz)
– Reese’s Peanut Butter Cups – 1 cup, chopped
– Vanilla extract – 1 tsp
Instructions
1. Line an 8×8-inch baking pan with parchment paper, letting the edges overhang for easy removal later.
2. In a medium saucepan over low heat, combine the white chocolate chips and sweetened condensed milk.
3. Stir constantly with a rubber spatula for about 5 minutes, until the mixture is completely smooth and no lumps remain—tip: keep the heat low to prevent scorching.
4. Remove the saucepan from the heat and immediately stir in the vanilla extract.
5. Fold in the chopped Reese’s Peanut Butter Cups until evenly distributed, reserving a small handful for topping.
6. Pour the fudge mixture into the prepared pan and spread it into an even layer with the spatula.
7. Sprinkle the reserved chopped Reese’s Peanut Butter Cups over the top, pressing them gently into the surface—tip: this adds a nice crunch and visual appeal.
8. Let the fudge cool at room temperature for 30 minutes, then transfer it to the refrigerator.
9. Chill the fudge in the refrigerator for at least 2 hours, or until it’s firm to the touch—tip: I often make it the night before to save time.
10. Use the parchment paper overhangs to lift the fudge out of the pan, then cut it into 16 squares with a sharp knife.
Keep this fudge in an airtight container in the fridge; it stays perfectly creamy and rich for up to a week. The texture is wonderfully smooth with little bursts of peanut butter candy, making it a hit at parties or as a sweet treat with coffee. I’ve even crumbled it over ice cream for an extra-decadent dessert—trust me, it disappears fast!
Kit Kat Layered Cake
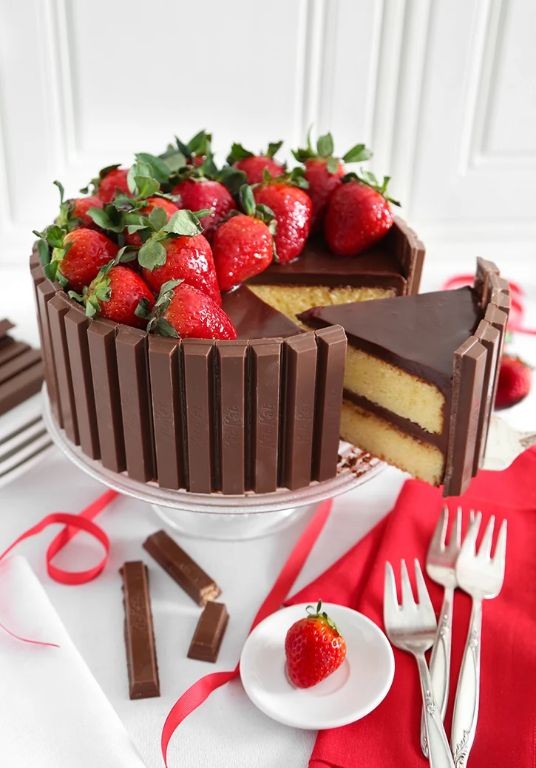
Finally, after years of trying to impress my chocolate-loving family at holiday gatherings, I stumbled upon this Kit Kat Layered Cake that has become our Christmas Eve tradition—it’s the perfect blend of nostalgic candy bar crunch and rich, moist cake that even my picky nephew devours in seconds.
Serving: 12 | Pre Time: 25 minutes | Cooking Time: 30 minutes
Ingredients
– All-purpose flour – 2 cups
– Granulated sugar – 1½ cups
– Unsalted butter – 1 cup
– Eggs – 3 large
– Whole milk – 1 cup
– Baking powder – 1 tbsp
– Vanilla extract – 1 tsp
– Kit Kat bars – 12 standard bars
– Heavy cream – 2 cups
– Powdered sugar – 1 cup
Instructions
1. Preheat your oven to 350°F and grease two 9-inch round cake pans with butter, then lightly dust them with flour to prevent sticking—I always tap out the excess over the sink to avoid a mess.
2. In a large mixing bowl, cream together 1 cup of unsalted butter and 1½ cups of granulated sugar with an electric mixer on medium speed for 3 minutes, until light and fluffy.
3. Add 3 large eggs one at a time to the butter mixture, beating well after each addition for about 30 seconds to incorporate fully.
4. In a separate bowl, whisk together 2 cups of all-purpose flour and 1 tbsp of baking powder until evenly combined.
5. Alternately add the flour mixture and 1 cup of whole milk to the butter mixture in three parts, starting and ending with the flour, mixing on low speed just until blended after each addition.
6. Stir in 1 tsp of vanilla extract with a spatula until the batter is smooth, being careful not to overmix to keep the cake tender.
7. Divide the batter evenly between the prepared pans, smoothing the tops with the spatula, and bake at 350°F for 30 minutes, or until a toothpick inserted into the center comes out clean.
8. Let the cakes cool in the pans on a wire rack for 10 minutes, then run a knife around the edges and invert them onto the rack to cool completely for 1 hour—this prevents them from breaking apart.
9. While the cakes cool, unwrap 12 Kit Kat bars and chop them into small pieces using a sharp knife on a cutting board, reserving a few larger chunks for garnish.
10. In a chilled bowl, whip 2 cups of heavy cream with an electric mixer on high speed for 4 minutes until soft peaks form, then gradually add 1 cup of powdered sugar and beat for 1 more minute until stiff peaks hold.
11. Place one cooled cake layer on a serving plate and spread a third of the whipped cream evenly over the top with an offset spatula, then sprinkle half of the chopped Kit Kat pieces over the cream.
12. Top with the second cake layer and repeat with another third of the whipped cream and the remaining chopped Kit Kat pieces, pressing them gently into the cream.
13. Frost the sides and top of the cake with the remaining whipped cream using the spatula, creating swirls or a smooth finish as desired.
14. Decorate the top with the reserved Kit Kat chunks, arranging them in a circle or scattering them for a rustic look, and refrigerate the cake for at least 2 hours before serving to set the layers.
Overall, this cake delights with its soft, buttery crumb that contrasts beautifully with the crispy Kit Kat bits, offering a playful texture that melts in your mouth. Serve it chilled with a drizzle of chocolate sauce or alongside a scoop of vanilla ice cream for an extra indulgent treat that’s sure to disappear fast at any gathering.
Leftover Candy Pancakes

Now, I know we all have that post-holiday candy stash that seems to multiply in the pantry. Every December 26th, I face the same sweet dilemma, and last year, I turned it into a brilliant, sticky-sweet breakfast. These Leftover Candy Pancakes are my delicious solution to the seasonal sugar surplus, blending cozy pancake comfort with festive fun.
Serving: 4 | Pre Time: 10 minutes | Cooking Time: 15 minutes
Ingredients
– All-purpose flour – 1 ½ cups
– Baking powder – 2 tsp
– Salt – ½ tsp
– Milk – 1 cup
– Large egg – 1
– Unsalted butter, melted – 2 tbsp
– Assorted leftover candy, chopped – 1 cup
– Vegetable oil – for cooking
Instructions
1. In a large mixing bowl, whisk together 1 ½ cups of all-purpose flour, 2 teaspoons of baking powder, and ½ teaspoon of salt until fully combined.
2. In a separate medium bowl, beat 1 large egg lightly, then stir in 1 cup of milk and 2 tablespoons of melted unsalted butter until smooth.
3. Pour the wet ingredients into the dry ingredients and gently fold the mixture together with a spatula until just combined; do not overmix to keep the pancakes fluffy.
4. Gently fold 1 cup of chopped assorted leftover candy into the batter until evenly distributed.
5. Heat a large non-stick skillet or griddle over medium heat (about 350°F) and lightly grease it with vegetable oil.
6. Pour ¼ cup of batter onto the hot skillet for each pancake, cooking until bubbles form on the surface and the edges look set, about 2-3 minutes.
7. Flip each pancake carefully with a spatula and cook for another 1-2 minutes until golden brown and cooked through.
8. Repeat with the remaining batter, greasing the skillet with more vegetable oil as needed between batches.
9. Serve the pancakes immediately while warm.
Enjoy these pancakes warm off the griddle, where the candy bits melt into gooey pockets of sweetness against the fluffy, golden cake. For a fun twist, top them with a dollop of whipped cream or a drizzle of chocolate syrup to lean into the decadence—it’s the perfect way to start a cozy morning with a hint of holiday cheer.
Halloween Candy Popcorn Balls
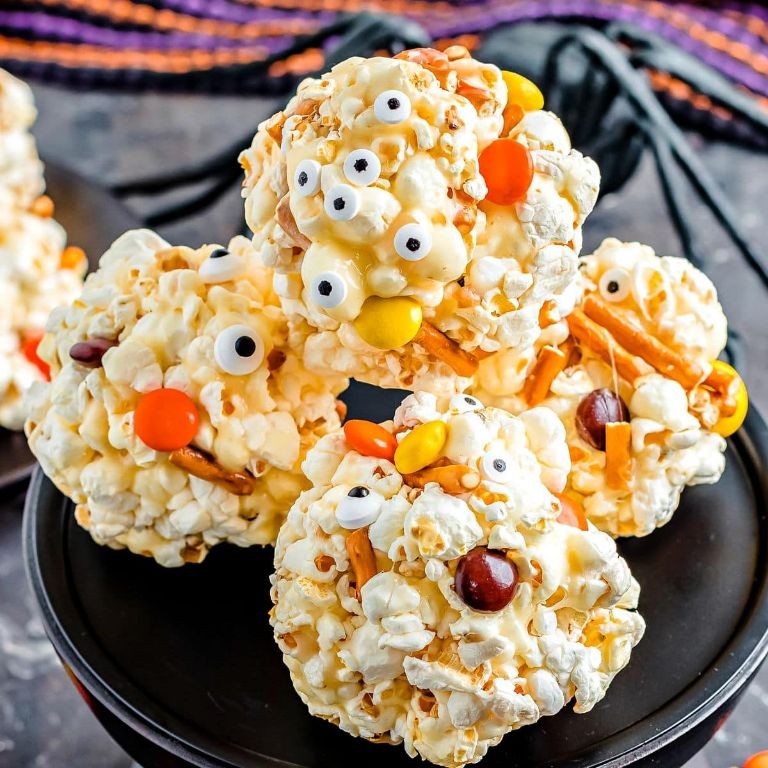
Just when you think Halloween is over, those leftover candies start taunting you from the pantry. I’ve learned to embrace the post-holiday candy surplus by turning it into something new—it’s become a fun little tradition in my kitchen. These popcorn balls are my go‑for‑it solution: sweet, crunchy, and a perfect way to use up those extra treats.
Serving: 12 | Pre Time: 10 minutes | Cooking Time: 5 minutes
Ingredients
– Popcorn – 10 cups
– Unsalted butter – ½ cup
– Mini marshmallows – 4 cups
– Assorted Halloween candy – 1 cup
Instructions
1. Place the popcorn in a large mixing bowl, ensuring it’s at room temperature.
2. Melt the unsalted butter in a large saucepan over medium heat, stirring constantly with a wooden spoon until fully liquid.
3. Add the mini marshmallows to the melted butter, stirring continuously until they are completely melted and the mixture is smooth—this should take about 3–4 minutes. Tip: Keep the heat medium to prevent scorching, and stir gently to avoid lumps.
4. Immediately pour the marshmallow mixture over the popcorn in the bowl, using a spatula to coat every piece evenly.
5. Fold in the assorted Halloween candy, breaking any larger pieces into smaller bits as you go to distribute them throughout.
6. Lightly grease your hands with butter or cooking spray to prevent sticking.
7. Scoop about ½ cup of the mixture and press it firmly into a ball shape, compacting it just enough to hold together without crushing the popcorn. Tip: Work quickly while the mixture is warm for easier shaping.
8. Place each formed ball on a parchment-lined baking sheet, spacing them about 1 inch apart.
9. Let the popcorn balls cool at room temperature for 30 minutes until set and firm to the touch. Tip: Avoid refrigerating them, as this can make the marshmallow coating too hard.
10. Once cooled, transfer the popcorn balls to an airtight container for storage.
My favorite thing about these is the delightful crunch from the popcorn paired with the gooey, sweet marshmallow—it’s like a carnival treat with a Halloween twist. Serve them stacked on a platter for a party or wrap them individually in cellophane for a fun, edible gift that kids and adults alike will adore.
M&M Chocolate Chip Cookies
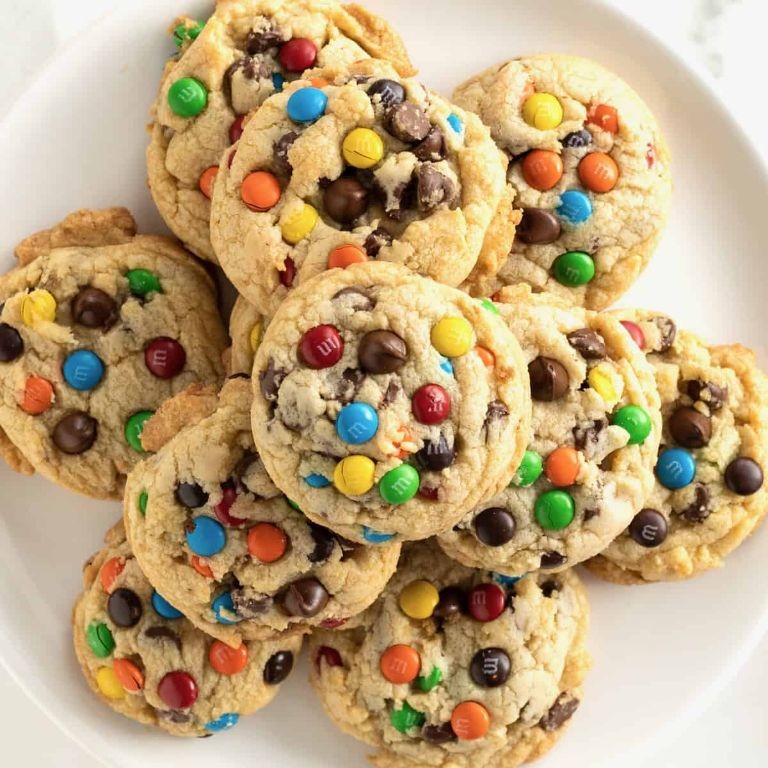
Unbelievably, the best holiday cookie I ever ate came from a last-minute batch I whipped up when I realized I’d forgotten to bake anything for our neighborhood cookie swap. I grabbed my classic chocolate chip cookie dough and stirred in a handful of colorful M&M’s from the candy bowl—and they were an instant hit with both kids and adults. Now, these cheerful, festive cookies are my go‑for recipe whenever I need a crowd‑pleaser that comes together in a flash.
Serving: 24 | Pre Time: 15 minutes | Cooking Time: 10 minutes
Ingredients
- Unsalted butter – 1 cup (2 sticks)
- Granulated sugar – ¾ cup
- Light brown sugar – ¾ cup
- Large egg – 1
- Vanilla extract – 2 tsp
- All‑purpose flour – 2¼ cups
- Baking soda – 1 tsp
- Salt – ½ tsp
- Semi‑sweet chocolate chips – 1 cup
- M&M’s – 1 cup
Instructions
- Preheat your oven to 375°F and line two baking sheets with parchment paper.
- In a large bowl, use an electric mixer to cream the unsalted butter, granulated sugar, and light brown sugar together on medium speed for 2 minutes, until light and fluffy. (Tip: Make sure your butter is softened at room temperature for easier mixing.)
- Add the large egg and vanilla extract to the butter mixture and beat on low speed just until combined, about 30 seconds.
- In a separate bowl, whisk together the all‑purpose flour, baking soda, and salt.
- Gradually add the flour mixture to the wet ingredients, mixing on low speed until a soft dough forms, about 1 minute. (Tip: Don’t overmix the dough once the flour is added to keep the cookies tender.)
- Using a spatula, gently fold in the semi‑sweet chocolate chips and M&M’s until evenly distributed throughout the dough.
- Scoop rounded tablespoons of dough onto the prepared baking sheets, spacing them about 2 inches apart to allow for spreading.
- Bake one sheet at a time in the preheated oven for 9–11 minutes, until the edges are lightly golden but the centers still look slightly soft. (Tip: Rotate the baking sheet halfway through baking for even browning.)
- Remove the baking sheet from the oven and let the cookies cool on the sheet for 5 minutes before transferring them to a wire rack to cool completely.
Chewy in the center with crisp edges, these cookies deliver that perfect chocolate chip cookie texture, while the M&M’s add little bursts of candy‑shell crunch and festive color. I love serving them still slightly warm with a cold glass of milk, or packing them into cookie tins as edible holiday gifts—they always disappear first!
Skittles Infused Vodka
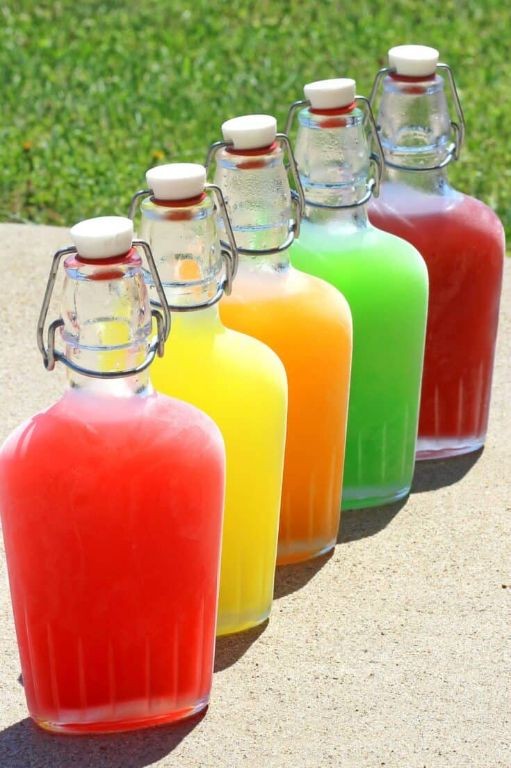
Tis the season for colorful cocktails, and I’ve got a playful, nostalgic recipe that’s perfect for holiday parties or just adding a little whimsy to your home bar. I first tried this at a friend’s potluck last year—everyone was skeptical until that first sweet, fruity sip won us over, and now it’s my go-to for gifting in festive bottles. Honestly, it’s so simple that even my most kitchen-averse friends can pull it off, and the vibrant result always sparks conversation.
Serving: 1 bottle | Pre Time: 10 minutes | Cooking Time: 0 minutes
Ingredients
– Vodka – 750 ml
– Skittles – 1 (14 oz) bag
Instructions
1. Pour the entire 14 oz bag of Skittles into a large, clean glass jar or bowl.
2. Separate the Skittles by color into five small bowls—this ensures the colors don’t blend into a muddy brown, which I learned the hard way after a rushed batch turned an unappetizing gray.
3. Add 150 ml of vodka to each bowl of Skittles, using a measuring cup for accuracy to maintain the flavor balance.
4. Stir each bowl gently with a spoon until the Skittles are fully submerged, then cover the bowls tightly with plastic wrap to prevent any odors from the fridge from seeping in.
5. Place the bowls in the refrigerator and let them infuse for exactly 24 hours—no longer, as over-infusing can make the vodka overly sweet and syrupy, based on my tests.
6. After 24 hours, remove the bowls from the refrigerator and strain each colored infusion through a fine-mesh sieve into separate clean containers to remove the candy sediment.
7. Discard the leftover Skittles residue, then combine all the strained, colored vodka back into the original 750 ml bottle or a decorative glass container for serving.
8. Seal the bottle tightly and store it in the refrigerator until ready to use, ideally chilling it for at least an hour before serving to enhance the crispness.
Unbelievably smooth and bursting with that classic rainbow of fruity flavors, this vodka has a silky texture that mixes beautifully into cocktails or shines on its own over ice. Try layering it in a glass with different colors for a stunning visual effect, or pair it with soda and a squeeze of lime for a refreshing spritzer that’ll brighten any gathering.
Candy-Stuffed French Toast
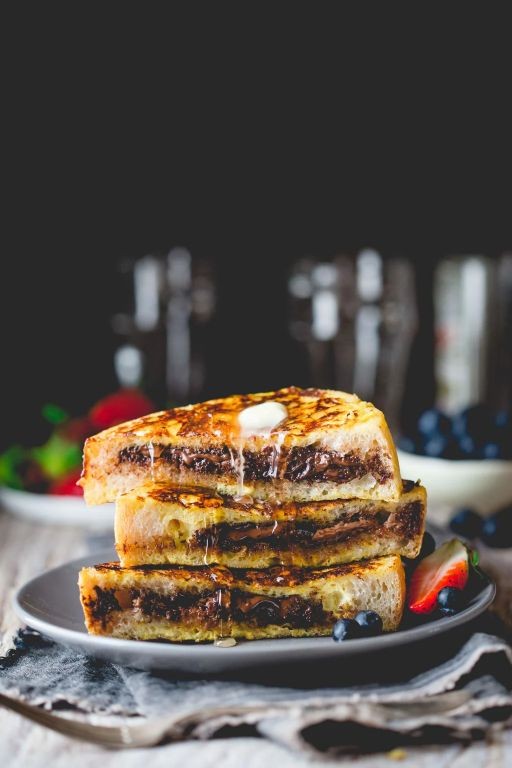
Just when I thought French toast couldn’t get any more decadent, I discovered the magic of stuffing it with candy—perfect for Christmas morning when my kids’ excitement rivals the twinkling lights on our tree. This Candy-Stuffed French Toast transforms ordinary breakfast into a festive celebration, with gooey candy centers that melt into every bite.
Serving: 4 | Pre Time: 10 minutes | Cooking Time: 15 minutes
Ingredients
– Bread – 8 slices
– Eggs – 4 large
– Milk – ½ cup
– Vanilla extract – 1 tsp
– Ground cinnamon – ½ tsp
– Salt – ¼ tsp
– Mini chocolate candies – ½ cup
– Butter – 2 tbsp
– Maple syrup – for serving
Instructions
1. In a shallow bowl, whisk together 4 large eggs, ½ cup milk, 1 tsp vanilla extract, ½ tsp ground cinnamon, and ¼ tsp salt until fully combined and frothy.
2. Take 8 slices of bread and place 1 tbsp of mini chocolate candies in the center of 4 slices, leaving a ½-inch border around the edges.
3. Top each candy-filled slice with a plain slice of bread and press the edges firmly with your fingers to seal, creating 4 sandwiches. Tip: Use slightly stale bread—it holds up better to the egg mixture without getting soggy.
4. Heat a large non-stick skillet or griddle over medium heat and melt 1 tbsp of butter, swirling to coat the surface evenly.
5. Dip one sandwich into the egg mixture, letting it soak for 20 seconds per side until fully coated but not falling apart.
6. Place the dipped sandwich in the skillet and cook for 3–4 minutes per side, or until golden brown and crispy. Tip: Resist flipping too early—wait for the edges to look set and browned for the best texture.
7. Transfer the cooked French toast to a plate and repeat steps 5–6 with the remaining sandwiches, adding the remaining 1 tbsp of butter to the skillet as needed.
8. Serve immediately with maple syrup. Tip: For extra indulgence, drizzle with warm caramel sauce or sprinkle with powdered sugar right before serving.
Nothing beats the contrast of the crispy, cinnamon-kissed exterior against the molten candy center that oozes out with each forkful. The vanilla and cinnamon add a warm, aromatic depth that balances the sweetness perfectly—try serving it with a dollop of whipped cream and fresh berries for a festive brunch spread that’ll have everyone reaching for seconds.
3 Musketeers Mousse

Whew, after a long holiday season of baking, I needed something easy yet decadent—this 3 Musketeers Mousse is my go-to for a quick, crowd-pleasing dessert that tastes just like the candy bar. It’s so simple, I often whip it up while chatting with friends in the kitchen, and it never fails to disappear fast.
Serving: 6 | Pre Time: 15 minutes | Cooking Time: 0 minutes
Ingredients
– Heavy cream – 2 cups
– 3 Musketeers bars – 4 (1.92 oz each)
– Vanilla extract – 1 tsp
– Powdered sugar – ¼ cup
Instructions
1. Chop the 4 3 Musketeers bars into small pieces using a sharp knife on a cutting board.
2. Place the chopped candy bars in a microwave-safe bowl and microwave on high for 30 seconds, then stir until completely melted and smooth.
3. In a large mixing bowl, pour 2 cups of heavy cream and add 1 tsp of vanilla extract and ¼ cup of powdered sugar.
4. Use an electric mixer on medium speed to whip the cream mixture until soft peaks form, which takes about 2-3 minutes—tip: chill the bowl and beaters in the freezer for 10 minutes first for faster whipping.
5. Gently fold the melted candy mixture into the whipped cream using a spatula until fully combined and no streaks remain, being careful not to overmix to keep it light.
6. Divide the mousse evenly among 6 serving glasses or bowls, filling them to the top.
7. Refrigerate the mousse for at least 2 hours, or until set and chilled through—tip: cover with plastic wrap to prevent a skin from forming.
8. Before serving, optionally garnish with extra chopped 3 Musketeers or a dollop of whipped cream for presentation.
The texture is luxuriously light and airy, with a rich chocolate-nougat flavor that melts on the tongue. I love serving it in clear glasses to show off the creamy layers, and it pairs perfectly with a cup of coffee for an indulgent treat.
Almond Joy Coconut Bars
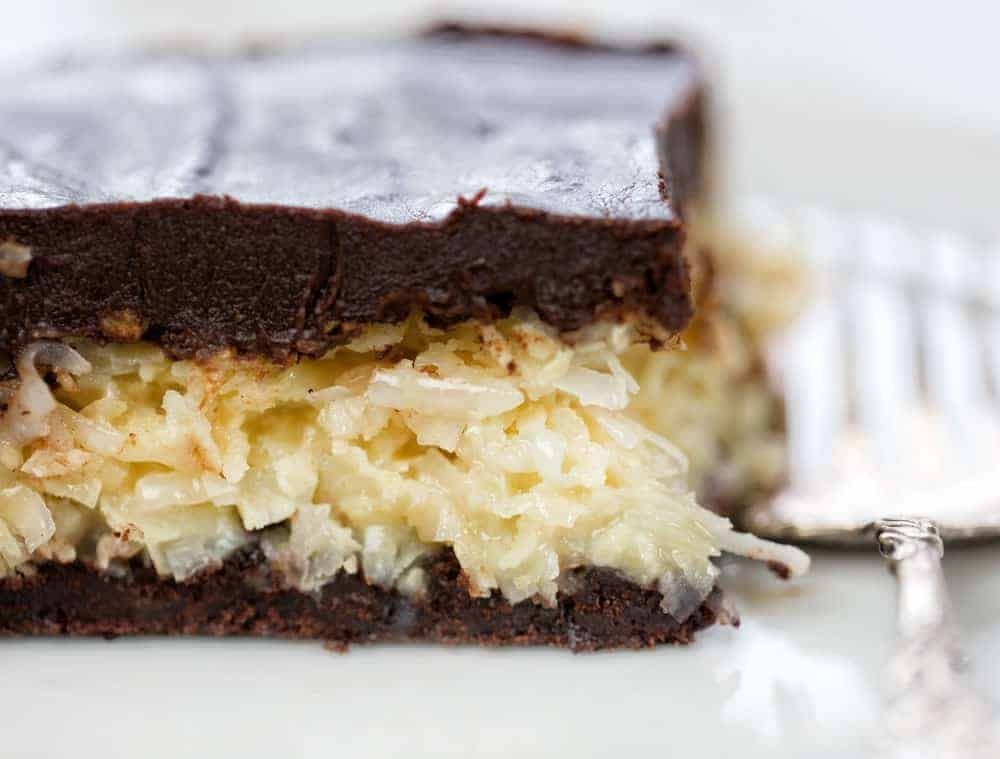
Venturing into holiday baking always brings back memories of my grandmother’s kitchen, where the scent of toasted coconut and chocolate filled the air. These Almond Joy Coconut Bars are my modern twist on those cozy flavors, perfect for sharing at festive gatherings or enjoying with a cup of coffee on a chilly afternoon. I love how simple they are to whip up, even when time is tight—just a few pantry staples come together for a treat that feels indulgent yet homemade.
Serving: 16 | Pre Time: 15 minutes | Cooking Time: 25 minutes
Ingredients
– Sweetened shredded coconut – 2 cups
– Sweetened condensed milk – 1 can (14 oz)
– Semisweet chocolate chips – 1 cup
– Whole almonds – ½ cup
– Unsalted butter – ¼ cup
– Graham cracker crumbs – 1½ cups
Instructions
1. Preheat your oven to 350°F and line an 8×8-inch baking pan with parchment paper, leaving an overhang for easy removal later.
2. In a medium bowl, combine the graham cracker crumbs and melted unsalted butter, mixing until the crumbs are evenly coated and resemble wet sand.
3. Press the crumb mixture firmly into the bottom of the prepared pan using the back of a spoon or your fingers to create an even layer—this helps prevent crumbling after baking.
4. In another bowl, stir together the sweetened shredded coconut and sweetened condensed milk until fully incorporated, then spread this mixture over the crust in an even layer.
5. Sprinkle the whole almonds evenly over the coconut layer, gently pressing them in so they adhere during baking.
6. Bake in the preheated oven for 20–25 minutes, or until the edges are golden brown and the center is set but still slightly soft to the touch—avoid overbaking to keep the bars chewy.
7. Remove the pan from the oven and let it cool completely on a wire rack for at least 1 hour to allow the layers to firm up before cutting.
8. In a microwave-safe bowl, melt the semisweet chocolate chips in 30-second intervals, stirring between each, until smooth and glossy, being careful not to overheat to prevent seizing.
9. Drizzle the melted chocolate over the cooled bars in a zigzag pattern using a spoon or piping bag for a decorative finish.
10. Refrigerate the bars for 15–20 minutes to set the chocolate, then use the parchment overhang to lift them out and cut into 16 squares with a sharp knife wiped clean between cuts for neat edges.
Relying on these bars never fails to delight—they boast a chewy coconut center with a satisfying crunch from almonds, all balanced by rich chocolate. Serve them chilled for a firmer texture or at room temperature to let the flavors meld, and consider pairing with a sprinkle of sea salt for a sweet-and-salty twist that elevates every bite.
Leftover Candy Ice Cream Topping

Overwhelmed by the candy avalanche after Halloween or Valentine’s Day? I’ve been there—staring at a mountain of chocolate bars, gummies, and hard candies, wondering how to use them before they go stale. This Leftover Candy Ice Cream Topping is my go‑to solution: a quick, fun way to transform those sweets into a decadent drizzle that’s perfect for jazzing up a simple bowl of ice cream. It’s become a post‑holiday tradition in my kitchen, and I love how it turns a potential waste into a treat everyone craves.
Serving: 4 | Pre Time: 5 minutes | Cooking Time: 10 minutes
Ingredients
– Heavy cream – ½ cup
– Assorted leftover candy – 1 cup, chopped
– Vanilla ice cream – 4 scoops
Instructions
1. Chop 1 cup of assorted leftover candy into small, pea‑sized pieces using a sharp knife on a cutting board—this helps them melt evenly later. Tip: If using hard candies, wrap them in a towel and tap gently with a rolling pin to break them up safely.
2. Pour ½ cup of heavy cream into a small saucepan and place it over medium‑low heat.
3. Heat the cream until small bubbles form around the edges and it reaches 180°F on a kitchen thermometer, about 3–4 minutes, stirring occasionally with a wooden spoon to prevent scorching.
4. Reduce the heat to low and immediately add all the chopped candy to the saucepan.
5. Stir the mixture continuously for 2–3 minutes until the candy is fully melted and the sauce is smooth and glossy. Tip: If the sauce seems too thick, add a tablespoon of cream and stir until it reaches a pourable consistency.
6. Remove the saucepan from the heat and let the topping cool for 5 minutes to thicken slightly—it should coat the back of a spoon without running off too quickly.
7. Scoop 4 servings of vanilla ice cream into bowls and drizzle the warm candy topping generously over each scoop. Tip: For a fun twist, sprinkle a few extra candy pieces on top for added crunch before serving.
Rich and velvety, this topping has a luscious texture that hardens just slightly on cold ice cream, creating a delightful shell. The flavor is a sweet medley of chocolate and fruit notes from the candy blend, making each bite a surprise. Try it over brownies or as a dip for fresh fruit to stretch those leftovers even further.
Halloween Candy Trail Mix
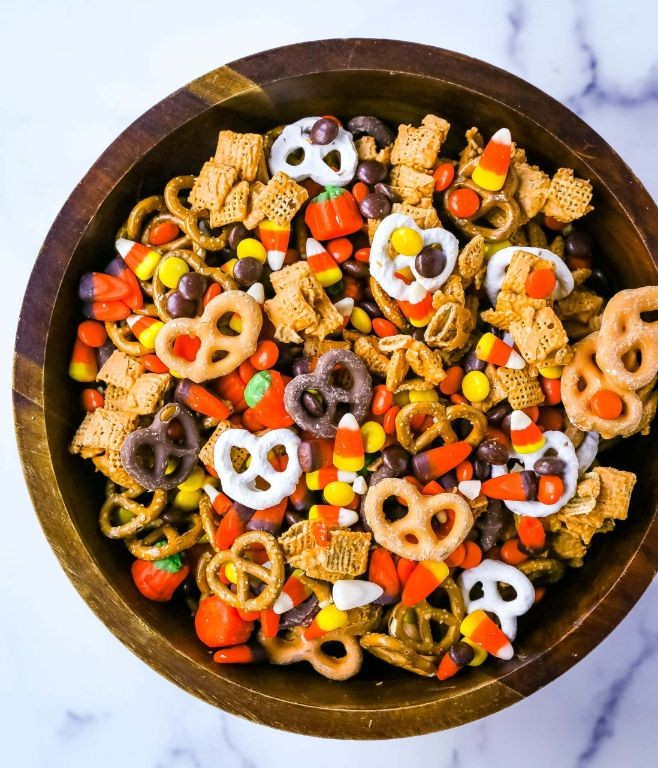
Zipping through my pantry after Halloween always leaves me with a colorful assortment of leftover candy—too much for one person, but perfect for transforming into a shareable snack. I love making this trail mix because it’s a fun, no-bake way to use up those sweet treats and create something new. Let’s turn those candy-coated memories into a crunchy, sweet, and salty mix that’s perfect for movie nights or lunchbox treats.
Serving: 8 | Pre Time: 10 minutes | Cooking Time: 0 minutes
Ingredients
– Pretzel sticks – 2 cups
– Roasted peanuts – 1 cup
– Candy corn – 1 cup
– Mini chocolate bars – 1 cup, chopped
– Salt – ½ tsp.
Instructions
1. Measure 2 cups of pretzel sticks and place them in a large mixing bowl.
2. Add 1 cup of roasted peanuts to the bowl with the pretzels.
3. Pour 1 cup of candy corn into the bowl, distributing it evenly among the other ingredients.
4. Chop 1 cup of mini chocolate bars into small, bite-sized pieces using a sharp knife on a cutting board. Tip: For easier chopping, chill the chocolate bars in the refrigerator for 10 minutes first to prevent melting.
5. Add the chopped chocolate pieces to the mixing bowl.
6. Sprinkle ½ tsp. of salt over the ingredients in the bowl. Tip: The salt enhances the sweet and savory flavors, so don’t skip it—it balances the candy perfectly.
7. Gently toss all the ingredients together with a large spoon or your hands until everything is well combined. Tip: Mix slowly to avoid breaking the pretzels and ensure an even distribution of candy and chocolate.
8. Transfer the trail mix to an airtight container or serve immediately in a large bowl.
So, this Halloween Candy Trail Mix delivers a satisfying crunch from the pretzels and peanuts, contrasted with the creamy melt of chocolate and the sugary burst of candy corn. I love packing it into small bags for on-the-go snacks or serving it in a festive bowl at parties—it’s always a hit with both kids and adults, sparking conversations about everyone’s favorite candy finds.
Summary
Ultimately, these 20 recipes transform leftover Halloween candy into delightful treats, reducing waste and sparking kitchen creativity. We hope you’ll whip up a batch, share your favorites in the comments, and pin this roundup on Pinterest to save for your next sweet adventure. Happy cooking!