Hey there, busy parents! Hitting that lunchtime slump with the same old sandwiches? We’ve got you covered. Dive into our roundup of 20 fun, easy, and healthy lunch box recipes that kids will actually love. From clever twists on classics to colorful, packable bites, these ideas will make midday meals exciting again. Let’s make lunchtime the highlight of their day—keep scrolling for delicious inspiration!
Mini Pizza Muffins

Versatile and perfect for parties, these Mini Pizza Muffins transform classic pizza flavors into a fun, handheld snack. Using a simple muffin base, they bake quickly and are endlessly customizable with your favorite toppings, making them ideal for busy weeknights or casual gatherings.
Serving: 12 | Pre Time: 10 minutes | Cooking Time: 15 minutes
Ingredients
– All-purpose flour – 1 cup
– Baking powder – 1 tsp
– Salt – ½ tsp
– Milk – ½ cup
– Egg – 1 large
– Vegetable oil – 2 tbsp
– Pizza sauce – ½ cup
– Shredded mozzarella cheese – 1 cup
– Pepperoni slices – 12
Instructions
1. Preheat your oven to 375°F and grease a 12-cup muffin tin thoroughly to prevent sticking.
2. In a large bowl, whisk together the all-purpose flour, baking powder, and salt until fully combined.
3. In a separate medium bowl, beat the egg lightly, then stir in the milk and vegetable oil until smooth.
4. Pour the wet ingredients into the dry ingredients and mix gently just until no dry streaks remain; overmixing can make the muffins tough.
5. Spoon about 1 tablespoon of the batter into each prepared muffin cup, spreading it evenly to cover the bottom.
6. Add 1 teaspoon of pizza sauce on top of the batter in each cup, spreading it lightly with the back of a spoon.
7. Sprinkle shredded mozzarella cheese evenly over the sauce in each cup, using about 1 tablespoon per muffin.
8. Place one pepperoni slice on top of the cheese in each muffin cup, pressing it down slightly.
9. Bake in the preheated oven for 12–15 minutes, or until the edges are golden brown and a toothpick inserted into the center comes out clean.
10. Let the muffins cool in the tin for 5 minutes before transferring them to a wire rack to cool completely; this helps them set without becoming soggy.
11. Serve warm or at room temperature.
Unbelievably soft and chewy, these muffins boast a savory flavor with melty cheese and a hint of pepperoni spice. Try serving them with a side of extra pizza sauce for dipping, or customize them by adding diced vegetables like bell peppers or olives before baking for a colorful twist.
Cheese and Veggie Quesadillas

Let’s make a simple yet satisfying meal that’s perfect for busy weeknights or casual gatherings. Cheese and Veggie Quesadillas are a versatile dish that combines gooey melted cheese with fresh vegetables, all crisped between two tortillas. This recipe is beginner-friendly and requires minimal prep, making it an ideal choice for anyone looking to whip up something delicious quickly.
Serving: 4 | Pre Time: 10 minutes | Cooking Time: 15 minutes
Ingredients
– Flour tortillas – 8
– Shredded cheddar cheese – 2 cups
– Bell pepper – 1, diced
– Onion – ½, diced
– Olive oil – 2 tbsp
– Salt – ½ tsp
Instructions
1. Heat a large skillet over medium heat and add 1 tbsp of olive oil.
2. Add the diced bell pepper and onion to the skillet, cooking for 5-7 minutes until softened, stirring occasionally to prevent burning.
3. Transfer the cooked vegetables to a bowl and set aside, wiping the skillet clean with a paper towel.
4. Place one flour tortilla in the skillet over medium heat and sprinkle ¼ cup of shredded cheddar cheese evenly over it.
5. Spread a quarter of the cooked vegetables over the cheese, then top with another ¼ cup of cheese and a second tortilla.
6. Cook for 2-3 minutes until the bottom tortilla is golden brown and crispy, pressing down gently with a spatula to help the layers adhere.
7. Carefully flip the quesadilla using the spatula and cook for another 2-3 minutes until the second side is golden brown and the cheese is fully melted.
8. Remove the quesadilla from the skillet and repeat steps 4-7 with the remaining ingredients to make three more quesadillas.
9. Cut each quesadilla into quarters with a sharp knife or pizza cutter for easy serving.
Delight in the crispy exterior that gives way to a warm, cheesy center with tender vegetables. For a creative twist, serve these quesadillas with a side of salsa or guacamole for dipping, or add a dollop of sour cream on top to enhance the creamy texture.
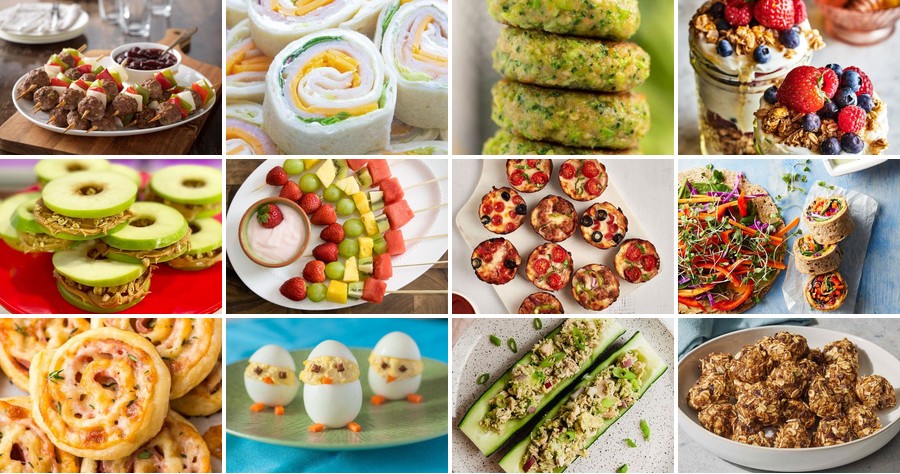
Turkey and Cheese Roll-Ups
Keeping weeknight dinners simple yet satisfying is a universal goal, and these Turkey and Cheese Roll-Ups deliver exactly that with minimal effort. Perfect for busy evenings, they combine lean protein and melty cheese in a handheld package that’s both kid-friendly and adult-approved.
Serving: 4 | Pre Time: 10 minutes | Cooking Time: 15 minutes
Ingredients
– Flour tortillas – 4 (8-inch)
– Sliced turkey – 8 oz
– Shredded cheddar cheese – 1 cup
– Olive oil – 1 tbsp
Instructions
1. Preheat your oven to 375°F (190°C) and line a baking sheet with parchment paper.
2. Lay one flour tortilla flat on a clean surface.
3. Arrange 2 oz of sliced turkey evenly over the tortilla, leaving a ½-inch border around the edges.
4. Sprinkle ¼ cup of shredded cheddar cheese over the turkey layer.
5. Tightly roll the tortilla from one end to the other, pressing gently to secure the filling.
6. Place the roll-up seam-side down on the prepared baking sheet.
7. Repeat steps 2–6 with the remaining tortillas, turkey, and cheese.
8. Brush the tops of all roll-ups lightly with 1 tbsp of olive oil using a pastry brush.
9. Bake in the preheated oven for 12–15 minutes, or until the tortillas turn golden brown and the cheese is fully melted.
10. Remove the baking sheet from the oven and let the roll-ups cool for 3 minutes before slicing.
11. Cut each roll-up diagonally into 1-inch pieces using a sharp serrated knife.
Offering a delightful contrast, these roll-ups feature a crispy exterior that gives way to a warm, gooey cheese center paired with savory turkey. Serve them with a side of marinara sauce for dipping or slice them into smaller rounds for an easy appetizer at gatherings.
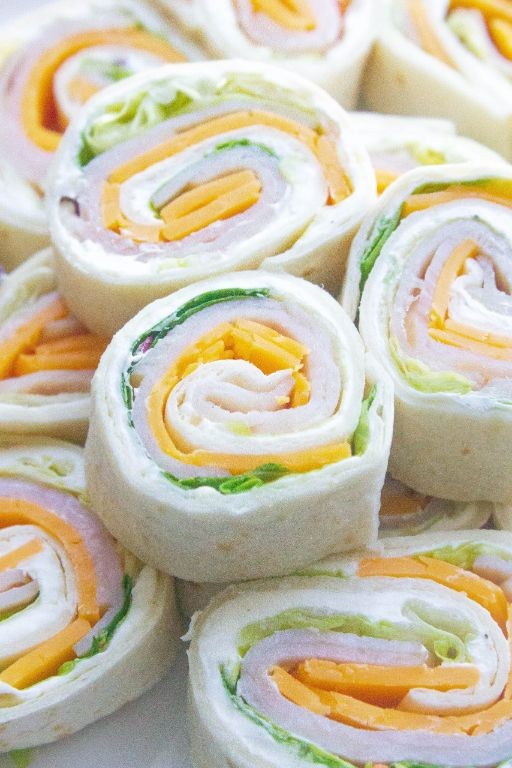
Peanut Butter Banana Sushi Rolls
Zesty yet comforting, this playful twist on sushi transforms pantry staples into a delightful snack that’s perfect for quick lunches or after-school treats. Let’s walk through each simple step together to create these no-cook rolls that even beginners can master.
Serving: 2 | Pre Time: 15 minutes | Cooking Time: 0 minutes
Ingredients
– Flour tortillas – 2 large
– Creamy peanut butter – ¼ cup
– Banana – 1 medium
– Honey – 1 tbsp
– Ground cinnamon – ½ tsp
Instructions
1. Lay one flour tortilla flat on a clean cutting board.
2. Spread 2 tablespoons of creamy peanut butter evenly over the entire surface of the tortilla, leaving a ½-inch border around the edges.
3. Peel the banana and place it whole along one edge of the tortilla.
4. Drizzle ½ tablespoon of honey in a thin line over the peanut butter.
5. Sprinkle ¼ teaspoon of ground cinnamon evenly over the peanut butter layer.
6. Starting from the banana edge, tightly roll the tortilla away from you, pressing gently as you go to seal the roll.
7. Repeat steps 1–6 with the second tortilla and remaining ingredients.
8. Using a sharp knife, slice each rolled tortilla crosswise into 1-inch pieces, wiping the knife clean between cuts for neat slices.
9. Arrange the slices on a plate with the spiral sides facing up.
Bursting with creamy peanut butter and sweet banana, these rolls offer a satisfying chewy texture from the tortilla with a hint of warmth from the cinnamon. Serve them immediately for the best consistency, or pack them in a bento box for a fun, portable snack that kids and adults alike will enjoy.
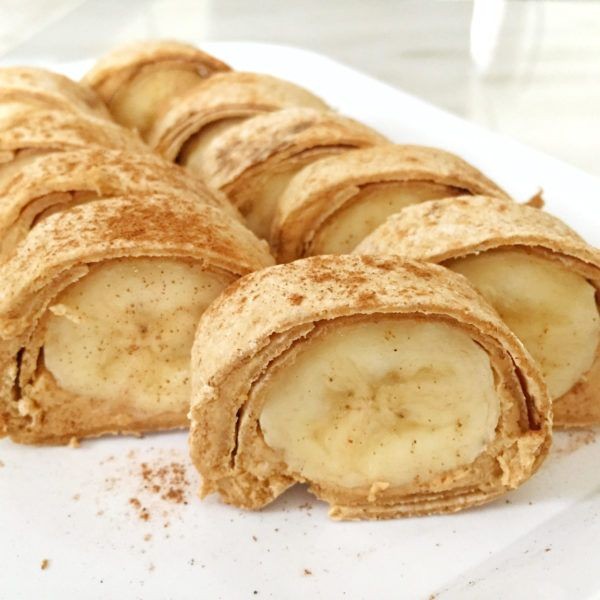
Yogurt Parfait with Granola
Creating a yogurt parfait with granola is simpler than you might think, and it’s the perfect make-ahead breakfast or snack. This methodical approach will guide you through building layers of creamy yogurt, crunchy granola, and fresh fruit for a balanced treat that’s both satisfying and nutritious.
Serving: 2 | Pre Time: 10 minutes | Cooking Time: 0 minutes
Ingredients
– Greek yogurt – 2 cups
– Granola – 1 cup
– Honey – 2 tbsp
– Fresh berries – 1 cup
Instructions
1. Measure 2 cups of Greek yogurt into a mixing bowl.
2. Add 2 tbsp of honey to the yogurt and stir until fully combined, which should take about 30 seconds.
3. Spoon ¼ cup of the yogurt mixture into the bottom of each of two serving glasses or jars.
4. Layer ¼ cup of granola evenly over the yogurt in each glass.
5. Add ¼ cup of fresh berries on top of the granola layer in each glass.
6. Repeat the layers by adding another ¼ cup of yogurt mixture over the berries in each glass.
7. Top each glass with another ¼ cup of granola, pressing it down gently with a spoon to create a flat surface.
8. Finish by arranging the remaining ¼ cup of berries on top of the granola in each glass.
9. Refrigerate the parfaits for at least 1 hour before serving to allow the flavors to meld and the granola to soften slightly.
10. Serve chilled directly from the refrigerator.
Resulting in a delightful contrast of textures, this parfait offers a creamy yogurt base that’s subtly sweetened with honey, layered with crunchy granola and bursts of juicy berries. For a creative twist, try drizzling extra honey on top just before serving or swapping the berries for sliced bananas or mango chunks to vary the flavor profile.
Apple Peanut Butter Sandwiches
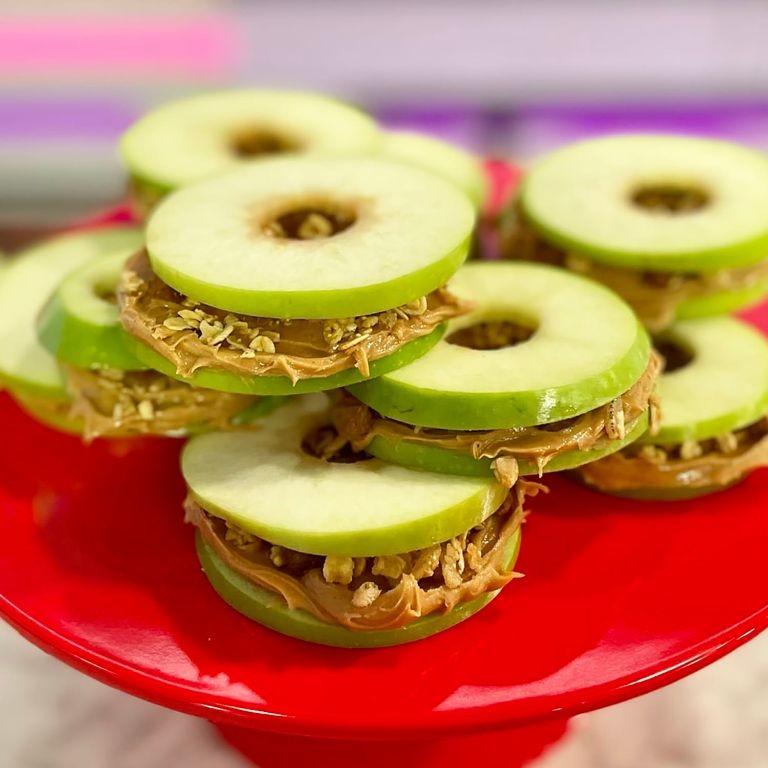
Now, let’s make a simple yet satisfying snack that combines crisp fruit with creamy nut butter. This no-cook recipe is perfect for quick lunches or after-school treats, requiring just a few basic ingredients and minimal effort. Follow these steps carefully for the best results.
Serving: 2 | Pre Time: 5 minutes | Cooking Time: 0 minutes
Ingredients
– Apple – 1 large
– Peanut butter – ¼ cup
– Bread – 4 slices
Instructions
1. Wash the apple thoroughly under cold running water to remove any dirt or residue.
2. Pat the apple dry completely with a clean kitchen towel to prevent the bread from getting soggy.
3. Using a sharp knife, cut the apple in half from top to bottom, then remove the core and seeds.
4. Slice each apple half into thin, even pieces about ¼-inch thick for uniform texture.
5. Lay out the 4 slices of bread on a clean, flat surface like a cutting board.
6. Spread 1 tablespoon of peanut butter evenly onto one side of each slice of bread, covering the surface completely.
7. Arrange the apple slices in a single layer on top of the peanut butter on 2 of the bread slices.
8. Place the remaining 2 bread slices on top, peanut butter side down, to form 2 sandwiches.
9. Press down gently on each sandwich with your hands to help the ingredients adhere together.
10. Cut each sandwich in half diagonally with a serrated knife for easier handling and serving.
11. Serve immediately to enjoy the crisp, fresh texture of the apples.
For a delightful crunch, the apple slices stay firm against the smooth, rich peanut butter, creating a balanced sweet and savory flavor. Feel free to drizzle a bit of honey or sprinkle cinnamon on the apples before assembling for a warm, spiced twist—these sandwiches also pair well with a glass of cold milk for a comforting snack.
Mini Meatball Skewers
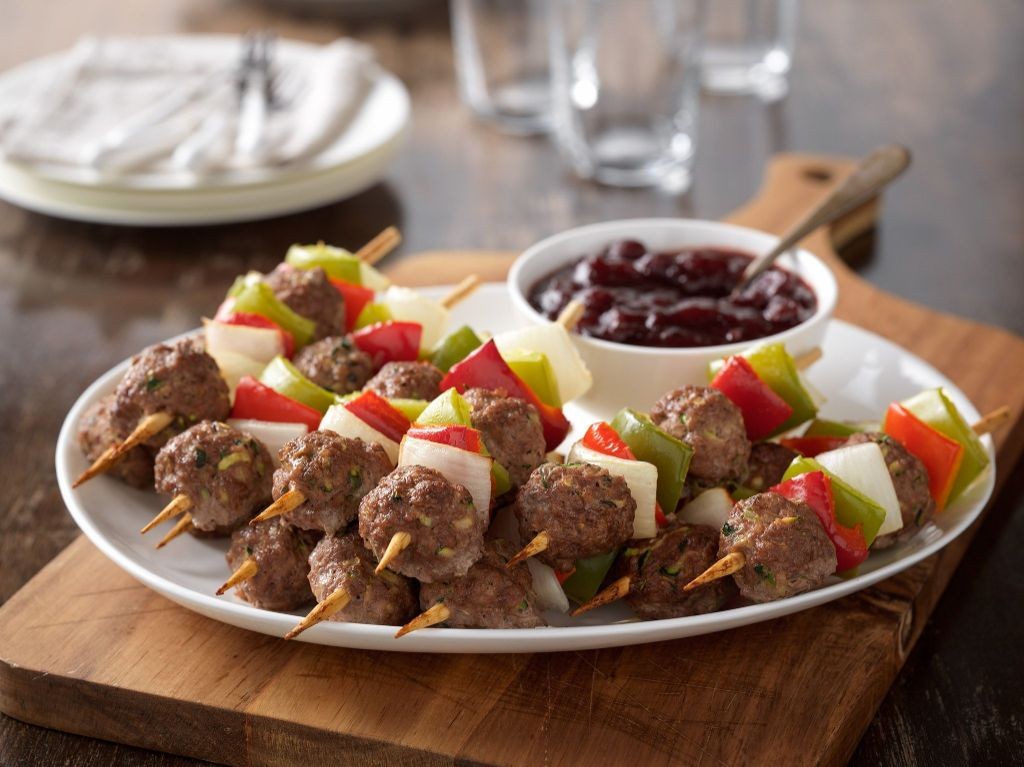
Diving into holiday appetizers doesn’t have to be daunting. These Mini Meatball Skewers are a simple, crowd-pleasing option that combines savory meatballs with a sweet glaze, perfect for festive gatherings. Let’s walk through the process methodically, ensuring success even for first-time cooks.
Serving: 24 skewers | Pre Time: 20 minutes | Cooking Time: 15 minutes
Ingredients
– Ground beef – 1 lb
– Breadcrumbs – ½ cup
– Egg – 1 large
– Garlic powder – 1 tsp
– Salt – ½ tsp
– Black pepper – ¼ tsp
– Apricot preserves – ½ cup
– Soy sauce – 2 tbsp
– Wooden skewers – 24
Instructions
1. Preheat your oven to 400°F and line a baking sheet with parchment paper.
2. In a large bowl, combine the ground beef, breadcrumbs, egg, garlic powder, salt, and black pepper.
3. Mix the ingredients with your hands until just combined, being careful not to overwork the meat, which can make the meatballs tough.
4. Roll the mixture into 1-inch meatballs, placing them on the prepared baking sheet as you go.
5. Bake the meatballs in the preheated oven for 12-15 minutes, until they reach an internal temperature of 160°F and are browned on the outside.
6. While the meatballs bake, combine the apricot preserves and soy sauce in a small saucepan over medium heat.
7. Stir the glaze mixture constantly for 3-5 minutes until it thickens slightly and becomes smooth, then remove it from the heat.
8. Once the meatballs are done, let them cool for 2 minutes to firm up, making them easier to handle without falling apart.
9. Thread one meatball onto each wooden skewer, dipping the tip in water first to prevent splintering.
10. Brush each skewered meatball generously with the warm apricot-soy glaze using a pastry brush for even coating.
11. Arrange the glazed skewers on a serving platter and serve immediately.
Upon serving, these skewers offer a delightful contrast: the meatballs are tender and juicy inside with a caramelized, sticky-sweet exterior from the glaze. For a creative twist, try alternating the meatballs with small pieces of pineapple or bell pepper on the skewers before glazing to add color and a hint of freshness to each bite.
Pasta Salad with Hidden Veggies
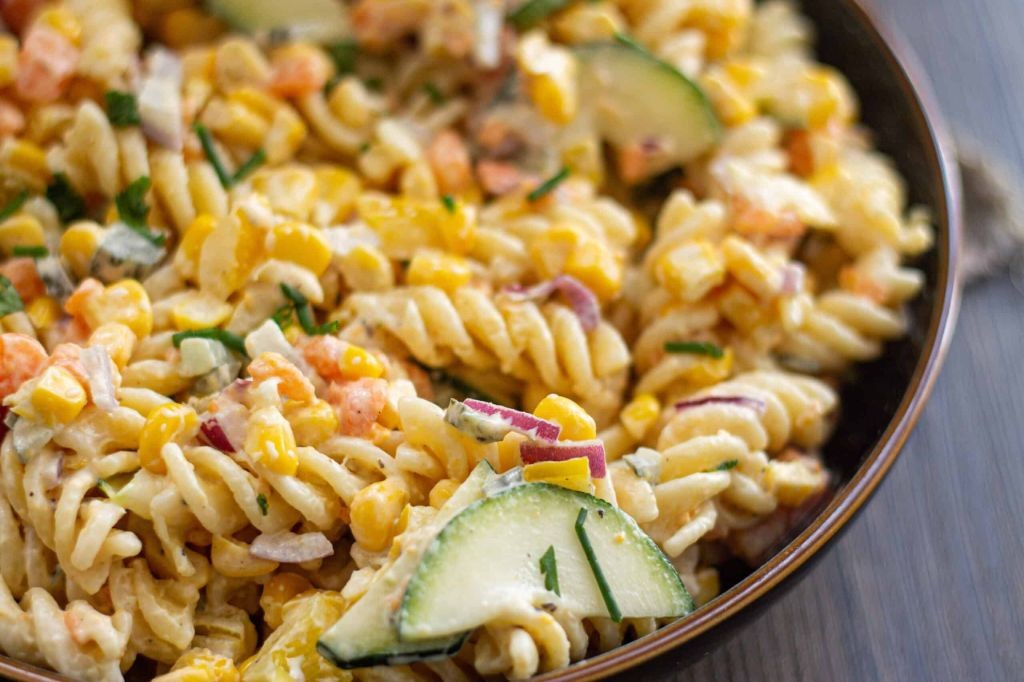
Zesty yet wholesome, this pasta salad cleverly incorporates vegetables into a familiar favorite, making it perfect for picky eaters or anyone seeking a nutritious twist. By blending veggies directly into the dressing, you’ll create a vibrant, flavorful dish that’s as easy to prepare as it is delicious. Follow these methodical steps to achieve a balanced, crowd-pleasing result every time.
Serving: 6 | Pre Time: 15 minutes | Cooking Time: 10 minutes
Ingredients
– Fusilli pasta – 12 oz
– Olive oil – ¼ cup
– Red wine vinegar – 2 tbsp
– Garlic – 2 cloves
– Carrot – 1 medium
– Zucchini – 1 small
– Cherry tomatoes – 1 cup
– Salt – 1 tsp
– Black pepper – ½ tsp
Instructions
1. Fill a large pot with 4 quarts of water, add ½ tsp salt, and bring to a rolling boil over high heat.
2. Add the fusilli pasta to the boiling water and cook for 8–10 minutes, stirring occasionally, until al dente (tender but firm to the bite).
3. While the pasta cooks, peel and roughly chop the carrot and zucchini into 1-inch pieces.
4. In a blender, combine the chopped carrot, zucchini, olive oil, red wine vinegar, peeled garlic cloves, remaining ½ tsp salt, and black pepper.
5. Blend the mixture on high speed for 45–60 seconds until completely smooth, scraping down the sides once to ensure even blending.
6. Drain the cooked pasta in a colander and rinse under cold running water for 30 seconds to stop the cooking process and cool it quickly.
7. Transfer the rinsed pasta to a large mixing bowl and pour the blended vegetable dressing over it.
8. Toss the pasta and dressing together thoroughly for 1–2 minutes until every piece is evenly coated.
9. Halve the cherry tomatoes and gently fold them into the pasta salad until just combined.
10. Cover the bowl and refrigerate the pasta salad for at least 1 hour to allow the flavors to meld and the dish to chill.
This pasta salad offers a creamy texture from the blended veggies, balanced by a tangy kick from the vinegar and the fresh pop of tomatoes. Try serving it in individual mason jars for a portable lunch or garnishing with fresh herbs like basil for an extra layer of flavor.
Hard-Boiled Egg Animals
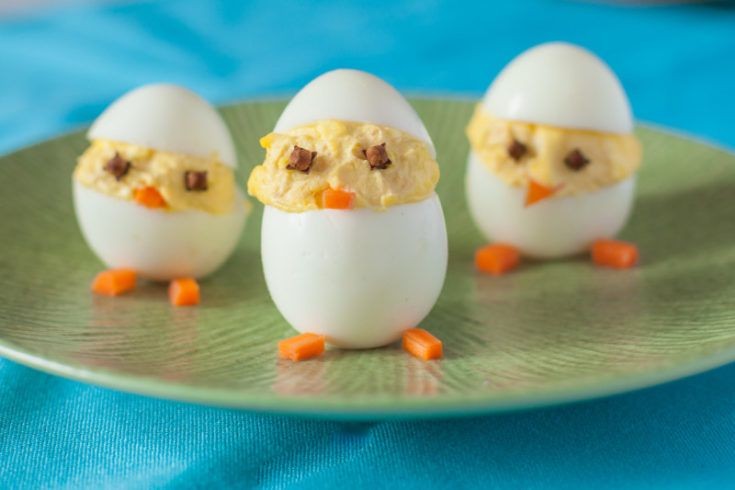
Only the most delightful kitchen projects combine simplicity with whimsy, and these Hard-Boiled Egg Animals are a perfect example—they transform a basic ingredient into playful, edible art that’s sure to charm kids and adults alike. This guide walks you through each precise step, ensuring your creations are both cute and delicious.
Serving: 4 | Pre Time: 5 minutes | Cooking Time: 12 minutes
Ingredients
– Eggs – 4 large
– Water – 4 cups
– Ice – 2 cups
– Black olives – 2
– Carrot – 1 small
– Cream cheese – 2 tbsp
Instructions
1. Place 4 large eggs in a single layer in a medium saucepan.
2. Pour 4 cups of cold water into the saucepan, ensuring the eggs are fully submerged by at least 1 inch.
3. Set the saucepan over high heat and bring the water to a rolling boil at 212°F.
4. Immediately remove the saucepan from the heat, cover it with a tight-fitting lid, and let the eggs sit for exactly 12 minutes.
5. While the eggs cook, prepare an ice bath by combining 2 cups of ice and 2 cups of cold water in a large bowl.
6. After 12 minutes, use a slotted spoon to transfer the eggs directly into the ice bath to cool for 5 minutes—this stops the cooking process for easy peeling.
7. Gently tap each egg on a hard surface and peel under cool running water to remove the shell completely.
8. Pat the peeled eggs dry with a paper towel to ensure decorations stick properly.
9. Slice a small carrot into thin rounds, then cut each round into small triangles for ears and feet.
10. Slice 2 black olives into thin rings for eyes, using a small round cutter or knife tip for precision.
11. Use a butter knife to spread 2 tbsp of cream cheese on a plate as “glue” for assembling the animals.
12. Dip the carrot pieces and olive rings into the cream cheese, then attach them to the eggs to create faces and limbs, pressing lightly to secure.
13. Arrange the decorated eggs on a serving platter and refrigerate for 10 minutes to set the decorations.
A fun, protein-packed snack, these eggs boast a firm yet tender texture with a mild, creamy flavor from the additions. Serve them at parties as edible centerpieces or pack them in lunches for a surprise that’s as nutritious as it is adorable.
Fruit Kabobs with Yogurt Dip

Before we dive into this refreshing and colorful recipe, let me assure you that creating these vibrant fruit kabobs with a creamy yogurt dip is one of the simplest, most satisfying ways to enjoy fresh produce. By following these clear steps, you’ll have a beautiful, healthy snack or dessert ready in no time, perfect for gatherings or a quick family treat.
Serving: 4 | Pre Time: 15 minutes | Cooking Time: 0 minutes
Ingredients
– Strawberries – 1 cup, hulled and halved
– Pineapple – 1 cup, cut into 1-inch chunks
– Grapes – 1 cup
– Wooden skewers – 8
– Plain Greek yogurt – 1 cup
– Honey – 2 tbsp
– Vanilla extract – 1 tsp
Instructions
1. Wash all the strawberries, pineapple chunks, and grapes thoroughly under cold running water.
2. Pat the washed fruit completely dry with paper towels to ensure the yogurt dip adheres properly later.
3. Hull each strawberry by removing the green stem and leafy top with a paring knife, then slice each strawberry in half vertically.
4. Thread the fruit onto the wooden skewers in an alternating pattern, such as strawberry half, pineapple chunk, grape, repeating until each skewer holds about ¾ cup of fruit.
5. Arrange the completed fruit kabobs on a large serving platter or baking sheet lined with parchment paper.
6. In a medium mixing bowl, combine the plain Greek yogurt, honey, and vanilla extract.
7. Whisk the yogurt mixture vigorously for 1-2 minutes until the honey is fully incorporated and the dip is smooth and creamy.
8. Transfer the yogurt dip to a small serving bowl and place it in the center of the platter with the fruit kabobs.
9. Serve immediately, or cover and refrigerate the kabobs and dip separately for up to 2 hours before serving to keep the fruit fresh.
Perfectly balanced, these kabobs offer a juicy, sweet burst from the fruit contrasted by the cool, tangy creaminess of the dip. The honey adds a subtle floral sweetness that complements the natural sugars in the strawberries and pineapple beautifully. For a festive twist, try drizzling the assembled kabobs with a little melted dark chocolate or sprinkling them with toasted coconut before serving.
Mini Pancake Stacks with Berries
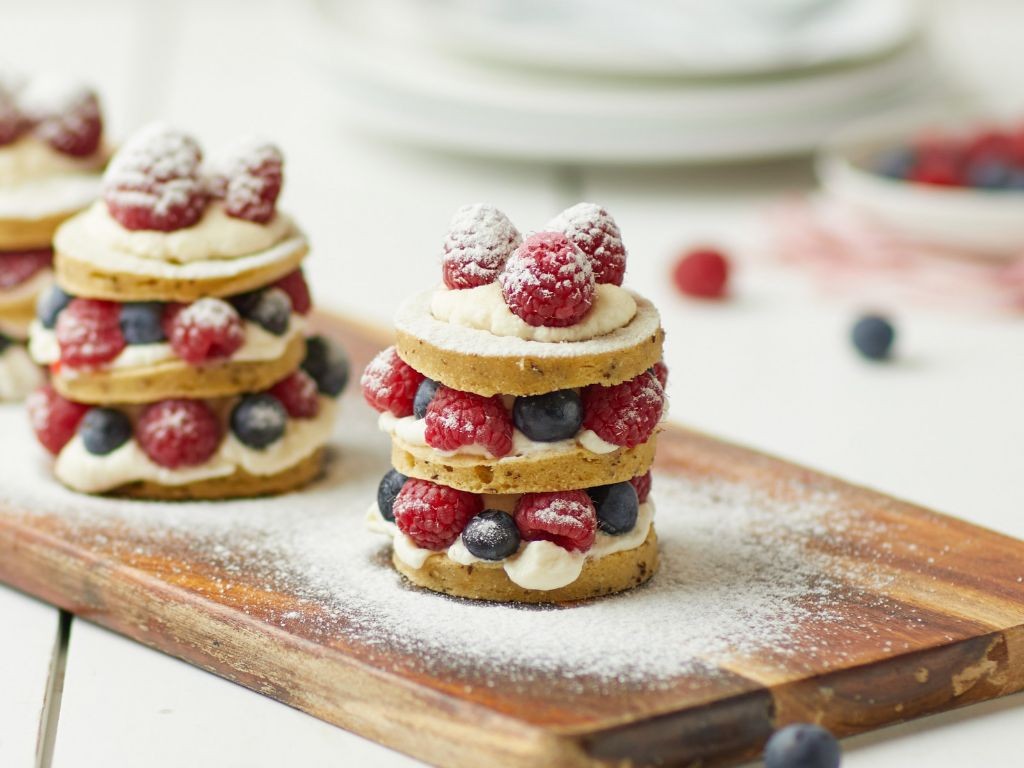
A delightful breakfast treat that’s both festive and easy to make, these mini pancake stacks are perfect for holiday mornings or weekend brunches. By using simple ingredients and a methodical approach, even beginners can create impressive, berry-topped towers that are sure to impress.
Serving: 4 | Pre Time: 10 minutes | Cooking Time: 15 minutes
Ingredients
– All-purpose flour – 1 cup
– Baking powder – 2 tsp
– Granulated sugar – 2 tbsp
– Salt – ¼ tsp
– Milk – ¾ cup
– Egg – 1 large
– Unsalted butter – 2 tbsp, melted
– Vanilla extract – 1 tsp
– Mixed berries – 1 cup
– Maple syrup – ¼ cup
Instructions
1. In a large bowl, whisk together 1 cup of all-purpose flour, 2 tsp of baking powder, 2 tbsp of granulated sugar, and ¼ tsp of salt until fully combined.
2. In a separate medium bowl, beat 1 large egg lightly, then add ¾ cup of milk, 2 tbsp of melted unsalted butter, and 1 tsp of vanilla extract, whisking until smooth.
3. Pour the wet ingredients into the dry ingredients and stir gently with a spatula until just combined; do not overmix to avoid tough pancakes.
4. Heat a non-stick skillet or griddle over medium heat (about 350°F) and lightly grease it with butter or cooking spray.
5. For each mini pancake, drop 1 tbsp of batter onto the skillet, cooking until bubbles form on the surface and the edges look set, about 1-2 minutes.
6. Flip each pancake carefully with a spatula and cook for another 1-2 minutes until golden brown and cooked through.
7. Repeat with the remaining batter, keeping cooked pancakes warm in a 200°F oven on a baking sheet.
8. While pancakes cook, rinse 1 cup of mixed berries and pat them dry with a paper towel to prevent sogginess.
9. To assemble, stack 3-4 mini pancakes per serving, layering berries between each pancake as you build.
10. Drizzle each stack with ¼ cup of maple syrup just before serving for a sweet finish.
Oozing with juicy berries and drenched in maple syrup, these stacks offer a fluffy texture with a hint of vanilla warmth. Serve them immediately for a vibrant, shareable breakfast that’s as fun to eat as it is to make—try adding a dollop of whipped cream or a sprinkle of powdered sugar for extra flair.
Tuna Salad Cucumber Boats
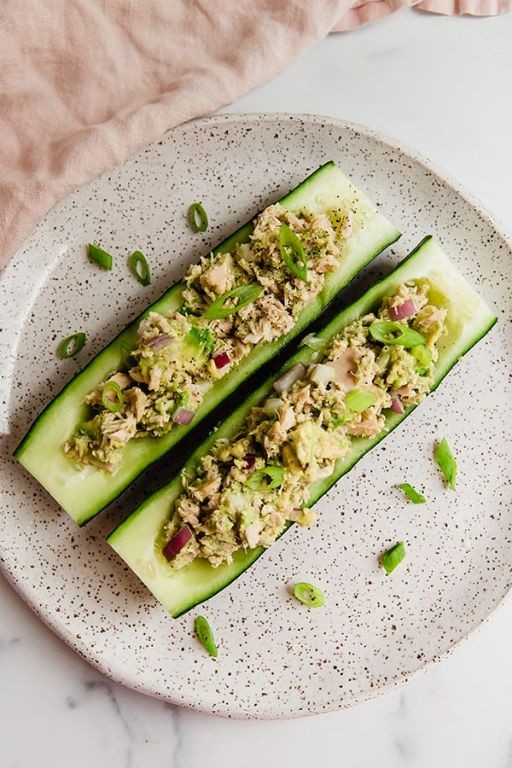
Let’s create a refreshing, protein-packed appetizer that’s perfect for light lunches or entertaining. These tuna salad cucumber boats are crisp, flavorful, and come together in minutes with minimal effort, making them ideal for beginners looking for a healthy, no-cook option.
Serving: 4 | Pre Time: 15 minutes | Cooking Time: 0 minutes
Ingredients
– Canned tuna – 2 (5-ounce) cans
– Mayonnaise – ¼ cup
– Dijon mustard – 1 tbsp
– Lemon juice – 1 tbsp
– English cucumber – 1 large
– Salt – ½ tsp
– Black pepper – ¼ tsp
Instructions
1. Drain the canned tuna thoroughly in a colander to remove excess liquid, which prevents a watery salad.
2. In a medium bowl, combine the drained tuna, mayonnaise, Dijon mustard, lemon juice, salt, and black pepper.
3. Mix the ingredients with a fork until well blended and the tuna is flaked evenly.
4. Wash the English cucumber under cold running water and pat it dry with a paper towel.
5. Cut the cucumber in half lengthwise using a sharp knife on a stable cutting board.
6. Scoop out the seeds from each cucumber half with a spoon, creating a hollow boat-like shape.
7. Spoon the tuna salad mixture evenly into the hollowed cucumber halves, pressing it down lightly.
8. Slice each filled cucumber half crosswise into 1-inch pieces for easy serving.
9. Arrange the cucumber boats on a serving platter immediately to maintain freshness.
Here’s how these simple bites come together: the crisp, cool cucumber provides a refreshing crunch that contrasts beautifully with the creamy, tangy tuna salad, while the lemon juice adds a bright zing. For a creative twist, try sprinkling them with chopped fresh dill or serving alongside whole-grain crackers for extra texture.
Sweet Potato and Black Bean Taquitos

Often overlooked in the freezer aisle, homemade taquitos offer a satisfying crunch and customizable filling that’s perfect for a quick meal or party appetizer. Our version combines creamy sweet potatoes and hearty black beans for a nutritious twist that comes together with minimal effort. Let’s walk through each step to ensure your taquitos turn out golden and delicious every time.
Serving: 12 | Pre Time: 15 minutes | Cooking Time: 20 minutes
Ingredients
– Sweet potatoes – 2 medium
– Black beans – 1 (15-oz) can
– Corn tortillas – 12
– Vegetable oil – ¼ cup
– Salt – ½ tsp
– Chili powder – 1 tsp
– Cumin – ½ tsp
Instructions
1. Preheat your oven to 400°F and line a baking sheet with parchment paper.
2. Peel the sweet potatoes, chop them into 1-inch cubes, and place them in a microwave-safe bowl.
3. Microwave the sweet potato cubes on high for 8 minutes, or until fork-tender, stirring halfway through to ensure even cooking.
4. Drain and rinse the black beans in a colander to remove excess sodium, then pat them dry with a paper towel.
5. Mash the cooked sweet potatoes in a large bowl until smooth, using a fork or potato masher.
6. Stir in the black beans, salt, chili powder, and cumin until the mixture is well combined.
7. Warm the corn tortillas in the microwave for 30 seconds wrapped in a damp paper towel to make them pliable and prevent cracking.
8. Spoon 2 tablespoons of the sweet potato mixture onto the center of each tortilla and roll it tightly into a cylinder.
9. Place the rolled taquitos seam-side down on the prepared baking sheet, spacing them 1 inch apart.
10. Brush each taquito lightly with vegetable oil using a pastry brush for even browning.
11. Bake the taquitos at 400°F for 20 minutes, flipping them halfway through, until they are golden brown and crispy.
12. Remove the taquitos from the oven and let them cool on the baking sheet for 5 minutes before serving.
Crispy on the outside with a soft, savory filling, these taquitos deliver a delightful contrast in textures. The sweet potatoes add a subtle sweetness that balances the earthy black beans and spices. For a fun twist, serve them with a side of avocado crema or a zesty salsa for dipping, making them a hit at any gathering.
Ants on a Log (Celery with Peanut Butter and Raisins)
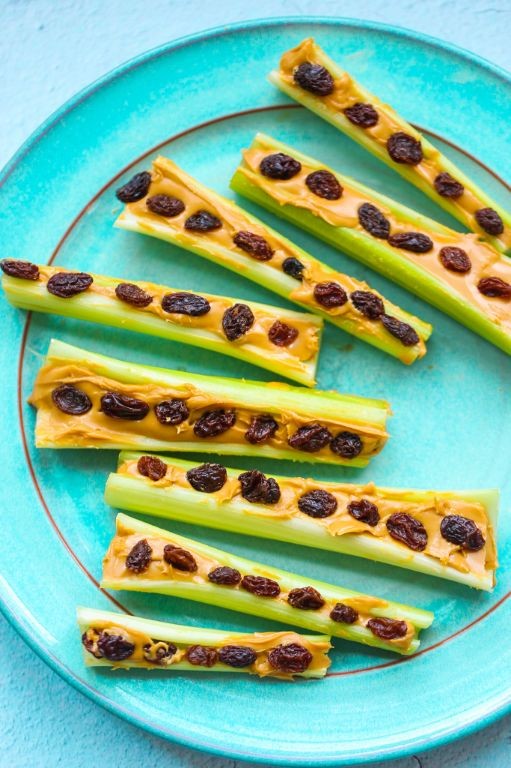
During my childhood, this simple snack was a staple in lunchboxes and after-school gatherings. Today, I’m excited to guide you through making this classic, no-cook treat that’s perfect for beginners and nostalgic for adults.
Serving: 4 | Pre Time: 10 minutes | Cooking Time: 0 minutes
Ingredients
- Celery stalks – 4
- Peanut butter – ½ cup
- Raisins – ¼ cup
Instructions
- Wash the celery stalks under cold running water for 30 seconds to remove any dirt.
- Pat the celery stalks dry completely with a clean kitchen towel to ensure the peanut butter adheres well.
- Trim off the leafy ends and tough base of each celery stalk using a sharp knife.
- Cut each celery stalk into 3-inch-long pieces, which typically yields 3-4 pieces per stalk.
- Spoon ½ cup of peanut butter into a small bowl to make it easier to spread.
- Using a butter knife, spread peanut butter evenly into the groove of each celery piece, filling it completely.
- Tip: For a smoother spread, let the peanut butter sit at room temperature for 5 minutes if it’s too firm from refrigeration.
- Place ¼ cup of raisins in a separate small bowl for easy access.
- Press raisins into the peanut butter on each celery piece, spacing them about ½ inch apart to resemble ants on a log.
- Tip: If the raisins are dry, soak them in warm water for 2 minutes and pat dry to plump them up for better texture.
- Arrange the completed pieces on a serving plate in a single layer.
- Tip: For a fun variation, try using almond butter or cream cheese instead of peanut butter, and substitute raisins with dried cranberries or chocolate chips.
- Serve immediately, or cover with plastic wrap and refrigerate for up to 2 hours before serving to keep them fresh.
Keenly crafted, this snack offers a delightful crunch from the celery, creamy richness from the peanut butter, and sweet bursts from the raisins. For a creative twist, arrange them on a platter with a drizzle of honey or a sprinkle of cinnamon for added flavor, making it a hit at parties or a quick, wholesome treat any time of day.
Oatmeal Energy Bites
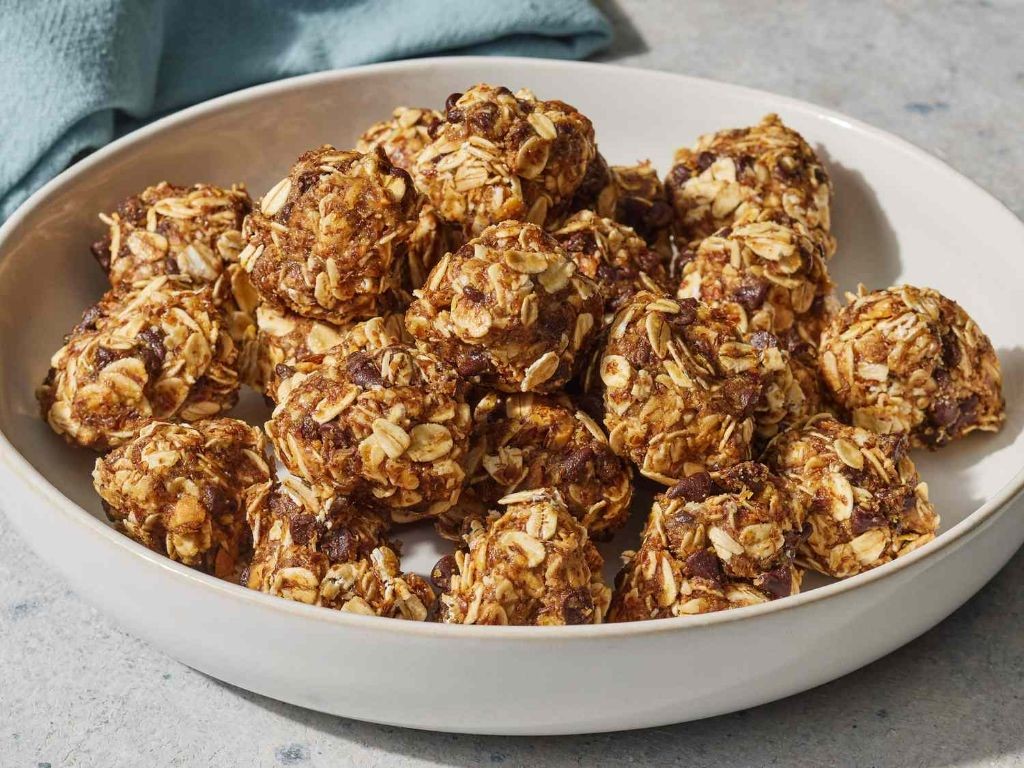
Ready to make a simple, no-bake snack that’s perfect for busy days? Oatmeal energy bites come together quickly with just a few pantry staples, offering a chewy, satisfying treat you can customize to your taste. Let’s walk through each step methodically so you end up with perfect bites every time.
Serving: 12 | Pre Time: 10 minutes | Cooking Time: 0 minutes
Ingredients
– Rolled oats – 1 cup
– Peanut butter – ½ cup
– Honey – ¼ cup
– Vanilla extract – 1 tsp
– Mini chocolate chips – ¼ cup
Instructions
1. Measure 1 cup of rolled oats into a medium mixing bowl.
2. Add ½ cup of peanut butter to the bowl with the oats.
3. Pour ¼ cup of honey into the bowl.
4. Add 1 tsp of vanilla extract to the mixture.
5. Stir all ingredients together with a spatula until fully combined, which should take about 2 minutes; if the mixture seems too dry, add an extra tablespoon of honey for better binding.
6. Fold in ¼ cup of mini chocolate chips until evenly distributed.
7. Use your hands to roll the mixture into 12 equal-sized balls, each about 1 inch in diameter; lightly wetting your hands can prevent sticking.
8. Place the balls on a parchment-lined baking sheet.
9. Refrigerate the energy bites for at least 30 minutes to firm up, which helps them hold their shape.
10. Transfer the chilled bites to an airtight container for storage.
Finally, these oatmeal energy bites boast a chewy texture with a sweet, nutty flavor from the peanut butter and honey. For a fun twist, try rolling them in shredded coconut or crushed nuts before chilling, or enjoy them straight from the fridge as a cool, energizing snack.
Summary
Savor these 20 easy, healthy lunch box ideas that make packing fun and nutritious a breeze! We hope these recipes bring joy to your family’s midday meals. Give them a try, and let us know which ones your kids love most in the comments below. Don’t forget to share your favorites on Pinterest to spread the lunchtime inspiration!


