There’s nothing quite like hosting a relaxed, memorable brunch—except maybe enjoying it stress-free! That’s where make-ahead magic comes in. We’ve gathered 20 delicious recipes that let you prep in advance, so you can savor the moment with your guests. From savory casseroles to sweet treats, these crowd-pleasers are perfect for entertaining. Dive in and discover your new go-to brunch favorites!
Make Ahead Breakfast Burritos

Zipping through busy mornings becomes effortless with these make-ahead breakfast burritos, which combine hearty ingredients in a convenient handheld package. By preparing a batch in advance, you’ll have a satisfying, protein-rich meal ready to reheat whenever you need it, saving precious time without sacrificing flavor or nutrition.
Serving: 8 | Pre Time: 20 minutes | Cooking Time: 25 minutes
Ingredients
– 2 tablespoons clarified butter
– 1 large yellow onion, finely diced
– 1 red bell pepper, seeded and finely diced
– 1 pound breakfast sausage, casings removed
– 12 pasture-raised eggs, lightly beaten
– 1 cup shredded sharp cheddar cheese
– 8 large flour tortillas (10-inch diameter)
– 1 tablespoon neutral oil (such as avocado oil)
– Kosher salt and freshly ground black pepper, to season
Instructions
1. Heat 1 tablespoon of clarified butter in a large skillet over medium heat until shimmering, about 2 minutes.
2. Add the finely diced yellow onion and red bell pepper to the skillet, sautéing until softened and lightly caramelized, approximately 8–10 minutes, stirring occasionally to prevent burning.
3. Transfer the sautéed vegetables to a bowl and set aside, wiping the skillet clean with a paper towel.
4. In the same skillet, add the remaining 1 tablespoon of clarified butter and heat over medium-high heat until melted.
5. Crumble the breakfast sausage into the skillet, cooking until browned and fully cooked through, about 6–8 minutes, breaking it into small pieces with a spatula.
6. Remove the cooked sausage with a slotted spoon, draining excess fat, and combine it with the sautéed vegetables in the bowl.
7. Reduce the heat to medium-low and pour the lightly beaten pasture-raised eggs into the skillet.
8. Gently scramble the eggs, stirring constantly with a silicone spatula, until they form soft, moist curds, about 4–5 minutes; avoid overcooking to keep them tender.
9. Season the scrambled eggs with kosher salt and freshly ground black pepper to taste, then fold in the shredded sharp cheddar cheese until just melted.
10. Combine the egg mixture with the sausage and vegetables in the bowl, mixing evenly to distribute ingredients.
11. Warm the flour tortillas in a dry skillet over low heat for 15–20 seconds per side to make them pliable, preventing tearing during assembly.
12. Place approximately ¾ cup of the filling in the center of each tortilla, folding in the sides and rolling tightly from the bottom to form a secure burrito.
13. Brush each assembled burrito lightly with neutral oil to promote even browning and prevent sticking during storage.
14. Wrap each burrito individually in parchment paper, then aluminum foil, labeling with the date for easy tracking.
15. Freeze the wrapped burritos in a single layer on a baking sheet for 2 hours before transferring to a freezer bag for up to 3 months.
16. To serve, remove the foil and reheat a burrito in the microwave for 2–3 minutes or in a preheated 375°F oven for 20–25 minutes until heated through and the tortilla is crisp.
These burritos boast a satisfying contrast of fluffy scrambled eggs, savory sausage, and melted cheddar, all wrapped in a lightly crisped tortilla. For a creative twist, serve them with a side of fresh pico de gallo or a drizzle of hot sauce to enhance the flavors.
Chocolate Chip Pancake Bake
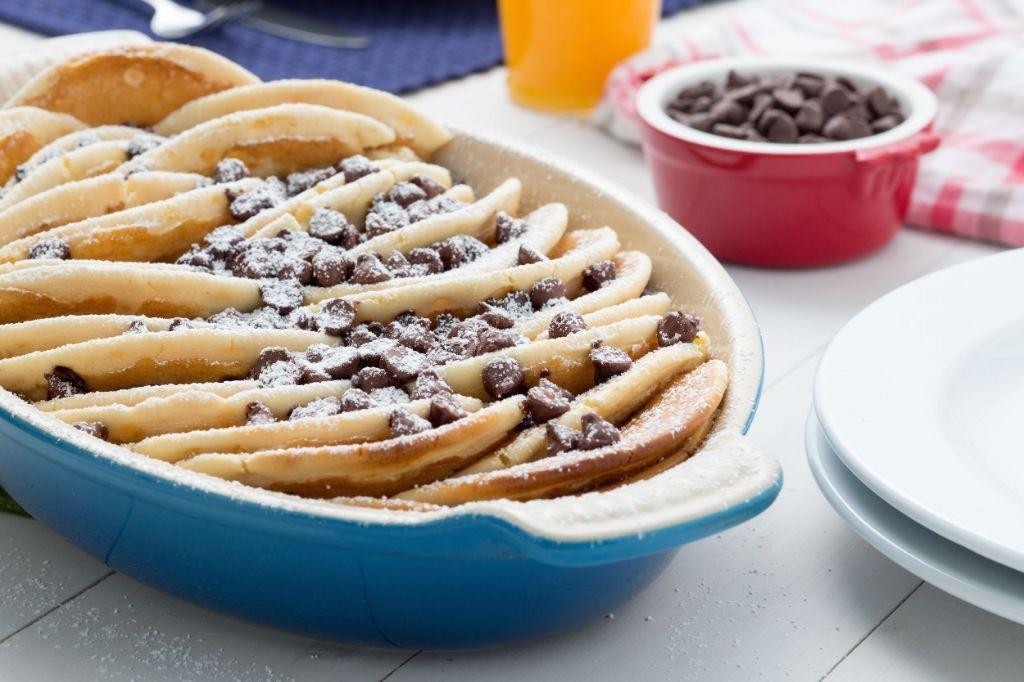
Meticulously crafted for holiday mornings or cozy brunches, this Chocolate Chip Pancake Bake transforms classic pancake batter into a hands-off, shareable delight. Imagine fluffy, golden-brown pancake squares studded with melty chocolate chips—perfect for feeding a crowd without hovering over the stove. Let’s walk through each step together to ensure your bake turns out beautifully every time.
Serving: 8 | Pre Time: 15 minutes | Cooking Time: 30 minutes
Ingredients
– 2 cups all-purpose flour
– 2 tablespoons granulated sugar
– 1 tablespoon baking powder
– 1/2 teaspoon fine sea salt
– 2 cups whole milk
– 2 large pasture-raised eggs, lightly beaten
– 1/4 cup clarified butter, melted and cooled slightly
– 1 teaspoon pure vanilla extract
– 1 cup semisweet chocolate chips
– 2 tablespoons unsalted butter, for greasing
Instructions
1. Preheat your oven to 375°F (190°C) and position a rack in the center.
2. Grease a 9×13-inch baking dish thoroughly with the unsalted butter, ensuring all surfaces are coated to prevent sticking.
3. In a large mixing bowl, whisk together the all-purpose flour, granulated sugar, baking powder, and fine sea salt until fully combined.
4. In a separate medium bowl, whisk the whole milk, pasture-raised eggs, clarified butter, and pure vanilla extract until smooth and emulsified.
5. Pour the wet ingredients into the dry ingredients and gently fold with a spatula until just incorporated, being careful not to overmix to avoid a tough texture.
6. Fold in the semisweet chocolate chips evenly throughout the batter.
7. Transfer the batter to the prepared baking dish, spreading it into an even layer with the spatula.
8. Bake for 25–30 minutes, or until the top is golden brown and a toothpick inserted into the center comes out clean, checking at the 25-minute mark to prevent overbaking.
9. Remove from the oven and let cool in the dish for 5 minutes before slicing into squares.
10. Serve warm directly from the dish.
Kick off your meal with this bake’s tender, cake-like interior and crisp edges, where pockets of molten chocolate add a rich contrast. For a festive twist, drizzle with maple syrup or top with a dollop of whipped cream and fresh berries, making it a versatile centerpiece for any gathering.
Ham and Cheese Quiche Cups

Let’s create elegant individual quiches that are perfect for holiday brunches or easy weeknight dinners. These ham and cheese quiche cups combine savory flavors in a convenient handheld format, making them ideal for gatherings or meal prep.
Serving: 12 | Pre Time: 15 minutes | Cooking Time: 25 minutes
Ingredients
– 1 sheet frozen puff pastry, thawed
– 6 pasture-raised eggs, lightly beaten
– 1 cup heavy cream
– 1 cup diced smoked ham
– 1 cup shredded Gruyère cheese
– ¼ cup finely chopped shallots
– 2 tablespoons clarified butter
– ½ teaspoon freshly grated nutmeg
– ¼ teaspoon fine sea salt
– ⅛ teaspoon freshly ground white pepper
Instructions
1. Preheat your oven to 375°F (190°C) and lightly grease a 12-cup standard muffin tin with clarified butter using a pastry brush.
2. Roll the thawed puff pastry sheet on a lightly floured surface to a 12×16-inch rectangle, then cut it into twelve 4-inch squares using a sharp chef’s knife.
3. Gently press each pastry square into a muffin cup, ensuring the corners point upward to create decorative edges that will crisp during baking.
4. In a medium mixing bowl, whisk together the lightly beaten pasture-raised eggs and heavy cream until fully emulsified and slightly frothy, about 1 minute.
5. Fold in the diced smoked ham, shredded Gruyère cheese, and finely chopped shallots until evenly distributed throughout the egg mixture.
6. Season the mixture with freshly grated nutmeg, fine sea salt, and freshly ground white pepper, whisking gently to incorporate.
7. Carefully ladle the filling into each pastry-lined muffin cup, filling them three-quarters full to prevent overflow during baking.
8. Bake in the preheated oven for 22-25 minutes, or until the pastry is golden brown and the centers are set with no visible liquid when gently jiggled.
9. Remove the muffin tin from the oven and let the quiche cups cool in the pan for 5 minutes to allow the custard to finish setting.
10. Use a small offset spatula to gently lift each quiche cup from the tin and transfer them to a wire rack to cool completely.
Buttery, flaky pastry encases a rich custard with smoky ham notes and nutty Gruyère complexity. These individual portions offer a satisfying contrast between the crisp exterior and creamy interior, making them excellent for brunch buffets when served alongside a frisée salad with champagne vinaigrette.
Blueberry Lemon Overnight Oats
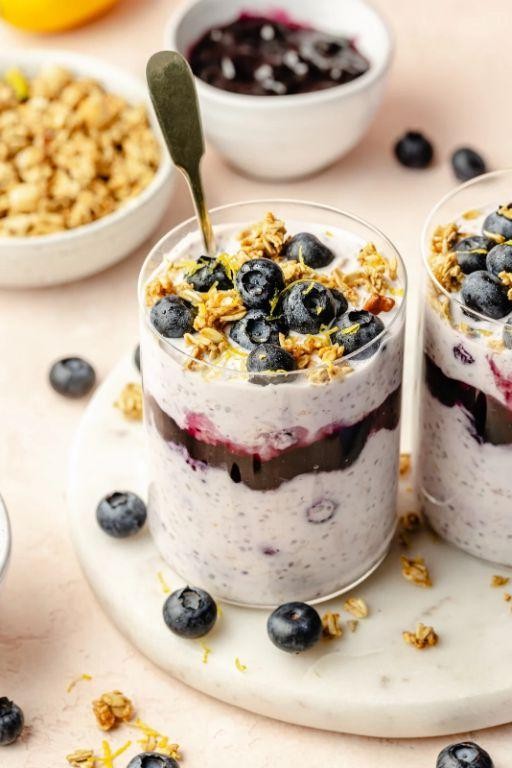
Starting your day with a nutritious breakfast doesn’t have to be complicated, especially with this make-ahead recipe. Simply combine a few wholesome ingredients the night before, and you’ll wake up to a creamy, flavorful jar of oats ready to enjoy. This method allows the oats to soften perfectly and the flavors to meld beautifully while you sleep.
Serving: 2 | Pre Time: 10 minutes | Cooking Time: 0 minutes
Ingredients
– 1 cup old-fashioned rolled oats
– 1 cup unsweetened almond milk
– 1/2 cup plain Greek yogurt
– 2 tablespoons pure maple syrup
– 1 teaspoon pure vanilla extract
– 1/2 cup fresh blueberries
– Zest of 1 medium lemon
– 1 tablespoon freshly squeezed lemon juice
– Pinch of fine sea salt
Instructions
1. In a medium mixing bowl, combine 1 cup of old-fashioned rolled oats and 1 cup of unsweetened almond milk.
2. Add 1/2 cup of plain Greek yogurt to the bowl and stir until fully incorporated with the oat mixture.
3. Pour in 2 tablespoons of pure maple syrup and 1 teaspoon of pure vanilla extract, stirring to distribute the sweeteners evenly.
4. Gently fold in 1/2 cup of fresh blueberries, taking care not to crush them.
5. Using a microplane, zest one medium lemon directly into the bowl, ensuring you capture only the yellow outer peel and avoid the bitter white pith.
6. Juice the zested lemon and measure out 1 tablespoon of the freshly squeezed juice, adding it to the mixture.
7. Season the mixture with a pinch of fine sea salt to enhance the overall flavor profile.
8. Divide the combined oat mixture evenly between two 16-ounce mason jars or airtight containers.
9. Seal the containers tightly and refrigerate them for a minimum of 8 hours, or preferably overnight, to allow the oats to fully hydrate and the flavors to develop.
10. Remove the jars from the refrigerator and give the contents a thorough stir before serving to ensure a consistent texture from top to bottom.
Just before serving, you’ll notice the oats have absorbed the liquid, creating a delightfully thick and creamy consistency without any cooking. The bright, tart notes from the lemon zest and juice perfectly balance the natural sweetness of the blueberries and maple syrup. For an elegant presentation, top each serving with an extra handful of fresh blueberries, a sprinkle of additional lemon zest, or a drizzle of maple syrup just before eating.
Sausage and Egg Breakfast Casserole

Gathering around the breakfast table for a satisfying meal is one of life’s simple pleasures, and this Sausage and Egg Breakfast Casserole delivers just that with minimal morning effort. It’s a hearty, make-ahead dish that combines savory sausage, creamy eggs, and melted cheese into a comforting bake perfect for feeding a crowd or enjoying as leftovers throughout the week.
Serving: 8 | Pre Time: 20 minutes | Cooking Time: 45 minutes
Ingredients
– 1 pound bulk breakfast sausage, casings removed
– 1 tablespoon clarified butter
– 1 medium yellow onion, finely diced
– 1 red bell pepper, finely diced
– 8 large pasture-raised eggs, lightly beaten
– 1 cup whole milk
– 1 teaspoon kosher salt
– ½ teaspoon freshly ground black pepper
– ½ teaspoon smoked paprika
– 6 cups day-old rustic bread, cut into 1-inch cubes
– 1½ cups sharp cheddar cheese, freshly grated
– 2 tablespoons fresh chives, finely chopped
Instructions
1. Preheat your oven to 375°F (190°C) and lightly grease a 9×13-inch baking dish with non-stick cooking spray.
2. Heat a large skillet over medium-high heat and add the bulk breakfast sausage, breaking it apart with a wooden spoon.
3. Cook the sausage for 6-8 minutes, stirring occasionally, until it is fully browned and no longer pink; transfer the cooked sausage to a paper towel-lined plate to drain excess fat.
4. In the same skillet, reduce the heat to medium and melt the clarified butter.
5. Add the finely diced yellow onion and red bell pepper to the skillet, cooking for 5-7 minutes until the vegetables are softened and the onions are translucent.
6. In a large mixing bowl, combine the lightly beaten pasture-raised eggs, whole milk, kosher salt, freshly ground black pepper, and smoked paprika, whisking vigorously until the mixture is fully homogenized.
7. Tip: For a fluffier texture, ensure your eggs are at room temperature before beating.
8. Add the day-old rustic bread cubes to the prepared baking dish, spreading them into an even layer.
9. Evenly distribute the cooked sausage and sautéed vegetables over the bread layer.
10. Sprinkle 1 cup of the freshly grated sharp cheddar cheese evenly over the sausage and vegetable mixture.
11. Carefully pour the egg and milk mixture over the entire casserole, ensuring it soaks through all the layers.
12. Gently press down on the top of the casserole with a spatula to help the bread absorb the liquid.
13. Cover the baking dish tightly with aluminum foil and bake in the preheated oven for 30 minutes.
14. Tip: Covering the dish initially prevents the top from browning too quickly while the eggs set.
15. After 30 minutes, remove the foil and sprinkle the remaining ½ cup of cheddar cheese over the top.
16. Return the casserole to the oven, uncovered, and bake for an additional 15 minutes, or until the top is golden brown and the center is set (a knife inserted should come out clean).
17. Tip: Let the casserole rest for 10 minutes after baking; this allows the layers to firm up for cleaner slicing.
18. Garnish the finished casserole with the finely chopped fresh chives before serving.
You’ll find this casserole boasts a delightful contrast of textures, from the custardy, set egg base to the crispy, golden-brown cheese topping. Its rich, savory flavor profile, enhanced by the smoked paprika and sharp cheddar, makes it a standout dish. Consider serving individual portions topped with a dollop of crème fraîche and a side of lightly dressed arugula for a brunch that feels both rustic and refined.
Vegetarian Breakfast Enchiladas

Crafting a satisfying morning meal doesn’t require meat, as these Vegetarian Breakfast Enchiladas prove. Combining fluffy scrambled eggs, hearty black beans, and melted cheese within a soft tortilla, all smothered in a vibrant sauce, they offer a complete and comforting start to the day. This methodical guide will walk you through each step for perfect results every time.
Serving: 4 | Pre Time: 20 minutes | Cooking Time: 25 minutes
Ingredients
– 8 large pasture-raised eggs, lightly beaten
– 1 (15-ounce) can of black beans, drained and rinsed
– 1 1/2 cups of shredded Monterey Jack cheese
– 8 (6-inch) corn tortillas
– 2 tablespoons of clarified butter
– 1/2 cup of finely diced yellow onion
– 1 jalapeño pepper, seeds removed and finely minced
– 2 cups of prepared red enchilada sauce
– 1/4 cup of chopped fresh cilantro
– 1/2 teaspoon of ground cumin
– 1/4 teaspoon of kosher salt
Instructions
1. Preheat your oven to 375°F (190°C) and lightly grease a 9×13-inch baking dish.
2. Heat 1 tablespoon of clarified butter in a large non-stick skillet over medium heat until it shimmers.
3. Add the diced yellow onion and minced jalapeño to the skillet, sautéing for 4-5 minutes until the onion turns translucent and soft.
4. Pour the lightly beaten pasture-raised eggs into the skillet with the vegetables.
5. Gently scramble the eggs, using a silicone spatula to push them from the edges toward the center, for 3-4 minutes until they are just set but still moist.
6. Transfer the scrambled eggs to a medium mixing bowl and fold in the drained black beans, 1 cup of shredded Monterey Jack cheese, ground cumin, and kosher salt until evenly combined.
7. Warm the corn tortillas by wrapping them in a damp paper towel and microwaving them for 30 seconds to make them pliable and prevent cracking.
8. Spoon approximately 1/3 cup of the egg and bean filling onto the center of each warmed tortilla.
9. Roll each tortilla tightly around the filling and place them seam-side down in the prepared baking dish.
10. Pour the prepared red enchilada sauce evenly over the top of the rolled tortillas, ensuring they are fully covered.
11. Sprinkle the remaining 1/2 cup of shredded Monterey Jack cheese uniformly over the sauced enchiladas.
12. Bake the enchiladas in the preheated oven, uncovered, for 20-25 minutes until the cheese is fully melted and bubbly and the sauce is gently simmering around the edges.
13. Remove the baking dish from the oven and let the enchiladas rest for 5 minutes to allow the filling to set for easier serving.
14. Garnish the finished enchiladas with the chopped fresh cilantro just before serving.
Gently baked, these enchiladas emerge with a delightful contrast: the tortillas soften into a tender wrap around the creamy, spiced filling, while the cheese forms a golden, slightly crisp topping. The red sauce infuses every bite with a tangy, mild heat that complements the richness of the eggs and beans, making them ideal for a leisurely weekend brunch when served with a side of sliced avocado or a dollop of cool sour cream.
Banana Bread Muffins with Streusel Topping

A comforting classic gets a delightful upgrade with these banana bread muffins, featuring a buttery streusel topping that adds irresistible crunch. Perfect for using up overripe bananas, this recipe transforms simple ingredients into a bakery-worthy treat that’s ideal for breakfast, snacks, or holiday gatherings. Follow these methodical steps to achieve moist, tender muffins with a golden-brown finish every time.
Serving: 12 | Pre Time: 20 minutes | Cooking Time: 22 minutes
Ingredients
– 2 cups all-purpose flour, sifted
– 1 teaspoon baking soda
– ½ teaspoon fine sea salt
– ½ cup unsalted butter, clarified and cooled to room temperature
– ¾ cup granulated sugar
– 2 large pasture-raised eggs, lightly beaten
– 3 very ripe bananas, mashed until smooth
– 1 teaspoon pure vanilla extract
– ½ cup full-fat Greek yogurt
– ½ cup light brown sugar, packed
– ¼ cup all-purpose flour
– ¼ cup unsalted butter, chilled and cubed
– ½ teaspoon ground cinnamon
Instructions
1. Preheat your oven to 375°F (190°C) and line a 12-cup muffin tin with paper liners.
2. In a medium bowl, whisk together 2 cups of sifted all-purpose flour, 1 teaspoon of baking soda, and ½ teaspoon of fine sea salt until fully combined.
3. In a large mixing bowl, cream ½ cup of clarified butter with ¾ cup of granulated sugar using an electric mixer on medium speed for 3–4 minutes, until light and fluffy.
4. Gradually add 2 lightly beaten pasture-raised eggs to the butter mixture, mixing on low speed until just incorporated after each addition.
5. Fold in 3 mashed very ripe bananas and 1 teaspoon of pure vanilla extract with a rubber spatula until the mixture is smooth and uniform.
6. Alternate adding the dry flour mixture and ½ cup of full-fat Greek yogurt to the wet ingredients, beginning and ending with the dry ingredients, and mix on low speed until no streaks of flour remain, being careful not to overmix.
7. In a small bowl, combine ½ cup of packed light brown sugar, ¼ cup of all-purpose flour, ¼ cup of chilled cubed unsalted butter, and ½ teaspoon of ground cinnamon, using your fingertips to rub the mixture into coarse crumbs for the streusel topping.
8. Divide the muffin batter evenly among the 12 prepared muffin cups, filling each about two-thirds full.
9. Sprinkle the streusel topping generously over each portion of batter, covering the surface completely.
10. Bake the muffins in the preheated oven at 375°F (190°C) for 20–22 minutes, or until a toothpick inserted into the center comes out clean and the tops are golden brown.
11. Transfer the muffin tin to a wire rack and allow the muffins to cool for 10 minutes before removing them to cool completely.
Warm from the oven, these muffins boast a moist, tender crumb infused with sweet banana flavor, contrasted by the crunchy, cinnamon-spiced streusel. For an indulgent twist, serve them slightly warmed with a dollop of whipped cream or a drizzle of caramel sauce, making them a standout addition to any brunch table or cozy afternoon treat.
Sweet Potato Hash with Poached Eggs
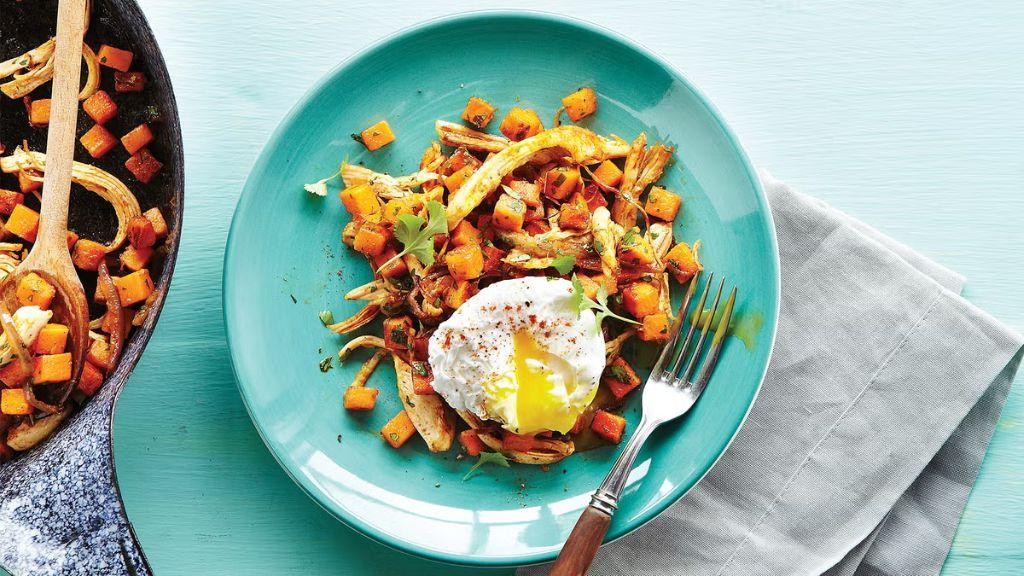
Ready to transform humble ingredients into a vibrant, satisfying breakfast? This sweet potato hash with poached eggs builds layers of flavor through careful technique, resulting in a dish where crispy-edged sweet potatoes meet perfectly runny yolks. Follow these methodical steps to master each component, from achieving caramelized vegetables to poaching eggs with confidence.
Serving: 4 | Pre Time: 15 minutes | Cooking Time: 25 minutes
Ingredients
– 2 large sweet potatoes, peeled and diced into ½-inch cubes
– 1 medium yellow onion, finely diced
– 1 red bell pepper, seeded and diced into ½-inch pieces
– 3 tablespoons clarified butter, divided
– 1 teaspoon smoked paprika
– ½ teaspoon ground cumin
– ¼ teaspoon cayenne pepper
– 1 teaspoon kosher salt
– 4 pasture-raised eggs
– 1 tablespoon white vinegar
– 2 tablespoons fresh chives, finely chopped
Instructions
1. Heat 2 tablespoons of clarified butter in a large cast-iron skillet over medium-high heat until it shimmers, about 2 minutes.
2. Add the diced sweet potatoes in a single layer, cooking undisturbed for 5 minutes to develop a golden-brown crust on one side.
3. Stir the sweet potatoes, then add the finely diced yellow onion and diced red bell pepper, distributing them evenly.
4. Reduce the heat to medium and cook, stirring occasionally, until the vegetables are tender and caramelized, about 12 minutes.
5. Sprinkle the smoked paprika, ground cumin, cayenne pepper, and kosher salt over the hash, stirring to coat evenly, and cook for 1 additional minute to toast the spices.
6. Transfer the hash to a plate and cover loosely with aluminum foil to keep warm.
7. Fill a medium saucepan with 3 inches of water, add the white vinegar, and bring to a gentle simmer over medium heat where small bubbles rise but the water does not boil vigorously.
8. Crack each pasture-raised egg into a small ramekin, then gently slide them one at a time into the simmering water, spacing them apart.
9. Poach the eggs for 3 minutes until the whites are set but the yolks remain runny, using a slotted spoon to remove them and drain on a paper towel-lined plate.
10. Divide the warm sweet potato hash among four plates, top each with a poached egg, and garnish with finely chopped fresh chives.
Let the contrasting textures—the crispy sweet potatoes against the silky egg yolk—create a delightful harmony in each bite. For a creative twist, serve the hash alongside a dollop of garlic-infused yogurt or sprinkle with crumbled feta cheese to add a tangy counterpoint to the dish’s earthy sweetness.
Make Ahead Breakfast Sandwiches

Kickstart your mornings with these convenient make-ahead breakfast sandwiches, perfect for busy days when you need a hearty, satisfying meal without the fuss. By preparing them in advance, you’ll have a freezer stocked with delicious, customizable sandwiches ready to heat and eat in minutes. Follow this methodical guide to create perfectly balanced sandwiches every time.
Serving: 6 | Pre Time: 15 minutes | Cooking Time: 25 minutes
Ingredients
– 6 English muffins, split
– 6 slices sharp cheddar cheese
– 6 large pasture-raised eggs, lightly beaten
– 6 slices thick-cut applewood-smoked bacon
– 2 tablespoons clarified butter
– 1/4 teaspoon kosher salt
– 1/8 teaspoon freshly ground black pepper
Instructions
1. Preheat your oven to 400°F (204°C) and line a baking sheet with parchment paper.
2. Arrange the bacon slices in a single layer on the prepared baking sheet.
3. Bake the bacon for 18-20 minutes, until crisp and golden brown, then transfer to a paper towel-lined plate to drain excess fat.
4. While the bacon bakes, heat a non-stick skillet over medium heat and add 1 tablespoon of clarified butter, swirling to coat the surface evenly.
5. Pour the lightly beaten eggs into the skillet and season with kosher salt and freshly ground black pepper.
6. Cook the eggs for 3-4 minutes, gently pushing the edges toward the center with a spatula to form large, soft curds, until just set but still slightly moist.
7. Remove the eggs from the heat and let them cool slightly before dividing into 6 equal portions.
8. Toast the split English muffins in a toaster or under a broiler until golden brown and crisp.
9. Assemble each sandwich by placing one slice of sharp cheddar cheese on the bottom half of a toasted English muffin.
10. Add one portion of scrambled eggs and one slice of crisp bacon on top of the cheese.
11. Cap each sandwich with the top half of the English muffin and wrap individually in parchment paper.
12. Place the wrapped sandwiches in a freezer-safe bag or container and freeze for up to 1 month.
13. To serve, unwrap a frozen sandwich and microwave on high for 1 minute 30 seconds to 2 minutes, until heated through, or bake at 350°F (177°C) for 20-25 minutes.
14. For optimal texture, let the sandwich rest for 1 minute after heating to allow the cheese to melt evenly and the muffin to soften slightly.
Gently reheating these sandwiches yields a delightful contrast: the English muffin becomes tender yet retains a slight chew, while the sharp cheddar melts into the fluffy eggs and crisp bacon adds a smoky crunch. For a creative twist, serve them with a side of spicy aioli or a fresh fruit salad to balance the richness, making each bite a satisfying start to any day.
Prosciutto and Asparagus Frittata

Savor a sophisticated yet approachable brunch dish that combines salty prosciutto with tender asparagus in a fluffy egg base. This prosciutto and asparagus frittata comes together with minimal effort, making it perfect for weekend gatherings or a special weekday breakfast. Follow these methodical steps to create a restaurant-quality meal right in your own kitchen.
Serving: 6 | Pre Time: 15 minutes | Cooking Time: 25 minutes
Ingredients
– 8 large pasture-raised eggs, lightly beaten
– 1/4 cup heavy cream
– 3 ounces thinly sliced prosciutto, torn into 1-inch pieces
– 1 pound fresh asparagus, trimmed and cut into 1-inch pieces
– 1/2 cup grated Parmigiano-Reggiano cheese
– 2 tablespoons clarified butter
– 1/2 teaspoon kosher salt
– 1/4 teaspoon freshly ground black pepper
– 1 tablespoon extra virgin olive oil
Instructions
1. Preheat your oven to 375°F and position a rack in the center.
2. In a large bowl, whisk together the lightly beaten pasture-raised eggs and heavy cream until fully combined and slightly frothy.
3. Fold in the grated Parmigiano-Reggiano cheese, kosher salt, and freshly ground black pepper until evenly distributed.
4. Heat the clarified butter in a 10-inch oven-safe skillet over medium heat until it shimmers, about 2 minutes.
5. Add the asparagus pieces to the skillet and sauté until bright green and tender-crisp, approximately 4-5 minutes.
6. Stir in the torn prosciutto pieces and cook for 1 minute to render slight fat and enhance flavor.
7. Pour the egg mixture evenly over the asparagus and prosciutto in the skillet, using a spatula to ensure ingredients are submerged.
8. Cook on the stovetop without stirring for 3-4 minutes until the edges begin to set, then transfer the skillet to the preheated oven.
9. Bake for 15-18 minutes until the frittata is puffed, golden brown, and the center is set when gently jiggled.
10. Remove the skillet from the oven using oven mitts and let it rest for 5 minutes to allow residual heat to finish cooking.
11. Drizzle the extra virgin olive oil over the surface before slicing into wedges.
Meticulously crafted, this frittata boasts a custardy interior with crisp-edged prosciutto and vibrant asparagus throughout. The Parmigiano-Reggiano adds a nutty depth that complements the salty meat beautifully. For an elegant presentation, serve warm slices atop a bed of arugula with a squeeze of lemon juice to brighten the rich flavors.
Chocolate Croissant Pudding

Kindly imagine transforming leftover croissants into a decadent dessert that feels both indulgent and resourceful. This Chocolate Croissant Pudding is a sumptuous bake that marries buttery, flaky pastry with a rich, custardy chocolate base, creating a comforting treat perfect for any gathering. Let’s walk through the process methodically to ensure your success.
Serving: 8 | Pre Time: 20 minutes | Cooking Time: 45 minutes
Ingredients
– 6 day-old croissants, torn into 1-inch pieces
– 2 cups heavy cream
– 1 cup whole milk
– 3/4 cup granulated sugar
– 4 pasture-raised eggs, lightly beaten
– 1 teaspoon pure vanilla extract
– 1/2 teaspoon fine sea salt
– 8 ounces high-quality dark chocolate (70% cacao), finely chopped
– 2 tablespoons unsalted butter, for greasing
Instructions
1. Preheat your oven to 350°F (175°C) and position a rack in the center.
2. Generously grease a 9×13-inch baking dish with unsalted butter, ensuring full coverage to prevent sticking.
3. Arrange the torn croissant pieces evenly in the prepared baking dish, creating a single layer.
4. In a medium saucepan over medium-low heat, combine heavy cream, whole milk, and granulated sugar, stirring constantly until the sugar dissolves completely and the mixture is warm to the touch, about 3-4 minutes.
5. Remove the saucepan from heat and immediately add the finely chopped dark chocolate, whisking vigorously until the chocolate is fully melted and the mixture is smooth and glossy.
6. In a separate large bowl, whisk together the lightly beaten pasture-raised eggs, pure vanilla extract, and fine sea salt until well combined.
7. Slowly pour the warm chocolate mixture into the egg mixture while whisking continuously to temper the eggs and prevent curdling.
8. Evenly pour the custard mixture over the croissant pieces in the baking dish, using a spatula to gently press down and ensure all pieces are fully submerged for maximum absorption.
9. Let the pudding sit at room temperature for 10 minutes to allow the croissants to soak up the custard, which enhances the final texture.
10. Place the baking dish in the preheated oven and bake for 40-45 minutes, or until the top is set and slightly puffed, and a knife inserted into the center comes out clean.
11. Remove the pudding from the oven and let it cool on a wire rack for at least 15 minutes before serving to allow it to firm up slightly.
What emerges is a luscious dessert with a crisp, golden top giving way to a soft, custard-soaked interior, where the bittersweet chocolate melds beautifully with the buttery croissant notes. For a creative twist, serve it warm with a dollop of crème fraîche or a sprinkle of flaky sea salt to balance the richness.
Breakfast Potatoes with Bell Peppers and Onions
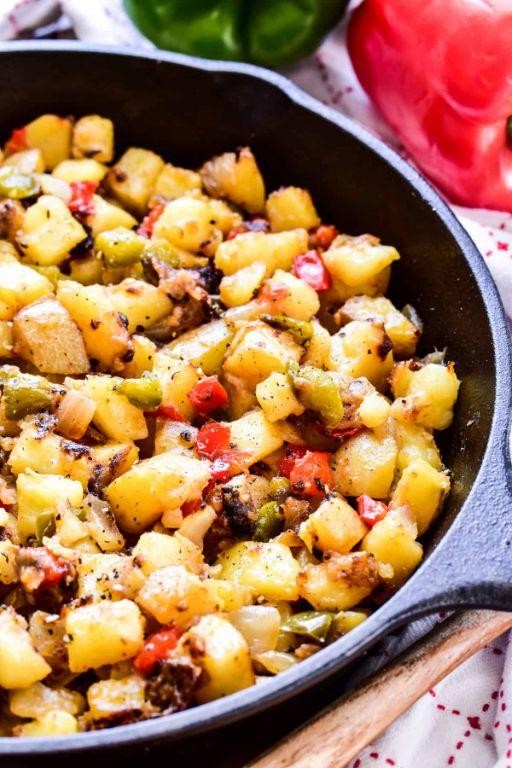
Finally, a breakfast potato recipe that delivers perfectly crispy edges and tender centers every time. Follow these methodical steps to master this classic combination of golden potatoes, sweet bell peppers, and aromatic onions, transforming simple ingredients into a standout morning dish.
Serving: 4 | Pre Time: 15 minutes | Cooking Time: 30 minutes
Ingredients
– 2 pounds Yukon Gold potatoes, scrubbed and cut into ¾-inch cubes
– 1 large yellow onion, finely julienned
– 1 red bell pepper, seeded and cut into ¼-inch strips
– 1 green bell pepper, seeded and cut into ¼-inch strips
– 3 tablespoons clarified butter
– 2 tablespoons extra-virgin olive oil
– 1 teaspoon smoked paprika
– ¾ teaspoon kosher salt
– ½ teaspoon freshly cracked black pepper
– 2 tablespoons finely chopped fresh flat-leaf parsley
Instructions
1. Place the potato cubes in a large saucepan, cover with cold water by 1 inch, and bring to a boil over high heat.
2. Reduce heat to medium and simmer potatoes for 6 minutes until just fork-tender but not falling apart.
3. Drain potatoes thoroughly in a colander and spread them in a single layer on a clean kitchen towel to steam-dry for 5 minutes.
4. Heat a large cast-iron skillet over medium-high heat for 2 minutes until a drop of water sizzles immediately.
5. Add clarified butter and olive oil to the skillet, swirling to coat the surface evenly.
6. Carefully add the dried potato cubes in a single layer, leaving space between pieces to ensure proper browning.
7. Cook potatoes undisturbed for 8 minutes until a deep golden crust forms on the bottom.
8. Using a thin metal spatula, flip potatoes and cook for another 6 minutes until evenly browned on all sides.
9. Add julienned onion and bell pepper strips to the skillet, distributing them evenly around the potatoes.
10. Cook vegetable mixture for 5 minutes, stirring only every 90 seconds to allow caramelization to develop.
11. Sprinkle smoked paprika, kosher salt, and black pepper evenly over the skillet contents.
12. Continue cooking for 3 more minutes, tossing gently to distribute seasonings without breaking potato cubes.
13. Remove skillet from heat and immediately stir in chopped parsley until evenly distributed.
14. Transfer mixture to a warmed serving platter using a slotted spoon to leave excess oil behind.
Remarkably, these potatoes achieve a textural contrast between the shatteringly crisp exterior and creamy interior that defines perfect breakfast potatoes. The caramelized onions and peppers create a sweet-savory foundation that complements the smoky paprika beautifully. For a creative twist, serve them alongside poached pasture-raised eggs or fold them into a breakfast burrito with sharp cheddar and crumbled chorizo.
Make Ahead Granola with Yogurt and Berries
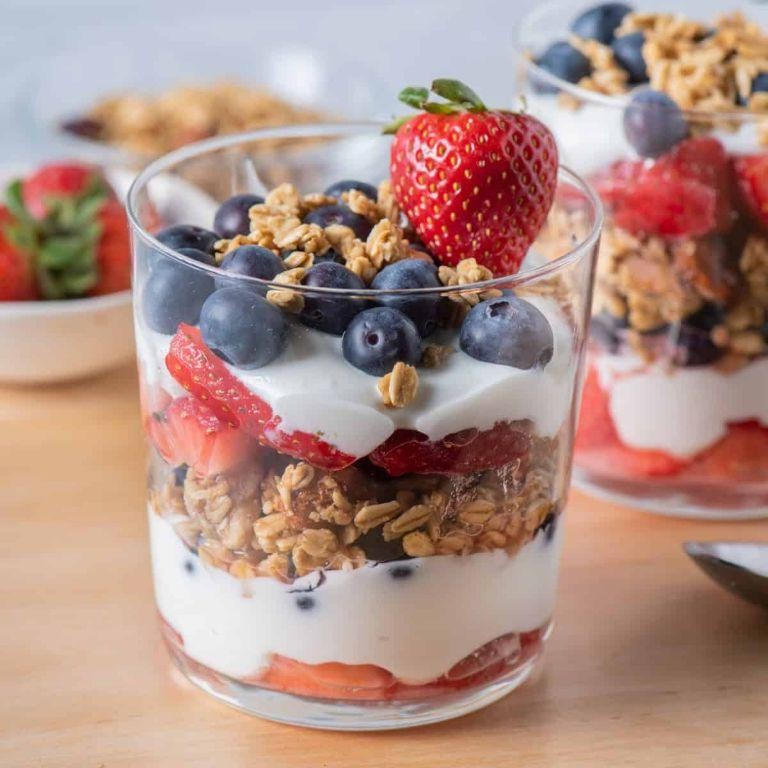
Zestfully preparing breakfast ahead of time ensures a stress-free morning, and this make-ahead granola with yogurt and berries delivers both convenience and vibrant flavor. By toasting oats and nuts with warm spices, then layering them with creamy yogurt and fresh fruit, you’ll create a balanced parfait that can be assembled in minutes after overnight refrigeration. Follow these methodical steps to build layers of texture and taste that hold up beautifully when prepared in advance.
Serving: 4 | Pre Time: 15 minutes | Cooking Time: 25 minutes
Ingredients
– 2 cups old-fashioned rolled oats
– 1 cup raw pecans, coarsely chopped
– ½ cup pure maple syrup
– ¼ cup extra-virgin coconut oil, melted
– 1 teaspoon ground cinnamon
– ½ teaspoon fine sea salt
– 2 cups plain whole-milk Greek yogurt
– 1 cup mixed fresh berries (such as raspberries and blueberries)
– 2 tablespoons local wildflower honey
Instructions
1. Preheat your oven to 325°F and line a rimmed baking sheet with parchment paper.
2. In a large mixing bowl, combine 2 cups old-fashioned rolled oats and 1 cup raw pecans, coarsely chopped.
3. In a small saucepan over low heat, gently warm ½ cup pure maple syrup and ¼ cup extra-virgin coconut oil, melted, just until liquid and combined—about 2 minutes.
4. Pour the warm liquid mixture over the oat-pecan blend, then add 1 teaspoon ground cinnamon and ½ teaspoon fine sea salt.
5. Toss everything thoroughly with a spatula until the dry ingredients are evenly coated, ensuring no dry spots remain for consistent toasting.
6. Spread the mixture in a single, even layer on the prepared baking sheet.
7. Bake at 325°F for 20–25 minutes, stirring halfway through, until the granola is golden brown and fragrant.
8. Remove from the oven and let cool completely on the baking sheet—about 30 minutes—to allow the granola to crisp up properly.
9. In four 8-ounce jars or glasses, spoon ½ cup plain whole-milk Greek yogurt into each as the first layer.
10. Top each yogurt layer with ¼ cup of the cooled granola mixture, pressing lightly to compact it.
11. Divide 1 cup mixed fresh berries evenly among the jars, placing them over the granola.
12. Drizzle each serving with ½ tablespoon local wildflower honey for a touch of natural sweetness.
13. Seal the jars tightly and refrigerate overnight or for up to 3 days before serving.
This granola parfait offers a delightful contrast: the crunchy, cinnamon-spiced clusters soften slightly against the tangy yogurt, while the berries add juicy bursts of freshness. Try layering it in clear mason jars for a visually appealing grab-and-go breakfast, or swap the honey for a drizzle of almond butter to deepen the nutty flavors.
Pumpkin Spice Waffles with Maple Syrup
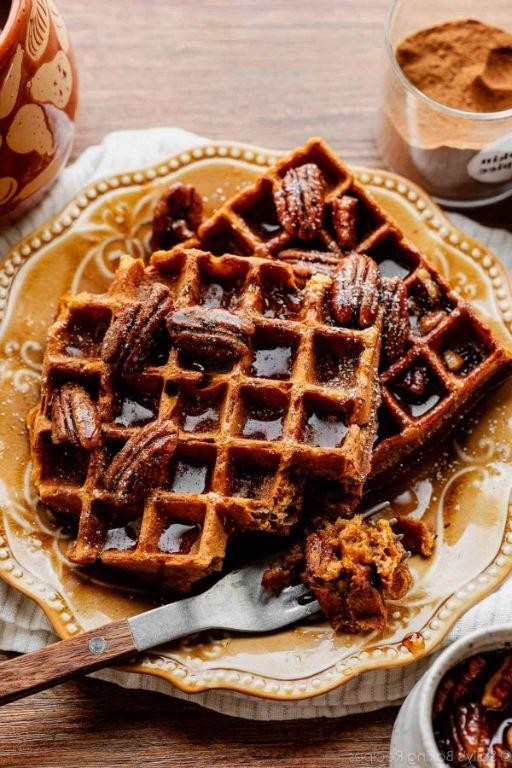
Ready to transform your breakfast routine with a seasonal classic? These pumpkin spice waffles combine warm autumn spices with the comforting texture of homemade waffles, making them perfect for cozy weekend mornings or holiday gatherings. Follow this methodical guide to create perfectly crisp yet tender waffles every time.
Serving: 4 | Pre Time: 15 minutes | Cooking Time: 20 minutes
Ingredients
– 2 cups all-purpose flour, sifted
– 1 tablespoon baking powder
– 1 teaspoon fine sea salt
– 2 teaspoons ground cinnamon
– 1 teaspoon ground ginger
– ½ teaspoon freshly grated nutmeg
– ¼ teaspoon ground cloves
– 1 cup pumpkin purée
– 3 pasture-raised eggs, lightly beaten
– 1 ½ cups whole milk
– ¼ cup clarified butter, melted and cooled
– ¼ cup granulated sugar
– 1 teaspoon pure vanilla extract
– Pure maple syrup, for serving
Instructions
1. Preheat your waffle iron to 375°F according to manufacturer instructions.
2. In a large mixing bowl, whisk together the sifted all-purpose flour, baking powder, fine sea salt, ground cinnamon, ground ginger, freshly grated nutmeg, and ground cloves until fully combined.
3. In a separate bowl, combine the pumpkin purée, lightly beaten pasture-raised eggs, whole milk, melted and cooled clarified butter, granulated sugar, and pure vanilla extract, whisking until smooth.
4. Pour the wet ingredients into the dry ingredients, folding gently with a spatula until just incorporated—do not overmix to avoid tough waffles.
5. Lightly brush the preheated waffle iron with additional clarified butter using a pastry brush.
6. Ladle approximately ½ cup of batter onto the center of the iron, spreading slightly with the back of the ladle.
7. Close the iron and cook for 4–5 minutes, or until steam subsides and the waffles are golden brown and crisp.
8. Transfer the cooked waffle to a wire rack to prevent sogginess, repeating with remaining batter.
9. Serve immediately, drizzled generously with pure maple syrup.
Soft and fluffy interiors contrast beautifully with crisp, caramelized edges, while the aromatic spices and pumpkin create a rich, earthy flavor profile. For a festive twist, top with candied pecans or a dollop of whipped cream infused with a hint of bourbon.
Smoked Salmon and Cream Cheese Bagel Bake
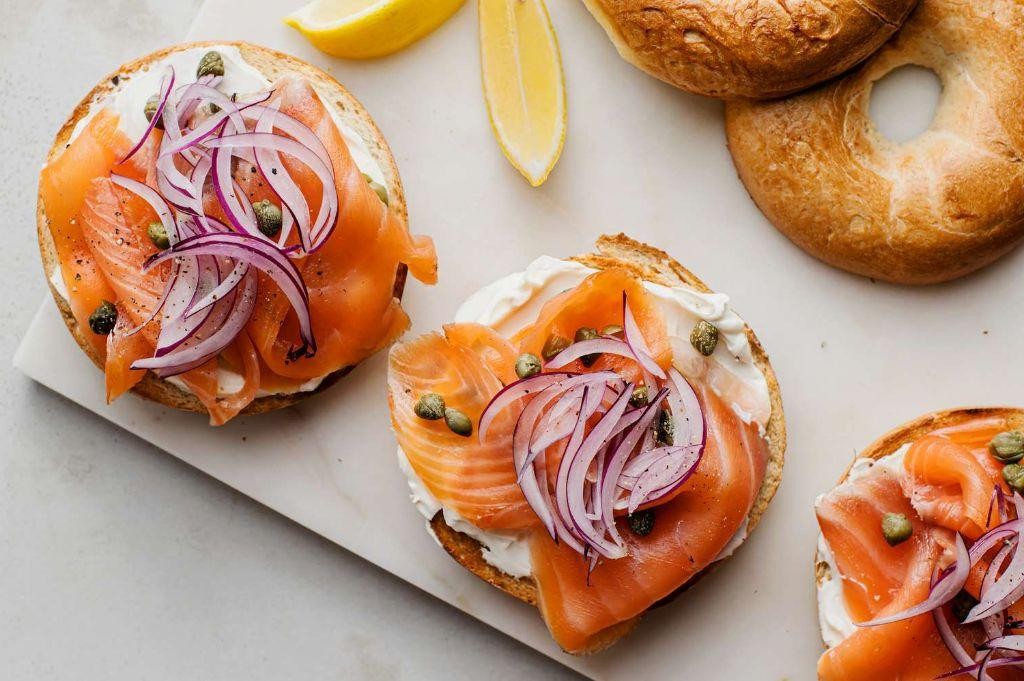
Tired of the same old breakfast routine? This Smoked Salmon and Cream Cheese Bagel Bake transforms your favorite deli combo into a warm, shareable casserole that’s perfect for feeding a crowd or meal prepping for the week. It layers everything you love about a classic bagel sandwich—chewy bagels, rich cream cheese, smoky salmon, and briny capers—into one comforting dish that bakes up golden and bubbly.
Serving: 6 | Pre Time: 15 minutes | Cooking Time: 35 minutes
Ingredients
– 4 plain bagels, sliced into 1-inch cubes
– 8 ounces full-fat cream cheese, softened to room temperature
– 1/2 cup crème fraîche
– 4 large pasture-raised eggs, lightly beaten
– 1 cup whole milk
– 1/2 teaspoon freshly ground black pepper
– 1/4 teaspoon fine sea salt
– 8 ounces cold-smoked salmon, flaked into large pieces
– 2 tablespoons nonpareil capers, drained
– 1/4 cup finely chopped fresh dill
– 1 tablespoon unsalted butter, for greasing the baking dish
– 1/4 cup grated Parmigiano-Reggiano cheese
Instructions
1. Preheat your oven to 375°F (190°C).
2. Generously grease a 9×13-inch baking dish with 1 tablespoon of unsalted butter, ensuring full coverage to prevent sticking.
3. Arrange the 4 plain bagels, sliced into 1-inch cubes, in a single, even layer across the bottom of the prepared baking dish.
4. In a large mixing bowl, combine 8 ounces of softened full-fat cream cheese and 1/2 cup of crème fraîche, whisking vigorously until completely smooth and lump-free.
5. Tip: For easiest blending, ensure both the cream cheese and crème fraîche are at room temperature before mixing.
6. To the cream cheese mixture, slowly whisk in 4 lightly beaten pasture-raised eggs until fully incorporated.
7. Gradually pour in 1 cup of whole milk while continuously whisking to create a homogeneous custard base.
8. Season the custard with 1/2 teaspoon of freshly ground black pepper and 1/4 teaspoon of fine sea salt, whisking to distribute evenly.
9. Evenly pour the seasoned custard mixture over the bagel cubes in the baking dish, using a spatula to gently press down, ensuring all cubes are submerged and saturated.
10. Tip: Allow the bagels to soak in the custard for 5 minutes before adding toppings to ensure maximum absorption and a tender final texture.
11. Scatter 8 ounces of flaked cold-smoked salmon, 2 tablespoons of drained nonpareil capers, and 1/4 cup of finely chopped fresh dill evenly over the soaked bagel mixture.
12. Sprinkle 1/4 cup of grated Parmigiano-Reggiano cheese uniformly over the entire surface.
13. Place the baking dish in the preheated oven and bake, uncovered, for 30-35 minutes.
14. Tip: The bake is done when the top is deeply golden brown, the edges are bubbling, and a knife inserted into the center comes out clean.
15. Remove the bake from the oven and let it rest on a wire rack for 10 minutes before serving to allow the custard to set fully.
Rely on this bake to deliver a wonderfully contrasting texture, with a crisp, cheesy top giving way to a soft, savory interior where the smoky salmon and tangy capers shine. For a creative twist, serve individual portions topped with a dollop of extra crème fraîche and a sprinkle of everything bagel seasoning for added crunch and flavor.
Mini Quiches with Spinach and Mushroom

Savory, elegant, and perfect for any gathering, these mini quiches with spinach and mushroom are a delightful bite-sized treat that’s surprisingly simple to master. They combine a flaky, buttery crust with a rich, custardy filling, making them ideal for brunches, appetizers, or even a light meal. Follow these methodical steps to create a batch that’s sure to impress.
Serving: 12 | Pre Time: 20 minutes | Cooking Time: 25 minutes
Ingredients
– 1 package (14.1 oz) refrigerated pie crust, thawed
– 2 tbsp clarified butter
– 8 oz cremini mushrooms, finely diced
– 2 cups fresh baby spinach, roughly chopped
– 4 pasture-raised eggs, lightly beaten
– 1 cup heavy cream
– 1/2 cup grated Gruyère cheese
– 1/4 tsp freshly grated nutmeg
– 1/2 tsp kosher salt
– 1/4 tsp freshly ground black pepper
Instructions
1. Preheat your oven to 375°F (190°C) and lightly grease a 12-cup mini muffin tin with cooking spray.
2. On a lightly floured surface, roll out the refrigerated pie crust to a 1/8-inch thickness.
3. Using a 3-inch round cutter, cut 12 circles from the pie crust, re-rolling scraps as needed.
4. Gently press each crust circle into the prepared muffin tin cups, ensuring they fit snugly against the bottom and sides.
5. In a medium skillet over medium heat, melt the clarified butter until it shimmers.
6. Add the finely diced cremini mushrooms and sauté for 5-7 minutes, stirring occasionally, until they release their moisture and turn golden brown.
7. Stir in the roughly chopped baby spinach and cook for 1-2 minutes, just until wilted, then remove the skillet from the heat and let the mixture cool slightly.
8. In a medium mixing bowl, whisk together the lightly beaten pasture-raised eggs and heavy cream until fully combined and smooth.
9. Fold in the grated Gruyère cheese, freshly grated nutmeg, kosher salt, and freshly ground black pepper.
10. Add the cooled mushroom and spinach mixture to the egg custard, stirring gently to distribute evenly.
11. Spoon the filling into the prepared crust-lined muffin cups, filling each to just below the rim to prevent overflow during baking.
12. Place the muffin tin in the preheated oven and bake for 20-25 minutes, or until the quiches are set in the center and the crust edges are lightly golden brown.
13. Remove the tin from the oven and let the quiches cool in the pan for 5 minutes before carefully transferring them to a wire rack to cool completely.
14. Serve warm or at room temperature.
Meticulously crafted, these mini quiches boast a tender, flaky crust that contrasts beautifully with the creamy, savory filling. The earthy notes from the mushrooms and subtle bitterness of the spinach are balanced by the rich Gruyère, creating a sophisticated flavor profile. For a creative twist, garnish with a dollop of crème fraîche and a sprinkle of fresh chives before serving.
Peach and Pecan Stuffed French Toast
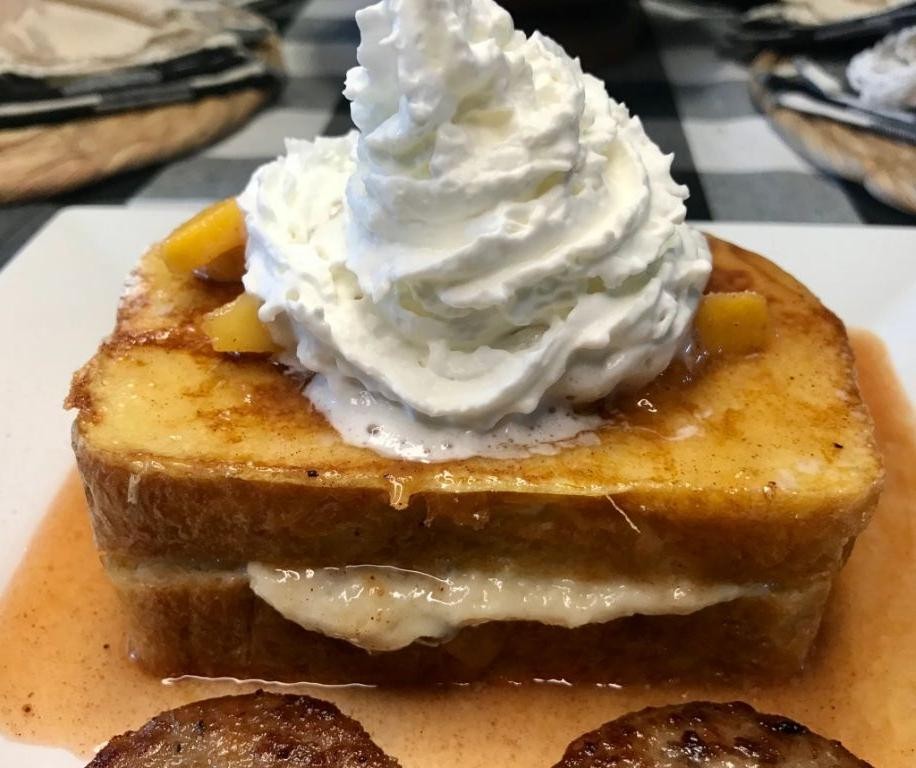
A delightful twist on classic French toast, this peach and pecan stuffed version transforms a simple breakfast into an elegant brunch centerpiece. By layering sweet, juicy peaches and crunchy toasted pecans between slices of brioche, then dipping in a rich custard, you’ll create a dish that’s both comforting and sophisticated. Follow these methodical steps to achieve perfectly golden, custardy French toast with a surprise filling in every bite.
Serving: 4 | Pre Time: 15 minutes | Cooking Time: 20 minutes
Ingredients
– 8 slices (1-inch thick) brioche bread
– 1 cup ripe peaches, peeled and thinly sliced
– ½ cup toasted pecans, roughly chopped
– 4 large pasture-raised eggs, lightly beaten
– 1 cup whole milk
– 2 tablespoons granulated sugar
– 1 teaspoon pure vanilla extract
– ¼ teaspoon fine sea salt
– 2 tablespoons clarified butter
– 2 tablespoons unsalted butter
– ¼ cup pure maple syrup, for serving
Instructions
1. In a shallow baking dish, whisk together the lightly beaten pasture-raised eggs, whole milk, granulated sugar, pure vanilla extract, and fine sea salt until fully combined and slightly frothy.
2. Arrange 4 slices of brioche bread on a clean work surface and evenly distribute the thinly sliced ripe peaches and roughly chopped toasted pecans over them, leaving a ½-inch border around the edges.
3. Top each slice with the remaining 4 slices of brioche bread to form sandwiches, pressing gently to adhere.
4. Dip each sandwich into the egg mixture, allowing it to soak for 30 seconds per side until the bread is saturated but not falling apart.
5. Heat a large non-stick skillet or griddle over medium heat and add 1 tablespoon of clarified butter, swirling to coat the surface evenly.
6. Place 2 sandwiches in the skillet and cook for 4–5 minutes, or until the bottom is deeply golden brown and crisp.
7. Carefully flip the sandwiches using a spatula and add 1 tablespoon of unsalted butter to the skillet, cooking for an additional 4–5 minutes until the second side is equally golden.
8. Transfer the cooked French toast to a wire rack set over a baking sheet to prevent sogginess, and repeat steps 5–7 with the remaining clarified butter, unsalted butter, and sandwiches.
9. Slice each sandwich diagonally and serve immediately, drizzled with pure maple syrup.
Vibrant and indulgent, this French toast boasts a creamy interior with bursts of sweet peach and nutty pecan, all encased in a crisp, buttery crust. For a creative twist, serve it with a dollop of whipped mascarpone or a sprinkle of cinnamon sugar to enhance the warm, comforting flavors.
Summary
Versatile and stress-free, these make-ahead brunch recipes are your secret to effortless entertaining. Whip up a crowd-pleasing spread, enjoy the party, and let the compliments roll in! We’d love to hear which recipe you try first—drop a comment below and share your favorite on Pinterest to spread the brunch joy.


