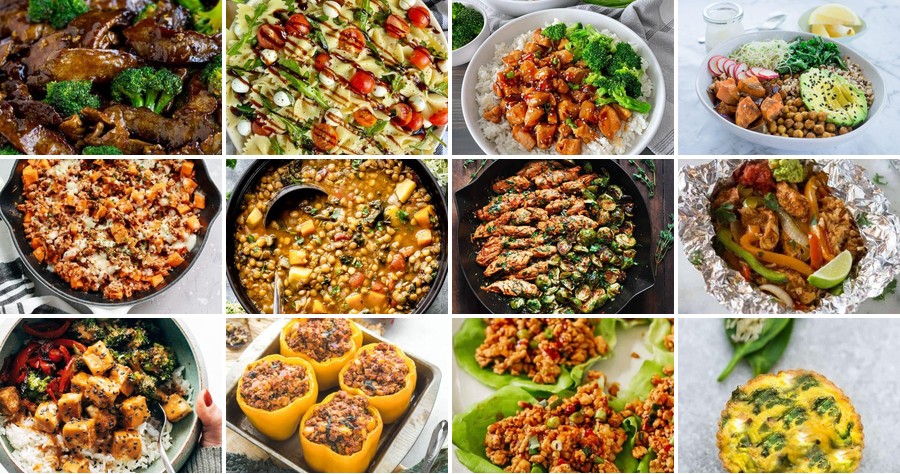
Unwind from hectic weekdays with these 20 quick meal prep recipes designed for busy home cooks. From speedy dinners to comforting favorites, we’ve gathered delicious solutions to simplify your evenings. Dive in to discover easy, tasty meals that will save you time and keep your family happy all week long!
Teriyaki Chicken and Rice Bowls
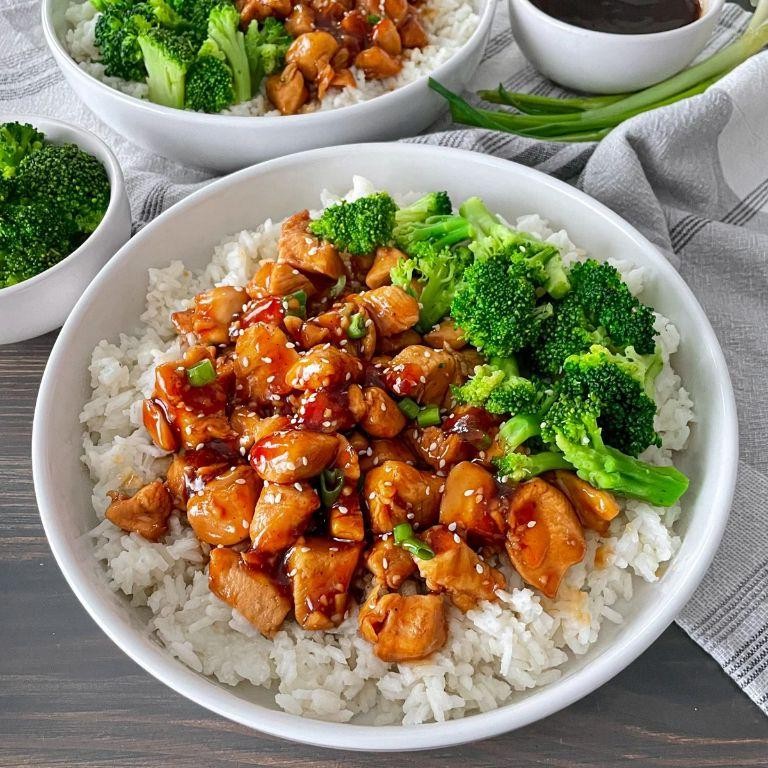
Venturing into my kitchen on this chilly December evening, I’m reminded of my college days when a simple, satisfying meal was my saving grace during finals week. This teriyaki chicken and rice bowl recipe is my go-to comfort food—it’s quick, flavorful, and always hits the spot, whether I’m cooking for myself or a hungry crowd.
Serving: 4 | Pre Time: 10 minutes | Cooking Time: 25 minutes
Ingredients
– 1.5 pounds of boneless, skinless chicken thighs, cut into bite-sized pieces
– 1 cup of white rice
– 2 cups of water
– 1/2 cup of soy sauce
– 1/4 cup of honey
– 2 tablespoons of rice vinegar
– 1 tablespoon of minced garlic
– 1 teaspoon of grated ginger
– 1 tablespoon of vegetable oil
– A couple of green onions, thinly sliced
– A splash of sesame oil for drizzling
Instructions
1. Rinse 1 cup of white rice under cold water until the water runs clear to remove excess starch, which helps prevent clumping—my grandma’s tip for fluffier rice!
2. Combine the rinsed rice and 2 cups of water in a medium saucepan, bring to a boil over high heat, then reduce the heat to low, cover, and simmer for 18 minutes until all the water is absorbed.
3. While the rice cooks, whisk together 1/2 cup of soy sauce, 1/4 cup of honey, 2 tablespoons of rice vinegar, 1 tablespoon of minced garlic, and 1 teaspoon of grated ginger in a small bowl to make the teriyaki sauce.
4. Heat 1 tablespoon of vegetable oil in a large skillet over medium-high heat until it shimmers, about 2 minutes.
5. Add 1.5 pounds of chicken pieces to the skillet and cook for 6-8 minutes, stirring occasionally, until they’re browned on all sides and reach an internal temperature of 165°F—I use a meat thermometer to avoid overcooking.
6. Pour the teriyaki sauce over the chicken, reduce the heat to medium, and let it simmer for 5 minutes until the sauce thickens and coats the chicken evenly, stirring frequently to prevent sticking.
7. Fluff the cooked rice with a fork and divide it evenly among four bowls.
8. Top each bowl of rice with the teriyaki chicken and sauce.
9. Garnish with a couple of sliced green onions and a splash of sesame oil for extra aroma.
Delightfully sticky and savory, this dish offers a perfect balance of sweet and salty flavors that meld together in every bite. The tender chicken pairs beautifully with the fluffy rice, and for a fun twist, I sometimes add a fried egg on top or serve it with a side of steamed broccoli to make it a complete meal.
Greek Quinoa Salad Jars
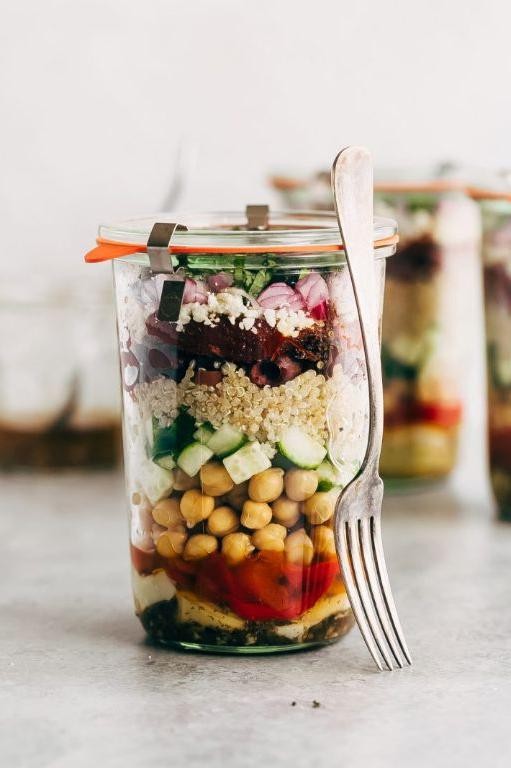
Crafting the perfect grab-and-go lunch can feel like a puzzle, but I’ve finally cracked it with these Greek quinoa salad jars—they’re my new meal-prep obsession after a hectic week left me scrambling for something healthy. I love how they layer up beautifully and stay fresh for days, making busy mornings a breeze.
Serving: 4 | Pre Time: 15 minutes | Cooking Time: 20 minutes
Ingredients
– 1 cup of quinoa
– 2 cups of water
– A couple of tablespoons of olive oil
– A splash of red wine vinegar
– A big handful of cherry tomatoes, halved
– Half a cucumber, diced
– A small red onion, finely chopped
– A cup of crumbled feta cheese
– A handful of Kalamata olives, pitted
– A sprinkle of dried oregano
– Salt and pepper, to your liking
Instructions
1. Rinse 1 cup of quinoa under cold water in a fine-mesh strainer for about 30 seconds to remove any bitterness.
2. In a medium saucepan, combine the rinsed quinoa and 2 cups of water, then bring it to a boil over high heat.
3. Once boiling, reduce the heat to low, cover the saucepan, and let it simmer for 15 minutes until the water is fully absorbed and the quinoa is fluffy—tip: don’t peek while it’s cooking to keep the steam in!
4. Remove the saucepan from the heat and let the quinoa cool completely for 10 minutes, fluffing it with a fork to prevent clumping.
5. In a small bowl, whisk together a couple of tablespoons of olive oil and a splash of red wine vinegar until well combined.
6. In a large mixing bowl, combine the cooled quinoa, halved cherry tomatoes, diced cucumber, finely chopped red onion, crumbled feta cheese, and pitted Kalamata olives.
7. Pour the olive oil and vinegar dressing over the quinoa mixture and toss everything gently to coat evenly—tip: add the dressing while the quinoa is still slightly warm to help it absorb the flavors better.
8. Sprinkle in a bit of dried oregano, along with salt and pepper, and give it one final mix.
9. Divide the salad evenly among 4 clean mason jars, pressing it down lightly to pack it in without squishing the ingredients—tip: layer the feta and olives near the top to keep them from getting soggy.
10. Seal the jars tightly and refrigerate them for at least 1 hour before serving to let the flavors meld.
Now, these jars are ready to shine with their vibrant, crunchy texture and tangy, savory kick from the feta and olives. I love how the quinoa soaks up the dressing overnight, making each bite even more flavorful, and they’re perfect for picnics or a quick desk lunch—just give them a shake and dig in!
Mediterranean Chickpea Wraps
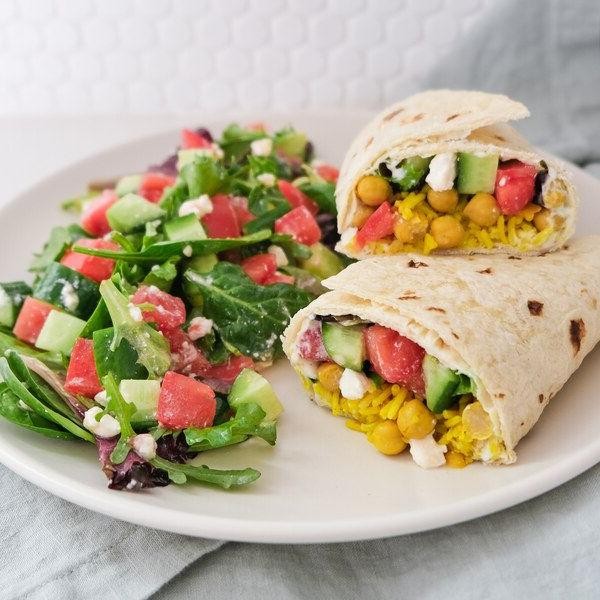
Last week, I was scrambling for a quick, healthy dinner after a long day of holiday shopping—you know the feeling! That’s when I threw together these Mediterranean chickpea wraps, which have become my go-to for a satisfying, no-fuss meal that’s packed with flavor and ready in a flash. Honestly, they’re so easy and versatile, I’ve made them three times since, tweaking little things each round to perfection.
Serving: 4 | Pre Time: 15 minutes | Cooking Time: 10 minutes
Ingredients
– 2 cans of chickpeas (drained and rinsed)
– 4 large flour tortillas
– 1 cup of plain Greek yogurt
– A couple of tablespoons of olive oil
– A splash of lemon juice (about 2 tablespoons)
– 1 teaspoon of ground cumin
– 1/2 teaspoon of smoked paprika
– A pinch of salt
– A handful of fresh parsley (chopped)
– 1/2 cup of crumbled feta cheese
– 1 cucumber (diced)
– 1 tomato (diced)
Instructions
1. Preheat a large skillet over medium heat (around 350°F) and add a tablespoon of olive oil to coat the bottom lightly.
2. Pat the drained chickpeas dry with a paper towel—this helps them crisp up better without steaming—then add them to the skillet in a single layer.
3. Cook the chickpeas for 5-7 minutes, stirring occasionally, until they’re golden brown and slightly crispy on the outside; listen for a gentle sizzle as a cue they’re ready.
4. While the chickpeas cook, in a medium bowl, whisk together the Greek yogurt, remaining olive oil, lemon juice, cumin, smoked paprika, and salt until smooth and creamy.
5. Tip: For extra flavor, let this yogurt sauce sit for a few minutes so the spices meld—I often do this while prepping other ingredients.
6. Once the chickpeas are done, remove them from the heat and let them cool slightly for about 2 minutes to avoid soggy wraps.
7. Warm the flour tortillas in the same skillet for 30 seconds per side until pliable and lightly toasted; this prevents tearing when you assemble.
8. To assemble, spread a generous spoonful of the yogurt sauce evenly over each tortilla, leaving a small border around the edges.
9. Top with the crispy chickpeas, followed by the diced cucumber, tomato, chopped parsley, and crumbled feta cheese.
10. Tip: Layer the ingredients in this order to keep the wraps from getting too wet—the sauce acts as a barrier for the veggies.
11. Fold the bottom edge of each tortilla up over the filling, then fold in the sides and roll tightly to enclose everything.
12. Tip: If you’re meal-prepping, wrap these in parchment paper and refrigerate; they hold up well for a day without getting mushy.
13. Serve immediately, or if you prefer, slice them in half diagonally for easier eating.
Crunchy from the chickpeas and creamy from the yogurt sauce, these wraps offer a delightful texture contrast that’s both hearty and refreshing. I love how the smoky paprika and tangy feta shine through, making each bite a burst of Mediterranean sunshine—perfect for a quick lunch or a light dinner with a side salad. Sometimes, I’ll even add a drizzle of hot sauce for an extra kick, or serve them with extra lemon wedges on the side for squeezing over just before digging in.
Slow Cooker Honey Garlic Chicken
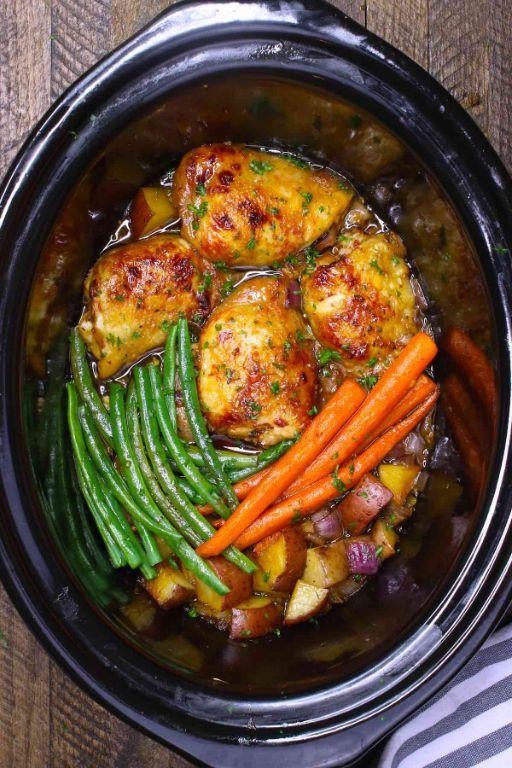
Sometimes the best meals are the ones that practically cook themselves while you’re busy wrapping gifts or chasing after kids. This slow cooker honey garlic chicken is my go-to for hectic holiday evenings—it fills the house with the most comforting aroma and always gets rave reviews from my family, who swear it tastes like I spent hours in the kitchen.
Serving: 6 | Pre Time: 15 minutes | Cooking Time: 4 hours
Ingredients
– About 2 pounds of boneless, skinless chicken thighs (I like thighs for their juiciness, but breasts work too!)
– A generous ½ cup of honey
– ⅓ cup of soy sauce (I use low-sodium to control the salt)
– A big splash of rice vinegar, roughly 2 tablespoons
– 6 cloves of garlic, minced (don’t skimp—fresh is best here!)
– A couple of teaspoons of grated fresh ginger
– 1 tablespoon of cornstarch mixed with 2 tablespoons of water (for thickening later)
– A sprinkle of sesame seeds and chopped green onions for garnish
Instructions
1. Place the chicken thighs in the bottom of your slow cooker in a single layer.
2. In a medium bowl, whisk together the honey, soy sauce, rice vinegar, minced garlic, and grated ginger until smooth.
3. Pour the honey-garlic mixture evenly over the chicken in the slow cooker, making sure all pieces are coated.
4. Cover the slow cooker with its lid and set it to cook on LOW for 4 hours. Tip: Avoid lifting the lid during cooking to keep the heat and moisture locked in for tender chicken.
5. After 4 hours, carefully remove the chicken from the slow cooker and place it on a plate; it should be fork-tender and easily shred.
6. In a small bowl, mix the cornstarch with 2 tablespoons of water to create a slurry without lumps.
7. Pour the slurry into the sauce remaining in the slow cooker and whisk it in thoroughly.
8. Turn the slow cooker to HIGH, cover, and let the sauce cook for 10–15 minutes until it thickens to a glossy, syrupy consistency. Tip: Stir the sauce once halfway through to prevent clumping and ensure even thickening.
9. While the sauce thickens, use two forks to shred the chicken into bite-sized pieces.
10. Return the shredded chicken to the slow cooker and stir it into the thickened sauce until fully coated.
11. Serve the chicken hot, garnished with sesame seeds and chopped green onions. Tip: For extra flavor, toast the sesame seeds in a dry pan over medium heat for 1–2 minutes until golden before sprinkling.
Chicken turns out incredibly tender and soaked in that sweet-salty garlicky sauce, which caramelizes slightly for a sticky finish. We love it piled over fluffy rice or stuffed into warm tortillas with a squeeze of lime for a fun twist—it’s become our Christmas Eve tradition because it’s so effortless yet feels special.
Vegan Buddha Bowls with Tahini Dressing
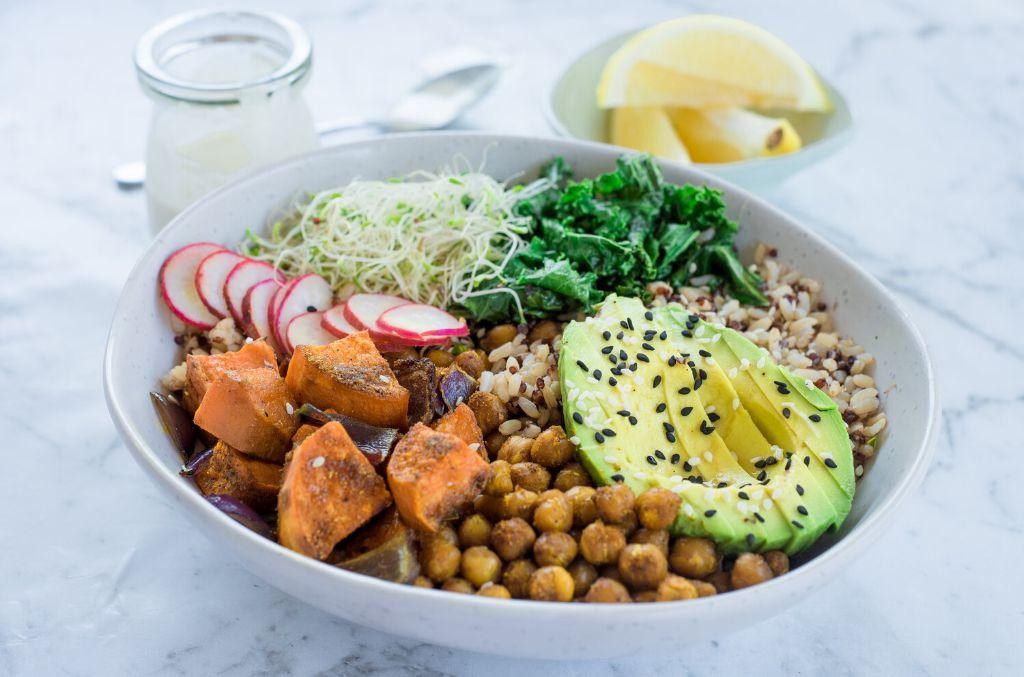
Vegan Buddha bowls have become my go-to weeknight dinner solution—they’re endlessly customizable, packed with nutrients, and always leave me feeling satisfied without weighing me down. I love how the creamy tahini dressing ties everything together, making each bite a perfect harmony of textures and flavors. Honestly, once you try this version, you might find yourself making it on repeat like I do!
Serving: 2 | Pre Time: 15 minutes | Cooking Time: 25 minutes
Ingredients
– 1 cup of quinoa
– 2 cups of water
– A couple of sweet potatoes, peeled and cubed
– A drizzle of olive oil
– A pinch of salt
– A handful of fresh kale, stems removed and roughly chopped
– A can of chickpeas, rinsed and drained
– For the tahini dressing: a quarter cup of tahini, a squeeze of lemon juice, a splash of water, and a dash of garlic powder
Instructions
1. Preheat your oven to 400°F to get it ready for roasting.
2. Rinse the quinoa under cold water in a fine-mesh strainer to remove any bitterness.
3. In a medium saucepan, combine the quinoa and 2 cups of water, then bring to a boil over high heat.
4. Reduce the heat to low, cover the saucepan, and let the quinoa simmer for 15 minutes until all the water is absorbed and the grains are fluffy.
5. While the quinoa cooks, toss the cubed sweet potatoes with a drizzle of olive oil and a pinch of salt on a baking sheet.
6. Roast the sweet potatoes in the preheated oven for 20 minutes, flipping them halfway through, until they’re tender and lightly browned at the edges.
7. In a small bowl, whisk together the tahini, lemon juice, a splash of water, and garlic powder until smooth and creamy, adding more water if needed to reach your desired consistency—this dressing should coat the back of a spoon easily.
8. Heat a skillet over medium heat and add the chickpeas, cooking them for 5 minutes until they’re slightly crispy, which adds a nice crunch to the bowl.
9. In the same skillet, wilt the kale for about 2 minutes until it’s bright green and tender, being careful not to overcook it to keep that fresh texture.
10. Divide the cooked quinoa between two bowls, then top with the roasted sweet potatoes, crispy chickpeas, and wilted kale.
11. Drizzle the tahini dressing generously over each bowl just before serving to prevent it from making the ingredients soggy.
Buddha bowls shine with their contrast of creamy dressing against the hearty quinoa and crispy chickpeas, creating a meal that’s both comforting and vibrant. I love adding extra lemon zest on top for a zesty kick, or serving it with a side of avocado slices to make it even more indulgent!
Egg Muffins with Spinach and Cheese

Perfect for those hectic holiday mornings when you need something nourishing but don’t want to spend hours in the kitchen, these egg muffins have become my go-to make-ahead breakfast. I started making them a few years ago after one too many frantic Christmas Eves, and now they’re a tradition—my little secret for staying fueled while wrapping last-minute gifts or prepping for the big day.
Serving: 12 | Pre Time: 10 minutes | Cooking Time: 20 minutes
Ingredients
- 8 large eggs
- A splash of whole milk (about 2 tablespoons)
- A couple of big handfuls of fresh baby spinach, roughly chopped
- 1 cup of shredded sharp cheddar cheese
- 1/2 a small yellow onion, finely diced
- 1 tablespoon of olive oil
- A good pinch of kosher salt and black pepper
Instructions
- Preheat your oven to 350°F (175°C) and generously grease a 12-cup standard muffin tin with non-stick cooking spray or a bit of the olive oil.
- Heat the olive oil in a medium skillet over medium heat. Add the finely diced yellow onion and cook, stirring occasionally, for about 5 minutes until it turns soft and translucent.
- Add the roughly chopped baby spinach to the skillet with the onions. Cook for just 1-2 minutes, stirring constantly, until the spinach wilts down dramatically. Remove the skillet from the heat and let this mixture cool slightly. Tip: Letting it cool prevents it from cooking the eggs when you mix them in.
- In a large mixing bowl, crack the 8 large eggs. Add the splash of whole milk, the good pinch of kosher salt, and black pepper.
- Whisk the egg mixture vigorously for a full minute until it’s completely smooth and slightly frothy. Tip: A thorough whisk is key for a light, fluffy texture without any stringy egg whites.
- Stir the slightly cooled spinach and onion mixture and the 1 cup of shredded sharp cheddar cheese into the whisked eggs until everything is evenly combined.
- Carefully pour or ladle the egg mixture into the prepared muffin tin, filling each cup about 3/4 of the way full.
- Bake in the preheated 350°F oven for 18-20 minutes. Tip: They’re done when the tops are lightly golden and the centers are completely set (no jiggle when you gently shake the tin).
- Let the muffins cool in the tin for 5 minutes before running a knife around the edges to pop them out.
Absolutely delightful warm from the oven, these muffins have a wonderfully fluffy, almost soufflé-like texture with little pockets of melted cheese. The spinach adds a fresh, earthy note that balances the rich eggs and cheddar perfectly. I love serving them on a platter with a side of hot sauce for dipping or crumbled over a simple green salad for a quick lunch.
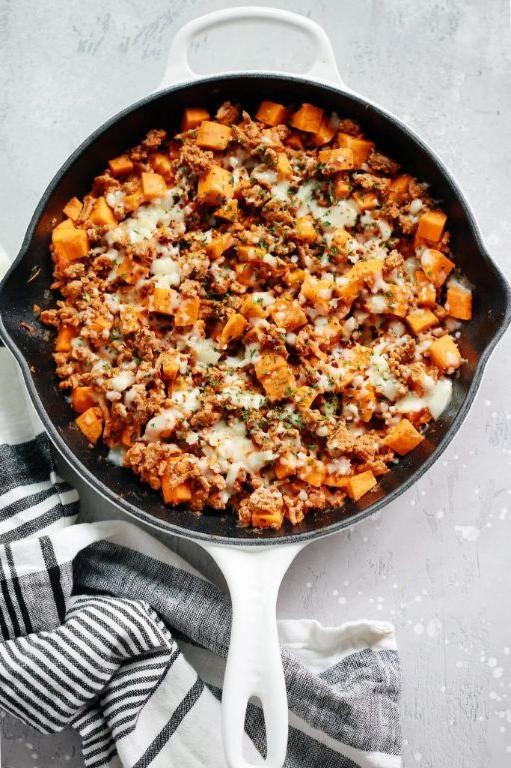
Turkey and Sweet Potato Skillet
M
My kitchen always smells like comfort when I’m making this one-pan wonder—it’s become my go-to weeknight dinner after a long day at work, especially when I’m craving something hearty but don’t want to fuss with a mountain of dishes. Honestly, I started throwing this together one chilly evening when my fridge was looking sparse, and now my family requests it regularly. It’s the perfect cozy meal that comes together in one skillet, making cleanup a breeze.
Serving: 4 | Pre Time: 15 minutes | Cooking Time: 25 minutes
Ingredients
– 1 pound of ground turkey (I usually grab the lean kind)
– 2 medium sweet potatoes, peeled and diced into ½-inch cubes
– 1 yellow onion, chopped
– 2 cloves of garlic, minced
– 1 tablespoon of olive oil
– 1 teaspoon of smoked paprika
– ½ teaspoon of dried thyme
– A pinch of salt and black pepper
– 1 cup of chicken broth
– A handful of fresh parsley, chopped (for garnish)
Instructions
1. Heat 1 tablespoon of olive oil in a large skillet over medium-high heat until it shimmers, about 1 minute.
2. Add 1 pound of ground turkey to the skillet, breaking it up with a spatula into small crumbles.
3. Cook the turkey for 5-7 minutes, stirring occasionally, until it’s no longer pink and lightly browned. Tip: Don’t overcrowd the pan—this helps the turkey brown nicely instead of steaming.
4. Remove the cooked turkey from the skillet and set it aside on a plate, leaving any drippings in the pan.
5. In the same skillet, add the chopped yellow onion and cook for 3-4 minutes, stirring often, until it turns soft and translucent.
6. Stir in the minced garlic and cook for 1 more minute until fragrant, being careful not to let it burn.
7. Add the diced sweet potatoes to the skillet, along with 1 teaspoon of smoked paprika, ½ teaspoon of dried thyme, and a pinch of salt and black pepper.
8. Pour in 1 cup of chicken broth, scraping up any browned bits from the bottom of the pan with your spatula. Tip: Those bits add tons of flavor, so don’t skip this step!
9. Bring the mixture to a simmer, then reduce the heat to medium-low, cover the skillet with a lid, and let it cook for 10-12 minutes.
10. Check the sweet potatoes by piercing one with a fork—they should be tender but not mushy. Tip: If they need more time, add a splash of water and cook for another 2-3 minutes.
11. Return the cooked turkey to the skillet, stirring everything together to combine and heat through for 2-3 minutes.
12. Remove the skillet from the heat and sprinkle with the chopped fresh parsley.
G
Grab a fork and dig into this savory skillet—the sweet potatoes get wonderfully soft and creamy, while the turkey adds a hearty, protein-packed bite. I love how the smoked paprika gives it a subtle smoky depth that pairs perfectly with a side of crusty bread or over a bed of fluffy quinoa. Sometimes, I’ll top it with a dollop of Greek yogurt for a tangy contrast that makes it feel extra special.
Lemon Garlic Shrimp with Zucchini Noodles
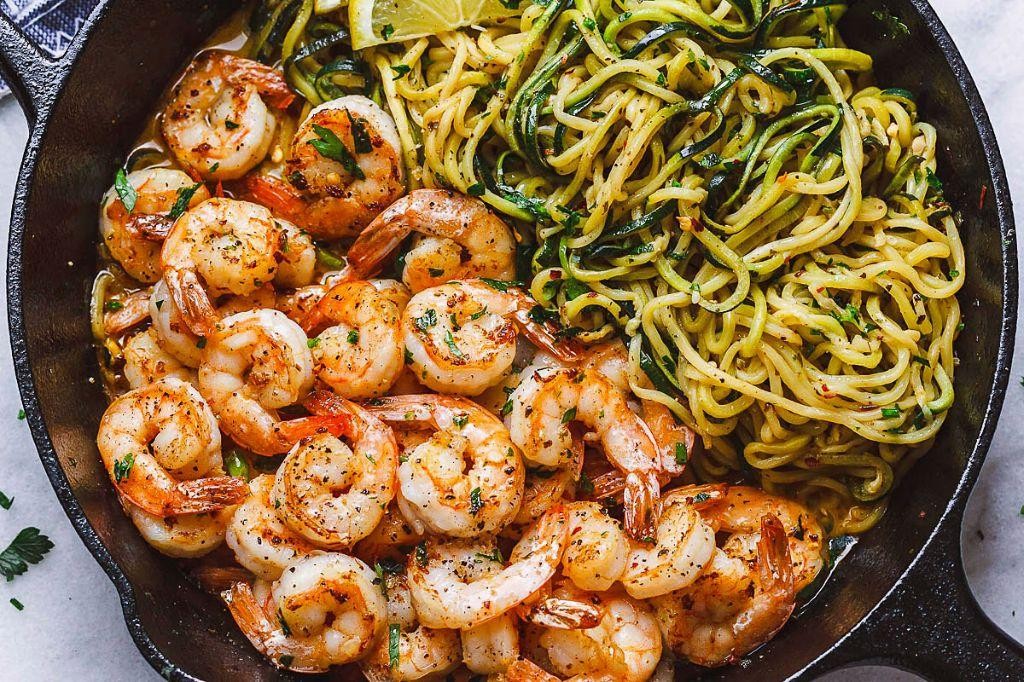
Whenever I’m craving something light yet satisfying that won’t leave me feeling sluggish, this Lemon Garlic Shrimp with Zucchini Noodles is my absolute go-to. It’s the perfect quick dinner that feels fancy but comes together in the time it takes to watch a short show.
Serving: 2 | Pre Time: 10 minutes | Cooking Time: 15 minutes
Ingredients
- A couple of medium zucchinis, spiralized into noodles
- 1 pound of large raw shrimp, peeled and deveined
- 4 cloves of garlic, minced
- The zest and juice from 1 large lemon
- A generous splash of olive oil (about 2 tablespoons)
- A small handful of fresh parsley, chopped
- A pinch of red pepper flakes (optional, for a little kick)
- Salt and freshly ground black pepper
Instructions
- Pat your shrimp completely dry with paper towels—this is my top tip for getting a nice sear instead of them steaming in their own moisture.
- Season the shrimp all over with salt and black pepper.
- Heat the olive oil in a large skillet over medium-high heat until it shimmers, about 1-2 minutes.
- Add the shrimp to the hot skillet in a single layer and cook for 2-3 minutes per side, until they turn pink and opaque.
- Transfer the cooked shrimp to a clean plate.
- In the same skillet, add the minced garlic and red pepper flakes (if using). Cook for just 30-60 seconds until fragrant, being careful not to let the garlic burn.
- Add the spiralized zucchini noodles to the skillet. Here’s a pro tip: don’t stir them too much at first. Let them sit for a minute to get a slight char, which adds great flavor.
- Toss the zucchini noodles in the garlic oil and cook for 2-3 minutes total, just until they soften but still have a bit of crunch.
- Return the cooked shrimp to the skillet with the zucchini noodles.
- Add the lemon zest, lemon juice, and chopped parsley to the skillet. Toss everything together until well combined and heated through, about 1 more minute.
- Give it a final taste and adjust the seasoning with a little more salt or pepper if needed.
Finally, serve this immediately while it’s hot. The zucchini noodles have this wonderful, fresh crunch that pairs so well with the tender, garlicky shrimp, and the lemon brightens up every single bite. I love serving it straight from the skillet with an extra wedge of lemon on the side.
Mexican Black Bean and Rice Casserole
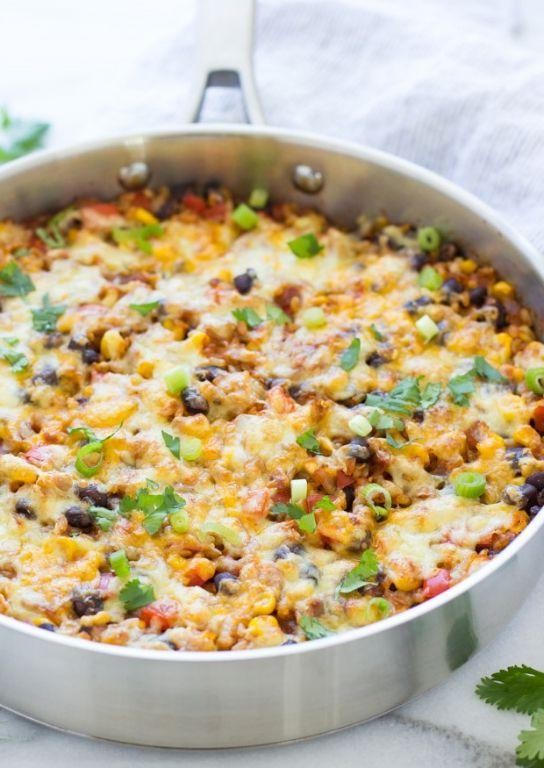
Every time I need a comforting, one-pan meal that feeds a crowd without breaking the bank, this Mexican Black Bean and Rice Casserole is my go-to. It’s the perfect dish for busy weeknights or casual gatherings—hearty, flavorful, and packed with pantry staples I always have on hand. I love how the rice soaks up all the delicious spices, and the melty cheese on top is just the cozy finish we all crave.
Serving: 6 | Pre Time: 15 minutes | Cooking Time: 45 minutes
Ingredients
– 1 tablespoon of olive oil
– 1 medium yellow onion, diced
– 2 cloves of garlic, minced
– 1 red bell pepper, chopped
– 1 cup of long-grain white rice
– 2 cups of vegetable broth
– 1 (15-ounce) can of black beans, rinsed and drained
– 1 (15-ounce) can of diced tomatoes
– 1 tablespoon of chili powder
– 1 teaspoon of ground cumin
– A pinch of salt
– 1 cup of shredded cheddar cheese
– A handful of fresh cilantro, chopped (for garnish)
Instructions
1. Preheat your oven to 375°F.
2. Heat 1 tablespoon of olive oil in a large oven-safe skillet over medium heat.
3. Add 1 diced yellow onion and cook for about 5 minutes, until it turns soft and translucent.
4. Stir in 2 minced garlic cloves and 1 chopped red bell pepper, cooking for another 3 minutes until fragrant.
5. Add 1 cup of long-grain white rice to the skillet and toast it for 2 minutes, stirring constantly to bring out a nutty flavor—this is my secret for extra depth!
6. Pour in 2 cups of vegetable broth, 1 can of rinsed black beans, 1 can of diced tomatoes, 1 tablespoon of chili powder, 1 teaspoon of ground cumin, and a pinch of salt.
7. Bring the mixture to a boil, then reduce the heat to low, cover the skillet, and let it simmer for 20 minutes until the rice is tender and has absorbed most of the liquid.
8. Remove the skillet from the heat and sprinkle 1 cup of shredded cheddar cheese evenly over the top.
9. Transfer the skillet to the preheated oven and bake uncovered for 10 minutes, or until the cheese is bubbly and golden brown—keep an eye on it to avoid burning.
10. Let the casserole cool for 5 minutes before serving to allow it to set nicely, then garnish with a handful of chopped fresh cilantro.
Comforting and satisfying, this casserole has a fluffy rice texture with a slight kick from the spices, and the melted cheese adds a creamy richness. I often serve it with a dollop of sour cream or avocado slices for extra freshness, and it reheats beautifully for leftovers the next day.
Overnight Oats with Berries and Almonds

Cranking open the fridge on a busy morning to find breakfast already made is one of life’s little victories. This overnight oats recipe has been my go-to for years—it’s the perfect make-ahead solution that feels indulgent but is secretly super simple. I love how the berries get all jammy overnight, and the almonds add just the right crunch.
Serving: 2 | Pre Time: 10 minutes | Cooking Time: 0 minutes
Ingredients
– 1 cup of old-fashioned rolled oats
– 1 cup of your favorite milk (I use almond)
– A big handful of mixed berries, fresh or frozen
– A couple of tablespoons of maple syrup
– A generous sprinkle of sliced almonds
– Just a tiny pinch of salt
Instructions
1. Grab two jars or containers with lids.
2. Divide 1 cup of old-fashioned rolled oats evenly between the two jars.
3. Pour 1 cup of your favorite milk over the oats in each jar, making sure all the oats are submerged. (Tip: Using a liquid measuring cup helps avoid spills.)
4. Add a big handful of mixed berries to each jar, gently pressing some down into the milk.
5. Drizzle a couple of tablespoons of maple syrup over the top of each jar.
6. Sprinkle a generous amount of sliced almonds into each jar.
7. Add just a tiny pinch of salt to each jar to enhance the flavors.
8. Securely screw the lids onto the jars and give each one a good shake to combine everything.
9. Place the jars in the refrigerator and let them sit for at least 8 hours, or overnight. (Tip: If using frozen berries, no need to thaw—they’ll soften perfectly as they chill.)
10. The next morning, give the oats a stir. (Tip: If the mixture seems too thick, stir in an extra splash of milk until it reaches your preferred consistency.)
11. Serve the oats straight from the jar, or transfer to a bowl if you prefer.
Overnight, the oats soften into a creamy, pudding-like texture that’s incredibly satisfying. The berries release their juices, creating little pockets of sweet-tart flavor throughout, while the almonds stay delightfully crisp for contrast. For a fun twist, try layering the ingredients in a clear glass to show off the beautiful colors before you dig in.
BBQ Pulled Pork Stuffed Sweet Potatoes

Gosh, there’s something so comforting about a meal that feels like a warm hug, especially during the holiday hustle. I whipped up these BBQ Pulled Pork Stuffed Sweet Potatoes last weekend when friends dropped by unexpectedly—they’re my go-to for feeding a crowd without fuss, and the smoky-sweet combo always wins everyone over.
Serving: 4 | Pre Time: 15 minutes | Cooking Time: 6 hours
Ingredients
– 4 medium sweet potatoes, scrubbed clean
– A 2-pound pork shoulder roast
– A generous cup of your favorite BBQ sauce
– A couple of tablespoons of olive oil
– A splash of apple cider vinegar
– A pinch of salt and black pepper
– A handful of fresh cilantro for garnish (optional)
Instructions
1. Preheat your oven to 400°F.
2. Prick each sweet potato all over with a fork—this lets steam escape so they don’t burst.
3. Rub the sweet potatoes with a tablespoon of olive oil and place them directly on the oven rack.
4. Bake for 45–60 minutes, until they’re tender when pierced with a fork.
5. While the sweet potatoes bake, season the pork shoulder all over with salt and pepper.
6. Heat the remaining tablespoon of olive oil in a large Dutch oven over medium-high heat.
7. Sear the pork shoulder for 3–4 minutes per side, until it’s browned—this locks in flavor.
8. Reduce the heat to low, pour in the BBQ sauce and apple cider vinegar, and cover the pot.
9. Let it simmer for 5–6 hours, stirring occasionally, until the pork shreds easily with a fork.
10. Once the sweet potatoes are done, let them cool for 5 minutes, then slice them open lengthwise.
11. Fluff the insides with a fork to create a pocket for the pork.
12. Fill each sweet potato with a heaping scoop of the pulled pork.
13. Drizzle extra BBQ sauce on top if you like it saucier.
14. Garnish with fresh cilantro for a pop of color and freshness.
So, what makes this dish shine? The sweet potatoes get wonderfully creamy, balancing the tangy, smoky pork perfectly. Serve them straight from the oven for a cozy dinner, or top with a dollop of coleslaw for a crunchy twist that’ll have everyone asking for seconds.
Asian-Inspired Turkey Lettuce Wraps
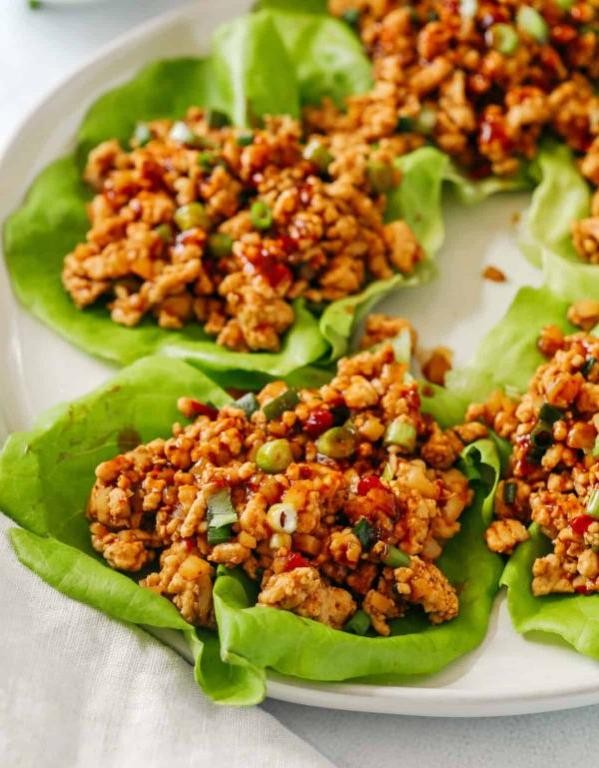
Finally, after a hectic holiday season of heavy meals, I found myself craving something fresh, light, and packed with flavor—enter these Asian-inspired turkey lettuce wraps. They’re my go-to for a quick, healthy dinner that feels like a treat, and I love how customizable they are for picky eaters (my kids top theirs with extra peanuts!).
Serving: 4 | Pre Time: 15 minutes | Cooking Time: 10 minutes
Ingredients
– 1 pound of ground turkey (I use 93% lean for the best texture)
– A head of butter lettuce, leaves separated and rinsed
– 2 cloves of garlic, minced
– A 1-inch piece of fresh ginger, grated (about 1 tablespoon)
– 3 green onions, thinly sliced
– 1/4 cup of low-sodium soy sauce
– 2 tablespoons of hoisin sauce
– 1 tablespoon of rice vinegar
– A splash of sesame oil (about 1 teaspoon)
– A couple of tablespoons of vegetable oil for cooking
– 1/2 cup of shredded carrots
– 1/4 cup of chopped peanuts for garnish
Instructions
1. Heat 1 tablespoon of vegetable oil in a large skillet or wok over medium-high heat until it shimmers, about 1 minute.
2. Add the ground turkey to the skillet, breaking it up with a spatula into small crumbles.
3. Cook the turkey for 5-7 minutes, stirring occasionally, until it’s no longer pink and starts to brown slightly—this builds flavor. Tip: Don’t overcrowd the pan; cook in batches if needed to avoid steaming.
4. Push the turkey to one side of the skillet and add the remaining 1 tablespoon of vegetable oil to the empty space.
5. Add the minced garlic and grated ginger to the oil and sauté for 30 seconds until fragrant, being careful not to burn them.
6. Stir the garlic and ginger into the turkey, then add the low-sodium soy sauce, hoisin sauce, rice vinegar, and sesame oil.
7. Mix everything together and let it simmer for 2-3 minutes until the sauce thickens and coats the turkey evenly. Tip: If the mixture looks dry, add a splash of water to loosen it up.
8. Turn off the heat and stir in the shredded carrots and most of the sliced green onions, reserving some for garnish.
9. Spoon the turkey mixture into the butter lettuce leaves, topping each with chopped peanuts and the remaining green onions. Tip: Serve the lettuce leaves chilled for a crisp contrast to the warm filling.
Now, dig in! The wraps offer a delightful crunch from the lettuce and peanuts against the savory, slightly sweet turkey, with a hint of ginger warmth. I sometimes serve them with extra hoisin sauce on the side for dipping, or pile the leftovers into a rice bowl the next day—it’s just as tasty!
Caprese Pasta Salad with Balsamic Glaze
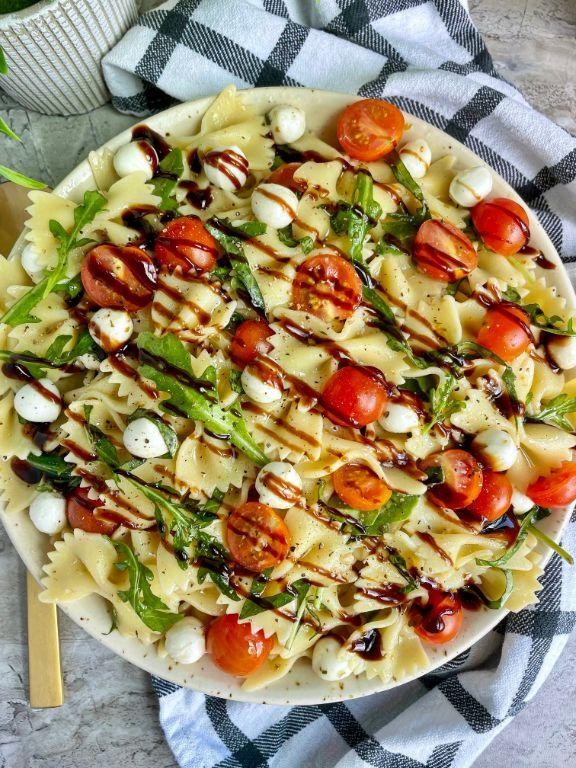
Remember those sweltering summer days when turning on the stove feels like a crime? That’s exactly when this Caprese Pasta Salad with Balsamic Glaze became my go-to lifesaver. It’s a cool, vibrant twist on the classic Italian salad, perfect for potlucks or a lazy dinner on the patio.
Serving: 6 | Pre Time: 15 minutes | Cooking Time: 10 minutes
Ingredients
– A 16-ounce box of your favorite short pasta, like fusilli or farfalle
– A big glug of extra virgin olive oil, about 1/4 cup
– A couple of pints of cherry tomatoes, halved
– A generous 8 ounces of fresh mozzarella pearls (those little balls are a time-saver!)
– A big handful of fresh basil leaves, roughly torn
– A good pinch of kosher salt and freshly cracked black pepper
– For the glaze: about 1/2 cup of balsamic vinegar and a tablespoon of honey
Instructions
1. Bring a large pot of salted water to a rolling boil over high heat.
2. Add the pasta and cook according to the package directions until al dente, usually about 8-10 minutes. (Tip: Taste a piece a minute before the time’s up to check for that perfect slight bite.)
3. While the pasta cooks, make the balsamic glaze. In a small saucepan, combine the balsamic vinegar and honey.
4. Bring the mixture to a simmer over medium heat, then reduce to low and let it bubble gently for 5-7 minutes, stirring occasionally, until it thickens enough to coat the back of a spoon. (Tip: Keep a close eye here—it can go from syrupy to sticky fast!)
5. Drain the cooked pasta in a colander and rinse it briefly under cool water to stop the cooking and cool it down.
6. Transfer the cooled pasta to a large mixing bowl and drizzle with the olive oil, tossing to coat and prevent sticking.
7. Add the halved cherry tomatoes, mozzarella pearls, and torn basil to the bowl.
8. Season everything with the kosher salt and black pepper, then toss gently to combine.
9. Drizzle the cooled balsamic glaze over the salad just before serving. (Tip: Let the glaze cool slightly so it doesn’t wilt the fresh basil.)
But the real magic happens when you take that first bite. The sweet-tart glaze clings to every noodle and tomato, while the creamy mozzarella and fragrant basil make it feel indulgent yet light. I love serving it straight from the bowl at a picnic, letting everyone dig in family-style.
Spicy Peanut Tofu Meal Prep Bowls
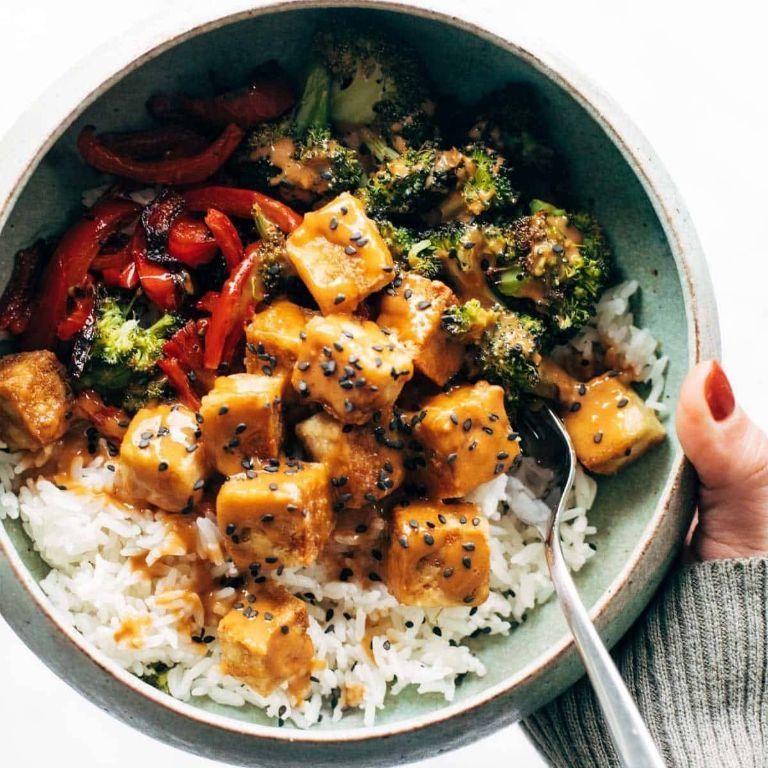
Whew, after a long week of holiday hustle, I’m craving something that’s both comforting and packed with flavor—enter these Spicy Peanut Tofu Meal Prep Bowls. They’re my go-to for busy days, inspired by my love for takeout but made healthier at home, and I always double the batch because they disappear fast in my fridge!
Serving: 4 | Pre Time: 15 minutes | Cooking Time: 25 minutes
Ingredients
– A 14-ounce block of extra-firm tofu, pressed and cubed
– 1 cup of uncooked brown rice
– 2 cups of broccoli florets
– 1 red bell pepper, thinly sliced
– 3 tablespoons of creamy peanut butter
– 2 tablespoons of soy sauce
– 1 tablespoon of sriracha sauce
– 1 tablespoon of maple syrup
– 2 cloves of garlic, minced
– 1 tablespoon of grated fresh ginger
– A splash of vegetable oil
– A sprinkle of sesame seeds for garnish
Instructions
1. Start by cooking the brown rice according to the package directions—I use a rice cooker for foolproof results, but a pot works too.
2. While the rice cooks, heat a splash of vegetable oil in a large skillet over medium-high heat until it shimmers, about 2 minutes.
3. Add the cubed tofu to the skillet and cook for 8-10 minutes, flipping occasionally, until all sides are golden brown and crispy.
4. Remove the tofu from the skillet and set it aside on a plate lined with a paper towel to absorb excess oil.
5. In the same skillet, add the broccoli florets and red bell pepper slices, cooking for 5-7 minutes until they’re tender-crisp and slightly charred.
6. In a small bowl, whisk together the peanut butter, soy sauce, sriracha sauce, maple syrup, minced garlic, and grated ginger until smooth.
7. Return the tofu to the skillet with the vegetables, then pour the peanut sauce over everything.
8. Stir gently to coat and cook for another 2-3 minutes until the sauce is heated through and slightly thickened.
9. Divide the cooked brown rice among four meal prep containers.
10. Top each container with the spicy peanut tofu and vegetable mixture.
11. Garnish with a sprinkle of sesame seeds before sealing the containers.
Zesty and satisfying, these bowls boast a perfect balance of creamy peanut sauce with a kick from the sriracha, while the crispy tofu and tender veggies add great texture. I love serving them chilled straight from the fridge or briefly reheated, and they pair wonderfully with extra lime wedges or a dash of chili flakes for an extra punch!
Garlic Butter Salmon with Roasted Veggies
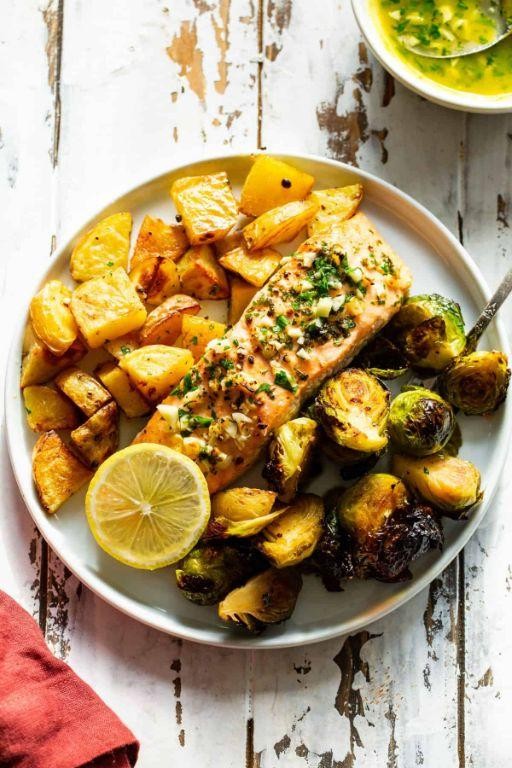
Last week, after a particularly hectic day at work, I found myself craving something comforting yet healthy—and that’s when this garlic butter salmon with roasted veggies came to the rescue. It’s become my go-to weeknight dinner because it’s simple, flavorful, and makes me feel like I’m treating myself without spending hours in the kitchen.
Serving: 4 | Pre Time: 15 minutes | Cooking Time: 25 minutes
Ingredients
- 4 salmon fillets, about 6 ounces each
- 1 pound of baby potatoes, halved
- 2 cups of broccoli florets
- 1 large bell pepper, sliced into strips
- 4 tablespoons of unsalted butter, melted
- 4 cloves of garlic, minced
- 2 tablespoons of olive oil
- 1 tablespoon of lemon juice
- 1 teaspoon of dried thyme
- Salt and pepper, to taste
Instructions
- Preheat your oven to 400°F and line a large baking sheet with parchment paper.
- In a small bowl, mix the melted butter, minced garlic, and lemon juice until well combined.
- Place the halved baby potatoes, broccoli florets, and bell pepper strips on the baking sheet.
- Drizzle the vegetables with olive oil, sprinkle with dried thyme, salt, and pepper, then toss to coat evenly.
- Roast the vegetables in the preheated oven for 15 minutes, stirring halfway through to ensure even cooking.
- While the vegetables roast, pat the salmon fillets dry with paper towels and season both sides with salt and pepper.
- After 15 minutes, remove the baking sheet from the oven and push the vegetables to the sides to make space for the salmon.
- Place the salmon fillets in the center of the baking sheet and brush each fillet generously with the garlic butter mixture.
- Return the baking sheet to the oven and bake for another 10-12 minutes, or until the salmon flakes easily with a fork and reaches an internal temperature of 145°F.
- Let the salmon rest for 5 minutes before serving to allow the juices to redistribute.
Creating this dish always leaves my kitchen smelling amazing, and the salmon turns out perfectly flaky with a rich, buttery garlic flavor that pairs so well with the tender, caramelized veggies. Consider serving it over a bed of quinoa or with a side of crusty bread to soak up any extra garlic butter—it’s a meal that feels both indulgent and wholesome.
Chicken Fajita Foil Packets

Haven’t we all had those nights where we want something delicious but dread the mountain of dishes afterward? I certainly have, especially during the holiday rush like today—December 24th—when I’d rather be wrapping presents than scrubbing pans. That’s why these Chicken Fajita Foil Packets have become my go-to lifesaver; they deliver all the sizzle of restaurant fajitas with zero cleanup, letting me enjoy the festive evening instead.
Serving: 4 | Pre Time: 15 minutes | Cooking Time: 25 minutes
Ingredients
– 1.5 pounds of boneless, skinless chicken breasts, sliced into thin strips
– 2 bell peppers (I use one red and one green for color), sliced into strips
– 1 large yellow onion, thinly sliced
– 3 tablespoons of olive oil
– 2 tablespoons of fajita seasoning (I grab my favorite store-bought blend to save time)
– A splash of lime juice (about 2 tablespoons)
– A couple of large flour tortillas for serving
– Optional: a handful of fresh cilantro for garnish
Instructions
1. Preheat your oven to 400°F and tear off four large sheets of heavy-duty aluminum foil, each about 12 inches long.
2. In a large mixing bowl, combine the chicken strips, bell pepper strips, and sliced onion.
3. Drizzle the olive oil over the chicken and vegetables, then sprinkle the fajita seasoning evenly on top.
4. Toss everything together with your hands or a spoon until the chicken and veggies are fully coated in the seasoning and oil.
5. Divide the mixture evenly among the four foil sheets, piling it in the center of each.
6. Drizzle a splash of lime juice over each pile—this adds a bright acidity that balances the spices.
7. Fold the foil over the mixture and crimp the edges tightly to create sealed packets, leaving a little room inside for steam to circulate.
8. Place the packets on a baking sheet and bake in the preheated oven for 25 minutes. Tip: The packets will puff up slightly when done, and you can carefully open one to check that the chicken is cooked through with no pink in the center.
9. Remove the baking sheet from the oven and let the packets sit for 5 minutes before opening—this allows the juices to redistribute so everything stays moist. Tip: Be cautious when opening, as hot steam will escape.
10. Warm the flour tortillas in a dry skillet over medium heat for about 30 seconds per side, or wrap them in a damp paper towel and microwave for 20 seconds until pliable. Tip: This step ensures your tortillas don’t tear when you load them up.
11. Open the foil packets and spoon the chicken fajita mixture onto the warm tortillas.
12. Garnish with fresh cilantro if using, then fold the tortillas around the filling to serve.
Chicken emerges juicy and tender from the steam, while the peppers and onions soften into a sweet, smoky mix that’s bursting with flavor. I love serving these straight from the foil at backyard gatherings—just let everyone build their own tacos, and you’ve got an interactive meal that feels festive without any fuss.
Quinoa and Kale Stuffed Peppers
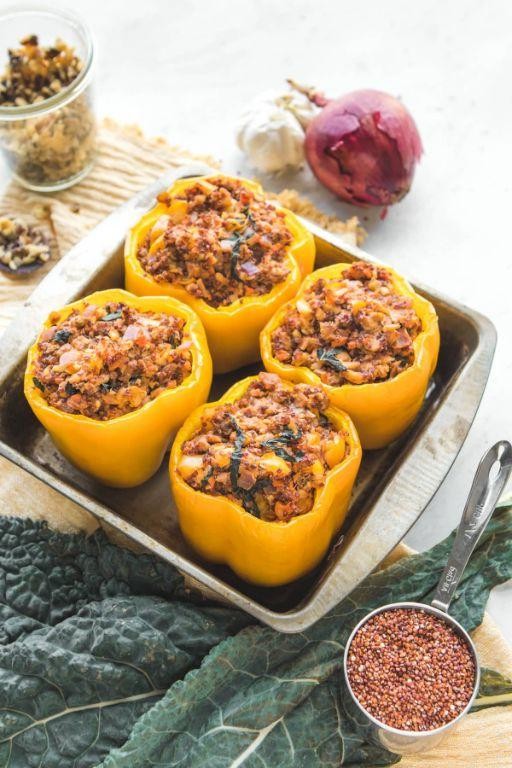
Zesty, vibrant, and packed with wholesome goodness, these quinoa and kale stuffed peppers are my go-to for a satisfying weeknight dinner that feels special. I started making them years ago when my garden overflowed with bell peppers, and they’ve become a family favorite—perfect for using up leftover quinoa and making veggies the star of the plate. Trust me, even the pickiest eaters at my table can’t resist these colorful, flavor-packed bundles.
Serving: 4 | Pre Time: 15 minutes | Cooking Time: 35 minutes
Ingredients
– 4 large bell peppers (any color you like, but I love a rainbow mix)
– 1 cup of uncooked quinoa
– 2 cups of vegetable broth (or water if you’re in a pinch)
– A big handful of fresh kale, stems removed and roughly chopped (about 2 cups packed)
– 1 small yellow onion, finely diced
– 2 cloves of garlic, minced
– A 15-ounce can of black beans, rinsed and drained
– A 14.5-ounce can of diced tomatoes, with their juices
– 1 teaspoon of ground cumin
– 1/2 teaspoon of smoked paprika
– A splash of olive oil (about 1 tablespoon)
– A sprinkle of shredded cheese (like cheddar or Monterey Jack, about 1/2 cup)
– Salt and pepper, just a pinch each to start
Instructions
1. Preheat your oven to 375°F (190°C) and line a baking dish with parchment paper or a light coating of oil.
2. Slice the tops off the bell peppers, remove the seeds and membranes, and place them upright in the baking dish. (Tip: Save the pepper tops—you can chop and sauté them with the onion for extra flavor!)
3. In a medium saucepan, combine the quinoa and vegetable broth, bring to a boil over high heat, then reduce to a simmer, cover, and cook for 15 minutes until the liquid is absorbed and quinoa is fluffy.
4. While the quinoa cooks, heat the olive oil in a large skillet over medium heat, add the diced onion, and sauté for 5 minutes until softened and translucent.
5. Add the minced garlic to the skillet and cook for 1 minute until fragrant, being careful not to let it burn.
6. Stir in the chopped kale and cook for 3-4 minutes until wilted and bright green. (Tip: Massage the kale with a bit of oil before cooking to soften it and reduce bitterness.)
7. Add the black beans, diced tomatoes with juices, cumin, smoked paprika, salt, and pepper to the skillet, stirring to combine, and cook for 5 minutes until heated through.
8. Fluff the cooked quinoa with a fork and mix it into the skillet with the vegetable mixture until well combined.
9. Spoon the quinoa-kale filling evenly into the bell peppers, packing it down gently, and top each with a sprinkle of shredded cheese.
10. Cover the baking dish with aluminum foil and bake for 25 minutes, then remove the foil and bake for an additional 10 minutes until the peppers are tender and the cheese is melted and bubbly. (Tip: Check for doneness by piercing a pepper with a fork—it should slide in easily.)
11. Remove from the oven and let cool for 5 minutes before serving.
So, what makes these stuffed peppers truly shine? The quinoa adds a delightful, slightly nutty texture that pairs perfectly with the tender kale and creamy black beans, while the smoked paprika gives a warm, smoky depth. Serve them with a dollop of Greek yogurt or avocado slices for a cool contrast, or crumble some tortilla chips on top for an extra crunch—they’re versatile enough to make any meal feel like a fiesta!
Pesto Chicken with Roasted Brussels Sprouts
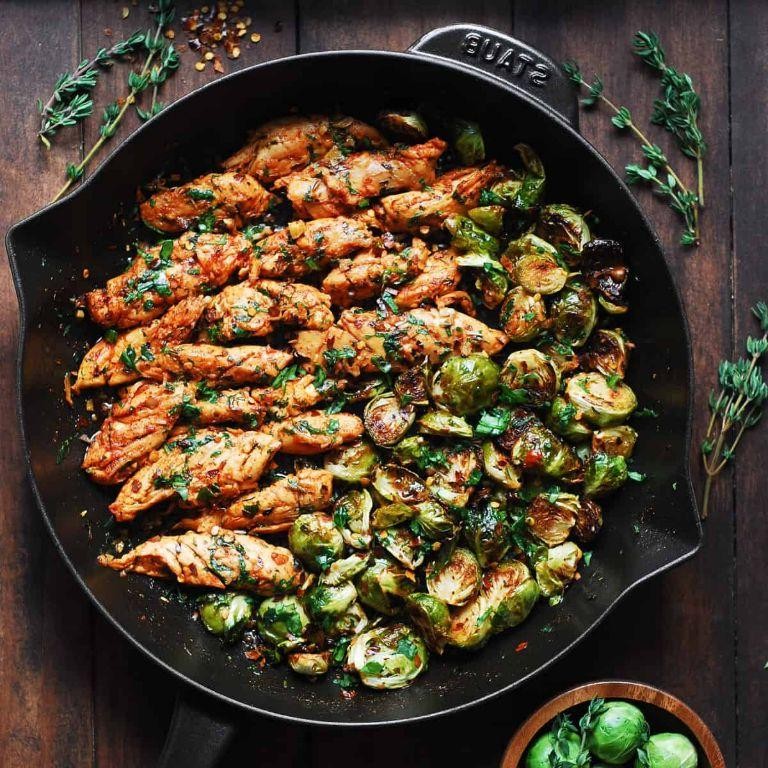
Sometimes, after a long day, I crave something that feels fancy but comes together without fuss—this pesto chicken with roasted Brussels sprouts is my go-to. It’s a cozy, one-pan wonder that fills the kitchen with the most incredible garlicky, herby aroma, and it’s become a weeknight staple in our house because it’s just so darn satisfying.
Serving: 4 | Pre Time: 15 minutes | Cooking Time: 30 minutes
Ingredients
– 4 boneless, skinless chicken breasts (about 1.5 pounds total)
– A heaping ½ cup of store-bought or homemade basil pesto
– 1 pound of Brussels sprouts, trimmed and halved
– 3 tablespoons of olive oil, divided
– 3 cloves of garlic, minced
– A generous pinch of kosher salt and freshly ground black pepper
– A squeeze of fresh lemon juice (about 1 tablespoon)
– A handful of grated Parmesan cheese for sprinkling
Instructions
1. Preheat your oven to 400°F and line a large baking sheet with parchment paper for easy cleanup.
2. In a large bowl, toss the halved Brussels sprouts with 2 tablespoons of olive oil, the minced garlic, salt, and pepper until evenly coated.
3. Spread the Brussels sprouts in a single layer on one half of the baking sheet, placing them cut-side down to help them caramelize and get crispy.
4. Pat the chicken breasts dry with paper towels, then rub them all over with the remaining 1 tablespoon of olive oil and season generously with salt and pepper.
5. Place the chicken breasts on the empty half of the baking sheet, spacing them apart so they cook evenly.
6. Roast in the preheated oven for 15 minutes, then remove the sheet from the oven.
7. Spoon the pesto over the top of each chicken breast, spreading it evenly with the back of the spoon to cover them completely.
8. Return the baking sheet to the oven and roast for another 12-15 minutes, until the chicken reaches an internal temperature of 165°F and the Brussels sprouts are tender and browned at the edges.
9. Remove from the oven and immediately drizzle the lemon juice over the Brussels sprouts, then sprinkle everything with the Parmesan cheese.
10. Let the chicken rest for 5 minutes before slicing to keep it juicy.
Now, the chicken stays incredibly moist under that pesto blanket, while the sprouts get almost nutty from roasting—toss them together on the plate, and the lemony Parmesan ties it all into a bright, hearty meal. I love serving this over a bed of creamy polenta or with crusty bread to soak up every last bit of flavor.
Summary
Just like that, you’ve got a whole toolkit of delicious, time-saving meals to conquer busy weekdays! We hope these 20 quick meal prep recipes make your life easier and tastier. Give them a try, and let us know which ones become your new favorites in the comments below. If you found this roundup helpful, please share it on Pinterest to help other busy home cooks!


