Let’s face it: after a long day, you deserve something sweet without the fuss. These 20 quick microwave dessert recipes are your secret weapon for busy nights. From gooey mug cakes to creamy puddings, you can satisfy your craving in minutes. So, grab your favorite mug and let’s whip up some easy, delicious treats that feel like a hug in a bowl!
Microwave Chocolate Mug Cake
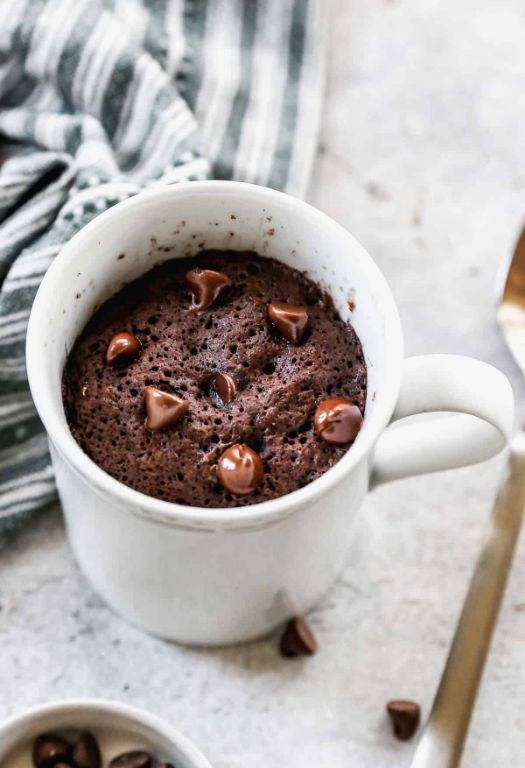
Ever crave a warm chocolate dessert but lack time? This microwave mug cake delivers in minutes. It’s a single-serving treat with minimal cleanup.
Serving: 1 | Pre Time: 2 minutes | Cooking Time: 1 minute
Ingredients
– 1/4 cup all-purpose flour
– 2 tbsp granulated sugar
– 2 tbsp unsweetened cocoa powder
– 1/4 tsp baking powder
– Pinch of fine sea salt
– 3 tbsp whole milk
– 2 tbsp melted unsalted butter
– 1/4 tsp pure vanilla extract
– 2 tbsp semi-sweet chocolate chips
Instructions
1. In a 12-ounce microwave-safe mug, whisk together 1/4 cup all-purpose flour, 2 tbsp granulated sugar, 2 tbsp unsweetened cocoa powder, 1/4 tsp baking powder, and a pinch of fine sea salt until fully combined.
2. Add 3 tbsp whole milk, 2 tbsp melted unsalted butter, and 1/4 tsp pure vanilla extract to the dry ingredients.
3. Stir the mixture vigorously with a fork for about 30 seconds until a smooth, thick batter forms with no dry streaks.
4. Fold 2 tbsp semi-sweet chocolate chips into the batter gently to distribute evenly.
5. Microwave the mug on high power for 60 seconds. Tip: Microwave times vary; start checking at 50 seconds if your microwave is powerful.
6. Remove the mug carefully—it will be hot. Let the cake cool for 1 minute to set. Tip: The cake is done when the top looks dry and springs back lightly to touch.
7. Serve immediately from the mug. Tip: For extra richness, top with a scoop of vanilla ice cream while warm.
Rich and moist, this cake has a tender crumb with pockets of melted chocolate. The cocoa provides a deep, bittersweet flavor that pairs perfectly with a cold glass of milk. Try crumbling it over yogurt for a breakfast twist or adding a sprinkle of flaky sea salt on top for contrast.
5-Minute Microwave Brownie
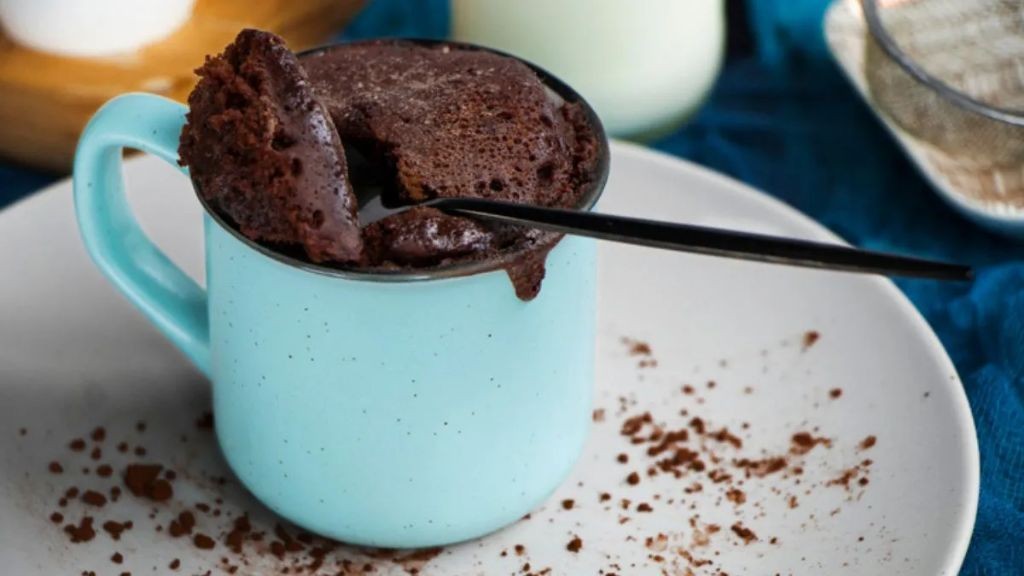
Tired of complicated baking? This 5-minute microwave brownie delivers intense chocolate flavor with zero oven time. Perfect for sudden cravings or last-minute dessert emergencies. Serving: 1 | Pre Time: 2 minutes | Cooking Time: 1 minute
Ingredients
– ¼ cup rich cocoa powder
– ¼ cup granulated white sugar
– 2 tablespoons creamy melted butter
– 2 tablespoons whole milk
– ¼ teaspoon pure vanilla extract
– 1 large farm-fresh egg
– 1 tablespoon all-purpose flour
– Pinch of fine sea salt
Instructions
1. In a microwave-safe mug, whisk together ¼ cup rich cocoa powder and ¼ cup granulated white sugar until no lumps remain.
2. Add 2 tablespoons creamy melted butter and stir vigorously to create a smooth paste.
3. Pour in 2 tablespoons whole milk and ¼ teaspoon pure vanilla extract, mixing until fully incorporated.
4. Crack 1 large farm-fresh egg directly into the mug and whisk until the mixture is uniform in color.
5. Gently fold in 1 tablespoon all-purpose flour and a pinch of fine sea salt until just combined—avoid overmixing.
6. Microwave on high for exactly 60 seconds; the brownie should rise slightly and look set on top with a moist center.
7. Let cool in the mug for 2 minutes to firm up before serving. You’ll know it’s ready when a toothpick inserted comes out with a few moist crumbs, not raw batter.
8. For best results, use a standard 12-ounce ceramic mug to prevent overflow during cooking.
9. If the center seems undercooked after 60 seconds, microwave in 10-second intervals until done, checking after each burst.
You’ll love the fudgy, dense texture that melts in your mouth with deep cocoa notes. Top with a scoop of vanilla ice cream while warm, or drizzle with salted caramel for an indulgent twist.
Microwave Caramel Popcorn
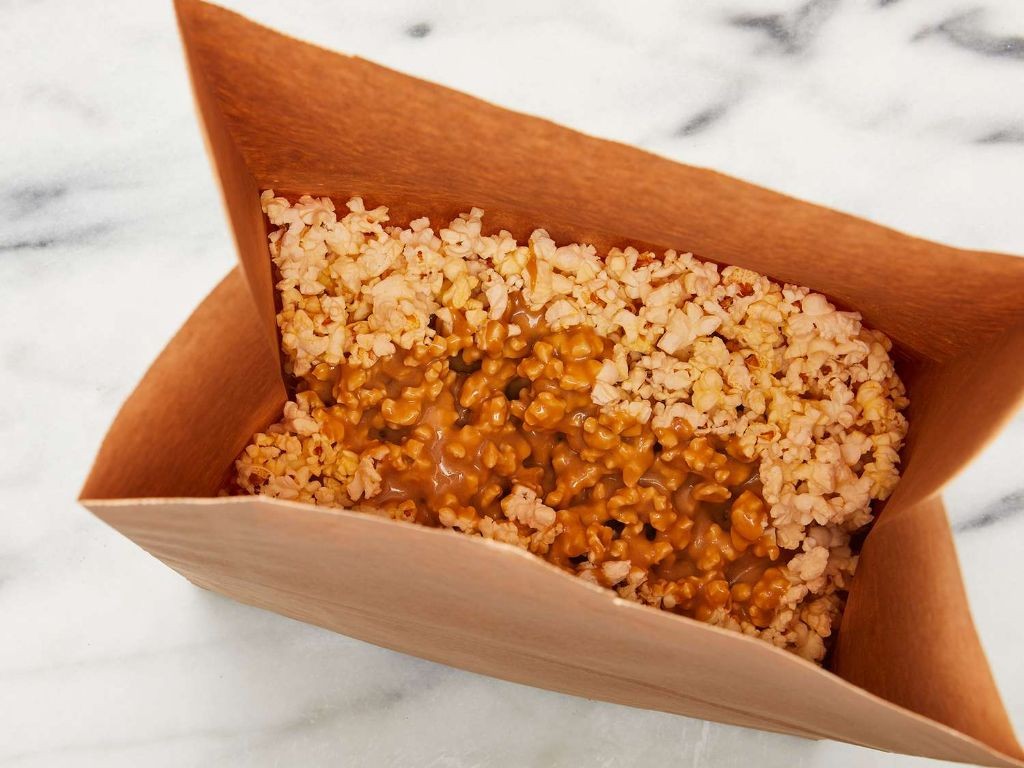
Zesty and sweet, this microwave caramel popcorn delivers classic flavor with minimal effort. Perfect for last-minute holiday gifts or movie nights, it comes together in minutes with pantry staples. The secret is in the timing—watch closely to avoid burning.
Serving: 8 | Pre Time: 5 minutes | Cooking Time: 6 minutes
Ingredients
– 10 cups freshly popped popcorn (use plain, air-popped kernels for best texture)
– ½ cup packed light brown sugar (for deep caramel flavor)
– ¼ cup unsalted butter (high-quality, softened)
– 2 tbsp light corn syrup (for glossy, smooth caramel)
– ¼ tsp pure vanilla extract (for aromatic sweetness)
– ¼ tsp baking soda (to create a light, airy coating)
– ⅛ tsp fine sea salt (to balance the sweetness)
Instructions
1. Place 10 cups of freshly popped popcorn in a large, microwave-safe bowl, removing any unpopped kernels.
2. In a separate microwave-safe bowl, combine ½ cup packed light brown sugar, ¼ cup unsalted butter, and 2 tbsp light corn syrup.
3. Microwave the sugar mixture on high for 1 minute, then stir thoroughly with a heatproof spatula until smooth.
4. Microwave the mixture again on high for 1 minute 30 seconds—it should bubble vigorously and turn a deep amber color.
5. Carefully remove the bowl (tip: use oven mitts as it will be very hot) and immediately stir in ¼ tsp pure vanilla extract and ¼ tsp baking soda; the mixture will foam up slightly.
6. Pour the hot caramel evenly over the popcorn in the large bowl, working quickly before it sets.
7. Use two large spoons to gently toss the popcorn until every piece is coated in caramel, avoiding crushing the kernels.
8. Microwave the coated popcorn on high for 1 minute, then stir with the spoons to redistribute the caramel.
9. Microwave again on high for 1 minute 30 seconds, watching closely to prevent burning—the caramel should be golden and slightly hardened.
10. Spread the popcorn in a single layer on a parchment-lined baking sheet and sprinkle with ⅛ tsp fine sea salt while still warm.
11. Let the popcorn cool completely at room temperature for about 15 minutes, until crisp and no longer sticky.
12. Break apart any large clumps with your hands before serving.
Heavenly crisp and buttery, this popcorn has a satisfying crunch with notes of toffee from the brown sugar. For a festive twist, mix in holiday sprinkles or drizzle with melted dark chocolate after cooling. Store in an airtight container to maintain its addictive snap for up to three days.
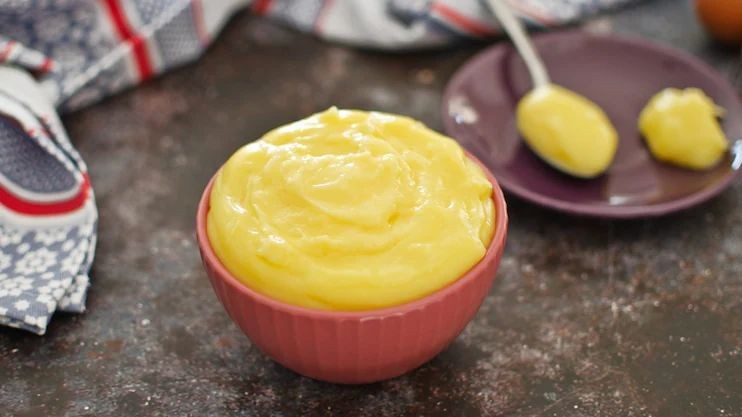
Microwave Lemon Curd

Lemon curd doesn’t require a double boiler or constant stirring. This microwave version delivers the same bright, creamy spread in minutes. It’s the perfect shortcut for busy bakers.
Serving: 1 cup | Pre Time: 5 minutes | Cooking Time: 8 minutes
Ingredients
– 3 large farm-fresh eggs
– 1 cup granulated white sugar
– 1/2 cup freshly squeezed lemon juice
– 1/2 cup unsalted butter, cut into small cubes
– 1 tablespoon finely grated lemon zest
Instructions
1. Crack 3 large farm-fresh eggs into a large, microwave-safe glass bowl.
2. Whisk the eggs vigorously until completely smooth and pale yellow, about 1 minute.
3. Add 1 cup granulated white sugar to the bowl with the eggs.
4. Whisk the sugar and eggs together until the mixture is fully combined and slightly thickened.
5. Pour in 1/2 cup freshly squeezed lemon juice and whisk again until uniform.
6. Tip: Use a fine-mesh strainer to remove any pulp from the juice for a perfectly smooth curd.
7. Microwave the mixture on high power for 1 minute.
8. Carefully remove the bowl and whisk the mixture thoroughly.
9. Microwave on high for another 1 minute, then whisk again.
10. Continue microwaving in 30-second intervals, whisking after each, until the curd coats the back of a spoon, about 4-5 intervals total.
11. Tip: The curd is done when you can draw a clear line through it on the spoon with your finger.
12. Immediately add 1/2 cup cubed unsalted butter and 1 tablespoon finely grated lemon zest to the hot curd.
13. Whisk continuously until all the butter has melted and the curd is glossy and smooth.
14. Tip: For the best flavor, use a microplane to zest the lemon, avoiding the bitter white pith.
15. Pour the finished lemon curd into a clean glass jar or container.
16. Press a piece of plastic wrap directly onto the surface of the curd to prevent a skin from forming.
17. Refrigerate the curd until completely chilled and set, for at least 2 hours.
Just spoon it over warm scones or swirl it into yogurt. The texture is luxuriously smooth and spreadable, with a perfect balance of sweet and tart. It makes a brilliant filling for thumbprint cookies or a quick topping for ice cream.
Microwave Apple Crisp
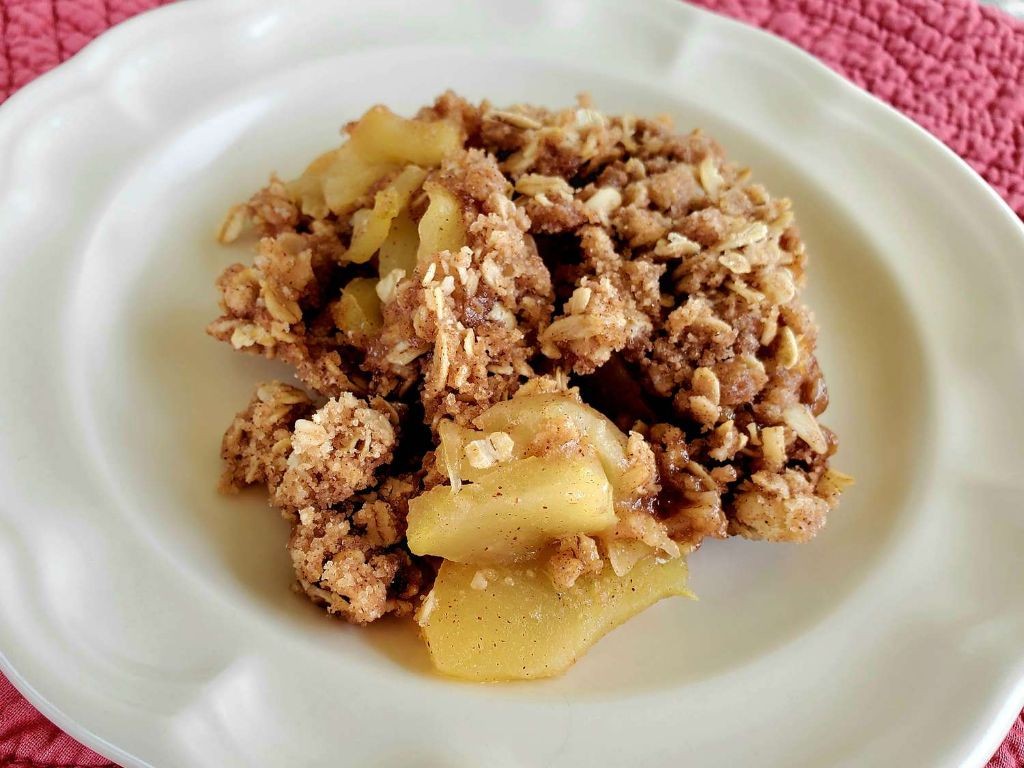
Perfect for when you need a cozy dessert fast, this microwave apple crisp delivers warm, spiced comfort in minutes. It’s a fuss-free treat that turns pantry staples into something special.
Serving: 2 | Pre Time: 5 minutes | Cooking Time: 5 minutes
Ingredients
– 2 cups peeled and thinly sliced tart apples, like Granny Smith
– 1/4 cup packed light brown sugar
– 1/2 teaspoon ground cinnamon
– 1/4 teaspoon ground nutmeg
– 1/2 cup old-fashioned rolled oats
– 1/4 cup all-purpose flour
– 3 tablespoons cold unsalted butter, cut into small cubes
– 2 tablespoons chopped pecans
– A pinch of fine sea salt
Instructions
1. In a microwave-safe bowl, toss the thinly sliced tart apples with 2 tablespoons of the light brown sugar, the ground cinnamon, and ground nutmeg until evenly coated.
2. Microwave the apple mixture on high for 2 minutes, until the apples are tender but still hold their shape—tip: stir halfway through to prevent hot spots.
3. In a separate bowl, combine the old-fashioned rolled oats, all-purpose flour, remaining 2 tablespoons of light brown sugar, chopped pecans, and a pinch of fine sea salt.
4. Add the cold unsalted butter cubes to the oat mixture and use your fingers to work it in until crumbly, with pea-sized bits—tip: keep the butter cold for a crispier topping.
5. Sprinkle the crumb topping evenly over the microwaved apples in the bowl.
6. Microwave on high for 3 minutes, until the topping is golden and the filling is bubbling—tip: watch closely in the last 30 seconds to avoid burning.
7. Let the crisp rest for 2 minutes before serving to allow the juices to thicken slightly.
Kick back with a spoonful of this warm dessert, where the tender, spiced apples meld with the crunchy, buttery oat topping. For a decadent twist, top it with a scoop of vanilla ice cream that melts into the crevices, or enjoy it straight from the bowl for a quick, satisfying treat.
Microwave Banana Bread Mug Cake
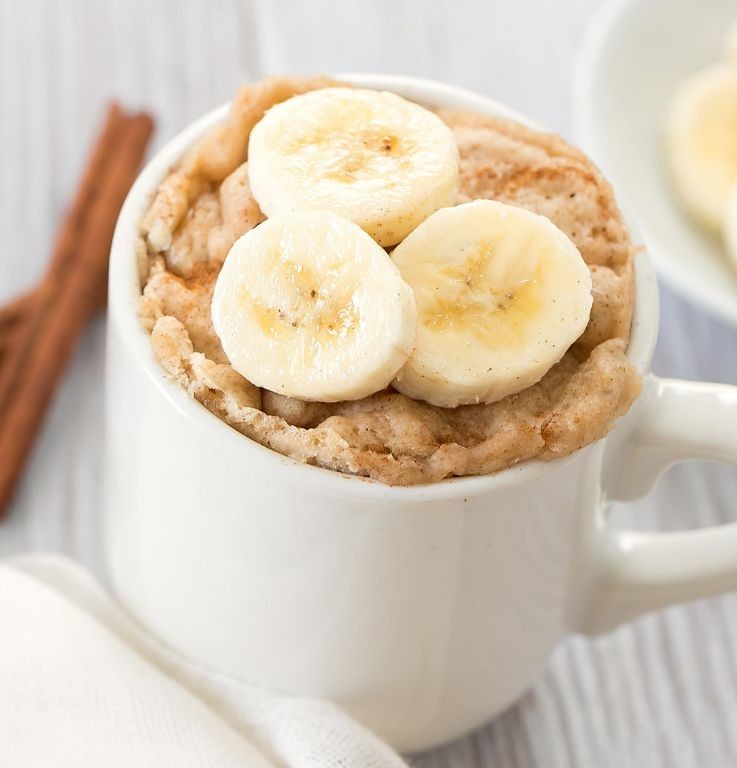
Zesty banana bread cravings strike at inconvenient times, but this microwave mug cake delivers warm comfort in minutes. Perfect for solo snacking or last-minute dessert emergencies, it transforms overripe bananas into a single-serving treat. Skip the oven and mixing bowls—this recipe requires just a mug and a microwave.
Serving: 1 | Pre Time: 3 minutes | Cooking Time: 2 minutes
Ingredients
– 1/4 cup mashed overripe banana (about 1 small banana)
– 2 tablespoons melted unsalted butter
– 1 large farm-fresh egg
– 2 tablespoons granulated sugar
– 1/4 cup all-purpose flour
– 1/4 teaspoon baking powder
– 1/8 teaspoon ground cinnamon
– Pinch of fine sea salt
– 1 tablespoon chopped toasted walnuts (optional)
Instructions
1. Mash 1/4 cup of overripe banana directly in a 12-ounce microwave-safe mug until smooth.
2. Add 2 tablespoons of melted unsalted butter and whisk vigorously with a fork to combine.
3. Crack 1 large farm-fresh egg into the mug and whisk until fully incorporated.
4. Stir in 2 tablespoons of granulated sugar until dissolved.
5. Sift 1/4 cup all-purpose flour, 1/4 teaspoon baking powder, 1/8 teaspoon ground cinnamon, and a pinch of fine sea salt directly into the mug.
6. Fold the dry ingredients into the wet mixture until just combined—avoid overmixing to prevent a tough texture.
7. Gently fold in 1 tablespoon of chopped toasted walnuts if using, distributing them evenly.
8. Microwave on high for 1 minute and 30 seconds to 2 minutes, checking at 1:30 for doneness; the cake is ready when the top springs back lightly to touch and no wet batter remains.
9. Let the mug cake rest for 1 minute to finish cooking and set before serving.
Hearty and moist, this mug cake boasts a tender crumb with pockets of sweet banana and warm cinnamon. For a decadent twist, top it with a dollop of whipped cream or a drizzle of caramel sauce while still warm. Enjoy it straight from the mug for ultimate cozy satisfaction.
Microwave Cinnamon Roll in a Mug
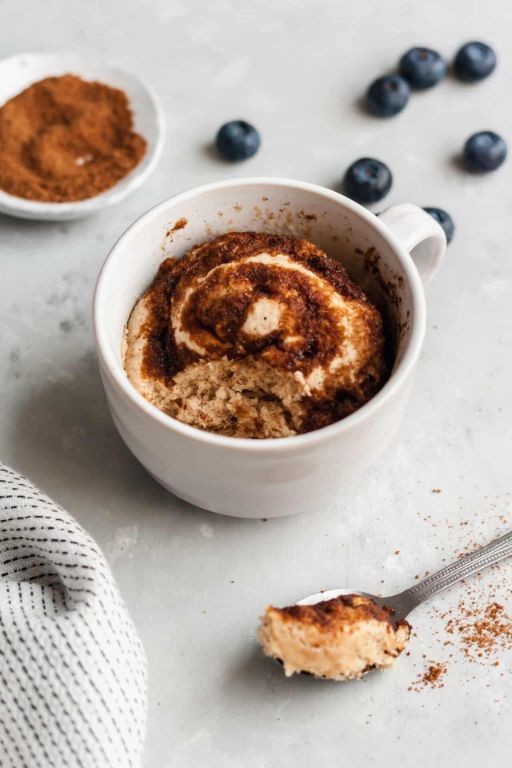
Zesty and quick, this microwave cinnamon roll in a mug delivers warm, gooey comfort in minutes. Perfect for a solo treat or last-minute craving, it’s a fuss-free dessert that feels homemade.
Serving: 1 | Pre Time: 5 minutes | Cooking Time: 1 minute
Ingredients
– ¼ cup of all-purpose flour
– 2 tablespoons of granulated sugar
– ¼ teaspoon of baking powder
– A pinch of fine sea salt
– 2 tablespoons of whole milk
– 1 tablespoon of melted unsalted butter
– ½ teaspoon of pure vanilla extract
– 1 tablespoon of light brown sugar
– ½ teaspoon of ground cinnamon
– 2 tablespoons of powdered sugar
– 1 teaspoon of whole milk for glaze
Instructions
1. In a microwave-safe mug, whisk together ¼ cup of all-purpose flour, 2 tablespoons of granulated sugar, ¼ teaspoon of baking powder, and a pinch of fine sea salt until well combined.
2. Add 2 tablespoons of whole milk, 1 tablespoon of melted unsalted butter, and ½ teaspoon of pure vanilla extract to the dry ingredients, stirring until a smooth batter forms with no lumps.
3. In a small bowl, mix 1 tablespoon of light brown sugar and ½ teaspoon of ground cinnamon to create the filling.
4. Spoon the cinnamon-sugar mixture evenly over the batter in the mug, then use a knife to gently swirl it into the batter for a marbled effect—avoid overmixing to keep distinct layers.
5. Microwave the mug on high for 60 seconds, checking that the top springs back lightly when touched; if needed, add 10-second increments until fully cooked but still moist.
6. While the roll cools slightly, prepare the glaze by whisking 2 tablespoons of powdered sugar with 1 teaspoon of whole milk in a separate bowl until smooth and pourable.
7. Drizzle the glaze over the warm cinnamon roll, allowing it to soak in for a richer flavor.
Decadently soft with a tender crumb, this mug treat boasts a caramel-like swirl from the cinnamon-sugar. Serve it fresh with a scoop of vanilla ice cream or a drizzle of extra glaze for an indulgent twist.
Microwave Blueberry Cobbler
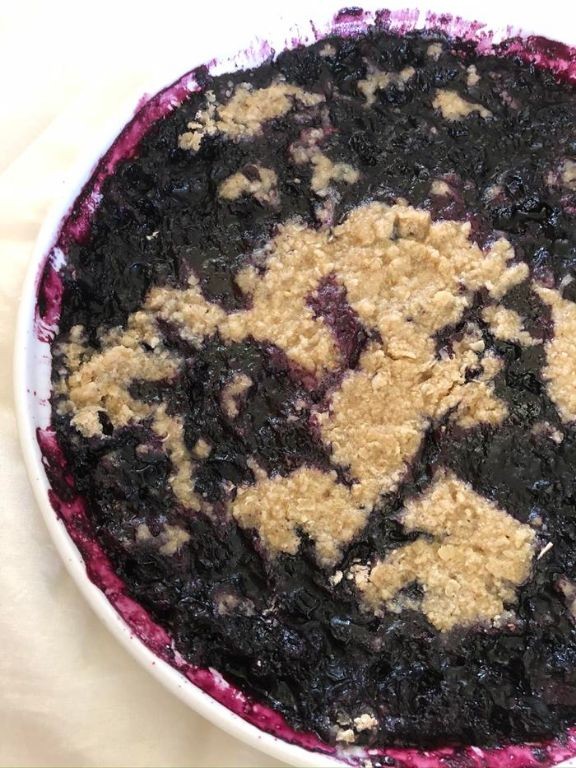
Unbelievably simple yet satisfying, this microwave blueberry cobbler delivers warm, fruity comfort in minutes. Forget complicated baking—this method uses your microwave for a quick dessert that feels homemade. You’ll have a bubbling, golden-topped treat ready before you know it.
Serving: 4 | Pre Time: 5 minutes | Cooking Time: 5 minutes
Ingredients
– 2 cups fresh, plump blueberries
– 1/4 cup granulated white sugar
– 1 tablespoon freshly squeezed lemon juice
– 1 cup all-purpose flour
– 1/4 cup packed light brown sugar
– 1 teaspoon baking powder
– 1/4 teaspoon fine sea salt
– 1/2 cup whole milk
– 4 tablespoons unsalted butter, melted
– 1/2 teaspoon pure vanilla extract
Instructions
1. In a microwave-safe 8×8-inch baking dish, combine 2 cups fresh, plump blueberries, 1/4 cup granulated white sugar, and 1 tablespoon freshly squeezed lemon juice.
2. Toss the mixture gently with a spoon until the blueberries are evenly coated, then spread them into a single layer in the dish.
3. In a medium mixing bowl, whisk together 1 cup all-purpose flour, 1/4 cup packed light brown sugar, 1 teaspoon baking powder, and 1/4 teaspoon fine sea salt until no lumps remain.
4. Add 1/2 cup whole milk, 4 tablespoons unsalted butter (melted), and 1/2 teaspoon pure vanilla extract to the dry ingredients.
5. Stir the batter with a fork just until combined, being careful not to overmix—a few small lumps are fine for a tender topping.
6. Drop spoonfuls of the batter evenly over the blueberry mixture in the dish, covering most of the surface but leaving small gaps for steam to escape.
7. Microwave the dish on high power for 4 to 5 minutes, checking at 4 minutes: the topping should be firm to the touch and golden-brown, and the blueberries should be bubbling around the edges.
8. Let the cobbler rest in the microwave for 2 minutes after cooking to allow the juices to thicken slightly and prevent burning your mouth.
9. Serve warm directly from the dish. What emerges is a cozy dessert with a soft, cake-like topping that soaks up the sweet-tart blueberry syrup. For a decadent twist, top it with a scoop of vanilla ice cream that melts into the warm berries, or enjoy it plain for a lighter treat that still feels indulgent.
Microwave Chocolate Chip Cookie
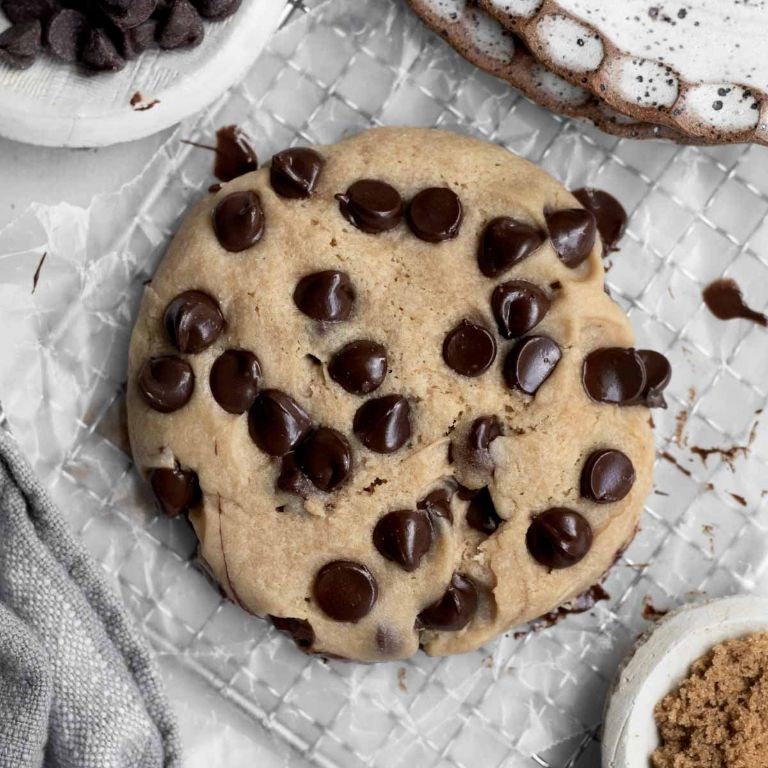
Venturing into a quick dessert fix? This microwave chocolate chip cookie delivers warm, gooey satisfaction in minutes. Perfect for solo cravings or last-minute sweet tooth emergencies.
Serving: 1 | Pre Time: 2 minutes | Cooking Time: 1 minute
Ingredients
– 1 tbsp softened unsalted butter
– 1 tbsp packed light brown sugar
– 1 tbsp granulated white sugar
– 1 large farm-fresh egg yolk
– 1/4 tsp pure vanilla extract
– 3 tbsp all-purpose flour
– 1/8 tsp baking soda
– Pinch of fine sea salt
– 2 tbsp semi-sweet chocolate chips
Instructions
1. Place 1 tbsp softened unsalted butter in a microwave-safe mug or small bowl.
2. Add 1 tbsp packed light brown sugar and 1 tbsp granulated white sugar to the butter.
3. Stir vigorously with a fork until the mixture is creamy and fully combined, about 30 seconds.
4. Mix in 1 large farm-fresh egg yolk and 1/4 tsp pure vanilla extract until smooth.
5. Add 3 tbsp all-purpose flour, 1/8 tsp baking soda, and a pinch of fine sea salt to the wet ingredients.
6. Stir until just combined, avoiding overmixing to keep the cookie tender.
7. Fold in 2 tbsp semi-sweet chocolate chips evenly throughout the batter.
8. Press the dough down gently in the mug to create an even surface for cooking.
9. Microwave on high for 40–50 seconds, watching closely to prevent overcooking—the center should look slightly underdone when removed.
10. Let the cookie rest in the mug for 1 minute to finish setting from residual heat.
Fresh from the microwave, this cookie boasts a soft, chewy interior with melty chocolate pockets and crisp edges. For a decadent twist, top it with a scoop of vanilla ice cream while warm, or drizzle with salted caramel for extra indulgence.
Microwave Pumpkin Spice Cake
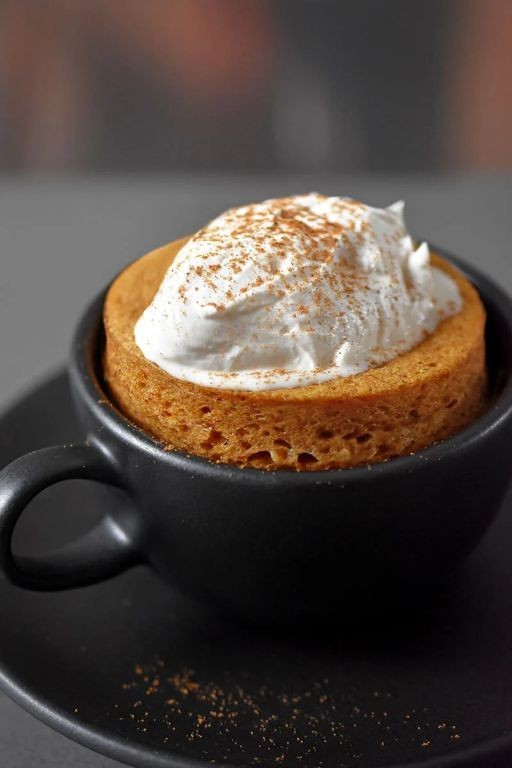
Savor a warm, spiced dessert in minutes with this microwave pumpkin spice cake. It’s perfect for a quick holiday treat or cozy weeknight craving. You’ll need just a few pantry staples and a microwave-safe mug or ramekin.
Serving: 1 | Pre Time: 5 minutes | Cooking Time: 2 minutes
Ingredients
– 4 tablespoons all-purpose flour
– 2 tablespoons granulated sugar
– 1/4 teaspoon baking powder
– 1/4 teaspoon ground cinnamon
– 1/8 teaspoon ground nutmeg
– 1/8 teaspoon ground ginger
– 1 pinch of fine sea salt
– 3 tablespoons canned pumpkin puree
– 2 tablespoons whole milk
– 1 tablespoon melted unsalted butter
– 1/4 teaspoon pure vanilla extract
Instructions
1. In a small bowl, whisk together 4 tablespoons all-purpose flour, 2 tablespoons granulated sugar, 1/4 teaspoon baking powder, 1/4 teaspoon ground cinnamon, 1/8 teaspoon ground nutmeg, 1/8 teaspoon ground ginger, and 1 pinch of fine sea salt until fully combined.
2. Add 3 tablespoons canned pumpkin puree, 2 tablespoons whole milk, 1 tablespoon melted unsalted butter, and 1/4 teaspoon pure vanilla extract to the dry ingredients.
3. Stir the mixture vigorously with a fork until a smooth, thick batter forms with no dry streaks, about 30 seconds. Tip: Avoid overmixing to keep the cake tender.
4. Lightly grease a 12-ounce microwave-safe mug or ramekin with butter or nonstick spray.
5. Pour the batter into the prepared mug, smoothing the top with a spoon.
6. Microwave on high power for 1 minute and 30 seconds to 2 minutes, until the cake rises and the center is set but slightly moist. Tip: Start with 1 minute 30 seconds and check—microwaves vary, so adjust to prevent dryness.
7. Let the cake cool in the mug for 1 minute to firm up before handling. Tip: Run a knife around the edges if you prefer to unmold it onto a plate.
8. Serve warm directly from the mug or plate it for presentation.
Rich with warm spices and moist from the pumpkin, this cake has a soft, fluffy texture that’s ideal straight from the microwave. For a festive touch, top it with a dollop of whipped cream or a drizzle of caramel sauce. Enjoy it as a quick solo dessert or double the recipe to share.
Microwave Strawberry Shortcake
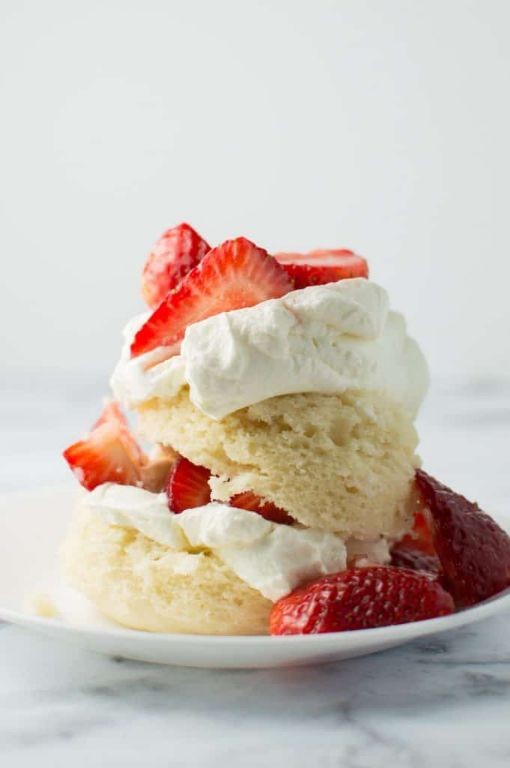
Ready for a sweet treat in minutes? This microwave strawberry shortcake delivers classic flavor with modern convenience. Use ripe, juicy strawberries for the best results.
Serving: 2 | Pre Time: 5 minutes | Cooking Time: 2 minutes
Ingredients
– 1 cup all-purpose flour
– 1/4 cup granulated sugar
– 1 1/2 tsp baking powder
– 1/4 tsp fine sea salt
– 1/4 cup cold unsalted butter, cubed
– 1/3 cup whole milk
– 1/2 tsp pure vanilla extract
– 1 cup fresh strawberries, hulled and sliced
– 1 tbsp granulated sugar (for strawberries)
– 1/2 cup heavy whipping cream
– 1 tbsp powdered sugar (for cream)
Instructions
1. In a medium microwave-safe bowl, whisk together 1 cup all-purpose flour, 1/4 cup granulated sugar, 1 1/2 tsp baking powder, and 1/4 tsp fine sea salt until fully combined.
2. Add 1/4 cup cold unsalted butter, cubed, to the dry ingredients. Use a pastry cutter or fork to cut the butter into pea-sized crumbs, which creates a tender crumb.
3. Pour in 1/3 cup whole milk and 1/2 tsp pure vanilla extract. Stir gently with a spoon until just combined; avoid overmixing to prevent a tough texture.
4. Spread the batter evenly in the bowl. Microwave on high for 90 seconds, or until a toothpick inserted in the center comes out clean.
5. While the cake cooks, toss 1 cup fresh strawberries, hulled and sliced, with 1 tbsp granulated sugar in a small bowl. Let sit for 5 minutes to macerate and release juices.
6. In a chilled bowl, whip 1/2 cup heavy whipping cream and 1 tbsp powdered sugar with a hand mixer on medium-high speed until stiff peaks form, about 2-3 minutes; chill the bowl first for faster whipping.
7. Let the cake cool for 2 minutes, then slice it into two portions. Top each with the macerated strawberries and a dollop of whipped cream.
Perfectly moist and fluffy, this cake pairs beautifully with the sweet-tart strawberries and airy cream. Serve it warm for a cozy dessert or chill it briefly for a refreshing twist.
Microwave Coconut Macaroons
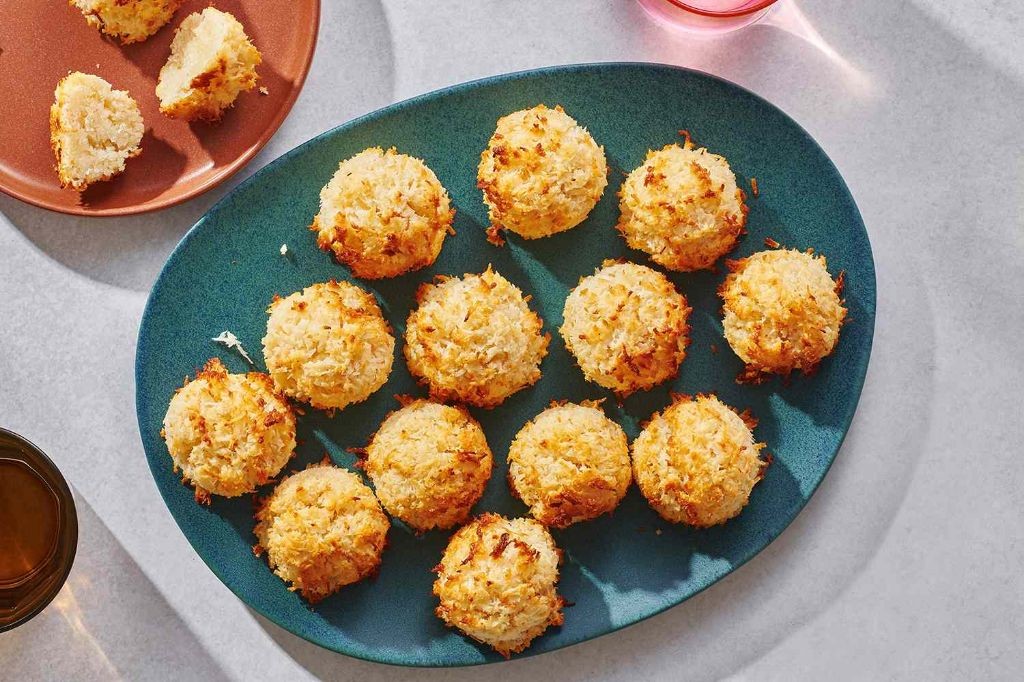
Zesty and sweet, these microwave coconut macaroons are a holiday lifesaver. They deliver classic flavor with minimal effort, perfect for last-minute gatherings or a quick treat. You’ll have chewy, golden bites ready in minutes.
Serving: 12 | Pre Time: 5 minutes | Cooking Time: 2 minutes
Ingredients
– 2 cups sweetened shredded coconut
– 1/2 cup sweetened condensed milk
– 1 teaspoon pure vanilla extract
– 1/4 teaspoon fine sea salt
– 2 large egg whites, at room temperature
Instructions
1. Line a microwave-safe plate with parchment paper.
2. In a medium bowl, combine 2 cups sweetened shredded coconut, 1/2 cup sweetened condensed milk, 1 teaspoon pure vanilla extract, and 1/4 teaspoon fine sea salt.
3. Stir the mixture until fully combined and sticky.
4. In a separate clean bowl, beat 2 large egg whites with a whisk until frothy and slightly thickened, about 1 minute.
5. Gently fold the beaten egg whites into the coconut mixture until just incorporated.
6. Scoop 1-tablespoon portions of the dough onto the prepared plate, spacing them 1 inch apart.
7. Microwave on high power for 1 minute.
8. Rotate the plate 180 degrees and microwave for another 30-60 seconds, watching closely until the macaroons are golden brown and set.
9. Let the macaroons cool on the plate for 5 minutes to firm up.
10. Transfer the macaroons to a wire rack to cool completely, about 15 minutes.
Keep these macaroons chewy with a crisp exterior by not over-microwaving. They offer a rich coconut flavor with hints of vanilla and a satisfyingly tender bite. For a festive twist, drizzle with melted dark chocolate or serve alongside fresh berries.
Microwave Rice Pudding
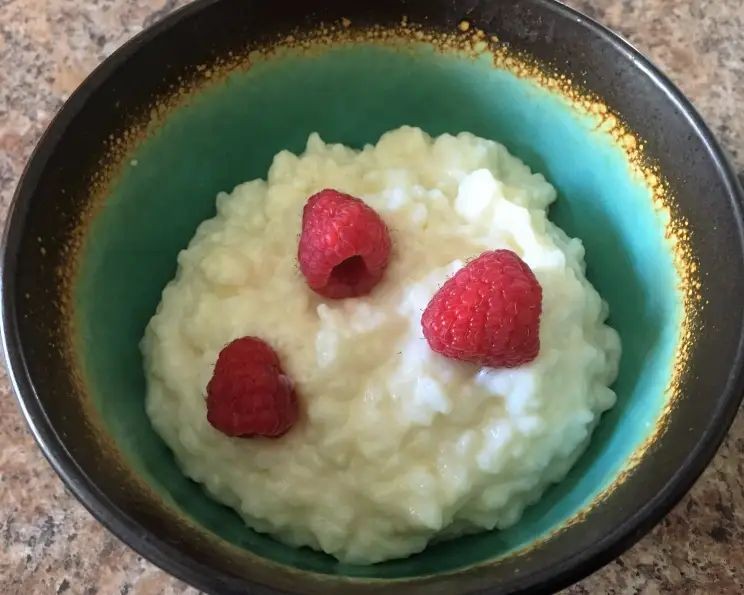
You’re craving something warm and comforting, but you don’t want to spend hours in the kitchen. This microwave rice pudding delivers creamy, nostalgic flavor in a fraction of the time.
Serving: 4 | Pre Time: 5 minutes | Cooking Time: 15 minutes
Ingredients
– 1 cup cooked long-grain white rice, preferably day-old and slightly dry
– 2 cups whole milk, cold and fresh
– 1/4 cup granulated white sugar
– 1 large egg, farm-fresh and lightly beaten
– 1/2 teaspoon pure vanilla extract
– 1/4 teaspoon ground cinnamon, fragrant and finely ground
– 1/8 teaspoon fine sea salt
– 2 tablespoons unsalted butter, cut into small cubes
Instructions
1. Combine 1 cup cooked long-grain white rice, 2 cups whole milk, 1/4 cup granulated white sugar, 1/8 teaspoon fine sea salt, and 1/4 teaspoon ground cinnamon in a large, microwave-safe bowl.
2. Microwave the mixture on high power for 5 minutes, then stir thoroughly with a whisk to break up any clumps.
3. Whisk 1 large egg and 1/2 teaspoon pure vanilla extract in a separate small bowl until fully combined.
4. Temper the egg mixture by slowly pouring about 1/2 cup of the hot rice mixture into the egg bowl while whisking constantly to prevent curdling.
5. Pour the tempered egg mixture back into the main bowl and whisk until fully incorporated.
6. Microwave on medium power (50%) for 8 minutes, stopping to stir vigorously every 2 minutes to ensure even cooking and prevent a skin from forming.
7. Check for doneness: the pudding should be thick enough to coat the back of a spoon and have a creamy, porridge-like consistency.
8. Stir in 2 tablespoons unsalted butter until completely melted and blended into the pudding.
9. Let the pudding rest at room temperature for 5 minutes to thicken further before serving.
Creates a luxuriously creamy texture with tender rice grains throughout. The cinnamon and vanilla offer a warm, aromatic sweetness that’s perfectly balanced. Serve it warm topped with a drizzle of honey or a sprinkle of toasted nuts for added crunch.
Microwave Chocolate Peanut Butter Cup
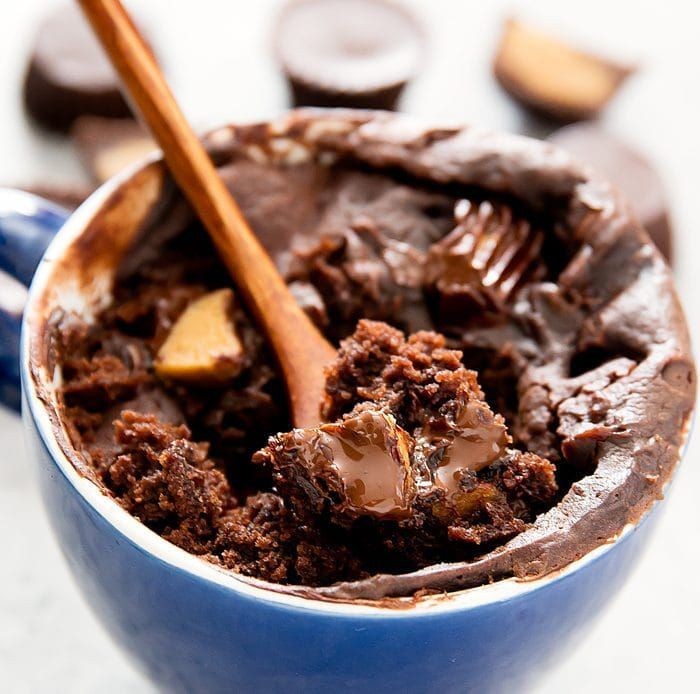
Nostalgic for a quick sweet fix? Microwave chocolate peanut butter cups deliver that classic candy bar flavor in minutes. Perfect for last-minute cravings or a simple homemade treat, they require no baking and minimal cleanup.
Serving: 6 | Pre Time: 5 minutes | Cooking Time: 1 minute
Ingredients
– 1 cup creamy smooth peanut butter
– 1/4 cup powdered sugar
– 1/4 teaspoon pure vanilla extract
– 1/4 teaspoon fine sea salt
– 1 cup semi-sweet chocolate chips
– 1 teaspoon coconut oil
Instructions
1. Line a standard muffin tin with 6 paper liners.
2. In a medium microwave-safe bowl, combine 1 cup creamy smooth peanut butter, 1/4 cup powdered sugar, 1/4 teaspoon pure vanilla extract, and 1/4 teaspoon fine sea salt.
3. Stir the mixture vigorously with a spatula until fully combined and smooth.
4. Divide the peanut butter mixture evenly among the 6 lined muffin cups, pressing it down gently to form an even layer.
5. In a separate small microwave-safe bowl, combine 1 cup semi-sweet chocolate chips and 1 teaspoon coconut oil.
6. Microwave the chocolate mixture on high for 30 seconds, then remove and stir thoroughly.
7. Microwave again for 15-second intervals, stirring after each, until the chocolate is completely melted and glossy.
8. Spoon the melted chocolate evenly over the peanut butter layer in each muffin cup, spreading it smoothly with the back of a spoon to cover completely.
9. Tap the muffin tin gently on the counter to remove any air bubbles from the chocolate.
10. Refrigerate the cups for at least 30 minutes, or until the chocolate is fully set and firm to the touch.
11. Remove the cups from the tin and peel off the paper liners.
Outrageously easy and satisfying, these cups feature a soft, creamy peanut butter center encased in a crisp, snappy chocolate shell. For a festive twist, sprinkle flaky sea salt on the melted chocolate before chilling, or serve them slightly chilled for a firmer texture that contrasts beautifully with the rich filling.
Microwave Cheesecake in a Cup
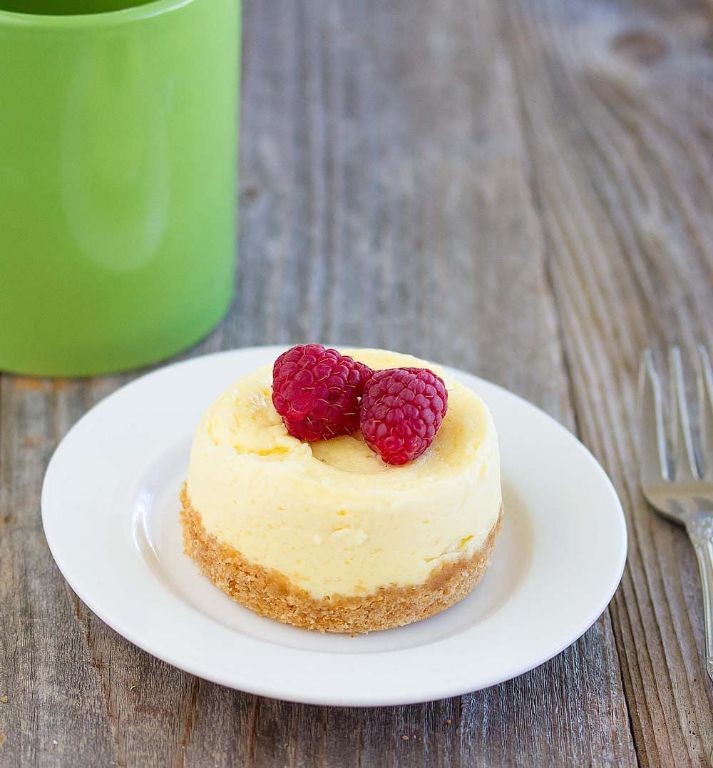
Perfect for when that cheesecake craving hits but you don’t want to turn on the oven. This microwave version delivers a creamy, indulgent dessert in minutes. It’s a single-serving miracle that proves great things come in small packages.
Serving: 1 | Pre Time: 5 minutes | Cooking Time: 2 minutes
Ingredients
– 4 ounces of full-fat, room-temperature cream cheese
– 2 tablespoons of fine, granulated white sugar
– 1 large, farm-fresh egg
– 1/2 teaspoon of pure vanilla extract
– 1/4 cup of rich, full-fat sour cream
– 1 graham cracker square, finely crushed
– 1/2 teaspoon of melted, unsalted butter
– 1 tablespoon of vibrant, seedless raspberry jam
Instructions
1. Place 4 ounces of room-temperature, full-fat cream cheese in a large, microwave-safe mug or ramekin.
2. Add 2 tablespoons of fine, granulated white sugar to the mug.
3. Using a fork, vigorously mash and stir the cream cheese and sugar together until completely smooth and no lumps remain. (Tip: Room-temperature cream cheese blends much easier than cold.)
4. Crack 1 large, farm-fresh egg into the mug.
5. Pour in 1/2 teaspoon of pure vanilla extract and 1/4 cup of rich, full-fat sour cream.
6. Whisk the mixture with the fork until it is fully combined, smooth, and uniform in color.
7. Microwave the mug on high power for 90 seconds. The center should look just set but still slightly jiggly. (Tip: Microwave power varies; start checking at 70 seconds to prevent overcooking.)
8. Carefully remove the mug from the microwave—it will be hot.
9. In a separate small bowl, combine 1 finely crushed graham cracker square with 1/2 teaspoon of melted, unsalted butter until the crumbs are evenly moistened.
10. Sprinkle the buttery graham cracker crumbs evenly over the top of the hot cheesecake.
11. Dollop 1 tablespoon of vibrant, seedless raspberry jam on top of the crumb layer. (Tip: Warm the jam for 5 seconds in the microwave for easier drizzling.)
12. Let the cheesecake rest in the mug for at least 10 minutes to finish setting and cool slightly.
A velvety, dense texture meets a bright, tangy raspberry swirl. The buttery crust adds a essential crunch. Serve it warm for a gooey treat or chilled for a firmer, classic cheesecake experience right from the mug.
Microwave Pineapple Upside-Down Cake

You’ve probably thought pineapple upside-down cake was a weekend project, but this microwave version delivers the same caramelized fruit and tender crumb in under 10 minutes. Yes, it’s that fast—and it’s perfect for a last-minute dessert craving or a cozy, impromptu treat.
Serving: 4 | Pre Time: 5 minutes | Cooking Time: 5 minutes
Ingredients
– 4 tablespoons of salted butter, melted
– ½ cup of light brown sugar, packed
– 1 cup of canned pineapple rings in juice, drained (reserve ¼ cup juice)
– 6 maraschino cherries, drained
– 1 cup of all-purpose flour, sifted
– ¾ cup of granulated sugar
– 1 teaspoon of baking powder
– ¼ teaspoon of fine sea salt
– ¼ cup of whole milk, at room temperature
– ¼ cup of reserved pineapple juice
– 1 large egg, at room temperature
– 1 teaspoon of pure vanilla extract
Instructions
1. In a microwave-safe 8-inch round cake pan, combine the melted salted butter and packed light brown sugar; stir until smooth.
2. Arrange the drained canned pineapple rings in a single layer over the butter-sugar mixture, then place a drained maraschino cherry in the center of each ring.
3. In a medium mixing bowl, whisk together the sifted all-purpose flour, granulated sugar, baking powder, and fine sea salt until fully combined.
4. In a separate bowl, whisk the whole milk, reserved pineapple juice, large egg, and pure vanilla extract until frothy and well-blended.
5. Pour the wet ingredients into the dry ingredients; fold gently with a spatula until just combined—avoid overmixing to keep the cake tender.
6. Spoon the batter evenly over the pineapple layer in the pan, smoothing the top with the spatula.
7. Microwave on high for 4–5 minutes, checking at 4 minutes: the cake is done when a toothpick inserted into the center comes out clean and the top springs back lightly to the touch.
8. Let the cake cool in the pan for 2 minutes to set the caramelized topping, then run a knife around the edges to loosen it.
9. Place a serving plate upside-down over the pan; carefully invert both to release the cake, tapping the pan bottom if needed to help it slide out.
10. Serve warm or at room temperature.
Notably, this cake boasts a moist, buttery crumb with pockets of juicy pineapple and a sticky-sweet caramel glaze that forms as it cooks. The texture is surprisingly light for a microwave dessert, with the cherries adding a pop of color and tartness. Try it à la mode with a scoop of vanilla ice cream for a warm-cold contrast, or slice it into wedges for a quick breakfast treat with coffee.
Microwave Red Velvet Mug Cake
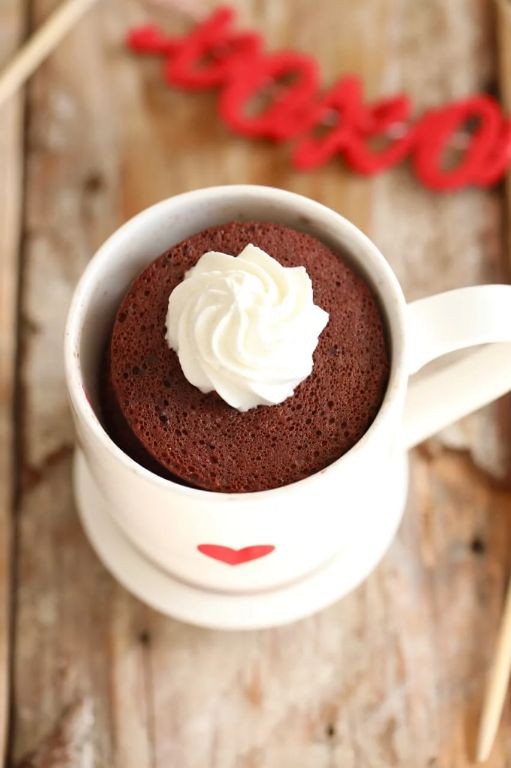
Perfect for when that red velvet craving hits but you’re short on time and dishes. This single-serving microwave mug cake delivers that signature crimson hue and cocoa-kissed flavor in under five minutes. No mixer, no oven, just a mug and a microwave.
Serving: 1 | Prep Time: 2 minutes | Cooking Time: 1 minute
Ingredients
- 4 tablespoons all-purpose flour
- 3 tablespoons granulated sugar
- 2 tablespoons unsweetened cocoa powder
- 1/4 teaspoon baking powder
- Pinch of fine sea salt
- 3 tablespoons whole milk
- 2 tablespoons vegetable oil
- 1/2 teaspoon pure vanilla extract
- 1/2 teaspoon red gel food coloring
- 2 tablespoons cream cheese frosting
Instructions
- Add 4 tablespoons all-purpose flour, 3 tablespoons granulated sugar, 2 tablespoons unsweetened cocoa powder, 1/4 teaspoon baking powder, and a pinch of fine sea salt to a 12-ounce microwave-safe mug.
- Whisk the dry ingredients together with a fork until thoroughly combined and no lumps remain.
- Pour 3 tablespoons whole milk, 2 tablespoons vegetable oil, and 1/2 teaspoon pure vanilla extract directly into the mug with the dry mix. Tip: Use a liquid measuring cup for the milk to ensure accuracy, which is crucial for mug cake texture.
- Add 1/2 teaspoon red gel food coloring to the mug. Tip: Gel coloring provides a vibrant red hue without thinning the batter like liquid food coloring would.
- Stir vigorously with a fork for about 30 seconds, scraping the bottom and sides, until you have a smooth, uniformly red batter with no dry pockets.
- Tap the mug firmly on the counter twice to release any large air bubbles.
- Microwave on high power for 60 seconds. Tip: Microwave wattages vary; the cake is done when the top looks dry and springs back lightly to the touch. If needed, microwave in 10-second increments.
- Let the mug cake cool in the microwave with the door closed for 1 full minute to finish setting.
- Top the warm cake immediately with 2 tablespoons cream cheese frosting, letting it melt slightly into the surface.
Keep it simple and eat straight from the mug for maximum comfort, or turn it out onto a plate for a more polished dessert. The crumb is remarkably tender and moist, with a distinct but not overwhelming cocoa flavor that pairs perfectly with the tangy frosting. For a festive twist, sprinkle crushed candy cane or holiday sprinkles over the frosting before serving.
Microwave S’mores Dip

Ditch the campfire—this microwave s’mores dip delivers gooey chocolate and toasted marshmallow perfection in minutes. It’s the ultimate fuss-free dessert for last-minute cravings or impromptu gatherings, requiring just a handful of pantry staples and a microwave.
Serving: 4 | Pre Time: 5 minutes | Cooking Time: 2 minutes
Ingredients
– 1 cup of high-quality semisweet chocolate chips
– 1 cup of mini marshmallows
– 1 tablespoon of creamy, unsalted butter
– 1 teaspoon of pure vanilla extract
– A pinch of flaky sea salt
– Graham crackers or fresh fruit for dipping
Instructions
1. Combine 1 cup of high-quality semisweet chocolate chips, 1 tablespoon of creamy, unsalted butter, and 1 teaspoon of pure vanilla extract in a large, microwave-safe bowl.
2. Microwave the mixture on high for 1 minute, then stir thoroughly with a spatula to melt any remaining chocolate chunks—this prevents scorching.
3. Return the bowl to the microwave and heat for another 30 seconds, stirring again until the chocolate is completely smooth and glossy.
4. Evenly scatter 1 cup of mini marshmallows over the melted chocolate layer in the bowl.
5. Microwave on high for 20–30 seconds, watching closely until the marshmallows puff up and turn lightly golden—do not overcook, as they can harden.
6. Immediately remove the bowl and sprinkle a pinch of flaky sea salt over the top for a balanced, savory contrast.
7. Serve warm with graham crackers or fresh fruit for dipping, ensuring each scoop gets both marshmallow and chocolate.
The dip sets with a fudgy, spoonable texture as it cools, offering deep chocolate richness punctuated by sweet, toasted marshmallow and a hint of salt. For a fun twist, layer it in individual ramekins or drizzle with caramel before serving.
Microwave Vanilla Custard
Oven-baked custard is a classic, but this microwave version delivers the same silky texture in minutes. Perfect for last-minute desserts or a quick sweet treat, it requires minimal effort and basic pantry staples. You’ll be surprised how creamy it turns out without the traditional water bath.
Serving: 4 | Pre Time: 5 minutes | Cooking Time: 8 minutes
Ingredients
– 2 cups of whole milk
– 3 large farm-fresh eggs
– 1/2 cup of granulated sugar
– 2 teaspoons of pure vanilla extract
– 1/4 teaspoon of fine sea salt
Instructions
1. In a large microwave-safe bowl, whisk together 2 cups of whole milk and 3 large farm-fresh eggs until fully combined and smooth.
2. Add 1/2 cup of granulated sugar, 2 teaspoons of pure vanilla extract, and 1/4 teaspoon of fine sea salt to the bowl, whisking vigorously for about 1 minute to dissolve the sugar completely.
3. Microwave the mixture on high power for 2 minutes, then remove the bowl and whisk it thoroughly to prevent lumps from forming—this ensures a creamy texture.
4. Return the bowl to the microwave and cook on medium power (50%) for 6 minutes, stopping to whisk every 2 minutes; the custard is done when it thickens enough to coat the back of a spoon without running off.
5. Immediately pour the hot custard into four individual serving dishes or ramekins to stop the cooking process and avoid overcooking.
6. Let the custard cool at room temperature for 10 minutes, then cover it with plastic wrap pressed directly onto the surface to prevent a skin from forming.
7. Refrigerate the custard for at least 2 hours, or until it is fully set and chilled through.
The result is a velvety-smooth custard with a rich vanilla flavor that melts in your mouth. Serve it chilled with a sprinkle of cinnamon or fresh berries for a simple yet elegant dessert, or layer it in a parfait with crumbled cookies for added crunch.
Summary
Finally, these 20 quick microwave desserts prove you can whip up something sweet and satisfying even on the busiest nights. We hope you find a new favorite to try! Don’t forget to leave a comment telling us which recipe you loved most and share this roundup on Pinterest to help other busy home cooks.


