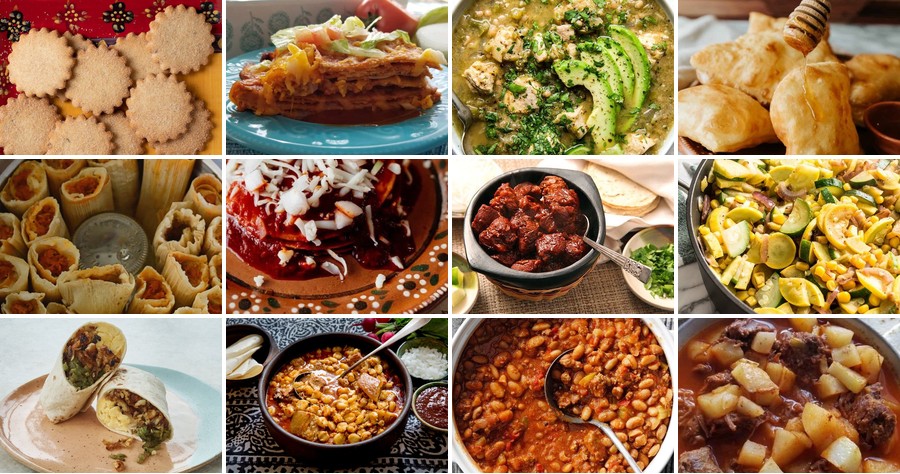
Nestled in the heart of the Southwest, New Mexico’s cuisine is a vibrant tapestry of bold flavors and rich traditions. If you’re craving authentic, spice-forward dishes that warm the soul, you’ve come to the right place. From sizzling green chile stews to smoky carne adovada, this roundup brings the essence of the Land of Enchantment to your kitchen. Let’s dive into these 18 fiery favorites!
Green Chile Stew with Pork
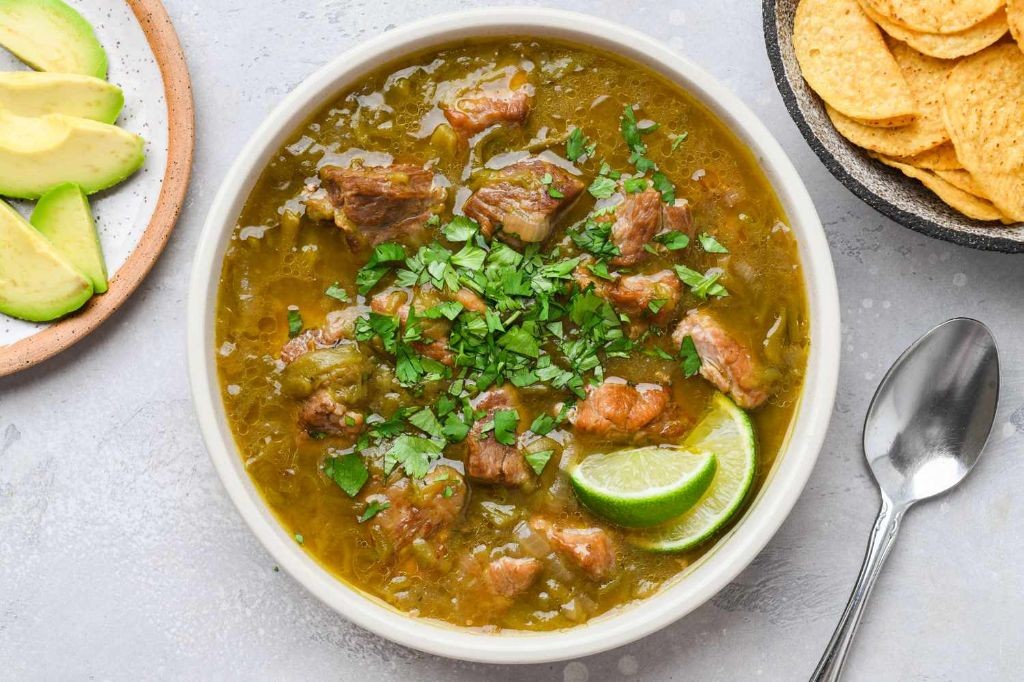
Jingle all the way to your slow cooker, because this Green Chile Stew with Pork is the cozy, flavorful hug your winter-weary soul has been craving—it’s basically a festive sweater for your taste buds!
Serving: 6 | Pre Time: 20 minutes | Cooking Time: 6 hours
Ingredients
– 2 lbs pork shoulder, cut into 1-inch cubes
– 2 tbsp vegetable oil
– 1 large yellow onion, diced
– 4 cloves garlic, minced
– 2 cups roasted green chiles, chopped
– 4 cups chicken broth
– 2 large russet potatoes, peeled and diced into 1/2-inch cubes
– 1 tsp ground cumin
– 1 tsp dried oregano
– 1/2 tsp salt
– 1/4 tsp black pepper
– 1/4 cup fresh cilantro, chopped
Instructions
1. Heat 2 tbsp vegetable oil in a large skillet over medium-high heat until shimmering, about 2 minutes.
2. Add 2 lbs pork shoulder cubes to the skillet and sear until browned on all sides, approximately 8–10 minutes total.
3. Transfer the seared pork to a 6-quart slow cooker using a slotted spoon.
4. In the same skillet, add 1 large diced yellow onion and sauté over medium heat until translucent, about 5 minutes.
5. Stir in 4 cloves minced garlic and cook for 1 minute until fragrant.
6. Add the onion-garlic mixture to the slow cooker with the pork.
7. Pour 2 cups chopped roasted green chiles, 4 cups chicken broth, 2 diced russet potatoes, 1 tsp ground cumin, 1 tsp dried oregano, 1/2 tsp salt, and 1/4 tsp black pepper into the slow cooker.
8. Stir all ingredients in the slow cooker until well combined.
9. Cover and cook on low heat for 6 hours, until the pork is tender and easily shreds with a fork.
10. Stir in 1/4 cup chopped fresh cilantro just before serving.
Warm, hearty, and packed with smoky green chile flavor, this stew boasts tender pork that melts in your mouth and potatoes that soak up every bit of the savory broth. Serve it in deep bowls with a side of warm tortillas for dipping, or top it with a dollop of sour cream and a sprinkle of extra cilantro for a fresh, vibrant finish.
Red Chile Enchiladas

Gather ’round, hungry friends, because we’re about to transform your kitchen into a fiesta of flavor with these soul-warming enchiladas that are easier to make than explaining your holiday travel plans to your family. Forget bland, soggy versions—this recipe delivers a vibrant, smoky kick that will have you doing a little happy dance with every bite. It’s the ultimate cozy comfort food that’s perfect for feeding a crowd or just treating yourself after a long day.
Serving: 6 | Pre Time: 25 minutes | Cooking Time: 35 minutes
Ingredients
– 12 corn tortillas
– 2 cups shredded cooked chicken
– 3 cups shredded Monterey Jack cheese
– 2 tablespoons vegetable oil
– 1 medium white onion, diced
– 2 cloves garlic, minced
– 2 cups red chile sauce
– 1 cup chicken broth
– 1/2 cup sour cream
– 1/4 cup chopped fresh cilantro
– 1/2 teaspoon ground cumin
– 1/4 teaspoon salt
Instructions
1. Preheat your oven to 375°F and lightly grease a 9×13-inch baking dish with vegetable oil.
2. Heat 1 tablespoon of vegetable oil in a large skillet over medium heat until shimmering, about 1 minute.
3. Add the diced onion to the skillet and cook, stirring frequently, until softened and translucent, about 5-7 minutes.
4. Stir in the minced garlic and cook for 1 more minute until fragrant, being careful not to let it burn.
5. Add the shredded chicken, ground cumin, and salt to the skillet, stirring to combine and heat through for 2-3 minutes. Tip: Using pre-cooked rotisserie chicken saves time and adds great flavor!
6. Remove the skillet from heat and stir in 1 cup of the shredded Monterey Jack cheese until melted and cohesive.
7. Warm the corn tortillas by wrapping them in a damp paper towel and microwaving for 30 seconds, or heating them briefly in a dry skillet—this prevents cracking when rolling. Tip: Keep tortillas covered with a towel to stay pliable.
8. Spoon about 1/4 cup of the chicken mixture onto each tortilla, roll tightly, and place seam-side down in the prepared baking dish.
9. In a medium bowl, whisk together the red chile sauce and chicken broth until smooth, then pour evenly over the assembled enchiladas.
10. Sprinkle the remaining 2 cups of shredded Monterey Jack cheese evenly over the top of the enchiladas.
11. Cover the baking dish with aluminum foil and bake at 375°F for 20 minutes.
12. Remove the foil and continue baking uncovered until the cheese is bubbly and lightly golden, about 10-15 minutes. Tip: Let it rest for 5 minutes before serving so the sauce thickens slightly.
13. Garnish the baked enchiladas with dollops of sour cream and a sprinkle of chopped fresh cilantro.
Here’s the delicious payoff: each bite delivers tender tortillas hugging a savory, cheesy filling, all smothered in a robust, slightly spicy red chile sauce that has just the right depth. The creamy sour cream and fresh cilantro cut through the richness beautifully. For a fun twist, serve them with a crisp side salad or scoop them over a bed of Mexican rice for a truly festive plate.
New Mexico Posole

Yikes, have you ever had a dish that feels like a warm hug from a New Mexican abuela? That’s this posole—a hearty, soul-soothing stew that’s basically a fiesta in a bowl, guaranteed to banish winter blues or just make a regular Tuesday feel spectacular. It’s the culinary equivalent of putting on your coziest sweater, but with way more flavor and zero risk of static cling.
Serving: 6 | Pre Time: 20 minutes | Cooking Time: 2 hours 30 minutes
Ingredients
– 2 tbsp vegetable oil
– 1 large yellow onion, diced
– 4 cloves garlic, minced
– 1 lb pork shoulder, cut into 1-inch cubes
– 4 cups chicken broth
– 2 cups water
– 1 (29 oz) can hominy, drained and rinsed
– 1 (14.5 oz) can diced tomatoes
– 2 tbsp chili powder
– 1 tsp dried oregano
– 1 tsp ground cumin
– Salt to taste
– For serving: lime wedges, chopped cilantro, sliced radishes, shredded cabbage
Instructions
1. Heat 2 tbsp vegetable oil in a large Dutch oven or heavy pot over medium-high heat until it shimmers, about 2 minutes.
2. Add 1 large diced yellow onion and cook, stirring occasionally, until softened and translucent, about 5–7 minutes.
3. Stir in 4 cloves minced garlic and cook until fragrant, about 30 seconds—don’t let it brown or it’ll turn bitter.
4. Add 1 lb cubed pork shoulder and sear on all sides until browned, about 5–7 minutes; this builds a flavorful fond (those tasty browned bits) on the pot’s bottom.
5. Pour in 4 cups chicken broth and 2 cups water, scraping the pot’s bottom with a wooden spoon to release the fond.
6. Stir in 1 can drained hominy, 1 can diced tomatoes, 2 tbsp chili powder, 1 tsp dried oregano, and 1 tsp ground cumin.
7. Bring the mixture to a boil, then reduce heat to low, cover, and simmer for 2 hours, stirring occasionally to prevent sticking.
8. After 2 hours, uncover and simmer for an additional 30 minutes to slightly thicken the broth; the pork should be fork-tender and easily shred.
9. Season with salt to taste—start with 1 tsp and adjust as needed, tasting as you go.
10. Ladle the posole into bowls and top with lime wedges, chopped cilantro, sliced radishes, and shredded cabbage for a fresh, crunchy contrast.
Hearty and vibrant, this posole boasts tender pork and plump hominy in a rich, slightly spicy broth that’s deeply comforting. Serve it with warm tortillas for dipping, or get creative by topping it with avocado slices or a dollop of sour cream for extra creaminess—it’s a versatile dish that welcomes your personal flair.
Carne Adovada
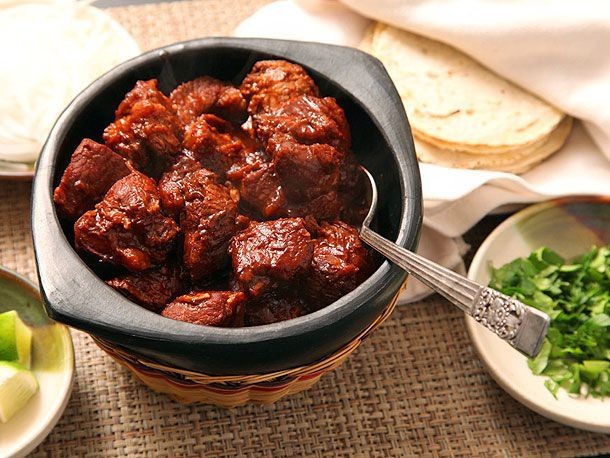
Brace yourselves, flavor adventurers, because we’re diving fork-first into a dish that’s basically a cozy, spicy hug for your taste buds—Carne Adovada! This New Mexican marvel transforms humble pork into a tender, chili-infused masterpiece that’s perfect for shaking up your dinner routine with some serious south-of-the-border sass.
Serving: 6 | Pre Time: 15 minutes | Cooking Time: 3 hours 30 minutes
Ingredients
– 3 lbs pork shoulder, cut into 1-inch cubes
– 6 dried New Mexico chilies, stems and seeds removed
– 2 dried guajillo chilies, stems and seeds removed
– 4 cloves garlic, peeled
– 1 tsp dried oregano
– 1 tsp ground cumin
– 1 tbsp white vinegar
– 2 cups chicken broth
– 2 tbsp vegetable oil
– 1 tsp salt
Instructions
1. In a dry skillet over medium heat, toast the dried New Mexico and guajillo chilies for 2-3 minutes until fragrant, flipping once to avoid burning—this deepens their flavor.
2. Place the toasted chilies in a bowl and cover with 2 cups of hot water; let them soak for 20 minutes until softened.
3. Drain the chilies, reserving 1/2 cup of the soaking liquid, and transfer them to a blender with the garlic, oregano, cumin, vinegar, and reserved liquid; blend on high for 1 minute until a smooth, thick paste forms.
4. In a large Dutch oven, heat the vegetable oil over medium-high heat; add the pork cubes and sear for 5-7 minutes until browned on all sides, working in batches if needed to avoid overcrowding.
5. Pour the chili paste over the seared pork, add the chicken broth and salt, and stir to combine everything evenly.
6. Bring the mixture to a simmer, then reduce the heat to low, cover the pot, and let it cook for 3 hours, stirring occasionally to prevent sticking—the low and slow cooking ensures the pork becomes fork-tender.
7. After 3 hours, remove the lid and simmer uncovered for an additional 15 minutes to thicken the sauce to a rich, coating consistency.
8. Taste and adjust seasoning if necessary, then remove from heat and let it rest for 10 minutes before serving.
Zesty and robust, this Carne Adovada boasts a melt-in-your-mouth texture with a deep, smoky chili flavor that’s not overly hot. Serve it over fluffy rice, stuffed into warm tortillas for killer tacos, or alongside a crisp salad to balance the richness—it’s a versatile showstopper that’ll have everyone asking for seconds!
Sopaipillas with Honey

Gather ’round, folks, because we’re about to turn your kitchen into a portal to a warm, honey-drenched fiesta! Sopaipillas are the puffy, golden pillows of fried dough that dreams are made of, and drizzling them with honey is basically a legal requirement for maximum joy. Consider this your official invitation to forget your worries and embrace the sweet, crispy magic.
Serving: 12 | Pre Time: 20 minutes | Cooking Time: 15 minutes
Ingredients
– 2 cups all-purpose flour
– 1 1/2 tsp baking powder
– 1 tsp salt
– 2 tbsp vegetable shortening
– 3/4 cup warm water (about 110°F)
– 4 cups vegetable oil (for frying)
– 1/2 cup honey
Instructions
1. In a large mixing bowl, whisk together 2 cups all-purpose flour, 1 1/2 tsp baking powder, and 1 tsp salt until fully combined.
2. Add 2 tbsp vegetable shortening to the dry ingredients and use your fingers or a pastry cutter to work it in until the mixture resembles coarse crumbs.
3. Pour in 3/4 cup warm water (about 110°F) and stir with a wooden spoon until a shaggy dough forms. Tip: The water temperature is key—too hot kills the yeast-like effect of the baking powder, too cold won’t activate it properly.
4. Turn the dough out onto a lightly floured surface and knead for 3-4 minutes until it becomes smooth and elastic.
5. Cover the dough with a clean kitchen towel and let it rest at room temperature for 15 minutes to relax the gluten.
6. While the dough rests, pour 4 cups vegetable oil into a large, heavy-bottomed pot or Dutch oven and heat it to 375°F over medium-high heat. Use a deep-fry thermometer to monitor the temperature accurately.
7. On a floured surface, roll the rested dough out to a 1/4-inch thickness using a rolling pin.
8. Cut the dough into 3-inch squares or triangles with a sharp knife or pizza cutter. Tip: Re-roll any scraps once to minimize toughness in the final sopaipillas.
9. Carefully add 3-4 dough pieces to the hot oil (375°F) without overcrowding the pot. Fry for 1-2 minutes per side until they puff up and turn golden brown. Tip: Gently press them down with a slotted spoon to ensure even frying and maximum puffiness.
10. Remove the fried sopaipillas with the slotted spoon and drain them on a wire rack set over a baking sheet or on paper towels.
11. Repeat steps 9-10 with the remaining dough pieces, allowing the oil to return to 375°F between batches.
12. Drizzle the warm sopaipillas generously with 1/2 cup honey just before serving.
Kick back and savor that irresistible contrast: the exterior shatters with a delicate crispness, giving way to a soft, airy interior that soaks up the honey like a dream. For a fun twist, serve them alongside a scoop of vanilla ice cream or dust them with powdered sugar and cinnamon for a cozy winter treat that’ll have everyone begging for seconds.
Blue Corn Pancakes

Savor the magic of breakfast with these whimsical blue corn pancakes—they’re like little edible clouds tinted with a hint of southwestern charm, guaranteed to make your morning feel downright legendary. Seriously, who needs boring beige flapjacks when you can flip stacks that look like they’ve been kissed by a clear sky?
Serving: 4 | Pre Time: 10 minutes | Cooking Time: 15 minutes
Ingredients
– 1 cup blue cornmeal
– 1 cup all-purpose flour
– 2 tablespoons granulated sugar
– 1 teaspoon baking powder
– 1/2 teaspoon baking soda
– 1/2 teaspoon salt
– 1 large egg
– 1 1/4 cups buttermilk
– 2 tablespoons unsalted butter, melted
– 1 teaspoon vanilla extract
– 2 tablespoons vegetable oil
Instructions
1. In a large bowl, whisk together 1 cup blue cornmeal, 1 cup all-purpose flour, 2 tablespoons granulated sugar, 1 teaspoon baking powder, 1/2 teaspoon baking soda, and 1/2 teaspoon salt until fully combined.
2. In a separate medium bowl, beat 1 large egg lightly, then stir in 1 1/4 cups buttermilk, 2 tablespoons melted unsalted butter, and 1 teaspoon vanilla extract until smooth.
3. Pour the wet ingredients into the dry ingredients and gently fold with a spatula just until no dry streaks remain—overmixing can lead to tough pancakes, so a few lumps are perfectly fine.
4. Heat a non-stick skillet or griddle over medium heat and add 1 tablespoon of the 2 tablespoons vegetable oil, swirling to coat the surface evenly.
5. Once the oil shimmers and a drop of water sizzles on the pan, scoop 1/4 cup of batter per pancake onto the skillet, leaving space between them for easy flipping.
6. Cook the pancakes for 2–3 minutes, or until bubbles form on the surface and the edges look set—this visual cue means it’s time to flip.
7. Carefully flip each pancake with a spatula and cook for another 1–2 minutes on the second side, until golden brown and cooked through.
8. Transfer the cooked pancakes to a warm plate and repeat with the remaining batter, adding the remaining 1 tablespoon vegetable oil to the skillet as needed to prevent sticking.
9. Serve the pancakes immediately while hot for the best texture and flavor.
All done! These blue corn pancakes boast a delightfully tender crumb with a subtle nutty sweetness from the cornmeal, making them irresistibly fluffy yet hearty. Drizzle them with maple syrup or top with fresh berries for a vibrant twist—they’re so pretty, you might just snap a photo before digging in!
Green Chile Chicken Soup
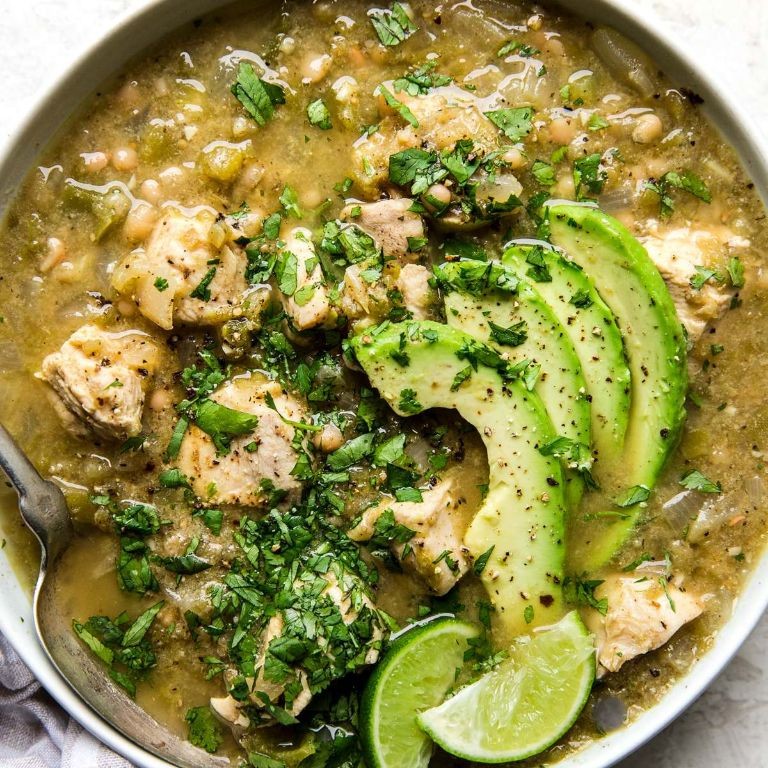
Mmm, is there anything more comforting than a steaming bowl of soup on a crisp winter day? This Green Chile Chicken Soup is here to rescue you from bland lunches and boring dinners with its zesty, soul-warming magic. It’s basically a hug in a bowl, but with a spicy kick that’ll make your taste buds do a happy dance.
Serving: 6 | Pre Time: 15 minutes | Cooking Time: 40 minutes
Ingredients
– 2 tbsp olive oil
– 1 large yellow onion, diced
– 3 cloves garlic, minced
– 1 lb boneless, skinless chicken breasts, cut into 1-inch pieces
– 2 (4 oz) cans diced green chiles
– 1 tsp ground cumin
– 1 tsp dried oregano
– 4 cups low-sodium chicken broth
– 1 (15 oz) can white beans, drained and rinsed
– 1 cup frozen corn kernels
– 1/2 cup heavy cream
– Salt and black pepper to taste
– Fresh cilantro, chopped, for garnish
– Lime wedges, for serving
Instructions
1. Heat 2 tbsp olive oil in a large pot or Dutch oven over medium-high heat until shimmering, about 2 minutes.
2. Add 1 large diced yellow onion and cook, stirring occasionally, until softened and translucent, about 5 minutes.
3. Stir in 3 minced garlic cloves and cook until fragrant, about 30 seconds, being careful not to burn it.
4. Add 1 lb chicken breast pieces to the pot and cook, stirring occasionally, until no longer pink on the outside, about 5 minutes.
5. Pour in 2 cans diced green chiles, 1 tsp ground cumin, and 1 tsp dried oregano, stirring to coat the chicken evenly.
6. Tip: Toasting the spices briefly with the chicken enhances their flavor without burning.
7. Add 4 cups chicken broth and bring the mixture to a boil over high heat.
8. Reduce the heat to medium-low, cover the pot, and simmer for 20 minutes to allow the chicken to cook through and flavors to meld.
9. Tip: Simmering with the lid on helps retain moisture and intensifies the broth.
10. Stir in 1 can drained white beans and 1 cup frozen corn kernels, cooking uncovered for 5 minutes until heated through.
11. Remove the pot from the heat and stir in 1/2 cup heavy cream until fully incorporated.
12. Tip: Adding cream off the heat prevents curdling and ensures a smooth, creamy texture.
13. Season the soup with salt and black pepper to taste, adjusting as needed.
14. Ladle the soup into bowls and garnish with fresh chopped cilantro and lime wedges on the side.
15. For a fun twist, serve it with crispy tortilla strips or a dollop of sour cream for extra richness. The soup boasts a velvety texture from the cream, balanced by the tender chicken and hearty beans, while the green chiles provide a gentle heat that lingers pleasantly. Fresh lime juice brightens each spoonful, making it a vibrant, satisfying meal perfect for cozy nights or impressing guests without the fuss.
New Mexico Tamales
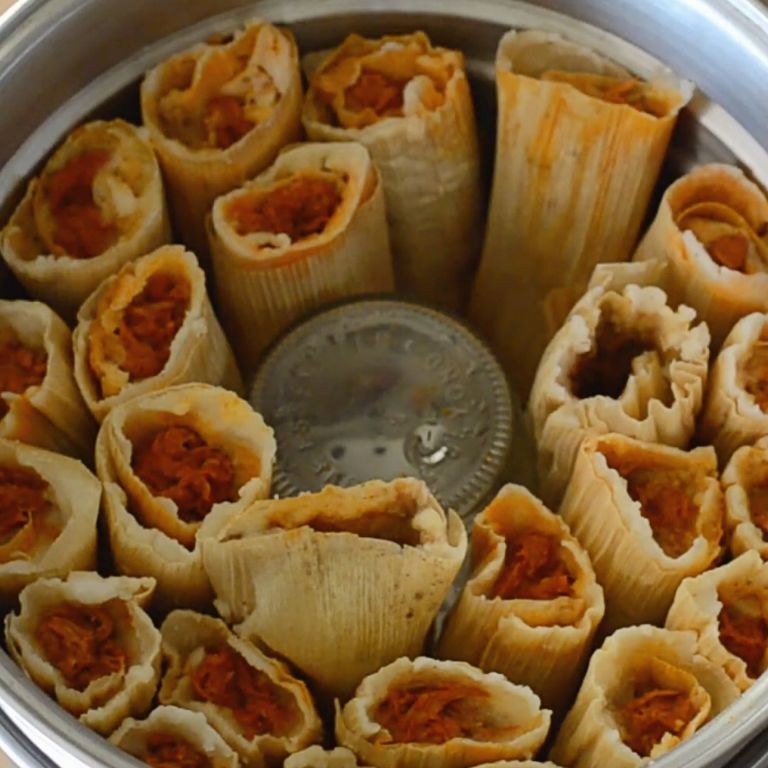
C’mon, let’s be real—when the holiday season hits, we all need a little something to spice up our lives (and our taste buds). Enter New Mexico tamales, the festive little bundles of joy that’ll have you feeling like you’ve won the culinary lottery without breaking a sweat. They’re basically edible presents, and who doesn’t love opening those?
Serving: 12 | Pre Time: 45 minutes | Cooking Time: 90 minutes
Ingredients
– 2 cups masa harina
– 1 1/2 cups warm chicken broth
– 1 tsp baking powder
– 1 tsp salt
– 2/3 cup lard
– 24 dried corn husks
– 1 lb pork shoulder, cooked and shredded
– 2 tbsp New Mexico red chile powder
– 1 tsp ground cumin
– 1/2 tsp garlic powder
Instructions
1. Soak the dried corn husks in warm water for 30 minutes until pliable, then drain and pat dry with a towel.
2. In a large bowl, combine masa harina, baking powder, and salt.
3. Beat lard in a separate bowl with an electric mixer on medium speed for 3 minutes until fluffy.
4. Gradually add the masa mixture to the lard, alternating with warm chicken broth, and mix on low speed for 5 minutes until a smooth dough forms.
5. In a medium bowl, mix shredded pork shoulder with New Mexico red chile powder, ground cumin, and garlic powder until evenly coated.
6. Spread 2 tablespoons of masa dough onto the center of a corn husk, leaving a 1-inch border at the top and bottom.
7. Place 1 tablespoon of the pork mixture in a line down the center of the dough.
8. Fold the sides of the husk inward to enclose the filling, then fold the bottom up and secure with a thin strip of torn husk if needed.
9. Arrange tamales upright in a steamer basket over 1 inch of boiling water, cover tightly, and steam for 90 minutes over medium heat, checking water level every 30 minutes to avoid burning.
10. Remove a tamale after 90 minutes; if the husk peels away easily, they’re done—let cool for 10 minutes before serving.
Dive into these tamales, and you’ll be greeted by a tender, slightly crumbly masa that gives way to a smoky, spicy pork filling with just enough kick to make things interesting. Serve them up with a dollop of sour cream or crumbled queso fresco for a cool contrast, or go wild and stuff them into a breakfast burrito the next day—leftovers never tasted so good!
Chile Rellenos with Queso

Alright, let’s get cheesy! Are you ready to stuff, dip, and fry your way to a crispy, melty, and utterly irresistible Tex-Mex classic? Chile Rellenos with Queso is the ultimate comfort food hack—think golden-brown poblano peppers hugging a river of gooey cheese, all smothered in a creamy, tangy sauce that’ll make you forget every bland meal you’ve ever suffered through. Trust me, your taste buds will throw a fiesta, and cleanup is optional (we won’t judge).
Serving: 4 | Pre Time: 20 minutes | Cooking Time: 25 minutes
Ingredients
– 4 large poblano peppers
– 8 ounces Monterey Jack cheese, shredded
– 1 cup all-purpose flour
– 3 large eggs
– 1/2 teaspoon salt
– 1/4 teaspoon black pepper
– 2 cups vegetable oil
– 1 tablespoon unsalted butter
– 1/2 cup diced onion
– 1 clove garlic, minced
– 1 cup heavy cream
– 4 ounces cream cheese, cubed
– 1/4 cup grated Parmesan cheese
Instructions
1. Preheat your oven to 400°F and line a baking sheet with parchment paper.
2. Place the poblano peppers on the baking sheet and roast for 15 minutes, turning once halfway, until the skins are blistered and charred.
3. Transfer the peppers to a bowl, cover with plastic wrap, and let steam for 10 minutes to loosen the skins—this makes peeling a breeze.
4. Carefully peel off the charred skins from each pepper, then make a lengthwise slit and remove the seeds and membranes, keeping the stem intact.
5. Stuff each pepper with 2 ounces of shredded Monterey Jack cheese, pressing gently to fill evenly without tearing.
6. In a shallow dish, whisk together 1 cup all-purpose flour, 1/2 teaspoon salt, and 1/4 teaspoon black pepper.
7. In another shallow dish, beat 3 large eggs until frothy.
8. Dredge each stuffed pepper in the flour mixture, shaking off excess, then dip into the beaten eggs to coat completely.
9. Heat 2 cups vegetable oil in a large skillet over medium-high heat until it reaches 350°F on a thermometer.
10. Fry the peppers in batches for 3–4 minutes per side, until golden brown and crispy, then drain on paper towels.
11. For the queso sauce, melt 1 tablespoon unsalted butter in a saucepan over medium heat.
12. Add 1/2 cup diced onion and 1 minced garlic clove, sautéing for 5 minutes until softened and fragrant.
13. Pour in 1 cup heavy cream and bring to a gentle simmer, stirring constantly to prevent scorching.
14. Whisk in 4 ounces cubed cream cheese and 1/4 cup grated Parmesan cheese until smooth and melted, about 3 minutes.
15. Serve the fried chiles rellenos immediately, drizzled generously with the warm queso sauce.
The result? A crispy exterior gives way to tender, smoky peppers and a molten cheese center that oozes with every bite, all balanced by that rich, velvety queso—it’s like a hug for your soul. Try pairing it with a fresh pico de gallo or crumbling some tortilla chips on top for an extra crunch that’ll have everyone fighting for the last bite.
Bizcochitos (New Mexico Cookies)

Wondering what happens when a cookie gets a spicy upgrade? Meet bizcochitos—New Mexico’s official state cookie that’s like a snickerdoodle decided to vacation in Santa Fe and never came back. These anise-scented, cinnamon-sugar-dusted delights are crisp, buttery, and just sassy enough to make your taste buds do a little fiesta dance.
Serving: 24 | Pre Time: 20 minutes | Cooking Time: 12 minutes
Ingredients
– 1 cup unsalted butter, softened
– ¾ cup granulated sugar
– 1 large egg
– 1 teaspoon anise extract
– 3 cups all-purpose flour
– 1 ½ teaspoons baking powder
– ¼ teaspoon salt
– ¼ cup brandy or rum
– ¼ cup granulated sugar (for rolling)
– 1 tablespoon ground cinnamon (for rolling)
Instructions
1. Preheat your oven to 350°F and line two baking sheets with parchment paper.
2. In a large bowl, cream together 1 cup softened butter and ¾ cup granulated sugar until light and fluffy, about 2-3 minutes with a hand mixer.
3. Beat in 1 large egg and 1 teaspoon anise extract until fully combined.
4. In a separate bowl, whisk together 3 cups all-purpose flour, 1 ½ teaspoons baking powder, and ¼ teaspoon salt.
5. Gradually add the dry ingredients to the butter mixture, mixing on low speed until just incorporated.
6. Pour in ¼ cup brandy or rum and mix until the dough comes together into a soft ball. Tip: If the dough feels too sticky, chill it in the refrigerator for 10 minutes—this makes rolling easier.
7. In a small bowl, combine ¼ cup granulated sugar and 1 tablespoon ground cinnamon for the rolling mixture.
8. Pinch off tablespoon-sized pieces of dough and roll them into smooth balls between your palms.
9. Roll each ball in the cinnamon-sugar mixture until evenly coated, then place them 2 inches apart on the prepared baking sheets.
10. Use the bottom of a glass to gently flatten each cookie to about ¼-inch thickness. Tip: Dip the glass in the cinnamon-sugar between presses to prevent sticking and add extra flavor.
11. Bake for 10-12 minutes, or until the edges are lightly golden and the centers look set. Tip: Rotate the baking sheets halfway through for even browning—these cookies are divas about getting an even tan.
12. Let the cookies cool on the baking sheets for 5 minutes before transferring them to a wire rack to cool completely.
Munch on these bizcochitos and you’ll be greeted with a crisp, sandy texture that melts into buttery richness, all wrapped up in that warm anise-cinnamon hug. They’re perfect dunked in hot chocolate or crumbled over vanilla ice cream for a Southwest-inspired sundae that’ll have you saying “¡olé!” with every bite.
Pinto Beans with Red Chile
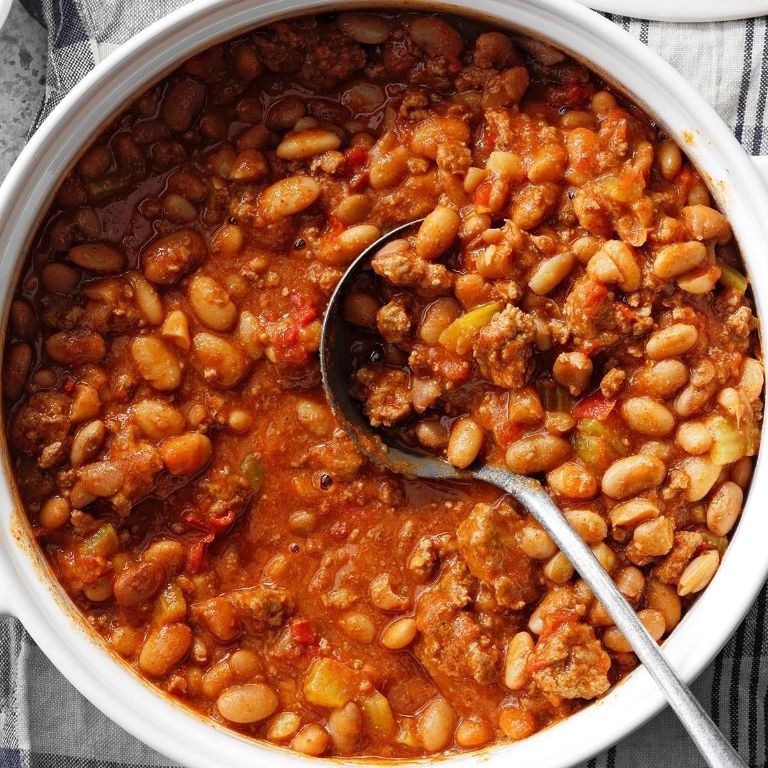
Y’all, if your taste buds are throwing a fiesta and your pantry is looking for a hero, let me introduce you to the humble pinto bean’s glow-up moment. This isn’t just a pot of beans; it’s a warm, spicy hug in a bowl that promises to banish bland dinners forever.
Serving: 6 | Pre Time: 15 minutes | Cooking Time: 2 hours 15 minutes
Ingredients
– 1 pound dried pinto beans
– 8 cups water
– 2 tablespoons vegetable oil
– 1 large yellow onion, diced
– 4 cloves garlic, minced
– 1/4 cup red chile powder
– 1 teaspoon ground cumin
– 1 teaspoon dried oregano
– 1 1/2 teaspoons salt
– 1/4 teaspoon black pepper
– 2 bay leaves
Instructions
1. Rinse 1 pound of dried pinto beans under cold water in a colander, picking out any small stones or debris.
2. Place the rinsed beans in a large pot or Dutch oven and add 8 cups of water. Let them soak for 1 hour at room temperature.
3. After soaking, bring the pot to a boil over high heat, then reduce the heat to low, cover, and simmer for 1 hour and 30 minutes until the beans are tender but not mushy. (Tip: Don’t add salt yet, as it can toughen the beans during this initial cook.)
4. While the beans simmer, heat 2 tablespoons of vegetable oil in a large skillet over medium heat for 1 minute.
5. Add 1 diced large yellow onion to the skillet and cook for 8-10 minutes, stirring occasionally, until softened and translucent.
6. Stir in 4 minced cloves of garlic and cook for 1 more minute until fragrant.
7. Add 1/4 cup of red chile powder, 1 teaspoon of ground cumin, and 1 teaspoon of dried oregano to the skillet. Cook for 2 minutes, stirring constantly, to toast the spices and deepen their flavor. (Tip: Toasting unlocks the oils in the spices for a richer taste.)
8. Once the beans are tender, stir the onion-spice mixture from the skillet into the pot with the beans.
9. Add 1 1/2 teaspoons of salt, 1/4 teaspoon of black pepper, and 2 bay leaves to the pot.
10. Simmer the mixture, uncovered, over low heat for 30 minutes, stirring occasionally, until the liquid thickens slightly into a saucy consistency. (Tip: For extra creaminess, mash a few beans against the side of the pot with a spoon before serving.)
11. Remove and discard the bay leaves before serving.
Get ready for a bowl of pure comfort: the beans are velvety-soft, swimming in a smoky, earthy red chile sauce that packs just enough heat to make you sit up and take notice. Serve it over rice for a hearty meal, stuff it into warm tortillas, or top it with a dollop of sour cream and fresh cilantro for a fiesta on a plate.
Stacked Red Chile Enchiladas
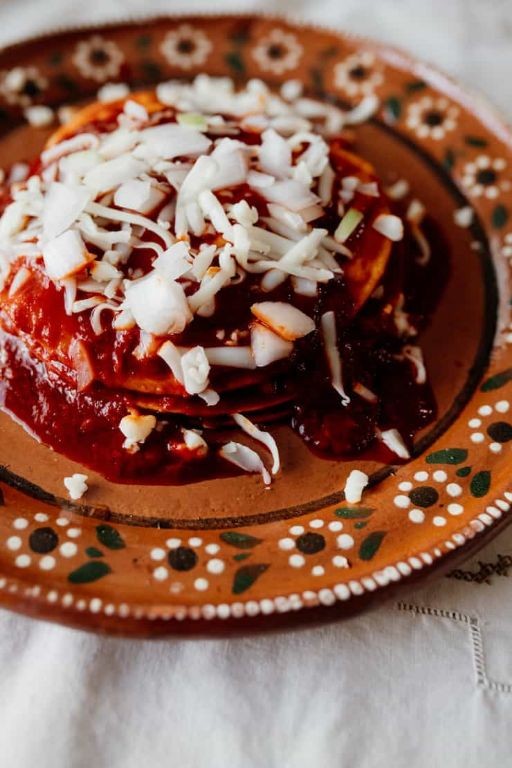
Scoot over, boring Tuesday dinners—these stacked red chile enchiladas are here to bring the fiesta to your table with layers of cheesy, saucy goodness that’ll make your taste buds do a happy dance. Think of them as the edible equivalent of a cozy blanket hug, but with a spicy kick that says, “Let’s party!”
Serving: 6 | Pre Time: 20 minutes | Cooking Time: 30 minutes
Ingredients
– 12 corn tortillas
– 2 cups shredded Monterey Jack cheese
– 1 lb ground beef
– 1 onion, diced
– 2 cloves garlic, minced
– 2 cups red enchilada sauce
– 1 tbsp vegetable oil
– 1 tsp ground cumin
– 1 tsp chili powder
– ½ tsp salt
– ¼ tsp black pepper
– ½ cup sour cream
– ¼ cup chopped cilantro
Instructions
1. Preheat your oven to 350°F and grease a 9×13-inch baking dish lightly with vegetable oil.
2. In a large skillet over medium-high heat, heat 1 tbsp vegetable oil until shimmering, about 1 minute.
3. Add the diced onion and cook for 5 minutes, stirring occasionally, until softened and translucent.
4. Add the minced garlic and cook for 1 minute, stirring constantly, until fragrant.
5. Add the ground beef to the skillet and cook for 8–10 minutes, breaking it up with a spoon, until browned and no pink remains.
6. Stir in 1 tsp ground cumin, 1 tsp chili powder, ½ tsp salt, and ¼ tsp black pepper, and cook for 1 minute to toast the spices.
7. Remove the skillet from heat and set aside; this filling can be made ahead and stored—just reheat before assembling for easier layering.
8. Pour ½ cup red enchilada sauce into the bottom of the greased baking dish and spread it evenly.
9. Place 4 corn tortillas in a single layer over the sauce, overlapping slightly to cover the dish.
10. Spread half of the beef mixture evenly over the tortillas.
11. Sprinkle ⅔ cup shredded Monterey Jack cheese over the beef layer.
12. Drizzle ½ cup red enchilada sauce over the cheese.
13. Repeat the layers: 4 tortillas, remaining beef, ⅔ cup cheese, and ½ cup sauce.
14. Top with the final 4 tortillas, pour the remaining ½ cup sauce over them, and sprinkle the last ⅔ cup cheese evenly.
15. Cover the dish with aluminum foil and bake for 20 minutes at 350°F.
16. Remove the foil and bake for an additional 10 minutes, until the cheese is bubbly and lightly golden.
17. Let the enchiladas rest for 5 minutes after baking—this helps the layers set for cleaner slices.
18. Garnish with ½ cup sour cream and ¼ cup chopped cilantro before serving.
Now, dig into those enchiladas and savor the melty cheese mingling with the robust red chile sauce, all hugged by soft tortillas that hold up beautifully without getting soggy. Not only do they make a stunning centerpiece for a casual dinner, but leftovers taste even better the next day—if you can resist eating them all at once!
Green Chile Cheeseburgers
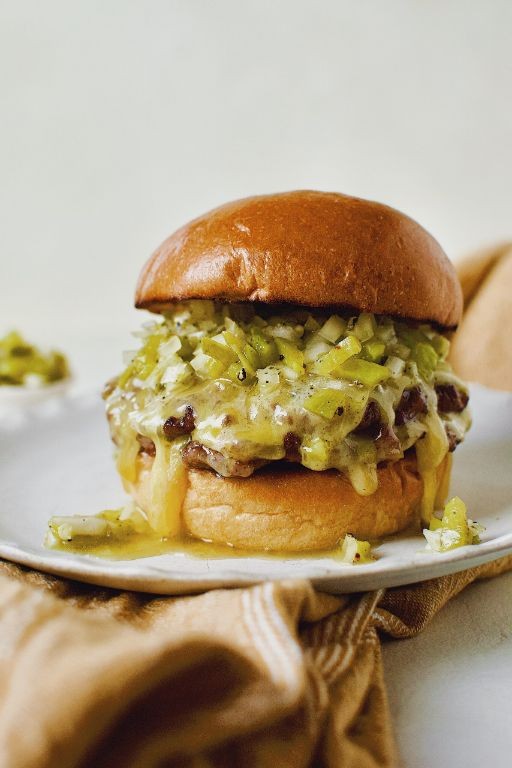
Sizzling with Southwestern spirit, these Green Chile Cheeseburgers are the ultimate upgrade to your backyard barbecue—they’re basically a fiesta in a bun, ready to rescue your taste buds from burger boredom. Imagine juicy beef patties smothered in roasted green chiles and melted cheese, creating a flavor explosion so good, you might just forget about ketchup forever.
Serving: 4 | Pre Time: 15 minutes | Cooking Time: 10 minutes
Ingredients
– 1.5 lbs ground beef (80/20 blend)
– 1 tsp salt
– 1/2 tsp black pepper
– 4 hamburger buns
– 1 cup roasted green chiles, chopped
– 4 slices cheddar cheese
– 2 tbsp vegetable oil
– 4 lettuce leaves
– 4 tomato slices
– 4 tbsp mayonnaise
Instructions
1. Preheat a grill or skillet to medium-high heat (400°F).
2. In a bowl, combine 1.5 lbs ground beef, 1 tsp salt, and 1/2 tsp black pepper; mix gently with your hands until just combined to avoid tough patties.
3. Divide the mixture into 4 equal portions and shape into 1-inch-thick patties, pressing a slight indentation in the center of each to prevent bulging during cooking.
4. Brush the grill or skillet with 2 tbsp vegetable oil to prevent sticking.
5. Place the patties on the heat and cook for 4-5 minutes without moving them to develop a flavorful crust.
6. Flip the patties and cook for another 3-4 minutes until the internal temperature reaches 160°F for medium doneness.
7. Top each patty with 1/4 cup roasted green chiles and 1 slice cheddar cheese; cover and cook for 1-2 minutes until the cheese melts completely.
8. While the patties cook, toast the 4 hamburger buns on the grill for 30-60 seconds until lightly golden for extra crunch.
9. Spread 1 tbsp mayonnaise on the bottom half of each toasted bun.
10. Layer 1 lettuce leaf and 1 tomato slice on top of the mayonnaise.
11. Place a cooked patty with melted cheese and chiles on each bun.
12. Cover with the top bun and serve immediately.
Mouthwatering and messy in the best way, these burgers boast a juicy, tender texture from the indented patties, with the smoky heat of green chiles cutting through the rich cheese. For a creative twist, serve them with a side of crispy sweet potato fries or pile on extra chiles for those who dare—just have napkins ready!
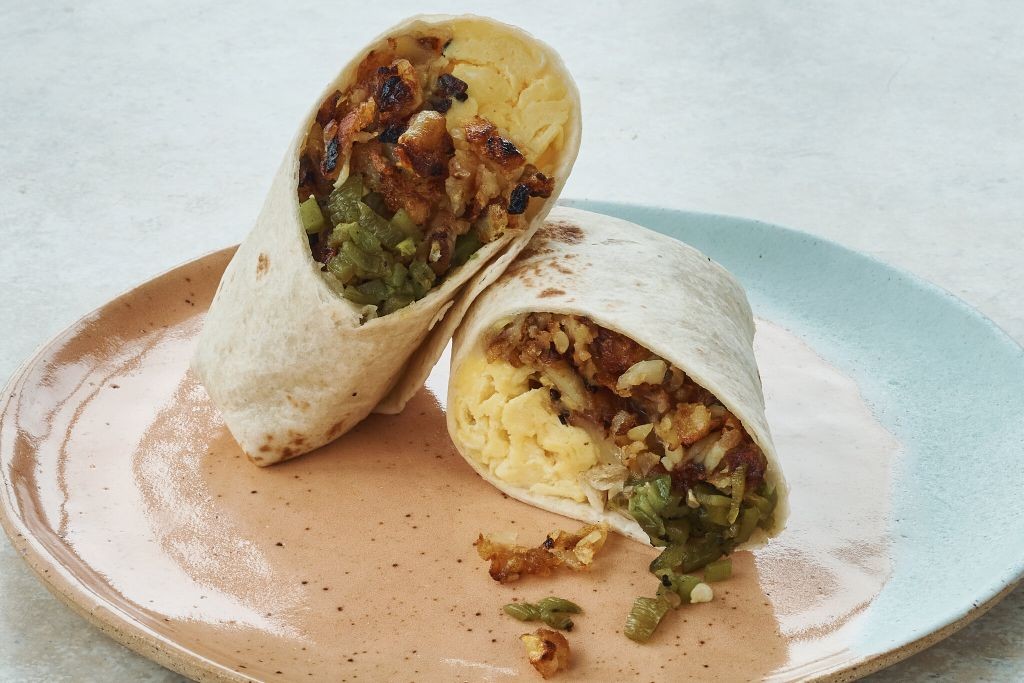
New Mexico Breakfast Burritos
Eager to kick your morning into high gear? Let’s talk about the New Mexico Breakfast Burrito—a handheld fiesta that packs more punch than your alarm clock. This spicy, savory masterpiece wraps up all your breakfast dreams in one warm, portable package, perfect for those days when you need fuel but can’t be bothered with a fork.
Serving: 4 | Pre Time: 15 minutes | Cooking Time: 20 minutes
Ingredients
– 1 tbsp olive oil
– 1/2 lb breakfast sausage
– 1/2 cup diced onion
– 1/4 cup diced green chiles
– 6 large eggs
– 1/4 cup milk
– 1 cup shredded cheddar cheese
– 4 large flour tortillas
– 1/2 cup salsa
– 1/4 cup sour cream
Instructions
1. Heat 1 tbsp olive oil in a large skillet over medium-high heat until shimmering, about 1 minute.
2. Add 1/2 lb breakfast sausage to the skillet, breaking it into small crumbles with a spatula as it cooks.
3. Cook the sausage for 5–7 minutes until browned and no pink remains, stirring occasionally.
4. Add 1/2 cup diced onion and 1/4 cup diced green chiles to the skillet with the sausage.
5. Sauté the mixture for 3–4 minutes until the onions are translucent and fragrant.
6. Tip: For extra flavor, let the onions caramelize slightly by cooking an additional minute—they should turn a light golden brown.
7. In a medium bowl, whisk together 6 large eggs and 1/4 cup milk until fully combined and frothy.
8. Push the sausage mixture to one side of the skillet and pour the egg mixture into the empty space.
9. Cook the eggs over medium heat for 2–3 minutes, gently scrambling with a spatula until soft curds form.
10. Tip: Avoid overcooking the eggs—remove them from heat when they’re still slightly moist, as they’ll continue to cook from residual heat.
11. Combine the scrambled eggs with the sausage mixture in the skillet, stirring gently to mix evenly.
12. Sprinkle 1 cup shredded cheddar cheese over the top of the mixture in the skillet.
13. Cover the skillet with a lid and let it sit off the heat for 1–2 minutes until the cheese melts completely.
14. Warm 4 large flour tortillas in a dry skillet over medium heat for 15–20 seconds per side until pliable.
15. Tip: For a crispier tortilla, lightly toast them until golden spots appear—this adds texture and prevents sogginess.
16. Divide the filling evenly among the warm tortillas, placing it in the center of each.
17. Fold the bottom edge of each tortilla over the filling, then fold in the sides and roll tightly to form a burrito.
18. Serve immediately with 1/2 cup salsa and 1/4 cup sour cream on the side for dipping.
Hearty and satisfying, these burritos boast a fluffy egg texture with a spicy kick from the green chiles and savory depth from the sausage. The melted cheddar adds a creamy richness that ties everything together beautifully. For a fun twist, try grilling the assembled burritos for a minute on each side to get a crispy, golden exterior that contrasts with the soft interior—perfect for dipping into that cool sour cream!
Chile con Queso Dip

Now, let’s talk about the ultimate party hero: Chile con Queso Dip. This gooey, cheesy marvel is the MVP of any gathering, ready to rescue bland chips and turn them into flavor-packed vehicles of joy. It’s so simple to whip up, you’ll wonder why you ever settled for store-bought gloop.
Serving: 8 | Pre Time: 10 minutes | Cooking Time: 15 minutes
Ingredients
– 1 tbsp unsalted butter
– 1/2 cup finely diced white onion
– 1 jalapeño pepper, seeds removed and finely diced
– 1 (10 oz) can diced tomatoes with green chiles, drained
– 8 oz Velveeta cheese, cubed
– 1 cup shredded Monterey Jack cheese
– 1/2 cup whole milk
– 1/2 tsp ground cumin
– 1/4 tsp garlic powder
– Tortilla chips for serving
Instructions
1. Melt 1 tbsp unsalted butter in a medium saucepan over medium heat.
2. Add 1/2 cup finely diced white onion and cook for 3–4 minutes, stirring occasionally, until softened and translucent.
3. Stir in 1 finely diced jalapeño pepper and cook for 1 minute to release its aroma.
4. Add 1 drained can of diced tomatoes with green chiles and cook for 2 minutes, stirring to combine.
5. Reduce heat to low and add 8 oz cubed Velveeta cheese, 1 cup shredded Monterey Jack cheese, 1/2 cup whole milk, 1/2 tsp ground cumin, and 1/4 tsp garlic powder.
6. Stir continuously for 5–7 minutes until all cheese is melted and the mixture is smooth, with no lumps.
7. Remove from heat and let sit for 2 minutes to thicken slightly before serving.
8. Serve immediately with tortilla chips for dipping.
Grab those chips and dive in—this dip boasts a velvety, creamy texture with a subtle kick from the jalapeño and tomatoes, making it irresistibly scoopable. For a fun twist, try it drizzled over nachos or as a decadent topping for baked potatoes to elevate your snack game instantly.
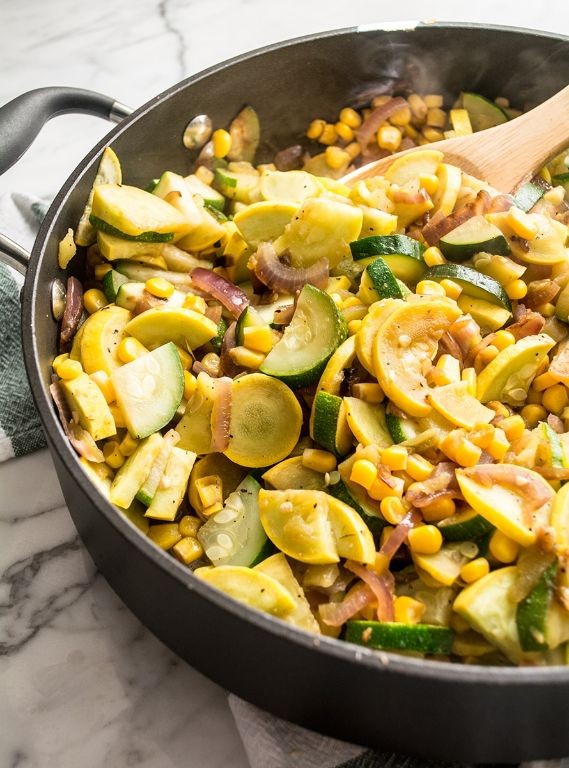
Calabacitas with Green Chile
Mmm, picture this: a sizzling skillet brimming with summer squash, sweet corn, and just enough green chile to make your taste buds do a happy dance. It’s the kind of dish that turns a hectic weeknight into a fiesta without any fuss—because who has time for fuss when there’s flavor to be had?
Serving: 4 | Pre Time: 15 minutes | Cooking Time: 20 minutes
Ingredients
– 2 tbsp olive oil
– 1 medium yellow onion, diced
– 2 cloves garlic, minced
– 2 medium zucchini, diced into 1/2-inch cubes
– 2 medium yellow squash, diced into 1/2-inch cubes
– 1 cup corn kernels (fresh or frozen)
– 1 (4 oz) can diced green chiles
– 1/2 tsp ground cumin
– 1/2 tsp smoked paprika
– 1/4 tsp salt
– 1/4 tsp black pepper
– 1/2 cup shredded Monterey Jack cheese
– 2 tbsp chopped fresh cilantro
Instructions
1. Heat 2 tbsp olive oil in a large skillet over medium-high heat until shimmering, about 1 minute.
2. Add 1 medium diced yellow onion and cook, stirring occasionally, until translucent and slightly golden, 5–6 minutes.
3. Stir in 2 minced garlic cloves and cook until fragrant, 30 seconds—don’t let it brown, or it’ll turn bitter.
4. Add 2 diced zucchini and 2 diced yellow squash to the skillet, spreading them in an even layer.
5. Cook without stirring for 3 minutes to allow the squash to develop a light sear, then stir and cook for another 3 minutes until tender-crisp.
6. Mix in 1 cup corn kernels, 1 can diced green chiles, 1/2 tsp ground cumin, 1/2 tsp smoked paprika, 1/4 tsp salt, and 1/4 tsp black pepper.
7. Reduce heat to medium and simmer, uncovered, for 5 minutes until the vegetables are tender and the liquid has mostly evaporated—if it looks too dry, add a splash of water.
8. Sprinkle 1/2 cup shredded Monterey Jack cheese evenly over the top, cover the skillet, and remove from heat.
9. Let sit for 2 minutes until the cheese melts completely, then garnish with 2 tbsp chopped fresh cilantro.
10. Serve immediately while warm. The squash stays tender with a slight bite, the corn adds pops of sweetness, and the green chile brings a gentle, smoky heat that’s totally addictive. Scoop it into warm tortillas, pile it over rice, or just grab a fork and dive right in—no judgment here!
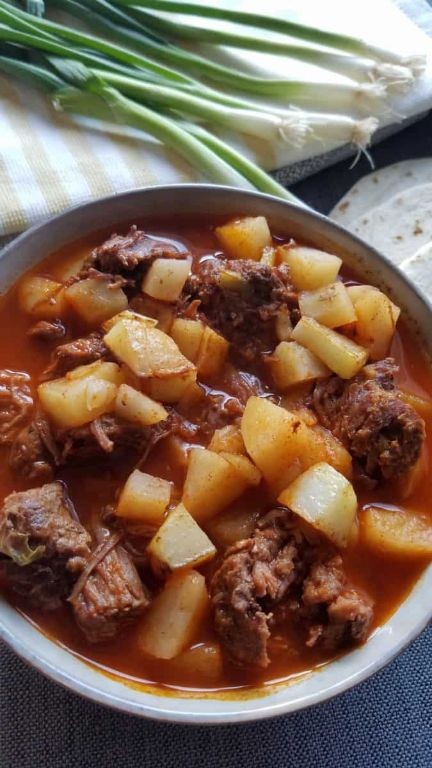
Red Chile Beef Stew
Alright, gather ’round, spice enthusiasts and cozy-craving cooks, because we’re about to transform your kitchen into a haven of smoky, savory magic. This isn’t just any stew; it’s a flavor fiesta where tender beef gets a long, slow hug from rich red chiles and aromatic spices, promising to banish the winter blues one glorious spoonful at a time.
Serving: 6 | Prep Time: 20 minutes | Cooking Time: 2 hours 30 minutes
Ingredients
– 2 lbs beef chuck roast, cut into 1-inch cubes
– 2 tbsp vegetable oil
– 1 large yellow onion, diced
– 4 cloves garlic, minced
– 4 dried ancho chiles, stems and seeds removed
– 4 cups beef broth
– 1 (14.5 oz) can diced tomatoes
– 1 tsp ground cumin
– 1 tsp dried oregano
– Salt to taste
– 2 tbsp all-purpose flour
Instructions
1. Pat the beef cubes completely dry with paper towels. (Tip: Dry meat browns better, creating a flavorful crust.)
2. Heat 1 tablespoon of vegetable oil in a large Dutch oven over medium-high heat until shimmering.
3. Add half the beef cubes in a single layer and sear without moving for 4-5 minutes until deeply browned on one side.
4. Flip each piece and sear for another 4-5 minutes, then transfer to a plate. Repeat with remaining oil and beef.
5. Reduce heat to medium and add the diced onion to the pot, cooking for 5-7 minutes until softened.
6. Add the minced garlic and cook for 1 minute until fragrant.
7. Tear the dried ancho chiles into pieces and add them to the pot, toasting for 1 minute.
8. Pour in 1 cup of beef broth and use a wooden spoon to scrape up all the browned bits from the bottom of the pot.
9. Return all the seared beef and any accumulated juices to the pot.
10. Add the remaining 3 cups of beef broth, the can of diced tomatoes (with juices), ground cumin, and dried oregano.
11. Bring the mixture to a simmer, then immediately reduce heat to low.
12. Cover the pot and let it simmer gently for 2 hours, stirring occasionally. (Tip: A low, steady simmer is key for tender meat.)
13. After 2 hours, uncover the pot. The beef should be fork-tender.
14. In a small bowl, whisk the 2 tablespoons of all-purpose flour with ¼ cup of the hot stew liquid until smooth to create a slurry.
15. Stir the slurry back into the stew. (Tip: This prevents lumps and thickens the sauce beautifully.)
16. Simmer uncovered for an additional 15-20 minutes, until the stew has thickened to your desired consistency.
17. Taste and season with salt as needed.
Come hungry, because this stew is a masterpiece of contrasts. The beef shreds with a gentle nudge of your fork, swimming in a velvety, brick-red sauce that packs a warm, smoky heat rather than a sharp burn. Serve it over a mound of creamy mashed potatoes for the ultimate comfort, or scoop it into warm tortillas for a fantastic taco night twist.
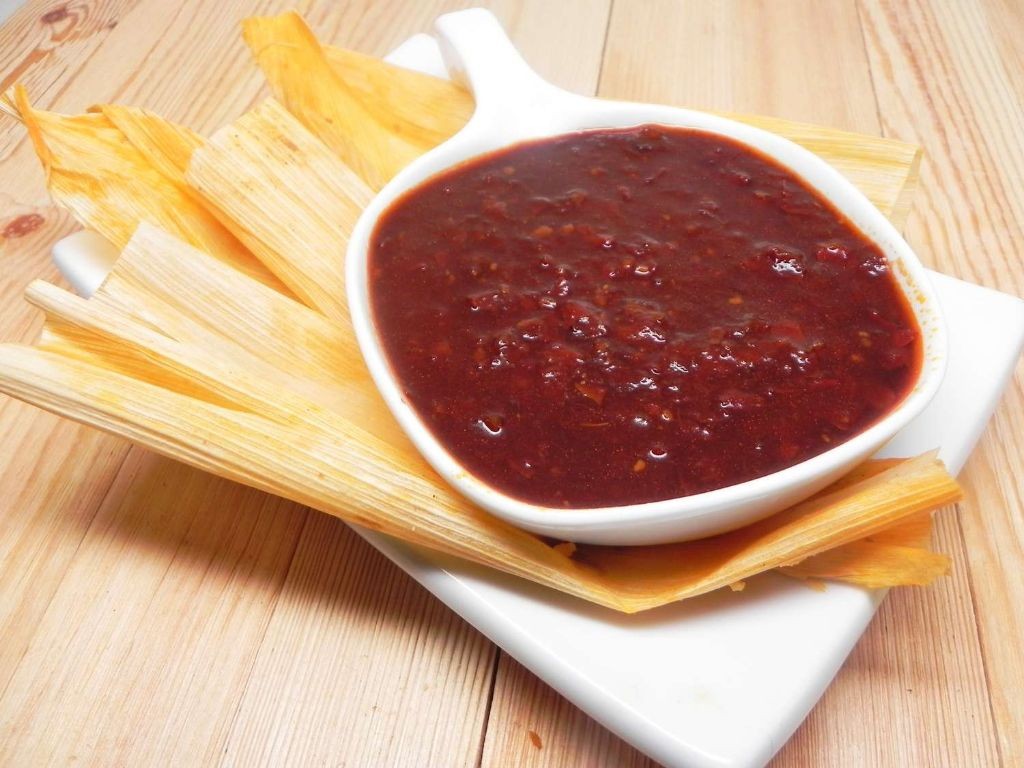
New Mexico Chile Sauce
Crank up the heat, folks—we’re diving into New Mexico Chile Sauce, the spicy, smoky superstar that’ll make your taste buds do a happy dance. Forget bland condiments; this zesty concoction brings the fiesta to everything from tacos to scrambled eggs, and it’s easier to whip up than you might think. Let’s get saucy and turn up the flavor dial!
Serving: 4 | Pre Time: 10 minutes | Cooking Time: 25 minutes
Ingredients
– 6 dried New Mexico chiles
– 2 cups water
– 1/2 cup chopped white onion
– 2 cloves garlic, minced
– 1 tablespoon vegetable oil
– 1/2 teaspoon salt
– 1/4 teaspoon ground cumin
Instructions
1. Remove stems and seeds from 6 dried New Mexico chiles, tearing them into pieces with your hands.
2. Place chile pieces in a medium saucepan with 2 cups water, bring to a boil over high heat, then reduce to a simmer for 10 minutes until softened.
3. Drain chiles, reserving 1/2 cup of the soaking liquid in a separate bowl.
4. Heat 1 tablespoon vegetable oil in a skillet over medium heat until shimmering, about 2 minutes.
5. Add 1/2 cup chopped white onion to the skillet, sauté for 5 minutes until translucent and lightly browned.
6. Stir in 2 cloves minced garlic and cook for 1 minute until fragrant, being careful not to burn it.
7. Transfer softened chiles, sautéed onion-garlic mixture, reserved 1/2 cup soaking liquid, 1/2 teaspoon salt, and 1/4 teaspoon ground cumin to a blender.
8. Blend on high speed for 2-3 minutes until completely smooth, scraping down the sides halfway through.
9. Pour the blended sauce back into the skillet and simmer over low heat for 10 minutes, stirring occasionally to thicken.
10. Remove from heat and let cool slightly before serving or storing.
Outrageously versatile, this sauce boasts a velvety texture with a deep, smoky kick that mellows into a warm glow. Drizzle it over enchiladas, mix it into soups, or slather it on grilled meats for an instant flavor upgrade—your kitchen just got a whole lot spicier!
Summary
Journey through New Mexico’s vibrant cuisine with these 18 authentic spicy recipes! From comforting stews to zesty salsas, there’s something to ignite every home cook’s passion. We’d love to hear which dish becomes your favorite—drop a comment below and share this flavorful roundup on Pinterest to spread the heat!


