
Unwind, busy bakers! We know your schedule is packed, but your love for that tangy, chewy sourdough doesn’t have to wait for the weekend. We’ve gathered 20 flavorful overnight recipes that do the hard work while you sleep, turning your kitchen into a hands-off bakery. From hearty loaves to sweet breakfast treats, get ready to wake up to the incredible aroma and taste of fresh-baked success.
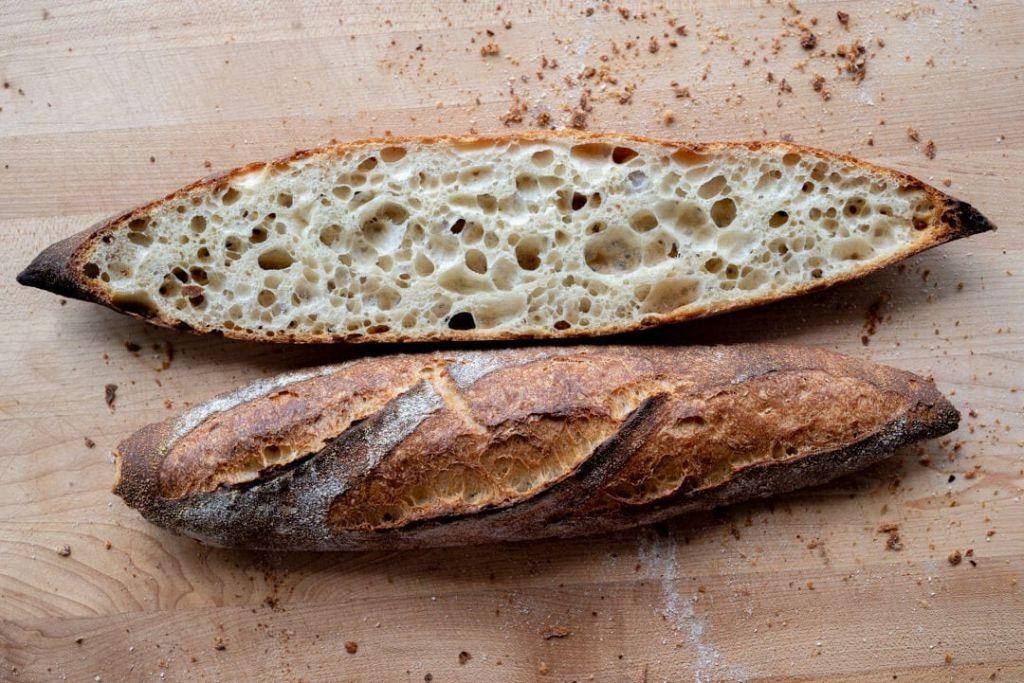
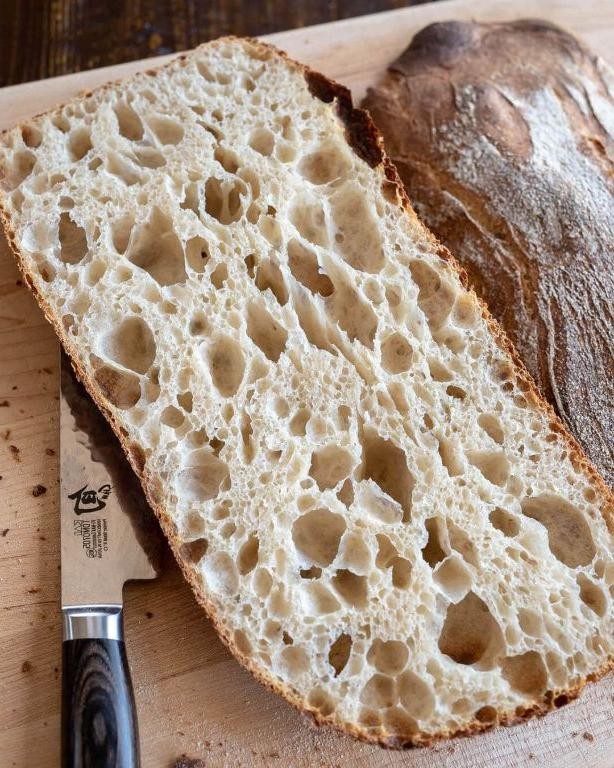
Classic Overnight Sourdough Bread

Venturing into sourdough baking can feel intimidating, but this overnight method breaks it down into manageable steps that yield a professional-quality loaf with minimal hands-on time. By planning ahead and letting time do the work, you’ll achieve that coveted crispy crust and tangy, airy crumb that makes sourdough so special.
Serving: 1 loaf | Pre Time: 14 hours | Cooking Time: 45 minutes
Ingredients
– 1 cup active sourdough starter, at peak fermentation
– 3 ½ cups bread flour, plus extra for dusting
– 1 ½ cups filtered water, at 85°F
– 2 teaspoons fine sea salt
– Rice flour, for dusting the proofing basket
Instructions
1. In a large mixing bowl, combine 1 cup active sourdough starter and 1 ½ cups filtered water at 85°F, whisking until fully incorporated.
2. Add 3 ½ cups bread flour to the liquid mixture, stirring with a dough whisk or wooden spoon until no dry flour remains and a shaggy dough forms.
3. Cover the bowl with a damp kitchen towel and let the dough rest for 30 minutes at room temperature to allow the flour to hydrate fully.
4. Sprinkle 2 teaspoons fine sea salt evenly over the dough surface, then use wet hands to fold and pinch the dough for 2-3 minutes until the salt is fully integrated and the dough becomes smoother.
5. Perform a series of four stretch-and-folds: grab one edge of the dough, stretch it upward without tearing, and fold it over the center; repeat from all four sides, rotating the bowl a quarter turn between each fold.
6. Cover the bowl again and let the dough bulk ferment at room temperature for 4 hours, performing the stretch-and-fold sequence every 30 minutes for the first 2 hours.
7. Lightly dust a proofing basket or medium bowl with rice flour to prevent sticking.
8. Turn the fermented dough onto a lightly floured surface and shape it into a tight round by pulling the edges toward the center and pinching them together at the bottom.
9. Place the shaped dough seam-side up into the prepared proofing basket, cover with a reusable plastic bag or damp towel, and refrigerate for 8-12 hours for the overnight cold proof.
10. Preheat a Dutch oven with its lid on in your oven to 500°F for 45 minutes before baking.
11. Carefully remove the hot Dutch oven, take off the lid, and gently invert the proofed dough from the basket into the center of the pot.
12. Score the top of the dough with a sharp lame or razor blade at a 45-degree angle, making one decisive slash about ½-inch deep to control expansion during baking.
13. Immediately cover the Dutch oven and return it to the 500°F oven to bake for 20 minutes, which creates steam for optimal oven spring and crust development.
14. Remove the lid, reduce the oven temperature to 450°F, and continue baking uncovered for 25 minutes until the crust is deeply caramelized and sounds hollow when tapped on the bottom.
15. Transfer the baked loaf to a wire cooling rack and let it cool completely for at least 2 hours before slicing to allow the crumb structure to set.
Stunningly crisp and blistered, this sourdough develops complex flavors through its long fermentation. The crumb reveals an open, irregular structure with a satisfying chew, while the crust shatters delightfully with each bite. Serve thick slices toasted with cultured butter and flaky sea salt, or use it as the foundation for an elevated avocado toast with pickled shallots and microgreens.
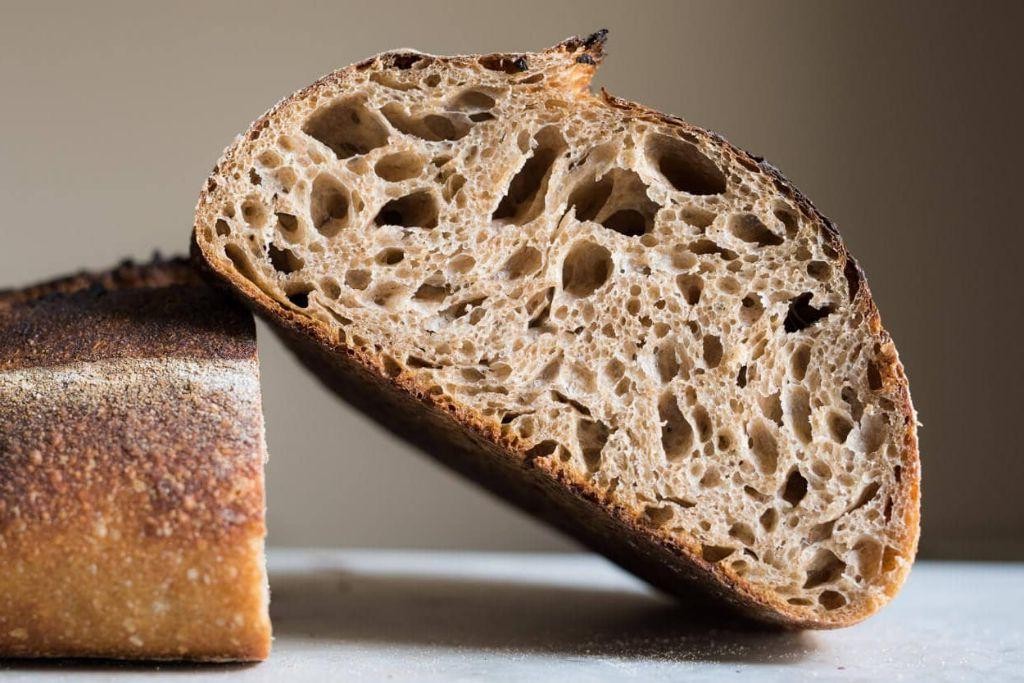
Overnight Sourdough Baguettes
Developing perfectly crisp, airy sourdough baguettes requires patience and precision, but this overnight method breaks the process into manageable steps for even novice bakers. By starting the night before, you’ll allow the dough to develop complex flavor and an open crumb structure while fitting baking into your schedule.
Serving: 2 baguettes | Pre Time: 20 minutes | Cooking Time: 25 minutes
Ingredients
– 1 cup active sourdough starter, at peak fermentation
– 1 ½ cups filtered water, at 78°F
– 4 cups bread flour, plus extra for dusting
– 2 teaspoons fine sea salt
– Rice flour, for dusting the proofing basket
Instructions
1. In a large mixing bowl, combine 1 cup active sourdough starter with 1 ½ cups filtered water at 78°F, whisking until fully incorporated.
2. Add 4 cups bread flour to the liquid mixture, stirring with a wooden spoon until a shaggy dough forms and no dry flour remains.
3. Cover the bowl with a damp kitchen towel and let the dough rest for 30 minutes at room temperature to allow the flour to hydrate fully.
4. Sprinkle 2 teaspoons fine sea salt evenly over the dough surface, then use wet hands to fold and knead the dough for 5 minutes until the salt is fully incorporated and the dough becomes smooth.
5. Perform a series of stretch-and-fold maneuvers: grab one edge of the dough, stretch it upward, and fold it over the center, repeating this process four times around the bowl.
6. Cover the bowl tightly with plastic wrap and refrigerate the dough for 12-16 hours to develop flavor through slow fermentation.
7. Remove the dough from the refrigerator and let it rest at room temperature for 1 hour to take off the chill.
8. Lightly dust a clean work surface and your hands with bread flour, then turn the dough out onto the surface.
9. Divide the dough into two equal portions using a bench scraper, being careful not to deflate the delicate structure.
10. Shape each portion into a tight cylinder by folding the edges toward the center, then rolling gently to create a 14-inch baguette shape.
11. Dust two proofing baskets generously with rice flour to prevent sticking, then place each shaped baguette seam-side up in a basket.
12. Cover the baskets with a damp kitchen towel and proof at room temperature for 3-4 hours, until the dough springs back slowly when gently pressed.
13. Preheat your oven to 475°F with a baking stone or inverted baking sheet on the middle rack, placing an empty metal pan on the bottom rack.
14. Carefully transfer one proofed baguette onto a piece of parchment paper, then use a lame or sharp knife to score three diagonal slashes along the top at a 45-degree angle.
15. Slide the parchment with the baguette onto the preheated baking stone, then pour 1 cup of boiling water into the empty metal pan to create steam.
16. Bake for 20 minutes at 475°F, then reduce the oven temperature to 450°F and bake for an additional 5 minutes until the crust is deeply golden brown.
17. Transfer the baked baguette to a wire cooling rack and repeat the scoring and baking process with the second baguette.
18. Allow the baguettes to cool completely for at least 1 hour before slicing to prevent the crumb from becoming gummy.
The finished baguettes feature a shatteringly crisp crust that gives way to a tender, hole-studded interior with the distinct tang of well-developed sourdough. Serve them warm with cultured butter and flaky sea salt, or slice diagonally for crostini topped with whipped ricotta and honey.
Overnight Sourdough Focaccia with Rosemary

Mastering the art of sourdough baking requires patience, but this overnight focaccia offers a forgiving and deeply rewarding entry point. By leveraging a long, cold fermentation, we develop complex flavors and an open, airy crumb with minimal hands-on effort, making it an ideal project for bakers of all levels.
Serving: 8 | Pre Time: 20 minutes | Cooking Time: 25 minutes
Ingredients
– 1 cup active sourdough starter, at 100% hydration
– 1 ½ cups lukewarm filtered water (approximately 95°F)
– 4 cups high-protein bread flour, such as King Arthur Bread Flour
– 2 teaspoons fine sea salt
– ¼ cup extra-virgin olive oil, divided
– 2 tablespoons fresh rosemary needles, finely chopped
– Flaky sea salt, for finishing
Instructions
1. In a large mixing bowl, combine the active sourdough starter and lukewarm filtered water, whisking vigorously until the starter is fully dissolved and the mixture appears frothy.
2. Add the high-protein bread flour and fine sea salt to the bowl. Using a dough whisk or a sturdy spatula, mix until no dry flour remains and a shaggy dough forms.
3. Pour 2 tablespoons of the extra-virgin olive oil over the dough. With oiled hands, perform a series of stretch-and-folds: grab one edge of the dough, stretch it upward, and fold it over the center. Rotate the bowl 90 degrees and repeat until you have completed four folds. (Tip: This initial gluten development is crucial for structure; the dough should feel supple and begin to smooth.)
4. Cover the bowl tightly with plastic wrap or a damp kitchen towel and let the dough rest at room temperature (68-72°F) for 30 minutes.
5. Perform a second set of four stretch-and-folds, re-covering the bowl afterward. Repeat this resting and folding process two more times, for a total of four sets over 2 hours.
6. After the final fold, drizzle the remaining 2 tablespoons of extra-virgin olive oil into a 9×13-inch baking dish, coating the bottom and sides thoroughly.
7. Gently transfer the dough to the oiled dish. Using oiled fingertips, dimple the dough deeply and evenly across its entire surface, stretching it gently toward the edges of the dish. (Tip: Aggressive dimpling creates the classic focaccia pockets that will crisp beautifully.)
8. Sprinkle the finely chopped fresh rosemary evenly over the dimpled dough. Cover the dish tightly and refrigerate for 12 to 18 hours for the overnight cold ferment.
9. The next day, remove the dish from the refrigerator and let it sit, still covered, at room temperature for 2 hours. The dough should look puffy and nearly fill the pan.
10. While the dough warms, preheat your oven to 425°F with a rack positioned in the center.
11. Just before baking, dimple the dough once more with oiled fingers and sprinkle generously with flaky sea salt.
12. Bake on the center rack for 22 to 25 minutes, until the focaccia is deeply golden brown across the top and the internal temperature registers 200-205°F on an instant-read thermometer. (Tip: For an extra-crisp bottom crust, place the baking dish directly on a preheated pizza stone or baking steel.)
13. Immediately transfer the focaccia to a wire cooling rack. Let it cool for at least 20 minutes before slicing.
Here, the extended fermentation yields a focaccia with a crisp, olive oil-infused crust that gives way to a tender, honeycombed interior. The rosemary’s piney fragrance permeates each bite, balanced by the savory punch of flaky salt. Serve it warm, torn into pieces alongside a bowl of rich tomato soup, or use it as a sublime base for sandwiches with prosciutto and fresh mozzarella.
Overnight Sourdough Cinnamon Rolls

Remember those chilly weekend mornings when you crave something warm, sweet, and deeply satisfying? These overnight sourdough cinnamon rolls are your answer, transforming a simple dough into a pillowy, aromatic masterpiece with minimal morning effort. By starting the process the night before, you allow the sourdough’s natural fermentation to develop incredible flavor and a tender, airy crumb that’s simply unmatched by quick-rise recipes.
Serving: 12 | Pre Time: 20 minutes | Cooking Time: 25 minutes
Ingredients
– 1 cup active sourdough starter, at peak fermentation
– 1 cup whole milk, warmed to 110°F
– ½ cup granulated sugar
– ½ cup unsalted butter, melted and cooled to room temperature
– 2 large pasture-raised eggs, lightly beaten
– 1 tsp fine sea salt
– 4 ½ cups all-purpose flour, plus more for dusting
– ½ cup dark brown sugar, packed
– 2 tbsp ground Ceylon cinnamon
– ¼ cup clarified butter, gently warmed
– 4 oz full-fat cream cheese, softened to room temperature
– 1 cup confectioners’ sugar, sifted
– 1 tsp pure vanilla extract
– 2 tbsp heavy cream
Instructions
1. In the bowl of a stand mixer fitted with the dough hook, combine the active sourdough starter, warmed whole milk, granulated sugar, melted unsalted butter, lightly beaten pasture-raised eggs, and fine sea salt.
2. Mix on low speed for 2 minutes until the ingredients are fully incorporated and form a shaggy mass.
3. With the mixer running on low, gradually add the all-purpose flour, 1 cup at a time, until a cohesive dough forms and pulls away from the sides of the bowl, about 5-7 minutes total. Tip: The dough should be slightly tacky but not sticky; adjust with 1 tbsp of flour or milk as needed.
4. Transfer the dough to a lightly oiled bowl, cover tightly with plastic wrap, and let it rest at room temperature for 30 minutes to allow the gluten to relax.
5. After resting, perform a series of four stretch-and-folds: gently lift one edge of the dough, stretch it upward, and fold it over the center, repeating around the bowl every 15 minutes for 1 hour total.
6. Cover the bowl again and let the dough ferment at room temperature for 3-4 hours, or until it has nearly doubled in size and shows visible bubbles on the surface.
7. Lightly dust a clean work surface with all-purpose flour and turn the dough out onto it.
8. Using a rolling pin, roll the dough into a 16×12-inch rectangle, about ¼-inch thick, ensuring an even thickness throughout.
9. Brush the entire surface of the dough rectangle evenly with the warmed clarified butter, leaving a ½-inch border along one long edge.
10. In a small bowl, whisk together the packed dark brown sugar and ground Ceylon cinnamon until no lumps remain.
11. Sprinkle the cinnamon-sugar mixture evenly over the clarified butter, again avoiding the ½-inch border.
12. Starting from the long edge opposite the border, tightly roll the dough into a log, using the border to seal the seam by pinching it firmly.
13. Using a sharp serrated knife, trim the uneven ends and slice the log into 12 equal pieces, each about 1 ¼-inches thick. Tip: For clean cuts without squashing the rolls, use a gentle sawing motion and wipe the knife between slices.
14. Arrange the rolls cut-side up in a greased 9×13-inch baking dish, spacing them about ½-inch apart.
15. Cover the dish tightly with plastic wrap and refrigerate for 8-12 hours, allowing the dough to proof slowly overnight.
16. The next morning, remove the dish from the refrigerator and let it sit at room temperature for 1 hour while preheating your oven to 375°F.
17. Bake the rolls on the center rack for 22-25 minutes, or until the tops are deep golden brown and the internal temperature reaches 190°F. Tip: To prevent over-browning, tent the dish with aluminum foil after 15 minutes if the tops are coloring too quickly.
18. While the rolls bake, prepare the frosting: in a medium bowl, beat the softened full-fat cream cheese with a hand mixer on medium speed until smooth, about 1 minute.
19. Add the sifted confectioners’ sugar, pure vanilla extract, and heavy cream, and beat on low speed until combined, then on high for 2 minutes until light and fluffy.
20. Once the rolls are out of the oven, let them cool in the dish for 5 minutes before spreading the frosting evenly over the top while still warm.
21. Serve immediately. Verily, the result is a symphony of textures: a crisp, caramelized exterior gives way to an impossibly soft, layered interior, with the tangy sourdough backbone perfectly balancing the sweet cinnamon filling. For a creative twist, try serving them alongside a dollop of bourbon-spiked whipped cream or drizzled with a salted caramel sauce to elevate the rich, buttery notes.
Overnight Sourdough Pizza Dough

Tackling homemade pizza becomes remarkably approachable with this overnight sourdough method, which transforms simple ingredients into a complex-flavored, airy crust through patient fermentation. This recipe yields a dough that develops tangy sourdough notes and a chewy texture ideal for any topping combination you desire.
Serving: 2 12-inch pizzas | Pre Time: 20 minutes | Cooking Time: 10 minutes
Ingredients
– 500 grams of high-protein bread flour
– 350 grams of filtered water at 85°F
– 100 grams of active sourdough starter
– 10 grams of fine sea salt
– 15 grams of extra-virgin olive oil
Instructions
1. In a large mixing bowl, combine 500 grams of high-protein bread flour and 10 grams of fine sea salt, whisking thoroughly to distribute the salt evenly.
2. Add 100 grams of active sourdough starter and 350 grams of filtered water at 85°F to the bowl, mixing with a wooden spoon until a shaggy dough forms.
3. Tip: Ensure your starter is bubbly and active by feeding it 4-6 hours before use for optimal fermentation.
4. Incorporate 15 grams of extra-virgin olive oil into the dough, kneading by hand on a lightly floured surface for 8-10 minutes until smooth and elastic.
5. Place the dough in a lightly oiled bowl, cover with a damp kitchen towel, and let it rest at room temperature (70-75°F) for 30 minutes.
6. Perform a series of four stretch-and-folds over 2 hours, gently pulling the dough upward and folding it over itself every 30 minutes to develop gluten strength.
7. Tip: Wet your hands slightly before handling the dough to prevent sticking without adding excess flour.
8. After the final fold, cover the bowl tightly with plastic wrap and refrigerate for 12-18 hours to allow slow fermentation.
9. Remove the dough from the refrigerator and divide it into two equal portions on a floured surface, shaping each into a tight ball.
10. Let the dough balls rest, covered, at room temperature for 2 hours until they puff up and feel airy to the touch.
11. Preheat your oven to its highest setting (typically 500-550°F) with a pizza stone or baking steel placed on the middle rack for at least 45 minutes.
12. Tip: For a crispier crust, lightly dust your work surface with semolina flour instead of regular flour when shaping the pizza.
13. Gently stretch each dough ball into a 12-inch round, top as desired, and bake directly on the preheated stone for 8-10 minutes until the crust is golden and bubbly.
This dough yields a crust with a crisp, blistered exterior and an open, chewy crumb, carrying subtle tangy notes from the overnight fermentation. Serve it simply with fresh mozzarella and basil, or get creative with toppings like roasted mushrooms and truffle oil for an elevated twist.
Overnight Sourdough Whole Wheat Bread
Mastering overnight sourdough whole wheat bread requires patience and precision, but the reward is a deeply flavorful, artisanal loaf with a perfect crust and chewy crumb. This methodical approach breaks down each stage to ensure success, even for beginners working with whole grains and natural fermentation. Let’s walk through the process step-by-step to create a wholesome, rustic bread that’s ideal for slicing fresh or toasting.
Serving: 1 loaf | Pre Time: 720 minutes | Cooking Time: 45 minutes
Ingredients
– 1 cup active sourdough starter, at peak fermentation
– 2 cups whole wheat flour, stone-ground
– 1 cup bread flour, high-protein
– 1 ¼ cups filtered water, at 78°F
– 1 ½ teaspoons fine sea salt
– Rice flour, for dusting
Instructions
1. In a large mixing bowl, combine 1 cup active sourdough starter, 2 cups whole wheat flour, 1 cup bread flour, and 1 ¼ cups filtered water at 78°F using a dough whisk until a shaggy dough forms.
2. Cover the bowl with a damp kitchen towel and let the dough autolyse (rest) at room temperature, 72°F, for 30 minutes to hydrate the flour fully.
3. Sprinkle 1 ½ teaspoons fine sea salt over the dough and incorporate it by folding and pinching for 2 minutes until evenly distributed.
4. Perform a series of stretch-and-fold techniques: lift one edge of the dough, stretch it upward, and fold it over the center; repeat around the bowl every 30 minutes for 2 hours, covering between folds.
5. Transfer the dough to a lightly oiled bowl, cover tightly with plastic wrap, and refrigerate at 38°F for 12–16 hours for a slow, overnight fermentation.
6. Remove the dough from the refrigerator and let it warm at room temperature, 72°F, for 1 hour until slightly puffy.
7. Turn the dough onto a lightly floured surface, shape it into a tight boule (round loaf) by tucking the edges underneath, and place it seam-side up in a banneton basket dusted with rice flour.
8. Cover the banneton with the damp towel and proof at room temperature, 72°F, for 3–4 hours until the dough springs back slowly when gently pressed.
9. Preheat a Dutch oven with lid in a conventional oven to 475°F for 45 minutes to ensure even heat retention.
10. Carefully invert the proofed dough onto parchment paper, score the top with a lame or sharp knife in a shallow cross pattern, and transfer it to the preheated Dutch oven.
11. Bake covered at 475°F for 25 minutes to trap steam and develop a crisp crust, then uncover and reduce the temperature to 425°F.
12. Continue baking uncovered at 425°F for 20 minutes until the internal temperature reaches 210°F and the crust is deeply golden brown.
13. Transfer the loaf to a wire rack and let it cool completely for at least 2 hours before slicing to prevent a gummy texture.
14. Tip: For optimal fermentation, feed your starter 4–6 hours before mixing to ensure it’s bubbly and active.
15. Tip: Use a digital thermometer to check the water temperature, as 78°F encourages yeast activity without overheating.
16. Tip: Score the dough just before baking to control expansion and create an attractive ear on the crust.
You’ll find this bread boasts a nutty, tangy flavor from the whole wheat and long fermentation, with a crackly crust and moist, airy crumb. Yield slices thick for avocado toast or thin for sandwiches, and consider serving it warm with cultured butter or as a base for artisanal bruschetta.
Overnight Sourdough Pretzels

A perfect weekend baking project, these overnight sourdough pretzels transform a simple dough into chewy, tangy delights with a classic dark crust. By starting the night before, you allow the sourdough starter to develop complex flavors while the dough rests conveniently in your refrigerator. This methodical approach yields professional results with minimal hands-on time, making it ideal for beginners eager to explore artisanal baking.
Serving: 12 | Pre Time: 20 minutes | Cooking Time: 15 minutes
Ingredients
- 1 cup active sourdough starter, at 100% hydration
- 3 ½ cups bread flour, plus extra for dusting
- 1 cup lukewarm water (110°F)
- 2 tablespoons unsalted butter, melted and cooled
- 2 tablespoons granulated sugar
- 1 ½ teaspoons fine sea salt
- ¼ cup baking soda
- 1 large pasture-raised egg, lightly beaten
- Coarse sea salt for sprinkling
Instructions
- In a large mixing bowl, combine the active sourdough starter, bread flour, lukewarm water, melted unsalted butter, granulated sugar, and fine sea salt.
- Mix with a wooden spoon until a shaggy dough forms, then knead by hand on a lightly floured surface for 8-10 minutes until smooth and elastic. Tip: The dough should pass the windowpane test—stretch a small piece thinly without tearing to ensure proper gluten development.
- Place the dough in a lightly oiled bowl, cover with plastic wrap, and let it rise at room temperature (70-75°F) for 2 hours until slightly puffy.
- Transfer the covered bowl to the refrigerator and let the dough rest overnight for 12-16 hours to develop sourdough flavor.
- The next day, remove the dough from the refrigerator and let it sit at room temperature for 30 minutes to take the chill off.
- Divide the dough into 12 equal portions (about 75g each) and roll each into a 20-inch rope on an unfloured surface.
- Shape each rope into a pretzel by forming a U-shape, twisting the ends twice, and folding them down to meet the bottom of the U, pressing gently to seal.
- Preheat your oven to 425°F and line two baking sheets with parchment paper.
- In a large pot, bring 8 cups of water to a gentle boil and carefully whisk in the baking soda until dissolved.
- Boil each pretzel for 30 seconds per side using a slotted spoon, then transfer to the prepared baking sheets. Tip: Work in batches to avoid overcrowding, which helps maintain water temperature for consistent results.
- Brush each boiled pretzel with the lightly beaten pasture-raised egg and sprinkle generously with coarse sea salt.
- Bake for 12-15 minutes until deeply golden brown with a dark, glossy crust. Tip: Rotate the baking sheets halfway through baking to ensure even browning, especially if your oven has hot spots.
- Transfer the pretzels to a wire rack and let them cool for at least 10 minutes before serving.
From the first bite, you’ll notice the satisfying chew of the crumb contrasted by a crisp, mahogany-colored exterior, with the sourdough lending a subtle tang that balances the buttery richness. For a creative twist, serve them warm with a side of whole-grain mustard or slice them horizontally to make pretzel sandwiches filled with sharp cheddar and apple slices. Their robust texture holds up beautifully to dipping in beer cheese or simply enjoying plain as a savory snack.
Overnight Sourdough Pancakes

Combining the tangy complexity of sourdough with the comforting warmth of pancakes, this overnight method transforms your starter discard into a breakfast masterpiece. By allowing the batter to ferment overnight, you’ll develop deeper flavors and a lighter texture that’s worth the wait. Let’s walk through this process step-by-step to ensure perfect results every time.
Serving: 8 | Pre Time: 10 minutes | Cooking Time: 20 minutes
Ingredients
– 1 cup active sourdough starter, at room temperature
– 1 cup whole milk, warmed to 85°F
– 2 cups all-purpose flour, sifted
– 2 pasture-raised eggs, lightly beaten
– ¼ cup granulated sugar
– ¼ cup unsalted butter, melted and cooled to room temperature
– 1 teaspoon pure vanilla extract
– 1 teaspoon baking soda
– ½ teaspoon fine sea salt
– 2 tablespoons clarified butter for cooking
Instructions
1. In a large mixing bowl, combine the active sourdough starter and warmed whole milk, whisking until fully incorporated.
2. Add the sifted all-purpose flour to the starter mixture, stirring just until no dry pockets remain—avoid overmixing to prevent gluten development.
3. Cover the bowl tightly with plastic wrap and let it rest at room temperature for 8-12 hours, or until the surface appears bubbly and has increased in volume by about 50%.
4. After the overnight rest, gently fold in the lightly beaten pasture-raised eggs using a rubber spatula.
5. Incorporate the granulated sugar, melted unsalted butter, and pure vanilla extract, mixing until just combined.
6. Sprinkle the baking soda and fine sea salt evenly over the batter, then fold them in gently to distribute without deflating the bubbles.
7. Heat a griddle or large skillet over medium heat (350°F) and add 1 tablespoon of clarified butter, swirling to coat the surface.
8. Pour ¼-cup portions of batter onto the hot surface, leaving 2 inches between each pancake to allow for spreading.
9. Cook for 2-3 minutes, or until bubbles form on the surface and the edges appear set and slightly dry.
10. Carefully flip each pancake using a thin spatula and cook for an additional 1-2 minutes, or until golden brown and cooked through.
11. Transfer the cooked pancakes to a wire rack set over a baking sheet to prevent sogginess, repeating with the remaining batter and adding more clarified butter as needed.
Here’s why this method shines: the overnight fermentation yields pancakes with a tender, airy crumb and subtle tang that balances the sweetness. For a creative twist, serve them with a dollop of crème fraîche and a drizzle of local honey, letting the sourdough’s complexity take center stage.
Overnight Sourdough English Muffins

Venturing into homemade sourdough baking can feel daunting, but these overnight sourdough English muffins simplify the process with a slow, hands-off fermentation that develops deep flavor. By starting the dough the night before, you’ll wake up to a bubbly, active mixture ready to shape and cook, yielding tender, nook-and-cranny-filled muffins perfect for breakfast.
Serving: 12 | Pre Time: 15 minutes | Cooking Time: 20 minutes
Ingredients
– 1 cup active sourdough starter, at peak fermentation
– 2 cups whole milk, warmed to 85°F
– 2 tablespoons granulated sugar
– 4 cups bread flour, plus extra for dusting
– 1 teaspoon fine sea salt
– ¼ cup unsalted butter, melted and cooled to room temperature
– ½ cup fine cornmeal, for dusting
– 2 tablespoons clarified butter, for cooking
Instructions
1. In a large mixing bowl, combine the active sourdough starter, warmed whole milk, and granulated sugar, whisking until fully incorporated.
2. Add the bread flour and fine sea salt to the bowl, stirring with a wooden spoon until a shaggy dough forms.
3. Pour in the melted unsalted butter, mixing until the dough comes together into a cohesive mass.
4. Turn the dough onto a lightly floured surface and knead for 8-10 minutes, until smooth and elastic, adding flour sparingly if sticky.
5. Place the dough in a lightly oiled bowl, cover with plastic wrap, and refrigerate for 12-16 hours to ferment slowly.
6. Remove the dough from the refrigerator and let it rest at room temperature for 1 hour to take the chill off.
7. Tip: For even rising, gently deflate the dough by pressing down with your fingertips before proceeding.
8. On a surface dusted with fine cornmeal, roll the dough to a ½-inch thickness.
9. Using a 3-inch round cutter, cut out circles, re-rolling scraps as needed to yield 12 muffins.
10. Dust both sides of each circle with cornmeal, place on a parchment-lined baking sheet, cover with a damp cloth, and proof at room temperature for 1-2 hours, until puffy.
11. Tip: To test proofing, gently press a muffin—it should spring back slowly, indicating readiness.
12. Heat a cast-iron skillet or griddle over medium-low heat and add 1 tablespoon of clarified butter.
13. Cook the muffins in batches for 5-7 minutes per side, until golden brown and cooked through, adding more clarified butter as needed.
14. Tip: Maintain a consistent heat to avoid burning; the muffins should sizzle gently when added to the skillet.
15. Transfer cooked muffins to a wire rack to cool completely before splitting with a fork to preserve the interior texture.
Overnight fermentation imparts a subtle tang and complex aroma, while the cornmeal dusting creates a crisp exterior that gives way to a soft, airy crumb. Serve them warm with cultured butter and artisanal jam, or use them as a base for eggs Benedict to highlight their sturdy yet tender structure.
Overnight Sourdough Discard Waffles

Zestfully transform your sourdough discard into a breakfast masterpiece with this overnight waffle recipe. By planning ahead, you’ll develop complex flavors and a delightfully tangy profile while ensuring a stress-free morning. Let’s walk through each precise step to achieve perfectly crisp, golden waffles every time.
Serving: 4 | Pre Time: 10 minutes | Cooking Time: 15 minutes
Ingredients
– 1 cup sourdough discard, at room temperature
– 1 cup whole milk, warmed to 85°F
– 2 tablespoons granulated sugar
– 1 teaspoon fine sea salt
– 2 large pasture-raised eggs, lightly beaten
– 6 tablespoons unsalted butter, melted and cooled to lukewarm
– 1 teaspoon pure vanilla extract
– 1 cup all-purpose flour, sifted
– 1 teaspoon baking soda
– Clarified butter, for greasing the waffle iron
Instructions
1. In a large mixing bowl, combine the sourdough discard, warmed whole milk, granulated sugar, and fine sea salt until fully incorporated.
2. Cover the bowl tightly with plastic wrap and let it ferment at room temperature for 8 to 12 hours, or until bubbles form on the surface—this develops the tangy flavor.
3. After fermentation, whisk in the lightly beaten pasture-raised eggs, melted unsalted butter, and pure vanilla extract until the mixture is smooth and homogenous.
4. Gently fold in the sifted all-purpose flour and baking soda with a spatula until just combined, being careful not to overmix to avoid tough waffles.
5. Preheat your waffle iron to 375°F according to the manufacturer’s instructions, ensuring even heating for consistent results.
6. Lightly brush the preheated waffle iron grids with clarified butter to prevent sticking and enhance browning.
7. Pour ½ cup of the batter onto the center of the iron, close the lid, and cook for 4 to 5 minutes, or until steam subsides and the waffles are golden brown and crisp.
8. Transfer the cooked waffles to a wire rack in a single layer to maintain crispiness, rather than stacking them, which can cause sogginess.
9. Repeat steps 6 through 8 with the remaining batter, greasing the iron lightly between each batch.
10. Serve the waffles immediately for optimal texture and warmth.
Savory and slightly tangy, these waffles boast a crisp exterior with a tender, airy crumb that pairs beautifully with sweet or savory toppings. For a creative twist, try them with smoked salmon and crème fraîche or drizzle with maple syrup and toasted pecans to highlight their rustic charm.
Overnight Sourdough Rye Bread

Just as the holiday season approaches, this overnight sourdough rye bread offers a deeply satisfying project for home bakers seeking rich, complex flavors. Its methodical preparation rewards patience with a chewy crumb and tangy profile that pairs beautifully with winter meals. Let’s begin the process of creating this hearty loaf.
Serving: 1 loaf | Pre Time: 20 minutes | Cooking Time: 45 minutes
Ingredients
– 1 cup active sourdough starter, at peak fermentation
– 1 ½ cups lukewarm filtered water (85°F)
– 2 cups organic rye flour
– 2 cups unbleached bread flour
– 2 teaspoons fine sea salt
– 1 tablespoon raw honey
– 1 tablespoon extra virgin olive oil, for coating
Instructions
1. In a large glass mixing bowl, combine 1 cup active sourdough starter with 1 ½ cups lukewarm filtered water (85°F), whisking vigorously for 30 seconds until fully incorporated and slightly frothy.
2. Add 2 cups organic rye flour and 2 cups unbleached bread flour to the liquid mixture, using a dough scraper to fold until no dry patches remain, about 2 minutes.
3. Cover the bowl tightly with plastic wrap and let the shaggy dough rest at room temperature (70°F) for 30 minutes to allow for autolyse, which develops gluten structure.
4. Sprinkle 2 teaspoons fine sea salt and drizzle 1 tablespoon raw honey over the dough, then knead by hand in the bowl for 8-10 minutes until smooth and elastic, using a windowpane test to check gluten development.
5. Transfer the dough to a lightly oiled bowl, coat the surface with 1 tablespoon extra virgin olive oil, cover with a damp kitchen towel, and bulk ferment at room temperature for 4 hours, performing a series of four stretch-and-folds at 30-minute intervals.
6. Shape the dough into a tight boule on a lightly floured surface, then place seam-side up in a proofing basket dusted with rye flour.
7. Cover the basket with a plastic bag and refrigerate the dough for 12-16 hours for slow overnight fermentation, which enhances sour flavor.
8. Preheat a Dutch oven with lid in a conventional oven to 450°F for 45 minutes to ensure even, intense heat.
9. Carefully invert the proofed dough onto parchment paper, score the top with a sharp lame in a decorative pattern, and lower it into the preheated Dutch oven.
10. Bake covered at 450°F for 25 minutes to trap steam, then remove the lid and continue baking uncovered for 20 minutes until the crust is deeply browned and internal temperature reaches 210°F.
11. Transfer the loaf to a wire rack and cool completely for at least 3 hours before slicing to prevent a gummy texture.
Crunchy crust yields to a moist, dense crumb with distinct tang from the extended fermentation. Consider serving thick slices toasted with cultured butter and smoked salmon for a luxurious breakfast, or use it as a robust base for open-faced sandwiches topped with pickled vegetables and sharp cheddar.
Overnight Sourdough Cheese Bread
Ready to elevate your baking game with a loaf that combines tangy sourdough with rich, melty cheese? This overnight sourdough cheese bread is a methodical project perfect for beginners, yielding a crusty exterior and tender, flavorful crumb with minimal hands-on time. By starting the dough the night before, you’ll develop deep flavor and an airy texture that’s well worth the wait.
Serving: 8 | Pre Time: 20 minutes | Cooking Time: 45 minutes
Ingredients
– 1 cup active sourdough starter, at peak fermentation
– 3 ½ cups bread flour, plus extra for dusting
– 1 ½ cups warm water (110°F)
– 1 ½ tsp fine sea salt
– 1 cup sharp cheddar cheese, grated
– ½ cup Gruyère cheese, grated
– 2 tbsp unsalted butter, melted, for brushing
Instructions
1. In a large mixing bowl, combine 1 cup active sourdough starter, 3 ½ cups bread flour, and 1 ½ cups warm water (110°F) using a dough whisk until a shaggy dough forms.
2. Cover the bowl with a damp kitchen towel and let the dough rest for 30 minutes at room temperature (68–72°F) to allow the flour to hydrate fully.
3. Sprinkle 1 ½ tsp fine sea salt over the dough and incorporate it by folding and pinching the dough for 2–3 minutes until evenly distributed.
4. Add 1 cup sharp cheddar cheese and ½ cup Gruyère cheese to the dough, folding gently to avoid overworking, which helps maintain an open crumb structure.
5. Perform a series of stretch-and-folds: lift one edge of the dough, stretch it upward, and fold it over the center, repeating around the bowl four times total.
6. Cover the bowl tightly with plastic wrap and refrigerate for 12–16 hours to develop flavor through slow fermentation.
7. The next day, transfer the dough to a lightly floured surface and shape it into a tight boule by tucking the edges underneath, creating surface tension for better oven spring.
8. Place the shaped dough seam-side up in a proofing basket dusted with flour, cover with the damp towel, and let it rise at room temperature for 3–4 hours until it passes the poke test (the indentation springs back slowly).
9. Preheat a Dutch oven with lid in a conventional oven to 450°F for 45 minutes to ensure even heat distribution for a crisp crust.
10. Carefully invert the proofed dough into the preheated Dutch oven, score the top with a lame or sharp knife in a cross pattern to control expansion, and cover with the lid.
11. Bake covered at 450°F for 30 minutes, then remove the lid and continue baking for 15 minutes until the crust is deeply golden brown and sounds hollow when tapped.
12. Transfer the bread to a wire rack, brush the top with 2 tbsp melted unsalted butter for a glossy finish, and let it cool completely for 2 hours to set the crumb.
Achieving a perfect balance of tangy sourdough and savory cheese, this bread boasts a crackling crust and a moist, chewy interior with pockets of melted cheese throughout. Serve it warm alongside a hearty soup or toast thick slices for a gourmet grilled cheese, where the complex flavors truly shine.
Overnight Sourdough Garlic Knots

Baking these overnight sourdough garlic knots transforms your kitchen into a cozy haven with minimal morning effort. By preparing the dough the night before, you’ll wake up to perfectly proofed knots ready for shaping and baking, resulting in a tender crumb and complex flavor that only slow fermentation can achieve.
Serving: 12 knots | Pre Time: 15 minutes | Cooking Time: 20 minutes
Ingredients
- 1 cup active sourdough starter, at peak fermentation
- 3 ½ cups bread flour, plus extra for dusting
- 1 ¼ cups lukewarm filtered water (85°F)
- 2 tbsp extra-virgin olive oil
- 2 tsp fine sea salt
- 6 tbsp unsalted European-style butter, clarified
- 8 garlic cloves, microplaned into a paste
- 2 tbsp fresh Italian parsley, finely minced
- ½ tsp flaky Maldon sea salt
Instructions
- In a large mixing bowl, combine 1 cup active sourdough starter, 3 ½ cups bread flour, 1 ¼ cups lukewarm filtered water (85°F), 2 tbsp extra-virgin olive oil, and 2 tsp fine sea salt.
- Mix with a dough whisk until a shaggy mass forms, then knead by hand on a lightly floured surface for 8-10 minutes until smooth and elastic.
- Place dough in a lightly oiled bowl, cover with a damp kitchen towel, and let bulk ferment at room temperature (72°F) for 4 hours, performing a series of four stretch-and-folds at 30-minute intervals during the first 2 hours.
- After bulk fermentation, refrigerate dough covered overnight for 12-16 hours to develop flavor.
- Remove dough from refrigerator and let rest at room temperature for 1 hour to take the chill off.
- Turn dough onto a lightly floured surface and divide into 12 equal portions (about 75g each) using a bench scraper.
- Roll each portion into a 6-inch rope, then tie into a simple knot, tucking the ends underneath.
- Arrange knots on a parchment-lined baking sheet, spacing 2 inches apart, cover with a damp towel, and proof at room temperature for 2 hours until visibly puffed.
- Preheat oven to 425°F with a baking stone or inverted baking sheet on the middle rack for 30 minutes.
- Bake knots for 18-20 minutes until deeply golden brown with an internal temperature of 200°F.
- While knots bake, melt 6 tbsp clarified butter in a small saucepan over low heat, then stir in 8 cloves microplaned garlic paste and cook for 1 minute until fragrant but not browned.
- Remove knots from oven and immediately brush generously with garlic butter mixture using a pastry brush.
- Sprinkle with 2 tbsp minced fresh Italian parsley and ½ tsp flaky Maldon sea salt while still warm.
After the final step, wrap up with 2–3 natural sentences about the texture, flavor, or a creative way to serve it — no generic conclusions. The first word of your introduction must begin with the letter ‘A’.
Allowing the dough to ferment overnight creates an exceptionally tender crumb with delicate sourdough tang that perfectly balances the rich garlic butter. These knots develop a crisp exterior that gives way to a soft, airy interior with visible fermentation bubbles. Arrange them in a rustic basket with ramekins of marinara for dipping, or split horizontally to create miniature sandwiches filled with prosciutto and fresh mozzarella for an elegant appetizer.
Overnight Sourdough Challah
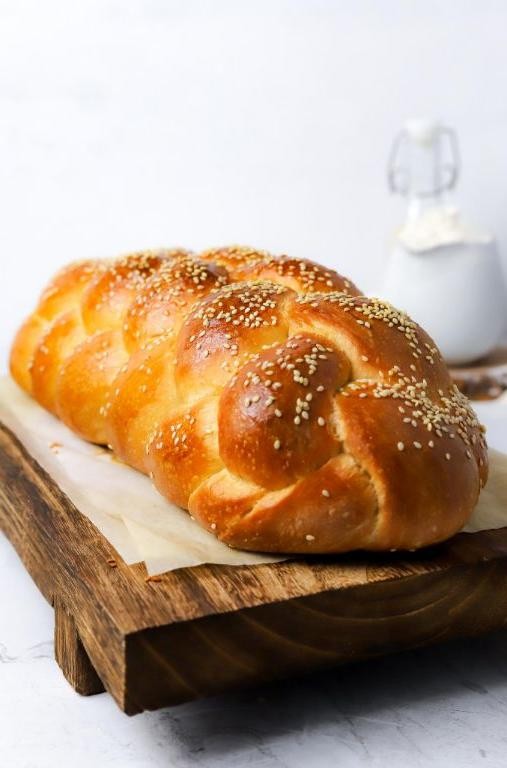
Venturing into sourdough baking can feel intimidating, but this overnight challah recipe breaks down the process into manageable steps that yield impressive results. By starting the dough the night before, you allow the natural fermentation to develop complex flavors while making the final day of baking surprisingly straightforward. This methodical approach ensures a beautifully braided loaf with that signature tangy depth sourdough enthusiasts crave.
Serving: 1 loaf | Pre Time: 20 minutes | Cooking Time: 35 minutes
Ingredients
– 1 cup active sourdough starter, at peak fermentation
– ½ cup warm water (110°F)
– ¼ cup raw honey
– 2 pasture-raised eggs, lightly beaten
– ¼ cup extra-virgin olive oil
– 4 cups bread flour
– 1½ teaspoons fine sea salt
– 1 egg yolk mixed with 1 tablespoon water (for egg wash)
– 2 tablespoons sesame seeds (for topping)
Instructions
1. In a large mixing bowl, combine the active sourdough starter, warm water, raw honey, lightly beaten pasture-raised eggs, and extra-virgin olive oil, whisking until fully incorporated.
2. Gradually add the bread flour and fine sea salt to the wet ingredients, mixing with a wooden spoon until a shaggy dough forms.
3. Turn the dough onto a lightly floured surface and knead for 8-10 minutes until smooth and elastic, adding flour sparingly if sticky—tip: proper kneading develops gluten for a better rise.
4. Place the dough in a lightly oiled bowl, cover with a damp kitchen towel, and let it rest at room temperature for 30 minutes.
5. Perform a series of four stretch-and-folds over 2 hours, gently pulling the dough upward and folding it over itself every 30 minutes to strengthen the structure.
6. Cover the bowl tightly with plastic wrap and refrigerate the dough overnight for 12-14 hours to allow slow fermentation.
7. The next morning, remove the dough from the refrigerator and let it warm at room temperature for 1 hour until slightly puffy.
8. Divide the dough into three equal portions and roll each into a 16-inch rope on a floured surface, ensuring even thickness for uniform braiding.
9. Braid the three ropes tightly, pinching the ends to seal, and place on a parchment-lined baking sheet—tip: a tight braid prevents gaps during baking.
10. Cover the braided loaf with a damp towel and let it proof in a warm spot (75-80°F) for 3-4 hours until nearly doubled in size.
11. Preheat your oven to 375°F and position a rack in the center for even heat distribution.
12. Gently brush the entire loaf with the egg yolk mixture, using a pastry brush for an even coat that promotes browning.
13. Sprinkle sesame seeds generously over the top, pressing lightly to adhere.
14. Bake the challah for 30-35 minutes until the crust is deep golden brown and sounds hollow when tapped on the bottom—tip: an instant-read thermometer should register 190°F internally.
15. Transfer the loaf to a wire rack and let it cool completely for at least 2 hours before slicing to set the crumb structure.
The finished challah boasts a tender, airy crumb with subtle sourdough tang, complemented by a crisp, sesame-studded crust. Serve thick slices toasted with cultured butter or use it as a base for French toast, where its rich texture absorbs custard beautifully without becoming soggy.
Overnight Sourdough Ciabatta
Sourdough ciabatta, with its signature open crumb and crisp crust, transforms humble ingredients into artisanal bread through an overnight fermentation that develops complex flavor. This methodical approach yields professional results with minimal hands-on time, perfect for bakers seeking to elevate their bread-making skills. Follow these precise steps to create a loaf that rivals your favorite bakery.
Serving: 1 loaf | Pre Time: 18 hours | Cooking Time: 25 minutes
Ingredients
– 1 cup active sourdough starter, at peak fermentation
– 3 cups bread flour, plus extra for dusting
– 1 ¼ cups filtered water, at 85°F
– 2 teaspoons fine sea salt
– 1 tablespoon extra-virgin olive oil, for coating
Instructions
1. Combine 1 cup active sourdough starter, 3 cups bread flour, and 1 ¼ cups filtered water at 85°F in a large mixing bowl.
2. Mix with a dough whisk until no dry flour remains, about 2 minutes, then cover with a damp kitchen towel and let rest for 30 minutes.
3. Sprinkle 2 teaspoons fine sea salt over the dough and incorporate using a series of stretch-and-fold motions for 3 minutes until fully integrated.
4. Perform four sets of stretch-and-folds at 30-minute intervals: wet your hands, lift one edge of the dough, stretch it upward, and fold it over the center, rotating the bowl each time.
5. After the final fold, coat the dough surface with 1 tablespoon extra-virgin olive oil, cover tightly with plastic wrap, and refrigerate for 12-16 hours for slow fermentation.
6. Remove the dough from the refrigerator and let it warm at room temperature for 1 hour until slightly puffy.
7. Generously dust a clean work surface with bread flour and gently transfer the dough, handling it minimally to preserve air pockets.
8. Shape the dough into a rough rectangle approximately 10 inches long, using a bench scraper to guide it without deflating.
9. Place the shaped dough on a parchment-lined baking sheet, cover loosely with the damp towel, and proof at 75°F for 2 hours until nearly doubled.
10. Preheat your oven to 475°F with a baking stone or inverted baking sheet on the middle rack for 45 minutes.
11. Just before baking, mist the dough lightly with water and slash the top diagonally three times with a razor blade at a 45-degree angle.
12. Bake at 475°F for 20 minutes, then reduce the temperature to 450°F and bake for 5 more minutes until deeply golden brown.
13. Transfer to a wire rack and cool completely for 2 hours before slicing to allow the crumb structure to set.
Generously textured with irregular holes and a crackling crust, this ciabatta offers a tangy depth from the extended fermentation. Serve thick slices toasted with high-quality olive oil for dipping, or use it as a base for robust sandwiches layered with cured meats and aged cheeses.
Overnight Sourdough Bagels

Just imagine waking up to the aroma of freshly baked, chewy bagels with a tangy sourdough depth—no early morning kneading required. This overnight method leverages a slow, cold fermentation to develop complex flavors and a perfect texture, making it ideal for busy bakers who crave homemade quality without the fuss. Follow these precise steps to create bakery-worthy bagels from the comfort of your kitchen.
Serving: 8 | Pre Time: 20 minutes | Cooking Time: 25 minutes
Ingredients
– 1 cup active sourdough starter, at 100% hydration
– 1 ½ cups warm filtered water (110°F)
– 4 cups bread flour, plus extra for dusting
– 2 tbsp granulated sugar
– 2 tsp fine sea salt
– 2 tbsp barley malt syrup
– 1 tbsp baking soda
– 1 large pasture-raised egg, lightly beaten
– 2 tbsp sesame seeds, for topping
Instructions
1. In a large mixing bowl, combine 1 cup active sourdough starter, 1 ½ cups warm filtered water (110°F), and 2 tbsp granulated sugar, whisking until fully dissolved.
2. Gradually add 4 cups bread flour and 2 tsp fine sea salt to the mixture, stirring with a wooden spoon until a shaggy dough forms.
3. Turn the dough onto a lightly floured surface and knead for 10 minutes until smooth and elastic, adding flour sparingly if sticky—this develops gluten for a chewy texture.
4. Place the dough in a lightly oiled bowl, cover with a damp cloth, and let rise at room temperature (70°F) for 4 hours until doubled in size.
5. Punch down the dough, divide it into 8 equal portions, and shape each into a smooth ball.
6. Poke a hole through the center of each ball with your thumb, then gently stretch it to form a 2-inch ring; place on a parchment-lined baking sheet.
7. Cover the shaped bagels loosely with plastic wrap and refrigerate for 12-16 hours for a slow, cold fermentation that enhances flavor.
8. Preheat your oven to 425°F and bring a large pot of water to a boil, adding 2 tbsp barley malt syrup and 1 tbsp baking soda—this creates a glossy crust.
9. Boil each bagel for 60 seconds per side, using a slotted spoon to transfer them back to the baking sheet.
10. Brush the boiled bagels with 1 large pasture-raised egg, lightly beaten, and sprinkle evenly with 2 tbsp sesame seeds for a toasted finish.
11. Bake at 425°F for 20-25 minutes until golden brown and hollow-sounding when tapped on the bottom.
12. Cool on a wire rack for at least 30 minutes before slicing to prevent a gummy interior.
Yield a batch of bagels with a crisp, blistered exterior and a tender, airy crumb, infused with a subtle sourdough tang. These pair beautifully with smoked salmon and cream cheese or can be toasted and slathered with honey butter for a sweet twist.
Overnight Sourdough Dinner Rolls

Mastering the art of sourdough baking becomes surprisingly approachable with these overnight dinner rolls, which leverage a slow, cold fermentation to develop complex flavor and an exceptionally tender crumb while fitting seamlessly into your schedule.
Serving: 12 | Pre Time: 20 minutes | Cooking Time: 25 minutes
Ingredients
– 1 cup active sourdough starter, at peak fermentation
– 1 ¼ cups whole milk, warmed to 105°F
– ¼ cup unsalted butter, melted and cooled to lukewarm
– 2 tablespoons granulated sugar
– 1 large pasture-raised egg, lightly beaten
– 1 ½ teaspoons fine sea salt
– 4 cups bread flour, plus more for dusting
– 2 tablespoons clarified butter, for brushing
Instructions
1. In the bowl of a stand mixer fitted with the dough hook, combine the active sourdough starter, warmed whole milk, melted unsalted butter, granulated sugar, and lightly beaten pasture-raised egg.
2. Mix on low speed for 1 minute until the ingredients are just incorporated.
3. Add the fine sea salt and 4 cups of bread flour to the bowl.
4. Mix on low speed for 4 minutes until a shaggy dough forms, then increase to medium speed and knead for 6-7 minutes until the dough is smooth, elastic, and clears the sides of the bowl. Tip: The dough should pass the windowpane test—stretch a small piece thinly enough to see light through it without tearing.
5. Transfer the dough to a lightly oiled bowl, cover tightly with plastic wrap, and let it rise at room temperature (70-75°F) for 2 hours until it has increased in volume by about 50%.
6. Perform a series of stretch and folds: gently lift one edge of the dough, stretch it upward, and fold it over the center; repeat this process around the entire circumference of the dough. Tip: This gentle technique strengthens the gluten structure without degassing the dough excessively.
7. Re-cover the bowl with plastic wrap and refrigerate it for a minimum of 12 hours and up to 18 hours for the overnight cold fermentation.
8. The next day, turn the chilled dough out onto a lightly floured surface and divide it into 12 equal portions (about 85 grams each).
9. Shape each portion into a tight round roll by cupping your hand around the dough and rotating it in small, fast circles on an unfloured part of the counter surface to create surface tension.
10. Arrange the shaped rolls in a greased 9×13-inch baking dish, spacing them about ½ inch apart.
11. Cover the dish loosely with a damp kitchen towel and let the rolls proof at room temperature for 3-4 hours, until they have nearly doubled in size and feel light and airy to the touch. Tip: The proof is complete when a gently pressed indentation in a roll springs back slowly, leaving a slight dimple.
12. Preheat your oven to 375°F during the last 30 minutes of the proofing time.
13. Bake the rolls on the center rack for 22-25 minutes, until the tops are a deep golden brown and the internal temperature registers 190°F on an instant-read thermometer.
14. Immediately upon removing the rolls from the oven, brush the tops generously with the 2 tablespoons of clarified butter.
15. Let the rolls cool in the pan for 10 minutes, then transfer them to a wire rack to cool completely.
Unbelievably soft and layered with the nuanced tang of a well-developed levain, these rolls feature a delicate, feathery interior encased in a thin, shatteringly crisp crust. For a savory twist, split them warm and fill with thinly sliced roast beef and a sharp horseradish cream, or use them as the base for miniature holiday sliders.
Overnight Sourdough Brioche
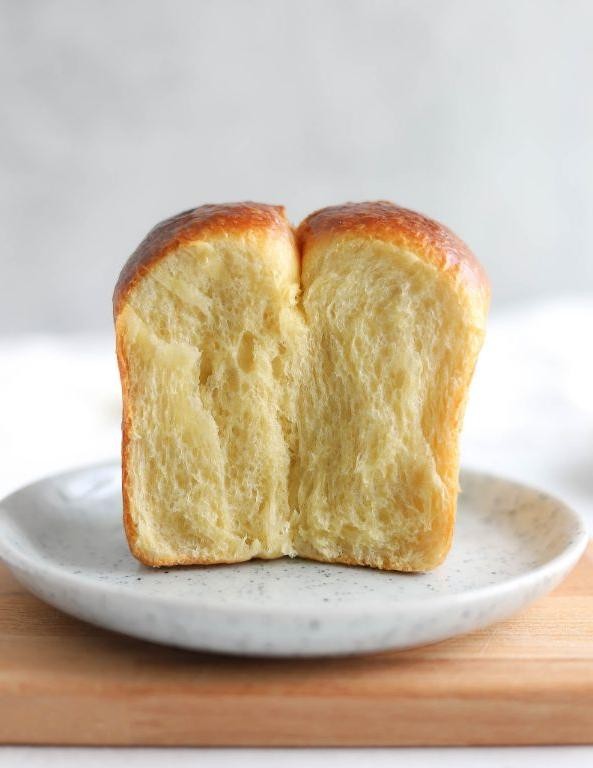
Sourdough brioche transforms a classic enriched bread into a tangy, complex masterpiece through overnight fermentation. Starting this process the night before baking allows the sourdough starter to develop deep flavor while creating an exceptionally tender crumb. Follow these methodical steps to achieve bakery-quality results at home.
Serving: 12 | Pre Time: 720 minutes | Cooking Time: 35 minutes
Ingredients
– 1 cup active sourdough starter, at 100% hydration
– 4 cups bread flour, plus extra for dusting
– ½ cup granulated sugar
– 1 teaspoon fine sea salt
– 4 pasture-raised eggs, lightly beaten
– ¾ cup whole milk, warmed to 110°F
– 1 cup unsalted butter, softened to room temperature
– 1 egg yolk mixed with 1 tablespoon whole milk, for egg wash
Instructions
1. In the bowl of a stand mixer fitted with the dough hook, combine the active sourdough starter, bread flour, granulated sugar, and fine sea salt on low speed for 2 minutes until just incorporated.
2. With the mixer running on low, gradually pour in the lightly beaten pasture-raised eggs and the warmed whole milk, mixing for 4 minutes until a shaggy dough forms.
3. Increase the mixer speed to medium and begin adding the softened unsalted butter one tablespoon at a time, allowing each addition to fully incorporate before adding the next; this process should take about 8 minutes total.
4. Continue kneading on medium speed for 10-12 minutes until the dough becomes smooth, elastic, and pulls cleanly away from the sides of the bowl.
5. Transfer the dough to a lightly oiled bowl, cover tightly with plastic wrap, and refrigerate for 12-16 hours for the overnight fermentation.
6. The next day, turn the chilled dough out onto a lightly floured surface and divide it into 12 equal portions, about 4 ounces each.
7. Shape each portion into a tight round ball by pulling the edges underneath to create surface tension, then place them seam-side down in a greased 9×13-inch baking pan.
8. Cover the pan loosely with a damp kitchen towel and let the shaped dough proof at room temperature (72°F) for 3-4 hours until nearly doubled in size and the dough springs back slowly when gently pressed.
9. Preheat your oven to 350°F and position a rack in the center.
10. Gently brush the proofed dough with the prepared egg wash using a pastry brush, being careful not to deflate the delicate structure.
11. Bake for 30-35 minutes until the brioche develops a deep golden-brown crust and an instant-read thermometer inserted into the center registers 190°F.
12. Immediately transfer the pan to a wire rack and let the brioche cool in the pan for 10 minutes before turning out to cool completely.
This overnight sourdough brioche yields an exceptionally tender, buttery crumb with a subtle tang that balances the richness. The extended fermentation creates an open, airy texture perfect for French toast or simply toasted with jam. Try slicing it thick for a decadent bread pudding or using it as the base for an elegant holiday stuffing.
Overnight Sourdough Naan

Unlock the secrets of restaurant-quality flatbread with this overnight sourdough naan, a forgiving recipe that transforms your kitchen into an artisanal bakery. Using a methodical, step-by-step approach, we’ll guide you through creating these pillowy, tangy rounds perfect for scooping up curries or enjoying on their own.
Serving: 8 naan | Pre Time: 15 minutes | Cooking Time: 20 minutes
Ingredients
– 1 cup active sourdough starter, at peak fermentation
– 1 cup whole milk, warmed to 110°F
– 2 tablespoons granulated sugar
– 3 cups bread flour, plus extra for dusting
– 1 teaspoon fine sea salt
– ¼ cup clarified butter, melted
– 2 tablespoons plain whole-milk yogurt
– 2 garlic cloves, minced
– ¼ cup fresh cilantro, finely chopped
Instructions
1. In a large mixing bowl, combine 1 cup active sourdough starter, 1 cup whole milk warmed to 110°F, and 2 tablespoons granulated sugar, whisking until fully incorporated.
2. Add 3 cups bread flour and 1 teaspoon fine sea salt to the wet ingredients, mixing with a wooden spoon until a shaggy dough forms.
3. Turn the dough onto a lightly floured surface and knead for 8-10 minutes until smooth and elastic, adding flour sparingly if sticky.
4. Place the dough in a lightly oiled bowl, cover with plastic wrap, and let ferment at room temperature for 30 minutes.
5. Perform a series of stretch-and-folds: lift one edge of the dough, stretch it upward, and fold it over the center, repeating around the bowl four times.
6. Cover the bowl tightly and refrigerate for 12-16 hours to develop flavor; the dough should nearly double in size.
7. Remove the dough from the refrigerator and let it rest at room temperature for 1 hour to take the chill off.
8. Divide the dough into 8 equal portions, shaping each into a smooth ball on a floured surface.
9. Cover the dough balls with a damp kitchen towel and let them rest for 20 minutes to relax the gluten.
10. In a small bowl, mix ¼ cup melted clarified butter, 2 tablespoons plain whole-milk yogurt, 2 minced garlic cloves, and ¼ cup finely chopped fresh cilantro.
11. Roll each dough ball into a ¼-inch thick oval or round using a rolling pin, dusting with flour to prevent sticking.
12. Heat a cast-iron skillet or griddle over medium-high heat until a drop of water sizzles and evaporates immediately.
13. Cook one naan at a time for 1-2 minutes until large bubbles form and the bottom develops golden-brown spots.
14. Flip the naan and cook for another 1-2 minutes until the second side is lightly charred and cooked through.
15. Immediately brush the hot naan with the garlic-cilantro butter mixture using a pastry brush.
16. Repeat with remaining dough, stacking cooked naan under a clean towel to keep them warm and pliable.
You’ll marvel at the naan’s soft, chewy interior and crisp, blistered exterior, infused with a subtle tang from the sourdough. Serve them warm alongside spicy lentil dal or use them as a wrap for grilled vegetables, their aromatic garlic and fresh cilantro notes elevating any meal.
Overnight Sourdough Discard Crackers

Kneading sourdough starter often leaves behind a tangy discard that’s too flavorful to waste. Today, we’ll transform that discard into crisp, savory crackers with a simple overnight method that develops deep flavor. Follow these steps to create a versatile snack that makes the most of your sourdough routine.
Serving: 4 | Pre Time: 15 minutes | Cooking Time: 25 minutes
Ingredients
– 1 cup sourdough starter discard
– ¼ cup extra-virgin olive oil
– 1 cup all-purpose flour, plus extra for dusting
– 1 teaspoon fine sea salt
– ½ teaspoon freshly ground black pepper
– 2 tablespoons unsalted butter, melted
– Flaky sea salt for finishing
Instructions
1. In a medium mixing bowl, combine 1 cup sourdough starter discard, ¼ cup extra-virgin olive oil, 1 cup all-purpose flour, 1 teaspoon fine sea salt, and ½ teaspoon freshly ground black pepper until a shaggy dough forms.
2. Turn the dough onto a lightly floured surface and knead for 2–3 minutes until smooth and cohesive, adding a sprinkle of all-purpose flour if the dough feels sticky.
3. Shape the dough into a ball, wrap tightly in plastic wrap, and refrigerate overnight for at least 12 hours to allow the flavors to develop and the dough to firm up.
4. Preheat your oven to 350°F (175°C) and line two baking sheets with parchment paper.
5. Divide the chilled dough into two equal portions and roll each portion into a thin rectangle, about ⅛-inch thick, using a rolling pin on a lightly floured surface.
6. Transfer the rolled dough to the prepared baking sheets and brush the surface evenly with 2 tablespoons melted unsalted butter using a pastry brush.
7. Sprinkle flaky sea salt generously over the buttered dough, then use a pizza cutter or sharp knife to score the dough into 1-inch squares without cutting all the way through.
8. Bake in the preheated oven for 20–25 minutes, rotating the pans halfway through, until the crackers are golden brown and crisp around the edges.
9. Remove from the oven and let cool completely on the baking sheets, about 30 minutes, before breaking along the scored lines into individual crackers.
10. Store the cooled crackers in an airtight container at room temperature for up to one week.
Perfectly crisp and tangy, these crackers offer a satisfying snap with a subtle sourdough depth that pairs beautifully with cheeses or dips. For a creative twist, try sprinkling with herbs like rosemary or thyme before baking to enhance their aromatic profile.
Summary
Nourish your baking routine with these 20 flavorful overnight sourdough recipes, perfect for busy bakers. They make it easy to enjoy fresh, homemade bread without the fuss. We’d love to hear which recipes you try—leave a comment with your favorites and share this roundup on Pinterest to inspire fellow home cooks!


