
Unwind after a hectic day with these 15 simple pantry recipes! We’ve gathered quick, comforting dinners that turn everyday staples into delicious meals—perfect for those busy nights when you need something satisfying without the fuss. Keep reading to discover easy, flavorful ideas that’ll make weeknight cooking a breeze.
Tomato and White Bean Soup

A cozy, creamy soup that’s ready in under 30 minutes—this Tomato and White Bean Soup is your new weeknight hero. Grab your pot and let’s get simmering.
Serving: 4 | Pre Time: 10 minutes | Cooking Time: 20 minutes
Ingredients
– 2 tbsp olive oil
– 1 medium yellow onion, diced
– 3 cloves garlic, minced
– 1 (28 oz) can crushed tomatoes
– 2 (15 oz) cans cannellini beans, drained and rinsed
– 4 cups vegetable broth
– 1 tsp dried oregano
– 1/2 tsp red pepper flakes
– 1/2 cup heavy cream
– Salt and black pepper to taste
– Fresh basil for garnish
Instructions
1. Heat 2 tbsp olive oil in a large pot over medium heat until shimmering, about 1 minute.
2. Add 1 diced yellow onion and cook, stirring frequently, until translucent and soft, about 5 minutes.
3. Stir in 3 minced garlic cloves and cook until fragrant, about 30 seconds—tip: avoid browning the garlic to prevent bitterness.
4. Pour in 1 can crushed tomatoes, 2 cans drained cannellini beans, 4 cups vegetable broth, 1 tsp dried oregano, and 1/2 tsp red pepper flakes.
5. Bring the mixture to a boil over high heat, then reduce to a simmer.
6. Cover the pot and simmer for 15 minutes, stirring occasionally to prevent sticking.
7. Remove the pot from heat and use an immersion blender to puree half the soup—tip: leave some beans whole for texture, blending for about 1 minute.
8. Stir in 1/2 cup heavy cream until fully incorporated.
9. Season with salt and black pepper to taste, starting with 1/2 tsp salt and adjusting as needed.
10. Ladle the soup into bowls and garnish with fresh basil leaves.
Fragrant and velvety, this soup balances tangy tomatoes with creamy beans for a rich, comforting bowl. Serve it with crusty bread for dipping, or top with a sprinkle of Parmesan for extra depth—it’s a versatile dish that’s perfect for chilly evenings.
Pantry Pasta with Garlic and Olive Oil
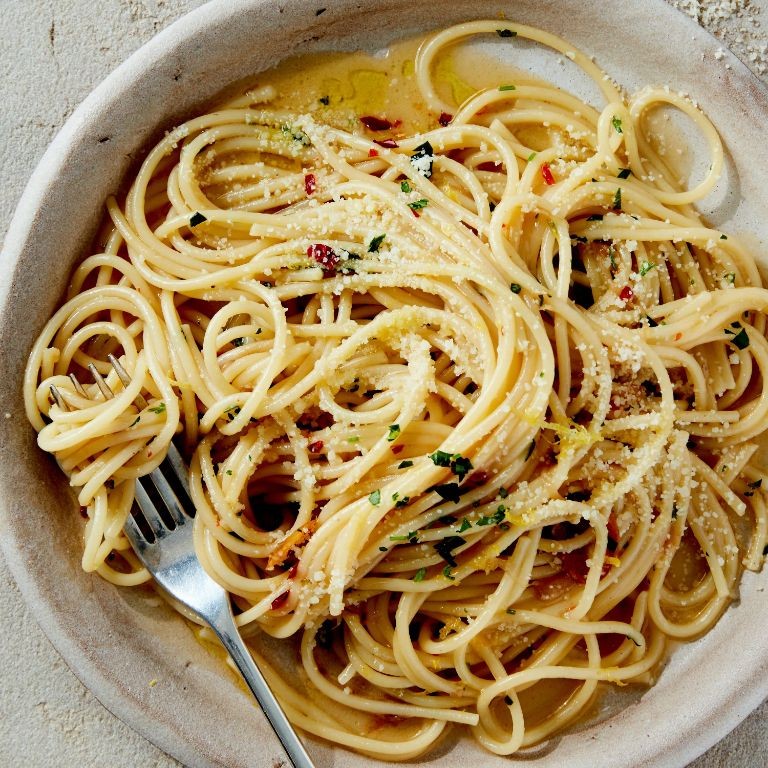
Tired of complicated recipes? Transform pantry staples into a garlicky masterpiece in minutes. This dish proves simple ingredients create bold flavor.
Serving: 4 | Pre Time: 5 minutes | Cooking Time: 15 minutes
Ingredients
– 1 lb dried spaghetti
– 1/2 cup extra virgin olive oil
– 8 cloves garlic
– 1 tsp red pepper flakes
– 1/2 cup grated Parmesan cheese
– 1/4 cup chopped fresh parsley
– 1 tsp kosher salt
Instructions
1. Bring a large pot of salted water to a rolling boil over high heat.
2. Add 1 lb dried spaghetti to the boiling water and cook for 9-11 minutes until al dente, stirring occasionally to prevent sticking.
3. While pasta cooks, thinly slice 8 cloves garlic.
4. Heat 1/2 cup extra virgin olive oil in a large skillet over medium-low heat for 2 minutes.
5. Add sliced garlic to the skillet and cook for 3-4 minutes, stirring constantly, until fragrant and lightly golden—watch closely to prevent burning.
6. Stir in 1 tsp red pepper flakes and cook for 30 seconds to infuse the oil.
7. Reserve 1 cup of pasta cooking water, then drain the spaghetti.
8. Immediately transfer the drained spaghetti to the skillet with the garlic oil.
9. Toss the pasta vigorously with tongs to coat every strand evenly in the oil.
10. Add 1/2 cup of the reserved pasta water and continue tossing for 1-2 minutes until the sauce emulsifies and clings to the pasta.
11. Remove the skillet from heat and stir in 1/2 cup grated Parmesan cheese until melted.
12. Fold in 1/4 cup chopped fresh parsley and 1 tsp kosher salt.
13. Serve immediately in warm bowls.
Glistening with garlic-infused oil, this pasta delivers a silky texture with a gentle heat from the pepper flakes. Top with extra Parmesan for a salty crunch, or pair it with a crisp white wine to cut through the richness.
Black Bean and Corn Quesadillas

Just when you think weeknight dinners can’t get any easier—these black bean and corn quesadillas prove you wrong. Jam-packed with flavor and ready in minutes, they’re the ultimate crowd-pleaser.
Serving: 4 | Pre Time: 10 minutes | Cooking Time: 15 minutes
Ingredients
– 1 (15-ounce) can black beans, rinsed and drained
– 1 cup frozen corn kernels
– 1 cup shredded Monterey Jack cheese
– 1/2 cup diced red onion
– 1/4 cup chopped fresh cilantro
– 1 teaspoon ground cumin
– 1/2 teaspoon chili powder
– 1/4 teaspoon salt
– 8 (8-inch) flour tortillas
– 2 tablespoons vegetable oil
– 1/2 cup sour cream
– 1/4 cup salsa
Instructions
1. In a medium bowl, combine the black beans, corn, Monterey Jack cheese, red onion, cilantro, cumin, chili powder, and salt.
2. Lay out four flour tortillas on a clean work surface.
3. Divide the bean mixture evenly among the tortillas, spreading it to within 1/2 inch of the edges.
4. Top each with a second tortilla and press down gently.
5. Heat 1 tablespoon of vegetable oil in a large skillet over medium heat until shimmering, about 2 minutes.
6. Place one quesadilla in the skillet and cook for 3–4 minutes, until the bottom is golden brown and crispy.
7. Carefully flip the quesadilla using a spatula and cook for another 3–4 minutes until the second side is golden brown and the cheese is melted.
8. Transfer the cooked quesadilla to a cutting board and repeat steps 5–7 with the remaining oil and quesadillas.
9. Let each quesadilla rest for 1 minute before slicing into wedges with a sharp knife or pizza cutter.
10. Serve immediately with sour cream and salsa on the side.
Let the crispy tortilla give way to a gooey, spiced filling that’s both hearty and fresh. The contrast of creamy beans, sweet corn, and melted cheese makes every bite irresistible—try drizzling with hot sauce or pairing with a simple avocado salad for an extra kick.
Canned Tomato and Basil Soup

A cozy classic gets a 15-minute glow-up. Transform pantry staples into a velvety, herb-kissed hug in a bowl—no fancy skills required. This canned tomato and basil soup delivers restaurant-quality flavor with zero fuss.
Serving: 4 | Pre Time: 5 minutes | Cooking Time: 10 minutes
Ingredients
– 2 tablespoons olive oil
– 1 medium yellow onion, diced
– 2 cloves garlic, minced
– 2 (14.5-ounce) cans crushed tomatoes
– 1 cup vegetable broth
– 1/2 cup heavy cream
– 1/4 cup fresh basil leaves, chopped
– 1 teaspoon granulated sugar
– 1/2 teaspoon dried oregano
– Salt and black pepper to taste
Instructions
1. Heat 2 tablespoons olive oil in a large pot over medium heat until shimmering, about 1 minute.
2. Add 1 diced yellow onion and cook, stirring frequently, until translucent and soft, 4–5 minutes.
3. Stir in 2 minced garlic cloves and cook until fragrant, 30 seconds—watch closely to prevent burning.
4. Pour in 2 cans crushed tomatoes and 1 cup vegetable broth, scraping the bottom of the pot to release any browned bits for extra flavor.
5. Add 1 teaspoon granulated sugar and 1/2 teaspoon dried oregano, then bring the mixture to a simmer over medium-high heat.
6. Reduce heat to medium-low, cover, and simmer for 8 minutes to meld flavors—the liquid should bubble gently.
7. Remove the pot from heat and stir in 1/2 cup heavy cream until fully incorporated.
8. Use an immersion blender directly in the pot to puree the soup until completely smooth, about 1 minute.
9. Stir in 1/4 cup chopped fresh basil, then season with salt and black pepper to taste.
10. Ladle the soup into bowls and serve immediately.
Ultra-silky with a bright tomato tang, this soup balances richness from the cream with the fresh pop of basil. Pair it with a grilled cheese sandwich for dunking, or swirl in a spoonful of pesto for an herbal kick—it’s versatile enough for a quick lunch or a cozy dinner centerpiece.
Peanut Butter and Oat Energy Bites

Packed with protein and perfect for on-the-go snacking, these no-bake energy bites deliver a sweet, nutty punch. Grab your food processor and get ready to blend up a batch that’ll keep you fueled all day. They’re gluten-free, vegan-friendly, and totally customizable.
Serving: 20 bites | Pre Time: 15 minutes | Cooking Time: 0 minutes
Ingredients
– 1 cup old-fashioned rolled oats
– ½ cup creamy peanut butter
– ⅓ cup honey
– ¼ cup ground flaxseed
– 1 tsp vanilla extract
– ¼ tsp salt
– ½ cup mini chocolate chips
Instructions
1. Combine 1 cup old-fashioned rolled oats, ½ cup creamy peanut butter, ⅓ cup honey, ¼ cup ground flaxseed, 1 tsp vanilla extract, and ¼ tsp salt in a large mixing bowl.
2. Stir the mixture vigorously with a spatula for 2–3 minutes until fully incorporated and a thick, sticky dough forms. Tip: If the dough feels too dry, add 1 tbsp of honey and mix again.
3. Fold in ½ cup mini chocolate chips until evenly distributed throughout the dough.
4. Scoop out 1-tbsp portions of the dough and roll them between your palms into smooth, round balls. Tip: Lightly dampen your hands with water to prevent sticking.
5. Arrange the rolled bites on a parchment-lined baking sheet or plate.
6. Place the baking sheet in the refrigerator and chill the bites for at least 30 minutes to firm up. Tip: For a firmer texture, freeze for 15 minutes before refrigerating.
7. Transfer the chilled bites to an airtight container.
8. Store the container in the refrigerator for up to 2 weeks.
Here’s how these bites come together: they’re chewy from the oats, rich from the peanut butter, and studded with melty chocolate chips. Try rolling them in shredded coconut or crushed nuts for extra crunch, or pack them in lunchboxes for a quick afternoon pick-me-up.
Quick and Easy Pancakes

Grab your skillet because these Quick and Easy Pancakes are about to become your new breakfast MVP. Forget complicated recipes—this one uses pantry staples for fluffy, golden results every single time. Let’s flip into it.
Serving: 8 pancakes | Pre Time: 5 minutes | Cooking Time: 10 minutes
Ingredients
– 1 cup all-purpose flour
– 2 tablespoons granulated sugar
– 2 teaspoons baking powder
– 1/2 teaspoon salt
– 1 cup milk
– 1 large egg
– 2 tablespoons unsalted butter, melted
– 1 teaspoon vanilla extract
– Cooking spray or extra butter for greasing
Instructions
1. Preheat a non-stick skillet or griddle over medium heat (350°F).
2. In a large bowl, whisk together 1 cup all-purpose flour, 2 tablespoons granulated sugar, 2 teaspoons baking powder, and 1/2 teaspoon salt.
3. In a separate bowl, whisk 1 cup milk, 1 large egg, 2 tablespoons melted unsalted butter, and 1 teaspoon vanilla extract until smooth.
4. Pour the wet ingredients into the dry ingredients and stir gently until just combined; a few lumps are fine to avoid tough pancakes.
5. Lightly grease the preheated skillet with cooking spray or extra butter.
6. Pour 1/4 cup of batter onto the skillet for each pancake, spacing them apart.
7. Cook for 2–3 minutes until bubbles form on the surface and the edges look set.
8. Flip each pancake carefully with a spatula and cook for another 1–2 minutes until golden brown on both sides.
9. Transfer cooked pancakes to a plate and repeat with remaining batter, greasing the skillet as needed between batches.
10. Serve immediately while warm.
Unbelievably fluffy and lightly sweet, these pancakes have a tender crumb that soaks up syrup perfectly. Stack them high with fresh berries and a drizzle of maple syrup, or get creative by folding chocolate chips into the batter before cooking. They’re so versatile, you’ll want to make them on repeat.
Rice and Lentil Pilaf
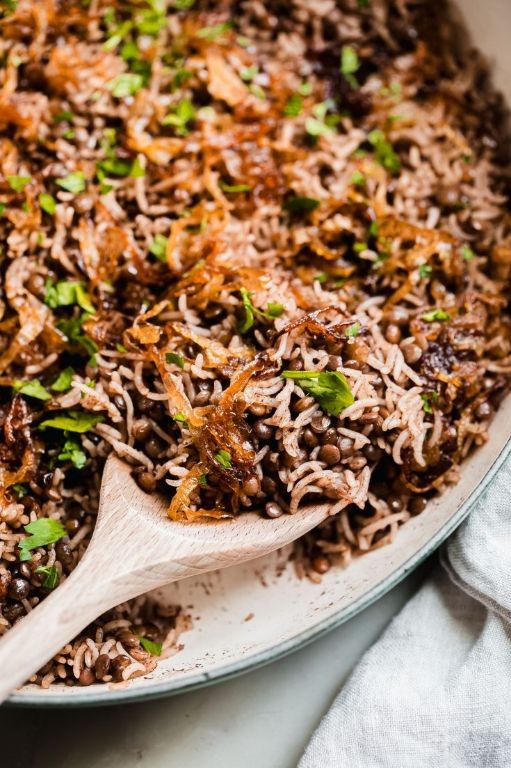
Let’s ditch the bland rice routine. This Rice and Lentil Pilaf packs protein and flavor into one pot—transform pantry staples into a hearty, satisfying meal in under an hour.
Serving: 4 | Pre Time: 10 minutes | Cooking Time: 35 minutes
Ingredients
– 1 tbsp olive oil
– 1 small yellow onion, diced
– 2 cloves garlic, minced
– 1 cup long-grain white rice
– 1/2 cup brown lentils
– 2 cups vegetable broth
– 1 tsp ground cumin
– 1/2 tsp smoked paprika
– 1/4 tsp black pepper
– 1/2 tsp salt
– 2 tbsp fresh parsley, chopped
Instructions
1. Heat 1 tbsp olive oil in a large skillet over medium heat until shimmering, about 2 minutes.
2. Add 1 diced small yellow onion and cook, stirring frequently, until translucent and soft, about 5 minutes.
3. Stir in 2 minced garlic cloves and cook until fragrant, about 30 seconds.
4. Add 1 cup long-grain white rice and 1/2 cup brown lentils to the skillet. Toast, stirring constantly, for 2 minutes to enhance nutty flavor.
5. Pour in 2 cups vegetable broth, 1 tsp ground cumin, 1/2 tsp smoked paprika, 1/4 tsp black pepper, and 1/2 tsp salt. Stir to combine.
6. Bring the mixture to a boil over high heat, then immediately reduce heat to low.
7. Cover the skillet tightly with a lid and simmer for 25 minutes. Do not lift the lid during cooking to prevent steam escape.
8. Remove the skillet from heat and let it sit, covered, for 10 minutes to allow the rice and lentils to fully absorb liquid and become tender.
9. Fluff the pilaf gently with a fork to separate grains without mashing.
10. Fold in 2 tbsp chopped fresh parsley just before serving for a bright, fresh finish.
Zesty and wholesome, this pilaf delivers fluffy rice with tender lentils in every bite. The smoky paprika and cumin create a warm, aromatic base that pairs perfectly with roasted vegetables or a simple green salad. For a creative twist, stuff it into bell peppers before baking at 375°F for 20 minutes.
Canned Tuna Pasta Bake
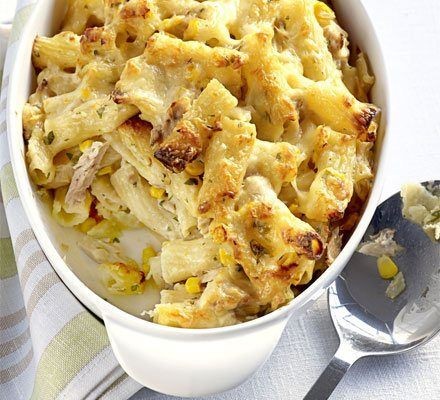
Pantry staples transform into a creamy, cheesy masterpiece in under an hour. This tuna pasta bake delivers ultimate comfort with minimal effort—perfect for hectic weeknights.
Serving: 6 | Pre Time: 15 minutes | Cooking Time: 35 minutes
Ingredients
- 12 ounces dried penne pasta
- 2 tablespoons olive oil
- 1 medium yellow onion, diced
- 2 cloves garlic, minced
- 2 (5-ounce) cans tuna in water, drained
- 1 (15-ounce) can crushed tomatoes
- 1 cup heavy cream
- 1 teaspoon dried oregano
- 1/2 teaspoon salt
- 1/4 teaspoon black pepper
- 2 cups shredded mozzarella cheese
- 1/4 cup grated Parmesan cheese
- 2 tablespoons chopped fresh parsley
Instructions
- Preheat your oven to 375°F.
- Bring a large pot of salted water to a rolling boil.
- Add the penne pasta to the boiling water and cook for 9 minutes, stirring occasionally. Tip: Cook the pasta 2-3 minutes less than the package directions for al dente texture, as it will continue cooking in the oven.
- Drain the pasta in a colander and set it aside.
- Heat the olive oil in a large skillet over medium heat for 1 minute.
- Add the diced onion to the skillet and cook for 5 minutes, stirring frequently, until softened and translucent.
- Add the minced garlic to the skillet and cook for 1 minute, stirring constantly, until fragrant.
- Add the drained tuna, crushed tomatoes, heavy cream, dried oregano, salt, and black pepper to the skillet.
- Stir the mixture thoroughly and bring it to a gentle simmer. Cook for 5 minutes, stirring occasionally. Tip: For a richer flavor, let the sauce simmer for an extra 2-3 minutes to slightly reduce.
- Remove the skillet from the heat.
- Add the drained pasta to the skillet and stir until the pasta is fully coated in the sauce.
- Transfer the pasta mixture to a 9×13-inch baking dish, spreading it into an even layer.
- Sprinkle the shredded mozzarella cheese evenly over the top of the pasta.
- Sprinkle the grated Parmesan cheese evenly over the mozzarella.
- Place the baking dish in the preheated oven and bake for 20 minutes. Tip: For a golden-brown top, switch the oven to broil for the final 2-3 minutes of baking, watching closely to prevent burning.
- Remove the baking dish from the oven and let it rest for 5 minutes.
- Sprinkle the chopped fresh parsley over the top before serving.
Warm from the oven, it boasts a perfectly creamy interior beneath a golden, bubbly cheese crust. The savory tuna and tomato base gets a delightful lift from the fresh parsley. Try serving it with a simple green salad dressed in lemon vinaigrette for a bright contrast.
Homemade Granola Bars

Make your snack game legendary with these homemade granola bars. They’re chewy, crunchy, and packed with flavor—no mystery ingredients, just pure deliciousness. Whip up a batch in minutes and say goodbye to store-bought bars forever.
Serving: 12 | Pre Time: 10 minutes | Cooking Time: 25 minutes
Ingredients
– 2 cups old-fashioned rolled oats
– 1 cup creamy peanut butter
– 1/2 cup honey
– 1/4 cup packed light brown sugar
– 1 tsp vanilla extract
– 1/2 tsp salt
– 1/2 cup mini chocolate chips
– 1/2 cup chopped almonds
Instructions
1. Preheat your oven to 350°F and line an 8×8-inch baking pan with parchment paper, letting the paper hang over the sides for easy removal.
2. Spread the rolled oats in a single layer on a rimmed baking sheet and toast them in the preheated oven for 10 minutes, stirring halfway through, until they are lightly golden and fragrant.
3. In a medium saucepan over medium heat, combine the peanut butter, honey, and brown sugar, stirring constantly with a rubber spatula for about 3-5 minutes until the mixture is smooth and just begins to bubble.
4. Remove the saucepan from the heat and immediately stir in the vanilla extract and salt until fully incorporated.
5. In a large mixing bowl, combine the toasted oats, chopped almonds, and mini chocolate chips, then pour the warm peanut butter mixture over the top.
6. Use the rubber spatula to fold everything together quickly and thoroughly until all the dry ingredients are evenly coated and no dry spots remain.
7. Transfer the mixture to the prepared baking pan and press it down firmly and evenly with the bottom of a measuring cup or your hands to compact it into a solid layer.
8. Bake the granola bars in the oven at 350°F for 15 minutes, then remove the pan and let it cool completely at room temperature for at least 2 hours to set properly.
9. Once completely cool, use the parchment paper overhang to lift the slab out of the pan, place it on a cutting board, and slice it into 12 even bars with a sharp knife.
10. Store the bars in an airtight container at room temperature for up to a week, or freeze them for longer storage.
Venture into snack perfection with bars that are perfectly chewy from the honey, with satisfying crunch from the almonds and oats. The rich peanut butter and melty chocolate chips make them irresistibly sweet and salty. Crumble one over yogurt for breakfast or pack them for an on-the-go energy boost—they’re endlessly versatile.
Pantry-Stuffed Bell Peppers
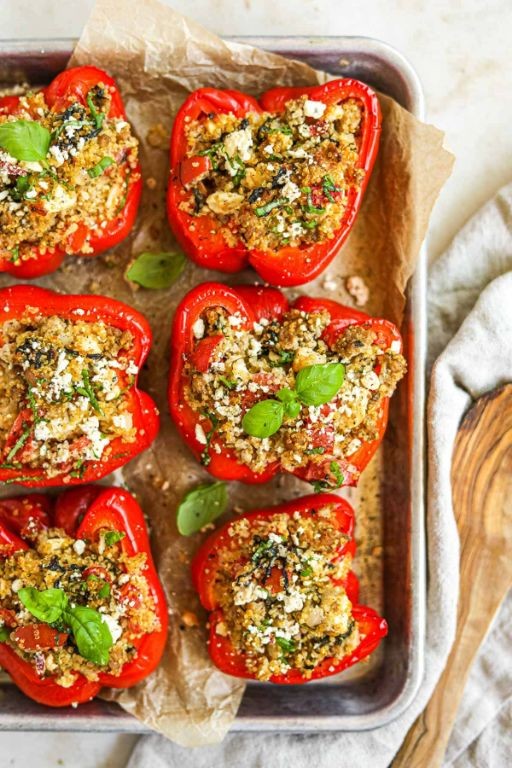
Let’s transform those pantry staples into a vibrant, satisfying meal. Pantry-stuffed bell peppers are your answer—no special trip required. They’re hearty, colorful, and packed with flavor.
Serving: 4 | Pre Time: 15 minutes | Cooking Time: 45 minutes
Ingredients
– 4 large bell peppers (any color)
– 1 tablespoon olive oil
– 1 medium onion, diced
– 2 cloves garlic, minced
– 1 (15-ounce) can black beans, rinsed and drained
– 1 (15-ounce) can diced tomatoes, undrained
– 1 cup cooked rice
– 1 teaspoon chili powder
– 1/2 teaspoon ground cumin
– 1/2 teaspoon salt
– 1 cup shredded cheddar cheese
Instructions
1. Preheat your oven to 375°F (190°C).
2. Slice the tops off the bell peppers and remove the seeds and membranes.
3. Place the hollowed peppers upright in a baking dish.
4. Heat the olive oil in a large skillet over medium heat for 1 minute.
5. Add the diced onion and cook for 5 minutes, stirring occasionally, until softened.
6. Add the minced garlic and cook for 1 minute until fragrant.
7. Stir in the black beans, diced tomatoes with their juices, cooked rice, chili powder, cumin, and salt.
8. Cook the mixture for 5 minutes, stirring frequently, until heated through and well combined.
9. Tip: For extra flavor, let the filling simmer for an additional 2-3 minutes to thicken slightly.
10. Spoon the filling evenly into the prepared bell peppers, pressing down gently.
11. Top each pepper with 1/4 cup of shredded cheddar cheese.
12. Cover the baking dish tightly with aluminum foil.
13. Bake at 375°F for 30 minutes.
14. Remove the foil and bake for an additional 15 minutes until the peppers are tender and the cheese is bubbly and golden brown.
15. Tip: Check doneness by piercing a pepper with a fork; it should slide in easily.
16. Let the stuffed peppers rest for 5 minutes before serving to set the filling.
17. Tip: For a crispy cheese topping, broil for the final 1-2 minutes, watching closely to prevent burning.
Now, enjoy these peppers hot from the oven. The bell peppers soften to a sweet, tender bite, contrasting with the hearty, spiced bean and rice filling. Serve them with a dollop of sour cream or a side salad for a complete, comforting meal that’s as easy as it is delicious.
Cornbread with Canned Corn

Make cornbread that actually tastes like corn. This recipe uses canned corn for sweet pops in every bite—no dry, crumbly stuff here. It’s the side dish upgrade your chili and soups have been begging for.
Serving: 8 | Pre Time: 10 minutes | Cooking Time: 25 minutes
Ingredients
– 1 cup all-purpose flour
– 1 cup yellow cornmeal
– 1/4 cup granulated sugar
– 1 tablespoon baking powder
– 1 teaspoon salt
– 1 cup buttermilk
– 1/3 cup vegetable oil
– 1 large egg
– 1 (15-ounce) can whole kernel corn, drained
Instructions
1. Preheat your oven to 400°F (200°C).
2. Grease an 8-inch square baking pan with butter or non-stick spray.
3. In a large bowl, whisk together 1 cup all-purpose flour, 1 cup yellow cornmeal, 1/4 cup granulated sugar, 1 tablespoon baking powder, and 1 teaspoon salt until fully combined.
4. In a separate medium bowl, whisk 1 cup buttermilk, 1/3 cup vegetable oil, and 1 large egg until smooth.
5. Pour the wet ingredients into the dry ingredients.
6. Gently fold the mixture with a spatula until just combined; do not overmix to keep the texture tender.
7. Fold in 1 (15-ounce) can whole kernel corn, drained, until evenly distributed.
8. Pour the batter into the prepared baking pan, spreading it evenly with the spatula.
9. Bake at 400°F for 20-25 minutes, or until a toothpick inserted into the center comes out clean and the top is golden brown.
10. Let the cornbread cool in the pan on a wire rack for 10 minutes before slicing.
Perfectly moist with a crisp, golden crust and sweet corn kernels in every slice. Serve it warm with a pat of butter melting on top, or crumble it into a bowl of chili for the ultimate cozy meal.
Quick Canned Tomato Sauce

Unlock a restaurant-quality sauce in under 30 minutes using pantry staples. This recipe transforms canned tomatoes into a rich, velvety base perfect for pasta, pizza, or dipping. Forget hours of simmering—bold flavors come together fast.
Serving: 4 | Pre Time: 5 minutes | Cooking Time: 20 minutes
Ingredients
– 2 tbsp olive oil
– 3 cloves garlic, minced
– 1 (28 oz) can crushed tomatoes
– 1 tsp dried oregano
– 1/2 tsp red pepper flakes
– 1 tsp salt
– 1/4 tsp black pepper
– 1 tbsp unsalted butter
– 1/4 cup fresh basil, chopped
Instructions
1. Heat 2 tbsp olive oil in a large saucepan over medium heat for 1 minute.
2. Add 3 cloves minced garlic and cook for 1 minute until fragrant, stirring constantly to prevent burning.
3. Pour in 1 (28 oz) can crushed tomatoes, using a spatula to scrape all contents from the can.
4. Stir in 1 tsp dried oregano, 1/2 tsp red pepper flakes, 1 tsp salt, and 1/4 tsp black pepper until fully combined.
5. Bring the sauce to a gentle boil, then immediately reduce heat to low.
6. Simmer uncovered for 15 minutes, stirring every 5 minutes to prevent sticking on the bottom.
7. Remove the saucepan from heat and stir in 1 tbsp unsalted butter until melted and fully incorporated.
8. Fold in 1/4 cup chopped fresh basil just before serving to maintain its bright color and flavor.
A silky, robust sauce with a subtle kick from the red pepper flakes coats pasta beautifully. Its balanced acidity and herbal notes make it ideal for topping homemade pizzas or as a dip for crusty bread. Try swirling a spoonful into soups or using it as a base for shakshuka for a creative twist.
Pantry-Friendly Chili
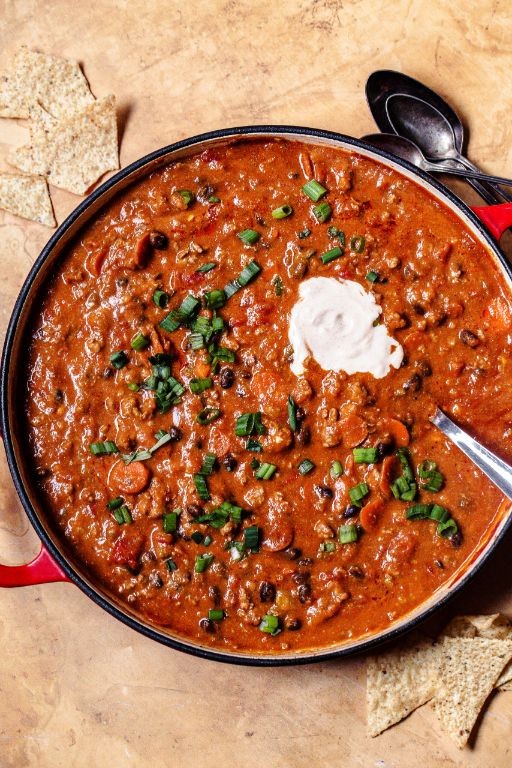
Whip up this cozy chili using just what’s in your cupboard—no grocery run required. It’s hearty, budget-friendly, and ready in under an hour. Perfect for a lazy weeknight or unexpected guests.
Serving: 6 | Pre Time: 10 minutes | Cooking Time: 45 minutes
Ingredients
– 1 tablespoon olive oil
– 1 medium yellow onion, diced
– 3 cloves garlic, minced
– 1 pound ground beef (85% lean)
– 2 tablespoons chili powder
– 1 teaspoon ground cumin
– 1 teaspoon smoked paprika
– 1/2 teaspoon dried oregano
– 1 (15-ounce) can kidney beans, drained and rinsed
– 1 (15-ounce) can black beans, drained and rinsed
– 1 (28-ounce) can crushed tomatoes
– 2 cups beef broth
– 1 teaspoon salt
– 1/2 teaspoon black pepper
– Optional toppings: shredded cheddar cheese, sour cream, chopped cilantro
Instructions
1. Heat 1 tablespoon olive oil in a large pot or Dutch oven over medium-high heat until shimmering, about 1 minute.
2. Add 1 diced yellow onion and cook, stirring occasionally, until softened and translucent, about 5 minutes.
3. Stir in 3 minced garlic cloves and cook until fragrant, about 30 seconds.
4. Add 1 pound ground beef, breaking it up with a wooden spoon, and cook until no pink remains, about 6–8 minutes.
5. Sprinkle in 2 tablespoons chili powder, 1 teaspoon ground cumin, 1 teaspoon smoked paprika, and 1/2 teaspoon dried oregano. Toast the spices with the meat for 1 minute to deepen their flavor—this enhances the chili’s richness.
6. Pour in 1 can crushed tomatoes, 2 cups beef broth, 1 can drained kidney beans, and 1 can drained black beans. Stir to combine.
7. Season with 1 teaspoon salt and 1/2 teaspoon black pepper, stirring well.
8. Bring the mixture to a boil, then reduce heat to low. Simmer uncovered for 30 minutes, stirring every 10 minutes to prevent sticking—this slow simmer melds the flavors beautifully.
9. After 30 minutes, check the consistency. If it’s too thin, simmer for an additional 5–10 minutes until thickened to your liking. For extra depth, let it sit off the heat for 10 minutes before serving.
10. Ladle into bowls and top with optional shredded cheddar cheese, sour cream, or chopped cilantro as desired.
Chunky beans and tender beef create a satisfying texture, while smoky spices deliver a warm, robust flavor. Serve it over baked potatoes or with cornbread for a comforting twist, and leftovers taste even better the next day.
Instant Noodle Stir-Fry

Just when you think instant noodles can’t get better, this stir-fry flips the script. Jazzed up with crisp veggies and a savory sauce, it’s a 15-minute upgrade that hits all the right notes. Forget boring bowls—this is a full-on flavor explosion in a pan.
Serving: 2 | Pre Time: 5 minutes | Cooking Time: 10 minutes
Ingredients
– 2 (3-ounce) packages instant ramen noodles, seasoning packets discarded
– 2 tablespoons vegetable oil
– 2 cloves garlic, minced
– 1/2 cup sliced bell pepper (any color)
– 1/2 cup shredded carrot
– 1/4 cup sliced green onions
– 2 tablespoons soy sauce
– 1 tablespoon oyster sauce
– 1 teaspoon sesame oil
– 1/4 teaspoon red pepper flakes (optional)
Instructions
1. Bring 4 cups of water to a boil in a medium pot over high heat.
2. Add the instant ramen noodles and cook for 2 minutes, stirring occasionally to separate.
3. Drain the noodles in a colander and rinse under cold water to stop cooking; set aside.
4. Heat the vegetable oil in a large skillet or wok over medium-high heat until shimmering, about 1 minute.
5. Add the minced garlic and cook for 30 seconds, stirring constantly to prevent burning.
6. Add the sliced bell pepper and shredded carrot; stir-fry for 3–4 minutes until crisp-tender.
7. Push the vegetables to the sides of the skillet, creating a well in the center.
8. Add the cooked noodles to the center and pour the soy sauce, oyster sauce, and sesame oil over them.
9. Toss everything together for 2 minutes, ensuring the noodles are evenly coated with sauce.
10. Sprinkle with sliced green onions and red pepper flakes (if using); toss for 30 seconds more.
11. Remove from heat and serve immediately.
Noodles emerge springy and slick, clinging to that umami-rich sauce with a subtle kick from the pepper flakes. The veggies stay crisp, adding a fresh crunch to every bite—try piling it into lettuce cups for a low-carb twist or topping with a fried egg for extra richness.
Summary
Effortless, delicious meals are just a pantry away! This roundup proves that with simple ingredients, you can whip up satisfying dinners any busy night. We hope these recipes make your evenings a little easier and a lot tastier. Give them a try, leave a comment with your favorite, and don’t forget to share this helpful list on Pinterest!


