Unlock the rich, buttery magic of pine nuts with these 17 savory recipes! Whether you’re craving a quick weeknight pasta, a show-stopping appetizer, or cozy comfort food, these tiny treasures add incredible depth and crunch. From classic pesto to innovative mains and sides, get ready to fall in love with pine nuts all over again. Let’s dive into these delicious ideas—your next favorite dish awaits!
Pesto Pasta with Toasted Pine Nuts
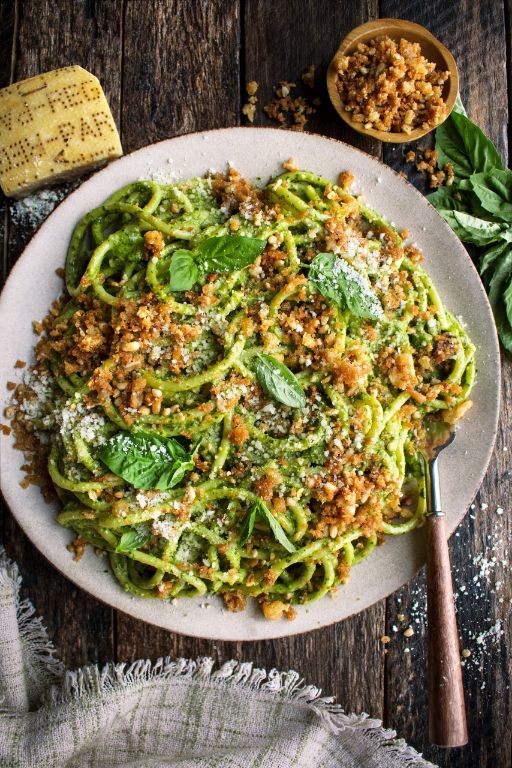
Over the years, I’ve found that the simplest dishes often bring the most joy, especially during the holiday rush when time is precious. This pesto pasta with toasted pine nuts is my go-to for a quick yet elegant meal that feels both comforting and celebratory—I love how the bright, herbaceous pesto clings to every strand of pasta, and the toasted nuts add just the right crunch. It’s a recipe I turn to when I need something fuss-free but impressive, perfect for a cozy Christmas Eve dinner or a last-minute gathering with friends.
Serving: 4 | Pre Time: 10 minutes | Cooking Time: 15 minutes
Ingredients
– 12 ounces dried spaghetti
– 2 cups fresh basil leaves, packed
– ½ cup extra-virgin olive oil
– ½ cup toasted pine nuts
– 2 cloves garlic, minced
– ½ cup finely grated Parmigiano-Reggiano cheese
– 1 teaspoon kosher salt
– ½ teaspoon freshly ground black pepper
– ¼ cup reserved pasta water
Instructions
1. Bring a large pot of salted water to a rolling boil over high heat.
2. Add the dried spaghetti to the boiling water and cook for 8–10 minutes, stirring occasionally, until al dente (the pasta should be tender but still firm to the bite).
3. While the pasta cooks, toast the pine nuts in a dry skillet over medium heat for 3–4 minutes, shaking the pan frequently, until they are golden brown and fragrant; tip: watch them closely to prevent burning, as they can go from toasted to burnt quickly.
4. In a food processor, combine the fresh basil leaves, extra-virgin olive oil, toasted pine nuts, minced garlic, finely grated Parmigiano-Reggiano cheese, kosher salt, and freshly ground black pepper.
5. Pulse the mixture for 30–45 seconds, scraping down the sides as needed, until it forms a coarse paste; tip: avoid over-processing to maintain a rustic texture in the pesto.
6. Reserve ¼ cup of the pasta water before draining the spaghetti.
7. Drain the spaghetti thoroughly and return it to the pot, off the heat.
8. Add the pesto and reserved pasta water to the pot with the spaghetti.
9. Toss the spaghetti with the pesto and pasta water for 1–2 minutes, using tongs, until the pasta is evenly coated and the sauce emulsifies slightly; tip: the starchy pasta water helps the pesto cling to the pasta, creating a silky sauce.
10. Serve the pesto pasta immediately in warmed bowls.
This dish delights with its vibrant green hue and aromatic basil fragrance, while the toasted pine nuts provide a satisfying crunch against the tender spaghetti. The creamy pesto, enriched by the Parmigiano-Reggiano, coats each strand beautifully, making it a versatile centerpiece—try it topped with grilled shrimp or alongside a crisp arugula salad for a complete meal.
Spinach and Pine Nut Stuffed Chicken
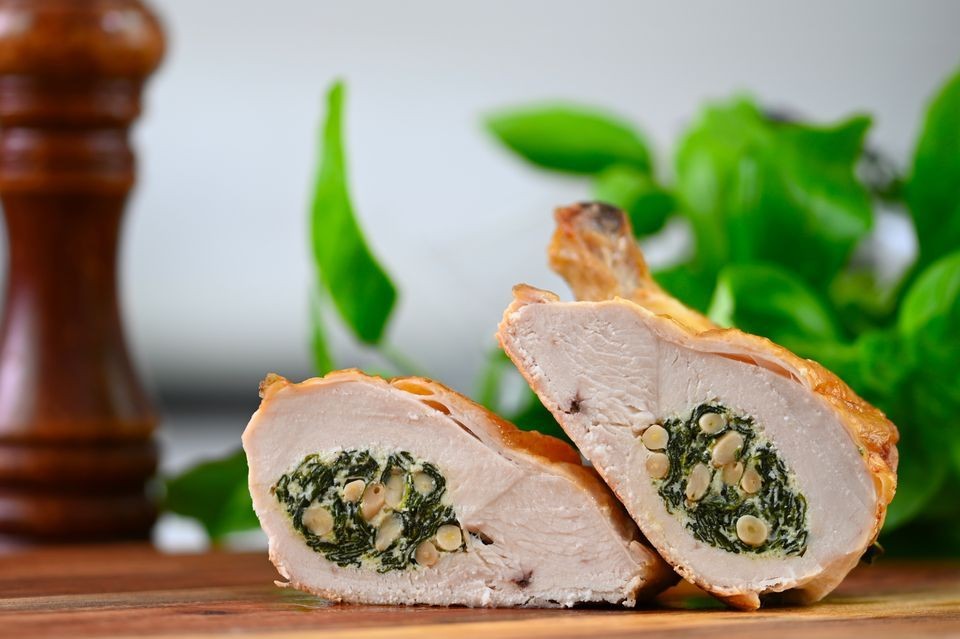
Kicking off the holiday cooking season, I always crave something elegant yet comforting—a dish that feels special without requiring hours in the kitchen. This spinach and pine nut stuffed chicken is my go-to for festive dinners; it’s the recipe I turn to when I want to impress guests but also sneak a few quiet moments with a glass of wine while it roasts.
Serving: 4 | Pre Time: 20 minutes | Cooking Time: 35 minutes
Ingredients
– 4 boneless, skin-on chicken breasts (about 6 ounces each)
– 2 tablespoons extra-virgin olive oil
– 1 teaspoon kosher salt
– ½ teaspoon freshly ground black pepper
– 1 tablespoon clarified butter
– 2 garlic cloves, minced
– 5 ounces fresh baby spinach
– ¼ cup toasted pine nuts
– ¼ cup grated Parmigiano-Reggiano cheese
– ¼ cup whole-milk ricotta cheese
– 1 large pasture-raised egg, lightly beaten
– ¼ teaspoon freshly grated nutmeg
Instructions
1. Preheat your oven to 375°F and line a baking sheet with parchment paper.
2. Pat the chicken breasts dry with paper towels, then season both sides evenly with kosher salt and freshly ground black pepper.
3. In a large skillet over medium heat, warm the clarified butter until it shimmers, about 1 minute.
4. Add the minced garlic to the skillet and sauté until fragrant, approximately 30 seconds, being careful not to let it brown.
5. Incorporate the fresh baby spinach into the skillet, stirring constantly until it wilts completely, which should take 2–3 minutes.
6. Transfer the wilted spinach mixture to a medium bowl and allow it to cool for 5 minutes to prevent the egg from scrambling.
7. To the cooled spinach, add the toasted pine nuts, grated Parmigiano-Reggiano cheese, whole-milk ricotta cheese, lightly beaten pasture-raised egg, and freshly grated nutmeg, then mix until fully combined.
8. Using a sharp knife, cut a horizontal pocket into the thickest part of each chicken breast, being careful not to cut all the way through.
9. Stuff each chicken breast pocket evenly with the spinach mixture, then secure the openings with toothpicks to prevent leakage during cooking.
10. Heat the extra-virgin olive oil in the same skillet over medium-high heat until it ripples, about 1 minute.
11. Place the stuffed chicken breasts skin-side down in the skillet and sear until the skin is golden brown and crisp, approximately 4–5 minutes.
12. Flip the chicken breasts and transfer the skillet to the preheated oven to roast until the internal temperature reaches 165°F, about 20–25 minutes.
13. Remove the chicken from the oven and let it rest on a cutting board for 5 minutes before carefully removing the toothpicks and slicing.
Perfectly roasted, this chicken emerges with a crisp, golden skin giving way to a moist, tender interior packed with the earthy spinach and nutty pine nuts. The ricotta adds a creamy richness that balances beautifully with the sharp Parmigiano-Reggiano, making it ideal for slicing over a bed of creamy polenta or alongside roasted root vegetables for a complete winter meal.
Pine Nut and Basil Risotto

Remember that cozy Italian restaurant we stumbled into during our last rainy weekend getaway? That’s exactly the comforting, aromatic vibe I aimed to recreate with this Pine Nut and Basil Risotto. It’s become my go-to for impressing guests without spending hours in the kitchen—plus, it fills the house with the most incredible herbal fragrance.
Serving: 4 | Pre Time: 15 minutes | Cooking Time: 30 minutes
Ingredients
– 1 ½ cups Arborio rice
– 4 cups low-sodium chicken stock, warmed to 180°F
– ½ cup dry white wine
– 1 medium yellow onion, finely diced
– 3 cloves garlic, minced
– ½ cup pine nuts, toasted
– 1 cup fresh basil leaves, chiffonade-cut
– ½ cup Parmigiano-Reggiano cheese, freshly grated
– 3 tablespoons unsalted butter
– 2 tablespoons extra-virgin olive oil
– Kosher salt and freshly ground black pepper
Instructions
1. In a heavy-bottomed saucepan, heat the extra-virgin olive oil over medium heat until shimmering, about 2 minutes.
2. Add the finely diced yellow onion and cook, stirring frequently, until translucent and soft, approximately 5–7 minutes.
3. Stir in the minced garlic and cook for 1 minute until fragrant, being careful not to let it brown.
4. Add the Arborio rice to the pan and toast, stirring constantly, for 2 minutes until the grains are lightly golden and coated in oil.
5. Pour in the dry white wine and cook, stirring, until fully absorbed, about 2 minutes.
6. Begin adding the warmed chicken stock one ladleful at a time, stirring continuously and allowing each addition to be nearly absorbed before adding the next—this gradual process is key for a creamy texture.
7. Continue adding stock and stirring until the rice is al dente and the mixture is creamy, which should take 20–25 minutes total.
8. Remove the pan from heat and stir in the unsalted butter, freshly grated Parmigiano-Reggiano, and chiffonade-cut basil until fully incorporated.
9. Season with kosher salt and freshly ground black pepper to your preference.
10. Gently fold in the toasted pine nuts just before serving to maintain their crunch.
Perfectly creamy with a subtle chew, this risotto balances the nutty pine nuts and bright basil against the rich, savory base. I love serving it in shallow bowls topped with an extra sprinkle of cheese and a drizzle of olive oil for a restaurant-worthy finish.
Grilled Salmon with Pine Nut Crust
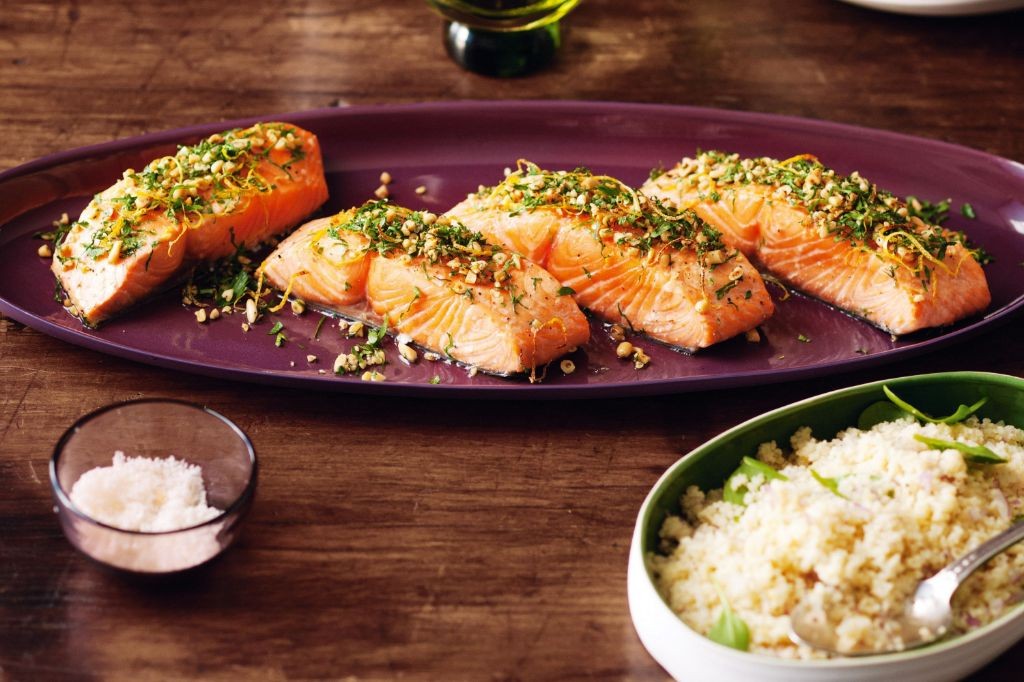
Gathering around the table for a special meal is one of my favorite holiday traditions, and this Grilled Salmon with Pine Nut Crust has become my go-to centerpiece for Christmas Eve dinner—it’s elegant enough to impress guests yet simple enough to let me enjoy the festivities. I love how the nutty crust adds a festive crunch, and the hint of lemon brightens up the rich salmon, making every bite feel like a celebration. Over the years, I’ve tweaked this recipe to perfection, often preparing the crust ahead while sipping on eggnog to save time during the busy season.
Serving: 4 | Pre Time: 15 minutes | Cooking Time: 12 minutes
Ingredients
– 4 salmon fillets (6 ounces each), skin-on
– 1/2 cup pine nuts, finely chopped
– 1/4 cup panko breadcrumbs
– 2 tablespoons clarified butter, melted
– 2 tablespoons fresh lemon juice
– 1 tablespoon Dijon mustard
– 1 teaspoon fresh thyme leaves, minced
– 1/2 teaspoon kosher salt
– 1/4 teaspoon freshly ground black pepper
– 1 tablespoon extra-virgin olive oil
Instructions
1. Preheat a grill or grill pan to medium-high heat (approximately 400°F).
2. Pat the salmon fillets dry with paper towels to ensure even cooking and better crust adhesion.
3. In a small bowl, combine the finely chopped pine nuts, panko breadcrumbs, melted clarified butter, fresh lemon juice, Dijon mustard, minced fresh thyme leaves, kosher salt, and freshly ground black pepper until a cohesive mixture forms.
4. Brush the top side of each salmon fillet (the side without skin) lightly with extra-virgin olive oil.
5. Divide the pine nut mixture evenly among the fillets, pressing it firmly onto the oiled surface to form a uniform crust that adheres well.
6. Place the salmon fillets crust-side up on the preheated grill, cooking for 6 minutes without moving them to develop a golden-brown sear.
7. Carefully flip the fillets using a spatula, cooking for an additional 4–6 minutes until the internal temperature reaches 145°F and the flesh flakes easily with a fork.
8. Transfer the grilled salmon to a serving platter and let it rest for 2 minutes to allow the juices to redistribute.
The result is a beautifully textured dish where the crisp, nutty crust contrasts with the tender, flaky salmon beneath, while the lemon and thyme infuse it with a bright, aromatic flavor that pairs wonderfully with a side of roasted asparagus or a simple arugula salad. For a festive twist, I sometimes garnish it with extra lemon zest or a drizzle of herb-infused oil to elevate the presentation.
Pine Nut and Parmesan Crusted Tilapia
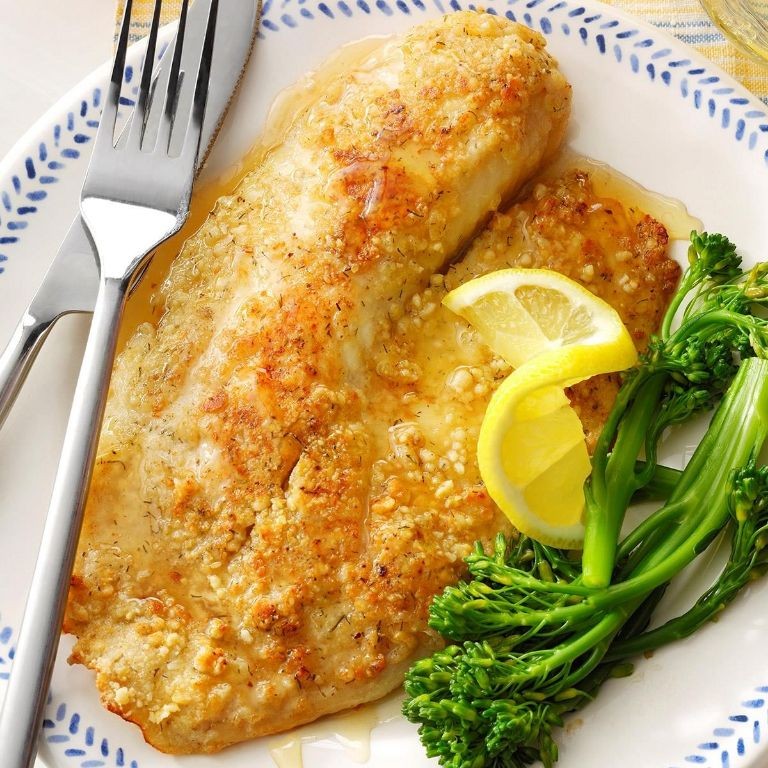
Gathering around the table for a quick yet impressive weeknight dinner is one of my favorite rituals, especially during the holiday rush when time feels scarce. This pine nut and Parmesan crusted tilapia has become my go-to solution—it delivers restaurant-quality flavor with minimal fuss, and the crispy topping always earns compliments from my family. I love how the nutty crunch pairs with the mild fish, creating a dish that feels special without requiring hours in the kitchen.
Serving: 4 | Pre Time: 15 minutes | Cooking Time: 12 minutes
Ingredients
– 4 (6-ounce) tilapia fillets, patted dry
– 1/2 cup finely grated Parmigiano-Reggiano cheese
– 1/3 cup raw pine nuts, finely chopped
– 1/4 cup panko breadcrumbs
– 2 tablespoons unsalted butter, clarified
– 1 large pasture-raised egg, lightly beaten
– 1/4 cup all-purpose flour
– 1 teaspoon kosher salt
– 1/2 teaspoon freshly ground black pepper
– 1 tablespoon extra-virgin olive oil
– 1 lemon, cut into wedges for serving
Instructions
1. Preheat your oven to 425°F and line a baking sheet with parchment paper.
2. In a shallow dish, combine the finely grated Parmigiano-Reggiano, chopped pine nuts, and panko breadcrumbs.
3. Place the all-purpose flour in a separate shallow dish and season it with kosher salt and freshly ground black pepper.
4. Pour the lightly beaten pasture-raised egg into a third shallow dish.
5. Pat the tilapia fillets completely dry with paper towels to ensure the coating adheres properly.
6. Dredge each fillet first in the seasoned flour, shaking off any excess.
7. Dip the floured fillet into the beaten egg, allowing any surplus to drip off.
8. Press the fillet firmly into the pine nut-Parmesan mixture, coating both sides evenly and pressing to adhere the crust.
9. Heat the clarified butter and extra-virgin olive oil in a large oven-safe skillet over medium-high heat until shimmering, about 2 minutes.
10. Carefully place the coated fillets in the skillet and sear for 2–3 minutes per side, until the crust is golden brown and crisp.
11. Transfer the skillet to the preheated oven and bake for 6–8 minutes, until the tilapia flakes easily with a fork and reaches an internal temperature of 145°F.
12. Remove the skillet from the oven and let the fillets rest for 2 minutes before serving.
Here’s the magic of this dish: the crust stays remarkably crisp while the fish beneath remains tender and moist. I love serving it over a bed of lemony arugula or alongside roasted asparagus to let the nutty, savory flavors shine. For a festive twist, garnish with extra pine nuts and a drizzle of brown butter just before bringing it to the table.
Caramelized Onion and Pine Nut Tart
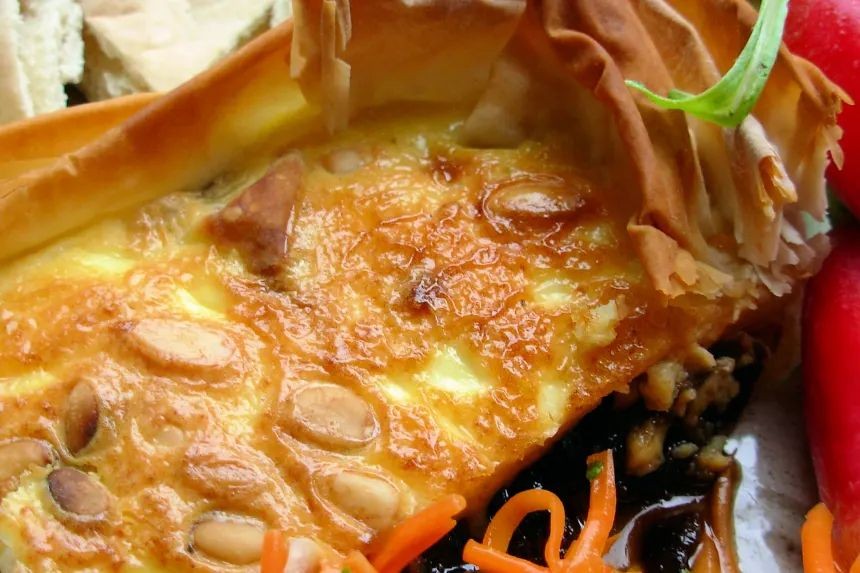
Zesty winter evenings always have me craving something savory and elegant, and this caramelized onion and pine nut tart has become my go-to for holiday gatherings—it’s the perfect balance of sweet, nutty, and buttery, with a story behind it: I first tasted a version at a friend’s rustic farmhouse dinner, and I’ve been tweaking it ever since to get that crisp, golden crust just right.
Serving: 8 | Pre Time: 30 minutes | Cooking Time: 45 minutes
Ingredients
– 1 ¼ cups all-purpose flour
– ½ teaspoon kosher salt
– 8 tablespoons unsalted butter, chilled and cubed
– 3-4 tablespoons ice water
– 2 tablespoons clarified butter
– 3 large yellow onions, thinly sliced
– 1 teaspoon granulated sugar
– ½ cup pine nuts, toasted
– 2 pasture-raised eggs, lightly beaten
– ½ cup heavy cream
– ¼ teaspoon freshly grated nutmeg
– ¼ cup grated Parmigiano-Reggiano cheese
– Fresh thyme leaves for garnish
Instructions
1. In a food processor, pulse the all-purpose flour and kosher salt to combine. Add the chilled, cubed unsalted butter and process until the mixture resembles coarse crumbs, about 10 seconds. Tip: Keep the butter very cold to ensure a flaky crust.
2. Gradually add the ice water, one tablespoon at a time, pulsing until the dough just comes together when pinched. Turn the dough onto a floured surface and form it into a disk. Wrap in plastic wrap and refrigerate for at least 30 minutes to relax the gluten.
3. While the dough chills, heat the clarified butter in a large skillet over medium-low heat. Add the thinly sliced yellow onions and cook, stirring occasionally, for 25-30 minutes until deeply golden and soft. Stir in the granulated sugar during the last 5 minutes to enhance caramelization.
4. Preheat the oven to 375°F. On a floured surface, roll the chilled dough into a 12-inch circle and transfer to a 9-inch tart pan with a removable bottom, pressing it into the edges. Trim any excess dough. Tip: Use a fork to prick the bottom all over to prevent puffing during baking.
5. In a medium bowl, whisk together the lightly beaten pasture-raised eggs, heavy cream, and freshly grated nutmeg until smooth. Stir in the caramelized onions and toasted pine nuts.
6. Pour the filling into the prepared tart shell and sprinkle evenly with the grated Parmigiano-Reggiano cheese. Tip: For an even bake, place the tart pan on a preheated baking sheet in the oven.
7. Bake at 375°F for 40-45 minutes, or until the crust is golden brown and the filling is set with a slight jiggle in the center.
8. Let the tart cool in the pan on a wire rack for 15 minutes before removing the sides. Garnish with fresh thyme leaves.
Elegantly rich and aromatic, this tart boasts a crisp, buttery crust that contrasts beautifully with the silky, sweet onion filling and crunchy pine nuts. Serve it warm as a stunning centerpiece at a dinner party, or slice it cold for a sophisticated picnic treat—either way, it’s sure to impress with its depth of flavor and rustic charm.
Pine Nut and Rosemary Focaccia
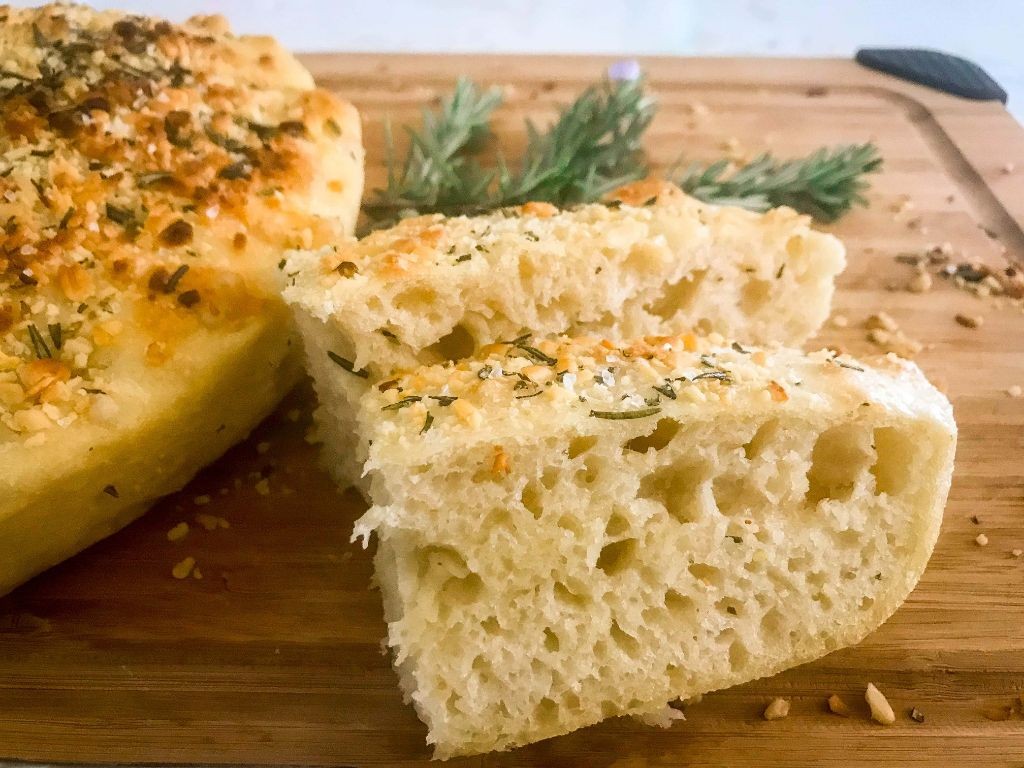
Baking this Pine Nut and Rosemary Focaccia always transports me back to a cozy winter afternoon in my first apartment, where the scent of fresh herbs and toasted nuts would fill every corner—it’s the kind of simple, soul-warming bread that turns an ordinary day into something special. I love how the rosemary’s earthy fragrance pairs with the rich, buttery crunch of pine nuts, creating a focaccia that’s both rustic and elegant, perfect for sharing with friends over a glass of wine or savoring solo with a drizzle of olive oil. Over the years, I’ve tweaked this recipe to get that ideal balance of a crisp, golden crust and a soft, airy interior, and I’m excited to pass it along to you, along with a few tricks I’ve picked up in my own kitchen.
Serving: 8 | Pre Time: 20 minutes | Cooking Time: 25 minutes
Ingredients
– 4 cups all-purpose flour, sifted
– 1 ½ cups warm water (110°F)
– 2 ¼ teaspoons active dry yeast
– 1 tablespoon granulated sugar
– 1 teaspoon fine sea salt
– ¼ cup extra-virgin olive oil, plus more for drizzling
– 2 tablespoons fresh rosemary leaves, finely chopped
– ½ cup pine nuts, toasted
– Flaky sea salt, for sprinkling
Instructions
1. In a large mixing bowl, combine the warm water (110°F), active dry yeast, and granulated sugar; let it stand for 5 minutes until frothy to activate the yeast.
2. Add the sifted all-purpose flour, fine sea salt, and ¼ cup extra-virgin olive oil to the yeast mixture, stirring with a wooden spoon until a shaggy dough forms.
3. Turn the dough onto a lightly floured surface and knead by hand for 8–10 minutes until smooth and elastic, adding a sprinkle of flour if sticky—this develops the gluten for a better rise.
4. Place the dough in a lightly oiled bowl, cover with a damp kitchen towel, and let it rise in a warm spot for 1 hour or until doubled in size.
5. Preheat your oven to 425°F and lightly oil a 9×13-inch baking pan.
6. Punch down the risen dough and transfer it to the prepared pan, gently stretching it to fit the edges without tearing.
7. Use your fingertips to dimple the dough surface all over, creating pockets for the olive oil to pool—this gives the focaccia its classic texture.
8. Drizzle the dough generously with extra-virgin olive oil, then evenly sprinkle the finely chopped fresh rosemary leaves and toasted pine nuts over the top.
9. Finish with a light sprinkle of flaky sea salt for a savory crunch.
10. Bake in the preheated oven at 425°F for 20–25 minutes, rotating the pan halfway through, until the top is deeply golden brown and the edges pull away from the pan.
11. Transfer the focaccia to a wire rack and let it cool for 10 minutes before slicing—this prevents it from becoming gummy.
Out of the oven, this focaccia boasts a crackly, herb-speckled crust that gives way to a tender, slightly chewy crumb, with the pine nuts adding a delightful nutty contrast. I adore serving it warm, torn into rustic pieces alongside a bowl of tomato soup or topped with creamy burrata and a drizzle of honey for a sweet-savory twist that always impresses at gatherings.
Quinoa Salad with Pine Nuts and Feta
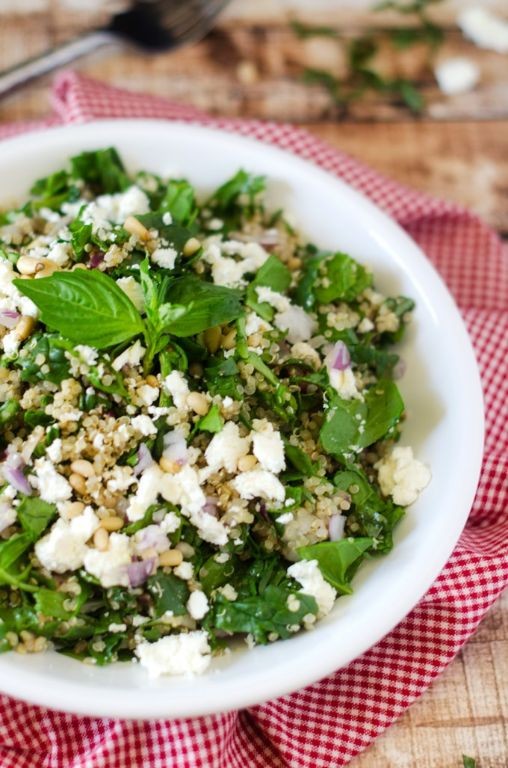
On chilly December afternoons like today, I find myself craving something vibrant yet comforting—a dish that feels nourishing but never heavy. This quinoa salad with pine nuts and feta has become my go-to for holiday potlucks and cozy weeknight dinners alike; it’s the kind of recipe I’ve tweaked over the years until every bite feels just right.
Serving: 4 | Pre Time: 15 minutes | Cooking Time: 20 minutes
Ingredients
– 1 cup tri-color quinoa, rinsed thoroughly
– 2 cups filtered water
– ½ cup raw pine nuts
– 4 ounces high-quality feta cheese, crumbled
– 1 medium English cucumber, finely diced
– ½ cup sun-dried tomatoes in olive oil, drained and julienned
– ¼ cup extra-virgin olive oil
– 2 tablespoons freshly squeezed lemon juice
– 1 teaspoon fine sea salt
– ½ teaspoon freshly cracked black pepper
– 2 tablespoons finely chopped fresh dill
Instructions
1. Combine the rinsed quinoa and filtered water in a medium saucepan over high heat until it reaches a rolling boil.
2. Immediately reduce the heat to low, cover the saucepan tightly, and simmer for exactly 15 minutes until the quinoa has absorbed all the liquid and the grains appear translucent with visible spirals.
3. Tip: Fluff the cooked quinoa with a fork and spread it on a baking sheet to cool completely—this prevents clumping and ensures a light, fluffy texture in the final salad.
4. While the quinoa cools, toast the pine nuts in a dry skillet over medium-low heat for 3–4 minutes, shaking the pan frequently until they turn golden brown and release a nutty aroma.
5. Transfer the toasted pine nuts to a plate to cool, which stops the cooking process and preserves their delicate crunch.
6. In a large mixing bowl, combine the cooled quinoa, toasted pine nuts, crumbled feta cheese, diced English cucumber, and julienned sun-dried tomatoes.
7. Tip: Gently fold the ingredients together with a silicone spatula to maintain the integrity of the feta crumbles and avoid crushing the pine nuts.
8. In a small bowl, whisk together the extra-virgin olive oil, freshly squeezed lemon juice, fine sea salt, and freshly cracked black pepper until emulsified.
9. Drizzle the dressing over the salad mixture and toss lightly until all components are evenly coated.
10. Tip: Let the dressed salad rest at room temperature for 10 minutes before serving to allow the flavors to meld and the quinoa to absorb the dressing fully.
11. Just before serving, sprinkle the finely chopped fresh dill over the top for a bright, herbal finish.
12. What I love most is the contrast of textures—the fluffy quinoa against the creamy feta and crunchy pine nuts creates a delightful mouthfeel. For a creative twist, serve it atop a bed of peppery arugula or alongside grilled lemon-herb chicken; the bright, tangy notes from the lemon dressing make it versatile enough for any season.
Pine Nut and Honey Glazed Carrots
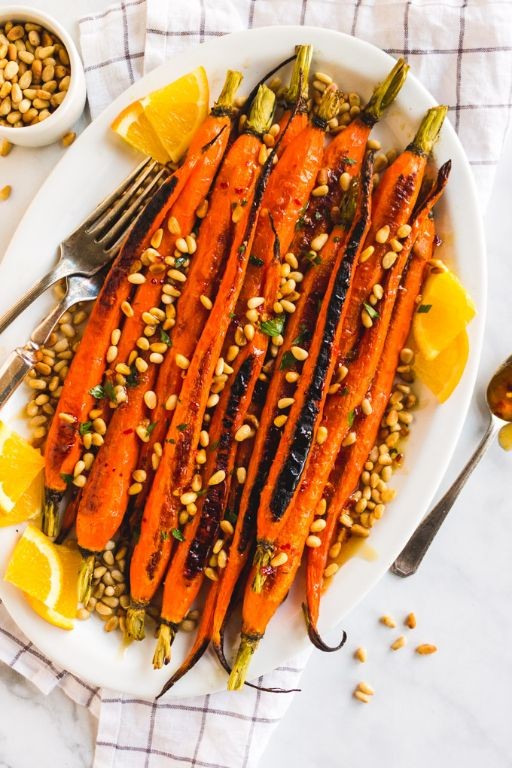
Browsing through the farmers’ market last weekend, I spotted the most vibrant bunch of carrots—their earthy sweetness just begged for a simple yet elegant treatment. As someone who often defaults to roasting vegetables with olive oil and salt, I decided to elevate my usual routine with a nutty, golden glaze that transforms humble carrots into a show-stopping side. This recipe is my new go-to for holiday dinners or whenever I want to impress guests without spending hours in the kitchen.
Serving: 4 | Pre Time: 10 minutes | Cooking Time: 25 minutes
Ingredients
– 1 pound fresh carrots, peeled and cut into ½-inch diagonal slices
– 2 tablespoons clarified butter
– ¼ cup raw pine nuts
– 3 tablespoons wildflower honey
– 1 tablespoon freshly squeezed lemon juice
– ½ teaspoon flaky sea salt
– ¼ teaspoon freshly ground black pepper
– 2 tablespoons finely chopped fresh parsley
Instructions
1. Preheat your oven to 400°F and line a rimmed baking sheet with parchment paper.
2. In a large mixing bowl, toss the carrot slices with clarified butter until evenly coated.
3. Spread the carrots in a single layer on the prepared baking sheet, ensuring they are not overcrowded to promote even roasting.
4. Roast the carrots in the preheated oven for 15 minutes, or until they begin to soften and develop light golden edges.
5. While the carrots roast, toast the pine nuts in a dry skillet over medium heat for 3–4 minutes, shaking the pan frequently until they are fragrant and lightly browned, then immediately transfer to a plate to prevent burning.
6. In a small saucepan, combine the wildflower honey and lemon juice, then warm over low heat for 2 minutes, stirring gently until the mixture is fluid and well blended.
7. Remove the carrots from the oven and drizzle the honey-lemon glaze evenly over them, using a spatula to toss and coat thoroughly.
8. Return the glazed carrots to the oven and roast for an additional 10 minutes, or until the glaze caramelizes and the carrots are tender when pierced with a fork.
9. Transfer the roasted carrots to a serving dish and sprinkle with toasted pine nuts, flaky sea salt, freshly ground black pepper, and finely chopped fresh parsley.
10. Serve immediately while warm, allowing the sweet, nutty aroma to entice your guests.
Heavenly caramelized edges give these carrots a delightful crunch, while the pine nuts add a buttery texture that contrasts beautifully with the glossy honey glaze. For a creative twist, I love serving them over a bed of creamy polenta or alongside roasted chicken—their vibrant color and complex flavors make any meal feel special.
Roasted Butternut Squash with Pine Nuts
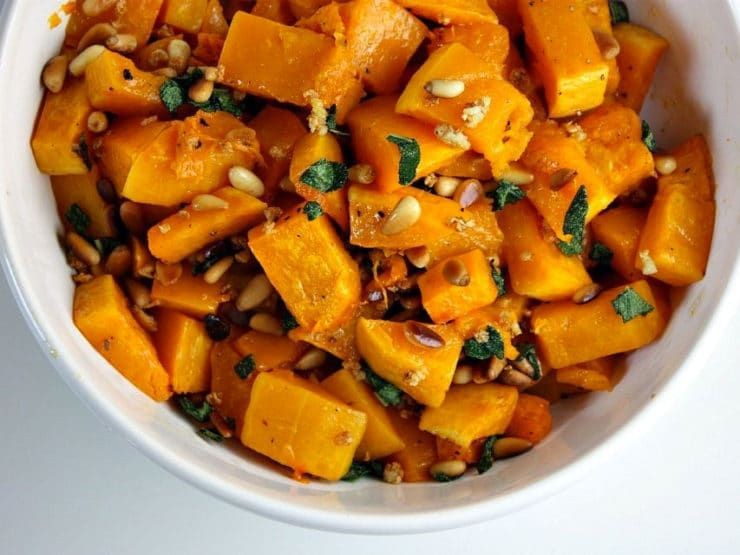
Every December, as the air turns crisp and holiday gatherings fill my calendar, I find myself craving the comforting sweetness of roasted vegetables. This roasted butternut squash with pine nuts has become my go-to side dish—it’s elegant enough for a festive table yet simple enough for a cozy weeknight. I love how the caramelized edges and toasted nuts create a dish that feels both rustic and refined.
Serving: 4 | Pre Time: 15 minutes | Cooking Time: 30 minutes
Ingredients
– 1 medium butternut squash, peeled, seeded, and cut into 1-inch cubes
– 2 tablespoons extra-virgin olive oil
– 1 tablespoon pure maple syrup
– 1 teaspoon kosher salt
– ½ teaspoon freshly cracked black pepper
– ¼ teaspoon ground cinnamon
– ⅓ cup raw pine nuts
– 1 tablespoon unsalted butter
– 1 tablespoon fresh thyme leaves
Instructions
1. Preheat your oven to 425°F and line a large, rimmed baking sheet with parchment paper.
2. In a large mixing bowl, combine the butternut squash cubes, extra-virgin olive oil, pure maple syrup, kosher salt, freshly cracked black pepper, and ground cinnamon.
3. Toss the mixture thoroughly until every squash cube is evenly coated with the oil and seasoning.
4. Spread the seasoned squash in a single, uncrowded layer on the prepared baking sheet.
5. Roast the squash in the preheated oven for 25 minutes, or until the cubes are fork-tender and the edges are deeply caramelized and golden brown.
6. While the squash roasts, place a small, dry skillet over medium-low heat and add the raw pine nuts.
7. Toast the pine nuts, shaking the pan frequently, for 3–4 minutes until they are fragrant and lightly golden, then immediately transfer them to a plate to prevent burning.
8. In the same skillet, melt the unsalted butter over low heat, then stir in the fresh thyme leaves and cook for 1 minute until fragrant.
9. Remove the roasted squash from the oven and transfer it to a serving bowl.
10. Drizzle the thyme-infused butter over the hot squash and sprinkle the toasted pine nuts on top.
11. Gently toss everything together to combine.
Perfectly roasted butternut squash offers a creamy, tender interior with delightfully crisp, caramelized edges. The sweet, earthy squash pairs beautifully with the rich, nutty pine nuts and aromatic thyme butter. For a creative twist, crumble some tangy goat cheese over the top just before serving to add a lovely contrast.
Pine Nut and Raisin Couscous
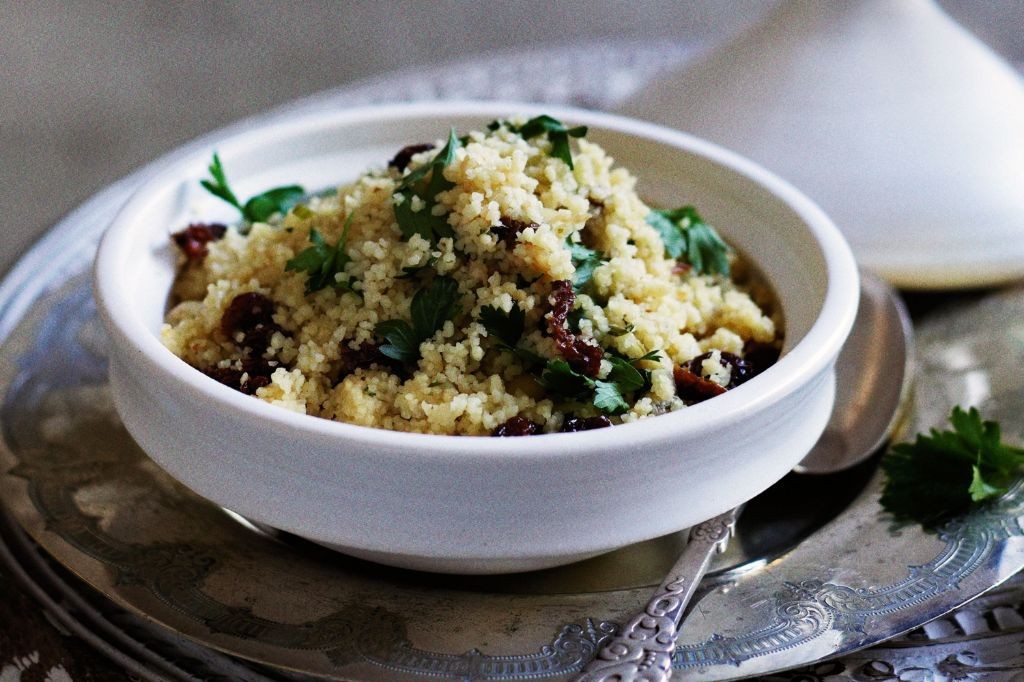
Often, when I’m craving something quick yet satisfying, I turn to this Pine Nut and Raisin Couscous—it’s a dish I’ve perfected over many lazy Sundays, inspired by a trip to a Mediterranean market where the aroma of toasted nuts and spices first captivated me. It’s my go‑to for a fuss‑free side that feels special enough for guests but simple enough for a weeknight.
Serving: 4 | Pre Time: 5 minutes | Cooking Time: 10 minutes
Ingredients
- 1 cup couscous
- 1 ¼ cups low‑sodium vegetable broth
- 2 tablespoons extra‑virgin olive oil
- ¼ cup pine nuts
- ⅓ cup golden raisins
- 1 small yellow onion, finely diced
- 1 garlic clove, minced
- ½ teaspoon ground cumin
- ¼ teaspoon ground cinnamon
- ¼ teaspoon fine sea salt
- 2 tablespoons fresh flat‑leaf parsley, finely chopped
- 1 tablespoon fresh lemon juice
Instructions
- In a small saucepan, bring the low‑sodium vegetable broth to a boil over medium‑high heat, then immediately remove it from the heat and set aside, covered, to keep warm.
- Heat the extra‑virgin olive oil in a medium skillet over medium heat until it shimmers, about 1 minute.
- Add the pine nuts to the skillet and toast, stirring constantly, until they turn golden‑brown and fragrant, approximately 2–3 minutes; tip: watch closely to prevent burning, as pine nuts can scorch quickly.
- Transfer the toasted pine nuts to a small bowl using a slotted spoon, leaving the oil in the skillet.
- Add the finely diced yellow onion to the skillet and sauté, stirring occasionally, until it becomes translucent and soft, about 4–5 minutes.
- Stir in the minced garlic, ground cumin, ground cinnamon, and fine sea salt, and cook for 30 seconds until aromatic.
- Pour the warm vegetable broth into the skillet, scraping up any browned bits from the bottom, and bring the mixture to a simmer over medium heat.
- Remove the skillet from the heat and immediately stir in the couscous and golden raisins, ensuring they are fully submerged; tip: let the couscous absorb the liquid off the heat to avoid overcooking and maintain a light texture.
- Cover the skillet tightly with a lid and let it stand undisturbed for 5 minutes, allowing the couscous to steam and plump up.
- Fluff the couscous gently with a fork to separate the grains, then fold in the toasted pine nuts, finely chopped fresh flat‑leaf parsley, and fresh lemon juice; tip: add the lemon juice last to preserve its bright acidity and prevent the parsley from wilting prematurely.
Keep this couscous warm for a cozy meal—it boasts a fluffy, tender texture with pops of sweet raisins and buttery pine nuts, all balanced by warm spices and a zesty lemon finish. I love serving it alongside grilled chicken or stuffed into roasted bell peppers for a vibrant, plant‑forward twist.
Lemon Pine Nut Cookies

During the holiday rush, I always crave something bright and nutty to cut through all the rich flavors. These lemon pine nut cookies are my go-to—they’re crisp, buttery, and have a lovely citrus zing that feels both festive and refreshing. I love making a big batch to share; they disappear from the cookie tin faster than I can refill it!
Serving: 24 | Pre Time: 20 minutes | Cooking Time: 12 minutes
Ingredients
– 1 cup unsalted European-style butter, softened to room temperature
– 3/4 cup granulated cane sugar
– 1 large pasture-raised egg, lightly beaten
– 2 tablespoons freshly squeezed lemon juice
– 1 tablespoon finely grated lemon zest
– 2 1/4 cups all-purpose flour, sifted
– 1/2 teaspoon kosher salt
– 1/2 cup pine nuts, lightly toasted
Instructions
1. Preheat your conventional oven to 350°F (175°C) and line two baking sheets with parchment paper.
2. In the bowl of a stand mixer fitted with the paddle attachment, cream the softened butter and granulated cane sugar on medium-high speed for exactly 3 minutes, until pale and fluffy.
3. Tip: Scrape down the sides of the bowl with a flexible spatula halfway through to ensure even incorporation.
4. With the mixer on low, add the lightly beaten egg, then stream in the freshly squeezed lemon juice and finely grated lemon zest until just combined.
5. In a separate medium bowl, whisk together the sifted all-purpose flour and kosher salt.
6. Gradually add the dry ingredients to the wet mixture, mixing on low speed until a cohesive dough forms, about 1 minute.
7. Tip: Avoid overmixing to prevent the cookies from becoming tough.
8. Gently fold in the lightly toasted pine nuts using a spatula until evenly distributed.
9. Using a 1-tablespoon cookie scoop, portion the dough onto the prepared baking sheets, spacing them 2 inches apart.
10. Lightly flatten each dough ball with the bottom of a glass dipped in granulated sugar to prevent sticking.
11. Bake in the preheated oven for 10–12 minutes, rotating the sheets halfway through, until the edges are golden brown.
12. Tip: The cookies will firm up as they cool, so remove them when the centers still look slightly soft.
13. Let the cookies cool on the baking sheets for 5 minutes before transferring to a wire rack to cool completely.
Now, these cookies emerge with a delicate, sandy crumb that melts in your mouth, perfectly balanced by the bright lemon and the rich, buttery crunch of pine nuts. I love serving them alongside a pot of Earl Grey tea or crumbling them over a scoop of vanilla bean ice cream for an elegant dessert.
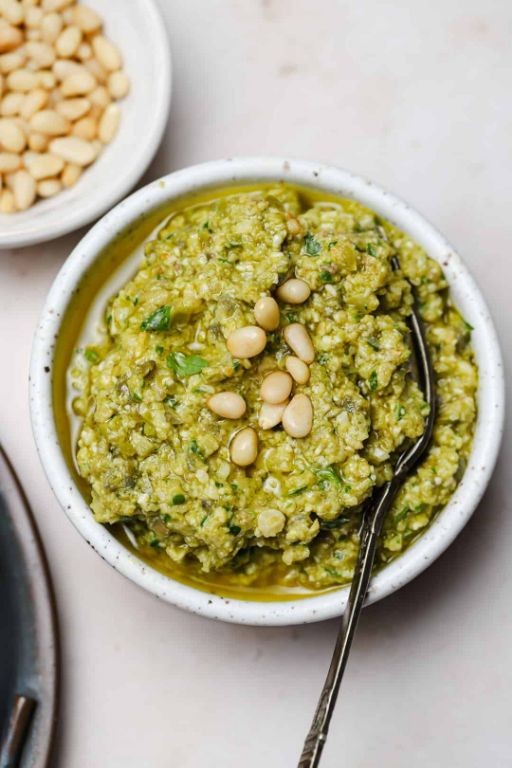
Pine Nut and Basil Hummus
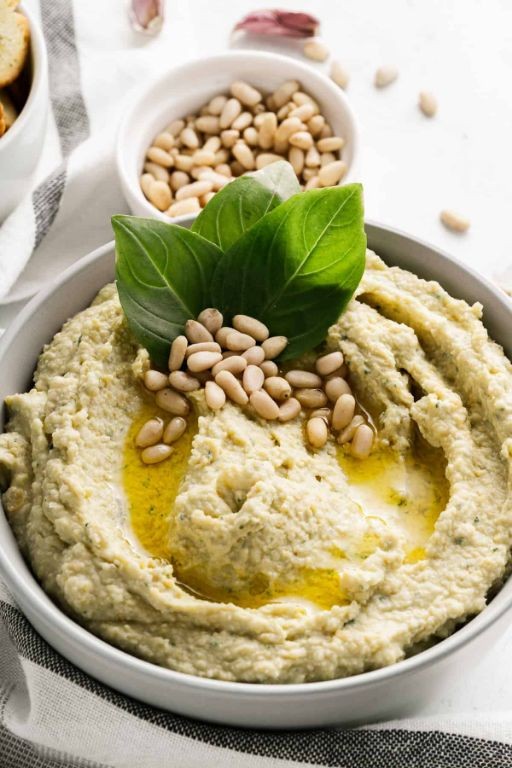
Crafting a vibrant, herbaceous dip has become my go‑to for holiday gatherings, and this Pine Nut and Basil Hummus is the star of my festive table—I love how the earthy pine nuts and fresh basil elevate classic hummus into something truly special. It’s a recipe I tweak every December, and this version, with its bright, aromatic notes, always disappears first.
Serving: 6 | Pre Time: 15 minutes | Cooking Time: 0 minutes
Ingredients
– 2 (15‑ounce) cans of chickpeas, drained and rinsed
– ½ cup tahini paste
– ¼ cup extra‑virgin olive oil, plus extra for drizzling
– 3 tablespoons freshly squeezed lemon juice
– 2 garlic cloves, peeled
– 1 cup fresh basil leaves, packed
– ⅓ cup pine nuts, lightly toasted
– 1 teaspoon kosher salt
– ½ teaspoon freshly ground black pepper
– 2–3 tablespoons ice‑cold water, as needed
Instructions
1. In a food processor, combine the drained chickpeas, tahini paste, extra‑virgin olive oil, freshly squeezed lemon juice, and peeled garlic cloves.
2. Process the mixture on high speed for 60 seconds, or until it forms a coarse paste, scraping down the sides with a spatula once to ensure even blending.
3. Add the packed fresh basil leaves, lightly toasted pine nuts, kosher salt, and freshly ground black pepper to the food processor.
4. Process again on high speed for 90 seconds, or until the hummus is smooth and uniformly green, pausing halfway to scrape down the sides.
5. With the processor running on low speed, slowly drizzle in 2 tablespoons of ice‑cold water through the feed tube to loosen the texture, adding up to 1 more tablespoon if needed until it reaches a creamy, spreadable consistency.
6. Transfer the hummus to a serving bowl, cover, and refrigerate for at least 30 minutes to allow the flavors to meld.
7. Before serving, drizzle the hummus with a thin stream of extra‑virgin olive oil and garnish with a few whole pine nuts and basil leaves.
Luxuriously creamy with a subtle crunch from the pine nuts, this hummus boasts a vibrant herbal aroma that pairs beautifully with crisp vegetable crudités or warm pita bread. For a festive twist, I sometimes swirl in a tablespoon of sun‑dried tomato paste or serve it alongside grilled halloumi—it’s endlessly adaptable and always a crowd‑pleaser.
Pine Nut and Goat Cheese Stuffed Peppers
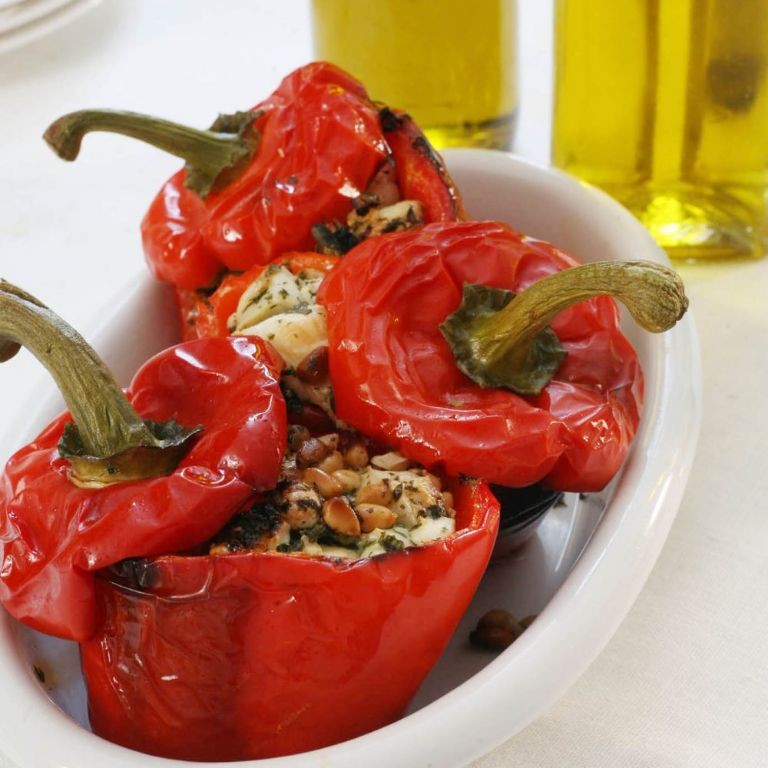
Yesterday, while rummaging through my pantry for holiday inspiration, I stumbled upon a forgotten bag of pine nuts and a log of goat cheese—a happy accident that sparked this festive, elegant appetizer. As someone who loves transforming simple ingredients into showstoppers, these stuffed peppers have become my go-to for impressing guests without spending hours in the kitchen.
Serving: 6 | Pre Time: 15 minutes | Cooking Time: 25 minutes
Ingredients
– 6 medium sweet bell peppers (assorted colors), halved lengthwise and seeded
– 8 ounces fresh goat cheese, at room temperature
– 1/2 cup pine nuts, toasted
– 1/4 cup extra-virgin olive oil
– 2 tablespoons fresh thyme leaves, finely chopped
– 1 teaspoon flaky sea salt
– 1/2 teaspoon freshly cracked black pepper
– 1/4 teaspoon crushed red pepper flakes
Instructions
1. Preheat your oven to 400°F (204°C) and line a rimmed baking sheet with parchment paper.
2. Arrange the bell pepper halves cut-side up on the prepared baking sheet in a single layer.
3. In a medium mixing bowl, combine the goat cheese, toasted pine nuts, olive oil, thyme, sea salt, black pepper, and red pepper flakes until fully incorporated. Tip: Toasting the pine nuts in a dry skillet over medium heat for 3-4 minutes until golden enhances their nutty flavor and prevents sogginess.
4. Divide the goat cheese mixture evenly among the pepper halves, using a small spoon to mound it slightly.
5. Bake in the preheated oven for 20-25 minutes, or until the peppers are tender and the filling is lightly golden at the edges. Tip: Rotate the baking sheet halfway through cooking to ensure even browning, as oven hotspots can cause uneven results.
6. Remove from the oven and let cool for 5 minutes before serving. Tip: Allowing brief cooling helps the filling set for cleaner slicing and prevents burns.
Perfectly balanced, these peppers offer a delightful contrast: the tender, sweet flesh of the peppers gives way to the creamy, tangy goat cheese filling, while the toasted pine nuts add a satisfying crunch. For a stunning presentation, arrange them on a platter with a drizzle of reduced balsamic glaze and fresh thyme sprigs—they disappear quickly at any gathering!
Pine Nut and Olive Tapenade
Gathering around the table with friends during the holiday rush always calls for something effortlessly elegant, and my go-to is this vibrant Pine Nut and Olive Tapenade. It’s a recipe I’ve tweaked over countless gatherings, born from a desire to elevate simple appetizers without spending hours in the kitchen—perfect for when you want to impress but keep things relaxed. The combination of briny olives and toasty pine nuts creates a depth of flavor that feels both rustic and refined, making it a staple in my entertaining repertoire.
Serving: 6 | Pre Time: 15 minutes | Cooking Time: 0 minutes
Ingredients
– 1 cup pitted Kalamata olives, drained
– 1/2 cup pitted Castelvetrano olives, drained
– 1/3 cup toasted pine nuts
– 2 tbsp extra-virgin olive oil
– 1 tbsp freshly squeezed lemon juice
– 1 tsp finely minced garlic
– 1/2 tsp freshly cracked black pepper
– 1/4 tsp flaky sea salt
Instructions
1. Place the toasted pine nuts in a dry skillet over medium heat and toast for 3–4 minutes, shaking the pan frequently until they turn golden brown and fragrant, then transfer to a plate to cool completely to prevent burning. Tip: Toasting unlocks the nuts’ oils, enhancing their nutty essence without adding fat.
2. Combine the pitted Kalamata olives, pitted Castelvetrano olives, cooled toasted pine nuts, finely minced garlic, freshly cracked black pepper, and flaky sea salt in a food processor fitted with a steel blade.
3. Pulse the mixture 8–10 times in 1-second bursts until coarsely chopped, scraping down the sides with a rubber spatula after every 3 pulses to ensure even texture. Tip: Avoid over-processing to maintain a rustic, chunky consistency that highlights each ingredient.
4. Add the extra-virgin olive oil and freshly squeezed lemon juice to the food processor.
5. Pulse 3–4 more times in 1-second bursts just until the ingredients are loosely combined but not puréed, checking that the oil is evenly distributed.
6. Transfer the tapenade to a serving bowl and let it rest at room temperature for 10 minutes to allow the flavors to meld. Tip: Resting time deepens the savory notes, so don’t skip this quick step for the best taste.
7. Serve immediately or cover and refrigerate for up to 3 days, bringing it to room temperature before serving to restore its optimal texture.
A rich, coarse blend with pops of briny olive and crunchy pine nuts, this tapenade offers a bold, savory punch that mellows into a smooth finish. I love spreading it on crostini or swirling it into pasta for an instant upgrade—its versatility makes it a star on any holiday table.
Pine Nut and Chocolate Biscotti
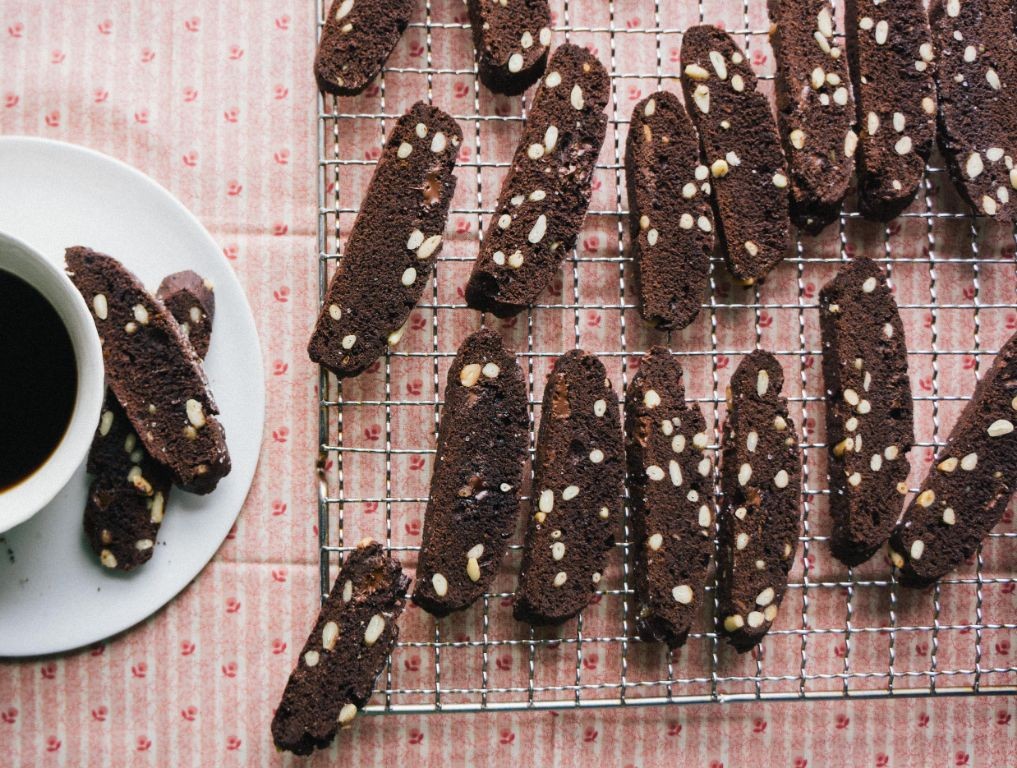
Savoring a warm cup of coffee on a chilly December morning, I find nothing pairs better than a crisp, nutty biscotti. This pine nut and chocolate version is my holiday go-to, inspired by a cozy bakery visit last year where I first fell for that perfect crunch. I love making a big batch to gift, wrapped in parchment and twine for a personal touch.
Serving: 24 | Pre Time: 20 minutes | Cooking Time: 50 minutes
Ingredients
– 2 cups all-purpose flour, sifted
– 1 cup granulated sugar
– 3 large pasture-raised eggs, lightly beaten
– 1/2 cup unsalted butter, melted and cooled to room temperature
– 1 tsp pure vanilla extract
– 1 tsp baking powder
– 1/4 tsp fine sea salt
– 3/4 cup pine nuts, toasted
– 1/2 cup dark chocolate chips (70% cacao)
Instructions
1. Preheat your oven to 350°F (175°C) and line a baking sheet with parchment paper.
2. In a large mixing bowl, whisk together the sifted all-purpose flour, granulated sugar, baking powder, and fine sea salt until fully combined.
3. Tip: Toasting the pine nuts enhances their flavor; spread them on a dry skillet over medium heat for 3-4 minutes until golden, stirring frequently to prevent burning.
4. Add the lightly beaten pasture-raised eggs, melted unsalted butter, and pure vanilla extract to the dry ingredients, stirring with a spatula until a cohesive dough forms.
5. Gently fold in the toasted pine nuts and dark chocolate chips until evenly distributed throughout the dough.
6. Divide the dough in half and shape each portion into a log approximately 12 inches long and 2 inches wide on the prepared baking sheet, spacing them 3 inches apart.
7. Bake in the preheated oven for 25 minutes, or until the logs are firm to the touch and lightly golden.
8. Tip: Let the logs cool on the baking sheet for 10 minutes before slicing to prevent crumbling; this ensures clean, even cuts.
9. Transfer the logs to a cutting board and use a serrated knife to slice them diagonally into 1/2-inch thick pieces.
10. Arrange the slices cut-side down on the baking sheet and return to the oven for 12-15 minutes, flipping halfway through, until crisp and dry.
11. Tip: For extra crispiness, turn off the oven and let the biscotti cool inside with the door slightly ajar for 30 minutes, which helps them dry without over-browning.
12. Remove from the oven and allow to cool completely on a wire rack before serving or storing.
Keenly crafted, these biscotti boast a satisfying snap with buttery undertones, while the toasted pine nuts add an earthy crunch that contrasts beautifully with the rich, bittersweet chocolate. I adore serving them alongside a dollop of mascarpone for dipping or crumbling them over vanilla gelato for an indulgent dessert twist.
Pine Nut and Garlic Green Beans
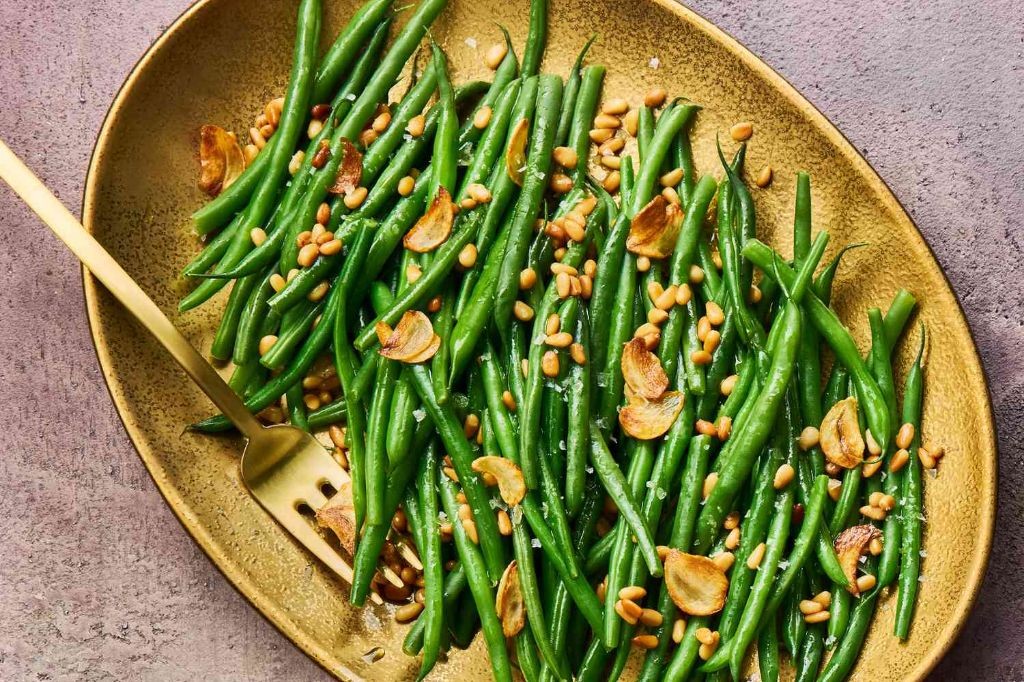
Brimming with festive cheer and the cozy aromas of the season, I find myself reaching for simple yet elegant sides to round out the holiday table. This recipe for Pine Nut and Garlic Green Beans has become my go-to, a dish born from a happy accident when I ran out of almonds but discovered a forgotten bag of pine nuts in the pantry—it’s now a non-negotiable part of our family gatherings.
Serving: 4 | Pre Time: 10 minutes | Cooking Time: 15 minutes
Ingredients
– 1 pound fresh haricots verts, ends trimmed
– 3 tablespoons extra-virgin olive oil
– 4 large garlic cloves, thinly sliced
– 1/3 cup raw pine nuts
– 1 teaspoon fine sea salt
– 1/2 teaspoon freshly cracked black pepper
– 2 teaspoons fresh lemon juice
Instructions
1. Prepare an ice bath by filling a large bowl with cold water and ice cubes.
2. Bring a large pot of generously salted water to a rolling boil over high heat.
3. Add the haricots verts to the boiling water and blanch for precisely 2 minutes until bright green and crisp-tender.
4. Immediately transfer the blanched beans to the ice bath using a slotted spoon to halt the cooking process; let them chill for 2 minutes. Tip: This shock preserves their vibrant color and snappy texture.
5. Drain the beans thoroughly and pat them completely dry with a clean kitchen towel to prevent oil splatter later.
6. Heat the extra-virgin olive oil in a large skillet over medium-low heat until it shimmers, about 1 minute.
7. Add the thinly sliced garlic and pine nuts to the skillet, toasting them for 3-4 minutes while stirring frequently until the garlic is fragrant and golden and the pine nuts are lightly browned. Tip: Keep the heat low to avoid burning the delicate garlic and nuts.
8. Increase the heat to medium-high and add the dried haricots verts to the skillet.
9. Season the beans with the fine sea salt and freshly cracked black pepper, then toss and sauté for 4-5 minutes until they are heated through and slightly blistered in spots.
10. Remove the skillet from the heat and drizzle the fresh lemon juice over the beans, tossing once more to combine. Tip: Adding the acid off the heat brightens the flavor without dulling the beans’ color.
11. Transfer the green beans to a serving platter immediately.
Remarkably versatile, these beans offer a delightful contrast of textures—the tender-crisp haricots verts against the buttery crunch of toasted pine nuts, all enveloped in the rich, aromatic garlic oil. I love serving them warm alongside a roast, but they’re equally fantastic at room temperature, making them a perfect make-ahead dish for potlucks.
Summary
Tantalizing pine nuts elevate every dish in this roundup, from salads to pastas! We hope these 18 savory recipes inspire your next kitchen adventure. Try one, leave a comment with your favorite, and share the article on Pinterest to spread the pine nut love. Happy cooking!


