
Ever find yourself staring at that tub of plain yogurt in your fridge, wondering how to jazz it up beyond breakfast? You’re not alone! From quick weeknight dinners to impressive party dips, creamy plain yogurt is the versatile superstar your kitchen has been waiting for. Get ready to transform this humble ingredient into 20 mouthwatering dishes for every occasion—let’s dive in!
Cucumber Mint Yogurt Dip

Zesty and refreshing, this Cucumber Mint Yogurt Dip has become my go-to summer staple after a friend brought it to a backyard barbecue last July—I’ve been tweaking it ever since to get that perfect cool, creamy balance. It’s incredibly simple to whip up, and I love how it turns basic veggies or pita into something special without any fuss.
Serving: 6 | Pre Time: 15 minutes | Cooking Time: 0 minutes
Ingredients
– Plain Greek yogurt – 2 cups
– Cucumber – 1 large
– Fresh mint leaves – ¼ cup
– Garlic – 1 clove
– Lemon juice – 2 tbsp
– Salt – ½ tsp
– Olive oil – 1 tbsp
Instructions
1. Peel the cucumber completely, then slice it in half lengthwise.
2. Use a spoon to scoop out and discard all the seeds from the cucumber halves.
3. Grate the cucumber on the large holes of a box grater into a medium bowl.
4. Place the grated cucumber in a clean kitchen towel and squeeze firmly over the sink to remove as much liquid as possible—this tip prevents a watery dip.
5. Mince the garlic clove finely until it forms a paste-like consistency.
6. Chop the fresh mint leaves into small pieces, about ¼-inch in size.
7. In a large mixing bowl, combine the plain Greek yogurt, squeezed cucumber, minced garlic, chopped mint, lemon juice, and salt.
8. Stir all ingredients together with a spatula until fully incorporated and smooth, about 1–2 minutes.
9. Drizzle the olive oil over the top of the dip and gently fold it in just once or twice to create a marbled effect—this adds a nice richness without overmixing.
10. Cover the bowl tightly with plastic wrap and refrigerate for at least 30 minutes to allow the flavors to meld; chilling it thoroughly makes it taste even better.
Perfectly creamy with a subtle crunch from the cucumber, this dip has a bright, herbal kick from the mint that pairs wonderfully with crisp carrot sticks or warm pita triangles. I sometimes sprinkle a pinch of sumac on top for an extra tangy twist—it’s so versatile, you can even thin it out with a splash of water to use as a salad dressing.
Yogurt Marinated Grilled Chicken

A few summers ago, I discovered that marinating chicken in yogurt transformed my weeknight grilling from dry and boring to incredibly juicy and flavorful—it’s become my go-to method ever since. This recipe is perfect for a quick dinner or a casual gathering, and the marinade works its magic in just 30 minutes. I love how the yogurt tenderizes the chicken while adding a subtle tang that pairs beautifully with smoky grill marks.
Serving: 4 | Pre Time: 35 minutes | Cooking Time: 15 minutes
Ingredients
– Plain Greek yogurt – 1 cup
– Lemon juice – 2 tbsp
– Garlic – 3 cloves, minced
– Olive oil – 2 tbsp
– Paprika – 1 tsp
– Salt – 1 tsp
– Black pepper – ½ tsp
– Boneless, skinless chicken breasts – 4 (about 1½ lbs)
Instructions
1. In a medium bowl, combine 1 cup plain Greek yogurt, 2 tbsp lemon juice, 3 minced garlic cloves, 2 tbsp olive oil, 1 tsp paprika, 1 tsp salt, and ½ tsp black pepper.
2. Add 4 boneless, skinless chicken breasts to the bowl, coating each piece evenly with the marinade.
3. Cover the bowl and refrigerate for exactly 30 minutes—this short marinating time is key to preventing the yogurt from breaking down the chicken too much.
4. Preheat a grill or grill pan to medium-high heat (about 400°F).
5. Remove the chicken from the marinade, shaking off any excess, and discard the remaining marinade.
6. Place the chicken on the grill and cook for 6–7 minutes per side, flipping only once, until the internal temperature reaches 165°F when checked with a meat thermometer.
7. Transfer the chicken to a clean plate and let it rest for 5 minutes before slicing to allow the juices to redistribute.
8. Slice the chicken against the grain into ½-inch thick pieces for maximum tenderness.
Perfectly grilled, this chicken boasts a tender, juicy interior with a slightly charred, smoky crust that’s infused with hints of garlic and paprika. I often serve it over a crisp salad or tucked into warm pitas with a dollop of extra yogurt and fresh herbs for a complete meal that’s both satisfying and light.
Blueberry Yogurt Smoothie Bowl
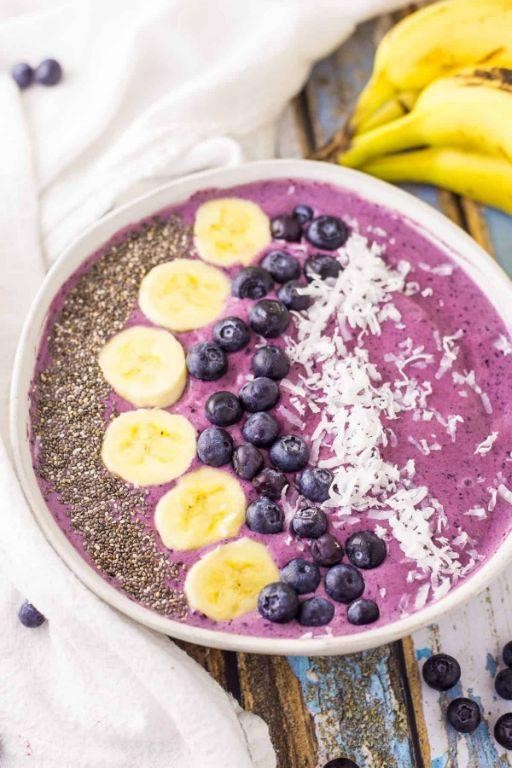
Holiday mornings call for something special, but who has time for elaborate breakfasts? I’ve been making this blueberry yogurt smoothie bowl for years—it’s my go-to when I want a vibrant, satisfying start without spending all morning in the kitchen. Honestly, it reminds me of lazy summer weekends when fresh berries are at their peak, though frozen work beautifully too.
Serving: 1 | Pre Time: 5 minutes | Cooking Time: 0 minutes
Ingredients
– Frozen blueberries – 1 cup
– Plain Greek yogurt – ½ cup
– Honey – 1 tbsp
– Almond milk – ¼ cup
– Granola – ¼ cup
Instructions
1. Add 1 cup of frozen blueberries, ½ cup of plain Greek yogurt, 1 tbsp of honey, and ¼ cup of almond milk to a high-speed blender.
2. Blend on high speed for 45–60 seconds until completely smooth and creamy, scraping down the sides once halfway through if needed.
3. Pour the smoothie mixture into a wide, shallow bowl immediately after blending to prevent separation.
4. Sprinkle ¼ cup of granola evenly over the top of the smoothie in the bowl.
5. Serve right away while the smoothie is cold and the granola retains its crunch.
Velvety and refreshing, this bowl has a luscious, spoonable texture that’s thick enough to hold toppings without being icy. The tang from the yogurt balances the sweet blueberries perfectly—try drizzling extra honey or adding a handful of sliced almonds for a nutty crunch. It’s so versatile; I sometimes swap in different berries or a sprinkle of chia seeds for an extra boost.
Garlic Yogurt Flatbread

Every time I’m craving something warm, pillowy, and packed with flavor, I turn to this garlic yogurt flatbread—it’s become my go‑to for busy weeknights or lazy weekends. I love how the tangy yogurt tenderizes the dough, and the garlic infuses every bite with cozy, aromatic goodness. Honestly, it’s so simple that I often whip it up while chatting with my kids or catching up on a podcast.
Serving: 4 | Pre Time: 15 minutes | Cooking Time: 10 minutes
Ingredients
- All‑purpose flour – 2 cups
- Plain whole‑milk yogurt – ¾ cup
- Garlic – 3 cloves, minced
- Olive oil – 2 tbsp
- Salt – 1 tsp
- Baking powder – 1 tsp
Instructions
- In a large mixing bowl, combine 2 cups all‑purpose flour, 1 tsp salt, and 1 tsp baking powder.
- Add ¾ cup plain whole‑milk yogurt to the dry ingredients.
- Mix with a fork until a shaggy dough forms, then knead by hand on a lightly floured surface for 3 minutes until smooth. Tip: If the dough feels too sticky, dust with a little extra flour—it should be soft but not tacky.
- Cover the dough with a damp kitchen towel and let it rest at room temperature for 10 minutes.
- While the dough rests, mince 3 cloves of garlic and combine with 2 tbsp olive oil in a small bowl.
- Divide the rested dough into 4 equal pieces and roll each into a ball.
- On a floured surface, use a rolling pin to flatten each ball into a ¼‑inch‑thick circle.
- Heat a large non‑stick skillet or griddle over medium‑high heat (about 375°F).
- Brush one side of a dough circle generously with the garlic‑oil mixture.
- Place the flatbread, garlic‑side down, in the hot skillet and cook for 2 minutes until golden brown spots appear. Tip: Don’t move the flatbread for the first minute—this helps it develop a nice crust.
- Brush the top side with more garlic‑oil, then flip and cook for another 2 minutes until both sides are golden and puffed. Tip: Press gently with a spatula while cooking to ensure even browning.
- Repeat with the remaining dough pieces, keeping cooked flatbreads wrapped in a clean towel to stay warm.
Just out of the skillet, these flatbreads are wonderfully soft and chewy with a crisp, garlic‑scented exterior. The yogurt keeps them tender for hours, making them perfect for tearing and dipping into hummus or serving alongside a hearty stew. I sometimes sprinkle them with fresh herbs or a pinch of red pepper flakes for an extra kick—they’re endlessly adaptable and always disappear fast!
Yogurt and Herb Stuffed Peppers

Cooking during the holiday rush always has me looking for something fresh and vibrant to balance out all the rich food. These Yogurt and Herb Stuffed Peppers are my go-to—they’re light, flavorful, and come together with minimal fuss, which is perfect for a busy weeknight like tonight.
Serving: 4 | Pre Time: 15 minutes | Cooking Time: 25 minutes
Ingredients
– Bell peppers – 4 large
– Plain Greek yogurt – 1 ½ cups
– Fresh dill – ¼ cup, chopped
– Fresh mint – 2 tbsp, chopped
– Garlic – 2 cloves, minced
– Olive oil – 2 tbsp
– Salt – 1 tsp
– Black pepper – ½ tsp
Instructions
1. Preheat your oven to 400°F (200°C) and line a baking sheet with parchment paper.
2. Slice the tops off the 4 bell peppers and remove all seeds and membranes from the inside.
3. In a medium bowl, combine 1 ½ cups plain Greek yogurt, ¼ cup chopped fresh dill, 2 tbsp chopped fresh mint, 2 cloves minced garlic, 1 tsp salt, and ½ tsp black pepper. Mix thoroughly until the herbs are evenly distributed—this is a great tip: letting the yogurt mixture sit for 5 minutes helps the flavors meld.
4. Spoon the yogurt and herb mixture evenly into the hollowed-out bell peppers, filling them to the top but not overflowing.
5. Drizzle 2 tbsp olive oil over the stuffed peppers. Here’s another tip: a light brush of oil on the outside of the peppers helps them roast to a perfect tender-crisp texture.
6. Place the peppers on the prepared baking sheet and bake in the preheated oven at 400°F for 20-25 minutes. You’ll know they’re done when the pepper skins are slightly blistered and the filling is warm throughout—a final tip: check at 20 minutes to avoid over-softening if you prefer a bit of crunch.
7. Carefully remove the baking sheet from the oven and let the peppers cool for 5 minutes before serving.
Fresh from the oven, these peppers offer a wonderful contrast: the roasted bell pepper is tender with a slight char, while the cool, herby yogurt filling stays creamy and bright. I love serving them alongside a simple grain salad or as a colorful starter that always impresses guests without any last-minute stress.
Lemon Yogurt Cake with Glaze

Last weekend, while digging through my grandmother’s old recipe box, I stumbled upon a faded card for a lemon yogurt cake—it brought back memories of sunny afternoons at her kitchen table. I’ve tweaked it slightly over the years, adding a simple glaze that makes it feel extra special, and it’s become my go-to when I need a quick, comforting treat that always impresses. Honestly, I love how the tangy yogurt keeps it moist for days, which is perfect since I tend to bake it on Sundays for the week ahead.
Serving: 8 | Pre Time: 15 minutes | Cooking Time: 45 minutes
Ingredients
– All-purpose flour – 1½ cups
– Granulated sugar – 1 cup
– Plain yogurt – ½ cup
– Eggs – 2
– Vegetable oil – ½ cup
– Lemon zest – 1 tbsp
– Lemon juice – 2 tbsp
– Baking powder – 1 tsp
– Salt – ½ tsp
– Powdered sugar – 1 cup
Instructions
1. Preheat your oven to 350°F and grease a 9-inch loaf pan, lining it with parchment paper for easy removal—this tip saves me from stuck cakes every time.
2. In a large bowl, whisk together the all-purpose flour, granulated sugar, baking powder, and salt until fully combined.
3. In a separate bowl, beat the eggs lightly, then stir in the plain yogurt, vegetable oil, lemon zest, and lemon juice until smooth.
4. Pour the wet ingredients into the dry ingredients and fold gently until just incorporated; overmixing can lead to a dense texture, so I stop as soon as no flour streaks remain.
5. Transfer the batter to the prepared pan and smooth the top with a spatula.
6. Bake at 350°F for 40–45 minutes, or until a toothpick inserted into the center comes out clean—the edges should be golden brown.
7. Let the cake cool in the pan for 10 minutes, then remove it to a wire rack to cool completely; this prevents sogginess from trapped steam.
8. While the cake cools, make the glaze by whisking the powdered sugar with 2 tablespoons of lemon juice until smooth and pourable.
9. Drizzle the glaze evenly over the cooled cake, allowing it to set for about 15 minutes before slicing.
Finally, this cake boasts a tender, moist crumb with a bright lemon zing that pairs beautifully with a cup of tea or as a dessert topped with fresh berries. For a creative twist, I sometimes serve it warm with a dollop of whipped cream or crumble it over yogurt for breakfast—it’s versatile enough to fit any occasion.
Spiced Yogurt Rice Pilaf
M y kitchen always smells like a cozy holiday market this time of year, and this Spiced Yogurt Rice Pilaf is my secret weapon for turning leftover rice into a creamy, fragrant side dish that feels both comforting and special. I love how the yogurt mellows the spices while keeping everything light—it’s the kind of recipe I make when I want something impressive but don’t want to fuss over the stove for hours.
Serving: 4 | Pre Time: 10 minutes | Cooking Time: 25 minutes
Ingredients
– Basmati rice – 1 cup
– Plain whole-milk yogurt – 1 cup
– Chicken or vegetable broth – 1 ½ cups
– Unsalted butter – 2 tbsp
– Yellow onion – 1 medium, finely chopped
– Ground cumin – 1 tsp
– Ground coriander – ½ tsp
– Salt – ½ tsp
– Fresh cilantro – 2 tbsp, chopped
Instructions
1. Rinse the basmati rice under cold water in a fine-mesh strainer until the water runs clear, which removes excess starch for fluffier grains.
2. Melt the unsalted butter in a medium saucepan over medium heat.
3. Add the finely chopped yellow onion and cook for 5 minutes, stirring occasionally, until it turns translucent and soft.
4. Stir in the ground cumin and ground coriander, cooking for 30 seconds until fragrant to bloom the spices.
5. Add the rinsed basmati rice to the saucepan and toast it for 2 minutes, stirring constantly to coat it in the butter and spices.
6. Pour in the chicken or vegetable broth and ½ tsp salt, then bring the mixture to a boil over high heat.
7. Reduce the heat to low, cover the saucepan with a tight-fitting lid, and simmer for 15 minutes without peeking to ensure even cooking.
8. Remove the saucepan from the heat and let it sit, covered, for 5 minutes to allow the rice to steam and absorb any remaining liquid.
9. Fluff the cooked rice gently with a fork to separate the grains without mashing them.
10. In a small bowl, whisk the plain whole-milk yogurt until smooth to prevent curdling when mixed with the hot rice.
11. Fold the whisked yogurt into the fluffed rice until fully incorporated, working quickly to keep the dish warm.
12. Garnish with 2 tbsp chopped fresh cilantro just before serving for a bright, fresh finish.
Y ou’ll love the creamy texture from the yogurt, which clings to each grain without making the pilaf heavy, while the toasted spices add a warm, earthy depth that pairs beautifully with roasted meats or a simple salad. Try serving it topped with a sprinkle of toasted almonds for extra crunch, or enjoy it as a standalone meal with a dollop of extra yogurt on the side—it’s versatile enough for weeknights but fancy enough for guests.
Yogurt Parfait with Granola and Berries
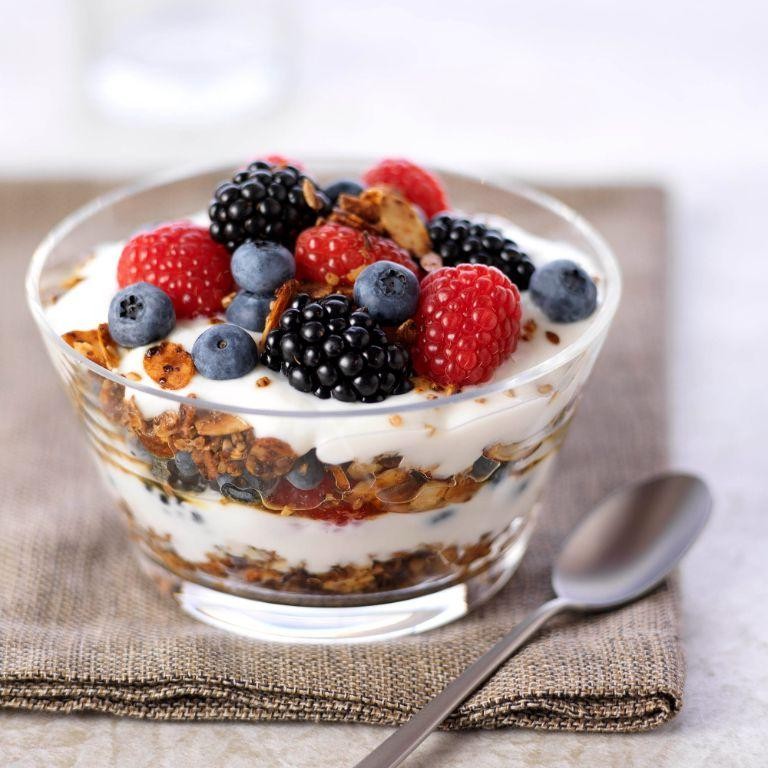
Gosh, after a hectic holiday season of baking and feasting, I’m craving something light, refreshing, and effortless—a perfect make-ahead breakfast or snack that feels like a treat without the guilt. This yogurt parfait with granola and berries is my go-to solution, inspired by those lazy weekend mornings when I want something delicious but don’t want to spend hours in the kitchen.
Serving: 2 | Pre Time: 10 minutes | Cooking Time: 0 minutes
Ingredients
– Greek yogurt – 2 cups
– Honey – 2 tbsp
– Granola – 1 cup
– Mixed berries (fresh or frozen) – 1 cup
Instructions
1. Place 2 cups of Greek yogurt in a medium mixing bowl.
2. Add 2 tbsp of honey to the yogurt.
3. Stir the yogurt and honey together for about 30 seconds until fully combined and smooth—this prevents clumps and ensures even sweetness throughout.
4. Rinse 1 cup of mixed berries under cold water for 10 seconds if using fresh, or thaw frozen berries in the refrigerator overnight to avoid excess moisture.
5. Pat the berries dry with a paper towel to remove excess water, which keeps the parfait from getting soggy.
6. Take two serving glasses or jars and spoon ¼ cup of the yogurt mixture into the bottom of each glass.
7. Layer ¼ cup of granola evenly over the yogurt in each glass.
8. Add ¼ cup of mixed berries on top of the granola layer in each glass.
9. Repeat the layers by adding another ¼ cup of yogurt, ¼ cup of granola, and ¼ cup of berries to each glass, pressing down gently with a spoon to compact the layers for a neat presentation.
10. Drizzle any remaining honey over the top of each parfait for an extra touch of sweetness.
11. Chill the parfaits in the refrigerator for at least 15 minutes before serving to allow the flavors to meld and the granola to soften slightly.
Heavenly layers of creamy yogurt, crunchy granola, and juicy berries create a delightful contrast in every bite—I love how the tartness of the berries balances the honey’s sweetness. For a fun twist, try swapping the berries with sliced bananas or a drizzle of nut butter, or serve it in a mason jar for a portable picnic treat that always impresses.
Chilled Yogurt and Avocado Soup
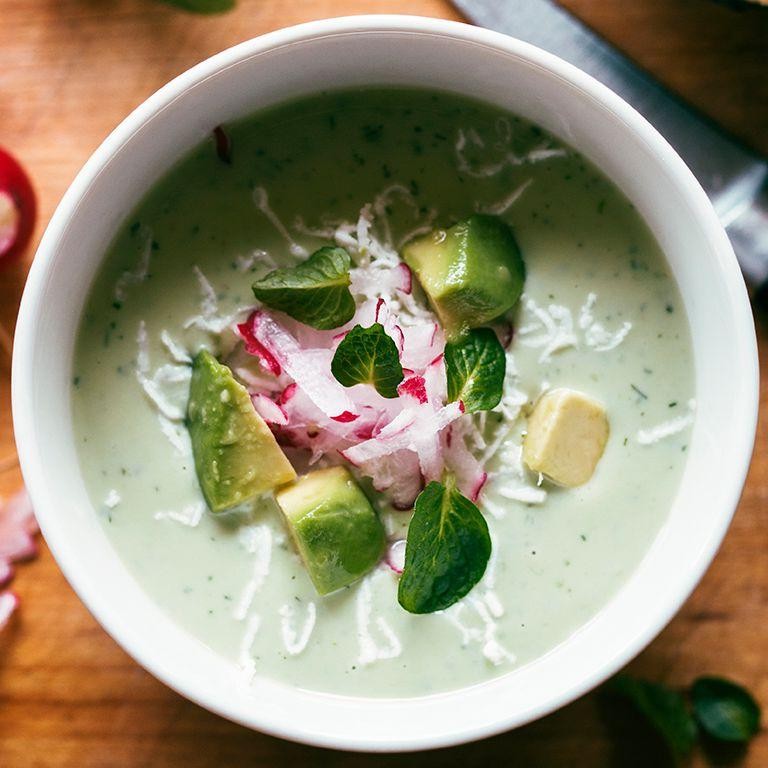
Sometimes, when the summer heat hits its peak, I find myself craving something refreshing that doesn’t require turning on the stove. This chilled soup is my go-to—it’s creamy, tangy, and comes together in minutes, perfect for those lazy afternoons when cooking feels like too much effort.
Serving: 4 | Pre Time: 15 minutes | Cooking Time: 0 minutes
Ingredients
– Plain Greek yogurt – 2 cups
– Ripe avocado – 1 large
– Fresh lime juice – 3 tbsp
– Cold water – 1 cup
– Salt – ½ tsp
– Fresh cilantro – ¼ cup (packed)
– Ice cubes – 1 cup
Instructions
1. Cut the ripe avocado in half, remove the pit, and scoop the flesh into a blender.
2. Add the plain Greek yogurt, fresh lime juice, cold water, and salt to the blender.
3. Blend on high speed for 45 seconds, or until the mixture is completely smooth and no avocado chunks remain. (Tip: For an extra-smooth texture, blend in two short bursts to avoid overheating the motor.)
4. Add the fresh cilantro and ice cubes to the blender.
5. Blend again on high speed for 30 seconds, or until the cilantro is finely chopped and the soup is frothy and well-chilled. (Tip: The ice cubes help chill the soup instantly—if you prefer it less icy, blend for only 15 seconds.)
6. Taste the soup and adjust the salt if needed, but avoid over-salting as the flavors will develop as it chills.
7. Pour the soup into a large bowl or individual serving bowls.
8. Cover the bowls tightly with plastic wrap and refrigerate for at least 1 hour to allow the flavors to meld. (Tip: For best results, chill it for up to 3 hours—this deepens the creamy avocado flavor without it turning brown.)
9. After chilling, give the soup a quick stir before serving to redistribute any separation.
Cool and velvety, this soup has a lush texture from the avocado that pairs beautifully with the tangy yogurt. I love garnishing it with a drizzle of olive oil or extra cilantro for a pop of color—it’s surprisingly filling yet light enough for a hot day.
Yogurt-Based Caesar Salad Dressing
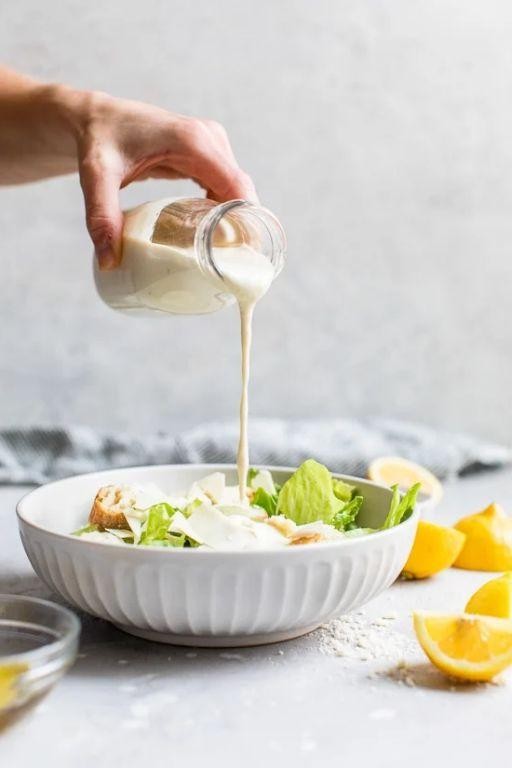
Pulling together a creamy Caesar dressing that’s actually good for you used to feel impossible—until I swapped the usual mayo and raw egg for tangy Greek yogurt. This yogurt-based version is my go‑to for a lighter, protein-packed salad that still delivers that classic garlicky, umami punch, and it comes together in just five minutes flat.
Serving: 4 | Pre Time: 5 minutes | Cooking Time: 0 minutes
Ingredients
– Plain Greek yogurt – ½ cup
– Grated Parmesan cheese – ¼ cup
– Lemon juice – 2 tbsp
– Extra-virgin olive oil – 2 tbsp
– Anchovy paste – 1 tsp
– Garlic clove – 1
– Dijon mustard – 1 tsp
– Freshly ground black pepper – ¼ tsp
– Kosher salt – ¼ tsp
Instructions
1. Peel 1 garlic clove and use a microplane or the finest side of a box grater to grate it directly into a medium mixing bowl—grating instead of mincing ensures the garlic dissolves smoothly into the dressing without any harsh chunks.
2. Add ½ cup plain Greek yogurt, ¼ cup grated Parmesan cheese, 2 tbsp lemon juice, 2 tbsp extra-virgin olive oil, 1 tsp anchovy paste, 1 tsp Dijon mustard, ¼ tsp kosher salt, and ¼ tsp freshly ground black pepper to the bowl with the grated garlic.
3. Whisk all ingredients vigorously for about 60 seconds, or until the mixture is completely smooth, creamy, and well emulsified with no streaks of oil remaining.
4. Taste the dressing and adjust seasoning if needed, but avoid over-salting since the Parmesan and anchovy paste already contribute saltiness.
5. Transfer the dressing to an airtight jar or container if not using immediately; it can be refrigerated for up to 5 days, though the flavors meld and improve if you let it sit for at least 30 minutes before serving.
Zesty and luxuriously creamy, this dressing clings beautifully to crisp romaine without weighing it down. I love tossing it with grilled chicken or shrimp for a hearty main, or even using it as a veggie dip—the tangy yogurt base makes it surprisingly versatile beyond just salads.
Yogurt and Spinach Stuffed Mushrooms
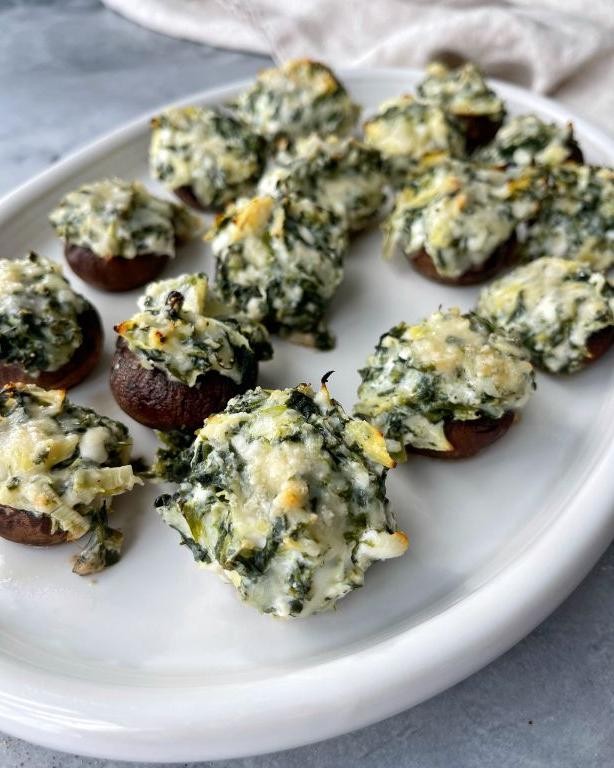
Unbelievably easy yet impressive, these stuffed mushrooms have become my go-to appetizer for holiday gatherings and casual weeknight dinners alike. I first tried a version at a friend’s potluck and have been tweaking the recipe ever since to get that perfect creamy filling with a hint of tang. Honestly, they disappear faster than I can plate them!
Serving: 4 | Pre Time: 15 minutes | Cooking Time: 20 minutes
Ingredients
– Large cremini mushrooms – 16
– Plain Greek yogurt – ½ cup
– Fresh spinach – 2 cups
– Garlic – 2 cloves
– Olive oil – 1 tbsp
– Salt – ¼ tsp
– Black pepper – ⅛ tsp
Instructions
1. Preheat your oven to 375°F and line a baking sheet with parchment paper.
2. Gently twist the stems off all 16 cremini mushrooms and set the caps aside on the prepared baking sheet.
3. Finely chop the mushroom stems and 2 cloves of garlic.
4. Heat 1 tbsp of olive oil in a skillet over medium heat for 1 minute until shimmering.
5. Add the chopped mushroom stems and garlic to the skillet and sauté for 3–4 minutes until softened and fragrant.
6. Add 2 cups of fresh spinach to the skillet and cook for 2–3 minutes, stirring constantly, until wilted and dark green.
7. Transfer the spinach mixture to a medium bowl and let it cool for 5 minutes to prevent the yogurt from curdling.
8. Stir in ½ cup of plain Greek yogurt, ¼ tsp salt, and ⅛ tsp black pepper until fully combined.
9. Spoon the yogurt-spinach filling evenly into each mushroom cap, mounding it slightly.
10. Bake the stuffed mushrooms at 375°F for 15–18 minutes until the tops are lightly golden and the mushrooms are tender.
11. Remove from the oven and let cool for 2 minutes before serving.
For a delightful contrast, these come out with tender mushroom caps cradling a creamy, tangy filling that’s brightened by the spinach. I love serving them warm with a sprinkle of fresh herbs or alongside a crisp salad for a light meal—they’re always a hit!
Turmeric Yogurt Roasted Vegetables
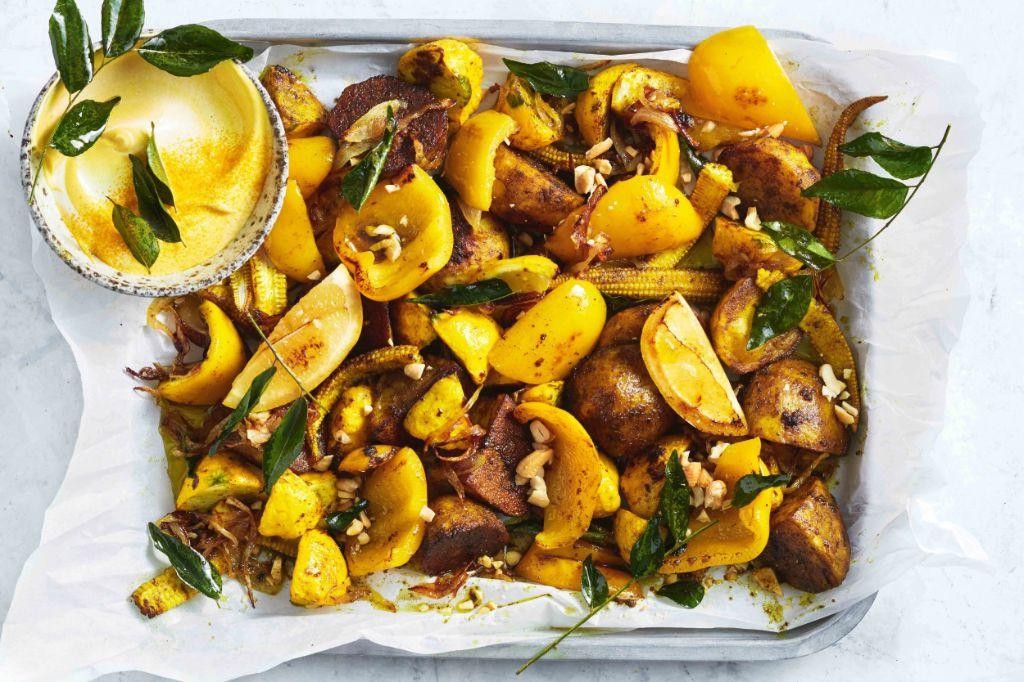
Every time I’m craving something cozy but healthy, I turn to this vibrant turmeric yogurt roasted vegetables recipe—it’s become my go-to for busy weeknights when I want a colorful, flavorful dish without spending hours in the kitchen. I love how the turmeric stains my fingers a sunny yellow, reminding me of lazy Sunday afternoons experimenting with spices. Honestly, it’s so simple that even my friend who “can’t cook” mastered it on her first try!
Serving: 4 | Pre Time: 15 minutes | Cooking Time: 30 minutes
Ingredients
– Sweet potatoes – 2 large
– Cauliflower – 1 head
– Red bell peppers – 2
– Olive oil – 3 tbsp
– Plain Greek yogurt – 1 cup
– Ground turmeric – 2 tsp
– Garlic powder – 1 tsp
– Salt – 1 tsp
– Black pepper – ½ tsp
Instructions
1. Preheat your oven to 425°F and line a large baking sheet with parchment paper.
2. Peel the sweet potatoes and cut them into 1-inch cubes.
3. Cut the cauliflower into florets about the same size as the sweet potato cubes for even cooking.
4. Core the red bell peppers and slice them into 1-inch strips.
5. In a large mixing bowl, combine the olive oil, Greek yogurt, ground turmeric, garlic powder, salt, and black pepper, whisking until smooth.
6. Add all the chopped vegetables to the bowl and toss thoroughly until every piece is coated with the yogurt mixture—I use my hands to ensure an even coating.
7. Spread the vegetables in a single layer on the prepared baking sheet, leaving space between them so they roast instead of steam.
8. Roast in the preheated oven for 25–30 minutes, flipping the vegetables halfway through with a spatula to promote even browning.
9. Check for doneness by piercing a sweet potato cube with a fork; it should be tender and the edges should be slightly caramelized.
10. Remove from the oven and let the vegetables rest for 5 minutes on the baking sheet to allow flavors to meld.
Now, this dish emerges from the oven with a beautiful golden hue and a creamy texture that clings to each vegetable. The yogurt creates a subtle tang that balances the earthy turmeric, while the roasted edges add a delightful crunch. I often serve it over quinoa for a complete meal or stuff it into warm pita bread with a drizzle of tahini for a quick lunch—it’s versatile enough to shine in any setting!
Yogurt and Banana Ice Cream

Just when I thought my sweet tooth couldn’t be tamed without a trip to the store, I discovered this magical two-ingredient trick hiding in my own kitchen. It’s the kind of happy accident that happens when you’re staring at a lonely banana and a tub of yogurt, wondering if dessert is even possible. I’ve made this so many lazy Sunday afternoons, and it never fails to feel like a little victory.
Serving: 2 | Pre Time: 5 minutes | Cooking Time: 0 minutes
Ingredients
– Ripe bananas – 2 large
– Plain Greek yogurt – 1 cup
Instructions
1. Peel 2 large, ripe bananas and slice them into 1-inch thick coins.
2. Place the banana slices in a single layer on a parchment-lined baking sheet. A pro tip: lining the sheet prevents sticking and makes cleanup a breeze.
3. Freeze the banana slices for at least 4 hours, or until they are completely solid and hard to the touch.
4. Transfer the frozen banana slices into the bowl of a high-powered food processor.
5. Add 1 cup of plain Greek yogurt to the food processor with the frozen bananas.
6. Secure the lid on the food processor and pulse the mixture 10 times to break up the large chunks.
7. Process the mixture on high speed for 60 seconds, then stop the machine and scrape down the sides with a spatula. Scraping is crucial here to ensure everything blends evenly into a smooth cream.
8. Process the mixture again on high speed for another 60-90 seconds, until it is completely smooth, creamy, and has the consistency of soft-serve ice cream. You’ll know it’s ready when no lumps remain and it easily scoops.
9. Serve the ice cream immediately for a soft-serve texture. For a firmer scoop, transfer it to a freezer-safe container and freeze for 1 hour.
Here’s the best part: this ice cream is luxuriously creamy and tastes like a dreamy banana foster, with a delightful tang from the yogurt that cuts the sweetness perfectly. I love serving it in chilled bowls with a drizzle of honey or a sprinkle of toasted nuts for a little crunch.
Yogurt and Chia Seed Pudding
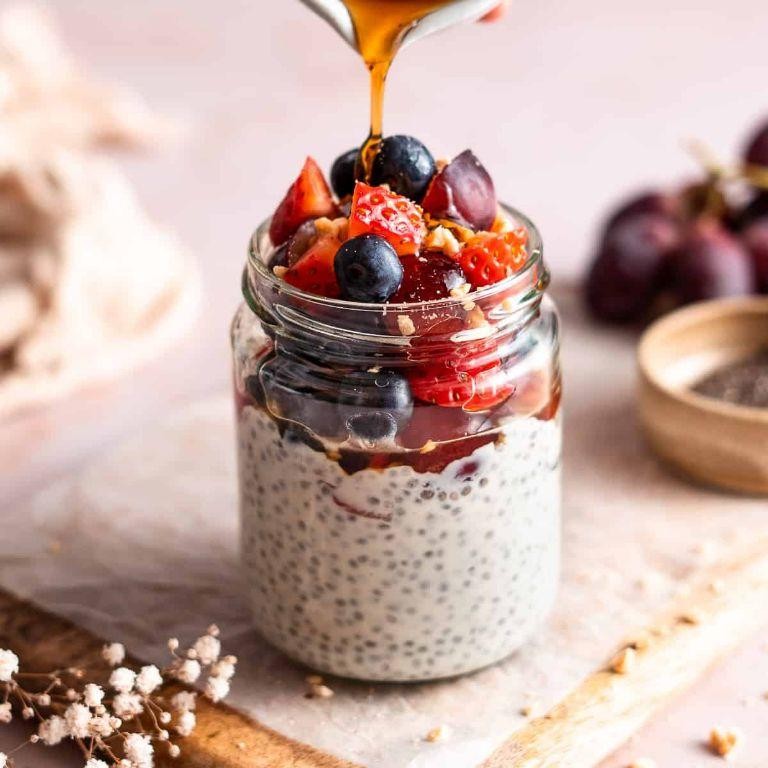
Gosh, I can’t tell you how many times I’ve scrambled for a quick, healthy breakfast that actually feels indulgent—this yogurt and chia seed pudding is my go-to lifesaver, especially during hectic holiday mornings like today. It’s the kind of no-cook recipe I prep the night before while wrapping gifts, and waking up to a creamy, ready-to-eat treat feels like a little gift to myself. Honestly, it’s so simple that even my kids can help layer the toppings, making it a fun family tradition we look forward to each December.
Serving: 2 | Pre Time: 5 minutes | Cooking Time: 0 minutes
Ingredients
– Greek yogurt – 1 cup
– Chia seeds – ¼ cup
– Honey – 2 tbsp
– Vanilla extract – 1 tsp
– Milk – ½ cup
– Fresh berries – ½ cup
Instructions
1. In a medium mixing bowl, combine 1 cup of Greek yogurt and ¼ cup of chia seeds using a whisk until fully incorporated—this helps prevent clumping for a smoother texture. 2. Add 2 tbsp of honey and 1 tsp of vanilla extract to the bowl, stirring vigorously for about 30 seconds to evenly distribute the sweetness and flavor. 3. Pour in ½ cup of milk while whisking continuously to create a uniform, slightly runny mixture; if it seems too thick, add an extra tablespoon of milk to adjust consistency. 4. Divide the mixture evenly between two serving jars or glasses, tapping each gently on the counter to remove any air bubbles. 5. Cover the jars tightly with lids or plastic wrap to prevent drying out. 6. Refrigerate the jars for at least 4 hours or overnight until the pudding sets to a thick, spoonable consistency—I often leave mine for 8 hours for maximum creaminess. 7. Just before serving, rinse ½ cup of fresh berries under cold water and pat them dry with a paper towel. 8. Top each jar of pudding evenly with the fresh berries, arranging them in a single layer for a vibrant presentation. 9. Serve immediately chilled, or store covered in the refrigerator for up to 3 days for easy grab-and-go breakfasts.
What I love most is how the chia seeds transform into tiny, gelatinous pearls that give this pudding a delightful tapioca-like texture, while the tangy yogurt balances the honey’s sweetness perfectly. For a festive twist during the holidays, I’ll swap the berries for a sprinkle of cinnamon or a drizzle of maple syrup, and it’s just as satisfying served in little mason jars as a make-ahead brunch centerpiece.
Herbed Yogurt Potato Salad

Last summer, I found myself with a surplus of fresh herbs from my garden and a craving for something lighter than the usual mayo-heavy potato salads. This herbed yogurt version quickly became my go-to for picnics and potlucks—it’s creamy, tangy, and packed with garden-fresh flavor that always gets compliments.
Serving: 6 | Pre Time: 15 minutes | Cooking Time: 20 minutes
Ingredients
– Yukon Gold potatoes – 2 lbs
– Plain Greek yogurt – 1 cup
– Fresh dill – ¼ cup chopped
– Fresh parsley – ¼ cup chopped
– Lemon juice – 2 tbsp
– Garlic – 2 cloves minced
– Salt – 1 tsp
– Black pepper – ½ tsp
– Olive oil – 1 tbsp
Instructions
1. Place the whole, unpeeled Yukon Gold potatoes in a large pot and cover with cold water by 1 inch.
2. Bring the pot to a boil over high heat, then reduce to a simmer and cook for 18–20 minutes until a fork easily pierces the potatoes.
3. Drain the potatoes in a colander and let them cool for 10 minutes until just warm to the touch—this prevents them from becoming mushy when mixed.
4. While the potatoes cool, combine the Greek yogurt, chopped dill, chopped parsley, lemon juice, minced garlic, salt, and black pepper in a large mixing bowl.
5. Whisk the yogurt mixture vigorously for 1 minute until smooth and well-blended.
6. Cut the cooled potatoes into 1-inch cubes, leaving the skins on for extra texture and nutrients.
7. Gently fold the potato cubes into the yogurt mixture with a spatula until evenly coated, being careful not to break them apart.
8. Drizzle the olive oil over the salad and give it one final gentle stir to incorporate.
9. Cover the bowl with plastic wrap and refrigerate for at least 1 hour to allow the flavors to meld—this step is key for the best taste.
10. Before serving, give the salad a quick stir and adjust seasoning if needed, though I rarely find it necessary.
Delightfully creamy yet light, this salad has a bright tang from the yogurt and lemon, balanced by the earthy herbs. I love serving it alongside grilled chicken or stuffed into lettuce cups for a low-carb twist—the potatoes stay firm, and every bite is bursting with fresh, summery flavor.
Yogurt and Coconut Curry Sauce

Every time I crave something creamy yet light, this yogurt and coconut curry sauce comes to mind—it’s my go-to for busy weeknights when I want a comforting meal without the heaviness. I first stumbled upon this combo after a friend’s potluck, where I was amazed by how a few simple ingredients could create such a vibrant, tangy sauce that pairs perfectly with veggies or grilled chicken.
Serving: 4 | Pre Time: 10 minutes | Cooking Time: 15 minutes
Ingredients
– Plain yogurt – 1 cup
– Coconut milk – ½ cup
– Curry powder – 1 tbsp
– Garlic – 2 cloves, minced
– Olive oil – 1 tbsp
– Salt – ½ tsp
Instructions
1. Heat 1 tbsp of olive oil in a medium saucepan over medium heat for 1 minute.
2. Add 2 cloves of minced garlic and sauté for 2 minutes, stirring constantly until fragrant and lightly golden.
3. Stir in 1 tbsp of curry powder and cook for 30 seconds to toast the spices, which enhances their flavor.
4. Pour in ½ cup of coconut milk and bring the mixture to a gentle simmer over medium-low heat for 3 minutes, stirring occasionally.
5. Reduce the heat to low and slowly whisk in 1 cup of plain yogurt until fully incorporated, taking care not to let it boil to prevent curdling.
6. Add ½ tsp of salt and simmer the sauce for 5 minutes, stirring frequently until it thickens slightly and coats the back of a spoon.
7. Remove the saucepan from the heat and let the sauce cool for 2 minutes before serving.
Zesty and velvety, this sauce has a smooth texture with a tangy kick from the yogurt balanced by the rich coconut undertones. I love drizzling it over roasted cauliflower or using it as a dip for naan—it’s versatile enough to elevate any simple dish into something special.
Yogurt and Beetroot Hummus
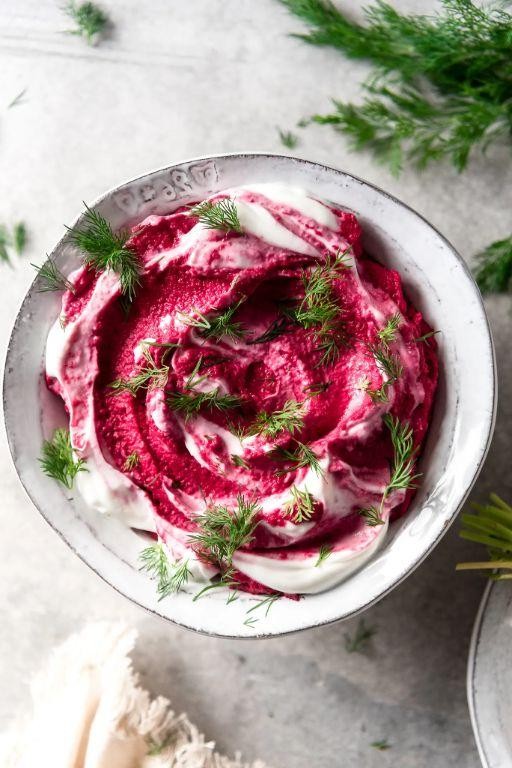
Browsing through my fridge this holiday season, I found leftover roasted beets from a dinner party and plain yogurt that needed using—a classic “clean out the fridge” moment that inspired this vibrant, creamy hummus. It’s become my go‑up for quick appetizers or a healthy snack, and the pink hue always gets compliments at gatherings, making it feel festive even on a busy December evening like tonight.
Serving: 6 | Pre Time: 10 minutes | Cooking Time: 0 minutes
Ingredients
– Chickpeas – 1 (15-ounce) can
– Cooked beetroot – 1 cup, diced
– Plain Greek yogurt – ½ cup
– Tahini – ¼ cup
– Lemon juice – 3 tablespoons
– Garlic – 2 cloves
– Olive oil – 2 tablespoons
– Salt – 1 teaspoon
– Ground cumin – ½ teaspoon
Instructions
1. Drain and rinse the chickpeas from the can in a colander under cold water, then pat them dry with a paper towel to help achieve a smoother hummus texture.
2. Peel and mince the garlic cloves finely to ensure they blend evenly without leaving chunks.
3. In a food processor, combine the chickpeas, diced cooked beetroot, plain Greek yogurt, tahini, lemon juice, minced garlic, salt, and ground cumin.
4. Process the mixture on high speed for 2 minutes, stopping to scrape down the sides with a spatula halfway through to incorporate everything uniformly.
5. While the processor is running, slowly drizzle in the olive oil through the feed tube over 30 seconds to emulsify and create a creamy consistency.
6. Taste the hummus and adjust seasoning if needed, but avoid over‑processing to prevent it from becoming too thin.
7. Transfer the hummus to a serving bowl, cover it with plastic wrap, and refrigerate for at least 30 minutes to allow the flavors to meld and the texture to firm up slightly.
8. Before serving, give it a quick stir and garnish with a drizzle of olive oil or extra beetroot pieces if desired.
Marbled with a stunning pink from the beets, this hummus has a velvety, spreadable texture that’s lighter than traditional versions thanks to the yogurt, with an earthy sweetness balanced by the tang of lemon and cumin. I love scooping it up with crunchy pita chips or spreading it on toast for a colorful breakfast—it’s surprisingly versatile and always disappears fast at potlucks!
Yogurt and Cinnamon Overnight Oats
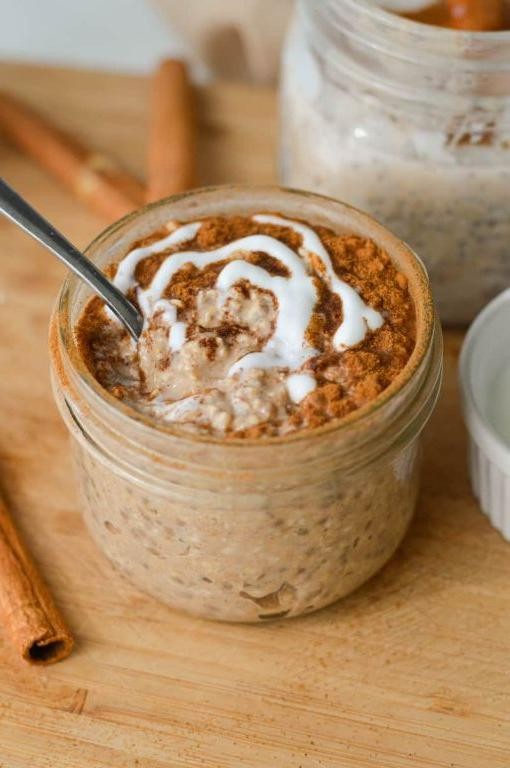
Cranking open the fridge at 6 a.m. used to be my morning dread—until I discovered this make-ahead miracle that feels like a warm hug in a jar. It’s my secret weapon for busy weeks, and I love how the cinnamon scent fills the kitchen when I prep it the night before.
Serving: 1 | Pre Time: 5 minutes | Cooking Time: 0 minutes
Ingredients
– Rolled oats – ½ cup
– Plain Greek yogurt – ½ cup
– Milk – ½ cup
– Honey – 1 tbsp
– Ground cinnamon – ½ tsp
– Salt – 1 pinch
Instructions
1. Grab a 12-ounce mason jar or airtight container.
2. Add ½ cup of rolled oats to the jar.
3. Spoon in ½ cup of plain Greek yogurt.
4. Pour ½ cup of milk over the yogurt and oats. (Tip: I use whole milk for creaminess, but any type works.)
5. Drizzle 1 tbsp of honey into the mixture.
6. Sprinkle ½ tsp of ground cinnamon evenly on top.
7. Add 1 pinch of salt to balance the sweetness.
8. Seal the jar tightly with its lid.
9. Shake the jar vigorously for 30 seconds until all ingredients are fully combined and no dry oats remain. (Tip: If the mixture seems too thick, add 1 more tbsp of milk and shake again.)
10. Place the jar in the refrigerator for at least 8 hours, or overnight. (Tip: For best results, let it chill for a full 8 hours to allow the oats to soften completely.)
11. After chilling, remove the jar from the refrigerator.
12. Stir the overnight oats once with a spoon to check consistency—it should be thick and creamy.
13. Serve immediately straight from the jar.
Velvety and spoonably thick, these oats have a tangy kick from the yogurt that’s perfectly sweetened by the honey, with the cinnamon weaving through every bite. I sometimes top it with a handful of fresh berries or a sprinkle of granola for crunch, making it a versatile breakfast that never gets old.
Yogurt and Pomegranate Chia Smoothie
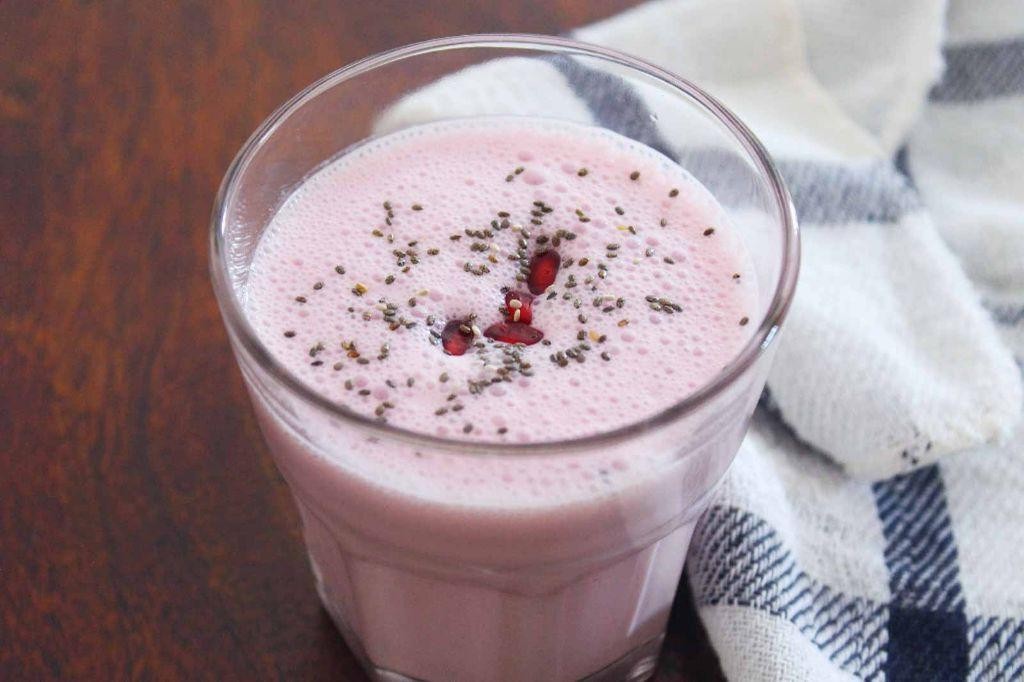
Holiday hustle got you frazzled? I know the feeling—between wrapping gifts and prepping for family, I’m always looking for a quick, nourishing breakfast that feels festive. This Yogurt and Pomegranate Chia Smoothie is my go-to: it’s vibrant, creamy, and packed with antioxidants to keep me energized through the season.
Serving: 1 | Pre Time: 5 minutes | Cooking Time: 0 minutes
Ingredients
– Greek yogurt – ½ cup
– Pomegranate juice – ¾ cup
– Chia seeds – 1 tbsp
– Honey – 1 tsp
– Ice cubes – ½ cup
Instructions
1. In a small bowl, combine 1 tbsp chia seeds with ¼ cup pomegranate juice. Let it sit for 10 minutes until the mixture thickens into a gel-like consistency—this helps the chia seeds blend smoothly without clumping.
2. Add ½ cup Greek yogurt, the remaining ½ cup pomegranate juice, 1 tsp honey, and ½ cup ice cubes to a blender.
3. Pour the chia seed gel from step 1 into the blender with the other ingredients.
4. Blend on high speed for 45–60 seconds until the mixture is completely smooth and frothy, scraping down the sides halfway through if needed to ensure even blending.
5. Pour the smoothie immediately into a tall glass. Just like that, it’s ready to enjoy!
Juicy and refreshing, this smoothie has a luscious, pudding-like texture from the chia seeds that makes it feel indulgent. I love how the tangy yogurt balances the sweet-tart pomegranate—it’s like a holiday party in a glass! For a fun twist, top it with extra pomegranate arils or a sprinkle of chia seeds for crunch.
Summary
A versatile collection, these 20 creamy plain yogurt recipes prove it’s a kitchen superstar for breakfasts, snacks, and desserts. We hope you find new favorites to whip up! Give a recipe a try, leave a comment telling us which one you loved, and don’t forget to share this roundup on Pinterest to spread the yogurt joy. Happy cooking!


