
Kickstart your kitchen creativity with these 18 essential Pretty Good Tools recipes! Whether you’re whipping up quick weeknight dinners, cozy comfort food, or seasonal favorites, this roundup has you covered. We’ve gathered the best dishes to make your cooking easier and more delicious. Ready to find your next go-to meal? Let’s dive in and explore these must-try recipes!
Garlic Press Pesto Pasta
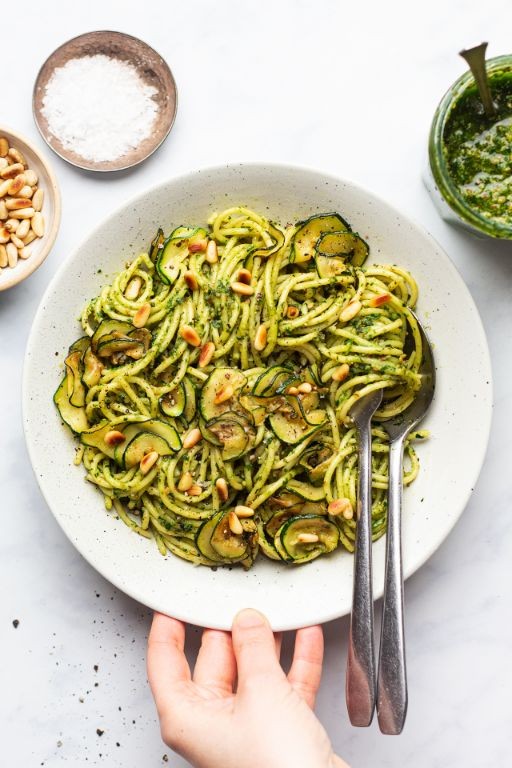
Venturing into the kitchen on a quiet afternoon, the simple act of crushing garlic releases a sharp, earthy perfume that promises comfort. This pesto pasta, born from that humble press, feels like a gentle embrace—a reminder that the most satisfying meals often come from the quietest moments.
Serving: 4 | Pre Time: 15 minutes | Cooking Time: 12 minutes
Ingredients
– 12 ounces dried spaghetti
– 4 large cloves of fresh garlic
– 2 cups loosely packed fresh basil leaves, vibrant green
– ½ cup rich extra virgin olive oil
– ½ cup finely grated Parmesan cheese, nutty and sharp
– ¼ cup toasted pine nuts, lightly golden and fragrant
– 1 teaspoon coarse sea salt
– ½ teaspoon freshly cracked black pepper
Instructions
1. Bring a large pot of generously salted water to a rolling boil over high heat.
2. Add the 12 ounces of dried spaghetti, stirring immediately to prevent sticking, and cook for 10–12 minutes until al dente, testing a strand for a firm bite.
3. While the pasta cooks, peel the 4 large cloves of fresh garlic and press them through a garlic press directly into a food processor bowl to capture all the flavorful juices.
4. Add the 2 cups of vibrant green fresh basil leaves, ½ cup of toasted pine nuts, 1 teaspoon of coarse sea salt, and ½ teaspoon of freshly cracked black pepper to the food processor.
5. Pulse the mixture 5–7 times until coarsely chopped, scraping down the sides with a spatula to ensure even blending.
6. With the food processor running on low speed, slowly drizzle in the ½ cup of rich extra virgin olive oil through the feed tube until the pesto is smooth and emulsified, about 30 seconds.
7. Transfer the pesto to a large mixing bowl and stir in the ½ cup of finely grated Parmesan cheese until fully incorporated.
8. Drain the cooked spaghetti, reserving ¼ cup of the starchy pasta water to help the sauce cling to the noodles.
9. Immediately add the hot spaghetti to the pesto in the bowl, tossing vigorously with tongs to coat every strand, adding the reserved pasta water 1 tablespoon at a time if needed to loosen the sauce.
10. Divide the pasta among four warmed bowls, serving it right away for the best texture and aroma.
Mellow and creamy, the pesto clings to each strand of pasta with a velvety richness, while the toasted pine nuts offer a satisfying crunch. For a twist, top it with a sprinkle of red pepper flakes or serve alongside grilled chicken, letting the garlicky basil notes shine through the simplicity.
Mandoline Slicer Veggie Chips
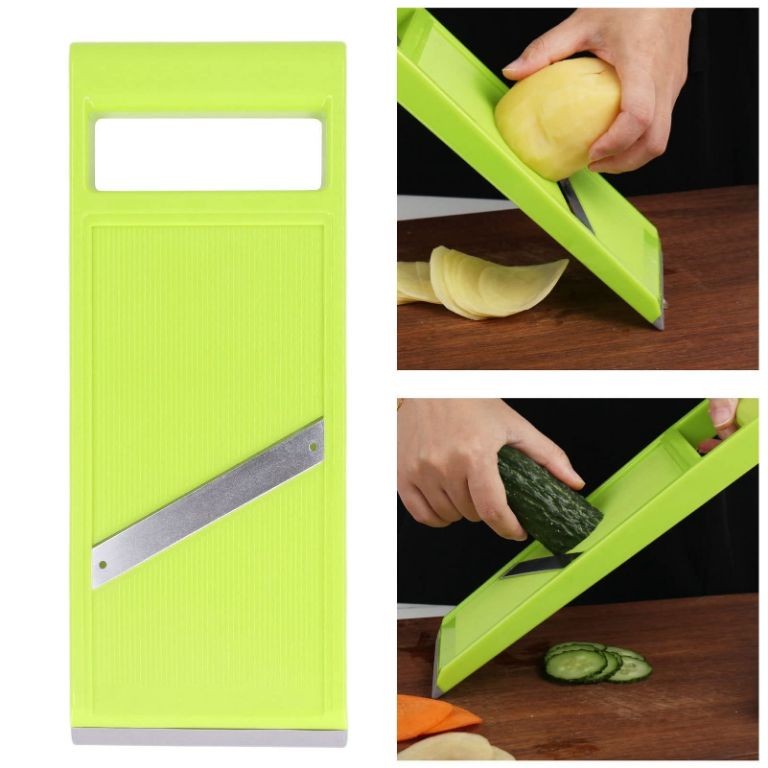
Evenings like this, when the kitchen light casts a soft glow and the world outside quiets, I find myself reaching for simple rituals—like transforming humble vegetables into something crisp and golden. There’s a quiet satisfaction in the rhythmic slice of a mandoline, turning roots and tubers into delicate, translucent rounds that will bake into chips with a satisfying crunch. It’s a gentle process, a way to savor the quiet and create a snack that feels both wholesome and a little bit special.
Serving: 4 | Pre Time: 20 minutes | Cooking Time: 25 minutes
Ingredients
– 2 medium russet potatoes, scrubbed clean and patted dry
– 1 large sweet potato, peeled
– 1 medium golden beet, peeled
– 1 large parsnip, peeled
– ¼ cup rich extra virgin olive oil
– 1 tablespoon finely ground sea salt
– ½ teaspoon freshly cracked black pepper
– ½ teaspoon smoked paprika
Instructions
1. Preheat your oven to 375°F and line two large baking sheets with parchment paper.
2. Using a mandoline slicer set to 1/16-inch thickness, carefully slice the russet potatoes, sweet potato, golden beet, and parsnip into uniform rounds. (Tip: Always use the hand guard for safety to protect your fingers.)
3. In a large mixing bowl, combine the rich extra virgin olive oil, finely ground sea salt, freshly cracked black pepper, and smoked paprika, whisking until fully blended.
4. Add all the vegetable slices to the bowl and gently toss with your hands until each piece is lightly and evenly coated with the oil and spice mixture.
5. Arrange the slices in a single layer on the prepared baking sheets, ensuring they do not touch or overlap to allow for even crisping.
6. Place the baking sheets in the preheated oven and bake for 15 minutes. (Tip: Rotate the pans halfway through baking to promote uniform browning.)
7. After 15 minutes, carefully flip each chip using tongs or a thin spatula.
8. Return the pans to the oven and continue baking for another 8–10 minutes, watching closely until the edges curl slightly and the chips turn a deep golden brown. (Tip: Chips will continue to crisp as they cool, so remove them when they are just shy of your desired crispness.)
9. Transfer the baked chips to a wire cooling rack and let them sit undisturbed for 10 minutes to fully crisp up.
So satisfyingly crisp and light, these chips offer a delightful mix of earthy sweetness from the beet and parsnip, balanced by the hearty russet and sweet potato. Serve them still slightly warm in a wide, shallow bowl, perhaps with a dollop of cool Greek yogurt for dipping, or simply enjoy them as a quiet, crunchy companion to an afternoon cup of tea.
Immersion Blender Creamy Tomato Soup
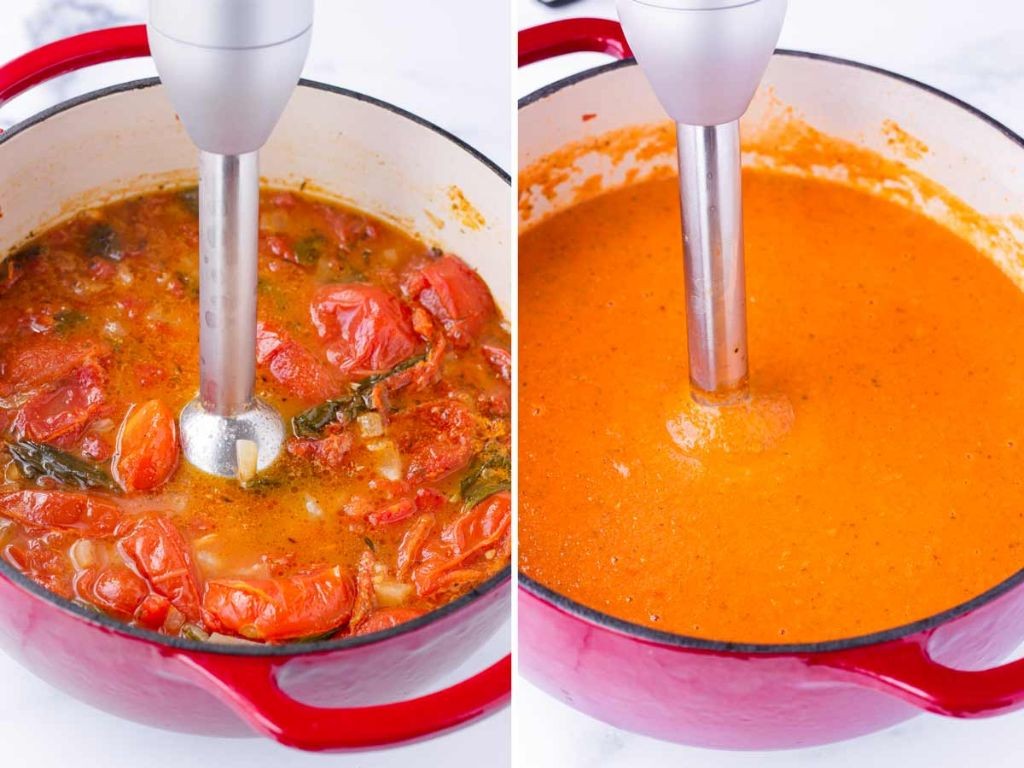
Beneath the quiet hum of the kitchen, there’s a simple comfort in transforming humble ingredients into something warm and velvety. This immersion blender tomato soup comes together with minimal fuss, letting the natural sweetness of roasted tomatoes shine through a creamy, dreamy texture. It’s the kind of recipe that feels like a gentle exhale at the end of a long day.
Serving: 4 | Pre Time: 15 minutes | Cooking Time: 35 minutes
Ingredients
– 2 pounds ripe Roma tomatoes, halved lengthwise
– 1 large yellow onion, roughly chopped
– 4 cloves garlic, peeled and smashed
– 3 tablespoons rich extra virgin olive oil
– 1 teaspoon fine sea salt
– ½ teaspoon freshly cracked black pepper
– 1 teaspoon dried oregano
– 4 cups low-sodium vegetable broth
– ½ cup heavy cream
– Fresh basil leaves, for garnish
Instructions
1. Preheat your oven to 400°F and line a large baking sheet with parchment paper.
2. Arrange the halved Roma tomatoes, chopped yellow onion, and smashed garlic cloves in a single layer on the prepared baking sheet.
3. Drizzle the vegetables evenly with the rich extra virgin olive oil, then sprinkle with the fine sea salt, freshly cracked black pepper, and dried oregano.
4. Roast the vegetables in the preheated oven for 25 minutes, or until the tomatoes are blistered and the onions are tender and lightly caramelized at the edges.
5. Tip: Roasting concentrates the tomatoes’ flavor and natural sugars, which is key for a deeply flavorful soup base.
6. Carefully transfer the hot roasted vegetables and any juices from the pan into a large, heavy-bottomed pot or Dutch oven.
7. Pour in the 4 cups of low-sodium vegetable broth and bring the mixture to a gentle simmer over medium heat.
8. Let the soup simmer uncovered for 10 minutes to allow the flavors to meld.
9. Remove the pot from the heat and, using an immersion blender, blend the soup directly in the pot until it is completely smooth and velvety.
10. Tip: For the smoothest texture, tilt the pot slightly and move the immersion blender in slow, steady circles, making sure to incorporate everything from the bottom.
11. Return the pot to low heat and stir in the ½ cup of heavy cream until fully incorporated and the soup is warmed through, about 2-3 minutes. Do not let it boil.
12. Tip: Adding the cream off the heat prevents it from curdling; warming it gently afterward ensures a silky consistency.
13. Ladle the hot soup into bowls and garnish with fresh basil leaves.
Velvety and rich, this soup has a luxurious texture that clings to the spoon, with a bright, sweet-acid balance from the roasted tomatoes. Serve it alongside a crusty grilled cheese sandwich for the ultimate cozy meal, or swirl in a spoonful of pesto for an herbal, vibrant twist.
Stand Mixer Chocolate Chip Cookies

Today, as the afternoon light slants through my kitchen window, I find myself drawn to the familiar hum of my stand mixer—a comforting ritual that promises the simple joy of chocolate chip cookies, warm from the oven and rich with memories.
Serving: 24 | Pre Time: 15 minutes | Cooking Time: 12 minutes
Ingredients
– 2 ¼ cups of soft all-purpose flour
– 1 teaspoon of fine sea salt
– 1 teaspoon of pure baking soda
– 1 cup of unsalted butter, softened to room temperature
– ¾ cup of granulated sugar
– ¾ cup of packed dark brown sugar
– 2 large farm-fresh eggs
– 2 teaspoons of pure vanilla extract
– 2 cups of semi-sweet chocolate chips
Instructions
1. Preheat your oven to 375°F and line two baking sheets with parchment paper.
2. In a medium bowl, whisk together the soft all-purpose flour, fine sea salt, and pure baking soda until well combined.
3. In the bowl of your stand mixer fitted with the paddle attachment, cream the unsalted butter, granulated sugar, and packed dark brown sugar on medium speed for 3 minutes, until light and fluffy.
4. Add the farm-fresh eggs one at a time, mixing on low speed after each addition until just incorporated.
5. Mix in the pure vanilla extract on low speed for 30 seconds.
6. Gradually add the flour mixture to the stand mixer bowl, mixing on low speed until no dry streaks remain, being careful not to overmix.
7. Gently fold in the semi-sweet chocolate chips with a spatula until evenly distributed throughout the dough.
8. Scoop rounded tablespoons of dough onto the prepared baking sheets, spacing them about 2 inches apart to allow for spreading.
9. Bake in the preheated oven for 10 to 12 minutes, until the edges are golden brown and the centers are just set but still soft.
10. Remove the baking sheets from the oven and let the cookies cool on the sheets for 5 minutes before transferring to a wire rack to cool completely.
Zesty with a hint of caramel from the brown sugar, these cookies emerge with crisp edges and a tender, chewy center that melts with pockets of gooey chocolate. Serve them warm with a glass of cold milk for a classic treat, or crumble them over vanilla ice cream for an indulgent dessert twist.
Food Processor Hummus
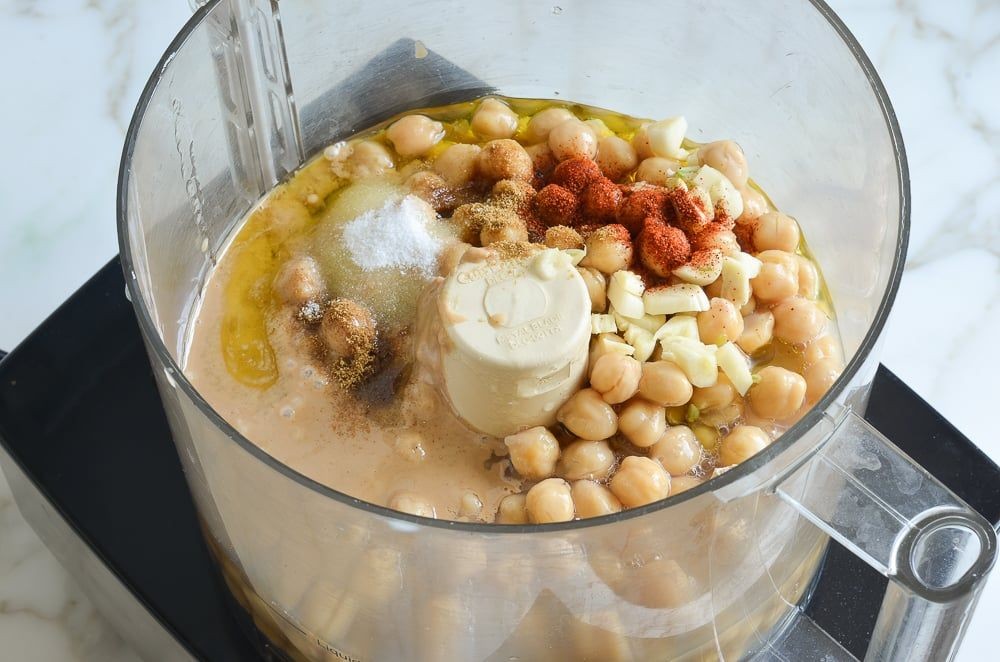
Drifting through the quiet afternoon, I find myself drawn to the kitchen’s hum, where a simple food processor transforms humble ingredients into something comforting and complete. This creamy hummus feels like a gentle pause in the day, a moment to gather and blend. It’s a recipe that asks for little but gives back a smooth, savory spread perfect for quiet reflection or sharing.
Serving: 6 | Pre Time: 10 minutes | Cooking Time: 0 minutes
Ingredients
– 2 (15-ounce) cans of plump, tender chickpeas, drained and rinsed
– ½ cup of rich, golden tahini paste
– ⅓ cup of freshly squeezed lemon juice, bright and tangy
– ¼ cup of extra virgin olive oil, fruity and smooth
– 2 large cloves of garlic, peeled and roughly chopped
– 1 teaspoon of fine sea salt
– ½ teaspoon of ground cumin, warm and earthy
– ¼ teaspoon of smoked paprika, subtly sweet
– 4-6 tablespoons of ice-cold water, as needed
– Optional: a drizzle of extra virgin olive oil and a sprinkle of smoked paprika for garnish
Instructions
1. Drain and rinse two 15-ounce cans of plump, tender chickpeas thoroughly under cold running water to remove any excess sodium and soften their texture.
2. In the bowl of a food processor fitted with the blade attachment, combine the rinsed chickpeas, ½ cup of rich, golden tahini paste, ⅓ cup of freshly squeezed lemon juice, ¼ cup of extra virgin olive oil, 2 large cloves of roughly chopped garlic, 1 teaspoon of fine sea salt, ½ teaspoon of warm ground cumin, and ¼ teaspoon of subtly sweet smoked paprika.
3. Secure the lid tightly on the food processor and pulse the mixture 5-7 times until the ingredients are roughly broken down and start to come together.
4. Tip: For an ultra-smooth hummus, consider peeling the chickpeas by gently rubbing them between your fingers after rinsing—this removes the skins that can cause graininess.
5. With the food processor running on low speed, slowly drizzle in 4 tablespoons of ice-cold water through the feed tube, allowing it to incorporate fully over about 30 seconds.
6. Stop the processor, scrape down the sides of the bowl with a rubber spatula to ensure even blending, and check the consistency—it should be thick but spreadable.
7. If the hummus is too thick, add 1-2 more tablespoons of ice-cold water, one at a time, with the processor running, until it reaches your desired creamy texture, which typically takes another 15-20 seconds per addition.
8. Tip: Using ice-cold water helps keep the hummus cool and prevents it from becoming gummy during blending, resulting in a lighter, fluffier finish.
9. Taste the hummus and adjust seasoning if needed, but avoid over-processing, as this can warm the mixture and affect the smoothness.
10. Transfer the hummus to a serving bowl, cover it with plastic wrap pressed directly onto the surface, and let it rest at room temperature for 10 minutes to allow the flavors to meld.
11. Tip: For optimal flavor development, refrigerate the hummus in an airtight container for at least 1 hour before serving—this deepens the garlic and spice notes while firming the texture slightly.
12. Just before serving, garnish the hummus with a drizzle of extra virgin olive oil and a light sprinkle of smoked paprika for visual appeal and an extra layer of aroma.
Zestfully smooth and velvety, this hummus cradles the earthy warmth of cumin and the gentle smokiness of paprika in every scoop. Its creamy texture clings to crackers or vegetable sticks, offering a savory depth that feels both nourishing and indulgent. Try spreading it on warm flatbread with a scatter of fresh herbs or layering it in a bowl with roasted vegetables for a simple, vibrant meal that invites slow enjoyment.
Microplane Zested Lemon Cake
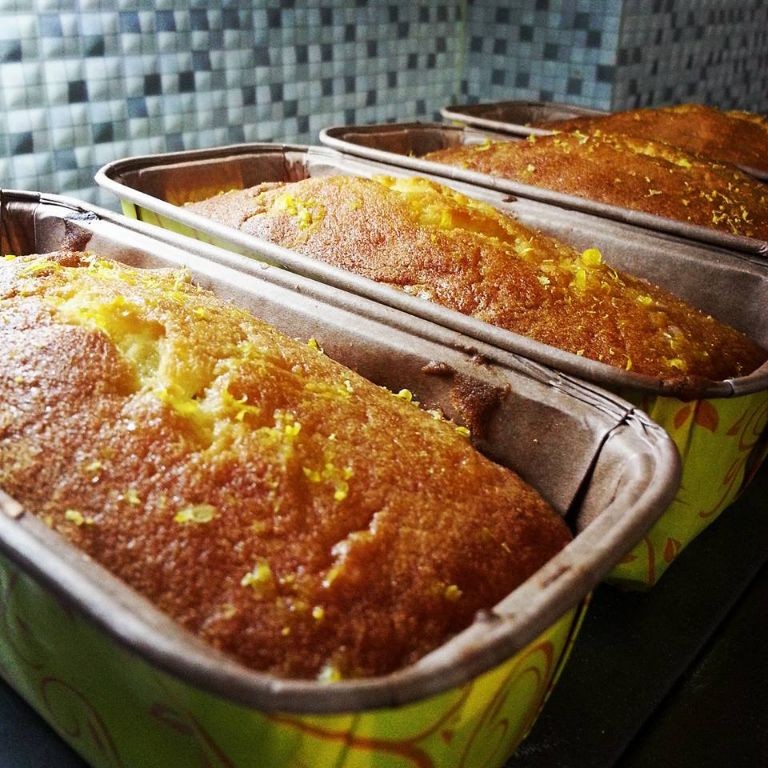
Nostalgia has a way of settling in the kitchen, especially on quiet afternoons when the light slants just so across the counter. Today, it called for the simple, sunlit comfort of a lemon cake, its fragrance promising a moment of pure, uncomplicated joy. The process itself becomes a gentle meditation, from the first scrape of zest to the final, tender crumb.
Serving: 8 | Pre Time: 20 minutes | Cooking Time: 45 minutes
Ingredients
– 1 cup of granulated white sugar, plus 2 tablespoons for the pan
– 1/2 cup of unsalted butter, softened at cool room temperature
– 2 large farm-fresh eggs, at room temperature
– 1 1/2 cups of unbleached all-purpose flour, spooned and leveled
– 1 1/2 teaspoons of aluminum-free baking powder
– 1/2 teaspoon of fine sea salt
– 1/2 cup of whole milk, at room temperature
– 2 tablespoons of freshly squeezed lemon juice
– The finely grated zest of 2 large, bright organic lemons, using a Microplane
Instructions
1. Preheat your oven to 350°F (175°C).
2. Generously butter a standard 9×5-inch loaf pan.
3. Sprinkle the 2 tablespoons of granulated sugar evenly across the bottom and sides of the buttered pan, tapping to coat; this creates a delicate, crackly crust.
4. In a large mixing bowl, use a hand mixer to cream the softened butter and 1 cup of sugar together on medium speed for 3-4 minutes, until pale and fluffy.
5. Add the room-temperature eggs one at a time, beating for 30 seconds after each addition until fully incorporated; scraping down the bowl with a spatula ensures an even mix.
6. In a separate medium bowl, whisk together the spooned flour, baking powder, and sea salt.
7. In a small bowl or liquid measuring cup, combine the room-temperature milk and fresh lemon juice; it will look slightly curdled, which is perfect for tenderness.
8. Add about one-third of the dry flour mixture to the butter mixture and mix on low speed until just combined.
9. Pour in half of the milk-lemon mixture and mix on low until just combined.
10. Repeat, adding another third of the flour, then the remaining milk, and finishing with the last of the flour, mixing until no dry streaks remain; avoid overmixing to keep the cake light.
11. Using a spatula, gently fold the finely grated lemon zest into the batter until evenly distributed.
12. Pour the batter into the prepared loaf pan and use the spatula to spread it evenly into the corners.
13. Bake on the center rack for 40-45 minutes, or until a toothpick inserted into the center comes out clean and the top is golden with a crack down the middle.
14. Let the cake cool in the pan on a wire rack for 15 minutes.
15. Carefully run a thin knife around the edges to loosen, then invert the cake onto the rack to cool completely.
Overturning the warm cake releases a cloud of citrus perfume. The texture is supremely tender and moist, with the zest providing little bursts of bright, fragrant oil in every bite. For a simple celebration, serve a thick slice with a dollop of softly whipped cream and a few fresh raspberries, letting the clean lemon flavor shine.
Dutch Oven Beef Stew

Dusk settles outside the window, the kind of quiet evening that calls for something slow and steady, something that fills the house with a deep, savory warmth as it simmers patiently on the stove. This is a stew for turning inward, for letting the hours soften the edges of the day.
Serving: 6 | Pre Time: 20 minutes | Cooking Time: 2 hours 30 minutes
Ingredients
– 2 tablespoons of rich extra virgin olive oil
– 2 pounds of well-marbled beef chuck, cut into 1-inch cubes
– 1 large yellow onion, finely diced
– 3 cloves of garlic, minced until fragrant
– 3 tablespoons of all-purpose flour
– 4 cups of robust beef broth
– 1 cup of dry red wine, like a Cabernet Sauvignon
– 1 pound of baby carrots, peeled
– 1 pound of Yukon Gold potatoes, cut into 1-inch chunks
– 2 sprigs of fresh rosemary
– 2 bay leaves
– 1 teaspoon of finely ground black pepper
– 1 teaspoon of coarse sea salt
Instructions
1. Pat the beef chuck cubes completely dry with paper towels to ensure a proper sear.
2. Heat the extra virgin olive oil in a large Dutch oven over medium-high heat until it shimmers, about 2 minutes.
3. Working in batches to avoid crowding, sear the beef cubes for 3-4 minutes per side until deeply browned on all edges, then transfer to a plate.
4. In the same pot, add the diced onion and cook for 5 minutes, stirring occasionally, until translucent and fragrant.
5. Add the minced garlic and cook for 1 more minute, just until its aroma is released.
6. Sprinkle the all-purpose flour over the onions and garlic, stirring constantly for 2 minutes to cook out the raw flour taste and create a roux.
7. Slowly pour in the beef broth and red wine while whisking continuously to prevent lumps from forming.
8. Return the seared beef and any accumulated juices to the pot.
9. Add the baby carrots, potato chunks, rosemary sprigs, bay leaves, black pepper, and sea salt, stirring gently to combine.
10. Bring the stew to a gentle boil, then immediately reduce the heat to low, cover the Dutch oven with its lid, and let it simmer for 2 hours, checking once to ensure it’s at a bare bubble.
11. After 2 hours, remove the lid and simmer uncovered for an additional 30 minutes to allow the sauce to thicken slightly.
12. Discard the rosemary stems and bay leaves before serving.
Perfectly tender beef melts against the toothsome potatoes, while the reduced wine and broth create a glossy, deeply savory gravy that clings to every spoonful. Consider serving it over a mound of creamy mashed potatoes or with a thick slice of crusty bread for dipping into every last bit of that rich, herb-infused sauce.
Spiralizer Zucchini Noodles
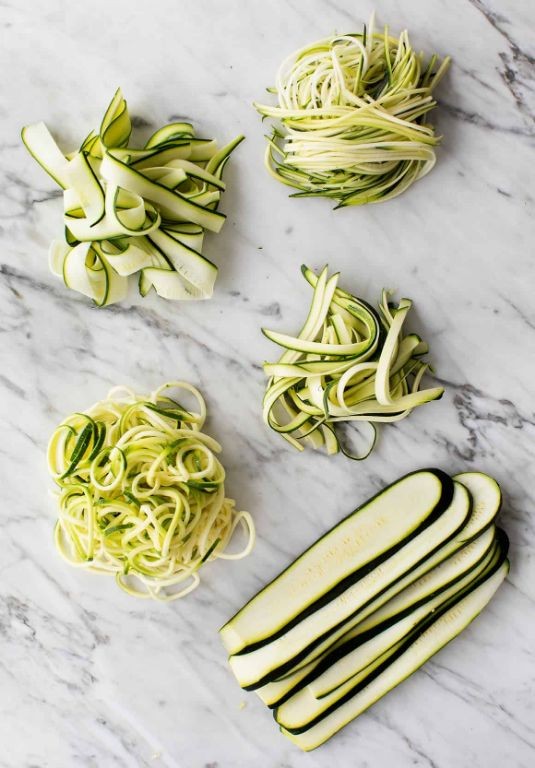
Under the soft glow of the kitchen light, there’s a quiet satisfaction in transforming a simple vegetable into something new, a gentle ritual that turns a busy evening into a moment of calm. Using a spiralizer feels like uncovering hidden potential, each twist revealing long, delicate ribbons that promise a lighter, fresher meal. It’s a small act of creation that soothes the mind as much as it nourishes the body.
Serving: 2 | Pre Time: 15 minutes | Cooking Time: 10 minutes
Ingredients
– 2 medium, firm zucchini
– 2 tablespoons rich extra virgin olive oil
– 3 plump garlic cloves, minced
– 1 cup sweet cherry tomatoes, halved
– ¼ cup freshly grated Parmesan cheese
– 1 tablespoon fresh basil leaves, thinly sliced
– ½ teaspoon coarse sea salt
– ¼ teaspoon finely ground black pepper
Instructions
1. Wash and dry the 2 medium, firm zucchini thoroughly, then trim off the ends.
2. Secure a zucchini in a spiralizer and turn the handle slowly to create long, noodle-like strands, repeating with the second zucchini; for best texture, avoid over-spiralizing into mushy strands.
3. Place the spiralized zucchini noodles in a colander, sprinkle with ½ teaspoon coarse sea salt, and let sit for 10 minutes to draw out excess moisture, which prevents a watery sauce.
4. While the noodles rest, heat 2 tablespoons rich extra virgin olive oil in a large skillet over medium heat until it shimmers lightly.
5. Add the 3 plump garlic cloves, minced, to the skillet and sauté for 1 minute until fragrant but not browned, stirring constantly to avoid burning.
6. Add the 1 cup sweet cherry tomatoes, halved, to the skillet and cook for 3–4 minutes until they soften and release their juices, gently pressing some with a spoon to create a light sauce.
7. Pat the zucchini noodles dry with paper towels to remove the released moisture, then add them to the skillet.
8. Toss everything together gently and cook for 2–3 minutes just until the noodles are warmed through but still al dente, avoiding overcooking to maintain a crisp-tender bite.
9. Remove the skillet from heat and stir in ¼ cup freshly grated Parmesan cheese, 1 tablespoon fresh basil leaves thinly sliced, and ¼ teaspoon finely ground black pepper.
10. Serve immediately while warm. Vibrant and light, these noodles offer a satisfying crunch with bursts of sweet tomato and savory garlic, perfect for a quick dinner that feels indulgent yet wholesome. Try topping with grilled shrimp or a sprinkle of red pepper flakes for an extra kick, letting the fresh flavors shine in every twirl.
Meat Grinder Homemade Sausage

Venturing into homemade sausage making feels like reclaiming a quiet kitchen ritual, where the steady hum of the meat grinder transforms simple ingredients into something deeply personal and satisfying. It’s a process that invites patience and rewards you with flavors far beyond anything store-bought.
Serving: 8 | Pre Time: 30 minutes | Cooking Time: 20 minutes
Ingredients
– 2 pounds of well-chilled, coarsely ground pork shoulder
– 1/4 cup of ice-cold water
– 2 tablespoons of kosher salt
– 1 tablespoon of freshly cracked black pepper
– 2 teaspoons of fragrant dried sage
– 1 teaspoon of sweet paprika
– 1/2 teaspoon of finely ground coriander seed
– 1/4 teaspoon of curing salt (Prague Powder #1)
– Natural hog casings, soaked in lukewarm water for 30 minutes
Instructions
1. Combine the coarsely ground pork shoulder, ice-cold water, kosher salt, freshly cracked black pepper, fragrant dried sage, sweet paprika, finely ground coriander seed, and curing salt in a large, chilled mixing bowl.
2. Mix the ingredients by hand for 3-4 minutes until the mixture becomes sticky and well-combined; keep the bowl over another bowl of ice to maintain a cold temperature, which helps the fat bind properly.
3. Rinse the natural hog casings under cool running water to remove any salt, then slide one end onto the sausage stuffer tube, leaving a 4-inch tail.
4. Feed the meat mixture into the grinder’s hopper, using the pusher to guide it through the stuffer attachment at a steady, medium pace to avoid air pockets.
5. As the casing fills, gently support it with your hand, allowing it to form a plump, continuous coil without overstuffing; a tip here is to occasionally prick any visible air bubbles with a sterilized pin to prevent bursting during cooking.
6. Twist the sausage into 5-inch links by pinching the casing and rotating it several times, then repeat along the entire length.
7. Place the linked sausages on a parchment-lined baking sheet and refrigerate, uncovered, for at least 1 hour to let the flavors meld and the casing dry slightly for better browning.
8. Preheat a cast-iron skillet over medium heat until a drop of water sizzles, then add the sausages without crowding, cooking for 8-10 minutes, turning occasionally until they reach an internal temperature of 160°F and develop a deep golden-brown crust.
9. Transfer the cooked sausages to a plate, tent loosely with foil, and let them rest for 5 minutes before serving to allow the juices to redistribute evenly.
Zesty and robust, these sausages boast a snappy casing that gives way to a juicy, well-seasoned interior with hints of sage and warm spices. Serve them sliced over creamy polenta, tucked into a crusty roll with caramelized onions, or crumbled into a hearty breakfast hash for a comforting meal that feels both rustic and refined.
Pastry Cutter Flaky Biscuits
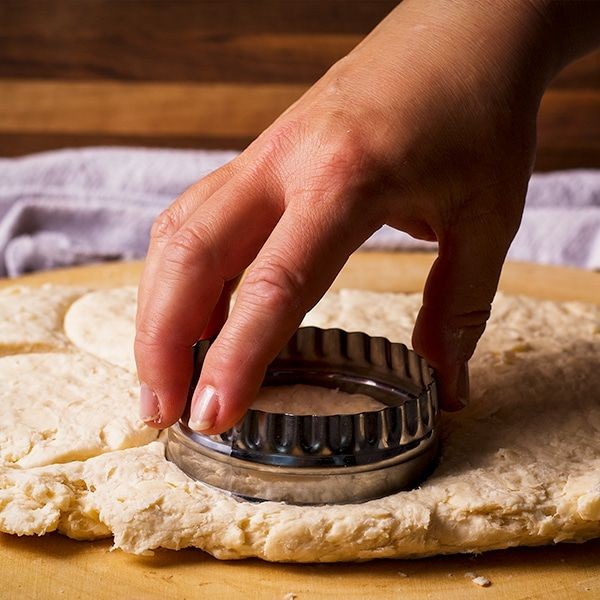
Dipping into the quiet of a winter morning, the simple act of making biscuits becomes a meditation—the rhythmic pressing of a pastry cutter through cold butter and flour, the gentle folding of dough that promises flaky layers. It’s a humble ritual that fills the kitchen with warmth and the faint, sweet scent of promise.
Serving: 8 | Pre Time: 20 minutes | Cooking Time: 15 minutes
Ingredients
– 2 cups of all-purpose flour, sifted to a light, airy texture
– 1 tablespoon of granulated sugar, fine and sparkling
– 1 tablespoon of baking powder, fresh and active
– 1 teaspoon of kosher salt, coarse and flaky
– ½ cup of unsalted butter, chilled and cut into small cubes
– ¾ cup of buttermilk, cold and tangy
Instructions
1. Preheat your oven to 425°F and line a baking sheet with parchment paper.
2. In a large mixing bowl, whisk together the sifted all-purpose flour, fine granulated sugar, fresh baking powder, and coarse kosher salt until evenly combined.
3. Add the chilled, cubed unsalted butter to the flour mixture, using a pastry cutter to cut it in until the mixture resembles coarse crumbs with pea-sized butter pieces—this creates flaky layers as the butter melts during baking.
4. Pour in the cold, tangy buttermilk, stirring gently with a fork just until the dough comes together; avoid overmixing to keep the biscuits tender.
5. Turn the dough onto a lightly floured surface, gently patting it into a 1-inch thick rectangle.
6. Fold the dough in half over itself, then pat it back to 1-inch thickness; repeat this folding process twice more to build additional flaky layers without kneading.
7. Use a 2½-inch round biscuit cutter to cut out biscuits, pressing straight down without twisting to ensure even rising.
8. Place the cut biscuits on the prepared baking sheet, spacing them about 1 inch apart.
9. Bake in the preheated oven at 425°F for 12-15 minutes, or until the tops are golden brown and the biscuits have puffed up beautifully.
10. Remove from the oven and let cool on the baking sheet for 5 minutes before serving.
Melt-in-your-mouth tender with a delicate crumb, these biscuits boast buttery, flaky layers that pull apart with a gentle tug. Serve them warm, slathered with honey or jam, or split and filled with savory ham for a comforting twist.
Grill Pan Chicken Fajitas

Perhaps there’s something quietly comforting about the sizzle of chicken and peppers in a grill pan on a winter afternoon, the way the aromas fill the kitchen with a promise of warmth and shared moments, a simple ritual that turns ordinary ingredients into a vibrant, hands-on meal.
Serving: 4 | Pre Time: 15 minutes | Cooking Time: 20 minutes
Ingredients
- 1.5 lbs of boneless, skinless chicken breasts, sliced into thin strips
- 2 large bell peppers (one red, one green), cored and sliced into thin strips
- 1 large yellow onion, peeled and thinly sliced
- 3 tbsp of rich extra virgin olive oil, divided
- 2 tbsp of freshly squeezed lime juice
- 2 tsp of warm ground cumin
- 1.5 tsp of smoky paprika
- 1 tsp of finely ground garlic powder
- 1 tsp of coarse kosher salt
- 1/2 tsp of freshly cracked black pepper
- 8 small flour tortillas
- 1/2 cup of fresh cilantro leaves, roughly chopped
- 1 ripe avocado, pitted and sliced
- 1/2 cup of tangy sour cream
Instructions
- In a large bowl, combine the chicken strips, 1 tbsp of the extra virgin olive oil, lime juice, ground cumin, smoky paprika, garlic powder, kosher salt, and cracked black pepper.
- Massage the marinade into the chicken until every piece is evenly coated, then set aside to rest for 10 minutes—this allows the flavors to penetrate deeply.
- Heat a large grill pan or cast-iron skillet over medium-high heat until a drop of water sizzles and evaporates upon contact, about 3 minutes.
- Add the remaining 2 tbsp of extra virgin olive oil to the hot pan, swirling to coat the surface evenly.
- Carefully place the marinated chicken strips in a single layer in the pan, ensuring they are not crowded to promote proper browning.
- Cook the chicken undisturbed for 4–5 minutes, until the bottoms develop deep golden-brown grill marks and release easily from the pan.
- Flip each chicken strip using tongs and cook for an additional 3–4 minutes, until the chicken is cooked through and no longer pink in the center.
- Transfer the cooked chicken to a clean plate and cover loosely with foil to keep warm.
- In the same pan, add the sliced bell peppers and onion, spreading them out in an even layer.
- Cook the vegetables, stirring occasionally, for 6–8 minutes until they are tender-crisp and lightly charred at the edges, which enhances their natural sweetness.
- Return the cooked chicken to the pan with the vegetables, gently tossing everything together to combine and reheat for 1 minute.
- While the fajita mixture finishes, warm the flour tortillas in a dry skillet over medium heat for 30 seconds per side, or wrap them in a damp paper towel and microwave for 20 seconds until pliable.
As you assemble each fajita, the tender, juicy chicken mingles with the sweet, charred peppers and onions, all wrapped in a soft, warm tortilla. A final garnish of creamy avocado slices, a dollop of cool sour cream, and a sprinkle of bright cilantro leaves creates a delightful contrast of textures and temperatures, perfect for a cozy family dinner or a casual gathering with friends.
Cast Iron Skillet Cornbread
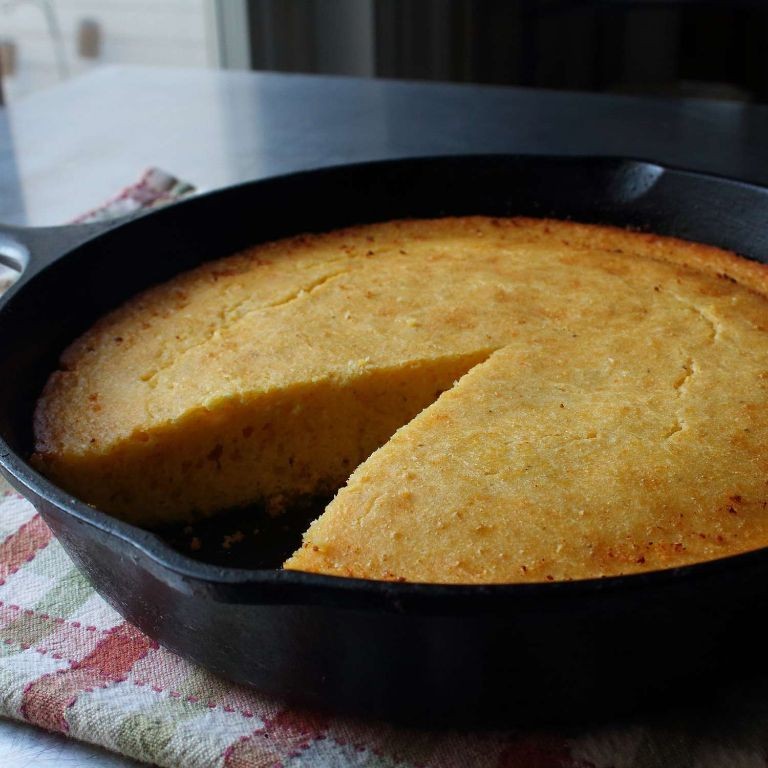
Just now, as the winter light slants through my kitchen window, I find myself reaching for the cast iron skillet—a familiar, comforting weight in my hands. There’s something about the ritual of making cornbread that feels like a quiet conversation with the past, a simple, sturdy bread that asks for little but gives so much warmth in return.
Serving: 8 | Pre Time: 10 minutes | Cooking Time: 25 minutes
Ingredients
– 1 cup of finely ground yellow cornmeal
– 1 cup of all-purpose flour, sifted
– 1 tablespoon of baking powder
– 1 teaspoon of fine sea salt
– 1 cup of whole milk, slightly warmed
– 1/3 cup of rich honey, gently warmed to a pourable consistency
– 1/2 cup of unsalted butter, melted and cooled slightly
– 2 large farm-fresh eggs, lightly beaten
– 1/4 cup of vegetable oil for greasing the skillet
Instructions
1. Preheat your oven to 400°F and place a 10-inch cast iron skillet inside to heat for 10 minutes—this preheating creates a beautifully crisp crust.
2. In a large mixing bowl, whisk together the finely ground yellow cornmeal, sifted all-purpose flour, baking powder, and fine sea salt until fully combined.
3. In a separate medium bowl, whisk the slightly warmed whole milk, gently warmed honey, melted unsalted butter, and lightly beaten farm-fresh eggs until smooth and emulsified.
4. Pour the wet ingredients into the dry ingredients and stir gently with a spatula until just combined; do not overmix to keep the texture tender.
5. Carefully remove the hot skillet from the oven using oven mitts, add the vegetable oil, and swirl it to coat the bottom and sides evenly.
6. Immediately pour the batter into the hot, oiled skillet—it should sizzle lightly, which helps form a golden-brown edge.
7. Bake at 400°F for 20–25 minutes, or until the top is golden brown and a toothpick inserted into the center comes out clean.
8. Let the cornbread cool in the skillet for 10 minutes before slicing to allow it to set properly.
From the first bite, you’ll notice the contrast: a shatteringly crisp crust gives way to a moist, tender crumb that’s subtly sweet from the honey. Serve it warm, slathered with butter that melts into the nooks, or crumble it over a bowl of chili for a hearty, textural twist that feels like a cozy embrace on a chilly evening.
Juicer Fresh Orange Juice

There’s a quiet magic in the morning light, a stillness before the day begins, when the simplest ritual can feel like a small, personal ceremony. Today, on this crisp December morning, I find myself drawn to the humble orange—its bright, cheerful presence a promise of sunshine even in winter’s chill. Let’s make a glass of juice that captures that pure, awakening essence, a liquid sunrise to start the day.
Serving: 2 | Pre Time: 5 minutes | Cooking Time: 0 minutes
Ingredients
– 4 large, heavy-for-their-size navel oranges, with vibrant, unblemished peels
– 1 cup of cold, filtered water
– 1 tablespoon of raw, golden honey (optional, for a touch of floral sweetness)
– A few ice cubes, made from purified water
Instructions
1. Place your juicer on a stable, clean countertop and assemble it according to the manufacturer’s instructions.
2. Thoroughly rinse the 4 large, heavy-for-their-size navel oranges under cool running water, gently scrubbing the vibrant peels to remove any residue.
3. Pat the oranges completely dry with a clean kitchen towel to prevent any water from diluting the juice.
4. Using a sharp chef’s knife, slice each orange in half crosswise, exposing the juicy segments within.
5. Turn on your juicer and place a half-pint glass or pitcher directly under the spout to catch the juice.
6. Firmly press one orange half, cut-side down, onto the juicer’s reamer or cone, and twist it slowly and steadily for a full 10 seconds to extract every last drop of pulp and juice.
7. Repeat step 6 with all remaining orange halves, using a spoon to scrape any clinging pulp from the juicer’s strainer basket between oranges for maximum yield.
8. Pour the 1 cup of cold, filtered water into the pitcher with the fresh juice and stir gently with a long spoon to combine.
9. If using, drizzle the 1 tablespoon of raw, golden honey into the mixture and stir for another 15 seconds until it is fully dissolved and integrated.
10. Add the few ice cubes made from purified water directly to the pitcher or divide them between two serving glasses.
11. Immediately pour the freshly mixed juice over the ice in the glasses.
12. Serve right away.
Each sip is a burst of bright, tangy sweetness, with a smooth, pulpy texture that feels substantial and refreshing. Enjoy it as a vibrant morning tonic, or for a playful twist, pour it over a scoop of vanilla bean sorbet for an instantly elegant dessert.
Pizza Cutter Homemade Pizza

Venturing into the kitchen on a quiet afternoon, I find myself drawn to the simple, tactile pleasure of making something from scratch. There’s a certain meditative quality to rolling out dough and layering flavors, a slow dance of hands and ingredients that feels both grounding and creative. Today, that dance is for a homemade pizza, a canvas waiting for our personal touch.
Serving: 4 | Pre Time: 20 minutes | Cooking Time: 15 minutes
Ingredients
– 1 ½ cups of warm water (about 110°F, like a soothing bath)
– 2 ¼ teaspoons of active dry yeast (those tiny, fragrant granules)
– 1 teaspoon of granulated sugar (a whisper of sweetness)
– 3 ½ cups of all-purpose flour (soft and cloud-like)
– 2 teaspoons of kosher salt (flaky and pure)
– 2 tablespoons of rich extra virgin olive oil (golden and fruity)
– ½ cup of vibrant tomato sauce (slow-simmered and tangy)
– 8 ounces of fresh mozzarella cheese (creamy and milky)
– ¼ cup of grated Parmesan cheese (sharp and nutty)
– 1 tablespoon of dried oregano (earthy and aromatic)
– ½ teaspoon of crushed red pepper flakes (for a gentle, warming kick)
Instructions
1. In a large mixing bowl, combine the warm water, active dry yeast, and granulated sugar, then let it sit for 5 minutes until frothy and bubbly—this activates the yeast for a light, airy crust.
2. Add the all-purpose flour, kosher salt, and rich extra virgin olive oil to the bowl, stirring with a wooden spoon until a shaggy dough forms.
3. Turn the dough onto a lightly floured surface and knead for 8-10 minutes until smooth and elastic, adding a sprinkle more flour if sticky—this develops the gluten for a chewy texture.
4. Place the dough in a lightly oiled bowl, cover with a damp kitchen towel, and let it rise in a warm spot for 1 hour until doubled in size.
5. Preheat your oven to 475°F with a pizza stone or baking sheet inside to heat thoroughly, which helps crisp the bottom crust.
6. Punch down the risen dough and divide it into two equal portions on a floured surface.
7. Roll out one portion into a 12-inch circle, about ¼-inch thick, using a rolling pin for an even base.
8. Transfer the rolled dough to a piece of parchment paper for easy handling.
9. Spread ¼ cup of vibrant tomato sauce evenly over the dough, leaving a ½-inch border around the edges for the crust.
10. Tear 4 ounces of fresh mozzarella cheese into small pieces and scatter them over the sauce, then sprinkle with 2 tablespoons of grated Parmesan cheese.
11. Season with ½ tablespoon of dried oregano and ¼ teaspoon of crushed red pepper flakes for layered flavor.
12. Slide the parchment paper with the pizza onto the preheated pizza stone or baking sheet in the oven.
13. Bake for 12-15 minutes until the crust is golden brown and the cheese is bubbly and slightly browned—rotate halfway through for even cooking.
14. Remove from the oven and let it cool for 2 minutes before slicing with a sharp pizza cutter.
15. Repeat steps 7-14 with the remaining dough and ingredients for the second pizza.
As you slice into that first warm piece, notice the crisp, blistered crust giving way to a tender, chewy interior, with the creamy mozzarella melting into the tangy tomato sauce. A drizzle of that rich extra virgin olive oil just before serving adds a glossy finish, or try topping it with fresh basil leaves for a burst of color and fragrance that makes each bite feel like a small celebration.
Egg Separator Angel Food Cake

Cradling a bowl of egg whites, I remember how this cake began as a quiet kitchen experiment—a way to honor those delicate, cloud-like whites that so often get overlooked. Today, on this soft December afternoon, it feels like a gentle celebration of simplicity and patience, where every careful fold and measured ingredient tells a story of transformation.
Serving: 12 | Pre Time: 25 minutes | Cooking Time: 45 minutes
Ingredients
– 1 ½ cups superfine granulated sugar, divided
– 1 cup cake flour, sifted twice for airiness
– 12 large farm-fresh egg whites, at room temperature
– 1 ½ teaspoons cream of tartar
– ¼ teaspoon fine sea salt
– 1 ½ teaspoons pure vanilla extract
– ½ teaspoon almond extract, for subtle fragrance
Instructions
1. Preheat your oven to 350°F and position a rack in the lower third—this helps the cake rise evenly without browning too quickly on top.
2. In a medium bowl, whisk together ¾ cup of the superfine granulated sugar with the twice-sifted cake flour until fully combined; set aside.
3. In a large, impeccably clean metal or glass bowl, combine the room-temperature egg whites, cream of tartar, and fine sea salt.
4. Using an electric mixer on medium speed, beat the egg white mixture until foamy and opaque, about 1 minute.
5. Gradually add the remaining ¾ cup of superfine granulated sugar, 1 tablespoon at a time, while beating on medium-high speed until stiff, glossy peaks form—this should take 5–7 minutes; the peaks should hold their shape when the beaters are lifted.
6. Gently fold in the pure vanilla extract and almond extract with a rubber spatula, using broad, sweeping motions to avoid deflating the whites.
7. Sift the flour-sugar mixture over the egg whites in four additions, folding gently after each until just incorporated and no dry streaks remain; overmixing can cause the cake to collapse.
8. Spoon the batter into an ungreased 10-inch tube pan, smoothing the top lightly with the spatula.
9. Bake at 350°F for 40–45 minutes, or until the top is golden brown and springs back when lightly touched; avoid opening the oven door during the first 30 minutes to prevent sinking.
10. Immediately invert the pan onto a cooling rack and let it hang upside down for at least 2 hours to cool completely—this step is crucial for maintaining the cake’s height and airy texture.
11. Once cooled, run a thin knife around the edges and center tube to loosen, then gently tap the cake out onto a serving plate.
Kneading memories into each slice, this cake emerges with a tender, cotton-soft crumb that melts on the tongue, its subtle vanilla and almond notes whispering of quiet mornings. Serve it simply dusted with powdered sugar, or crown it with a drift of whipped cream and fresh berries for a touch of brightness that contrasts its delicate sweetness.
Mortar and Pestle Guacamole

Musing on the quiet moments in the kitchen, I find a simple, grounding ritual in the rhythmic press and grind of stone against fruit, a tactile meditation that yields something far greater than the sum of its parts.
Serving: 4 | Pre Time: 15 minutes | Cooking Time: 0 minutes
Ingredients
– 3 ripe, fragrant Hass avocados
– 1/4 cup of finely chopped, crisp white onion
– 1/3 cup of freshly chopped, vibrant cilantro
– 2 tablespoons of freshly squeezed, bright lime juice
– 1 finely minced, fiery serrano pepper (seeds removed for less heat)
– 1/2 teaspoon of flaky, crunchy sea salt
Instructions
1. Cut the 3 ripe, fragrant Hass avocados in half, remove the pits, and scoop the flesh directly into a large, sturdy mortar.
2. Using the pestle, press and grind the avocado flesh against the bottom of the mortar for about 1 minute, until it forms a coarse, rustic paste with some visible chunks remaining.
3. Add the 1/4 cup of finely chopped, crisp white onion and the 1 finely minced, fiery serrano pepper to the mortar. (Tip: Rinsing the chopped onion under cold water for 10 seconds can mellow its sharp bite.)
4. Gently fold and press these ingredients into the avocado base with the pestle for 30 seconds to just combine, being careful not to over-mash.
5. Stir in the 1/3 cup of freshly chopped, vibrant cilantro and the 2 tablespoons of freshly squeezed, bright lime juice with the pestle until evenly distributed.
6. Sprinkle the 1/2 teaspoon of flaky, crunchy sea salt over the mixture. (Tip: Add the salt last to prevent the avocado from browning prematurely as you work.)
7. Give the guacamole one final, gentle stir with the pestle to incorporate the salt. (Tip: For best flavor, let the guacamole rest at room temperature for 5 minutes before serving to allow the flavors to meld.)
Nothing compares to the lush, creamy texture punctuated by little bursts of onion and the bright, herbal notes from the cilantro. The heat from the serrano builds slowly, making it perfect for scooping with thick, salty tortilla chips or as a vibrant topping for fish tacos.
Waffle Maker Belgian Waffles

Just now, as the morning light filters through my kitchen window, I find myself reaching for the familiar warmth of my waffle maker, a simple ritual that transforms humble ingredients into something golden and comforting. There’s a quiet joy in watching the batter sizzle and puff, filling the air with the sweet, buttery scent of home.
Serving: 4 | Pre Time: 10 minutes | Cooking Time: 15 minutes
Ingredients
– 2 cups of all-purpose flour, sifted to a fine, airy consistency
– 2 tablespoons of granulated sugar, for a subtle sweetness
– 1 tablespoon of baking powder, to ensure a light, fluffy rise
– 1/2 teaspoon of fine sea salt, to balance the flavors
– 2 large farm-fresh eggs, beaten until pale and frothy
– 1 3/4 cups of whole milk, warmed slightly to room temperature
– 1/2 cup of unsalted butter, melted and cooled to a golden liquid
– 1 teaspoon of pure vanilla extract, for a warm, aromatic note
Instructions
1. Preheat your waffle maker to 375°F, allowing it to heat fully for about 5 minutes until the indicator light signals readiness.
2. In a large mixing bowl, whisk together the sifted all-purpose flour, granulated sugar, baking powder, and fine sea salt until evenly combined.
3. In a separate bowl, gently beat the farm-fresh eggs until frothy, then stir in the warmed whole milk, melted unsalted butter, and pure vanilla extract.
4. Tip: Pour the wet ingredients into the dry mixture, folding gently with a spatula until just incorporated—avoid overmixing to keep the batter tender.
5. Lightly grease the preheated waffle maker with a brush of butter or non-stick spray to prevent sticking.
6. Ladle about 1/2 cup of batter onto the center of the waffle maker, spreading it slightly with the back of the ladle for even coverage.
7. Close the lid and cook for 4-5 minutes, or until the steam subsides and the waffles are deep golden brown with crisp edges.
8. Tip: Resist the urge to peek early; opening the lid can cause the waffles to tear and lose their fluffy texture.
9. Carefully remove each waffle with a fork and place it on a wire rack to cool slightly, which helps maintain crispiness.
10. Repeat with the remaining batter, greasing the waffle maker lightly between batches if needed.
11. Tip: For extra flavor, sprinkle a pinch of cinnamon into the batter or top with fresh berries before closing the lid.
Waffles emerge from the iron with a delicate crunch giving way to a soft, pillowy interior, their vanilla-kissed aroma mingling with buttery richness. Serve them warm, drizzled with maple syrup or crowned with a dollop of whipped cream, and watch as they become the centerpiece of a leisurely breakfast, inviting slow savoring and shared smiles.
Can Opener Chili Con Carne

Kindly, as the afternoon light fades on this quiet December day, I find myself drawn to the kitchen, where simple ingredients promise warmth and comfort. This chili con carne, born from pantry staples and a trusty can opener, is a gentle reminder that nourishment often waits patiently in the most humble of places, ready to transform a solitary evening into something softly satisfying.
Serving: 4 | Pre Time: 10 minutes | Cooking Time: 25 minutes
Ingredients
– 1 tablespoon of rich extra virgin olive oil
– 1 pound of lean ground beef, preferably 85/15
– 1 medium yellow onion, finely diced
– 2 cloves of fresh garlic, minced
– 1 (15-ounce) can of fire-roasted diced tomatoes, with their vibrant juices
– 1 (15-ounce) can of dark red kidney beans, drained and rinsed
– 1 (8-ounce) can of tomato sauce
– 2 tablespoons of chili powder blend
– 1 teaspoon of ground cumin, freshly toasted if possible
– 1 teaspoon of smoked paprika
– ½ teaspoon of fine sea salt
– ¼ teaspoon of freshly cracked black pepper
– 1 cup of low-sodium beef broth
Instructions
1. Heat the rich extra virgin olive oil in a large, heavy-bottomed pot or Dutch oven over medium heat until it shimmers lightly, about 2 minutes.
2. Add the finely diced yellow onion, stirring occasionally until it turns translucent and soft, approximately 5 minutes.
3. Stir in the minced fresh garlic and cook for 1 minute until fragrant, being careful not to let it brown.
4. Add the lean ground beef to the pot, breaking it apart with a wooden spoon, and cook until no pink remains, about 6-8 minutes.
5. Sprinkle the chili powder blend, ground cumin, smoked paprika, fine sea salt, and freshly cracked black pepper over the beef, stirring to coat evenly and toast the spices for 1 minute to deepen their flavors.
6. Pour in the can of fire-roasted diced tomatoes with their vibrant juices, the can of tomato sauce, and the low-sodium beef broth, stirring to combine.
7. Bring the mixture to a gentle simmer, then reduce the heat to low, cover the pot partially, and let it cook for 15 minutes, stirring occasionally to prevent sticking.
8. Gently fold in the drained and rinsed dark red kidney beans and simmer uncovered for an additional 5 minutes until the chili thickens slightly.
9. Remove the pot from the heat and let the chili rest for 5 minutes to allow the flavors to meld together beautifully.
The chili emerges with a hearty, spoon-coating texture, where tender beans mingle with richly spiced beef in a tomato-based broth that whispers of smoke and warmth. Serve it over a mound of fluffy white rice or with a side of crusty bread for dipping, and perhaps a dollop of cool sour cream to balance the gentle heat, making each bite a cozy embrace on a winter’s eve.
Summary
Whether you’re a seasoned cook or just starting out, these 18 essential Pretty Good Tools recipes offer delicious inspiration for every kitchen. We hope you’ll whip up a few, share your favorites in the comments below, and pin this roundup to your Pinterest boards to save for later. Happy cooking!


