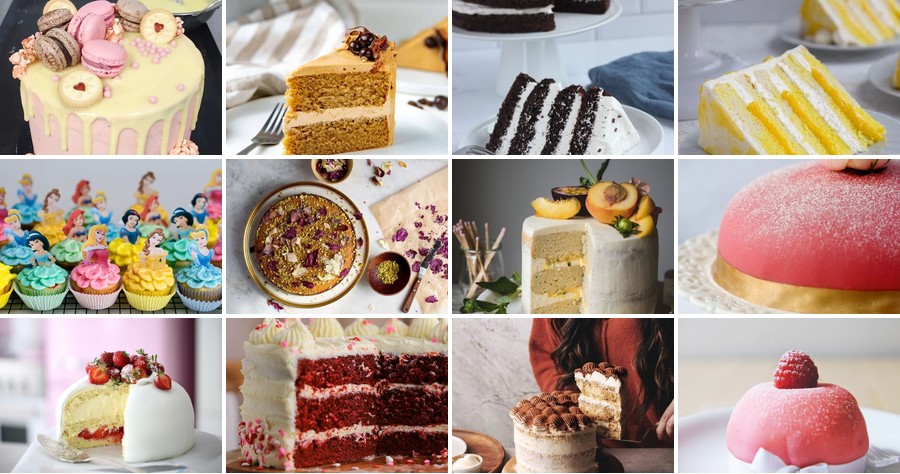
Savor the magic of royal celebrations with these enchanting princess cake recipes! Whether you’re planning a birthday party, a tea time treat, or just want to add a touch of elegance to your baking, these delightful creations are perfect for home cooks. From classic layers to whimsical designs, get ready to impress your guests and make every moment feel like a fairy tale. Let’s dive into these 20 delightful recipes!
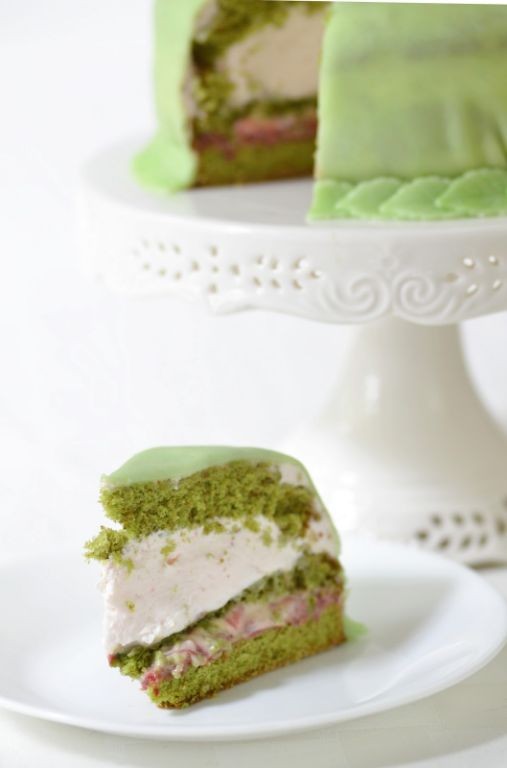
Classic Swedish Princess Cake with Vanilla Custard
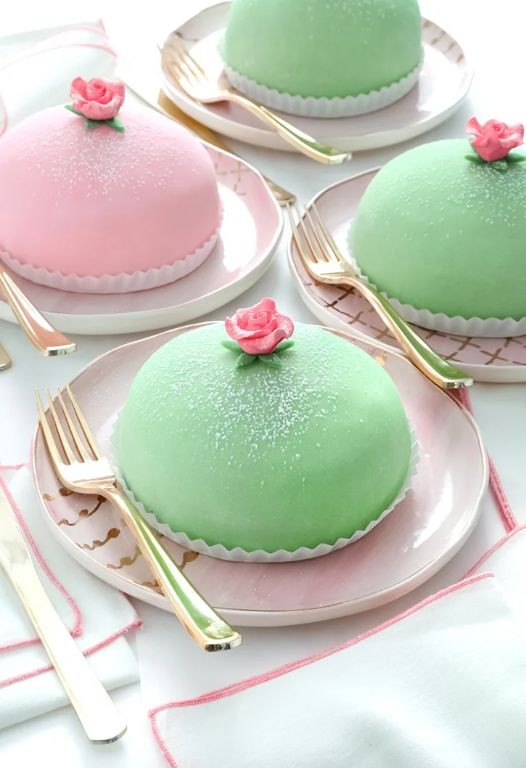
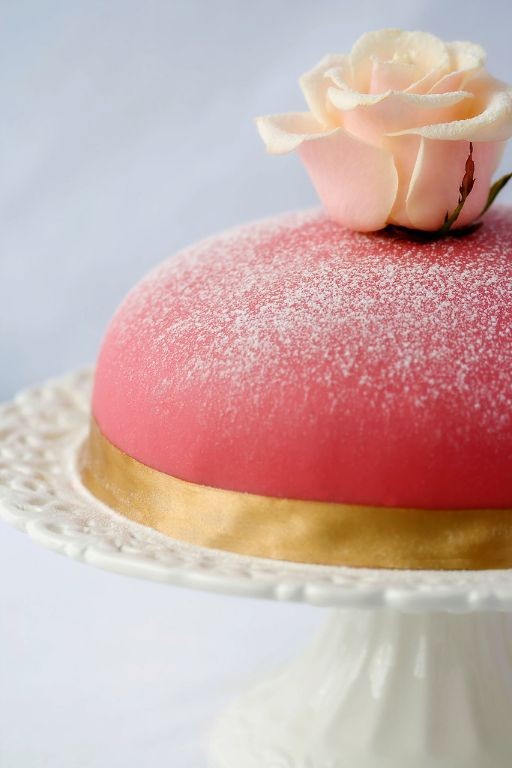
Heralding from the royal courts of Sweden, the Princess Cake is a confectionary masterpiece that marries delicate sponge with lush vanilla custard and a signature marzipan cloak. This elegant dessert, with its pastel green dome and delicate rose, transforms any occasion into a celebration worthy of its regal name. Its layers whisper of tradition while offering a timeless sophistication that delights both the eye and palate.
Serving: 8 | Pre Time: 45 minutes | Cooking Time: 25 minutes
Ingredients
- Eggs – 4 large
- Granulated sugar – ¾ cup
- All-purpose flour – 1 cup
- Vanilla extract – 1 tsp
- Whole milk – 2 cups
- Cornstarch – ¼ cup
- Heavy cream – 1½ cups
- Marzipan – 14 oz
- Green food coloring – 2 drops
Instructions
- Preheat oven to 350°F and grease a 9-inch round cake pan.
- Beat eggs and granulated sugar with an electric mixer on high speed for 5 minutes until pale and thick.
- Sift all-purpose flour into the egg mixture and fold gently with a spatula to avoid deflating the batter.
- Pour batter into the prepared pan and bake for 25 minutes until a toothpick inserted comes out clean.
- Cool cake completely on a wire rack, then slice horizontally into three even layers.
- In a saucepan, whisk whole milk, cornstarch, and ½ cup sugar over medium heat for 8 minutes until thickened.
- Remove custard from heat, stir in vanilla extract, and chill for 30 minutes until firm.
- Whip heavy cream to stiff peaks and fold half into the chilled custard for a lighter filling.
- Spread custard mixture between cake layers, stacking them evenly.
- Frost the assembled cake with remaining whipped cream, shaping it into a smooth dome.
- Knead marzipan with green food coloring until evenly tinted, then roll out to a ¼-inch thickness.
- Drape marzipan over the cake, trimming excess and smoothing seams with your fingers.
- Decorate with a marzipan rose and refrigerate for 2 hours before serving to set the layers.
Creating this cake yields a dessert with a cloud-like sponge that gives way to the rich, velvety custard, all encased in a subtly sweet marzipan shell. For a festive twist, dust the top with powdered sugar or garnish with fresh berries to complement its delicate flavors. Serve chilled slices with a cup of strong coffee to balance its luxurious sweetness, making each bite a moment of pure indulgence.
Mini Princess Cakes with Raspberry Filling
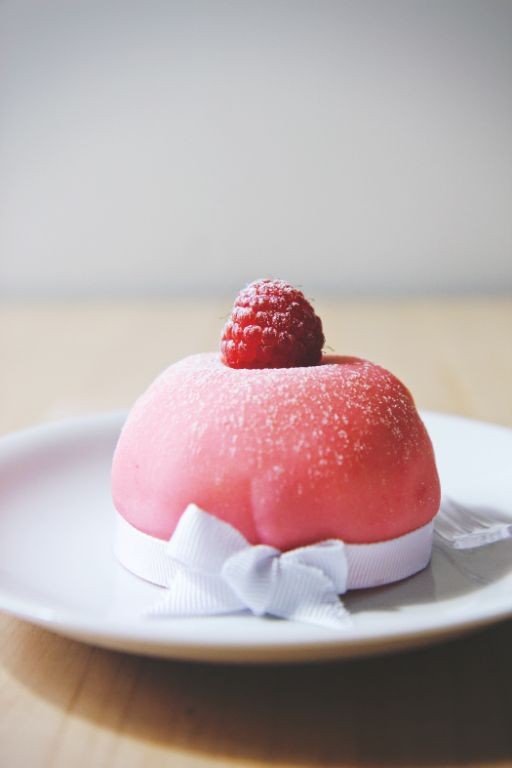
Fairy-tale elegance meets modern simplicity in these Mini Princess Cakes with Raspberry Filling. Featuring delicate sponge layers, a vibrant raspberry core, and a smooth marzipan finish, these individual desserts transform a classic Swedish treat into a charming, shareable delight perfect for holiday gatherings or afternoon tea. Their petite size and stunning presentation make them an unforgettable finale to any festive meal.
Serving: 12 | Pre Time: 30 minutes | Cooking Time: 20 minutes
Ingredients
– All-purpose flour – 1 cup
– Granulated sugar – ¾ cup
– Eggs – 3
– Unsalted butter – ½ cup
– Baking powder – 1 tsp
– Vanilla extract – 1 tsp
– Raspberry jam – ½ cup
– Heavy cream – 1 cup
– Powdered sugar – ¼ cup
– Marzipan – 8 oz
– Green food coloring – 2 drops
Instructions
1. Preheat your oven to 350°F and grease a 9×13-inch baking pan.
2. In a large bowl, beat 3 eggs and ¾ cup granulated sugar with an electric mixer on high speed for 5 minutes until pale and fluffy.
3. Melt ½ cup unsalted butter and let it cool slightly, then fold it gently into the egg mixture along with 1 tsp vanilla extract to avoid deflating the batter.
4. Sift 1 cup all-purpose flour and 1 tsp baking powder together, then gradually fold into the wet ingredients until just combined with no streaks of flour.
5. Pour the batter into the prepared pan and bake at 350°F for 18–20 minutes, or until a toothpick inserted in the center comes out clean.
6. Let the sponge cake cool completely in the pan on a wire rack, then use a 2-inch round cutter to stamp out 24 circles.
7. Whip 1 cup heavy cream and ¼ cup powdered sugar with an electric mixer on medium-high speed for 3–4 minutes until stiff peaks form.
8. Place one cake circle on a serving plate, spread 1 tsp raspberry jam evenly over it, then top with a dollop of whipped cream and another cake circle.
9. Roll out 8 oz marzipan on a surface dusted with powdered sugar to ⅛-inch thickness, then mix in 2 drops green food coloring until evenly tinted.
10. Cut the marzipan into 12 squares large enough to drape over each cake, smoothing it gently over the top and sides to create a seamless dome.
11. Refrigerate the assembled cakes for at least 1 hour to set before serving.
12. Dust the tops lightly with powdered sugar for a snowy effect, if desired.
A cloud-like sponge and tart raspberry filling contrast beautifully with the sweet, pliable marzipan shell in these mini masterpieces. For a festive twist, garnish each cake with a fresh raspberry or edible gold leaf just before serving to highlight their regal charm.
Chocolate Princess Cake with Whipped Cream Frosting
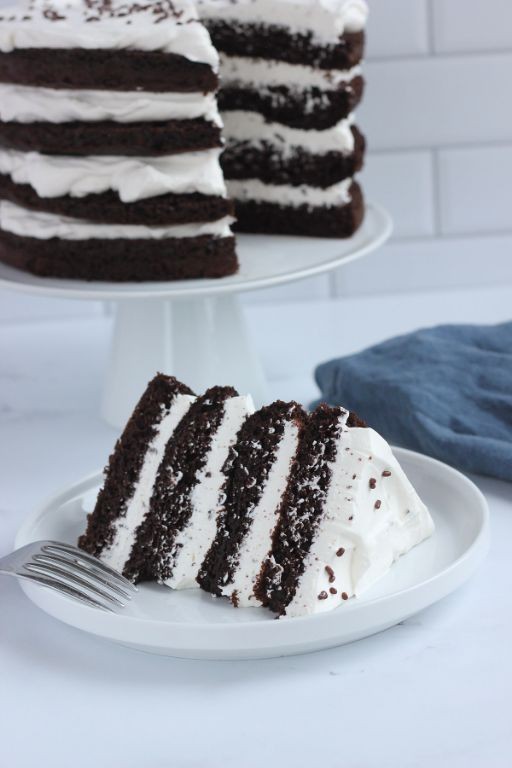
Just as the holiday season reaches its peak, a dessert emerges that captures both elegance and comfort in every bite. This Chocolate Princess Cake with Whipped Cream Frosting is a showstopper, featuring layers of moist chocolate cake enveloped in a cloud-like frosting, perfect for festive gatherings or a decadent weekend treat. Its rich cocoa flavor and airy texture make it an irresistible centerpiece for any celebration.
Serving: 12 | Pre Time: 30 minutes | Cooking Time: 35 minutes
Ingredients
– All-purpose flour – 2 cups
– Granulated sugar – 1 ½ cups
– Cocoa powder – ¾ cup
– Baking powder – 2 tsp
– Baking soda – 1 tsp
– Salt – ½ tsp
– Eggs – 3
– Buttermilk – 1 cup
– Vegetable oil – ½ cup
– Vanilla extract – 2 tsp
– Boiling water – 1 cup
– Heavy cream – 2 cups
– Powdered sugar – ½ cup
Instructions
1. Preheat the oven to 350°F and grease two 9-inch round cake pans, lining the bottoms with parchment paper for easy removal.
2. In a large bowl, whisk together the all-purpose flour, granulated sugar, cocoa powder, baking powder, baking soda, and salt until fully combined.
3. Add the eggs, buttermilk, vegetable oil, and vanilla extract to the dry ingredients, mixing on medium speed until smooth, about 2 minutes.
4. Gradually pour in the boiling water while stirring on low speed; the batter will be thin, which helps create a moist cake—tip: use a spatula to scrape the bowl’s sides to ensure no lumps remain.
5. Divide the batter evenly between the prepared pans and bake at 350°F for 30–35 minutes, or until a toothpick inserted into the center comes out clean.
6. Let the cakes cool in the pans for 10 minutes, then transfer them to a wire rack to cool completely, about 1 hour—tip: avoid frosting warm cakes to prevent the whipped cream from melting.
7. While the cakes cool, make the frosting by beating the heavy cream and powdered sugar on high speed until stiff peaks form, about 3–4 minutes; chill it in the refrigerator until ready to use.
8. Place one cake layer on a serving plate, spread a generous layer of whipped cream frosting over it, then top with the second layer and frost the entire cake evenly—tip: use an offset spatula for smooth, professional-looking sides.
9. Refrigerate the cake for at least 30 minutes before serving to allow the frosting to set firmly.
Meticulously crafted, this cake boasts a tender, fudgy crumb that melts on the tongue, complemented by the light, sweet whipped cream that adds a refreshing contrast. For a creative twist, garnish with fresh berries or a dusting of cocoa powder, making it a versatile dessert that shines at holiday feasts or intimate dinners alike.
Strawberry Princess Cake with Marzipan Covering

Whimsical yet sophisticated, this Strawberry Princess Cake with Marzipan Covering transforms classic flavors into an enchanting centerpiece, perfect for holiday celebrations or elegant gatherings where a touch of magic is desired. With its delicate layers of sponge, lush strawberry filling, and smooth marzipan cloak, it offers a visually stunning and deliciously balanced dessert that feels both nostalgic and refreshingly modern. The marzipan covering not only provides a flawless finish but also adds a subtle almond sweetness that complements the bright, fruity notes beautifully.
Serving: 12 | Pre Time: 45 minutes | Cooking Time: 25 minutes
Ingredients
– All-purpose flour – 2 cups
– Granulated sugar – 1 ½ cups
– Unsalted butter – 1 cup
– Eggs – 4 large
– Baking powder – 2 tsp
– Salt – ½ tsp
– Whole milk – ¾ cup
– Vanilla extract – 1 tsp
– Fresh strawberries – 3 cups
– Powdered sugar – 1 cup
– Heavy cream – 1 ½ cups
– Marzipan – 1 lb
– Red food coloring – 2 drops
Instructions
1. Preheat the oven to 350°F and grease two 9-inch round cake pans.
2. In a large bowl, cream together the unsalted butter and granulated sugar until light and fluffy, about 3 minutes.
3. Add the eggs one at a time, beating well after each addition, then mix in the vanilla extract.
4. In a separate bowl, whisk together the all-purpose flour, baking powder, and salt.
5. Gradually add the dry ingredients to the butter mixture, alternating with the whole milk, and mix until just combined.
6. Divide the batter evenly between the prepared pans and bake for 22-25 minutes, or until a toothpick inserted into the center comes out clean.
7. Let the cakes cool in the pans for 10 minutes, then transfer to a wire rack to cool completely.
8. While the cakes cool, hull and slice the fresh strawberries, reserving a few whole ones for garnish.
9. In a chilled bowl, whip the heavy cream and powdered sugar to stiff peaks, then fold in half of the sliced strawberries.
10. Place one cake layer on a serving plate, spread with the strawberry cream filling, and top with the second layer.
11. Roll out the marzipan on a surface dusted with powdered sugar to a ¼-inch thickness large enough to cover the entire cake.
12. Carefully drape the marzipan over the cake, smoothing it gently with your hands to remove any air bubbles and trim the excess from the bottom.
13. Tint the remaining marzipan with red food coloring, shape into small roses or leaves, and arrange on top with the reserved whole strawberries.
14. Refrigerate the cake for at least 1 hour before serving to allow the flavors to meld and the marzipan to set.
Just as delightful as it looks, this cake offers a tender crumb that contrasts with the creamy filling and the slightly chewy marzipan exterior, creating a symphony of textures in every bite. The strawberry flavor shines through with a natural sweetness, balanced by the subtle almond notes, making it a showstopper that’s as enjoyable to eat as it is to admire. For a festive twist, serve it with a drizzle of raspberry coulis or alongside a glass of sparkling wine to elevate the experience.
Lemon Princess Cake with Citrus Curd Layers
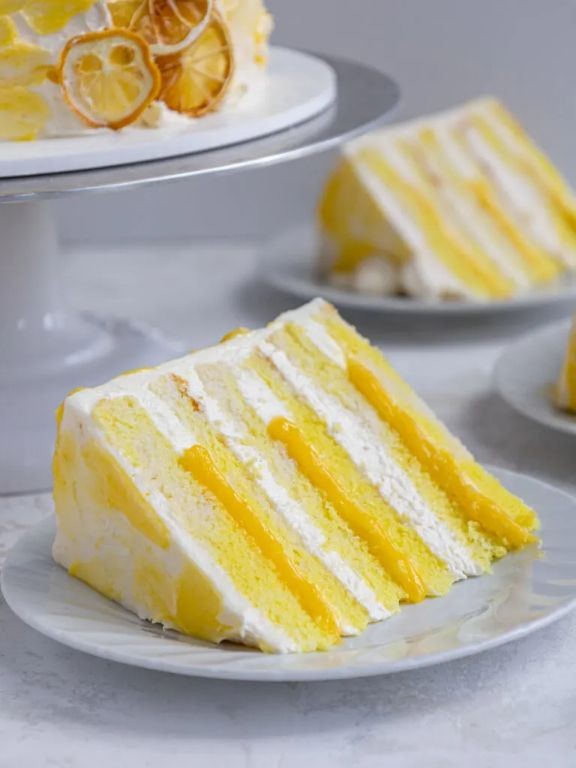
Kindly imagine a dessert that captures the essence of a sunlit winter garden, a confection where bright, zesty citrus curd is elegantly suspended between layers of tender, lemony cake. This Lemon Princess Cake is a celebration of simplicity and sophistication, a stunning centerpiece that promises to delight with every ethereal bite.
Serving: 8 | Pre Time: 30 minutes | Cooking Time: 25 minutes
Ingredients
– All-purpose flour – 1 ½ cups
– Granulated sugar – 1 cup
– Unsalted butter – ½ cup (1 stick), softened
– Eggs – 3 large
– Lemon juice – ½ cup
– Lemon zest – 2 tbsp
– Baking powder – 1 ½ tsp
– Salt – ¼ tsp
– Heavy cream – 1 cup
– Powdered sugar – 1 cup
Instructions
1. Preheat your oven to 350°F (175°C) and grease two 8-inch round cake pans, lining the bottoms with parchment paper for easy release.
2. In a large bowl, cream the softened butter and granulated sugar together with an electric mixer on medium-high speed for 3-4 minutes, until light and fluffy.
3. Add the eggs one at a time to the butter mixture, beating well after each addition until fully incorporated.
4. In a separate bowl, whisk together the all-purpose flour, baking powder, and salt to ensure even distribution and prevent clumping.
5. Gradually add the dry ingredients to the wet mixture, mixing on low speed just until combined, being careful not to overmix the batter.
6. Fold in the lemon juice and lemon zest gently with a spatula until the batter is smooth and uniformly flavored.
7. Divide the batter evenly between the prepared cake pans, using a scale for precision to guarantee layers of equal thickness.
8. Bake the cakes in the preheated oven for 22-25 minutes, or until a toothpick inserted into the center comes out clean and the edges are lightly golden.
9. Allow the cakes to cool in the pans for 10 minutes, then transfer them to a wire rack to cool completely to room temperature, which prevents sogginess.
10. While the cakes cool, prepare the frosting by whipping the heavy cream and powdered sugar together in a chilled bowl with an electric mixer on high speed for 3-4 minutes, until stiff peaks form.
11. Place one cooled cake layer on a serving plate and spread half of the whipped cream frosting evenly over the top with an offset spatula.
12. Carefully place the second cake layer on top and frost the top and sides with the remaining whipped cream, smoothing it for a polished finish.
13. Refrigerate the assembled cake for at least 1 hour before serving to allow the flavors to meld and the frosting to set firmly.
Majestically light and refreshing, this cake boasts a tender crumb that melts on the tongue, punctuated by the vibrant, tangy burst of lemon in every layer. For a festive twist, garnish with edible flowers or a dusting of powdered sugar just before presenting, making it a radiant finale to any holiday gathering.
Vegan Princess Cake with Coconut Cream
Meticulously crafted for festive celebrations, this Vegan Princess Cake with Coconut Cream transforms classic elegance into a plant-based masterpiece. Its layers of delicate sponge, luscious coconut cream, and vibrant marzipan coating create a stunning centerpiece that’s as delightful to behold as it is to savor. Perfect for holiday gatherings or special occasions, it proves that indulgence can be both compassionate and exquisite.
Serving: 8 | Pre Time: 30 minutes | Cooking Time: 25 minutes
Ingredients
– All-purpose flour – 1 ½ cups
– Granulated sugar – ¾ cup
– Baking powder – 1 tsp
– Salt – ¼ tsp
– Unsweetened almond milk – 1 cup
– Vegetable oil – ⅓ cup
– Vanilla extract – 1 tsp
– Full-fat coconut milk – 2 (13.5 oz) cans, chilled overnight
– Powdered sugar – ¼ cup
– Vegan marzipan – 14 oz
– Green food coloring – 2 drops
Instructions
1. Preheat your oven to 350°F and grease two 8-inch round cake pans, lining them with parchment paper for easy removal.
2. In a large bowl, whisk together the all-purpose flour, granulated sugar, baking powder, and salt until fully combined.
3. Add the unsweetened almond milk, vegetable oil, and vanilla extract to the dry ingredients, stirring gently until the batter is smooth with no lumps.
4. Divide the batter evenly between the prepared pans, tapping them lightly on the counter to release any air bubbles.
5. Bake for 22–25 minutes, or until a toothpick inserted into the center comes out clean and the cakes are golden brown.
6. Let the cakes cool in the pans for 10 minutes, then transfer them to a wire rack to cool completely—this prevents sogginess.
7. While the cakes cool, open the chilled coconut milk cans and scoop the solid cream into a bowl, discarding the liquid.
8. Using an electric mixer on high speed, whip the coconut cream with powdered sugar for 3–4 minutes until stiff peaks form.
9. Place one cake layer on a serving plate, spread half of the whipped coconut cream evenly over it, then top with the second layer and cover the entire cake with the remaining cream.
10. Knead the vegan marzipan with green food coloring on a clean surface dusted with powdered sugar until uniformly colored.
11. Roll out the marzipan into a 12-inch circle, about ⅛-inch thick, and carefully drape it over the cake, smoothing it with your hands to eliminate wrinkles.
12. Trim any excess marzipan from the base and let the cake chill in the refrigerator for at least 1 hour to set before serving.
Just as enchanting as its traditional counterpart, this cake boasts a light, airy sponge paired with rich, velvety coconut cream that melts on the tongue. For a festive twist, garnish with edible flowers or dust the marzipan with powdered sugar to mimic a winter wonderland effect.
Gluten-Free Princess Cake with Almond Sponge
Gracefully layered with delicate almond sponge, raspberry jam, and a cloud of vanilla pastry cream, this gluten-free princess cake transforms a classic into an inclusive celebration dessert. Its marzipan dome, tinted a soft pastel green, crowns a creation that’s as stunning to behold as it is tender to taste, perfect for holiday gatherings or special occasions. Each slice reveals the harmonious balance of nutty, fruity, and creamy notes, making it a showstopper that caters to dietary needs without compromise.
Serving: 8 | Pre Time: 45 minutes | Cooking Time: 25 minutes
Ingredients
– Almond flour – 1 ½ cups
– Granulated sugar – ¾ cup
– Eggs – 4 large
– Vanilla extract – 1 tsp
– Baking powder – 1 tsp
– Salt – ¼ tsp
– Raspberry jam – ½ cup
– Whole milk – 1 cup
– Cornstarch – 3 tbsp
– Egg yolks – 2 large
– Marzipan – 8 oz
– Green food coloring – 2 drops
Instructions
1. Preheat the oven to 350°F and grease an 8-inch round cake pan, lining it with parchment paper for easy removal.
2. In a large bowl, whisk together almond flour, ½ cup granulated sugar, baking powder, and salt until fully combined.
3. Separate the eggs, placing whites in a clean, dry bowl and yolks in a small bowl; add vanilla extract to the yolks and mix lightly.
4. Beat the egg whites with an electric mixer on medium-high speed until foamy, about 1 minute, then gradually add the remaining ¼ cup sugar and beat until stiff peaks form, which should take 3–4 minutes and look glossy.
5. Gently fold the egg yolk mixture into the almond flour mixture using a spatula until just incorporated, being careful not to overmix to keep the batter airy.
6. Fold the beaten egg whites into the batter in three additions, folding gently after each until no white streaks remain to maintain the sponge’s lightness.
7. Pour the batter into the prepared pan and bake for 20–25 minutes, or until a toothpick inserted into the center comes out clean and the top is golden brown.
8. Let the cake cool in the pan for 10 minutes, then transfer to a wire rack to cool completely, about 1 hour, to prevent it from crumbling when handled.
9. While the cake cools, prepare the pastry cream: in a saucepan, whisk together milk, cornstarch, and egg yolks over medium heat until thickened, about 5–7 minutes, stirring constantly to avoid lumps, then remove from heat and let cool to room temperature.
10. Slice the cooled cake horizontally into two even layers using a serrated knife for a clean cut.
11. Spread raspberry jam evenly over the bottom cake layer, then top with a layer of the cooled pastry cream, leaving a ½-inch border to prevent overflow.
12. Place the top cake layer over the filling and press down gently to secure it.
13. Knead the marzipan with green food coloring on a clean surface dusted with powdered sugar until evenly tinted, then roll it out into a circle large enough to cover the cake.
14. Drape the marzipan over the assembled cake, smoothing it with your hands to eliminate wrinkles and trimming any excess around the base.
15. Refrigerate the cake for at least 2 hours before serving to set the layers and enhance the flavors.
Each forkful yields a moist, nutty sponge that contrasts beautifully with the tangy raspberry jam and silky pastry cream, all encased in a subtly sweet marzipan shell. For a festive touch, garnish with edible flowers or dust with powdered sugar just before serving, making it a centerpiece that delights both gluten-free and traditional dessert lovers alike.
Princess Cake Roll with Pastry Cream and Berries
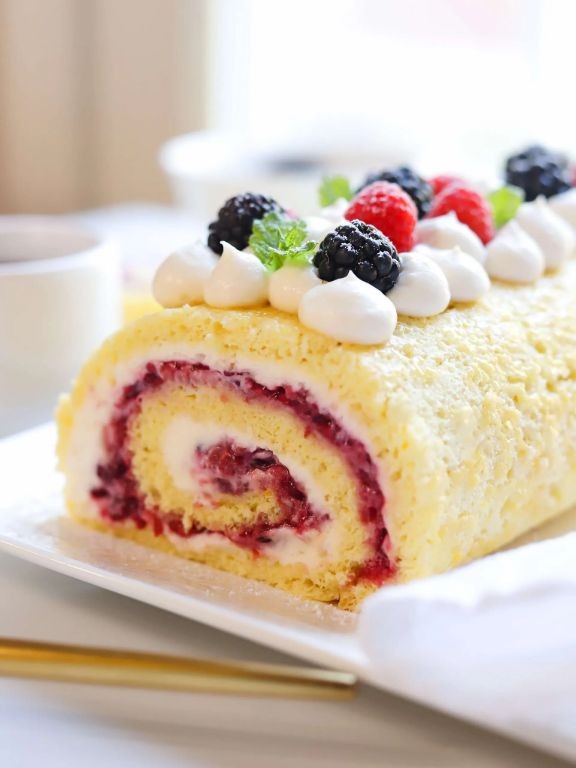
Nestled within the delicate embrace of a tender sponge cake, this Princess Cake Roll unfurls to reveal a luxurious filling of vanilla-kissed pastry cream and a vibrant mosaic of fresh berries, offering a dessert that is as visually stunning as it is delicious. Its elegant swirl promises a delightful contrast of textures and a celebration of simple, refined flavors, perfect for elevating any afternoon tea or special occasion. Crafting this confection is a rewarding endeavor that yields a show-stopping centerpiece with a surprisingly approachable technique.
Serving: 8 | Pre Time: 30 minutes | Cooking Time: 12 minutes
Ingredients
– Eggs – 4 large
– Granulated sugar – ¾ cup
– All-purpose flour – ¾ cup
– Baking powder – 1 tsp
– Salt – ¼ tsp
– Vanilla extract – 1 tsp
– Whole milk – 1 cup
– Cornstarch – 3 tbsp
– Egg yolks – 4
– Unsalted butter – 2 tbsp
– Mixed fresh berries (such as strawberries, raspberries, blueberries) – 1½ cups
– Confectioners’ sugar – for dusting
Instructions
1. Preheat your oven to 350°F (175°C) and line a 10×15-inch jelly roll pan with parchment paper, lightly greasing the paper.
2. In a large bowl, beat the 4 large eggs and ¾ cup granulated sugar with an electric mixer on high speed for 5–7 minutes until the mixture is thick, pale, and forms a ribbon when the beaters are lifted.
3. Sift the ¾ cup all-purpose flour, 1 tsp baking powder, and ¼ tsp salt together, then gently fold into the egg mixture in three additions using a spatula, being careful not to deflate the batter.
4. Fold in 1 tsp vanilla extract until just combined, then pour the batter into the prepared pan, spreading it evenly into the corners.
5. Bake for 10–12 minutes, or until the cake springs back lightly when touched and the edges are just beginning to pull away from the pan.
6. While the cake bakes, lay a clean kitchen towel on a flat surface and dust it generously with confectioners’ sugar.
7. Immediately upon removing the cake from the oven, invert it onto the sugared towel, carefully peel off the parchment paper, and starting from a short end, roll the cake up with the towel inside; let it cool completely rolled up on a wire rack—this prevents cracking when filled.
8. For the pastry cream: In a medium saucepan, whisk together 1 cup whole milk, 3 tbsp cornstarch, 4 egg yolks, and ¼ cup of the remaining granulated sugar from the initial ¾ cup until smooth.
9. Cook the mixture over medium heat, whisking constantly, for 5–7 minutes until it thickens to a pudding-like consistency and large bubbles break the surface; remove from heat and stir in 2 tbsp unsalted butter until melted and incorporated.
10. Transfer the pastry cream to a bowl, press plastic wrap directly onto the surface to prevent a skin from forming, and refrigerate for at least 30 minutes until completely chilled.
11. Gently unroll the cooled cake, spread the chilled pastry cream evenly over the surface, leaving a ½-inch border on all sides, and sprinkle 1½ cups mixed fresh berries evenly over the cream.
12. Carefully re-roll the cake from the same short end, using the towel to guide it into a tight log without squeezing out the filling.
13. Place the roll seam-side down on a serving platter, dust the top with confectioners’ sugar, and refrigerate for at least 1 hour before slicing to allow it to set.
14. Using a serrated knife, slice the cake roll into 1-inch pieces, wiping the knife clean between cuts for neat edges.
Delicate and airy, the sponge cake provides a soft contrast to the rich, velvety pastry cream, while the berries add bursts of juicy tartness that cut through the sweetness. For a festive presentation, garnish each slice with a few extra berries and a mint leaf, or drizzle with a raspberry coulis to enhance the berry notes; this cake roll is best served chilled, allowing the flavors to meld into a harmonious, elegant dessert.
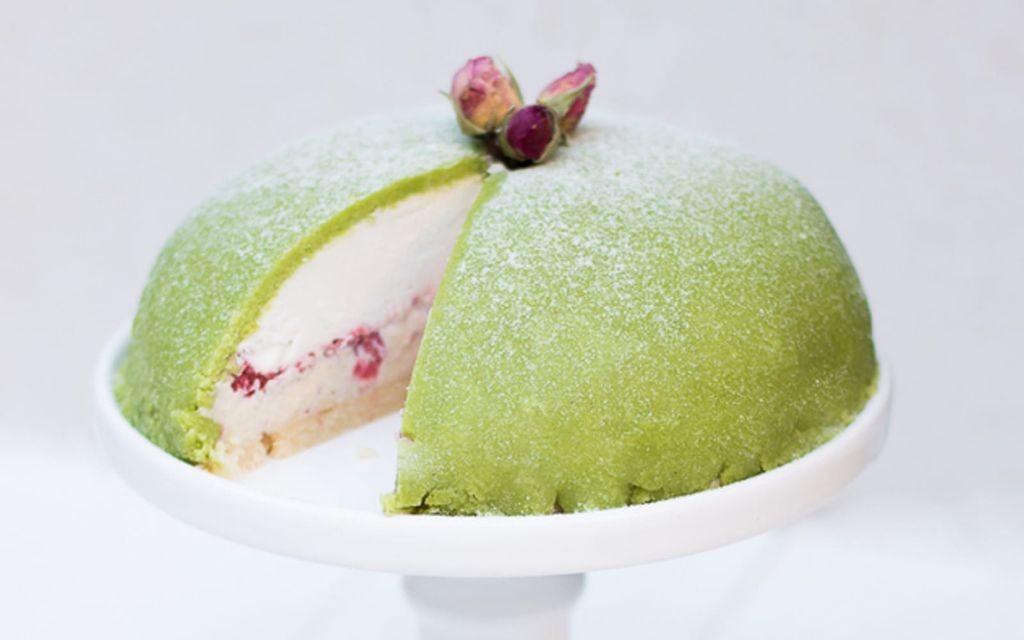
Matcha Green Tea Princess Cake
Heralding the festive season with a touch of Japanese elegance, this Matcha Green Tea Princess Cake transforms a classic dessert into a modern masterpiece. Its delicate layers of matcha-infused sponge and silky cream offer a sophisticated balance of earthy and sweet notes, perfect for holiday gatherings or a refined afternoon treat. The vibrant green hue and graceful presentation make it as visually stunning as it is delicious.
Serving: 8 | Pre Time: 30 minutes | Cooking Time: 25 minutes
Ingredients
– All-purpose flour – 1 cup
– Granulated sugar – ¾ cup
– Eggs – 4 large
– Unsalted butter – ½ cup, melted
– Matcha powder – 2 tbsp
– Heavy cream – 1 cup
– Powdered sugar – ¼ cup
– Vanilla extract – 1 tsp
Instructions
1. Preheat the oven to 350°F and grease an 8-inch round cake pan, lining it with parchment paper for easy removal.
2. In a large bowl, whisk together the all-purpose flour and matcha powder until fully combined and free of lumps.
3. In a separate bowl, beat the eggs and granulated sugar with an electric mixer on high speed for 5 minutes until pale and fluffy, which incorporates air for a lighter cake texture.
4. Gently fold the flour-matcha mixture into the egg mixture in three additions, using a spatula to avoid deflating the batter.
5. Drizzle in the melted unsalted butter while folding continuously until just incorporated, ensuring even distribution without overmixing.
6. Pour the batter into the prepared pan and bake at 350°F for 22–25 minutes, or until a toothpick inserted into the center comes out clean.
7. Let the cake cool in the pan for 10 minutes, then transfer to a wire rack to cool completely to prevent crumbling when assembling.
8. While the cake cools, whip the heavy cream, powdered sugar, and vanilla extract in a chilled bowl on medium-high speed for 3–4 minutes until stiff peaks form.
9. Slice the cooled cake horizontally into two even layers using a serrated knife for clean cuts.
10. Spread half of the whipped cream evenly over the bottom cake layer, then place the top layer gently on top.
11. Frost the top and sides of the cake with the remaining whipped cream, smoothing it with an offset spatula for a polished finish.
12. Refrigerate the cake for at least 1 hour before serving to allow the flavors to meld and the cream to set firmly.
Layers of tender matcha sponge meld with the airy cream, offering a subtly earthy flavor that’s both refreshing and indulgent. For a festive twist, garnish with edible gold leaf or fresh berries, or serve alongside a cup of hot green tea to enhance the aromatic notes.
Red Velvet Princess Cake with Cream Cheese Frosting
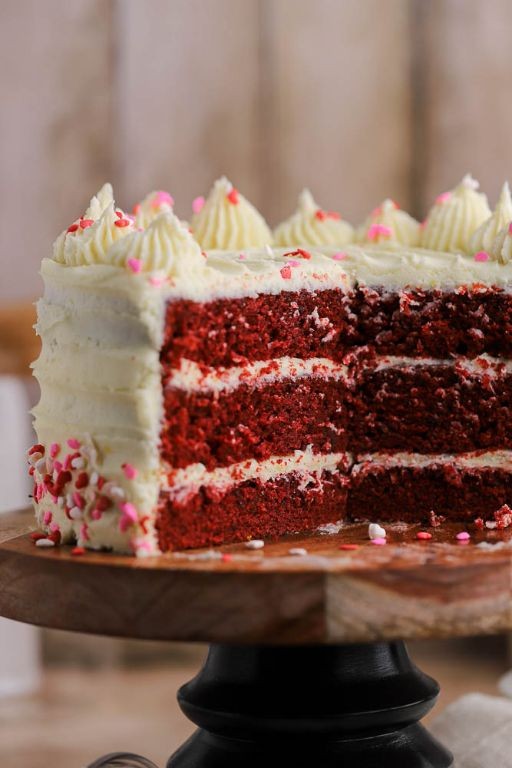
Visions of holiday elegance come to life with this stunning Red Velvet Princess Cake, a festive confection that marries the rich, cocoa-kissed crumb of classic red velvet with the delicate charm of a princess cake. Crowned with a luscious cream cheese frosting and adorned with a shimmering marzipan rose, this dessert transforms any celebration into a regal affair, offering both visual drama and indulgent flavor in every slice.
Serving: 12 | Pre Time: 30 minutes | Cooking Time: 25 minutes
Ingredients
– All-purpose flour – 2 ½ cups
– Granulated sugar – 1 ½ cups
– Unsweetened cocoa powder – 2 tbsp
– Baking soda – 1 tsp
– Salt – ½ tsp
– Buttermilk – 1 cup
– Vegetable oil – 1 cup
– Large eggs – 2
– Red food coloring – 2 tbsp
– White vinegar – 1 tsp
– Vanilla extract – 2 tsp
– Cream cheese – 16 oz
– Unsalted butter – ½ cup
– Powdered sugar – 4 cups
– Marzipan – 8 oz
Instructions
1. Preheat your oven to 350°F and grease three 8-inch round cake pans, lining the bottoms with parchment paper for easy removal.
2. In a large bowl, whisk together the all-purpose flour, granulated sugar, unsweetened cocoa powder, baking soda, and salt until fully combined.
3. In a separate bowl, whisk the buttermilk, vegetable oil, eggs, red food coloring, white vinegar, and vanilla extract until smooth and uniformly red.
4. Gradually pour the wet ingredients into the dry ingredients, folding gently with a spatula until just incorporated to avoid overmixing, which can toughen the cake.
5. Divide the batter evenly among the prepared pans, smoothing the tops with an offset spatula for even layers.
6. Bake for 22–25 minutes, or until a toothpick inserted into the center comes out clean, rotating the pans halfway through for uniform baking.
7. Let the cakes cool in the pans on a wire rack for 10 minutes, then invert them onto the rack to cool completely, about 1 hour.
8. While the cakes cool, beat the cream cheese and unsalted butter in a stand mixer on medium speed for 3 minutes until light and fluffy.
9. Gradually add the powdered sugar, 1 cup at a time, beating on low speed to prevent a sugar cloud, then increase to high for 2 minutes until the frosting is smooth and spreadable.
10. Place one cake layer on a serving plate, spread a generous ½ cup of frosting evenly over the top, and repeat with the remaining layers, frosting the sides last for a clean finish.
11. Roll out the marzipan on a lightly powdered sugar-dusted surface to ⅛-inch thickness, cut into petal shapes, and assemble into a rose for the top garnish.
12. Chill the cake for at least 30 minutes before slicing to set the frosting and ensure neat, beautiful servings.
Gloriously moist and tender, this cake boasts a subtle tang from the buttermilk and cream cheese, balanced by the sweetness of the frosting. For a festive twist, serve each slice with a drizzle of raspberry coulis or alongside a scoop of vanilla bean ice cream to complement its rich, velvety texture.
Princess Cake Cupcakes with Fondant Toppers

Sublime and whimsical, these Princess Cake Cupcakes with Fondant Toppers transform a classic Swedish torte into charming individual treats, perfect for celebrations where a touch of elegance is desired. Featuring layers of tender sponge cake, raspberry jam, and vanilla pastry cream beneath a smooth marzipan dome, each cupcake is crowned with a delicate fondant decoration, making them as delightful to behold as they are to savor.
Serving: 12 | Pre Time: 45 minutes | Cooking Time: 20 minutes
Ingredients
– All-purpose flour – 1 ½ cups
– Granulated sugar – 1 cup
– Unsalted butter – ½ cup
– Eggs – 3 large
– Milk – ½ cup
– Baking powder – 2 tsp
– Vanilla extract – 1 tsp
– Salt – ¼ tsp
– Raspberry jam – ¾ cup
– Vanilla pastry cream – 2 cups
– Marzipan – 12 oz
– Green food coloring – 2 drops
– Fondant – 8 oz
– Powdered sugar – ¼ cup
Instructions
1. Preheat the oven to 350°F and line a 12-cup muffin tin with paper liners.
2. In a medium bowl, whisk together 1 ½ cups all-purpose flour, 2 tsp baking powder, and ¼ tsp salt until fully combined.
3. In a large bowl, cream ½ cup unsalted butter and 1 cup granulated sugar with an electric mixer on medium speed for 3 minutes, until light and fluffy.
4. Add 3 large eggs one at a time to the butter mixture, beating for 30 seconds after each addition until incorporated.
5. Mix in 1 tsp vanilla extract until just blended.
6. Gradually add the flour mixture to the wet ingredients in three parts, alternating with ½ cup milk, beginning and ending with the flour, and mix on low speed until the batter is smooth, being careful not to overmix.
7. Divide the batter evenly among the prepared muffin cups, filling each about two-thirds full.
8. Bake at 350°F for 18–20 minutes, or until a toothpick inserted into the center of a cupcake comes out clean.
9. Remove the cupcakes from the oven and let them cool in the tin for 10 minutes, then transfer to a wire rack to cool completely to room temperature, which prevents sogginess.
10. Use a small knife to cut a 1-inch deep cone from the top of each cooled cupcake, reserving the removed pieces.
11. Fill each cavity with 1 tbsp raspberry jam, then top with 2 tbsp vanilla pastry cream, spreading it evenly.
12. Trim the reserved cake cones to create flat lids and place them back over the filling to seal.
13. Knead 12 oz marzipan with 2 drops green food coloring on a surface dusted with ¼ cup powdered sugar until uniformly colored and pliable.
14. Roll out the marzipan to ⅛-inch thickness and cut into 12 circles slightly larger than the cupcake tops, then drape each over a cupcake, smoothing the edges down the sides with your fingers for a seamless finish.
15. Roll out 8 oz fondant on a powdered sugar-dusted surface to ⅛-inch thickness and cut into decorative shapes like crowns or roses for toppers, using cookie cutters for consistency.
16. Attach a fondant topper to each cupcake with a dab of water, pressing gently to adhere.
Marvel at the delightful contrast in these cupcakes: the soft sponge gives way to a burst of tart raspberry and creamy vanilla, all enveloped in sweet marzipan. For a festive twist, serve them on a tiered stand dusted with edible glitter, or pair with a sparkling rosé to enhance the berry notes, making each bite a regal experience.
Tiramisu-Inspired Princess Cake
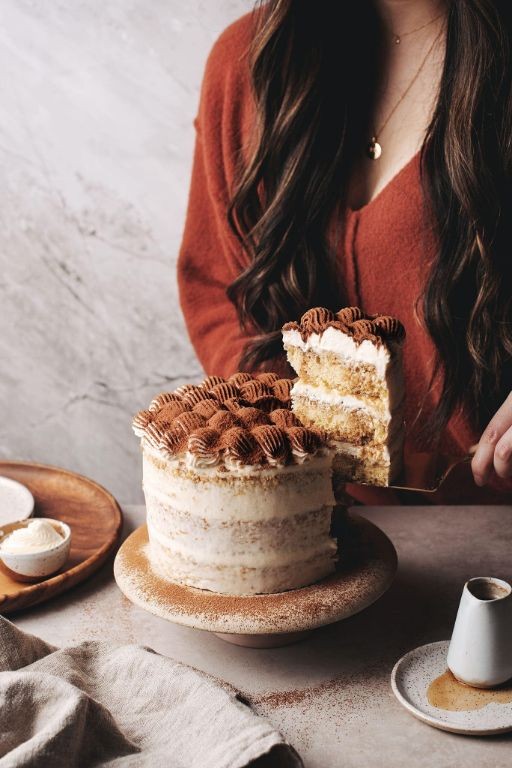
Delicate layers of coffee-soaked ladyfingers, velvety mascarpone cream, and a crown of marzipan transform the classic Italian tiramisu into a Scandinavian-inspired showstopper perfect for holiday celebrations. This Tiramisu-Inspired Princess Cake blends the rich espresso notes of its namesake with the whimsical elegance of a traditional princess cake, creating a dessert that’s as stunning to behold as it is indulgent to savor. With its harmonious balance of bitter coffee, sweet cream, and almond-kissed marzipan, it offers a festive twist that will captivate guests from the first slice.
Serving: 10 | Pre Time: 30 minutes | Cooking Time: 0 minutes
Ingredients
– Ladyfingers – 24
– Espresso – 1 cup, cooled
– Mascarpone cheese – 16 oz
– Heavy cream – 1 cup
– Granulated sugar – ½ cup
– Marzipan – 8 oz
– Green food coloring – 2 drops
Instructions
1. Brew 1 cup of espresso and let it cool completely to room temperature, about 15 minutes, to prevent the ladyfingers from becoming soggy too quickly.
2. In a large bowl, combine 16 oz of mascarpone cheese and ½ cup of granulated sugar, then beat with an electric mixer on medium speed for 2 minutes until smooth and creamy.
3. In a separate bowl, whip 1 cup of heavy cream on high speed for 3–4 minutes until stiff peaks form, being careful not to overbeat to avoid a grainy texture.
4. Gently fold the whipped cream into the mascarpone mixture using a spatula until fully incorporated, ensuring no streaks remain for a uniform filling.
5. Quickly dip 8 ladyfingers, one at a time, into the cooled espresso for 2 seconds each, then arrange them in a single layer in a 9-inch springform pan.
6. Spread one-third of the mascarpone cream evenly over the ladyfingers using an offset spatula to create a smooth layer.
7. Repeat steps 5 and 6 twice more to build two additional layers, ending with a final layer of mascarpone cream on top.
8. Cover the pan with plastic wrap and refrigerate the cake for at least 6 hours, or preferably overnight, to allow the flavors to meld and the texture to set firmly.
9. Knead 8 oz of marzipan with 2 drops of green food coloring on a clean surface dusted with powdered sugar until the color is evenly distributed, about 3 minutes.
10. Roll out the marzipan into a 12-inch circle, then drape it over the chilled cake, trimming any excess and smoothing it gently with your hands.
11. Decorate the top with a dusting of cocoa powder or edible flowers, if desired, before serving chilled.
Buttery and tender from the espresso-infused ladyfingers, this cake boasts a luxuriously creamy texture that melts on the tongue with each bite. The subtle almond flavor of the marzipan adds a delicate sweetness that complements the robust coffee notes, making it an ideal centerpiece for a winter gathering. Serve it sliced thin to showcase the elegant layers, or garnish with a sprinkle of gold leaf for an extra festive touch.
Pistachio Princess Cake with Rosewater Syrup
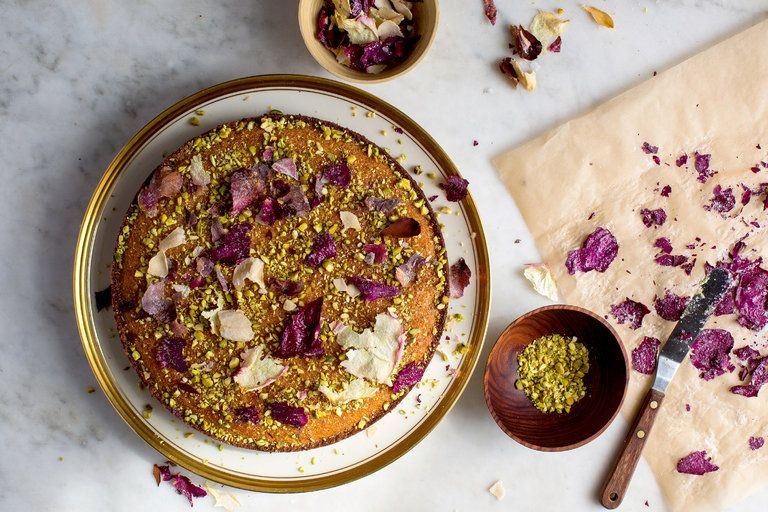
Pistachio Princess Cake with Rosewater Syrup emerges as a stunning centerpiece, its delicate layers of nutty sponge soaked in fragrant syrup creating an ethereal dessert that feels both regal and comforting. This elegant confection balances the earthy richness of pistachios with the floral whisper of rosewater, resulting in a treat that’s as beautiful to behold as it is to savor.
Serving: 8 | Pre Time: 20 minutes | Cooking Time: 30 minutes
Ingredients
– All-purpose flour – 1 cup
– Granulated sugar – ¾ cup
– Unsalted butter – ½ cup
– Eggs – 3
– Pistachios – ½ cup
– Baking powder – 1 tsp
– Salt – ¼ tsp
– Rosewater – 2 tbsp
– Water – ½ cup
– Confectioners’ sugar – 1 cup
Instructions
1. Preheat the oven to 350°F and grease an 8-inch round cake pan.
2. Finely grind the pistachios in a food processor until they resemble coarse sand, being careful not to over-process into a paste.
3. In a medium bowl, whisk together the flour, baking powder, and salt.
4. In a large bowl, cream the butter and granulated sugar with an electric mixer on medium speed for 3 minutes until light and fluffy.
5. Add the eggs one at a time to the butter mixture, beating well after each addition to ensure a smooth batter.
6. Gently fold the dry ingredients into the wet mixture with a spatula until just combined, then fold in the ground pistachios.
7. Pour the batter into the prepared pan and bake for 25–30 minutes, or until a toothpick inserted into the center comes out clean.
8. While the cake bakes, combine the water and confectioners’ sugar in a small saucepan over medium heat, stirring until the sugar dissolves completely.
9. Remove the syrup from heat and stir in the rosewater, then let it cool to room temperature.
10. Once the cake is baked, let it cool in the pan for 10 minutes before transferring it to a wire rack.
11. While the cake is still warm, use a skewer to poke holes all over the top and slowly pour the rosewater syrup over it, allowing it to soak in fully.
12. Let the cake cool completely before slicing to ensure clean cuts and even syrup distribution.
Now, this cake delights with a moist, tender crumb that’s subtly perfumed by the rosewater, while the pistachios add a delightful crunch and nutty depth. Serve it with a dollop of whipped cream or alongside fresh berries for a vibrant contrast that highlights its elegant flavors.
Princess Cake with Fresh Mango Layers

Majestically layered and crowned with tropical flair, this Princess Cake with Fresh Mango Layers reimagines a classic dessert for modern palates. Its delicate sponge, lush mango filling, and smooth marzipan coating create a stunning centerpiece that’s as delightful to behold as it is to savor, perfect for elevating any celebration with a touch of sun-kissed elegance.
Serving: 12 | Pre Time: 45 minutes | Cooking Time: 25 minutes
Ingredients
– All-purpose flour – 1 ½ cups
– Granulated sugar – 1 cup
– Unsalted butter – ½ cup
– Eggs – 4 large
– Vanilla extract – 1 tsp
– Baking powder – 1 tsp
– Salt – ¼ tsp
– Fresh mango – 2 cups, diced
– Heavy cream – 2 cups
– Powdered sugar – ½ cup
– Marzipan – 16 oz
– Green food coloring – 2 drops
Instructions
1. Preheat your oven to 350°F and grease two 9-inch round cake pans, lining them with parchment paper for easy removal.
2. In a large bowl, cream together the unsalted butter and granulated sugar with an electric mixer on medium speed for 3 minutes until light and fluffy.
3. Add the eggs one at a time, beating well after each addition, then mix in the vanilla extract until fully incorporated.
4. In a separate bowl, whisk together the all-purpose flour, baking powder, and salt to ensure even distribution and prevent lumps.
5. Gradually fold the dry ingredients into the wet mixture using a spatula, mixing just until combined to avoid overworking the batter, which can lead to a dense cake.
6. Divide the batter evenly between the prepared pans and smooth the tops with a spatula.
7. Bake for 22–25 minutes, or until a toothpick inserted into the center comes out clean and the cakes are golden brown.
8. Let the cakes cool in the pans for 10 minutes, then transfer them to a wire rack to cool completely to room temperature, about 1 hour.
9. While the cakes cool, whip the heavy cream and powdered sugar with an electric mixer on high speed for 4–5 minutes until stiff peaks form.
10. Place one cake layer on a serving plate and spread half of the whipped cream evenly over the top, then arrange half of the diced fresh mango in a single layer.
11. Top with the second cake layer and repeat with the remaining whipped cream and mango, ensuring the layers are level for a polished finish.
12. Knead the marzipan with green food coloring on a lightly powdered sugar-dusted surface until evenly tinted, then roll it out into a 12-inch circle about ⅛-inch thick.
13. Drape the marzipan over the assembled cake, gently smoothing it down the sides and trimming any excess with a sharp knife for a clean edge.
14. Refrigerate the cake for at least 2 hours before serving to allow the flavors to meld and the structure to set, making it easier to slice neatly.
Yielded with a silky marzipan exterior, each slice reveals tender cake layers punctuated by bursts of juicy mango and cloud-like cream. The interplay of sweet, tropical fruit and rich, buttery sponge creates a harmonious balance, ideal for garnishing with edible flowers or a dusting of powdered sugar to highlight its regal presentation.
Black Forest Princess Cake with Cherry Filling
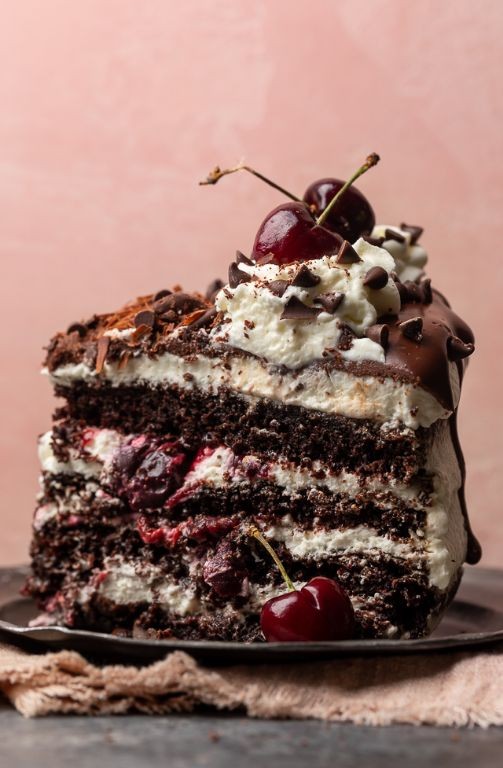
Nestled between holiday feasts and cozy winter evenings, the Black Forest Princess Cake with Cherry Filling emerges as a showstopping dessert that marries deep chocolate richness with bright, tart fruit. This elegant creation transforms classic flavors into a layered masterpiece, perfect for celebrating the season with a touch of sophistication. Each slice reveals a harmonious balance, promising to delight both the eyes and the palate.
Serving: 12 | Pre Time: 30 minutes | Cooking Time: 35 minutes
Ingredients
– All-purpose flour – 2 cups
– Granulated sugar – 1 ½ cups
– Unsweetened cocoa powder – ¾ cup
– Baking powder – 1 ½ tsp
– Baking soda – 1 tsp
– Salt – ½ tsp
– Eggs – 2 large
– Buttermilk – 1 cup
– Vegetable oil – ½ cup
– Vanilla extract – 2 tsp
– Hot water – 1 cup
– Cherry pie filling – 21 oz can
– Heavy cream – 2 cups
– Powdered sugar – ¼ cup
Instructions
1. Preheat the oven to 350°F and grease two 9-inch round cake pans, lining the bottoms with parchment paper for easy removal.
2. In a large bowl, whisk together the all-purpose flour, granulated sugar, unsweetened cocoa powder, baking powder, baking soda, and salt until fully combined.
3. Add the eggs, buttermilk, vegetable oil, and vanilla extract to the dry ingredients, mixing on medium speed until smooth, about 2 minutes.
4. Gradually pour in the hot water while stirring, which will thin the batter and enhance the chocolate flavor; the mixture will be liquidy.
5. Divide the batter evenly between the prepared pans, tapping them gently on the counter to release air bubbles.
6. Bake for 30-35 minutes, or until a toothpick inserted into the center comes out clean, rotating the pans halfway through for even baking.
7. Let the cakes cool in the pans for 10 minutes, then transfer to a wire rack to cool completely, about 1 hour.
8. While the cakes cool, whip the heavy cream and powdered sugar with an electric mixer on high speed until stiff peaks form, about 3-4 minutes; chill until ready to use.
9. Place one cake layer on a serving plate and spread half of the cherry pie filling evenly over the top, leaving a ½-inch border to prevent spillage.
10. Top with the second cake layer and spread the remaining cherry pie filling over it, using a spatula to smooth it into an even layer.
11. Frost the entire cake with the whipped cream, covering the sides and top smoothly; for a decorative touch, pipe rosettes around the edges with a piping bag.
12. Refrigerate the cake for at least 2 hours before serving to allow the flavors to meld and the cream to set firmly.
Zesty cherry notes cut through the dense, moist chocolate layers, creating a luxurious texture that melts on the tongue. Serve chilled with a dusting of cocoa powder or alongside a scoop of vanilla ice cream for an indulgent contrast, making it a festive centerpiece that captivates with every forkful.
Caramel Princess Cake with Salted Caramel Drizzle
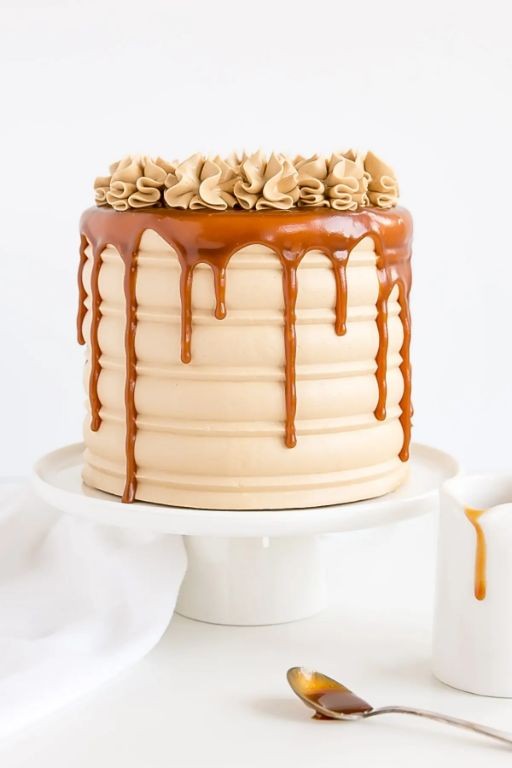
Oozing with golden decadence, this Caramel Princess Cake is a celebration of contrasting textures and flavors, where a tender vanilla sponge meets a luscious salted caramel drizzle that both glazes and pools. Perfect for holiday gatherings or elegant afternoon teas, it transforms simple ingredients into a showstopping dessert that balances sweetness with a savory edge.
Serving: 8 | Pre Time: 20 minutes | Cooking Time: 30 minutes
Ingredients
– All-purpose flour – 2 cups
– Granulated sugar – 1½ cups
– Unsalted butter – ½ cup
– Eggs – 3 large
– Vanilla extract – 2 tsp
– Baking powder – 2 tsp
– Salt – ½ tsp
– Heavy cream – 1 cup
– Brown sugar – 1 cup
– Sea salt flakes – 1 tsp
Instructions
1. Preheat your oven to 350°F and grease a 9-inch round cake pan, lining the bottom with parchment paper for easy removal.
2. In a large bowl, cream together the softened unsalted butter and granulated sugar with an electric mixer on medium speed for 3–4 minutes until light and fluffy.
3. Add the eggs one at a time, beating well after each addition, then mix in the vanilla extract until fully incorporated.
4. In a separate bowl, whisk together the all-purpose flour, baking powder, and salt to ensure even distribution and prevent lumps.
5. Gradually fold the dry ingredients into the wet mixture using a spatula, mixing just until no streaks of flour remain to avoid overmixing, which can lead to a dense cake.
6. Pour the batter into the prepared pan and smooth the top with a spatula, then bake for 25–30 minutes until a toothpick inserted into the center comes out clean.
7. While the cake bakes, prepare the salted caramel drizzle by combining the brown sugar and heavy cream in a saucepan over medium heat, stirring constantly until the sugar dissolves completely.
8. Bring the mixture to a gentle boil and cook for 5–7 minutes, stirring occasionally, until it thickens slightly and coats the back of a spoon; remove from heat and stir in the sea salt flakes.
9. Let the cake cool in the pan for 10 minutes, then transfer it to a wire rack to cool completely to room temperature before drizzling to prevent the caramel from melting.
10. Once cooled, pour the warm salted caramel drizzle evenly over the top of the cake, allowing it to drip down the sides for a rustic, elegant finish.
With its moist, tender crumb and glossy caramel coating, this cake offers a delightful interplay of sweet and salty notes that linger on the palate. Serve it slightly warm to enhance the gooey texture of the drizzle, or pair it with a dollop of whipped cream for added richness, making it a versatile centerpiece for any festive occasion.
Princess Cake with Passionfruit Curd
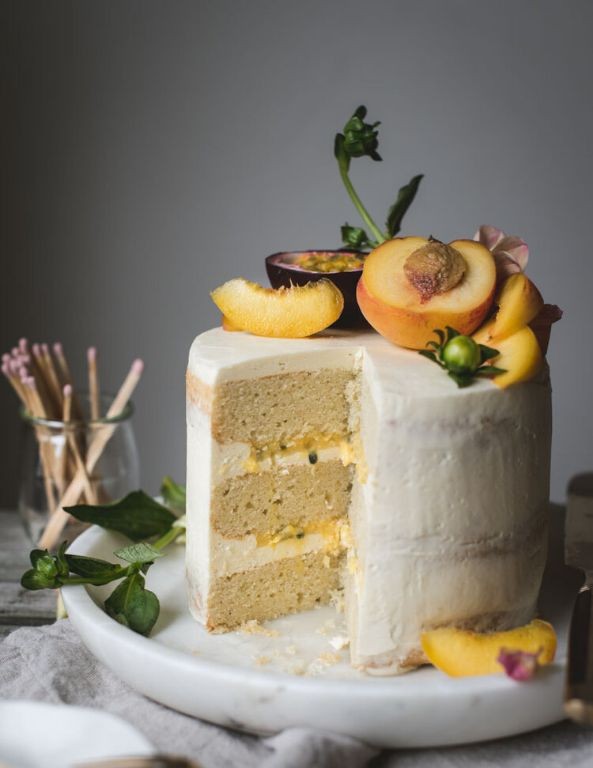
Fashioned for festive celebrations, this Princess Cake with Passionfruit Curd transforms a classic into a tropical delight. Its layers of tender sponge, luscious curd, and airy whipped cream are crowned with a smooth marzipan dome, offering a sophisticated balance of sweet and tart. Perfect for holiday gatherings, it brings a touch of elegance to any dessert table.
Serving: 12 | Pre Time: 45 minutes | Cooking Time: 25 minutes
Ingredients
– All-purpose flour – 1 ½ cups
– Granulated sugar – 1 cup
– Eggs – 4 large
– Unsalted butter – ½ cup, melted
– Passionfruit pulp – ¾ cup
– Heavy cream – 2 cups
– Marzipan – 1 lb
– Powdered sugar – 2 tbsp
Instructions
1. Preheat the oven to 350°F and grease two 9-inch round cake pans.
2. In a large bowl, whisk together 1 ½ cups all-purpose flour and 1 cup granulated sugar until combined.
3. Add 4 large eggs one at a time, beating well after each addition to incorporate air for a light texture.
4. Gently fold in ½ cup melted unsalted butter until the batter is smooth, being careful not to overmix.
5. Divide the batter evenly between the prepared pans and bake for 20–25 minutes, or until a toothpick inserted comes out clean.
6. Let the cakes cool in the pans for 10 minutes, then transfer to a wire rack to cool completely to prevent crumbling.
7. In a saucepan over medium heat, combine ¾ cup passionfruit pulp with 2 tbsp powdered sugar, stirring constantly for 5–7 minutes until thickened into a curd.
8. Remove the curd from heat and let it cool to room temperature, about 15 minutes, to avoid melting the cream later.
9. In a chilled bowl, whip 2 cups heavy cream until stiff peaks form, which should take 3–4 minutes on high speed.
10. Place one cake layer on a serving plate, spread half of the passionfruit curd evenly over it, then top with half of the whipped cream.
11. Add the second cake layer and repeat with the remaining curd and whipped cream, stacking neatly for even layers.
12. Roll out 1 lb marzipan on a surface dusted with powdered sugar to a 12-inch circle, about ¼-inch thick.
13. Drape the marzipan over the assembled cake, smoothing it gently with your hands to cover completely and trim any excess.
14. Refrigerate the cake for at least 2 hours before serving to set the layers and enhance the flavors.
Upon slicing, the cake reveals a vibrant contrast of yellow curd against white cream, with a moist sponge that melts in the mouth. The passionfruit adds a tangy brightness that cuts through the richness, making each bite refreshingly complex. For a creative twist, garnish with fresh berries or edible flowers to complement its regal appearance.
Princess Cake Parfaits in Glass Jars
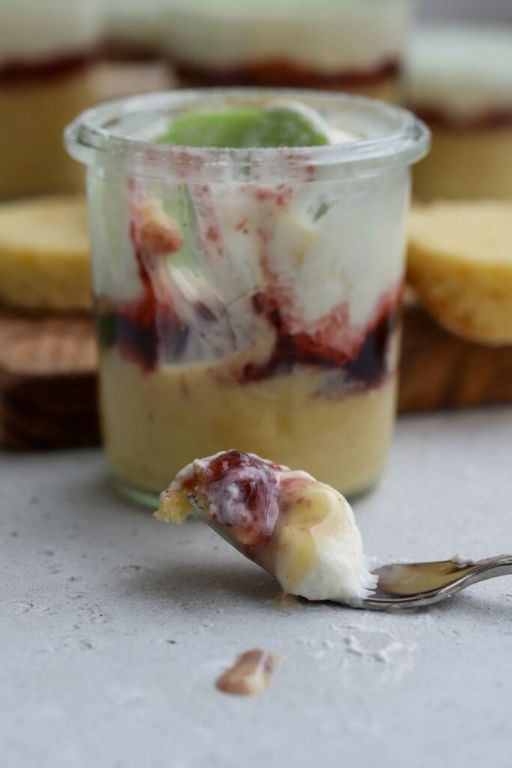
Meticulously layered in elegant glass jars, these Princess Cake Parfaits transform the classic Swedish torte into a stunning, portable dessert. With alternating tiers of tender sponge cake, rich vanilla custard, and airy whipped cream, each bite offers a delightful contrast of textures and flavors. Crowned with a vibrant marzipan lid and a dusting of powdered sugar, they’re perfect for holiday gatherings or as a show-stopping finale to any meal.
Serving: 4 | Pre Time: 25 minutes | Cooking Time: 20 minutes
Ingredients
– All-purpose flour – ¾ cup
– Granulated sugar – ½ cup
– Eggs – 3
– Vanilla extract – 1 tsp
– Whole milk – 1 cup
– Cornstarch – 2 tbsp
– Heavy cream – 1 cup
– Powdered sugar – 2 tbsp
– Green marzipan – 4 oz
– Raspberry jam – ½ cup
Instructions
1. Preheat your oven to 350°F and grease a 9-inch round cake pan.
2. In a large bowl, beat the eggs and granulated sugar with an electric mixer on high speed for 5 minutes until pale and thickened.
3. Gently fold in the all-purpose flour and vanilla extract until just combined, being careful not to deflate the batter.
4. Pour the batter into the prepared pan and bake for 18–20 minutes, or until a toothpick inserted into the center comes out clean.
5. Let the cake cool completely in the pan on a wire rack, then crumble it into small, even pieces using your hands.
6. In a medium saucepan, whisk together the whole milk, cornstarch, and 2 tablespoons of granulated sugar over medium heat.
7. Cook the mixture, stirring constantly with a wooden spoon, for 5–7 minutes until it thickens to a pudding-like consistency, then remove from heat and let cool to room temperature.
8. In a chilled bowl, whip the heavy cream and powdered sugar with an electric mixer on medium-high speed for 3–4 minutes until stiff peaks form.
9. Assemble the parfaits by layering crumbled cake, raspberry jam, vanilla custard, and whipped cream in four 8-ounce glass jars, repeating until the jars are full.
10. Roll out the green marzipan on a lightly floured surface to ⅛-inch thickness and cut it into four circles to fit the jar tops.
11. Place a marzipan circle on top of each parfait and dust lightly with powdered sugar before serving.
Each spoonful delivers a harmonious blend of moist cake, silky custard, and light cream, with the marzipan adding a subtle almond sweetness. For a festive twist, garnish with fresh berries or edible flowers just before serving to enhance the visual appeal.
Princess Cake with White Chocolate Ganache
Radiant and regal, the Princess Cake with White Chocolate Ganache is a showstopping dessert that transforms a classic into an opulent celebration centerpiece. Its delicate layers of sponge cake, raspberry jam, and vanilla pastry cream are enrobed in a smooth, glossy white chocolate ganache, creating a harmonious balance of textures and flavors. Perfect for holiday gatherings or special occasions, this elegant treat is surprisingly approachable for home bakers seeking to impress.
Serving: 12 | Pre Time: 45 minutes | Cooking Time: 25 minutes
Ingredients
– All-purpose flour – 1 ½ cups
– Granulated sugar – 1 cup
– Eggs – 4 large
– Vanilla extract – 2 tsp
– Baking powder – 2 tsp
– Salt – ½ tsp
– Whole milk – ½ cup
– Unsalted butter – ½ cup, melted
– Raspberry jam – 1 cup
– Vanilla pastry cream – 2 cups
– White chocolate chips – 12 oz
– Heavy cream – 1 cup
Instructions
1. Preheat the oven to 350°F and grease two 9-inch round cake pans, then line them with parchment paper for easy removal.
2. In a large bowl, whisk together the all-purpose flour, baking powder, and salt until fully combined to ensure even leavening.
3. In a separate bowl, beat the eggs and granulated sugar with an electric mixer on medium-high speed for 5 minutes, until the mixture is pale, thick, and tripled in volume.
4. Gently fold the dry ingredients into the egg mixture in three additions, alternating with the whole milk and melted unsalted butter, to maintain the batter’s airy structure.
5. Divide the batter evenly between the prepared pans and bake for 22–25 minutes, until a toothpick inserted into the center comes out clean and the tops spring back when lightly touched.
6. Let the cakes cool in the pans for 10 minutes, then transfer them to a wire rack to cool completely to prevent sogginess.
7. Place one cake layer on a serving plate and spread the raspberry jam evenly over the top, leaving a ½-inch border to avoid seepage.
8. Spread 1 cup of the vanilla pastry cream over the jam layer, then top with the second cake layer and spread the remaining pastry cream over the top and sides for a crumb coat.
9. Refrigerate the cake for 30 minutes to set the crumb coat, which helps the ganache adhere smoothly without crumbs.
10. In a heatproof bowl, combine the white chocolate chips and heavy cream, then microwave in 30-second intervals, stirring after each, until fully melted and smooth.
11. Let the ganache cool for 5 minutes to thicken slightly, then pour it over the chilled cake, using an offset spatula to spread it evenly and create a glossy finish.
12. Refrigerate the cake for at least 2 hours before serving to allow the ganache to set firmly.
Opulent and indulgent, this cake delights with its moist, tender crumb and creamy layers that meld seamlessly under the rich white chocolate ganache. The subtle tartness of the raspberry jam cuts through the sweetness, offering a refined flavor profile that pairs beautifully with a cup of espresso. For a festive twist, garnish with edible gold leaf or fresh berries just before serving to elevate its visual appeal.
Princess Cake with Espresso-Infused Sponge

Pristine layers of delicate sponge, infused with the rich aroma of espresso, create a cake fit for royalty yet approachable for any home baker. This princess cake elevates the classic with a sophisticated coffee note that balances the sweetness, making it perfect for holiday gatherings or elegant afternoon tea. The combination of airy texture and deep flavor promises a dessert that’s as visually stunning as it is delicious.
Serving: 8 | Pre Time: 20 minutes | Cooking Time: 25 minutes
Ingredients
– All-purpose flour – 1 ½ cups
– Granulated sugar – 1 cup
– Eggs – 3
– Espresso powder – 2 tbsp
– Unsalted butter – ½ cup
– Baking powder – 1 tsp
– Salt – ¼ tsp
– Heavy cream – 1 cup
– Confectioners’ sugar – 2 cups
– Vanilla extract – 1 tsp
Instructions
1. Preheat the oven to 350°F and grease two 8-inch round cake pans, lining them with parchment paper for easy removal.
2. In a medium bowl, whisk together the all-purpose flour, baking powder, and salt until fully combined to ensure even leavening.
3. In a large bowl, beat the unsalted butter and granulated sugar with an electric mixer on medium speed for 3 minutes, until light and fluffy.
4. Add the eggs one at a time to the butter mixture, beating well after each addition to incorporate air for a tender crumb.
5. Dissolve the espresso powder in 1 tablespoon of hot water, then stir it into the wet ingredients along with the vanilla extract.
6. Gradually fold the dry ingredients into the wet mixture using a spatula, mixing just until no flour streaks remain to avoid overmixing.
7. Divide the batter evenly between the prepared pans and smooth the tops with a spatula for uniform layers.
8. Bake for 22-25 minutes, until a toothpick inserted into the center comes out clean and the cakes spring back when lightly touched.
9. Cool the cakes in the pans on a wire rack for 10 minutes, then invert them onto the rack to cool completely to prevent sogginess.
10. While the cakes cool, whip the heavy cream with an electric mixer on high speed for 4-5 minutes, until stiff peaks form.
11. In a separate bowl, sift the confectioners’ sugar and gradually beat it into the whipped cream until smooth and spreadable.
12. Place one cake layer on a serving plate, spread half of the cream filling evenly over it, then top with the second layer.
13. Frost the top and sides of the cake with the remaining cream, using an offset spatula for a sleek finish.
14. Chill the assembled cake in the refrigerator for at least 1 hour before serving to set the frosting.
Generously slice this masterpiece to reveal its moist, espresso-kissed layers, each bite offering a harmonious blend of bitter coffee notes and sweet cream. The sponge remains incredibly light, while the frosting adds a luxurious richness that melts on the tongue. For a creative twist, garnish with edible gold dust or serve alongside a shot of espresso to enhance the flavors, making it a showstopper at any festive table.
Summary
Culinary magic awaits in these 20 princess cake recipes, perfect for making any celebration feel royally special. We hope you find inspiration to bake a little enchantment into your kitchen. Don’t forget to share which recipe is your favorite in the comments below, and if you loved this roundup, please pin it to your Pinterest boards to save for your next magical baking adventure!


