
You know those nights when you’re short on time but still want a delicious, satisfying meal? We’ve got you covered with 19 easy pulled rotisserie chicken recipes perfect for busy weeknights. From cozy comfort food to quick dinners everyone will love, these ideas will transform that store-bought bird into something special. Let’s dive in and make your evenings a little tastier!
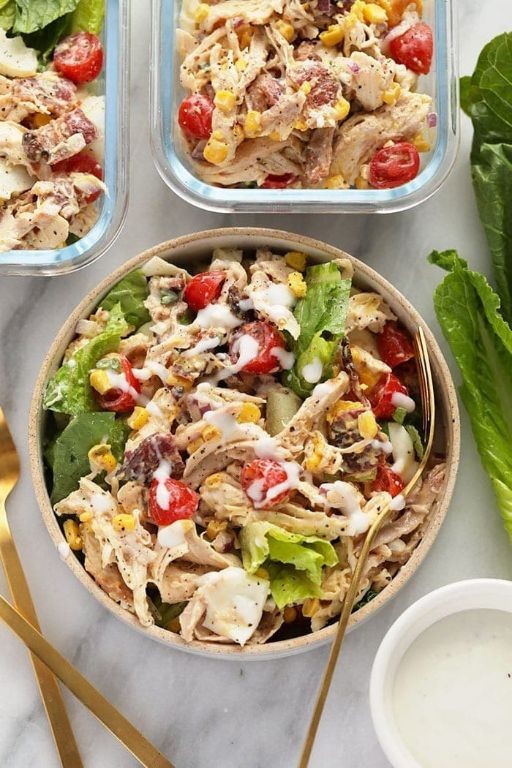
Pulled Rotisserie Chicken Tacos with Avocado Crema

Just yesterday, I found myself with leftover rotisserie chicken and a craving for something comforting yet vibrant. Pulling the tender meat apart felt almost meditative, and I knew tacos were the answer—warm tortillas cradling that savory chicken, brightened with a creamy avocado sauce. This is the kind of meal that turns simple leftovers into a little celebration, perfect for a quiet evening when you want something satisfying without much fuss.
Serving: 4 | Pre Time: 15 minutes | Cooking Time: 10 minutes
Ingredients
– 2 cups shredded rotisserie chicken (I love using the dark meat for extra richness)
– 8 small corn tortillas (warmed slightly—they just taste better that way)
– 1 ripe avocado, pitted and scooped (choose one that yields gently to pressure)
– 1/4 cup sour cream (full-fat gives the crema a lovely silkiness)
– 2 tablespoons fresh lime juice (about 1 lime, squeezed right before using)
– 1/4 cup chopped fresh cilantro (stems removed for a smoother blend)
– 1/2 teaspoon ground cumin (toasted lightly in a dry pan first for deeper flavor)
– 1/4 teaspoon garlic powder (a quick substitute when fresh garlic isn’t handy)
– Salt, as needed (I start with a pinch and adjust later)
– 1 tablespoon olive oil (extra virgin is my go-to for its fruity notes)
– 1/2 cup diced red onion (soaked in cold water for 5 minutes to mellow the bite)
Instructions
1. Place the shredded rotisserie chicken in a medium bowl and set it aside.
2. In a small skillet over medium heat, warm the olive oil for about 30 seconds until it shimmers lightly.
3. Add the diced red onion to the skillet and cook for 3–4 minutes, stirring occasionally, until it softens and turns translucent.
4. Sprinkle the ground cumin over the onions and cook for 1 more minute to toast the spices, releasing their aroma.
5. Transfer the onion mixture to the bowl with the chicken, tossing gently to combine evenly.
6. In a blender or food processor, combine the avocado, sour cream, lime juice, cilantro, garlic powder, and a pinch of salt.
7. Blend the mixture on medium speed for 1–2 minutes until completely smooth and creamy, scraping down the sides once if needed.
8. Heat a separate skillet or griddle over medium-high heat and warm the corn tortillas for 30–45 seconds per side until pliable and lightly toasted.
9. Assemble the tacos by placing a portion of the chicken mixture onto each warmed tortilla.
10. Drizzle the avocado crema generously over the chicken in each taco.
11. Serve immediately while the tortillas are still warm and the crema is fresh.
Vividly creamy and subtly tangy, the avocado crema melts into the savory chicken, while the soft tortillas offer a comforting chew. For a creative twist, try stacking these tacos with extra crema and a sprinkle of crumbled queso fresco, letting the flavors mingle into a delightful, messy bite that feels both rustic and refined.
Creamy Pulled Rotisserie Chicken Pasta Bake

Evenings like this one, with the kitchen window showing the last of the winter light, call for something that feels both effortless and deeply comforting. This pasta bake, born from a leftover rotisserie chicken, is exactly that—a creamy, bubbling dish that gathers everyone around the table without demanding hours of your attention.
Serving: 6 | Pre Time: 15 minutes | Cooking Time: 35 minutes
Ingredients
– 12 oz dried penne pasta (I find the ridges hold the sauce beautifully)
– 2 tbsp extra virgin olive oil, my go-to for its fruity depth
– 1 medium yellow onion, finely diced
– 3 cloves garlic, minced (freshly minced makes all the difference)
– 3 cups shredded rotisserie chicken, skin removed for a cleaner texture
– 1 (15 oz) can crushed tomatoes
– 1 cup heavy cream, at room temperature to prevent curdling
– 1 cup shredded mozzarella cheese
– 1/2 cup grated Parmesan cheese, plus extra for serving
– 1 tsp dried oregano
– 1/2 tsp kosher salt
– 1/4 tsp freshly ground black pepper
Instructions
1. Preheat your oven to 375°F (190°C) and lightly grease a 9×13 inch baking dish.
2. Bring a large pot of salted water to a rolling boil over high heat.
3. Add the penne pasta to the boiling water and cook for 2 minutes less than the package directions for al dente, about 9-10 minutes.
4. While the pasta cooks, heat the olive oil in a large, deep skillet or Dutch oven over medium heat.
5. Add the diced onion and cook, stirring occasionally, until softened and translucent, about 5-7 minutes.
6. Stir in the minced garlic and cook for just 1 minute until fragrant, being careful not to let it burn.
7. Add the shredded chicken, crushed tomatoes, dried oregano, salt, and pepper to the skillet. Stir to combine and let it simmer gently for 5 minutes.
8. Reduce the heat to low and slowly pour in the heavy cream, stirring constantly to create a smooth, unified sauce. Let it warm through for 2 minutes, but do not boil.
9. Drain the cooked pasta and immediately add it to the skillet with the sauce, tossing until every piece is well coated.
10. Transfer the entire mixture to your prepared baking dish, spreading it into an even layer.
11. In a small bowl, combine the shredded mozzarella and grated Parmesan cheese.
12. Sprinkle the cheese mixture evenly over the top of the pasta bake.
13. Place the dish in the preheated oven and bake for 20-25 minutes, until the cheese is melted, bubbly, and has golden spots.
14. Remove the bake from the oven and let it rest for 5-10 minutes before serving; this allows the sauce to settle and makes serving cleaner.
Under its golden, cheesy crust, the pasta is wonderfully tender, cradled in a sauce that’s rich from the cream yet bright from the tomatoes. The shredded chicken stays remarkably juicy, offering a savory counterpoint in every forkful. Serve it straight from the dish with a simple green salad, or for a cozy twist, scoop leftovers into a bowl the next day—it reheats beautifully, the flavors having deepened overnight.
Pulled Rotisserie Chicken BBQ Sliders

Zigzagging through the grocery store aisles on a busy Tuesday, I found myself craving something simple yet soul-warming, something that could transform a store-bought rotisserie chicken into a cozy, shareable feast. Pulled Rotisserie Chicken BBQ Sliders were born from that quiet, midweek longing—a humble dish that feels like a gentle exhale at the end of a long day.
Serving: 6 | Pre Time: 15 minutes | Cooking Time: 10 minutes
Ingredients
– 1 whole rotisserie chicken, shredded (I like to use the leftover chicken from last night’s dinner for that extra-homey feel)
– 1 cup of your favorite BBQ sauce (I always reach for a smoky, hickory-flavored one—it adds such depth)
– ½ cup chicken broth, low-sodium (this keeps the chicken moist without making it soggy)
– 2 tbsp unsalted butter (room temperature butter melts more evenly, creating a silkier sauce)
– 1 tbsp apple cider vinegar (a splash brightens the richness of the BBQ sauce beautifully)
– 1 tsp garlic powder (I prefer this over fresh garlic here for its mellow, even flavor)
– ½ tsp smoked paprika (this is my secret weapon—it gives a subtle, warm smokiness)
– 12 slider buns, split (soft potato buns are my go-to; they hold up well without overpowering the filling)
– Optional: pickles or coleslaw for serving (I love adding a quick, tangy slaw for crunch)
Instructions
1. In a medium saucepan over low heat, combine the shredded rotisserie chicken, BBQ sauce, chicken broth, unsalted butter, apple cider vinegar, garlic powder, and smoked paprika.
2. Stir the mixture gently with a wooden spoon until the butter is fully melted and the ingredients are well incorporated, about 2 minutes.
3. Increase the heat to medium-low and let the mixture simmer uncovered, stirring occasionally to prevent sticking, for 8–10 minutes until the sauce has thickened slightly and coats the chicken evenly. Tip: Avoid boiling to keep the chicken tender and prevent the sauce from becoming too thick.
4. While the chicken simmers, lightly toast the split slider buns in a toaster or under a broiler set to low for 1–2 minutes until just golden—this adds a nice texture without drying them out. Tip: Watch closely to avoid burning, as buns can toast quickly.
5. Remove the saucepan from the heat and let the BBQ chicken mixture rest for 2 minutes to allow the flavors to meld.
6. Spoon about ¼ cup of the BBQ chicken mixture onto the bottom half of each toasted slider bun. Tip: Use a slotted spoon if the mixture seems too saucy to prevent the buns from getting soggy.
7. Top with pickles or coleslaw if desired, then place the top half of the buns over the filling.
8. Serve the sliders immediately while warm. Wrap up with 2–3 natural sentences about the texture, flavor, or a creative way to serve it: Warm from the stove, these sliders offer a tender, juicy bite with a smoky-sweet sauce that clings to every shred of chicken. For a fun twist, I sometimes serve them with a side of sweet potato fries or layer them with a slice of sharp cheddar before assembling—the cheese melts slightly into the warm filling, adding a creamy contrast that makes each slider feel like a tiny, comforting hug.
Loaded Pulled Rotisserie Chicken Nachos

Evenings like this, when the kitchen is quiet and the world outside feels still, I find myself craving something comforting yet effortless—a meal that feels like a warm embrace after a long day. That’s where these loaded nachos come in, a humble assembly of pantry staples and a rotisserie chicken that transforms into a cozy, shareable feast. It’s the kind of dish that invites you to slow down, to savor each layer as it comes together, piece by piece.
Serving: 4 | Pre Time: 15 minutes | Cooking Time: 10 minutes
Ingredients
– 1 (12-ounce) bag of sturdy tortilla chips—I always reach for the thick-cut ones, as they hold up better under all the toppings.
– 2 cups of shredded rotisserie chicken, pulled from a store-bought bird for ease; I like to use the dark meat for its richer flavor.
– 1 (15-ounce) can of black beans, drained and rinsed until the water runs clear to remove excess sodium.
– 1 cup of shredded sharp cheddar cheese, freshly grated if possible—it melts more smoothly than pre-shredded.
– 1/2 cup of diced red onion, soaked in cold water for 5 minutes to mellow its bite, a little trick I picked up from my grandma.
– 1/2 cup of sliced jalapeños, seeds removed if you prefer less heat; I leave a few in for a subtle kick.
– 1/4 cup of chopped fresh cilantro, added at the end for a bright, herbal note.
– 1/2 cup of sour cream, for dolloping on top—full-fat is my go-to for its creamy texture.
– 1 tablespoon of olive oil, extra virgin if you have it, to lightly coat the baking sheet.
Instructions
1. Preheat your oven to 375°F (190°C) and line a large baking sheet with parchment paper, lightly brushing it with 1 tablespoon of olive oil to prevent sticking.
2. Spread 1 (12-ounce) bag of tortilla chips in an even layer on the prepared baking sheet, ensuring they overlap slightly but aren’t piled too high.
3. Evenly sprinkle 2 cups of shredded rotisserie chicken and 1 (15-ounce) can of drained black beans over the chips, distributing them well to cover most areas.
4. Top with 1 cup of shredded cheddar cheese, scattering it generously so every chip gets a bit of melty goodness.
5. Bake in the preheated oven for 8–10 minutes, or until the cheese is fully melted and bubbly, with the edges of the chips just starting to turn golden brown.
6. Remove the baking sheet from the oven and let it cool for 2 minutes to set slightly—this helps the toppings adhere better without burning your mouth.
7. Scatter 1/2 cup of diced red onion, 1/2 cup of sliced jalapeños, and 1/4 cup of chopped cilantro over the warm nachos.
8. Dollop 1/2 cup of sour cream in small spoonfuls across the top, serving immediately while everything is still warm and gooey.
This dish yields a delightful contrast of textures: the crisp chips soften slightly under the weight of the juicy chicken and beans, while the melted cheese binds it all into a cohesive, savory bite. Try serving it straight from the baking sheet for a casual, family-style meal, or pair it with a light salad to balance the richness—it’s versatile enough for game nights or quiet dinners alike.
Pulled Rotisserie Chicken and Wild Rice Soup

Just now, as the evening light fades outside my kitchen window, I find myself drawn to the quiet comfort of simmering soup. Pulled rotisserie chicken and wild rice soup feels like a warm embrace on a chilly December night, a gentle reminder to slow down and savor the simple things. It’s a humble, nourishing bowl that turns leftover chicken into something deeply satisfying.
Serving: 6 | Pre Time: 15 minutes | Cooking Time: 45 minutes
Ingredients
– 2 tablespoons extra virgin olive oil (my go-to for its fruity depth)
– 1 medium yellow onion, finely diced (I like the sweetness it brings)
– 2 medium carrots, peeled and diced into ½-inch pieces
– 2 celery stalks, diced (the leaves add nice flavor, so I keep them on)
– 3 cloves garlic, minced (freshly minced makes all the difference)
– 6 cups low-sodium chicken broth (I prefer the control over saltiness)
– 1 cup wild rice blend, rinsed (the nutty texture is essential)
– 1 rotisserie chicken, skin removed and meat shredded into bite-sized pieces (about 3 cups)
– 1 teaspoon dried thyme
– ½ teaspoon freshly ground black pepper
– ½ cup heavy cream (room temperature blends in smoothly)
– 2 tablespoons chopped fresh parsley, for garnish
Instructions
1. Heat 2 tablespoons extra virgin olive oil in a large Dutch oven or heavy-bottomed pot over medium heat for 1 minute until shimmering.
2. Add 1 diced yellow onion, 2 diced carrots, and 2 diced celery stalks to the pot. Cook for 8-10 minutes, stirring occasionally, until the vegetables soften and the onion turns translucent.
3. Stir in 3 minced garlic cloves and cook for 1 minute until fragrant, being careful not to let it brown.
4. Pour in 6 cups low-sodium chicken broth and 1 cup rinsed wild rice blend. Increase the heat to high and bring to a boil.
5. Once boiling, reduce the heat to low, cover the pot with a lid, and simmer for 35 minutes until the wild rice is tender and has split open slightly.
6. Add 3 cups shredded rotisserie chicken, 1 teaspoon dried thyme, and ½ teaspoon black pepper to the pot. Stir gently to combine.
7. Simmer uncovered for 5 minutes to allow the flavors to meld and the chicken to warm through.
8. Remove the pot from the heat and stir in ½ cup room temperature heavy cream until fully incorporated.
9. Ladle the soup into bowls and garnish each serving with a sprinkle of 2 tablespoons chopped fresh parsley.
Perhaps what I love most is the way the creamy broth clings to the chewy wild rice and tender chicken, creating a comforting texture in every spoonful. The subtle earthiness of the thyme pairs beautifully with the sweet vegetables, making this soup feel both rustic and refined. For a cozy twist, try serving it with a crusty slice of sourdough bread for dipping into the rich, savory liquid.
Pulled Rotisserie Chicken Caesar Wrap
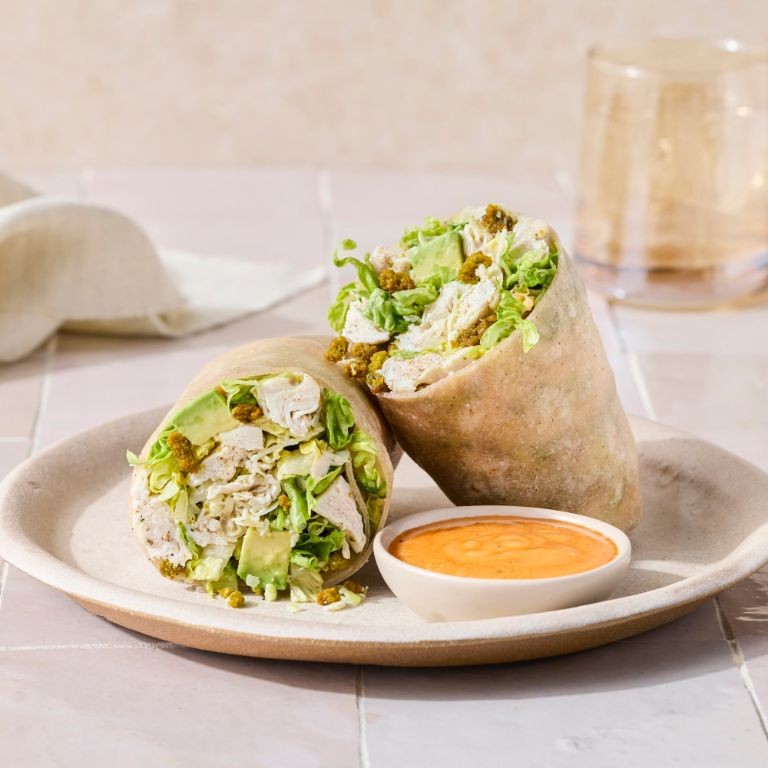
A quiet Tuesday evening, the kind where the kitchen feels like a sanctuary, and the simple act of assembling a wrap becomes a gentle ritual. There’s something deeply comforting about pulling apart a rotisserie chicken, its savory warmth mingling with crisp greens and creamy dressing, all tucked into a soft tortilla—a humble, handheld meal that feels like a quiet reward. It’s the sort of dish that doesn’t demand perfection, just a moment of care.
Serving: 4 | Pre Time: 15 minutes | Cooking Time: 5 minutes
Ingredients
– 4 large flour tortillas (I like the burrito-size ones for a generous wrap)
– 3 cups pulled rotisserie chicken, skin removed (warm or room temperature works best for easy mixing)
– 1 cup shredded romaine lettuce, patted dry to keep the wrap crisp
– 1/2 cup grated Parmesan cheese (freshly grated melts so nicely)
– 1/2 cup Caesar dressing (I prefer a creamy, garlicky homemade version, but store-bought is fine too)
– 2 tbsp olive oil (extra virgin olive oil is my go-to for a light, fruity note)
– 1/4 tsp black pepper, freshly ground for a subtle kick
Instructions
1. In a medium mixing bowl, combine the pulled rotisserie chicken and Caesar dressing, stirring gently until the chicken is evenly coated—this helps every bite stay moist and flavorful.
2. Warm a large skillet over medium heat for about 2 minutes, then add 1 tablespoon of olive oil, swirling to coat the bottom evenly.
3. Place one flour tortilla in the skillet and heat for 30 seconds per side, just until it becomes pliable and lightly toasted; repeat with the remaining tortillas, adding more oil as needed to prevent sticking.
4. Lay a warmed tortilla flat on a clean surface, then spoon 3/4 cup of the dressed chicken mixture onto the center, spreading it into a horizontal line.
5. Top the chicken with 1/4 cup of shredded romaine lettuce, arranging it evenly over the mixture to add a fresh, crunchy layer.
6. Sprinkle 2 tablespoons of grated Parmesan cheese over the lettuce, allowing it to cling to the dressing for a savory melt.
7. Fold the bottom edge of the tortilla up over the filling, then tightly roll it from one side to the other, tucking in the edges as you go to secure the wrap.
8. Heat the same skillet over medium-low heat, place the wrapped seam-side down, and cook for 1-2 minutes until golden and crisp, then flip and cook for another 1-2 minutes to seal it completely.
9. Transfer the wrap to a cutting board, let it rest for 1 minute to set, then slice it diagonally in half with a sharp knife for easier handling.
10. Repeat steps 4 through 9 with the remaining tortillas and filling, serving immediately while warm.
Unwrapping this creation reveals a delightful contrast: the tender, savory chicken melds with the cool, crisp lettuce and rich Parmesan, all hugged by a lightly toasted tortilla that holds everything together without overwhelming. For a creative twist, try drizzling a little extra dressing on the plate or serving it with a side of pickled vegetables to cut through the creaminess—it’s a simple meal that feels both nourishing and indulgent, perfect for those quiet evenings when you crave something satisfying yet effortless.
Spicy Pulled Rotisserie Chicken Quesadillas

There’s something quietly comforting about transforming a simple rotisserie chicken into a warm, spicy quesadilla on a chilly evening. The gentle sizzle of the skillet, the melty cheese pulling apart—it feels like a small, delicious ritual. I love how the heat from the spices mingles with the familiar, tender chicken, creating a meal that’s both cozy and exciting.
Serving: 4 | Pre Time: 15 minutes | Cooking Time: 10 minutes
Ingredients
– 2 cups shredded rotisserie chicken (I like to use the meat from a store-bought bird for ease, but homemade works beautifully too)
– 4 large flour tortillas (about 10-inch size—I find these hold everything without tearing)
– 2 cups shredded Monterey Jack cheese (this melts so smoothly and has a mild flavor that lets the spices shine)
– 1 tablespoon olive oil (extra virgin is my go-to for its fruity note)
– 1 teaspoon chili powder (I use a medium-heat blend for a warm kick)
– 1/2 teaspoon ground cumin (toasted lightly in a dry pan first if you have time—it deepens the flavor wonderfully)
– 1/4 teaspoon garlic powder (a quick pantry staple that adds savory depth)
– 1/4 teaspoon smoked paprika (this gives a subtle smoky hint that I adore)
– 1/4 teaspoon salt (I prefer fine sea salt for even seasoning)
– 1/4 cup chopped fresh cilantro (optional, but I always add it for a bright, fresh finish)
Instructions
1. In a medium bowl, combine the shredded rotisserie chicken, chili powder, cumin, garlic powder, smoked paprika, and salt, mixing gently until the chicken is evenly coated with the spices.
2. Heat a large skillet or griddle over medium heat for about 2 minutes until warm to the touch—this ensures even cooking without burning.
3. Place one flour tortilla flat in the skillet and sprinkle 1/2 cup of shredded Monterey Jack cheese evenly over half of the tortilla.
4. Spoon half of the spiced chicken mixture (about 1 cup) over the cheese on the same half of the tortilla, spreading it out gently to avoid overfilling.
5. Fold the empty half of the tortilla over the filling, pressing down lightly with a spatula to help it seal as it cooks.
6. Cook the quesadilla for 3–4 minutes, or until the bottom is golden brown and crispy—you can peek by lifting an edge with the spatula.
7. Carefully flip the quesadilla using the spatula and cook for another 2–3 minutes until the second side is golden brown and the cheese inside is fully melted.
8. Transfer the cooked quesadilla to a cutting board and repeat steps 3–7 with the remaining tortilla, cheese, and chicken mixture to make a second quesadilla.
9. Let each quesadilla rest for 1 minute before slicing into wedges—this allows the cheese to set slightly so it doesn’t ooze out too much.
10. Sprinkle the chopped fresh cilantro over the sliced quesadillas if using, for an added burst of freshness.
Layers of crispy tortilla give way to tender, spiced chicken and gooey cheese in every bite. The subtle smokiness from the paprika and warmth from the chili powder make this feel like a hug in food form—perfect for dipping into salsa or sour cream, or simply enjoying as is on a quiet night.
Pulled Rotisserie Chicken and Kale Salad
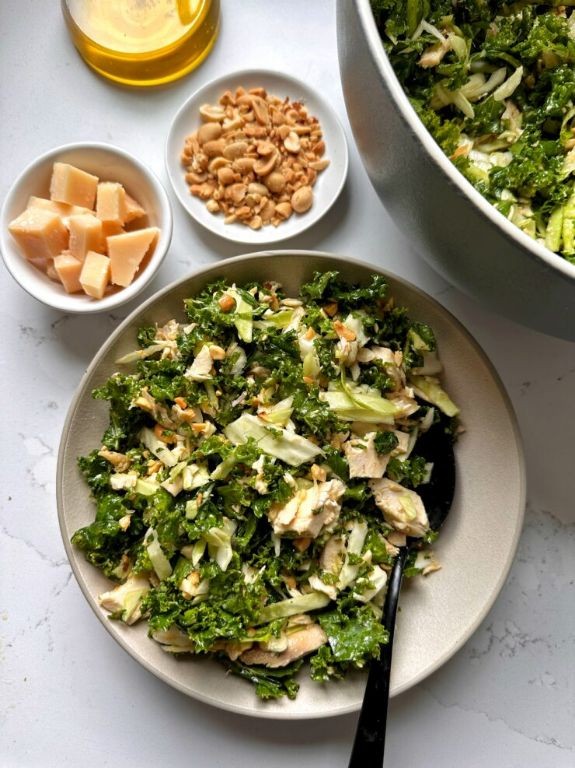
Yesterday, as the winter light faded early, I found myself craving something both comforting and nourishing—a meal that felt like a warm hug but didn’t weigh me down. Pulling the tender meat from a rotisserie chicken and tossing it with hearty kale felt like the perfect, gentle answer to that quiet evening hunger.
Serving: 4 | Pre Time: 15 minutes | Cooking Time: 0 minutes
Ingredients
– 1 store-bought rotisserie chicken, still warm if possible—I find the warmth makes the meat especially tender and easy to pull.
– 1 large bunch of curly kale, about 8 cups torn into bite-sized pieces; I give it a good massage with the dressing to soften those sturdy leaves.
– 1/2 cup of mayonnaise, the full-fat kind for its rich, creamy base.
– 2 tablespoons of apple cider vinegar, which adds a bright, tangy kick that cuts through the richness.
– 1 tablespoon of honey, just a touch to balance the acidity—local honey is my favorite here for its subtle floral notes.
– 1/2 teaspoon of garlic powder, for a mellow, savory depth without the sharpness of fresh garlic.
– 1/4 teaspoon of smoked paprika, which gives a whisper of smokiness that complements the chicken beautifully.
– 1/4 teaspoon of salt, to enhance all the flavors without overpowering.
– 1/4 teaspoon of black pepper, freshly ground for the best aroma.
– 1/4 cup of dried cranberries, for little bursts of sweet-tartness that make each bite interesting.
– 1/4 cup of sliced almonds, toasted until golden for a delightful crunch—I always toast a bit extra to snack on.
Instructions
1. Remove all the meat from the rotisserie chicken, discarding the skin and bones, and use two forks to shred it into bite-sized pieces into a large mixing bowl. Tip: Pull the chicken while it’s still slightly warm for the easiest shredding and most succulent texture.
2. In a small bowl, whisk together 1/2 cup of mayonnaise, 2 tablespoons of apple cider vinegar, 1 tablespoon of honey, 1/2 teaspoon of garlic powder, 1/4 teaspoon of smoked paprika, 1/4 teaspoon of salt, and 1/4 teaspoon of black pepper until smooth and fully combined.
3. Place 8 cups of torn kale in a separate large bowl, pour half of the dressing over it, and use your hands to massage the kale for 2-3 minutes until it turns a darker green and feels tender. Tip: Massaging breaks down the kale’s fibers, making it less bitter and more palatable—don’t skip this step!
4. Add the shredded chicken, 1/4 cup of dried cranberries, and 1/4 cup of toasted sliced almonds to the bowl with the massaged kale.
5. Pour the remaining dressing over the mixture and toss everything gently but thoroughly until all ingredients are evenly coated. Tip: Toss from the bottom up to ensure the dressing distributes without crushing the delicate chicken.
6. Divide the salad among four plates or bowls for serving.
This salad yields a wonderful contrast of textures, from the juicy, savory pulled chicken to the crisp almonds and chewy cranberries, all brought together by the creamy, tangy dressing. The kale, once massaged, becomes almost silky, making each forkful a comforting yet vibrant experience. Try serving it tucked into warm pita pockets or alongside a slice of crusty bread for a heartier meal that still feels light and refreshing.
Easy Pulled Rotisserie Chicken Fried Rice
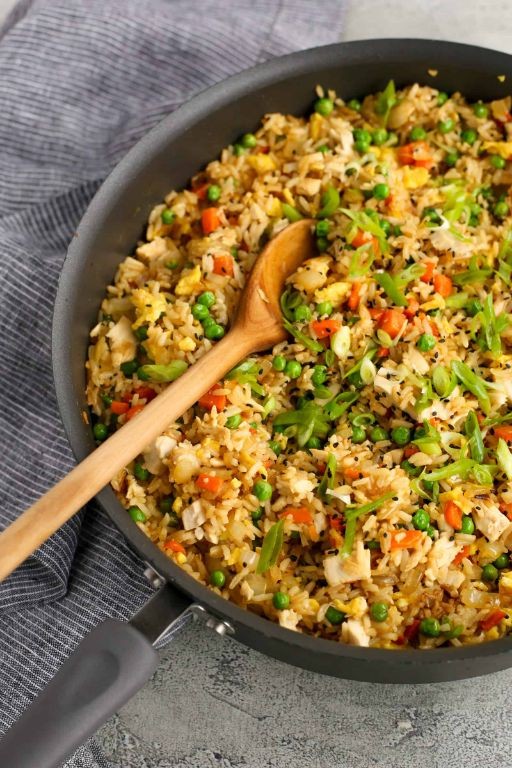
Sometimes the simplest meals emerge from quiet evenings when the refrigerator holds only humble remnants—a bit of leftover rotisserie chicken, half an onion, a few eggs. This easy pulled rotisserie chicken fried rice transforms those quiet scraps into a warm, comforting bowl that feels both nourishing and deeply satisfying, a gentle reminder that good food doesn’t require grand plans.
Serving: 4 | Pre Time: 10 minutes | Cooking Time: 15 minutes
Ingredients
– 3 cups cooked white rice, preferably day-old and chilled—it fries up so much better without turning mushy.
– 2 cups pulled rotisserie chicken, shredded by hand into tender, bite-sized pieces.
– 3 large eggs, which I like to whisk in a small bowl while still cold from the fridge for easier scrambling.
– 1/2 cup frozen peas and carrots, no need to thaw; they’ll steam right in the pan.
– 1/2 yellow onion, finely diced—I find a sharp knife makes this task almost meditative.
– 3 tablespoons vegetable oil, divided; a neutral oil is perfect here to let the other flavors shine.
– 2 tablespoons soy sauce, plus an extra splash for adjusting at the end if you like.
– 1 tablespoon sesame oil, my secret for that rich, nutty aroma that fills the kitchen.
– 2 cloves garlic, minced finely; fresh garlic makes all the difference.
– 1/4 teaspoon ground white pepper, for a subtle warmth that doesn’t overpower.
Instructions
1. Heat a large skillet or wok over medium-high heat for 2 minutes until the surface feels hot when you hold your hand above it.
2. Add 1 tablespoon of vegetable oil to the hot skillet, swirling to coat the bottom evenly.
3. Pour in the whisked eggs and let them set for 15 seconds without stirring to form large curds, then scramble gently for 1 minute until just cooked through. Transfer the eggs to a clean plate.
4. In the same skillet, add the remaining 2 tablespoons of vegetable oil and heat for 30 seconds.
5. Add the diced onion and cook for 3 minutes, stirring occasionally, until the edges turn translucent and slightly golden.
6. Stir in the minced garlic and cook for 1 minute exactly, until fragrant but not browned, to avoid bitterness.
7. Add the frozen peas and carrots and cook for 2 minutes, stirring frequently, until they are heated through and bright in color.
8. Add the pulled rotisserie chicken and cook for 2 minutes, stirring to warm it evenly and blend with the vegetables.
9. Crumble the chilled rice into the skillet with your fingers to break up any clumps, then cook for 4 minutes, stirring constantly, until the rice grains are separated and lightly toasted.
10. Return the scrambled eggs to the skillet, breaking them into smaller pieces with your spatula as you mix.
11. Drizzle the soy sauce and sesame oil evenly over the rice mixture, then sprinkle with ground white pepper.
12. Cook for 2 more minutes, stirring thoroughly to coat everything evenly and let the flavors meld. Remove from heat.
13. Taste a small spoonful; if desired, add an extra splash of soy sauce for more saltiness, stirring it in well.
Every bite of this fried rice offers a delightful contrast—the rice is lightly crisped at the edges yet tender within, while the rotisserie chicken stays juicy and flavorful. I love serving it straight from the skillet, perhaps with a sprinkle of green onions or a drizzle of chili oil for those who crave a gentle heat, making it a versatile centerpiece for a cozy weeknight dinner.
Pulled Rotisserie Chicken and Biscuit Pot Pie

Years have a way of folding into themselves, and on this quiet evening, I find myself craving the kind of meal that feels like a warm, slow exhale—a simple pot pie that turns a store-bought shortcut into something deeply comforting. It’s a gentle nod to making the most of what we have, transforming a humble rotisserie chicken into a cozy, biscuit-topped embrace. This is the sort of dish that fills the kitchen with a buttery, savory perfume, promising a quiet moment of solace at the table.
Serving: 4 | Pre Time: 20 minutes | Cooking Time: 35 minutes
Ingredients
– 1 store-bought rotisserie chicken, shredded (I find the meat from the thighs and legs is the most flavorful and tender for this)
– 1/4 cup unsalted butter (I always keep a stick at room temperature for easier melting)
– 1/2 cup all-purpose flour
– 2 cups whole milk, warmed slightly (cold milk can make the sauce lumpy, so I take it out of the fridge early)
– 1 cup frozen mixed vegetables, like peas and carrots (no need to thaw—they cook perfectly in the sauce)
– 1 teaspoon dried thyme
– 1/2 teaspoon garlic powder
– 1/2 teaspoon onion powder
– 1 teaspoon kosher salt
– 1/4 teaspoon freshly ground black pepper
– 1 (16.3 oz) can refrigerated biscuit dough (the flaky layers kind is my favorite for a golden, tender top)
Instructions
1. Preheat your oven to 375°F (190°C) and lightly grease a 9-inch deep-dish pie plate or a similar baking dish.
2. In a large skillet or Dutch oven over medium heat, melt 1/4 cup of unsalted butter until it foams slightly, about 2-3 minutes.
3. Whisk in 1/2 cup of all-purpose flour to form a smooth paste, cooking for 1 full minute while stirring constantly to remove the raw flour taste—this is your roux, and it should smell nutty.
4. Gradually pour in 2 cups of warmed whole milk, whisking continuously to prevent lumps, until the mixture thickens into a creamy sauce, about 5-7 minutes. Tip: If the sauce seems too thick, you can add a splash more milk to reach a gravy-like consistency.
5. Stir in 1 teaspoon of dried thyme, 1/2 teaspoon of garlic powder, 1/2 teaspoon of onion powder, 1 teaspoon of kosher salt, and 1/4 teaspoon of freshly ground black pepper until well combined.
6. Add 1 cup of frozen mixed vegetables and the shredded meat from 1 rotisserie chicken to the sauce, folding gently to coat everything evenly. Cook for 2-3 minutes just to heat through, then remove from heat.
7. Pour the chicken and vegetable mixture into the prepared baking dish, spreading it into an even layer.
8. Open 1 can of refrigerated biscuit dough and separate the biscuits. Tip: For a rustic look, I like to tear each biscuit in half and arrange the pieces slightly overlapping on top of the filling, which helps them bake up fluffy and golden.
9. Place the dish in the preheated oven and bake for 25-30 minutes, or until the biscuits are puffed and deeply golden brown on top, and the filling is bubbling around the edges. Tip: To ensure even browning, rotate the dish halfway through baking if your oven has hot spots.
10. Remove from the oven and let it rest for 5-10 minutes before serving to allow the filling to set slightly.
What emerges from the oven is a study in contrasts: the flaky, buttery biscuits give way to a rich, velvety filling that’s studded with tender chicken and sweet pops of vegetable. For a cozy twist, I sometimes serve it in shallow bowls with a simple green salad on the side, letting the savory gravy pool just so. It’s the kind of meal that feels both effortless and deeply nourishing, perfect for a quiet night in.
Buffalo Pulled Rotisserie Chicken Stuffed Peppers

Remembering how leftover rotisserie chicken used to sit forgotten in my fridge, I realized it deserved better—a second act with purpose. Tonight, I transformed those humble shreds into something warm and vibrant, filling bell peppers with the bold comfort of Buffalo sauce. It’s a quiet kitchen project that turns simplicity into a cozy, satisfying meal.
Serving: 4 | Pre Time: 15 minutes | Cooking Time: 25 minutes
Ingredients
– 4 large bell peppers, any color—I love the sweetness of red ones for balance.
– 2 cups shredded rotisserie chicken, skin removed for a cleaner texture.
– 1/2 cup Buffalo sauce, like Frank’s RedHot, which gives that classic tangy kick.
– 1 cup shredded Monterey Jack cheese, divided—I save a handful for topping.
– 1/2 cup crumbled blue cheese, for a sharp, creamy contrast.
– 1/4 cup diced celery, for a fresh crunch that cuts through the richness.
– 2 tbsp unsalted butter, melted, to mellow the sauce’s heat just a touch.
– 1/4 tsp garlic powder, my secret for a subtle depth without overpowering.
Instructions
1. Preheat your oven to 375°F (190°C) and line a baking sheet with parchment paper.
2. Slice the tops off the bell peppers and remove the seeds and membranes, creating hollow cups.
3. In a large mixing bowl, combine the shredded chicken, Buffalo sauce, melted butter, and garlic powder, stirring until evenly coated.
4. Gently fold in 3/4 cup of the Monterey Jack cheese, all of the blue cheese, and the diced celery—tip: mix lightly to keep the celery crisp.
5. Spoon the chicken mixture into the pepper cups, packing it down slightly without overfilling.
6. Sprinkle the remaining 1/4 cup of Monterey Jack cheese evenly over the tops of the stuffed peppers.
7. Place the peppers on the prepared baking sheet and bake for 20–25 minutes, until the peppers are tender and the cheese is bubbly and golden brown—tip: check at 20 minutes to avoid overcooking.
8. Remove from the oven and let rest for 5 minutes before serving—tip: this allows the filling to set for easier slicing.
Vividly tender, the peppers soften into a sweet shell that cradles the spicy, cheesy filling, with each bite offering a playful contrast of heat and cool creaminess. Serve them alongside a simple green salad or over a bed of rice to soak up any extra sauce, making for a comforting weeknight dinner that feels both nostalgic and new.
Pulled Rotisserie Chicken Banh Mi Sandwich
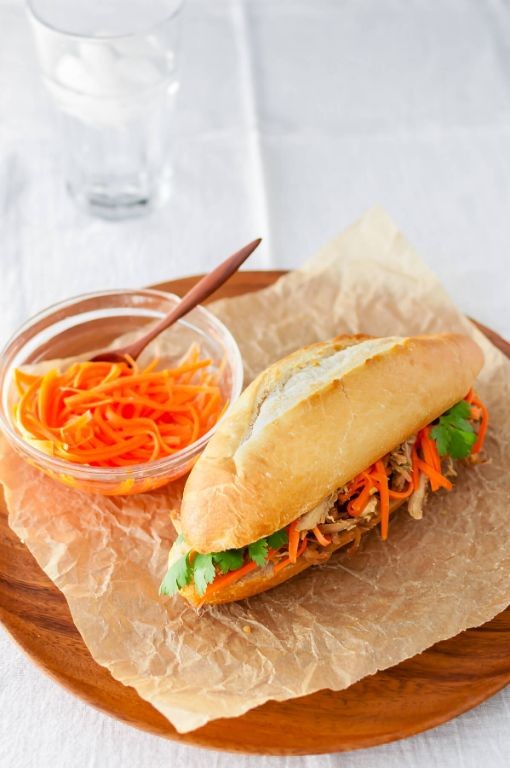
Often, the simplest meals become the most cherished, like this sandwich born from a quiet Tuesday’s leftover chicken and a craving for something bright. Pulling the tender meat from a store-bought rotisserie bird feels like a small, mindful act, and layering it with crisp, quick-pickled vegetables transforms the ordinary into a small feast. It’s a humble, satisfying assembly that always feels just right.
Serving: 4 | Pre Time: 20 minutes | Cooking Time: 0 minutes
Ingredients
– 1 rotisserie chicken, about 3 cups of meat shredded (I find the warm, pre-cooked bird from the market saves the day)
– 4 Vietnamese baguettes or small French rolls, about 6 inches long (seek out the light, airy ones with a crisp crust)
– 1 medium carrot, julienned into thin matchsticks (I love the sweet crunch it adds)
– 1/2 medium daikon radish, julienned into thin matchsticks
– 1/4 cup rice vinegar (unseasoned is my go-to for a clean tang)
– 1 tablespoon granulated sugar
– 1/2 teaspoon kosher salt
– 1/4 cup mayonnaise (a good-quality one makes all the difference)
– 1 tablespoon soy sauce
– 1 teaspoon sriracha, or more if you like heat (I usually add an extra dash)
– 1/2 cup fresh cilantro sprigs (tear off the leaves for a fragrant finish)
– 1/4 cup thinly sliced jalapeño peppers, seeds removed for less spice
Instructions
1. Shred all the meat from the rotisserie chicken into a medium bowl, discarding the skin and bones, until you have about 3 cups of pulled chicken.
2. In a small bowl, whisk together 1/4 cup rice vinegar, 1 tablespoon sugar, and 1/2 teaspoon salt until the sugar and salt fully dissolve.
3. Place the julienned carrot and daikon in the vinegar mixture, tossing to coat evenly, and let them pickle at room temperature for 15 minutes to soften slightly while you prepare the rest.
4. In another small bowl, combine 1/4 cup mayonnaise, 1 tablespoon soy sauce, and 1 teaspoon sriracha, stirring until smooth to create a creamy, spicy spread. Tip: Taste the spread now; if you prefer more heat, add another 1/2 teaspoon of sriracha.
5. Slice the baguettes horizontally, leaving one edge intact like a hinge, and lightly toast them in a toaster oven or under a broiler for 2-3 minutes until just crisp on the inside.
6. Spread the mayonnaise mixture generously on the cut sides of each toasted baguette.
7. Drain the pickled carrots and daikon from the vinegar mixture, squeezing out any excess liquid with your hands. Tip: Pressing them gently ensures the sandwich stays crisp, not soggy.
8. Layer the bottom half of each baguette with about 3/4 cup of the pulled chicken, followed by the drained pickled vegetables, a handful of cilantro sprigs, and a few slices of jalapeño.
9. Close the sandwiches gently, pressing down slightly to compact the fillings. Tip: For easier eating, you can wrap each sandwich tightly in parchment paper and slice it in half diagonally.
Zesty and vibrant, this sandwich offers a delightful contrast: the soft, savory chicken melds with the crunchy, tangy pickles, while the spicy mayo ties it all together. Serve it immediately for the best texture, or pack it for a picnic where the flavors seem to deepen in the open air.
Pulled Rotisserie Chicken Enchiladas Verde

Beneath the soft glow of the kitchen light, there’s a quiet comfort in transforming the humble remains of a rotisserie chicken into something warm and enveloping. It’s a gentle, almost meditative process of shredding, stirring, and rolling, where the tangy brightness of tomatillos meets the rich, savory shreds of chicken. This dish feels like a cozy embrace on a plate, a simple alchemy of leftovers and pantry staples.
Serving: 6 | Pre Time: 25 minutes | Cooking Time: 35 minutes
Ingredients
– 1 rotisserie chicken, skin and bones removed, meat shredded by hand (I find the gentle pull of fingers creates the perfect texture)
– 12 corn tortillas (I always warm a few extra, as the first one or two often tear)
– 2 cups salsa verde, store-bought or homemade (I love the vibrant kick of a good tomatillo-based salsa)
– 1 cup shredded Monterey Jack cheese (a mild melter that doesn’t overpower)
– 1/2 cup sour cream, at room temperature (it blends more smoothly this way)
– 1/4 cup chopped fresh cilantro
– 1 tablespoon vegetable oil
– 1/2 teaspoon ground cumin
– 1/4 teaspoon kosher salt
Instructions
1. Preheat your oven to 375°F (190°C).
2. In a large bowl, combine the shredded rotisserie chicken, 1/2 cup of the salsa verde, sour cream, cumin, and kosher salt. Mix gently until the chicken is evenly coated.
3. Warm the corn tortillas one at a time in a dry skillet over medium heat for about 15 seconds per side, just until pliable. Tip: Cover the warmed tortillas with a clean kitchen towel to keep them soft and prevent cracking.
4. Pour the remaining 1 1/2 cups of salsa verde into the bottom of a 9×13-inch baking dish, spreading it into a thin, even layer.
5. Place a warmed tortilla on a clean surface. Spoon about 1/3 cup of the chicken mixture down the center of the tortilla.
6. Roll the tortilla tightly around the filling and place it seam-side down in the baking dish. Repeat with the remaining tortillas and filling, arranging them snugly in the dish.
7. Pour any remaining salsa verde from the bowl evenly over the top of the rolled enchiladas.
8. Sprinkle the shredded Monterey Jack cheese uniformly over the enchiladas. Tip: For a golden, bubbly top, make sure the cheese coverage is even and reaches the edges.
9. Cover the baking dish tightly with aluminum foil and bake in the preheated oven for 25 minutes.
10. Remove the foil and bake for an additional 10 minutes, or until the cheese is fully melted and the edges of the tortillas are just beginning to crisp. Tip: Let the enchiladas rest for 5 minutes after baking; this allows the filling to set for cleaner slicing.
11. Garnish the baked enchiladas with the chopped fresh cilantro before serving.
Nothing compares to the tender pull of the chicken against the soft tortilla, all bathed in that bright, tangy verde sauce. The melted cheese adds a creamy richness that balances the salsa’s zing perfectly. For a delightful contrast, try serving them alongside a crisp, simple salad or with a dollop of extra sour cream for those who love a cooler bite.
Pulled Rotisserie Chicken and Corn Chowder

There’s something quietly comforting about transforming a simple rotisserie chicken into a warm, creamy chowder as the evening light fades. This pulled chicken and corn chowder feels like a gentle embrace, a way to stretch a humble grocery store find into something deeply nourishing and slow. I love how the sweet corn and tender chicken mingle in a rich, savory broth that’s perfect for a quiet dinner at home.
Serving: 4 | Pre Time: 15 minutes | Cooking Time: 30 minutes
Ingredients
– 2 tablespoons unsalted butter (I always keep my butter cold until I’m ready to use it, as it melts more evenly)
– 1 medium yellow onion, finely diced (a sharp knife makes this task feel almost meditative)
– 2 cloves garlic, minced (freshly minced garlic releases the best aroma)
– 3 tablespoons all-purpose flour (this helps thicken the chowder to a lovely, silky consistency)
– 4 cups low-sodium chicken broth (I prefer low-sodium so I can control the seasoning myself)
– 2 cups fresh or frozen corn kernels (fresh summer corn is a dream, but frozen works beautifully year-round)
– 1 cup heavy cream (it adds a luxurious richness that makes the chowder feel special)
– 2 cups pulled rotisserie chicken, shredded (using pre-cooked chicken is my little shortcut for a quick, satisfying meal)
– 1 teaspoon dried thyme (rubbing it between your fingers before adding wakes up its fragrance)
– Salt and black pepper (I add these gradually, tasting as I go to get it just right)
Instructions
1. Melt 2 tablespoons of unsalted butter in a large pot or Dutch oven over medium heat.
2. Add 1 finely diced yellow onion and cook, stirring occasionally, for about 5 minutes until the onion turns soft and translucent.
3. Stir in 2 minced garlic cloves and cook for 1 minute until fragrant, being careful not to let the garlic burn.
4. Sprinkle 3 tablespoons of all-purpose flour over the onion and garlic mixture, stirring constantly to form a paste, and cook for 2 minutes to remove the raw flour taste.
5. Gradually whisk in 4 cups of low-sodium chicken broth until the mixture is smooth and free of lumps.
6. Add 2 cups of corn kernels and 1 teaspoon of dried thyme, then bring the mixture to a gentle simmer over medium-high heat.
7. Reduce the heat to medium-low, cover the pot, and let it simmer for 15 minutes to allow the flavors to meld and the corn to become tender.
8. Stir in 1 cup of heavy cream and 2 cups of pulled rotisserie chicken, then simmer uncovered for 5 more minutes until the chicken is heated through.
9. Season the chowder with salt and black pepper to your liking, starting with 1/2 teaspoon of salt and a few grinds of pepper, then adjust as needed.
10. Remove the pot from the heat and let the chowder sit for 5 minutes to thicken slightly before serving.
On a chilly evening, this chowder settles into a creamy, hearty texture with pops of sweet corn and shreds of tender chicken in every spoonful. The subtle thyme and savory broth create a cozy depth that feels both familiar and a little indulgent. I sometimes serve it with a sprinkle of fresh parsley or a side of crusty bread for dipping, letting the simplicity of the meal speak for itself.
Pulled Rotisserie Chicken Flatbread Pizza

Sometimes the simplest meals are the ones that feel most like home, especially on a quiet evening when you want something comforting yet effortless. This pulled rotisserie chicken flatbread pizza is exactly that—a humble assembly of pantry staples and store-bought shortcuts that transforms into a warm, satisfying dinner with minimal fuss. It’s the kind of dish that reminds you cooking doesn’t have to be complicated to feel special.
Serving: 2 | Pre Time: 10 minutes | Cooking Time: 12 minutes
Ingredients
– 2 store-bought naan flatbreads (I find the thicker ones hold toppings better without getting soggy)
– 1 cup shredded rotisserie chicken, skin removed (about half a small chicken—I always save the carcass for stock later)
– ½ cup shredded mozzarella cheese (full-fat melts into the creamiest, most stretchy layer)
– ¼ cup grated Parmesan cheese (the pre-grated kind works fine, but I love the nuttiness of freshly grated)
– ⅓ cup pizza sauce (my go-to is a simple jarred marinara for its bright acidity)
– 1 tablespoon extra virgin olive oil (a good drizzle adds a fruity depth)
– ½ teaspoon dried oregano (crushed between your palms to wake up the aroma)
– ¼ teaspoon red pepper flakes (optional, but I like a subtle heat)
– Fresh basil leaves for garnish (a small handful torn at the end makes it feel fresh)
Instructions
1. Preheat your oven to 425°F and line a baking sheet with parchment paper.
2. Place the two naan flatbreads on the prepared baking sheet in a single layer.
3. Brush the top of each flatbread lightly with the extra virgin olive oil, coating the surface evenly—this helps the crust crisp up in the oven.
4. Spread the pizza sauce over each flatbread, leaving a ½-inch border around the edges to prevent overflow.
5. Sprinkle the shredded mozzarella cheese evenly over the sauce on both flatbreads.
6. Distribute the shredded rotisserie chicken in an even layer on top of the cheese.
7. Sprinkle the grated Parmesan cheese over the chicken, followed by the dried oregano and red pepper flakes if using.
8. Bake in the preheated oven for 10–12 minutes, or until the cheese is fully melted and bubbly and the edges of the flatbread are golden brown.
9. Remove the baking sheet from the oven and let the flatbreads cool for 2 minutes on the sheet—this allows the cheese to set slightly so it doesn’t slide off when sliced.
10. Garnish with torn fresh basil leaves just before serving.
Just out of the oven, the flatbreads have a satisfying crispness that gives way to tender chicken and gooey, melted cheese. The oregano and basil lend an herby freshness that cuts through the richness, making each bite feel balanced. For a cozy twist, try drizzling a little balsamic glaze over the top or serving it with a simple side salad dressed in lemon vinaigrette.
Pulled Rotisserie Chicken Cobb Salad
Just now, as the evening light fades on this quiet December day, I find myself craving something both comforting and fresh—a meal that feels like a gentle pause. This salad, born from a leftover rotisserie chicken, is exactly that: a humble assembly of textures and tastes that somehow feels like a small, personal celebration.
Serving: 4 | Pre Time: 20 minutes | Cooking Time: 0 minutes
Ingredients
– 1 store-bought rotisserie chicken, about 2 pounds—I always look for one with a nicely seasoned, golden-brown skin.
– 6 cups chopped romaine lettuce, washed and spun very dry so the dressing clings properly.
– 4 large hard-boiled eggs, peeled and quartered; I prefer room-temperature eggs here as they slice more cleanly.
– 1 large avocado, pitted and sliced—choose one that yields just slightly to gentle pressure.
– 6 slices thick-cut bacon, cooked until crisp and crumbled; the smoky aroma always reminds me of weekend breakfasts.
– 1 cup cherry tomatoes, halved—I look for the sweetest, ripest ones I can find.
– 1/2 cup crumbled blue cheese, about 2 ounces; a good, tangy variety makes all the difference.
– 1/3 cup extra virgin olive oil, my go-to for its fruity notes.
– 2 tablespoons red wine vinegar, which adds a bright, sharp contrast.
– 1 teaspoon Dijon mustard, to help emulsify the dressing.
– 1/4 teaspoon kosher salt, plus more for seasoning.
– 1/4 teaspoon freshly ground black pepper.
Instructions
1. Remove all the meat from the rotisserie chicken, discarding the skin and bones, and shred it into bite-sized pieces using two forks—this should yield about 3 cups of pulled chicken.
2. In a small bowl, whisk together the extra virgin olive oil, red wine vinegar, Dijon mustard, 1/4 teaspoon kosher salt, and 1/4 teaspoon black pepper until fully combined and slightly thickened, about 30 seconds.
3. Place the chopped romaine lettuce in a large, wide salad bowl. Drizzle about half of the dressing over the lettuce and toss gently with your hands or salad tongs to coat every leaf evenly.
4. Arrange the pulled chicken, quartered hard-boiled eggs, sliced avocado, crumbled bacon, halved cherry tomatoes, and crumbled blue cheese in neat rows or sections on top of the dressed lettuce.
5. Drizzle the remaining dressing over the arranged toppings. Tip: Add the dressing just before serving to keep the lettuce crisp and the avocado from browning.
6. Serve immediately. Tip: For a heartier meal, I sometimes add a side of warm, crusty bread to soak up any extra dressing.
7. Tip: If preparing ahead, store the components separately in airtight containers in the refrigerator and assemble just before eating to maintain optimal texture.
Vividly layered and satisfying, this salad offers a delightful contrast between the cool, crisp lettuce and the warm, savory chicken. The creamy avocado and tangy blue cheese mingle with the smoky bacon in each forkful, creating a harmony that feels both rustic and refined. For a creative twist, try serving it in individual mason jars for a portable lunch, or top it with a soft-poached egg to let the yolk become a rich, additional dressing.
Pulled Rotisserie Chicken Mac and Cheese

Beneath the quiet hum of the kitchen light, there’s a comfort in pulling together the familiar—the creamy, the hearty, the deeply satisfying. This dish feels like a gentle exhale at the end of a long week, a simple way to turn a store-bought shortcut into something truly special. It’s the kind of meal that fills the house with a warm, cheesy aroma, promising coziness in every bite.
Serving: 6 | Pre Time: 15 minutes | Cooking Time: 25 minutes
Ingredients
– 1 tablespoon extra virgin olive oil, my go-to for its gentle fruity note
– 1 small yellow onion, finely diced (I find a sharp knife makes this meditative)
– 2 cloves garlic, minced—freshly crushed releases the best aroma
– 3 tablespoons all-purpose flour
– 2 cups whole milk, slightly warmed to prevent curdling
– 2 cups shredded sharp cheddar cheese, I prefer the extra tang for balance
– 1 teaspoon Dijon mustard, just a whisper for depth
– ½ teaspoon smoked paprika, for a hint of warmth
– ¼ teaspoon freshly ground black pepper
– 12 ounces elbow macaroni
– 2 cups pulled rotisserie chicken, shredded into bite-sized pieces (using leftover chicken feels wonderfully thrifty)
– ½ cup panko breadcrumbs
– 1 tablespoon unsalted butter, melted
Instructions
1. Bring a large pot of salted water to a rolling boil over high heat.
2. Add the elbow macaroni to the boiling water and cook for 7 minutes, stirring occasionally, until al dente (it will finish cooking in the sauce).
3. Drain the pasta in a colander and set it aside; do not rinse, as the starch helps the sauce cling.
4. While the pasta cooks, heat the extra virgin olive oil in a large Dutch oven or deep skillet over medium heat.
5. Add the diced onion and cook for 5 minutes, stirring often, until translucent and soft.
6. Stir in the minced garlic and cook for 1 minute, just until fragrant to avoid bitterness.
7. Sprinkle the all-purpose flour over the onions and garlic, stirring constantly for 2 minutes to cook out the raw flour taste and form a roux.
8. Gradually whisk in the warmed whole milk, ensuring no lumps form, and bring the mixture to a gentle simmer.
9. Reduce the heat to low and stir in the shredded sharp cheddar cheese, Dijon mustard, smoked paprika, and black pepper until the cheese is fully melted and the sauce is smooth.
10. Fold in the drained elbow macaroni and pulled rotisserie chicken until everything is evenly coated in the cheese sauce.
11. In a small bowl, combine the panko breadcrumbs and melted unsalted butter until the crumbs are lightly moistened.
12. Transfer the mac and cheese mixture to a greased 9×13-inch baking dish and sprinkle the buttered panko evenly over the top.
13. Place the baking dish under a preheated broiler on the middle rack for 3–4 minutes, watching closely, until the topping is golden brown and crispy.
14. Remove from the oven and let it rest for 5 minutes before serving to allow the sauce to set slightly.
Heavenly in its simplicity, this mac and cheese bakes into a creamy, velvety embrace with tender shreds of chicken throughout. The panko topping adds a delightful crunch that contrasts the soft interior, while the smoked paprika weaves a subtle smoky note. For a cozy twist, serve it in individual ramekins straight from the broiler, perhaps with a side of crisp green salad to cut through the richness.
Pulled Rotisserie Chicken Shepherd’s Pie
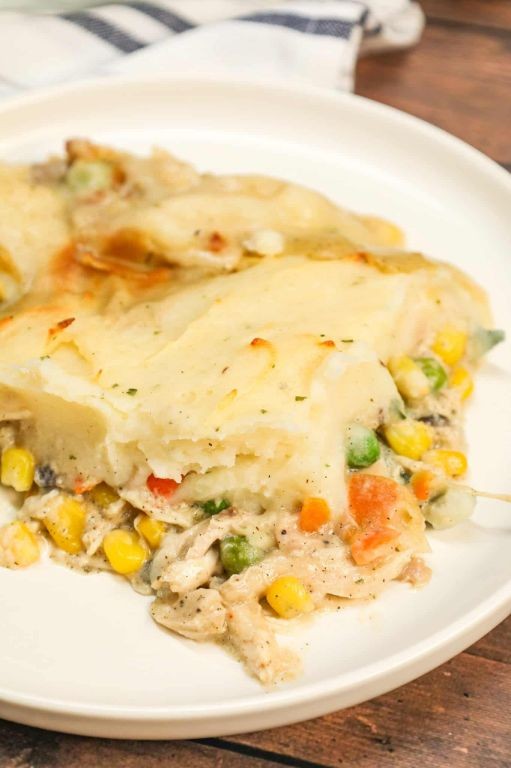
Cradling a warm bowl on a quiet evening feels like a small, comforting ritual, especially when it holds something as humble and nourishing as this shepherd’s pie. I love how the rotisserie chicken, already rich with flavor, transforms into a tender, savory filling beneath a blanket of creamy mashed potatoes. It’s the kind of meal that simmers slowly, filling the kitchen with a gentle, inviting aroma that promises ease and warmth.
Serving: 6 | Pre Time: 20 minutes | Cooking Time: 40 minutes
Ingredients
– 1 rotisserie chicken, shredded (I find the meat pulls apart more easily when it’s still slightly warm)
– 4 cups mashed potatoes (about 3 large russet potatoes, boiled and mashed with 1/2 cup whole milk and 4 tbsp unsalted butter—I prefer using room-temperature butter for smoother blending)
– 1 yellow onion, finely diced (extra-virgin olive oil is my go-to for sautéing, about 2 tbsp)
– 2 carrots, peeled and diced into small pieces
– 1 cup frozen peas (thawed under cool running water for a few minutes)
– 1 cup chicken broth (low-sodium lets you control the salt better)
– 2 tbsp all-purpose flour
– 1 tsp dried thyme (rubbed between my palms to release its earthy fragrance)
– 1/2 tsp black pepper
– 1/2 cup shredded cheddar cheese (optional, but I always add a sprinkle for a golden top)
Instructions
1. Preheat your oven to 375°F (190°C) and lightly grease a 9×13-inch baking dish with olive oil or non-stick spray.
2. In a large skillet over medium heat, heat 2 tbsp of extra-virgin olive oil until it shimmers, about 1 minute.
3. Add the diced yellow onion and carrots, sautéing for 8-10 minutes until the onions are translucent and the carrots begin to soften, stirring occasionally to prevent burning.
4. Sprinkle 2 tbsp of all-purpose flour over the vegetables, stirring constantly for 1 minute to cook off the raw flour taste and form a light roux.
5. Gradually pour in 1 cup of chicken broth, whisking continuously to avoid lumps, and bring the mixture to a gentle simmer for 3-4 minutes until it thickens slightly.
6. Stir in the shredded rotisserie chicken, thawed peas, 1 tsp of dried thyme, and 1/2 tsp of black pepper, cooking for another 2 minutes until everything is well combined and heated through. Tip: If the filling seems too thick, add a splash more broth; if too thin, let it simmer a bit longer.
7. Transfer the chicken mixture evenly into the prepared baking dish, spreading it out with a spatula.
8. Spoon the 4 cups of mashed potatoes over the filling, using the back of a spoon to spread them into an even layer that covers the entire surface.
9. If using, sprinkle 1/2 cup of shredded cheddar cheese evenly over the potatoes. Tip: For a crisper top, you can broil it for the last 2-3 minutes of baking, but watch closely to avoid burning.
10. Bake in the preheated oven for 25-30 minutes, until the edges are bubbly and the top is golden brown. Tip: Let it rest for 5-10 minutes after baking—this helps the layers set for cleaner slices.
11. Remove from the oven and let it cool slightly before serving.
Layers of tender chicken and vegetables meld into a savory, hearty base, while the mashed potatoes bake into a fluffy, golden crust that gives way with each spoonful. The peas add a pop of sweetness that balances the thyme’s earthiness, making every bite comforting and complete. Serve it straight from the dish with a simple green salad on the side, or scoop leftovers into a bowl for a cozy next-day lunch that tastes even better as the flavors deepen.
Pulled Rotisserie Chicken Stuffed Sweet Potatoes

Zigzagging through the holiday rush, I found myself craving something that felt both celebratory and comforting—a quiet kitchen moment where simple ingredients transform into a warm, satisfying meal. This dish is my gentle answer to busy evenings, where the sweetness of roasted potatoes meets savory, tender chicken in a cozy embrace that feels like a hug on a plate.
Serving: 4 | Pre Time: 15 minutes | Cooking Time: 50 minutes
Ingredients
– 4 medium sweet potatoes, scrubbed clean (I look for ones with smooth skins that feel firm to the touch)
– 2 cups pulled rotisserie chicken, shredded (I use a store-bought one to save time, but homemade works beautifully too)
– 1/2 cup sour cream (full-fat gives the creamiest texture, in my opinion)
– 1/4 cup unsalted butter, melted (I always melt it gently to avoid burning)
– 1/4 cup chopped fresh parsley (fresh herbs brighten everything up)
– 1/2 tsp smoked paprika (this adds a subtle, smoky depth I love)
– 1/2 tsp garlic powder
– 1/4 tsp black pepper
– 1/4 tsp salt
Instructions
1. Preheat your oven to 400°F (200°C) and line a baking sheet with parchment paper for easy cleanup.
2. Pierce each sweet potato 4-5 times with a fork to allow steam to escape during baking, which prevents them from bursting.
3. Place the sweet potatoes on the prepared baking sheet and bake for 45-50 minutes, until they are tender when pierced with a fork and the skins are slightly crispy.
4. While the sweet potatoes bake, in a medium bowl, combine the pulled rotisserie chicken, sour cream, melted butter, chopped parsley, smoked paprika, garlic powder, black pepper, and salt, mixing gently until well incorporated.
5. Once the sweet potatoes are done, remove them from the oven and let them cool for 5 minutes until they are safe to handle but still warm.
6. Carefully slice each sweet potato lengthwise down the middle, being cautious not to cut all the way through the bottom skin, to create a pocket for stuffing.
7. Use a fork to fluff the insides of the sweet potatoes slightly, which helps the filling nestle in better and creates a fluffy texture.
8. Evenly divide the chicken mixture among the sweet potatoes, spooning it into the pockets until they are generously filled.
9. Return the stuffed sweet potatoes to the oven and bake for an additional 5 minutes, just until the filling is heated through and the tops are lightly golden.
10. Remove from the oven and let them rest for 2-3 minutes before serving to allow the flavors to meld together.
The result is a delightful contrast of creamy, savory chicken against the natural sweetness of the potatoes, with a hint of smokiness from the paprika. I love serving these topped with an extra sprinkle of parsley or a drizzle of hot sauce for a bit of kick—they’re perfect for a cozy dinner or even as a hearty lunch the next day.
Summary
Effortless and delicious, these rotisserie chicken recipes are your secret weapon for stress-free weeknight dinners. We hope you find a new family favorite! Give one a try, leave a comment below to tell us which one you loved, and don’t forget to share this roundup on Pinterest to help other busy cooks.