Who says dessert has to be a hassle? Whether you’re craving something sweet after dinner or need a last-minute treat for guests, these 18 easy recipes deliver deliciousness in a flash. From no-bake bites to simple stovetop wonders, we’ve gathered quick desserts that are perfect for busy home cooks. Get ready to satisfy your sweet tooth without spending hours in the kitchen!
5-Minute Chocolate Mug Cake
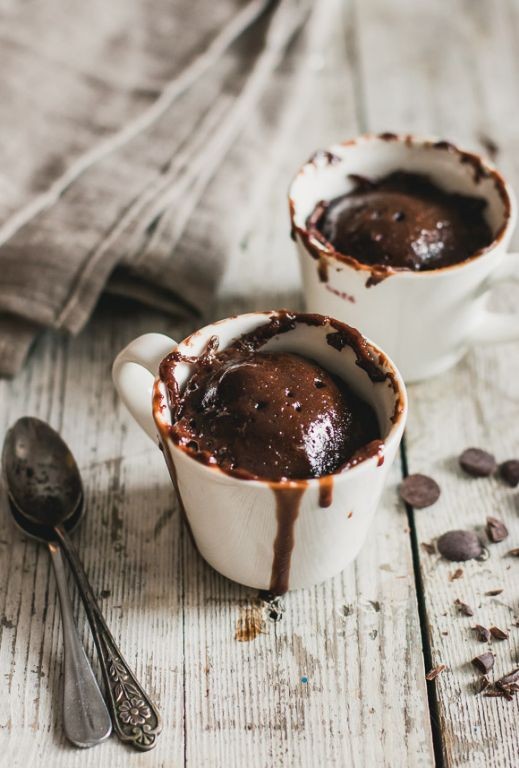
Hectic day? This 5-minute chocolate mug cake delivers rich, fudgy satisfaction with minimal effort. Perfect for solo dessert cravings or last-minute sweet fixes.
Serving: 1 | Pre Time: 2 minutes | Cooking Time: 1 minute
Ingredients
– 1/4 cup all-purpose flour (spooned and leveled)
– 2 tbsp granulated sugar (adjust to taste)
– 2 tbsp unsweetened cocoa powder (Dutch-processed for deeper flavor)
– 1/4 tsp baking powder
– Pinch of salt
– 3 tbsp milk (whole or 2%, or any non-dairy alternative)
– 2 tbsp vegetable oil (or any neutral oil like canola)
– 1/4 tsp vanilla extract
– 1 tbsp chocolate chips (optional, for extra gooeyness)
Instructions
1. In a 12-ounce microwave-safe mug, whisk together 1/4 cup all-purpose flour, 2 tbsp granulated sugar, 2 tbsp unsweetened cocoa powder, 1/4 tsp baking powder, and a pinch of salt until no lumps remain.
2. Add 3 tbsp milk, 2 tbsp vegetable oil, and 1/4 tsp vanilla extract to the dry ingredients. Stir vigorously with a fork for 30 seconds until the batter is smooth and fully combined.
3. Fold in 1 tbsp chocolate chips if using, distributing them evenly throughout the batter.
4. Microwave the mug on high power for 60 seconds. Check for doneness: the cake should be set on top but slightly moist in the center. If needed, microwave in 10-second intervals up to 20 seconds more.
5. Let the mug cake cool in the mug for 1 minute to firm up before serving. This resting time prevents burns and improves texture.
6. Enjoy directly from the mug with a spoon. For best results, serve warm to highlight the gooey chocolate interior.
Tender and moist, this cake boasts a fudgy crumb with intense cocoa flavor. Top with a scoop of vanilla ice cream for a hot-cold contrast, or drizzle with caramel sauce for extra indulgence.
Quick Strawberry Cheesecake Parfait
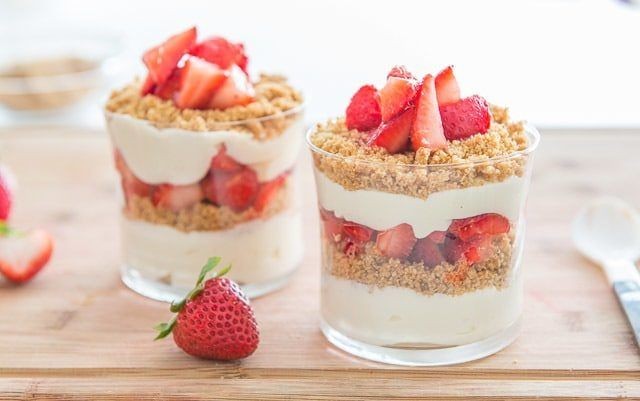
Whip up this no-bake dessert in minutes for a festive treat that feels special without the fuss. Layers of creamy cheesecake filling, fresh strawberries, and crunchy graham crackers create a satisfying contrast. Perfect for last-minute holiday gatherings or a quick sweet fix.
Serving: 4 | Pre Time: 15 minutes | Cooking Time: 0 minutes
Ingredients
– 8 oz cream cheese, softened to room temperature for easy mixing
– 1/4 cup granulated sugar
– 1 tsp vanilla extract
– 1 cup heavy whipping cream, chilled
– 1 lb fresh strawberries, hulled and sliced, reserve a few for garnish
– 1 cup graham cracker crumbs, from about 8 whole crackers
– 2 tbsp unsalted butter, melted
Instructions
1. Beat the softened cream cheese with an electric mixer on medium speed for 1 minute until smooth.
2. Add the granulated sugar and vanilla extract to the cream cheese, then beat for another 1 minute until fully combined and creamy.
3. In a separate bowl, whip the chilled heavy cream on high speed for 2–3 minutes until stiff peaks form.
4. Gently fold the whipped cream into the cream cheese mixture using a spatula until no white streaks remain, being careful not to deflate the mixture.
5. Combine the graham cracker crumbs and melted butter in a small bowl, mixing until the crumbs are evenly coated and hold together when pressed.
6. Layer the ingredients in four serving glasses: start with 2 tablespoons of the graham cracker mixture, pressing it down lightly with the back of a spoon.
7. Add a layer of sliced strawberries, using about 1/4 of the total amount per glass.
8. Spoon a layer of the cheesecake filling over the strawberries, dividing it evenly among the glasses.
9. Repeat the layers once more, ending with a final dollop of the cheesecake filling on top.
10. Garnish each parfait with a reserved strawberry slice and a sprinkle of any remaining graham cracker crumbs.
11. Chill the parfaits in the refrigerator for at least 30 minutes before serving to allow the flavors to meld and the layers to set slightly.
You’ll love the creamy, tangy filling against the sweet berries and buttery crunch. For a fun twist, try swapping in crushed cookies or adding a drizzle of chocolate sauce. These parfaits stay fresh in the fridge for up to a day, making them ideal for prepping ahead.
Easy No-Bake Oreo Dessert
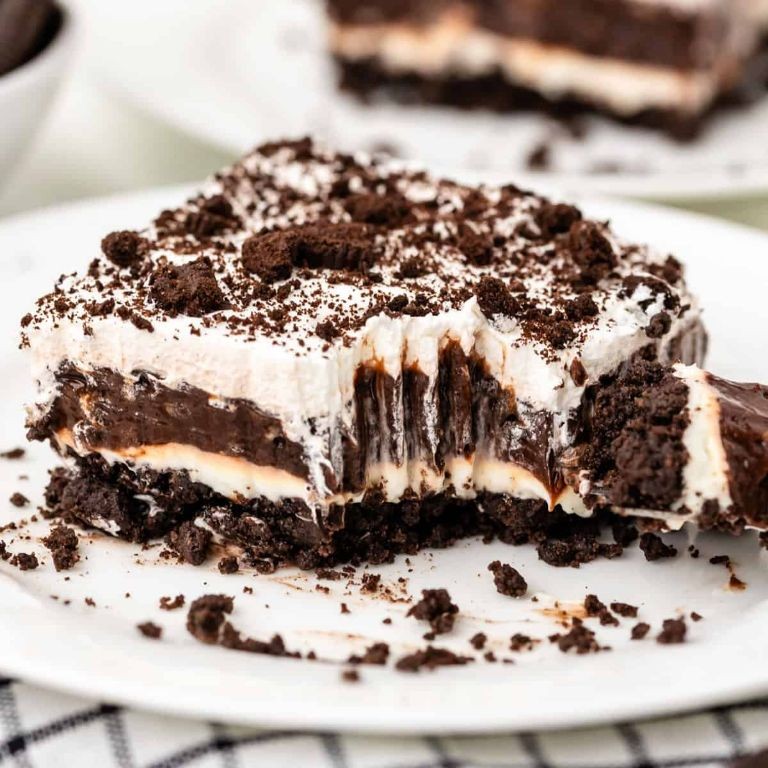
You’ve probably had those days when you want a showstopping dessert without turning on the oven. This easy no-bake Oreo treat layers creamy filling with a crunchy cookie crust for a crowd-pleaser every time.
Serving: 12 | Pre Time: 25 minutes | Cooking Time: 0 minutes
Ingredients
– 36 Oreo cookies (or any chocolate sandwich cookies)
– 1/2 cup unsalted butter, melted (or use salted butter and omit added salt)
– 1 (8 oz) package cream cheese, softened to room temperature
– 1 cup powdered sugar, sifted to avoid lumps
– 1 (12 oz) container Cool Whip, thawed in the refrigerator
– 2 (3.4 oz) packages instant chocolate pudding mix
– 3 cups cold whole milk (2% works, but whole milk yields a creamier texture)
– Additional Cool Whip and crushed Oreos for garnish, optional
Instructions
1. Place 30 Oreo cookies in a large resealable plastic bag and crush finely with a rolling pin until they resemble coarse sand.
2. Pour the crushed cookies into a 9×13-inch baking dish and add the melted butter. Tip: Use a fork to mix until the crumbs are evenly moistened and hold together when pressed.
3. Press the crumb mixture firmly and evenly into the bottom of the dish to form the crust. Chill in the refrigerator for 10 minutes to set.
4. In a large mixing bowl, beat the softened cream cheese with an electric mixer on medium speed until smooth, about 1 minute.
5. Gradually add the powdered sugar to the cream cheese, beating on low speed until fully incorporated and no lumps remain.
6. Gently fold in 2 cups of the thawed Cool Whip with a spatula until the mixture is uniform and creamy. Tip: Avoid overmixing to keep the filling light.
7. Spread the cream cheese mixture evenly over the chilled crust with an offset spatula. Return the dish to the refrigerator.
8. In a separate bowl, whisk the chocolate pudding mixes and cold milk vigorously for 2 minutes until thick and smooth. Tip: Let the pudding sit for 5 minutes to thicken further before using.
9. Pour the pudding over the cream cheese layer and spread it evenly with the spatula.
10. Top the pudding layer with the remaining Cool Whip, spreading it to cover completely.
11. Crush the remaining 6 Oreo cookies and sprinkle them over the top for garnish, if desired.
12. Cover the dish with plastic wrap and refrigerate for at least 4 hours, or overnight for best results.
Chill time is crucial for the layers to set into a firm, sliceable dessert with a satisfying contrast between the crunchy crust and creamy fillings. For a festive twist, layer in fresh berries or drizzle with caramel sauce just before serving.
Speedy Banana Pudding
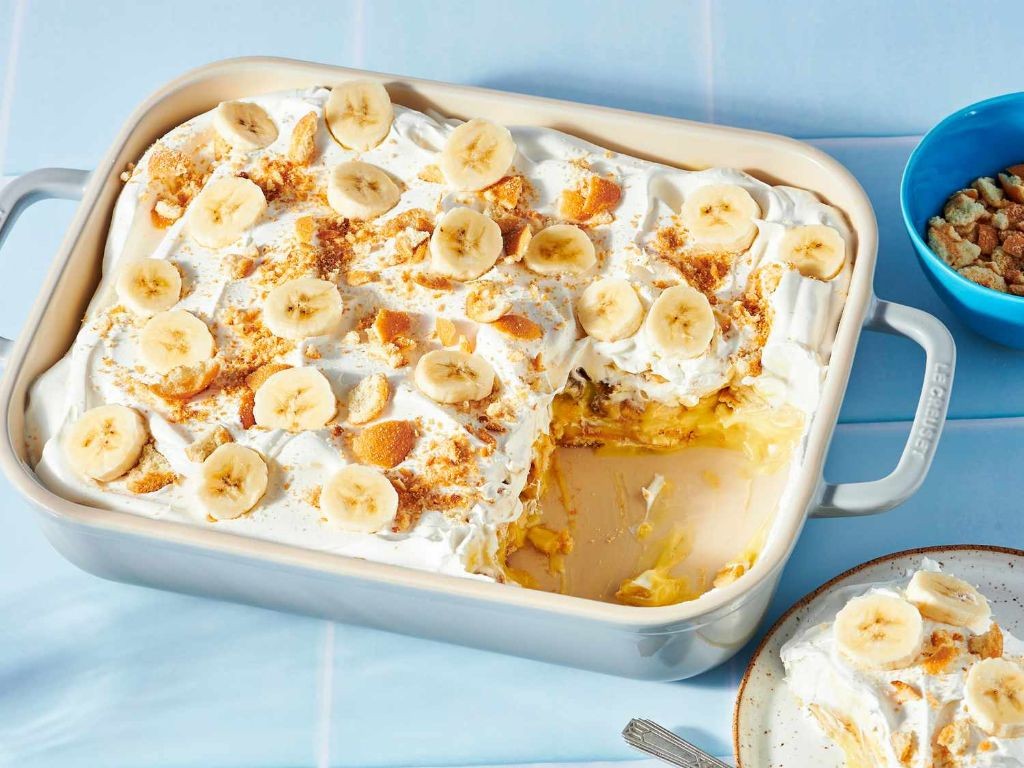
Perfect for a last-minute dessert, this speedy banana pudding comes together in minutes with minimal fuss. It’s a creamy, no-bake treat that’s ideal for potlucks or a quick family snack.
Serving: 6 | Pre Time: 10 minutes | Cooking Time: 0 minutes
Ingredients
- 2 cups cold whole milk (for creamier texture, or use 2% for lighter)
- 1 (3.4 oz) box instant vanilla pudding mix
- 1 (8 oz) container frozen whipped topping, thawed
- 1 (11 oz) box vanilla wafer cookies
- 3–4 ripe bananas, sliced (use slightly spotted ones for natural sweetness)
Instructions
- Pour the 2 cups cold whole milk into a large mixing bowl.
- Add the entire box of instant vanilla pudding mix to the milk.
- Whisk vigorously for 2 minutes until the mixture thickens completely and no lumps remain.
- Gently fold in the thawed whipped topping until just combined to keep it light and airy.
- Arrange a single layer of vanilla wafer cookies to cover the bottom of a 9×13-inch baking dish.
- Top the wafer layer evenly with half of the sliced bananas.
- Spread half of the pudding mixture over the bananas using a spatula.
- Repeat the layers: add another layer of wafers, the remaining bananas, and the rest of the pudding.
- Cover the dish tightly with plastic wrap, pressing it directly onto the pudding surface to prevent a skin from forming.
- Refrigerate for at least 4 hours, or ideally overnight, to allow the flavors to meld and the wafers to soften.
Finished with a silky, cloud-like texture, the pudding contrasts with the softened, cake-like wafers. For a festive twist, top individual servings with crushed cookies or a drizzle of caramel sauce just before serving.
Instant Pot Chocolate Lava Cake
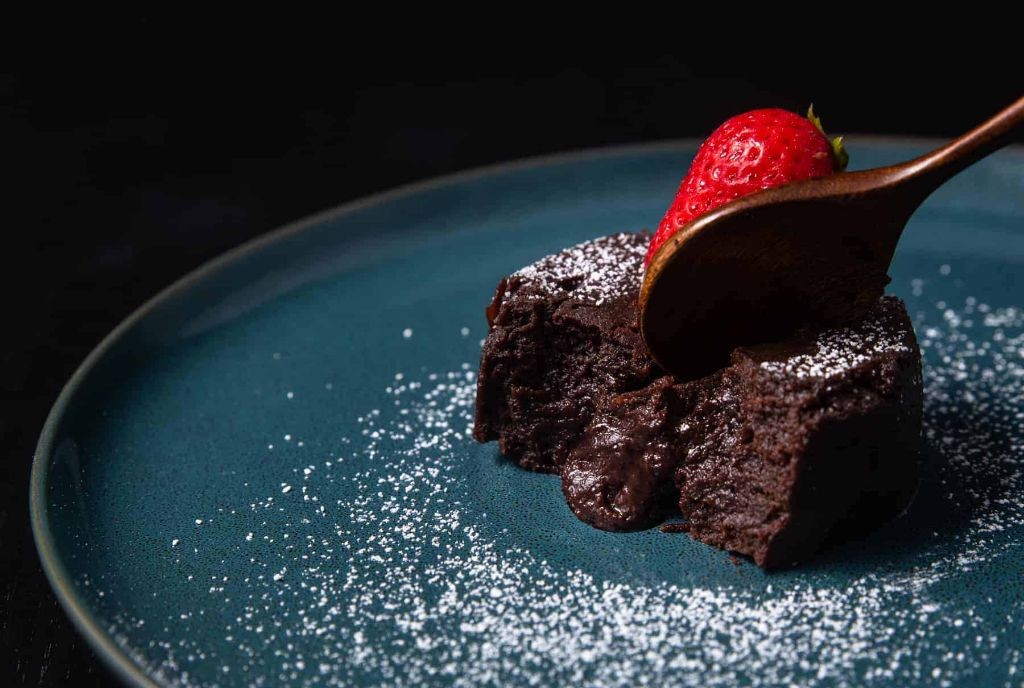
Fancy a decadent dessert in minutes? Instant Pot chocolate lava cake delivers rich, molten chocolate with minimal effort. This single-serving treat is perfect for a quick, impressive finish to any meal.
Serving: 1 | Pre Time: 5 minutes | Cooking Time: 10 minutes
Ingredients
– 2 tbsp unsalted butter, melted (plus extra for greasing)
– 1 tbsp granulated sugar
– 2 tbsp all-purpose flour
– 1 tbsp unsweetened cocoa powder
– 1/8 tsp baking powder
– Pinch of salt
– 2 tbsp milk, at room temperature
– 1/4 tsp vanilla extract
– 1 oz semi-sweet chocolate, chopped (or chocolate chips)
– Powdered sugar for dusting, optional
Instructions
1. Grease a 6-ounce ramekin thoroughly with butter to prevent sticking.
2. In a small bowl, whisk together melted butter and granulated sugar until combined.
3. Add flour, cocoa powder, baking powder, and salt; whisk until no dry streaks remain.
4. Stir in milk and vanilla extract until the batter is smooth.
5. Fold in chopped chocolate, ensuring it’s evenly distributed throughout the batter.
6. Pour the batter into the prepared ramekin and smooth the top with a spatula.
7. Cover the ramekin tightly with aluminum foil to keep moisture out during cooking.
8. Pour 1 cup of water into the Instant Pot and place the trivet inside.
9. Set the ramekin on the trivet, seal the lid, and set the valve to sealing.
10. Cook on high pressure for 10 minutes, then allow a natural pressure release for 5 minutes.
11. Carefully open the lid and use tongs to remove the hot ramekin.
12. Let the cake cool for 1-2 minutes, then invert onto a plate.
13. Dust with powdered sugar if desired and serve immediately.
Expect a warm, gooey chocolate center surrounded by a tender cake exterior. Each bite offers a luxurious contrast of textures, making it ideal topped with vanilla ice cream or fresh berries for added freshness.
Fast Raspberry Fool

Vivid raspberries and cream come together in minutes for this elegant, no-bake dessert. It’s a refreshing, light treat perfect for last-minute entertaining or a quick sweet fix. The fool’s simplicity lets the fruit’s bright flavor shine through.
Serving: 4 | Pre Time: 15 minutes | Cooking Time: 0 minutes
Ingredients
– 12 oz fresh raspberries, plus extra for garnish (or use frozen, thawed and drained)
– 1/2 cup granulated sugar, adjust to taste
– 1 cup heavy cream, chilled
– 1 tsp pure vanilla extract
– 1 tbsp powdered sugar, optional for extra sweetness
Instructions
1. Place 10 oz of the raspberries and the granulated sugar in a medium bowl. Mash thoroughly with a fork until mostly broken down and juicy, leaving some texture.
2. Let the mashed raspberry mixture sit at room temperature for 10 minutes to macerate and release more liquid.
3. In a large, chilled mixing bowl, pour the chilled heavy cream. Add the vanilla extract and powdered sugar if using.
4. Using an electric mixer on medium-high speed, whip the cream until stiff peaks form, about 2–3 minutes. Tip: Chill the bowl and beaters beforehand for faster whipping.
5. Gently fold the macerated raspberry mixture into the whipped cream with a spatula until just combined, creating a marbled effect. Tip: Avoid overmixing to keep the fool light and fluffy.
6. Divide the mixture evenly among 4 serving glasses or bowls.
7. Top each serving with the remaining 2 oz of fresh raspberries for garnish. Tip: Chill the fool for 15–20 minutes before serving to let the flavors meld, if time allows.
Soft, pillowy cream swirls with tart, jammy raspberries for a delightful contrast. Serve it immediately for a light, airy texture, or layer it with crumbled shortbread cookies in a parfait glass for added crunch.
Quick Apple Cinnamon Crumble

Craving a warm, comforting dessert without the fuss? This quick apple cinnamon crumble delivers cozy flavors in under an hour. Perfect for last-minute gatherings or a simple weeknight treat.
Serving: 6 | Pre Time: 15 minutes | Cooking Time: 35 minutes
Ingredients
– 4 cups peeled and sliced apples (such as Granny Smith or Honeycrisp, about 4 medium apples)
– 1/2 cup granulated sugar (adjust to taste based on apple sweetness)
– 1 tbsp lemon juice (fresh or bottled, to prevent browning)
– 1 tsp ground cinnamon
– 1/2 tsp vanilla extract
– 1 cup all-purpose flour
– 1/2 cup old-fashioned rolled oats
– 1/2 cup packed brown sugar
– 1/2 cup unsalted butter, cold and cubed (or use salted butter and omit added salt)
– 1/4 tsp salt (omit if using salted butter)
Instructions
1. Preheat your oven to 375°F (190°C) and grease an 8×8-inch baking dish.
2. In a large bowl, toss the sliced apples with granulated sugar, lemon juice, cinnamon, and vanilla extract until evenly coated.
3. Transfer the apple mixture to the prepared baking dish, spreading it into an even layer.
4. In the same bowl (no need to wash it), combine the flour, oats, brown sugar, and salt (if using).
5. Add the cold, cubed butter to the flour mixture.
6. Use your fingers or a pastry cutter to work the butter into the dry ingredients until the mixture resembles coarse crumbs with some pea-sized pieces remaining. Tip: Keep the butter cold for a flakier topping.
7. Sprinkle the crumble topping evenly over the apples in the baking dish.
8. Place the dish in the preheated oven and bake for 30-35 minutes, or until the topping is golden brown and the apples are bubbling around the edges.
9. Remove the crumble from the oven and let it cool on a wire rack for at least 15 minutes before serving. Tip: This resting time allows the juices to thicken slightly.
A warm, bubbly filling of tender, spiced apples sits beneath a crisp, buttery oat topping. Serve it straight from the dish with a scoop of vanilla ice cream for a classic pairing, or enjoy it slightly warm for breakfast with a dollop of Greek yogurt. The contrast between the soft fruit and crunchy crumble is utterly satisfying.
3-Minute Nutella Brownie
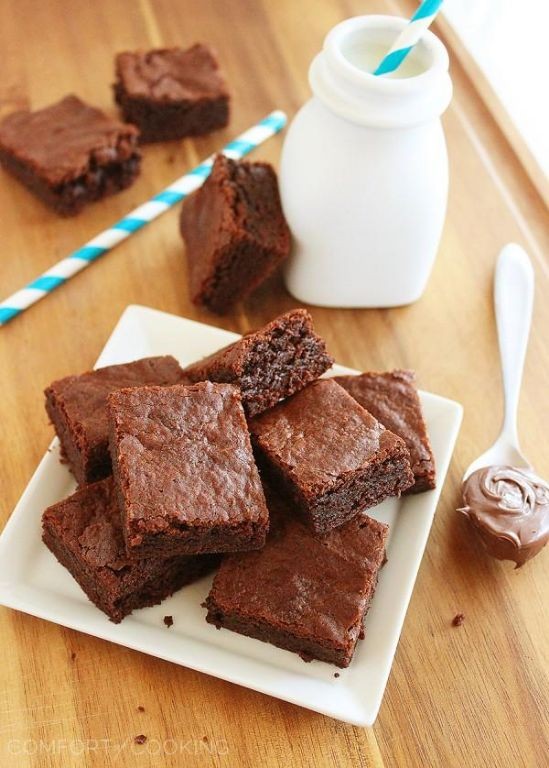
Kickstart your chocolate craving with this lightning-fast dessert. This single-serving brownie cooks in a mug in just minutes. You’ll get a warm, fudgy treat with minimal effort.
Serving: 1 | Pre Time: 2 minutes | Cooking Time: 1 minute
Ingredients
– 1/4 cup all-purpose flour
– 2 tbsp granulated sugar
– 2 tbsp unsweetened cocoa powder
– 1/4 tsp baking powder
– 1/8 tsp salt
– 3 tbsp milk (any type, dairy or non-dairy)
– 2 tbsp vegetable oil (or any neutral oil)
– 2 tbsp Nutella (or any chocolate-hazelnut spread)
– 1/4 tsp vanilla extract (optional, for extra flavor)
Instructions
1. Place a microwave-safe mug on your countertop.
2. Add 1/4 cup all-purpose flour to the mug.
3. Add 2 tbsp granulated sugar to the mug.
4. Add 2 tbsp unsweetened cocoa powder to the mug.
5. Add 1/4 tsp baking powder to the mug.
6. Add 1/8 tsp salt to the mug.
7. Whisk the dry ingredients together in the mug with a fork until fully combined, ensuring no lumps remain.
8. Pour 3 tbsp milk into the mug.
9. Pour 2 tbsp vegetable oil into the mug.
10. Add 2 tbsp Nutella to the mug.
11. Add 1/4 tsp vanilla extract to the mug if using.
12. Stir the mixture vigorously with a fork for about 30 seconds until a smooth, thick batter forms, scraping the sides and bottom to incorporate all ingredients evenly.
13. Microwave the mug on high power for 60 seconds, watching to prevent overflow—the brownie should rise and set but remain slightly moist in the center.
14. Remove the mug from the microwave using an oven mitt, as it will be hot.
15. Let the brownie cool in the mug for 1-2 minutes before eating to avoid burning your mouth.
Bite into a rich, gooey center with a tender crumb. Top it with a scoop of vanilla ice cream for a hot-cold contrast, or sprinkle with sea salt to enhance the chocolate notes.
Easy Vanilla Ice Cream Sundae
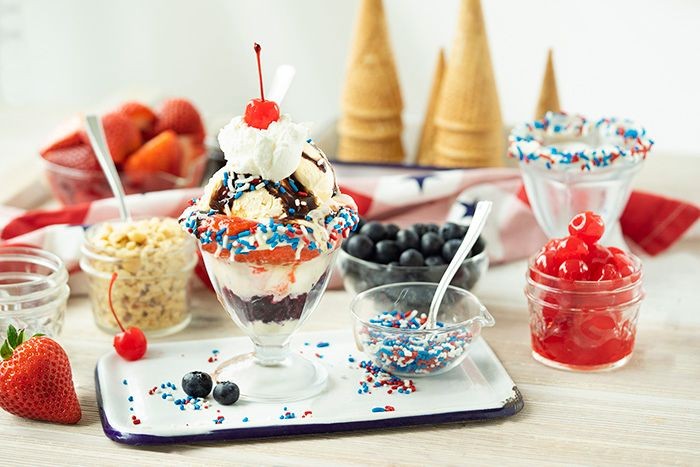
A simple vanilla ice cream sundae is the perfect quick dessert for any occasion. This no-cook recipe comes together in minutes with just a few pantry staples. It’s endlessly customizable, so feel free to get creative with your toppings.
Serving: 2 | Pre Time: 5 minutes | Cooking Time: 0 minutes
Ingredients
– 4 scoops vanilla ice cream (about 2 cups, use high-quality for best flavor)
– 1/4 cup hot fudge sauce (warmed, or use caramel sauce as an alternative)
– 1/4 cup whipped cream (from a can or homemade, adjust amount to preference)
– 2 tbsp chopped peanuts (salted for a sweet-salty contrast, or use any nut)
– 2 maraschino cherries (for garnish, optional but classic)
Instructions
1. Remove the vanilla ice cream from the freezer and let it sit at room temperature for 5 minutes to soften slightly for easier scooping.
2. Place two serving bowls or sundae glasses in the freezer for 2 minutes to chill them, which helps keep the ice cream firm longer.
3. Scoop 2 scoops of vanilla ice cream into each chilled bowl, arranging them neatly.
4. Warm the hot fudge sauce in a microwave-safe container for 20 seconds on high power until it pours easily, stirring halfway through.
5. Drizzle half of the warmed hot fudge sauce evenly over the ice cream in each bowl.
6. Top each sundae with 2 tablespoons of whipped cream, using a spoon to create soft peaks.
7. Sprinkle 1 tablespoon of chopped peanuts over the whipped cream on each sundae for crunch.
8. Place one maraschino cherry on top of each sundae as a final garnish.
Grab a spoon and dig in immediately for the best texture—the ice cream should be creamy but not melted, with warm sauce creating a delightful contrast. The combination of cool vanilla, rich fudge, and salty peanuts makes every bite satisfying. Try serving it in waffle cones for a fun twist or adding a drizzle of extra sauce for indulgence.
Speedy Coconut Macaroons
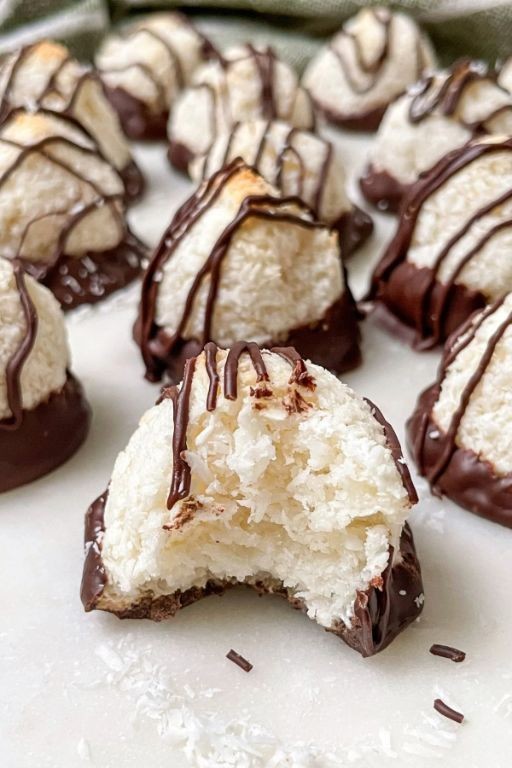
Zipping through holiday baking just got easier with these Speedy Coconut Macaroons. They require minimal ingredients and come together in under 30 minutes, delivering chewy, sweet bites perfect for last-minute gatherings or a quick treat. Serving: 24 | Pre Time: 10 minutes | Cooking Time: 15 minutes
Ingredients
– 14 oz sweetened shredded coconut (not unsweetened, for proper texture)
– 1 (14 oz) can sweetened condensed milk (full-fat works best for richness)
– 2 tsp pure vanilla extract (or almond extract for variation)
– 1/4 tsp fine sea salt (adjust to balance sweetness)
– 2 large egg whites, at room temperature (helps with volume)
Instructions
1. Preheat your oven to 325°F and line two baking sheets with parchment paper.
2. In a large mixing bowl, combine the sweetened shredded coconut, sweetened condensed milk, vanilla extract, and sea salt until fully incorporated. Tip: Use a spatula to fold gently to avoid crushing the coconut.
3. In a separate, clean bowl, beat the egg whites with an electric mixer on high speed until stiff peaks form, about 2-3 minutes. Tip: Ensure no yolk contaminates the whites for maximum volume.
4. Gently fold the beaten egg whites into the coconut mixture until just combined, being careful not to deflate the whites. Tip: Fold in a figure-eight motion for even distribution without overmixing.
5. Using a 1-tablespoon cookie scoop or spoon, drop rounded mounds of the mixture onto the prepared baking sheets, spacing them about 1 inch apart.
6. Bake in the preheated oven for 12-15 minutes, or until the edges are golden brown and the tops are lightly toasted. Rotate the sheets halfway through for even baking.
7. Remove from the oven and let the macaroons cool on the baking sheets for 5 minutes before transferring to a wire rack to cool completely. What you get are chewy, coconut-packed delights with a crisp exterior and a hint of vanilla. For a festive twist, drizzle them with melted chocolate or serve alongside a cup of coffee for a simple, satisfying snack.
No-Bake Chocolate Oat Bars

These no-bake chocolate oat bars require zero oven time and come together in minutes. They’re perfect for last-minute holiday gifts or a quick sweet fix when you’re short on time. The combination of chewy oats and rich chocolate makes them irresistible.
Serving: 16 | Pre Time: 15 minutes | Cooking Time: 0 minutes
Ingredients
– 2 cups old-fashioned rolled oats (not quick oats for better texture)
– 1 cup creamy peanut butter (or any nut butter you prefer)
– ½ cup honey (or maple syrup for a vegan option)
– ½ cup unsalted butter (softened to room temperature)
– 1 tsp pure vanilla extract
– ¼ tsp fine sea salt (adjust to taste)
– 1 cup semi-sweet chocolate chips (milk or dark chocolate work too)
– 1 tbsp coconut oil (or any neutral oil to help chocolate melt smoothly)
Instructions
1. Line an 8×8-inch baking pan with parchment paper, leaving overhang on two sides for easy removal.
2. Combine 2 cups rolled oats, 1 cup peanut butter, ½ cup honey, ½ cup softened butter, 1 tsp vanilla extract, and ¼ tsp sea salt in a large mixing bowl.
3. Mix all ingredients thoroughly with a spatula until fully incorporated and no dry spots remain—this should take about 2-3 minutes of vigorous stirring.
4. Press the oat mixture firmly and evenly into the prepared pan using the bottom of a measuring cup or your hands to create a compact layer.
5. Place the pan in the refrigerator to chill for exactly 10 minutes while you prepare the chocolate topping.
6. Melt 1 cup chocolate chips and 1 tbsp coconut oil together in a microwave-safe bowl in 30-second intervals, stirring between each, until completely smooth (about 90 seconds total).
7. Remove the pan from the refrigerator and pour the melted chocolate over the chilled oat base, spreading it evenly with an offset spatula.
8. Return the pan to the refrigerator and chill for at least 2 hours, or until the chocolate layer is completely set and firm to the touch.
9. Use the parchment overhang to lift the entire slab out of the pan and place it on a cutting board.
10. Cut into 16 even bars using a sharp knife, wiping the blade clean between cuts for neat edges.
Keep these bars stored in an airtight container in the refrigerator for up to a week—the chocolate stays firm and the oats remain chewy. For a festive twist, sprinkle flaky sea salt over the chocolate before chilling, or drizzle with white chocolate after cutting.
Quick Blueberry Yogurt Parfait
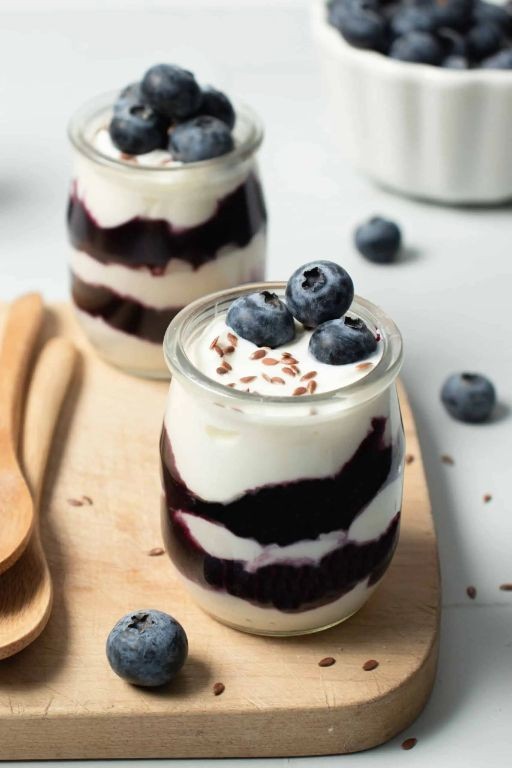
Satisfy your sweet tooth without the guilt with this layered treat. It’s perfect for a fast breakfast or a healthy dessert, requiring zero cooking and minimal effort. You’ll have a vibrant, customizable parfait ready in minutes.
Serving: 1 | Pre Time: 5 minutes | Cooking Time: 0 minutes
Ingredients
– 1 cup plain Greek yogurt (full-fat for creamier texture, or use low-fat)
– 1/2 cup fresh blueberries (frozen work too; thaw slightly)
– 1/4 cup granola (any crunchy variety)
– 1 tablespoon honey (or maple syrup for a vegan option)
– 1/4 teaspoon vanilla extract (optional, for enhanced flavor)
Instructions
1. Gather all ingredients: 1 cup Greek yogurt, 1/2 cup blueberries, 1/4 cup granola, 1 tablespoon honey, and 1/4 teaspoon vanilla extract.
2. In a small bowl, stir the 1 cup Greek yogurt with the 1/4 teaspoon vanilla extract until fully combined. Tip: Let the yogurt sit at room temperature for 5 minutes to soften for easier mixing.
3. Rinse the 1/2 cup blueberries under cold water and pat them completely dry with a paper towel. Tip: Drying prevents sogginess and keeps the layers distinct.
4. Select a clear glass or jar for serving to showcase the layers.
5. Spoon half of the yogurt mixture (about 1/2 cup) into the bottom of the glass, spreading it evenly.
6. Layer half of the blueberries (1/4 cup) evenly over the yogurt.
7. Sprinkle half of the granola (2 tablespoons) over the blueberries to create a crunchy middle layer.
8. Repeat the layering: add the remaining yogurt, then the remaining blueberries.
9. Drizzle the 1 tablespoon honey evenly over the top layer of blueberries. Tip: Warm the honey for 10 seconds to make it easier to drizzle thinly.
10. Finish by sprinkling the remaining granola (2 tablespoons) on top as the final layer.
11. Serve immediately to maintain the granola’s crunch.
Delight in the contrast of creamy yogurt, juicy berries, and crunchy granola in every spoonful. The honey adds a subtle sweetness that complements the tangy yogurt perfectly. For a fun twist, try layering in other seasonal fruits like sliced strawberries or peaches.
5-Ingredient Chocolate Mousse
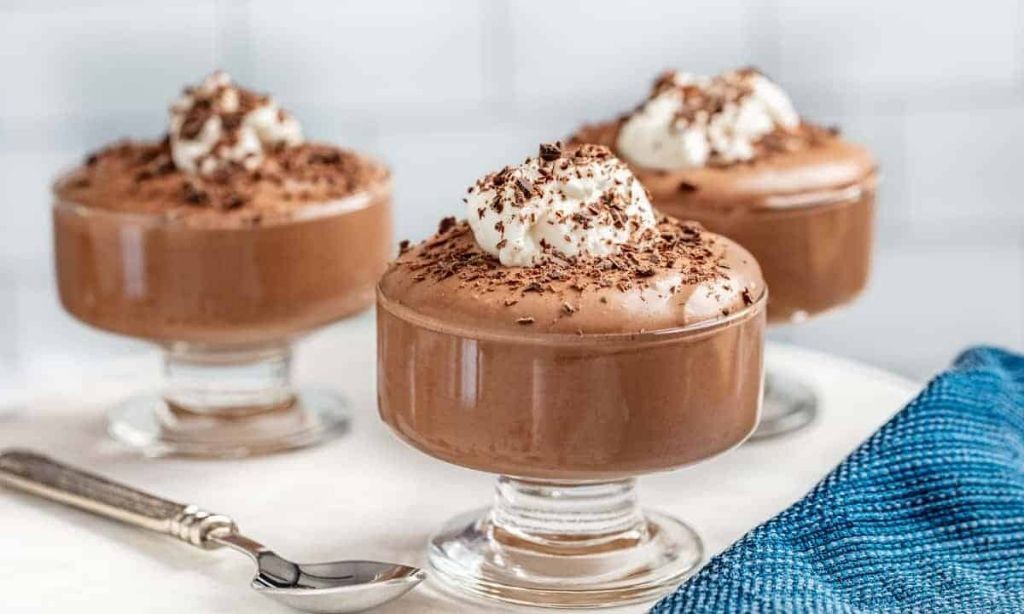
Easy chocolate mousse is achievable with minimal effort and ingredients. This five-ingredient version delivers rich flavor and airy texture without complicated techniques. It’s perfect for last-minute desserts or elegant gatherings.
Serving: 4 | Pre Time: 15 minutes | Cooking Time: 0 minutes
Ingredients
– 1 cup heavy cream, chilled (for best whipping)
– 4 oz semi-sweet chocolate chips, or chopped baking chocolate
– 2 tbsp granulated sugar, adjust to taste
– 1 tsp vanilla extract, pure for best flavor
– Pinch of salt, to enhance chocolate
Instructions
1. Place chocolate chips in a microwave-safe bowl. Microwave on high for 30 seconds, then stir. Repeat in 15-second intervals until fully melted and smooth, about 1 minute total.
2. Let melted chocolate cool for 5 minutes at room temperature to avoid curdling the cream.
3. In a large mixing bowl, pour chilled heavy cream. Use an electric mixer on medium speed to whip cream until soft peaks form, about 2-3 minutes.
4. Add granulated sugar, vanilla extract, and salt to the whipped cream. Continue whipping on medium-high speed until stiff peaks form, about 1-2 minutes more; do not over-whip.
5. Gently fold cooled melted chocolate into the whipped cream mixture with a spatula, using a figure-eight motion to maintain airiness.
6. Divide mousse evenly among four serving glasses or bowls. Refrigerate for at least 2 hours, or until set and chilled through.
7. Serve chilled directly from the refrigerator. For a decorative touch, top with shaved chocolate or fresh berries before serving.
Mousse sets into a light, creamy texture with deep chocolate notes. Its simplicity allows for customization—try layering with crushed cookies or adding a splash of liqueur. Enjoy it as a quick treat or dressed up for special occasions.
Fast Pineapple Upside-Down Mug Cake
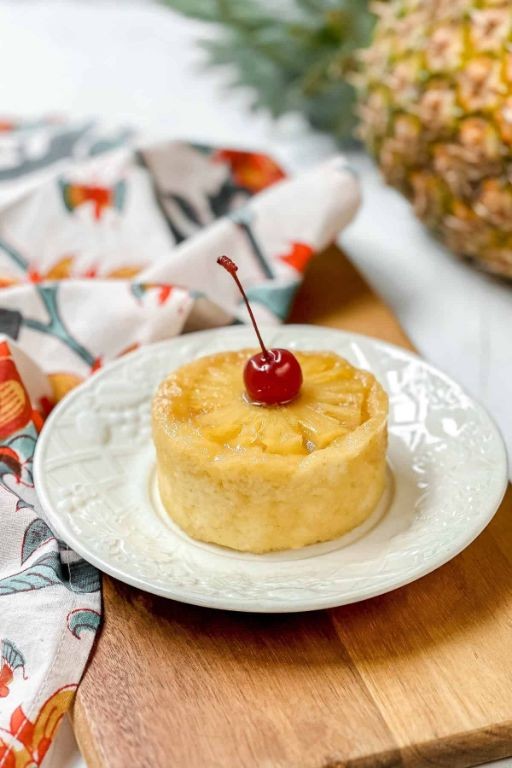
Lacking time but craving dessert? This single-serving pineapple upside-down mug cake delivers classic flavors in under 5 minutes. Perfect for a quick sweet fix.
Serving: 1 | Pre Time: 2 minutes | Cooking Time: 2 minutes
Ingredients
– 1 tbsp unsalted butter, melted (or coconut oil for dairy-free)
– 1 tbsp brown sugar, packed
– 1 pineapple ring, canned or fresh, patted dry
– 1 maraschino cherry (optional for garnish)
– ¼ cup all-purpose flour
– 2 tbsp granulated sugar
– ¼ tsp baking powder
– Pinch of salt
– 3 tbsp milk (any type)
– ½ tsp vanilla extract
Instructions
1. Place a 12-ounce microwave-safe mug on a flat surface.
2. Melt 1 tbsp butter in the mug by microwaving for 15 seconds at full power.
3. Tip: Swirl the melted butter to coat the bottom and sides of the mug evenly to prevent sticking.
4. Sprinkle 1 tbsp brown sugar over the melted butter in the mug.
5. Place 1 pineapple ring flat on top of the brown sugar layer.
6. Add 1 maraschino cherry in the center of the pineapple ring if using.
7. In a small bowl, whisk together ¼ cup flour, 2 tbsp granulated sugar, ¼ tsp baking powder, and a pinch of salt until no lumps remain.
8. Pour 3 tbsp milk and ½ tsp vanilla extract into the dry ingredients.
9. Tip: Stir just until combined; overmixing can make the cake dense.
10. Pour the batter over the pineapple layer in the mug, spreading it evenly with a spoon.
11. Microwave the mug on high for 90 seconds.
12. Tip: Check doneness by inserting a toothpick; it should come out clean—if wet, microwave in 10-second intervals.
13. Let the mug cake cool for 1 minute to set.
14. Carefully run a knife around the edges to loosen the cake.
15. Place a small plate upside down over the mug and invert it to release the cake.
16. Serve immediately while warm.
Buttery caramelized pineapple tops this moist, tender cake with a hint of vanilla. Enjoy it plain or elevate it with a scoop of vanilla ice cream for a decadent treat. The quick microwave method ensures a gooey, satisfying dessert in minutes.
Easy Peach Cobbler in a Mug
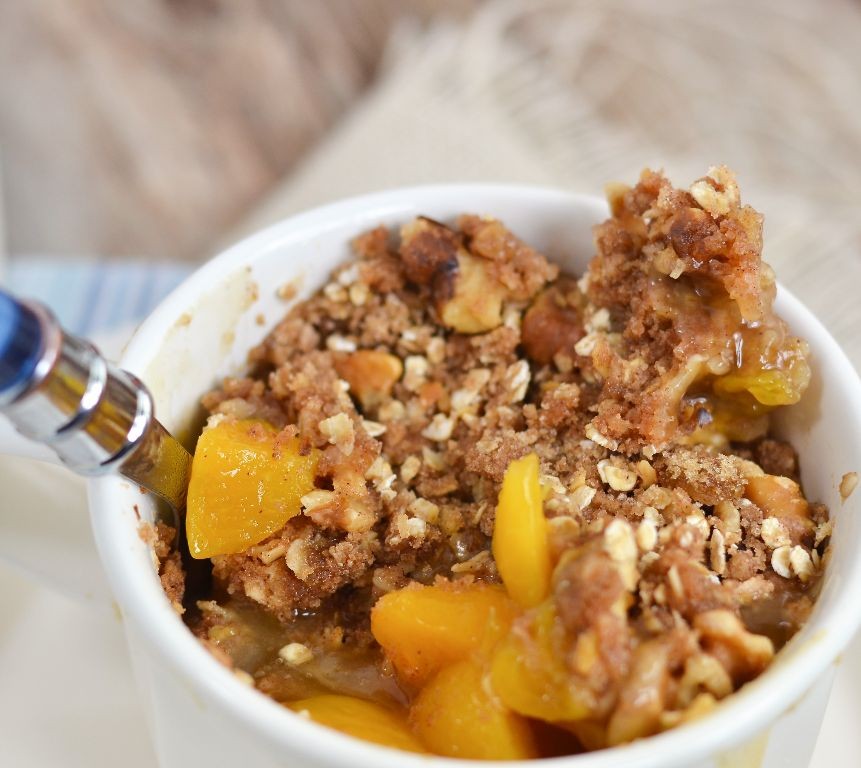
Oven-baked peach cobbler is a classic, but this microwave version delivers the same cozy flavors in minutes. Perfect for a single-serving dessert craving when you need something warm and sweet fast. Grab a mug and let’s make dessert happen.
Serving: 1 | Pre Time: 5 minutes | Cooking Time: 2 minutes
Ingredients
– 1/2 cup canned peach slices in syrup, drained (or fresh peaches chopped small)
– 2 tbsp all-purpose flour
– 2 tbsp granulated sugar
– 1/4 tsp baking powder
– Pinch of salt
– 2 tbsp milk (whole or 2% works best)
– 1 tbsp unsalted butter, melted (or vegetable oil as a substitute)
– 1/4 tsp vanilla extract (optional for extra flavor)
– Ground cinnamon for sprinkling (adjust to preference)
Instructions
1. In a microwave-safe mug (at least 12 oz capacity), combine the flour, sugar, baking powder, and salt with a fork until evenly mixed.
2. Add the milk, melted butter, and vanilla extract to the dry ingredients, stirring just until no dry streaks remain—avoid overmixing to keep the topping tender.
3. Gently fold in the drained peach slices, distributing them evenly throughout the batter without crushing them.
4. Sprinkle a generous pinch of ground cinnamon over the top of the mixture for a warm, aromatic finish.
5. Microwave on high power for 1 minute 30 seconds to 2 minutes, checking at 1 minute 30 seconds. The cobbler is done when the top looks set and a toothpick inserted comes out clean—microwave times vary, so watch closely to prevent overcooking.
6. Carefully remove the mug from the microwave (it will be hot) and let it cool for 2-3 minutes before serving to allow the flavors to meld and avoid burns.
7. Serve warm directly from the mug. For a richer treat, top with a scoop of vanilla ice cream or a dollop of whipped cream right before eating.
Hearty and comforting, this cobbler emerges with a soft, cake-like topping that soaks up the juicy peach syrup. The cinnamon adds a subtle spice that pairs beautifully with the sweet fruit, making it ideal for a quick solo indulgence or a last-minute dessert fix.
Quick Cinnamon Sugar Donuts
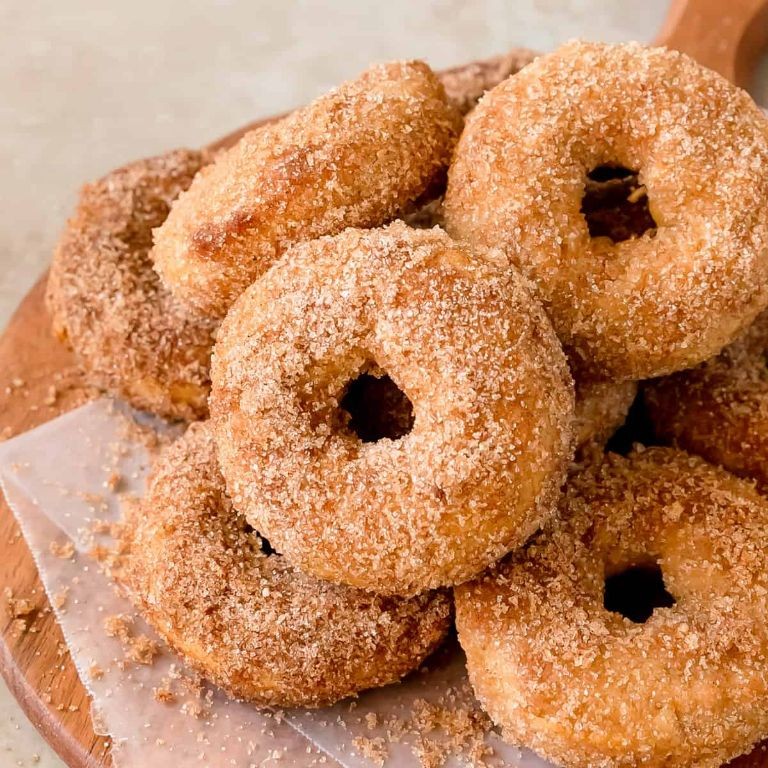
Cinnamon sugar donuts are a nostalgic treat that’s surprisingly simple to make at home. These quick, baked versions skip the fryer for a lighter, weeknight-friendly dessert. You’ll have warm, spiced donuts ready in under 30 minutes.
Serving: 6 | Pre Time: 10 minutes | Cooking Time: 10 minutes
Ingredients
– 1 cup all-purpose flour
– 1/3 cup granulated sugar
– 1 tsp baking powder
– 1/2 tsp salt
– 1/2 cup milk (whole or 2%)
– 1 large egg
– 2 tbsp unsalted butter, melted
– 1 tsp vanilla extract
– 1/4 cup granulated sugar for coating
– 1 tbsp ground cinnamon for coating
– 2 tbsp unsalted butter, melted for coating
Instructions
1. Preheat your oven to 350°F and grease a 6-cavity donut pan thoroughly with butter or non-stick spray.
2. In a medium bowl, whisk together 1 cup flour, 1/3 cup sugar, 1 tsp baking powder, and 1/2 tsp salt until fully combined.
3. In a separate bowl, whisk 1/2 cup milk, 1 egg, 2 tbsp melted butter, and 1 tsp vanilla extract until smooth.
4. Pour the wet ingredients into the dry ingredients and stir just until no dry streaks remain; avoid overmixing to keep the donuts tender.
5. Spoon or pipe the batter evenly into the prepared donut pan, filling each cavity about 3/4 full.
6. Bake for 8–10 minutes, or until the donuts spring back lightly when touched and a toothpick inserted comes out clean.
7. While the donuts bake, mix 1/4 cup sugar and 1 tbsp cinnamon in a shallow bowl for the coating.
8. Let the donuts cool in the pan for 2 minutes, then transfer them to a wire rack.
9. Brush each warm donut lightly with the 2 tbsp melted butter using a pastry brush for even coverage.
10. Dip or roll each buttered donut in the cinnamon-sugar mixture until fully coated on all sides.
11. Serve immediately while warm for the best texture and flavor.
Perfectly soft and cakey with a crisp, sugary exterior, these donuts deliver classic comfort. Pair them with a hot coffee for a cozy breakfast, or crumble them over vanilla ice cream for an indulgent dessert twist.
Summary
Hooray! This collection proves that amazing desserts don’t require hours in the kitchen. We hope these 18 easy, quick recipes inspire your next sweet treat. Give one a try, leave a comment with your favorite, and don’t forget to share this roundup on Pinterest to spread the joy of simple baking!


