
Whether you’re whipping up a quick weeknight dinner, planning a cozy comfort meal, or seeking inspiration for your next gathering, ham slices are your versatile kitchen hero. From savory breakfasts to elegant entrees, we’ve gathered 20 delicious recipes to transform this humble ingredient into something special for every occasion. Let’s dive in and discover your new favorite dish!
Ham and Cheese Stuffed French Toast

Fancy a savory twist on a breakfast classic? This ham and cheese stuffed French toast transforms simple ingredients into a decadent, satisfying meal. Perfect for a lazy weekend brunch or a festive holiday morning, it’s surprisingly straightforward to master.
Serving: 2 | Pre Time: 10 minutes | Cooking Time: 10 minutes
Ingredients
– 4 slices of thick-cut white bread (I find brioche or Texas toast works best for a sturdy, rich base)
– 4 slices of deli ham (I prefer Black Forest ham for its smoky depth)
– 4 slices of sharp cheddar cheese (room temperature cheese melts more evenly)
– 2 large eggs (I always use room temp eggs here for a smoother custard)
– 1/2 cup of whole milk (for a creamy, luxurious soak)
– 1/4 teaspoon of garlic powder (a secret savory boost)
– 1/4 teaspoon of black pepper (freshly ground adds a nice bite)
– 2 tablespoons of unsalted butter (my go-to for a golden, buttery crust)
Instructions
1. Lay out 4 slices of thick-cut white bread on a clean work surface.
2. Place 1 slice of deli ham and 1 slice of sharp cheddar cheese on each of 2 bread slices.
3. Top each with the remaining 2 bread slices to form 2 sandwiches, pressing gently to seal.
4. In a shallow bowl, whisk together 2 large eggs, 1/2 cup of whole milk, 1/4 teaspoon of garlic powder, and 1/4 teaspoon of black pepper until fully combined and frothy.
5. Dip one sandwich fully into the egg mixture, letting it soak for 30 seconds per side to absorb the custard evenly—this prevents a soggy center.
6. Repeat with the second sandwich.
7. Heat a large non-stick skillet or griddle over medium heat (about 350°F) and melt 1 tablespoon of unsalted butter until it foams slightly.
8. Place both soaked sandwiches in the skillet and cook for 3–4 minutes, until the bottom is golden brown and crisp.
9. Carefully flip the sandwiches using a spatula and add the remaining 1 tablespoon of butter to the skillet, swirling to coat.
10. Cook for another 3–4 minutes, until the second side is golden brown and the cheese inside is fully melted—peek by gently pressing the center; it should feel soft and gooey.
11. Transfer the French toast to a cutting board and let it rest for 1 minute before slicing to allow the filling to set slightly.
12. Slice each sandwich diagonally and serve immediately.
Perfectly golden and crisp on the outside, this French toast oozes with melted cheddar and savory ham for a comforting, hearty bite. Pair it with a drizzle of maple syrup for a sweet-savory contrast or a side of fresh fruit to brighten the plate.
Creamy Ham and Potato Soup

Zipping through chilly evenings calls for a comforting bowl of this creamy ham and potato soup—it’s a hearty, one-pot wonder that’s surprisingly simple to whip up, even for kitchen newcomers. Let’s walk through each step together, ensuring you end up with a velvety, flavorful soup every time.
Serving: 4 | Pre Time: 15 minutes | Cooking Time: 30 minutes
Ingredients
– 2 tablespoons unsalted butter (I always keep mine chilled until use for better control)
– 1 medium yellow onion, diced (about 1 cup)
– 2 cloves garlic, minced
– 3 cups diced Yukon Gold potatoes (peeled, about 1 pound—they hold their shape beautifully)
– 1 cup diced cooked ham (I prefer leftovers from a Sunday roast for extra depth)
– 4 cups chicken broth (low-sodium is my go-to to manage saltiness)
– 1 cup heavy cream
– 1/2 teaspoon dried thyme
– Salt and black pepper (freshly ground pepper adds a lovely kick)
Instructions
1. Melt 2 tablespoons unsalted butter in a large pot over medium heat.
2. Add 1 cup diced yellow onion and cook for 5 minutes, stirring occasionally, until softened and translucent.
3. Stir in 2 cloves minced garlic and cook for 1 minute, just until fragrant—be careful not to burn it.
4. Tip: For richer flavor, let the onions caramelize slightly by cooking an extra 2 minutes until golden.
5. Add 3 cups diced Yukon Gold potatoes and 1 cup diced cooked ham to the pot.
6. Pour in 4 cups chicken broth and bring to a boil over high heat.
7. Reduce heat to medium-low, cover, and simmer for 15 minutes, until potatoes are fork-tender.
8. Tip: Check doneness by piercing a potato piece with a fork—it should slide off easily.
9. Stir in 1 cup heavy cream and 1/2 teaspoon dried thyme.
10. Simmer uncovered for 5 minutes over low heat to thicken slightly, stirring occasionally.
11. Season with salt and black pepper to taste, starting with 1/4 teaspoon salt and adjusting as needed.
12. Tip: Let the soup rest off heat for 5 minutes before serving; this allows flavors to meld and prevents it from being too hot.
13. Ladle into bowls and serve immediately.
Delightfully creamy with tender potato chunks and savory ham bits, this soup boasts a velvety texture that’s both comforting and satisfying. For a creative twist, top it with crispy crumbled bacon or a sprinkle of sharp cheddar cheese to add a crunchy contrast. It pairs wonderfully with crusty bread for dipping, making it a cozy meal perfect for any winter night.
Ham and Pineapple Skewers with Teriyaki Glaze

Every holiday season, I find myself craving something that’s both festive and fuss-free. Enter these Ham and Pineapple Skewers with Teriyaki Glaze—they’re a sweet, savory, and smoky appetizer that comes together with minimal effort, perfect for feeding a crowd without missing the party.
Serving: 6 | Pre Time: 15 minutes | Cooking Time: 10 minutes
Ingredients
– 1 pound thick-cut ham steak, cut into 1-inch cubes (I like using a smoky, pre-cooked ham for deeper flavor)
– 1 fresh pineapple, peeled, cored, and cut into 1-inch chunks (a ripe, sweet pineapple makes all the difference)
– 1/2 cup teriyaki sauce (my go-to is a store-bought bottle to save time, but homemade works too)
– 2 tablespoons honey (for a touch of natural sweetness that balances the saltiness)
– 1 tablespoon vegetable oil (this helps prevent sticking on the grill)
– 8–10 wooden skewers, soaked in water for 30 minutes (soaking is key to avoid burning)
Instructions
1. Preheat your grill or grill pan to medium-high heat, about 400°F.
2. In a small bowl, whisk together 1/2 cup teriyaki sauce and 2 tablespoons honey until smooth.
3. Thread alternating pieces of 1-inch ham cubes and 1-inch pineapple chunks onto the soaked wooden skewers, leaving a small space between each piece for even cooking.
4. Brush the assembled skewers lightly with 1 tablespoon vegetable oil on all sides.
5. Place the skewers on the preheated grill and cook for 4–5 minutes.
6. Flip the skewers using tongs and brush the tops generously with the teriyaki-honey glaze.
7. Cook for another 4–5 minutes, brushing with more glaze halfway through, until the ham is lightly charred and the pineapple is caramelized with golden-brown edges.
8. Remove the skewers from the grill and let them rest for 2 minutes before serving.
Finally, these skewers deliver a delightful contrast: the ham stays juicy with a smoky bite, while the pineapple turns tender and caramelized, all coated in that sticky-sweet teriyaki glaze. For a fun twist, serve them over a bed of rice or with a side of sriracha mayo for dipping—they’re sure to disappear fast at any gathering.
Ham and Swiss Quiche with Hash Brown Crust

On a busy morning or for a cozy brunch, this savory quiche with a crispy hash brown crust delivers comfort and flavor in every bite. It combines the classic pairing of ham and Swiss cheese in a creamy custard that bakes to golden perfection. Let me guide you through each step so you can create this satisfying dish with confidence.
Serving: 6 | Pre Time: 20 minutes | Cooking Time: 45 minutes
Ingredients
– 4 cups frozen shredded hash browns, thawed and squeezed dry in a clean kitchen towel (this removes excess moisture for a crispier crust)
– 3 tablespoons unsalted butter, melted (I prefer unsalted to control the salt level)
– 1/2 teaspoon salt for the crust
– 1 cup diced ham, about 1/4-inch pieces (I like using leftover baked ham for extra flavor)
– 1 cup shredded Swiss cheese, loosely packed (Gruyère works great too for a nuttier taste)
– 4 large eggs, at room temperature for easier blending (I set them out 30 minutes ahead)
– 1 cup whole milk (2% milk can substitute, but whole gives a richer custard)
– 1/4 teaspoon black pepper, freshly ground
– 1/4 teaspoon garlic powder (optional, but it adds a subtle savory note)
Instructions
1. Preheat your oven to 400°F (200°C) and lightly grease a 9-inch pie dish with butter or non-stick spray.
2. In a medium bowl, combine the thawed hash browns, melted butter, and 1/2 teaspoon salt, mixing until evenly coated.
3. Press the hash brown mixture firmly into the bottom and up the sides of the prepared pie dish to form an even crust, about 1/4-inch thick.
4. Bake the crust in the preheated oven for 20 minutes, or until it turns lightly golden and feels set to the touch.
5. While the crust bakes, whisk the eggs in a large bowl until smooth and slightly frothy, about 1 minute.
6. Add the milk, black pepper, and garlic powder to the eggs, whisking vigorously to combine fully.
7. Once the crust is baked, remove it from the oven and reduce the oven temperature to 375°F (190°C).
8. Sprinkle the diced ham and shredded Swiss cheese evenly over the hot crust.
9. Slowly pour the egg mixture over the ham and cheese, filling the crust to just below the rim.
10. Carefully transfer the quiche to the oven and bake at 375°F for 25-30 minutes, until the center is set and a knife inserted comes out clean.
11. Let the quiche cool on a wire rack for 10 minutes before slicing to allow the custard to firm up.
Just out of the oven, this quiche boasts a crispy, golden-brown hash brown crust that contrasts beautifully with the creamy, savory filling. The ham adds a salty richness, while the Swiss cheese melts into a smooth, slightly tangy layer. Serve it warm with a simple green salad or fresh fruit for a balanced meal that’s sure to impress.
Ham and Spinach Stuffed Chicken Breast

Whether you’re looking for an impressive yet approachable weeknight dinner or a centerpiece for a special meal, this ham and spinach stuffed chicken breast delivers both elegance and comfort. With a methodical approach, even beginners can master this dish that transforms simple ingredients into something extraordinary.
Serving: 4 | Pre Time: 20 minutes | Cooking Time: 25 minutes
Ingredients
- 4 boneless, skinless chicken breasts (about 6 oz each) – I prefer thicker cuts for easier stuffing
- 1 cup fresh spinach, tightly packed – baby spinach works beautifully here
- 4 slices deli ham (about 2 oz total) – I love using Black Forest ham for its smoky flavor
- 4 oz cream cheese, softened – room temperature spreads much easier
- 1/2 cup shredded mozzarella cheese
- 2 tbsp extra virgin olive oil – my go-to for its fruity notes
- 1 tsp garlic powder
- 1/2 tsp paprika
- 1/2 tsp dried thyme
- 1/4 tsp black pepper, freshly ground
- 1/4 tsp salt
Instructions
- Place chicken breasts between two sheets of plastic wrap and pound to 1/4-inch thickness using a meat mallet or rolling pin.
- In a medium bowl, combine softened cream cheese, shredded mozzarella, garlic powder, paprika, dried thyme, black pepper, and salt until well blended.
- Lay one slice of ham on each flattened chicken breast, leaving a 1/2-inch border around the edges.
- Divide the spinach evenly among the chicken breasts, placing it over the ham slices.
- Spread the cream cheese mixture evenly over the spinach on each breast.
- Starting from the shorter end, tightly roll each chicken breast, tucking in the filling as you go.
- Secure each roll with 2-3 toothpicks inserted at 1-inch intervals to prevent unraveling during cooking.
- Preheat oven to 375°F and place a rack in the center position.
- Heat extra virgin olive oil in a large oven-safe skillet over medium-high heat until shimmering, about 2 minutes.
- Place chicken rolls seam-side down in the hot skillet and cook until golden brown on all sides, about 2-3 minutes per side.
- Transfer the skillet to the preheated oven and bake for 18-20 minutes, or until the internal temperature reaches 165°F when measured with an instant-read thermometer inserted into the thickest part.
- Remove from oven and let rest for 5 minutes before carefully removing toothpicks and slicing.
Buttery cream cheese melts into every bite while the ham adds savory depth that complements the fresh spinach perfectly. The golden exterior gives way to colorful layers that make each slice visually stunning—serve over creamy polenta or alongside roasted vegetables for a complete meal that feels both special and satisfying.
Ham and Mushroom Pasta Alfredo

Meticulously crafted yet wonderfully simple, this Ham and Mushroom Pasta Alfredo is the ultimate comfort food for a busy weeknight. Let’s walk through each step together to create a creamy, savory dish that feels indulgent but comes together in under 30 minutes.
Serving: 4 | Pre Time: 10 minutes | Cooking Time: 20 minutes
Ingredients
– 12 oz fettuccine pasta (I always keep a box in the pantry for last-minute meals)
– 8 oz sliced cremini mushrooms (baby bellas add a deeper flavor than white button)
– 1 cup diced ham (leftover holiday ham works beautifully here)
– 3 tbsp unsalted butter (I prefer unsalted to control the saltiness)
– 2 cloves garlic, minced (freshly minced makes all the difference)
– 1 cup heavy cream (this creates the luxurious sauce base)
– 1 cup freshly grated Parmesan cheese (pre-grated won’t melt as smoothly)
– 1/4 tsp freshly ground black pepper
– 1/4 tsp salt
– 2 tbsp chopped fresh parsley (for a bright finish)
Instructions
1. Bring a large pot of salted water to a rolling boil over high heat.
2. Add the 12 oz fettuccine pasta to the boiling water and cook for 9-11 minutes, stirring occasionally, until al dente (it should have a slight bite).
3. While the pasta cooks, melt 3 tbsp unsalted butter in a large skillet over medium heat.
4. Add 8 oz sliced cremini mushrooms to the skillet and cook for 5-7 minutes, stirring occasionally, until they release their liquid and turn golden brown.
5. Add 1 cup diced ham and 2 cloves minced garlic to the skillet and cook for 1-2 minutes, just until the garlic becomes fragrant.
6. Pour 1 cup heavy cream into the skillet and bring it to a gentle simmer over medium-low heat.
7. Stir in 1 cup freshly grated Parmesan cheese until it completely melts into the cream, creating a smooth sauce.
8. Season the sauce with 1/4 tsp salt and 1/4 tsp freshly ground black pepper, stirring to combine.
9. Drain the cooked pasta, reserving 1/2 cup of the pasta water.
10. Add the drained pasta directly to the skillet with the sauce.
11. Toss the pasta with the sauce for 1-2 minutes, adding splashes of the reserved pasta water if needed to reach your desired consistency.
12. Remove the skillet from the heat and stir in 2 tbsp chopped fresh parsley.
13. Divide the pasta among four bowls and serve immediately.
Key to this dish’s appeal is the velvety sauce clinging to each strand of pasta, punctuated by the savory ham and earthy mushrooms. For a creative twist, try serving it in shallow bowls with a side of garlic bread to soak up every last drop of that creamy Alfredo sauce.
Ham and Egg Breakfast Muffins

Perfect for busy mornings or holiday brunches, these Ham and Egg Breakfast Muffins are a protein-packed, make-ahead marvel that will simplify your routine. They combine savory ham, fluffy eggs, and melty cheese in a convenient handheld form, requiring minimal prep for maximum satisfaction. Let’s walk through each step together to ensure your batch turns out tender and delicious every time.
Serving: 12 | Pre Time: 15 minutes | Cooking Time: 20 minutes
Ingredients
– 8 large eggs (I prefer room temperature eggs here for more even cooking)
– 1 cup diced cooked ham, about ¼-inch pieces (leftover holiday ham works wonderfully)
– ½ cup shredded sharp cheddar cheese
– ¼ cup whole milk (for extra creaminess)
– 1 tbsp unsalted butter, melted (extra for greasing the muffin tin)
– ½ tsp kosher salt
– ¼ tsp freshly ground black pepper
– 1 tbsp chopped fresh chives (optional, but they add a lovely fresh pop)
Instructions
1. Preheat your oven to 350°F (175°C) and generously grease a 12-cup standard muffin tin with butter, ensuring each cup is fully coated to prevent sticking.
2. In a large mixing bowl, crack the 8 large eggs and whisk them vigorously for about 45 seconds until they are fully combined and slightly frothy.
3. Pour the ¼ cup of whole milk into the whisked eggs, then add the ½ teaspoon of kosher salt and ¼ teaspoon of freshly ground black pepper, whisking again until everything is uniformly incorporated.
4. Stir in the 1 cup of diced cooked ham, ½ cup of shredded sharp cheddar cheese, and 1 tablespoon of chopped fresh chives (if using) into the egg mixture, folding gently with a spatula to distribute evenly without overmixing.
5. Evenly divide the egg mixture among the 12 prepared muffin cups, filling each about ¾ full, which helps them rise properly without overflowing.
6. Place the muffin tin in the preheated oven and bake for 18–20 minutes, or until the tops are lightly golden and the centers are set—check by inserting a toothpick; it should come out clean.
7. Remove the muffin tin from the oven and let the muffins cool in the pan for 5 minutes to firm up, then carefully run a knife around the edges to loosen and transfer them to a wire rack.
8. Brush the tops of the warm muffins with the 1 tablespoon of melted unsalted butter for a glossy finish and extra richness.
Hearty and satisfying, these muffins boast a tender, custard-like interior with pockets of salty ham and gooey cheese. Enjoy them warm straight from the oven, or store cooled muffins in an airtight container for quick grab-and-go breakfasts all week—they reheat beautifully in the toaster oven for a crispy edge.
Ham and Cheddar Cornbread Muffins

Zesty and satisfying, these savory muffins combine classic cornbread with hearty ham and sharp cheddar for a perfect grab-and-go snack or side dish. Let’s walk through each step together to ensure your muffins turn out tender, golden, and packed with flavor.
Serving: 12 | Pre Time: 15 minutes | Cooking Time: 20 minutes
Ingredients
– 1 cup all-purpose flour (I always spoon it into the cup to avoid packing it down)
– 1 cup yellow cornmeal (stone-ground gives a lovely texture)
– 1 tablespoon baking powder (check the date—fresh is key for a good rise)
– 1 teaspoon salt (I use fine sea salt for even distribution)
– 1 cup milk, at room temperature (whole milk makes them extra moist)
– 1/3 cup vegetable oil (a neutral oil like canola works well here)
– 2 large eggs, at room temperature (this helps them blend smoothly)
– 1 cup diced ham (about 1/4-inch pieces; I prefer a smoky, cooked ham)
– 1 cup shredded sharp cheddar cheese (freshly grated melts better than pre-shredded)
Instructions
1. Preheat your oven to 400°F (200°C) and line a 12-cup muffin tin with paper liners or grease it lightly.
2. In a large mixing bowl, whisk together the all-purpose flour, yellow cornmeal, baking powder, and salt until well combined.
3. In a separate medium bowl, whisk the milk, vegetable oil, and eggs until smooth and fully incorporated.
4. Pour the wet ingredients into the dry ingredients and stir gently with a spatula until just combined—a few lumps are okay to avoid overmixing.
5. Fold in the diced ham and shredded sharp cheddar cheese evenly throughout the batter.
6. Divide the batter evenly among the 12 muffin cups, filling each about 3/4 full.
7. Bake in the preheated oven for 18–20 minutes, or until the tops are golden brown and a toothpick inserted into the center comes out clean.
8. Let the muffins cool in the tin for 5 minutes, then transfer them to a wire rack to cool completely.
9. You’ll know they’re ready when they’re firm to the touch and have a lovely aroma filling your kitchen.
Yes, these muffins emerge with a slightly crisp crust and a tender, moist interior, thanks to the cornmeal and cheese. The ham adds a savory punch that pairs wonderfully with the sharp cheddar, making them ideal for breakfast on-the-go or as a side with soup. Try serving them warm with a pat of butter or alongside a fresh salad for a comforting meal.
Ham and Asparagus Roll-Ups with Hollandaise

Picture this: a holiday table where elegant, savory bundles steal the show with minimal fuss. These ham and asparagus roll-ups draped in creamy hollandaise are that impressive yet approachable centerpiece, perfect for a festive brunch or a cozy dinner.
Serving: 4 | Pre Time: 15 minutes | Cooking Time: 20 minutes
Ingredients
- 8 slices of deli ham (I like Black Forest ham for its smoky depth)
- 16 asparagus spears, trimmed (look for firm, bright green stalks)
- 3 large egg yolks (room temperature eggs blend more smoothly)
- 1/2 cup (1 stick) unsalted butter, cut into tablespoons
- 1 tablespoon fresh lemon juice (freshly squeezed makes all the difference)
- 1/4 teaspoon salt
- A pinch of cayenne pepper (my secret for a subtle kick)
- 1 tablespoon water
Instructions
- Bring a large pot of salted water to a rolling boil over high heat.
- Add the asparagus spears and blanch for 2 minutes until bright green and tender-crisp.
- Immediately transfer the asparagus to a bowl of ice water to stop the cooking, then pat dry thoroughly with paper towels. Tip: Dry asparagus ensures the ham wraps neatly without slipping.
- Lay a slice of ham flat on a clean surface and place 2 asparagus spears at one end.
- Roll the ham tightly around the asparagus to form a compact bundle.
- Repeat with the remaining ham and asparagus to make 8 roll-ups.
- Arrange the roll-ups seam-side down on a baking sheet lined with parchment paper.
- Preheat your oven to 375°F (190°C).
- Bake the roll-ups for 10-12 minutes until the ham is lightly crisped at the edges.
- While baking, prepare the hollandaise: combine egg yolks, lemon juice, salt, cayenne, and 1 tablespoon water in a blender.
- Blend on medium speed for 30 seconds until the mixture is pale and frothy.
- Melt the butter in a small saucepan over medium heat until bubbling but not browned, about 3-4 minutes. Tip: Hot, melted butter helps emulsify the sauce quickly.
- With the blender running on low, slowly drizzle the hot butter into the egg yolk mixture in a thin, steady stream until thickened and creamy, about 1-2 minutes. Tip: Slow drizzling prevents the sauce from breaking.
- Remove the roll-ups from the oven and let them rest for 2 minutes.
- Plate the roll-ups and drizzle generously with the warm hollandaise sauce.
Yield to the luxurious contrast of the salty, crisp ham against the tender asparagus, all enveloped in that rich, lemony hollandaise. For a brunch twist, serve these atop toasted English muffins with a poached egg, letting the extra hollandaise mingle deliciously.
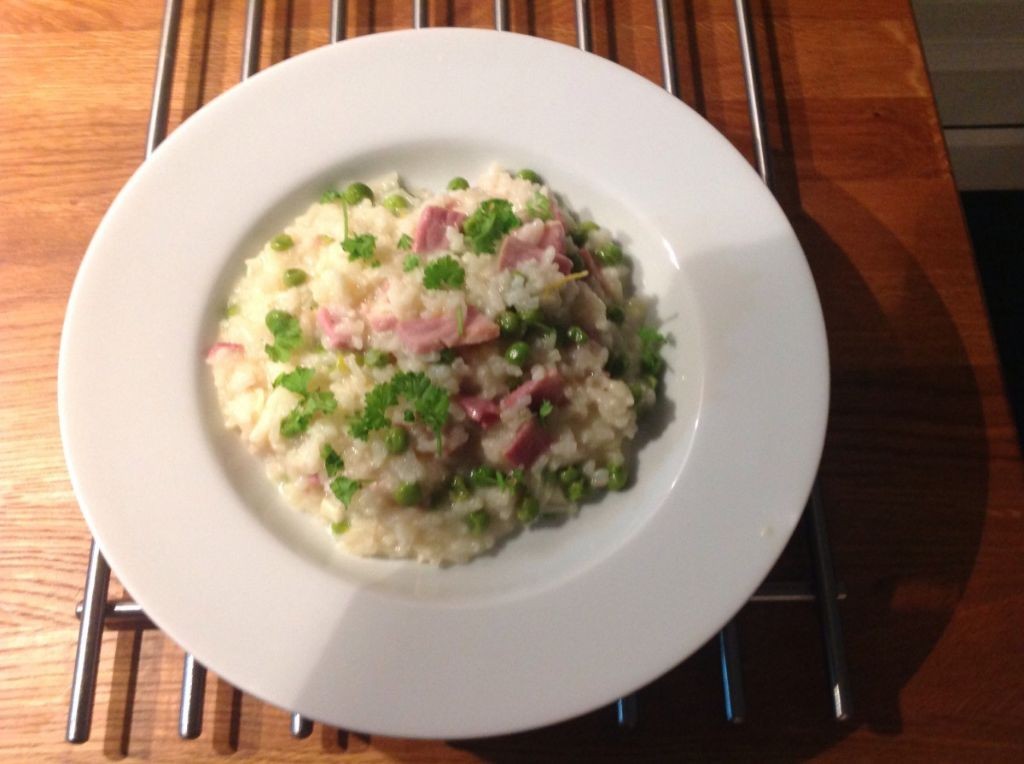
Ham and Pea Risotto with Parmesan
During the holiday season, nothing beats a comforting, creamy risotto that comes together with minimal fuss. This ham and pea risotto with Parmesan is a perfect weeknight dinner that feels special enough for company, yet simple enough for a cozy night in.
Serving: 4 | Pre Time: 10 minutes | Cooking Time: 30 minutes
Ingredients
- 1 tablespoon extra virgin olive oil (my go-to for its fruity flavor)
- 1 small yellow onion, finely diced (about 1 cup)
- 2 cloves garlic, minced
- 1 ½ cups Arborio rice (the short-grain starch is key for creaminess)
- ½ cup dry white wine (I like a crisp Sauvignon Blanc here)
- 4 cups low-sodium chicken broth, warmed (keeping it hot prevents the rice from cooling)
- 1 cup diced cooked ham (leftover holiday ham works beautifully)
- 1 cup frozen peas, thawed
- ½ cup freshly grated Parmesan cheese, plus more for serving
- 2 tablespoons unsalted butter, cut into pieces
- Salt and freshly ground black pepper
- 2 tablespoons chopped fresh parsley for garnish (optional, but adds a bright finish)
Instructions
- Heat the olive oil in a large, heavy-bottomed pot or Dutch oven over medium heat until shimmering, about 1 minute.
- Add the diced onion and cook, stirring frequently, until softened and translucent, about 5-7 minutes.
- Stir in the minced garlic and cook until fragrant, about 30 seconds.
- Add the Arborio rice and toast, stirring constantly, until the grains are lightly golden and opaque at the edges, about 2-3 minutes. Tip: Toasting the rice helps it absorb liquid better without becoming mushy.
- Pour in the white wine and cook, stirring, until the liquid is completely absorbed, about 2 minutes.
- Add 1 cup of the warm chicken broth to the rice. Cook, stirring frequently, until the broth is nearly absorbed, about 4-5 minutes.
- Repeat step 6, adding the remaining broth 1 cup at a time and stirring until each addition is mostly absorbed before adding the next. The total process should take about 20-25 minutes. Tip: Constant stirring releases the rice’s starch, creating the risotto’s signature creamy texture.
- When the rice is tender but still has a slight bite (al dente) and the mixture is creamy, stir in the diced ham and thawed peas. Cook for 2 minutes to heat through.
- Remove the pot from the heat. Stir in the grated Parmesan cheese and butter until fully melted and incorporated. Tip: Adding fat off the heat prevents the cheese from becoming stringy.
- Season with salt and pepper to taste. The ham and Parmesan add salt, so taste before adding more.
- Divide the risotto among bowls. Garnish with extra Parmesan and chopped parsley if desired.
Zesty Parmesan and savory ham balance the sweet peas in this luxuriously creamy dish. The risotto should be loose enough to spread slightly on the plate, not stiff. For a fun twist, top each serving with a fried egg or serve alongside a simple arugula salad dressed with lemon vinaigrette.
Ham and Cheese Sliders with Hawaiian Rolls

You’ll love how these ham and cheese sliders transform humble ingredients into a crowd-pleasing appetizer or easy dinner. With just a few simple steps, you’ll create golden, buttery rolls filled with savory ham and melty cheese that everyone will devour.
Serving: 12 | Pre Time: 10 minutes | Cooking Time: 20 minutes
Ingredients
– 1 package (12 count) Hawaiian sweet rolls—I always use the King’s Hawaiian brand for their perfect softness and slight sweetness.
– 12 slices deli ham, preferably Black Forest ham for its smoky flavor.
– 6 slices Swiss cheese, cut in half to fit the rolls—I find Swiss melts beautifully without becoming greasy.
– ½ cup (1 stick) unsalted butter, melted—using unsalted lets you control the saltiness.
– 1 tablespoon Dijon mustard, my secret ingredient for a tangy kick.
– 1 tablespoon Worcestershire sauce, which adds a savory depth.
– 1 teaspoon onion powder, for a subtle aromatic note.
– 1 teaspoon poppy seeds, optional but they add a lovely crunch and visual appeal.
Instructions
1. Preheat your oven to 350°F (175°C) and line a 9×13-inch baking dish with parchment paper for easy cleanup.
2. Without separating the rolls, slice the entire package of Hawaiian rolls in half horizontally using a serrated knife to keep them intact.
3. Place the bottom half of the rolls in the prepared baking dish.
4. Layer 12 slices of ham evenly over the bottom rolls, folding them slightly to fit.
5. Top the ham with 12 half-slices of Swiss cheese, ensuring coverage across all rolls.
6. Place the top half of the rolls over the cheese layer, pressing down gently.
7. In a small bowl, whisk together ½ cup melted unsalted butter, 1 tablespoon Dijon mustard, 1 tablespoon Worcestershire sauce, and 1 teaspoon onion powder until fully combined.
8. Tip: Brush the butter mixture evenly over the top of the rolls, making sure to get into the crevices for maximum flavor.
9. Sprinkle 1 teaspoon poppy seeds evenly over the top if using.
10. Cover the baking dish tightly with aluminum foil and bake at 350°F for 15 minutes to allow the cheese to melt and the rolls to warm through.
11. Tip: Remove the foil and bake for an additional 5 minutes, or until the tops are golden brown and slightly crispy.
12. Let the sliders rest for 5 minutes before slicing into individual portions along the roll seams.
13. Tip: Use a sharp knife to cut through the melted cheese cleanly without squishing the rolls.
Vibrant and satisfying, these sliders emerge with a crisp, buttery top that gives way to soft, sweet rolls and gooey melted cheese. The combination of smoky ham and tangy Dijon creates a balanced flavor that’s perfect for parties or a cozy weeknight meal—try serving them with a side of pickles or a simple green salad for a complete dish.
Ham and Broccoli Stuffed Baked Potatoes

During the busy holiday season, comforting yet simple meals become essential. These ham and broccoli stuffed baked potatoes deliver creamy satisfaction with minimal effort, making them perfect for a cozy December dinner. Let’s walk through each step together to create this hearty dish.
Serving: 4 | Pre Time: 15 minutes | Cooking Time: 60 minutes
Ingredients
– 4 large russet potatoes, scrubbed clean (I look for ones that feel firm and heavy for the fluffiest insides)
– 1 tablespoon extra virgin olive oil, my go-to for its fruity aroma
– 1 teaspoon kosher salt, plus more for seasoning
– 1/2 teaspoon freshly ground black pepper
– 1 cup diced cooked ham, about 1/4-inch pieces (leftover holiday ham works wonderfully here)
– 1 1/2 cups small broccoli florets, chopped into bite-sized pieces
– 1/2 cup sour cream, at room temperature for easier mixing
– 1/4 cup whole milk, warmed slightly to prevent curdling
– 1 cup shredded sharp cheddar cheese, divided (I prefer the extra tang it adds)
– 2 tablespoons unsalted butter, softened
– 1/4 teaspoon garlic powder, for a subtle savory note
Instructions
1. Preheat your oven to 400°F and line a baking sheet with aluminum foil for easy cleanup.
2. Pierce each potato 6-8 times with a fork to allow steam to escape during baking.
3. Rub the potatoes all over with olive oil, then sprinkle evenly with 1/2 teaspoon of the kosher salt.
4. Place the potatoes directly on the oven rack and bake for 50-55 minutes, until the skins are crisp and a fork inserts easily into the centers.
5. While the potatoes bake, bring a medium pot of salted water to a boil over high heat.
6. Add the broccoli florets to the boiling water and cook for 3 minutes exactly, until bright green and tender-crisp.
7. Immediately drain the broccoli in a colander and rinse under cold water to stop the cooking process, which preserves its vibrant color.
8. In a medium mixing bowl, combine the diced ham, blanched broccoli, sour cream, warmed milk, 3/4 cup of the cheddar cheese, softened butter, garlic powder, remaining 1/2 teaspoon salt, and black pepper.
9. Once the potatoes are baked, carefully remove them from the oven using oven mitts and let them cool for 5 minutes until handleable.
10. Slice each potato lengthwise about three-quarters of the way through, then gently squeeze the ends to open them up.
11. Use a spoon to scoop out the warm potato flesh into the ham and broccoli mixture, leaving about 1/4-inch of potato attached to the skins to maintain structure.
12. Mix the potato flesh thoroughly with the other ingredients until well combined and creamy.
13. Evenly divide the filling among the potato skins, mounding it slightly in the center.
14. Sprinkle the remaining 1/4 cup of cheddar cheese over the top of each stuffed potato.
15. Return the potatoes to the baking sheet and bake at 400°F for 8-10 minutes, until the cheese is melted and bubbly.
16. Let the potatoes rest for 3 minutes before serving to allow the filling to set slightly.
They emerge from the oven with a satisfying contrast: crispy potato skins give way to a creamy, savory filling where the salty ham and fresh broccoli create wonderful texture. Try serving them alongside a simple green salad for a complete meal, or top with a dollop of extra sour cream for added richness.
Ham and Apple Grilled Cheese Sandwich

Many grilled cheese sandwiches are predictable, but this ham and apple version brings sweet, savory, and melty together in perfect harmony. It’s a simple upgrade that feels special enough for a holiday lunch yet easy enough for a cozy weeknight. Let me guide you through each step to ensure your sandwich turns out beautifully every time.
Serving: 2 | Pre Time: 10 minutes | Cooking Time: 10 minutes
Ingredients
– 4 slices of sourdough bread (I love its tangy crunch, but any sturdy bread works)
– 4 slices of sharp cheddar cheese (room temperature cheese melts more evenly)
– 4 thin slices of deli ham (I prefer Black Forest ham for its smoky flavor)
– 1 medium apple, thinly sliced (a crisp variety like Honeycrisp adds sweetness without mushiness)
– 2 tablespoons of unsalted butter (extra virgin olive oil is my go-to for a lighter option, but butter gives that classic golden crust)
– 1 teaspoon of Dijon mustard (just a hint for tang—trust me, it balances the richness)
Instructions
1. Lay out all ingredients on your counter to ensure everything is ready.
2. Spread 1/2 teaspoon of Dijon mustard evenly on one side of each slice of sourdough bread.
3. Place 1 slice of sharp cheddar cheese on the mustard side of 2 bread slices.
4. Top the cheese with 2 slices of deli ham per sandwich, folding them to fit neatly.
5. Arrange thin apple slices over the ham, covering it in a single layer.
6. Add another slice of sharp cheddar cheese on top of the apple slices.
7. Close the sandwiches with the remaining bread slices, mustard side facing inward.
8. Heat a large skillet or griddle over medium-low heat for 2 minutes until evenly warm.
9. Melt 1 tablespoon of unsalted butter in the skillet, swirling to coat the surface.
10. Place both sandwiches in the skillet and cook for 4–5 minutes, pressing down gently with a spatula, until the bottom is golden brown and crisp.
11. Carefully flip the sandwiches using the spatula.
12. Add the remaining 1 tablespoon of unsalted butter to the skillet, letting it melt around the sandwiches.
13. Cook for another 4–5 minutes until the second side is golden brown and the cheese is fully melted, checking by peeking at the edges.
14. Remove the sandwiches from the skillet and let them rest on a cutting board for 1 minute to set the cheese.
15. Slice each sandwich diagonally with a sharp knife for easier serving.
The result is a sandwich with a crisp, buttery exterior that gives way to gooey melted cheese, savory ham, and a refreshing crunch from the apple. Serve it with a simple side salad or a bowl of tomato soup for a comforting meal that’s both familiar and delightfully new.
Ham and Sweet Potato Hash with Fried Eggs

Gathering around the table for a hearty breakfast doesn’t get much better than this simple, satisfying skillet dish. Let’s walk through making a comforting ham and sweet potato hash topped with perfectly fried eggs, step by step.
Serving: 4 | Pre Time: 15 minutes | Cooking Time: 25 minutes
Ingredients
– 2 tablespoons extra virgin olive oil (my go-to for its fruity flavor)
– 1 large yellow onion, diced (about 1 cup)
– 2 medium sweet potatoes, peeled and cut into 1/2-inch cubes (about 3 cups)
– 8 ounces cooked ham, diced (I like a smoky, thick-cut variety)
– 1 teaspoon smoked paprika
– 1/2 teaspoon garlic powder
– 1/2 teaspoon dried thyme
– Salt and black pepper
– 4 large eggs (I prefer room temperature eggs here for more even cooking)
– 2 tablespoons unsalted butter
– Fresh parsley, chopped (for garnish, optional but bright)
Instructions
1. Heat the olive oil in a large skillet over medium heat until it shimmers, about 2 minutes.
2. Add the diced onion to the skillet and cook, stirring occasionally, until softened and translucent, about 5 minutes.
3. Add the sweet potato cubes to the skillet with the onions. Cook, stirring every 3-4 minutes, until the potatoes are tender and lightly browned on the edges, about 12-15 minutes. Tip: Cover the skillet for the first 8 minutes to help steam the potatoes, then uncover to crisp them.
4. Stir in the diced ham, smoked paprika, garlic powder, and dried thyme. Cook for 3 minutes, stirring frequently, until the ham is heated through and fragrant.
5. Season the hash mixture with salt and black pepper to your liking, then transfer it to a plate and tent with foil to keep warm.
6. Wipe the skillet clean with a paper towel and return it to medium-low heat.
7. Add the butter to the skillet and let it melt completely and foam slightly, about 1 minute.
8. Crack the eggs directly into the skillet, spacing them apart. Tip: For clean cracks, tap each egg firmly on a flat surface.
9. Cook the eggs undisturbed until the whites are fully set and the yolks are still runny, about 3-4 minutes. Tip: Cover the skillet for the last minute to gently set the tops without overcooking the yolks.
10. Divide the warm hash among four plates and top each portion with a fried egg.
11. Garnish with chopped fresh parsley if desired.
Kickstart your morning with this vibrant dish where the creamy sweet potatoes and savory ham create a delightful base. The runny egg yolk mingles with the hash, adding a rich, silky sauce that ties everything together. For a fun twist, serve it in individual cast-iron skillets straight from the oven to keep it sizzling hot at the table.
Ham and Jalapeño Cornbread Casserole
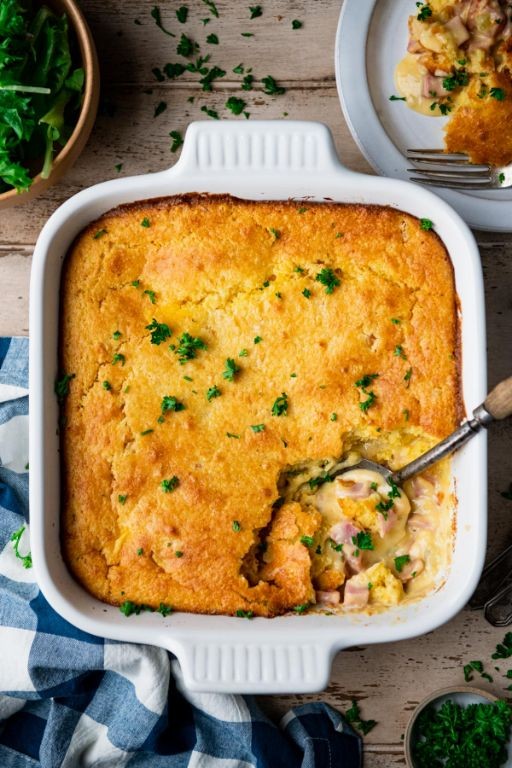
A comforting casserole that transforms humble cornbread into a savory, spicy delight perfect for feeding a crowd during chilly evenings. This ham and jalapeño cornbread casserole layers smoky ham, sharp cheddar, and fresh jalapeños between two cornbread layers, creating a hearty dish that bakes up golden and fragrant. Let’s walk through each step together to ensure your casserole turns out perfectly moist and flavorful every time.
Serving: 8 | Pre Time: 20 minutes | Cooking Time: 45 minutes
Ingredients
– 2 cups cornmeal (I like stone-ground for its rustic texture)
– 1 cup all-purpose flour
– 1 tablespoon baking powder
– 1 teaspoon salt
– 2 large eggs, at room temperature for better mixing
– 1 cup buttermilk (full-fat gives the best tang)
– ½ cup unsalted butter, melted and slightly cooled
– 1 cup diced ham (I use leftover holiday ham for extra flavor)
– 1 cup shredded sharp cheddar cheese
– 2 fresh jalapeños, finely chopped (remove seeds for less heat)
– ½ cup sour cream
Instructions
1. Preheat your oven to 375°F (190°C) and grease a 9×13-inch baking dish with butter or cooking spray.
2. In a large mixing bowl, whisk together 2 cups cornmeal, 1 cup all-purpose flour, 1 tablespoon baking powder, and 1 teaspoon salt until fully combined.
3. In a separate bowl, beat 2 large eggs with a fork until frothy, then stir in 1 cup buttermilk, ½ cup melted butter, and ½ cup sour cream until smooth.
4. Pour the wet ingredients into the dry ingredients and mix gently until just combined—overmixing can make the cornbread tough.
5. Spread half of the cornbread batter evenly into the prepared baking dish using a spatula.
6. Sprinkle 1 cup diced ham, 1 cup shredded cheddar cheese, and 2 chopped jalapeños evenly over the batter layer.
7. Carefully spoon the remaining cornbread batter over the filling and spread it to cover completely, sealing the edges.
8. Bake in the preheated oven for 45 minutes, or until the top is golden brown and a toothpick inserted into the center comes out clean.
9. Let the casserole cool for 10 minutes before slicing to allow it to set properly.
Keep this casserole warm and inviting, with a golden crust giving way to a moist, cheesy interior punctuated by spicy jalapeño bites. Serve it alongside a crisp green salad for a balanced meal, or top individual portions with a dollop of extra sour cream to complement the heat.
Ham and Caramelized Onion Flatbread Pizza

Zesty yet comforting, this ham and caramelized onion flatbread pizza transforms simple ingredients into a gourmet weeknight meal. Perfect for busy evenings, it combines sweet caramelized onions with savory ham on a crispy flatbread base. Let’s walk through each step together to ensure delicious results every time.
Serving: 2 | Pre Time: 15 minutes | Cooking Time: 20 minutes
Ingredients
– 2 pre-made flatbreads (I like using whole-wheat ones for extra texture)
– 1 large yellow onion, thinly sliced (sweet varieties work best here)
– 1 tbsp extra virgin olive oil (my go-to for its fruity flavor)
– 1/2 cup shredded mozzarella cheese
– 4 oz thinly sliced deli ham, torn into bite-sized pieces
– 1/4 cup grated Parmesan cheese
– 1 tsp dried oregano
– Salt to taste (I use a pinch to enhance the onions)
Instructions
1. Preheat your oven to 425°F and line a baking sheet with parchment paper.
2. Heat 1 tbsp extra virgin olive oil in a skillet over medium-low heat.
3. Add the thinly sliced yellow onion to the skillet, stirring to coat it in the oil.
4. Cook the onion for 15-20 minutes, stirring occasionally, until it turns golden brown and caramelized. Tip: Low and slow cooking prevents burning and brings out the onion’s natural sweetness.
5. While the onion cooks, place the 2 pre-made flatbreads on the prepared baking sheet.
6. Evenly sprinkle 1/2 cup shredded mozzarella cheese over each flatbread.
7. Distribute the torn deli ham pieces evenly over the cheese layer.
8. Once caramelized, spread the cooked onion evenly over the ham on both flatbreads.
9. Sprinkle 1/4 cup grated Parmesan cheese and 1 tsp dried oregano over the top. Tip: Adding Parmesan last helps it crisp up beautifully in the oven.
10. Bake in the preheated oven for 8-10 minutes, until the cheese is melted and the edges are golden brown. Tip: Watch closely near the end to avoid overcooking—flatbreads can go from perfect to burnt quickly.
11. Remove from the oven and let cool for 2-3 minutes before slicing.
Happily, this flatbread pizza emerges with a satisfying crunch from the flatbread, balanced by the sweet onions and salty ham. For a creative twist, drizzle with balsamic glaze or serve alongside a fresh arugula salad to cut through the richness.
Ham and Lentil Soup with Herbs

Facing a chilly evening or needing a hearty meal that practically cooks itself? This Ham and Lentil Soup with Herbs is your answer—a comforting, one-pot wonder that transforms simple ingredients into a deeply satisfying bowl. Let’s walk through each step together to build layers of flavor from the ground up.
Serving: 6 | Pre Time: 15 minutes | Cooking Time: 45 minutes
Ingredients
– 2 tablespoons extra virgin olive oil (my go-to for its fruity depth)
– 1 large yellow onion, diced (I find a sharp knife makes this quicker)
– 2 medium carrots, peeled and diced
– 2 celery stalks, diced
– 3 cloves garlic, minced (freshly minced releases the best aroma)
– 1 cup dried brown lentils, rinsed
– 6 cups low-sodium chicken broth
– 1 bay leaf
– 1 teaspoon dried thyme
– 1/2 teaspoon dried rosemary, crumbled
– 1 1/2 cups diced cooked ham (leftover holiday ham works beautifully here)
– Salt and black pepper (I add these gradually to control seasoning)
Instructions
1. Heat 2 tablespoons extra virgin olive oil in a large pot or Dutch oven over medium heat for 1 minute until shimmering.
2. Add 1 large diced yellow onion, 2 diced carrots, and 2 diced celery stalks to the pot.
3. Sauté the vegetables for 8–10 minutes, stirring occasionally, until the onion is translucent and the carrots begin to soften.
4. Stir in 3 minced garlic cloves and cook for 1 minute until fragrant—tip: don’t let the garlic brown, or it may turn bitter.
5. Add 1 cup rinsed brown lentils, 6 cups low-sodium chicken broth, 1 bay leaf, 1 teaspoon dried thyme, and 1/2 teaspoon crumbled dried rosemary to the pot.
6. Increase the heat to high and bring the mixture to a boil, which should take about 5 minutes.
7. Once boiling, reduce the heat to low, cover the pot with a lid, and simmer for 25 minutes—tip: a gentle simmer with small bubbles ensures the lentils cook evenly without breaking apart.
8. After 25 minutes, stir in 1 1/2 cups diced cooked ham and continue simmering, uncovered, for 10 more minutes.
9. Remove the pot from the heat and discard the bay leaf—tip: taste the soup now and season with salt and black pepper gradually, starting with 1/2 teaspoon salt and 1/4 teaspoon pepper, adjusting as needed.
10. Ladle the soup into bowls and let it rest for 5 minutes before serving to allow the flavors to meld.
Now, you’ve got a pot of soup that’s ready to warm you up. Notice how the lentils have softened into a creamy base while the ham adds savory bites throughout. For a creative twist, top it with a dollop of Greek yogurt or serve alongside crusty bread to soak up every last drop—it’s a meal that tastes even better the next day as the herbs infuse deeper into the broth.
Ham and Brie Croissant Bake

Savor the ultimate holiday brunch with this Ham and Brie Croissant Bake—it’s a decadent, crowd-pleasing casserole that transforms buttery croissants, savory ham, and creamy brie into a golden, bubbly masterpiece. Perfect for Christmas morning or a cozy weekend gathering, this dish comes together with minimal fuss for maximum flavor.
Serving: 6 | Pre Time: 15 minutes | Cooking Time: 35 minutes
Ingredients
– 4 large croissants, preferably day-old for better texture—I tear them into chunks by hand for a rustic look.
– 8 ounces diced ham, about 2 cups—I use a good-quality deli ham for richer flavor.
– 8 ounces Brie cheese, rind removed and cubed—room temp Brie blends more smoothly into the custard.
– 4 large eggs, at room temperature to help them incorporate evenly.
– 1 cup whole milk—I find it gives a creamier result than lower-fat options.
– 1/2 cup heavy cream for extra richness.
– 1 teaspoon Dijon mustard to add a subtle tang.
– 1/4 teaspoon freshly ground black pepper, plus a pinch of salt if your ham isn’t too salty.
– 2 tablespoons chopped fresh chives for garnish—they add a bright, fresh finish.
Instructions
1. Preheat your oven to 350°F and lightly grease a 9×13-inch baking dish with butter or non-stick spray.
2. Tear the croissants into 1-inch chunks and spread them evenly in the prepared baking dish.
3. Scatter the diced ham and cubed Brie cheese over the croissant pieces in the dish.
4. In a medium mixing bowl, whisk together the eggs, whole milk, heavy cream, Dijon mustard, black pepper, and salt (if using) until fully combined and smooth.
5. Pour the egg mixture evenly over the croissants, ham, and Brie in the baking dish.
6. Gently press down on the croissant pieces with a spatula to ensure they soak up the custard—this helps prevent dry spots.
7. Let the dish sit at room temperature for 10 minutes to allow the custard to absorb fully.
8. Bake in the preheated oven for 30–35 minutes, or until the top is golden brown and the center is set (it should not jiggle when shaken).
9. Remove from the oven and let it cool for 5 minutes before sprinkling with chopped fresh chives.
10. Slice and serve warm directly from the dish.
Oozing with melted Brie and savory ham, this bake offers a delightful contrast of crispy edges and soft, custardy centers. For a festive twist, drizzle it with a touch of honey or pair it with a simple arugula salad to balance the richness—it’s sure to become a holiday favorite.
Ham and Coleslaw Wraps with Spicy Mayo

Let’s create a simple, satisfying lunch that comes together in minutes but tastes like you spent hours in the kitchen. These wraps are perfect for a quick meal prep or a casual get-together, combining savory, crunchy, and spicy elements in one neat package.
Serving: 4 | Pre Time: 15 minutes | Cooking Time: 0 minutes
Ingredients
– 4 large flour tortillas (I like the burrito-sized ones for easier rolling)
– 1 lb thinly sliced deli ham (I prefer a honey-baked variety for a touch of sweetness)
– 3 cups pre-shredded coleslaw mix (the classic cabbage and carrot blend saves so much time)
– 1/2 cup mayonnaise
– 2 tbsp sriracha sauce (adjust this if you’re sensitive to heat—it packs a punch!)
– 1 tbsp fresh lime juice (bottled works in a pinch, but fresh really brightens the flavor)
– 1/2 tsp garlic powder
– 1/4 tsp black pepper
Instructions
1. In a medium mixing bowl, combine the 1/2 cup mayonnaise, 2 tbsp sriracha sauce, 1 tbsp lime juice, 1/2 tsp garlic powder, and 1/4 tsp black pepper. Whisk vigorously for about 30 seconds until the mixture is completely smooth and uniformly orange-pink in color.
2. Add the 3 cups of pre-shredded coleslaw mix to the bowl with the spicy mayo. Tip: Let the coleslaw sit for 5 minutes after mixing to slightly soften the cabbage, making the wraps easier to bite into.
3. Lay one large flour tortilla flat on a clean work surface.
4. Arrange approximately 1/4 lb of the thinly sliced deli ham in a single layer over the center of the tortilla, leaving a 1-inch border around the edges.
5. Spoon one-quarter of the dressed coleslaw mixture (about 3/4 cup) evenly over the ham layer. Tip: Avoid overfilling the center to prevent the wrap from bursting when you roll it.
6. Fold the bottom edge of the tortilla up and over the filling, then fold in the left and right sides.
7. Roll the wrap tightly away from you to form a secure cylinder. Tip: If the tortilla cracks, microwave it for 10 seconds wrapped in a damp paper towel to make it more pliable.
8. Repeat steps 3 through 7 with the remaining three tortillas, ham, and coleslaw mixture.
9. Slice each wrap in half diagonally with a sharp serrated knife for a clean cut that shows off the colorful layers.
An ideal grab-and-go meal, these wraps offer a delightful contrast between the soft tortilla, salty ham, and the crunchy, creamy slaw with a spicy kick. Serve them immediately with extra sriracha on the side for dipping, or wrap them tightly in parchment paper for a picnic—the coleslaw stays crisp for hours.
Summary
These 20 delicious ham slice recipes prove this versatile ingredient can shine in any meal, from quick weeknight dinners to festive gatherings. Try a few, leave a comment with your favorite, and share this roundup on Pinterest to inspire fellow home cooks!