Ever dreamt of baking a show-stopping red velvet cake that’ll wow your guests? You’re in the right place! From classic layers to creative twists, these 18 decadent recipes are perfect for birthdays, holidays, or any celebration. Whether you’re a baking newbie or a seasoned pro, get ready to find your new favorite. Let’s dive into these irresistible treats—your next masterpiece awaits!
Classic Red Velvet Cake with Cream Cheese Frosting
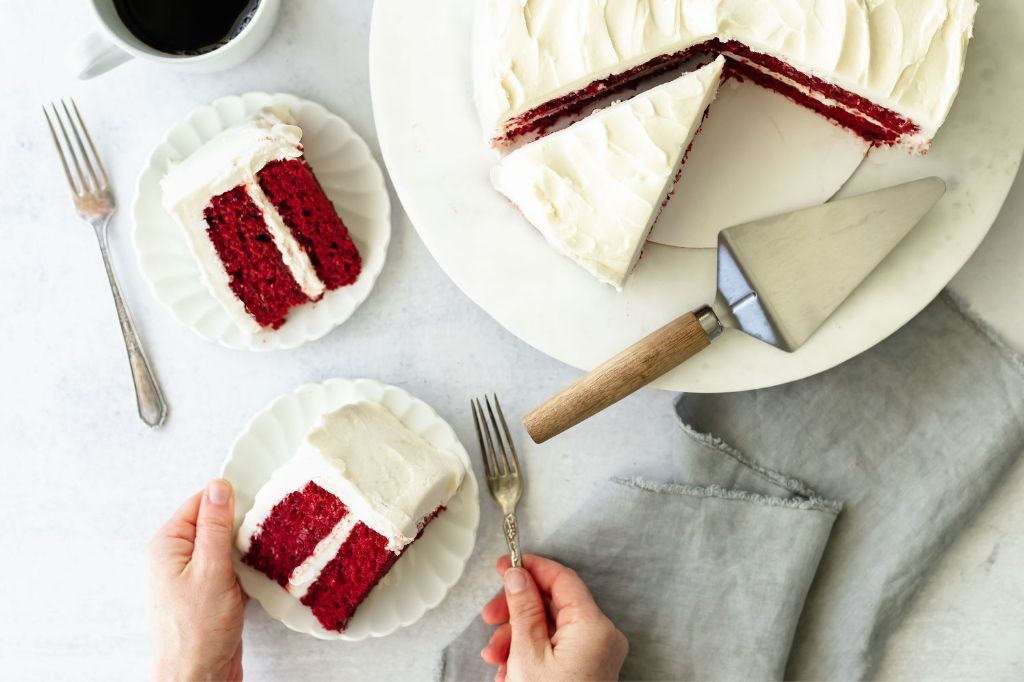
Zipping through my recipe box, I always pause at this holiday classic—it’s the cake my grandma would make for Christmas Eve, filling the kitchen with that unmistakable cocoa-vanilla scent. Today, I’m sharing my go-to version, perfect for cozy gatherings or a sweet solo treat.
Serving: 12 | Pre Time: 25 minutes | Cooking Time: 30 minutes
Ingredients
– 2 ½ cups all-purpose flour, sifted for lightness
– 1 ½ cups granulated sugar, fine and sparkling
– 1 teaspoon baking soda
– 1 teaspoon fine sea salt
– 2 tablespoons unsweetened cocoa powder, Dutch-processed for depth
– 1 ½ cups vegetable oil, neutral and smooth
– 2 large eggs, room-temperature and farm-fresh
– 1 cup buttermilk, tangy and well-shaken
– 2 teaspoons pure vanilla extract, aromatic and high-quality
– 1 tablespoon distilled white vinegar, clear and sharp
– 1 ounce red food coloring, vibrant gel-based
– 8 ounces cream cheese, full-fat and softened
– ½ cup unsalted butter, softened to room temperature
– 4 cups powdered sugar, sifted to avoid lumps
– 1 teaspoon pure vanilla extract, for the frosting
Instructions
1. Preheat your oven to 350°F (175°C) and grease two 9-inch round cake pans, lining them with parchment paper for easy release—this tip saves so much frustration!
2. In a large mixing bowl, whisk together the sifted all-purpose flour, granulated sugar, baking soda, fine sea salt, and Dutch-processed cocoa powder until fully combined.
3. Add the neutral vegetable oil, room-temperature eggs, tangy buttermilk, aromatic vanilla extract, sharp distilled white vinegar, and vibrant red food coloring to the dry ingredients.
4. Beat the mixture on medium speed for exactly 2 minutes, scraping down the bowl halfway through to ensure no pockets of flour remain—this ensures a velvety texture.
5. Divide the batter evenly between the prepared pans, smoothing the tops with a spatula.
6. Bake at 350°F for 28–30 minutes, or until a toothpick inserted into the center comes out clean with just a few moist crumbs, avoiding overbaking to keep it tender.
7. Let the cakes cool in the pans on a wire rack for 10 minutes, then invert them onto the rack to cool completely, about 1 hour—patience here prevents a crumbly mess!
8. While the cakes cool, make the frosting: in a medium bowl, beat the softened full-fat cream cheese and softened unsalted butter on high speed for 3 minutes until fluffy and pale.
9. Gradually add the sifted powdered sugar and vanilla extract, beating on low speed until incorporated, then increase to high for 2 more minutes until smooth and spreadable.
10. Place one cooled cake layer on a serving plate, spread a thick layer of frosting over the top, add the second layer, and frost the top and sides evenly, using an offset spatula for a rustic look.
Celebrate with this beauty—its moist, tender crumb and tangy-sweet frosting melt together in every bite. I love serving it with a dusting of cocoa powder or fresh berries for a pop of color, making it as festive as it is delicious.
Red Velvet Cupcakes with Vanilla Bean Glaze

You know those moments when you need a little holiday magic in the middle of a busy week? Yesterday, while wrapping gifts, I realized I was craving something festive, sweet, and just a bit decadent to share with friends. That’s when these red velvet cupcakes with a dreamy vanilla bean glaze came to mind—they’re my go-to for instant cheer.
Serving: 12 | Pre Time: 20 minutes | Cooking Time: 20 minutes
Ingredients
– 1 ¼ cups of all-purpose flour, sifted for a light crumb
– ¾ cup of granulated sugar, for balanced sweetness
– 1 teaspoon of baking soda
– 1 teaspoon of fine sea salt
– 1 tablespoon of unsweetened cocoa powder, Dutch-processed for deep color
– ½ cup of vegetable oil, for moist texture
– ¾ cup of buttermilk, at room temperature for even mixing
– 1 large farm-fresh egg, at room temperature
– 1 tablespoon of pure vanilla extract
– 1 ounce of liquid red food coloring, for vibrant hue
– 1 teaspoon of distilled white vinegar, to activate the baking soda
– 1 cup of powdered sugar, sifted to avoid lumps
– 2 tablespoons of whole milk, for a smooth glaze
– 1 whole vanilla bean, seeds scraped for intense flavor
Instructions
1. Preheat your oven to 350°F and line a 12-cup muffin tin with festive paper liners.
2. In a large mixing bowl, whisk together the sifted all-purpose flour, granulated sugar, baking soda, fine sea salt, and Dutch-processed cocoa powder until fully combined.
3. In a separate medium bowl, vigorously whisk the vegetable oil, room-temperature buttermilk, room-temperature farm-fresh egg, pure vanilla extract, liquid red food coloring, and distilled white vinegar until the mixture is smooth and uniformly red.
4. Pour the wet ingredients into the dry ingredients and gently fold with a spatula just until no flour streaks remain—overmixing can lead to dense cupcakes.
5. Divide the batter evenly among the prepared liners, filling each about two-thirds full to allow for rising.
6. Bake in the preheated oven for 18–20 minutes, or until a toothpick inserted into the center of a cupcake comes out clean with a few moist crumbs.
7. Remove the cupcakes from the oven and let them cool in the tin for 5 minutes before transferring to a wire rack to cool completely—this prevents steaming and soggy bottoms.
8. For the glaze, in a small bowl, whisk the sifted powdered sugar, whole milk, and scraped seeds from the whole vanilla bean until smooth and pourable; if it’s too thick, add more milk a teaspoon at a time.
9. Once the cupcakes are fully cooled, drizzle the vanilla bean glaze over the tops in a circular motion, allowing it to drip slightly down the sides for a rustic look.
10. Let the glaze set for about 10 minutes before serving to ensure it firms up nicely.
Buttery and tender with a hint of cocoa, these cupcakes are pure comfort. The vanilla bean glaze adds a creamy, aromatic finish that pairs perfectly with the subtle tang from the buttermilk. Serve them as a festive treat with a cup of coffee or crumble one over vanilla ice cream for an indulgent dessert twist.
Red Velvet Cheesecake Swirl Brownies
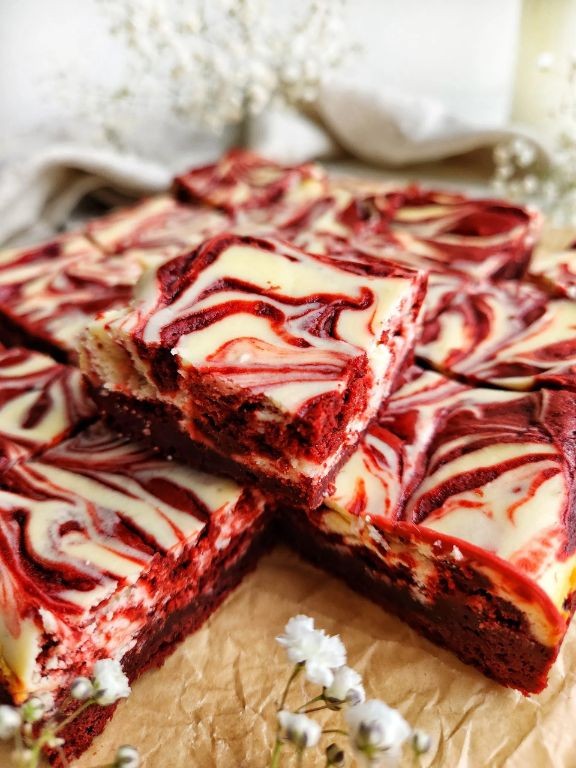
Picture this: it’s a chilly December afternoon, and I’m craving something decadent to share with friends who are dropping by for a last-minute holiday visit. I always keep a stash of red velvet cake mix in my pantry for moments like these—it’s my secret weapon for turning simple baking into something festive and special. These brownies combine that nostalgic red velvet flavor with a creamy cheesecake swirl, creating a treat that’s as beautiful as it is delicious.
Serving: 16 | Pre Time: 15 minutes | Cooking Time: 30 minutes
Ingredients
- 1 box (15.25 oz) of rich red velvet cake mix
- 1/2 cup of creamy unsalted butter, melted
- 2 large farm-fresh eggs
- 8 oz of smooth cream cheese, softened to room temperature
- 1/3 cup of fine granulated sugar
- 1 tsp of pure vanilla extract
Instructions
- Preheat your oven to 350°F and line an 8×8-inch baking pan with parchment paper, leaving an overhang for easy removal later.
- In a medium bowl, combine the red velvet cake mix, melted unsalted butter, and 1 farm-fresh egg until a thick, fudgy dough forms. Tip: Use a spatula to scrape the sides for even mixing.
- Press the dough evenly into the prepared pan with your fingers or a flat-bottomed cup to create a smooth base.
- In another bowl, beat the softened cream cheese, granulated sugar, remaining farm-fresh egg, and pure vanilla extract with a hand mixer on medium speed until smooth and creamy, about 2 minutes.
- Drop spoonfuls of the cream cheese mixture over the red velvet base in the pan.
- Use a knife or toothpick to gently swirl the cream cheese into the red velvet layer, creating a marbled pattern. Tip: Avoid over-swirling to keep distinct layers.
- Bake in the preheated oven for 28–32 minutes, or until the edges are set and a toothpick inserted into the center comes out with a few moist crumbs. Tip: Check at 28 minutes to prevent overbaking, as ovens vary.
- Remove from the oven and let cool completely in the pan on a wire rack for at least 1 hour before slicing.
Keep these brownies chilled for a firmer texture that contrasts beautifully with the soft, tangy cheesecake swirl. The deep cocoa notes from the red velvet blend with the creamy sweetness, making each bite a delightful mix of flavors. Serve them slightly warmed with a scoop of vanilla ice cream for an extra-indulgent dessert that’ll have everyone asking for the recipe.
Red Velvet Layer Cake with Whipped Cream Filling
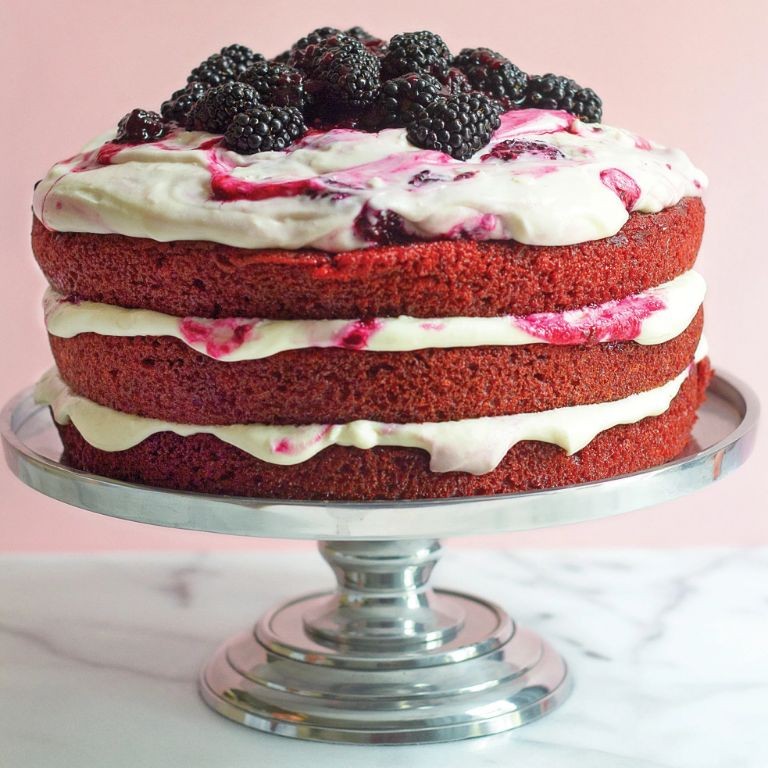
Crafting a stunning red velvet layer cake with whipped cream filling has become my go-to holiday showstopper—there’s something magical about its vibrant color and velvety texture that makes every celebration feel extra special. I love how the tangy buttermilk and cocoa powder create a rich, nuanced flavor, and I always sneak a taste of the whipped cream filling while assembling (a little chef’s treat!). It’s the perfect centerpiece for festive gatherings, and I’ve found that letting the layers cool completely prevents any sogginess, ensuring each slice is picture-perfect.
Serving: 12 | Pre Time: 30 minutes | Cooking Time: 25 minutes
Ingredients
– 2 ½ cups all-purpose flour, sifted for a light crumb
– 1 ½ cups granulated sugar, fine and sparkling
– 1 teaspoon baking soda
– 1 teaspoon fine sea salt
– 2 tablespoons unsweetened cocoa powder, Dutch-processed for deep color
– 1 ½ cups vegetable oil, neutral and smooth
– 2 large eggs, farm-fresh and at room temperature
– 1 cup buttermilk, full-fat and tangy
– 2 teaspoons pure vanilla extract, aromatic and rich
– 1 tablespoon distilled white vinegar, clear and sharp
– 2 tablespoons red food coloring, gel-based for vibrant hue
– 2 cups heavy whipping cream, cold and high-fat
– ½ cup powdered sugar, finely sifted
– 1 teaspoon vanilla extract for the filling
Instructions
1. Preheat your oven to 350°F (175°C) and grease three 8-inch round cake pans, lining them with parchment paper for easy release.
2. In a large mixing bowl, whisk together 2 ½ cups sifted all-purpose flour, 1 ½ cups granulated sugar, 1 teaspoon baking soda, 1 teaspoon fine sea salt, and 2 tablespoons unsweetened cocoa powder until fully combined.
3. In a separate bowl, beat 1 ½ cups vegetable oil, 2 large eggs, 1 cup buttermilk, 2 teaspoons pure vanilla extract, 1 tablespoon distilled white vinegar, and 2 tablespoons red food coloring with an electric mixer on medium speed for 2 minutes until smooth and uniformly red.
4. Gradually add the dry ingredients to the wet mixture, mixing on low speed just until incorporated—overmixing can lead to a tough cake, so stop as soon as no flour streaks remain.
5. Divide the batter evenly among the prepared pans, using a scale for precision if desired, and tap them lightly on the counter to remove air bubbles.
6. Bake for 22–25 minutes, or until a toothpick inserted into the center comes out clean with a few moist crumbs, rotating the pans halfway through for even browning.
7. Cool the cakes in the pans on a wire rack for 10 minutes, then invert them onto the rack, peel off the parchment, and let cool completely for at least 1 hour to prevent the filling from melting.
8. While the cakes cool, make the whipped cream filling by chilling a large bowl and beaters in the freezer for 10 minutes to ensure stiff peaks.
9. In the chilled bowl, whip 2 cups heavy whipping cream, ½ cup powdered sugar, and 1 teaspoon vanilla extract on high speed for 3–4 minutes until firm peaks form that hold their shape when the beaters are lifted.
10. Place one cooled cake layer on a serving plate, spread half of the whipped cream filling evenly over the top with an offset spatula, leaving a ½-inch border to prevent spillage, and repeat with the second layer and remaining filling.
11. Top with the final cake layer, pressing down gently to secure, and refrigerate the assembled cake for at least 30 minutes before serving to set the filling.
12. Slice with a sharp, warm knife for clean edges, wiping it between cuts to maintain the cake’s pristine layers.
The result is a moist, tender crumb with a subtle cocoa tang, beautifully contrasted by the light, airy whipped cream that melts in your mouth. For a festive twist, I sometimes sprinkle edible gold dust on top or serve it with fresh berries on the side—it’s so decadent yet surprisingly easy to pull off, making every bite worth the effort.
Red Velvet Bundt Cake with Chocolate Ganache
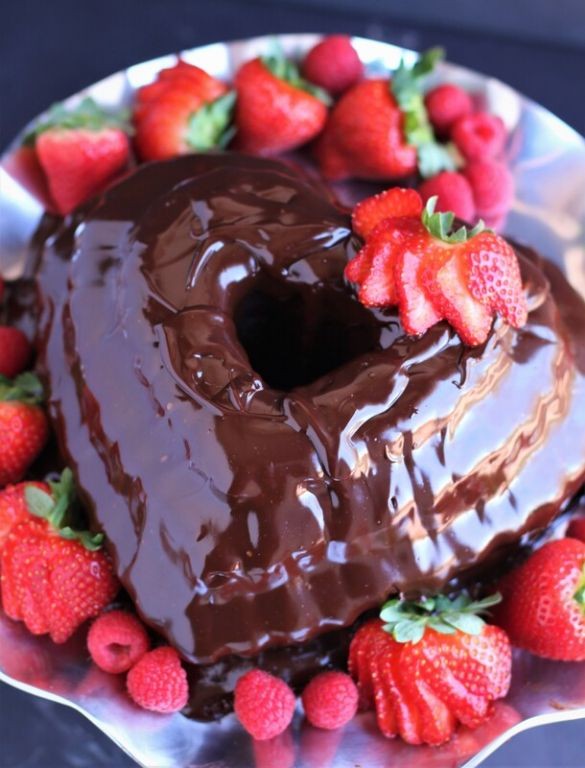
Last December, when I was scrambling for a festive dessert that would impress my in-laws but not keep me in the kitchen all day, I stumbled upon this red velvet Bundt cake. It’s become my go-to for holiday gatherings because it’s stunningly simple yet feels incredibly special, with that signature tang and deep crimson color that just says celebration.
Serving: 12 | Pre Time: 25 minutes | Cooking Time: 55 minutes
Ingredients
– 2 ½ cups of sifted cake flour, for a feather-light crumb
– 2 tablespoons of rich, unsweetened cocoa powder
– 1 teaspoon of fine sea salt
– 1 ½ cups of granulated sugar
– 1 cup of high-quality vegetable oil
– 2 large farm-fresh eggs, at room temperature
– 1 tablespoon of pure vanilla extract
– 1 teaspoon of distilled white vinegar
– 1 fluid ounce of liquid red food coloring
– 1 cup of cultured buttermilk, well-shaken
– 1 teaspoon of baking soda
– 8 ounces of high-quality semisweet chocolate, finely chopped
– 1 cup of heavy whipping cream
Instructions
1. Preheat your oven to 350°F and generously grease a 10-cup Bundt pan with non-stick baking spray, making sure to get into every crevice.
2. In a medium bowl, whisk together the sifted cake flour, rich unsweetened cocoa powder, and fine sea salt until fully combined.
3. In a large mixing bowl, beat the granulated sugar and high-quality vegetable oil with an electric mixer on medium speed for 2 minutes until slightly fluffy.
4. Add the 2 large farm-fresh eggs one at a time to the sugar-oil mixture, beating well after each addition until fully incorporated.
5. Mix in the pure vanilla extract, distilled white vinegar, and liquid red food coloring until the batter is uniformly deep red.
6. Tip: Alternate adding the dry ingredients and cultured buttermilk to the wet mixture, beginning and ending with the dry ingredients, to prevent overmixing and ensure a tender cake.
7. In a small dish, stir the baking soda into the last addition of buttermilk until it fizzes slightly, then immediately fold it into the batter until just combined.
8. Pour the batter into the prepared Bundt pan and tap it gently on the counter to release any large air bubbles.
9. Bake at 350°F for 50-55 minutes, or until a toothpick inserted into the center comes out clean with just a few moist crumbs.
10. Tip: Let the cake cool in the pan on a wire rack for exactly 15 minutes before inverting it—this prevents sticking and helps it hold its shape.
11. While the cake cools, make the ganache by placing the finely chopped high-quality semisweet chocolate in a heatproof bowl.
12. Heat the heavy whipping cream in a small saucepan over medium heat until it just begins to simmer around the edges, about 3-4 minutes.
13. Immediately pour the hot cream over the chocolate, let it sit undisturbed for 2 minutes, then whisk until smooth and glossy.
14. Tip: Allow the ganache to cool and thicken slightly for 5-10 minutes so it drapes beautifully over the cake without running off.
15. Drizzle the warm chocolate ganache over the completely cooled cake, letting it drip down the sides naturally.
16. Now, nothing beats slicing into this moist, velvety cake with its subtle cocoa flavor and tangy buttermilk notes. The glossy ganache adds a decadent richness that makes it perfect for a holiday centerpiece, or try serving it with a dollop of whipped cream and fresh berries for a lighter touch.
Red Velvet Cake Pops with White Chocolate Coating
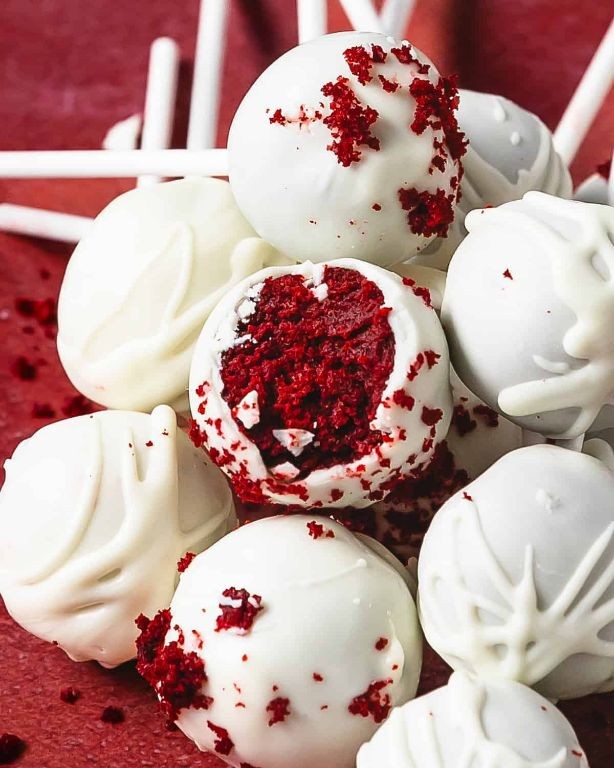
Gathering around the kitchen with loved ones during the holidays always sparks my creativity, and these Red Velvet Cake Pops are my favorite festive project—they’re whimsical, bite-sized, and impossible to resist. I love how they turn a classic cake into a handheld treat, perfect for gifting or party platters.
Serving: 24 | Pre Time: 30 minutes | Cooking Time: 25 minutes
Ingredients
– 1 box of moist red velvet cake mix
– 3 large farm-fresh eggs
– ½ cup of creamy vegetable oil
– 1 cup of water
– 8 oz of full-fat cream cheese, softened to room temperature
– 4 cups of powdered sugar, sifted for smoothness
– 24 lollipop sticks
– 12 oz of high-quality white chocolate chips
– 2 tbsp of refined coconut oil
– Optional: festive sprinkles for decoration
Instructions
1. Preheat your oven to 350°F and grease a 9×13-inch baking pan lightly.
2. In a large mixing bowl, combine the moist red velvet cake mix, farm-fresh eggs, creamy vegetable oil, and water, stirring until just smooth—overmixing can make the cake dense.
3. Pour the batter into the prepared pan and bake for 25 minutes, or until a toothpick inserted in the center comes out clean.
4. Let the cake cool completely in the pan on a wire rack, about 1 hour, to prevent crumbling later.
5. Crumble the cooled cake into fine crumbs in a large bowl using your hands or a fork.
6. Add the softened full-fat cream cheese and sifted powdered sugar to the crumbs, mixing until a dough-like consistency forms that holds together when squeezed.
7. Roll the mixture into 24 evenly sized balls, about 1-inch in diameter, and place them on a parchment-lined baking sheet.
8. Insert a lollipop stick into each ball, then freeze for 15 minutes to firm up—this helps the coating adhere better.
9. In a microwave-safe bowl, melt the high-quality white chocolate chips with refined coconut oil in 30-second intervals, stirring until smooth and glossy.
10. Dip each chilled cake pop into the melted white chocolate, swirling gently to coat evenly and tapping off any excess.
11. Immediately decorate with festive sprinkles if desired, then stand the pops upright in a foam block or cup to set completely, about 30 minutes.
Lusciously creamy and subtly tangy from the cream cheese, these pops offer a delightful contrast to the rich red velvet base. I love serving them at holiday gatherings or packaging them in clear bags with ribbons for sweet homemade gifts—they always disappear fast!
Red Velvet Ice Cream Cake with Oreo Crust
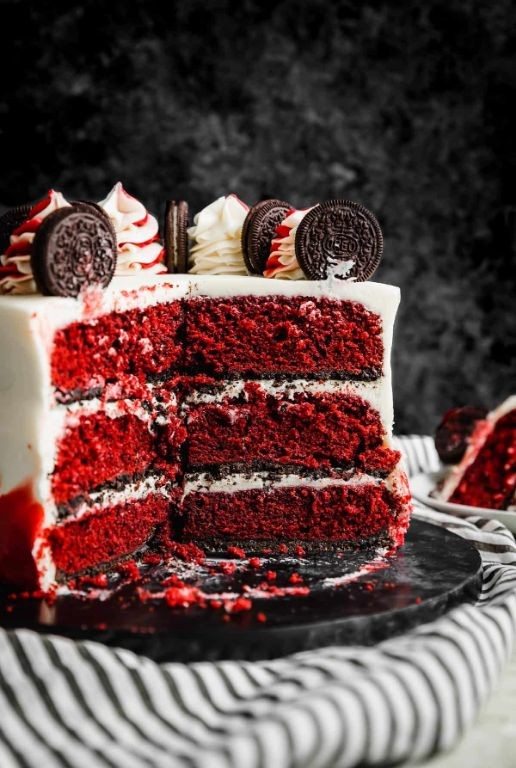
Nothing says holiday cheer like a stunning dessert that’s secretly easy to pull together. I first made this Red Velvet Ice Cream Cake for a last-minute Christmas Eve gathering, and now it’s my go‑to showstopper—trust me, your guests will think you spent all day in the kitchen!
Serving: 12 | Pre Time: 25 minutes | Cooking Time: 0 minutes
Ingredients
– 24 classic Oreo cookies, finely crushed
– 6 tablespoons unsalted butter, melted and slightly cooled
– 1.5 quarts high-quality red velvet ice cream, softened just until spreadable
– 8 ounces cream cheese, at room temperature
– 1 cup powdered sugar, sifted to avoid lumps
– 1 teaspoon pure vanilla extract
– 1 cup heavy whipping cream, cold
– ½ cup mini semi‑sweet chocolate chips, for garnish
Instructions
1. In a medium bowl, combine the finely crushed Oreo cookies with the melted unsalted butter until the mixture resembles wet sand.
2. Firmly press the Oreo mixture into the bottom of a 9‑inch springform pan to form an even crust, using the bottom of a measuring cup to compact it. Tip: Chill the crust in the freezer for 10 minutes to set it faster.
3. In a large bowl, beat the room‑temperature cream cheese with an electric mixer on medium speed until completely smooth, about 2 minutes.
4. Gradually add the sifted powdered sugar to the cream cheese, beating on low speed until fully incorporated, then mix in the pure vanilla extract.
5. In a separate chilled bowl, whip the cold heavy whipping cream with clean beaters on high speed until stiff peaks form, about 3–4 minutes. Tip: Ensure the cream is very cold for the best volume.
6. Gently fold the whipped cream into the cream cheese mixture until no white streaks remain, being careful not to deflate the mixture.
7. Spread the softened red velvet ice cream in an even layer over the chilled Oreo crust, working quickly to prevent melting.
8. Carefully spoon the cream cheese mixture over the ice cream layer and smooth the top with an offset spatula.
9. Sprinkle the mini semi‑sweet chocolate chips evenly over the top, pressing them lightly so they adhere. Tip: Freeze the cake, uncovered, for at least 6 hours or overnight to set completely.
10. To serve, run a thin knife under hot water, dry it, and slide it around the edges of the pan before releasing the springform.
Cut into slices with a warm knife for clean edges. Creamy and dreamy, this cake delivers that iconic red velvet tang against the crunchy Oreo base, with chocolate chips adding little bursts of sweetness. I love serving it with a drizzle of hot fudge or alongside a cup of strong coffee—it’s a festive treat that feels indulgent yet surprisingly simple to make.
Red Velvet Muffins with Cream Cheese Swirl
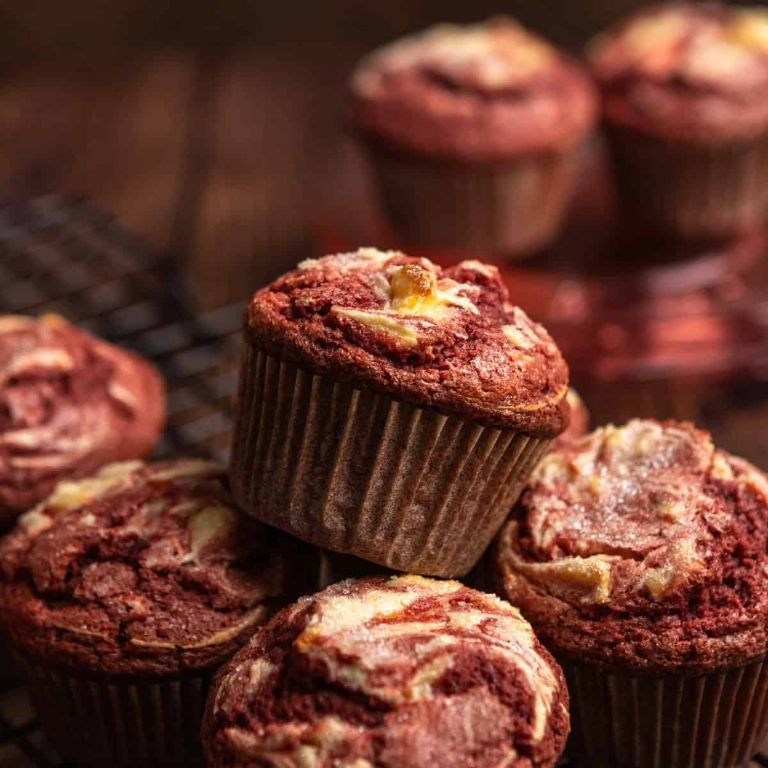
Nothing says holiday baking like the classic combination of red velvet and cream cheese, but I’ve always found layer cakes a bit fussy for a cozy morning. That’s why I turned my favorite flavors into these simple, swirled muffins—perfect for a festive breakfast or a sweet afternoon pick-me-up with a cup of coffee. I love how the tangy cream cheese ribbon cuts through the rich cocoa, making each bite a little celebration.
Serving: 12 | Pre Time: 15 minutes | Cooking Time: 20 minutes
Ingredients
– 1 ½ cups all-purpose flour
– ¾ cup granulated sugar
– ¼ cup unsweetened cocoa powder
– 1 teaspoon baking soda
– ½ teaspoon fine sea salt
– 1 cup buttermilk, at room temperature
– ½ cup vegetable oil
– 2 large farm-fresh eggs, at room temperature
– 1 tablespoon pure vanilla extract
– 1 tablespoon red food coloring gel
– 8 ounces full-fat cream cheese, softened
– ¼ cup powdered sugar
– 1 teaspoon fresh lemon juice
Instructions
1. Preheat your oven to 375°F and line a 12-cup muffin tin with paper liners.
2. In a large mixing bowl, whisk together the all-purpose flour, granulated sugar, unsweetened cocoa powder, baking soda, and fine sea salt until fully combined.
3. In a separate medium bowl, whisk the buttermilk, vegetable oil, farm-fresh eggs, pure vanilla extract, and red food coloring gel until smooth and uniformly crimson.
4. Pour the wet ingredients into the dry ingredients and gently fold with a spatula just until no flour streaks remain—overmixing can lead to dense muffins.
5. In a small bowl, beat the softened full-fat cream cheese, powdered sugar, and fresh lemon juice with a fork until creamy and lump-free.
6. Fill each muffin cup halfway with the red velvet batter using a spoon or cookie scoop.
7. Dollop about 1 teaspoon of the cream cheese mixture into the center of each batter-filled cup.
8. Top each with the remaining red velvet batter, covering the cream cheese completely to prevent burning.
9. Use a toothpick to gently swirl the layers together in a figure-eight motion for a marbled effect, being careful not to overmix.
10. Bake for 18–20 minutes, or until a toothpick inserted into the muffin part (avoiding the cream cheese swirl) comes out clean.
11. Let the muffins cool in the tin for 5 minutes, then transfer to a wire rack to cool completely—this helps them set without becoming soggy.
12. Serve warm or at room temperature.
So, these muffins emerge with a tender, moist crumb and that signature red velvet tang, while the cream cheese swirl stays luxuriously soft and slightly tart. I love them slightly warm, where the swirl gets a little melty, or try crumbling one over vanilla ice cream for an indulgent dessert twist!
Red Velvet Donuts with Powdered Sugar Dusting
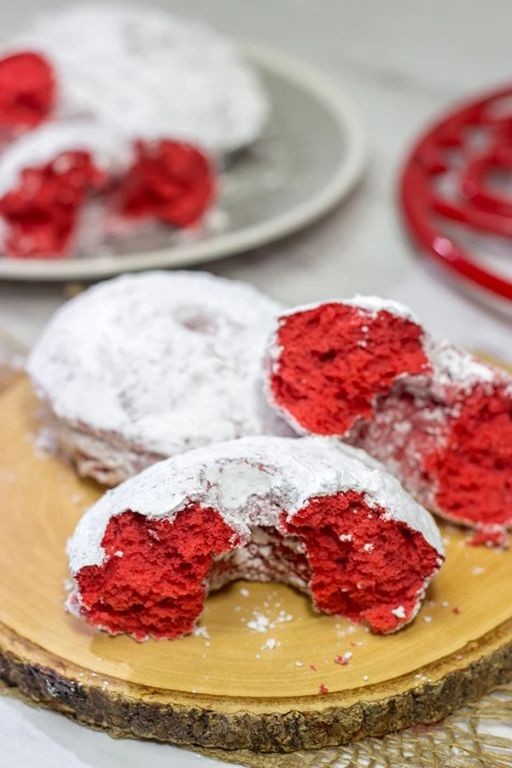
Picture this: a snowy December morning, the scent of cocoa and vanilla wafting through my cozy kitchen—it’s the perfect backdrop for baking these festive, melt-in-your-mouth treats. I’ve always loved how red velvet brings a touch of holiday magic to any table, and these donuts are my go-Serving: 12 | Pre Time: 15 minutes | Cooking Time: 10 minutes
Ingredients
- 1 ½ cups all-purpose flour, sifted for a light, airy texture
- ¾ cup granulated sugar, for a sweet, balanced base
- 1 teaspoon baking powder, to ensure fluffy donuts
- ½ teaspoon fine sea salt, to enhance the flavors
- ¼ cup unsweetened cocoa powder, for that rich, chocolatey depth
- 1 large farm-fresh egg, at room temperature for easy mixing
- ¾ cup buttermilk, tangy and creamy for moisture
- ¼ cup unsalted butter, melted and slightly cooled
- 1 tablespoon pure vanilla extract, for aromatic warmth
- 1 tablespoon red gel food coloring, vibrant and bold
- 1 cup powdered sugar, for a snowy dusting
Instructions
- Preheat your oven to 350°F and grease a 12-cavity donut pan with butter or non-stick spray to prevent sticking.
- In a large mixing bowl, whisk together the sifted all-purpose flour, granulated sugar, baking powder, fine sea salt, and unsweetened cocoa powder until fully combined and lump-free.
- In a separate medium bowl, beat the farm-fresh egg lightly with a fork, then stir in the tangy buttermilk, melted unsalted butter, pure vanilla extract, and vibrant red gel food coloring until the mixture is smooth and uniformly colored.
- Pour the wet ingredients into the dry ingredients and gently fold with a spatula just until no flour streaks remain—overmixing can lead to tough donuts, so stop as soon as it’s incorporated.
- Spoon or pipe the batter into the prepared donut pan, filling each cavity about ¾ full to allow for rising without overflowing.
- Bake in the preheated oven for 8–10 minutes, or until a toothpick inserted into a donut comes out clean and the tops spring back lightly when touched.
- Let the donuts cool in the pan for 5 minutes, then transfer them to a wire rack to cool completely—this prevents sogginess and ensures they’re ready for dusting.
- Once fully cooled, place the powdered sugar in a fine-mesh sieve and generously dust it over the donuts, tapping gently for an even, snowy coating.
Here’s the best part: biting into one reveals a tender, cake-like crumb with a subtle cocoa tang, perfectly complemented by the sweet powdered sugar that melts on your tongue. Serve them warm with a mug of hot cocoa for a cozy treat, or stack them on a festive platter—they’re so pretty, they might just steal the show at your holiday brunch!
Red Velvet Trifle with Layers of Whipped Cream
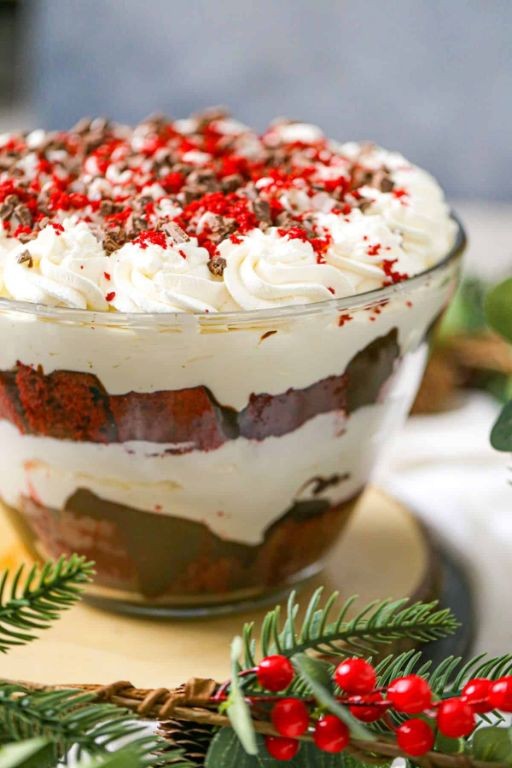
You know those holiday seasons when you want something show-stopping but secretly crave the comfort of a simple dessert? Yesterday, as I was digging through my grandmother’s recipe box, I stumbled upon her classic red velvet cake recipe and thought—why not turn it into a stunning, layered trifle that’s perfect for sharing? It’s the kind of dessert that feels festive yet fuss-free, with velvety cake, fluffy whipped cream, and a hint of cocoa that makes every spoonful irresistible.
Serving: 10 | Pre Time: 30 minutes | Cooking Time: 25 minutes
Ingredients
– 2 cups all-purpose flour, sifted for a light texture
– 1 1/2 cups granulated sugar, for balanced sweetness
– 1 cup buttermilk, tangy and rich
– 1/2 cup unsalted butter, softened to room temperature
– 2 large farm-fresh eggs, at room temperature
– 1/4 cup unsweetened cocoa powder, finely sifted
– 1 tbsp red food coloring, vibrant and gel-based
– 1 tsp pure vanilla extract, aromatic and high-quality
– 1 tsp baking soda, for lift
– 1 tsp white vinegar, to activate the baking soda
– 1/4 tsp fine sea salt, to enhance flavors
– 3 cups heavy whipping cream, cold and high-fat
– 1/2 cup powdered sugar, for sweetening the cream
Instructions
1. Preheat your oven to 350°F and grease two 9-inch round cake pans, then line them with parchment paper for easy removal.
2. In a large mixing bowl, cream together the softened unsalted butter and granulated sugar on medium speed for 3 minutes until light and fluffy—this incorporates air for a tender crumb.
3. Add the farm-fresh eggs one at a time, beating well after each addition to ensure a smooth batter.
4. In a separate bowl, whisk together the sifted all-purpose flour, finely sifted unsweetened cocoa powder, baking soda, and fine sea salt until fully combined.
5. Gradually add the dry ingredients to the butter mixture, alternating with the tangy buttermilk, mixing on low speed just until incorporated to avoid overmixing.
6. Stir in the pure vanilla extract and vibrant red food coloring until the batter is uniformly red, then quickly fold in the white vinegar to activate the baking soda for a rise.
7. Divide the batter evenly between the prepared pans and bake at 350°F for 22-25 minutes, or until a toothpick inserted into the center comes out clean.
8. Let the cakes cool in the pans for 10 minutes, then transfer to a wire rack to cool completely—this prevents sogginess in the trifle.
9. While the cakes cool, in a chilled bowl, whip the cold heavy whipping cream and powdered sugar on high speed for 4-5 minutes until stiff peaks form; keep it refrigerated until use.
10. Crumble the cooled red velvet cakes into bite-sized pieces using your hands for a rustic texture.
11. In a large trifle bowl or individual glasses, layer half of the cake crumbs, then half of the whipped cream, repeating to create two full layers.
12. Chill the assembled trifle in the refrigerator for at least 1 hour before serving to let the flavors meld.
Just imagine digging into this trifle—the moist, cocoa-kissed cake melts into clouds of lightly sweetened cream, creating a dreamy contrast that’s both rich and airy. For a festive twist, I love topping it with fresh raspberries or a sprinkle of crushed peppermint during the holidays, making it a centerpiece that disappears fast at any gathering!
Red Velvet Whoopie Pies with Marshmallow Filling
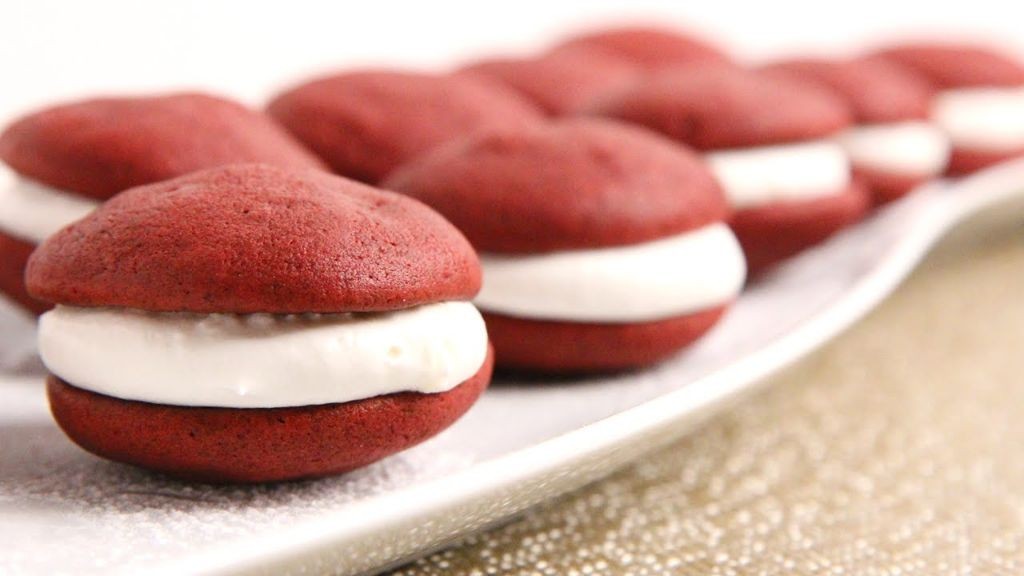
Remember those chilly winter afternoons when you crave something festive yet comforting? I do, and that’s exactly why I’m sharing these red velvet whoopie pies—they’re like little edible hugs with a marshmallow surprise inside. As a self-proclaimed cookie enthusiast, I love how these bring a pop of color to any holiday table, and I always sneak a taste of the filling while I’m whipping it up (a guilty habit, I know!).
Serving: 12 | Pre Time: 20 minutes | Cooking Time: 10 minutes
Ingredients
– 1 ½ cups all-purpose flour, sifted for a light texture
– ¼ cup unsweetened cocoa powder, rich and dark
– ½ teaspoon baking soda, for a tender rise
– ¼ teaspoon fine sea salt, to balance sweetness
– ½ cup unsalted butter, softened to room temperature
– ¾ cup granulated sugar, for a delicate sweetness
– 1 large farm-fresh egg, at room temperature
– 1 teaspoon pure vanilla extract, aromatic and warm
– 1 tablespoon liquid red food coloring, vibrant and bold
– ½ cup buttermilk, tangy and creamy
– 1 cup marshmallow fluff, fluffy and sweet
– ½ cup powdered sugar, finely sifted
– 1 tablespoon unsalted butter, softened
Instructions
1. Preheat your oven to 350°F and line two baking sheets with parchment paper.
2. In a medium bowl, whisk together the all-purpose flour, unsweetened cocoa powder, baking soda, and fine sea salt until fully combined.
3. In a large mixing bowl, cream the softened unsalted butter and granulated sugar together on medium speed for 2–3 minutes until light and fluffy.
4. Add the farm-fresh egg and pure vanilla extract to the butter mixture, beating until just incorporated.
5. Mix in the liquid red food coloring until the batter turns a deep, uniform red hue.
6. Alternately add the dry ingredients and buttermilk to the wet mixture, starting and ending with the dry ingredients, mixing on low speed after each addition until smooth.
7. Drop rounded tablespoons of batter onto the prepared baking sheets, spacing them 2 inches apart to allow for spreading.
8. Bake for 8–10 minutes, or until the tops spring back lightly when touched and the edges are set.
9. Let the cookies cool on the baking sheets for 5 minutes, then transfer them to a wire rack to cool completely.
10. In a small bowl, combine the marshmallow fluff, powdered sugar, and softened unsalted butter, beating on medium speed for 1–2 minutes until smooth and spreadable.
11. Spread a generous tablespoon of the marshmallow filling onto the flat side of one cookie, then sandwich it with another cookie, pressing gently.
12. Repeat with the remaining cookies and filling until all whoopie pies are assembled.
Here’s the best part: these whoopie pies boast a soft, cake-like texture with a subtle cocoa flavor that pairs perfectly with the sweet, gooey marshmallow center. I love serving them with a dusting of powdered sugar or alongside a hot cocoa for a cozy treat—they’re sure to disappear fast at any gathering!
Red Velvet Tiramisu with Coffee Soaked Layers
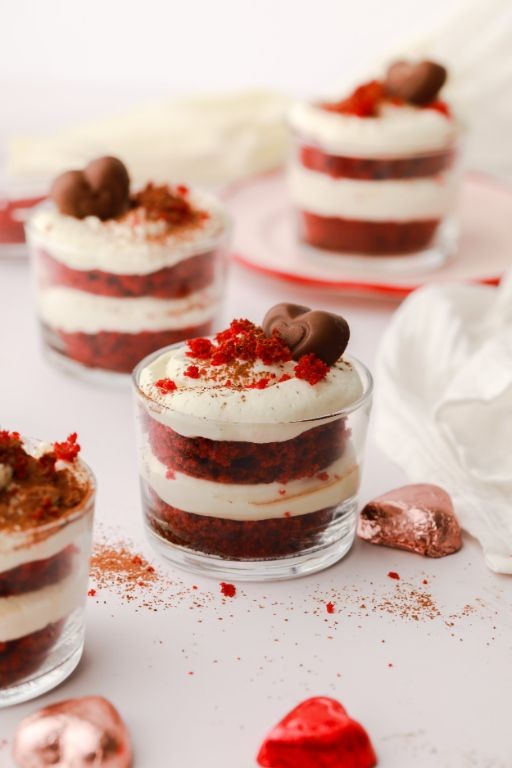
Unbelievably, I discovered this magical fusion of two beloved desserts during a holiday baking marathon last year when I ran out of ladyfingers but had leftover red velvet cake scraps—now it’s become my signature festive treat that always impresses guests with its stunning layers and comforting flavors.
Serving: 8 | Pre Time: 25 minutes | Cooking Time: 0 minutes
Ingredients
– 1 package (15.25 oz) red velvet cake mix
– 3 large farm-fresh eggs at room temperature
– 1 cup whole milk at room temperature
– ½ cup rich vegetable oil
– 1½ cups strong brewed coffee, cooled to room temperature
– 2 tablespoons pure vanilla extract
– 16 oz creamy mascarpone cheese at room temperature
– 1¼ cups powdered sugar, sifted
– 1 cup heavy whipping cream, chilled
– 2 tablespoons unsweetened cocoa powder for dusting
Instructions
1. Preheat your oven to 350°F and grease a 9×13-inch baking pan with non-stick spray.
2. In a large mixing bowl, combine the red velvet cake mix with 3 large farm-fresh eggs, 1 cup whole milk, and ½ cup rich vegetable oil until smooth—tip: scrape the bowl’s sides halfway through mixing to ensure even incorporation.
3. Pour the batter into your prepared pan and bake at 350°F for 25-30 minutes, until a toothpick inserted in the center comes out clean with just a few moist crumbs.
4. Let the cake cool completely in the pan on a wire rack for 1 hour, then cut it into 1-inch cubes—tip: use a serrated knife for clean cuts without crumbling.
5. In a small bowl, whisk together 1½ cups strong brewed coffee and 2 tablespoons pure vanilla extract.
6. In another bowl, beat 16 oz creamy mascarpone cheese with 1¼ cups sifted powdered sugar until fluffy and smooth, about 2 minutes on medium speed.
7. In a separate chilled bowl, whip 1 cup heavy whipping cream to stiff peaks, then gently fold it into the mascarpone mixture until no streaks remain—tip: fold slowly to maintain the airy texture.
8. Arrange half of the red velvet cake cubes in a single layer in a 9×9-inch dish.
9. Drizzle half of the coffee-vanilla mixture evenly over the cake layer, allowing it to soak in for 1 minute.
10. Spread half of the mascarpone cream over the soaked cake layer in an even thickness.
11. Repeat with the remaining cake cubes, coffee mixture, and mascarpone cream.
12. Cover the dish with plastic wrap and refrigerate for at least 4 hours, or ideally overnight, to set.
13. Just before serving, dust the top generously with 2 tablespoons unsweetened cocoa powder using a fine-mesh sieve.
Layers of moist, coffee-kissed red velvet melt into that velvety mascarpone cream, creating a dessert that’s both decadent and surprisingly light. Serve it chilled in clear glasses to showcase those gorgeous crimson streaks, or top with fresh berries for a pop of color that balances the rich cocoa notes perfectly.
Red Velvet Macarons with Cream Cheese Filling
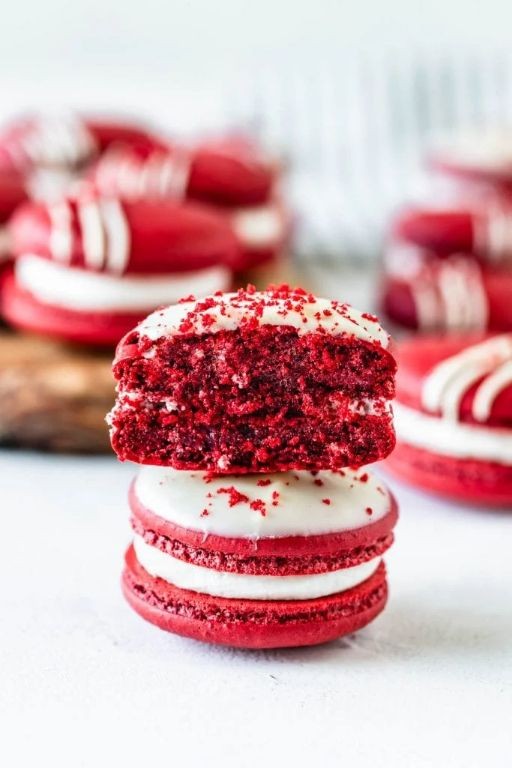
Sometimes the most festive treats come from a happy kitchen accident—like the time I spilled a drop of red food coloring into my macaron batter and ended up with these gorgeous, holiday-ready Red Velvet Macarons with Cream Cheese Filling. They’ve become my go-to for Christmas Eve, filling the house with a sweet, slightly cocoa-kissed aroma that feels like a warm hug.
Serving: 24 macarons | Pre Time: 45 minutes | Cooking Time: 15 minutes
Ingredients
– 1 cup (100g) finely ground almond flour
– 1 ¾ cups (200g) powdered sugar, sifted
– 3 large egg whites, at room temperature
– ¼ cup (50g) granulated sugar
– 1 teaspoon pure vanilla extract
– 2 tablespoons unsweetened cocoa powder, Dutch-processed for a deep color
– 1 teaspoon red gel food coloring, vibrant and concentrated
– 4 ounces full-fat cream cheese, softened to room temperature
– ½ cup (60g) powdered sugar, for the filling
– 1 teaspoon fresh lemon juice, for a bright tang
Instructions
1. Sift together 1 cup of finely ground almond flour, 1 ¾ cups of sifted powdered sugar, and 2 tablespoons of Dutch-processed cocoa powder into a large bowl to remove any lumps, ensuring smooth macaron shells.
2. In a separate clean, dry bowl, use an electric mixer to beat 3 large room-temperature egg whites on medium speed until foamy, about 1 minute.
3. Gradually add ¼ cup of granulated sugar to the egg whites while beating, then increase to high speed and whip until stiff, glossy peaks form, approximately 3-4 minutes.
4. Gently fold in 1 teaspoon of pure vanilla extract and 1 teaspoon of vibrant red gel food coloring into the meringue until evenly combined, being careful not to deflate the mixture.
5. Add the sifted dry ingredients to the meringue in two batches, folding with a spatula in a J-shaped motion until the batter flows like lava and a ribbon forms when lifted—this “macaronage” step is key; overmixing can lead to flat shells.
6. Transfer the batter to a piping bag fitted with a ½-inch round tip and pipe 1 ½-inch circles onto parchment-lined baking sheets, spacing them 1 inch apart.
7. Firmly tap the baking sheets on the counter 2-3 times to release air bubbles, then let the piped shells sit at room temperature for 30-40 minutes until a skin forms and they are no longer sticky to the touch.
8. Preheat your oven to 300°F (150°C) and bake the macarons for 12-15 minutes, rotating the trays halfway through, until the shells are set and lift cleanly from the parchment—a tip: if they wobble, they need more time.
9. Allow the shells to cool completely on the baking sheets for at least 20 minutes before carefully removing them.
10. For the filling, beat 4 ounces of softened full-fat cream cheese with ½ cup of powdered sugar and 1 teaspoon of fresh lemon juice in a medium bowl until smooth and creamy, about 2 minutes.
11. Pair the cooled macaron shells by size, then pipe or spread a generous teaspoon of the cream cheese filling onto the flat side of one shell and sandwich with another, pressing gently.
12. For best results, refrigerate the assembled macarons in an airtight container for 24 hours to allow the flavors to meld and the texture to become perfectly chewy—this “maturation” step makes all the difference.
Finally, these macarons boast a crisp exterior that gives way to a tender, slightly chewy interior, with the rich cocoa and tangy cream cheese filling creating a balanced, festive flavor. I love serving them on a vintage platter with a dusting of powdered sugar for a snowy effect, or gifting them in little boxes tied with ribbon—they’re almost too pretty to eat, but trust me, you won’t resist!
Red Velvet Crepe Cake with Chocolate Drizzle
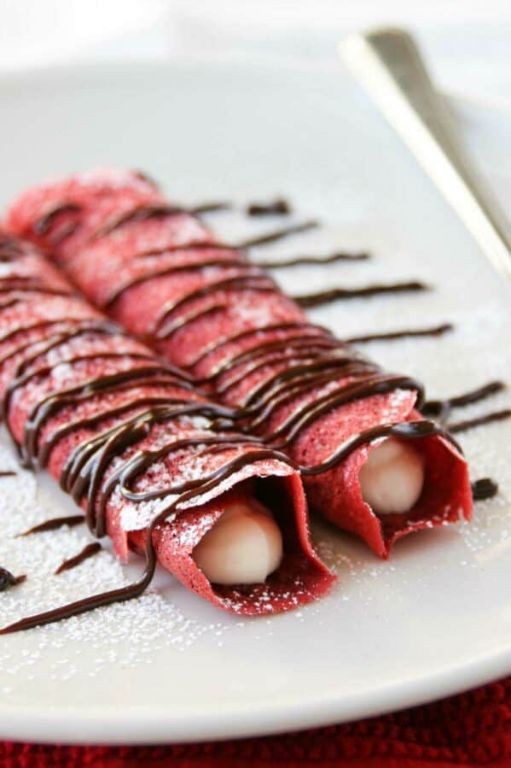
Sometimes, the best holiday traditions are the ones you create yourself—like this stunning Red Velvet Crepe Cake with Chocolate Drizzle that’s become my Christmas Eve showstopper. I love how the deep crimson layers peek through the glossy chocolate, making it almost too beautiful to eat (almost!). It’s surprisingly simple to assemble, though it does require a little patience for stacking those delicate crepes just right.
Serving: 8 | Pre Time: 25 minutes | Cooking Time: 30 minutes
Ingredients
– 2 cups all-purpose flour, sifted for a light texture
– 3 large farm-fresh eggs, at room temperature
– 2 1/4 cups whole milk, gently warmed
– 1/4 cup granulated sugar
– 1/4 cup unsalted butter, melted and slightly cooled
– 2 tablespoons unsweetened cocoa powder, Dutch-processed for rich color
– 1 tablespoon pure vanilla extract
– 1 teaspoon distilled white vinegar
– 1/2 teaspoon fine sea salt
– 1 ounce red gel food coloring, for vibrant hue
– 16 ounces cream cheese, softened to room temperature
– 1 1/2 cups powdered sugar, sifted to avoid lumps
– 1 cup heavy whipping cream, cold
– 4 ounces semi-sweet chocolate, finely chopped for smooth melting
– 1/2 cup heavy cream, for the drizzle
Instructions
1. In a large mixing bowl, whisk together the sifted all-purpose flour, granulated sugar, Dutch-processed cocoa powder, and fine sea salt until fully combined. 2. Create a well in the center of the dry ingredients and add the farm-fresh eggs, gently warmed whole milk, melted unsalted butter, pure vanilla extract, distilled white vinegar, and red gel food coloring. 3. Whisk the mixture slowly from the center outward until a smooth, lump-free batter forms with a vibrant red color, then let it rest at room temperature for 15 minutes to allow the flour to hydrate—this prevents tough crepes. 4. Heat a non-stick 8-inch skillet over medium-low heat and lightly grease it with butter, using a paper towel to wipe away excess for a thin, even coating. 5. Pour 1/4 cup of the batter into the center of the skillet, immediately tilting and swirling to spread it into a thin, even circle. 6. Cook the crepe for 60-90 seconds until the edges lift easily and the surface looks set with small bubbles, then flip it carefully with a spatula and cook for another 30 seconds until lightly golden. 7. Transfer the cooked crepe to a wire rack to cool completely, repeating with the remaining batter to make about 16 crepes, stacking them with parchment paper in between to prevent sticking. 8. In a stand mixer fitted with the paddle attachment, beat the softened cream cheese on medium speed for 2 minutes until creamy and smooth. 9. Gradually add the sifted powdered sugar to the cream cheese, beating on low speed to incorporate without creating a sugar cloud, then increase to medium-high and beat for 3 minutes until fluffy. 10. In a separate chilled bowl, whip the cold heavy whipping cream on high speed for 3-4 minutes until stiff peaks form. 11. Gently fold the whipped cream into the cream cheese mixture in two additions using a spatula, taking care not to deflate the air—this creates a light, spreadable frosting. 12. Place one cooled crepe on a serving plate and spread a thin, even layer of the cream cheese frosting over it, repeating the process to stack all crepes, ending with a crepe on top. 13. Chill the assembled cake in the refrigerator for at least 1 hour to set the layers, which makes slicing cleaner. 14. For the chocolate drizzle, heat the 1/2 cup heavy cream in a small saucepan over medium heat until it just begins to simmer, then pour it over the finely chopped semi-sweet chocolate in a heatproof bowl. 15. Let the mixture sit undisturbed for 2 minutes to melt the chocolate, then whisk until smooth and glossy. 16. Drizzle the warm chocolate ganache over the chilled cake, allowing it to drip down the sides decoratively. 17. Slice the cake with a sharp knife wiped clean between cuts for neat portions. 18. Serve immediately or refrigerate for up to 2 days.
Now, that first bite reveals a delightful contrast: the tender, slightly cocoa-kissed crepes give way to the tangy, cloud-like frosting, all wrapped in a rich chocolate shell. I love serving this on a festive platter with fresh berries or a dusting of powdered sugar for an extra touch of holiday magic—it’s sure to impress any guest, and leftovers (if there are any!) taste even better the next day.
Red Velvet Cookie Sandwiches with Buttercream Filling
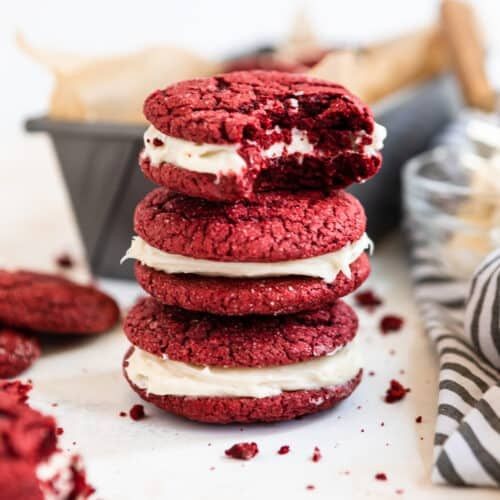
Last December, I found myself craving something festive but not overly complicated—enter these red velvet cookie sandwiches. They’re like little holiday hugs, with that iconic crimson hue and a dreamy buttercream filling that’s impossible to resist. I love making them with my niece; we always end up with flour everywhere, but the laughter (and the cookies) are totally worth it.
Serving: 12 | Pre Time: 20 minutes | Cooking Time: 10 minutes
Ingredients
– 2 cups all-purpose flour
– 1/4 cup unsweetened cocoa powder
– 1 teaspoon baking soda
– 1/2 teaspoon fine sea salt
– 1/2 cup unsalted butter, softened to room temperature
– 3/4 cup granulated sugar
– 1/4 cup light brown sugar, packed
– 1 large farm-fresh egg
– 2 teaspoons pure vanilla extract
– 1 tablespoon liquid red food coloring
– 1/2 cup buttermilk
– 1/2 cup unsalted butter, softened to room temperature
– 2 cups powdered sugar, sifted
– 1 teaspoon pure vanilla extract
– 2 tablespoons heavy cream
Instructions
1. Preheat your oven to 350°F and line two baking sheets with parchment paper.
2. In a medium bowl, whisk together the all-purpose flour, unsweetened cocoa powder, baking soda, and fine sea salt until well combined.
3. In a large mixing bowl, use an electric mixer on medium speed to cream the 1/2 cup softened unsalted butter, granulated sugar, and light brown sugar for 2–3 minutes until light and fluffy. Tip: Scrape down the bowl halfway through to ensure even mixing.
4. Beat in the farm-fresh egg, 2 teaspoons pure vanilla extract, and liquid red food coloring until fully incorporated and the mixture is a vibrant red.
5. Gradually add the dry ingredients to the wet ingredients, alternating with the buttermilk, mixing on low speed just until combined. Tip: Overmixing can lead to tough cookies, so stop as soon as no flour streaks remain.
6. Scoop tablespoon-sized portions of dough onto the prepared baking sheets, spacing them about 2 inches apart.
7. Bake for 8–10 minutes, or until the edges are set and the tops are slightly cracked. Tip: The cookies will continue to firm up as they cool, so don’t overbake them.
8. Let the cookies cool on the baking sheets for 5 minutes, then transfer to a wire rack to cool completely.
9. While the cookies cool, make the buttercream: In a clean bowl, beat the 1/2 cup softened unsalted butter with an electric mixer on medium speed for 1–2 minutes until smooth.
10. Gradually add the sifted powdered sugar, mixing on low speed to avoid a cloud of sugar, then increase to medium and beat for 2 minutes until fluffy.
11. Beat in 1 teaspoon pure vanilla extract and heavy cream until the buttercream is light and spreadable.
12. Once the cookies are completely cool, spread or pipe about 1 tablespoon of buttercream onto the flat side of one cookie and sandwich with another.
Packed with a soft, cake-like texture and a hint of cocoa, these sandwiches offer a delightful contrast between the tender cookie and the creamy, sweet filling. For a festive twist, roll the edges in crushed candy canes or drizzle with white chocolate—they’re perfect for holiday parties or cozy nights in.
Summary
Delicious red velvet cakes await! Whether you’re celebrating a birthday, holiday, or just a sweet craving, these 18 recipes offer something for every baker. We hope you find a new favorite to whip up and share. Don’t forget to let us know which recipe you loved in the comments and pin this roundup to your Pinterest boards for your next baking adventure!


