
You’re about to take a delicious trip down memory lane! This collection of 20 nostalgic retro recipes brings back the comfort food classics we all love, but with a modern twist perfect for today’s home cook. From gooey casseroles to sweet treats, get ready to rediscover those beloved flavors that feel like a warm hug. Let’s dive in and bring some retro charm to your kitchen!
Classic Beef Wellington with Puff Pastry

Venturing into the kitchen to tackle a Classic Beef Wellington always feels like a special occasion project for me—it’s that showstopper dish I love to make when I want to impress guests or treat my family to something truly decadent. I remember the first time I tried it, nervously wrapping that tender beef in all its layers, and now it’s become my go-to for holiday dinners. Let’s dive in and make this elegant yet approachable masterpiece together.
Serving: 4 | Pre Time: 30 minutes | Cooking Time: 45 minutes
Ingredients
– 1 (2 lb) beef tenderloin, trimmed
– 2 tbsp olive oil (or any neutral oil)
– Salt and black pepper, to season generously
– 8 oz cremini mushrooms, finely chopped
– 2 tbsp unsalted butter
– 1 tbsp fresh thyme leaves
– 2 tbsp Dijon mustard
– 6 slices prosciutto
– 1 sheet frozen puff pastry, thawed (keep cold until use)
– 1 large egg, beaten (for egg wash)
Instructions
1. Pat the beef tenderloin completely dry with paper towels.
2. Season the beef all over with salt and black pepper.
3. Heat olive oil in a large skillet over high heat until shimmering, about 1 minute.
4. Sear the beef on all sides until deeply browned, about 2-3 minutes per side.
5. Transfer the seared beef to a plate and let it cool to room temperature, about 15 minutes.
6. Brush the cooled beef evenly with Dijon mustard.
7. In the same skillet, melt butter over medium heat.
8. Add the chopped mushrooms and cook, stirring frequently, until all moisture evaporates and they form a paste, about 10 minutes.
9. Stir in fresh thyme leaves and cook for 1 more minute, then remove from heat and let cool completely.
10. Lay out a large piece of plastic wrap on a clean surface.
11. Arrange the prosciutto slices in a rectangle on the plastic wrap, slightly overlapping.
12. Spread the cooled mushroom mixture evenly over the prosciutto.
13. Place the mustard-brushed beef in the center of the mushroom-covered prosciutto.
14. Use the plastic wrap to tightly roll the prosciutto and mushrooms around the beef, twisting the ends to seal.
15. Refrigerate the wrapped beef for 20 minutes to firm up.
16. Preheat your oven to 400°F (200°C) and line a baking sheet with parchment paper.
17. Roll out the puff pastry sheet on a lightly floured surface to about 12×14 inches.
18. Unwrap the chilled beef bundle and place it in the center of the pastry.
19. Fold the pastry over the beef, trimming any excess, and seal the edges by pressing with a fork.
20. Place the Wellington seam-side down on the prepared baking sheet.
21. Brush the entire pastry with the beaten egg wash.
22. Use a sharp knife to score a decorative pattern on top of the pastry, being careful not to cut through.
23. Bake in the preheated oven until the pastry is golden brown and puffed, about 25-30 minutes.
24. Remove from the oven and let rest for 10 minutes before slicing.
Nothing beats slicing into that golden, flaky pastry to reveal the perfectly pink, juicy beef inside—it’s a textural dream with the crisp exterior giving way to tender meat. The earthy mushrooms and salty prosciutto meld into a rich, savory flavor that pairs beautifully with a simple red wine reduction or roasted vegetables. For a creative twist, I sometimes serve individual mini Wellingtons by cutting the beef into smaller portions before wrapping.
Tuna Noodle Casserole with Crunchy Topping
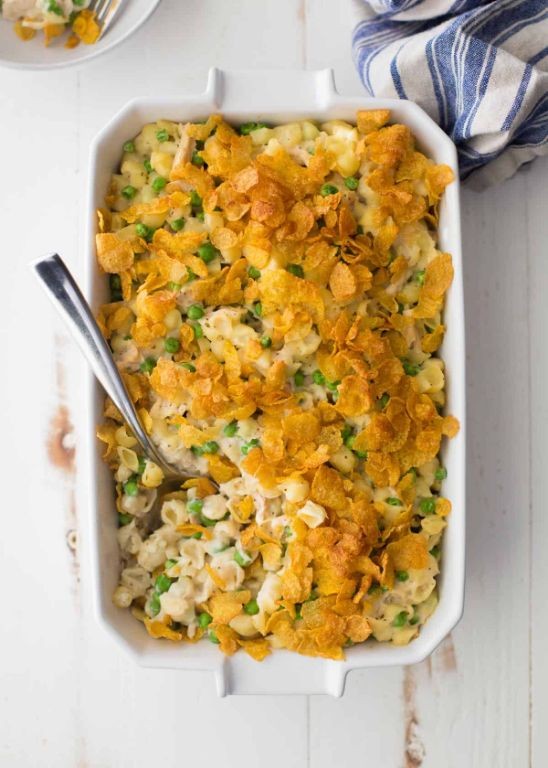
Brace yourselves, comfort food lovers—this classic casserole is the cozy hug we all need when the weather turns chilly. I grew up with my grandma’s version, and after tweaking it over the years, I’ve landed on this foolproof recipe that’s become a weeknight staple in my house. It’s creamy, hearty, and topped with the most satisfying crunch you’ll ever scoop onto a fork.
Serving: 6 | Pre Time: 15 minutes | Cooking Time: 30 minutes
Ingredients
– 8 oz wide egg noodles
– 2 (5 oz) cans tuna in water, drained
– 1 (10.5 oz) can condensed cream of mushroom soup
– 1 cup whole milk
– 1 cup frozen peas, thawed (or fresh if you have them)
– 1/2 cup finely chopped yellow onion
– 1 cup shredded cheddar cheese
– 1 cup crushed potato chips (I prefer kettle-cooked for extra crunch)
– 2 tbsp unsalted butter, melted
– 1/2 tsp garlic powder
– 1/4 tsp black pepper
Instructions
1. Preheat your oven to 375°F and grease a 9×13-inch baking dish lightly with butter or cooking spray.
2. Bring a large pot of salted water to a boil over high heat, then add the egg noodles and cook for 6–8 minutes until al dente, stirring occasionally to prevent sticking.
3. Drain the noodles in a colander and return them to the pot off the heat.
4. In a medium bowl, combine the drained tuna, condensed cream of mushroom soup, whole milk, thawed peas, chopped yellow onion, shredded cheddar cheese, garlic powder, and black pepper, stirring until well mixed.
5. Tip: If the mixture seems too thick, add a splash more milk to reach a creamy consistency.
6. Pour the tuna mixture over the cooked noodles in the pot and gently fold everything together until evenly coated.
7. Transfer the noodle mixture to the prepared baking dish, spreading it out into an even layer.
8. In a small bowl, toss the crushed potato chips with the melted butter until lightly coated.
9. Sprinkle the buttered potato chips evenly over the top of the casserole.
10. Tip: For extra browning, press the chips down slightly so they adhere to the surface.
11. Bake the casserole in the preheated oven for 25–30 minutes, until the edges are bubbly and the topping is golden brown and crispy.
12. Tip: Let it rest for 5 minutes after baking to set up for easier serving.
13. Serve the casserole hot directly from the dish.
So creamy and comforting, this casserole delivers a nostalgic flavor with that irresistible crunchy topping. I love pairing it with a simple green salad to balance the richness, and leftovers reheat beautifully for a quick lunch the next day.
Deviled Eggs with Paprika Garnish
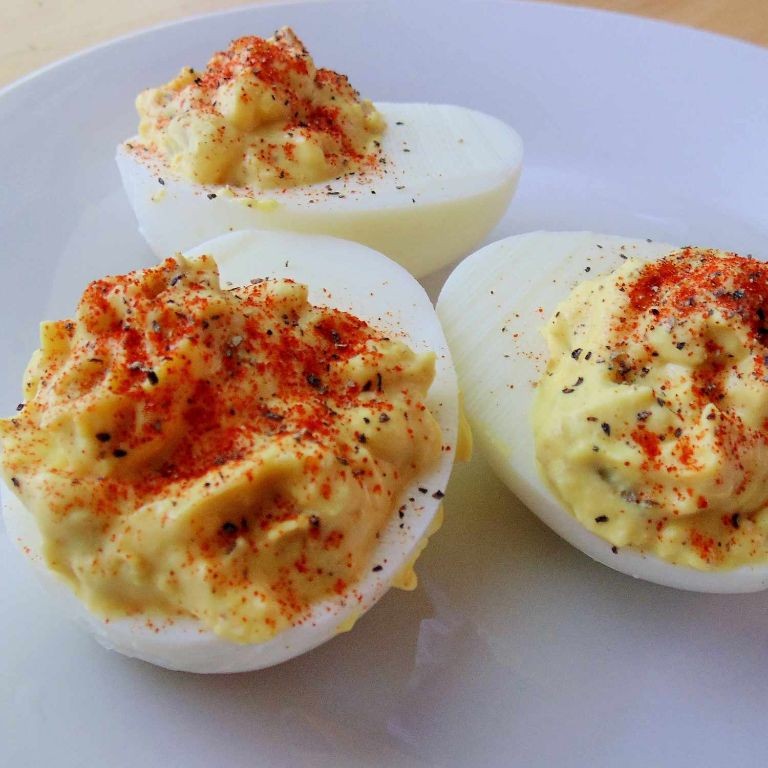
Nothing says “party” to me quite like a platter of deviled eggs—they’re the ultimate crowd-pleaser that always disappears first at my family gatherings. I’ve been making this version for years, tweaking it until the filling is just creamy enough with a subtle tang, and that sprinkle of paprika on top adds a smoky hint and a pop of color that makes them look as good as they taste. Let’s get these started—they come together in no time!
Serving: 12 halves | Pre Time: 15 minutes | Cooking Time: 10 minutes
Ingredients
– 6 large eggs
– ¼ cup mayonnaise (I prefer full-fat for richness, but light works too)
– 1 teaspoon yellow mustard
– 1 teaspoon white vinegar
– ¼ teaspoon salt (adjust to taste)
– ⅛ teaspoon black pepper
– Paprika for garnish (smoked paprika adds extra depth)
Instructions
1. Place 6 large eggs in a single layer in a saucepan and cover them with cold water by about 1 inch.
2. Bring the water to a rolling boil over high heat, then immediately remove the pan from the heat and cover it with a lid.
3. Let the eggs sit covered for 10 minutes—this timing ensures firm yolks without a gray ring.
4. Transfer the eggs to a bowl of ice water and cool for 5 minutes to stop the cooking and make peeling easier.
5. Gently tap each egg on the counter and peel under cool running water to help remove the shell smoothly.
6. Slice each peeled egg in half lengthwise using a sharp knife.
7. Scoop out the yolks into a medium bowl and place the whites on a serving plate.
8. Mash the yolks with a fork until they form fine crumbs.
9. Add ¼ cup mayonnaise, 1 teaspoon yellow mustard, 1 teaspoon white vinegar, ¼ teaspoon salt, and ⅛ teaspoon black pepper to the yolks.
10. Mix everything together until completely smooth and creamy—if it seems thick, add a teaspoon of mayonnaise to loosen it.
11. Spoon or pipe the yolk mixture evenly into the 12 egg white halves.
12. Lightly sprinkle paprika over each filled egg for garnish.
They’re creamy with a tangy kick from the vinegar and mustard, and that paprika gives a warm, smoky finish. Try serving them on a bed of fresh herbs or with crispy bacon bits on top for an extra savory twist!
Shrimp Cocktail with Homemade Sauce
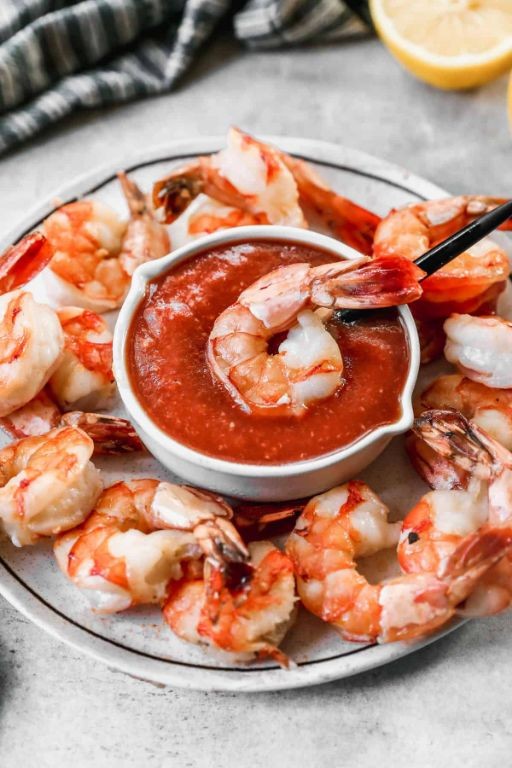
Now, I’ll admit—I used to think shrimp cocktail was just a fancy restaurant appetizer, but after perfecting this homemade version, it’s become my go‑at‑home treat for gatherings or even a cozy night in. There’s something so satisfying about peeling those plump shrimp and whipping up a zesty sauce from scratch, and I love how it always impresses guests without much fuss. Trust me, once you try this, you’ll never go back to store‑bought sauce again!
Serving: 4 | Pre Time: 15 minutes | Cooking Time: 5 minutes
Ingredients
– 1 lb large shrimp, peeled and deveined (I prefer wild‑caught for better flavor)
– 4 cups water
– 1 lemon, sliced (plus extra wedges for serving)
– 2 bay leaves
– 1 tsp whole black peppercorns
– 1 tsp salt
– 1 cup ketchup
– 2 tbsp prepared horseradish, drained (adjust to your preferred spice level)
– 1 tbsp fresh lemon juice
– 1 tsp Worcestershire sauce
– ½ tsp hot sauce, such as Tabasco (optional, for a kick)
– Fresh parsley, chopped (for garnish)
Instructions
1. In a medium pot, combine the water, lemon slices, bay leaves, peppercorns, and salt, then bring to a boil over high heat.
2. Once boiling, add the shrimp and cook for exactly 2–3 minutes, until they turn pink and opaque—avoid overcooking to keep them tender.
3. Immediately drain the shrimp and transfer them to a bowl of ice water to stop the cooking process; let them chill for 5 minutes to firm up.
4. While the shrimp cool, make the sauce: in a small bowl, whisk together the ketchup, horseradish, lemon juice, Worcestershire sauce, and hot sauce (if using) until smooth.
5. Taste the sauce and adjust the horseradish or lemon juice if desired—I like mine tangy with a hint of heat.
6. Drain the chilled shrimp and pat them dry with paper towels to prevent the sauce from becoming watery.
7. Arrange the shrimp on a serving platter with lemon wedges and a bowl of the homemade sauce on the side.
8. Garnish with chopped parsley for a fresh, colorful touch.
Unbelievably fresh and vibrant, these shrimp have a firm, juicy bite that pairs perfectly with the creamy, tangy sauce—it’s all about that balance of sweet, spicy, and citrusy flavors. I love serving them over crushed ice for a classic presentation, or you can skewer them for easy dipping at parties; either way, they disappear fast!
Tomato Aspic with Herb Infusion
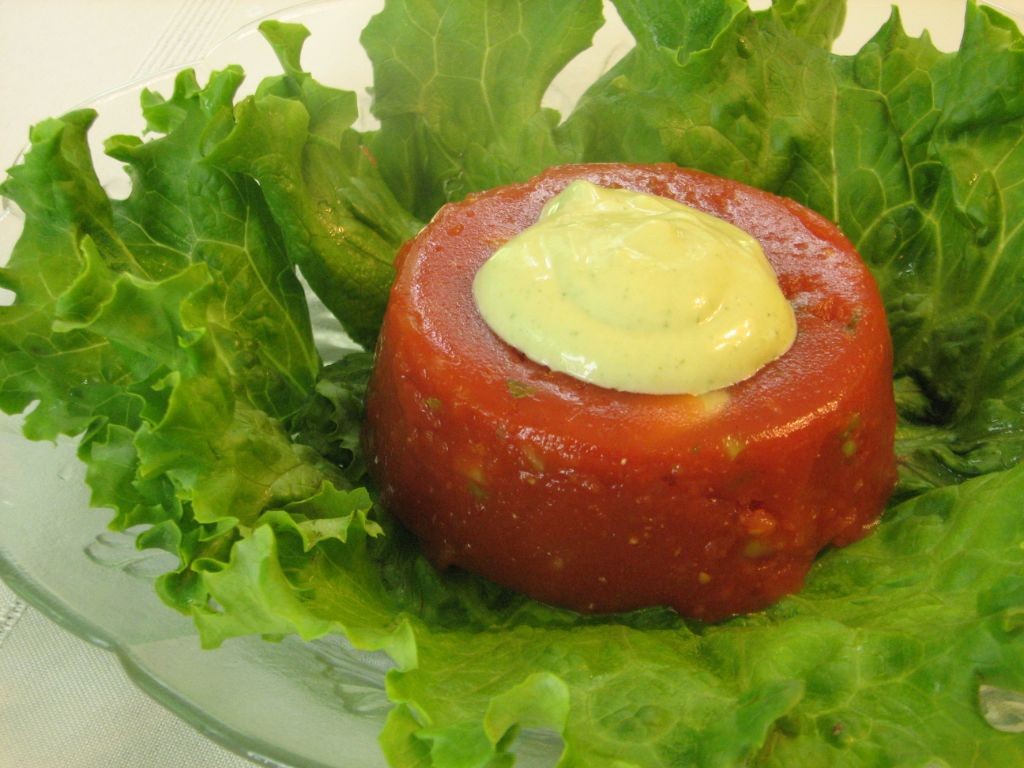
Kicking off the holiday season with a retro classic that’s making a comeback—Tomato Aspic with Herb Infusion. I first tried this at my grandmother’s Christmas Eve dinner years ago, and its shimmering, savory elegance stuck with me. It’s the perfect make-ahead starter that feels fancy without fuss, and my version adds a fresh herbal twist that brightens up the rich tomato base.
Serving: 6 | Pre Time: 20 minutes | Cooking Time: 10 minutes
Ingredients
– 4 cups tomato juice (use high-quality, no-salt-added for best flavor)
– 3 tbsp unflavored gelatin powder (I prefer Knox for reliable setting)
– 1/2 cup cold water
– 1/4 cup fresh lemon juice (about 2 lemons, adjust for tartness)
– 1 tbsp Worcestershire sauce (or soy sauce for a gluten-free option)
– 1 tsp hot sauce, such as Tabasco (optional, for a subtle kick)
– 1/2 tsp salt (I use fine sea salt)
– 1/4 tsp black pepper, freshly ground
– 1/4 cup fresh herbs, finely chopped (I mix equal parts parsley, dill, and chives; substitute with 1 tbsp dried herbs if needed)
– 1/2 cup finely diced celery (about 2 stalks, for crunch)
– 1/4 cup finely diced red onion (soak in ice water for 10 minutes to mellow the bite)
Instructions
1. Pour 1/2 cup cold water into a small bowl and sprinkle 3 tbsp unflavored gelatin powder evenly over the surface; let it sit for 5 minutes until it blooms and looks spongy.
2. In a medium saucepan over medium heat, combine 4 cups tomato juice, 1/4 cup fresh lemon juice, 1 tbsp Worcestershire sauce, 1 tsp hot sauce (if using), 1/2 tsp salt, and 1/4 tsp black pepper; heat until it just begins to simmer, about 5 minutes, stirring occasionally.
3. Remove the saucepan from heat and immediately whisk in the bloomed gelatin mixture until it dissolves completely, about 1 minute, ensuring no lumps remain for a smooth texture.
4. Stir in 1/4 cup finely chopped fresh herbs, 1/2 cup finely diced celery, and 1/4 cup finely diced red onion until evenly distributed throughout the liquid.
5. Lightly grease a 6-cup mold or loaf pan with non-stick spray, then pour the tomato mixture into it; tap the mold gently on the counter to release any air bubbles.
6. Cover the mold with plastic wrap and refrigerate for at least 4 hours, or until fully set and firm to the touch—overnight is ideal for the best results.
7. To unmold, dip the bottom of the mold in warm water for 10–15 seconds, then run a thin knife around the edges; invert onto a serving plate and gently shake to release the aspic.
Firm yet jiggly, this aspic delivers a tangy tomato punch balanced by the herb infusion’s freshness. Serve it chilled on a bed of crisp lettuce or with crackers for a retro appetizer that’s surprisingly light and vibrant.
Salisbury Steak with Mushroom Gravy
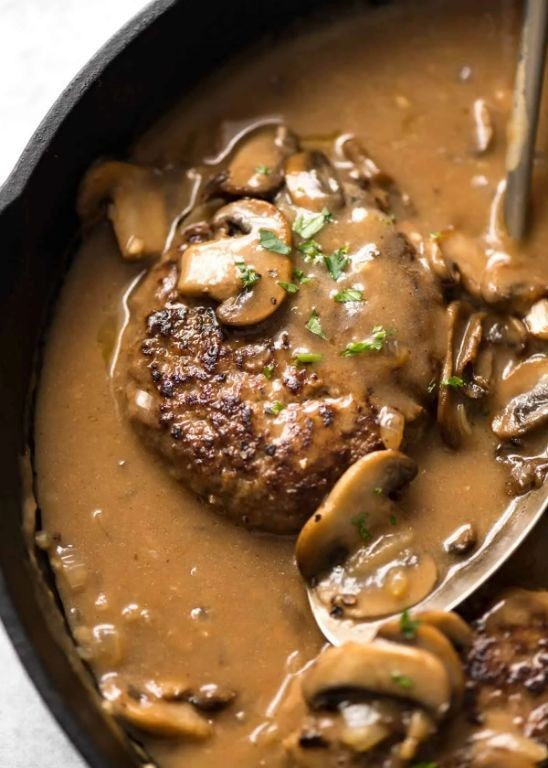
Zesty winter evenings always make me crave something hearty and comforting, and this Salisbury Steak with Mushroom Gravy has been my go-to for years—it’s like a warm hug on a plate, perfect for those chilly December nights when you want something satisfying without spending hours in the kitchen. I love how the savory gravy soaks into the steaks, making every bite rich and flavorful, and it’s a dish my family requests whenever we need a cozy meal together.
Serving: 4 | Pre Time: 15 minutes | Cooking Time: 25 minutes
Ingredients
– 1 lb ground beef (I prefer 80/20 for juiciness)
– 1/4 cup breadcrumbs (panko works great for extra crunch)
– 1 large egg, beaten
– 1/2 cup finely chopped onion (yellow or white)
– 2 tbsp Worcestershire sauce
– 1 tsp garlic powder
– 1/2 tsp salt (adjust to taste)
– 1/4 tsp black pepper
– 2 tbsp vegetable oil (or any neutral oil)
– 8 oz sliced mushrooms (cremini or button)
– 2 tbsp all-purpose flour
– 2 cups beef broth (low-sodium if preferred)
– 1/4 cup heavy cream (optional, for a richer gravy)
– Fresh parsley for garnish (optional)
Instructions
1. In a large bowl, combine the ground beef, breadcrumbs, beaten egg, chopped onion, Worcestershire sauce, garlic powder, salt, and black pepper.
2. Mix the ingredients gently with your hands until just combined—overmixing can make the steaks tough.
3. Shape the mixture into 4 oval patties, about 3/4-inch thick, and set them aside on a plate.
4. Heat the vegetable oil in a large skillet over medium-high heat until it shimmers, about 2 minutes.
5. Add the patties to the skillet and cook for 4-5 minutes per side, until browned and cooked through—they should reach an internal temperature of 160°F.
6. Transfer the cooked patties to a plate and cover loosely with foil to keep warm.
7. In the same skillet, add the sliced mushrooms and cook over medium heat for 5-7 minutes, stirring occasionally, until they release their juices and turn golden brown.
8. Sprinkle the flour over the mushrooms and stir constantly for 1 minute to cook off the raw flour taste.
9. Gradually whisk in the beef broth, scraping up any browned bits from the bottom of the skillet for extra flavor.
10. Bring the gravy to a simmer and cook for 3-5 minutes, stirring frequently, until it thickens slightly.
11. Stir in the heavy cream if using, then return the patties to the skillet, spooning the gravy over them.
12. Simmer for an additional 2-3 minutes to heat everything through.
13. Garnish with fresh parsley if desired and serve immediately.
For a finishing touch, this dish boasts tender, juicy patties smothered in a velvety mushroom gravy that’s deeply savory with a hint of umami from the Worcestershire sauce. I love serving it over creamy mashed potatoes or buttery egg noodles to soak up every last drop of that rich gravy—it’s a comforting classic that always feels like a special treat.
Waldorf Salad with Apples and Walnuts
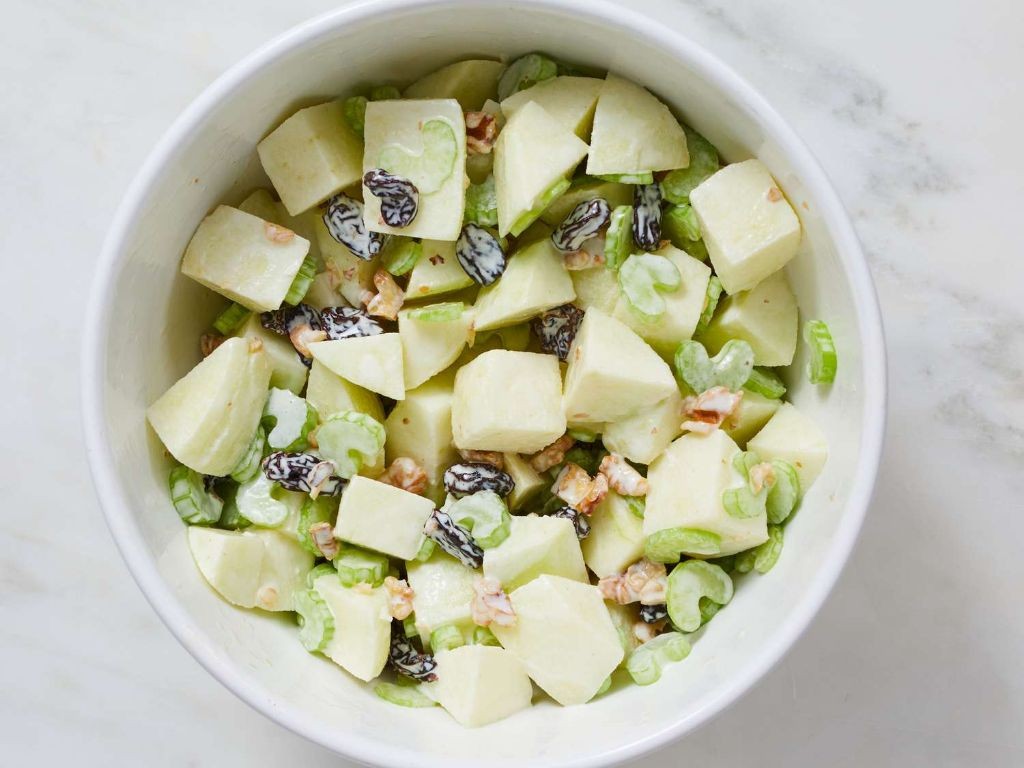
Kicking off the holiday season, I always crave something crisp and refreshing after all the heavy meals. This Waldorf Salad with Apples and Walnuts is my go-to—it’s a nostalgic nod to my grandmother’s table, where she’d whip it up with whatever apples were in season. I love how it balances sweet, tangy, and crunchy in every bite, making it perfect for a light lunch or a festive side.
Serving: 4 | Pre Time: 15 minutes | Cooking Time: 0 minutes
Ingredients
– 2 large apples, cored and diced (I prefer Honeycrisp for sweetness, but Granny Smith adds a nice tartness)
– 1 cup walnuts, roughly chopped (toast them for extra flavor, or use pecans as a substitute)
– 1/2 cup mayonnaise (use full-fat for creaminess, or Greek yogurt for a lighter option)
– 1 tablespoon lemon juice (freshly squeezed works best to prevent browning)
– 1/4 cup celery, finely chopped (adds a refreshing crunch)
– 1/4 cup raisins (soak in warm water for 5 minutes if they’re too dry)
– Salt and pepper to taste (start with a pinch of each and adjust as needed)
Instructions
1. In a small bowl, whisk together 1/2 cup mayonnaise and 1 tablespoon lemon juice until smooth and well combined.
2. Core and dice 2 large apples into 1/2-inch pieces, placing them directly into a large mixing bowl to minimize oxidation.
3. Add 1/4 cup finely chopped celery and 1/4 cup raisins to the bowl with the apples.
4. Roughly chop 1 cup walnuts and toast them in a dry skillet over medium heat for 3-5 minutes, stirring frequently, until fragrant and lightly golden.
5. Tip: Toasting the walnuts enhances their nutty flavor—just be careful not to burn them, as they can turn bitter quickly.
6. Add the toasted walnuts to the mixing bowl with the apples, celery, and raisins.
7. Pour the mayonnaise-lemon mixture over the ingredients in the large bowl.
8. Gently toss everything together with a large spoon or spatula until evenly coated, being careful not to mash the apples.
9. Tip: For best results, let the salad chill in the refrigerator for at least 30 minutes before serving to allow the flavors to meld.
10. Season with a pinch of salt and pepper, tasting and adjusting if needed, then transfer to a serving dish.
11. Tip: If making ahead, store the salad in an airtight container in the fridge for up to 2 days—the apples may soften slightly but will still taste delicious.
12. Here’s the final touch: I love how the crisp apples and celery play off the creamy dressing, while the toasted walnuts add a satisfying crunch. Serve it over a bed of greens for a hearty salad, or alongside roasted chicken for a complete meal—it’s versatile enough to shine at any gathering.
Swedish Meatballs in Creamy Sauce
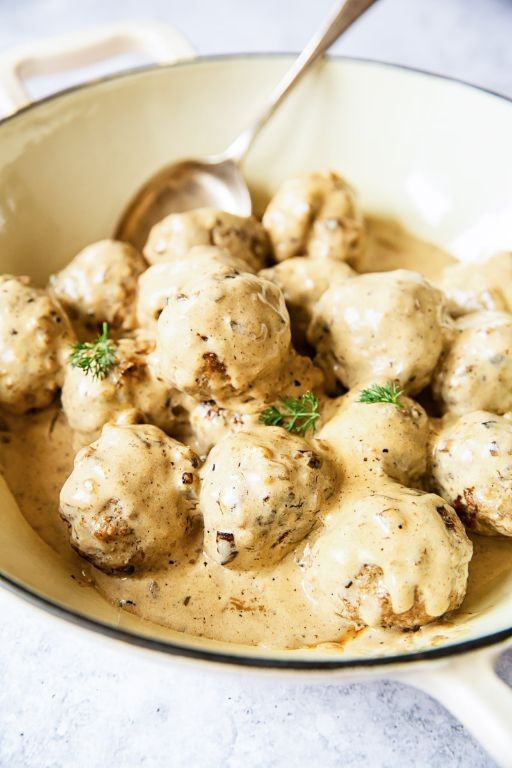
Finally, after a long day of holiday shopping, I needed something comforting and easy to whip up—these Swedish meatballs in creamy sauce are my go-to. They remind me of cozy family dinners, and the rich sauce is perfect for sopping up with mashed potatoes or egg noodles. I love how the recipe comes together quickly, making it ideal for busy weeknights or casual gatherings.
Serving: 4 | Pre Time: 15 minutes | Cooking Time: 25 minutes
Ingredients
– 1 lb ground beef (or a mix of beef and pork for more flavor)
– 1/2 cup breadcrumbs (I use panko for a lighter texture)
– 1/4 cup milk (whole milk works best for richness)
– 1 large egg, beaten
– 1/2 tsp ground allspice (adjust to taste, it adds warmth)
– 1/2 tsp salt
– 1/4 tsp black pepper
– 2 tbsp butter (unsalted, for sautéing)
– 1 tbsp olive oil (or any neutral oil)
– 1/4 cup all-purpose flour (for thickening the sauce)
– 2 cups beef broth (low-sodium preferred)
– 1/2 cup heavy cream (for a velvety sauce)
– 1 tbsp Worcestershire sauce (adds depth of flavor)
– Fresh parsley, chopped (for garnish, optional)
Instructions
1. In a large bowl, combine the ground beef, breadcrumbs, milk, beaten egg, allspice, salt, and pepper. Tip: Mix gently with your hands to avoid overworking the meat, which can make the meatballs tough.
2. Shape the mixture into 1-inch meatballs, placing them on a plate; you should get about 20 meatballs.
3. Heat the butter and olive oil in a large skillet over medium heat until the butter melts and sizzles lightly.
4. Add the meatballs to the skillet in a single layer, working in batches if needed to avoid crowding.
5. Cook the meatballs for 8-10 minutes, turning occasionally, until browned on all sides and cooked through to an internal temperature of 160°F. Tip: Use a meat thermometer to ensure they’re perfectly done without overcooking.
6. Transfer the cooked meatballs to a plate and set aside, leaving the drippings in the skillet.
7. Sprinkle the flour into the skillet drippings and whisk continuously for 1-2 minutes over medium heat to form a roux, until it turns light golden brown.
8. Gradually pour in the beef broth while whisking to prevent lumps, then add the heavy cream and Worcestershire sauce.
9. Bring the sauce to a simmer over medium heat, stirring often, and cook for 5-7 minutes until it thickens to a creamy consistency. Tip: If the sauce seems too thick, add a splash more broth; if too thin, simmer a bit longer.
10. Return the meatballs to the skillet, gently stirring to coat them in the sauce, and heat for 2-3 minutes until warmed through.
11. Garnish with chopped parsley if desired and serve immediately.
Buttery and tender, these meatballs soak up the creamy sauce beautifully, with a hint of allspice that adds a cozy, aromatic touch. I love serving them over a bed of fluffy mashed potatoes or with a side of lingonberry jam for a sweet contrast—it’s a dish that always feels like a warm hug on a plate.
Pineapple Upside-Down Cake with Maraschino Cherries
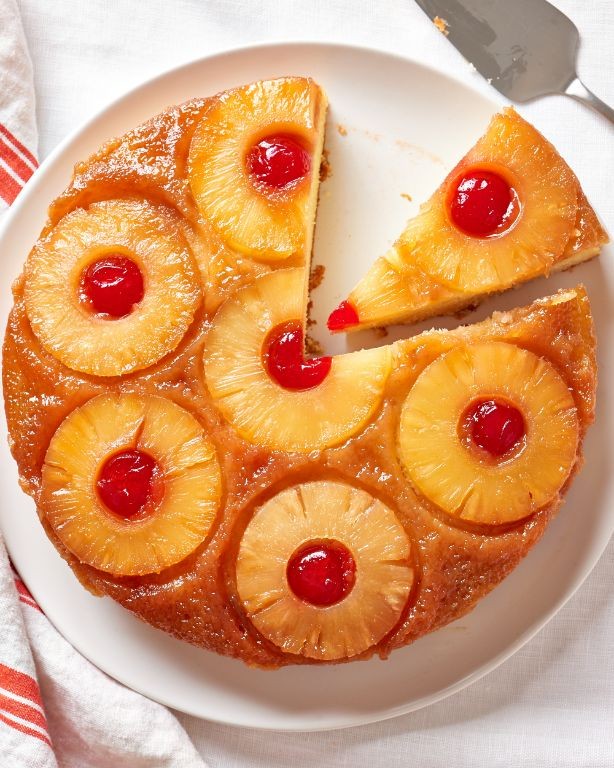
Baking this cake always takes me back to my grandmother’s kitchen, where the scent of caramelized pineapple and warm vanilla would fill the air on Sunday afternoons. It’s a classic dessert that feels both nostalgic and celebratory, perfect for sharing with loved ones during the holidays or any cozy gathering. I love how the maraschino cherries add little pops of color and sweetness that make each slice look as joyful as it tastes.
Serving: 8 | Pre Time: 20 minutes | Cooking Time: 45 minutes
Ingredients
– 1/2 cup unsalted butter, softened (plus extra for greasing the pan)
– 1 cup packed light brown sugar
– 1 (20 oz) can pineapple slices in juice, drained (reserve 1/4 cup juice for the batter)
– 10-12 maraschino cherries, patted dry
– 1 1/2 cups all-purpose flour, spooned and leveled for accuracy
– 1 1/2 tsp baking powder
– 1/4 tsp salt
– 3/4 cup granulated sugar
– 2 large eggs, at room temperature
– 1 tsp pure vanilla extract
– 1/2 cup whole milk, at room temperature
Instructions
1. Preheat your oven to 350°F (175°C) and generously grease a 9-inch round cake pan with butter.
2. In a small saucepan over medium heat, melt 1/2 cup of butter, then stir in the brown sugar until fully combined and bubbly, about 2-3 minutes.
3. Pour the brown sugar mixture evenly into the bottom of the prepared cake pan.
4. Arrange the pineapple slices in a single layer over the mixture, placing a maraschino cherry in the center of each slice and in any gaps.
5. In a medium bowl, whisk together the flour, baking powder, and salt until well combined.
6. In a large mixing bowl, use an electric mixer on medium speed to beat the granulated sugar and remaining 1/2 cup of softened butter until light and fluffy, about 3 minutes.
7. Add the eggs one at a time to the butter-sugar mixture, beating well after each addition, then mix in the vanilla extract.
8. Tip: Alternate adding the flour mixture and milk to the wet ingredients, starting and ending with the flour, to prevent overmixing and ensure a tender crumb.
9. Pour the batter evenly over the arranged pineapple and cherries in the pan, smoothing the top with a spatula.
10. Bake in the preheated oven for 40-45 minutes, or until a toothpick inserted into the center comes out clean and the top is golden brown.
11. Tip: Let the cake cool in the pan on a wire rack for exactly 10 minutes—this allows the caramel to set slightly so it doesn’t stick when flipped.
12. Run a knife around the edges of the pan to loosen the cake, then carefully invert it onto a serving plate.
13. Tip: If any pineapple or cherries stick, gently reposition them while the cake is still warm for a perfect presentation.
14. Allow the cake to cool completely before slicing, about 1 hour.
Zesty pineapple and rich caramel meld into a moist, buttery cake that’s irresistibly sticky on top. The cherries add a sweet-tart contrast that cuts through the richness, making each bite balanced. Serve it warm with a dollop of whipped cream or a scoop of vanilla ice cream to highlight the tropical flavors.
Ambrosia Salad with Coconut and Marshmallows
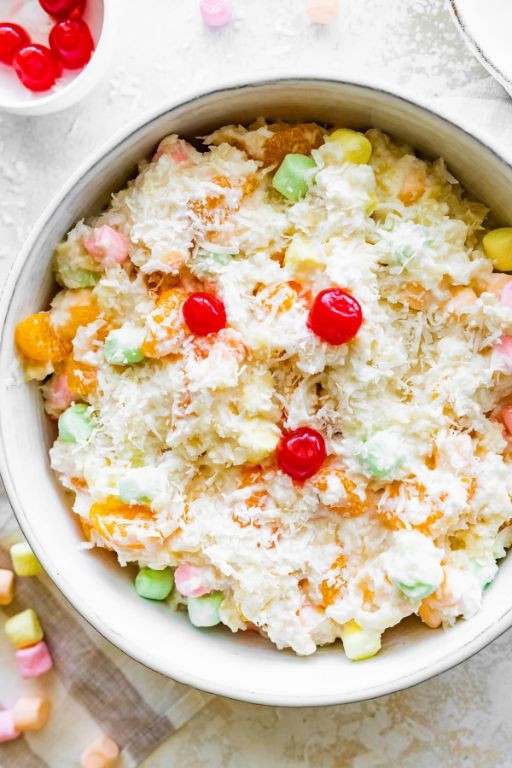
Remember those potlucks where someone always brought a bowl of fluffy, sweet, and nostalgic goodness? That’s exactly what this ambrosia salad is—a retro treat I love making for family gatherings because it’s as easy as it is delightful. I always keep a bag of mini marshmallows in the pantry just for this, and my grandma’s trick of toasting the coconut makes all the difference.
Serving: 8 | Pre Time: 15 minutes | Cooking Time: 0 minutes
Ingredients
– 2 cups mini marshmallows (use fresh ones for best texture)
– 1 cup sweetened shredded coconut, divided (toast half for extra flavor)
– 1 (20 oz) can pineapple tidbits, drained well (save the juice for another use)
– 1 (11 oz) can mandarin oranges, drained thoroughly
– 1 cup sour cream (full-fat works best for creaminess)
– 1/2 cup maraschino cherries, halved and patted dry (reduce to 1/4 cup if you prefer less sweetness)
Instructions
1. Preheat your oven to 350°F and spread 1/2 cup of the shredded coconut in a single layer on a baking sheet.
2. Toast the coconut in the oven for 5–7 minutes, stirring once halfway, until it turns golden brown and fragrant—watch closely to avoid burning.
3. Let the toasted coconut cool completely on the baking sheet, about 10 minutes, to prevent it from becoming soggy when mixed in.
4. In a large mixing bowl, combine the sour cream and the remaining 1/2 cup of untoasted shredded coconut, stirring until smooth.
5. Add the drained pineapple tidbits, drained mandarin oranges, and mini marshmallows to the bowl, folding gently with a spatula to coat evenly without crushing the fruit.
6. Gently fold in the halved maraschino cherries and the cooled toasted coconut until just distributed.
7. Cover the bowl tightly with plastic wrap and refrigerate for at least 2 hours, or up to overnight, to allow the flavors to meld and the marshmallows to soften slightly.
8. Give the salad one final gentle stir before serving to redistribute any juices that may have settled.
Creamy and bursting with tropical sweetness, this salad has a delightful contrast between the soft marshmallows, juicy fruit, and crunchy toasted coconut. Serve it chilled in a clear bowl to show off its colorful layers, or scoop it into individual cups for a festive touch at holiday dinners—it’s a crowd-pleaser that always brings back fond memories.
Chicken a la King with Buttery Pastry Shells

Cooking for a crowd during the holiday season always sends me into a bit of a panic, but this Chicken a la King with Buttery Pastry Shells is my secret weapon. It’s a comforting, creamy classic that feels fancy but comes together with surprisingly little fuss, and I love that I can prep the filling ahead of time.
Serving: 6 | Pre Time: 20 minutes | Cooking Time: 35 minutes
Ingredients
– 1.5 lbs boneless, skinless chicken breasts, cut into 1-inch cubes
– 1/2 cup (1 stick) unsalted butter, divided
– 1 medium yellow onion, finely diced
– 8 oz white mushrooms, sliced (cremini work great too)
– 1/2 cup all-purpose flour
– 2 cups chicken broth
– 1 cup heavy cream
– 1/2 cup frozen peas, thawed
– 1/4 cup dry sherry (optional, but adds great depth)
– 1 tsp paprika
– Salt and freshly ground black pepper
– 6 frozen puff pastry shells, baked according to package directions (usually at 400°F)
Instructions
1. Season the cubed chicken breasts generously with salt and pepper.
2. In a large skillet or Dutch oven, melt 2 tablespoons of the butter over medium-high heat.
3. Add the chicken and cook for 5-7 minutes, stirring occasionally, until it is no longer pink and is lightly browned on all sides. Remove the chicken to a plate and set aside.
4. In the same skillet, melt the remaining 6 tablespoons of butter over medium heat.
5. Add the diced onion and cook for 3-4 minutes until softened and translucent.
6. Add the sliced mushrooms and cook for another 5-6 minutes, stirring occasionally, until they have released their liquid and are golden brown. Tip: Don’t crowd the mushrooms; cook them in batches if your pan is small to ensure they brown properly.
7. Sprinkle the flour over the mushroom and onion mixture. Cook, stirring constantly, for 2 full minutes to cook out the raw flour taste.
8. Gradually whisk in the chicken broth, ensuring no lumps form, then whisk in the heavy cream.
9. Bring the mixture to a simmer, then reduce the heat to medium-low. Let it simmer gently for 5 minutes, stirring frequently, until the sauce has thickened enough to coat the back of a spoon.
10. Stir in the cooked chicken, thawed peas, dry sherry (if using), and paprika.
11. Simmer for an additional 3-4 minutes until everything is heated through. Tip: Taste the sauce now and adjust the seasoning with more salt and pepper if needed; the broth and butter can vary in saltiness.
12. Remove the skillet from the heat and let the filling sit for 5 minutes to allow the flavors to meld and the sauce to thicken slightly more. Tip: If the sauce seems too thick after resting, you can thin it with a splash of extra broth or cream.
13. Spoon the hot Chicken a la King filling into the warm, baked puff pastry shells.
Zesty and rich, the creamy sauce clings perfectly to the tender chicken and vegetables, while the flaky, buttery pastry shell provides a wonderful textural contrast. For a fun twist, skip the individual shells and serve this over toasted bread or even crispy waffles for a hearty brunch.
Baked Alaska with Meringue Topping

Pulling a Baked Alaska out of the oven never fails to impress my dinner guests—it’s that magical dessert where ice cream and cake survive a hot oven under a blanket of toasted meringue. I first attempted it years ago after a holiday party flop, and now it’s my go‑for‑broke showstopper. Trust me, with a little patience, you can master this classic too.
Serving: 8 | Pre Time: 45 minutes | Cooking Time: 5 minutes
Ingredients
– 1 pint vanilla ice cream, slightly softened (or any favorite flavor)
– 1 (9‑inch) round sponge cake layer, about 1‑inch thick (store‑bought or homemade)
– 4 large egg whites, at room temperature
– 1 cup granulated sugar
– 1/4 teaspoon cream of tartar (helps stabilize the meringue)
– 1/2 teaspoon pure vanilla extract
Instructions
1. Place the sponge cake layer on a baking sheet lined with parchment paper.
2. Scoop the slightly softened vanilla ice cream onto the center of the cake, shaping it into a dome that covers the cake completely, then freeze the assembly for 30 minutes until firm.
3. In the bowl of a stand mixer fitted with the whisk attachment, combine the egg whites and cream of tartar.
4. Beat the egg whites on medium speed until foamy, about 1 minute.
5. Gradually add the granulated sugar, 1 tablespoon at a time, while beating on medium‑high speed.
6. Continue beating until stiff, glossy peaks form and the sugar is fully dissolved, about 5‑7 minutes; rub a little meringue between your fingers—if it feels gritty, keep beating.
7. Beat in the vanilla extract until just combined.
8. Remove the ice cream‑cake dome from the freezer and quickly cover it entirely with the meringue, sealing it to the baking sheet and creating decorative peaks with a spatula.
9. Immediately place the meringue‑covered dome in a preheated 475°F oven and bake for 4‑5 minutes, watching closely until the meringue is golden brown.
10. Use a wide spatula to transfer the Baked Alaska to a serving plate.
The contrast of the warm, toasty meringue against the frozen, creamy center is pure delight. For a festive twist, I sometimes drizzle it with a raspberry coulis or sprinkle crushed peppermint on top right before serving.
French Onion Soup with Gruyère Cheese

On a chilly evening like this, I always crave something warm and comforting, and nothing hits the spot quite like a classic French onion soup. I remember the first time I tried making it years ago—I was so nervous about caramelizing the onions, but now it’s one of my favorite cozy rituals. This version with nutty Gruyère cheese is pure comfort in a bowl.
Serving: 4 | Pre Time: 15 minutes | Cooking Time: 60 minutes
Ingredients
– 4 large yellow onions, thinly sliced (about 6 cups)
– 3 tbsp unsalted butter (or olive oil for a dairy-free option)
– 1 tsp granulated sugar
– 1/4 cup dry white wine (like Sauvignon Blanc, or substitute with beef broth)
– 4 cups beef broth
– 2 sprigs fresh thyme (or 1/2 tsp dried thyme)
– 1 bay leaf
– Salt and black pepper, to taste (start with 1/2 tsp salt)
– 4 slices French bread, about 1/2 inch thick
– 1 1/2 cups shredded Gruyère cheese (about 6 oz)
Instructions
1. In a large Dutch oven or heavy pot, melt 3 tbsp unsalted butter over medium-low heat.
2. Add 4 large thinly sliced yellow onions and 1 tsp granulated sugar to the pot, stirring to coat.
3. Cook the onions, stirring occasionally, for 40-45 minutes until deeply caramelized and golden brown—be patient, as this slow process builds flavor.
4. Pour in 1/4 cup dry white wine to deglaze the pot, scraping up any browned bits from the bottom with a wooden spoon.
5. Add 4 cups beef broth, 2 sprigs fresh thyme, and 1 bay leaf to the pot, then bring the mixture to a simmer over medium-high heat.
6. Reduce the heat to low, cover the pot, and let the soup simmer gently for 20 minutes to meld the flavors.
7. While the soup simmers, preheat your oven’s broiler to high (about 500°F) and place 4 slices of French bread on a baking sheet.
8. Toast the bread under the broiler for 1-2 minutes per side until lightly golden and crisp, watching closely to prevent burning.
9. Remove the thyme sprigs and bay leaf from the soup, then season with salt and black pepper to taste—I usually start with 1/2 tsp salt.
10. Ladle the hot soup into 4 oven-safe bowls, then top each with a toasted bread slice and sprinkle evenly with 1 1/2 cups shredded Gruyère cheese.
11. Place the bowls on a baking sheet and broil for 3-4 minutes until the cheese is bubbly and golden brown.
12. Carefully remove the bowls from the oven using oven mitts, as they will be very hot.
Ladle this soup into bowls and watch as the cheese stretches with every spoonful—it’s rich, savory, and utterly satisfying. For a fun twist, I sometimes add a splash of brandy to the broth or serve it with a side of crisp salad to balance the richness.
Cherry Gelatin Mold with Whipped Cream

Last weekend, while digging through my grandmother’s old recipe box, I stumbled upon this retro gem—a Cherry Gelatin Mold with Whipped Cream. It’s the kind of wobbly, sweet-tart dessert that instantly transports me back to holiday potlucks and family dinners, and I couldn’t wait to give it a fresh, easy-to-follow makeover for today’s home cooks.
Serving: 8 | Pre Time: 20 minutes | Cooking Time: 5 minutes
Ingredients
– 2 (3-ounce) packages cherry-flavored gelatin (like Jell-O)
– 2 cups boiling water (just off the boil, about 212°F)
– 1 (21-ounce) can cherry pie filling (stir it well to break up any clumps)
– 1 (20-ounce) can crushed pineapple in juice, undrained (the juice adds natural sweetness)
– 1 cup cold water (straight from the fridge for faster setting)
– 1 cup heavy whipping cream (chilled in the freezer for 10 minutes before whipping)
– 2 tablespoons granulated sugar (adjust to taste if you prefer less sweetness)
– 1 teaspoon vanilla extract (pure vanilla for the best flavor)
Instructions
1. In a large heatproof bowl, combine the 2 packages of cherry gelatin.
2. Pour 2 cups of boiling water over the gelatin and whisk continuously for 2 minutes, or until the gelatin is completely dissolved—no granules should remain. Tip: Whisking thoroughly prevents a lumpy texture later.
3. Stir in the entire can of cherry pie filling and the undrained crushed pineapple until evenly mixed.
4. Add 1 cup of cold water to the bowl and stir to combine, which helps cool the mixture slightly.
5. Lightly grease a 6-cup gelatin mold or bundt pan with non-stick cooking spray for easy unmolding.
6. Pour the gelatin mixture into the prepared mold and smooth the top with a spatula.
7. Refrigerate the mold, uncovered, for at least 4 hours, or until fully set and firm to the touch. Tip: For best results, chill overnight to ensure it holds its shape perfectly when unmolded.
8. About 30 minutes before serving, prepare the whipped cream: In a chilled mixing bowl, combine 1 cup of heavy whipping cream, 2 tablespoons of granulated sugar, and 1 teaspoon of vanilla extract.
9. Using an electric mixer on medium-high speed, whip the cream for 3–4 minutes, or until stiff peaks form that hold their shape when the beaters are lifted. Tip: Avoid overwhipping, which can turn the cream grainy; stop as soon as peaks are firm.
10. To unmold the gelatin, dip the mold briefly in warm water for 10–15 seconds, then invert it onto a serving plate and gently shake to release.
11. Serve the gelatin mold immediately, topped generously with the whipped cream.
Just like that, you’ve got a shimmering, ruby-red dessert with a delightful jiggle and bursts of cherry and pineapple in every bite. The whipped cream adds a cloud-like contrast that melts into the sweet-tart gelatin—try serving it sliced with extra cream on the side for a festive touch at your next gathering.
Oysters Rockefeller with Spinach and Breadcrumbs

Venturing into holiday appetizers always feels like a special treat, and this year, I’m leaning into a classic with a twist—my take on Oysters Rockefeller, which I first fell for at a cozy New Orleans restaurant years ago. It’s a dish that feels fancy but is surprisingly approachable, especially when you lean on fresh spinach and a crispy breadcrumb topping to make it your own.
Serving: 4 | Pre Time: 20 minutes | Cooking Time: 15 minutes
Ingredients
– 12 fresh oysters, shucked (keep them on the half shell for easy baking)
– 2 cups fresh spinach, chopped (frozen works too, just thaw and squeeze dry)
– 1/2 cup breadcrumbs (I use panko for extra crunch)
– 1/4 cup unsalted butter, melted (or substitute with olive oil for a lighter version)
– 2 cloves garlic, minced (adjust to taste if you love a strong garlic kick)
– 1/4 cup grated Parmesan cheese (Pecorino Romano adds a sharper flavor)
– 1 tbsp lemon juice (freshly squeezed is best for brightness)
– Salt and black pepper, to season (I start with 1/2 tsp salt and a pinch of pepper)
Instructions
1. Preheat your oven to 425°F (218°C) and line a baking sheet with aluminum foil for easy cleanup.
2. Arrange the shucked oysters in their half shells on the prepared baking sheet, ensuring they’re stable to prevent tipping.
3. In a medium skillet over medium heat, melt the unsalted butter, then add the minced garlic and sauté for 1–2 minutes until fragrant but not browned.
4. Add the chopped spinach to the skillet and cook for 3–4 minutes, stirring occasionally, until wilted and any excess liquid has evaporated—this prevents a soggy topping.
5. Remove the skillet from heat and stir in the breadcrumbs, grated Parmesan cheese, lemon juice, salt, and black pepper until well combined.
6. Spoon the spinach and breadcrumb mixture evenly over each oyster, covering them completely for a generous topping.
7. Bake in the preheated oven for 10–12 minutes, or until the breadcrumbs are golden brown and the oysters’ edges curl slightly.
8. Carefully remove the baking sheet from the oven using oven mitts, as the shells will be hot.
9. Let the oysters cool for 2–3 minutes before serving to allow the flavors to meld and avoid burning your mouth.
So, what makes this version stand out? The spinach adds a vibrant, earthy note that balances the briny oysters, while the crispy breadcrumbs provide a satisfying crunch. Serve them straight from the oven with extra lemon wedges for a zesty finish, or pair with a light white wine to elevate your holiday spread.
Macaroni and Cheese with Velvety Cheese Sauce
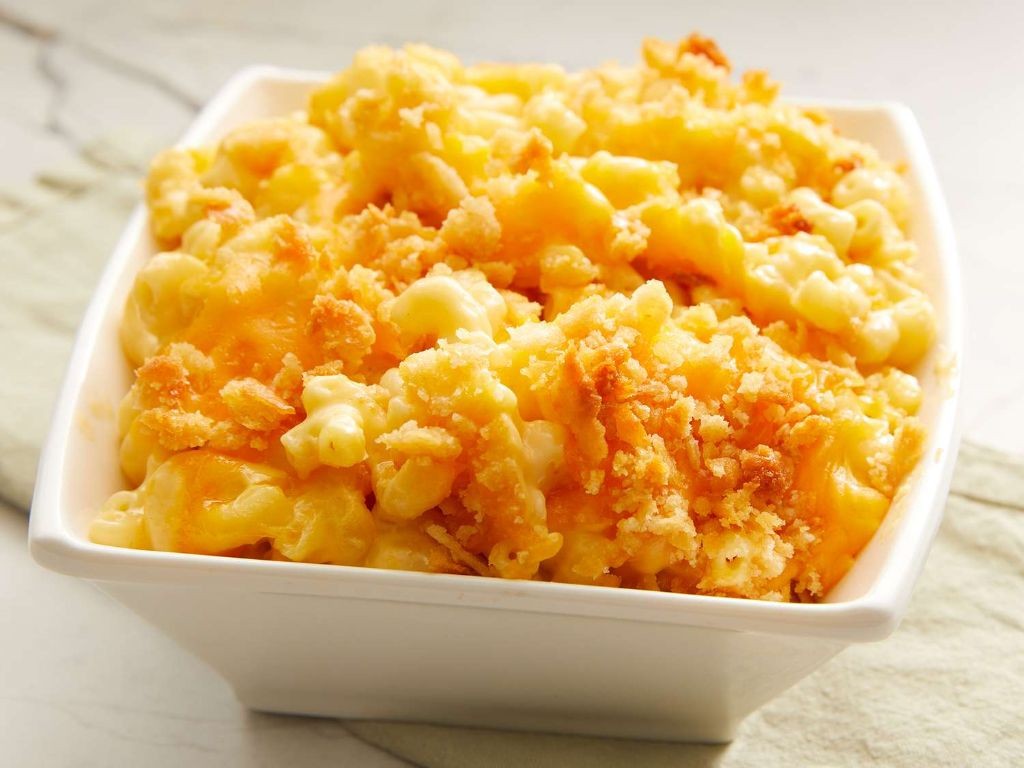
Zesty winter evenings always have me craving something warm and comforting, and nothing hits the spot quite like a classic mac and cheese. I’ve spent years tweaking my recipe to get that perfect, velvety sauce that clings to every noodle, and I’m thrilled to share my go-to version with you—it’s become a weekly staple in my house, especially when the temperature drops.
Serving: 6 | Pre Time: 15 minutes | Cooking Time: 25 minutes
Ingredients
– 1 lb elbow macaroni
– 4 tbsp unsalted butter
– 1/4 cup all-purpose flour
– 3 cups whole milk, warmed slightly to prevent curdling
– 2 cups shredded sharp cheddar cheese
– 1 cup shredded Gruyère cheese, for a nutty depth
– 1/2 tsp paprika
– 1/2 tsp dry mustard
– 1/4 tsp garlic powder
– Salt and black pepper, to season throughout
Instructions
1. Bring a large pot of salted water to a rolling boil over high heat.
2. Add the elbow macaroni to the boiling water and cook for 8-10 minutes, stirring occasionally, until al dente (it should have a slight bite).
3. Drain the pasta in a colander and set it aside, but do not rinse to help the sauce adhere better.
4. In the same pot over medium heat, melt the unsalted butter until it bubbles slightly.
5. Whisk in the all-purpose flour continuously for 2 minutes to form a smooth roux, which will thicken the sauce without lumps.
6. Gradually pour in the warmed whole milk while whisking constantly to prevent clumping.
7. Cook the mixture for 5-7 minutes, whisking often, until it thickens enough to coat the back of a spoon.
8. Reduce the heat to low and stir in the shredded sharp cheddar cheese and shredded Gruyère cheese until fully melted and smooth.
9. Mix in the paprika, dry mustard, and garlic powder, then season with salt and black pepper to taste.
10. Add the drained elbow macaroni to the cheese sauce and stir gently until every noodle is evenly coated.
11. Serve immediately while hot. Just out of the pot, this mac and cheese boasts a luxuriously creamy texture with a rich, tangy flavor from the cheddar and a subtle nuttiness from the Gruyère. For a fun twist, try topping it with crispy breadcrumbs or serving it alongside a fresh green salad to balance the richness.
Chicken Divan with Broccoli and Cheese Sauce

Back when I was a kid, my mom would make this creamy, comforting casserole every time we had leftover chicken—it was our family’s secret to turning simple ingredients into something special. Now, as a busy adult, I love how this dish comes together with minimal fuss, yet feels like a cozy hug on a plate. It’s the perfect way to sneak in some veggies while indulging in that rich, cheesy sauce we all crave.
Serving: 6 | Pre Time: 20 minutes | Cooking Time: 30 minutes
Ingredients
– 1.5 lbs boneless, skinless chicken breasts, cut into 1-inch pieces (or use rotisserie chicken for a shortcut)
– 4 cups fresh broccoli florets (about 1 large head)
– 3 tbsp unsalted butter (or olive oil for a lighter option)
– 3 tbsp all-purpose flour
– 2 cups whole milk, warmed slightly to prevent lumps
– 1 cup shredded sharp cheddar cheese (freshly grated melts better than pre-shredded)
– 1/2 cup grated Parmesan cheese
– 1 tsp garlic powder
– 1/2 tsp paprika
– Salt and black pepper, to season throughout
– 1/2 cup panko breadcrumbs for topping (optional, adds a nice crunch)
Instructions
1. Preheat your oven to 375°F (190°C) and lightly grease a 9×13-inch baking dish.
2. Bring a large pot of salted water to a boil over high heat, then add the broccoli florets and cook for 3–4 minutes until bright green and tender-crisp. Drain immediately and set aside.
3. In a large skillet, melt the butter over medium heat, then add the chicken pieces and cook for 6–8 minutes, stirring occasionally, until no longer pink and lightly browned. Tip: Don’t overcrowd the skillet to ensure even browning.
4. Sprinkle the flour over the chicken in the skillet and stir constantly for 1 minute to cook off the raw flour taste.
5. Gradually pour in the warmed milk while whisking continuously to avoid lumps, and cook for 3–4 minutes until the sauce thickens enough to coat the back of a spoon.
6. Reduce the heat to low and stir in the cheddar cheese, Parmesan cheese, garlic powder, paprika, 1/2 tsp salt, and 1/4 tsp black pepper until the cheeses are fully melted and the sauce is smooth. Tip: If the sauce seems too thick, add a splash more milk.
7. Arrange the cooked broccoli evenly in the prepared baking dish, then pour the cheesy chicken sauce over the top, spreading it out with a spatula.
8. If using, sprinkle the panko breadcrumbs over the casserole for a crispy topping. Tip: For extra flavor, toss the breadcrumbs with a drizzle of melted butter before sprinkling.
9. Bake in the preheated oven for 20–25 minutes, until the top is golden brown and the sauce is bubbling around the edges.
10. Let the casserole rest for 5 minutes before serving to allow it to set slightly. This creamy bake pairs wonderfully with a simple side salad or crusty bread for soaking up every bit of that luscious sauce.
Peaches and Cream Jell-O Salad

Last summer, my aunt brought this vibrant, wobbly dessert to our family picnic, and it was an instant hit—kids and adults alike couldn’t get enough of its sweet, creamy layers. I’ve since made it my go‑to potluck dish because it’s surprisingly simple to whip up, and it always brings a bit of nostalgic, retro charm to the table. Let me show you how easy it is to recreate that peachy, creamy magic in your own kitchen.
Serving: 8 | Pre Time: 20 minutes | Cooking Time: 5 minutes
Ingredients
– 1 (3‑ounce) package peach‑flavored Jell‑O (or any similar gelatin mix)
– 1 cup boiling water
– 1 cup cold water
– 1 (15‑ounce) can sliced peaches in syrup, drained and chopped (reserve ¼ cup syrup)
– 1 (8‑ounce) package cream cheese, softened to room temperature
– 1 cup heavy whipping cream
– ¼ cup granulated sugar
– 1 teaspoon vanilla extract
Instructions
1. In a medium heat‑proof bowl, combine the peach‑flavored Jell‑O and 1 cup of boiling water. Whisk continuously for 2 minutes until the powder is fully dissolved.
2. Stir in 1 cup of cold water and the reserved ¼ cup peach syrup until well blended. Tip: For a clearer gelatin layer, let the mixture cool for 10 minutes before proceeding.
3. Pour the gelatin mixture into a 9×13‑inch baking dish. Gently stir in the chopped peaches.
4. Refrigerate the dish for 1 hour, or until the gelatin is set but still slightly tacky to the touch.
5. While the gelatin chills, place the softened cream cheese in a large mixing bowl. Beat with an electric mixer on medium speed for 1 minute until smooth.
6. Gradually add the heavy whipping cream, granulated sugar, and vanilla extract to the cream cheese. Increase the mixer speed to high and beat for 3–4 minutes until stiff peaks form. Tip: Chill your mixing bowl and beaters in the freezer for 10 minutes beforehand to help the cream whip faster.
7. Once the gelatin is set, spread the cream cheese mixture evenly over the top using a spatula. Tip: For clean layers, spread gently to avoid disturbing the gelatin below.
8. Return the dish to the refrigerator and chill for at least 4 hours, or overnight, until fully firm.
9. To serve, cut into squares with a sharp knife dipped in warm water for neat edges.
This salad sets up with a delightfully jiggly peach gelatin base that gives way to a rich, velvety cream topping—each bite is a perfect balance of fruity sweetness and tangy creaminess. Try garnishing it with fresh mint or a sprinkle of crushed graham crackers for a fun textural contrast, or serve it alongside grilled meats at your next barbecue for a refreshing side.
Pot Roast with Carrots and Potatoes
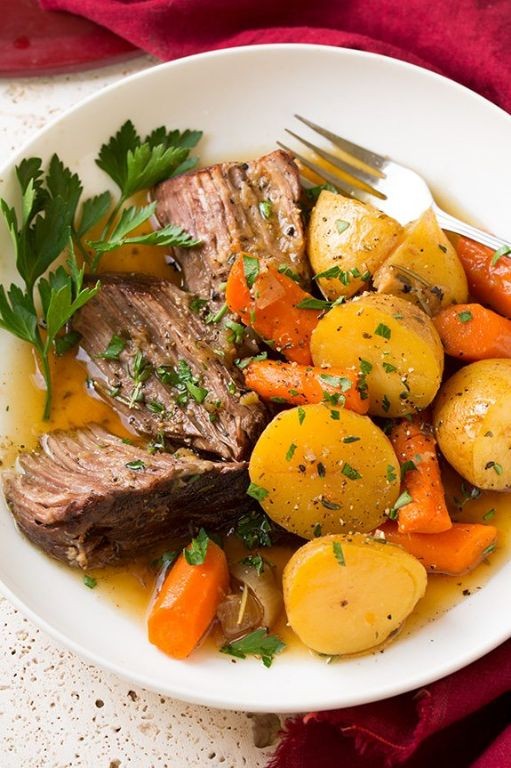
Gathering around the table for a comforting meal is one of my favorite winter traditions, and this pot roast with carrots and potatoes has been my go-to Sunday supper for years—it’s the kind of dish that fills the house with warmth and makes everyone feel right at home. I love how the slow cooking melds the flavors together, creating a tender, fall-apart roast that’s perfect for cozy nights in.
Serving: 6 | Pre Time: 20 minutes | Cooking Time: 3 hours 30 minutes
Ingredients
– 3 lbs beef chuck roast
– 2 tbsp olive oil (or any neutral oil)
– 1 large yellow onion, chopped
– 4 cloves garlic, minced
– 2 cups beef broth
– 1 tbsp tomato paste
– 1 tbsp Worcestershire sauce
– 1 tsp dried thyme
– 1 tsp salt (adjust to taste)
– 1/2 tsp black pepper
– 1 lb carrots, peeled and cut into 2-inch chunks
– 1.5 lbs Yukon Gold potatoes, quartered (or red potatoes)
– 2 tbsp cornstarch mixed with 2 tbsp water (for thickening, optional)
Instructions
1. Preheat your oven to 325°F.
2. Pat the beef chuck roast dry with paper towels to ensure a good sear.
3. Heat olive oil in a large Dutch oven over medium-high heat until shimmering, about 2 minutes.
4. Sear the roast on all sides until deeply browned, about 4-5 minutes per side.
5. Remove the roast from the pot and set it aside on a plate.
6. Add the chopped onion to the pot and sauté until softened, about 5 minutes.
7. Stir in the minced garlic and cook for 1 minute until fragrant.
8. Pour in the beef broth, scraping up any browned bits from the bottom of the pot for extra flavor.
9. Add the tomato paste, Worcestershire sauce, dried thyme, salt, and black pepper, stirring to combine.
10. Return the seared roast to the pot, nestling it into the liquid.
11. Cover the pot with a lid and transfer it to the preheated oven.
12. Cook for 2 hours and 30 minutes, until the roast is fork-tender.
13. Remove the pot from the oven and add the carrot chunks and quartered potatoes around the roast.
14. Cover and return to the oven for an additional 1 hour, until the vegetables are tender when pierced with a fork.
15. Transfer the roast and vegetables to a serving platter, tenting with foil to keep warm.
16. If desired, thicken the cooking liquid by simmering it on the stovetop over medium heat and whisking in the cornstarch mixture until it reaches your preferred consistency, about 3-5 minutes.
17. Serve the pot roast sliced or shredded, drizzled with the thickened gravy.
Creating this pot roast yields incredibly tender meat that practically melts in your mouth, with carrots and potatoes that soak up all the rich, savory juices. I often serve it over creamy mashed potatoes for an extra indulgent touch, or shred the leftovers for hearty sandwiches the next day—it’s a versatile dish that never fails to satisfy.
Summary
Whether you’re craving a taste of childhood or sharing beloved classics with a new generation, these 20 nostalgic retro recipes offer a delicious way to connect. We hope you’ll whip up a few, leave a comment telling us your favorite, and share this tasty trip down memory lane on Pinterest. Happy cooking!


