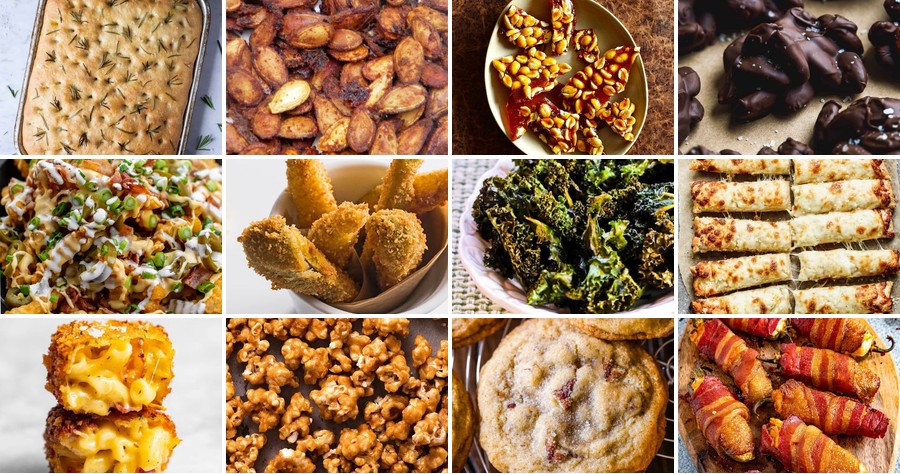
Ready to ditch those bland munchies? We’ve rounded up 18 crunchy, salty snack recipes that are downright irresistible—perfect for game day, movie nights, or just satisfying that sudden craving. From crispy chickpeas to savory spiced nuts, these easy-to-make bites are sure to become your new go-tos. Dive in and discover your next favorite snack!
Homemade Sea Salt Potato Chips
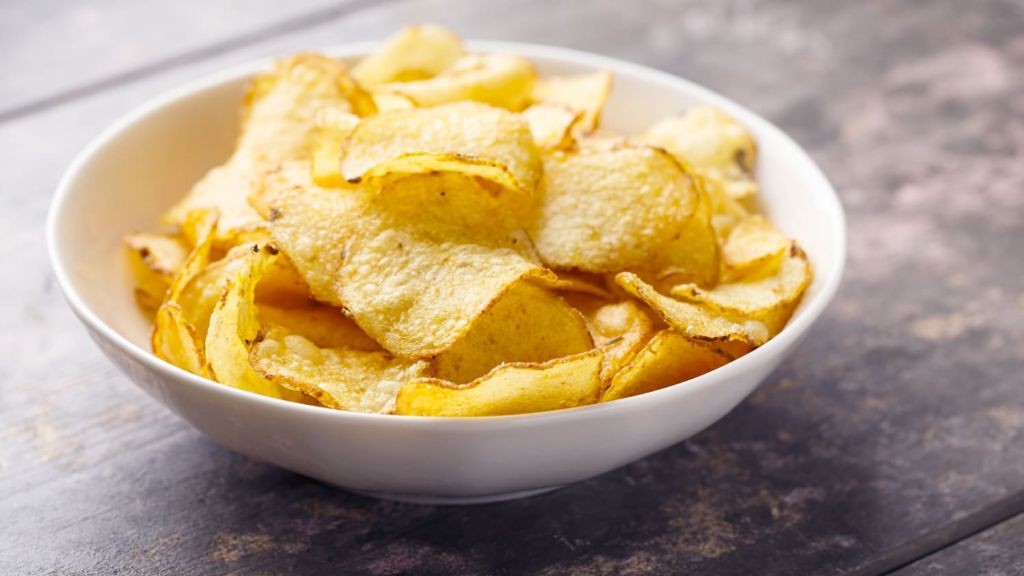
Often, in the quiet hum of the kitchen, the simplest ingredients whisper the most profound truths. A russet potato, cold water, and fine sea salt—these humble elements hold the promise of a crisp, golden memory, a tactile pleasure born from patience and care.
Serving: 4 | Pre Time: 20 minutes | Cooking Time: 25 minutes
Ingredients
– 2 large russet potatoes (approximately 1.5 lbs total), scrubbed clean
– 4 cups cold water
– 2 quarts peanut oil, for frying
– 2 tbsp fine sea salt, for finishing
Instructions
1. Using a mandoline slicer, carefully slice the scrubbed russet potatoes into uniformly thin rounds, approximately 1/16-inch thick.
2. Immediately submerge all potato slices in a large bowl containing the 4 cups of cold water to prevent oxidation and remove excess surface starch.
3. Soak the slices for 15 minutes, gently agitating them once halfway through to ensure thorough rinsing.
4. Drain the potato slices and spread them in a single layer on a double layer of clean kitchen towels.
5. Gently pat the tops of the slices with another towel until the surfaces are completely dry to the touch; any residual moisture will cause the oil to splatter violently.
6. In a large, heavy-bottomed Dutch oven or deep fryer, heat the 2 quarts of peanut oil to 350°F, using a deep-fry thermometer to monitor the temperature accurately.
7. Carefully add a single layer of dried potato slices to the hot oil, frying for 2 to 3 minutes until they turn a pale golden color and the bubbling actively subsides.
8. Using a spider skimmer or slotted spoon, transfer the fried chips to a wire rack set over a baking sheet, allowing excess oil to drip away for a crisper final texture.
9. While the chips are still hot and glistening, sprinkle them evenly with a portion of the fine sea salt, which will adhere perfectly to the warm surface.
10. Repeat the frying and salting process in small, manageable batches until all potato slices are transformed, allowing the oil to return to 350°F between each batch for consistent results.
11. Let the chips cool completely on the wire rack until they reach room temperature and achieve their full, glass-like crispness.
Yielded from the fryer, these chips possess an ethereal, shattering crispness that gives way to the pure, earthy essence of potato. Their flavor is a clean canvas, elevated solely by the bright, mineral crunch of the sea salt. Consider serving them alongside a dollop of crème fraîche blended with fresh chives for a delightful contrast of temperatures and textures.
Parmesan Garlic Pretzel Bites

Evenings like this, when the world outside slows to a quiet hum, I find myself drawn to the kitchen, craving something that feels both nostalgic and new. There’s a comfort in the simple act of shaping dough, a gentle rhythm that mirrors the fading light, and today, it’s the warm, savory promise of Parmesan Garlic Pretzel Bites that calls. They’re little pockets of soft, yeasted dough, transformed by a quick boil and a hot oven into golden-brown morsels, each one destined to be brushed with garlic-infused butter and showered with finely grated Parmigiano-Reggiano.
Serving: 6 | Pre Time: 90 minutes | Cooking Time: 15 minutes
Ingredients
– 1 ½ cups warm water (110°F)
– 2 ¼ teaspoons active dry yeast
– 1 tablespoon granulated sugar
– 4 cups all-purpose flour, plus more for dusting
– 2 teaspoons fine sea salt
– ¼ cup unsalted butter, melted and cooled slightly
– 10 cups water for boiling
– ⅔ cup baking soda
– 1 large pasture-raised egg, lightly beaten with 1 tablespoon water for egg wash
– 6 tablespoons clarified butter, gently warmed
– 3 cloves garlic, finely minced
– 1 cup finely grated Parmigiano-Reggiano cheese
– 1 tablespoon flaky sea salt for finishing
Instructions
1. In a large mixing bowl, combine the warm water, active dry yeast, and granulated sugar; let stand until foamy, about 5 minutes.
2. Add the all-purpose flour, fine sea salt, and melted unsalted butter to the yeast mixture.
3. Using a dough hook attachment on low speed, mix until a shaggy dough forms, about 2 minutes.
4. Increase speed to medium and knead until the dough is smooth and elastic, about 5 minutes.
5. Tip: To test dough readiness, perform the windowpane test: gently stretch a small piece; it should thin without tearing.
6. Transfer the dough to a lightly oiled bowl, cover with a damp kitchen towel, and let rise in a warm place until doubled in size, about 1 hour.
7. Punch down the risen dough and turn it out onto a lightly floured surface.
8. Divide the dough into 24 equal pieces and roll each into a smooth ball.
9. Cover the dough balls with the damp towel and let rest for 10 minutes.
10. In a large pot, bring the 10 cups of water and baking soda to a rolling boil.
11. Working in batches of 6, boil the dough balls for 30 seconds each, flipping once halfway through.
12. Tip: Use a slotted spoon to gently lower and retrieve the bites to avoid deflating them.
13. Transfer the boiled bites to a parchment-lined baking sheet, spacing them 1 inch apart.
14. Brush each bite evenly with the egg wash.
15. Bake in a preheated 450°F oven until deeply golden brown, about 12-14 minutes.
16. While baking, combine the warmed clarified butter and minced garlic in a small bowl.
17. Tip: For optimal garlic flavor, infuse the butter over very low heat for 5 minutes before warming, then strain out solids.
18. Immediately upon removing the bites from the oven, brush them generously with the garlic butter.
19. Sprinkle evenly with the finely grated Parmigiano-Reggiano and flaky sea salt while still hot.
20. Serve warm. Soft inside with a chewy, blistered crust, these bites offer a savory burst of umami from the cheese, balanced by the pungent garlic and buttery richness. For a creative twist, skewer them with rosemary sprigs and serve alongside a chilled, herbaceous aioli for dipping.
Salted Caramel Popcorn

Beneath the quiet hum of the kitchen, there’s a simple alchemy waiting to unfold, a transformation of humble kernels into something glistening and profound. It begins with the scent of toasting corn and ends with the deep, buttery sigh of caramel settling into every nook.
Serving: 8 | Pre Time: 5 minutes | Cooking Time: 25 minutes
Ingredients
– ½ cup popcorn kernels
– 3 tablespoons clarified butter, divided
– 1 cup granulated sugar
– 6 tablespoons unsalted European-style butter, cubed
– ½ cup heavy cream, warmed to 110°F
– 1½ teaspoons flaky sea salt, such as Maldon
– 1 teaspoon pure vanilla extract
Instructions
1. Place a large, heavy-bottomed pot or Dutch oven over medium heat and add 1 tablespoon of clarified butter.
2. Add ½ cup of popcorn kernels to the pot, cover with a lid, and shake gently until the popping slows to 2-3 seconds between pops, about 4-5 minutes.
3. Immediately transfer the popped popcorn to an enormous heatproof bowl, discarding any unpopped kernels, and set aside. Tip: Using clarified butter prevents burning and ensures even, fluffy popcorn.
4. In a medium, light-colored saucepan, combine 1 cup of granulated sugar with the remaining 2 tablespoons of clarified butter over medium heat.
5. Cook, stirring constantly with a heat-resistant spatula, until the sugar fully dissolves and the mixture turns a deep amber color, reaching 350°F on a candy thermometer, about 7-9 minutes.
6. Carefully add 6 tablespoons of cubed unsalted European-style butter, stirring vigorously until completely incorporated and the mixture is smooth.
7. Remove the saucepan from the heat and slowly drizzle in ½ cup of heavy cream, warmed to 110°F, while stirring continuously; the mixture will bubble vigorously.
8. Stir in 1½ teaspoons of flaky sea salt and 1 teaspoon of pure vanilla extract until fully combined. Tip: Warming the cream prevents the caramel from seizing and ensures a silky texture.
9. Immediately pour the hot caramel sauce over the prepared popcorn in the large bowl.
10. Using two heatproof silicone spatulas, gently fold and toss the popcorn until every piece is evenly coated with the caramel, working quickly before the sauce sets.
11. Spread the coated popcorn in a single layer on two parchment-lined baking sheets, separating any large clusters.
12. Allow the popcorn to cool completely and harden at room temperature for at least 1 hour before serving. Tip: For extra crunch, let the popcorn sit uncovered overnight; the caramel will crystallize slightly.
Perfectly balanced, each piece offers a satisfying crunch that gives way to the rich, buttery depth of the caramel, punctuated by the occasional bright flake of salt. Consider serving it piled high in a wooden bowl for a gathering or packaging individual portions in cellophane bags tied with twine for thoughtful gifts.
Crispy Fried Pickles with Spicy Mayo

Holding a warm plate of these golden bites on a quiet afternoon feels like a small, savory celebration. The sharp tang of the pickles, the satisfying crunch of the coating, and the creamy kick of the sauce come together in a way that’s both comforting and exciting, a simple pleasure worth savoring slowly.
Serving: 4 | Pre Time: 15 minutes | Cooking Time: 10 minutes
Ingredients
– 1 (16-ounce) jar of dill pickle spears, thoroughly drained and patted dry with paper towels
– 1 cup all-purpose flour
– 2 large pasture-raised eggs, lightly beaten
– 1 cup panko breadcrumbs
– 1 teaspoon smoked paprika
– ½ teaspoon garlic powder
– ¼ teaspoon cayenne pepper
– 1 quart peanut oil, for frying
– ½ cup mayonnaise
– 1 tablespoon sriracha sauce
– 1 teaspoon fresh lemon juice
Instructions
1. Set up a breading station with three shallow dishes: place the all-purpose flour in the first, the lightly beaten pasture-raised eggs in the second, and combine the panko breadcrumbs, smoked paprika, garlic powder, and cayenne pepper in the third.
2. Dredge each thoroughly drained and patted-dry dill pickle spear first in the flour, shaking off any excess, then dip it into the beaten eggs, allowing the excess to drip back into the dish.
3. Finally, coat the pickle spear evenly in the seasoned panko breadcrumb mixture, pressing gently to ensure full adherence.
4. Place the breaded pickles on a wire rack set over a baking sheet and let them rest for 10 minutes to help the coating set, which prevents it from falling off during frying.
5. While the pickles rest, heat 1 quart of peanut oil in a heavy-bottomed Dutch oven or deep fryer to 375°F, using a deep-fry thermometer to monitor the temperature accurately.
6. Carefully lower 4-5 breaded pickle spears into the hot oil using tongs or a spider skimmer, frying for 2-3 minutes until they turn a deep golden brown and become crispy.
7. Transfer the fried pickles to a paper towel-lined plate to drain excess oil, and repeat the frying process with the remaining batches, allowing the oil to return to 375°F between each batch for consistent results.
8. In a small bowl, whisk together the mayonnaise, sriracha sauce, and fresh lemon juice until smooth to create the spicy mayo dipping sauce.
9. Serve the crispy fried pickles immediately alongside the spicy mayo.
Remember the first crunch, where the delicate, shattering exterior gives way to the warm, briny pickle within. The spicy mayo adds a creamy, tangy heat that balances the richness, making these perfect for stacking on a platter with fresh herb sprigs or enjoying straight from the skillet while they’re still almost too hot to handle.
Loaded Cheese and Bacon Fries

Drifting through the quiet kitchen this morning, I found myself craving something deeply comforting, a dish that feels like a warm embrace on a cold December day. There’s a simple magic in transforming humble potatoes into a canvas for rich, savory toppings—a process that invites patience and rewards with every indulgent bite.
Serving: 4 | Pre Time: 20 minutes | Cooking Time: 35 minutes
Ingredients
– 2 pounds russet potatoes, scrubbed and cut into 1/2-inch thick fries
– 3 tablespoons clarified butter, melted
– 1 teaspoon fine sea salt
– 1/2 teaspoon freshly cracked black pepper
– 6 slices thick-cut applewood-smoked bacon, diced into 1/4-inch pieces
– 1 1/2 cups shredded sharp cheddar cheese
– 1/2 cup crumbled blue cheese
– 1/4 cup thinly sliced scallions, green parts only
– 1/4 cup full-fat sour cream
– 2 tablespoons chopped fresh chives
Instructions
1. Preheat your oven to 425°F and line a large baking sheet with parchment paper.
2. In a large mixing bowl, toss the potato fries with the melted clarified butter until evenly coated.
3. Arrange the fries in a single layer on the prepared baking sheet, ensuring they do not touch for optimal crispness.
4. Season the fries uniformly with the fine sea salt and freshly cracked black pepper.
5. Roast the fries in the preheated oven for 25 minutes, flipping them halfway through with a spatula to promote even browning.
6. While the fries roast, cook the diced bacon in a skillet over medium heat for 8–10 minutes until crispy and golden brown, then transfer to a paper towel-lined plate to drain.
7. Remove the fries from the oven and sprinkle the shredded sharp cheddar cheese evenly over the top.
8. Return the baking sheet to the oven and bake for an additional 5–7 minutes until the cheese is fully melted and bubbly.
9. Immediately top the fries with the crispy bacon, crumbled blue cheese, and thinly sliced scallions.
10. Dollop the full-fat sour cream over the fries and garnish with the chopped fresh chives.
Just pulled from the oven, these fries offer a delightful contrast: the potatoes are golden and crisp on the outside yet tender within, while the melted cheeses create a luxurious, gooey blanket. The salty bacon and tangy blue cheese cut through the richness, making each forkful a balanced symphony of flavors. For a playful twist, serve them straight from the skillet with extra sour cream for dipping, or pair with a crisp, cold lager to complement the savory depth.
Salted Dark Chocolate Almond Clusters

Holding a warm mug on this quiet December morning, I find myself craving something that balances bitter and sweet, something simple yet deeply satisfying to make with my own hands. These salted dark chocolate almond clusters are that quiet kitchen ritual—a few humble ingredients transformed into glossy, crackly treasures that feel both indulgent and grounding.
Serving: 12 clusters | Pre Time: 10 minutes | Cooking Time: 5 minutes
Ingredients
– 8 ounces high-quality dark chocolate (70% cacao), finely chopped
– 1 cup whole raw almonds
– ½ teaspoon flaky sea salt (such as Maldon)
– 1 tablespoon clarified butter
Instructions
1. Line a baking sheet with parchment paper.
2. Place the finely chopped dark chocolate and clarified butter in a heatproof bowl.
3. Create a double boiler by setting the bowl over a saucepan of gently simmering water, ensuring the bottom of the bowl does not touch the water.
4. Stir the chocolate and butter mixture continuously with a silicone spatula until completely melted and smooth, about 3–4 minutes.
5. Tip: For the best texture, melt the chocolate slowly over low heat to prevent seizing.
6. Remove the bowl from the heat and let the chocolate cool for 1 minute.
7. Add the whole raw almonds to the melted chocolate, folding gently with the spatula until all almonds are thoroughly coated.
8. Using a tablespoon, drop heaping spoonfuls of the chocolate-coated almond mixture onto the prepared parchment paper, spacing them about 1 inch apart.
9. Immediately sprinkle a pinch of flaky sea salt evenly over the top of each cluster.
10. Tip: Salting the clusters while the chocolate is still wet ensures the salt adheres properly and doesn’t melt.
11. Transfer the baking sheet to the refrigerator and chill the clusters until the chocolate is completely set and firm, about 30 minutes.
12. Tip: For a quicker set, you can place the clusters in the freezer for 15 minutes, but allow them to come to room temperature before serving for optimal flavor release.
13. Once set, gently peel the clusters from the parchment paper.
What emerges are clusters with a satisfying snap, the rich bitterness of dark chocolate giving way to the nutty crunch of almonds, all lifted by the bright pop of salt. They’re perfect arranged on a wooden board for sharing, or tucked into a small bowl for a solitary afternoon treat alongside a book.
Savory Herb Roasted Nuts
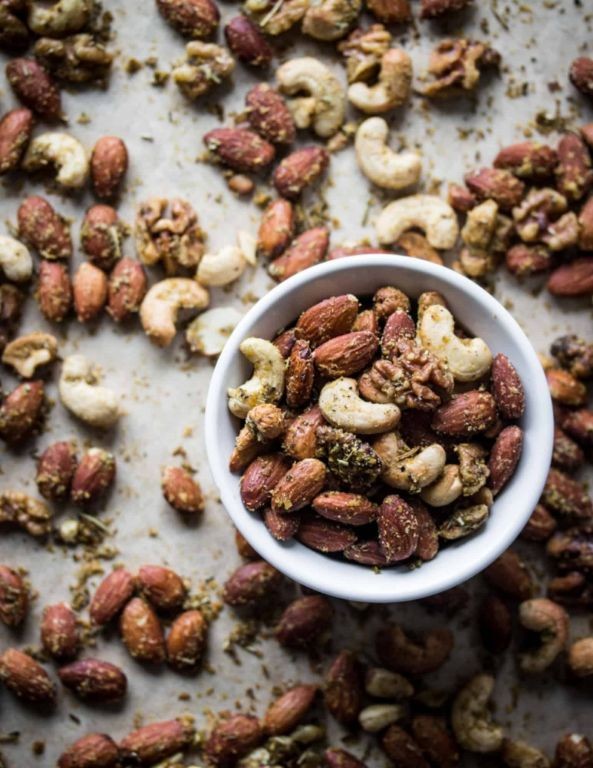
Beneath the quiet hum of the kitchen, there is a simple alchemy in turning raw nuts into something warm and deeply savory, a small ritual of roasting that fills the air with the promise of comfort and shared moments.
Serving: 8 | Pre Time: 10 minutes | Cooking Time: 25 minutes
Ingredients
– 3 cups of raw mixed nuts (such as almonds, pecans, and walnuts)
– 2 tablespoons of clarified butter, gently melted
– 1 tablespoon of pure maple syrup
– 1 teaspoon of fine sea salt
– 1 teaspoon of freshly cracked black pepper
– 1 tablespoon of finely chopped fresh rosemary
– 1 teaspoon of dried thyme
Instructions
1. Preheat your oven to 325°F (163°C) and line a large, rimmed baking sheet with parchment paper.
2. In a large mixing bowl, combine the 3 cups of raw mixed nuts.
3. Drizzle the 2 tablespoons of clarified butter and the 1 tablespoon of pure maple syrup over the nuts.
4. Using a silicone spatula, toss the nuts thoroughly until they are evenly and lightly coated.
5. Sprinkle the 1 teaspoon of fine sea salt, 1 teaspoon of freshly cracked black pepper, 1 tablespoon of finely chopped fresh rosemary, and 1 teaspoon of dried thyme over the nut mixture.
6. Toss again with the spatula to ensure the herbs and spices are distributed uniformly, a tip for consistent flavor in every bite.
7. Spread the coated nuts in a single, even layer on the prepared baking sheet, avoiding overcrowding to promote even roasting.
8. Place the baking sheet in the preheated oven and roast for 20 minutes, stirring the nuts gently with the spatula at the 10-minute mark to prevent burning and ensure all sides develop color.
9. After 20 minutes, check for doneness; the nuts should be fragrant and have taken on a deep golden-brown hue, with the pecans appearing slightly darker.
10. Remove the baking sheet from the oven and let the nuts cool completely on the sheet for at least 30 minutes, a crucial step as they will crisp up further as they cool.
Consider the final texture: a satisfying crunch gives way to the rich, buttery depth of the nuts, elevated by the earthy rosemary and subtle sweetness. Serve them warm in a rustic bowl for a holiday gathering, or package them in small jars as a thoughtful homemade gift.
Tangy Salt and Vinegar Kale Chips
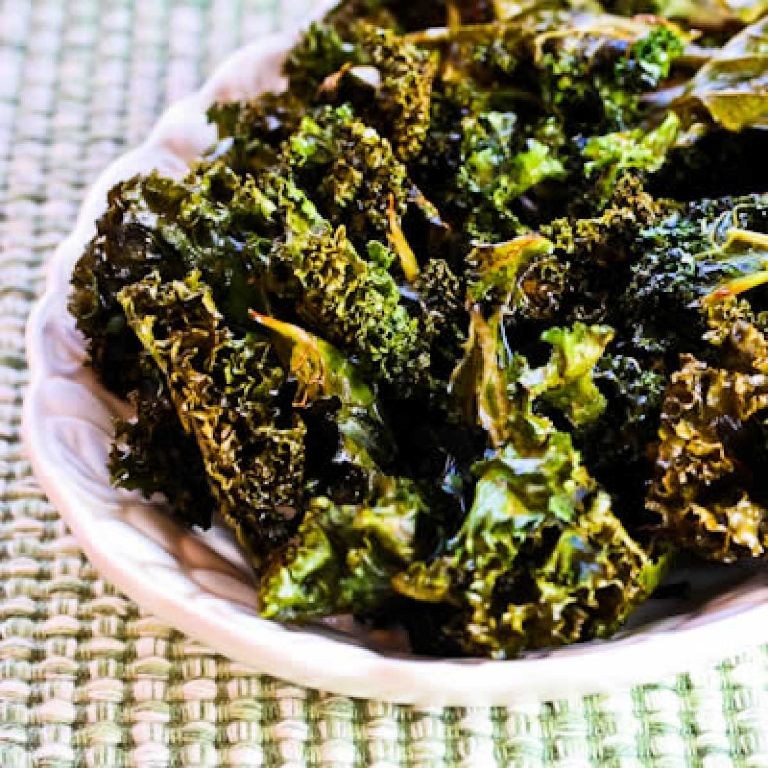
Lately, I’ve been craving something that bridges the gap between a nostalgic snack and a quiet moment of mindful cooking, a recipe that feels both indulgent and nourishing. These chips transform humble kale into a whisper-thin, shatteringly crisp vehicle for that sharp, mouthwatering tang we all remember from childhood, yet they feel entirely grown-up. Making them is a slow, almost meditative process of massaging, waiting, and watching that turns the kitchen into a peaceful sanctuary.
Serving: 4 | Pre Time: 20 minutes | Cooking Time: 90 minutes
Ingredients
– 1 large bunch of lacinato kale, stems removed and leaves torn into 2-inch pieces
– 2 tablespoons extra-virgin olive oil
– 3 tablespoons distilled white vinegar
– 1 ½ teaspoons flaky sea salt
– ½ teaspoon freshly cracked black pepper
Instructions
1. Preheat your oven to 200°F and position two racks in the upper and lower thirds.
2. In a large mixing bowl, combine the torn lacinato kale pieces, extra-virgin olive oil, and distilled white vinegar.
3. Using your hands, gently massage the kale for 2-3 minutes until the leaves are uniformly coated and have softened slightly, taking care not to bruise them excessively.
4. Arrange the massaged kale in a single, uncrowded layer on two parchment-lined baking sheets, ensuring no pieces overlap to guarantee even crisping.
5. Evenly sprinkle the flaky sea salt and freshly cracked black pepper over the kale on both baking sheets.
6. Place the baking sheets in the preheated oven and dehydrate the kale for 90 minutes, rotating the sheets and swapping their positions every 30 minutes to promote uniform drying.
7. After 90 minutes, check for doneness; the chips are ready when they are completely dry, crisp to the touch, and have a slightly darkened, matte appearance without any browning.
8. Remove the baking sheets from the oven and allow the chips to cool completely on the sheets for 15 minutes; they will crisp further as they cool.
Vibrantly tangy and impossibly light, these chips achieve a delicate, glass-like texture that shatters with each bite, releasing a perfect balance of sharp vinegar and savory salt. Their ethereal crispness makes them an elegant standalone snack, or try crumbling them over a creamy potato soup for a surprising burst of acidity and crunch that elevates the entire bowl.
Salted Butter Pecan Cookies
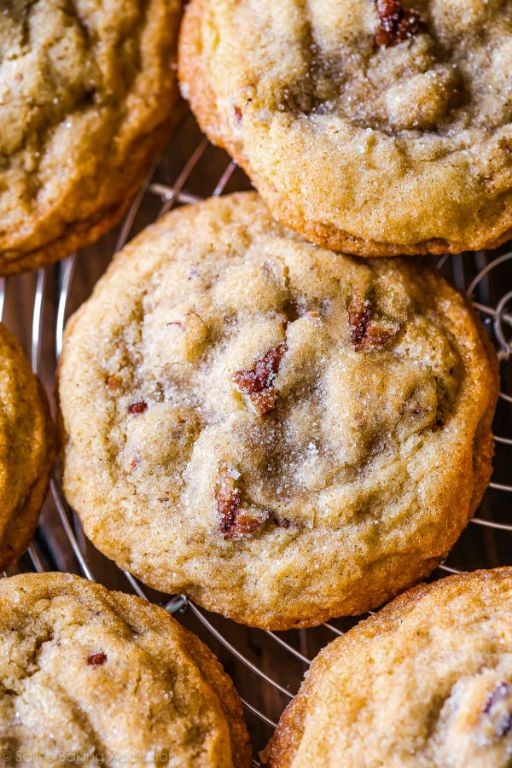
Here, in the quiet kitchen, with winter light filtering through the window, there’s a simple comfort in the ritual of creaming butter and sugar. These cookies, with their toasted pecans and a whisper of salt, are like edible memories of cozy afternoons.
Serving: 24 | Pre Time: 20 minutes | Cooking Time: 12 minutes
Ingredients
– 1 cup (2 sticks) unsalted European-style butter, at room temperature
– ¾ cup granulated sugar
– ¾ cup packed dark brown sugar
– 2 large pasture-raised eggs, lightly beaten
– 2 teaspoons pure vanilla extract
– 2 ¼ cups all-purpose flour, spooned and leveled
– 1 teaspoon baking soda
– 1 teaspoon fine sea salt
– 1 ½ cups raw pecan halves, toasted and coarsely chopped
– Flaky sea salt, for finishing
Instructions
1. Preheat your oven to 350°F (175°C) and line two baking sheets with parchment paper.
2. In the bowl of a stand mixer fitted with the paddle attachment, combine the room-temperature unsalted butter, granulated sugar, and dark brown sugar.
3. Cream the butter and sugars together on medium-high speed for exactly 3 minutes, until the mixture is pale, fluffy, and no sugar granules are visible.
4. Tip: Scrape down the bowl with a flexible spatula halfway through creaming to ensure even incorporation.
5. With the mixer on low speed, gradually add the lightly beaten pasture-raised eggs, one at a time, waiting until each is fully incorporated before adding the next.
6. Add the pure vanilla extract and mix on low speed for 15 seconds until just combined.
7. In a separate medium bowl, whisk together the spooned and leveled all-purpose flour, baking soda, and fine sea salt until thoroughly aerated.
8. Tip: Whisking the dry ingredients prevents dense spots in the final cookie.
9. With the mixer on the lowest speed, gradually add the dry ingredient mixture to the wet ingredients, mixing just until no streaks of flour remain, about 45 seconds.
10. Using a spatula, fold in the coarsely chopped toasted pecans by hand until evenly distributed.
11. Tip: Toasting the pecans at 350°F for 8 minutes before chopping deepens their flavor and adds a crucial crunch.
12. Using a #40 cookie scoop (about 1.5 tablespoons), portion the dough into 24 balls and place them 2 inches apart on the prepared baking sheets.
13. Gently press each dough ball to slightly flatten it and sprinkle a few flakes of sea salt onto the center of each.
14. Bake one sheet at a time in the preheated oven for 10 to 12 minutes, until the edges are set and golden brown but the centers still appear soft.
15. Allow the cookies to cool on the baking sheet for 5 minutes before transferring them to a wire rack to cool completely.
Now, the finished cookies offer a perfect contrast: crisp, caramelized edges giving way to a soft, chewy center studded with buttery pecans. Their flavor is a rich, toasty sweetness, elevated by that final crystalline pop of salt. For a delightful twist, serve them slightly warm alongside a small bowl of vanilla bean ice cream for an impromptu cookie sandwich.
Cheesy Garlic Breadsticks

Yesterday, as the afternoon light faded, I found myself craving something warm and comforting—a simple pleasure to savor slowly. There’s a quiet magic in pulling apart soft, garlicky bread, strings of melted cheese stretching between each piece, that feels like a gentle pause in the rush of the season.
Serving: 4 | Pre Time: 15 minutes | Cooking Time: 12 minutes
Ingredients
– 1 pound store-bought pizza dough, at room temperature
– ¼ cup clarified butter, gently melted
– 4 cloves garlic, finely minced
– 2 tablespoons fresh parsley, finely chopped
– 1 cup whole-milk mozzarella cheese, freshly grated
– ½ cup Parmigiano-Reggiano cheese, freshly grated
– ½ teaspoon fine sea salt
– ¼ teaspoon freshly ground black pepper
Instructions
1. Preheat your oven to 425°F and line a baking sheet with parchment paper.
2. On a lightly floured surface, roll the pizza dough into a 10×12-inch rectangle, about ¼-inch thick.
3. In a small bowl, combine the clarified butter, minced garlic, and chopped parsley.
4. Using a pastry brush, evenly coat the entire surface of the dough with the garlic-butter mixture.
5. Sprinkle the grated mozzarella and Parmigiano-Reggiano cheeses uniformly over the dough, leaving a ½-inch border.
6. Season the surface with fine sea salt and freshly ground black pepper.
7. Using a pizza cutter or sharp knife, slice the dough vertically into 1-inch-wide strips.
8. Carefully transfer each strip to the prepared baking sheet, spacing them about 1 inch apart.
9. Bake in the preheated oven for 10–12 minutes, or until the cheese is bubbly and the edges are golden brown.
10. Remove from the oven and let cool on the baking sheet for 2–3 minutes before serving. Tip: For extra crispiness, place the baking sheet on the middle rack and avoid overcrowding the strips. Tip: Use freshly grated cheese, as pre-shredded varieties contain anti-caking agents that can inhibit melting. Tip: Let the dough come to room temperature for easier rolling and to prevent tearing.
What emerges from the oven is a delightful contrast: a crisp, buttery exterior giving way to a tender, chewy interior, with the sharpness of garlic and Parmigiano-Reggiano mellowed by the creamy mozzarella. Serve them warm, perhaps alongside a bowl of roasted tomato soup for dipping, or simply enjoy them as they are—a humble, heartfelt treat that turns an ordinary moment into something quietly special.
Smoky Bacon-Wrapped Jalapeno Poppers

Nestled in the quiet glow of a winter afternoon, I find myself drawn to the kitchen, craving something with a bit of warmth and a gentle, smoky whisper. These little bites are a quiet celebration of contrasts—the soft, creamy heart and the crisp, savory embrace that wraps around it.
Serving: 12 poppers | Pre Time: 20 minutes | Cooking Time: 25 minutes
Ingredients
– 6 large fresh jalapeño peppers, halved lengthwise and seeded
– 8 ounces full-fat cream cheese, softened to room temperature
– 1 cup finely shredded sharp cheddar cheese
– 1 teaspoon smoked paprika
– 12 thin slices of applewood-smoked bacon
– 2 tablespoons pure maple syrup
– 1 tablespoon clarified butter, melted
Instructions
1. Preheat your oven to 400°F (204°C) and line a rimmed baking sheet with parchment paper.
2. In a medium mixing bowl, combine the softened cream cheese, shredded cheddar cheese, and smoked paprika until fully incorporated and smooth.
3. Using a small spoon, evenly divide the cheese mixture among the 12 jalapeño halves, filling each cavity generously and mounding it slightly.
4. Wrap each stuffed jalapeño half with one slice of applewood-smoked bacon, starting at one end and spiraling it snugly around the pepper to fully enclose the filling; secure the bacon end with a toothpick if it tends to unravel.
5. Arrange the wrapped poppers on the prepared baking sheet, ensuring they are spaced about 1 inch apart to allow for even cooking and crisping.
6. In a small bowl, whisk together the pure maple syrup and melted clarified butter until emulsified.
7. Using a pastry brush, lightly coat the top of each bacon-wrapped popper with the maple-butter glaze, which will help caramelize the bacon as it bakes.
8. Place the baking sheet in the preheated oven and bake for 20–25 minutes, or until the bacon is fully cooked, crisp, and deeply golden brown, and the cheese filling is bubbly.
9. Carefully remove the poppers from the oven and let them rest on the baking sheet for 5 minutes to allow the filling to set slightly before serving.
Kicking back with these poppers, the texture is a delightful play of creamy, molten cheese against the crisp, salty bacon and tender pepper. The smoky paprika and maple glaze add a subtle sweetness that lingers, making them perfect for a cozy gathering or a quiet moment with a crisp lager.
Salted Peanut Brittle
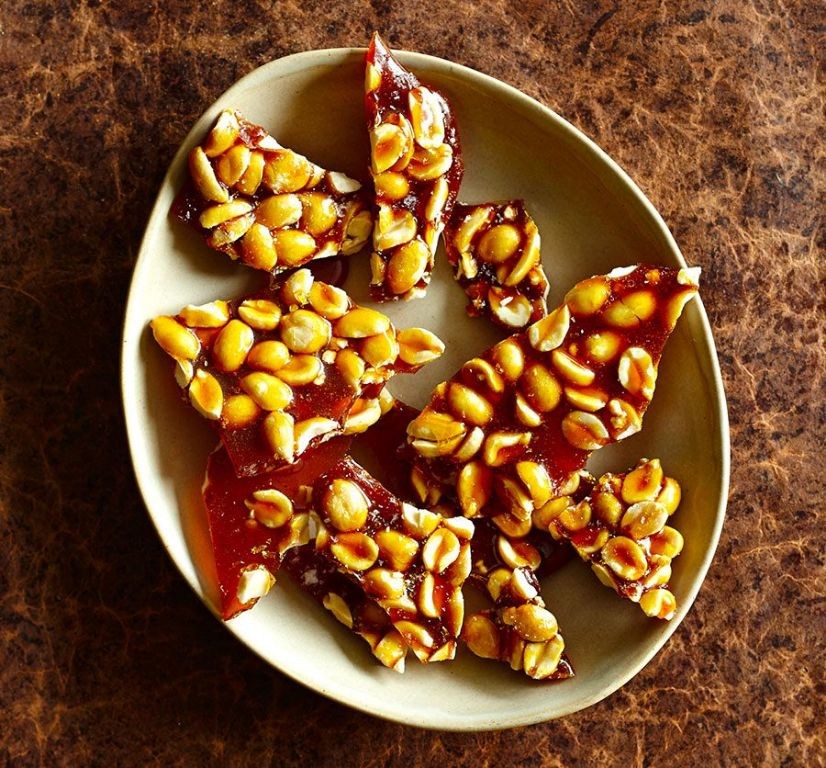
On this quiet December morning, as the world outside bustles with holiday preparations, I find myself drawn to the simple, nostalgic act of making something sweet and crunchy. There’s a comforting rhythm to crafting brittle—the slow melt of sugar, the satisfying crack of cooled candy—that feels like a small, personal celebration amidst the season’s chaos. It’s a humble treat, really, just peanuts and caramel, yet it holds the warmth of countless kitchen memories.
Serving: 12 | Pre Time: 10 minutes | Cooking Time: 20 minutes
Ingredients
– 2 cups granulated sugar
– 1 cup light corn syrup
– 1/2 cup water
– 1/2 cup unsalted butter, cut into small cubes
– 2 cups dry-roasted salted peanuts
– 1 teaspoon pure vanilla extract
– 1 teaspoon baking soda
Instructions
1. Line a rimmed baking sheet with a silicone baking mat or lightly greased parchment paper.
2. In a heavy-bottomed 3-quart saucepan, combine the granulated sugar, light corn syrup, and water over medium heat.
3. Stir constantly with a heat-resistant spatula until the sugar dissolves completely, about 3–4 minutes.
4. Attach a candy thermometer to the side of the pan, ensuring it does not touch the bottom.
5. Increase the heat to medium-high and cook without stirring until the mixture reaches 300°F (hard crack stage), which will take approximately 10–12 minutes.
6. Tip: Avoid stirring during this stage to prevent sugar crystallization, which can make the brittle grainy.
7. Remove the pan from the heat and immediately stir in the unsalted butter cubes until fully melted and incorporated.
8. Quickly fold in the dry-roasted salted peanuts and pure vanilla extract until evenly coated.
9. Tip: Work swiftly here, as the mixture will begin to set rapidly once removed from heat.
10. Sprinkle the baking soda over the hot mixture and stir vigorously—it will foam and lighten in color.
11. Immediately pour the brittle onto the prepared baking sheet, spreading it into an even layer about 1/4-inch thick with the spatula.
12. Tip: For easier spreading, lightly grease the spatula with butter to prevent sticking.
13. Allow the brittle to cool completely at room temperature for at least 1 hour until hardened and crisp.
14. Break the cooled brittle into irregular pieces by hand or with a knife.
Vividly golden and shimmering with a delicate, glass-like snap, this brittle offers a perfect balance of buttery caramel and salty peanut crunch. Serve it alongside a strong cup of coffee for a midday pick-me-up, or crumble it over vanilla ice cream for an effortless dessert that delights with every sweet, salty bite.
Everything Bagel Spiced Crackers

Crisp, golden crackers speckled with the familiar warmth of everything bagel seasoning—these homemade delights transform simple pantry staples into something quietly extraordinary. They emerge from the oven with a satisfying snap and that addictive blend of toasted sesame, garlic, and poppy seeds, perfect for a thoughtful afternoon snack or an elegant addition to a cheese board. Making them feels like a small, grounding ritual, a way to fill the kitchen with comforting aromas while creating something both humble and special.
Serving: 24 crackers | Pre Time: 15 minutes | Cooking Time: 18 minutes
Ingredients
– 1 cup all-purpose flour, plus extra for dusting
– 1/2 teaspoon fine sea salt
– 1/4 cup cold unsalted butter, cut into small cubes
– 1/4 cup cold whole milk
– 1 large pasture-raised egg, lightly beaten
– 2 tablespoons everything bagel seasoning blend
Instructions
1. Preheat your oven to 375°F (190°C) and line a large baking sheet with parchment paper.
2. In a medium mixing bowl, whisk together 1 cup of all-purpose flour and 1/2 teaspoon of fine sea salt until thoroughly combined.
3. Add 1/4 cup of cold, cubed unsalted butter to the flour mixture, using your fingertips or a pastry cutter to work it in until the mixture resembles coarse crumbs with some pea-sized butter pieces remaining—this creates flaky layers in the baked crackers.
4. Make a well in the center of the mixture and pour in 1/4 cup of cold whole milk, stirring with a fork just until a shaggy dough begins to form.
5. Turn the dough out onto a lightly floured surface and gently knead it 4-5 times until it just comes together into a cohesive ball; avoid overworking to keep the crackers tender.
6. Roll the dough out into a rough rectangle, about 1/8-inch thick, using a floured rolling pin to ensure an even thickness for consistent baking.
7. Brush the entire surface of the dough evenly with 1 large, lightly beaten pasture-raised egg, which acts as a glue for the seasoning and promotes a golden finish.
8. Sprinkle 2 tablespoons of everything bagel seasoning blend uniformly over the egg-washed dough, gently pressing it in with your palms to help it adhere.
9. Use a sharp knife or a pizza cutter to slice the dough into approximately 2-inch squares, then transfer them to the prepared baking sheet, spacing them about 1/2 inch apart.
10. Bake in the preheated oven for 16-18 minutes, or until the crackers are firm to the touch and the edges turn a deep golden brown; rotate the sheet halfway through for even coloring.
11. Remove the baking sheet from the oven and let the crackers cool completely on the sheet, about 20 minutes, to crisp up fully—they will firm as they cool.
These crackers bake up delightfully crisp and shatter with a delicate snap, each bite releasing the savory, toasty notes of sesame, garlic, and onion from the seasoning. Their sturdy yet flaky texture makes them ideal for pairing with creamy cheeses or rich dips, or simply enjoying on their own as a subtly spiced treat. Try serving them alongside a sharp cheddar or a dollop of herb-infused cream cheese for a simple, satisfying appetizer that feels both rustic and refined.
Fried Mac and Cheese Bites
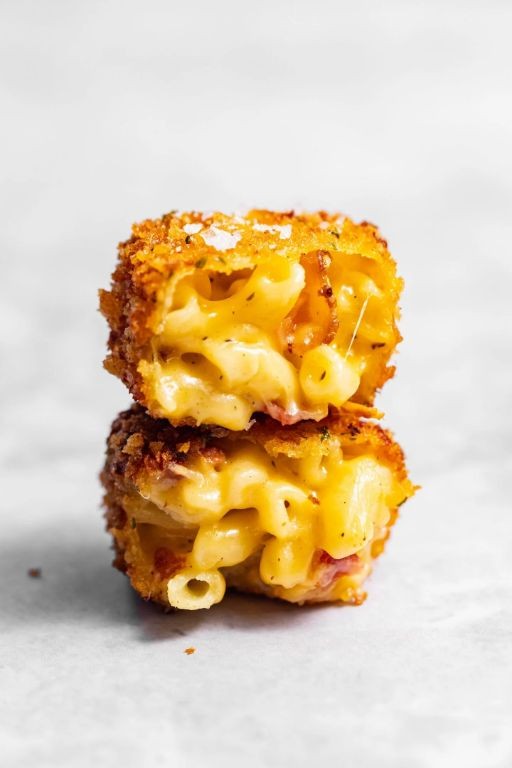
Here, in the quiet kitchen light, I find myself reaching for the familiar comfort of childhood, transformed into something crisp and golden. These fried mac and cheese bites hold the creamy soul of a classic, wrapped in a delicate, shattering crust that promises a moment of pure, simple joy.
Serving: 24 bites | Pre Time: 30 minutes | Cooking Time: 15 minutes
Ingredients
– 8 ounces of dried elbow macaroni
– 2 tablespoons of unsalted butter
– 2 tablespoons of all-purpose flour
– 1 ½ cups of whole milk, warmed to 110°F
– 8 ounces of sharp cheddar cheese, freshly grated
– 2 ounces of Parmigiano-Reggiano cheese, freshly grated
– ¼ teaspoon of freshly grated nutmeg
– ½ teaspoon of kosher salt
– ¼ teaspoon of freshly ground white pepper
– 2 large pasture-raised eggs, lightly beaten
– 1 cup of all-purpose flour for dredging
– 1 cup of panko breadcrumbs
– 4 cups of peanut oil for frying
– Flaky sea salt for finishing
Instructions
1. Bring a large pot of heavily salted water to a rolling boil over high heat.
2. Add 8 ounces of dried elbow macaroni to the boiling water and cook for 7 minutes, until al dente, then drain thoroughly in a colander without rinsing.
3. In a heavy-bottomed saucepan over medium heat, melt 2 tablespoons of unsalted butter until it foams and subsides.
4. Whisk in 2 tablespoons of all-purpose flour and cook for 90 seconds, stirring constantly, to form a pale roux.
5. Gradually pour in 1 ½ cups of whole milk, warmed to 110°F, whisking continuously to prevent lumps, and bring the mixture to a gentle simmer.
6. Reduce the heat to low and simmer the béchamel sauce for 3 minutes, until it thickens enough to coat the back of a spoon.
7. Remove the saucepan from the heat and immediately stir in 8 ounces of grated sharp cheddar and 2 ounces of grated Parmigiano-Reggiano until fully melted and smooth.
8. Season the cheese sauce with ¼ teaspoon of freshly grated nutmeg, ½ teaspoon of kosher salt, and ¼ teaspoon of freshly ground white pepper.
9. Fold the drained macaroni into the cheese sauce until evenly coated, then transfer the mixture to a parchment-lined baking sheet, spreading it into an even layer.
10. Refrigerate the macaroni and cheese, uncovered, for 2 hours until completely firm and cold; this chilling step is crucial for clean shaping and prevents the bites from falling apart during frying.
11. Using a tablespoon measure, scoop the chilled macaroni and cheese and roll between your palms to form 24 uniform balls, placing them on a fresh parchment-lined tray.
12. Set up a breading station with three shallow dishes: one with 1 cup of all-purpose flour, one with 2 lightly beaten pasture-raised eggs, and one with 1 cup of panko breadcrumbs.
13. Dredge each ball first in the flour, shaking off excess, then dip in the beaten eggs, allowing any excess to drip off, and finally roll in the panko breadcrumbs, pressing gently to adhere a thick, even coating.
14. In a large, heavy Dutch oven, heat 4 cups of peanut oil to 350°F, using a deep-fry thermometer to monitor the temperature accurately; maintaining this oil temperature ensures a crisp exterior without greasiness.
15. Working in batches of 6 to avoid overcrowding, carefully lower the breaded bites into the hot oil using a spider skimmer and fry for 2-3 minutes, turning occasionally, until deeply golden brown and crisp.
16. Transfer the fried bites to a wire rack set over a baking sheet to drain, and immediately sprinkle with flaky sea salt while still hot; letting them rest on a rack, rather than paper towels, preserves their delicate crunch.
17. Repeat the frying process with the remaining batches, allowing the oil to return to 350°F between each batch for consistent results.
Reflecting on the finished bites reveals a perfect contrast: the exterior shatters with a delicate crunch, giving way to a luxuriously creamy, molten center that carries the sharp tang of cheddar and the nutty depth of Parmigiano-Reggiano. Serve them warm alongside a ramekin of cool, herb-infused crème fraîche for dipping, or scatter them over a bed of peppery arugula dressed simply with lemon and olive oil for a playful, elegant appetizer.
Rosemary Salted Focaccia

Zestfully, the quiet morning light finds me in the kitchen, where the simple alchemy of flour, water, and time begins to feel like a gentle meditation. There is a profound comfort in the slow rise of dough, a patient promise of the warm, fragrant loaf to come, its surface dimpled and glistening with oil and herbs.
Serving: 8 | Pre Time: 90 minutes | Cooking Time: 25 minutes
Ingredients
– 4 cups (500g) high-protein bread flour, such as King Arthur
– 1 ⅔ cups (390ml) lukewarm water (105°F to 110°F)
– 2 ¼ teaspoons (1 packet) active dry yeast
– 2 teaspoons fine sea salt
– ¼ cup (60ml) extra-virgin olive oil, plus more for the pan and finishing
– 2 tablespoons fresh rosemary needles, finely chopped
– 1 tablespoon flaky sea salt, such as Maldon
Instructions
1. In the bowl of a stand mixer fitted with a dough hook, combine the lukewarm water and active dry yeast. Let the mixture stand undisturbed for 5 minutes until foamy.
2. Add the high-protein bread flour and fine sea salt to the yeast mixture.
3. Mix on low speed for 2 minutes until a shaggy dough forms, then increase to medium speed and knead for 5 minutes until the dough is smooth and elastic. (Tip: The dough is properly kneaded when it passes the “windowpane test”—stretch a small piece thinly enough to see light through it without tearing.)
4. Pour 2 tablespoons of the extra-virgin olive oil into a large, clean bowl.
5. Transfer the kneaded dough to the oiled bowl, turning it once to coat all surfaces.
6. Cover the bowl tightly with plastic wrap and a kitchen towel. Let the dough rise in a warm, draft-free place for 1 hour, or until doubled in size.
7. Pour the remaining 2 tablespoons of extra-virgin olive oil into a 9×13-inch baking pan, tilting to coat the bottom and sides completely.
8. Gently deflate the risen dough and transfer it to the prepared pan.
9. Using oiled fingertips, gently press and stretch the dough to fill the pan evenly from corner to corner.
10. Cover the pan loosely with plastic wrap and let the dough rise again for 30 minutes. (Tip: For optimal oven spring, ensure your oven is fully preheated before this second rise is complete.)
11. Preheat your oven to 425°F (218°C).
12. Uncover the dough. Press your oiled fingertips deeply into the dough at 1-inch intervals to create characteristic dimples.
13. Drizzle 1 additional tablespoon of extra-virgin olive oil over the dimpled surface.
14. Evenly sprinkle the finely chopped fresh rosemary and flaky sea salt over the entire surface.
15. Bake on the center rack for 22 to 25 minutes, until the focaccia is deeply golden brown and sounds hollow when tapped on the bottom. (Tip: For an exceptionally crisp crust, place a pan of water on the oven’s bottom rack during baking to create steam.)
16. Transfer the baked focaccia to a wire rack and let it cool for at least 15 minutes before slicing.
Remarkably tender and airy within, the focaccia boasts a crisp, olive oil-kissed crust studded with fragrant rosemary and bursts of saline crunch. Rip a piece warm from the loaf to savor its pure, yeasty flavor, or slice it thickly for sandwiches with roasted vegetables and creamy burrata.
Cajun Spiced Roasted Pumpkin Seeds
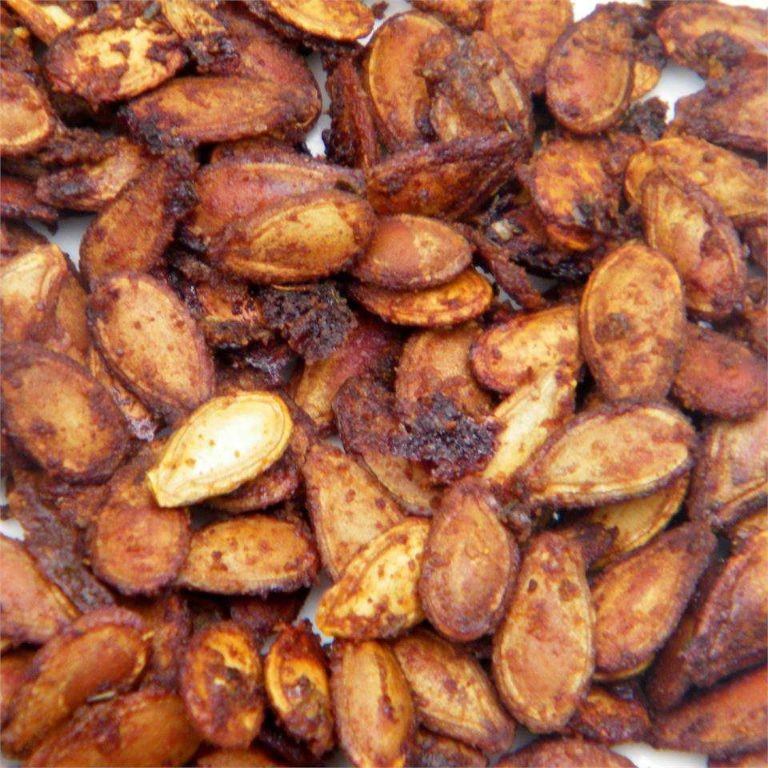
Yesterday, as I carved pumpkins for holiday decorations, the pile of seeds glistening on the counter whispered of forgotten potential. This simple act of reclamation—transforming what might be discarded into something deeply savory and satisfying—feels like a quiet, grounding ritual. Let’s honor that feeling with these Cajun-spiced roasted pumpkin seeds, a snack that carries the warmth of the season in every crunchy bite.
Serving: 4 | Pre Time: 10 minutes | Cooking Time: 25 minutes
Ingredients
– 1 cup fresh pumpkin seeds, rinsed and thoroughly patted dry
– 1 tablespoon extra-virgin olive oil
– 1 teaspoon smoked paprika
– ½ teaspoon garlic powder
– ¼ teaspoon onion powder
– ¼ teaspoon dried oregano
– ¼ teaspoon dried thyme
– ⅛ teaspoon cayenne pepper
– ½ teaspoon fine sea salt
Instructions
1. Preheat your oven to 325°F (163°C) and line a rimmed baking sheet with parchment paper.
2. In a medium mixing bowl, combine the patted-dry pumpkin seeds and extra-virgin olive oil, tossing until the seeds are evenly coated. Tip: Ensuring the seeds are completely dry prevents steaming and promotes even crisping.
3. In a small bowl, whisk together the smoked paprika, garlic powder, onion powder, dried oregano, dried thyme, cayenne pepper, and fine sea salt to create the Cajun spice blend.
4. Sprinkle the spice blend over the oiled pumpkin seeds and toss vigorously until every seed is uniformly coated with the seasoning.
5. Spread the seasoned seeds in a single, even layer on the prepared baking sheet. Tip: Avoid overcrowding to allow for proper air circulation and consistent roasting.
6. Place the baking sheet in the preheated oven and roast for 20 to 25 minutes, stirring the seeds gently with a spatula every 8 minutes to prevent burning and ensure even coloring.
7. Remove the baking sheet from the oven when the seeds are fragrant, deeply golden, and make a light, hollow sound when tapped. Tip: They will continue to crisp slightly as they cool on the sheet.
8. Let the roasted pumpkin seeds cool completely on the baking sheet for about 15 minutes before serving or storing.
Lightly smoky and complexly spiced, these seeds offer a delightful crunch that gives way to a tender, nutty interior. Their rustic charm makes them a perfect standalone snack, yet they also lend a wonderful textural contrast when sprinkled over autumnal soups or folded into a fall-inspired grain salad.
Summary
Satisfy every craving with these 18 crunchy, salty snacks! From quick fixes to party favorites, there’s something for every home cook. We’d love to hear which recipes you try—leave a comment with your favorites and share this roundup on Pinterest to spread the snack love!


