
Hungry for a taste of the Bay? San Francisco’s food scene is legendary, and now you can bring its iconic flavors right into your kitchen. From sourdough bread to cioppino stew, we’ve gathered 18 authentic recipes that capture the city’s delicious spirit. Whether you’re craving comfort food or want to explore new favorites, get ready to cook your way through SF’s most famous dishes—let’s dive in!
San Francisco Sourdough Bread

Unbelievably crusty and tangy, San Francisco sourdough is the ultimate homemade bread project. You’ll love the chewy texture and that signature sour kick—it’s easier than you think with a little patience. Let’s get baking!
Serving: 1 loaf | Pre Time: 18 hours (includes overnight proofing) | Cooking Time: 45 minutes
Ingredients
– 1 cup active sourdough starter, bubbly and fed (if it floats in water, it’s ready)
– 1 ½ cups warm water (about 85°F)
– 4 cups bread flour, plus extra for dusting
– 1 ½ tsp fine sea salt
– Rice flour for dusting the banneton, optional (prevents sticking better than regular flour)
Instructions
1. In a large bowl, combine the sourdough starter and warm water, stirring until mostly dissolved.
2. Add the bread flour and sea salt, mixing with a wooden spoon until a shaggy dough forms.
3. Cover the bowl with a damp kitchen towel and let it rest at room temperature for 30 minutes—this autolyse helps develop gluten.
4. Perform a series of stretch-and-folds: wet your hands, grab one edge of the dough, stretch it upward, and fold it over the center. Repeat around the bowl 4-5 times. Tip: Do this gently to avoid tearing the dough.
5. Cover the bowl again and let it rest for 30 minutes. Repeat the stretch-and-folds 3 more times, resting 30 minutes between each set.
6. After the final fold, cover the bowl tightly and let the dough rise at room temperature (70-75°F) for 8-12 hours, until nearly doubled in size.
7. Lightly flour a work surface and turn the dough out. Shape it into a tight round by pulling the edges toward the center and pinching them together underneath.
8. Generously dust a banneton or bowl with rice flour, then place the dough seam-side up inside. Cover with the towel and refrigerate for at least 4 hours or up to overnight for more sour flavor.
9. Preheat your oven to 450°F with a Dutch oven inside for 30 minutes—it needs to be piping hot.
10. Carefully remove the hot Dutch oven. Tip: Use oven mitts and turn the dough onto parchment paper for easy transfer.
11. Score the top of the dough about ½ inch deep with a sharp knife or lame to control expansion.
12. Place the dough with parchment into the Dutch oven, cover with the lid, and bake for 30 minutes. Tip: The steam trapped inside creates that classic crackly crust.
13. Remove the lid and bake for another 15 minutes, until the crust is deep golden brown and sounds hollow when tapped.
14. Transfer the bread to a wire rack and let it cool completely for at least 2 hours before slicing—it’s still cooking inside!
Here’s your reward: a loaf with a crisp, blistered crust and an airy, chewy crumb. That tangy flavor deepens over the next day, making it perfect for avocado toast or a hearty grilled cheese. Slice it thick and enjoy every bite!
Cioppino Seafood Stew
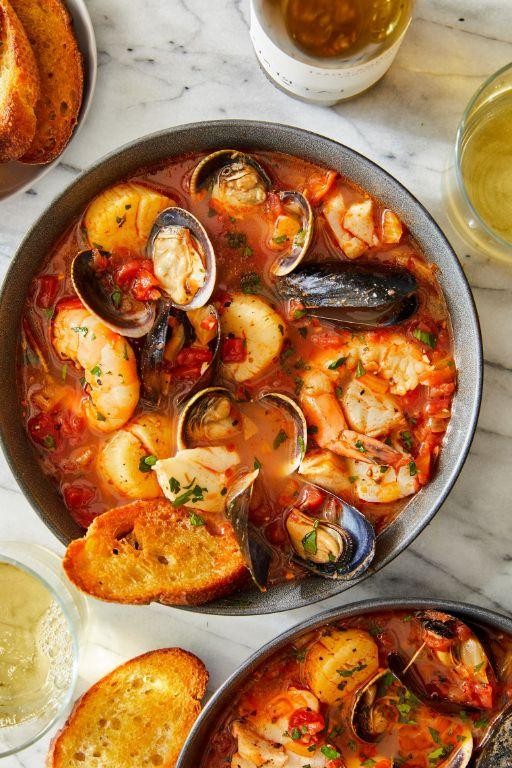
Zipping through holiday prep? You need a showstopper that’s surprisingly simple. This Cioppino is a vibrant, one-pot seafood stew that feels festive but comes together with minimal fuss—perfect for a cozy Christmas Eve or any gathering where you want to impress without stress.
Serving: 4 | Pre Time: 20 minutes | Cooking Time: 30 minutes
Ingredients
– 2 tbsp olive oil (or any neutral oil)
– 1 medium yellow onion, diced
– 4 garlic cloves, minced
– 1 (28-oz) can crushed tomatoes
– 2 cups fish stock or clam juice
– 1 cup dry white wine
– 1 tsp dried oregano
– 1/2 tsp red pepper flakes (adjust to taste)
– 1 lb firm white fish (like cod or halibut), cut into 1-inch chunks
– 1/2 lb large shrimp, peeled and deveined
– 1/2 lb mussels, scrubbed
– 1/4 cup fresh parsley, chopped
– Salt and black pepper, to taste
Instructions
1. Heat the olive oil in a large Dutch oven or heavy pot over medium heat until shimmering, about 2 minutes.
2. Add the diced onion and cook, stirring occasionally, until softened and translucent, 5–7 minutes.
3. Stir in the minced garlic and cook until fragrant, about 30 seconds—be careful not to let it burn.
4. Pour in the crushed tomatoes, fish stock, white wine, dried oregano, and red pepper flakes. Tip: Use a wine you’d drink for the best flavor.
5. Bring the mixture to a simmer, then reduce the heat to medium-low. Let it cook uncovered for 15 minutes to allow the flavors to meld.
6. Season the broth with salt and black pepper to taste—start with 1 tsp salt and 1/2 tsp pepper, then adjust.
7. Gently add the white fish chunks to the pot. Simmer for 3 minutes until the fish starts to turn opaque.
8. Add the shrimp and mussels to the pot. Tip: Discard any mussels that are open before cooking.
9. Cover the pot and cook for 5–7 minutes, or until the shrimp are pink and curled, the mussels have opened, and the fish flakes easily with a fork. Tip: Avoid overcooking the seafood to keep it tender.
10. Stir in the chopped parsley just before serving.
11. Ladle the stew into bowls, discarding any unopened mussels.
Ooh, that aroma! This cioppino delivers a brothy, tomato-based base with a gentle kick from the pepper flakes, perfectly complementing the sweet shrimp, briny mussels, and flaky fish. Serve it with crusty bread for dipping into all that flavorful liquid, or over a bed of linguine for a heartier twist—it’s a messy, satisfying meal meant to be enjoyed with good company.
Mission-Style Burrito

Whether you’re craving a hearty meal or need something portable for your next adventure, this Mission-style burrito delivers big flavor wrapped in a warm tortilla. It’s packed with seasoned meat, rice, beans, and all the fixings—perfect for customizing to your taste. You’ll love how satisfying it is to make at home.
Serving: 4 | Pre Time: 20 minutes | Cooking Time: 30 minutes
Ingredients
– 1 lb flank steak, thinly sliced (or substitute with chicken or tofu)
– 2 tbsp olive oil, or any neutral oil
– 1 tbsp chili powder
– 1 tsp cumin
– 1/2 tsp garlic powder
– Salt, to taste
– 4 large flour tortillas (10-inch size works best)
– 2 cups cooked white rice, warm
– 1 can (15 oz) black beans, drained and rinsed
– 1 cup shredded Monterey Jack cheese
– 1/2 cup sour cream
– 1/2 cup salsa, store-bought or homemade
– 1 avocado, sliced
Instructions
1. In a bowl, combine the sliced steak with chili powder, cumin, garlic powder, and a pinch of salt. Tip: Let it marinate for 10 minutes for deeper flavor.
2. Heat olive oil in a large skillet over medium-high heat until it shimmers, about 1 minute.
3. Add the seasoned steak to the skillet and cook for 5-7 minutes, stirring occasionally, until browned and cooked through.
4. Remove the steak from the skillet and set aside on a plate.
5. Warm the tortillas in a dry skillet over low heat for 30 seconds per side, or wrap them in a damp paper towel and microwave for 20 seconds. Tip: This makes them more pliable and less likely to tear.
6. Lay a tortilla flat on a clean surface.
7. Spread 1/2 cup of warm rice in the center of the tortilla, leaving a 2-inch border at the edges.
8. Top the rice with 1/4 of the cooked steak, 1/4 of the black beans, 1/4 cup of cheese, 2 tbsp of sour cream, 2 tbsp of salsa, and a few avocado slices.
9. Fold the sides of the tortilla inward over the filling, then roll it tightly from the bottom to enclose everything. Tip: Press down gently as you roll to keep the burrito compact.
10. Repeat steps 6-9 with the remaining tortillas and ingredients.
11. Serve immediately, or wrap each burrito in foil to keep warm. For a crispy exterior, heat a skillet over medium heat and cook the burrito seam-side down for 2-3 minutes until golden.
Fluffy rice and tender steak meld with creamy beans and zesty salsa in every bite, creating a texture that’s both hearty and balanced. Enjoy it fresh for a soft wrap, or toast it lightly to add a satisfying crunch—either way, it’s a crowd-pleaser that’s easy to share or save for later.
Anchor Steam Beer Battered Fish and Chips

Zesty and golden-crisp, this beer-battered fish and chips is the ultimate comfort food for a cozy night in. You get flaky white fish wrapped in a light, airy crust with that signature Anchor Steam tang, plus perfectly crispy fries on the side. It’s easier than you think to make at home—just grab your favorite beer and let’s get frying!
Serving: 4 | Pre Time: 20 minutes | Cooking Time: 15 minutes
Ingredients
- 1 ½ lbs cod fillets, cut into 4 pieces (or any firm white fish like haddock)
- 4 large russet potatoes, peeled and cut into ½-inch thick fries
- 1 cup all-purpose flour, plus ½ cup for dredging
- 1 tsp baking powder
- 1 tsp salt, plus extra for seasoning
- ½ tsp black pepper
- 1 cup Anchor Steam beer, chilled (or any lager-style beer)
- 1 large egg
- 6 cups vegetable oil for frying, or enough to fill a pot 3 inches deep (use a neutral oil with high smoke point)
- Lemon wedges for serving (optional, but adds brightness)
- Tartar sauce for dipping (store-bought or homemade)
Instructions
- Place the cut potatoes in a large bowl of cold water and soak for 15 minutes to remove excess starch, which helps them crisp up.
- Drain the potatoes and pat them completely dry with paper towels to prevent oil splatters.
- In a large, heavy-bottomed pot or Dutch oven, heat the vegetable oil to 325°F over medium-high heat, using a deep-fry thermometer to monitor the temperature.
- Carefully add the dried potatoes to the hot oil and fry for 5 minutes, stirring occasionally, until they are soft but not yet browned.
- Remove the fries with a slotted spoon and drain them on a wire rack set over a baking sheet; let them cool slightly while you prepare the fish batter.
- In a medium bowl, whisk together 1 cup of flour, baking powder, 1 tsp salt, and black pepper until well combined.
- Pour in the chilled Anchor Steam beer and crack in the egg, then whisk just until the batter is smooth with a few small lumps—overmixing can make it dense.
- Place the remaining ½ cup of flour in a shallow dish and dredge each piece of cod fillet, shaking off any excess.
- Increase the oil temperature to 375°F, ensuring it’s hot enough so the batter sizzles immediately when added.
- Dip one floured fish piece into the batter, letting excess drip off, then gently lower it into the hot oil; repeat with remaining pieces, frying in batches to avoid overcrowding.
- Fry the fish for 4–5 minutes, turning once halfway, until the batter is deep golden brown and crispy.
- Transfer the fried fish to the wire rack with the fries to drain excess oil.
- Return the fries to the 375°F oil and fry for an additional 3–4 minutes until they are golden and crispy, then drain on the rack.
- Season the hot fries and fish immediately with a pinch of salt for maximum flavor absorption.
Really, the magic is in that first bite—the crust shatters to reveal tender, flaky fish, while the fries are fluffy inside with a satisfying crunch. Serve it all piled high with lemon wedges and tartar sauce for dipping, maybe with an extra cold Anchor Steam on the side to complete the pub-style vibe at home.
Dungeness Crab Cakes

Kick off your holiday season with these irresistible Dungeness crab cakes. They’re surprisingly simple to make at home, and the sweet, delicate crab flavor shines through perfectly. You’ll love how crispy they get on the outside while staying tender inside.
Serving: 4 | Pre Time: 20 minutes | Cooking Time: 10 minutes
Ingredients
– 1 lb fresh Dungeness crab meat, picked over for shells
– 1/2 cup panko breadcrumbs, plus 1/2 cup more for coating
– 1/4 cup mayonnaise
– 1 large egg, lightly beaten
– 2 tbsp chopped fresh parsley
– 1 tbsp Dijon mustard
– 1 tsp Old Bay seasoning, or your favorite seafood seasoning
– 1/2 tsp lemon zest
– 1/4 tsp black pepper
– 1/4 cup vegetable oil, or any neutral oil with a high smoke point
– Lemon wedges for serving
Instructions
1. In a large bowl, gently combine the crab meat, 1/2 cup panko, mayonnaise, egg, parsley, Dijon mustard, Old Bay seasoning, lemon zest, and black pepper. Tip: Be careful not to overmix to keep the crab meat in nice chunks.
2. Place the remaining 1/2 cup panko in a shallow dish. Form the crab mixture into 8 equal patties, about 1/2-inch thick.
3. Lightly coat each patty in the panko, pressing gently to help the breadcrumbs adhere. Tip: Chilling the formed cakes for 15 minutes in the refrigerator helps them hold their shape better during cooking.
4. Heat the vegetable oil in a large skillet over medium-high heat until it shimmers, about 350°F.
5. Carefully place the crab cakes in the skillet, working in batches if needed to avoid crowding. Cook for 3-4 minutes per side, until golden brown and crispy. Tip: Resist the urge to move them around too much so they develop a good crust.
6. Transfer the cooked crab cakes to a paper towel-lined plate to drain any excess oil.
7. Serve immediately with lemon wedges on the side.
Fresh from the skillet, these crab cakes have a wonderfully crispy exterior that gives way to a moist, flaky interior. The sweet crab flavor is complemented by the zesty lemon and savory seasoning. For a fun twist, try serving them on slider buns with a dollop of remoulade or alongside a simple arugula salad.
Joe’s Special Scramble
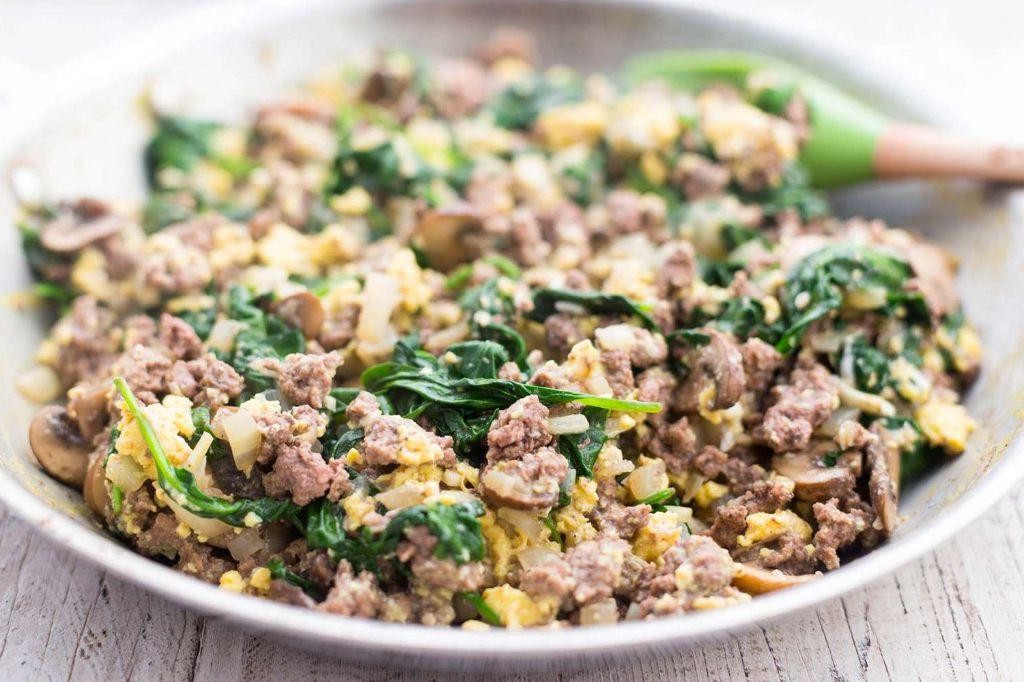
Zipping through holiday prep? You need a quick, hearty breakfast that feels special without the fuss. Joe’s Special Scramble is your answer—a one-pan wonder packed with savory flavor that’ll fuel your festive morning.
Serving: 2 | Pre Time: 10 minutes | Cooking Time: 15 minutes
Ingredients
– 1 tbsp olive oil (or any neutral oil)
– 1/2 lb ground beef (80/20 blend works well)
– 1/2 medium yellow onion, diced
– 1 cup fresh spinach, roughly chopped
– 4 large eggs
– 1/4 cup grated Parmesan cheese
– 1/4 tsp salt
– 1/4 tsp black pepper
Instructions
1. Heat 1 tbsp olive oil in a large non-stick skillet over medium-high heat (about 350°F).
2. Add 1/2 lb ground beef to the skillet, breaking it into small pieces with a spatula.
3. Cook the beef for 5-7 minutes until it’s browned and no longer pink, stirring occasionally.
4. Add 1/2 diced yellow onion to the skillet with the beef.
5. Sauté the onion and beef together for 3-4 minutes until the onion is translucent and soft.
6. Stir in 1 cup chopped fresh spinach and cook for 1-2 minutes until wilted. Tip: Wilt spinach quickly by covering the skillet briefly.
7. Crack 4 large eggs directly into the skillet over the beef and vegetable mixture.
8. Immediately scramble the eggs with the other ingredients using a spatula, mixing thoroughly.
9. Cook while stirring constantly for 2-3 minutes until the eggs are fully set but still moist. Tip: Remove from heat just before eggs look completely dry to avoid overcooking.
10. Sprinkle 1/4 cup grated Parmesan cheese, 1/4 tsp salt, and 1/4 tsp black pepper over the scramble.
11. Gently fold everything together until the cheese melts and the seasonings are evenly distributed. Tip: Taste and adjust salt only after adding the Parmesan, as it’s salty.
12. Transfer the scramble to plates and serve immediately.
A rich, savory scramble with tender beef, sweet onions, and pops of green spinach. The eggs stay creamy, while the Parmesan adds a salty, nutty finish—perfect piled on toast or wrapped in a warm tortilla for a handheld feast.
Italian-style Seafood Risotto
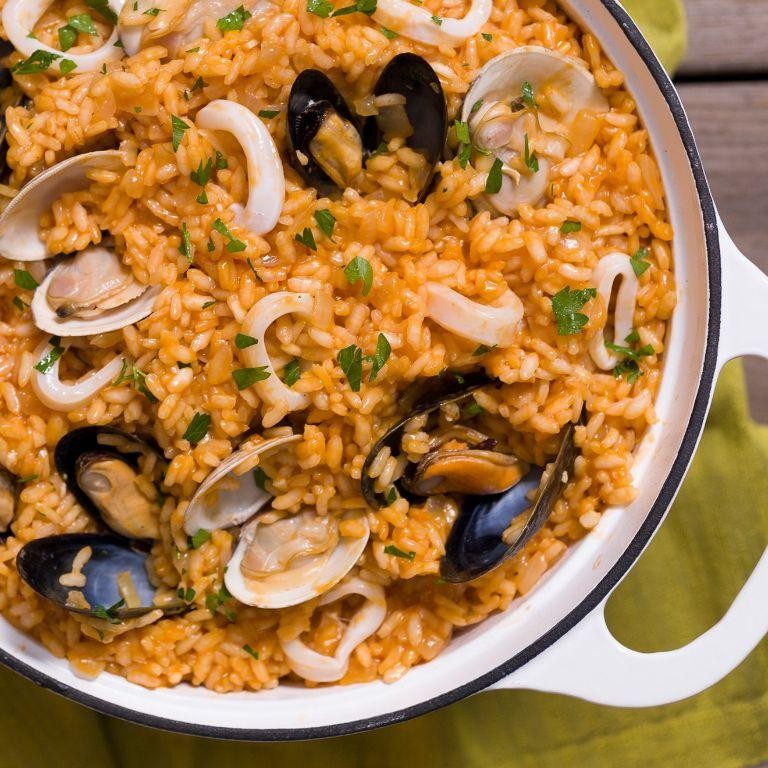
Zipping through holiday prep? This Italian-style seafood risotto is your cozy, impressive escape—creamy, briny, and ready to wow without the fuss.
Serving: 4 | Pre Time: 15 minutes | Cooking Time: 30 minutes
Ingredients
– 1 lb mixed seafood (like shrimp and scallops), thawed if frozen—pat dry with paper towels for better browning
– 1 ½ cups Arborio rice
– 4 cups seafood or chicken broth, warmed on the stove—keep it simmering in a pot nearby
– ½ cup dry white wine (or substitute with extra broth)
– 1 small onion, finely diced
– 2 cloves garlic, minced
– 3 tbsp unsalted butter, divided
– 2 tbsp olive oil (or any neutral oil)
– ½ cup grated Parmesan cheese
– Salt and black pepper, adjust to taste
– 2 tbsp fresh parsley, chopped—for garnish at the end
Instructions
1. Heat 1 tbsp olive oil and 1 tbsp butter in a large skillet or Dutch oven over medium heat until the butter melts.
2. Add the diced onion and cook for 5 minutes, stirring occasionally, until softened and translucent.
3. Stir in the minced garlic and cook for 1 minute until fragrant—don’t let it brown.
4. Add the Arborio rice to the skillet and toast for 2 minutes, stirring constantly, until the grains look slightly translucent at the edges.
5. Pour in the white wine and cook, stirring, until it’s fully absorbed, about 2 minutes.
6. Ladle in 1 cup of the warm broth and simmer, stirring frequently, until the liquid is mostly absorbed, about 5 minutes.
7. Repeat adding broth ½ cup at a time, stirring after each addition until absorbed, for about 20 minutes total—the rice should be tender but still have a slight bite (al dente). Tip: Keep the broth warm to maintain even cooking.
8. While the risotto cooks, pat the seafood dry with paper towels and season lightly with salt and pepper.
9. In a separate pan, heat 1 tbsp olive oil over medium-high heat until shimmering, then add the seafood.
10. Cook the seafood for 2–3 minutes per side until opaque and lightly browned—don’t overcrowd the pan to ensure a good sear. Tip: Cook shrimp and scallops separately if sizes vary for even doneness.
11. Once the risotto is creamy and al dente, remove it from heat and stir in the remaining 2 tbsp butter and Parmesan cheese until melted.
12. Gently fold in the cooked seafood and any juices from the pan. Tip: Add seafood at the end to keep it tender and avoid overcooking.
13. Season with salt and pepper to taste—start with ¼ tsp salt and adjust as needed.
14. Garnish with chopped fresh parsley before serving.
Warm and velvety, this risotto cradles sweet seafood in every creamy bite, with a hint of white wine brightness. Serve it straight from the skillet for a rustic touch, or top with extra Parmesan and a drizzle of olive oil to make it feel extra special.
Chicken Tetrazzini
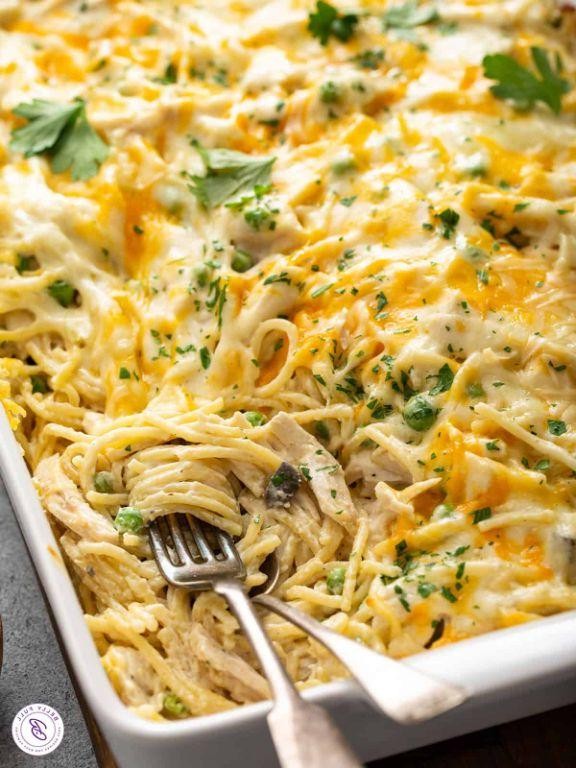
Sometimes you just need that cozy, comforting pasta bake that feels like a warm hug. This Chicken Tetrazzini is exactly that—a creamy, cheesy casserole that’s perfect for feeding a crowd or enjoying as leftovers all week.
Serving: 6 | Pre Time: 20 minutes | Cooking Time: 40 minutes
Ingredients
– 12 oz spaghetti, broken in half (or linguine)
– 2 tbsp olive oil (or any neutral oil)
– 1 lb boneless, skinless chicken breasts, cut into 1-inch cubes
– 1 medium onion, finely chopped
– 8 oz mushrooms, sliced
– 3 cloves garlic, minced
– 4 tbsp unsalted butter
– ¼ cup all-purpose flour
– 2 cups chicken broth
– 1 cup heavy cream
– ½ cup grated Parmesan cheese
– ½ cup shredded mozzarella cheese
– Salt and black pepper, to season
– ¼ cup chopped fresh parsley, for garnish (optional)
Instructions
1. Preheat your oven to 375°F and lightly grease a 9×13-inch baking dish.
2. Bring a large pot of salted water to a boil and cook the spaghetti according to package directions until al dente, then drain and set aside.
3. Heat the olive oil in a large skillet over medium-high heat, then add the chicken cubes and cook for 6–8 minutes until browned and cooked through, stirring occasionally.
4. Remove the chicken from the skillet and set aside on a plate.
5. In the same skillet, add the onion and mushrooms, cooking for 5–7 minutes until softened and lightly browned.
6. Stir in the minced garlic and cook for 1 minute until fragrant.
7. Add the butter to the skillet and let it melt, then sprinkle in the flour and whisk constantly for 2 minutes to form a roux.
8. Gradually pour in the chicken broth while whisking to prevent lumps, then add the heavy cream and bring to a simmer.
9. Cook the sauce for 3–5 minutes until thickened, stirring frequently.
10. Remove the skillet from heat and stir in the Parmesan cheese until melted, then season with salt and black pepper.
11. In a large bowl, combine the cooked spaghetti, cooked chicken, and sauce mixture, tossing gently to coat everything evenly.
12. Transfer the mixture to the prepared baking dish and sprinkle the shredded mozzarella cheese evenly over the top.
13. Bake in the preheated oven for 20–25 minutes until the cheese is bubbly and golden brown.
14. Let the casserole cool for 5 minutes before serving, then garnish with chopped parsley if desired.
Oozing with creamy sauce and tender chicken, this Tetrazzini has a rich, savory flavor that’s balanced by the mild mushrooms. For a fun twist, try serving it with a side of garlic bread or a crisp green salad to cut through the richness.
Clam Chowder in a Sourdough Bread Bowl

Picture this: a chilly evening, you’re craving something warm and comforting, and you want it to feel like a hug in a bowl. That’s where this classic clam chowder comes in—it’s creamy, hearty, and served right in a sourdough bread bowl for the ultimate cozy experience. You’ll love how the flavors meld together, making it perfect for a relaxed dinner or a festive gathering.
Serving: 4 | Pre Time: 15 minutes | Cooking Time: 30 minutes
Ingredients
- 4 large sourdough bread bowls (or use round sourdough loaves, hollowed out)
- 2 tbsp unsalted butter (or olive oil for a dairy-free option)
- 1 medium onion, diced (about 1 cup)
- 2 celery stalks, diced (about 1/2 cup)
- 2 cloves garlic, minced (adjust to taste)
- 2 (6.5 oz) cans chopped clams, drained, juice reserved (or fresh clams if available)
- 2 cups clam juice (from the cans, plus water if needed to reach 2 cups)
- 2 cups heavy cream (or half-and-half for a lighter version)
- 2 medium potatoes, peeled and diced into 1/2-inch cubes (about 2 cups)
- 1 tsp dried thyme (or fresh thyme sprigs)
- Salt and black pepper to taste (start with 1/2 tsp salt, 1/4 tsp pepper)
- 2 tbsp all-purpose flour (for thickening, or use cornstarch as a gluten-free alternative)
- Fresh parsley, chopped (for garnish, optional)
Instructions
- Preheat your oven to 350°F. Place the sourdough bread bowls on a baking sheet and bake for 10 minutes, or until lightly toasted and warm—this helps them hold up better when filled with soup.
- In a large pot over medium heat, melt the unsalted butter until it bubbles slightly, about 1 minute.
- Add the diced onion and celery to the pot. Cook, stirring occasionally, for 5-7 minutes, or until the vegetables are softened and translucent.
- Stir in the minced garlic and cook for 1 minute more, until fragrant—be careful not to burn it, as garlic can turn bitter quickly.
- Sprinkle the all-purpose flour over the vegetables. Cook, stirring constantly, for 2 minutes to form a roux, which will thicken the chowder nicely.
- Gradually pour in the clam juice while stirring continuously to prevent lumps from forming.
- Add the diced potatoes and dried thyme to the pot. Bring the mixture to a simmer over medium-high heat, then reduce to medium-low and cook for 15 minutes, or until the potatoes are fork-tender.
- Stir in the drained chopped clams and heavy cream. Heat for 5 minutes over medium heat, stirring occasionally, until the chowder is hot but not boiling—boiling can cause the cream to curdle.
- Season with salt and black pepper to taste, starting with the suggested amounts and adjusting as needed.
- Ladle the hot clam chowder into the warmed sourdough bread bowls. Garnish with chopped fresh parsley if desired.
Mmm, you’re in for a treat with this dish! The chowder is luxuriously creamy with tender clams and soft potatoes, while the sourdough bowl adds a chewy, slightly tangy contrast that soaks up every last drop. For a fun twist, try topping it with crispy bacon bits or a sprinkle of Old Bay seasoning to kick up the flavor—it’s sure to become a go-to comfort meal in your kitchen.
Green Goddess Salad

Unexpectedly delicious and packed with fresh flavor, this Green Goddess Salad is a vibrant, creamy dish that’s perfect for a quick lunch or a light dinner. You’ll love how the tangy dressing coats every crisp bite, making it a refreshing change from your usual greens. It’s so easy to whip up, you’ll want to make it all season long.
Serving: 4 | Pre Time: 15 minutes | Cooking Time: 0 minutes
Ingredients
– 1 large head of romaine lettuce, chopped (about 8 cups)
– 1 English cucumber, thinly sliced (or any crisp cucumber)
– 1 avocado, diced (use ripe but firm for best texture)
– 1/4 cup fresh basil leaves, packed
– 1/4 cup fresh parsley leaves, packed
– 2 tbsp fresh chives, chopped
– 1/2 cup plain Greek yogurt (full-fat for creaminess)
– 1/4 cup mayonnaise
– 2 tbsp lemon juice, freshly squeezed (about 1 lemon)
– 2 tbsp olive oil
– 1 small garlic clove, minced
– 1/4 tsp salt (adjust if needed)
– 1/4 tsp black pepper
Instructions
1. In a large salad bowl, combine the chopped romaine lettuce, thinly sliced English cucumber, and diced avocado.
2. In a blender or food processor, add the fresh basil leaves, fresh parsley leaves, chopped fresh chives, plain Greek yogurt, mayonnaise, freshly squeezed lemon juice, olive oil, minced garlic clove, salt, and black pepper.
3. Blend the ingredients on high speed for 30-45 seconds until the dressing is smooth and vibrant green, scraping down the sides once if needed. Tip: For a chunkier texture, pulse briefly instead of blending fully.
4. Pour the blended Green Goddess dressing over the salad ingredients in the bowl.
5. Using salad tongs or two large spoons, gently toss the salad for 1-2 minutes until the lettuce, cucumber, and avocado are evenly coated with the dressing. Tip: Toss just before serving to keep the greens crisp and prevent sogginess.
6. Let the salad sit at room temperature for 5 minutes to allow the flavors to meld. Tip: If preparing ahead, store the dressing separately and toss right before eating for the freshest results.
7. Serve the salad immediately in individual bowls or on a large platter.
So creamy and herb-forward, this salad has a luscious texture that clings to every leaf without being heavy. The crisp cucumber and avocado add a satisfying crunch, while the garlic and lemon give it a bright, zesty kick. Try it as a side with grilled chicken or piled into a wrap for a portable meal—it’s versatile enough to shine anywhere.
Fortune Cookies with a Twist

Kicking off the holiday season with a fun twist on a classic! You know those crispy fortune cookies from Chinese restaurants? We’re making them at home with a sweet, buttery upgrade. They’re surprisingly simple and perfect for adding personalized messages or holiday wishes.
Serving: 12 cookies | Pre Time: 15 minutes | Cooking Time: 20 minutes
Ingredients
– 2 large egg whites, at room temperature for better volume
– 1/2 cup granulated sugar
– 1/2 cup all-purpose flour, sifted to prevent lumps
– 1/4 cup unsalted butter, melted and cooled slightly
– 1/2 tsp vanilla extract
– 1/4 tsp almond extract, optional for extra flavor
– Pinch of salt
– Cooking spray or extra butter for greasing
Instructions
1. Preheat your oven to 375°F and line two baking sheets with parchment paper, lightly greasing them with cooking spray or butter to prevent sticking.
2. In a medium bowl, whisk the egg whites until frothy and slightly thickened, about 1-2 minutes with a hand mixer or vigorously by hand.
3. Gradually add the sugar while whisking continuously until the mixture is smooth and glossy, which should take another 2 minutes.
4. Gently fold in the sifted flour, melted butter, vanilla extract, almond extract (if using), and salt until just combined, being careful not to overmix to keep the batter light.
5. Drop 1 tablespoon of batter onto the prepared baking sheets, spacing them 3 inches apart, and use the back of a spoon to spread each into a thin 4-inch circle.
6. Bake one sheet at a time for 5-7 minutes, or until the edges turn golden brown and the centers are set but still slightly soft.
7. Immediately remove one cookie from the oven, place a small strip of paper with a fortune or message in the center, and fold it in half over the edge of a mug to create the classic crescent shape.
8. Pinch the ends together gently to form the fortune cookie shape, holding for 10-15 seconds until it sets; work quickly as they harden fast.
9. Repeat with the remaining cookies, returning the baking sheet to the oven briefly if they cool too much to fold.
10. Let the cookies cool completely on a wire rack for about 10 minutes to crisp up.
Here’s the best part: these cookies come out delightfully crisp with a buttery, vanilla-kissed flavor that’s way better than store-bought. Serve them warm with tea for a cozy treat, or tuck in holiday notes to surprise your guests—they’ll love the homemade touch!
Pulled Pork Sandwiches with Coleslaw
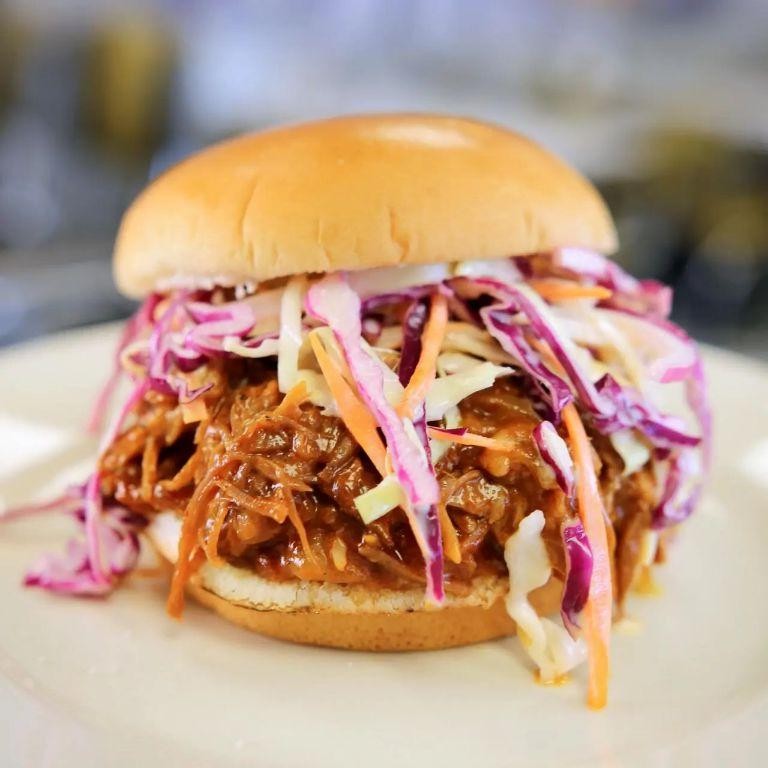
Let’s be real—sometimes you just need a sandwich that feels like a hug. These pulled pork sandwiches with coleslaw are exactly that: tender, smoky, and piled high with a crunchy, tangy slaw that cuts right through the richness. Perfect for feeding a crowd or just treating yourself on a lazy weekend.
Serving: 8 | Pre Time: 20 minutes | Cooking Time: 8 hours
Ingredients
– 4 lbs pork shoulder, trimmed of excess fat
– 2 tbsp olive oil (or any neutral oil)
– 1 tbsp kosher salt
– 1 tbsp black pepper
– 1 tbsp smoked paprika
– 1 cup apple cider vinegar
– 1 cup ketchup
– 1/4 cup brown sugar
– 2 tbsp Worcestershire sauce
– 1 head green cabbage, thinly sliced
– 2 carrots, grated
– 1 cup mayonnaise
– 2 tbsp white vinegar
– 1 tbsp sugar
– 8 brioche buns, split
Instructions
1. Preheat your oven to 300°F.
2. Rub the pork shoulder all over with olive oil.
3. In a small bowl, mix together kosher salt, black pepper, and smoked paprika.
4. Massage the spice rub evenly onto the pork.
5. Place the pork in a large Dutch oven or roasting pan.
6. In a separate bowl, whisk together apple cider vinegar, ketchup, brown sugar, and Worcestershire sauce.
7. Pour the sauce mixture over the pork in the pan.
8. Cover the pan tightly with a lid or aluminum foil.
9. Roast the pork in the preheated oven for 8 hours, until it shreds easily with a fork.
10. While the pork cooks, make the coleslaw: in a large bowl, combine thinly sliced green cabbage and grated carrots.
11. In a small bowl, whisk together mayonnaise, white vinegar, and sugar until smooth.
12. Pour the dressing over the cabbage and carrots, tossing to coat evenly.
13. Let the coleslaw chill in the refrigerator for at least 30 minutes to allow the flavors to meld.
14. Once the pork is done, remove it from the oven and let it rest for 15 minutes.
15. Using two forks, shred the pork directly in the pan, mixing it with the cooking juices.
16. Toast the split brioche buns lightly in a toaster or on a grill pan for about 2 minutes per side, until golden.
17. Pile the shredded pork onto the bottom halves of the toasted buns.
18. Top the pork with a generous scoop of the chilled coleslaw.
19. Place the top halves of the buns on the coleslaw to complete the sandwiches.
20. Serve immediately while warm.
Deliciously messy, these sandwiches offer a perfect balance of smoky, sweet pork and crisp, creamy slaw. The slow-roasted meat practically melts in your mouth, while the coleslaw adds a refreshing crunch that keeps each bite interesting. For a fun twist, try serving them open-faced with extra slaw on the side or pile the leftovers into tacos the next day.
Grilled Oysters with Garlic Butter

Mmm, picture this: you’re hosting a summer gathering, and the smoky aroma of grilled oysters fills the air. It’s a showstopper that feels fancy but is surprisingly simple to pull off. Let’s get those shells sizzling!
Serving: 4 | Pre Time: 15 minutes | Cooking Time: 10 minutes
Ingredients
– 12 fresh oysters in the shell, scrubbed clean (look for tightly closed shells)
– 1/2 cup unsalted butter, softened
– 4 cloves garlic, minced finely (about 1 tbsp)
– 2 tbsp fresh parsley, chopped (or use 1 tsp dried parsley in a pinch)
– 1/4 tsp kosher salt
– 1/4 tsp black pepper, freshly ground
– 1 lemon, cut into wedges for serving
Instructions
1. Preheat your grill to medium-high heat, about 400°F.
2. Place the scrubbed oysters flat-side up on the grill grate.
3. Grill the oysters for 5-8 minutes until the shells just begin to pop open. Tip: Use tongs to transfer them to a baking sheet as they open to avoid overcooking.
4. While the oysters grill, combine the softened butter, minced garlic, chopped parsley, salt, and pepper in a small bowl. Tip: Mixing the butter while soft ensures it melts evenly later.
5. Carefully pry open the grilled oyster shells with an oyster knife, discarding the top shell.
6. Loosen each oyster from its bottom shell with the knife, keeping it in place.
7. Spoon about 1 teaspoon of the garlic butter mixture over each oyster.
8. Return the oysters to the grill and cook for an additional 2-3 minutes until the butter is melted and bubbling. Tip: Watch closely here—the butter can burn quickly if the heat is too high.
9. Remove the oysters from the grill and serve immediately with lemon wedges.
Just out of the grill, these oysters are juicy and briny with a rich, garlicky butter that soaks into every bite. The edges get slightly crisp from the heat, adding a wonderful texture contrast. For a fun twist, sprinkle them with a pinch of smoked paprika or serve alongside crusty bread to soak up all that delicious butter.
Pasta Primavera with Seasonal Vegetables
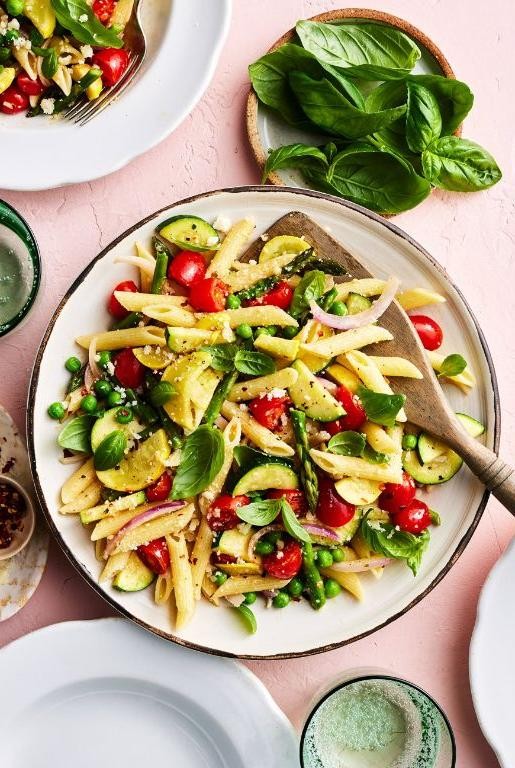
Just when you need a fresh, vibrant meal that celebrates the season, pasta primavera delivers. This colorful dish tosses tender pasta with crisp, seasonal vegetables in a light, garlicky sauce—it’s a simple, satisfying way to eat your veggies without fuss.
Serving: 4 | Pre Time: 15 minutes | Cooking Time: 20 minutes
Ingredients
- 12 oz spaghetti (or any long pasta like linguine)
- 3 tbsp olive oil (or any neutral oil)
- 4 cloves garlic, minced
- 1 medium zucchini, sliced into half-moons
- 1 red bell pepper, thinly sliced
- 1 cup cherry tomatoes, halved
- 1 cup broccoli florets
- 1/2 cup grated Parmesan cheese
- 1/4 cup fresh basil, chopped
- Salt and black pepper (adjust to taste)
Instructions
- Bring a large pot of salted water to a boil over high heat.
- Add the spaghetti to the boiling water and cook for 8–10 minutes, stirring occasionally, until al dente (tender but firm).
- While the pasta cooks, heat the olive oil in a large skillet over medium heat for 1 minute.
- Add the minced garlic to the skillet and sauté for 30 seconds, stirring constantly, until fragrant but not browned.
- Add the sliced zucchini, red bell pepper, and broccoli florets to the skillet and cook for 5–7 minutes, stirring occasionally, until the vegetables are crisp-tender.
- Add the halved cherry tomatoes to the skillet and cook for 2–3 minutes more, until they start to soften and release juices.
- Drain the cooked spaghetti, reserving 1/2 cup of the pasta water.
- Add the drained spaghetti to the skillet with the vegetables and toss to combine.
- Pour in 1/4 cup of the reserved pasta water and toss again, adding more if needed to create a light, silky sauce that coats the pasta.
- Remove the skillet from the heat and stir in the grated Parmesan cheese and chopped basil.
- Season with salt and black pepper to taste, tossing everything together until well mixed.
Zesty and bright, this pasta primavera offers a delightful crunch from the seasonal veggies paired with the smooth, garlic-infused sauce. Serve it immediately, perhaps with an extra sprinkle of Parmesan or a side of crusty bread to soak up every last bit.
Ghirardelli Chocolate Brownies

Holiday baking just got a whole lot easier with these decadent Ghirardelli chocolate brownies. You’re going to love how simple they are to whip up, and that rich chocolate flavor is absolutely irresistible. Trust me, your kitchen will smell amazing in no time.
Serving: 16 | Pre Time: 15 minutes | Cooking Time: 30 minutes
Ingredients
– 1 cup unsalted butter, melted and slightly cooled (or use vegetable oil for a fudgier texture)
– 2 cups granulated sugar
– 4 large eggs, at room temperature for better mixing
– 1 teaspoon vanilla extract
– 1 cup all-purpose flour, spooned and leveled
– ¾ cup unsweetened cocoa powder, sifted to avoid lumps
– ½ teaspoon salt
– 1 cup Ghirardelli semi-sweet chocolate chips (or chopped baking bars for extra richness)
Instructions
1. Preheat your oven to 350°F (175°C) and line a 9×13-inch baking pan with parchment paper, leaving an overhang for easy removal.
2. In a large mixing bowl, whisk together the melted unsalted butter and granulated sugar until well combined and smooth.
3. Add the 4 large eggs one at a time, whisking thoroughly after each addition to incorporate air for a lighter texture.
4. Stir in the 1 teaspoon vanilla extract until evenly distributed throughout the mixture.
5. In a separate medium bowl, sift together the 1 cup all-purpose flour, ¾ cup unsweetened cocoa powder, and ½ teaspoon salt to ensure no clumps.
6. Gradually fold the dry ingredients into the wet mixture using a spatula, mixing just until no flour streaks remain to avoid tough brownies.
7. Gently fold in the 1 cup Ghirardelli semi-sweet chocolate chips until evenly dispersed in the batter.
8. Pour the batter into the prepared baking pan and spread it into an even layer with the spatula.
9. Bake in the preheated oven for 25–30 minutes, or until a toothpick inserted into the center comes out with a few moist crumbs (not wet batter).
10. Let the brownies cool completely in the pan on a wire rack for about 1 hour before slicing to get clean edges.
Unbelievably fudgy and packed with deep chocolate flavor, these brownies have a crackly top and a soft, gooey center that melts in your mouth. Serve them warm with a scoop of vanilla ice cream for an indulgent dessert, or enjoy them as a sweet snack with your afternoon coffee—they’re sure to disappear fast!
Summary
Ultimately, this collection brings the vibrant flavors of San Francisco right to your kitchen. From sourdough bread to cioppino, each recipe is a delicious adventure. We hope you’ll try them, share your favorites in the comments, and pin your must-makes on Pinterest. Happy cooking!


