Battling SIBO doesn’t mean sacrificing flavor! We’ve gathered 18 delicious, gut-friendly recipes that are as satisfying as they are supportive. From comforting soups to vibrant bowls, these dishes are designed to nourish your body and delight your taste buds. Get ready to explore a world of easy, flavorful cooking that celebrates a happy, healthy gut. Let’s dive into these tasty solutions!
Herb-Roasted Chicken with Carrots
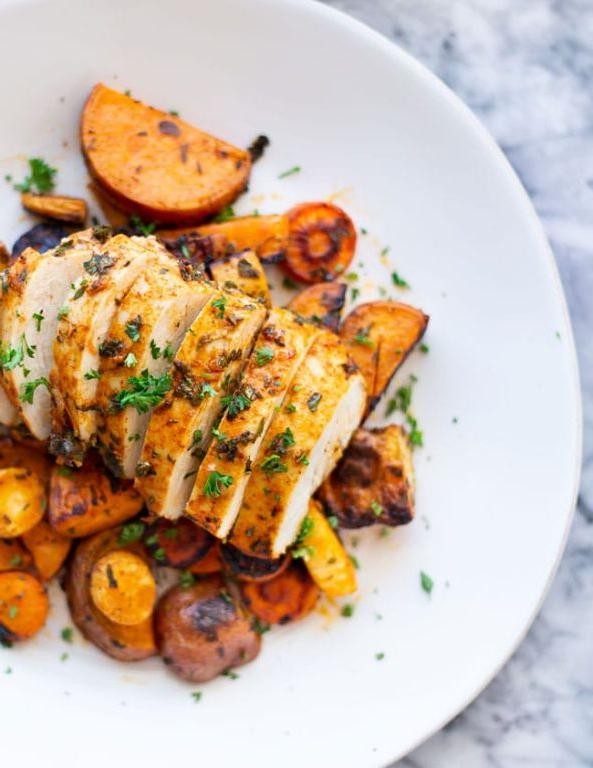
Perfect for a cozy night in, this herb-roasted chicken with carrots delivers crispy skin and tender meat with minimal effort. Grab your sheet pan and let’s get roasting.
Serving: 4 | Pre Time: 15 minutes | Cooking Time: 60 minutes
Ingredients
- One whole chicken (about 4 pounds)
- A couple of tablespoons of olive oil
- A handful of fresh rosemary sprigs
- A handful of fresh thyme sprigs
- Four cloves of garlic, smashed
- One lemon, halved
- A pound of carrots, peeled and cut into 2-inch chunks
- A splash of chicken broth (about ½ cup)
- Salt and black pepper
Instructions
- Preheat your oven to 425°F.
- Pat the chicken completely dry with paper towels—this helps the skin crisp up.
- Rub the chicken all over with olive oil, then season generously inside and out with salt and black pepper.
- Stuff the cavity with the rosemary, thyme, garlic, and lemon halves.
- Place the chicken breast-side up in a large roasting pan or rimmed baking sheet.
- Arrange the carrot chunks around the chicken in a single layer.
- Pour the chicken broth into the bottom of the pan to keep everything moist.
- Roast for 60 minutes, or until a meat thermometer inserted into the thickest part of the thigh reads 165°F.
- Let the chicken rest for 10 minutes before carving—this keeps the juices locked in.
- Serve the carved chicken with the roasted carrots and pan juices spooned over the top.
Crispy, golden skin gives way to juicy, herb-infused meat, while the carrots soak up all the savory pan drippings. Shred any leftovers for tacos tomorrow, or pile it onto a crusty baguette for an epic sandwich.
Ginger-Turmeric Poached Salmon
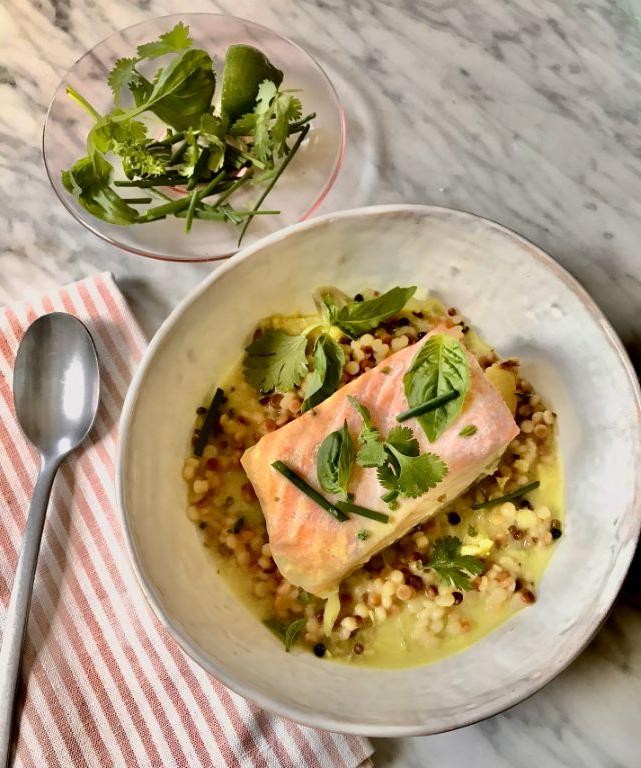
Zap your weeknight dinner routine with this vibrant, anti-inflammatory salmon. Poaching in ginger-turmeric broth keeps it impossibly moist and infuses every bite with warm, earthy flavor. It’s a 20-minute, one-pan wonder that feels fancy but is stupid simple.
Serving: 4 | Pre Time: 5 minutes | Cooking Time: 15 minutes
Ingredients
– 4 salmon fillets (about 6 oz each, skin-on or off)
– 4 cups of water
– A big thumb of fresh ginger, sliced into coins
– A couple of teaspoons of ground turmeric
– A generous splash of olive oil
– A couple of garlic cloves, smashed
– A good pinch of salt
– A handful of fresh cilantro for garnish
– A lemon, cut into wedges
Instructions
1. Grab a large skillet or shallow pot and pour in the 4 cups of water.
2. Add the sliced ginger, ground turmeric, olive oil, smashed garlic cloves, and salt to the water.
3. Place the skillet over medium-high heat and bring the mixture to a gentle simmer—you should see small bubbles forming around the edges, not a rolling boil.
4. Tip: Let the broth simmer for 5 minutes to allow the ginger and turmeric flavors to fully infuse into the liquid.
5. Carefully lower the salmon fillets into the simmering broth, ensuring they are fully submerged.
6. Reduce the heat to low to maintain a bare simmer—the liquid should just barely bubble.
7. Poach the salmon for 8–10 minutes, depending on thickness. The fish is done when it flakes easily with a fork and reaches an internal temperature of 145°F.
8. Tip: Avoid stirring or moving the salmon too much while poaching to keep the fillets intact.
9. Using a slotted spoon or spatula, gently transfer the poached salmon to serving plates.
10. Discard the poaching liquid or save it as a light broth for another use.
11. Garnish the salmon with fresh cilantro and serve immediately with lemon wedges on the side.
12. Tip: For extra flavor, squeeze the lemon wedges over the salmon right before eating to brighten the dish.
Unbelievably tender, the salmon flakes apart with a buttery texture that melts in your mouth, infused with the warm, earthy notes of turmeric and the zing of fresh ginger. Serve it over a bed of coconut rice to soak up any extra broth, or flake it into tacos with a crunchy cabbage slaw for a fun twist. This dish is a vibrant, health-packed meal that’s as beautiful on the plate as it is satisfying.
Garlic-Infused Olive Oil Zucchini Noodles
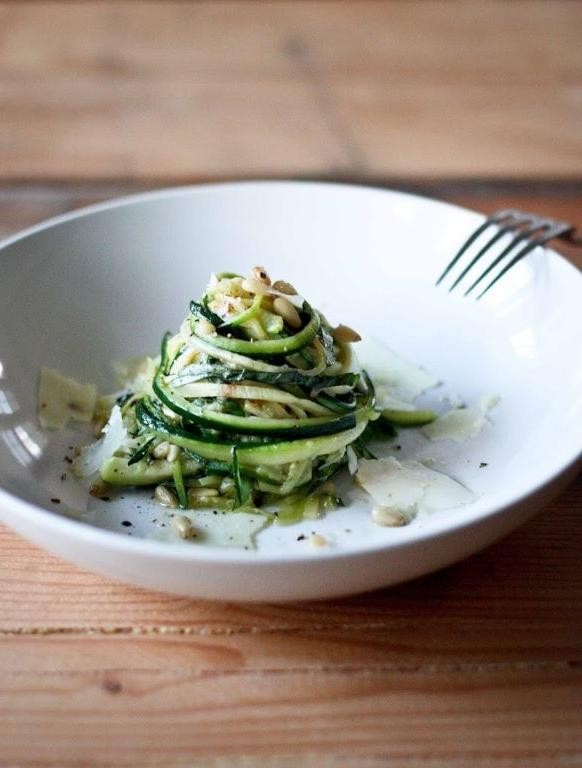
Ditch the heavy pasta tonight—this garlic-infused zucchini noodle dish is your new weeknight hero. It’s fresh, fast, and packed with flavor that’ll make you forget all about the carbs.
Serving: 2 | Pre Time: 10 minutes | Cooking Time: 10 minutes
Ingredients
– 2 medium zucchinis, spiralized into noodles
– 1/4 cup of extra virgin olive oil
– 4 cloves of garlic, thinly sliced
– A pinch of red pepper flakes
– A handful of fresh basil leaves, roughly chopped
– A squeeze of fresh lemon juice (about 1 tbsp)
– Salt and freshly ground black pepper
Instructions
1. Spiralize the zucchinis into noodle shapes using a spiralizer or julienne peeler. Tip: Pat the zucchini noodles dry with a paper towel to prevent a watery sauce.
2. Heat the olive oil in a large skillet over medium-low heat for 2 minutes until warm.
3. Add the sliced garlic to the skillet and cook for 2–3 minutes, stirring constantly, until fragrant and lightly golden. Tip: Keep the heat low to avoid burning the garlic, which can turn bitter.
4. Stir in the red pepper flakes and cook for 30 seconds to infuse the oil with spice.
5. Increase the heat to medium and add the zucchini noodles to the skillet.
6. Toss the noodles in the garlic oil for 3–4 minutes until just tender but still al dente. Tip: Don’t overcook—zucchini noodles soften quickly and can become mushy.
7. Remove the skillet from the heat and stir in the chopped basil and lemon juice.
8. Season generously with salt and black pepper, tossing to combine evenly.
Whip this up for a light, vibrant meal that’s crisp with a subtle garlic kick. The zucchini noodles hold their texture beautifully, making it perfect topped with grilled shrimp or a sprinkle of Parmesan for extra richness.
Low-FODMAP Beef and Spinach Stir-Fry

Ever feel like your gut’s throwing a tantrum after dinner? This low-FODMAP beef and spinach stir-fry is your peace treaty. Whip up a flavorful, satisfying meal that skips the bloat and delivers big on taste.
Serving: 4 | Pre Time: 15 minutes | Cooking Time: 15 minutes
Ingredients
- 1 pound of flank steak, sliced super thin against the grain
- 2 tablespoons of garlic-infused olive oil (trust me, it’s the low-FODMAP hero)
- A big splash of gluten-free tamari or soy sauce (about 3 tablespoons)
- 1 tablespoon of maple syrup
- A couple of big handfuls of fresh spinach (about 5 ounces)
- 1 red bell pepper, sliced into thin strips
- 2 green onions (green parts only), chopped
- Cooked white rice for serving
Instructions
- Slice 1 pound of flank steak into thin strips, cutting against the grain for tenderness.
- Heat 1 tablespoon of garlic-infused olive oil in a large skillet or wok over medium-high heat until it shimmers, about 1 minute.
- Add the sliced steak to the hot skillet in a single layer. Tip: Don’t crowd the pan—cook in batches if needed to get a good sear.
- Sear the steak for 2-3 minutes per side until browned and cooked through, then transfer to a plate.
- Add the remaining 1 tablespoon of garlic-infused olive oil to the same skillet.
- Toss in the sliced red bell pepper and stir-fry for 3-4 minutes until slightly softened.
- Pour in 3 tablespoons of gluten-free tamari and 1 tablespoon of maple syrup, stirring to combine.
- Add the cooked steak back to the skillet, tossing to coat in the sauce.
- Throw in the fresh spinach and stir until just wilted, about 1 minute. Tip: Add spinach last to keep it vibrant and avoid mushiness.
- Remove from heat and stir in the chopped green onion tops.
- Serve immediately over cooked white rice. Tip: For extra flavor, let the stir-fry sit for 2 minutes off heat before serving—the juices will meld beautifully.
Marvel at the tender beef coated in that sweet-salty glaze, with peppers adding crunch and spinach melting into every bite. The garlic-infused oil gives it that savory depth without the FODMAP fuss. Try it wrapped in lettuce cups for a low-carb twist, or top with a fried egg for a next-day breakfast bowl.
Lemon-Pepper Baked Cod with Green Beans
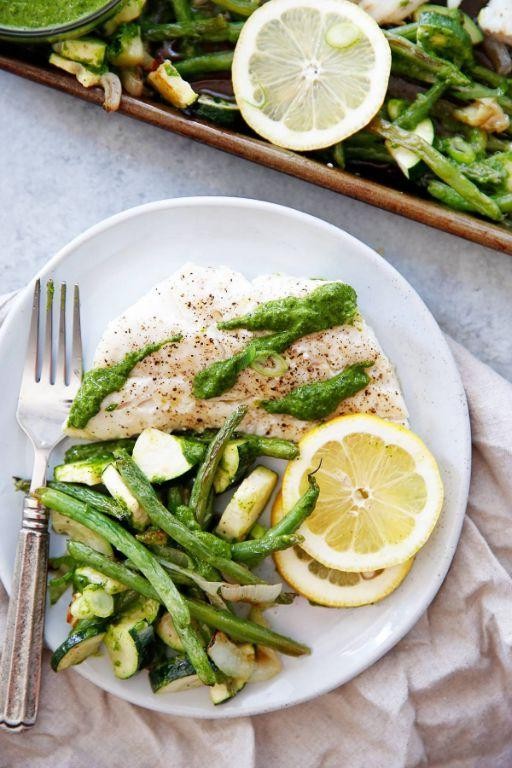
A crispy, zesty baked fish that’s ready in under 30 minutes—perfect for busy weeknights. Lemon-pepper baked cod with green beans delivers bright flavor and tender texture with minimal effort. Let’s get cooking!
Serving: 4 | Pre Time: 10 minutes | Cooking Time: 20 minutes
Ingredients
– 4 cod fillets (about 6 oz each)
– 1 lb fresh green beans, trimmed
– 2 lemons (one for zest/juice, one for slices)
– 3 tbsp olive oil
– 2 tsp lemon-pepper seasoning
– 1 tsp garlic powder
– A pinch of salt
– A couple of sprigs of fresh thyme (optional)
Instructions
1. Preheat your oven to 400°F and line a baking sheet with parchment paper.
2. Pat the cod fillets dry with paper towels—this helps them crisp up nicely.
3. In a small bowl, mix 2 tbsp olive oil, lemon zest from one lemon, 1 tbsp lemon juice, lemon-pepper seasoning, garlic powder, and a pinch of salt.
4. Brush the oil mixture evenly over both sides of each cod fillet.
5. Toss the green beans with the remaining 1 tbsp olive oil and spread them in a single layer on half the baking sheet.
6. Place the seasoned cod fillets on the other half of the baking sheet, spacing them apart.
7. Top each fillet with a thin lemon slice and a thyme sprig if using.
8. Bake at 400°F for 15–18 minutes, until the cod flakes easily with a fork and the green beans are tender-crisp.
9. Let the cod rest for 2 minutes before serving to keep it juicy.
Lightly flaky cod with a zesty crust pairs perfectly with those garlicky green beans. Serve it over quinoa or with crusty bread to soak up the lemony juices—it’s a vibrant, healthy meal that feels anything but boring.
Coconut-Curry Shrimp with Bok Choy
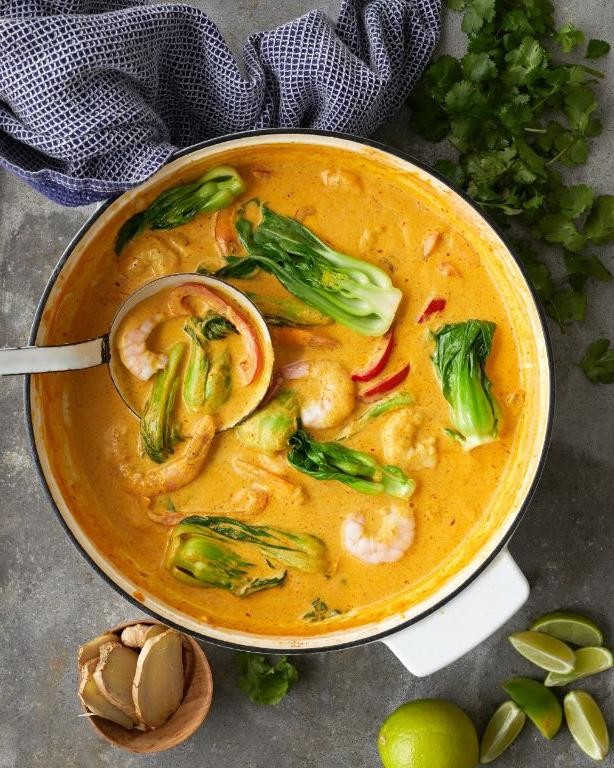
Ditch the takeout menus—this Coconut-Curry Shrimp with Bok Choy is your new 20-minute weeknight hero. It’s creamy, spicy, and packed with fresh crunch. You’ll be licking the bowl clean.
Serving: 4 | Pre Time: 10 minutes | Cooking Time: 15 minutes
Ingredients
– A couple of tablespoons of olive oil
– 1 pound of large shrimp, peeled and deveined
– A big pinch of salt and black pepper
– 1 small yellow onion, finely chopped
– 3 cloves of garlic, minced
– A tablespoon of fresh ginger, grated
– 2 tablespoons of red curry paste
– A 14-ounce can of full-fat coconut milk
– A splash of fish sauce
– A squeeze of lime juice (about 1 lime)
– 2 heads of baby bok choy, chopped
– A handful of fresh cilantro, chopped (for garnish)
Instructions
1. Heat 1 tablespoon of olive oil in a large skillet over medium-high heat until shimmering.
2. Pat the shrimp completely dry with paper towels—this helps them sear instead of steam.
3. Season the shrimp all over with salt and black pepper.
4. Add the shrimp to the hot skillet in a single layer. Cook for 1–2 minutes per side until pink and opaque, then transfer to a plate.
5. Add the remaining tablespoon of olive oil to the same skillet.
6. Toss in the chopped onion and cook for 3–4 minutes, stirring often, until softened.
7. Stir in the minced garlic and grated ginger. Cook for 1 minute until fragrant.
8. Add the red curry paste and cook for 1 minute, stirring constantly to toast the spices.
9. Pour in the entire can of coconut milk and whisk until smooth with the curry paste.
10. Bring the sauce to a gentle simmer, then reduce heat to medium-low.
11. Stir in the fish sauce and lime juice.
12. Add the chopped bok choy to the simmering sauce. Cook for 2–3 minutes until the stems are tender-crisp and the leaves are wilted.
13. Tip: Don’t overcook the bok choy—you want a bit of crunch for texture.
14. Return the cooked shrimp to the skillet. Stir gently to coat in the sauce and heat through for 1 minute.
15. Remove the skillet from the heat.
16. Tip: Let the dish rest for 2 minutes off the heat—the flavors will meld beautifully.
17. Garnish with the chopped fresh cilantro just before serving.
18. Tip: For extra heat, stir in a sliced Thai chili with the garlic and ginger.
Get ready for a flavor explosion—the creamy coconut curry clings to the juicy shrimp, while the bok choy adds a fresh, crisp bite. Serve it over steamed jasmine rice to soak up every last drop of sauce, or wrap it in warm tortillas for a fun, hands-on twist.
Rosemary-Lamb Chops with Roasted Bell Peppers
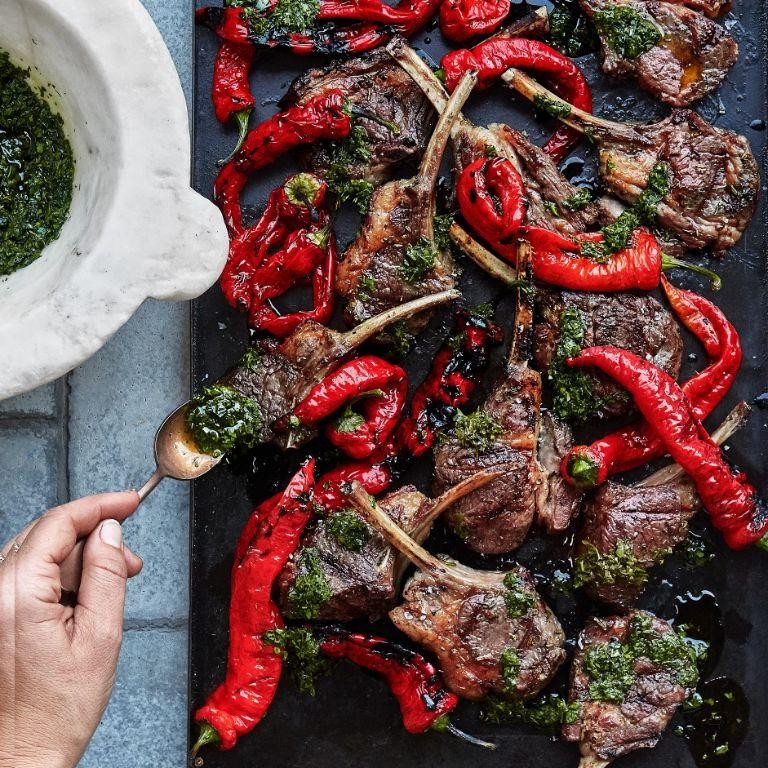
Zesty rosemary-lamb chops with roasted bell peppers are about to become your new weeknight hero. Grab your skillet—this 30-minute meal delivers restaurant-quality flavor without the fuss. Perfect for impressing guests or treating yourself after a long day.
Serving: 4 | Pre Time: 10 minutes | Cooking Time: 20 minutes
Ingredients
– 8 lamb chops (about 1.5 lbs total)
– 2 large bell peppers (any color), sliced into strips
– 3 tbsp olive oil
– 4 garlic cloves, minced
– 2 tbsp fresh rosemary, finely chopped
– 1 tsp kosher salt
– ½ tsp black pepper
– A splash of balsamic vinegar
– A couple of lemon wedges for serving
Instructions
1. Preheat your oven to 400°F (200°C).
2. Pat the lamb chops dry with paper towels to ensure a good sear.
3. In a small bowl, mix 2 tbsp olive oil, minced garlic, chopped rosemary, kosher salt, and black pepper to create a marinade.
4. Rub the marinade evenly over all sides of the lamb chops and let them sit for 5 minutes.
5. Toss the bell pepper strips with the remaining 1 tbsp olive oil on a baking sheet.
6. Roast the peppers in the preheated oven for 15 minutes, or until they start to char at the edges.
7. While the peppers roast, heat a large skillet over medium-high heat until hot.
8. Sear the lamb chops for 3-4 minutes per side for medium-rare, or until they reach an internal temperature of 145°F (63°C).
9. Remove the lamb chops from the skillet and let them rest on a plate for 5 minutes to keep them juicy.
10. Drizzle the roasted peppers with a splash of balsamic vinegar right out of the oven.
11. Plate the lamb chops alongside the peppers and garnish with lemon wedges.
These chops boast a crispy, herb-crusted exterior with tender, pink centers that melt in your mouth. The sweet, smoky peppers add a vibrant contrast that’s both hearty and refreshing. Try serving them over creamy polenta or with a simple arugula salad for a complete meal that feels effortlessly elegant.
Basil-Pesto Grilled Chicken Skewers
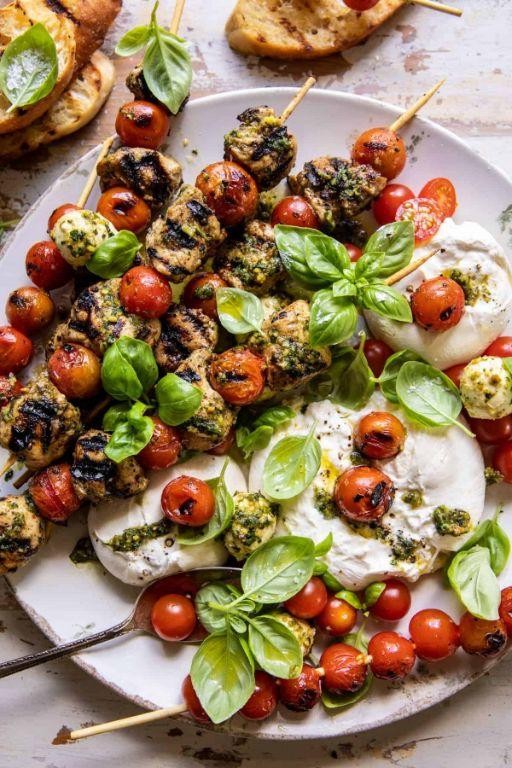
Fired up for a flavor-packed dinner that’s basically summer on a stick? These basil-pesto grilled chicken skewers are your ticket to a vibrant, herby meal in minutes—no fuss, all sizzle.
Serving: 4 | Pre Time: 15 minutes | Cooking Time: 10 minutes
Ingredients
– 1.5 pounds of boneless, skinless chicken breasts, cut into 1-inch cubes
– A generous ½ cup of fresh basil pesto (store-bought or homemade)
– 2 tablespoons of olive oil
– A couple of wooden skewers, soaked in water for 30 minutes
– A pinch of salt and black pepper
– A splash of lemon juice for zing
Instructions
1. Soak the wooden skewers in water for 30 minutes to prevent burning on the grill.
2. Cut the chicken breasts into 1-inch cubes and place them in a bowl.
3. Add the basil pesto, olive oil, salt, and black pepper to the bowl with the chicken.
4. Toss everything together until the chicken is evenly coated with the pesto mixture.
5. Thread the chicken cubes onto the soaked skewers, leaving a little space between each piece for even cooking.
6. Preheat your grill to medium-high heat, about 400°F.
7. Place the skewers on the grill and cook for 4-5 minutes per side, flipping once, until the chicken reaches an internal temperature of 165°F.
8. Remove the skewers from the grill and drizzle with a splash of lemon juice before serving.
These skewers come off the grill with a juicy, tender bite and a bold, herby kick from the pesto. Toss them over a bed of greens or pair with grilled veggies for a complete meal that’s as colorful as it is delicious.
Parsley-Lemon Quinoa with Grilled Shrimp
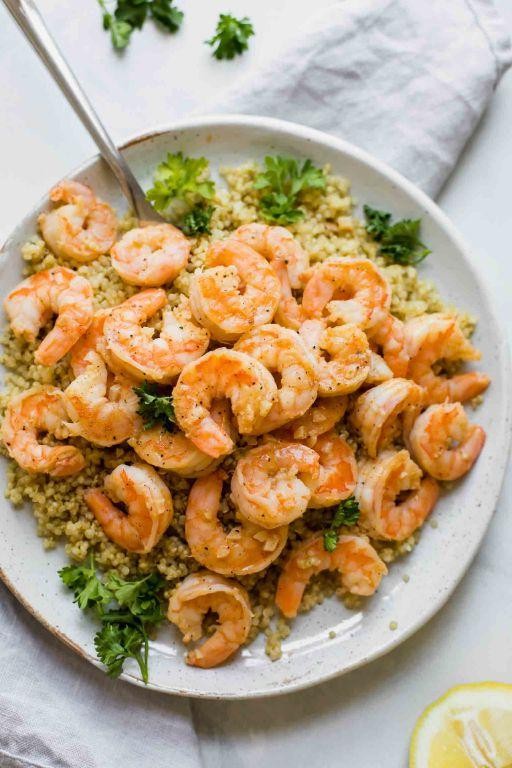
Out with boring salads and in with this vibrant bowl that’s basically a flavor party. Packed with bright parsley, zesty lemon, and perfectly grilled shrimp, it’s the fresh, protein-packed meal you’ll crave all week. Let’s get cooking.
Serving: 4 | Pre Time: 15 minutes | Cooking Time: 20 minutes
Ingredients
– 1 cup of quinoa
– 2 cups of water
– A big handful of fresh parsley (about 1 cup, chopped)
– The juice and zest from 2 lemons
– A couple of garlic cloves, minced
– A generous glug of olive oil (about 3 tablespoons)
– 1 pound of large shrimp, peeled and deveined
– A good pinch of salt and black pepper
Instructions
1. Rinse the quinoa under cold water in a fine-mesh strainer for 1 minute to remove bitterness.
2. Combine the rinsed quinoa and 2 cups of water in a medium saucepan.
3. Bring the mixture to a boil over high heat, then reduce the heat to low, cover, and simmer for 15 minutes until all the water is absorbed.
4. While the quinoa cooks, zest and juice the 2 lemons into a small bowl.
5. Finely chop the fresh parsley and mince the garlic cloves.
6. In a large mixing bowl, whisk together the lemon juice, lemon zest, minced garlic, and 2 tablespoons of olive oil to make the dressing.
7. Once the quinoa is cooked, fluff it with a fork and immediately transfer it to the bowl with the dressing.
8. Toss the warm quinoa with the dressing until evenly coated, then stir in the chopped parsley. (Tip: Adding the quinoa warm helps it absorb the flavors better.)
9. Season the shrimp with salt and black pepper on both sides.
10. Heat a grill pan or skillet over medium-high heat and add the remaining 1 tablespoon of olive oil.
11. Place the shrimp in the hot pan and cook for 2-3 minutes per side until they turn pink and opaque. (Tip: Don’t overcrowd the pan to ensure a good sear.)
12. Remove the shrimp from the pan and let them rest for 2 minutes. (Tip: Resting keeps the shrimp juicy.)
13. Serve the quinoa in bowls and top with the grilled shrimp.
Dig into a bowl where the quinoa is fluffy and tangy, with pops of fresh parsley in every bite. The shrimp add a smoky, juicy contrast that makes this dish feel indulgent yet light. Try it piled into lettuce wraps for a crunchy, low-carb twist.
Thyme-Roasted Turkey with Mashed Parsnips
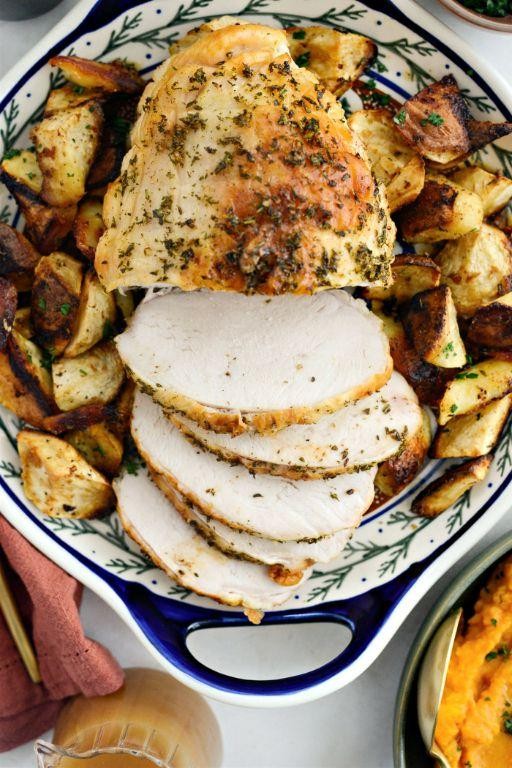
Ready to upgrade your holiday table? This thyme-roasted turkey with mashed parsnips delivers juicy, herb-kissed meat and creamy, slightly sweet sides in one stunning showstopper. Roast it low and slow for maximum flavor, then whip up those parsnips while the bird rests.
Serving: 6 | Pre Time: 25 minutes | Cooking Time: 3 hours
Ingredients
– A 12-pound whole turkey (thawed if frozen)
– A couple of tablespoons of olive oil
– A big handful of fresh thyme sprigs
– A tablespoon of kosher salt
– A teaspoon of black pepper
– 2 pounds of parsnips (peeled and chopped)
– 4 cloves of garlic (peeled)
– A cup of heavy cream
– 4 tablespoons of unsalted butter
– A splash of whole milk
– A pinch of nutmeg
Instructions
1. Preheat your oven to 325°F.
2. Pat the turkey completely dry with paper towels—this helps the skin crisp up.
3. Rub the turkey all over with olive oil, then season inside and out with salt and pepper.
4. Stuff the cavity with thyme sprigs and garlic cloves for aromatic flavor.
5. Place the turkey breast-side up on a rack in a roasting pan.
6. Roast for about 3 hours, or until a meat thermometer inserted into the thickest part of the thigh reads 165°F.
7. Tip: Baste the turkey with pan juices every 45 minutes to keep it moist.
8. Remove the turkey from the oven and let it rest on a cutting board for 30 minutes before carving.
9. While the turkey rests, place the chopped parsnips in a large pot and cover with water.
10. Bring to a boil over high heat, then reduce to a simmer and cook for 20 minutes, or until the parsnips are fork-tender.
11. Drain the parsnips well and return them to the pot.
12. Add the heavy cream, butter, milk, and nutmeg to the pot.
13. Mash everything together with a potato masher until smooth and creamy.
14. Tip: For extra fluffiness, use a hand mixer on low speed instead of mashing.
15. Season the mashed parsnips with a little more salt if needed, but taste first as the butter adds saltiness.
16. Carve the turkey into slices, discarding the thyme and garlic from the cavity.
17. Tip: Save the pan drippings to make a quick gravy by simmering with a bit of flour and broth.
18. Serve the turkey slices alongside the mashed parsnips.
That golden-brown turkey skin shatters with each bite, revealing tender, thyme-infused meat that pairs perfectly with the velvety, subtly sweet parsnips. Try drizzling the mashed parsnips with a bit of honey or topping them with crispy fried onions for an extra crunch that contrasts the creamy texture.
Cumin-Spiced Pork Tenderloin with Carrots
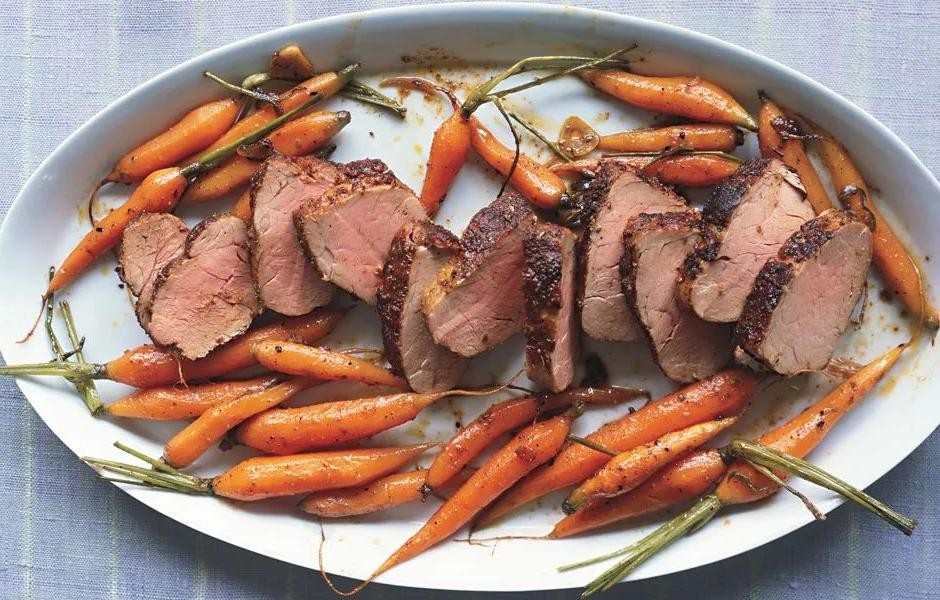
Just when you thought pork tenderloin couldn’t get more addictive, we’re hitting it with warm cumin and roasting it alongside sweet carrots. This one-pan wonder delivers restaurant-quality flavor with minimal cleanup—perfect for busy weeknights or impressing last-minute guests. Get ready for a meal that’s both cozy and vibrant.
Serving: 4 | Pre Time: 15 minutes | Cooking Time: 25 minutes
Ingredients
– 1 pork tenderloin (about 1.5 pounds)
– 2 tablespoons of olive oil
– 1 tablespoon of ground cumin
– 1 teaspoon of smoked paprika
– A couple of garlic cloves, minced
– A splash of apple cider vinegar (about 1 tablespoon)
– 4 medium carrots, peeled and sliced into 1-inch pieces
– Salt and black pepper
Instructions
1. Preheat your oven to 400°F (200°C).
2. Pat the pork tenderloin dry with paper towels—this helps the seasoning stick better.
3. In a small bowl, mix 1 tablespoon of olive oil, ground cumin, smoked paprika, minced garlic, and apple cider vinegar to form a paste.
4. Rub the paste all over the pork tenderloin, coating it evenly.
5. Toss the carrot pieces with the remaining 1 tablespoon of olive oil, salt, and black pepper in a large roasting pan.
6. Place the seasoned pork tenderloin in the center of the pan, surrounded by the carrots.
7. Roast in the preheated oven for 20–25 minutes, or until the pork reaches an internal temperature of 145°F (63°C) when checked with a meat thermometer.
8. Remove the pan from the oven and let the pork rest for 5 minutes before slicing—this keeps it juicy.
9. Slice the pork into 1-inch thick medallions and serve immediately with the roasted carrots.
What you get is tender, juicy pork with a smoky cumin crust that pairs perfectly with the caramelized, sweet carrots. Try serving it over a bed of quinoa or with a dollop of Greek yogurt for a creamy contrast—it’s a flavor combo that’ll have everyone asking for seconds.
Dill-Cucumber Salad with Grilled Salmon
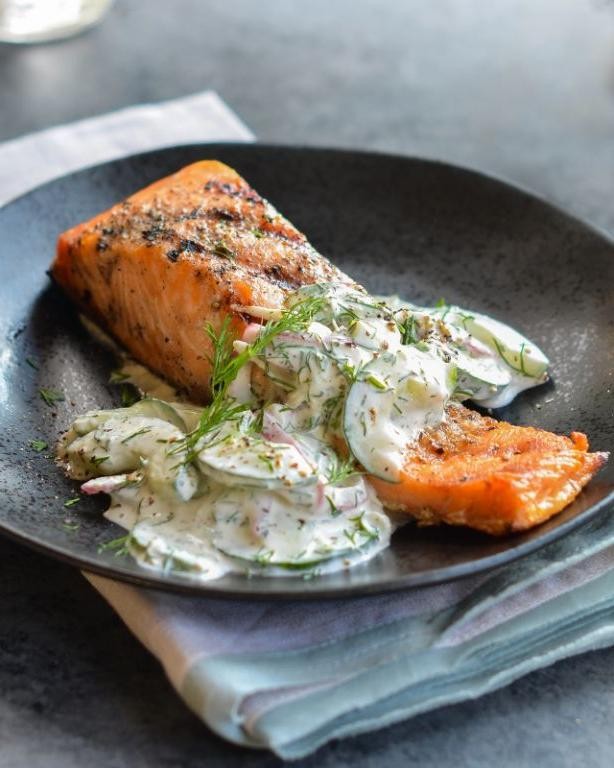
Ditch the boring salads—this dill-cucumber combo with grilled salmon is your new summer obsession. Crisp cucumbers meet smoky salmon in a tangy yogurt dressing that’s ridiculously refreshing. Perfect for meal prep or a quick weeknight dinner that feels fancy.
Serving: 4 | Pre Time: 15 minutes | Cooking Time: 10 minutes
Ingredients
– 4 salmon fillets (about 6 oz each)
– 2 large cucumbers, thinly sliced
– A big handful of fresh dill, chopped
– 1 cup plain Greek yogurt
– A generous squeeze of lemon juice (about 2 tbsp)
– A couple of garlic cloves, minced
– A splash of olive oil (about 2 tbsp)
– A pinch of salt and black pepper
Instructions
1. Preheat your grill to medium-high heat (about 400°F).
2. Pat the salmon fillets dry with paper towels to ensure a crispy skin.
3. Brush the salmon lightly with olive oil and season both sides with salt and pepper.
4. Place the salmon skin-side down on the grill and cook for 4–5 minutes until the skin is crispy.
5. Flip the salmon carefully and grill for another 3–4 minutes until it flakes easily with a fork. Tip: Don’t overcook—salmon is best when slightly pink in the center.
6. While the salmon grills, slice the cucumbers thinly and toss them into a large bowl.
7. In a small bowl, mix the Greek yogurt, minced garlic, lemon juice, and chopped dill until smooth. Tip: Use full-fat yogurt for a creamier texture that won’t water out.
8. Pour the yogurt dressing over the cucumbers and toss to coat evenly.
9. Let the salmon rest for 2–3 minutes after grilling to lock in juices.
10. Serve the salmon fillets over the dressed cucumber salad. Tip: Garnish with extra dill for a pop of color and freshness.
You get a cool, crunchy salad against the warm, flaky salmon—it’s a texture dream. The dill and lemon brighten everything up without overpowering. Try it stuffed into pita pockets for a portable lunch or topped with avocado slices for extra creaminess.
Oregano-Marinated Grilled Steak with Zucchini
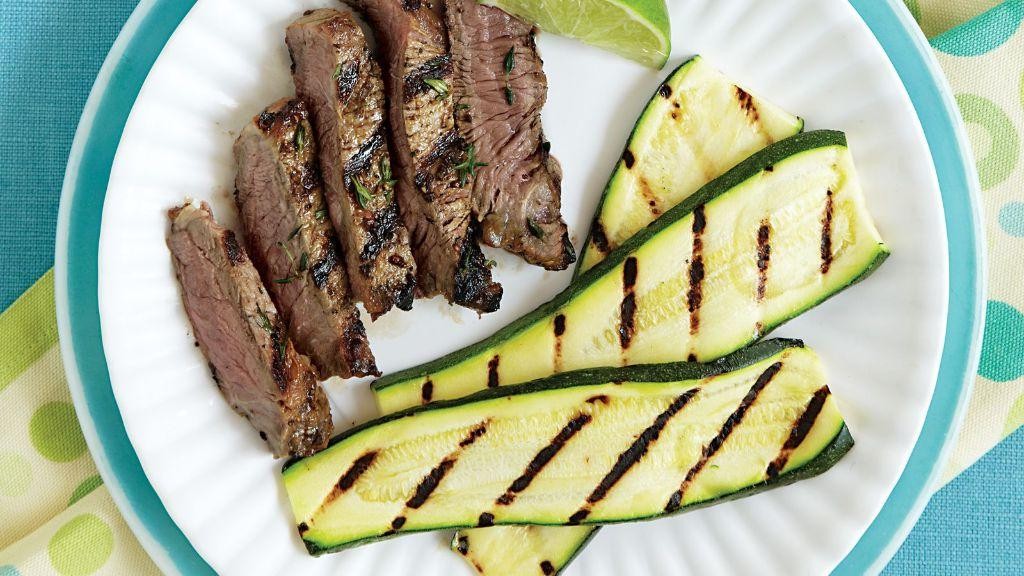
Tired of boring weeknight dinners? This oregano-marinated grilled steak with zucchini transforms basic ingredients into a flavor-packed meal. Fire up the grill and get ready for juicy, herb-kissed steak with perfectly charred zucchini in under 30 minutes.
Serving: 4 | Pre Time: 15 minutes | Cooking Time: 12 minutes
Ingredients
– 1.5 lbs of flank steak
– A couple of medium zucchinis, sliced lengthwise into 1/2-inch planks
– 1/4 cup of olive oil
– 3 tablespoons of fresh lemon juice
– 2 tablespoons of dried oregano
– 3 cloves of garlic, minced
– A big pinch of kosher salt
– A few cracks of black pepper
Instructions
1. Whisk together 1/4 cup olive oil, 3 tablespoons lemon juice, 2 tablespoons dried oregano, 3 minced garlic cloves, a big pinch of salt, and a few cracks of pepper in a bowl to make the marinade.
2. Place 1.5 lbs flank steak in a shallow dish and pour the marinade over it, coating both sides completely. Let it sit at room temperature for 15 minutes—this helps the meat cook more evenly.
3. While the steak marinates, slice 2 medium zucchinis lengthwise into 1/2-inch planks and lightly brush them with a bit of the leftover marinade or a drizzle of olive oil.
4. Preheat your grill to high heat, about 450-500°F, and clean the grates well to prevent sticking.
5. Place the marinated steak on the hot grill and cook for 5-6 minutes per side for medium-rare, or until it reaches an internal temperature of 130°F. For a pro tip, only flip the steak once to get those perfect grill marks.
6. While the steak cooks, add the zucchini planks to the grill and cook for 3-4 minutes per side until they have nice char marks and are tender but not mushy.
7. Transfer the grilled steak to a cutting board and let it rest for 5 minutes—this locks in all those delicious juices before slicing.
8. Slice the steak thinly against the grain to ensure it’s tender, then serve immediately with the grilled zucchini.
Buttery and tender from the marinade, the steak pairs perfectly with the smoky, slightly sweet zucchini. For a creative twist, chop the leftovers and toss them into a grain bowl with quinoa and a lemon-herb dressing the next day.
Turmeric-Ginger Chicken Soup

Whip up this golden-hued immunity booster in under an hour. It’s the cozy, feel-good hug your winter-weary soul craves—packed with anti-inflammatory turmeric and zesty ginger to fight off the sniffles. Your kitchen will smell like a healing potion, and your taste buds will thank you.
Serving: 4 | Pre Time: 15 minutes | Cooking Time: 35 minutes
Ingredients
– A couple of tablespoons of olive oil
– One large yellow onion, diced
– Three cloves of garlic, minced
– A big knob of fresh ginger (about a 2-inch piece), peeled and grated
– Two tablespoons of ground turmeric
– One pound of boneless, skinless chicken thighs, cut into bite-sized chunks
– Six cups of low-sodium chicken broth
– Two large carrots, sliced into coins
– Two stalks of celery, chopped
– A splash of fresh lemon juice (from about half a lemon)
– A handful of fresh cilantro, chopped
– Salt and freshly cracked black pepper
Instructions
1. Heat the olive oil in a large Dutch oven or heavy-bottomed pot over medium heat for 1 minute.
2. Add the diced onion and cook, stirring often, for 5 minutes until softened and translucent.
3. Stir in the minced garlic, grated ginger, and ground turmeric, and cook for 1 more minute until fragrant. (Tip: Grate the ginger directly over the pot to catch all the juice.)
4. Add the chicken chunks to the pot and season generously with salt and pepper.
5. Cook the chicken, stirring occasionally, for 5–6 minutes until it’s no longer pink on the outside.
6. Pour in the chicken broth and use a wooden spoon to scrape up any browned bits from the bottom of the pot.
7. Add the sliced carrots and chopped celery to the broth.
8. Bring the soup to a boil, then immediately reduce the heat to a gentle simmer.
9. Cover the pot with a lid, leaving it slightly ajar, and simmer for 20 minutes until the chicken is cooked through and the vegetables are tender. (Tip: Simmering with the lid ajar prevents the broth from boiling over while still reducing slightly.)
10. Remove the pot from the heat and stir in the fresh lemon juice.
11. Taste the soup and adjust the seasoning with more salt and pepper if needed.
12. Ladle the soup into bowls and top each serving with a sprinkle of fresh chopped cilantro.
13. (Tip: For a richer broth, let the soup sit off the heat for 10 minutes before serving—the flavors will deepen.)
Rustic and restorative, this soup has a velvety broth with tender chicken and soft vegetables in every spoonful. The turmeric gives it a warm, earthy depth, while the ginger and lemon provide a bright, zippy finish. Serve it with a crusty loaf of sourdough for dipping, or swirl in a spoonful of coconut milk for a creamier, tropical twist.
Chive-Scalloped Potatoes with Baked Chicken
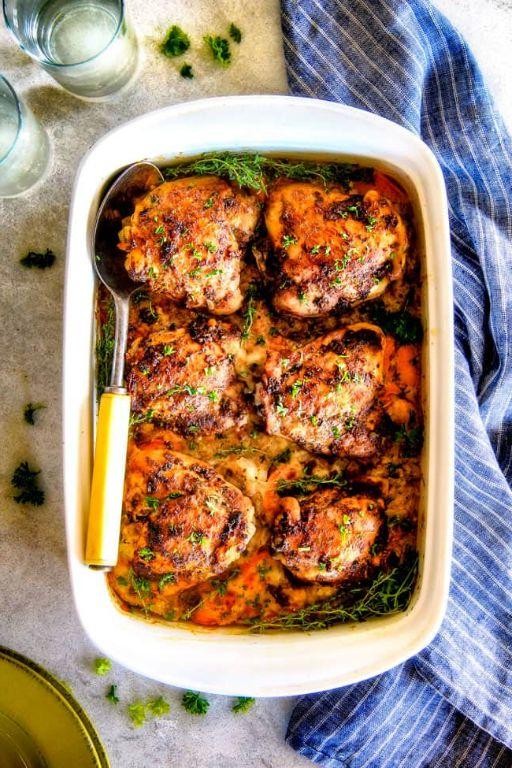
Ever crave that cozy dinner that feels like a hug? Elevate your weeknight with creamy potatoes and juicy chicken—no fuss, all flavor.
Serving: 4 | Pre Time: 20 minutes | Cooking Time: 1 hour 15 minutes
Ingredients
– 4 boneless, skinless chicken breasts
– 2 pounds of Yukon Gold potatoes, thinly sliced
– 1 cup of heavy cream
– 1 cup of shredded sharp cheddar cheese
– 1/2 cup of chopped fresh chives
– 3 tablespoons of unsalted butter
– 2 cloves of garlic, minced
– A splash of olive oil
– A couple of pinches of salt and black pepper
Instructions
1. Preheat your oven to 375°F (190°C).
2. Rub the chicken breasts with a splash of olive oil, then season them with a pinch of salt and black pepper on both sides.
3. In a large skillet over medium-high heat, sear the chicken for 3-4 minutes per side until golden brown, then set aside. Tip: Don’t overcrowd the pan to get a good crust.
4. In the same skillet, melt 2 tablespoons of butter over medium heat, then sauté the minced garlic for 1 minute until fragrant.
5. Add the heavy cream to the skillet, bring it to a gentle simmer, then stir in half of the shredded cheddar cheese until melted.
6. Layer half of the thinly sliced potatoes in a greased 9×13-inch baking dish, sprinkle with half of the chopped chives, and pour half of the cream mixture over them.
7. Repeat with the remaining potatoes, chives, and cream mixture, then top with the rest of the cheddar cheese.
8. Place the seared chicken breasts on top of the potato layers.
9. Cover the dish with aluminum foil and bake for 45 minutes. Tip: This helps the potatoes cook through without drying out.
10. Remove the foil, dot the top with the remaining 1 tablespoon of butter, and bake uncovered for another 15-20 minutes until the cheese is bubbly and the chicken reaches 165°F (74°C) internally. Tip: Use a meat thermometer to ensure perfect doneness.
11. Let it rest for 5 minutes before serving.
Outrageously creamy potatoes melt with sharp cheddar and fresh chives, while the chicken stays juicy from that initial sear. Serve it straight from the dish for a rustic touch, or pair with a crisp salad to cut through the richness.
Sage-Butternut Squash Soup with Turkey
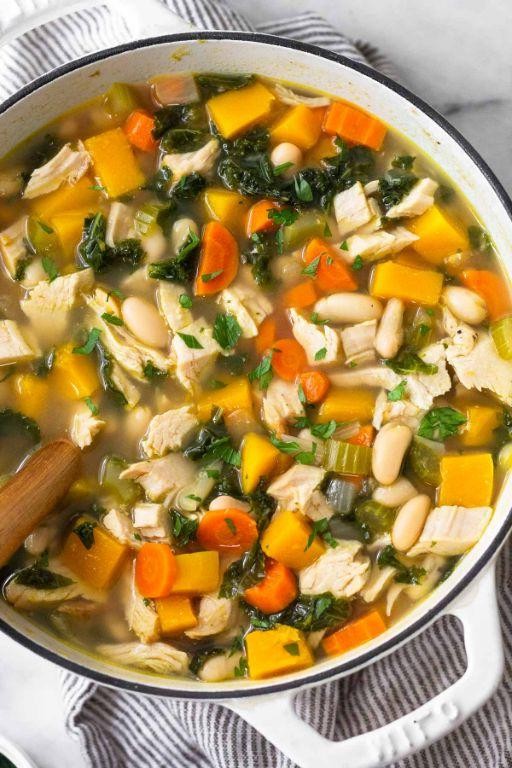
Grab your coziest sweater—this sage-butternut squash soup with turkey is about to become your winter MVP. We’re blending sweet squash with savory turkey and earthy sage for a bowl that’s pure comfort. Skip the takeout and let’s get simmering.
Serving: 4 | Pre Time: 15 minutes | Cooking Time: 45 minutes
Ingredients
– 1 medium butternut squash, peeled and cubed (about 4 cups)
– 1 lb ground turkey
– 1 yellow onion, chopped
– 2 cloves garlic, minced
– 4 cups chicken broth
– 1 cup heavy cream
– 2 tbsp olive oil
– 1 tbsp fresh sage, chopped (plus a few whole leaves for garnish)
– A pinch of salt and black pepper
– A splash of apple cider vinegar
Instructions
1. Heat 1 tbsp olive oil in a large pot over medium heat.
2. Add the chopped onion and cook for 5 minutes until translucent.
3. Stir in the minced garlic and cook for 1 more minute until fragrant.
4. Add the ground turkey to the pot, breaking it up with a spoon, and cook for 8–10 minutes until browned and no longer pink.
5. Toss in the cubed butternut squash and chopped sage, stirring to combine.
6. Pour in 4 cups of chicken broth, bring to a boil, then reduce heat to low, cover, and simmer for 25 minutes until the squash is fork-tender.
7. Carefully transfer the mixture to a blender (or use an immersion blender in the pot) and blend until smooth.
8. Return the soup to the pot if needed, stir in 1 cup heavy cream, and heat on low for 5 minutes until warmed through.
9. Add a splash of apple cider vinegar, then season with a pinch of salt and black pepper.
10. In a small skillet, heat the remaining 1 tbsp olive oil over medium-high, fry the whole sage leaves for 30 seconds until crisp, then set aside for garnish.
Zesty and velvety, this soup boasts a creamy texture with chunks of savory turkey peeking through. The sage adds an herby punch that pairs perfectly with crusty bread or a dollop of sour cream. Try serving it in hollowed-out bread bowls for an extra cozy twist—it’s a holiday table showstopper.
Paprika-Roasted Chicken with Green Beans
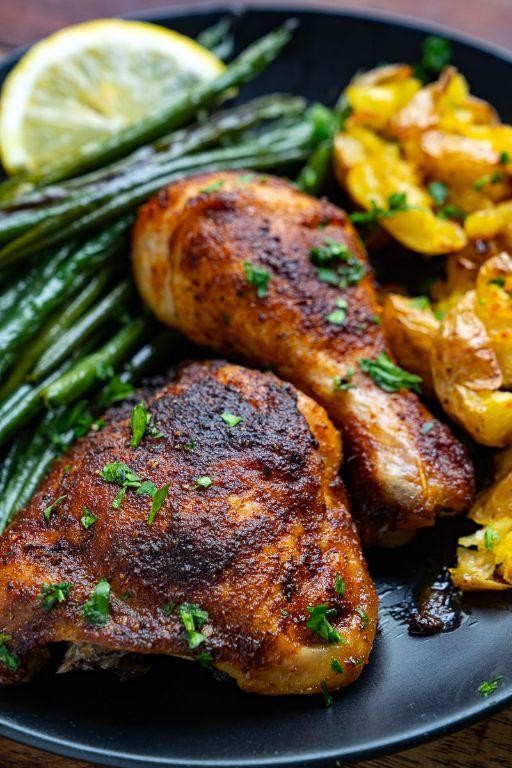
You need a dinner that’s all flavor, zero fuss. This paprika-roasted chicken with green beans delivers crispy skin, tender meat, and vibrant veggies—all on one sheet pan. Let’s get roasting.
Serving: 4 | Pre Time: 15 minutes | Cooking Time: 45 minutes
Ingredients
– 4 bone-in, skin-on chicken thighs
– A couple of tablespoons of olive oil
– 2 tablespoons of smoked paprika
– A big pinch of salt and black pepper
– 1 pound of fresh green beans, ends trimmed
– 1 lemon, sliced into thin rounds
– A splash of chicken broth (about ¼ cup)
Instructions
1. Preheat your oven to 425°F and line a large sheet pan with parchment paper.
2. Pat the chicken thighs completely dry with paper towels—this helps the skin crisp up beautifully.
3. In a small bowl, mix the olive oil, smoked paprika, salt, and black pepper into a thick paste.
4. Rub the spice paste all over the chicken thighs, making sure to get it under the skin too for maximum flavor.
5. Arrange the chicken thighs skin-side up on one side of the prepared sheet pan.
6. Toss the trimmed green beans and lemon slices with any remaining spice paste in the bowl.
7. Spread the green beans and lemon slices in a single layer on the other side of the sheet pan.
8. Pour the chicken broth evenly over the green beans to keep them moist during roasting.
9. Roast in the preheated oven for 40-45 minutes, until the chicken skin is deeply golden and crispy, and the internal temperature reaches 165°F.
10. Let the chicken rest for 5 minutes before serving to allow the juices to redistribute.
Dive into that crispy, paprika-spiced skin giving way to juicy, tender chicken. The green beans soak up all the savory pan juices, getting slightly charred and bursting with bright lemon flavor. Serve it straight from the pan with crusty bread to mop up every last bit, or shred the chicken over a grain bowl for tomorrow’s lunch.
Lemongrass-Coconut Chicken Curry
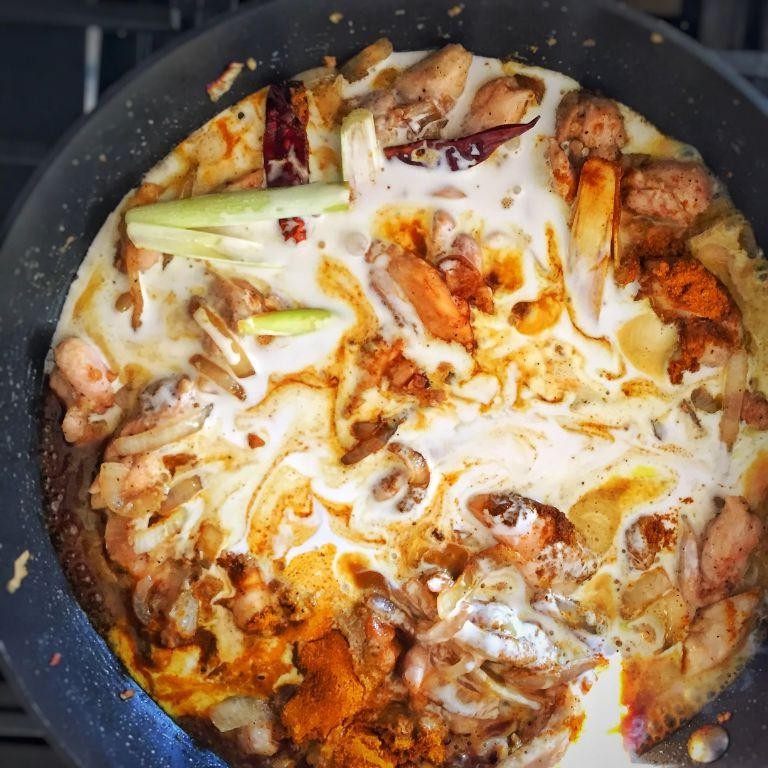
Ever crave something that’s cozy, creamy, and packed with flavor? This lemongrass-coconut chicken curry delivers exactly that—a fragrant, soul-warming bowl that’s surprisingly simple to whip up. Get ready to transform your weeknight dinner game.
Serving: 4 | Pre Time: 15 minutes | Cooking Time: 25 minutes
Ingredients
– 1.5 lbs boneless, skinless chicken thighs, cut into bite-sized chunks
– 1 can (13.5 oz) full-fat coconut milk
– 2 stalks fresh lemongrass, trimmed and smashed
– 1 medium yellow onion, thinly sliced
– 3 cloves garlic, minced
– 1 tbsp fresh ginger, grated
– 2 tbsp red curry paste
– 1 tbsp fish sauce
– 1 tbsp brown sugar
– 1 tbsp vegetable oil
– A big handful of fresh cilantro, chopped
– A squeeze of lime juice
– Cooked jasmine rice, for serving
Instructions
1. Heat 1 tbsp vegetable oil in a large pot or Dutch oven over medium-high heat until shimmering, about 1 minute.
2. Add the sliced onion and cook, stirring often, until softened and lightly golden, about 5 minutes.
3. Stir in the minced garlic and grated ginger, cooking for 1 minute until fragrant—don’t let it burn.
4. Add the chicken chunks to the pot in a single layer. Let them sear undisturbed for 2 minutes to develop a golden crust, then stir to brown all sides, about 5 minutes total.
5. Push the chicken to one side and add 2 tbsp red curry paste to the empty space. Toast it for 30 seconds, stirring constantly, to deepen its flavor.
6. Pour in the entire can of coconut milk, scraping up any browned bits from the bottom of the pot.
7. Add the smashed lemongrass stalks, 1 tbsp fish sauce, and 1 tbsp brown sugar. Stir everything to combine.
8. Bring the mixture to a gentle simmer, then reduce heat to low. Cover and let it cook for 15 minutes, stirring occasionally, until the chicken is tender and cooked through.
9. Remove the pot from heat. Fish out and discard the lemongrass stalks.
10. Stir in the chopped cilantro and a generous squeeze of lime juice just before serving.
11. Serve immediately over hot jasmine rice.
Perfectly tender chicken swims in a luxuriously creamy, aromatic sauce with just the right kick. The fresh lime and cilantro brighten every bite, making it irresistibly scoopable over fluffy rice. Try it with a side of crispy roti for dipping—you’ll want to savor every last drop.
Summary
Lovingly crafted, these 18 SIBO-friendly recipes offer a delicious path to a happier gut. We hope you find joy and relief in trying them! Share your favorite in the comments below and pin this roundup on Pinterest to help others discover these gut-friendly delights. Happy cooking!


