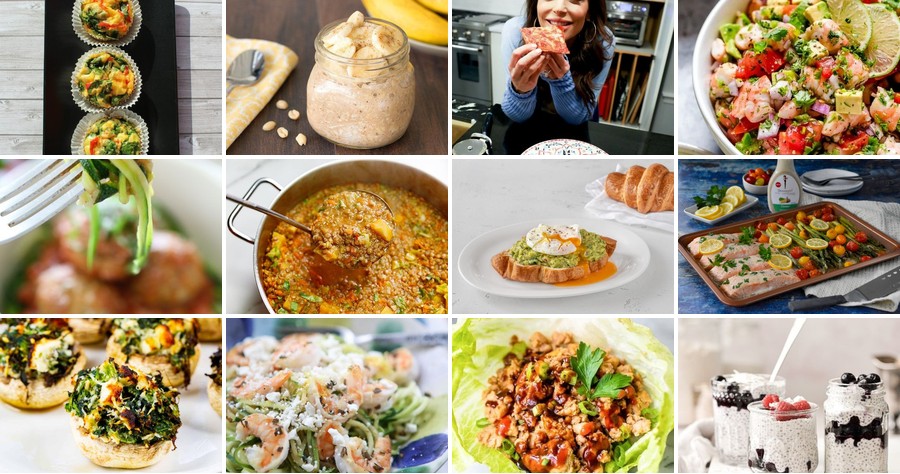
Unleash your inner chef without the guilt! We’ve gathered 19 delicious Skinny Girl recipes that prove healthy eating can be incredibly tasty and satisfying. From quick weeknight dinners to lightened-up comfort food classics, this roundup is your go-to guide for nourishing meals that delight your taste buds. Dive in and discover your new favorite dishes for a vibrant, healthy lifestyle.
Skinny Girl Avocado Toast with Poached Egg
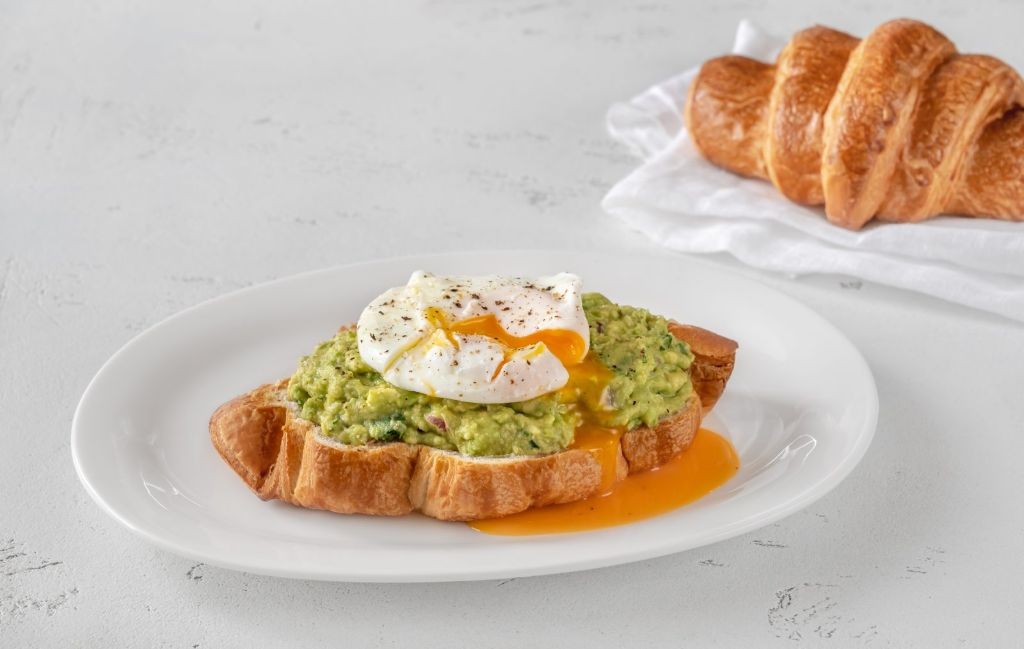
OBSESSED with this protein-packed breakfast that looks as good as it tastes. Grab your avocado and let’s make magic happen—this toast delivers creamy texture and savory satisfaction without the guilt. Perfect for busy mornings when you need fuel fast.
Serving: 1 | Pre Time: 5 minutes | Cooking Time: 10 minutes
Ingredients
– 1 slice sourdough bread
– ½ ripe Hass avocado
– 1 pasture-raised egg
– 1 tsp white vinegar
– ½ tsp flaky sea salt
– ¼ tsp freshly cracked black pepper
– 1 tsp extra-virgin olive oil
– 1 tsp fresh lemon juice
– 1 tbsp microgreens
Instructions
1. Fill a small saucepan with 3 inches of water and bring to a gentle simmer over medium heat, maintaining 180°F.
2. Crack the pasture-raised egg into a small ramekin.
3. Add 1 tsp white vinegar to the simmering water to help coagulate the egg whites.
4. Create a vortex in the water by stirring with a spoon, then gently slide the egg from the ramekin into the center of the vortex.
5. Poach the egg for exactly 3 minutes for a runny yolk, using a slotted spoon to occasionally nudge the egg to prevent sticking.
6. While the egg poaches, toast the sourdough bread slice in a toaster until golden-brown and crisp, about 2 minutes.
7. Halve the ripe Hass avocado, remove the pit, and scoop the flesh into a small bowl.
8. Mash the avocado with 1 tsp fresh lemon juice, ½ tsp flaky sea salt, and ¼ tsp freshly cracked black pepper until slightly chunky.
9. Remove the poached egg from the water with a slotted spoon and drain on a paper towel.
10. Drizzle 1 tsp extra-virgin olive oil over the toasted sourdough.
11. Spread the mashed avocado mixture evenly onto the toast.
12. Carefully place the poached egg on top of the avocado layer.
13. Garnish with 1 tbsp microgreens for a fresh, peppery finish.
Marvel at the contrast between the crisp sourdough and the velvety avocado mash. The runny yolk creates a luxurious sauce that melds with the bright lemon and rich olive oil. For a spicy twist, add a sprinkle of crushed red pepper flakes or serve alongside smoked salmon for an elevated brunch presentation.
Low-Calorie Skinny Girl Zucchini Noodles
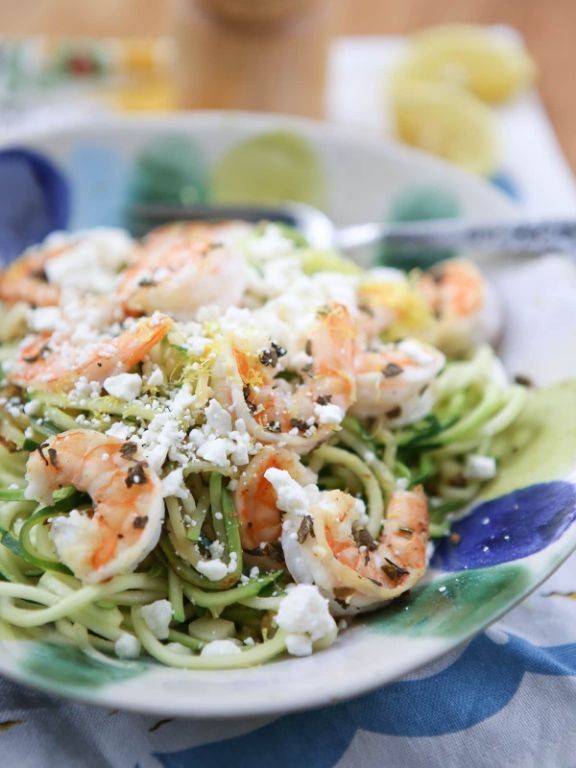
Ditch the guilt and grab your spiralizer—this isn’t your average pasta swap. We’re transforming humble zucchini into crave-worthy, low-calorie noodles that actually satisfy. Get ready for a meal that’s light, bright, and packed with flavor.
Serving: 2 | Pre Time: 15 minutes | Cooking Time: 10 minutes
Ingredients
– 2 medium zucchini (about 1 lb total), spiralized into noodles
– 1 tbsp extra-virgin olive oil
– 2 cloves garlic, finely minced
– 1/4 cup low-sodium vegetable broth
– 1 tbsp freshly squeezed lemon juice
– 1/4 cup finely grated Parmigiano-Reggiano cheese
– 1/4 cup fresh basil leaves, chiffonade-cut
– 1/4 tsp freshly cracked black pepper
– 1/8 tsp fine sea salt
Instructions
1. Spiralize two medium zucchini into noodle-like strands using a spiralizer fitted with the medium blade.
2. Heat one tablespoon of extra-virgin olive oil in a large skillet over medium-high heat until it shimmers, about 90 seconds.
3. Add two cloves of finely minced garlic to the skillet and sauté for 45 seconds, just until fragrant and lightly golden.
4. Tip: Do not brown the garlic, as it will turn bitter and overpower the delicate zucchini.
5. Immediately add all the spiralized zucchini noodles to the skillet.
6. Sauté the noodles for 2 minutes, using tongs to toss them constantly and ensure even cooking.
7. Pour in one-quarter cup of low-sodium vegetable broth.
8. Continue cooking for another 3-4 minutes, until the noodles are just tender but still retain a slight bite (al dente) and most of the broth has evaporated.
9. Tip: Avoid overcooking, as zucchini noodles will quickly become mushy and release excess water.
10. Remove the skillet from the heat source.
11. Drizzle one tablespoon of freshly squeezed lemon juice over the noodles and toss to combine.
12. Sprinkle one-quarter cup of finely grated Parmigiano-Reggiano cheese, one-quarter cup of chiffonade-cut fresh basil, one-quarter teaspoon of freshly cracked black pepper, and one-eighth teaspoon of fine sea salt over the noodles.
13. Toss everything gently but thoroughly until the cheese begins to melt and coat the noodles.
14. Tip: For a richer flavor, let the dish rest off the heat for 2 minutes before serving to allow the flavors to meld.
15. Divide the zucchini noodles evenly between two plates.
Fresh, vibrant, and satisfyingly toothsome, these noodles offer a clean, herbaceous flavor with a bright citrus finish. For a creative twist, top with a poached pasture-raised egg or serve chilled the next day as a light pasta salad.
Skinny Girl Greek Yogurt Parfait
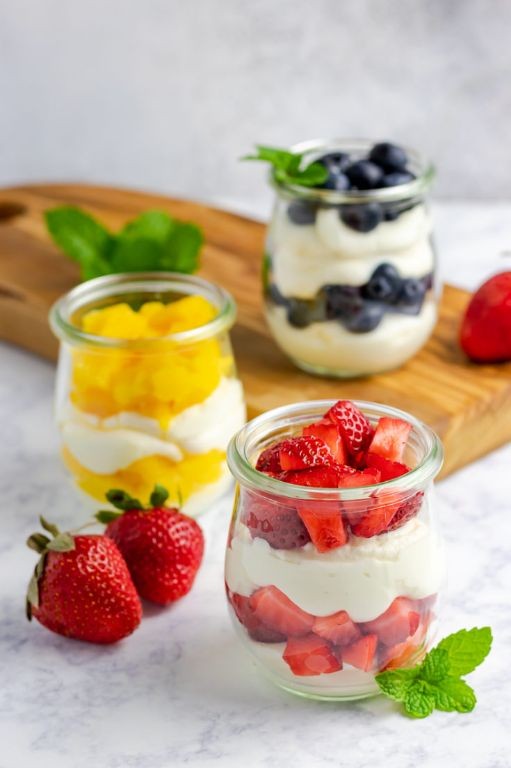
Just when you thought yogurt bowls couldn’t get any better—this parfait is the ultimate protein-packed, guilt-free indulgence. Jolt your morning routine with layers of creamy Greek yogurt, crunchy granola, and vibrant berries that’ll make your taste buds sing. Skip the sugar crash and dive straight into pure, unadulterated deliciousness.
Serving: 1 | Pre Time: 10 minutes | Cooking Time: 0 minutes
Ingredients
– 1 cup plain Greek yogurt (preferably full-fat for optimal creaminess)
– ½ cup artisanal granola blend (with nuts and seeds)
– ½ cup fresh mixed berries (such as raspberries, blueberries, and blackberries)
– 1 tablespoon raw honey (preferably local and unfiltered)
– 1 teaspoon pure vanilla extract
– 1 teaspoon fresh lemon zest (finely grated)
Instructions
1. In a small mixing bowl, combine 1 cup plain Greek yogurt, 1 teaspoon pure vanilla extract, and 1 teaspoon fresh lemon zest. Whisk vigorously for 30 seconds until fully incorporated and airy.
2. Drizzle 1 tablespoon raw honey over the yogurt mixture. Fold gently with a spatula to create a marbled effect, avoiding overmixing to maintain texture.
3. Select a clear glass or parfait dish. Spoon one-third of the yogurt mixture into the bottom, spreading it evenly with the back of a spoon.
4. Sprinkle 2 tablespoons of the artisanal granola blend over the yogurt layer, ensuring an even distribution for consistent crunch.
5. Arrange 2 tablespoons of fresh mixed berries on top of the granola, pressing lightly to secure them in place.
6. Repeat steps 3–5 twice more to build two additional layers, finishing with a final layer of berries on top.
7. Garnish the parfait with any remaining granola and a light dusting of lemon zest for visual appeal.
8. Serve immediately to preserve the granola’s crisp texture, or refrigerate for up to 1 hour if preparing ahead.
What emerges is a symphony of textures—the velvety yogurt contrasts with the granola’s hearty crunch, while the berries burst with juicy sweetness. For a creative twist, swap the honey for maple syrup or layer in dark chocolate shavings between the yogurt and granola. This parfait isn’t just a breakfast; it’s a vibrant, Instagram-worthy masterpiece that’ll keep you satisfied all morning long.
Skinny Girl Quinoa Salad with Lemon Dressing
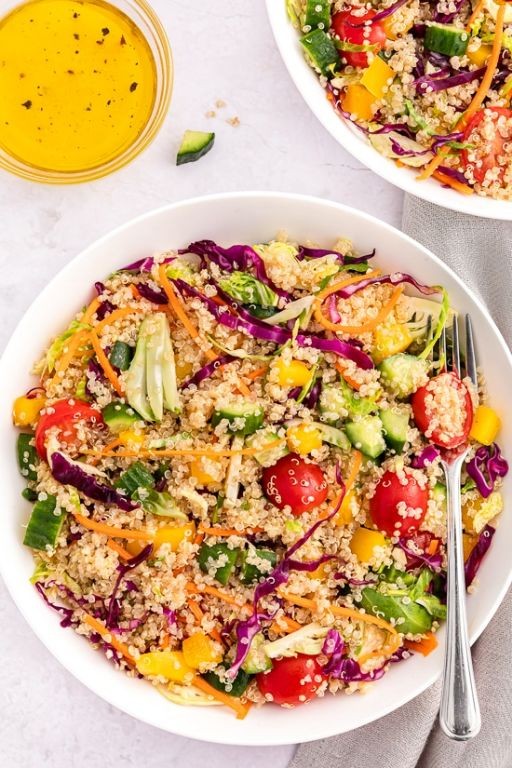
Rethink your salad game with this vibrant, protein-packed bowl that’s as satisfying as it is healthy. Whip up this quinoa salad in under 30 minutes for a lunch that fuels your day without weighing you down. It’s fresh, zesty, and totally Instagram-worthy.
Serving: 4 | Pre Time: 15 minutes | Cooking Time: 15 minutes
Ingredients
– 1 cup quinoa, rinsed
– 2 cups filtered water
– 1/2 tsp fine sea salt
– 1 English cucumber, finely diced
– 1 pint cherry tomatoes, halved
– 1/2 red onion, thinly sliced
– 1/4 cup extra-virgin olive oil
– 1/4 cup freshly squeezed lemon juice
– 1 tbsp Dijon mustard
– 1 clove garlic, minced
– 1/4 cup fresh dill, chopped
– 1/4 cup fresh parsley, chopped
– 1/4 tsp freshly ground black pepper
Instructions
1. Combine the rinsed quinoa, filtered water, and fine sea salt in a medium saucepan.
2. Bring the mixture to a boil over high heat, then reduce the heat to low, cover, and simmer for 15 minutes until all liquid is absorbed and quinoa is fluffy.
3. Tip: Fluff the cooked quinoa with a fork and spread it on a baking sheet to cool completely, preventing a mushy salad.
4. While the quinoa cools, finely dice the English cucumber and halve the cherry tomatoes.
5. Thinly slice the red onion and soak the slices in ice water for 5 minutes to mellow their sharpness, then drain and pat dry.
6. In a small bowl, whisk together the extra-virgin olive oil, freshly squeezed lemon juice, Dijon mustard, and minced garlic until emulsified.
7. Tip: For a smoother dressing, use a microplane to grate the garlic instead of mincing it.
8. In a large mixing bowl, combine the cooled quinoa, diced cucumber, halved cherry tomatoes, drained red onion, chopped fresh dill, and chopped fresh parsley.
9. Pour the dressing over the salad and toss gently to coat all ingredients evenly.
10. Season with freshly ground black pepper and toss once more.
11. Tip: Let the salad rest for 10 minutes before serving to allow the flavors to meld together.
12. Serve immediately or chill in the refrigerator for up to 2 hours.
Witness the perfect harmony of fluffy quinoa and crisp vegetables, all brightened by that tangy lemon dressing. Each bite delivers a refreshing crunch with herbaceous notes from the dill and parsley. Try it as a base for grilled chicken or scoop it into lettuce cups for a low-carb twist.
Skinny Girl Cauliflower Rice Stir-Fry
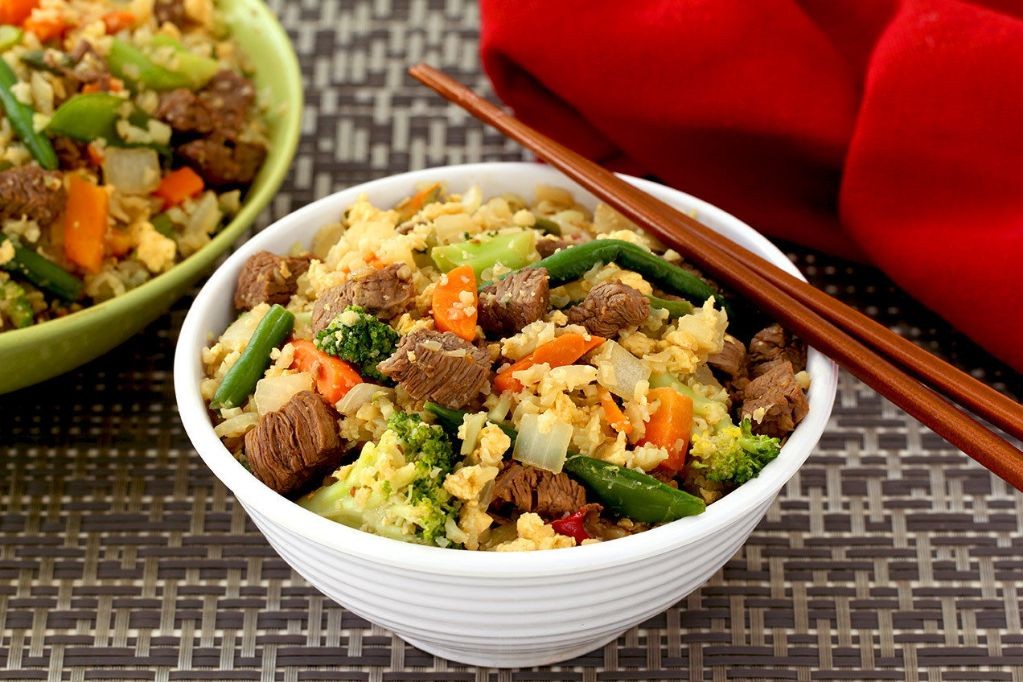
Banish bland meals with this vibrant cauliflower rice stir-fry that swaps heavy grains for light, veggie-packed goodness. Grab your wok and transform simple ingredients into a crave-worthy dinner in minutes—your taste buds won’t believe it’s skinny.
Serving: 4 | Pre Time: 15 minutes | Cooking Time: 10 minutes
Ingredients
– 1 large head cauliflower, riced (about 4 cups)
– 2 tbsp avocado oil
– 1 lb boneless, skinless chicken thighs, cut into ½-inch pieces
– 1 red bell pepper, julienned
– 1 cup snap peas, trimmed
– 3 cloves garlic, minced
– 1 tbsp fresh ginger, grated
– ¼ cup low-sodium soy sauce
– 2 tbsp rice vinegar
– 1 tsp toasted sesame oil
– 2 green onions, thinly sliced
– 1 tbsp toasted sesame seeds
Instructions
1. Heat a large wok or skillet over high heat and add 1 tbsp avocado oil.
2. Add chicken pieces in a single layer and sear undisturbed for 2 minutes to develop a golden crust.
3. Flip chicken and cook for another 2 minutes until cooked through, then transfer to a plate.
4. Add remaining 1 tbsp avocado oil to the wok and swirl to coat.
5. Add julienned bell pepper and snap peas, stir-frying for 2 minutes until crisp-tender.
6. Stir in minced garlic and grated ginger, cooking for 30 seconds until fragrant.
7. Add riced cauliflower and toss continuously for 3 minutes to lightly toast.
8. Pour in low-sodium soy sauce and rice vinegar, stirring to coat evenly.
9. Return cooked chicken to the wok and toss to combine.
10. Drizzle with toasted sesame oil and remove from heat.
11. Garnish with sliced green onions and toasted sesame seeds.
Light and satisfying, this stir-fry delivers a crisp-tender texture with savory umami notes from the soy and a bright finish from the vinegar. Serve it in lettuce cups for a low-carb twist or top with a fried egg for extra protein—either way, it’s a flavor-packed meal that feels indulgent without the guilt.
Skinny Girl Grilled Chicken Lettuce Wraps
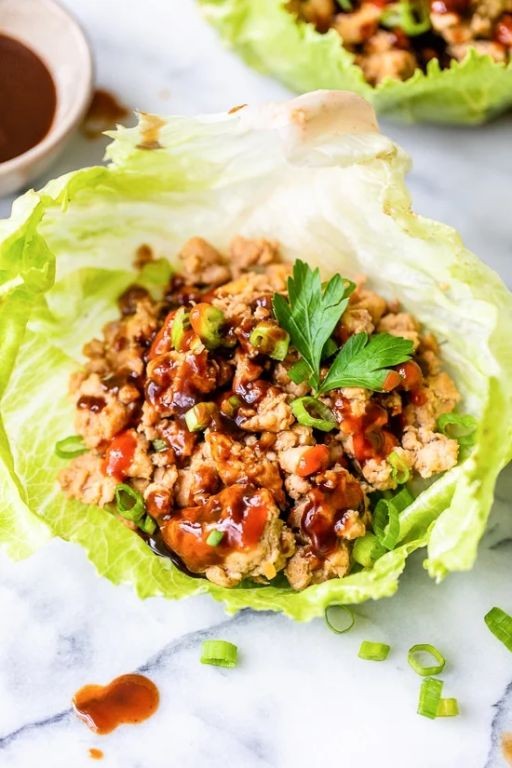
Munch your way to flavor town without the guilt—these wraps ditch the carbs but keep all the crunch. Picture this: juicy grilled chicken, crisp lettuce cups, and a tangy sauce that’ll make your taste buds dance. Ready in under 30 minutes, it’s the ultimate light lunch or dinner that actually satisfies.
Serving: 4 | Pre Time: 15 minutes | Cooking Time: 12 minutes
Ingredients
– 1.5 lbs boneless, skinless chicken breasts, pounded to ½-inch thickness
– 2 tbsp extra-virgin olive oil
– 2 tbsp fresh lime juice
– 1 tbsp low-sodium tamari
– 1 tsp toasted sesame oil
– 2 cloves garlic, finely minced
– 1 tsp freshly grated ginger
– ¼ tsp red pepper flakes
– 8 large butter lettuce leaves, rinsed and patted dry
– ½ cup shredded carrots
– ¼ cup thinly sliced scallions
– 2 tbsp chopped fresh cilantro
– ¼ cup creamy almond butter
– 1 tbsp rice vinegar
Instructions
1. In a medium bowl, whisk together 1 tbsp extra-virgin olive oil, lime juice, tamari, toasted sesame oil, minced garlic, grated ginger, and red pepper flakes until fully emulsified.
2. Add the pounded chicken breasts to the bowl, turning to coat evenly in the marinade. Let marinate at room temperature for 10 minutes—this brief rest allows the flavors to penetrate without overcooking the chicken during grilling.
3. Preheat a grill pan or outdoor grill to medium-high heat (400°F). Lightly brush the grill grates with the remaining 1 tbsp extra-virgin olive oil to prevent sticking.
4. Place the marinated chicken breasts on the hot grill. Cook for 5–6 minutes per side, or until the internal temperature reaches 165°F and the exterior develops distinct grill marks.
5. Transfer the grilled chicken to a cutting board and let rest for 5 minutes—this crucial step ensures the juices redistribute, keeping the meat moist and tender.
6. While the chicken rests, prepare the sauce: in a small bowl, whisk together creamy almond butter and rice vinegar until smooth and pourable.
7. Thinly slice the rested chicken against the grain into ¼-inch strips.
8. Arrange the butter lettuce leaves on a serving platter. Divide the sliced chicken evenly among the leaves.
9. Top each lettuce cup with shredded carrots, sliced scallions, and chopped fresh cilantro.
10. Drizzle the almond butter sauce generously over each wrap just before serving to maintain the lettuce’s crisp texture.
Unwrap a burst of contrasting textures: the cool, crunchy lettuce cradles warm, smoky chicken, while the creamy almond butter sauce adds a nutty richness that ties it all together. For a fun twist, set up a DIY wrap station with extra toppings like pickled radishes or crispy wonton strips—perfect for casual gatherings where everyone can build their own.
Skinny Girl Spinach and Feta Stuffed Mushrooms
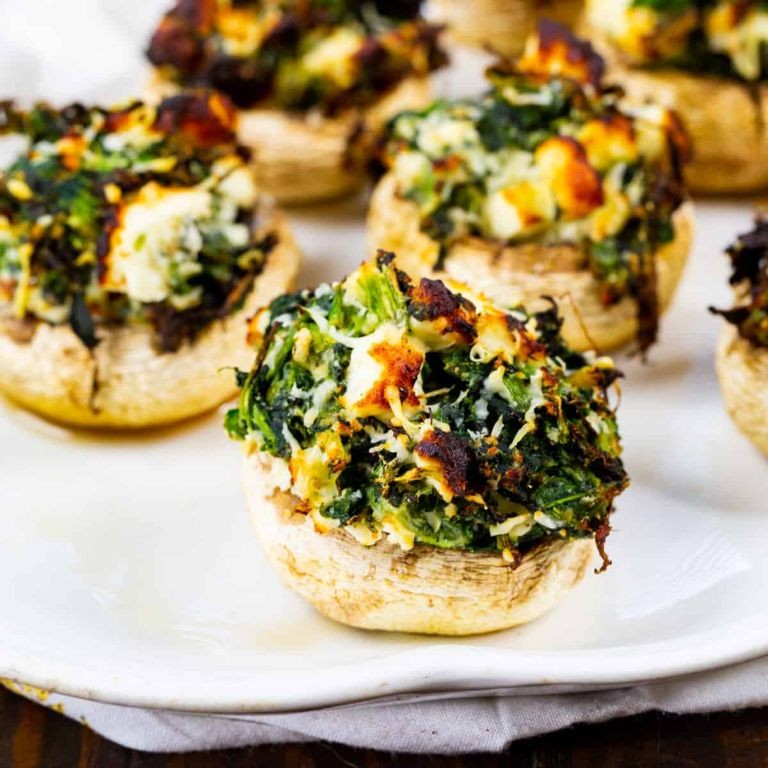
Elevate your appetizer game with these guilt-free stuffed mushrooms that deliver big flavor without the calorie bomb. Each bite combines earthy mushrooms with creamy feta and vibrant spinach—perfect for holiday parties or a quick weeknight treat. They’re so delicious, no one will guess they’re “skinny.”
Serving: 4 | Pre Time: 15 minutes | Cooking Time: 20 minutes
Ingredients
– 16 large cremini mushrooms, stems removed and reserved
– 2 tablespoons extra-virgin olive oil
– 1 small yellow onion, finely diced
– 2 garlic cloves, minced
– 4 cups fresh baby spinach, roughly chopped
– 4 ounces crumbled feta cheese
– ¼ cup panko breadcrumbs
– 1 teaspoon dried oregano
– ½ teaspoon kosher salt
– ¼ teaspoon freshly ground black pepper
– 2 tablespoons unsalted butter, melted
Instructions
1. Preheat your oven to 400°F and line a baking sheet with parchment paper.
2. Finely chop the reserved mushroom stems.
3. Heat olive oil in a large skillet over medium heat until shimmering.
4. Sauté the diced onion for 3–4 minutes until translucent.
5. Add the chopped mushroom stems and minced garlic; cook for 2 minutes until fragrant.
6. Stir in the chopped spinach and cook just until wilted, about 1 minute.
7. Transfer the mixture to a bowl and let cool for 5 minutes to prevent melting the cheese.
8. Fold in the crumbled feta, panko breadcrumbs, oregano, salt, and pepper until fully combined.
9. Spoon the filling generously into each mushroom cap, mounding it slightly.
10. Arrange the stuffed mushrooms on the prepared baking sheet.
11. Brush the tops lightly with melted butter for a golden finish.
12. Bake at 400°F for 18–20 minutes until the mushrooms are tender and the tops are crisp.
13. Let rest for 3 minutes before serving to allow the filling to set.
Velvety feta melts into the earthy spinach, while the panko adds a satisfying crunch against the tender mushroom base. For a festive twist, garnish with lemon zest or serve alongside a tangy yogurt dip—these bites shine as both an elegant starter and a protein-packed snack.
Skinny Girl Turkey Meatballs with Zoodles
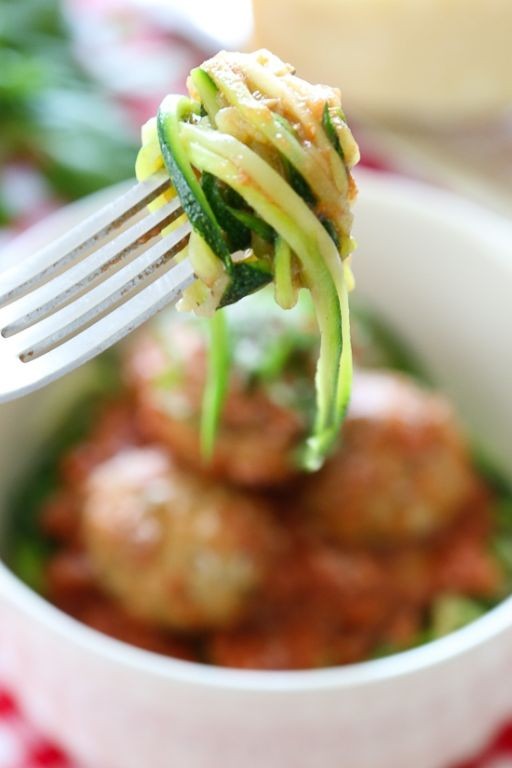
Need a dinner that’s lean, mean, and ready in a flash? These turkey meatballs with zucchini noodles deliver big flavor without the guilt. Perfect for a post-holiday reset or a quick weeknight win.
Serving: 4 | Pre Time: 15 minutes | Cooking Time: 20 minutes
Ingredients
- 1 lb ground turkey (93% lean)
- 1 large pasture-raised egg, lightly beaten
- 1/2 cup panko breadcrumbs
- 1/4 cup finely grated Parmigiano-Reggiano
- 2 tbsp extra-virgin olive oil, divided
- 4 medium zucchini, spiralized into zoodles
- 2 cloves garlic, minced
- 1 (24 oz) jar high-quality marinara sauce
- 1 tsp dried oregano
- 1/2 tsp kosher salt
- 1/4 tsp freshly ground black pepper
- Fresh basil leaves, for garnish
Instructions
- Preheat your oven to 400°F and line a rimmed baking sheet with parchment paper.
- In a large mixing bowl, combine the ground turkey, lightly beaten egg, panko breadcrumbs, grated Parmigiano-Reggiano, dried oregano, kosher salt, and black pepper. Tip: Mix gently with your hands just until combined to avoid tough meatballs.
- Portion the mixture into 20 equal-sized balls, rolling them gently between your palms.
- Arrange the meatballs on the prepared baking sheet, spacing them about 1 inch apart.
- Drizzle 1 tablespoon of extra-virgin olive oil evenly over the meatballs.
- Bake for 18-20 minutes, or until the internal temperature reaches 165°F and the exteriors are golden brown.
- While the meatballs bake, heat the remaining 1 tablespoon of olive oil in a large skillet over medium heat.
- Add the minced garlic to the skillet and sauté for 30 seconds, just until fragrant.
- Add the spiralized zucchini noodles to the skillet. Tip: Sauté the zoodles for only 2-3 minutes until just tender-crisp to prevent them from becoming watery.
- Pour the marinara sauce into the skillet with the zoodles and stir to combine. Heat through for 3-4 minutes until warmed.
- Remove the meatballs from the oven and gently fold them into the skillet with the sauce and zoodles. Tip: Let the meatballs rest in the sauce for 2 minutes off the heat to allow the flavors to meld.
- Divide the mixture among four plates and garnish with fresh basil leaves.
These meatballs are incredibly tender and juicy, with the zoodles providing a fresh, al dente bite that soaks up the rich marinara. Try serving them over a bed of creamy polenta or stuffing them into whole-grain pita pockets for a fun twist.
Skinny Girl Sweet Potato Nachos

A crispy, guilt-free twist on game-day classics that swaps chips for roasted sweet potatoes. Layer them with lean protein and vibrant toppings for a colorful, nutrient-packed platter that satisfies cravings without the calorie overload.
Serving: 4 | Pre Time: 15 minutes | Cooking Time: 25 minutes
Ingredients
– 2 large sweet potatoes, peeled and sliced into ¼-inch rounds
– 2 tablespoons avocado oil
– 1 teaspoon smoked paprika
– ½ teaspoon fine sea salt
– 1 cup shredded rotisserie chicken breast
– ½ cup black beans, rinsed and drained
– ½ cup shredded Monterey Jack cheese
– ¼ cup diced red onion
– ¼ cup chopped fresh cilantro
– ½ cup pico de gallo
– ¼ cup Greek yogurt
Instructions
1. Preheat oven to 425°F and line a baking sheet with parchment paper.
2. In a large bowl, toss sweet potato rounds with avocado oil, smoked paprika, and fine sea salt until evenly coated.
3. Arrange rounds in a single layer on the prepared baking sheet, ensuring they do not overlap.
4. Roast for 20–25 minutes, flipping halfway through, until edges are caramelized and centers are tender.
5. Remove from oven and immediately top evenly with shredded rotisserie chicken breast and black beans.
6. Sprinkle shredded Monterey Jack cheese over the entire surface.
7. Return to oven for 3–4 minutes, just until cheese is melted and bubbly.
8. Transfer nachos to a serving platter and garnish with diced red onion and chopped fresh cilantro.
9. Dollop pico de gallo and Greek yogurt over the top before serving.
Just out of the oven, these nachos offer a satisfying contrast of crispy sweet potato edges against creamy melted cheese and tender chicken. The smoky paprika melds with fresh pico de gallo for a bright, zesty finish—perfect for scooping straight from the platter or plating individually with extra Greek yogurt for dipping.
Skinny Girl Baked Salmon with Asparagus
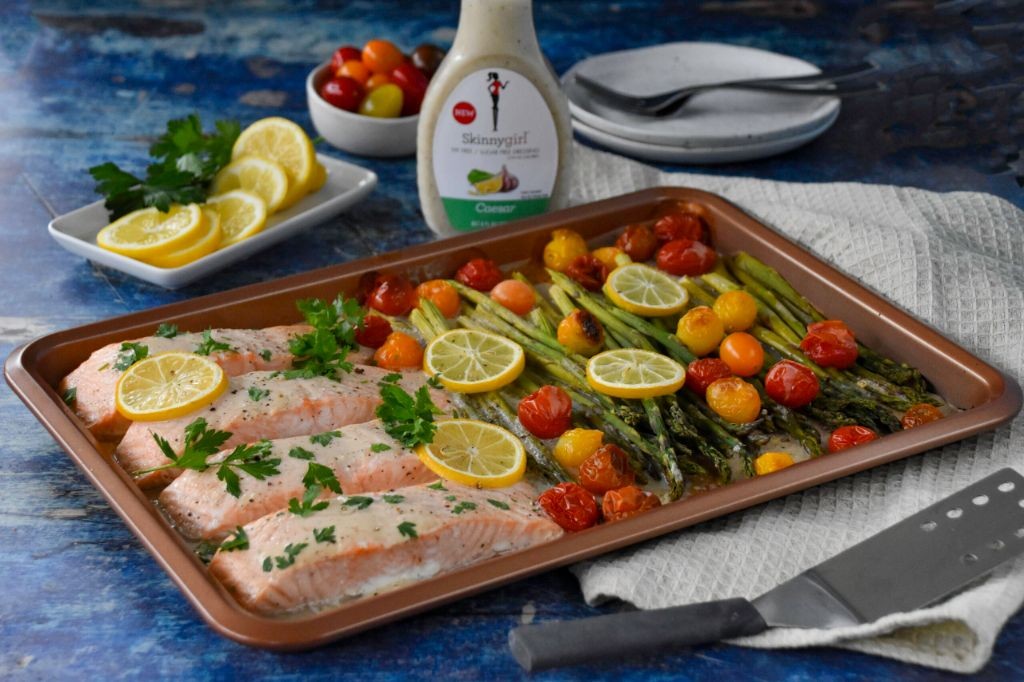
Ditch the diet drama—this baked salmon with asparagus delivers restaurant-quality flavor without the fuss. Grab your sheet pan and let’s get this protein-packed, veggie-loaded dinner on the table in under 30 minutes.
Serving: 4 | Pre Time: 10 minutes | Cooking Time: 15 minutes
Ingredients
– 4 (6-ounce) skin-on salmon fillets, patted dry
– 1 pound fresh asparagus spears, woody ends trimmed
– 3 tablespoons extra-virgin olive oil, divided
– 2 tablespoons freshly squeezed lemon juice
– 1 tablespoon Dijon mustard
– 2 cloves garlic, finely minced
– 1 teaspoon smoked paprika
– ½ teaspoon fine sea salt
– ¼ teaspoon freshly cracked black pepper
– 2 tablespoons unsalted butter, cut into small cubes
– 1 lemon, thinly sliced into rounds
– 2 tablespoons finely chopped fresh dill
Instructions
1. Preheat your oven to 425°F (218°C) and position a rack in the center.
2. Arrange the trimmed asparagus spears in a single layer on a large, rimmed baking sheet.
3. Drizzle 1 tablespoon of extra-virgin olive oil over the asparagus and toss to coat evenly.
4. In a small bowl, whisk together the remaining 2 tablespoons of olive oil, lemon juice, Dijon mustard, minced garlic, smoked paprika, sea salt, and black pepper until emulsified.
5. Place the salmon fillets, skin-side down, on the baking sheet among the asparagus.
6. Brush the mustard-herb emulsion generously over the top and sides of each salmon fillet.
7. Scatter the cubed unsalted butter evenly over the salmon fillets.
8. Arrange the thin lemon slices on top of the buttered salmon.
9. Transfer the baking sheet to the preheated oven and bake for 12–15 minutes, or until the salmon flakes easily with a fork and the asparagus is tender-crisp.
10. Remove the baking sheet from the oven and let the salmon rest for 3 minutes.
11. Garnish the finished dish with the finely chopped fresh dill.
Zesty lemon and smoky paprika create a vibrant crust on the buttery, flaky salmon, while the asparagus retains a satisfying snap. Serve it straight from the sheet pan for a rustic family-style meal, or plate it over a bed of cauliflower rice for a low-carb twist that feels anything but restrictive.
Skinny Girl Coconut Chia Pudding
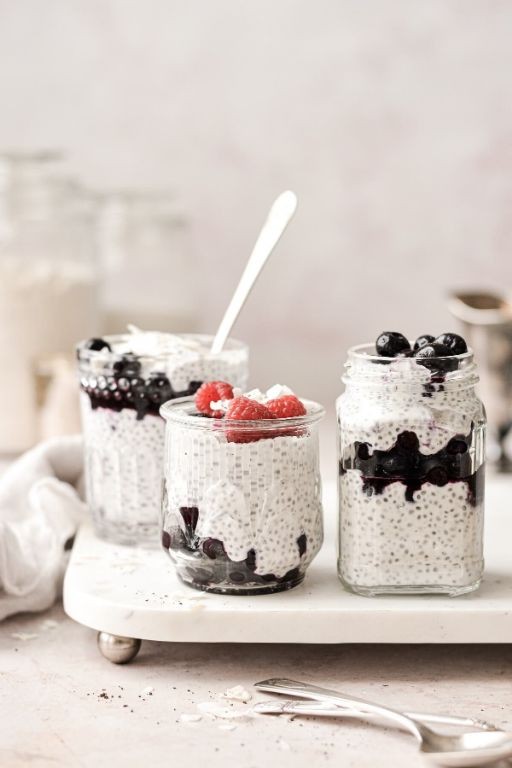
Whip up a guilt-free dessert that’s creamy, dreamy, and ready to fuel your day. This coconut chia pudding is a skinny girl’s secret weapon—packed with protein and healthy fats, it’s the perfect make-ahead breakfast or snack. Just blend, chill, and devour.
Serving: 4 | Pre Time: 10 minutes | Cooking Time: 0 minutes
Ingredients
– 1 cup full-fat coconut milk, chilled
– ¼ cup chia seeds
– 2 tablespoons pure maple syrup
– 1 teaspoon pure vanilla extract
– ¼ teaspoon fine sea salt
– Fresh berries, for garnish
– Toasted coconut flakes, for garnish
Instructions
1. In a medium mixing bowl, combine 1 cup chilled full-fat coconut milk and ¼ cup chia seeds.
2. Whisk vigorously for 1 minute until the mixture is smooth and the chia seeds are evenly distributed.
3. Add 2 tablespoons pure maple syrup, 1 teaspoon pure vanilla extract, and ¼ teaspoon fine sea salt to the bowl.
4. Whisk again for 30 seconds until all ingredients are fully incorporated and the pudding base is homogeneous.
5. Cover the bowl tightly with plastic wrap, pressing it directly onto the surface of the pudding to prevent a skin from forming.
6. Refrigerate the pudding for at least 4 hours, or ideally overnight, until it has thickened to a spoonable consistency.
7. Remove the pudding from the refrigerator and give it a gentle stir to break up any clumps.
8. Divide the pudding evenly among four serving glasses or bowls.
9. Top each serving with fresh berries and a sprinkle of toasted coconut flakes.
10. Serve immediately, or cover and refrigerate for up to 3 days.
Rich and velvety, this pudding sets into a luxurious texture that’s both satisfying and light. The coconut milk lends a subtle tropical sweetness, perfectly balanced by the maple syrup’s caramel notes. For a creative twist, layer it with granola and mango chunks in a parfait, or blend it frozen for a dairy-free ice cream alternative.
Skinny Girl Black Bean and Corn Salsa
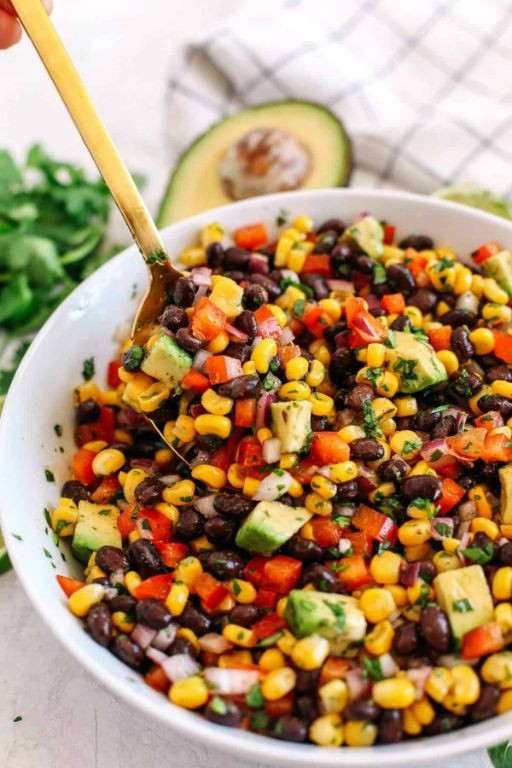
Make your next gathering unforgettable with this vibrant salsa that balances smoky, sweet, and tangy notes in every scoop. It’s the perfect make-ahead appetizer that only gets better as the flavors meld. Grab your chips and get ready to impress.
Serving: 6 | Pre Time: 15 minutes | Cooking Time: 0 minutes
Ingredients
– 2 (15-ounce) cans of black beans, thoroughly rinsed and drained
– 1½ cups of fresh sweet corn kernels, cut from the cob
– 1 medium red onion, finely diced
– 2 large jalapeño peppers, seeds and ribs removed, minced
– ½ cup of fresh cilantro leaves, roughly chopped
– ⅓ cup of freshly squeezed lime juice
– 2 tablespoons of extra-virgin olive oil
– 1 teaspoon of ground cumin
– ½ teaspoon of smoked paprika
– ¾ teaspoon of fine sea salt
Instructions
1. Place the rinsed black beans in a large mixing bowl.
2. Add the fresh sweet corn kernels to the bowl.
3. Incorporate the finely diced red onion.
4. Mix in the minced jalapeño peppers.
5. Gently fold in the roughly chopped cilantro leaves.
6. Pour the freshly squeezed lime juice over the mixture.
7. Drizzle the extra-virgin olive oil into the bowl.
8. Sprinkle the ground cumin evenly across the ingredients.
9. Dust the mixture with smoked paprika.
10. Season with fine sea salt.
11. Using a large spoon or spatula, toss all ingredients together until thoroughly combined. Tip: For optimal flavor development, cover and refrigerate the salsa for at least 1 hour before serving.
12. Taste the salsa and adjust seasoning if necessary. Tip: If a brighter acidity is desired, add an additional tablespoon of lime juice and stir.
13. Transfer the salsa to a serving bowl. Tip: For a festive presentation, garnish with a few whole cilantro leaves just before serving.
Keep this salsa chilled until ready to serve to maintain its crisp texture. The black beans provide a creamy, hearty base that contrasts beautifully with the pop of sweet corn and the sharp bite of red onion. Serve it alongside sturdy tortilla chips, spoon it over grilled chicken or fish, or use it as a fresh topping for tacos and nachos.
Skinny Girl Veggie-Packed Egg Muffins
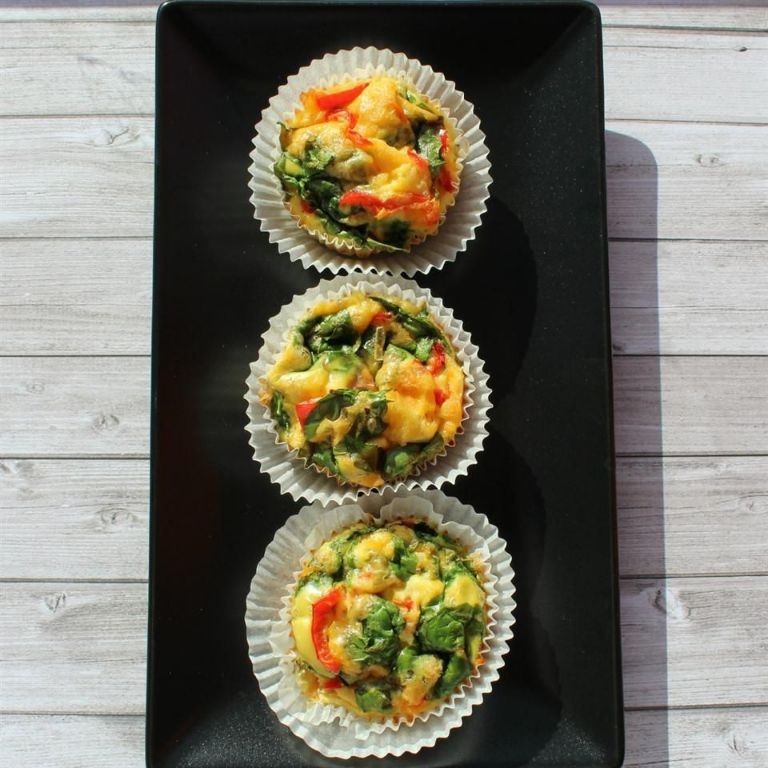
Zap your morning routine with these protein-packed, veggie-loaded egg muffins. They’re a make-ahead marvel—perfect for grab-and-go breakfasts or a light lunch. Whip up a batch on Sunday and enjoy all week.
Serving: 12 | Pre Time: 15 minutes | Cooking Time: 22 minutes
Ingredients
– 8 large pasture-raised eggs, lightly beaten
– 1/2 cup whole milk
– 1 tablespoon extra-virgin olive oil
– 1 cup finely diced red bell pepper
– 1 cup chopped fresh baby spinach
– 1/2 cup finely diced yellow onion
– 1/2 cup shredded sharp cheddar cheese
– 1 teaspoon kosher salt
– 1/2 teaspoon freshly ground black pepper
– 1/4 teaspoon smoked paprika
Instructions
1. Preheat your oven to 350°F (175°C).
2. Lightly grease a standard 12-cup muffin tin with the extra-virgin olive oil, ensuring each cup is coated.
3. In a large mixing bowl, combine the lightly beaten pasture-raised eggs and whole milk, whisking vigorously for 30 seconds until fully incorporated and slightly frothy.
4. Add the finely diced red bell pepper, chopped fresh baby spinach, finely diced yellow onion, shredded sharp cheddar cheese, kosher salt, freshly ground black pepper, and smoked paprika to the egg mixture.
5. Stir the mixture with a silicone spatula until all ingredients are evenly distributed.
6. Evenly divide the egg mixture among the 12 prepared muffin cups, filling each about 3/4 full.
7. Place the muffin tin in the preheated oven and bake for 20-22 minutes, or until the tops are lightly golden and a toothpick inserted into the center of a muffin comes out clean.
8. Remove the muffin tin from the oven and let the egg muffins cool in the tin for 5 minutes.
9. Gently run a butter knife around the edges of each muffin to loosen them.
10. Transfer the muffins to a wire rack to cool completely, about 15 minutes.
You’ll love the fluffy, tender texture and the savory burst from the melted cheddar and smoked paprika. These muffins are fantastic served warm with a dollop of Greek yogurt or crumbled over a crisp green salad for a protein boost.
Skinny Girl Shrimp and Avocado Salad
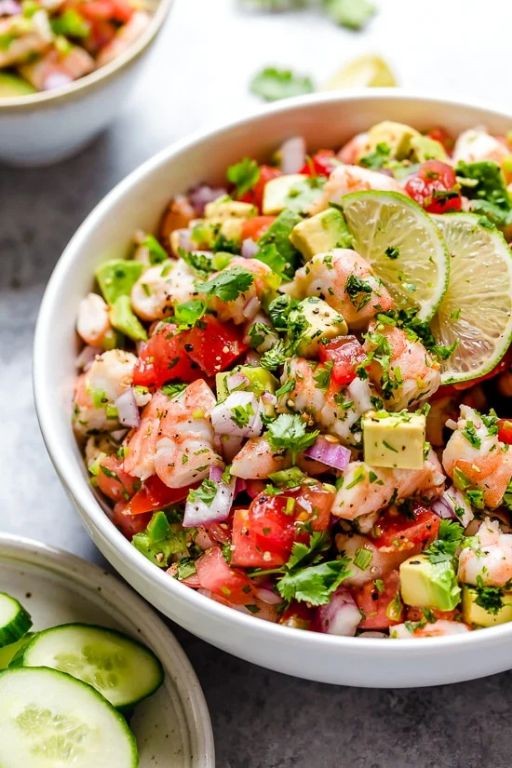
Hear me out: this salad is the ultimate protein-packed lunch that actually satisfies. Whip it up in 15 minutes flat—no cooking required. Seriously, it’s so fresh and vibrant, you’ll forget it’s ‘skinny.’
Serving: 2 | Pre Time: 15 minutes | Cooking Time: 0 minutes
Ingredients
– 1 lb wild-caught shrimp, peeled, deveined, and steamed
– 2 ripe Hass avocados, diced
– 1 cup cherry tomatoes, halved
– 1/2 cup English cucumber, finely diced
– 1/4 cup red onion, thinly sliced
– 1/4 cup fresh cilantro, chopped
– 2 tbsp extra-virgin olive oil
– 1 tbsp fresh lime juice
– 1 tsp Dijon mustard
– 1/2 tsp sea salt
– 1/4 tsp freshly cracked black pepper
Instructions
1. Place the steamed shrimp in a large mixing bowl.
2. Add the diced Hass avocados, halved cherry tomatoes, finely diced English cucumber, and thinly sliced red onion to the bowl.
3. In a small separate bowl, whisk together the extra-virgin olive oil, fresh lime juice, and Dijon mustard until emulsified, about 30 seconds.
4. Pour the dressing over the shrimp and vegetable mixture.
5. Gently toss all ingredients with a spatula to coat evenly, being careful not to mash the avocados.
6. Fold in the chopped fresh cilantro.
7. Season the salad with sea salt and freshly cracked black pepper, then toss once more to combine.
8. Divide the salad evenly between two serving bowls or plates immediately.
9. Optionally, garnish with an extra lime wedge or cilantro sprig for presentation.
Outrageously creamy from the avocado yet bright from the lime, each bite delivers a crisp, refreshing crunch. Serve it over a bed of butter lettuce for extra volume or stuff it into whole-wheat wraps for a portable lunch—the possibilities are as endless as the flavor.
Skinny Girl Berry Smoothie Bowl
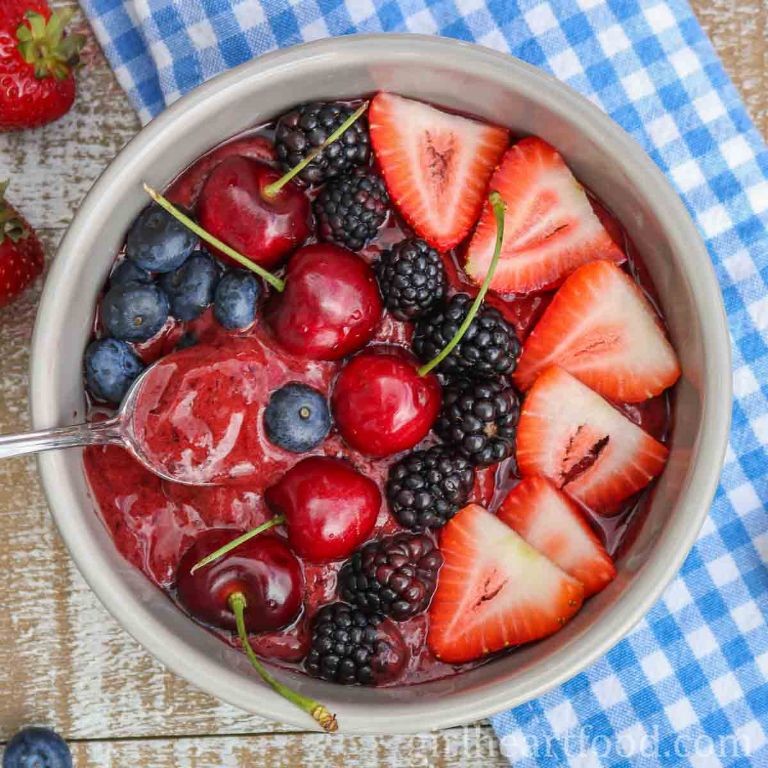
Elevate your morning routine with this vibrant smoothie bowl that packs flavor without the guilt. Every spoonful delivers a refreshing berry burst that energizes your day. This colorful creation proves healthy eating can be absolutely delicious.
Serving: 1 | Pre Time: 10 minutes | Cooking Time: 0 minutes
Ingredients
– 1 cup frozen mixed berries (strawberries, blueberries, raspberries)
– 1/2 cup unsweetened almond milk
– 1/4 cup plain Greek yogurt
– 1 tablespoon chia seeds
– 1/2 teaspoon pure vanilla extract
– 1/4 cup fresh blueberries
– 2 tablespoons sliced almonds
– 1 tablespoon unsweetened coconut flakes
Instructions
1. Combine 1 cup frozen mixed berries, 1/2 cup unsweetened almond milk, 1/4 cup plain Greek yogurt, 1 tablespoon chia seeds, and 1/2 teaspoon pure vanilla extract in a high-speed blender.
2. Blend on high speed for 45-60 seconds until completely smooth and creamy, scraping down the sides halfway through if needed.
3. Pour the smoothie mixture into a shallow bowl, using a spatula to ensure all contents transfer completely.
4. Arrange 1/4 cup fresh blueberries, 2 tablespoons sliced almonds, and 1 tablespoon unsweetened coconut flakes artfully over the smoothie base.
5. Serve immediately for optimal texture and temperature.
Gorgeous layers of creamy smoothie and crunchy toppings create a delightful textural contrast. The tart berries balance beautifully with the subtle sweetness of coconut and almonds. For an extra protein boost, sprinkle with hemp seeds or drizzle with a light honey glaze.
Skinny Girl Lentil and Vegetable Soup
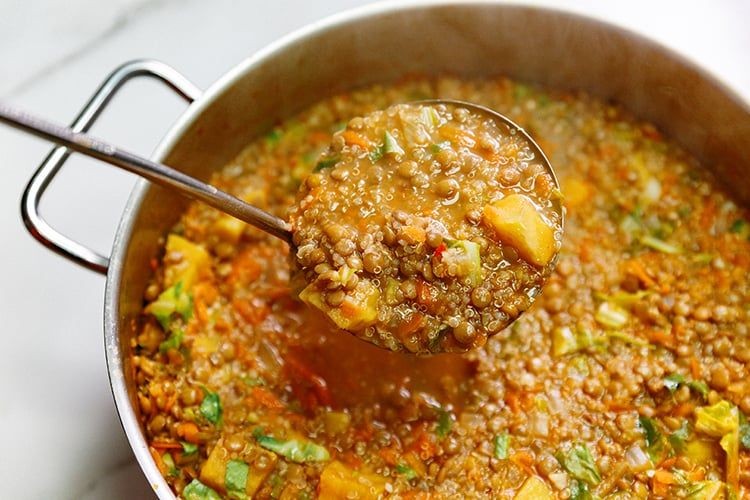
Whip up this vibrant, nutrient-packed soup that’s as satisfying as it is simple. Loaded with earthy lentils and crisp vegetables, it’s a one-pot wonder ready in under an hour. Perfect for a cozy weeknight or a healthy meal prep staple.
Serving: 6 | Pre Time: 15 minutes | Cooking Time: 40 minutes
Ingredients
– 2 tablespoons extra-virgin olive oil
– 1 large yellow onion, finely diced
– 3 cloves garlic, minced
– 2 medium carrots, peeled and diced into 1/4-inch pieces
– 2 celery stalks, diced into 1/4-inch pieces
– 1 cup dried brown lentils, rinsed and drained
– 6 cups low-sodium vegetable broth
– 1 (14.5-ounce) can fire-roasted diced tomatoes, with juices
– 1 teaspoon dried thyme
– 1/2 teaspoon smoked paprika
– 1 bay leaf
– 4 cups fresh baby spinach
– 2 tablespoons freshly squeezed lemon juice
– Kosher salt and freshly ground black pepper
Instructions
1. Heat the extra-virgin olive oil in a large Dutch oven or heavy-bottomed pot over medium heat until shimmering, about 2 minutes.
2. Add the finely diced yellow onion and sauté, stirring frequently, until translucent and fragrant, about 5 minutes.
3. Stir in the minced garlic and cook for 1 minute until aromatic, being careful not to let it brown.
4. Add the diced carrots and celery to the pot, cooking for 5 minutes until they begin to soften.
5. Tip: For deeper flavor, let the vegetables develop a light caramelization before proceeding.
6. Pour in the rinsed brown lentils, stirring to coat them in the oil and vegetable mixture for 1 minute.
7. Add the low-sodium vegetable broth, fire-roasted diced tomatoes with their juices, dried thyme, smoked paprika, and bay leaf.
8. Bring the mixture to a boil over high heat, then immediately reduce to a low simmer.
9. Cover the pot and simmer for 30 minutes, or until the lentils are tender but not mushy.
10. Tip: Check the lentils at 25 minutes; they should be soft with a slight bite.
11. Remove the bay leaf and discard it.
12. Stir in the fresh baby spinach and cook just until wilted, about 2 minutes.
13. Turn off the heat and stir in the freshly squeezed lemon juice.
14. Season with kosher salt and freshly ground black pepper to your preference.
15. Tip: Add the lemon juice off-heat to preserve its bright, acidic notes.
Savor the hearty texture of tender lentils mingling with soft vegetables in a rich, smoky broth. The lemon adds a zesty finish that cuts through the earthiness beautifully. Serve it with a crusty whole-grain bread for dipping or top with a dollop of Greek yogurt for extra creaminess.
Skinny Girl Cauliflower Pizza Crust

Zigzagging through diet trends? This cauliflower crust ditches the guilt without sacrificing flavor. We’re transforming humble florets into a crispy, golden base that holds your favorite toppings perfectly.
Serving: 4 | Pre Time: 25 minutes | Cooking Time: 35 minutes
Ingredients
– 1 large head cauliflower, riced (about 4 cups)
– 2 pasture-raised eggs, lightly beaten
– 1 cup finely grated Parmigiano-Reggiano cheese
– 1/2 cup shredded low-moisture part-skim mozzarella cheese
– 2 tbsp extra-virgin olive oil
– 1 tsp dried oregano
– 1/2 tsp garlic powder
– 1/4 tsp fine sea salt
– 1/4 tsp freshly cracked black pepper
Instructions
1. Preheat your oven to 400°F (204°C) and line a large baking sheet with parchment paper.
2. Place the riced cauliflower in a microwave-safe bowl and microwave on high for 5 minutes to steam and soften.
3. Transfer the hot cauliflower to a clean, thin kitchen towel and wring it forcefully over the sink to remove all excess moisture—this is crucial for a crisp crust.
4. In a large mixing bowl, combine the wrung cauliflower, beaten eggs, Parmigiano-Reggiano, mozzarella, olive oil, oregano, garlic powder, sea salt, and black pepper.
5. Mix thoroughly with your hands until a cohesive, slightly sticky dough forms.
6. Place the dough onto the prepared baking sheet and press it into a 12-inch circle, about 1/4-inch thick, ensuring the edges are slightly thicker to prevent burning.
7. Bake the crust on the middle oven rack for 20 minutes, or until the edges turn a light golden brown and the surface appears dry.
8. Carefully flip the crust using a large spatula—a pro tip for even cooking—and bake for an additional 10-15 minutes until uniformly golden and firm to the touch.
9. Remove from the oven and immediately add your desired pizza toppings, then return to the oven and broil on high for 3-5 minutes, watching closely to prevent charring.
Kaleidoscopic in its versatility, this crust offers a satisfyingly crisp bite with nutty, cheesy undertones. Serve it sliced traditionally, or get creative by cutting it into strips for dipping into marinara or a creamy garlic aioli.
Skinny Girl Peanut Butter Banana Overnight Oats

Escape the morning rush with this creamy, protein-packed breakfast that assembles in minutes. Grab a jar, layer your ingredients, and let the fridge work its magic overnight. Wake up to a ready-to-eat meal that tastes like dessert but fuels your day like a champion.
Serving: 1 | Pre Time: 5 minutes | Cooking Time: 0 minutes
Ingredients
– ½ cup old-fashioned rolled oats
– 1 tablespoon creamy natural peanut butter
– ½ medium ripe banana, thinly sliced
– ¾ cup unsweetened almond milk
– 1 teaspoon pure maple syrup
– 1 pinch fine sea salt
Instructions
1. Select a 12-ounce mason jar or airtight container with a lid.
2. Add ½ cup old-fashioned rolled oats to the bottom of the jar.
3. Layer ½ medium ripe banana, thinly sliced, evenly over the oats.
4. Spoon 1 tablespoon creamy natural peanut butter into the center of the jar.
5. Pour ¾ cup unsweetened almond milk over the ingredients, ensuring all oats are submerged.
6. Drizzle 1 teaspoon pure maple syrup over the mixture.
7. Add 1 pinch fine sea salt to balance the sweetness.
8. Seal the jar tightly with its lid.
9. Vigorously shake the jar for 30 seconds to combine all ingredients thoroughly.
10. Refrigerate the jar for a minimum of 8 hours, or overnight, to allow the oats to soften and absorb the liquid.
11. Remove the jar from the refrigerator after the chilling period.
12. Stir the mixture with a spoon to achieve a uniform, creamy consistency.
13. Serve the oats directly from the jar, optionally garnishing with additional banana slices or a drizzle of peanut butter.
For a thicker texture, reduce the almond milk to ½ cup. To prevent browning, add a squeeze of lemon juice to the banana slices before layering. For enhanced flavor, use a pinch of cinnamon or vanilla extract in the milk mixture.
Fabulously creamy and subtly sweet, this overnight oat mixture develops a pudding-like texture that’s both satisfying and light. The natural peanut butter provides a rich, nutty depth that perfectly complements the caramelized notes of the ripe banana. Try topping it with a sprinkle of dark chocolate chips or a dollop of Greek yogurt for a decadent yet wholesome twist.
Skinny Girl Cucumber and Avocado Sushi Rolls
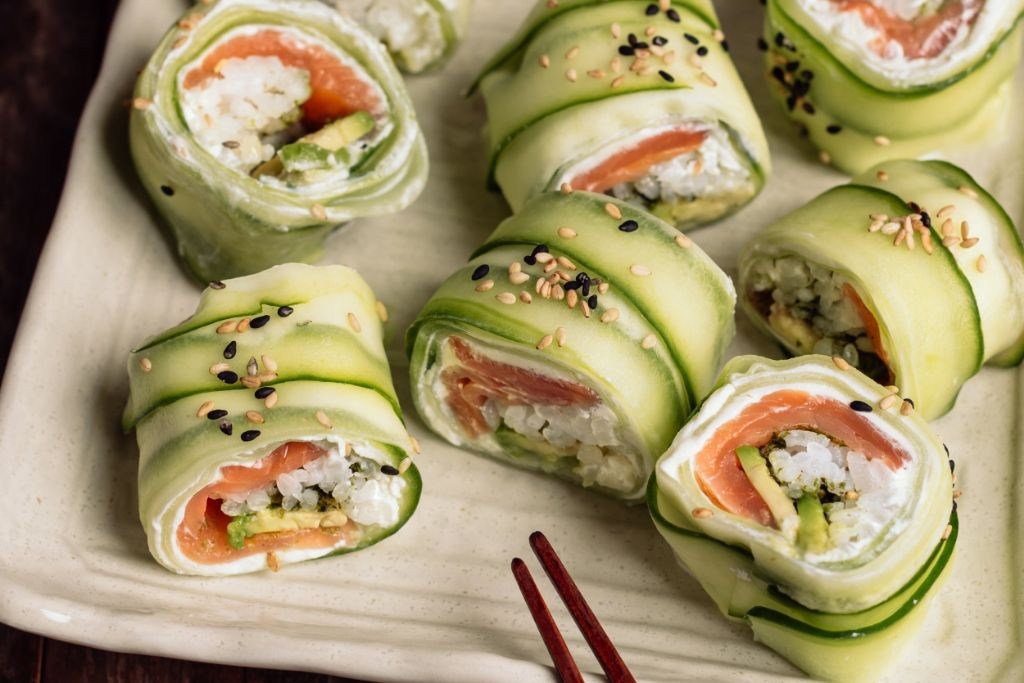
Tired of heavy sushi that leaves you sluggish? Transform your lunch routine with these vibrant, plant-powered rolls. They’re crisp, creamy, and packed with fresh flavor—perfect for a light yet satisfying meal.
Serving: 4 | Pre Time: 25 minutes | Cooking Time: 5 minutes
Ingredients
– 1 cup sushi rice, rinsed until water runs clear
– 1 ¼ cups filtered water
– 2 tablespoons seasoned rice vinegar
– 1 teaspoon granulated sugar
– ½ teaspoon fine sea salt
– 2 sheets nori (seaweed)
– ½ ripe Hass avocado, thinly sliced
– ½ English cucumber, julienned
– 1 tablespoon toasted sesame seeds
– 2 teaspoons low-sodium tamari
– ½ teaspoon wasabi paste
Instructions
1. Combine rinsed sushi rice and filtered water in a small saucepan. Bring to a boil over medium-high heat, then immediately reduce heat to low, cover, and simmer for 15 minutes.
2. Remove saucepan from heat and let rice steam, covered, for 10 minutes—this ensures perfectly tender grains.
3. Gently fold seasoned rice vinegar, granulated sugar, and fine sea salt into the warm rice using a cutting motion with a rice paddle to avoid mashing.
4. Lay a bamboo sushi mat on a clean surface and place one nori sheet, shiny side down, on the mat.
5. Spread half the seasoned rice evenly over the nori, leaving a 1-inch border at the top edge.
6. Arrange half the thinly sliced Hass avocado and julienned English cucumber horizontally across the center of the rice.
7. Tip: Lightly moisten the top border of nori with water to help seal the roll tightly.
8. Using the bamboo mat, firmly roll the nori away from you, applying even pressure to form a compact cylinder.
9. Repeat steps 4–8 with the remaining nori sheet, rice, avocado, and cucumber.
10. Transfer rolls to a cutting board and use a sharp, wet knife to slice each into 8 even pieces, wiping the blade clean between cuts for neat edges.
11. Arrange slices on a serving platter and sprinkle with toasted sesame seeds.
12. Whisk low-sodium tamari and wasabi paste in a small bowl until fully combined to create a dipping sauce.
13. Tip: For extra crunch, briefly toast the nori sheets over a low gas flame for 10 seconds per side before rolling.
14. Serve sushi rolls immediately with the tamari-wasabi sauce on the side.
15. Tip: If preparing ahead, cover rolls with a damp cloth to prevent the nori from becoming soggy.
Each bite delivers a satisfying contrast—the cool, crisp cucumber against the velvety avocado, all wrapped in subtly tangy rice. Elevate your presentation by garnishing with microgreens or serving alongside pickled ginger for a bright, acidic note.
Summary
Ultimately, this collection proves healthy eating can be utterly delicious and easy! We hope these 19 Skinny Girl recipes inspire your kitchen adventures. Give them a try, and don’t forget to leave a comment telling us your favorite. If you loved this roundup, please share it on Pinterest to help other home cooks discover these tasty, wholesome ideas. Happy cooking!


