Bursting with vibrant hues and playful flavors, these Skittle cake recipes are your ticket to a whimsical baking adventure! Whether you’re planning a birthday bash or just craving a colorful treat, we’ve gathered 18 delightful twists that transform classic cakes into edible rainbows. From simple sprinkle-topped wonders to creative layered masterpieces, there’s a sweet surprise for every home baker. Ready to add some magic to your kitchen? Let’s dive in!
Rainbow Skittle Drip Cake with Vanilla Buttercream
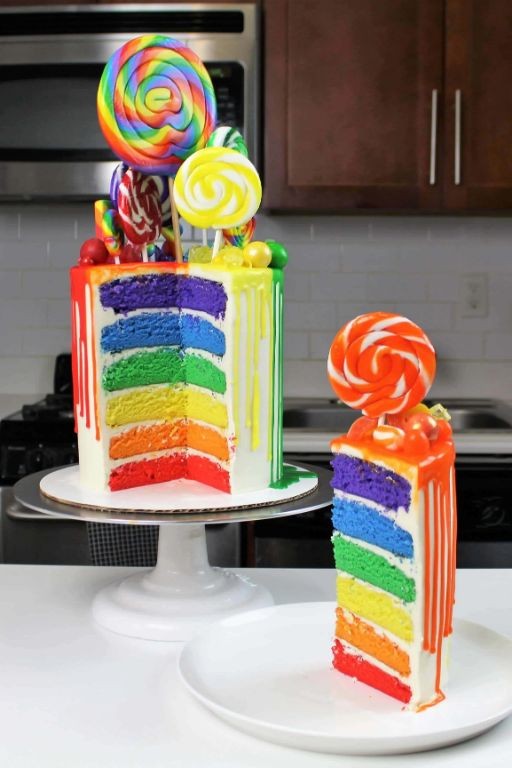
Vibrant, whimsical, and guaranteed to make your inner child do a happy dance, this Rainbow Skittle Drip Cake with Vanilla Buttercream is the ultimate celebration centerpiece. It’s a technicolor dream of fluffy cake layers, creamy frosting, and a playful candy cascade that’s surprisingly simple to master—no unicorn magic required, just a good mixer and a sense of fun.
Serving: 12 | Pre Time: 45 minutes | Cooking Time: 30 minutes
Ingredients
– 3 cups all-purpose flour (I always spoon and level to avoid dense cake)
– 2 cups granulated sugar (for that perfect sweetness)
– 1 cup unsalted butter, softened (room temp is key for smooth blending)
– 1 cup whole milk (I use whole for richer texture)
– 4 large eggs, room temperature (they incorporate better this way)
– 2 tsp baking powder
– 1 tsp vanilla extract (pure extract makes all the difference)
– ½ tsp salt
– Gel food coloring in red, orange, yellow, green, blue, and purple (gels give vibrant hues without thinning batter)
– 2 cups powdered sugar (for the buttercream)
– ½ cup heavy cream (chilled for stable drips)
– 1 bag Skittles candy (the rainbow mix, obviously!)
Instructions
1. Preheat your oven to 350°F and grease three 8-inch round cake pans, lining them with parchment paper for easy release.
2. In a large bowl, cream together 1 cup softened butter and 2 cups granulated sugar on medium speed for 3 minutes until light and fluffy.
3. Add 4 room-temperature eggs one at a time, beating for 30 seconds after each addition to ensure even mixing.
4. In a separate bowl, whisk together 3 cups flour, 2 tsp baking powder, and ½ tsp salt.
5. Alternately add the flour mixture and 1 cup milk to the butter mixture, starting and ending with flour, mixing on low until just combined—overmixing leads to tough cake.
6. Stir in 1 tsp vanilla extract until evenly distributed.
7. Divide the batter equally into six small bowls, tinting each with a different gel food coloring until vibrant.
8. Spoon the colored batters into the prepared pans in random swirls, then bake for 25-30 minutes until a toothpick inserted comes out clean.
9. Let cakes cool in pans for 10 minutes, then transfer to a wire rack to cool completely—patience here prevents frosting meltdown!
10. For the buttercream, beat remaining 1 cup softened butter on high for 2 minutes, then gradually add 2 cups powdered sugar and 2 tbsp heavy cream until smooth and spreadable.
11. Stack and frost the cooled cake layers with buttercream, using a crumb coat first: apply a thin layer, chill for 15 minutes, then add a final thick coat for a sleek finish.
12. Warm remaining heavy cream slightly, mix with a bit of gel coloring if desired, and spoon around the cake top edges to create drips down the sides.
13. Immediately press Skittles onto the buttercream in colorful patterns before the drips set.
Crunchy, creamy, and bursting with fruity candy, this cake delivers a textural party in every slice. Serve it at birthdays or just because—it’s guaranteed to turn any day into a rainbow-filled celebration!
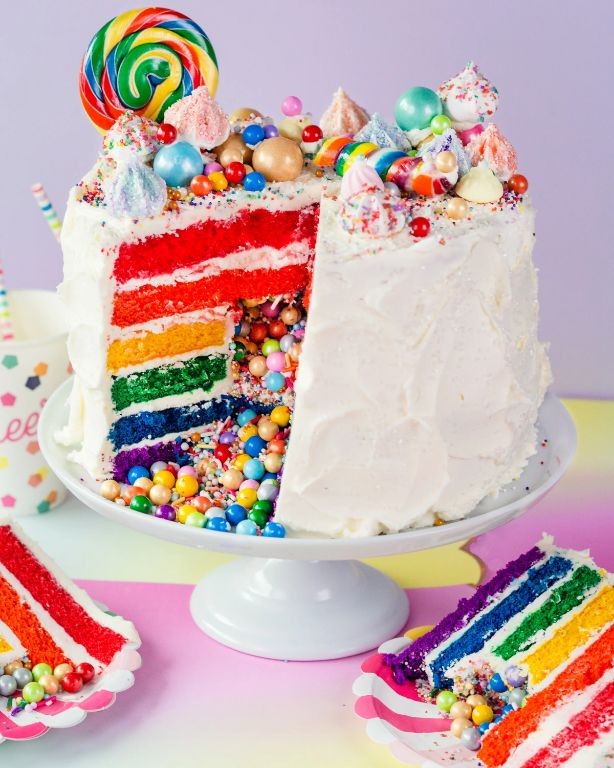
Skittle Confetti Cake with White Chocolate Ganache

Let’s be real—sometimes you need a cake that screams ‘party’ louder than your aunt at karaoke. This Skittle Confetti Cake with White Chocolate Ganache is a rainbow explosion of fun, guaranteed to turn any Tuesday into a celebration. It’s like a unicorn and a birthday cake had a deliciously colorful baby.
Serving: 12 | Pre Time: 25 minutes | Cooking Time: 30 minutes
Ingredients
– 2 cups all-purpose flour (I always sift mine first for extra fluffiness)
– 1 ½ cups granulated sugar (trust me, it’s the sweet spot)
– 1 cup unsalted butter, softened (room temp is key—no cold butter allowed!)
– ¾ cup whole milk (I use whole for richness, but any works)
– 3 large eggs, at room temperature (they blend smoother, promise)
– 2 tsp vanilla extract (the good stuff, not imitation)
– 1 ½ tsp baking powder
– ½ tsp salt
– 1 cup rainbow Skittles, roughly chopped (save a handful for garnish)
– 8 oz white chocolate chips (quality matters here—splurge a little)
– ½ cup heavy cream (for that silky ganache magic)
Instructions
1. Preheat your oven to 350°F and grease two 9-inch round cake pans—I line mine with parchment paper for easy release.
2. In a large bowl, cream the softened butter and sugar together with a mixer on medium speed for 3–4 minutes until light and fluffy. Tip: Scrape the bowl halfway through to ensure even mixing.
3. Add the room temperature eggs one at a time, beating well after each addition, then mix in the vanilla extract.
4. In a separate bowl, whisk together the sifted flour, baking powder, and salt.
5. Alternately add the dry ingredients and whole milk to the butter mixture, starting and ending with the dry ingredients, mixing on low until just combined. Tip: Overmixing leads to a dense cake—stop as soon as no streaks remain.
6. Gently fold in the chopped Skittles with a spatula, reserving a few pieces for later.
7. Divide the batter evenly between the prepared pans and smooth the tops. Bake at 350°F for 28–30 minutes, or until a toothpick inserted in the center comes out clean. Tip: Rotate the pans halfway through for even baking.
8. Let the cakes cool in the pans for 10 minutes, then transfer to a wire rack to cool completely.
9. For the ganache, heat the heavy cream in a saucepan over medium heat until it just begins to simmer—don’t let it boil.
10. Pour the hot cream over the white chocolate chips in a heatproof bowl, let sit for 2 minutes, then whisk until smooth and glossy.
11. Place one cake layer on a serving plate, spread a thin layer of ganache on top, add the second layer, and frost the entire cake with the remaining ganache.
12. Decorate with the reserved Skittle pieces for a confetti-like finish.
Brace yourself for a moist, tender crumb with bursts of fruity candy in every bite. The white chocolate ganache adds a creamy contrast that’s not too sweet—perfect for slicing into rainbows at birthdays or just because you deserve it. Serve it with a side of whimsy and watch it disappear faster than you can say ‘Skittles’!
Layered Skittle Cake with Cream Cheese Frosting
Tired of boring birthday cakes that look like they were designed by a colorblind accountant? This Layered Skittle Cake with Cream Cheese Frosting is the edible equivalent of a confetti cannon—a vibrant, playful dessert that’ll make your taste buds throw a party. It’s the perfect way to turn a simple cake into a rainbow-filled spectacle that even unicorns would envy.
Serving: 12 | Pre Time: 30 minutes | Cooking Time: 25 minutes
Ingredients
– 2 cups all-purpose flour (I always sift mine first to avoid lumps—trust me, it’s worth the extra 30 seconds)
– 1 ½ cups granulated sugar (for that perfect sweetness without going overboard)
– 3 large eggs, at room temperature (cold eggs can make your batter curdle, and nobody wants that drama)
– 1 cup whole milk (the richer, the better for a moist crumb)
– ½ cup unsalted butter, softened (I use Kerrygold—it adds a lovely hint of richness)
– 1 tbsp baking powder (the secret to a fluffy rise)
– 1 tsp vanilla extract (pure, not imitation—your cake will thank you)
– ¼ tsp salt (just a pinch to balance the sweetness)
– 1 8-oz package cream cheese, softened (full-fat is non-negotiable for that creamy frosting)
– ½ cup powdered sugar (sifted to avoid gritty texture)
– 5 bags of Skittles, assorted colors (about 10 oz total—go wild with the rainbow mix!)
Instructions
1. Preheat your oven to 350°F and grease two 9-inch round cake pans—I like to line them with parchment paper for easy removal.
2. In a large bowl, whisk together the flour, baking powder, and salt until well combined.
3. In a separate bowl, cream the softened butter and granulated sugar with an electric mixer on medium speed for 3–4 minutes, until light and fluffy. Tip: Scrape down the sides of the bowl halfway through to ensure even mixing.
4. Add the room-temperature eggs one at a time, beating well after each addition, then mix in the vanilla extract.
5. Gradually alternate adding the flour mixture and whole milk to the butter mixture, starting and ending with the flour, and mix on low speed until just combined—overmixing can lead to a tough cake.
6. Divide the batter evenly between the prepared pans and smooth the tops with a spatula.
7. Bake for 22–25 minutes, or until a toothpick inserted into the center comes out clean. Tip: Rotate the pans halfway through baking for even browning.
8. Let the cakes cool in the pans for 10 minutes, then transfer them to a wire rack to cool completely.
9. While the cakes cool, make the frosting: In a medium bowl, beat the softened cream cheese and powdered sugar on medium speed for 2–3 minutes until smooth and creamy. Tip: If the frosting seems too soft, chill it in the refrigerator for 15 minutes before using.
10. Once the cakes are cool, spread a layer of cream cheese frosting on top of one cake layer.
11. Place the second cake layer on top and frost the top and sides evenly with the remaining frosting.
12. Press the Skittles onto the frosted cake in colorful patterns or random bursts—get creative!
Fabulously fun and bursting with fruity crunch, this cake offers a soft, moist texture contrasted by the candy’s satisfying snap. Serve it sliced with a side of rainbow sprinkles for extra pizzazz, or pair it with a scoop of vanilla ice cream to balance the tangy cream cheese frosting.
Skittle-Stuffed Funfetti Cake with Sprinkles
Let’s be honest: you’re not here for a subtle dessert. You’re here for a cake that screams ‘party’ with every Technicolor bite—a Skittle-stuffed Funfetti cake that’s basically a piñata for your taste buds. It’s the kind of bake that turns a Tuesday into a celebration and guarantees you’ll be the most popular person at any gathering.
Serving: 12 | Pre Time: 25 minutes | Cooking Time: 35 minutes
Ingredients
– 2 ¼ cups all-purpose flour (I always spoon and level to avoid a dense cake—trust me on this)
– 1 ½ cups granulated sugar (for that perfect sweetness)
– ¾ cup unsalted butter, softened (room temp is key for smooth creaming)
– 3 large eggs, at room temperature (they incorporate better, promise!)
– 1 cup whole milk (full-fat for maximum moisture)
– 1 tbsp vanilla extract (pure vanilla is my go-to for that warm flavor)
– 2 tsp baking powder (the lift hero)
– ½ tsp salt (to balance the sweetness)
– ½ cup rainbow sprinkles (the classic jimmies, not nonpareils—they hold color better)
– 1 cup Skittles, divided (go for the original fruit mix for a burst of flavor)
– 1 cup powdered sugar (for the glaze)
– 2 tbsp whole milk (extra for that drizzle consistency)
– Additional rainbow sprinkles for topping (because more is always merrier)
Instructions
1. Preheat your oven to 350°F and grease a 9-inch round cake pan, then line it with parchment paper for easy removal.
2. In a large bowl, cream the softened butter and granulated sugar together with a hand mixer on medium speed for 3–4 minutes, until light and fluffy—this incorporates air for a tender crumb.
3. Add the room-temperature eggs one at a time, beating well after each addition to ensure a smooth batter.
4. Mix in the vanilla extract until just combined.
5. In a separate bowl, whisk together the all-purpose flour, baking powder, and salt to distribute the leavening evenly.
6. Alternately add the flour mixture and whole milk to the butter mixture in three parts, starting and ending with the flour, mixing on low speed until just incorporated—overmixing can lead to a tough cake.
7. Gently fold in the ½ cup of rainbow sprinkles with a spatula to avoid streaking the batter.
8. Pour half of the batter into the prepared pan and spread it evenly with a spatula.
9. Sprinkle ¾ cup of Skittles evenly over the batter layer, pressing them down slightly so they don’t all sink during baking.
10. Top with the remaining batter, smoothing it out to cover the Skittles completely.
11. Bake in the preheated oven for 30–35 minutes, or until a toothpick inserted into the center comes out clean (avoid the Skittle spots for an accurate test).
12. Let the cake cool in the pan on a wire rack for 10 minutes, then turn it out to cool completely—this prevents sogginess.
13. While the cake cools, make the glaze by whisking the powdered sugar and 2 tbsp of whole milk in a small bowl until smooth and pourable.
14. Drizzle the glaze over the cooled cake, then immediately top with additional rainbow sprinkles and the remaining ¼ cup of Skittles for a festive finish.
15. Allow the glaze to set for 10 minutes before slicing.
After all that fun, you’ll be rewarded with a moist, confetti-packed cake that’s studded with chewy, fruity Skittle surprises in every slice. Serve it with a scoop of vanilla ice cream to balance the sweetness, or cut it into squares for a colorful party platter—it’s guaranteed to disappear faster than you can say ‘rainbow.’
Vibrant Skittle Pound Cake with Citrus Glaze
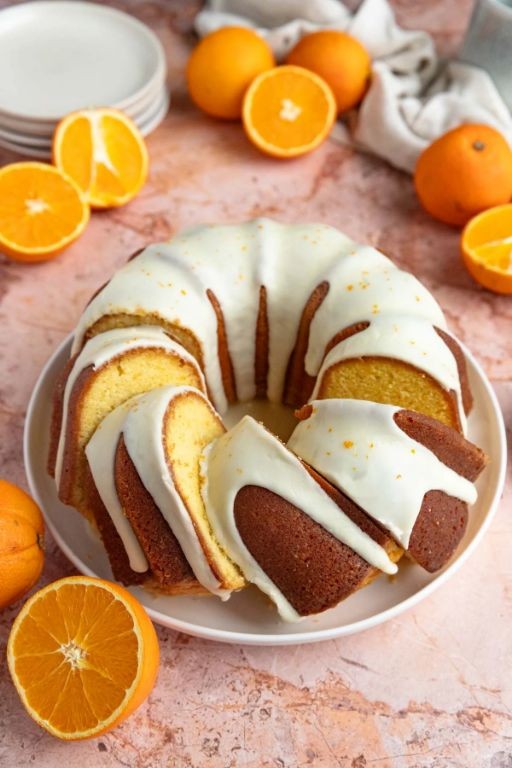
Picture this: a pound cake that looks like it rained Skittles and tastes like a citrusy dream. This vibrant creation is the perfect antidote to dreary days, guaranteed to make your dessert table the life of the party. Trust me, it’s a flavor explosion that’ll have everyone asking for the recipe.
Serving: 12 | Pre Time: 25 minutes | Cooking Time: 65 minutes
Ingredients
- 1 cup (2 sticks) unsalted butter, softened to room temperature (this is non-negotiable for perfect creaming!)
- 1 ½ cups granulated sugar
- 4 large eggs, also at room temperature—cold eggs can curdle the batter, and we don’t want that drama.
- 2 teaspoons pure vanilla extract
- 3 cups all-purpose flour, spooned and leveled to avoid a dense cake
- ½ teaspoon baking powder
- ½ teaspoon salt
- 1 cup whole milk
- 1 cup rainbow Skittles, roughly chopped (I use the original fruit mix for maximum color pop)
- For the glaze: 1 ½ cups powdered sugar, sifted, and 3 tablespoons fresh orange juice plus 1 teaspoon of its zest (freshly squeezed makes all the difference).
Instructions
- Preheat your oven to 325°F and generously grease a 10-inch Bundt pan, making sure to get into all the nooks.
- In a large bowl, use an electric mixer on medium speed to beat the softened butter and granulated sugar together for a full 3 minutes until light and fluffy—this incorporates air for a tender crumb.
- Add the room-temperature eggs one at a time, beating well after each addition, then mix in the vanilla extract.
- In a separate bowl, whisk together the flour, baking powder, and salt.
- With the mixer on low, alternate adding the flour mixture and the whole milk to the butter mixture, beginning and ending with the flour, and mix just until combined; overmixing leads to toughness.
- Gently fold in the chopped Skittles with a spatula until evenly distributed—this prevents the colors from bleeding too much.
- Pour the batter into the prepared Bundt pan and smooth the top with a spatula.
- Bake for 60 to 65 minutes, or until a toothpick inserted into the center comes out clean with no wet batter.
- Let the cake cool in the pan on a wire rack for 15 minutes, then invert it onto the rack to cool completely; rushing this can cause it to break.
- While the cake cools, make the glaze by whisking the sifted powdered sugar with the fresh orange juice and zest in a medium bowl until smooth.
- Once the cake is completely cool, drizzle the citrus glaze evenly over the top, letting it drip down the sides.
Let’s be real: this cake is a textural marvel—dense yet moist with little bursts of chewy Skittle candy. The bright citrus glaze cuts through the sweetness perfectly, making each slice a joyful, colorful experience. Serve it at a birthday bash or just because; it’s guaranteed to disappear faster than you can say “taste the rainbow.”
Skittle Rainbow Bundt Cake with Lemon Drizzle
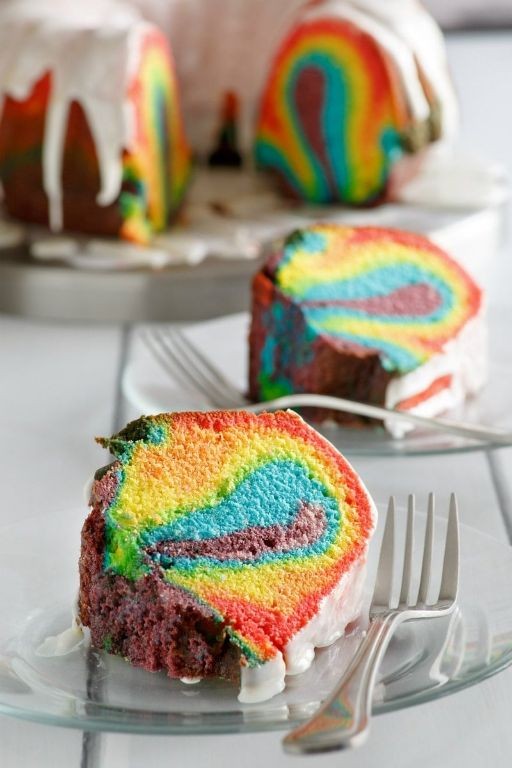
Let’s be honest—rainbows are great, but they’re even better when you can eat them. This Skittle Rainbow Bundt Cake with Lemon Drizzle is a vibrant, playful dessert that’ll make any day feel like a celebration, and it’s surprisingly simple to whip up. Just be warned: it might disappear faster than a pot of gold!
Serving: 12 | Pre Time: 25 minutes | Cooking Time: 55 minutes
Ingredients
– 2 cups all-purpose flour (I always sift mine first for a lighter crumb)
– 1 1/2 cups granulated sugar (trust me, it’s the sweet spot)
– 1 cup unsalted butter, softened to room temperature (this is key for easy creaming)
– 4 large eggs, at room temperature (they blend in smoother, promise!)
– 1 cup buttermilk (full-fat gives the best moisture)
– 2 tsp baking powder
– 1 tsp vanilla extract (pure vanilla is my go-to for that warm flavor)
– 1/2 tsp salt
– 1 cup rainbow-colored Skittles, roughly chopped (separate by color if you want layers, or mix for a confetti effect)
– 1/2 cup fresh lemon juice (about 3 lemons—bottled just won’t do)
– 1 cup powdered sugar (for that glossy drizzle)
Instructions
1. Preheat your oven to 350°F and generously grease a 10-inch Bundt pan with butter or non-stick spray, making sure to get into all those nooks and crannies.
2. In a large bowl, cream together the softened butter and granulated sugar with an electric mixer on medium speed for 3–4 minutes, until light and fluffy—this aerates the batter for a tender cake.
3. Add the room-temperature eggs one at a time, beating well after each addition to fully incorporate and prevent curdling.
4. In a separate bowl, whisk together the sifted flour, baking powder, and salt to ensure even distribution.
5. Alternately add the flour mixture and buttermilk to the butter mixture in three additions, starting and ending with the flour, mixing on low speed just until combined after each; overmixing can lead to a tough texture.
6. Gently fold in the vanilla extract and chopped Skittles with a spatula, being careful not to overmix to keep those colorful bits intact.
7. Pour the batter evenly into the prepared Bundt pan and smooth the top with a spatula.
8. Bake at 350°F for 50–55 minutes, or until a toothpick inserted into the center comes out clean with just a few moist crumbs—no wet batter.
9. Let the cake cool in the pan on a wire rack for 15 minutes, then invert it onto the rack to cool completely; patience here prevents sticking!
10. While the cake cools, whisk together the fresh lemon juice and powdered sugar in a small bowl until smooth and pourable, adjusting with a splash more juice if too thick.
11. Once the cake is fully cooled, drizzle the lemon glaze over the top, letting it drip down the sides for that irresistible finish.
Zesty and vibrant, this cake boasts a moist, tender crumb with bursts of fruity Skittle candy and a tangy lemon kick. Serve it sliced with a scoop of vanilla ice cream or as a show-stopping centerpiece at your next gathering—it’s guaranteed to spark joy (and maybe a few rainbow-themed jokes!).
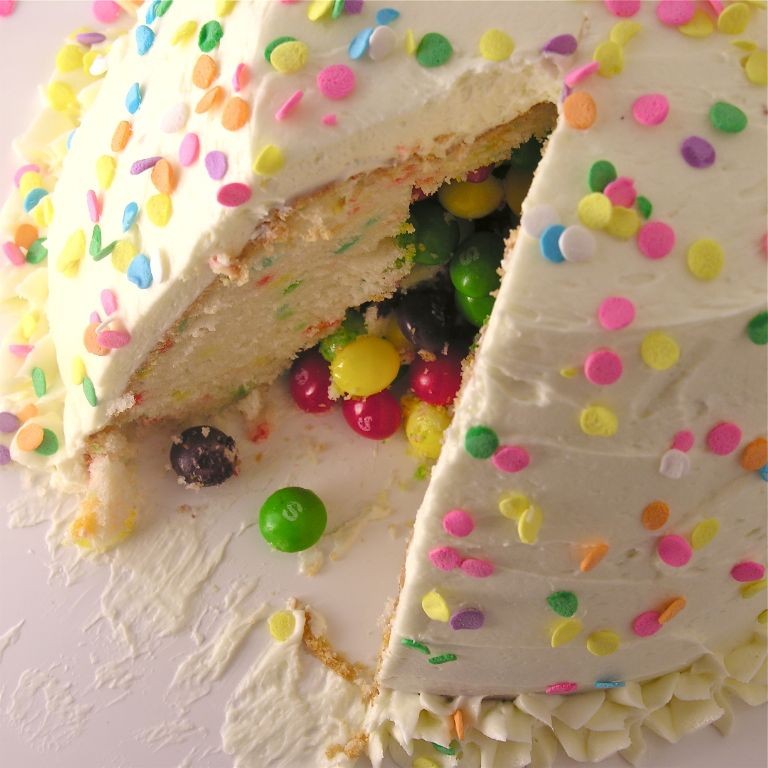
Skittle Pinata Cake with Hidden Candy Surprise

Kick off your next celebration with a cake that’s as much a party trick as it is a dessert—a vibrant, multi-layered marvel with a hidden candy stash inside that’ll have everyone grinning. Picture slicing into a beautifully frosted cake only to unleash a rainbow of Skittles tumbling out, because why should piñatas have all the fun? It’s the ultimate surprise for birthdays, game nights, or any excuse to eat candy for dinner (we won’t tell).
Serving: 12 | Pre Time: 30 minutes | Cooking Time: 25 minutes
Ingredients
– 2 cups all-purpose flour (spooned and leveled for accuracy—trust me, it matters)
– 1 ½ cups granulated sugar (because this cake is sweet enough without extra drama)
– ¾ cup unsalted butter, softened (I leave mine on the counter for an hour—room temp blends like a dream)
– 3 large eggs, at room temperature (they incorporate better, giving a fluffier crumb)
– 1 cup whole milk (full-fat for richness, though 2% works in a pinch)
– 2 tsp vanilla extract (pure is my go-to for that warm, cozy flavor)
– 1 tsp baking powder (the unsung hero of lift)
– ½ tsp salt (to balance all that sweetness)
– 2 cups vanilla buttercream frosting (homemade or store-bought—no judgment here)
– 1 ½ cups Skittles candy (the classic rainbow mix, because color explosions are non-negotiable)
– Food coloring gels in red, blue, and yellow (for a vibrant exterior—liquid dyes can water things down)
Instructions
1. Preheat your oven to 350°F and grease two 8-inch round cake pans, lining the bottoms with parchment paper for easy release.
2. In a large bowl, cream the softened butter and granulated sugar together with an electric mixer on medium speed for 3–4 minutes, until light and fluffy—this aerates the batter for a tender cake.
3. Add the room-temperature eggs one at a time, beating well after each addition to ensure they’re fully incorporated.
4. Mix in the vanilla extract until just combined.
5. In a separate bowl, whisk together the all-purpose flour, baking powder, and salt.
6. Alternately add the flour mixture and whole milk to the butter mixture, starting and ending with the flour, mixing on low speed until smooth—overmixing can lead to a dense cake, so stop as soon as it’s blended.
7. Divide the batter evenly between the prepared pans, smoothing the tops with a spatula.
8. Bake for 22–25 minutes, or until a toothpick inserted into the center comes out clean and the edges are lightly golden.
9. Cool the cakes in the pans on a wire rack for 10 minutes, then remove them from the pans to cool completely—this prevents sogginess.
10. Once cooled, use a serrated knife to level the tops of both cakes if they’ve domed.
11. Place one cake layer on a serving plate and spread a thin layer of vanilla buttercream frosting over it, leaving a 1-inch border unfrosted around the edge.
12. Pile 1 cup of Skittles candy in the center of the frosted layer, keeping them within the border to avoid spillage.
13. Carefully place the second cake layer on top, pressing down gently to seal.
14. Divide the remaining frosting into three bowls and tint each with red, blue, and yellow food coloring gels to create bright shades.
15. Frost the entire cake with the colored buttercream, using an offset spatula to swirl the colors together for a playful, marbled effect—chill the cake for 15 minutes if the frosting gets too soft.
16. Decorate the top with the remaining ½ cup of Skittles, pressing them lightly into the frosting.
17. Refrigerate the cake for at least 1 hour before serving to set the frosting and keep the candy surprise intact.
Unveil this masterpiece to oohs and aahs—the moist, vanilla-scented layers give way to a crunchy, fruity burst from the hidden Skittles, creating a textural party in every bite. Serve it with a side of napkins (things might get messy) or slice it open dramatically to watch the candy cascade onto the plate, because presentation is half the fun!
Skittle Cookie Cake with Brown Sugar Frosting
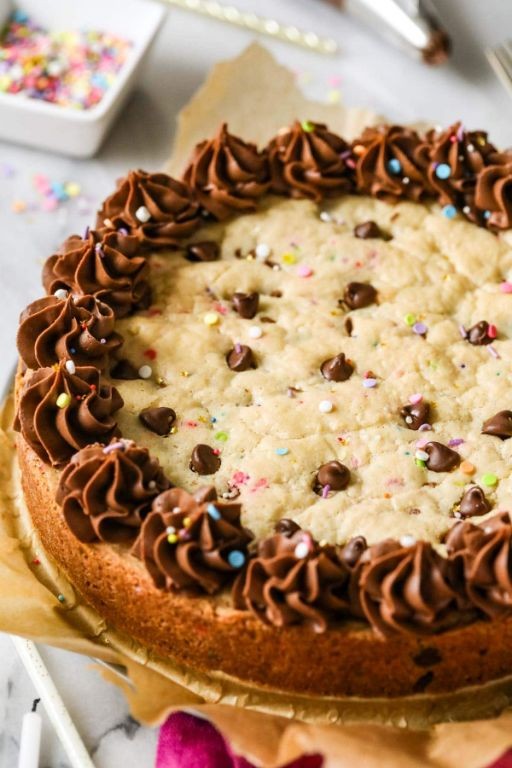
Ridiculously fun and guaranteed to make you the hero of any party, this Skittle Cookie Cake with Brown Sugar Frosting is the edible rainbow you never knew you needed—think chewy cookie meets birthday cake, with a frosting so good you might just eat it with a spoon. Seriously, it’s like happiness baked into a pan.
Serving: 12 | Pre Time: 20 minutes | Cooking Time: 25 minutes
Ingredients
– 2 cups all-purpose flour (I always spoon and level to avoid dense cookies)
– 1 tsp baking soda
– ½ tsp salt (a pinch of kosher salt works wonders)
– ¾ cup unsalted butter, softened (room temp is key for that perfect creaminess)
– 1 cup packed light brown sugar (the secret to that deep, molasses-y flavor)
– ½ cup granulated sugar
– 2 large eggs, at room temperature (trust me, cold eggs can make the batter curdle)
– 2 tsp pure vanilla extract (skip the imitation stuff—it’s worth it)
– 1 cup rainbow Skittles, divided (save a handful for the top, because extra color is always a win)
– 8 oz cream cheese, softened (full-fat for the creamiest frosting)
– ½ cup unsalted butter, softened (yes, more butter—it’s frosting, not a salad)
– 1 cup powdered sugar, sifted (no lumps allowed in this fluffy dream)
– 1 tsp vanilla extract
Instructions
1. Preheat your oven to 350°F and grease a 9×13-inch baking pan—I like to use butter for a golden edge.
2. In a medium bowl, whisk together the flour, baking soda, and salt until well combined; set aside.
3. In a large bowl, use an electric mixer on medium speed to cream the softened butter, brown sugar, and granulated sugar for 2–3 minutes, until light and fluffy.
4. Add the room-temperature eggs one at a time, beating well after each addition to incorporate fully.
5. Mix in the vanilla extract until just blended.
6. Gradually add the dry ingredients to the wet mixture, mixing on low speed until a soft dough forms—don’t overmix, or the cookies can get tough.
7. Gently fold in ¾ cup of the Skittles with a spatula, reserving the rest for later.
8. Spread the dough evenly into the prepared pan, using wet hands to press it down smoothly.
9. Bake at 350°F for 22–25 minutes, until the edges are golden brown and a toothpick inserted in the center comes out clean.
10. Let the cookie cake cool completely in the pan on a wire rack, about 1 hour—patience here prevents a melty frosting disaster.
11. While it cools, make the frosting: in a clean bowl, beat the softened cream cheese and butter on medium speed for 2 minutes until smooth.
12. Gradually add the sifted powdered sugar and vanilla, beating on low at first to avoid a sugar cloud, then increase to high for 1–2 minutes until fluffy.
13. Once the cake is cool, spread the frosting evenly over the top with an offset spatula.
14. Sprinkle the reserved Skittles over the frosting, pressing them in lightly so they stick.
15. Slice into squares and serve immediately, or chill for 30 minutes if you prefer a firmer texture.
This treat boasts a chewy, buttery base with pops of fruity Skittle crunch, all topped by a tangy-sweet frosting that’s irresistibly smooth. Try serving it with a scoop of vanilla ice cream for a warm-cold contrast, or cut it into fun shapes for a kids’ party—it’s as versatile as it is vibrant.
Skittle Mini Cupcakes with Whipped Topping
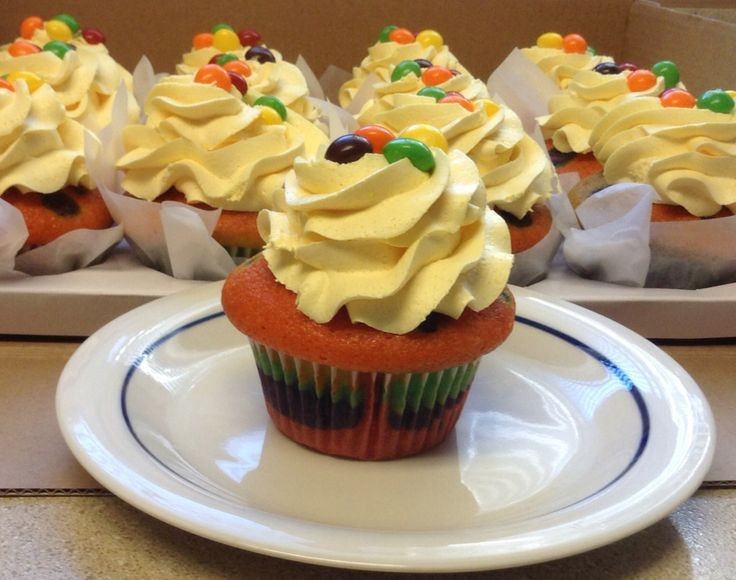
Zany as it sounds, these Skittle Mini Cupcakes are the ultimate party trick—they’re like a rainbow exploded in your mouth, but in the best possible way. Imagine fluffy, colorful bites topped with a cloud of whipped goodness that’ll have everyone begging for the recipe. Trust me, they’re so fun to make, you might just forget you’re an adult for a minute!
Serving: 24 | Pre Time: 15 minutes | Cooking Time: 12 minutes
Ingredients
– 1 ½ cups all-purpose flour (I always sift mine for extra fluffiness)
– 1 cup granulated sugar (go for the fine stuff—it blends like a dream)
– ½ cup unsalted butter, softened (room temp is key here; I leave it out for an hour)
– 2 large eggs, at room temperature (they mix better and give a smoother batter)
– 1 tsp vanilla extract (pure vanilla is my go-to for that rich flavor)
– ½ cup whole milk (full-fat makes these cupcakes extra moist)
– 1 tsp baking powder (fresh baking powder ensures a good rise)
– ¼ tsp salt (just a pinch to balance the sweetness)
– 1 cup Skittles, divided (I prefer the original mix for a vibrant color pop)
– 1 cup heavy whipping cream (chilled—it whips up faster and holds its shape)
– 2 tbsp powdered sugar (for sweetening the topping without grittiness)
Instructions
1. Preheat your oven to 350°F and line a mini muffin tin with 24 paper liners.
2. In a medium bowl, whisk together 1 ½ cups all-purpose flour, 1 tsp baking powder, and ¼ tsp salt until well combined.
3. In a large bowl, cream ½ cup unsalted butter and 1 cup granulated sugar with an electric mixer on medium speed for 2-3 minutes, until light and fluffy.
4. Add 2 large eggs one at a time, beating well after each addition, then mix in 1 tsp vanilla extract.
5. Gradually add the flour mixture to the butter mixture, alternating with ½ cup whole milk, starting and ending with the flour, and mix on low speed until just combined—tip: don’t overmix to avoid dense cupcakes.
6. Fold in ½ cup of Skittles gently into the batter, reserving the rest for later.
7. Spoon the batter into the prepared liners, filling each about ⅔ full, and bake for 10-12 minutes, until a toothpick inserted comes out clean—tip: rotate the pan halfway through for even baking.
8. Let the cupcakes cool in the tin for 5 minutes, then transfer to a wire rack to cool completely.
9. While cooling, make the whipped topping: in a chilled bowl, beat 1 cup heavy whipping cream and 2 tbsp powdered sugar with an electric mixer on high speed for 3-4 minutes, until stiff peaks form—tip: chill your beaters first for faster whipping.
10. Pipe or spread the whipped topping onto the cooled cupcakes and sprinkle with the remaining ½ cup of Skittles.
Dazzlingly colorful and delightfully fluffy, these mini cupcakes offer a burst of fruity flavor with every bite, thanks to those candy gems. The whipped topping adds a light, creamy contrast that melts in your mouth—try serving them on a platter arranged by color for a fun, eye-catching display at your next gathering!
Gluten-Free Skittle Cake with Coconut Frosting
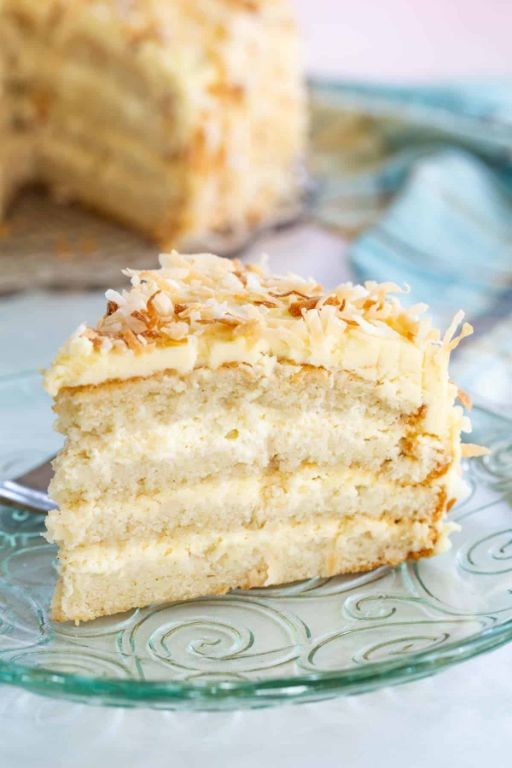
Zany as it sounds, this rainbow-hued dessert is the ultimate gluten-free party trick—imagine biting into a cloud of coconut-flavored joy studded with bursts of fruity Skittle magic. It’s the cake that makes everyone at the table do a double-take, then beg for seconds (and the recipe). Seriously, who knew a handful of candy could turn a simple treat into a showstopper?
Serving: 12 | Pre Time: 20 minutes | Cooking Time: 35 minutes
Ingredients
- 2 cups gluten-free all-purpose flour (I swear by Bob’s Red Mill for that perfect crumb)
- 1 cup granulated sugar (because life’s too short for less sweetness)
- 3 large eggs, at room temp—trust me, they blend smoother this way
- 1 cup unsweetened coconut milk (the canned kind adds extra richness)
- ½ cup coconut oil, melted but not hot (it’s my go-to for moisture)
- 1 tsp vanilla extract (pure, not imitation—your taste buds will thank you)
- 2 tsp baking powder (the gluten-free lifeline for rise)
- ½ tsp salt (just a pinch to balance the sugar)
- 1 cup rainbow Skittles, divided (save a handful for garnish—they’re the confetti of joy)
- For the frosting: 8 oz cream cheese, softened (full-fat is non-negotiable here), ½ cup powdered sugar, and ¼ cup shredded coconut (toasted if you’re feeling fancy)
Instructions
- Preheat your oven to 350°F and grease a 9-inch round cake pan—I like to line it with parchment paper for easy removal.
- In a large bowl, whisk together the gluten-free flour, granulated sugar, baking powder, and salt until no lumps remain.
- Add the room-temperature eggs, coconut milk, melted coconut oil, and vanilla extract to the dry ingredients. Tip: Mix gently with a spatula to avoid overworking the batter, which can make it dense.
- Fold in ¾ cup of the Skittles, reserving the rest for later—they’ll add a pop of color inside the cake.
- Pour the batter into the prepared pan and smooth the top with a spatula. Bake at 350°F for 30–35 minutes, or until a toothpick inserted in the center comes out clean. Tip: Avoid opening the oven door early, as gluten-free cakes can sink if disturbed.
- Let the cake cool completely in the pan on a wire rack, about 1 hour—patience is key here to prevent a melty frosting disaster.
- While it cools, make the frosting: In a medium bowl, beat the softened cream cheese and powdered sugar with a hand mixer until smooth, about 2 minutes. Tip: If it’s too thick, add a splash of coconut milk to reach a spreadable consistency.
- Fold the shredded coconut into the frosting, then spread it evenly over the cooled cake.
- Decorate the top with the remaining Skittles, pressing them lightly into the frosting for a vibrant finish.
Every slice reveals a confetti-like interior with soft, moist crumbs that practically melt in your mouth, while the coconut frosting adds a creamy, tropical contrast. Serve it chilled for a firmer texture, or get creative by pairing it with a scoop of vanilla ice cream for an extra-indulgent treat—it’s guaranteed to disappear faster than you can say “rainbow.”
Skittle Cake Pops Dipped in Candy Melts
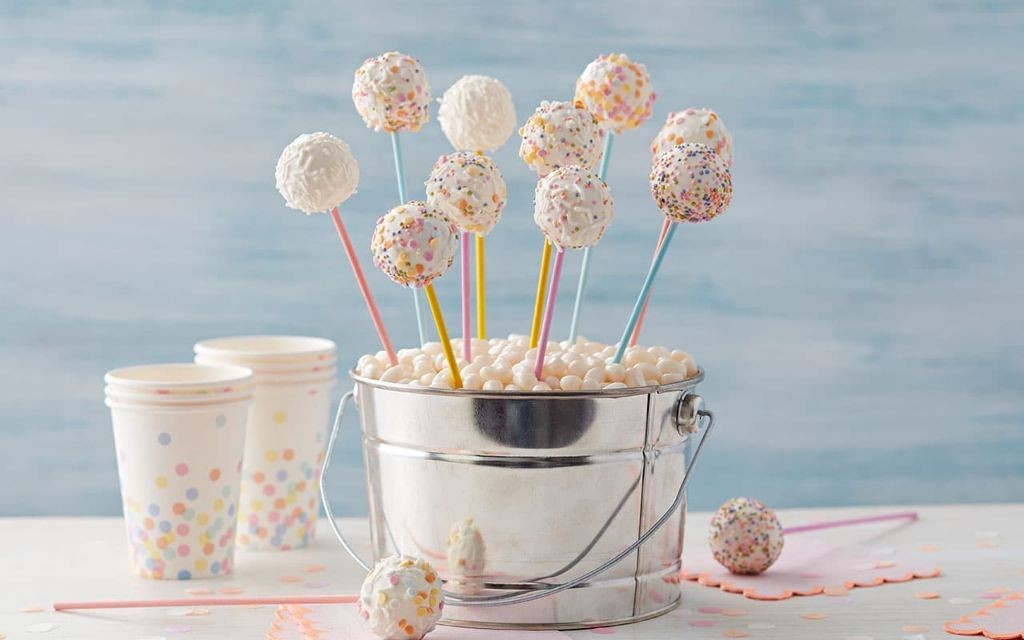
Venture beyond the ordinary with these Skittle Cake Pops Dipped in Candy Melts—they’re like a carnival for your taste buds, bursting with color and whimsy in every bite. Imagine a cake pop that’s not just a sweet treat but a vibrant, playful party on a stick, perfect for turning any day into a celebration. Trust me, these little guys are so fun to make and even more delightful to devour.
Serving: 24 | Pre Time: 30 minutes | Cooking Time: 15 minutes
Ingredients
- 1 box vanilla cake mix (I always go for the moist variety—it makes the pops extra tender)
- 1 cup water
- ½ cup vegetable oil (a neutral oil works best here to let the flavors shine)
- 3 large eggs (I prefer room temp eggs for smoother mixing)
- 1 cup vanilla frosting (store-bought is fine, but homemade adds a special touch)
- 1 cup Skittles candy, finely chopped (go for the rainbow mix for maximum color pop)
- 2 cups candy melts in assorted colors (I like to use a variety to match the Skittles’ vibrancy)
- 24 lollipop sticks (wooden ones are my go-to for easy handling)
- 1 tbsp shortening (this helps thin the candy melts for a smooth dip—trust me, it’s a game-changer)
Instructions
- Preheat your oven to 350°F and grease a 9×13-inch baking pan lightly with oil or cooking spray.
- In a large mixing bowl, combine the vanilla cake mix, water, vegetable oil, and eggs, whisking until the batter is smooth and lump-free—tip: don’t overmix to keep the cake light.
- Pour the batter into the prepared pan and bake for 25-30 minutes, or until a toothpick inserted into the center comes out clean; let the cake cool completely on a wire rack, about 1 hour.
- Crumble the cooled cake into fine crumbs in a large bowl using your hands or a fork.
- Add the vanilla frosting to the cake crumbs and mix thoroughly until the mixture holds together when squeezed—tip: start with ¾ cup frosting and add more if needed to avoid soggy pops.
- Fold in the finely chopped Skittles candy evenly throughout the mixture.
- Roll the mixture into 24 equal-sized balls, about 1 inch in diameter, and place them on a parchment-lined baking sheet.
- Insert a lollipop stick into each cake ball, pushing it about halfway through, and freeze the pops for 15 minutes to firm up—tip: this prevents them from falling apart during dipping.
- In a microwave-safe bowl, melt the candy melts with shortening in 30-second intervals, stirring between each until smooth and fluid.
- Dip each cake pop into the melted candy melts, swirling to coat completely, and tap off any excess gently.
- Stand the dipped pops upright in a foam block or cup to set at room temperature for about 20 minutes, or until the coating hardens.
Unwrap the joy of these cake pops—they boast a soft, crumbly interior with a crisp candy shell and bursts of fruity Skittle bits in every mouthful. Serve them at parties as edible confetti or gift them in clear bags tied with ribbon for a sweet surprise that’s sure to spark smiles.
Lemon-Skittle Sheet Cake with Creamy Icing
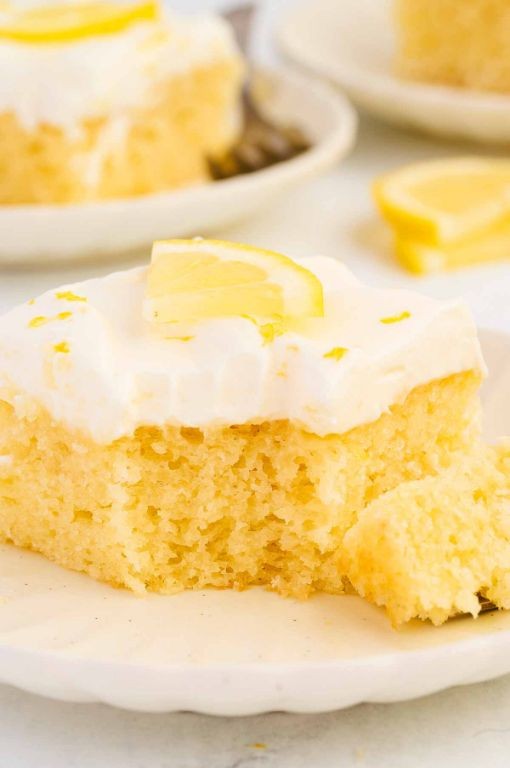
Kick off your taste buds’ wildest party with this Lemon-Skittle Sheet Cake—a dessert that’s part sunshine, part candy-coated joy, and entirely impossible to resist. It’s the kind of treat that makes you forget you ever had a bad day, blending zesty lemon with a rainbow of fruity Skittles in a cake so fluffy, you’ll want to dive face-first into the pan. Trust me, your kitchen will smell like a citrusy carnival, and your friends will be begging for the recipe before the first slice is gone.
Serving: 16 | Pre Time: 20 minutes | Cooking Time: 30 minutes
Ingredients
– 2 cups all-purpose flour (I always sift mine for extra fluffiness—no one likes a dense cake!)
– 1 cup granulated sugar (because life is sweet, and so is this batter)
– 1/2 cup unsalted butter, softened (room temp is key here; cold butter is a mood killer)
– 3 large eggs, at room temperature (they blend smoother, promise!)
– 1 cup whole milk (skim works in a pinch, but whole milk gives it that rich, creamy vibe)
– 1/4 cup fresh lemon juice (squeeze it yourself—bottled just doesn’t have the same zing)
– 1 tbsp lemon zest (extra zest means extra flavor, so don’t be shy!)
– 1 tsp baking powder (the magic lift for our cake)
– 1/2 tsp salt (to balance all that sweetness)
– 1 cup Skittles, divided (I use the original fruit mix, but any flavor works—just avoid the sour ones unless you’re feeling adventurous)
– 2 cups powdered sugar (for the icing—no substitutions, this is the glue that holds the fun together)
– 1/2 cup heavy cream (chilled is best for a thick, dreamy icing)
– 1 tsp vanilla extract (pure vanilla is my go-to for that warm, cozy flavor)
Instructions
1. Preheat your oven to 350°F and grease a 9×13-inch baking pan lightly with butter or non-stick spray.
2. In a large mixing bowl, cream together the softened butter and granulated sugar with an electric mixer on medium speed for about 3 minutes, until light and fluffy. Tip: Scrape down the sides of the bowl halfway through to ensure everything is evenly mixed.
3. Add the room-temperature eggs one at a time, beating well after each addition until fully incorporated.
4. In a separate bowl, whisk together the sifted flour, baking powder, and salt until combined.
5. Gradually add the dry ingredients to the butter mixture, alternating with the whole milk, mixing on low speed just until no flour streaks remain. Tip: Overmixing can lead to a tough cake, so stop as soon as it’s smooth.
6. Fold in the fresh lemon juice and lemon zest gently with a spatula until evenly distributed throughout the batter.
7. Pour the batter into the prepared baking pan, spreading it out evenly with the spatula.
8. Sprinkle 3/4 cup of the Skittles evenly over the top of the batter, pressing them lightly so they don’t sink completely during baking.
9. Bake in the preheated oven for 28-30 minutes, or until a toothpick inserted into the center comes out clean. Tip: Rotate the pan halfway through baking for even browning—no one wants a lopsided cake!
10. Remove the cake from the oven and let it cool completely in the pan on a wire rack for at least 1 hour.
11. While the cake cools, make the icing: In a medium bowl, whisk together the powdered sugar, heavy cream, and vanilla extract until smooth and thick, about 2 minutes.
12. Once the cake is cool, spread the icing evenly over the top with a spatula.
13. Sprinkle the remaining 1/4 cup of Skittles over the icing for a colorful, crunchy finish.
14. Slice into squares and serve immediately, or store covered at room temperature for up to 2 days.
Absolutely bursting with bright lemon flavor and chewy Skittle surprises, this cake is a textural dream—soft and moist with pops of fruity candy. Serve it at parties for a show-stopping centerpiece, or enjoy a slice with a cold glass of milk for the ultimate comfort food moment. Either way, it’s guaranteed to bring smiles and maybe a few sticky fingers!
Skittle Cheesecake with a Graham Cracker Crust
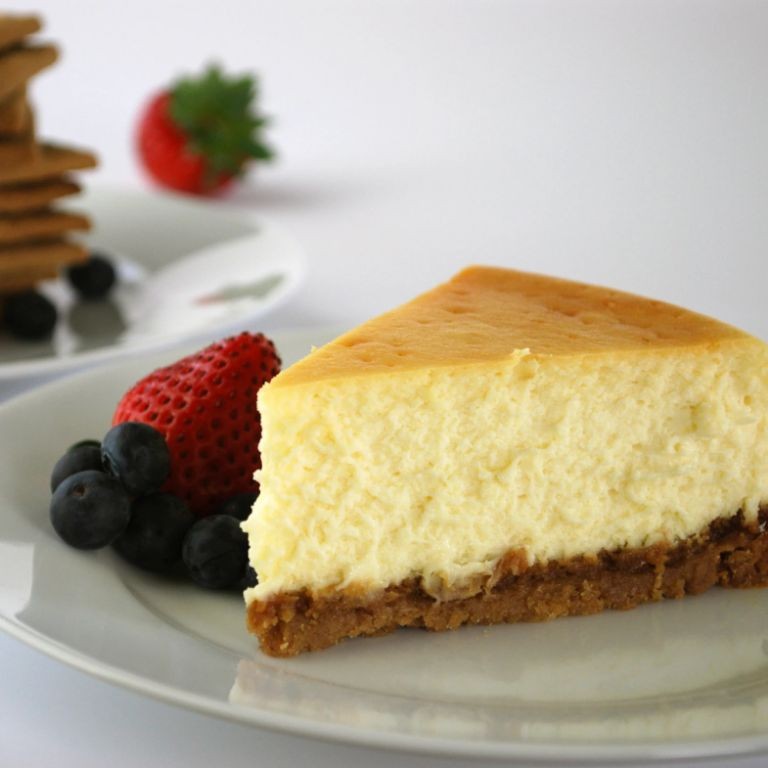
Unexpectedly delightful and guaranteed to spark joy, this Skittle cheesecake is the whimsical dessert you never knew you needed—it’s like a rainbow threw a party in a creamy, dreamy filling, all snuggled into a buttery graham cracker crust. Perfect for birthdays, potlucks, or just because Tuesday deserves a sprinkle of magic, it’s a showstopper that’s surprisingly simple to whip up. Trust me, your inner child (and everyone else) will thank you.
Serving: 8 | Pre Time: 20 minutes | Cooking Time: 55 minutes
Ingredients
– 1 1/2 cups graham cracker crumbs (I always crush mine fresh for that extra-crunchy texture)
– 1/4 cup granulated sugar (just enough to sweeten the crust without overpowering it)
– 1/2 cup unsalted butter, melted (use the good stuff—it makes all the difference)
– 24 oz cream cheese, softened to room temperature (this is non-negotiable for a smooth, lump-free filling)
– 3/4 cup granulated sugar (for the filling, because balance is key)
– 3 large eggs, at room temperature (I prefer room temp eggs here to avoid curdling)
– 1 tsp vanilla extract (pure vanilla is my go-to for that warm, cozy flavor)
– 1 cup sour cream (full-fat for maximum creaminess)
– 1 1/2 cups Skittles, divided (save some for garnish—the more colors, the merrier!)
Instructions
1. Preheat your oven to 325°F (163°C) and grease a 9-inch springform pan lightly with butter or non-stick spray.
2. In a medium bowl, combine the graham cracker crumbs, 1/4 cup sugar, and melted butter until the mixture resembles wet sand.
3. Press the crumb mixture firmly into the bottom of the prepared pan, using the back of a spoon to create an even layer—tip: chill it in the fridge for 10 minutes to set while you prep the filling.
4. In a large mixing bowl, beat the softened cream cheese and 3/4 cup sugar on medium speed until smooth and creamy, about 2-3 minutes.
5. Add the eggs one at a time, beating well after each addition to incorporate fully and avoid lumps.
6. Mix in the vanilla extract and sour cream until just combined, being careful not to overmix—tip: scrape down the sides of the bowl to ensure everything is evenly blended.
7. Gently fold in 1 cup of Skittles into the cheesecake batter, reserving the remaining 1/2 cup for later.
8. Pour the batter over the chilled crust and smooth the top with a spatula.
9. Place the springform pan on a baking sheet and bake in the preheated oven for 50-55 minutes, or until the edges are set but the center still has a slight jiggle—tip: avoid opening the oven door during baking to prevent cracks.
10. Turn off the oven, crack the door open slightly, and let the cheesecake cool inside for 1 hour to set gradually.
11. Remove from the oven, sprinkle the reserved Skittles on top as garnish, and refrigerate for at least 4 hours or overnight before serving.
So creamy and bursting with fruity pops from the Skittles, this cheesecake is a textural dream—the crisp crust gives way to a velvety filling that’s not too sweet. Serve it chilled with a dollop of whipped cream or alongside a scoop of vanilla ice cream for an extra-indulgent treat that’ll have everyone asking for seconds.
Skittle Icebox Cake with Layered Wafers
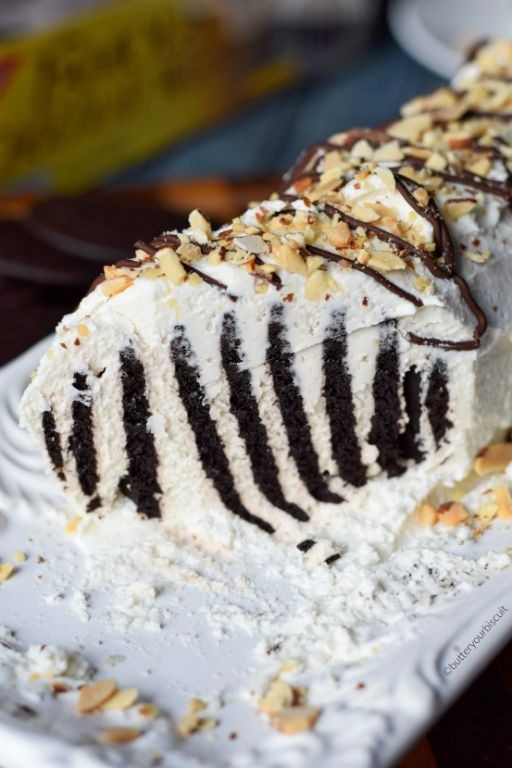
Vividly colorful and ridiculously easy, this Skittle Icebox Cake with Layered Wafers is the dessert equivalent of a confetti cannon—no baking required, just pure, unadulterated fun that’ll have everyone reaching for seconds (or thirds, no judgment). It’s the perfect treat to whip up when you’re craving something sweet but want to avoid turning on the oven, and trust me, the rainbow layers are almost too pretty to eat… almost.
Serving: 8 | Pre Time: 25 minutes | Cooking Time: 0 minutes
Ingredients
– 2 cups heavy whipping cream, chilled straight from the fridge for maximum fluffiness
– 1/4 cup granulated sugar, because a little sweetness never hurt anybody
– 1 teaspoon pure vanilla extract, my secret weapon for that warm, cozy flavor
– 1 (14.3 oz) package vanilla wafer cookies, the classic kind that crunches just right
– 1 (14 oz) bag Skittles candy, sorted by color—I like to make a rainbow, but feel free to mix it up!
– 1/2 cup rainbow sprinkles, for that extra festive touch (optional, but highly recommended)
Instructions
1. In a large mixing bowl, combine the chilled heavy whipping cream, granulated sugar, and vanilla extract.
2. Using an electric mixer on medium-high speed, whip the mixture for 3–4 minutes until stiff peaks form—tip: stop when you can turn the bowl upside down without anything sliding out!
3. Gently fold in the rainbow sprinkles with a spatula to distribute them evenly without deflating the cream.
4. Arrange a single layer of vanilla wafer cookies in the bottom of a 9×13-inch baking dish, placing them close together to form a solid base.
5. Spread one-third of the whipped cream mixture evenly over the wafers using a spatula.
6. Sprinkle one color of sorted Skittles evenly over the cream layer—I start with red for a pop of vibrancy.
7. Repeat steps 4–6 twice more, alternating wafer layers, cream layers, and different Skittle colors to build rainbow stripes.
8. For the final layer, spread the remaining whipped cream over the top and garnish with any leftover Skittles and sprinkles—tip: press them in lightly so they stick.
9. Cover the dish tightly with plastic wrap and refrigerate for at least 4 hours, or ideally overnight, to let the wafers soften—tip: patience is key here for that perfect cake-like texture!
Chill out and let this beauty set, and you’ll be rewarded with layers that meld into a creamy, dreamy dessert with a subtle crunch from the softened wafers and bursts of fruity Skittle flavor. Serve it sliced straight from the dish, or get fancy by plating individual portions with a drizzle of melted chocolate or a dollop of extra whipped cream for a show-stopping finish at your next gathering!
Skittle Angel Food Cake with Berry Compote
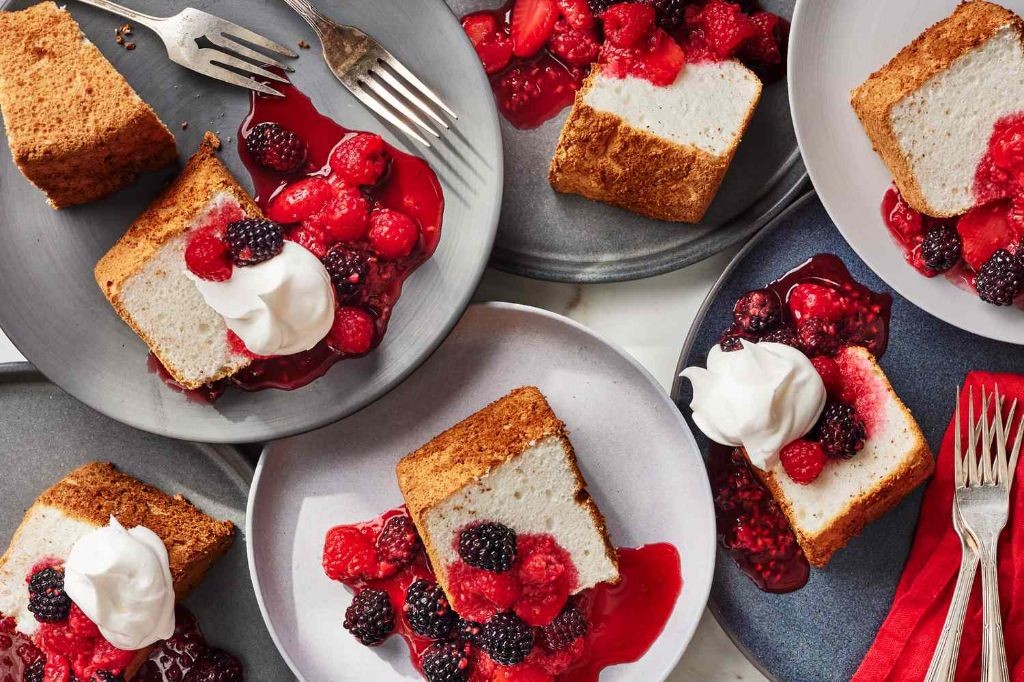
Miraculously, someone finally figured out how to make angel food cake even more heavenly—by tossing in a rainbow of Skittles! This whimsical twist on a classic dessert is like a party in your mouth, with a vibrant berry compote that cuts through the sweetness like a fruity superhero. Trust me, your taste buds will send you thank-you notes.
Serving: 12 | Pre Time: 25 minutes | Cooking Time: 35 minutes
Ingredients
– 1 cup cake flour, sifted (I always sift twice for that cloud-like texture—no lumps allowed!)
– 1 ½ cups granulated sugar, divided (half for the batter, half for whipping those egg whites into submission)
– 12 large egg whites, at room temperature (room temp is key here; cold ones just won’t whip up as fluffy)
– 1 ½ tsp cream of tartar (my secret weapon for stabilizing those peaks)
– ¼ tsp salt (just a pinch to balance the sweetness)
– 1 tsp vanilla extract (pure vanilla is my go-to for that warm, cozy flavor)
– 1 cup Skittles, roughly chopped (go wild with the colors—rainbow vibes only!)
– 2 cups mixed berries (I use frozen strawberries, blueberries, and raspberries for convenience and year-round joy)
– ¼ cup water (to get that compote simmering)
– 2 tbsp lemon juice (freshly squeezed, please—bottled stuff just doesn’t have the same zing)
Instructions
1. Preheat your oven to 350°F and grab an ungreased 10-inch tube pan—greasing is a no-no for angel food cake, or it won’t climb the sides properly.
2. In a medium bowl, whisk together the sifted cake flour and ¾ cup of the granulated sugar until well combined.
3. In a large, clean bowl, beat the room-temperature egg whites with an electric mixer on medium speed until foamy, about 1 minute.
4. Add the cream of tartar and salt to the egg whites, then increase the mixer speed to high and beat until soft peaks form, roughly 2-3 minutes.
5. Gradually add the remaining ¾ cup of granulated sugar to the egg whites, 1 tablespoon at a time, beating on high until stiff, glossy peaks form, about 4-5 minutes total.
6. Gently fold in the vanilla extract with a rubber spatula, using broad strokes to avoid deflating the egg whites.
7. Sprinkle the flour-sugar mixture over the egg white mixture in three additions, folding gently after each until just incorporated—no overmixing, or you’ll lose that airy texture.
8. Fold in the chopped Skittles until evenly distributed throughout the batter.
9. Spoon the batter into the ungreased tube pan and smooth the top with the spatula.
10. Bake at 350°F for 35 minutes, or until the top is golden brown and a toothpick inserted near the center comes out clean.
11. Immediately invert the pan onto a cooling rack and let it cool completely upside down for at least 1 hour to prevent collapsing.
12. While the cake cools, make the berry compote: in a saucepan over medium heat, combine the mixed berries, water, and lemon juice.
13. Bring the mixture to a simmer, then reduce heat to low and cook for 10-15 minutes, stirring occasionally, until the berries break down and the sauce thickens slightly.
14. Remove the compote from heat and let it cool to room temperature before serving.
15. Once the cake is cool, run a knife around the edges and center tube to loosen it, then gently remove it from the pan.
16. Slice the cake and serve each piece topped with a generous spoonful of the berry compote.
Unbelievably light and fluffy, this cake has a subtle crunch from the Skittles that melts into a sweet, fruity burst with every bite. The tart berry compote adds a refreshing contrast, making it perfect for summer picnics or a fun twist on birthday desserts—just try not to eat the whole thing in one sitting!
Skittle Coffee Cake with Cinnamon Streusel
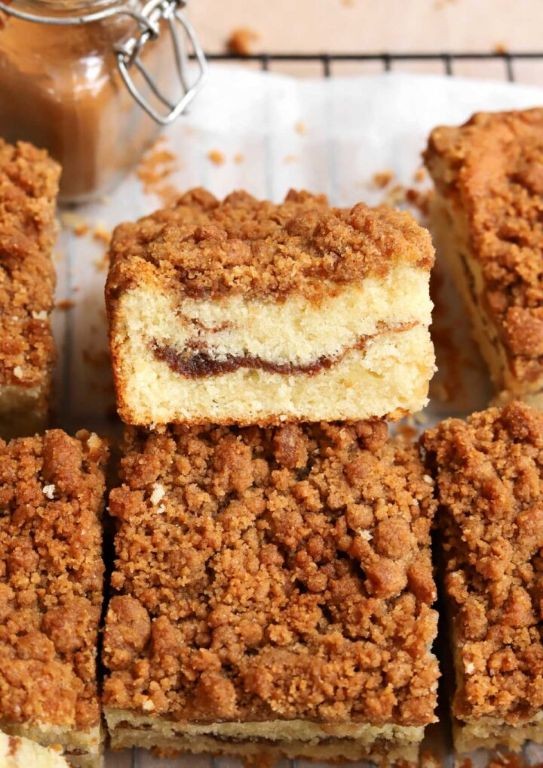
Dare to dream of a coffee cake that looks like it rained Skittles? This Skittle Coffee Cake with Cinnamon Streusel is the whimsical, sugar-packed upgrade your brunch table desperately needs—it’s basically a party in a pan, and the streusel is the confetti.
Serving: 12 | Pre Time: 20 minutes | Cooking Time: 45 minutes
Ingredients
- 2 cups all-purpose flour (I always sift mine first for a fluffier crumb)
- 1 cup granulated sugar (because we’re not shy about sweetness here)
- 1/2 cup unsalted butter, softened (room temp is key for easy creaming)
- 1 cup buttermilk (the tangy secret to keeping it moist)
- 2 large eggs (I crack ’em straight from the fridge, but room temp works too)
- 2 tsp baking powder (the lift that makes it rise to the occasion)
- 1 tsp vanilla extract (pure vanilla is my go-to for that warm aroma)
- 1/2 tsp salt (to balance all that sugar—trust me)
- 1 cup rainbow Skittles (pick out the green ones if you’re feeling fancy, or don’t!)
- For the streusel: 1/2 cup brown sugar, 1/3 cup all-purpose flour, 1 tsp ground cinnamon, 1/4 cup cold butter cubed (keep it cold for that perfect crumble)
Instructions
- Preheat your oven to 350°F and grease a 9×13-inch baking pan—I like to use butter for extra flavor.
- In a large bowl, cream together the softened butter and granulated sugar with a mixer on medium speed for about 2 minutes, until light and fluffy. Tip: Don’t rush this step; proper creaming ensures a tender cake.
- Add the eggs one at a time, beating well after each addition, then mix in the vanilla extract.
- In a separate bowl, whisk together the flour, baking powder, and salt.
- Alternately add the flour mixture and buttermilk to the butter mixture, starting and ending with the flour, mixing on low speed until just combined. Tip: Overmixing can lead to a tough cake, so stop as soon as no dry streaks remain.
- Gently fold in the Skittles by hand to avoid crushing them too much.
- Pour the batter into the prepared pan and spread it evenly with a spatula.
- For the streusel, combine the brown sugar, flour, and cinnamon in a small bowl, then cut in the cold butter with a pastry cutter or your fingers until crumbly.
- Sprinkle the streusel evenly over the batter. Tip: Press it lightly into the surface so it sticks during baking.
- Bake for 40-45 minutes, or until a toothpick inserted into the center comes out clean and the top is golden brown.
- Let the cake cool in the pan on a wire rack for at least 15 minutes before slicing.
The result is a moist, tender crumb with bursts of fruity Skittle flavor and a crunchy cinnamon streusel that’s downright addictive. Serve it warm with a dollop of whipped cream for extra decadence, or slice it into squares and watch it disappear at your next gathering—just be prepared for requests for the recipe!
Skittle Tres Leches Cake with Whipped Cream
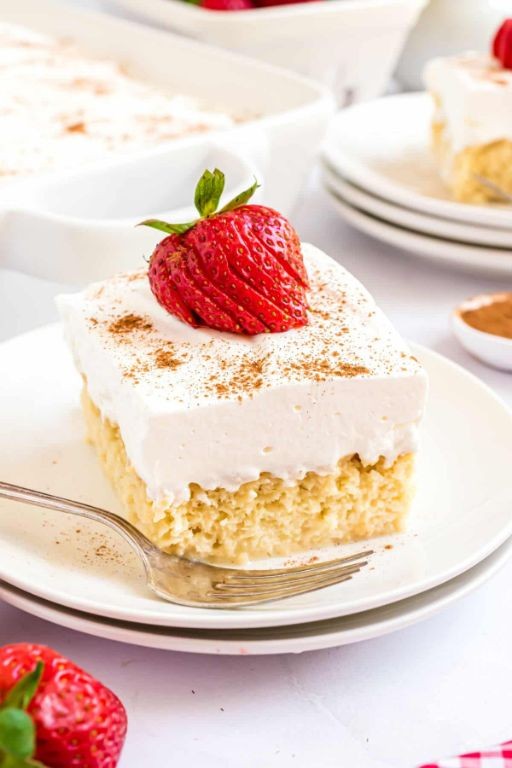
Dare to dream in rainbow? This Skittle Tres Leches Cake is a nostalgic, sugar-coated fantasy that turns a classic dessert into a vibrant party on a plate. It’s the perfect bake for anyone who believes dessert should be as fun as it is delicious—just try not to eat all the Skittles before they make it into the batter!
Serving: 12 | Pre Time: 25 minutes | Cooking Time: 30 minutes
Ingredients
- 1 ½ cups all-purpose flour (I always sift mine first for a lighter crumb)
- 1 cup granulated sugar (the sweet foundation of our rainbow dreams)
- 4 large eggs, at room temperature (trust me, room temp eggs whip up fluffier)
- ½ cup whole milk (for the cake batter—save the rest for the soak)
- 1 tsp baking powder
- ½ tsp salt
- 1 tsp vanilla extract (pure vanilla is my non-negotiable here)
- 1 (14 oz) can sweetened condensed milk
- 1 (12 oz) can evaporated milk
- 1 cup heavy cream (for the tres leches soak—it’s the magic trio)
- 2 cups heavy cream, chilled (for the whipped topping—cold cream whips best)
- ¼ cup powdered sugar (to sweeten that cloud-like whipped cream)
- 1 (14 oz) bag Skittles, divided (I use the original fruit flavors for maximum color pop)
Instructions
- Preheat your oven to 350°F and grease a 9×13-inch baking pan.
- In a large bowl, whisk together the flour, baking powder, and salt until combined.
- In a separate bowl, beat the eggs and granulated sugar with a mixer on high speed for 5 minutes, until pale and fluffy—this is key for a light cake texture.
- Gently fold the flour mixture into the egg mixture until just incorporated, being careful not to overmix.
- Stir in the vanilla extract and ½ cup whole milk until the batter is smooth.
- Pour the batter into the prepared pan and bake for 30 minutes, or until a toothpick inserted in the center comes out clean.
- While the cake bakes, combine the sweetened condensed milk, evaporated milk, and 1 cup heavy cream in a pitcher to make the tres leches mixture.
- Let the cake cool in the pan for 10 minutes, then poke holes all over the top with a fork or skewer.
- Slowly pour the tres leches mixture over the warm cake, allowing it to soak in completely—this might take a few minutes, so be patient for that moist goodness.
- Refrigerate the soaked cake for at least 4 hours, or overnight if you can wait, to let the flavors meld.
- For the whipped cream, beat the 2 cups chilled heavy cream and powdered sugar with a mixer on medium-high speed until stiff peaks form, about 3-4 minutes; tip: chill your bowl and beaters first for faster whipping.
- Spread the whipped cream evenly over the chilled cake.
- Sort the Skittles by color and sprinkle them generously over the whipped cream in a rainbow pattern or fun design—save a handful to snack on, I won’t judge!
Unbelievably moist and bursting with fruity candy crunch, this cake is a textural dream. Serve it chilled for a refreshing treat, or get creative by adding extra Skittles on the side for a DIY topping bar—because why should rainbows have all the fun?
Skittle Sponge Cake with Fruity Filling
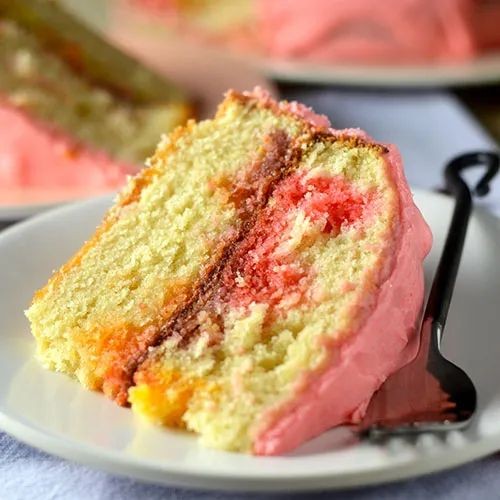
A whimsical rainbow of flavor is about to explode in your kitchen with this playful dessert that turns a classic candy into a show-stopping cake. Imagine a fluffy, tender sponge cake infused with the vibrant, fruity essence of Skittles, all wrapped around a sweet, gooey filling that will have everyone asking for seconds. It’s the perfect way to add a pop of color and pure joy to any celebration, from birthday parties to just-because Tuesdays.
Serving: 8 | Pre Time: 25 minutes | Cooking Time: 30 minutes
Ingredients
– 1 ½ cups all-purpose flour (I always sift mine first for extra fluffiness)
– 1 cup granulated sugar (the sweet foundation of our rainbow)
– ½ cup unsalted butter, softened (room temp is key for perfect creaming)
– 3 large eggs, at room temperature (trust me, they incorporate better this way)
– 1 cup buttermilk (my secret weapon for a moist, tender crumb)
– 1 tsp vanilla extract (pure, not imitation, for the best flavor)
– 1 ½ tsp baking powder (the lift that makes this cake soar)
– ½ tsp salt (to balance all that sweetness)
– 1 cup Skittles candy, finely crushed (rainbow power, unleashed!)
– ½ cup strawberry jam, for the fruity filling (I prefer a seedless variety for smoothness)
Instructions
1. Preheat your oven to 350°F (175°C) and grease two 8-inch round cake pans, lining the bottoms with parchment paper for easy release.
2. In a large mixing bowl, cream the softened butter and granulated sugar together with an electric mixer on medium speed for 3-4 minutes, until light and fluffy—this step is crucial for airy texture.
3. Add the room-temperature eggs one at a time, beating well after each addition until fully incorporated, then mix in the vanilla extract.
4. In a separate bowl, whisk together the sifted flour, baking powder, and salt to ensure even distribution.
5. Alternately add the dry ingredients and buttermilk to the butter mixture, starting and ending with the dry ingredients, mixing on low speed just until combined to avoid overmixing.
6. Gently fold in the finely crushed Skittles with a spatula until evenly distributed throughout the batter.
7. Divide the batter evenly between the prepared pans, smoothing the tops with a spatula, and bake for 25-30 minutes, or until a toothpick inserted into the center comes out clean.
8. Let the cakes cool in the pans for 10 minutes, then transfer them to a wire rack to cool completely—patience here prevents crumbling!
9. Once cooled, spread the strawberry jam evenly over the top of one cake layer, then carefully place the second layer on top to create the fruity filling.
10. Optionally, dust with powdered sugar or decorate with extra whole Skittles for a festive finish.
Oozing with fruity goodness, this cake boasts a soft, pillowy sponge that melts in your mouth, punctuated by bursts of candy flavor in every bite. Serve it sliced with a scoop of vanilla ice cream for a cool contrast, or get creative by cutting it into rainbow-shaped pieces for a kid-friendly treat that’s as fun to look at as it is to eat.
Summary
Hooray! This collection proves baking can be wildly fun and colorful. We hope these Skittle cake recipes inspire you to create something joyful in your kitchen. Give one a try, then drop a comment to tell us your favorite! If you loved this roundup, please share it on Pinterest to spread the sweetness. Happy baking!


