
Make your next gathering unforgettable with these 20 delicious small plate recipes! Perfect for entertaining, these shareable bites are designed to impress guests without keeping you stuck in the kitchen. From savory appetizers to sweet treats, you’ll find crowd-pleasing options that make hosting a breeze. Let’s dive into these easy-to-follow recipes that promise to elevate your next party!
Bruschetta with Tomato and Basil

Yikes, have you ever had a tomato so perfect it deserves its own fan club? Meet bruschetta—the Italian appetizer that’s basically a crunchy toast platform for summer’s juiciest tomatoes and fragrant basil, all drizzled with golden olive oil. It’s the effortless star of any gathering, guaranteed to disappear faster than you can say “more garlic, please!”
Serving: 4 | Pre Time: 15 minutes | Cooking Time: 10 minutes
Ingredients
– 1 rustic Italian baguette, sliced into ½-inch thick pieces
– 3 tablespoons extra-virgin olive oil, divided
– 2 cloves garlic, peeled
– 4 ripe heirloom tomatoes, finely diced
– ¼ cup fresh basil leaves, chiffonade-cut
– 1 tablespoon aged balsamic vinegar
– ½ teaspoon flaky sea salt
– ¼ teaspoon freshly cracked black pepper
Instructions
1. Preheat your oven to 400°F (204°C) and line a baking sheet with parchment paper.
2. Arrange the baguette slices in a single layer on the prepared baking sheet.
3. Brush each slice lightly with 1 tablespoon of extra-virgin olive oil using a pastry brush.
4. Toast the bread in the preheated oven for 8–10 minutes, or until the edges are golden-brown and crisp.
5. Remove the toasted bread from the oven and let it cool for 2 minutes on a wire rack.
6. While the bread cools, rub one side of each slice with the peeled garlic cloves for a subtle aromatic flavor.
7. In a medium mixing bowl, combine the diced heirloom tomatoes, chiffonade-cut basil, remaining 2 tablespoons of extra-virgin olive oil, aged balsamic vinegar, flaky sea salt, and freshly cracked black pepper.
8. Gently toss the tomato mixture with a silicone spatula until evenly coated, being careful not to crush the tomatoes.
9. Spoon the tomato-basil mixture generously onto the garlic-rubbed side of each toasted baguette slice.
10. Serve immediately on a decorative platter, optionally garnished with additional basil leaves.
Crunchy, juicy, and bursting with fresh flavors, this bruschetta offers a delightful contrast between the crisp toast and the vibrant tomato medley. For a creative twist, top it with a drizzle of reduced balsamic glaze or a sprinkle of creamy burrata cheese just before serving.
Stuffed Mushrooms with Cream Cheese and Herbs

Crisp, creamy, and utterly irresistible, these stuffed mushrooms are the holiday appetizer that’ll have your guests hovering by the oven. Imagine plump, earthy caps cradling a velvety, herb-kissed filling—each bite is a tiny, elegant flavor bomb. Trust me, they disappear faster than holiday cookies left unattended.
Serving: 6 | Pre Time: 15 minutes | Cooking Time: 20 minutes
Ingredients
– 24 large cremini mushrooms, stems removed and finely chopped
– 8 ounces full-fat cream cheese, softened to room temperature
– 1/4 cup unsalted butter, clarified
– 1/4 cup finely grated Parmigiano-Reggiano cheese
– 2 tablespoons fresh flat-leaf parsley, finely minced
– 1 tablespoon fresh thyme leaves, stripped from stems
– 2 cloves garlic, microplaned or finely minced
– 1/4 teaspoon fine sea salt
– 1/8 teaspoon freshly cracked black pepper
Instructions
1. Preheat your oven to 400°F (204°C) and line a rimmed baking sheet with parchment paper.
2. Heat the clarified butter in a medium skillet over medium heat until it shimmers, about 1 minute.
3. Add the chopped mushroom stems and sauté, stirring frequently, until they release their moisture and turn golden brown, approximately 5–7 minutes.
4. Stir in the microplaned garlic and cook for just 30 seconds until fragrant to prevent burning.
5. Transfer the mushroom stem mixture to a medium mixing bowl and allow it to cool for 5 minutes.
6. Add the softened cream cheese, Parmigiano-Reggiano, minced parsley, thyme leaves, fine sea salt, and cracked black pepper to the bowl.
7. Fold all ingredients together with a spatula until fully combined and uniform. (Tip: For extra fluffiness, use a hand mixer on low speed for 15 seconds.)
8. Using a small spoon, generously fill each mushroom cap with the cream cheese mixture, mounding it slightly.
9. Arrange the stuffed mushrooms on the prepared baking sheet, ensuring they are not touching.
10. Bake on the center rack for 18–20 minutes, or until the filling is puffed and lightly golden and the mushroom caps are tender. (Tip: Rotate the pan halfway through for even browning.)
11. Let the mushrooms rest on the baking sheet for 3 minutes before serving to allow the filling to set. (Tip: Garnish with an extra sprinkle of fresh herbs for a vibrant finish.)
Perfectly balanced, these morsels offer a delightful contrast: the tender, juicy mushroom gives way to a luxuriously smooth and tangy filling. The fresh herbs provide a bright, aromatic lift that cuts through the richness beautifully. For a show-stopping presentation, serve them on a slate board drizzled with a balsamic reduction or alongside a crisp, chilled rosé.
Spinach and Artichoke Dip in Bread Bowls
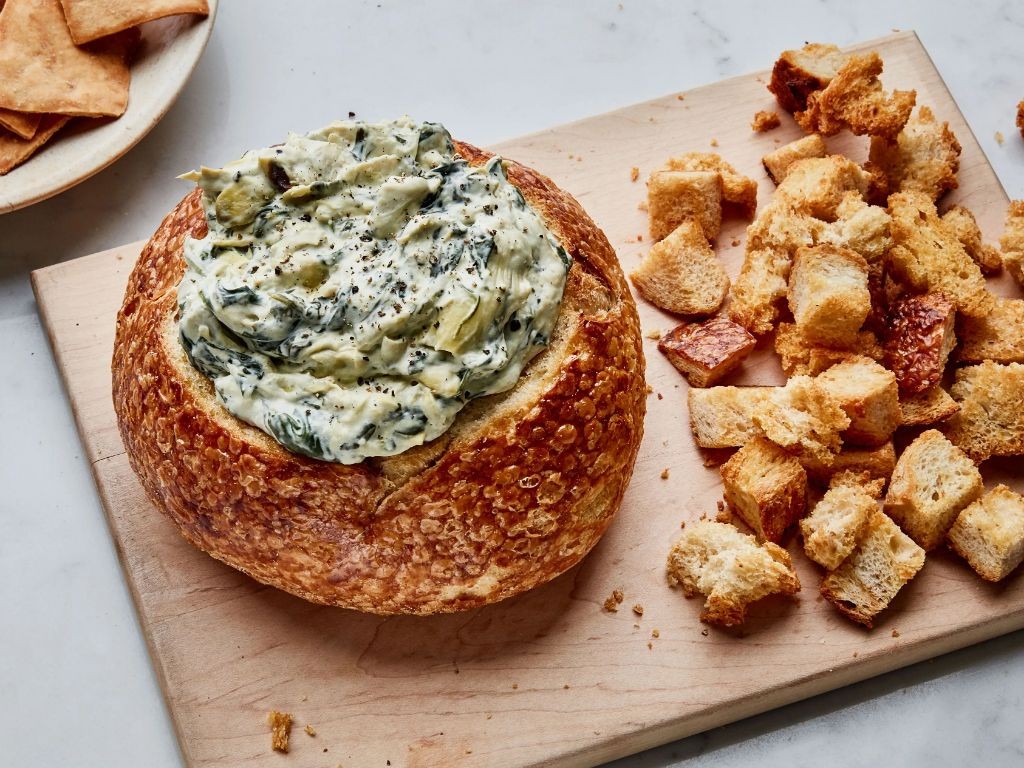
Miraculously, this spinach and artichoke dip in bread bowls is the culinary equivalent of a warm hug—creamy, cheesy, and utterly irresistible. It’s the party hero that disappears faster than your New Year’s resolutions, guaranteed to make you the MVP of any gathering. Let’s turn simple ingredients into a legendary snack that’s as fun to make as it is to devour.
Serving: 6 | Pre Time: 20 minutes | Cooking Time: 25 minutes
Ingredients
– 2 large sourdough bread bowls
– 4 cups fresh baby spinach, roughly chopped
– 1 (14-ounce) can artichoke hearts, drained and finely chopped
– 8 ounces cream cheese, softened to room temperature
– 1 cup mayonnaise
– 1 cup sour cream
– 1 cup grated Parmesan cheese
– 1 cup shredded mozzarella cheese
– 3 cloves garlic, minced
– 1 tablespoon unsalted butter
– 1 teaspoon smoked paprika
– ½ teaspoon freshly ground black pepper
– ¼ teaspoon kosher salt
Instructions
1. Preheat your oven to 375°F (190°C) and line a baking sheet with parchment paper.
2. Slice the tops off the sourdough bread bowls and hollow them out, leaving a ½-inch border to create sturdy vessels; reserve the removed bread for another use.
3. In a large skillet over medium heat, melt the unsalted butter until it foams slightly.
4. Add the minced garlic and sauté for 1–2 minutes until fragrant and golden, being careful not to burn it.
5. Stir in the roughly chopped baby spinach and cook for 3–4 minutes until wilted and vibrant green.
6. Transfer the spinach mixture to a large mixing bowl and let it cool for 5 minutes to prevent curdling the dairy.
7. Tip: For extra flavor, toast the hollowed bread bowls on the baking sheet for 5 minutes at 375°F before filling—this prevents sogginess.
8. To the bowl, add the softened cream cheese, mayonnaise, sour cream, grated Parmesan cheese, shredded mozzarella cheese, finely chopped artichoke hearts, smoked paprika, freshly ground black pepper, and kosher salt.
9. Fold everything together with a spatula until fully combined and creamy, ensuring no streaks of cream cheese remain.
10. Evenly divide the dip mixture between the two hollowed bread bowls, mounding it slightly for a generous presentation.
11. Place the filled bowls on the prepared baking sheet and bake at 375°F for 20–25 minutes, until the dip is bubbly and the bread edges are golden brown.
12. Tip: Check at 20 minutes—if the top isn’t lightly browned, broil for 1–2 minutes for a crispy, cheesy crust.
13. Remove from the oven and let rest for 5 minutes to allow the dip to set slightly for easier serving.
14. Tip: Garnish with a sprinkle of extra Parmesan and a drizzle of olive oil for a restaurant-worthy finish.
Kick back and savor this masterpiece: the dip emerges luxuriously creamy with pockets of tender artichoke and spinach, while the bread bowl turns irresistibly crisp, offering edible spoons for every scoop. Serve it straight from the oven with veggie sticks or crispy tortilla chips for a textural contrast that’ll have guests fighting over the last bite—trust me, it’s a flavor fiesta worth the hype!
Bacon-Wrapped Dates Stuffed with Almonds
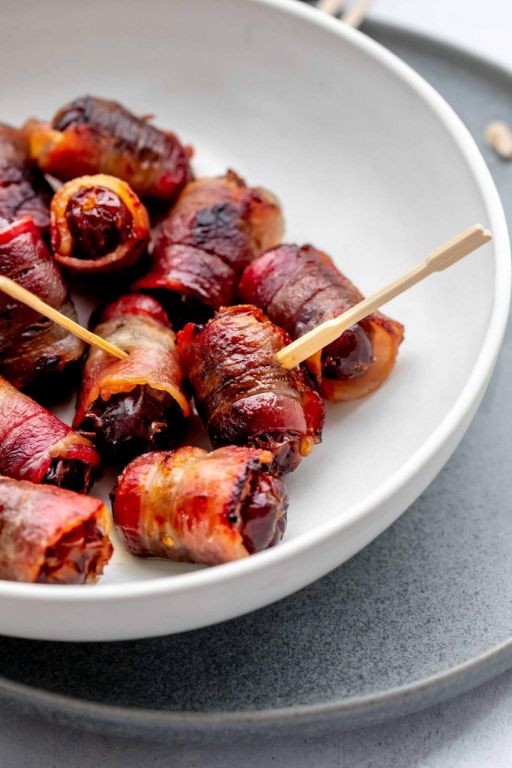
Brace yourselves, flavor adventurers—we’re about to transform three humble ingredients into a party superstar that’ll have guests whispering sweet nothings to your snack spread. These little bundles of joy are the ultimate sweet-salty-crunchy trifecta, wrapped in a crispy, savory hug.
Serving: 24 pieces | Pre Time: 15 minutes | Cooking Time: 20 minutes
Ingredients
– 24 large Medjool dates, pitted
– 24 whole raw almonds
– 12 slices thick-cut applewood-smoked bacon, each slice cut crosswise into 2 equal pieces
– 2 tablespoons pure maple syrup, for brushing
– ¼ teaspoon freshly cracked black pepper
Instructions
1. Preheat your oven to 400°F (204°C) and line a rimmed baking sheet with parchment paper.
2. Insert one whole raw almond into the cavity of each pitted Medjool date, pressing gently to secure.
3. Wrap each stuffed date with one half-slice of bacon, ensuring the ends overlap slightly underneath the date to prevent unraveling during baking.
4. Arrange the wrapped dates seam-side down on the prepared baking sheet, spacing them about 1 inch apart to allow for even crisping.
5. Lightly brush the top of each bacon-wrapped date with pure maple syrup using a pastry brush, which will promote caramelization and add a subtle sweetness.
6. Sprinkle the freshly cracked black pepper evenly over all the dates for a gentle aromatic kick.
7. Bake in the preheated oven for 18–20 minutes, or until the bacon is fully rendered, crisp, and deeply golden brown, rotating the sheet halfway through for uniform cooking.
8. Transfer the baking sheet to a wire rack and let the dates rest for 5 minutes to allow the bacon to crisp further and the filling to set slightly—this prevents molten almond surprises.
9. Serve warm directly from the baking sheet or arranged on a serving platter.
Now, behold your creation: each bite delivers a crackle of smoky bacon giving way to the lush, caramelized date, all anchored by the nutty crunch of toasted almond. Nestle these gems atop a swoosh of whipped goat cheese or skewer them with rosemary sprigs for a fragrant, Instagram-worthy presentation that’ll disappear faster than holiday leftovers.
Parmesan Crisps with Arugula and Prosciutto
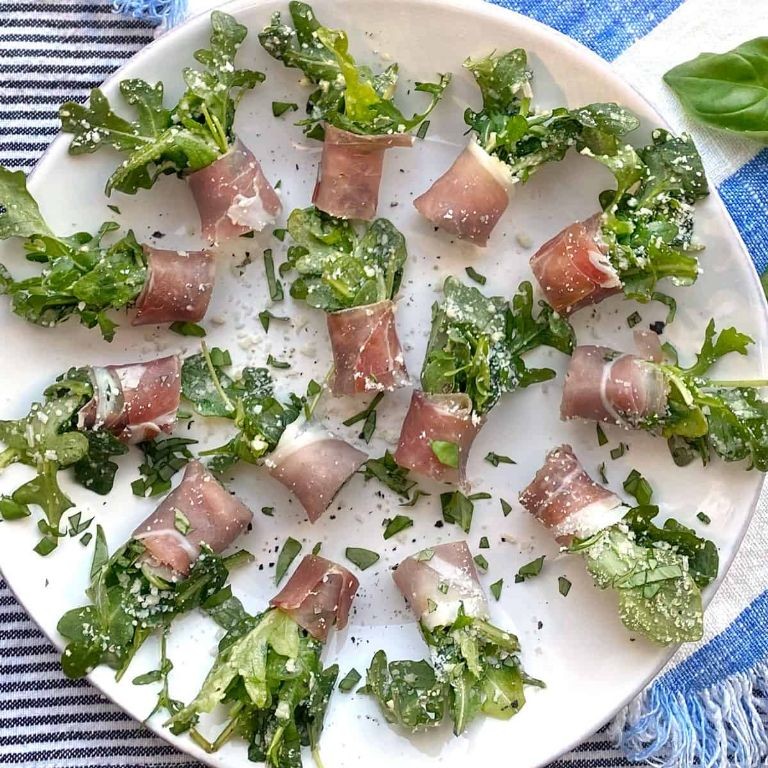
Wondering how to turn a few pantry staples into a show-stopping appetizer that looks like you spent hours? Welcome to the magic of Parmesan crisps—where cheese becomes a crunchy vessel for peppery arugula and salty prosciutto, all in under 20 minutes. It’s basically a salad that decided to wear a fancy hat!
Serving: 12 | Pre Time: 5 minutes | Cooking Time: 12 minutes
Ingredients
– 1½ cups finely grated Parmigiano-Reggiano cheese
– 2 cups fresh baby arugula leaves
– 4 ounces thinly sliced prosciutto di Parma
– 2 tablespoons extra-virgin olive oil
– 1 tablespoon freshly squeezed lemon juice
– ½ teaspoon flaky sea salt
– ¼ teaspoon freshly cracked black pepper
Instructions
1. Preheat your oven to 400°F and line a large baking sheet with parchment paper.
2. Place tablespoon-sized mounds of finely grated Parmigiano-Reggiano cheese onto the prepared baking sheet, spacing them 2 inches apart to allow for spreading.
3. Bake the cheese mounds for 8–10 minutes at 400°F, or until the edges turn golden brown and the centers are bubbly. Tip: Watch closely after 8 minutes—the crisps can burn quickly!
4. Remove the baking sheet from the oven and let the crisps cool completely on the sheet for 5 minutes, which allows them to firm up into perfect, crunchy discs.
5. While the crisps cool, whisk together 2 tablespoons of extra-virgin olive oil and 1 tablespoon of freshly squeezed lemon juice in a small bowl to create a simple vinaigrette.
6. Toss 2 cups of fresh baby arugula leaves with the vinaigrette in a mixing bowl until lightly coated.
7. Gently tear 4 ounces of thinly sliced prosciutto di Parma into bite-sized pieces.
8. Top each cooled Parmesan crisp with a small handful of dressed arugula leaves.
9. Arrange the torn prosciutto pieces over the arugula on each crisp. Tip: For even distribution, drape the prosciutto loosely to create visual appeal.
10. Sprinkle each assembled crisp with ½ teaspoon of flaky sea salt and ¼ teaspoon of freshly cracked black pepper. Tip: Season just before serving to maintain the crisp’s texture.
Vividly crisp and savory, these bites deliver a satisfying crunch from the cheese base that contrasts beautifully with the tender arugula and silky prosciutto. The bright lemon vinaigrette cuts through the richness, making each mouthful a balanced dance of flavors. For a creative twist, serve them stacked on a platter with a drizzle of aged balsamic glaze for an extra touch of sweetness.
Roasted Red Pepper Hummus with Pita Chips

Yikes, your store-bought hummus just got a serious upgrade! This Roasted Red Pepper Hummus is the vibrant, smoky, and impossibly creamy dip that’ll make your taste buds do a happy dance, and those homemade pita chips? They’re the crunchy, salty sidekick you never knew you needed.
Serving: 6 | Pre Time: 15 minutes | Cooking Time: 15 minutes
Ingredients
– 2 large red bell peppers, seeded and quartered
– 3 tablespoons extra-virgin olive oil, divided
– 1 (15-ounce) can chickpeas, drained and rinsed
– ¼ cup tahini paste
– 3 tablespoons freshly squeezed lemon juice
– 1 large garlic clove, minced
– 1 teaspoon ground cumin
– ½ teaspoon smoked paprika
– ½ teaspoon fine sea salt
– 3 pita bread rounds
– 1 tablespoon za’atar seasoning
Instructions
1. Preheat your oven to 425°F (218°C) and line a rimmed baking sheet with parchment paper.
2. Arrange the quartered red bell peppers on the prepared sheet, drizzle with 1 tablespoon of olive oil, and roast for 20-25 minutes until the skins are charred and blistered.
3. Transfer the roasted peppers to a bowl, cover tightly with plastic wrap, and let steam for 10 minutes to loosen the skins—this makes peeling effortless.
4. While the peppers steam, combine the chickpeas, tahini, lemon juice, minced garlic, cumin, smoked paprika, and sea salt in a food processor.
5. Peel the skins from the cooled peppers, discard them, and add the pepper flesh to the food processor.
6. Process the mixture on high for 2-3 minutes, scraping down the sides once, until completely smooth and creamy; for an ultra-silky texture, blend for an additional minute.
7. With the processor running, slowly drizzle in the remaining 2 tablespoons of olive oil until fully incorporated.
8. Reduce the oven temperature to 400°F (204°C) and slice each pita round into 8 wedges.
9. Arrange the pita wedges in a single layer on the baking sheet, brush lightly with olive oil, and sprinkle evenly with za’atar seasoning.
10. Bake the pita chips for 8-10 minutes, flipping halfway through, until golden brown and crisp; watch closely to avoid burning.
11. Transfer the hummus to a serving bowl, garnish with a drizzle of olive oil and a pinch of smoked paprika if desired.
12. Serve immediately with the warm pita chips for dipping.
Delightfully smooth with a subtle smoky kick from the roasted peppers, this hummus pairs perfectly with the herbaceous crunch of za’atar-spiced chips. For a creative twist, use it as a vibrant spread on sandwiches or dollop it over grilled vegetables to elevate any meal.
Smoked Salmon Canapés with Dill Cream Cheese

Zesty holiday hosting just got a whole lot easier with these elegant smoked salmon canapés—they’re the effortless appetizer that looks like you spent hours fussing, but secretly comes together faster than you can say “pass the champagne.” Perfect for your festive spread, these little bites deliver a luxurious punch of flavor without any last-minute kitchen drama.
Serving: 24 canapés | Pre Time: 15 minutes | Cooking Time: 0 minutes
Ingredients
– 8 oz cold-smoked salmon, thinly sliced
– 8 oz cream cheese, softened to room temperature
– ¼ cup fresh dill, finely chopped
– 2 tbsp fresh lemon juice
– 1 tsp lemon zest, finely grated
– ½ tsp freshly ground black pepper
– 24 small rye bread rounds or cucumber slices
– 1 tbsp capers, drained
– Fresh dill sprigs for garnish
Instructions
1. In a medium mixing bowl, combine the softened cream cheese, finely chopped fresh dill, fresh lemon juice, finely grated lemon zest, and freshly ground black pepper.
2. Using a hand mixer or whisk, beat the mixture on medium speed for 1–2 minutes until smooth and fully incorporated, scraping down the sides of the bowl with a rubber spatula to ensure no lumps remain.
3. Arrange 24 small rye bread rounds or cucumber slices on a clean work surface or serving platter.
4. Using a small offset spatula or butter knife, spread approximately 1 teaspoon of the dill cream cheese mixture evenly onto each bread round or cucumber slice, covering the surface completely.
5. Gently drape a thin slice of cold-smoked salmon over each canapé, folding or ruffling it slightly for an elegant, textured appearance.
6. Place 1–2 drained capers atop each canapé, pressing lightly to adhere.
7. Garnish each piece with a small fresh dill sprig, gently tucking it into the salmon or cream cheese for a polished finish.
8. Transfer the assembled canapés to a serving tray and refrigerate, uncovered, for 10 minutes to allow the flavors to meld and the cream cheese to set slightly before serving.
These canapés offer a delightful contrast of textures—the creamy, herbaceous spread against the silky, smoky salmon and the crisp bite of the base. The bright acidity from the lemon and briny capers cuts through the richness beautifully. Try serving them on a chilled slate board alongside a dry sparkling wine for an extra festive touch that’ll have your guests coming back for seconds.
Chicken Satay with Peanut Sauce

Picture this: you’re at a backyard barbecue, but instead of the usual burgers, you’re greeted by the sizzle of marinated chicken skewers, their smoky aroma teasing your taste buds like a culinary magician. This isn’t just any grilled chicken—it’s a flavor-packed adventure that transforms your grill into a Southeast Asian street food stall, complete with a creamy, dreamy peanut sauce that might just steal the show.
Serving: 4 | Pre Time: 30 minutes | Cooking Time: 10 minutes
Ingredients
- 1.5 pounds boneless, skinless chicken thighs, cut into 1-inch strips
- 1/4 cup coconut milk, full-fat
- 2 tablespoons soy sauce
- 1 tablespoon fish sauce
- 1 tablespoon brown sugar
- 2 cloves garlic, minced
- 1 teaspoon ground turmeric
- 1/2 teaspoon ground coriander
- 8 bamboo skewers, soaked in water for 30 minutes
- 1/2 cup creamy peanut butter
- 1/4 cup coconut milk, full-fat
- 1 tablespoon lime juice, freshly squeezed
- 1 teaspoon soy sauce
- 1/2 teaspoon red pepper flakes
- 2 tablespoons vegetable oil
Instructions
- In a medium bowl, combine 1/4 cup coconut milk, 2 tablespoons soy sauce, 1 tablespoon fish sauce, 1 tablespoon brown sugar, 2 cloves minced garlic, 1 teaspoon ground turmeric, and 1/2 teaspoon ground coriander to create the marinade.
- Add 1.5 pounds of boneless, skinless chicken thigh strips to the marinade, ensuring each piece is fully coated, and refrigerate for 20 minutes to allow flavors to penetrate.
- Thread the marinated chicken strips onto 8 pre-soaked bamboo skewers, packing them tightly to prevent drying during grilling.
- Preheat a grill or grill pan to medium-high heat, approximately 400°F, and lightly brush with 2 tablespoons vegetable oil to prevent sticking.
- Place the chicken skewers on the grill and cook for 4-5 minutes per side, turning once, until the internal temperature reaches 165°F and the exterior develops a golden-brown char.
- While the chicken cooks, prepare the peanut sauce by whisking together 1/2 cup creamy peanut butter, 1/4 cup coconut milk, 1 tablespoon freshly squeezed lime juice, 1 teaspoon soy sauce, and 1/2 teaspoon red pepper flakes in a small bowl until smooth and creamy.
- Remove the chicken skewers from the grill and let them rest for 3 minutes to redistribute juices, ensuring maximum tenderness.
- Serve the grilled chicken satay immediately with the prepared peanut sauce for dipping.
Velvety from the coconut milk marinade and boasting a smoky char, these skewers offer a tender bite that pairs perfectly with the rich, slightly spicy peanut sauce. For a creative twist, serve them atop a bed of crisp cucumber ribbons or alongside jasmine rice to soak up every last drop of sauce, turning a simple meal into a vibrant feast that’ll have everyone reaching for seconds.
Mini Quiches with Spinach and Feta

Jingle all the way to a brunch that’s both elegant and effortless with these bite-sized beauties. They’re the perfect excuse to feel fancy without the fuss, packing a savory punch of greens and tangy cheese into every flaky, golden parcel. Consider them your new secret weapon for impressing guests or treating yourself to a decadent morning.
Serving: 12 | Pre Time: 20 minutes | Cooking Time: 25 minutes
Ingredients
– 1 package (14.1 oz) refrigerated pie crusts, thawed
– 6 large pasture-raised eggs, lightly beaten
– 1 cup heavy cream
– 1/2 cup whole milk
– 1 cup finely chopped fresh spinach, packed
– 3/4 cup crumbled feta cheese
– 1/4 cup finely diced yellow onion
– 1 tbsp clarified butter, melted
– 1/2 tsp kosher salt
– 1/4 tsp freshly ground black pepper
– 1/8 tsp freshly grated nutmeg
Instructions
1. Preheat your oven to 375°F (190°C) and lightly grease a standard 12-cup muffin tin with the melted clarified butter, ensuring even coverage to prevent sticking.
2. On a lightly floured surface, unroll the thawed pie crusts and use a 3.5-inch round cutter to stamp out 12 circles, re-rolling scraps as needed.
3. Gently press each dough circle into a prepared muffin cup, forming a neat crust that comes just to the top edge.
4. In a large mixing bowl, whisk together the lightly beaten eggs, heavy cream, and whole milk until fully homogenized and slightly frothy.
5. Fold the packed chopped spinach, crumbled feta, diced onion, kosher salt, black pepper, and grated nutmeg into the egg mixture until evenly distributed.
6. Evenly divide the filling mixture among the 12 prepared crusts, filling each nearly to the top but leaving a 1/8-inch gap to allow for puffing.
7. Carefully transfer the muffin tin to the preheated oven and bake for 22-25 minutes, or until the quiche centers are fully set and the crust edges are a deep golden brown.
8. Remove the tin from the oven and let the quiches cool in the pan for 5 minutes to firm up before gently loosening the edges with a small offset spatula.
9. Transfer the mini quiches to a wire rack to cool slightly, about 10 minutes, before serving warm.
Remarkably, these quiches achieve a sublime contrast: the flaky, buttery crust shatters to reveal a luxuriously creamy, set custard flecked with vibrant spinach and pockets of salty feta. For a playful twist, serve them atop a swipe of herbed crème fraîche or alongside a bright arugula salad dressed with lemon vinaigrette to cut through the richness.
Avocado and Black Bean Salsa with Tortilla Chips
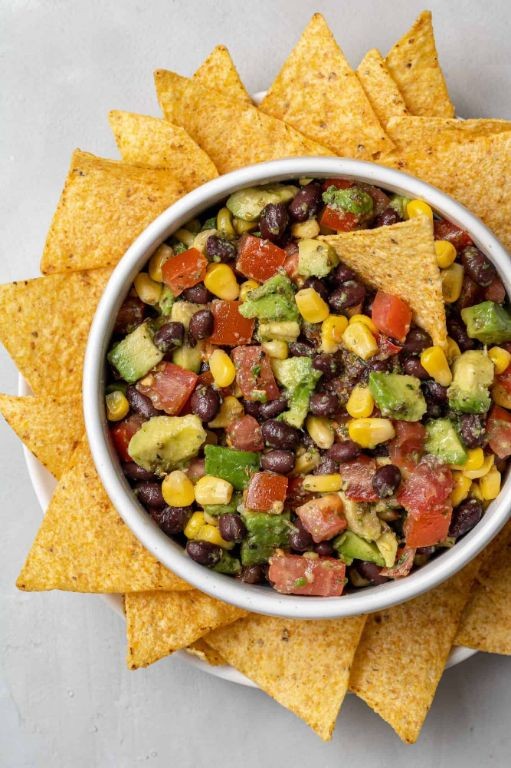
Muster your snack squad because this Avocado and Black Bean Salsa is about to become the MVP of your next gathering—it’s the zesty, crunchy, and creamy champion that turns tortilla chips from mere vehicles into the main event. Seriously, it’s so good you might forget there’s a party happening around it.
Serving: 6 | Pre Time: 20 minutes | Cooking Time: 0 minutes
Ingredients
– 2 ripe Hass avocados, medium-diced
– 1 (15-ounce) can black beans, rinsed and drained
– 1 cup cherry tomatoes, quartered
– 1/2 cup red onion, finely minced
– 1/4 cup fresh cilantro leaves, roughly chopped
– 1 jalapeño pepper, seeds removed and finely diced
– 2 tablespoons freshly squeezed lime juice
– 1 tablespoon extra-virgin olive oil
– 1 teaspoon kosher salt
– 1/2 teaspoon freshly ground black pepper
– 1 bag tortilla chips, for serving
Instructions
1. In a large mixing bowl, combine the medium-diced Hass avocados, rinsed and drained black beans, quartered cherry tomatoes, and finely minced red onion.
2. Add the roughly chopped fresh cilantro leaves and finely diced jalapeño pepper to the bowl.
3. Pour the freshly squeezed lime juice and extra-virgin olive oil over the mixture.
4. Season with kosher salt and freshly ground black pepper, then gently fold all ingredients together until just combined to avoid mashing the avocados.
5. Taste the salsa and adjust seasoning if necessary, keeping in mind that flavors will meld as it rests.
6. Transfer the salsa to a serving bowl and let it sit at room temperature for 10 minutes to allow the flavors to develop.
7. Arrange the tortilla chips around the salsa bowl on a platter for serving.
8. Serve immediately to enjoy the optimal texture and freshness.
So, scoop up this vibrant salsa with a sturdy tortilla chip and savor the contrast of creamy avocado against the firm black beans and juicy tomatoes. For a creative twist, pile it onto grilled fish or stuff it into tacos for an instant flavor upgrade—it’s the versatile hero your kitchen deserves.
Cheese and Charcuterie Board with Assorted Crackers

Well, well, well, look who decided to throw a party without breaking a sweat! This isn’t just a cheese board; it’s your golden ticket to becoming the host with the most, requiring zero actual cooking but delivering maximum deliciousness. Think of it as your edible art project where the only skill needed is the ability to arrange things prettily and then shamelessly take all the credit.
Serving: 6-8 | Pre Time: 20 minutes | Cooking Time: 0 minutes
Ingredients
– 8 oz. triple-cream brie cheese, chilled
– 6 oz. aged gouda cheese, thinly sliced
– 4 oz. sharp white cheddar cheese, cubed
– 4 oz. spicy soppressata, thinly sliced
– 3 oz. prosciutto di Parma, gently folded
– 2 oz. cornichons, drained
– 1/4 cup whole-grain mustard
– 1/3 cup honeycomb
– 1 cup marcona almonds, toasted
– 1 bunch red seedless grapes, washed and patted dry
– Assorted artisanal crackers (such as water crackers, seeded crisps, and rosemary flatbreads)
Instructions
1. Select a large wooden board, slate slab, or marble platter as your canvas, ensuring it’s clean and dry.
2. Unwrap the chilled triple-cream brie and place it directly in the center of the board to anchor your arrangement.
3. Arrange the thinly sliced aged gouda in a fan pattern on one side of the brie.
4. Scatter the cubed sharp white cheddar around the gouda, creating little clusters for easy grabbing.
5. Drape the thinly sliced spicy soppressata in loose folds next to the cheddar, allowing it to cascade naturally.
6. Gently fold the prosciutto di Parma into rosettes and tuck them among the cheeses for an elegant touch.
7. Place the drained cornichons in a small ramekin or directly on the board to prevent their brine from softening the crackers.
8. Spoon the whole-grain mustard into another small dish and position it near the meats for dipping.
9. Break the honeycomb into rustic chunks and arrange them beside the brie, as the sweet contrast pairs perfectly with the salty cheeses.
10. Scatter the toasted marcona almonds in empty spaces to add crunch and fill any gaps.
11. Nestle the bunch of red seedless grapes along the board’s edge, using them to add color and a fresh, juicy element.
12. Finally, artfully arrange the assorted artisanal crackers around the perimeter, ensuring each type is easily accessible. Tip: Add crackers just before serving to keep them crisp.
Unbelievably simple, yet utterly impressive, this board offers a symphony of textures from the creamy brie and crunchy almonds to the crisp crackers and juicy grapes. The flavor journey swings from the sharp bite of cheddar and spicy soppressata to the sweet relief of honeycomb, making every bite a delightful surprise. Serve it as the star of your holiday gathering or a chic centerpiece for a cozy night in—either way, be prepared for your guests to hover around it all evening long!
Summary
Culinary inspiration awaits! This collection of 20 small plates makes entertaining effortless and impressive. From savory bites to sweet finishes, there’s a perfect dish for every gathering. We hope you find a new favorite to share with friends and family. Give these recipes a try, then let us know which ones you loved in the comments below! Don’t forget to pin this article to your Pinterest boards for your next party.


