
Ready to transform a chilly snow day into a deliciously cozy occasion? We’ve gathered 13 comforting recipes perfect for warming up your kitchen and your soul. From hearty soups to indulgent baked treats, these winter favorites are sure to make staying in feel extra special. Grab your coziest blanket and let’s dive into these irresistible snow day delights!
Creamy Chicken and Wild Rice Soup

Gathering around a simmering pot of this creamy chicken and wild rice soup always feels like a warm hug on a chilly day—it’s my go-to comfort food after a long week, and I love how the wild rice adds a delightful chewiness that makes every spoonful satisfying. I often double the batch to freeze for busy nights, and trust me, it reheats beautifully without losing its creamy texture.
Serving: 6 | Pre Time: 15 minutes | Cooking Time: 45 minutes
Ingredients
– 2 tbsp olive oil
– 1 cup diced onion
– 1 cup diced carrot
– 1 cup diced celery
– 3 cloves minced garlic
– 1 lb boneless, skinless chicken breasts
– 1 cup wild rice
– 6 cups chicken broth
– 1 tsp dried thyme
– 1 tsp salt
– 1/2 tsp black pepper
– 1 cup heavy cream
– 1/2 cup grated Parmesan cheese
Instructions
1. Heat 2 tbsp olive oil in a large pot over medium heat until shimmering, about 2 minutes.
2. Add 1 cup diced onion, 1 cup diced carrot, and 1 cup diced celery to the pot, stirring frequently until softened, about 8 minutes.
3. Stir in 3 cloves minced garlic and cook until fragrant, about 1 minute.
4. Place 1 lb boneless, skinless chicken breasts in the pot, browning each side for 4 minutes until lightly golden.
5. Pour in 6 cups chicken broth and add 1 cup wild rice, 1 tsp dried thyme, 1 tsp salt, and 1/2 tsp black pepper, stirring to combine.
6. Bring the mixture to a boil, then reduce heat to low, cover, and simmer for 30 minutes until the rice is tender and chicken is cooked through.
7. Remove the chicken from the pot, shred it into bite-sized pieces using two forks, and return it to the pot.
8. Stir in 1 cup heavy cream and 1/2 cup grated Parmesan cheese, heating over low heat until warmed through, about 5 minutes, without boiling to prevent curdling.
9. Ladle the soup into bowls and serve immediately.
Perfectly creamy with a hint of nuttiness from the wild rice, this soup boasts a rich, velvety broth that clings to every spoonful. I love topping it with extra Parmesan and a sprinkle of fresh herbs for a pop of color, or pairing it with crusty bread to soak up every last drop—it’s a cozy meal that always feels like a special treat.
Homemade Hot Chocolate with Marshmallows

You know those chilly December afternoons when you just want to wrap your hands around something warm and sweet? Yesterday, as I watched the first real snowflakes of the season from my kitchen window, I had that exact craving and decided to ditch the instant packet for the real deal.
Serving: 2 | Pre Time: 5 minutes | Cooking Time: 10 minutes
Ingredients
– 2 cups whole milk
– 1/4 cup granulated sugar
– 1/4 cup unsweetened cocoa powder
– 1/4 cup semi-sweet chocolate chips
– 1/2 tsp pure vanilla extract
– 1/8 tsp fine salt
– 4 large marshmallows
Instructions
1. Pour 2 cups of whole milk into a medium saucepan.
2. Place the saucepan over medium-low heat to gently warm the milk, which helps prevent scorching—this is my first tip for a smooth base.
3. While the milk warms, whisk together 1/4 cup granulated sugar, 1/4 cup unsweetened cocoa powder, and 1/8 tsp fine salt in a small bowl to eliminate any lumps.
4. Once the milk is steaming and small bubbles form around the edges (about 5 minutes), reduce the heat to low.
5. Gradually add the dry cocoa mixture to the warm milk, whisking constantly to fully incorporate it and avoid clumps.
6. Add 1/4 cup semi-sweet chocolate chips to the saucepan.
7. Continue whisking over low heat for 3-4 minutes until the chocolate chips are completely melted and the mixture is smooth and slightly thickened.
8. Remove the saucepan from the heat and stir in 1/2 tsp pure vanilla extract.
9. Divide the hot chocolate evenly between two mugs.
10. Top each mug with 2 large marshmallows.
11. For a toasted finish, my second tip is to carefully use a kitchen torch to lightly brown the marshmallows, or place them under a broiler for 30-60 seconds, watching closely to prevent burning.
12. Let the drinks sit for 1 minute before serving—my final tip is this brief rest allows the flavors to meld perfectly.
Ultimate comfort in a cup, this hot chocolate is luxuriously creamy with a deep chocolate flavor that’s perfectly balanced by the sweet, gooey marshmallow topping. For a festive twist, I sometimes add a candy cane stirrer or a sprinkle of cinnamon on cold mornings.
Cheesy Baked Mac and Cheese

Kind of like a warm hug on a chilly December evening, this cheesy baked mac and cheese is my ultimate comfort food. I first perfected this recipe during a particularly snowy holiday season, and now it’s a non-negotiable part of my family’s Christmas Eve tradition—trust me, the bubbling cheese crust is worth every minute.
Serving: 6 | Pre Time: 15 minutes | Cooking Time: 35 minutes
Ingredients
– 1 lb elbow macaroni
– 4 tbsp unsalted butter
– 1/4 cup all-purpose flour
– 3 cups whole milk
– 1 tsp dry mustard powder
– 1/2 tsp paprika
– 1/2 tsp black pepper
– 1 tsp kosher salt
– 4 cups shredded sharp cheddar cheese
– 1 cup shredded Gruyère cheese
– 1/2 cup panko breadcrumbs
Instructions
1. Preheat your oven to 375°F and grease a 9×13-inch baking dish.
2. Bring a large pot of salted water to a rolling boil over high heat.
3. Add 1 lb elbow macaroni to the boiling water and cook for 7 minutes, stirring occasionally, until al dente.
4. Drain the pasta in a colander and set it aside; do not rinse it to help the cheese sauce cling better.
5. In the same pot, melt 4 tbsp unsalted butter over medium heat.
6. Whisk in 1/4 cup all-purpose flour and cook for 2 minutes, stirring constantly, until it forms a smooth, golden paste.
7. Gradually pour in 3 cups whole milk while whisking continuously to prevent lumps.
8. Add 1 tsp dry mustard powder, 1/2 tsp paprika, 1/2 tsp black pepper, and 1 tsp kosher salt to the sauce.
9. Cook the sauce for 5-7 minutes, whisking often, until it thickens enough to coat the back of a spoon.
10. Remove the pot from the heat and stir in 4 cups shredded sharp cheddar cheese and 1 cup shredded Gruyère cheese until fully melted and smooth.
11. Tip: For extra creaminess, let the sauce sit off the heat for a minute before adding the cheese to prevent graininess.
12. Fold the drained pasta into the cheese sauce until evenly coated.
13. Transfer the mixture to the greased baking dish and spread it into an even layer.
14. Sprinkle 1/2 cup panko breadcrumbs evenly over the top for a crispy finish.
15. Tip: Lightly toast the panko in a dry pan for 2 minutes beforehand to enhance its crunch without burning in the oven.
16. Bake at 375°F for 25 minutes, or until the top is golden brown and the edges are bubbling.
17. Tip: Let it rest for 10 minutes after baking—this allows the sauce to set slightly for perfect, scoopable servings.
18. The result is a luxuriously creamy interior with a satisfyingly crisp, cheesy crust. I love serving it straight from the dish with a sprinkle of fresh herbs or alongside a simple green salad to balance the richness.
Garlic Butter Roasted Potatoes

Every time I host a holiday dinner, I get nervous about pleasing everyone—but these garlic butter roasted potatoes are my secret weapon. They’re crispy on the outside, fluffy on the inside, and infused with so much savory garlic butter that even my picky nephew asks for seconds. I’ve been making this recipe for years, tweaking it until it’s just right, and now it’s my go‑to side dish for everything from weeknight dinners to festive gatherings.
Serving: 4 | Pre Time: 15 minutes | Cooking Time: 40 minutes
Ingredients
– 2 pounds Yukon Gold potatoes
– 3 tablespoons unsalted butter
– 4 cloves garlic
– 2 tablespoons olive oil
– 1 teaspoon kosher salt
– ½ teaspoon black pepper
– 1 tablespoon fresh parsley
Instructions
1. Preheat your oven to 425°F and line a large baking sheet with parchment paper.
2. Wash and scrub the 2 pounds Yukon Gold potatoes thoroughly, then pat them dry with a clean kitchen towel.
3. Cut each potato into 1‑inch cubes for even roasting, leaving the skins on for extra texture.
4. In a small saucepan over low heat, melt the 3 tablespoons unsalted butter, then add the 4 cloves garlic, minced, and cook for 1–2 minutes until fragrant—be careful not to burn it, as garlic can turn bitter quickly.
5. In a large mixing bowl, combine the potato cubes, 2 tablespoons olive oil, melted garlic butter, 1 teaspoon kosher salt, and ½ teaspoon black pepper, tossing until all pieces are evenly coated.
6. Spread the potatoes in a single layer on the prepared baking sheet, ensuring they aren’t crowded to help them crisp up properly.
7. Roast in the preheated oven at 425°F for 20 minutes, then use a spatula to flip the potatoes for even browning.
8. Continue roasting for another 15–20 minutes, checking at the 15‑minute mark—the potatoes are done when golden brown and crispy on the edges, and a fork pierces them easily.
9. Remove from the oven and immediately sprinkle with 1 tablespoon fresh parsley, chopped, tossing gently to distribute the herbs while hot.
10. Let the potatoes rest for 5 minutes on the baking sheet to allow the flavors to meld and the exterior to set for maximum crispiness.
Buttery and aromatic, these potatoes develop a delightful crunch that gives way to a tender interior. Serve them straight from the oven alongside grilled steak or fold them into breakfast hash for a savory twist—they’re so versatile, I often double the batch to have leftovers.
Apple Cinnamon French Toast Bake
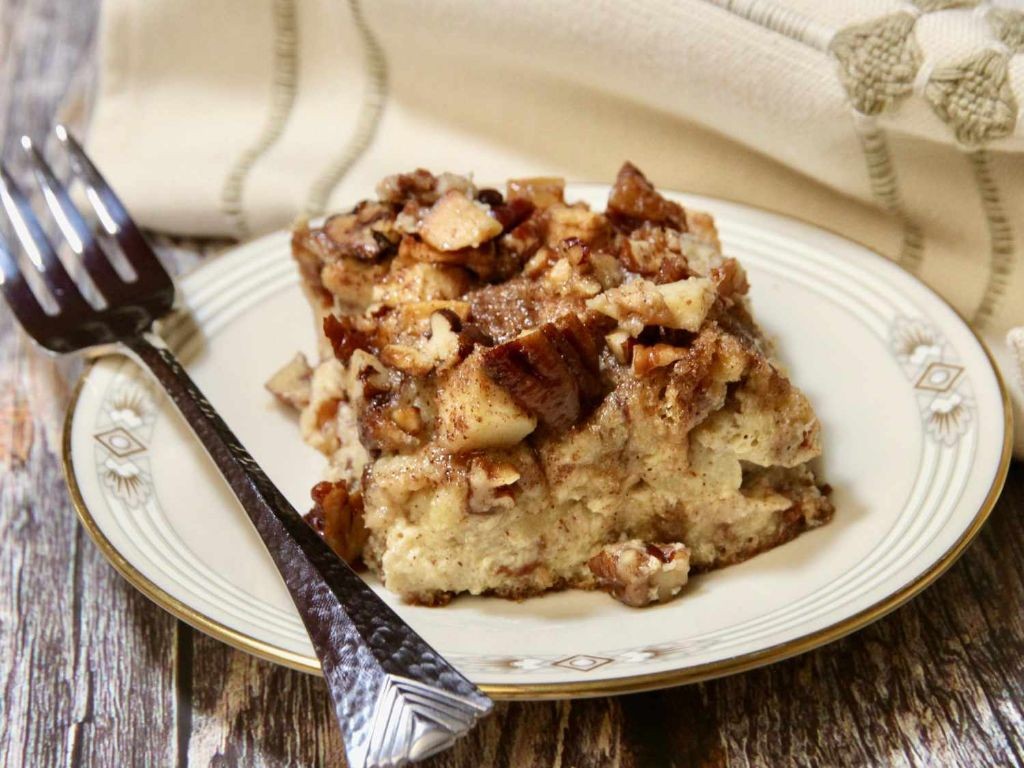
Mornings in my house are a whirlwind of coffee brewing and sleepy-eyed chaos, but this Apple Cinnamon French Toast Bake is the one thing that makes everyone slow down and gather around the table. I first made it for a holiday brunch years ago, and now it’s our go-to cozy weekend treat, filling the kitchen with the most incredible scent of baked apples and warm spices.
Serving: 8 | Pre Time: 20 minutes | Cooking Time: 45 minutes
Ingredients
– 1 loaf (about 16 oz) French bread, cut into 1-inch cubes
– 2 medium apples, peeled and diced
– 6 large eggs
– 2 cups whole milk
– 1/2 cup heavy cream
– 1/2 cup granulated sugar
– 1/4 cup light brown sugar, packed
– 2 tsp vanilla extract
– 2 tsp ground cinnamon
– 1/4 tsp ground nutmeg
– 1/4 tsp salt
– 4 tbsp unsalted butter, melted
– 1/4 cup maple syrup, for serving
Instructions
1. Preheat your oven to 350°F and grease a 9×13-inch baking dish with non-stick cooking spray.
2. Spread the cubed French bread evenly in the prepared baking dish, then scatter the diced apples over the top.
3. In a large mixing bowl, whisk together the eggs, whole milk, heavy cream, granulated sugar, brown sugar, vanilla extract, cinnamon, nutmeg, and salt until fully combined and smooth.
4. Pour the egg mixture evenly over the bread and apples in the baking dish, pressing down gently with a spatula to ensure all the bread is submerged.
5. Let the mixture sit for 15 minutes to allow the bread to absorb the custard—this prevents a soggy bottom and ensures even cooking.
6. Drizzle the melted butter evenly over the top of the soaked bread mixture.
7. Bake in the preheated oven for 45 minutes, or until the top is golden brown and the center is set (a knife inserted should come out clean).
8. Remove the bake from the oven and let it cool for 10 minutes before slicing; this resting time helps the custard set for cleaner cuts.
9. Serve warm, drizzled with maple syrup. For an extra touch, sprinkle a pinch of cinnamon on top just before serving to enhance the aroma.
Fluffy and custardy with pockets of tender, spiced apples, this bake is pure comfort in every bite. The edges get delightfully crisp while the center stays soft, and I love serving it with a dollop of whipped cream or a side of crispy bacon for a sweet-and-savory twist that always disappears fast.
One-Pot Creamy Tomato Basil Pasta

Sometimes, after a long day, the last thing I want is a sink full of dishes—that’s why this one-pot wonder has become my go‑to. I first made it on a hectic Tuesday when my kids were begging for something comforting, and now it’s a staple in our rotation. It’s creamy, cozy, and comes together with minimal fuss, letting you savor the evening instead of scrubbing pans.
Serving: 4 | Pre Time: 10 minutes | Cooking Time: 20 minutes
Ingredients
– 12 ounces dried pasta (such as penne or fusilli)
– 1 tablespoon olive oil
– 1 small yellow onion, finely diced
– 3 cloves garlic, minced
– 1 (28-ounce) can crushed tomatoes
– 2 cups vegetable broth
– 1 teaspoon dried oregano
– 1/2 teaspoon red pepper flakes
– 1/2 cup heavy cream
– 1/2 cup freshly grated Parmesan cheese
– 1/4 cup fresh basil leaves, thinly sliced
– Salt and black pepper, to taste
Instructions
1. Heat 1 tablespoon olive oil in a large pot or Dutch oven over medium heat until shimmering, about 1 minute.
2. Add 1 small diced yellow onion and cook, stirring occasionally, until softened and translucent, about 5 minutes.
3. Stir in 3 minced garlic cloves and cook until fragrant, about 30 seconds, being careful not to burn it.
4. Pour in 1 can crushed tomatoes, 2 cups vegetable broth, 1 teaspoon dried oregano, and 1/2 teaspoon red pepper flakes, then stir to combine.
5. Add 12 ounces dried pasta, submerging it fully in the liquid, and bring the mixture to a boil over high heat.
6. Reduce heat to medium-low, cover the pot, and simmer for 12–15 minutes, stirring halfway through, until the pasta is al dente and most liquid is absorbed.
7. Turn off the heat and stir in 1/2 cup heavy cream and 1/2 cup grated Parmesan until the cheese melts and the sauce is creamy.
8. Season with salt and black pepper to taste, then fold in 1/4 cup sliced fresh basil.
9. Let the pasta rest, uncovered, for 2–3 minutes to thicken slightly before serving.
Hearty and velvety, this pasta coats each noodle in a rich tomato-cream sauce with a hint of spice from the red pepper flakes. I love topping it with extra basil and a sprinkle of Parmesan, or serving it alongside a crisp green salad for a complete meal. It’s the kind of dish that feels indulgent yet simple enough for any weeknight.
Homemade Cinnamon Rolls with Cream Cheese Frosting
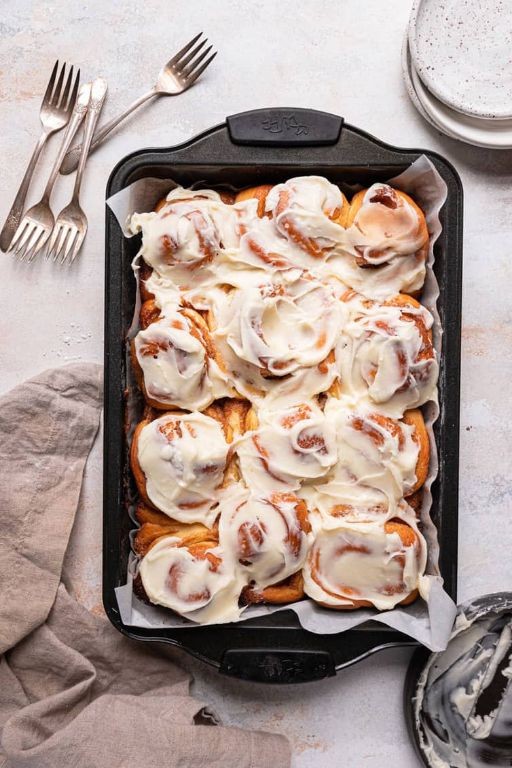
Last weekend, I woke up craving something warm and sweet, the kind of treat that makes the whole house smell like a holiday morning. After a quick pantry check, I decided to whip up a batch of homemade cinnamon rolls—there’s just something magical about that swirl of cinnamon and sugar wrapped in soft dough, especially when topped with a tangy cream cheese frosting. Trust me, these are worth every minute of the wait.
Serving: 12 | Pre Time: 90 minutes | Cooking Time: 25 minutes
Ingredients
– 4 cups all-purpose flour
– 1 cup whole milk, warmed to 110°F
– ½ cup granulated sugar
– ½ cup unsalted butter, melted
– 2 large eggs, room temperature
– 1 packet (2¼ tsp) active dry yeast
– 1 tsp salt
– ½ cup light brown sugar, packed
– 2 tbsp ground cinnamon
– 8 oz cream cheese, softened
– 2 cups powdered sugar
– 1 tsp vanilla extract
– 2 tbsp whole milk
Instructions
1. In a large bowl, combine the warmed whole milk, granulated sugar, and active dry yeast; let it sit for 5 minutes until foamy.
2. Add the melted unsalted butter, eggs, and salt to the yeast mixture, stirring until smooth.
3. Gradually mix in the all-purpose flour until a soft dough forms, then knead on a floured surface for 5–7 minutes until elastic.
4. Place the dough in a greased bowl, cover with a damp towel, and let it rise in a warm spot for 1 hour or until doubled in size.
5. Roll the dough out on a floured surface into a 16×12-inch rectangle.
6. In a small bowl, mix the light brown sugar and ground cinnamon, then sprinkle it evenly over the dough.
7. Tightly roll the dough from the long side into a log, pinching the seam to seal.
8. Cut the log into 12 equal slices using a sharp knife or dental floss for clean cuts.
9. Place the slices in a greased 9×13-inch baking pan, cover, and let rise for 30 minutes until puffy.
10. Preheat the oven to 350°F and bake the rolls for 20–25 minutes until golden brown.
11. While baking, beat the softened cream cheese, powdered sugar, vanilla extract, and whole milk in a bowl until smooth.
12. Spread the cream cheese frosting over the warm rolls immediately after removing them from the oven.
Just out of the oven, these rolls are irresistibly soft and fluffy with a gooey cinnamon center that melts in your mouth. The cream cheese frosting adds a delightful tang that balances the sweetness perfectly—try serving them warm with a drizzle of extra frosting or alongside a hot cup of coffee for the ultimate cozy breakfast.
Baked Ziti with Italian Sausage
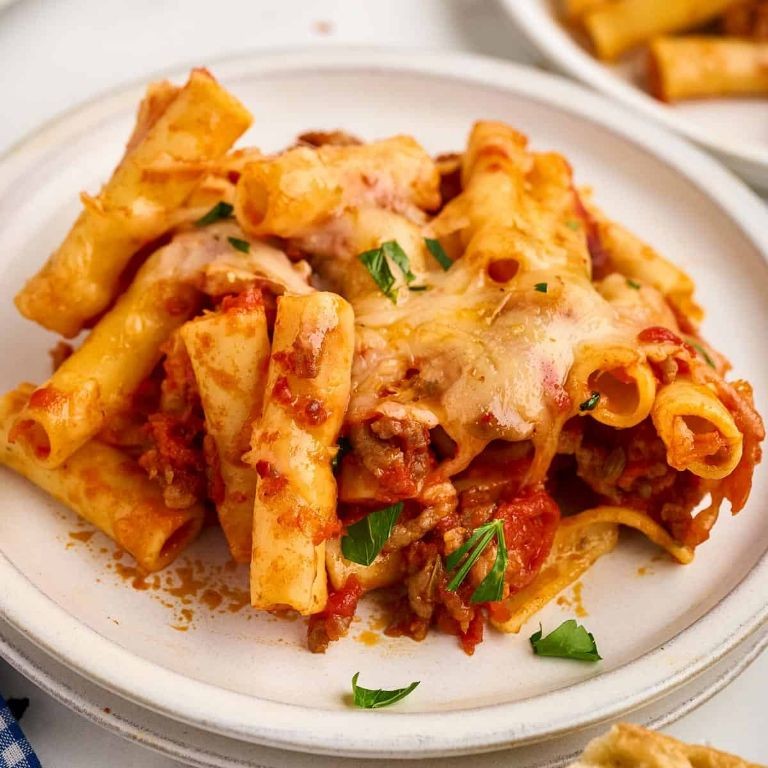
Baked ziti with Italian sausage is one of those comforting dishes that always feels like a warm hug on a cold day—I first fell in love with it at a friend’s holiday potluck years ago, and now it’s my go-to for feeding a crowd without spending all day in the kitchen. There’s something magical about how the flavors meld together in the oven, and I love that you can prep it ahead and just pop it in when guests arrive.
Serving: 8 | Pre Time: 20 minutes | Cooking Time: 45 minutes
Ingredients
– 1 pound Italian sausage (casings removed)
– 1 tablespoon olive oil
– 1 medium onion (diced)
– 3 cloves garlic (minced)
– 28 ounces crushed tomatoes
– 1 teaspoon dried oregano
– 1 teaspoon salt
– 1/2 teaspoon black pepper
– 1 pound ziti pasta
– 15 ounces ricotta cheese
– 2 cups shredded mozzarella cheese
– 1/2 cup grated Parmesan cheese
Instructions
1. Preheat your oven to 375°F (190°C) and grease a 9×13-inch baking dish lightly with olive oil.
2. Heat 1 tablespoon olive oil in a large skillet over medium-high heat, then add 1 pound Italian sausage, breaking it into small pieces with a spoon as it cooks for 8-10 minutes until browned and no longer pink.
3. Add 1 medium diced onion to the skillet and cook for 5 minutes, stirring occasionally, until softened and translucent.
4. Stir in 3 cloves minced garlic and cook for 1 minute until fragrant—be careful not to burn it, as garlic can turn bitter quickly.
5. Pour in 28 ounces crushed tomatoes, 1 teaspoon dried oregano, 1 teaspoon salt, and 1/2 teaspoon black pepper, then reduce heat to low and simmer for 10 minutes to let the flavors combine.
6. While the sauce simmers, bring a large pot of salted water to a boil and cook 1 pound ziti pasta according to package directions until al dente, about 10-12 minutes, then drain well.
7. In a large bowl, mix the drained ziti with the sausage-tomato sauce until evenly coated.
8. Spread half of the pasta mixture into the prepared baking dish, then dollop 15 ounces ricotta cheese evenly over the top using a spoon—this helps create creamy pockets in the baked dish.
9. Sprinkle 1 cup shredded mozzarella cheese over the ricotta layer.
10. Top with the remaining pasta mixture, pressing it down gently with a spatula to compact it slightly.
11. Cover the baking dish with aluminum foil and bake at 375°F for 25 minutes to heat through.
12. Remove the foil, sprinkle the remaining 1 cup mozzarella cheese and 1/2 cup grated Parmesan cheese evenly over the top, and bake uncovered for 10-15 minutes until the cheese is melted and bubbly with golden spots.
13. Let the baked ziti rest for 5-10 minutes before serving to allow it to set and make slicing easier.
Finally, this baked ziti emerges from the oven with a gooey, golden cheese topping that gives way to tender pasta and savory sausage in every bite. For a fun twist, I sometimes serve it with a side of garlic bread or a crisp green salad to balance the richness—it’s always a hit at gatherings!
Maple Glazed Roasted Carrots
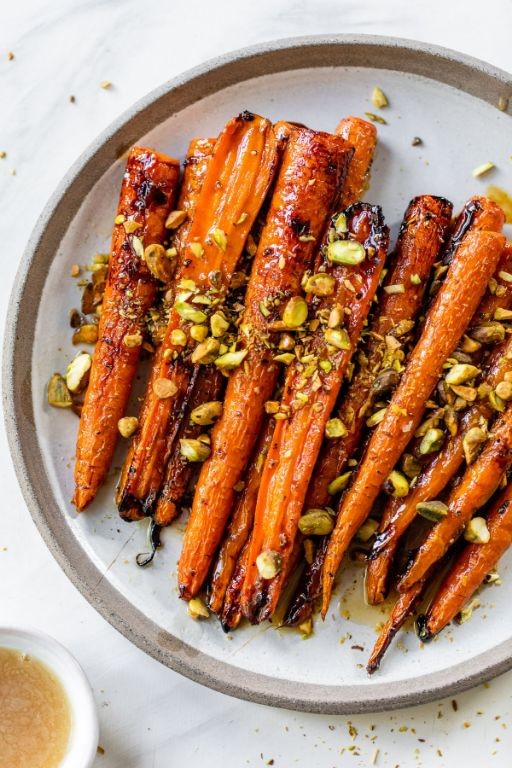
Perfectly caramelized and sweetly glazed, these maple roasted carrots are my go-to holiday side dish that always disappears first at the table. I started making them years ago when I needed something quick but impressive for a last-minute Friendsgiving, and now they’re a non-negotiable part of our family’s December menu—even my carrot-skeptic nephew asks for seconds.
Serving: 4 | Pre Time: 10 minutes | Cooking Time: 25 minutes
Ingredients
- 1.5 lbs carrots
- 2 tbsp olive oil
- 2 tbsp pure maple syrup
- 1 tbsp unsalted butter
- 1/2 tsp salt
- 1/4 tsp black pepper
- 1/4 tsp ground cinnamon
- 1 tbsp fresh thyme leaves
Instructions
- Preheat your oven to 425°F and line a rimmed baking sheet with parchment paper.
- Peel 1.5 lbs carrots and trim off the ends.
- Cut the carrots into uniform 3-inch pieces to ensure even cooking.
- In a large bowl, toss the carrot pieces with 2 tbsp olive oil, 1/2 tsp salt, and 1/4 tsp black pepper until evenly coated.
- Arrange the carrots in a single layer on the prepared baking sheet, leaving space between each piece.
- Roast the carrots at 425°F for 15 minutes, then remove the baking sheet from the oven.
- In a small saucepan over medium heat, melt 1 tbsp unsalted butter.
- Add 2 tbsp pure maple syrup and 1/4 tsp ground cinnamon to the saucepan, whisking continuously for 1 minute until combined.
- Drizzle the maple glaze evenly over the partially roasted carrots, using a brush to coat all sides.
- Return the baking sheet to the oven and roast for another 10 minutes at 425°F.
- Check that the carrots are fork-tender and the glaze is bubbling and caramelized.
- Transfer the roasted carrots to a serving platter and immediately sprinkle with 1 tbsp fresh thyme leaves.
Every bite offers a delightful contrast between the caramelized exterior and tender interior, with the maple and cinnamon creating a warm, autumnal sweetness that isn’t cloying. I love serving these alongside a simple roast chicken or tossing any leftovers into a grain bowl the next day—they even make a fantastic sweet-and-savory addition to holiday cheese boards.
Classic Shepherd’s Pie

Usually, when December rolls around and the chill sets in, I find myself craving the kind of meal that feels like a warm hug from the inside out. That’s why my family’s Classic Shepherd’s Pie is on heavy rotation—it’s the ultimate cozy, one-pan wonder that makes everyone at the table happy, and honestly, the leftovers are just as good the next day.
Serving: 6 | Pre Time: 20 minutes | Cooking Time: 50 minutes
Ingredients
– 1.5 lbs ground beef (85% lean)
– 1 large yellow onion, diced
– 2 large carrots, peeled and diced
– 2 cloves garlic, minced
– 1 tbsp olive oil
– 2 tbsp all-purpose flour
– 1 cup beef broth
– 1 tbsp Worcestershire sauce
– 1 tsp dried thyme
– 1/2 tsp salt
– 1/4 tsp black pepper
– 1 cup frozen peas
– 2.5 lbs russet potatoes, peeled and quartered
– 1/2 cup whole milk
– 4 tbsp unsalted butter
– 1/2 cup shredded cheddar cheese
Instructions
1. Place the quartered potatoes in a large pot, cover with cold water, and bring to a boil over high heat.
2. Reduce heat to medium and simmer the potatoes for 15-20 minutes, until fork-tender.
3. While potatoes cook, heat olive oil in a large skillet over medium-high heat.
4. Add the diced onion and carrots to the skillet and sauté for 5 minutes, until onions are translucent.
5. Add the ground beef to the skillet and cook for 8-10 minutes, breaking it up with a spoon until no pink remains.
6. Stir in the minced garlic and cook for 1 minute until fragrant.
7. Sprinkle the flour over the beef mixture and stir continuously for 2 minutes to cook out the raw flour taste.
8. Gradually pour in the beef broth and Worcestershire sauce, stirring constantly until the mixture thickens, about 3-4 minutes.
9. Add the dried thyme, salt, black pepper, and frozen peas, then simmer for 5 minutes before removing from heat.
10. Drain the cooked potatoes and return them to the hot pot to evaporate excess moisture for 1 minute.
11. Add the milk and butter to the potatoes and mash until smooth and creamy.
12. Preheat your oven to 400°F.
13. Transfer the beef mixture to a 9×13 inch baking dish and spread it into an even layer.
14. Spoon the mashed potatoes over the beef layer and spread gently to cover completely.
15. Sprinkle the shredded cheddar cheese evenly over the mashed potatoes.
16. Bake in the preheated oven for 20-25 minutes, until the cheese is melted and the edges are bubbling.
17. Let the pie rest for 10 minutes after baking to allow the filling to set for easier serving.
As always, the magic of this dish is in the contrast: the creamy, cheesy potato topping gives way to a rich, savory filling that’s packed with tender vegetables. I love serving it straight from the dish with a simple green salad on the side to cut through the richness, or for a fun twist, try scooping individual portions into ramekins before baking for personal pies.
Peanut Butter and Chocolate Chip Cookies

Finally, after years of testing countless cookie recipes, I’ve landed on my absolute favorite version of peanut butter and chocolate chip cookies—the kind that’s perfectly chewy in the center with just the right crisp at the edges. It’s the recipe I turn to every holiday season, and my family now expects a fresh batch waiting when they arrive. Trust me, these disappear fast, so I always make a double batch!
Serving: 24 | Pre Time: 15 minutes | Cooking Time: 10 minutes
Ingredients
– 1 cup unsalted butter, softened
– 1 cup creamy peanut butter
– 1 cup granulated sugar
– 1 cup packed light brown sugar
– 2 large eggs
– 2 tsp vanilla extract
– 2 ½ cups all-purpose flour
– 1 tsp baking soda
– ½ tsp salt
– 2 cups semisweet chocolate chips
Instructions
1. Preheat your oven to 350°F and line two baking sheets with parchment paper.
2. In a large bowl, use an electric mixer on medium speed to cream together 1 cup softened unsalted butter, 1 cup creamy peanut butter, 1 cup granulated sugar, and 1 cup packed light brown sugar until light and fluffy, about 3 minutes.
3. Add 2 large eggs and 2 tsp vanilla extract to the bowl, mixing on low speed until fully incorporated.
4. In a separate medium bowl, whisk together 2 ½ cups all-purpose flour, 1 tsp baking soda, and ½ tsp salt until combined.
5. Gradually add the dry ingredients to the wet mixture, mixing on low speed just until no flour streaks remain, being careful not to overmix.
6. Fold in 2 cups semisweet chocolate chips with a spatula until evenly distributed throughout the dough.
7. Scoop rounded tablespoons of dough onto the prepared baking sheets, spacing them about 2 inches apart to allow for spreading.
8. Bake one sheet at a time in the preheated oven for 10–12 minutes, or until the edges are golden brown but the centers still look slightly soft.
9. Let the cookies cool on the baking sheet for 5 minutes before transferring them to a wire rack to cool completely.
Looking at these cookies, you’ll love the rich peanut butter flavor melding with gooey chocolate chips in every bite. They have that ideal texture—crispy on the outside yet wonderfully chewy inside. Try serving them warm with a glass of cold milk or crumbled over vanilla ice cream for an indulgent treat!
Vegetable Lentil Soup with Crusty Bread

Gathering around a warm bowl of soup on a chilly December evening is one of my favorite winter rituals—especially when it’s this hearty vegetable lentil soup, which I’ve been perfecting for years. There’s something so comforting about the way the lentils soften into the broth and the vegetables meld together, making it the ideal cozy meal to share with family or enjoy solo with a good book. I love that it comes together mostly from pantry staples, which means I can whip it up even on busy weeknights when I’m craving something nourishing and simple.
Serving: 6 | Pre Time: 15 minutes | Cooking Time: 45 minutes
Ingredients
– 2 tbsp olive oil
– 1 medium yellow onion, diced
– 3 cloves garlic, minced
– 2 medium carrots, peeled and diced
– 2 stalks celery, diced
– 1 tsp dried thyme
– 1 tsp ground cumin
– 1/4 tsp red pepper flakes
– 1 cup brown lentils, rinsed
– 6 cups vegetable broth
– 1 (14.5 oz) can diced tomatoes, undrained
– 2 cups fresh spinach, roughly chopped
– 1 tbsp lemon juice
– Salt and black pepper, to taste
– Crusty bread, for serving
Instructions
1. Heat 2 tbsp olive oil in a large pot or Dutch oven over medium heat until shimmering, about 2 minutes.
2. Add 1 medium yellow onion, diced, and cook, stirring occasionally, until translucent and softened, about 5 minutes.
3. Stir in 3 cloves garlic, minced, and cook until fragrant, about 30 seconds—be careful not to let it burn, as this can turn bitter.
4. Add 2 medium carrots, peeled and diced, and 2 stalks celery, diced, and cook, stirring occasionally, until slightly softened, about 5 minutes.
5. Sprinkle in 1 tsp dried thyme, 1 tsp ground cumin, and 1/4 tsp red pepper flakes, and stir for 30 seconds to toast the spices and release their aroma, which deepens the soup’s flavor.
6. Pour in 1 cup brown lentils, rinsed, 6 cups vegetable broth, and 1 (14.5 oz) can diced tomatoes, undrained, and stir to combine.
7. Increase heat to high and bring the mixture to a boil, then reduce heat to low, cover the pot, and simmer until the lentils are tender but not mushy, about 30 minutes—check by tasting a lentil; it should be soft with a slight bite.
8. Stir in 2 cups fresh spinach, roughly chopped, and cook until wilted, about 2 minutes.
9. Remove the pot from heat and stir in 1 tbsp lemon juice, which brightens the soup and balances the richness.
10. Season with salt and black pepper, to taste, starting with 1 tsp salt and 1/2 tsp pepper, then adjust as needed after tasting.
11. Ladle the soup into bowls and serve immediately with crusty bread on the side for dipping.
Perfectly hearty and satisfying, this soup has a thick, stew-like texture from the tender lentils and a warm, earthy flavor with a hint of spice from the cumin and red pepper flakes. I love how the spinach adds a pop of color and freshness, making it feel vibrant even in the depths of winter. For a creative twist, try topping it with a dollop of Greek yogurt or a sprinkle of fresh herbs like parsley—it’s endlessly adaptable to whatever you have on hand.
Warm Spiced Mulled Wine

December always brings back memories of my grandmother’s cozy kitchen, where the scent of cinnamon and citrus would fill the air long before the presents were unwrapped. Today, as the winter chill sets in, I’m sharing my take on her classic warm spiced mulled wine—a hug in a mug that’s perfect for holiday gatherings or a quiet night by the fire.
Serving: 6 | Pre Time: 5 minutes | Cooking Time: 25 minutes
Ingredients
– 1 (750 ml) bottle red wine
– 2 cups apple cider
– 1/4 cup honey
– 1 orange, sliced into rounds
– 8 whole cloves
– 2 cinnamon sticks
– 1 tsp whole allspice berries
– 1/4 tsp ground nutmeg
Instructions
1. Pour 1 (750 ml) bottle red wine and 2 cups apple cider into a large pot.
2. Add 1/4 cup honey, 1 orange sliced into rounds, 8 whole cloves, 2 cinnamon sticks, 1 tsp whole allspice berries, and 1/4 tsp ground nutmeg to the pot.
3. Heat the mixture over medium-low heat until it reaches 160°F on a kitchen thermometer, which should take about 10 minutes—never let it boil to preserve the alcohol and flavors.
4. Reduce the heat to low and let the mulled wine simmer uncovered for 15 minutes, stirring occasionally with a wooden spoon to blend the spices evenly.
5. Remove the pot from the heat and let it sit for 5 minutes to allow the flavors to meld further; I often cover it loosely with a lid to keep it warm.
6. Strain the mulled wine through a fine-mesh sieve into a heatproof pitcher or mugs, discarding the solids for a smooth sip.
Just ladle this fragrant brew into your favorite mugs—its deep ruby color and silky texture carry notes of baked apple and warm spice that linger on the palate. For a festive twist, I sometimes garnish each serving with a fresh orange slice or a cinnamon stick stirrer, making it as beautiful as it is delicious.
Summary
Delight in these 18 cozy recipes, perfect for warming up your winter snow days. We hope this collection inspires you to create comforting meals and sweet treats. Give them a try, and don’t forget to leave a comment telling us your favorite! If you loved this roundup, please share it on Pinterest to spread the warmth. Happy cooking!


