
Out of time but craving something delicious? Summer’s heat calls for quick, refreshing meals, and your Instant Pot is the perfect solution. From cool salads to hearty dinners, these 19 recipes make cooking a breeze. Let’s dive into easy, seasonal favorites that’ll keep you out of the kitchen and enjoying the sunshine!
Instant Pot Summer Vegetable Lasagna
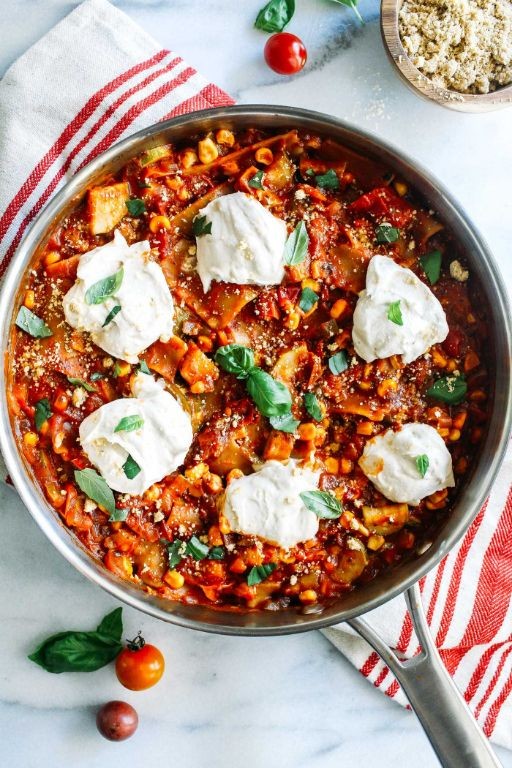
Need a quick, veggie-packed dinner? This Instant Pot lasagna layers summer vegetables with minimal effort. No boiling noodles required—just assemble and pressure cook.
Serving: 6 | Pre Time: 15 minutes | Cooking Time: 25 minutes
Ingredients
– Lasagna noodles – 9 sheets
– Zucchini – 2 cups, thinly sliced
– Yellow squash – 2 cups, thinly sliced
– Cherry tomatoes – 1 cup, halved
– Marinara sauce – 24 oz jar
– Ricotta cheese – 15 oz
– Mozzarella cheese – 2 cups, shredded
– Parmesan cheese – ½ cup, grated
– Olive oil – 1 tbsp
– Garlic – 2 cloves, minced
– Salt – 1 tsp
– Black pepper – ½ tsp
Instructions
1. Turn on the Instant Pot to Sauté mode and heat 1 tbsp olive oil for 1 minute.
2. Add 2 cloves minced garlic and sauté for 30 seconds until fragrant.
3. Add 2 cups sliced zucchini, 2 cups sliced yellow squash, and 1 tsp salt; sauté for 3 minutes to soften slightly.
4. Tip: Sautéing vegetables first prevents excess water in the lasagna.
5. Turn off Sauté mode and spread ½ cup marinara sauce in the bottom of the pot.
6. Layer 3 lasagna noodles over the sauce, breaking them to fit if needed.
7. Spread ⅓ of the ricotta cheese (5 oz) evenly over the noodles.
8. Top with ⅓ of the sautéed vegetables and ⅓ of the halved cherry tomatoes.
9. Spoon ½ cup marinara sauce over the vegetables and sprinkle ⅓ cup shredded mozzarella.
10. Repeat steps 6–9 twice more to create three layers total.
11. Pour the remaining marinara sauce over the top layer and sprinkle ½ cup grated Parmesan and remaining mozzarella.
12. Tip: Ensure noodles are fully covered with sauce to prevent drying out.
13. Secure the Instant Pot lid, set valve to Sealing, and pressure cook on High for 10 minutes.
14. After cooking, let pressure release naturally for 10 minutes, then quick-release any remaining pressure.
15. Tip: Natural release helps the lasagna set without becoming soggy.
16. Carefully remove the lid and let the lasagna rest for 5 minutes before serving.
Just out of the pot, this lasagna boasts tender noodles with a creamy, veggie-filled interior. The zucchini and squash add a subtle sweetness, balanced by the tangy marinara and rich cheeses. Serve it with a crisp salad for a complete summer meal, or slice leftovers cold for a next-day lunch.
Instant Pot BBQ Pulled Chicken Sandwiches
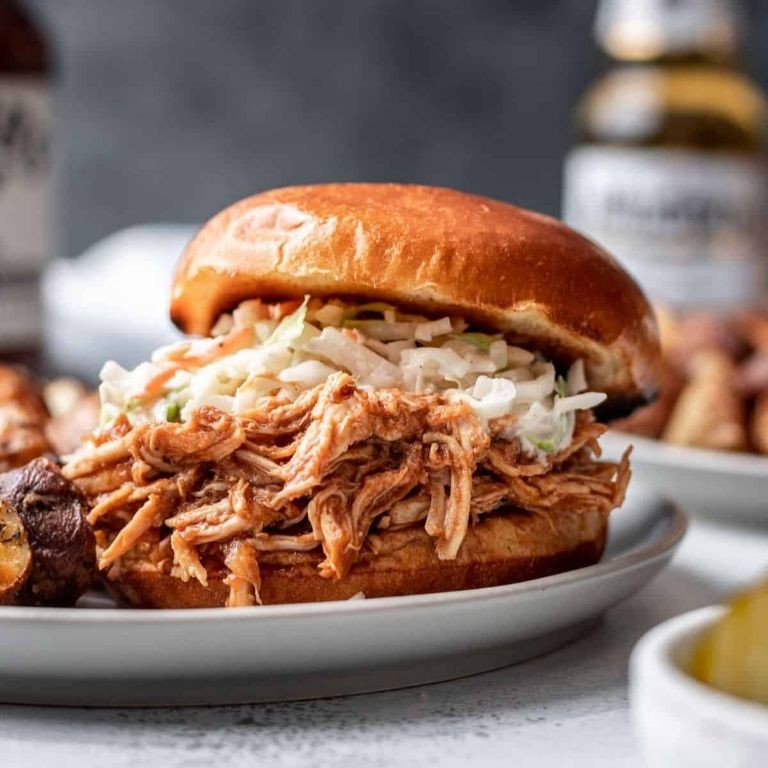
Get dinner on the table fast with this Instant Pot favorite. Great for busy weeknights or casual gatherings, these sandwiches deliver smoky-sweet flavor with minimal effort. You’ll have tender, shredded chicken ready in under an hour.
Serving: 6 | Pre Time: 10 minutes | Cooking Time: 25 minutes
Ingredients
– Boneless, skinless chicken breasts – 2 lbs
– BBQ sauce – 1 cup
– Chicken broth – ½ cup
– Apple cider vinegar – 2 tbsp
– Brown sugar – 2 tbsp
– Garlic powder – 1 tsp
– Onion powder – 1 tsp
– Salt – 1 tsp
– Black pepper – ½ tsp
– Hamburger buns – 6
Instructions
1. Place chicken breasts in the Instant Pot.
2. Add BBQ sauce, chicken broth, apple cider vinegar, brown sugar, garlic powder, onion powder, salt, and black pepper to the pot.
3. Stir ingredients gently to coat the chicken.
4. Secure the lid and set the valve to “Sealing.”
5. Select “Manual” or “Pressure Cook” and set the timer for 15 minutes at high pressure.
6. Allow the pressure to release naturally for 10 minutes after cooking, then carefully turn the valve to “Venting” to release any remaining steam.
7. Remove the lid and transfer the chicken to a large bowl using tongs, reserving the liquid in the pot.
8. Shred the chicken thoroughly with two forks until no large pieces remain.
9. Return the shredded chicken to the Instant Pot and stir it into the reserved cooking liquid until fully coated and saucy.
10. Toast the hamburger buns lightly in a toaster or on a skillet over medium heat for 2–3 minutes until golden brown.
11. Spoon the BBQ pulled chicken onto the toasted buns, dividing it evenly among the 6 servings.
Just pile the chicken high on those buns for a satisfying, messy meal. The texture is perfectly tender and juicy, with a tangy-sweet BBQ sauce that clings to every strand. Try serving it with a side of coleslaw or pickles for a classic crunch that balances the richness.
Instant Pot Corn on the Cob with Garlic Butter

Oven-roasted corn is great, but the Instant Pot delivers tender, juicy kernels in minutes with minimal effort. This garlic butter version elevates simple corn into a savory side dish perfect for any meal. It’s hands-off cooking at its best.
Serving: 4 | Pre Time: 5 minutes | Cooking Time: 4 minutes
Ingredients
– Corn on the cob – 4 ears
– Water – 1 cup
– Unsalted butter – 4 tbsp
– Garlic – 3 cloves
– Salt – ½ tsp
– Black pepper – ¼ tsp
Instructions
1. Pour 1 cup of water into the Instant Pot.
2. Place a trivet inside the pot.
3. Arrange 4 ears of corn on the cob on the trivet in a single layer.
4. Lock the lid and set the valve to sealing.
5. Cook on high pressure for 4 minutes.
6. Once done, perform a quick release by turning the valve to venting.
7. Carefully remove the lid.
8. Use tongs to transfer the corn to a serving plate.
9. Mince 3 cloves of garlic finely.
10. Melt 4 tbsp of unsalted butter in a small saucepan over medium heat.
11. Add the minced garlic to the butter and cook for 1 minute until fragrant.
12. Stir in ½ tsp of salt and ¼ tsp of black pepper.
13. Brush the garlic butter mixture evenly over the hot corn using a pastry brush.
14. Serve immediately.
Resulting corn is tender with a slight bite, infused with rich garlic butter that clings to every kernel. For a twist, sprinkle with grated Parmesan or chopped fresh herbs like parsley right after brushing. It pairs wonderfully with grilled meats or as a standout addition to summer barbecues.
Instant Pot Lemon Garlic Shrimp Pasta
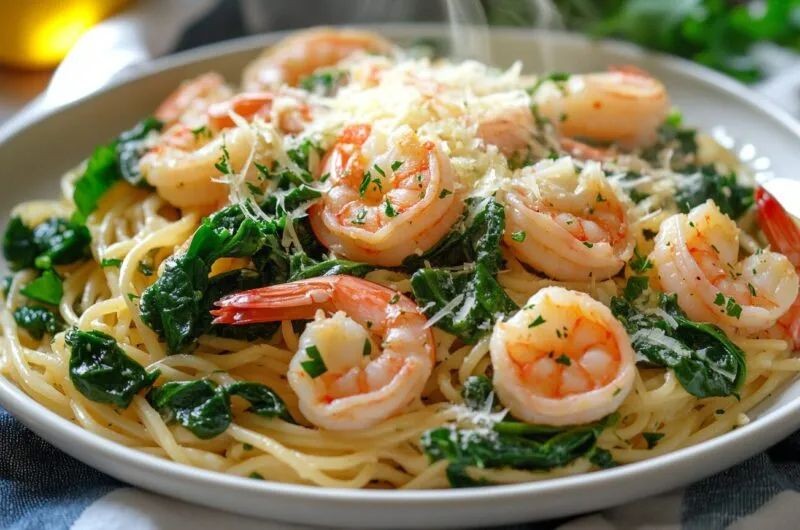
Hearty, quick, and bursting with bright flavor, this Instant Pot Lemon Garlic Shrimp Pasta is a weeknight lifesaver. It comes together in minutes with minimal cleanup. You’ll have a restaurant-quality meal on the table fast.
Serving: 4 | Pre Time: 5 minutes | Cooking Time: 5 minutes
Ingredients
– Linguine – 12 oz
– Water – 4 cups
– Salt – 1 tsp
– Olive oil – 2 tbsp
– Garlic – 4 cloves, minced
– Raw shrimp – 1 lb, peeled and deveined
– Lemon juice – ¼ cup
– Lemon zest – 1 tbsp
– Butter – 2 tbsp
– Parsley – ¼ cup, chopped
Instructions
1. Break the linguine in half and place it in the Instant Pot.
2. Pour in the water and add the salt.
3. Secure the lid, set the valve to sealing, and cook on high pressure for 4 minutes.
4. Perform a quick pressure release immediately when the timer beeps.
5. Drain the pasta in a colander, reserving ½ cup of the pasta water, and set the pasta aside.
6. Select the “Sauté” function on the Instant Pot and add the olive oil.
7. Add the minced garlic and cook for 30 seconds, stirring constantly to prevent burning.
8. Add the raw shrimp in a single layer and cook for 1 minute per side, until pink and opaque.
9. Stir in the lemon juice and lemon zest.
10. Add the butter and stir until melted and combined with the sauce.
11. Return the drained pasta and the reserved pasta water to the pot.
12. Toss everything together until the pasta is well-coated and heated through, about 1 minute.
13. Turn off the Instant Pot and stir in the chopped parsley.
Fresh, tangy lemon and rich garlic infuse every strand of perfectly al dente pasta. The shrimp stay tender and juicy, never rubbery. For a creative twist, serve it with a sprinkle of red pepper flakes or a side of crusty bread to soak up the sauce.
Instant Po tWatermelon Gazpacho

Only have 10 minutes? This chilled watermelon gazpacho requires zero cooking and delivers maximum refreshment. It’s the perfect quick-fix for a hot day.
Serving: 4 | Pre Time: 10 minutes | Cooking Time: 0 minutes
Ingredients
– Seedless watermelon – 4 cups, cubed
– English cucumber – 1 cup, chopped
– Red onion – ¼ cup, chopped
– Jalapeño – 1, seeded and chopped
– Lime juice – 3 tbsp
– Extra virgin olive oil – 2 tbsp
– Salt – ½ tsp
Instructions
1. Combine the cubed watermelon, chopped cucumber, chopped red onion, and chopped jalapeño in a blender.
2. Add the lime juice, extra virgin olive oil, and salt to the blender.
3. Blend the mixture on high speed for 45 seconds, or until completely smooth and no chunks remain.
4. Taste the gazpacho and adjust the seasoning with an extra pinch of salt if needed.
5. Pour the blended soup through a fine-mesh strainer into a large bowl to remove any remaining pulp for a silkier texture.
6. Transfer the strained gazpacho to an airtight container and refrigerate it for at least 2 hours, or until thoroughly chilled to 40°F.
7. Stir the chilled gazpacho well before serving to recombine any separated liquids.
8. Ladle the gazpacho into bowls or glasses for serving.
Smooth and vibrantly pink, this gazpacho has a sweet base from the watermelon balanced by a sharp kick from the jalapeño and onion. Serve it in chilled glasses garnished with a drizzle of olive oil and a cucumber slice for an elegant presentation.
Instant Pot Hawaiian Chicken Tacos
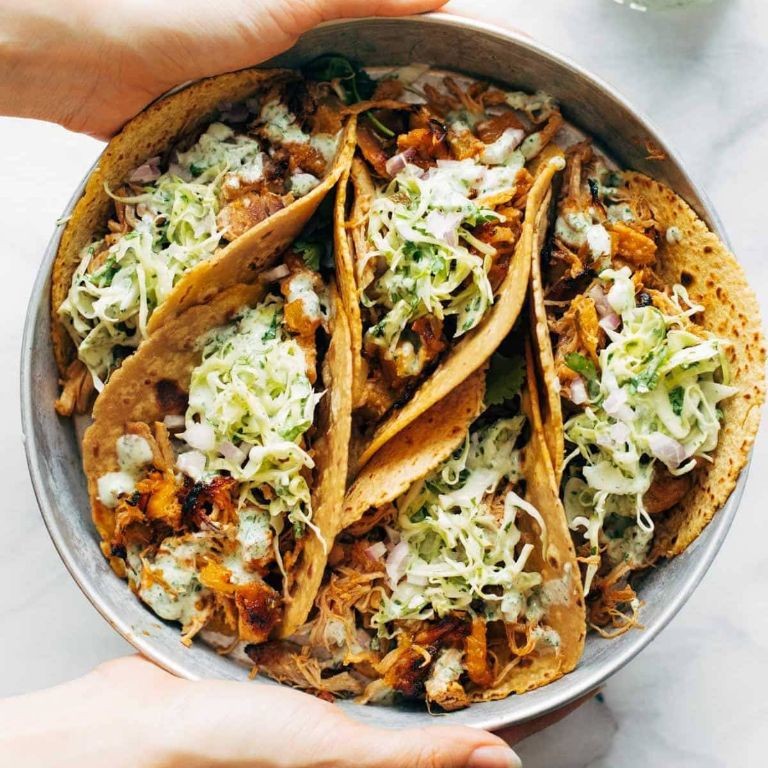
Forget complicated taco nights—these Instant Pot Hawaiian Chicken Tacos deliver sweet, savory, and tangy flavors with minimal effort. Fresh pineapple and teriyaki sauce create a tropical glaze that pairs perfectly with tender shredded chicken. You’ll have a crowd-pleasing meal ready in under an hour.
Serving: 6 | Pre Time: 10 minutes | Cooking Time: 25 minutes
Ingredients
– Boneless, skinless chicken breasts – 2 lbs
– Pineapple juice – 1 cup
– Teriyaki sauce – ½ cup
– Brown sugar – 2 tbsp
– Garlic powder – 1 tsp
– Cornstarch – 1 tbsp
– Water – 2 tbsp
– Corn tortillas – 12
– Fresh pineapple chunks – 1 cup
– Green onions – ¼ cup, sliced
Instructions
1. Place 2 lbs of boneless, skinless chicken breasts in the Instant Pot.
2. Pour 1 cup of pineapple juice and ½ cup of teriyaki sauce over the chicken.
3. Sprinkle 2 tbsp of brown sugar and 1 tsp of garlic powder evenly over the chicken.
4. Secure the Instant Pot lid and set the valve to “Sealing.”
5. Cook on high pressure for 12 minutes, then allow natural pressure release for 10 minutes—this keeps the chicken moist and tender.
6. Carefully release any remaining pressure and open the lid.
7. Remove the chicken to a cutting board and shred it using two forks.
8. Set the Instant Pot to “Sauté” mode on high.
9. In a small bowl, whisk together 1 tbsp of cornstarch and 2 tbsp of water until smooth.
10. Stir the cornstarch slurry into the cooking liquid in the Instant Pot and cook for 3–5 minutes, until the sauce thickens to a glaze consistency.
11. Return the shredded chicken to the pot and stir to coat it evenly in the sauce.
12. Warm 12 corn tortillas in a dry skillet over medium heat for 30 seconds per side, or until pliable—this prevents them from cracking when folded.
13. Spoon the chicken mixture onto the warmed tortillas.
14. Top each taco with fresh pineapple chunks and sliced green onions for a bright, fresh finish.
15. Serve immediately while the chicken is hot and the tortillas are soft.
Sweet and savory shredded chicken with a sticky glaze contrasts beautifully with the juicy pineapple chunks. The tender texture of the chicken holds up well in the soft corn tortillas. For a fun twist, serve the leftovers over rice or in lettuce wraps the next day.
Instant Pot Mediterranean Chickpea Salad

Tired of soggy chickpea salads? This Instant Pot version delivers perfectly tender chickpeas with bright Mediterranean flavors in minutes. Transform pantry staples into a vibrant, protein-packed meal that’s ready to serve hot or cold.
Serving: 4 | Pre Time: 5 minutes | Cooking Time: 35 minutes
Ingredients
– Dried chickpeas – 1 cup
– Water – 4 cups
– Salt – 1 tsp
– Lemon juice – 3 tbsp
– Olive oil – ¼ cup
– Garlic – 2 cloves, minced
– Dried oregano – 1 tsp
– Red onion – ½ cup, finely diced
– Cucumber – 1 cup, diced
– Cherry tomatoes – 1 cup, halved
– Feta cheese – ½ cup, crumbled
– Fresh parsley – ¼ cup, chopped
Instructions
1. Rinse 1 cup of dried chickpeas under cold water in a colander.
2. Combine the rinsed chickpeas, 4 cups of water, and 1 tsp salt in the Instant Pot.
3. Seal the Instant Pot lid and set the valve to “Sealing.”
4. Select “Manual” or “Pressure Cook” and set the timer for 35 minutes at high pressure.
5. Allow the pressure to release naturally for 15 minutes after cooking, then quick-release any remaining pressure.
6. Drain the chickpeas in a colander and let them cool for 5 minutes.
7. In a large bowl, whisk together 3 tbsp lemon juice, ¼ cup olive oil, 2 minced garlic cloves, and 1 tsp dried oregano.
8. Add the drained chickpeas to the bowl and toss to coat them evenly in the dressing.
9. Stir in ½ cup diced red onion, 1 cup diced cucumber, and 1 cup halved cherry tomatoes.
10. Gently fold in ½ cup crumbled feta cheese and ¼ cup chopped fresh parsley.
11. Season the salad with additional salt only if needed after tasting.
Unbelievably creamy chickpeas contrast with crisp vegetables and tangy feta. Serve it warm over quinoa for a hearty dinner, or chill it for a refreshing lunch—the flavors deepen overnight. Try stuffing it into pita pockets with a dollop of tzatziki for a handheld meal.
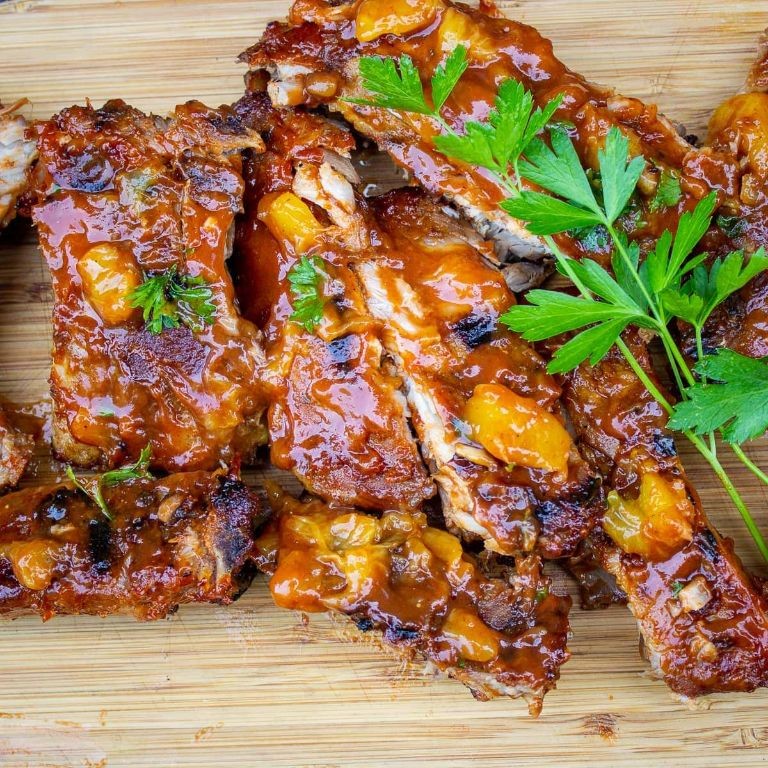
Instant Pot Peach and Bourbon BBQ Ribs
Nothing beats tender ribs with a sweet, smoky kick. Need a crowd-pleaser that practically cooks itself? These Instant Pot ribs deliver fall-off-the-bone texture with minimal effort. Serving: 4 | Pre Time: 10 minutes | Cooking Time: 35 minutes
Ingredients
– Baby back ribs – 2 racks (about 4 lbs)
– Peach preserves – ½ cup
– Bourbon – ¼ cup
– Ketchup – ½ cup
– Apple cider vinegar – 2 tbsp
– Worcestershire sauce – 1 tbsp
– Garlic powder – 1 tsp
– Onion powder – 1 tsp
– Smoked paprika – 1 tsp
– Salt – 1 tsp
– Black pepper – ½ tsp
– Water – 1 cup
Instructions
1. Remove the membrane from the back of each rack of ribs using a paper towel for grip.
2. Cut each rack in half to fit in the Instant Pot.
3. Season ribs evenly on both sides with salt, black pepper, garlic powder, onion powder, and smoked paprika.
4. Pour water into the Instant Pot and place the trivet inside.
5. Arrange rib halves standing upright against the pot walls or stacked on the trivet.
6. Lock the lid, set the valve to “Sealing,” and cook on High Pressure for 25 minutes.
7. While ribs cook, combine peach preserves, bourbon, ketchup, apple cider vinegar, Worcestershire sauce, and remaining spices in a saucepan.
8. Bring sauce to a simmer over medium heat, stirring frequently for 5 minutes until slightly thickened.
9. After cooking, allow pressure to release naturally for 10 minutes, then quick-release any remaining pressure.
10. Carefully transfer ribs to a foil-lined baking sheet, discarding cooking liquid.
11. Brush ribs generously with prepared BBQ sauce on both sides.
12. Broil ribs on high for 3-5 minutes until sauce is caramelized and bubbly, watching closely to prevent burning.
13. Let ribs rest for 5 minutes before slicing between bones.
14. Serve remaining sauce on the side for dipping.
Ultimate tenderness meets bold flavor in every bite. The peach preserves add a subtle sweetness that balances the smoky bourbon, while the quick broil creates a sticky, caramelized crust. Try serving over creamy polenta or with grilled corn for a complete summer meal.
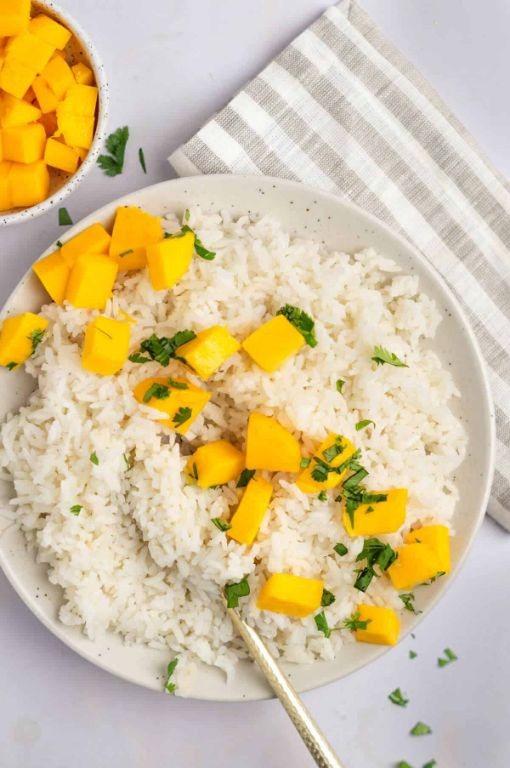
Instant Pot Coconut Lime Rice with Mango
Ditch the takeout menus and make this vibrant Instant Pot rice in minutes. It’s a tropical side that pairs perfectly with grilled chicken or fish, and the mango adds a sweet, fresh finish.
Serving: 4 | Pre Time: 5 minutes | Cooking Time: 10 minutes
Ingredients
– Jasmine rice – 1 ½ cups
– Coconut milk – 1 (13.5 oz) can
– Water – ¾ cup
– Lime – 1
– Salt – ½ tsp
– Mango – 1
Instructions
1. Rinse the jasmine rice under cold water in a fine-mesh strainer until the water runs clear.
2. Add the rinsed rice, coconut milk, water, and salt to the Instant Pot.
3. Stir the mixture once to combine, ensuring no rice sticks to the bottom.
4. Secure the lid, set the valve to “Sealing,” and cook on high pressure for 3 minutes.
5. Once cooking is complete, let the pressure release naturally for 10 minutes, then quick-release any remaining pressure.
6. While the rice cooks, zest the lime and set the zest aside.
7. Juice the lime to yield about 2 tablespoons of juice.
8. Peel the mango and dice it into ½-inch cubes.
9. Fluff the cooked rice with a fork, then fold in the lime juice and zest.
10. Gently stir in the diced mango just before serving to keep it from becoming mushy.
Out of the pot, the rice is creamy yet distinct, with a bright lime tang cutting through the rich coconut. Serve it warm as a side, or chill it for a refreshing next-day salad base.
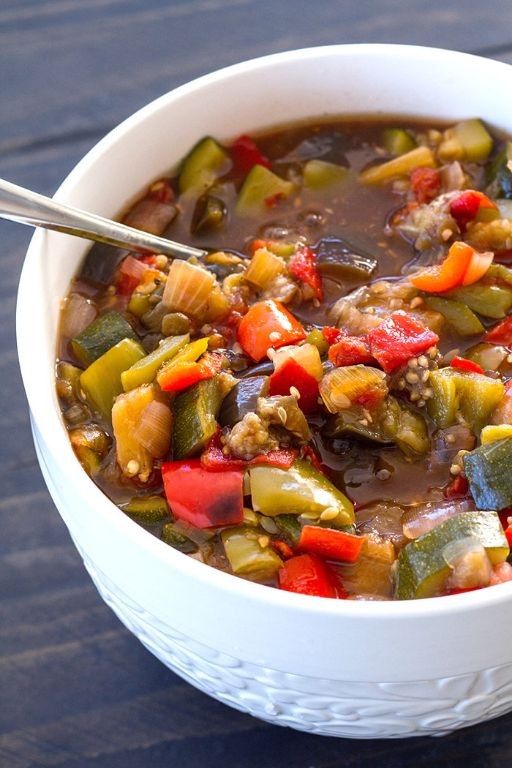
Instant Pot Summer Ratatouille
Ratatouille transforms summer’s bounty into a vibrant, one-pot meal. This Instant Pot version delivers deep flavor in minutes, making it perfect for busy weeknights.
Serving: 4 | Pre Time: 10 minutes | Cooking Time: 10 minutes
Ingredients
– Olive oil – 2 tbsp
– Onion – 1, diced
– Garlic – 3 cloves, minced
– Eggplant – 1 medium, cubed
– Zucchini – 2 medium, sliced
– Bell peppers – 2, chopped
– Canned diced tomatoes – 1 (14.5 oz) can
– Tomato paste – 2 tbsp
– Dried oregano – 1 tsp
– Salt – 1 tsp
– Black pepper – ½ tsp
– Fresh basil – ¼ cup, chopped
Instructions
1. Set the Instant Pot to “Sauté” mode and heat the olive oil for 2 minutes.
2. Add the diced onion and cook for 3 minutes, stirring occasionally, until translucent.
3. Stir in the minced garlic and cook for 30 seconds until fragrant.
4. Add the cubed eggplant, sliced zucchini, and chopped bell peppers to the pot.
5. Pour in the canned diced tomatoes, tomato paste, dried oregano, salt, and black pepper.
6. Secure the lid, set the valve to “Sealing,” and pressure cook on “High” for 4 minutes.
7. Once cooking is complete, perform a quick release by carefully turning the valve to “Venting.”
8. Open the lid and stir in the chopped fresh basil.
9. Let the ratatouille sit for 5 minutes to allow the flavors to meld.
Keep the vegetables in uniform, 1-inch pieces for even cooking. Quickly release the pressure immediately after cooking to prevent the vegetables from becoming mushy. Stir in the basil at the end to preserve its bright, fresh flavor. This dish boasts a tender-crisp texture with a rich, savory tomato base. Serve it over polenta, with crusty bread, or as a side to grilled chicken for a complete meal.
Instant Pot Spicy Mango Chicken
Vividly flavorful and satisfyingly simple, this Instant Pot Spicy Mango Chicken delivers bold taste with minimal effort. Versatile enough for busy weeknights yet impressive for guests, it combines sweet fruit with savory heat. You’ll have a complete meal ready in under an hour.Serving: 4 | Pre Time: 10 minutes | Cooking Time: 25 minutes
Ingredients
– Boneless, skinless chicken thighs – 1.5 lbs
– Mango – 1 cup, diced
– Onion – 1 medium, chopped
– Garlic – 3 cloves, minced
– Ginger – 1 tbsp, grated
– Soy sauce – ¼ cup
– Sriracha – 2 tbsp
– Brown sugar – 2 tbsp
– Chicken broth – ½ cup
– Cornstarch – 1 tbsp
– Cilantro – ¼ cup, chopped
Instructions
1. Turn the Instant Pot to Sauté mode and wait until the display reads “Hot.”
2. Add the chicken thighs to the pot and cook for 3 minutes per side until lightly browned.
3. Remove the chicken and set aside on a plate.
4. Add the onion to the pot and cook for 2 minutes until softened.
5. Stir in the garlic and ginger, cooking for 30 seconds until fragrant.
6. Pour in the soy sauce, sriracha, brown sugar, and chicken broth, scraping the bottom to deglaze.
7. Return the chicken to the pot, along with any accumulated juices.
8. Secure the lid, set the valve to Sealing, and cook on High Pressure for 10 minutes.
9. Once done, allow a 10-minute natural release, then quick-release any remaining pressure.
10. Remove the chicken and shred it with two forks.
11. In a small bowl, mix the cornstarch with 2 tablespoons of water to create a slurry.
12. Turn the Instant Pot to Sauté mode again and stir in the slurry.
13. Cook for 2–3 minutes until the sauce thickens to a glossy consistency.
14. Add the shredded chicken and diced mango back to the pot, stirring to coat.
15. Turn off the Instant Pot and stir in the chopped cilantro.
16. Serve immediately over rice or with naan for dipping.
Rich and aromatic, the chicken becomes incredibly tender while absorbing the sweet-spicy sauce. The mango adds a bright, juicy contrast that balances the heat perfectly. For a creative twist, try serving it in lettuce wraps or topping it with toasted coconut flakes.
Instant Pot Greek Yogurt with Honey and Berries

Make creamy Greek yogurt in your Instant Pot with minimal effort. This recipe yields thick, tangy yogurt that pairs perfectly with honey and fresh berries for a protein-packed breakfast or snack. Skip store-bought versions and control the ingredients yourself.
Serving: 4 | Pre Time: 5 minutes | Cooking Time: 8 hours
Ingredients
– Whole milk – ½ gallon
– Plain Greek yogurt – 2 tbsp
– Honey – ¼ cup
– Mixed berries – 1 cup
Instructions
1. Pour ½ gallon of whole milk into the Instant Pot insert.
2. Secure the lid, set the valve to “Sealing,” and press the “Yogurt” button, then “Adjust” to “Boil.”
3. Let the milk boil until the Instant Pot beeps, which takes about 30–45 minutes.
4. Remove the insert and let the milk cool to 110°F, checking with a thermometer—this prevents killing the yogurt cultures.
5. Whisk 2 tbsp of plain Greek yogurt into the cooled milk until fully combined.
6. Return the insert to the Instant Pot, secure the lid, set the valve to “Sealing,” and press the “Yogurt” button, then “Adjust” to “Normal” for 8 hours.
7. After 8 hours, transfer the yogurt to a fine-mesh strainer lined with cheesecloth over a bowl and refrigerate for 4 hours to thicken.
8. Discard the whey from the bowl and scoop the strained yogurt into serving bowls.
9. Drizzle ¼ cup of honey evenly over the yogurt.
10. Top with 1 cup of mixed berries, gently pressing them in for even distribution.
Verily, this yogurt turns out luxuriously thick with a smooth, creamy texture that contrasts delightfully with the juicy berries. Its tangy flavor is balanced by the sweet honey, making it a versatile base for granola or nuts. For a creative twist, layer it in jars with granola for a portable parfait.
Instant Pot Zucchini and Tomato Parmesan
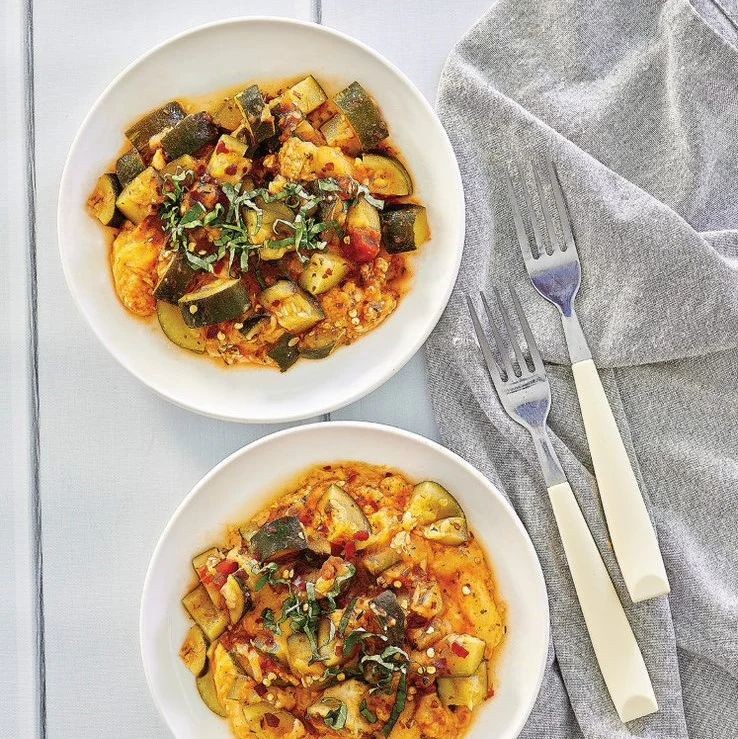
Whip up a comforting, veggie-packed dinner in minutes with this Instant Pot favorite. It combines tender zucchini and juicy tomatoes with rich Parmesan for a satisfying one-pot meal. Perfect for busy weeknights when you crave something hearty but simple.
Serving: 4 | Pre Time: 10 minutes | Cooking Time: 10 minutes
Ingredients
– Olive oil – 1 tbsp
– Garlic – 2 cloves, minced
– Zucchini – 2 medium, sliced into ½-inch rounds
– Canned diced tomatoes – 1 (14.5 oz) can
– Dried oregano – 1 tsp
– Salt – ½ tsp
– Black pepper – ¼ tsp
– Grated Parmesan cheese – ½ cup
– Fresh basil – ¼ cup, chopped
Instructions
1. Turn the Instant Pot to “Sauté” mode and heat the olive oil for 1 minute.
2. Add the minced garlic and sauté for 30 seconds until fragrant, stirring constantly to prevent burning.
3. Add the sliced zucchini and cook for 2 minutes, stirring occasionally to lightly brown the edges.
4. Pour in the canned diced tomatoes with their juices, scraping the bottom of the pot to deglaze any browned bits.
5. Stir in the dried oregano, salt, and black pepper until evenly combined.
6. Secure the lid, set the valve to “Sealing,” and pressure cook on “High” for 3 minutes.
7. Once cooking is complete, perform a quick release by carefully turning the valve to “Venting” until the pressure drops.
8. Open the lid and stir in the grated Parmesan cheese until melted and creamy.
9. Fold in the chopped fresh basil just before serving to preserve its bright flavor.
10. Serve immediately while hot, optionally garnishing with extra Parmesan or basil.
Only the zucchini retains a slight bite, while the tomatoes break down into a savory sauce. This dish offers a creamy, tangy flavor from the Parmesan, balanced by the freshness of basil. Try it over pasta or with crusty bread to soak up every last drop.
Instant Pot Pineapple Teriyaki Pork Chops
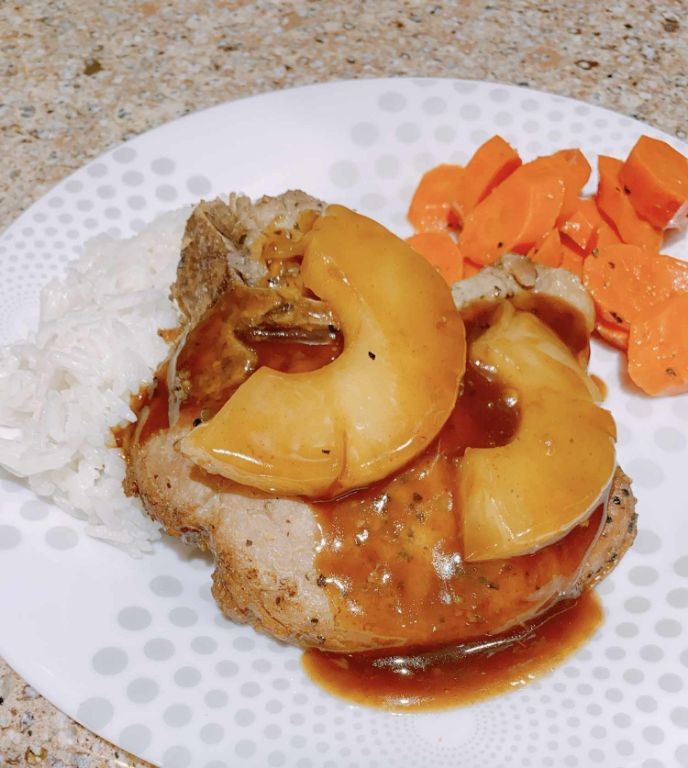
Zesty pineapple and savory teriyaki transform simple pork chops into a weeknight wonder. This Instant Pot recipe delivers tender, flavorful results in under 30 minutes, perfect for busy evenings.
Serving: 4 | Pre Time: 5 minutes | Cooking Time: 15 minutes
Ingredients
– Pork chops – 4 (1-inch thick)
– Pineapple juice – 1 cup
– Soy sauce – ¼ cup
– Brown sugar – 2 tbsp
– Garlic – 2 cloves, minced
– Ginger – 1 tsp, grated
– Cornstarch – 1 tbsp
– Water – 2 tbsp
Instructions
1. Turn the Instant Pot to Sauté mode and let it heat for 2 minutes.
2. Pat the pork chops dry with paper towels to ensure a good sear.
3. Place the pork chops in the pot and sear for 2 minutes per side until browned.
4. Remove the pork chops and set them aside on a plate.
5. Add the pineapple juice, soy sauce, brown sugar, garlic, and ginger to the pot, scraping the bottom to deglaze.
6. Return the pork chops to the pot, ensuring they are submerged in the sauce.
7. Secure the lid, set the valve to Sealing, and cook on High Pressure for 8 minutes.
8. Allow the pressure to release naturally for 5 minutes, then quick-release any remaining pressure.
9. Remove the pork chops and set them aside, covering them loosely with foil to keep warm.
10. Turn the Instant Pot back to Sauté mode and bring the sauce to a simmer.
11. Mix the cornstarch and water in a small bowl until smooth to create a slurry.
12. Whisk the slurry into the simmering sauce and cook for 2–3 minutes until thickened, stirring constantly to prevent lumps.
13. Spoon the thickened sauce over the pork chops before serving.
Melt-in-your-mouth pork chops soak up the sweet and tangy pineapple-teriyaki glaze, creating a juicy, caramelized finish. Serve them over steamed rice or with a side of roasted vegetables for a balanced meal that’s sure to become a family favorite.
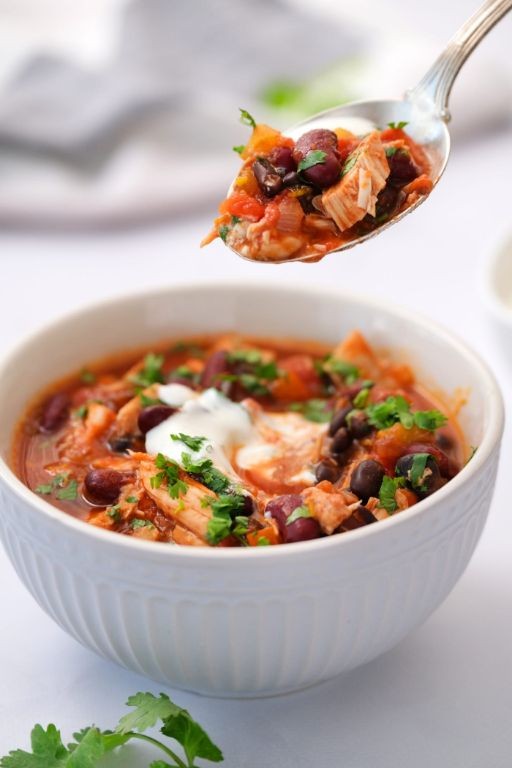
Instant Pot Cilantro Lime Black Beans
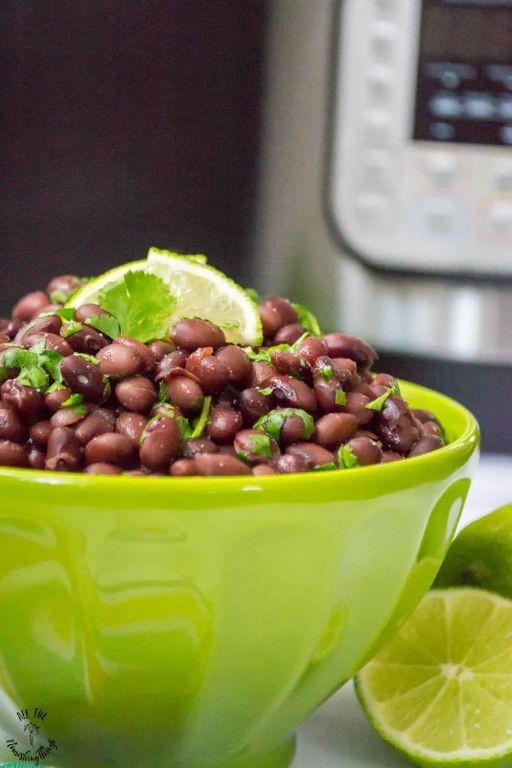
A flavorful, protein-packed side dish that comes together in minutes. These Instant Pot black beans are zesty, creamy, and perfect for meal prep. They’re a versatile base for bowls, tacos, or burritos.
Serving: 6 | Pre Time: 5 minutes | Cooking Time: 30 minutes
Ingredients
– Dried black beans – 1 lb
– Water – 4 cups
– Salt – 1 tsp
– Lime juice – ¼ cup
– Fresh cilantro – ½ cup, chopped
Instructions
1. Rinse 1 lb of dried black beans under cold water in a colander.
2. Place the rinsed beans into the Instant Pot.
3. Add 4 cups of water and 1 tsp of salt to the pot.
4. Secure the lid and set the valve to “Sealing.”
5. Press the “Manual” or “Pressure Cook” button and set the timer for 30 minutes at high pressure.
6. Allow the pressure to release naturally for 15 minutes once cooking is complete.
7. Carefully turn the valve to “Venting” to release any remaining pressure.
8. Open the lid and drain any excess liquid from the beans, reserving ½ cup of the cooking liquid.
9. Stir in ¼ cup of lime juice and the reserved ½ cup of cooking liquid.
10. Mash about one-third of the beans directly in the pot with a potato masher to thicken the mixture.
11. Fold in ½ cup of chopped fresh cilantro until evenly distributed.
12. Let the beans sit for 5 minutes to allow the flavors to meld.
Enjoy these beans warm for the best creamy texture and bright, tangy flavor. They hold up well in the fridge for up to five days, making them ideal for quick lunches. Try them as a filling for vegetarian enchiladas or layered in a grain bowl with avocado and salsa.
Instant Pot Cold Brew Coffee Concentrate
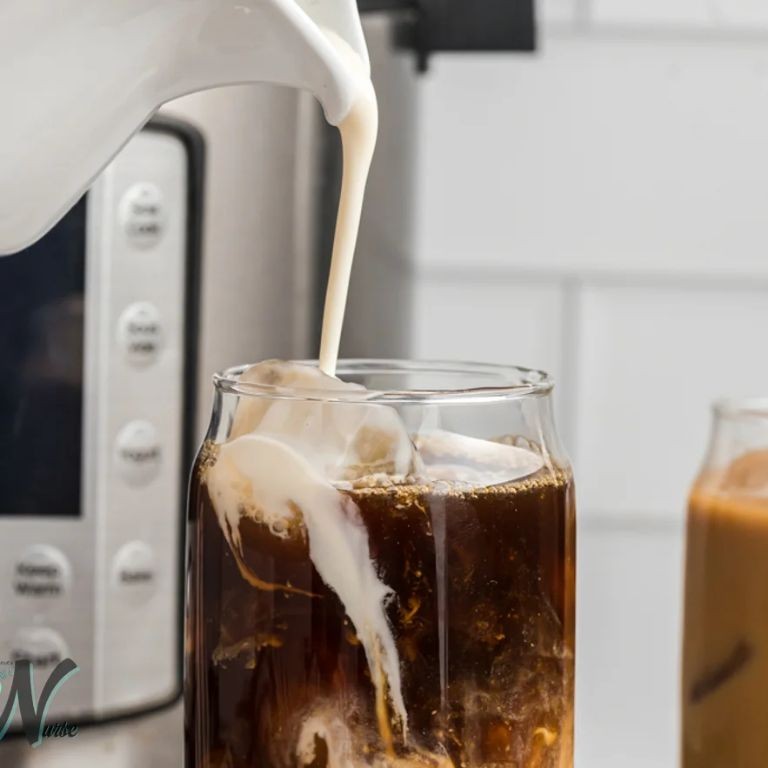
Forget waiting overnight for cold brew. This Instant Pot method delivers smooth, strong concentrate in under an hour. It’s perfect for iced coffees, lattes, or even coffee cocktails.
Serving: 8 | Pre Time: 5 minutes | Cooking Time: 40 minutes
Ingredients
– Coarse ground coffee – 1 cup
– Cold water – 4 cups
Instructions
1. Place 1 cup coarse ground coffee into the Instant Pot’s inner pot.
2. Pour 4 cups cold water over the coffee grounds, ensuring all grounds are submerged.
3. Secure the Instant Pot lid and set the valve to the sealing position.
4. Select the “Manual” or “Pressure Cook” setting and set the timer for 4 minutes at high pressure.
5. Allow the pressure to release naturally for 35 minutes once cooking is complete.
6. Carefully open the lid after the pressure indicator drops.
7. Place a fine-mesh strainer lined with a coffee filter over a large bowl or pitcher.
8. Slowly pour the coffee mixture through the filter to separate the concentrate from the grounds.
9. Discard the used coffee grounds and filter.
10. Transfer the strained concentrate to a clean glass jar or bottle.
11. Seal the container and refrigerate immediately.
The concentrate is bold and velvety, with low acidity and a rich chocolatey finish. Try it diluted 1:1 with water or milk over ice, or mix it into a coffee milkshake for a decadent treat.
Instant Pot Summer Squash and Sausage Soup

A hearty, one-pot soup that transforms summer squash and sausage into a comforting meal with minimal effort. This Instant Pot recipe delivers deep flavor in under 30 minutes, perfect for busy weeknights. Just set it and forget it while the pressure cooker does the work.
Serving: 4 | Pre Time: 5 minutes | Cooking Time: 20 minutes
Ingredients
– Italian sausage – 1 lb
– Yellow onion – 1 medium, diced
– Garlic – 3 cloves, minced
– Chicken broth – 4 cups
– Yellow summer squash – 2 medium, sliced into ½-inch rounds
– Salt – ½ tsp
– Black pepper – ¼ tsp
– Fresh basil – ¼ cup, chopped
Instructions
1. Select the “Sauté” function on the Instant Pot and heat for 2 minutes.
2. Add 1 lb Italian sausage and cook for 5 minutes, breaking it into crumbles with a wooden spoon until browned.
3. Stir in 1 diced yellow onion and cook for 3 minutes until softened.
4. Add 3 minced garlic cloves and cook for 1 minute until fragrant.
5. Pour in 4 cups chicken broth, scraping the bottom to deglaze and prevent burn warnings.
6. Add 2 sliced yellow summer squash, ½ tsp salt, and ¼ tsp black pepper.
7. Secure the lid, set the valve to “Sealing,” and pressure cook on “High” for 5 minutes.
8. Allow natural pressure release for 10 minutes, then quick-release any remaining pressure.
9. Stir in ¼ cup chopped fresh basil just before serving.
Keep the soup chunky with tender squash that holds its shape against the savory sausage. Its rich broth gains depth from the rendered sausage fat, making it hearty without being heavy. For a creative twist, top with grated Parmesan or serve over a scoop of cooked rice to stretch it further.
Instant Pot Pesto Pasta with Cherry Tomatoes
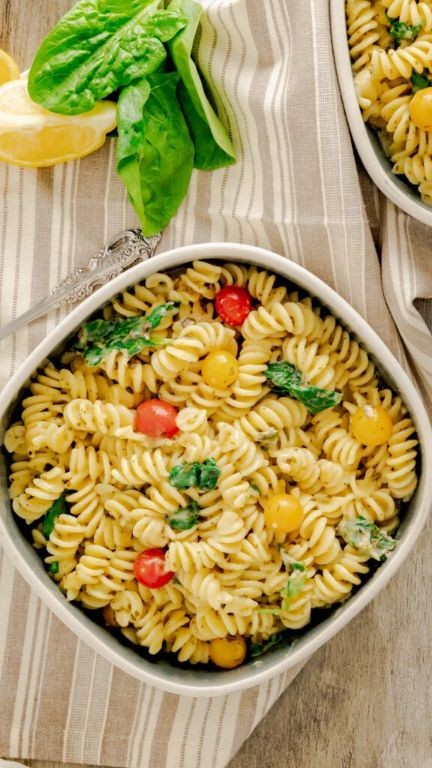
Unlock a vibrant, restaurant-quality pasta dish in under 30 minutes with minimal cleanup. Using your Instant Pot streamlines the entire process, from cooking the pasta to creating a silky sauce. This recipe delivers bright, herby flavors and tender-crisp vegetables with almost no effort.
Serving: 4 | Pre Time: 5 minutes | Cooking Time: 4 minutes
Ingredients
– Pasta – 1 lb
– Water – 4 cups
– Salt – 1 tsp
– Pesto – 1 cup
– Cherry tomatoes – 2 cups
– Parmesan cheese – ½ cup, grated
Instructions
1. Add 1 lb pasta, 4 cups water, and 1 tsp salt to the Instant Pot.
2. Secure the lid, set the valve to “Sealing,” and pressure cook on High for 4 minutes.
3. Once cooking completes, perform a quick release by carefully turning the valve to “Venting” until pressure drops.
4. Tip: For al dente pasta, reduce cooking time to 3 minutes if using thinner shapes like linguine.
5. Open the lid and immediately stir in 1 cup pesto until the pasta is evenly coated.
6. Add 2 cups cherry tomatoes and stir gently to combine without crushing them.
7. Tip: Halve the tomatoes before adding if you prefer a softer texture and more integrated flavor.
8. Let the mixture sit in the warm pot for 2 minutes to slightly soften the tomatoes.
9. Stir in ½ cup grated Parmesan cheese until melted and creamy.
10. Tip: Reserve a tablespoon of pasta water before draining to adjust sauce consistency if needed.
11. Serve immediately directly from the pot.
A creamy, herbaceous sauce clings perfectly to each strand of pasta, while the cherry tomatoes add juicy bursts of sweetness. For a heartier meal, top with grilled chicken or stir in white beans during the final warming step. The pesto’s basil and garlic notes shine brightly against the rich, salty Parmesan.
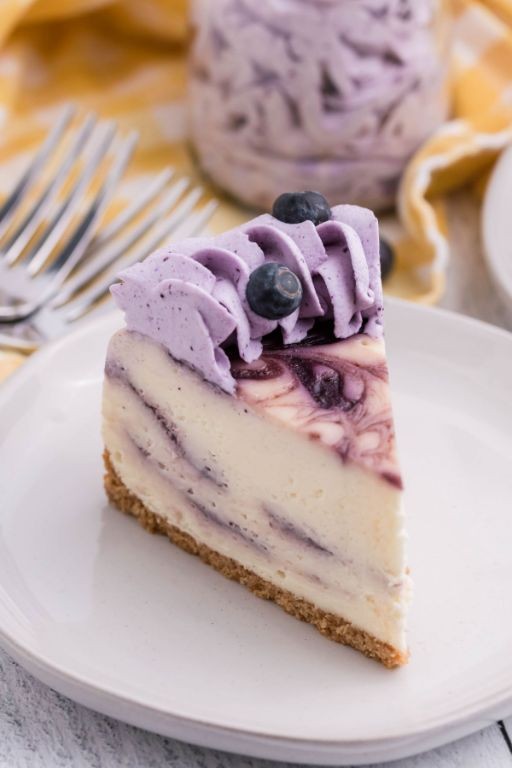
Instant Pot Blueberry Lemon Cheesecake
You’ve probably faced the dilemma of wanting a decadent dessert without spending hours in the kitchen. This Instant Pot version delivers a creamy, tangy cheesecake in a fraction of the time, making it perfect for last-minute gatherings or a sweet weeknight treat.
Serving: 8 | Pre Time: 15 minutes | Cooking Time: 35 minutes
Ingredients
– Graham cracker crumbs – 1 ½ cups
– Unsalted butter – 5 tbsp, melted
– Granulated sugar – ¾ cup
– Cream cheese – 24 oz, room temperature
– Sour cream – ½ cup
– Eggs – 3 large
– Lemon juice – 3 tbsp
– Lemon zest – 1 tbsp
– Vanilla extract – 1 tsp
– Blueberry pie filling – 1 can (21 oz)
– Water – 1 cup
Instructions
1. Combine graham cracker crumbs, melted butter, and ¼ cup of the granulated sugar in a medium bowl.
2. Press the crumb mixture firmly and evenly into the bottom of a 7-inch springform pan. Tip: Use the bottom of a measuring cup to compact the crust for a solid base.
3. In a large mixing bowl, beat the room-temperature cream cheese with the remaining ½ cup of granulated sugar on medium speed until completely smooth, about 2 minutes.
4. Add the sour cream, eggs, lemon juice, lemon zest, and vanilla extract to the cream cheese mixture. Beat on low speed just until fully combined, about 1 minute. Tip: Avoid overmixing after adding eggs to prevent a cracked surface.
5. Pour the cheesecake filling over the prepared crust in the springform pan.
6. Cover the pan tightly with aluminum foil.
7. Pour 1 cup of water into the inner pot of your Instant Pot.
8. Place the covered springform pan onto the trivet and carefully lower it into the Instant Pot.
9. Secure the lid, set the valve to “Sealing,” and select “Pressure Cook” or “Manual” on High pressure for 35 minutes.
10. Once the cooking cycle is complete, allow the pressure to release naturally for 20 minutes, then perform a quick release for any remaining pressure. Tip: A natural release helps the cheesecake set gently and reduces cracking.
11. Carefully remove the pan from the Instant Pot using the trivet handles, uncover it, and let it cool on a wire rack for 1 hour.
12. Refrigerate the cheesecake, uncovered, for at least 6 hours, or preferably overnight.
13. Before serving, top the chilled cheesecake evenly with the entire can of blueberry pie filling.
Velvety and rich, the texture is perfectly dense yet creamy, with the bright lemon zest cutting through the sweetness. The burst of blueberry topping adds a juicy contrast that makes each bite complex. For a creative twist, serve individual slices with a dollop of whipped cream and a fresh mint leaf.
Summary
Convenient and delicious, these 19 Instant Pot recipes are your ticket to easy summer meals without heating up the kitchen. We hope you find a new favorite! Give them a try, then drop a comment below telling us which one you loved most. Don’t forget to share this roundup on Pinterest to help other busy cooks discover these refreshing ideas.


