Let’s face it: the Super Bowl is as much about the snacks as the game! Whether you’re hosting a crowd or just craving some game-day goodness, we’ve got you covered with 17 irresistible recipes that are sure to score big. From cheesy dips to crispy wings, these crowd-pleasers will make your party the MVP. Ready to tackle your snack lineup? Let’s dive in!
Buffalo chicken dip with crispy tortilla chips

Ever find yourself at a party where the chips are lonely and the conversation is dull? Enter this Buffalo chicken dip—the ultimate wingless wing experience that’ll have everyone hovering around the bowl like seagulls at a beach picnic. It’s creamy, spicy, and ridiculously easy to whip up, making you the MVP of any gathering without breaking a sweat.
Serving: 8 | Pre Time: 10 minutes | Cooking Time: 20 minutes
Ingredients
– 2 cups of shredded cooked chicken (rotisserie chicken works like a charm)
– 8 ounces of cream cheese, softened to room temperature
– 1/2 cup of Frank’s RedHot sauce (or your favorite buffalo sauce)
– 1/2 cup of ranch dressing (go for the creamy kind)
– 1 cup of shredded cheddar cheese
– A couple of green onions, thinly sliced
– A bag of crispy tortilla chips for dipping
Instructions
1. Preheat your oven to 350°F—this ensures everything bakes evenly without any cold spots.
2. In a large mixing bowl, combine the shredded chicken, softened cream cheese, Frank’s RedHot sauce, and ranch dressing, stirring until fully blended and creamy.
3. Tip: If the cream cheese is still a bit firm, microwave it for 15 seconds to make mixing a breeze.
4. Fold in 3/4 cup of the shredded cheddar cheese and half of the sliced green onions, reserving the rest for topping later.
5. Transfer the mixture to an oven-safe baking dish, spreading it out evenly with a spatula.
6. Sprinkle the remaining 1/4 cup of cheddar cheese on top for a golden, bubbly finish.
7. Bake in the preheated oven for 20 minutes, or until the edges are bubbling and the cheese is melted and slightly browned.
8. Tip: Keep an eye on it after 15 minutes—ovens can vary, and you want it hot but not burnt.
9. Remove from the oven and let it cool for 5 minutes to avoid scorching your tongue (trust me, it’s worth the wait).
10. Garnish with the remaining green onions for a fresh pop of color and flavor.
11. Tip: Serve it warm with those crispy tortilla chips on the side for the perfect crunch contrast.
This dip emerges from the oven with a gooey, velvety texture that clings to every chip, while the buffalo sauce delivers a tangy kick balanced by the cool ranch. Try scooping it onto celery sticks for a low-carb twist, or go wild and drizzle extra hot sauce on top for those who dare. Totally irresistible, it’s the kind of crowd-pleaser that disappears faster than you can say “game day.”
Loaded nachos with ground beef and melted cheese
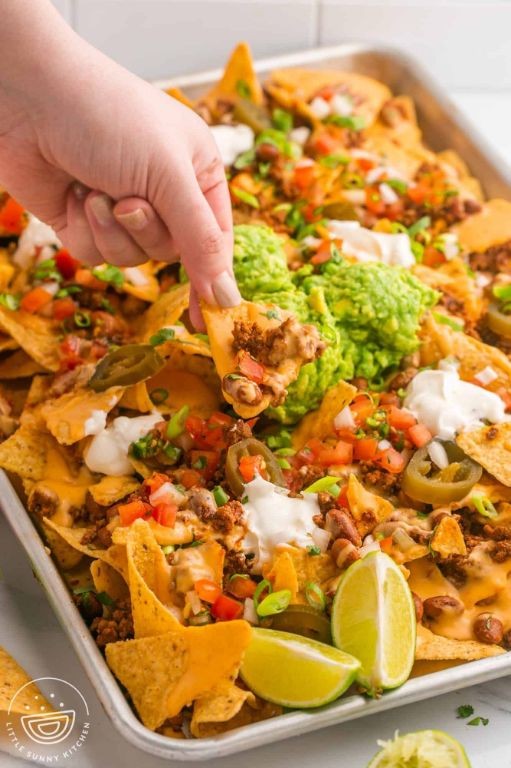
Ever had one of those days where you’re craving something gloriously messy, ridiculously cheesy, and utterly satisfying? Enter these loaded nachos—a crispy, gooey, flavor-packed fiesta that’s basically a party on a baking sheet. It’s the ultimate crowd-pleaser for game day, movie night, or just because you deserve a little edible joy.
Serving: 4 | Pre Time: 15 minutes | Cooking Time: 20 minutes
Ingredients
– A big bag of your favorite tortilla chips (about 8 cups)
– A pound of ground beef (I use 80/20 for flavor)
– A packet of taco seasoning (or about 2 tablespoons of your own blend)
– A splash of water (about ¼ cup)
– A couple of cups of shredded cheddar cheese (or a Mexican blend)
– A can of black beans, rinsed and drained (15 oz)
– A jar of sliced jalapeños (about ½ cup, or fresh if you’re feeling spicy)
– A cup of sour cream for dolloping
– A handful of chopped fresh cilantro
– A lime, cut into wedges
Instructions
1. Preheat your oven to 375°F and grab a large baking sheet.
2. Spread the tortilla chips in a single layer on the baking sheet—don’t overcrowd them, or they’ll steam instead of crisp up (tip: use two sheets if needed!).
3. In a skillet over medium-high heat, brown the ground beef for about 8-10 minutes, breaking it into small crumbles with a spoon until no pink remains.
4. Drain any excess grease from the skillet, then stir in the taco seasoning and splash of water, cooking for another 2-3 minutes until the mixture thickens slightly.
5. Sprinkle the cooked beef evenly over the tortilla chips on the baking sheet.
6. Scatter the black beans and jalapeños over the beef layer.
7. Top everything generously with the shredded cheese, making sure to cover the edges for maximum meltiness.
8. Bake in the preheated oven for 8-10 minutes, or until the cheese is fully melted and bubbly (tip: keep an eye on it to avoid burning the chips!).
9. Remove from the oven and let it cool for 2-3 minutes—this helps the cheese set so it doesn’t slide off.
10. Dollop with sour cream, sprinkle with chopped cilantro, and serve immediately with lime wedges on the side for a zesty squeeze (tip: add extra toppings like guacamole or salsa if you’re feeling fancy!).
So, what’s the verdict? You’ll get a perfect crunch from the chips, a savory kick from the beef and beans, and that ooey-gooey cheese pull we all dream about. Serve it straight from the sheet pan for a fun, shareable centerpiece, or scoop it into bowls for a less messy (but equally delicious) experience.
Mini sliders with caramelized onions and spicy mayo
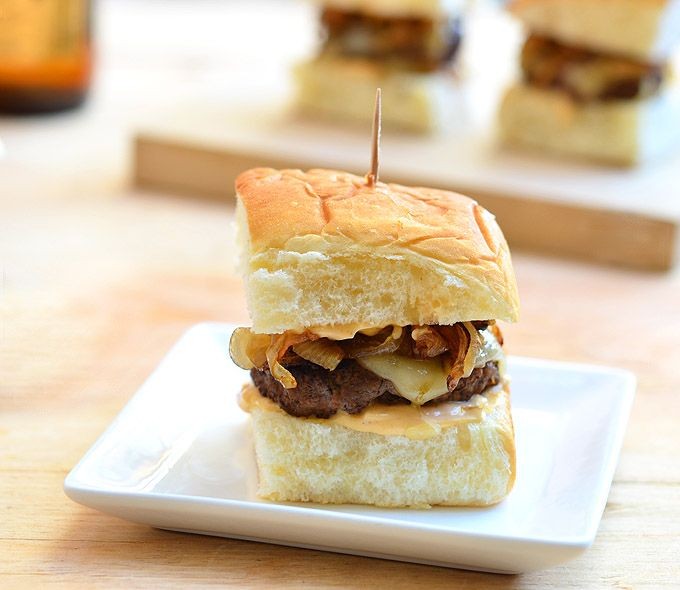
Feast your eyes on these bite-sized beauties that pack more flavor than your average party appetizer! These mini sliders are the ultimate crowd-pleaser, combining sweet caramelized onions with a spicy mayo kick that’ll make your taste buds do a happy dance. Trust me, these little guys disappear faster than your New Year’s resolutions.
Serving: 12 sliders | Pre Time: 15 minutes | Cooking Time: 25 minutes
Ingredients
- 1 pound of ground beef (80/20 blend for juiciness)
- 12 slider buns (the soft, squishy kind)
- 2 large yellow onions, thinly sliced
- 2 tablespoons of olive oil
- 1 tablespoon of brown sugar
- 1/2 cup of mayonnaise
- 1 tablespoon of sriracha sauce (or more if you’re brave)
- 1 teaspoon of garlic powder
- 1 teaspoon of onion powder
- 1/2 teaspoon of salt
- 1/4 teaspoon of black pepper
- 4 slices of cheddar cheese, each cut into 3 pieces
- A couple of butter pats for toasting
Instructions
- Heat 1 tablespoon of olive oil in a large skillet over medium-low heat.
- Add the thinly sliced onions and cook for 5 minutes, stirring occasionally until they begin to soften.
- Sprinkle 1 tablespoon of brown sugar over the onions and continue cooking for 15-20 minutes, stirring every few minutes, until they turn a deep golden brown and become jammy. Tip: Don’t rush this step—low and slow is key for perfect caramelization!
- While onions cook, combine 1/2 cup mayonnaise, 1 tablespoon sriracha, 1 teaspoon garlic powder, and 1 teaspoon onion powder in a small bowl. Mix well and set aside.
- In a medium bowl, gently mix 1 pound ground beef with 1/2 teaspoon salt and 1/4 teaspoon black pepper until just combined—overmixing makes tough patties.
- Divide the beef mixture into 12 equal portions and shape into small patties slightly larger than your slider buns (they’ll shrink as they cook).
- Heat the remaining 1 tablespoon olive oil in a separate skillet over medium-high heat.
- Cook the patties for 2-3 minutes per side, or until they reach an internal temperature of 160°F. Tip: Press gently with a spatula to check doneness—if juices run clear, they’re ready!
- Place a piece of cheddar cheese on each patty during the last 30 seconds of cooking to melt slightly.
- Lightly butter the cut sides of the slider buns and toast in a skillet or toaster oven for 1-2 minutes until golden. Tip: Toasting prevents soggy buns from the spicy mayo!
- Spread a generous dollop of the spicy mayo mixture on the bottom half of each toasted bun.
- Top each with a cheesy patty and a spoonful of caramelized onions.
- Cap with the top bun and secure with toothpicks if needed.
Delight in the contrast of the soft, buttery buns against the juicy beef patties, with the sweet onions cutting through the spicy mayo’s kick. Serve these warm on a platter with extra spicy mayo for dipping, or pack them for a picnic—they’re just as delicious at room temperature!
Bacon-wrapped jalapeño poppers with cream cheese
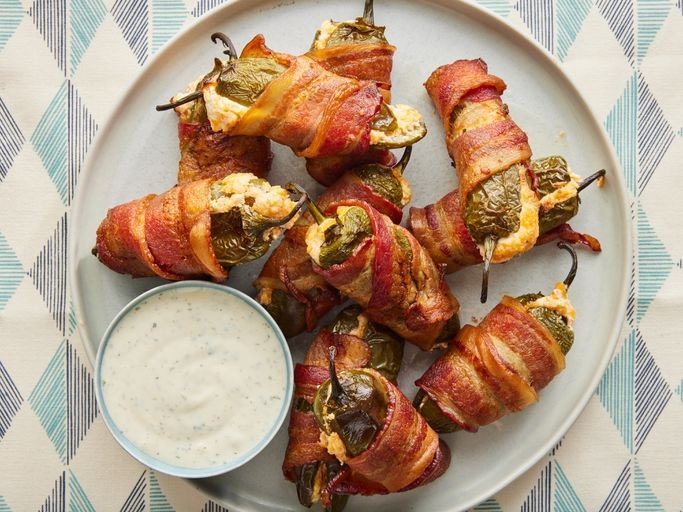
Brace yourselves, spice lovers—these bacon-wrapped jalapeño poppers are about to become your new favorite party trick, combining creamy, cheesy goodness with a smoky, crispy hug that’ll have everyone begging for the recipe. Seriously, they’re so addictive you might need to hide a few for yourself before the guests arrive!
Serving: 12 | Pre Time: 20 minutes | Cooking Time: 25 minutes
Ingredients
– 6 fresh jalapeño peppers (look for ones that are firm and bright green)
– 8 ounces of cream cheese, softened to room temperature (it’ll mix way easier, promise!)
– 1 cup of shredded cheddar cheese (the sharper, the better for that tangy kick)
– 12 slices of thin-cut bacon (because crispy bacon is non-negotiable here)
– A pinch of garlic powder (just a little sprinkle for extra flavor magic)
– A splash of olive oil (for greasing that baking sheet)
Instructions
1. Preheat your oven to 400°F (that’s 204°C for the science-minded folks) and lightly grease a baking sheet with that splash of olive oil to prevent sticking.
2. Slice each jalapeño in half lengthwise, then use a small spoon to scoop out all the seeds and membranes—this cuts the heat, so you can enjoy the flavor without the fire!
3. In a medium bowl, mix together the softened cream cheese, shredded cheddar cheese, and that pinch of garlic powder until it’s smooth and well-combined; if it’s too stiff, let it sit out for a few more minutes.
4. Spoon the cheese mixture evenly into each jalapeño half, filling them just to the top without overflowing—they should look like little cheesy boats ready to sail.
5. Wrap each stuffed jalapeño half with one slice of bacon, securing it with a toothpick through the center to hold everything in place during baking.
6. Arrange the poppers on the prepared baking sheet, leaving a little space between each one so the bacon can crisp up nicely all around.
7. Bake in the preheated oven for 20–25 minutes, until the bacon is fully cooked and crispy, and the cheese is bubbly and golden—keep an eye out around the 20-minute mark to avoid burning.
8. Let the poppers cool on the baking sheet for about 5 minutes before serving; this helps the cheese set so they don’t fall apart when you pick them up.
Now, these poppers deliver a perfect crunch from the bacon, a creamy melt from the cheese, and just enough jalapeño zing to keep things interesting. Try serving them with a cool ranch dip or alongside a crisp salad for a fun twist—they’re guaranteed to disappear faster than you can say “more please!”
Homemade guacamole with fresh lime and cilantro
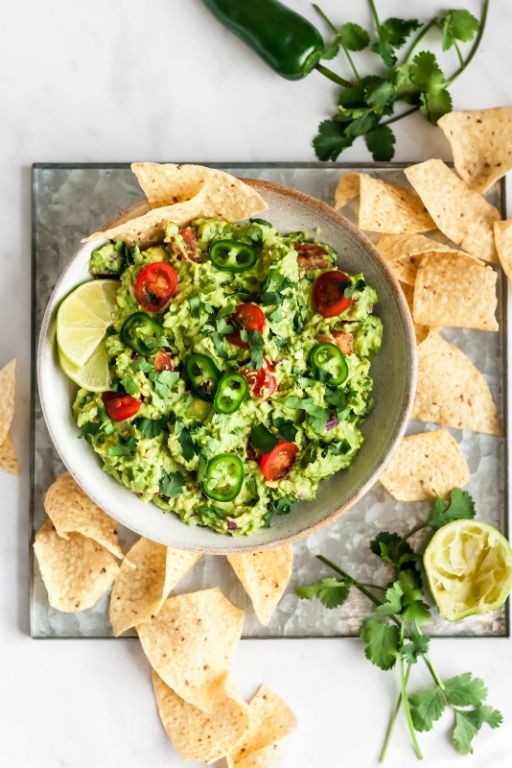
Tired of guacamole that tastes like it’s been sitting in a sad deli case since last Tuesday? Today, we’re making a version so fresh and zippy, it’ll make store-bought dips weep with envy. Get ready to dip, scoop, and devour your way to avocado bliss.
Serving: 4 | Pre Time: 15 minutes | Cooking Time: 0 minutes
Ingredients
– 3 perfectly ripe avocados (you want them slightly soft when gently squeezed)
– Juice from 1 large, juicy lime (about 2 tablespoons)
– A generous handful of fresh cilantro leaves, roughly chopped (about 1/4 cup)
– 1/4 cup of finely diced red onion
– 1 medium jalapeño, seeds removed and finely minced (unless you like it fiery!)
– 1 medium tomato, seeds scooped out and diced
– 1/2 teaspoon of kosher salt
– A couple of grinds of fresh black pepper
Instructions
1. Cut your 3 ripe avocados in half, remove the pits, and scoop the flesh into a medium mixing bowl.
2. Immediately add the juice from 1 large lime (about 2 tablespoons) over the avocado to prevent browning.
3. Using a fork or potato masher, mash the avocado and lime juice together until you reach your desired consistency—chunky or smooth, your call!
4. Tip: For the best flavor, use a potato masher; it gives you more control than a fork for that perfect texture.
5. Add the 1/4 cup of finely diced red onion, the minced jalapeño, the diced tomato, and the roughly chopped cilantro (about 1/4 cup) to the bowl.
6. Sprinkle in the 1/2 teaspoon of kosher salt and a couple of grinds of fresh black pepper.
7. Gently fold all the ingredients together with a spatula until just combined—don’t overmix, or it’ll get mushy!
8. Tip: Taste a small spoonful and adjust the salt or lime juice if needed; the flavors should pop, not whisper.
9. Transfer the guacamole to a serving bowl and press a piece of plastic wrap directly onto the surface.
10. Tip: This cling-film trick is a game-changer—it keeps air out and your guac gorgeously green for hours.
11. Let it sit at room temperature for about 10 minutes to let the flavors meld before serving.
Heavenly, right? This guac boasts a creamy yet chunky texture with a bright kick from the lime and a fresh herbaceous note from the cilantro. Serve it with a mountain of tortilla chips, slather it on tacos, or get wild and use it as a topping for grilled chicken—it’s so versatile, it might just become your new kitchen MVP.
Pulled pork sliders with tangy barbecue sauce
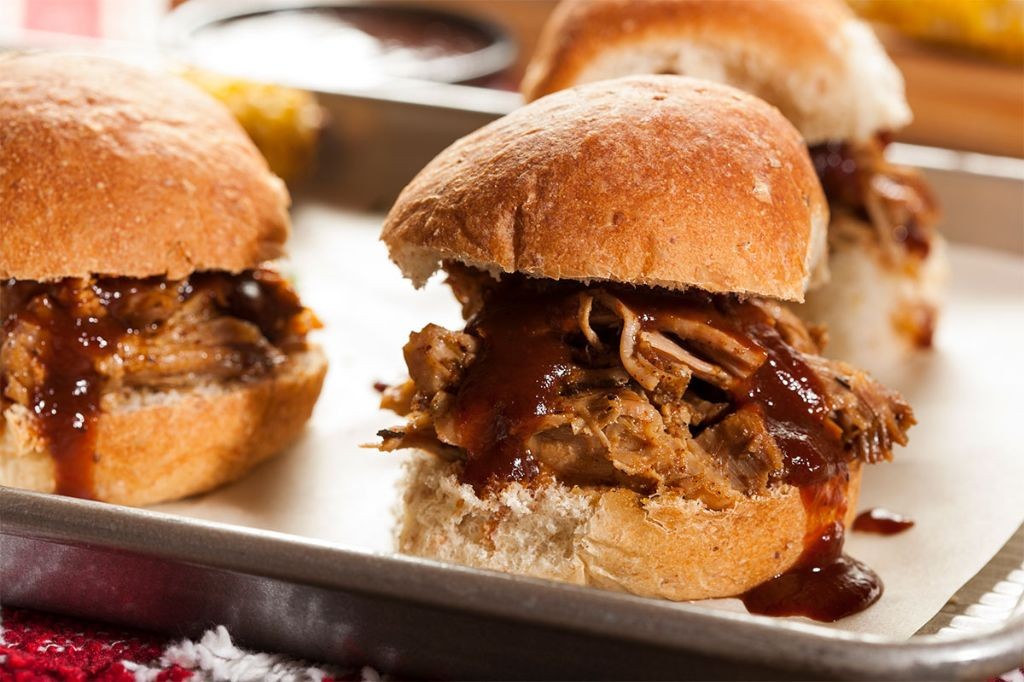
Kick off your next gathering with these irresistible pulled pork sliders that’ll have everyone asking for your secret—spoiler: it’s mostly patience and a killer sauce! Picture tender, slow-cooked pork piled high on soft buns, all drenched in a tangy barbecue sauce that’s equal parts sweet, smoky, and sassy. Trust me, these little bites are the ultimate crowd-pleaser, perfect for game day, picnics, or just because you deserve something delicious.
Serving: 8 | Pre Time: 15 minutes | Cooking Time: 8 hours
Ingredients
– A 3-pound pork shoulder (bone-in or boneless, your call!)
– A couple of tablespoons of olive oil
– A generous sprinkle of salt and black pepper
– A cup of your favorite barbecue sauce (store-bought or homemade)
– A splash of apple cider vinegar
– A tablespoon of brown sugar
– 8 slider buns (brioche works like a dream)
– A handful of coleslaw for topping (optional but highly recommended)
Instructions
1. Preheat your oven to 300°F—low and slow is the name of the game here!
2. Pat the pork shoulder dry with paper towels, then rub it all over with olive oil, salt, and black pepper.
3. Place the pork in a Dutch oven or roasting pan, cover tightly with a lid or foil, and pop it in the oven for 6 hours. Tip: Don’t peek too often; keeping that steam locked in ensures super tender meat.
4. After 6 hours, remove the pork from the oven—it should shred easily with a fork. Let it rest for 10 minutes, then shred it into bite-sized pieces right in the pan.
5. In a small bowl, whisk together the barbecue sauce, apple cider vinegar, and brown sugar until smooth.
6. Pour the sauce mixture over the shredded pork, stirring to coat every nook and cranny. Tip: If the sauce seems too thick, add a tablespoon of water to loosen it up.
7. Return the sauced pork to the oven, uncovered, and bake for another 2 hours at 300°F. Tip: Stir it halfway through to prevent any sticky spots and deepen that flavor.
8. While the pork finishes, lightly toast the slider buns in a toaster or oven for 2-3 minutes until golden.
9. Pile the pulled pork onto the toasted buns, top with a spoonful of coleslaw if using, and serve immediately.
These sliders boast a melt-in-your-mouth texture with a perfect balance of savory pork and zesty sauce. Try serving them with extra sauce on the side for dipping, or get creative by adding pickles or jalapeños for a spicy kick. They’re so good, you might just skip the main course and make a meal out of these alone!
Cheesy garlic bread bites with marinara dip

Mmm…is there anything better than warm, cheesy, garlicky bread you can pop in your mouth? We think not. These little bites are the perfect party starter, game-day snack, or just a very valid reason to eat an entire bowl of marinara sauce by yourself—no judgment here.
Serving: 4-6 | Pre Time: 15 minutes | Cooking Time: 15 minutes
Ingredients
– A 16-ounce loaf of French bread, cut into 1-inch cubes
– A generous 1/2 cup of melted unsalted butter
– 4 cloves of garlic, minced (or a heaping tablespoon from a jar, we won’t tell)
– A couple of tablespoons of fresh parsley, chopped
– 1 1/2 cups of shredded mozzarella cheese
– A good 1/2 cup of grated Parmesan cheese
– A 24-ounce jar of your favorite marinara sauce, for dipping
Instructions
1. Preheat your oven to 400°F (200°C) and line a large baking sheet with parchment paper.
2. In a medium bowl, whisk together the 1/2 cup of melted butter and the 4 minced garlic cloves until well combined.
3. Place all the 1-inch bread cubes in a large mixing bowl.
4. Pour the garlic butter mixture over the bread cubes and toss thoroughly until every piece is evenly coated. Tip: Let the bread sit for 5 minutes to soak up all that garlicky goodness.
5. Add the 1 1/2 cups of shredded mozzarella, 1/2 cup of grated Parmesan, and the couple of tablespoons of chopped parsley to the bowl with the bread.
6. Gently toss everything together until the cheese and herbs are distributed among the bread cubes.
7. Spread the cheesy bread mixture in a single layer on your prepared baking sheet.
8. Bake in the preheated 400°F oven for 12-15 minutes, or until the cheese is melted, bubbly, and the bread edges are golden brown. Tip: For extra crispiness, broil for the final 1-2 minutes, but watch closely to prevent burning!
9. While the bites bake, pour the 24-ounce jar of marinara sauce into a small saucepan.
10. Heat the sauce over medium-low heat, stirring occasionally, until warmed through, about 5-7 minutes. Tip: Stir in a pinch of red pepper flakes for a spicy kick.
11. Remove the baking sheet from the oven and let the bites cool for 2-3 minutes—they’ll be molten lava hot!
12. Transfer the warm cheesy garlic bread bites to a serving platter with the bowl of warm marinara sauce for dipping.
You’ll love the crispy, golden exterior that gives way to a soft, cheesy, and intensely garlicky center. Yes, they’re dangerously addictive, especially when dunked into that rich, herby marinara—consider making a double batch because these disappear faster than you can say “more cheese, please.”
Spinach and artichoke dip served in a bread bowl
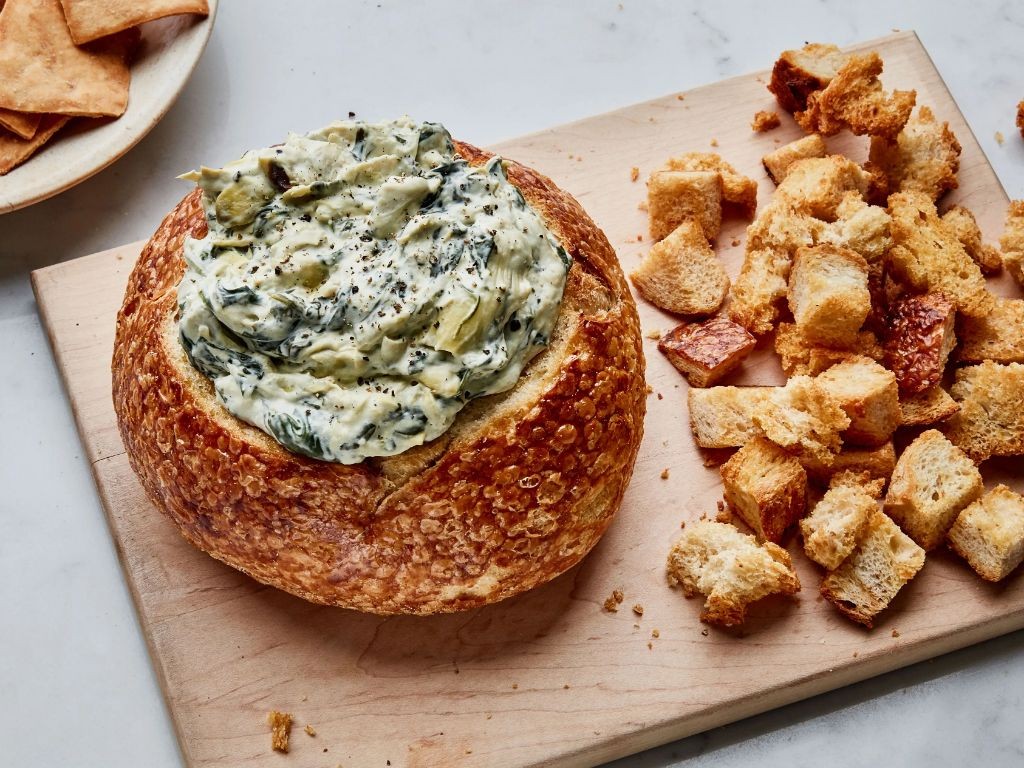
Kick off your holiday party with this creamy, dreamy spinach and artichoke dip that’s so good, your guests might forget to open their presents. Served in a warm, crusty bread bowl, it’s the ultimate edible centerpiece that’s basically a hug in food form. Trust me, this cheesy masterpiece will disappear faster than your New Year’s resolutions.
Serving: 6 | Pre Time: 15 minutes | Cooking Time: 25 minutes
Ingredients
– One big round sourdough bread bowl (about 8 inches wide)
– A couple of tablespoons of olive oil
– A whole 10-ounce package of frozen chopped spinach, thawed and squeezed dry (seriously, get all that water out!)
– One 14-ounce can of artichoke hearts, drained and chopped
– A full 8-ounce block of cream cheese, softened
– A heaping cup of shredded mozzarella cheese
– A generous half cup of grated Parmesan cheese
– A splash of milk (about ¼ cup)
– Two cloves of garlic, minced
– A pinch of salt and a few cracks of black pepper
Instructions
1. Preheat your oven to 375°F and line a baking sheet with parchment paper.
2. Slice off the top quarter of the sourdough bread bowl and hollow out the inside, leaving about a ½-inch thick shell. Tip: Save the bread scraps for dipping later—they’re perfect for scooping!
3. Brush the inside of the bread bowl and the cut side of the top with olive oil, then place both on the baking sheet.
4. Bake the bread bowl and top for 10 minutes until lightly toasted and crisp.
5. While the bread bakes, combine the squeezed spinach, chopped artichokes, cream cheese, mozzarella, Parmesan, milk, garlic, salt, and pepper in a large mixing bowl. Tip: Use a hand mixer on low to blend everything smoothly without lumps.
6. Remove the bread from the oven and carefully spoon the dip mixture into the hollowed-out bowl, filling it to the top.
7. Return the filled bread bowl and the top to the oven and bake for 25 minutes, or until the dip is bubbly and golden brown on top. Tip: If the bread edges start to brown too quickly, loosely tent them with foil to prevent burning.
8. Let the dip cool for 5 minutes before serving to avoid molten cheese burns (we’ve all been there!).
Every bite delivers a gooey, garlicky punch with tender artichokes and spinach nestled in that warm, crusty bread. Serve it straight from the bowl with extra bread chunks or veggie sticks for dipping, and watch it become the star of your spread—just try not to eat the whole thing yourself!
Spicy buffalo cauliflower wings with blue cheese dressing
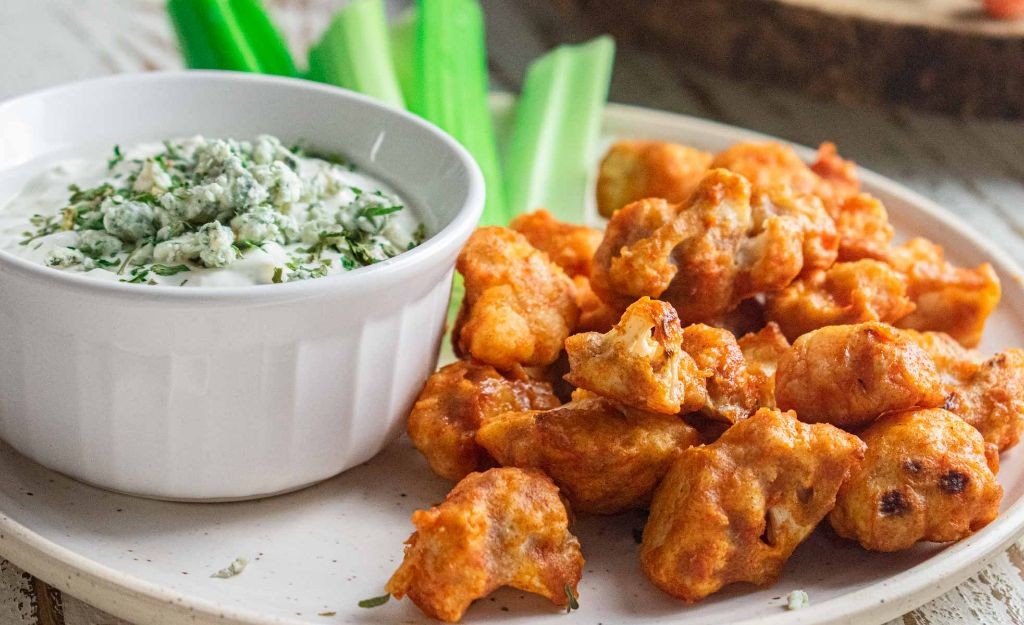
Let’s be real—sometimes you want that spicy, saucy, finger-licking wing experience without the actual chicken. Enter these fiery little florets that pack all the punch of buffalo wings with a veggie-powered twist. They’re crispy, they’re zesty, and they’re about to become your new game-day (or any-day) obsession.
Serving: 4 | Pre Time: 15 minutes | Cooking Time: 25 minutes
Ingredients
- 1 head of cauliflower, cut into bite-sized florets (about 4 cups worth)
- 1 cup of all-purpose flour
- 1 cup of milk (any kind you like—dairy or plant-based both work!)
- 2 teaspoons of garlic powder
- 1 teaspoon of paprika
- A good pinch of salt and black pepper
- 1 cup of your favorite buffalo sauce
- 2 tablespoons of melted butter or vegan butter
- A splash of olive oil or cooking spray for the baking sheet
- For the blue cheese dressing: ½ cup of mayonnaise, ¼ cup of sour cream, ½ cup of crumbled blue cheese, a squeeze of lemon juice, and a couple of tablespoons of milk to thin it out
Instructions
- Preheat your oven to 450°F and line a large baking sheet with parchment paper, giving it a light spray with olive oil to prevent sticking.
- In a large bowl, whisk together the flour, milk, garlic powder, paprika, salt, and pepper until you have a smooth, pancake-batter-like consistency—no lumps allowed! Tip: If the batter seems too thick, add a tablespoon more milk; too thin, sprinkle in a bit more flour.
- Toss the cauliflower florets in the batter until they’re fully coated, letting any excess drip off back into the bowl.
- Arrange the coated florets in a single layer on the prepared baking sheet, making sure they aren’t touching so they crisp up evenly.
- Bake for 20 minutes, flipping them halfway through with tongs, until they’re golden brown and crispy on the edges.
- While the cauliflower bakes, mix the buffalo sauce and melted butter in a small bowl, and in another bowl, stir together all the blue cheese dressing ingredients until creamy. Tip: For extra tang in the dressing, let it chill in the fridge for 10 minutes while the cauliflower cooks.
- Once the cauliflower is out of the oven, carefully toss the hot florets in the buffalo sauce mixture until they’re thoroughly coated—work quickly to keep them crispy!
- Return the sauced cauliflower to the baking sheet and bake for another 5 minutes, just until the sauce is sticky and caramelized. Tip: Watch closely to avoid burning; they should look glossy and irresistible.
- Serve immediately with the blue cheese dressing for dipping. Every bite delivers a crunchy exterior with a tender interior, smothered in that classic spicy-sweet buffalo kick. Try piling them on a platter with celery sticks and carrot coins for a full wing-bar experience, or stuff them into tacos with shredded lettuce for a fun twist—they’re so good, you might forget there’s no chicken involved!
Crunchy mozzarella sticks with marinara sauce
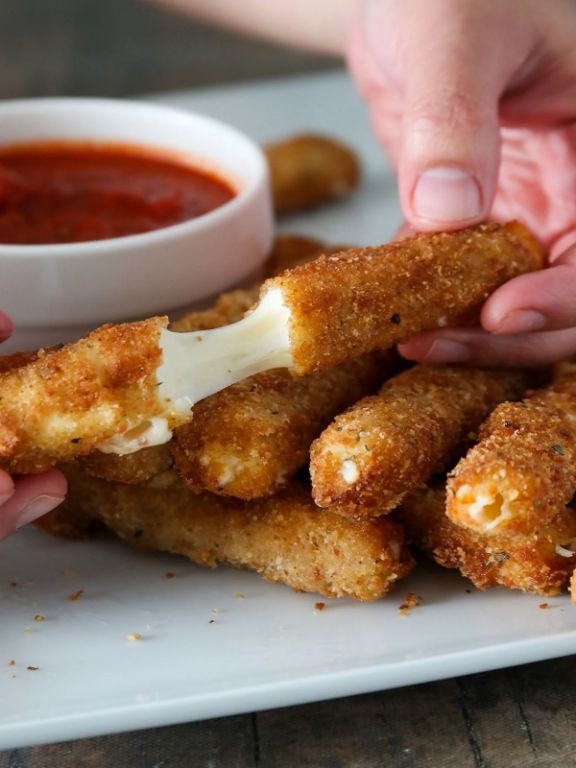
Hear that? That’s the sound of your taste buds doing a happy dance. These crunchy mozzarella sticks are the ultimate game-day snack, date-night appetizer, or “I deserve a treat” moment—crispy on the outside, gloriously gooey on the inside, and dunked in a zesty marinara that’s basically a flavor hug.
Serving: 4 | Pre Time: 15 minutes | Cooking Time: 10 minutes
Ingredients
– 8 mozzarella string cheese sticks
– 1 cup all-purpose flour
– 2 large eggs, beaten
– 1 cup Italian-style breadcrumbs
– 1/2 cup grated Parmesan cheese
– A couple of cups of vegetable oil for frying
– 1 cup marinara sauce
– A splash of olive oil
– A pinch of salt
Instructions
1. Cut each mozzarella string cheese stick in half crosswise to make 16 pieces total.
2. Set up a breading station with three shallow bowls: place the flour in the first, the beaten eggs in the second, and mix the breadcrumbs with the Parmesan cheese in the third.
3. Dredge each mozzarella piece in the flour, shaking off any excess—this helps the egg stick better.
4. Dip the floured piece into the beaten eggs, coating it completely.
5. Roll the egg-coated piece in the breadcrumb-Parmesan mixture, pressing gently to ensure an even, thick coating. Tip: Freeze the coated sticks for 10 minutes before frying to prevent cheese leakage.
6. In a deep skillet or pot, heat the vegetable oil over medium-high heat until it reaches 375°F—use a thermometer for accuracy.
7. Carefully add the frozen mozzarella sticks to the hot oil in batches, frying for about 2–3 minutes until golden brown and crispy. Tip: Don’t overcrowd the pan to maintain the oil temperature.
8. Remove the fried sticks with a slotted spoon and drain on a paper towel-lined plate, sprinkling with a pinch of salt while hot.
9. In a small saucepan, heat the marinara sauce with a splash of olive oil over low heat for 5 minutes, stirring occasionally until warm. Tip: Add a dash of red pepper flakes to the sauce for a spicy kick.
10. Serve the mozzarella sticks immediately with the warm marinara sauce for dipping.
Ah, the magic moment: that first bite gives a satisfying crunch before melting into a stretchy, cheesy center. The marinara adds a tangy contrast that’s downright addictive—try pairing them with a cold beer or stacking them on a charcuterie board for a next-level snack spread.
Turkey and cheese pinwheels with ranch dressing
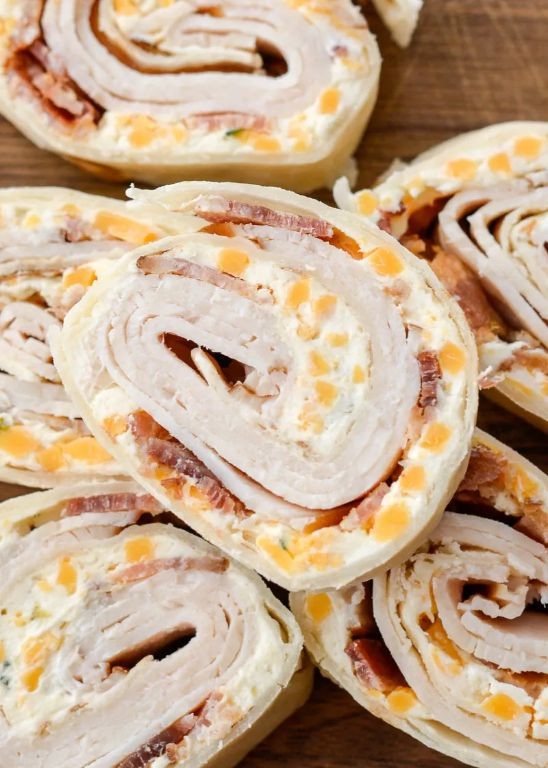
Crispy, creamy, and ridiculously easy to make, these turkey and cheese pinwheels are the ultimate snack-time hero. They’re the perfect solution for when hunger strikes and you need something deliciously satisfying in minutes. Let’s roll into this no-fuss recipe that’s sure to become a household favorite!
Serving: 4 | Pre Time: 10 minutes | Cooking Time: 5 minutes
Ingredients
– 4 large flour tortillas
– 8 slices of deli turkey
– 1 cup of shredded cheddar cheese
– 1/2 cup of ranch dressing
– A couple of tablespoons of olive oil for brushing
Instructions
1. Lay a flour tortilla flat on a clean surface.
2. Spread 2 tablespoons of ranch dressing evenly over the entire tortilla, leaving a 1/2-inch border around the edges.
3. Place 2 slices of deli turkey on top of the ranch dressing in a single layer.
4. Sprinkle 1/4 cup of shredded cheddar cheese evenly over the turkey.
5. Tightly roll up the tortilla from one end to the other, pressing gently as you go to keep it compact.
6. Repeat steps 1-5 with the remaining tortillas and ingredients.
7. Heat a non-stick skillet over medium heat (about 350°F) and brush it lightly with olive oil.
8. Place the rolled tortillas seam-side down in the skillet and cook for 2-3 minutes until golden brown and crispy.
9. Flip the pinwheels carefully using tongs and cook for another 2-3 minutes until the other side is golden brown and the cheese is melted.
10. Remove the pinwheels from the skillet and let them cool on a cutting board for 1 minute to set.
11. Slice each roll into 1-inch thick pinwheels using a sharp knife.
12. Serve immediately while warm and crispy.
Outrageously crunchy on the outside with a gooey, savory filling, these pinwheels deliver a burst of flavor in every bite. For a fun twist, try dipping them in extra ranch dressing or serving them alongside a fresh garden salad for a light meal. They’re so addictive, you might just find yourself making a double batch next time!
BBQ meatballs with a sweet and smoky glaze

Dare we say these BBQ meatballs might just steal the show at your next potluck? They’re the perfect blend of savory, smoky, and sweet, delivering a flavor punch that’ll have everyone asking for the recipe. Honestly, they’re so good, you might want to make a double batch—trust us on this one.
Serving: 4 | Pre Time: 15 minutes | Cooking Time: 25 minutes
Ingredients
– 1 pound of ground beef (80/20 works great for juicy meatballs!)
– 1/2 cup of breadcrumbs
– 1 large egg
– 1/4 cup of finely chopped onion
– 2 cloves of garlic, minced
– A generous pinch of salt and a couple of cracks of black pepper
– 1 cup of your favorite BBQ sauce (go for a smoky variety if you can)
– 1/4 cup of brown sugar
– A splash of apple cider vinegar (about 1 tablespoon)
– 1 tablespoon of olive oil
Instructions
1. Preheat your oven to 400°F and line a baking sheet with parchment paper.
2. In a large bowl, combine the ground beef, breadcrumbs, egg, chopped onion, minced garlic, salt, and pepper. Mix gently with your hands until just combined—overmixing can make the meatballs tough.
3. Shape the mixture into 1-inch meatballs, placing them on the prepared baking sheet as you go.
4. Bake the meatballs in the preheated oven for 15 minutes, or until they’re browned and cooked through.
5. While the meatballs bake, whisk together the BBQ sauce, brown sugar, and apple cider vinegar in a small saucepan over medium heat.
6. Bring the glaze to a simmer, stirring occasionally, and let it cook for 5 minutes until slightly thickened.
7. Remove the meatballs from the oven and carefully transfer them to the saucepan with the glaze.
8. Gently toss the meatballs in the glaze until they’re fully coated, then return them to the baking sheet.
9. Bake the glazed meatballs for another 5-10 minutes, until the glaze is sticky and caramelized. Tip: Keep an eye on them to prevent burning—the sugar can go from golden to burnt quickly!
10. Let the meatballs cool for a few minutes before serving. Tip: They’re easier to handle once they’ve set a bit.
Aren’t these little flavor bombs just irresistible? The meatballs come out tender and juicy, with a sticky-sweet glaze that packs a smoky punch. Serve them over a bed of creamy mashed potatoes for ultimate comfort, or skewer them as appetizers—either way, they’ll disappear fast!
Parmesan garlic pretzel bites with beer cheese dip
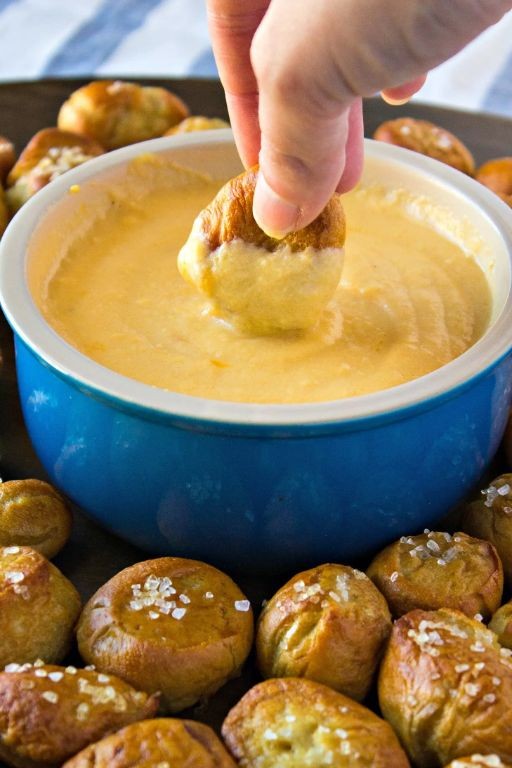
Ever find yourself staring into the abyss of your snack cabinet, wishing for something that’s both gloriously cheesy and unapologetically garlicky? Enter these Parmesan garlic pretzel bites with beer cheese dip—the ultimate party starter that’s basically a hug for your taste buds. They’re so good, you might just forget to share.
Serving: 6 | Pre Time: 20 minutes | Cooking Time: 15 minutes
Ingredients
– A packet of refrigerated pizza dough (about 16 ounces)
– A couple of tablespoons of melted butter
– A good sprinkle of grated Parmesan cheese (about 1/4 cup)
– A heaping teaspoon of garlic powder
– A big pinch of coarse salt
– For the dip: a cup of shredded sharp cheddar, a splash of beer (about 1/4 cup), a couple of tablespoons of milk, and a dash of mustard powder
Instructions
1. Preheat your oven to 425°F and line a baking sheet with parchment paper.
2. Roll out the pizza dough on a lightly floured surface and cut it into roughly 1-inch squares—don’t stress about perfection; rustic is charming!
3. Arrange the dough squares on the prepared baking sheet, leaving a little space between them so they can puff up nicely.
4. Bake for 10-12 minutes, or until the bites are golden brown and sound hollow when tapped—this visual cue means they’re perfectly cooked through.
5. While the bites bake, mix the melted butter, Parmesan, garlic powder, and salt in a bowl until it forms a paste.
6. As soon as the bites come out of the oven, brush them generously with the garlic-Parmesan mixture while they’re still hot; this helps the flavors soak in.
7. For the dip, combine the cheddar, beer, milk, and mustard powder in a small saucepan over medium heat, stirring constantly until smooth and bubbly, about 5 minutes—tip: use a wooden spoon to prevent sticking.
8. Serve the warm pretzel bites immediately with the beer cheese dip on the side for dipping.
Crunchy on the outside and pillowy soft inside, these bites pack a savory punch with every garlicky, cheesy bite. Try serving them straight from the oven at your next game night, or get fancy by skewering them with toothpicks for easy grabbing—they disappear faster than you can say “more please!”
Seven-layer taco dip with fresh salsa and sour cream
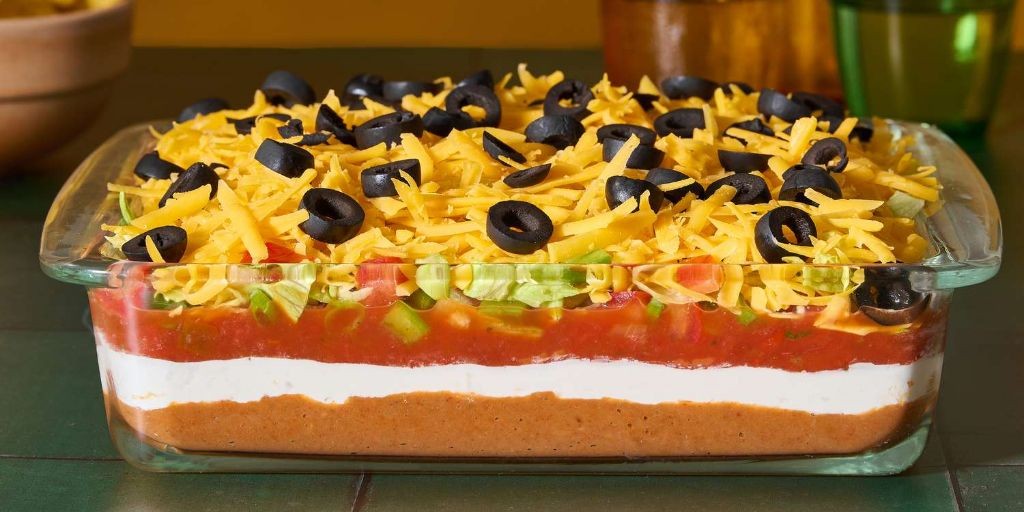
Hangry? Let’s fix that with a dip so epic it deserves its own fan club. This seven-layer taco dip is basically a fiesta in a dish, where fresh salsa and cool sour cream team up to save your snack game from total boredom. It’s the ultimate crowd-pleaser that’ll have everyone double-dipping without shame.
Serving: 8 | Pre Time: 20 minutes | Cooking Time: 0 minutes
Ingredients
– 1 (16-ounce) can of refried beans
– 1 cup of sour cream
– 1 (1-ounce) packet of taco seasoning
– 2 cups of shredded cheddar cheese
– 2 large tomatoes, diced
– 1/2 cup of diced red onion
– 1 jalapeño, finely chopped (seeds removed if you’re not into the heat)
– a big handful of fresh cilantro, chopped
– a squeeze of lime juice
– a bag of your favorite tortilla chips for serving
Instructions
1. Grab a 9×13-inch baking dish and spread the refried beans evenly across the bottom as your sturdy base layer.
2. In a small bowl, mix the sour cream with the taco seasoning until it’s fully combined and no dry spots remain—this adds a flavor punch without extra work.
3. Spoon the seasoned sour cream over the beans and smooth it out gently with a spatula to avoid mixing the layers.
4. Sprinkle the shredded cheddar cheese evenly over the sour cream layer, covering it completely for that melty goodness.
5. In a medium bowl, toss together the diced tomatoes, red onion, jalapeño, cilantro, and lime juice to make your fresh salsa; tip: let it sit for 5 minutes to let the flavors mingle.
6. Drain any excess liquid from the salsa by giving it a quick press with a spoon—this keeps your dip from getting soggy.
7. Spread the salsa evenly over the cheese layer, then pop the dish in the fridge to chill for at least 30 minutes before serving; tip: chilling helps the layers set so they don’t slide apart when you dig in.
8. Serve directly from the dish with tortilla chips for scooping, and enjoy immediately!
Zesty and creamy with a satisfying crunch from the chips, this dip is a texture dream that’s perfect for game days or casual get-togethers. For a fun twist, try layering it in individual cups for a portable party snack—just don’t blame us if it disappears too fast!
Mini pizza bagels with pepperoni and melted mozzarella
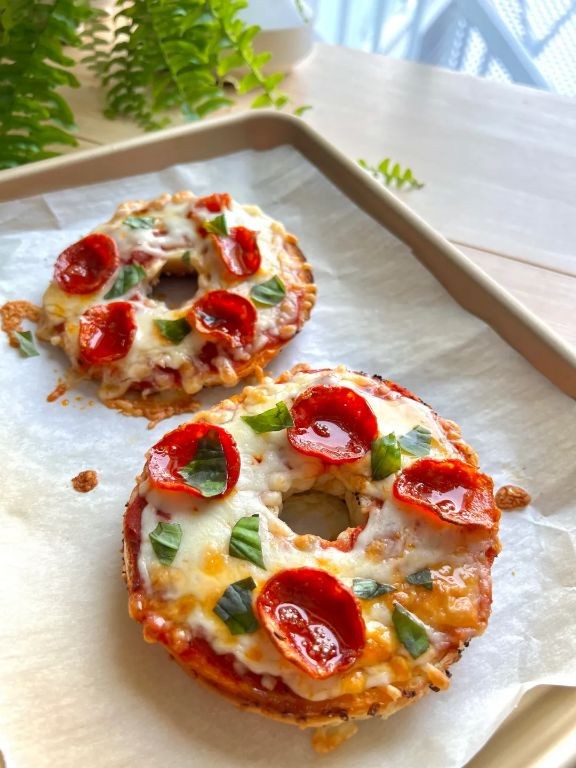
Unbelievably, we’ve found the snack that bridges the gap between “I’m starving” and “I don’t want to cook”—meet your new best friend for game day, movie night, or any random Tuesday craving. These little flavor bombs are basically a party on a bagel, and they come together faster than you can say “extra cheese, please.”
Serving: 12 | Pre Time: 5 minutes | Cooking Time: 10 minutes
Ingredients
- 6 plain bagels, split in half (so you get 12 little pizza canvases)
- 1 cup of your favorite pizza sauce (the jarred stuff is totally fine here—no judgment!)
- 2 cups of shredded mozzarella cheese (because more cheese is always the answer)
- A couple of handfuls of mini pepperoni slices (about 1 cup, but who’s counting?)
- A splash of olive oil (just a light drizzle to get things crispy)
- A pinch of dried oregano (for that classic pizza parlor vibe)
Instructions
- Preheat your oven to 375°F (190°C) and line a baking sheet with parchment paper—this prevents sticking and makes cleanup a breeze.
- Place the bagel halves cut-side up on the prepared baking sheet, giving them a little space so they crisp up evenly.
- Lightly brush the cut sides of the bagels with a splash of olive oil; this helps them get golden and toasty instead of soggy.
- Spoon about 1 tablespoon of pizza sauce onto each bagel half, spreading it almost to the edges but not quite—leave a tiny border to avoid drips.
- Sprinkle a generous layer of shredded mozzarella cheese over the sauce on each bagel half, covering it completely for maximum meltiness.
- Top each cheesy bagel with a small handful of mini pepperoni slices, scattering them evenly so every bite gets a bit of that spicy kick.
- Finish with a tiny pinch of dried oregano sprinkled over the top for an herby aroma that’ll make your kitchen smell amazing.
- Bake in the preheated oven for 8–10 minutes, or until the cheese is fully melted and bubbly and the bagel edges are crisp and golden brown.
- Carefully remove the baking sheet from the oven using oven mitts—those little guys will be hot! Let them cool for 2–3 minutes before serving to avoid burnt tongues.
Bite into these and you’ll get that perfect combo: a crispy, chewy bagel base, gooey melted mozzarella, and a punch of pepperoni in every mouthful. Serve them straight up for a quick snack, or get fancy by dipping them in extra pizza sauce or ranch dressing—they’re basically begging to be devoured while binge-watching your favorite show.
Chili cheese fries topped with green onions
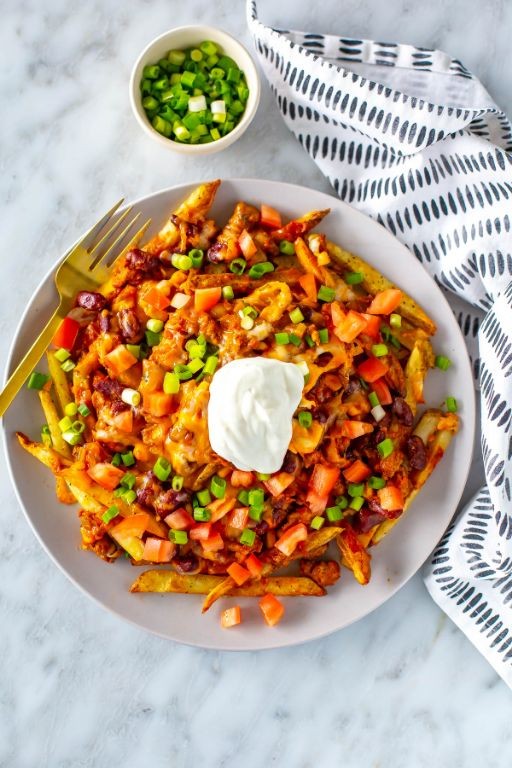
Zesty, zingy, and downright zany—these chili cheese fries are the ultimate comfort food mashup that’ll make your taste buds do a happy dance. Picture this: crispy golden fries smothered in a hearty, spicy chili, blanketed with melty cheese, and finished with a fresh pop of green onions. It’s the kind of dish that turns a regular Tuesday into a fiesta, no sombrero required!
Serving: 4 | Pre Time: 15 minutes | Cooking Time: 30 minutes
Ingredients
– A couple of pounds of frozen French fries (the crispy kind!)
– A splash of vegetable oil for baking
– A pound of ground beef (or swap for turkey if you’re feeling fancy)
– A small onion, diced up fine
– A couple of cloves of garlic, minced
– A can (15 ounces) of kidney beans, drained and rinsed
– A can (15 ounces) of diced tomatoes
– A tablespoon of chili powder
– A teaspoon of cumin
– A pinch of salt and black pepper
– Two cups of shredded cheddar cheese
– A bunch of green onions, sliced thin
Instructions
1. Preheat your oven to 425°F and spread the frozen fries in a single layer on a baking sheet lined with parchment paper. Drizzle with a splash of vegetable oil and bake for 20–25 minutes, flipping halfway through, until they’re golden and crispy. (Tip: Don’t overcrowd the pan—this ensures even crisping!)
2. While the fries bake, heat a large skillet over medium-high heat and cook the ground beef for 5–7 minutes, breaking it up with a spoon, until it’s browned and no longer pink.
3. Add the diced onion and minced garlic to the skillet and sauté for 3–4 minutes, until the onion is soft and fragrant.
4. Stir in the kidney beans, diced tomatoes, chili powder, cumin, salt, and black pepper. Bring the mixture to a simmer, then reduce the heat to low and let it cook for 10–12 minutes, stirring occasionally, until the chili thickens slightly. (Tip: Letting it simmer deepens the flavors—patience pays off!)
5. Once the fries are done, transfer them to a large oven-safe dish or keep them on the baking sheet. Top the fries evenly with the hot chili mixture.
6. Sprinkle the shredded cheddar cheese over the chili-covered fries. Return the dish to the oven and bake for 3–5 minutes, just until the cheese is melted and bubbly.
7. Remove from the oven and immediately scatter the sliced green onions on top. (Tip: Add the green onions last to keep them bright and fresh!)
8. Serve right away while everything’s hot and gooey.
Every bite delivers a crunchy, cheesy, spicy symphony—the fries stay surprisingly crisp under that chili blanket, while the green onions add a cool, oniony kick. Try piling these onto a platter for game day or scooping them into individual bowls for a cozy night in; either way, they’re guaranteed to disappear faster than you can say “more please!”
Caramelized onion and brie puff pastry bites
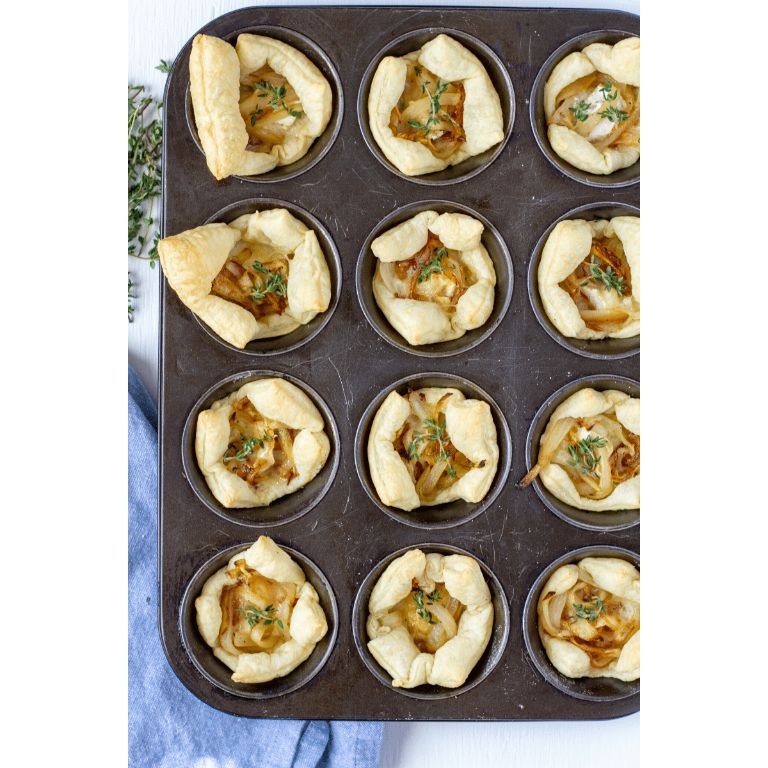
Tantalizingly simple yet impossibly elegant, these caramelized onion and brie puff pastry bites are the ultimate party trick—they look like you fussed for hours, but the secret is letting the onions do all the heavy, sweet, and savory lifting while you just play pastry architect. Imagine buttery, flaky layers hugging molten brie and deeply golden onions; it’s the kind of appetizer that disappears faster than your resolve to ‘just have one.’ Trust me, making a double batch is not a suggestion, it’s a survival tactic for any gathering.
Serving: 24 bites | Pre Time: 20 minutes | Cooking Time: 40 minutes
Ingredients
– A couple of large yellow onions, thinly sliced
– A good glug of olive oil (about 2 tablespoons)
– A pinch of granulated sugar
– A splash of balsamic vinegar (about 1 tablespoon)
– A sheet of frozen puff pastry, thawed
– A 4-ounce wheel of brie cheese, rind removed and cut into small cubes
– A sprinkle of fresh thyme leaves
– A little beaten egg (for that golden glow)
Instructions
1. Heat the olive oil in a large skillet over medium-low heat.
2. Add the thinly sliced onions and cook, stirring occasionally, for about 25 minutes until they soften and turn translucent.
3. Sprinkle the pinch of sugar over the onions and continue cooking, stirring frequently, for another 10-15 minutes until they are deeply golden brown and caramelized. Tip: Don’t rush this step—low and slow is key for that sweet, jammy texture without burning.
4. Stir in the splash of balsamic vinegar and cook for 1 more minute, then remove the skillet from the heat and let the onions cool completely.
5. Preheat your oven to 400°F and line a baking sheet with parchment paper.
6. Unfold the thawed puff pastry sheet on a lightly floured surface and roll it out slightly to smooth any seams.
7. Cut the pastry into 24 equal squares using a sharp knife or pizza cutter.
8. Place about half a teaspoon of the cooled caramelized onions in the center of each pastry square.
9. Top the onions with a cube of brie and a few fresh thyme leaves on each square.
10. Brush the edges of each pastry square lightly with the beaten egg.
11. Fold each square into a triangle, pressing the edges firmly with a fork to seal. Tip: Make sure those edges are sealed tight to prevent any cheesy escapees during baking.
12. Arrange the pastry triangles on the prepared baking sheet, leaving about an inch between them.
13. Brush the tops of each triangle lightly with the remaining beaten egg.
14. Bake in the preheated oven for 15-18 minutes, or until the pastry is puffed and golden brown. Tip: Keep an eye on them after 15 minutes—oven temperatures can vary, and you want that perfect golden hue, not a tan.
15. Let the bites cool on the baking sheet for 5 minutes before serving.
Just baked, these bites offer a fantastic contrast: the pastry shatters into buttery flakes, giving way to the gooey, rich brie and the sweet-savory punch of the onions. Serve them warm on a platter with a drizzle of honey for a touch of sweetness or alongside a crisp arugula salad to cut through the richness—either way, they’re guaranteed to be the first thing to vanish from the table.
Summary
Hosting a winning game day is easy with these 17 irresistible snack recipes! From cheesy dips to crispy wings, there’s something for every fan. We hope you find a new favorite to make your celebration extra special. Give these recipes a try, then let us know which ones you loved in the comments below—and don’t forget to share this roundup on Pinterest for your next party!