
Craving a culinary adventure? Syrian cuisine offers a vibrant world of flavors, from comforting stews to aromatic rice dishes, perfect for home cooks looking to explore authentic Middle Eastern cooking. In this roundup, we’ve gathered 20 delicious recipes that bring the warmth and richness of Syria to your kitchen. Get ready to savor every bite—let’s dive into these mouthwatering dishes!
Kibbeh Bil Sanieh (Baked Kibbeh)
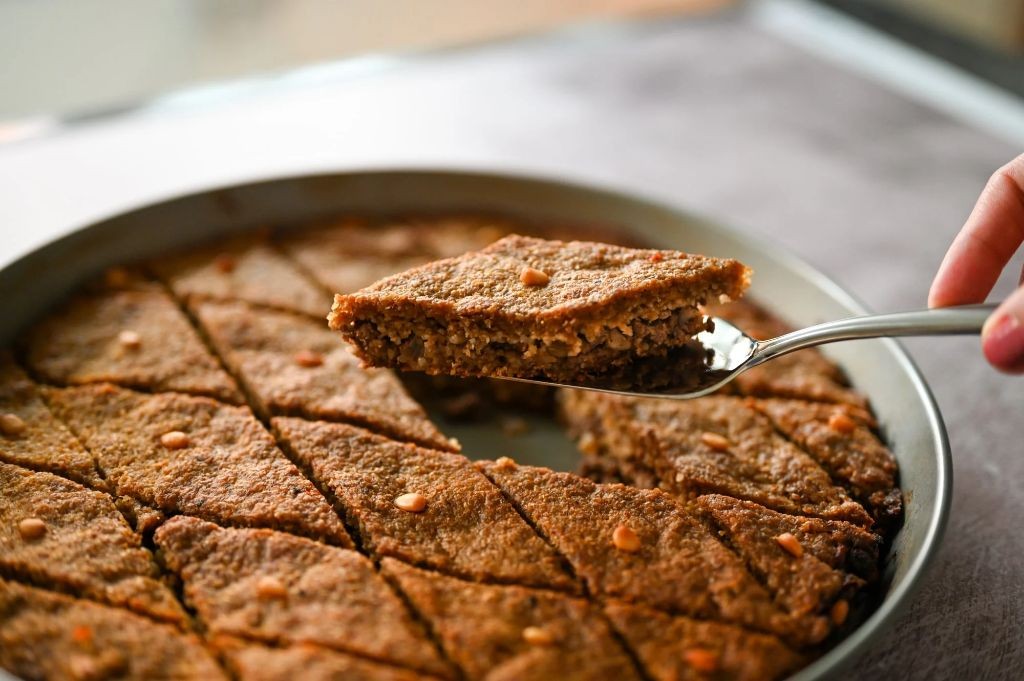
Crafting a cozy, comforting meal that feels like a warm hug is one of my favorite winter pastimes, and this baked kibbeh is my go-to. I first fell for its spiced, savory layers at a friend’s potluck years ago, and now it’s a staple in my kitchen for feeding a crowd with minimal fuss.
Serving: 6 | Pre Time: 25 minutes | Cooking Time: 45 minutes
Ingredients
– 1.5 cups fine bulgur wheat, rinsed and drained
– 1 lb ground lamb (or ground beef for a milder flavor)
– 1 large onion, finely chopped
– 1/4 cup pine nuts, toasted for extra crunch
– 2 tbsp olive oil (or any neutral oil)
– 1 tsp ground cumin
– 1/2 tsp ground allspice
– 1/4 tsp ground cinnamon
– 1 tsp salt
– 1/4 tsp black pepper
– 1/4 cup water, as needed to moisten the mixture
Instructions
1. Preheat your oven to 375°F (190°C) and lightly grease a 9×9-inch baking dish with olive oil.
2. In a large bowl, combine the rinsed bulgur wheat with 1/4 cup water, letting it soak for 10 minutes until softened.
3. Heat 1 tbsp olive oil in a skillet over medium heat, then sauté the chopped onion for 5-7 minutes until translucent and fragrant.
4. Add the ground lamb to the skillet, breaking it up with a spoon, and cook for 8-10 minutes until browned and no pink remains.
5. Stir in the cumin, allspice, cinnamon, salt, and pepper, cooking for 1 more minute to toast the spices evenly.
6. Mix the cooked lamb mixture and toasted pine nuts into the soaked bulgur, combining thoroughly until the texture is cohesive.
7. Press half of the kibbeh mixture firmly into the bottom of the prepared baking dish to form an even layer.
8. Spread the remaining mixture on top, smoothing it with a spatula, and score the surface in a diamond pattern with a knife.
9. Drizzle the top with the remaining 1 tbsp olive oil and bake for 45 minutes, or until the edges are golden brown and crisp.
10. Let the kibbeh rest for 10 minutes before slicing to allow the layers to set properly.
This dish emerges from the oven with a wonderfully crisp top that gives way to tender, spiced layers beneath. Try serving it with a dollop of cool yogurt or a simple cucumber salad to balance the rich flavors—it’s perfect for a festive gathering or a cozy weeknight dinner.
Shawarma with Garlic Sauce
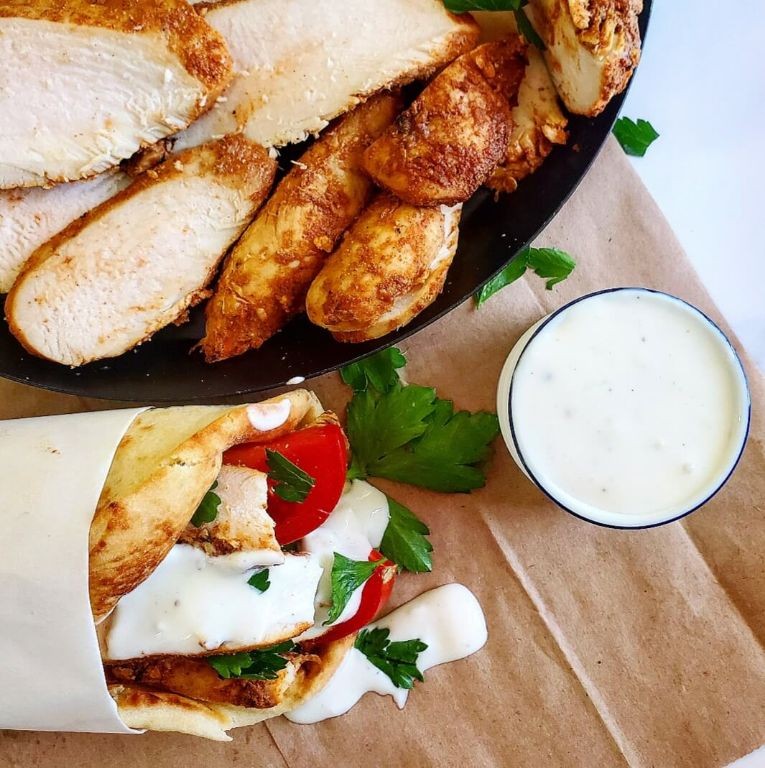
Picture this: after a long day of holiday shopping, I was craving something warm, flavorful, and utterly comforting. That’s when my mind drifted to the sizzling, spiced meat and creamy garlic sauce of a perfect shawarma wrap—a dish that always feels like a cozy hug. I knew I had to make it at home, and after a few trials, this version has become my go-to for a satisfying, restaurant-quality meal without the fuss.
Serving: 4 | Pre Time: 20 minutes | Cooking Time: 15 minutes
Ingredients
– 1.5 lbs boneless, skinless chicken thighs, thinly sliced (or use beef or lamb for variation)
– 2 tbsp olive oil, or any neutral oil like avocado oil
– 1 tbsp shawarma spice blend (store-bought or homemade with cumin, paprika, and turmeric)
– 1 tsp salt, adjust to taste
– 1/2 tsp black pepper
– 4 large flour tortillas or pita breads
– 1 cup plain Greek yogurt, for the sauce (full-fat works best for creaminess)
– 4 cloves garlic, minced (use more or less based on your preference)
– 2 tbsp lemon juice, freshly squeezed for brightness
– 1 tbsp chopped fresh parsley, optional for garnish
– 1 cup shredded lettuce, for serving
– 1/2 cup diced tomatoes, for serving
Instructions
1. In a medium bowl, combine the sliced chicken thighs, olive oil, shawarma spice blend, salt, and black pepper, tossing until the chicken is evenly coated. Let it marinate at room temperature for 10 minutes to allow the flavors to meld—this step enhances the depth of taste.
2. Heat a large skillet or grill pan over medium-high heat until it’s hot, about 2 minutes. Add the marinated chicken in a single layer, cooking for 5-7 minutes per side until the pieces are browned and reach an internal temperature of 165°F, flipping once halfway through for even cooking.
3. While the chicken cooks, prepare the garlic sauce by whisking together the Greek yogurt, minced garlic, and lemon juice in a small bowl until smooth. Taste and adjust seasoning if needed, but avoid over-mixing to keep it creamy.
4. Warm the flour tortillas or pita breads in a dry skillet over low heat for 30 seconds per side, or until pliable and lightly toasted—this prevents them from tearing when filled.
5. Assemble the shawarma by placing a warm tortilla on a plate, topping it with a portion of the cooked chicken, shredded lettuce, diced tomatoes, and a generous drizzle of the garlic sauce. Sprinkle with chopped parsley if using.
6. Fold the tortilla tightly around the fillings, tucking in the sides to form a secure wrap. Repeat with the remaining ingredients.
7. Serve the shawarma wraps immediately while warm. They pair wonderfully with extra sauce on the side for dipping or a simple cucumber salad.
This shawarma delivers tender, juicy chicken with a smoky spice kick, balanced by the cool, tangy garlic sauce that cuts through the richness. Try serving it sliced in half for easy sharing, or pile the ingredients into a bowl for a deconstructed version—either way, it’s a flavor-packed meal that’s sure to become a weeknight favorite.
Fattoush Salad with Pomegranate Dressing
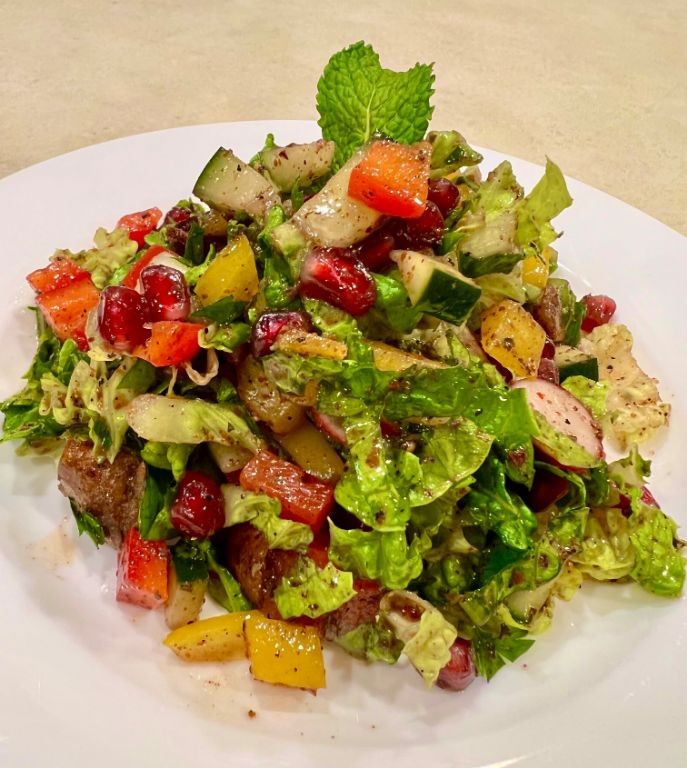
Crisp, colorful, and bursting with fresh flavors, this Fattoush Salad with Pomegranate Dressing is my go-to for a quick, healthy meal that feels special. I first fell in love with it at a friend’s potluck years ago, and now I make it weekly—it’s perfect for using up leftover pita and whatever veggies are in the fridge. Trust me, the tangy-sweet dressing makes it irresistible!
Serving: 4 | Pre Time: 20 minutes | Cooking Time: 10 minutes
Ingredients
– 2 large pita breads, torn into 1-inch pieces (or use store-bought pita chips for a shortcut)
– 3 tbsp olive oil, divided (or any neutral oil)
– 1 tsp sumac, plus extra for garnish
– 1 English cucumber, diced into ½-inch pieces
– 2 medium tomatoes, chopped (I prefer Roma for less juice)
– 1 cup chopped romaine lettuce, packed
– ½ cup chopped fresh parsley, packed
– ¼ cup chopped fresh mint, packed (adjust to taste—it adds a bright kick)
– ¼ cup pomegranate seeds, for topping
– ¼ cup pomegranate molasses (look for it in Middle Eastern grocery stores or online)
– 2 tbsp lemon juice, freshly squeezed
– 1 small garlic clove, minced
– ¼ tsp salt, plus more as needed
– ¼ tsp black pepper, freshly ground
Instructions
1. Preheat your oven to 375°F (190°C) and line a baking sheet with parchment paper.
2. In a medium bowl, toss the torn pita pieces with 1 tablespoon of olive oil and 1 teaspoon of sumac until evenly coated.
3. Spread the pita pieces in a single layer on the prepared baking sheet and bake for 8–10 minutes, or until golden brown and crisp, checking halfway to avoid burning.
4. While the pita toasts, dice the cucumber and chop the tomatoes, romaine lettuce, parsley, and mint, placing them all in a large salad bowl.
5. In a small bowl, whisk together the pomegranate molasses, lemon juice, minced garlic, remaining 2 tablespoons of olive oil, ¼ teaspoon salt, and black pepper until well combined to make the dressing.
6. Once the pita is done baking, remove it from the oven and let it cool for 2–3 minutes to crisp up further.
7. Pour the pomegranate dressing over the vegetables in the salad bowl and toss gently to coat everything evenly.
8. Add the toasted pita pieces to the salad just before serving to keep them crunchy, and toss lightly to combine.
9. Top the salad with pomegranate seeds and a sprinkle of extra sumac for garnish.
A vibrant mix of textures awaits—the crisp pita contrasts beautifully with the juicy vegetables, while the pomegranate dressing adds a tangy sweetness that ties it all together. Serve it immediately as a light lunch or pair it with grilled chicken for a heartier dinner; it’s so refreshing that I often double the recipe for leftovers!
Maqluba (Upside-Down Rice Dish)
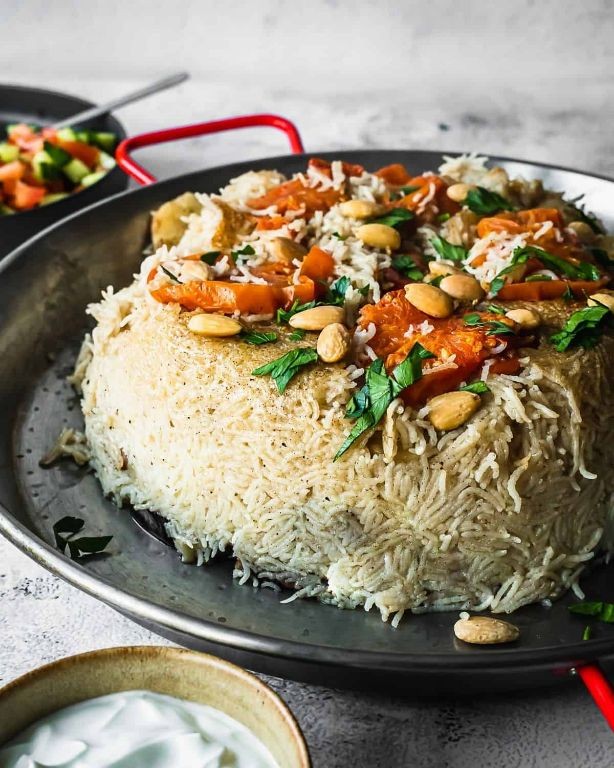
Finally, after years of trying to perfect my grandmother’s recipe, I’ve nailed down a Maqluba that’s both comforting and impressive—a true showstopper for any dinner party. This upside-down rice dish, layered with spiced meat and vegetables, always reminds me of cozy family gatherings where the big reveal of flipping the pot was met with cheers. Trust me, the drama is half the fun, and the flavors are worth every minute of prep.
Serving: 6 | Pre Time: 30 minutes | Cooking Time: 60 minutes
Ingredients
– 1.5 lbs boneless chicken thighs, cut into chunks (or substitute lamb for a richer flavor)
– 2 cups basmati rice, rinsed until water runs clear (this prevents mushiness)
– 1 large eggplant, sliced into ½-inch rounds
– 2 large tomatoes, sliced into ¼-inch rounds
– 1 large onion, thinly sliced
– 3 tbsp olive oil (or any neutral oil like vegetable oil)
– 4 cups chicken broth (use low-sodium to control saltiness)
– 1 tsp ground cumin
– 1 tsp ground turmeric
– 1 tsp ground cinnamon
– Salt, to season layers (I add a pinch between each for even flavor)
– ¼ cup slivered almonds, for garnish (toast them lightly for extra crunch)
Instructions
1. Heat 2 tbsp olive oil in a large, heavy-bottomed pot or Dutch oven over medium-high heat until shimmering, about 2 minutes.
2. Add the chicken thighs and cook until browned on all sides, approximately 5–7 minutes, then remove and set aside on a plate.
3. In the same pot, add the remaining 1 tbsp olive oil and sauté the sliced onion until soft and translucent, about 4–5 minutes.
4. Layer the eggplant slices evenly over the onions in the pot, seasoning with a pinch of salt and half of the cumin, turmeric, and cinnamon.
5. Arrange the tomato slices on top of the eggplant, followed by the browned chicken pieces, spreading them out evenly.
6. Sprinkle the rinsed basmati rice over the chicken, ensuring it covers the surface completely without pressing down.
7. Pour the chicken broth slowly over the rice, using the back of a spoon to gently submerge it—the liquid should just cover the ingredients by about ½ inch.
8. Bring the mixture to a boil over high heat, then reduce to a low simmer, cover the pot tightly, and cook for 45 minutes without peeking (this traps steam for perfect rice).
9. Remove the pot from heat and let it rest, covered, for 10 minutes to allow the layers to set firmly.
10. Place a large serving platter over the pot, hold both firmly, and carefully flip it upside-down in one swift motion to reveal the Maqluba.
11. Garnish the top with toasted slivered almonds before serving.
The rice emerges fluffy and infused with warm spices, while the eggplant and tomatoes melt into a savory base that’s subtly sweet. I love serving it straight from the platter with a side of tangy yogurt or a crisp salad to balance the richness—it’s a meal that feels like a hug in a dish.
Stuffed Grape Leaves (Warak Enab)
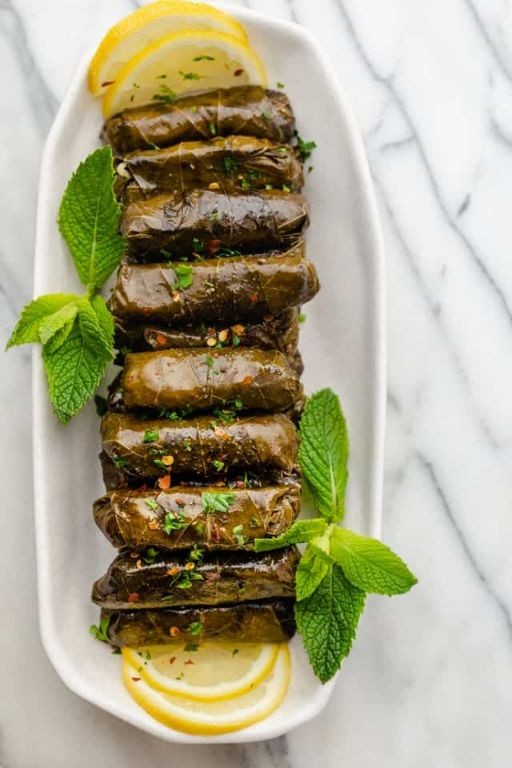
Zipping through my recipe archives for a cozy winter meal, I stumbled upon my grandmother’s stuffed grape leaves—a dish that always transports me back to her sunlit kitchen. Warak Enab might sound fancy, but it’s essentially a comforting, savory bundle of rice and herbs, perfect for sharing with friends or savoring solo on a chilly evening like today. I love how the aroma fills the house as they simmer, a little ritual that makes any day feel special.
Serving: 6 | Pre Time: 30 minutes | Cooking Time: 60 minutes
Ingredients
– 1 jar (16 oz) grape leaves in brine, rinsed well (drain and soak in water for 10 minutes to reduce saltiness)
– 1 cup long-grain white rice, rinsed until water runs clear (this prevents mushiness)
– 1 lb ground lamb, 80% lean (or substitute with ground beef for a heartier flavor)
– 1/4 cup olive oil, plus extra for drizzling (or any neutral oil like avocado oil)
– 1/4 cup fresh lemon juice, from about 2 lemons (bottled works in a pinch, but fresh adds brightness)
– 1/4 cup chopped fresh dill (dried dill can be used at 1 tbsp if fresh isn’t available)
– 1/4 cup chopped fresh mint (optional, but it adds a lovely herbal note)
– 1 tsp ground allspice (adjust to taste—start with 1/2 tsp if you’re unsure)
– 1/2 tsp black pepper (freshly ground preferred for best flavor)
– 1/2 tsp salt (add more later if needed after tasting)
– 4 cups water, for simmering
Instructions
1. In a large mixing bowl, combine 1 cup rinsed long-grain white rice, 1 lb ground lamb, 1/4 cup olive oil, 1/4 cup fresh lemon juice, 1/4 cup chopped fresh dill, 1/4 cup chopped fresh mint (if using), 1 tsp ground allspice, 1/2 tsp black pepper, and 1/2 tsp salt. Mix with your hands until evenly incorporated—this ensures the flavors meld properly.
2. Lay a grape leaf flat on a clean surface, shiny side down. Place 1 tablespoon of the rice-lamb mixture near the stem end. Fold the sides inward over the filling, then roll tightly from the stem end toward the tip to form a compact cylinder. Repeat until all filling is used, aiming for about 30-35 rolls.
3. Arrange the stuffed grape leaves snugly in a single layer in a large pot, seam-side down to prevent unraveling. Pour 4 cups of water over them until just covered—this helps them cook evenly without drying out.
4. Place a heatproof plate directly on top of the rolls in the pot to weigh them down during cooking, which keeps them intact. Bring to a boil over high heat, then reduce to a low simmer, cover, and cook for 45 minutes.
5. After 45 minutes, check if the rice is tender by sampling one roll; if needed, simmer for an additional 10-15 minutes until fully cooked. Remove from heat and let cool in the pot for 10 minutes to set.
6. Carefully transfer the stuffed grape leaves to a serving platter using tongs. Drizzle with a little extra olive oil and a squeeze of lemon juice for added zest.
Just out of the pot, these grape leaves offer a tender bite with a savory, herb-infused filling that’s subtly spiced. I love serving them warm with a dollop of Greek yogurt or tucking them into a lunchbox for a flavorful next-day treat—they only get better as the flavors meld overnight.
Hummus with Pine Nuts
Just the other day, as I was rummaging through my pantry for a quick snack, I realized how much I rely on hummus—it’s my go-to for everything from veggie dips to sandwich spreads. This version with pine nuts adds a delightful crunch and nutty richness that feels a bit fancy but is still super easy to whip up. I love making it on lazy Sundays when I want something satisfying without spending hours in the kitchen.
Serving: 4 | Pre Time: 10 minutes | Cooking Time: 0 minutes
Ingredients
– 1 (15-ounce) can chickpeas, drained and rinsed (save a few for garnish if you like)
– 1/4 cup tahini, well-stirred (or use almond butter for a twist)
– 1/4 cup fresh lemon juice, from about 2 lemons (adjust for tanginess)
– 2 tablespoons olive oil, plus extra for drizzling (or any neutral oil)
– 1 clove garlic, minced (use more if you love garlicky flavor)
– 1/2 teaspoon ground cumin (toast it lightly for extra aroma)
– 1/4 cup pine nuts, toasted (watch closely as they burn quickly)
– Salt to taste (I start with 1/2 teaspoon and adjust)
– 2-3 tablespoons ice water (for a creamier texture)
– Paprika and chopped parsley for garnish (optional)
Instructions
1. In a dry skillet over medium heat, toast the pine nuts for 2-3 minutes, shaking the pan frequently, until they turn golden brown and fragrant—remove them immediately to prevent burning.
2. In a food processor, combine the chickpeas, tahini, lemon juice, olive oil, minced garlic, ground cumin, and salt.
3. Process the mixture on high speed for 1 minute, scraping down the sides with a spatula to ensure everything is well incorporated.
4. With the processor running, slowly add 2 tablespoons of ice water through the feed tube and blend for another 30 seconds until smooth—add more water if needed for a creamier consistency.
5. Taste the hummus and adjust the salt or lemon juice as desired, processing briefly to mix.
6. Transfer the hummus to a serving bowl and use the back of a spoon to create swirls on the surface.
7. Drizzle with a little extra olive oil, then sprinkle the toasted pine nuts, paprika, and parsley over the top.
8. Serve immediately or cover and refrigerate for up to 3 days—it thickens when chilled, so let it sit at room temperature for 10 minutes before serving.
Here’s what makes this hummus stand out: the pine nuts add a buttery crunch that contrasts beautifully with the smooth, creamy base, while the cumin and garlic give it a warm, savory depth. I love scooping it up with warm pita bread or using it as a spread in wraps for a quick lunch—it’s versatile enough to impress guests but simple enough for a weeknight treat.
Mutabbal (Smoky Eggplant Dip)
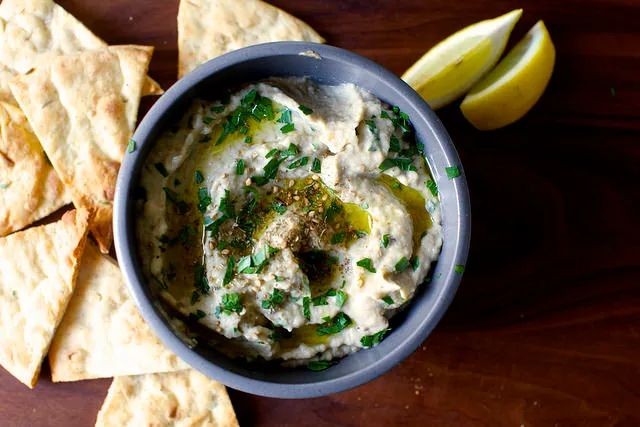
Haven’t we all been there—staring at a beautiful eggplant at the farmer’s market, wondering what magic to make? That’s exactly how my love affair with Mutabbal began, a smoky, creamy dip that’s become my go-to for everything from casual snacking to impressing dinner guests. I love how roasting the eggplant transforms it into something utterly luxurious, and I often double the batch because it disappears so fast in my house!
Serving: 4 | Pre Time: 10 minutes | Cooking Time: 40 minutes
Ingredients
– 2 large eggplants (about 2 lbs total)
– 3 tbsp tahini, well-stirred
– 2 tbsp fresh lemon juice
– 2 cloves garlic, minced
– 3 tbsp extra-virgin olive oil, plus more for drizzling
– 1/2 tsp salt, or to taste
– 1/4 tsp ground cumin (optional, for extra warmth)
– 2 tbsp plain yogurt (for creaminess, or omit for vegan)
– Fresh parsley, chopped, for garnish
– Pita bread or veggie sticks, for serving
Instructions
1. Preheat your oven to 400°F and line a baking sheet with aluminum foil for easy cleanup.
2. Pierce the eggplants all over with a fork—about 10-12 times each—to prevent them from bursting in the oven.
3. Place the eggplants directly on the prepared baking sheet and roast for 35-40 minutes, turning once halfway through, until the skins are charred and the flesh is very soft when pierced with a knife.
4. Remove the eggplants from the oven and let them cool until they’re safe to handle, about 15-20 minutes.
5. Cut the eggplants in half lengthwise and scoop out the soft flesh into a colander, discarding the skins; let it drain for 5 minutes to remove excess liquid, which helps avoid a watery dip.
6. Transfer the drained eggplant flesh to a medium mixing bowl and mash it with a fork until mostly smooth but with some texture remaining.
7. Add the tahini, lemon juice, minced garlic, olive oil, salt, and cumin (if using) to the bowl, and stir until well combined.
8. Fold in the yogurt (if using) gently to incorporate it without overmixing, which keeps the dip light and airy.
9. Taste and adjust seasoning with more salt or lemon juice if needed, remembering that flavors will meld as it chills.
10. Transfer the Mutabbal to a serving bowl, drizzle with a little extra olive oil, and sprinkle with chopped parsley.
11. Serve immediately with warm pita bread or fresh veggie sticks, or cover and refrigerate for up to 2 days for the flavors to deepen.
Smoky from the roasted eggplant and tangy from the lemon, this dip has a velvety texture that’s perfect for scooping. I love spreading it on toast for breakfast or using it as a sandwich spread—it’s surprisingly versatile beyond the usual appetizer plate!
Yalanji (Vegetarian Stuffed Cabbage Rolls)
Sometimes, the most comforting dishes are the ones that feel like a warm hug, and that’s exactly what these vegetarian stuffed cabbage rolls bring to the table. Inspired by Middle Eastern yalanji, they’re a lighter, veggie-packed twist I love to make when I’m craving something hearty but fresh—plus, they’re a hit at potlucks because they’re naturally vegan and gluten-free!
Serving: 6 | Pre Time: 30 minutes | Cooking Time: 45 minutes
Ingredients
– 1 large head green cabbage (look for one with loose, pliable leaves)
– 2 tablespoons olive oil (or any neutral oil)
– 1 medium yellow onion, finely chopped
– 3 cloves garlic, minced
– 1 cup long-grain white rice, rinsed
– 1 (15-ounce) can chickpeas, drained and rinsed
– 1/4 cup fresh parsley, chopped
– 1/4 cup fresh mint, chopped
– 1 teaspoon ground cumin
– 1/2 teaspoon smoked paprika
– 1/4 teaspoon ground cinnamon
– 2 cups vegetable broth
– 1 (28-ounce) can crushed tomatoes
– 1 tablespoon lemon juice (freshly squeezed for best flavor)
– Salt and black pepper, as needed
Instructions
1. Bring a large pot of water to a boil over high heat. Carefully remove 12 large outer leaves from the cabbage head, then submerge them in the boiling water for 3–4 minutes until softened and pliable. Drain and set aside on a clean towel to cool. Tip: Use tongs to handle the hot leaves and pat them dry to prevent sogginess.
2. Heat the olive oil in a large skillet over medium heat. Add the chopped onion and cook for 5–7 minutes, stirring occasionally, until translucent and lightly golden.
3. Stir in the minced garlic and cook for 1 minute until fragrant, being careful not to let it burn.
4. Add the rinsed rice, chickpeas, parsley, mint, cumin, smoked paprika, and cinnamon to the skillet. Cook for 2–3 minutes, stirring constantly, to toast the spices and coat the ingredients evenly.
5. Season the mixture generously with salt and black pepper, then remove from heat and let it cool slightly for easier handling.
6. Preheat your oven to 375°F (190°C). Spread 1 cup of the crushed tomatoes evenly over the bottom of a 9×13-inch baking dish.
7. Place a cabbage leaf on a flat surface, spoon about 1/4 cup of the rice filling into the center, fold in the sides, and roll tightly from the stem end. Repeat with all leaves and filling, arranging the rolls seam-side down in the baking dish. Tip: Don’t overstuff the rolls to avoid tearing—they should be snug but close easily.
8. Pour the remaining crushed tomatoes and vegetable broth over the rolls, then drizzle with lemon juice. Cover the dish tightly with aluminum foil.
9. Bake in the preheated oven for 45 minutes, then remove the foil and bake for an additional 10–15 minutes until the tops are lightly browned and the rice is tender. Tip: Check doneness by inserting a knife into a roll; the rice should be fully cooked and absorb the liquid.
10. Let the rolls rest for 10 minutes before serving to allow the flavors to meld. Once plated, these rolls offer a tender cabbage wrap with a savory, spiced filling that’s both hearty and refreshing. I love serving them with a dollop of yogurt or a sprinkle of extra herbs for a bright finish—they’re perfect as a cozy main or alongside a crisp salad.
Lentil Soup with Lemon
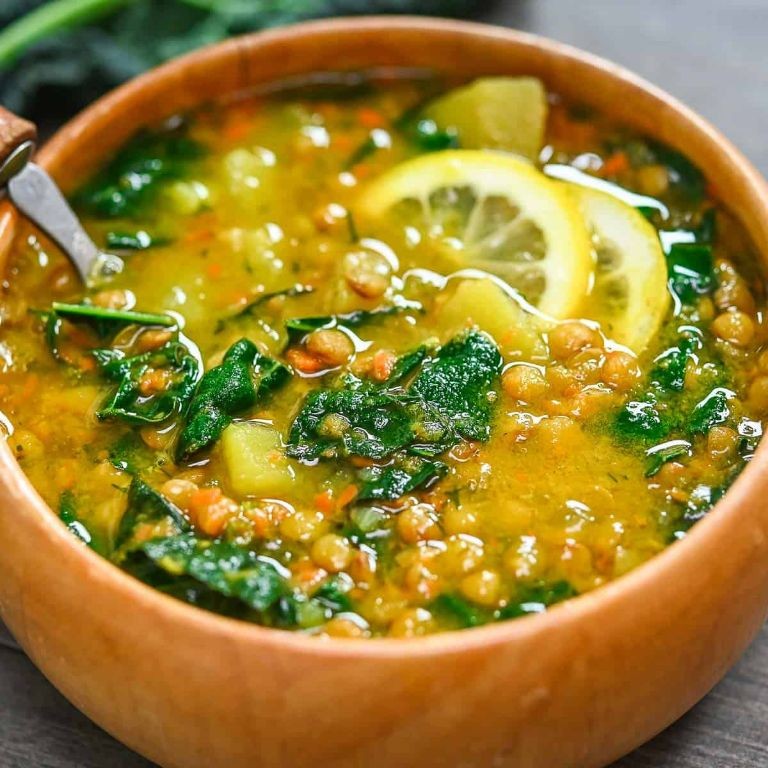
Whenever I’m craving something cozy yet bright, this lentil soup with lemon is my go-to. It’s the kind of dish that simmers away while I tidy up the kitchen, filling the house with the most comforting aroma. I love how the lemon adds a fresh twist that makes it feel special, not just another bowl of soup.
Serving: 4 | Pre Time: 15 minutes | Cooking Time: 45 minutes
Ingredients
– 2 tbsp olive oil (or any neutral oil)
– 1 medium yellow onion, diced
– 2 carrots, peeled and diced
– 2 celery stalks, diced
– 3 cloves garlic, minced
– 1 cup brown lentils, rinsed and drained
– 6 cups vegetable broth (or chicken broth)
– 1 tsp ground cumin
– 1/2 tsp smoked paprika
– 1 bay leaf
– 1 lemon, juiced (about 3 tbsp)
– Salt and black pepper, to taste (adjust as needed)
– Fresh parsley, chopped, for garnish (optional)
Instructions
1. Heat the olive oil in a large pot over medium heat until shimmering, about 2 minutes.
2. Add the diced onion, carrots, and celery to the pot, stirring to coat in the oil.
3. Cook the vegetables, stirring occasionally, until softened and the onion is translucent, about 8-10 minutes.
4. Stir in the minced garlic and cook until fragrant, about 1 minute, being careful not to let it burn.
5. Add the rinsed lentils, vegetable broth, cumin, smoked paprika, and bay leaf to the pot, stirring to combine.
6. Bring the mixture to a boil over high heat, then reduce the heat to low to maintain a gentle simmer.
7. Cover the pot partially with a lid, leaving a small gap for steam to escape, and simmer until the lentils are tender, about 30-35 minutes.
8. Remove the pot from the heat and discard the bay leaf.
9. Stir in the lemon juice, then season with salt and black pepper, tasting and adjusting as needed.
10. Ladle the soup into bowls and garnish with chopped fresh parsley if desired.
Keep in mind that this soup thickens beautifully as it sits, with the lentils becoming creamy while still holding their shape. The lemon brightens every spoonful, cutting through the earthy spices for a balanced flavor. I often serve it with a crusty bread for dipping, or for a heartier meal, top it with a dollop of Greek yogurt.
Baklava with Rosewater Syrup
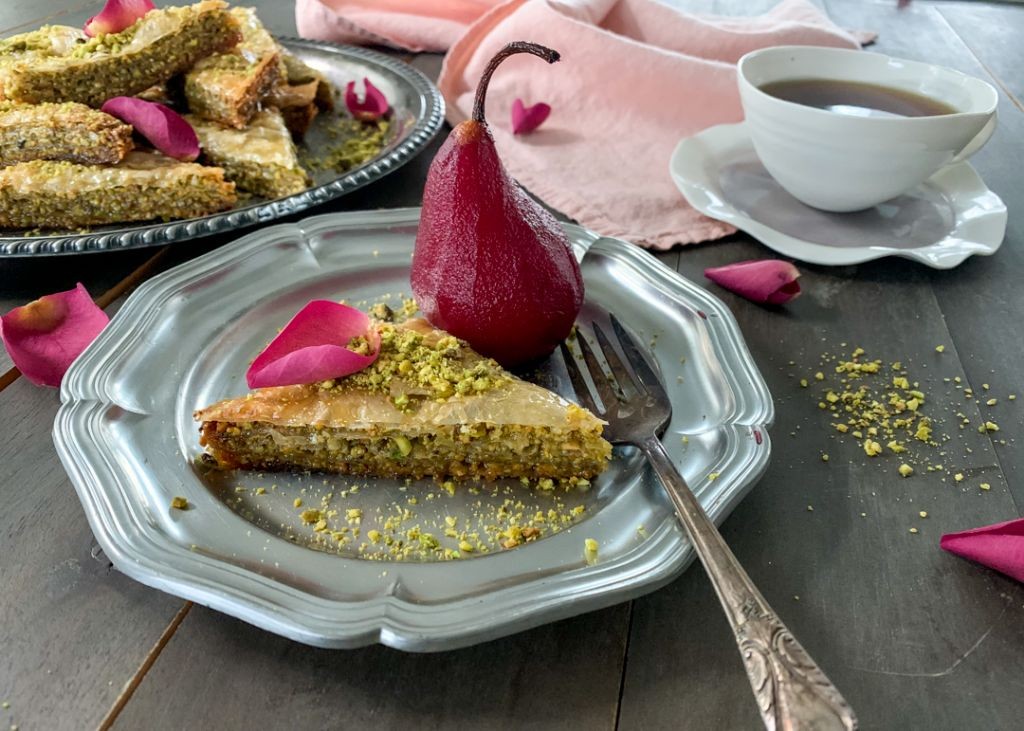
Just when I thought my holiday baking couldn’t get any more festive, I discovered this baklava with rosewater syrup—a dessert that feels both luxurious and surprisingly approachable. My first attempt was for a potluck last winter, and I’ll never forget how the floral aroma filled my tiny kitchen, making it feel like a Middle Eastern bakery. Now it’s my go-to when I want to impress guests without spending all day in the kitchen.
Serving: 24 pieces | Pre Time: 30 minutes | Cooking Time: 50 minutes
Ingredients
– 1 package (16 oz) phyllo dough, thawed overnight in refrigerator
– 2 cups walnuts, finely chopped (pecans work great too)
– 1 cup unsalted butter, melted and cooled slightly
– 1 cup granulated sugar
– 1 cup water
– 1/2 cup honey
– 2 tbsp rosewater (adjust to taste, start with 1 tbsp if unsure)
– 1 tsp lemon juice
– 1/2 tsp ground cinnamon
Instructions
1. Preheat your oven to 350°F (175°C) and brush a 9×13-inch baking dish with some melted butter.
2. Combine chopped walnuts with cinnamon in a medium bowl, mixing thoroughly with your hands to distribute spices evenly—this prevents clumping.
3. Unroll phyllo dough and cover with a damp kitchen towel to prevent drying, working with one sheet at a time.
4. Place one phyllo sheet in the baking dish, brush lightly with melted butter using a pastry brush, and repeat this process until you have 8 buttered layers.
5. Sprinkle about 1/3 of the walnut mixture evenly over the phyllo layers, pressing gently with your palms.
6. Add 4 more buttered phyllo sheets, then another 1/3 of walnuts, repeating until all walnuts are used, ending with 8 buttered phyllo sheets on top.
7. Using a sharp knife, cut the baklava into 24 diamond shapes before baking—this prevents crumbling later and ensures even syrup absorption.
8. Bake at 350°F for 45-50 minutes until golden brown and crisp, rotating the pan halfway through for even browning.
9. While baking, combine sugar, water, honey, and lemon juice in a saucepan, bringing to a boil over medium heat while stirring constantly.
10. Reduce heat to low and simmer syrup for 10 minutes exactly (use a timer) until slightly thickened, then remove from heat and stir in rosewater.
11. Immediately pour hot syrup evenly over the hot baklava straight from the oven, listening for that satisfying sizzle that indicates proper absorption.
12. Let cool completely at room temperature for at least 4 hours—this patience allows layers to crisp properly and flavors to meld.
Unbelievably crisp layers shatter with each bite, giving way to the fragrant walnut filling that’s perfectly sweetened without being cloying. The rosewater syrup adds a subtle floral note that makes this feel special enough for celebrations, yet I’ve been known to enjoy a piece with my afternoon coffee when I need a little luxury. For an extra touch, serve with a dollop of thick Greek yogurt to balance the sweetness.
Kebab Halabi (Aleppo-Style Kebabs)
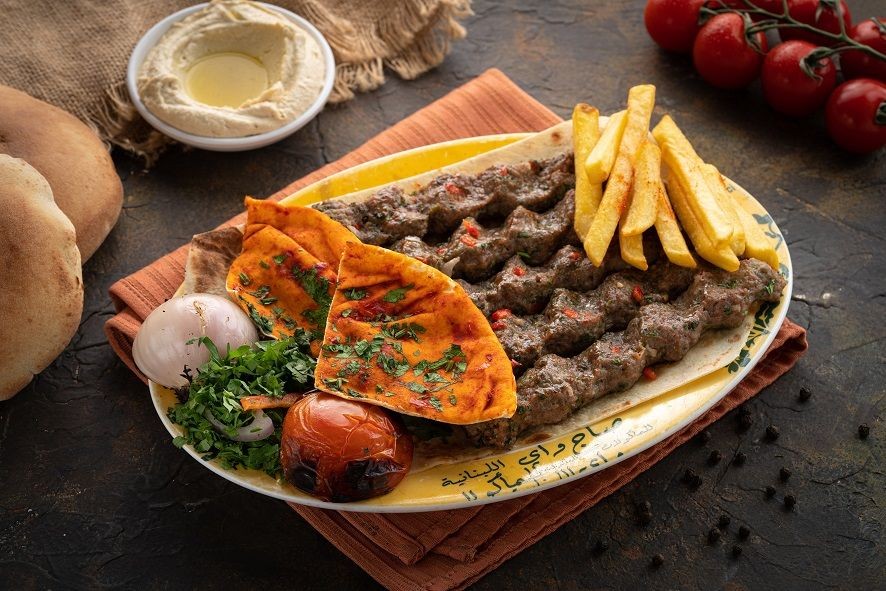
Tantalizing and aromatic, Kebab Halabi is a dish I discovered during a trip to a Syrian restaurant in Chicago, and it quickly became a weeknight favorite in my kitchen. The blend of spices and tender meat transports me right back to that cozy evening, and I love how simple it is to recreate at home—perfect for when you want something flavorful without spending hours cooking. I often double the recipe to have leftovers for lunches, which taste even better the next day after the flavors meld overnight.
Serving: 4 | Pre Time: 20 minutes | Cooking Time: 10 minutes
Ingredients
– 1.5 lbs ground lamb (or ground beef for a milder flavor)
– 1 medium onion, finely grated (about 1/2 cup, squeeze out excess liquid for better binding)
– 3 cloves garlic, minced (about 1 tbsp)
– 1 tsp ground cumin
– 1 tsp ground coriander
– 1/2 tsp ground cinnamon
– 1/2 tsp Aleppo pepper (or crushed red pepper flakes, adjust to taste for heat)
– 1 tsp salt
– 2 tbsp olive oil (or any neutral oil)
– 4 pita breads, for serving
– 1/2 cup plain yogurt, for serving (optional, adds a creamy contrast)
Instructions
1. In a large mixing bowl, combine 1.5 lbs ground lamb, 1/2 cup finely grated onion, 1 tbsp minced garlic, 1 tsp ground cumin, 1 tsp ground coriander, 1/2 tsp ground cinnamon, 1/2 tsp Aleppo pepper, and 1 tsp salt.
2. Mix the ingredients thoroughly with your hands for about 2 minutes until well incorporated and the mixture feels slightly sticky, which helps the kebabs hold their shape.
3. Divide the mixture into 8 equal portions and shape each into a flat, oval patty about 1/2-inch thick, placing them on a plate or tray.
4. Preheat a grill or large skillet over medium-high heat to 400°F, lightly brushing it with 2 tbsp olive oil to prevent sticking.
5. Cook the kebabs for 4-5 minutes per side, flipping once, until they are browned and reach an internal temperature of 160°F for safety.
6. While the kebabs cook, warm 4 pita breads in a toaster or oven at 300°F for 2-3 minutes until soft and pliable.
7. Remove the kebabs from the heat and let them rest for 2 minutes on a plate to allow the juices to redistribute, keeping them moist.
8. Serve the kebabs immediately with the warmed pita breads and 1/2 cup plain yogurt on the side if desired.
Outrageously juicy and fragrant, these kebabs boast a tender texture with a hint of warmth from the spices. I love stuffing them into pita with a dollop of yogurt for a quick wrap, or serving them over a salad for a lighter meal—the leftovers make fantastic next-day sandwiches too!
Freekeh Pilaf with Chicken
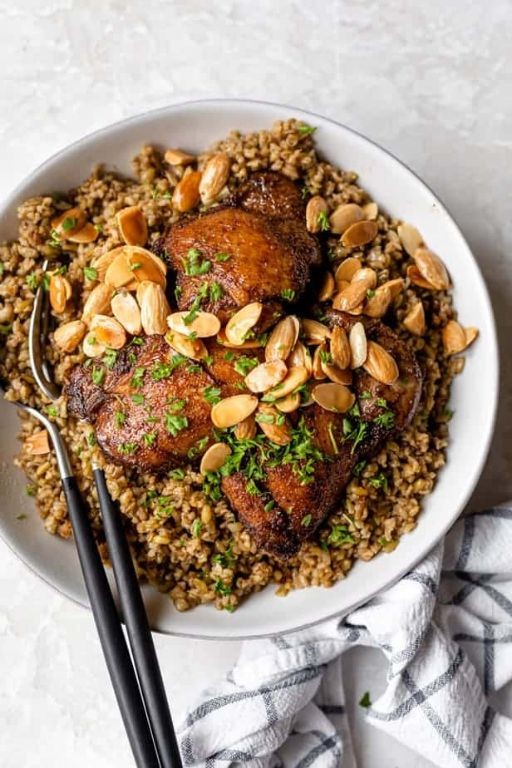
Diving into my pantry last week, I realized I had a bag of freekeh that had been sitting there since my last Middle Eastern market trip—talk about a sign to get cooking! This Freekeh Pilaf with Chicken is my new favorite one-pan wonder, perfect for those busy weeknights when you want something hearty but don’t want to fuss with a million dishes. Trust me, the nutty, smoky flavor of freekeh paired with tender chicken is a combo that’ll have everyone asking for seconds.
Serving: 4 | Pre Time: 15 minutes | Cooking Time: 40 minutes
Ingredients
– 1.5 lbs boneless, skinless chicken thighs, cut into 1-inch pieces (breasts work too, but thighs stay juicier)
– 1 cup freekeh, rinsed (look for cracked freekeh for faster cooking)
– 2 tbsp olive oil (or any neutral oil like avocado)
– 1 medium yellow onion, diced
– 2 cloves garlic, minced
– 2 cups low-sodium chicken broth
– 1 tsp ground cumin
– 1/2 tsp smoked paprika
– Salt and black pepper, as needed (start with 1/2 tsp salt and adjust later)
– 1/4 cup chopped fresh parsley, for garnish (cilantro is a tasty swap)
Instructions
1. Heat olive oil in a large skillet or Dutch oven over medium-high heat until shimmering, about 2 minutes.
2. Add chicken pieces in a single layer and cook until browned on all sides, 5–7 minutes total, stirring occasionally to prevent sticking.
3. Remove chicken from skillet and set aside on a plate, covering loosely to keep warm.
4. In the same skillet, add diced onion and cook over medium heat until softened and translucent, about 5 minutes, scraping up any browned bits from the chicken for extra flavor.
5. Stir in minced garlic and cook for 1 minute until fragrant, being careful not to let it burn.
6. Add rinsed freekeh to the skillet and toast for 2 minutes, stirring constantly to lightly brown the grains and enhance their nutty taste.
7. Pour in chicken broth, then mix in ground cumin, smoked paprika, salt, and black pepper, stirring to combine evenly.
8. Bring the mixture to a boil, then reduce heat to low, cover the skillet, and simmer for 25 minutes until the freekeh is tender and has absorbed most of the liquid.
9. Return the cooked chicken to the skillet, stirring gently to incorporate, and cook uncovered for 5 more minutes to heat through and let flavors meld.
10. Remove from heat and sprinkle with chopped parsley before serving.
Every bite of this pilaf delivers a satisfying chew from the freekeh, balanced by the savory spices and juicy chicken. I love serving it straight from the skillet with a dollop of yogurt or a squeeze of lemon for a bright finish—it’s cozy enough for dinner but impressive for guests too!
Basbousa (Semolina Cake)

Craving something sweet but not overly complicated? I stumbled upon Basbousa, a Middle Eastern semolina cake, during a holiday potluck last year, and it quickly became my go-to dessert for gatherings—it’s moist, fragrant, and always a crowd-pleaser. I love how it’s forgiving for bakers of any level, and the syrup soak makes it irresistibly tender every time.
Serving: 12 | Pre Time: 15 minutes | Cooking Time: 35 minutes
Ingredients
– 2 cups fine semolina (not coarse, for a smoother texture)
– 1 cup granulated sugar
– 1 cup plain yogurt (full-fat works best for richness)
– ¾ cup unsalted butter, melted (or coconut oil for a dairy-free option)
– 1 tsp baking powder
– ½ cup sliced almonds (for topping, or use pistachios)
– 1 ½ cups water
– 1 cup granulated sugar (for the syrup)
– 1 tbsp lemon juice (to prevent crystallization)
– 1 tsp rose water (optional, adds floral notes)
Instructions
1. Preheat your oven to 350°F (175°C) and grease a 9×13-inch baking pan with butter or oil.
2. In a large mixing bowl, combine 2 cups fine semolina, 1 cup granulated sugar, 1 cup plain yogurt, ¾ cup melted unsalted butter, and 1 tsp baking powder; mix until smooth with no lumps.
3. Pour the batter into the prepared pan and spread it evenly with a spatula.
4. Score the top into diamond or square shapes using a knife—this helps the syrup absorb later.
5. Press ½ cup sliced almonds gently onto the scored lines for decoration.
6. Bake in the preheated oven at 350°F for 30–35 minutes, or until the edges turn golden brown and a toothpick inserted comes out clean.
7. While baking, make the syrup: in a saucepan over medium heat, combine 1 ½ cups water and 1 cup granulated sugar, stirring until dissolved.
8. Bring the syrup to a boil, then reduce heat and simmer for 10 minutes until slightly thickened.
9. Remove the syrup from heat and stir in 1 tbsp lemon juice and 1 tsp rose water (if using); let it cool slightly.
10. Once the cake is out of the oven, immediately pour the warm syrup evenly over the hot cake, allowing it to soak in fully.
11. Let the cake cool completely in the pan for at least 2 hours to set before cutting along the scored lines.
Out of the oven, this Basbousa boasts a delightful crumbly-yet-moist texture from the semolina, with a sweet, aromatic syrup that seeps into every bite. I often serve it with a dollop of whipped cream or alongside strong coffee for a cozy treat—it’s perfect for sharing at parties or savoring as a sweet afternoon pick-me-up.
Labneh with Za’atar and Olive Oil
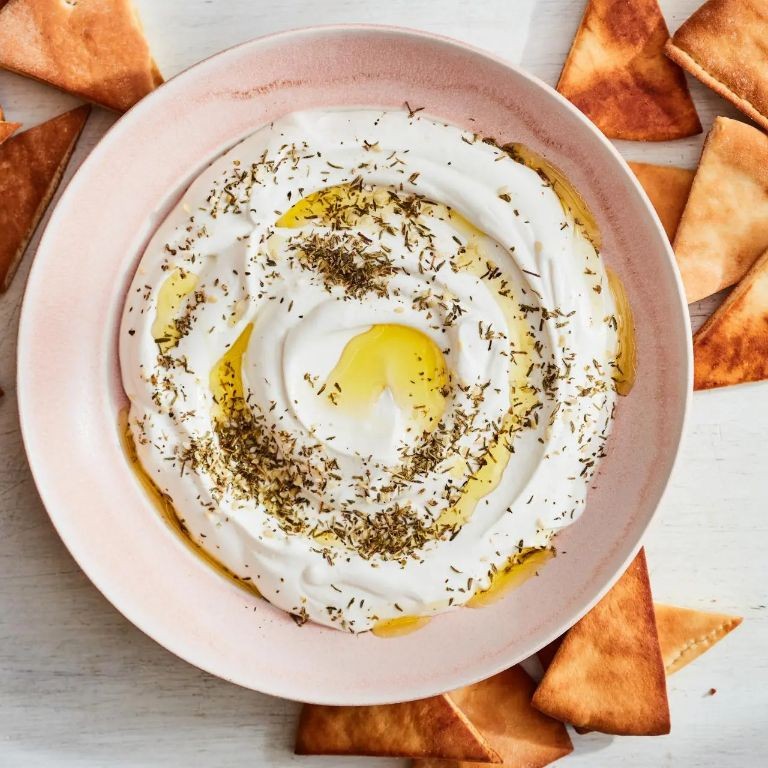
Browsing through my fridge this morning, I realized I had a container of plain yogurt that was just begging to be transformed. It reminded me of a simple yet stunning appetizer I first tried at a friend’s Mediterranean-themed potluck last summer—creamy, tangy, and utterly moreish. Let’s make that magic happen right now.
Serving: 4 | Pre Time: 10 minutes | Cooking Time: 0 minutes
Ingredients
– 2 cups plain whole-milk yogurt (Greek yogurt works great for extra thickness)
– 1/2 teaspoon fine sea salt
– 2 tablespoons extra-virgin olive oil, plus more for drizzling
– 1 tablespoon za’atar spice blend (look for one with sumac and sesame seeds)
– Fresh pita bread or crackers, for serving
Instructions
1. Line a fine-mesh strainer with a double layer of cheesecloth or a clean kitchen towel.
2. Place the lined strainer over a medium bowl.
3. In a separate bowl, stir together the 2 cups of plain yogurt and 1/2 teaspoon of fine sea salt until fully combined.
4. Pour the yogurt mixture into the lined strainer.
5. Fold the edges of the cloth over the yogurt to cover it loosely.
6. Refrigerate the setup for at least 8 hours or up to 24 hours to drain; the longer it drains, the thicker your labneh will be.
7. After draining, discard the liquid whey from the bowl.
8. Transfer the thickened labneh from the cloth to a serving plate.
9. Use the back of a spoon to spread the labneh into a shallow, even layer about 1/2-inch thick.
10. Drizzle 2 tablespoons of extra-virgin olive oil evenly over the surface of the labneh.
11. Sprinkle 1 tablespoon of za’atar spice blend uniformly over the oiled labneh.
12. Serve immediately with fresh pita bread or crackers on the side.
Gliding your pita through this dip reveals a luscious, spreadable texture with a pleasant tang from the yogurt, balanced by the earthy, herbal notes of za’atar and the fruity richness of the oil. For a twist, try topping it with a handful of toasted pine nuts or a drizzle of honey for a sweet-savory kick that’s perfect for holiday gatherings.
Shish Barak (Meat Dumplings in Yogurt Sauce)
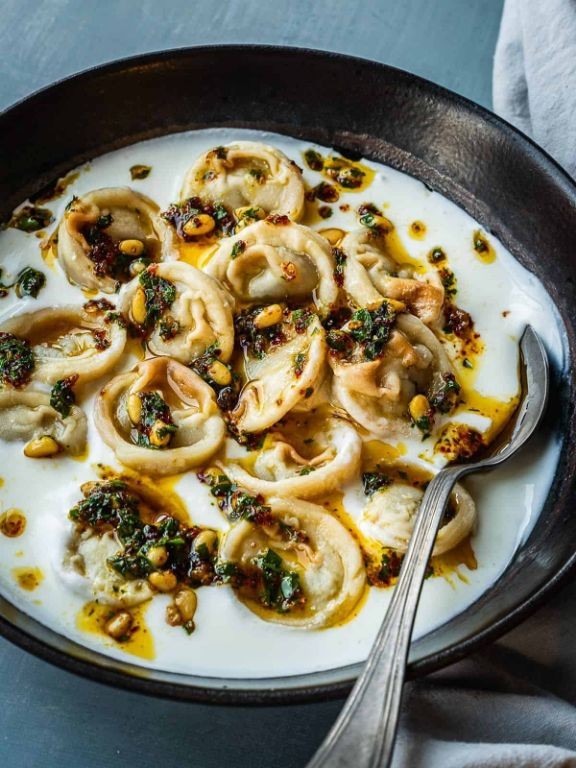
You know those cozy winter evenings when you crave something warm, comforting, and just a little bit special? That’s exactly when I turn to Shish Barak, these delightful little meat dumplings swimming in a tangy yogurt sauce. It’s a Middle Eastern classic that feels like a hug in a bowl, and while it takes a bit of love to prepare, every bite is absolutely worth it.
Serving: 4 | Pre Time: 45 minutes | Cooking Time: 30 minutes
Ingredients
– 1 lb ground beef (80/20 works great for flavor)
– 1 small onion, finely chopped
– 2 tbsp olive oil (or any neutral oil)
– 1 tsp ground allspice
– 1/2 tsp ground cinnamon
– Salt and black pepper (I start with 1 tsp salt and 1/2 tsp pepper)
– 1 package (about 12 oz) wonton wrappers (found in the refrigerated section)
– 4 cups plain whole-milk yogurt (full-fat gives the creamiest sauce)
– 1 egg white, lightly beaten (this helps stabilize the yogurt)
– 2 tbsp cornstarch
– 2 cups water
– 2 tbsp dried mint (crush it between your palms to release more aroma)
– 2 tbsp butter
– 3 cloves garlic, minced
Instructions
1. Heat the olive oil in a large skillet over medium heat until shimmering, about 2 minutes.
2. Add the chopped onion and cook, stirring frequently, until soft and translucent, 5–7 minutes.
3. Add the ground beef to the skillet, breaking it up with a wooden spoon into small crumbles.
4. Cook the beef until no pink remains, 8–10 minutes, then drain any excess fat.
5. Stir in the allspice, cinnamon, salt, and black pepper until evenly combined, then remove from heat and let cool slightly. Tip: Letting the filling cool prevents the wrappers from getting soggy.
6. Lay a wonton wrapper flat on a clean surface and place 1 teaspoon of the meat mixture in the center.
7. Moisten the edges of the wrapper with water using your finger, then fold it into a triangle, pressing firmly to seal.
8. Bring the two opposite corners of the triangle together and pinch them to form a dumpling shape, repeating until all filling is used.
9. In a large bowl, whisk together the yogurt, egg white, and cornstarch until completely smooth and no lumps remain.
10. Gradually whisk in the water until the mixture is thin and pourable. Tip: Adding water slowly prevents the yogurt from curdling when heated.
11. Pour the yogurt mixture into a large pot and heat over medium-low, stirring constantly with a wooden spoon, until it just begins to simmer, 10–12 minutes. Do not let it boil.
12. Gently add the dumplings to the simmering yogurt sauce and cook for 15 minutes, stirring occasionally to prevent sticking.
13. While the dumplings cook, melt the butter in a small saucepan over medium heat.
14. Add the minced garlic and cook until fragrant and lightly golden, 1–2 minutes, then stir in the dried mint and remove from heat. Tip: Toasting the mint in butter deepens its flavor beautifully.
15. Pour the garlic-mint butter over the cooked dumplings and sauce, gently swirling to combine.
My favorite part is that first spoonful—the dumplings are tender and savory, while the yogurt sauce is luxuriously creamy with a bright tang from the mint. Serve it over a bed of rice or with warm pita bread to soak up every last drop, and maybe save some for lunch tomorrow because it tastes even better the next day!
Samak Harra (Spicy Fish with Tahini Sauce)
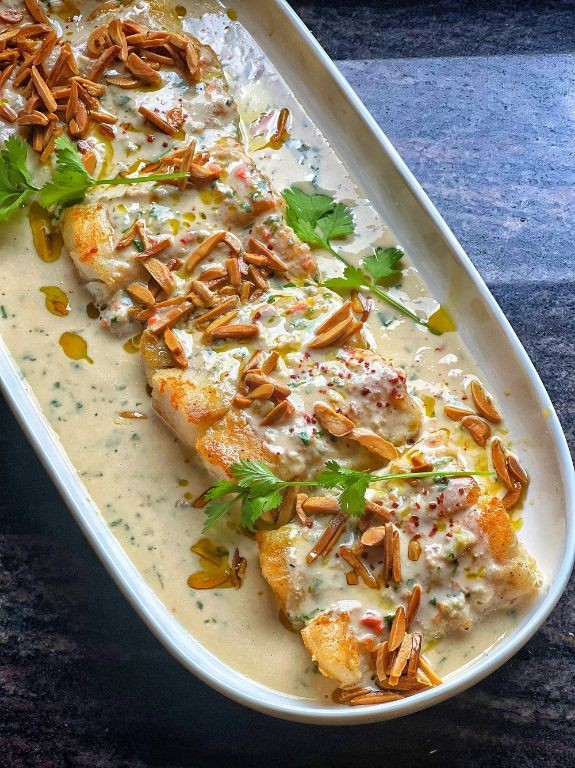
Finally, a dish that brings the vibrant flavors of the Middle East right to your weeknight dinner table! Samak Harra, with its perfectly spiced fish and creamy tahini sauce, has become my go-to for impressing guests without spending hours in the kitchen. I love how the spicy marinade fills the house with the most incredible aroma while it bakes.
Serving: 4 | Pre Time: 20 minutes | Cooking Time: 25 minutes
Ingredients
– 1.5 lbs white fish fillets (like cod or halibut), patted dry
– 3 tbsp olive oil (or any neutral oil)
– 4 garlic cloves, minced
– 1 tbsp paprika
– 1 tsp cayenne pepper (adjust for less heat)
– 1 tsp ground cumin
– 1/2 cup tahini paste
– 1/4 cup fresh lemon juice
– 1/2 cup water, plus more as needed
– 1/4 cup chopped fresh parsley, for garnish
– Salt, to season
Instructions
1. Preheat your oven to 400°F (200°C) and lightly grease a baking dish with 1 tablespoon of the olive oil.
2. In a small bowl, combine the remaining 2 tablespoons of olive oil, minced garlic, paprika, cayenne pepper, and cumin to create a spice paste.
3. Place the dried fish fillets in the prepared baking dish and rub the spice paste evenly over all sides of each fillet. Tip: Let the fish sit with the marinade for 10 minutes at room temperature for deeper flavor.
4. Bake the fish in the preheated oven for 20–25 minutes, or until the fillets are opaque and flake easily with a fork.
5. While the fish bakes, prepare the tahini sauce. In a medium bowl, whisk together the tahini paste and fresh lemon juice until smooth and thickened.
6. Gradually whisk in the 1/2 cup of water until the sauce reaches a creamy, pourable consistency. Tip: If the sauce seizes or thickens too much, simply add more water, one tablespoon at a time, while whisking.
7. Season the tahini sauce with salt to your preference and set it aside.
8. Once the fish is cooked, remove it from the oven and let it rest for 5 minutes. Tip: This resting time allows the juices to redistribute, keeping the fish moist.
9. To serve, drizzle the prepared tahini sauce generously over the baked fish fillets.
10. Garnish the dish with the chopped fresh parsley.
That first bite delivers a wonderful contrast: the flaky, warmly spiced fish against the cool, nutty creaminess of the tahini sauce. I love serving it over a bed of fluffy couscous or with warm pita bread to soak up every last drop of sauce.
Za’atar Manakish (Flatbread with Za’atar)
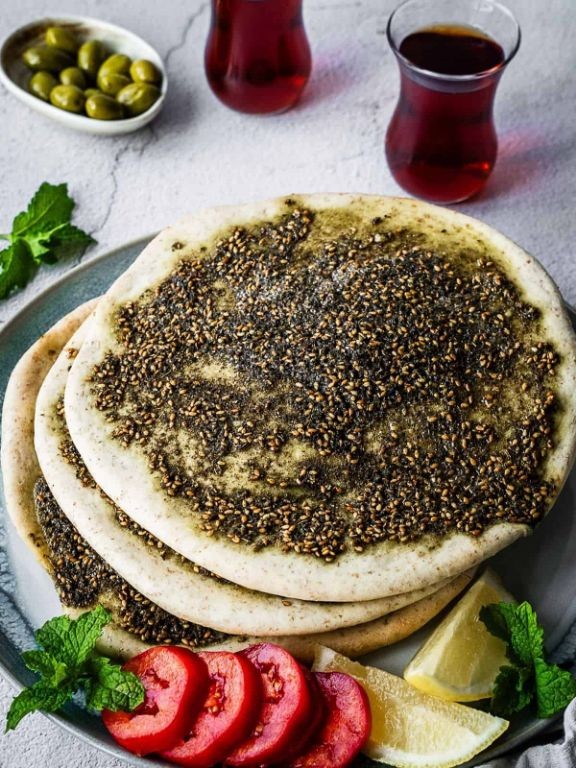
Let me tell you about the first time I discovered za’atar manakish at a tiny Middle Eastern bakery in Brooklyn – the aroma of toasted sesame and herbs stopped me in my tracks, and I’ve been making my own version ever since. There’s something magical about how this simple flatbread transforms with just a few pantry staples into something so fragrant and satisfying. I love making these on lazy weekend mornings when I want something special without too much fuss.
Serving: 4 | Pre Time: 15 minutes | Cooking Time: 10 minutes
Ingredients
– 1 pound pizza dough (store-bought or homemade, at room temperature)
– ¼ cup extra virgin olive oil (or any neutral oil)
– ½ cup za’atar spice blend (look for one with sumac, thyme, and sesame seeds)
– 2 tablespoons sesame seeds (for extra crunch, optional)
– ½ teaspoon kosher salt (adjust to taste)
Instructions
1. Preheat your oven to 475°F and place a pizza stone or baking sheet inside to heat for at least 30 minutes.
2. Divide the pizza dough into 4 equal pieces on a lightly floured surface.
3. Roll each piece into a 6-inch circle about ¼-inch thick using a rolling pin.
4. In a small bowl, mix the olive oil, za’atar spice blend, and kosher salt until fully combined.
5. Brush each dough circle generously with the za’atar-oil mixture, leaving a ½-inch border around the edges.
6. Sprinkle sesame seeds evenly over the top of each flatbread if using.
7. Carefully transfer one flatbread to the preheated pizza stone or baking sheet using a pizza peel or the back of a baking sheet.
8. Bake for 8-10 minutes until the edges are golden brown and the bottom is crisp.
9. Remove from the oven and let cool on a wire rack for 2 minutes before repeating with remaining flatbreads.
10. Tip: For extra flavor, toast the sesame seeds in a dry skillet for 1-2 minutes before adding to the za’atar mixture.
11. Tip: If your dough springs back while rolling, let it rest for 5 minutes covered with a damp towel to relax the gluten.
12. Tip: Check for doneness by lifting an edge – it should be lightly browned and firm to the touch.
Out of the oven, these manakish have a wonderfully crisp bottom with a slightly chewy interior that holds up to the earthy, tangy za’atar topping. I love tearing them into pieces and dipping them in labneh or serving them alongside a simple salad – they’re equally perfect for breakfast with a soft-boiled egg or as an appetizer when friends come over.
Falafel with Tahini Sauce
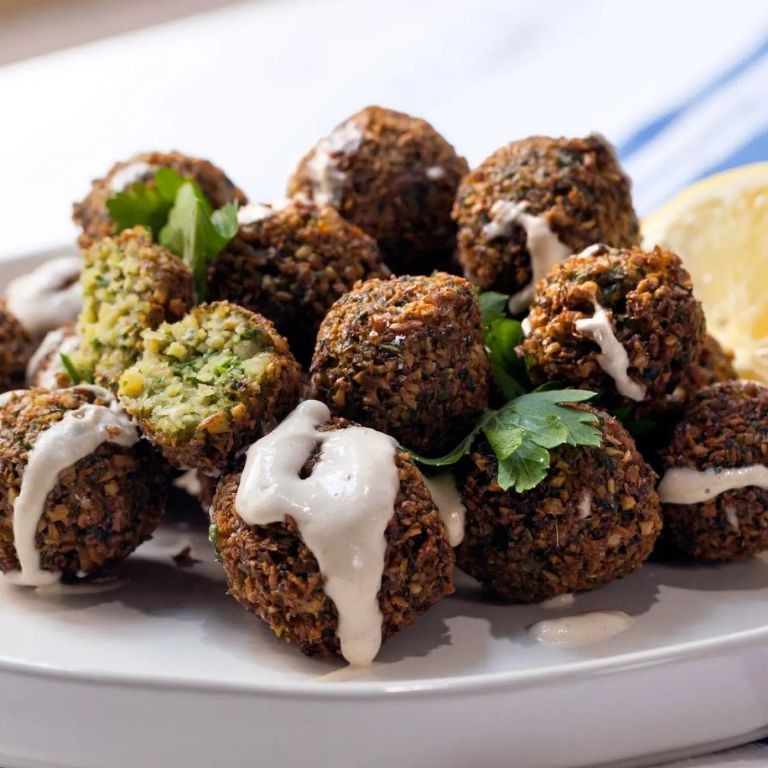
Haven’t we all had those days where we crave something crispy, savory, and satisfying, but don’t want to spend hours in the kitchen? That’s exactly why this falafel with tahini sauce has become my go-to weeknight hero—it’s surprisingly simple to whip up, and the aroma of frying spices always makes my kitchen feel like a cozy Middle Eastern café. I love making a big batch on Sundays to enjoy throughout the week, tucked into pitas or over a fresh salad.
Serving: 4 | Pre Time: 15 minutes | Cooking Time: 20 minutes
Ingredients
– 2 (15-oz) cans chickpeas, drained and rinsed (or 3 cups cooked chickpeas)
– 1 small yellow onion, roughly chopped
– 4 cloves garlic, peeled
– 1/2 cup fresh parsley, packed
– 1/4 cup fresh cilantro, packed (optional, but adds brightness)
– 1 tsp ground cumin
– 1 tsp ground coriander
– 1/2 tsp baking soda
– 1/2 tsp salt
– 1/4 tsp black pepper
– 1/4 cup all-purpose flour
– 2 cups vegetable oil for frying (or any neutral oil with a high smoke point)
– 1/2 cup tahini paste
– 1/4 cup lemon juice, freshly squeezed
– 1/4 cup water, plus more as needed
– 1 clove garlic, minced
– Pinch of salt for the sauce
Instructions
1. Combine the chickpeas, onion, 4 cloves garlic, parsley, cilantro, cumin, coriander, baking soda, salt, and pepper in a food processor.
2. Pulse the mixture for 30–45 seconds until it’s finely chopped but not pureed—it should hold together when pressed, with a slightly coarse texture.
3. Transfer the mixture to a bowl and stir in the flour until fully incorporated; this helps bind the falafel so they don’t fall apart during frying.
4. Shape the mixture into 16 small balls, about 1.5 inches in diameter, pressing firmly to compact them, and place on a parchment-lined tray.
5. Heat the vegetable oil in a deep skillet or pot over medium-high heat until it reaches 350°F on a thermometer; if you don’t have one, test by dropping a small piece of the mixture—it should sizzle immediately.
6. Carefully add 4–5 falafel balls to the hot oil using a slotted spoon, frying for 3–4 minutes until golden brown and crispy on all sides, turning occasionally.
7. Remove the falafel with the slotted spoon and drain on a paper towel-lined plate; repeat with the remaining balls, letting the oil return to 350°F between batches to ensure even cooking.
8. While the falafel fry, whisk together the tahini paste, lemon juice, water, minced garlic, and a pinch of salt in a small bowl until smooth; add more water, 1 tablespoon at a time, if the sauce is too thick—it should drizzle easily.
9. Serve the falafel warm with the tahini sauce drizzled on top.
Oh, the contrast here is everything—crispy, herb-packed falafel with a creamy, tangy tahini sauce that just melts into each bite. I love stuffing them into warm pita pockets with pickled veggies or crumbling them over a grain bowl for extra texture; they stay surprisingly crisp if you reheat them in the oven at 400°F for a few minutes.
Knafeh (Cheese Pastry with Syrup)
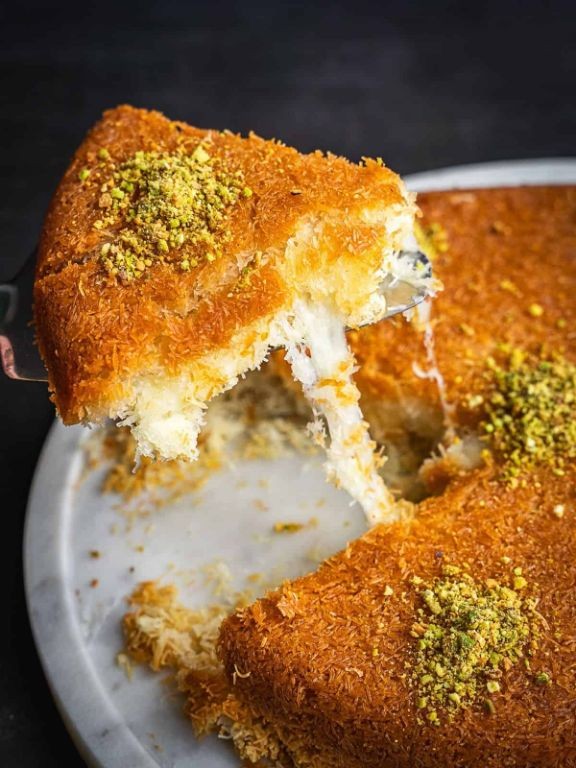
Whenever I’m craving something sweet and comforting, I turn to knafeh—a Middle Eastern cheese pastry soaked in fragrant syrup that’s become a favorite in my kitchen. It’s the perfect blend of crispy, gooey, and sweet, and I love making it for weekend gatherings because it always feels like a special treat. Trust me, once you try it, you’ll understand why it’s a beloved dessert across cultures.
Serving: 8 | Pre Time: 20 minutes | Cooking Time: 35 minutes
Ingredients
– 1 lb shredded mozzarella cheese (or a mix of mozzarella and akkawi if available)
– 1 package (16 oz) kataifi dough, thawed
– 1 cup unsalted butter, melted (or ghee for a richer flavor)
– 1 ½ cups granulated sugar
– 1 cup water
– 1 tbsp lemon juice
– 1 tsp orange blossom water (optional, but adds a lovely aroma)
– ½ cup chopped pistachios, for garnish (adjust to your preference)
Instructions
1. Preheat your oven to 350°F (175°C) and grease a 9×13-inch baking dish lightly with butter.
2. In a large bowl, separate the kataifi dough strands with your fingers to fluff them up, which helps create a crispier texture later.
3. Pour the melted butter over the kataifi dough and mix thoroughly until every strand is evenly coated.
4. Press half of the buttered kataifi dough into the bottom of the greased baking dish to form an even layer.
5. Spread the shredded mozzarella cheese evenly over the kataifi layer in the dish.
6. Top the cheese with the remaining buttered kataifi dough, pressing down gently to compact it.
7. Bake in the preheated oven for 30–35 minutes, or until the top is golden brown and crispy.
8. While the knafeh bakes, combine the granulated sugar and water in a saucepan over medium heat, stirring until the sugar dissolves completely.
9. Bring the syrup to a boil, then reduce the heat and simmer for 10 minutes without stirring to avoid crystallization.
10. Remove the syrup from the heat and stir in the lemon juice and orange blossom water, then let it cool slightly.
11. Once the knafeh is out of the oven, immediately pour the warm syrup evenly over the hot pastry, allowing it to soak in.
12. Let the knafeh cool for 10–15 minutes to set before slicing it into squares.
13. Garnish each serving with chopped pistachios just before serving for a crunchy contrast.
Knafeh delights with its contrasting textures—a crispy, buttery top gives way to a stretchy, melted cheese center that’s perfectly sweetened by the floral syrup. I often serve it warm with a scoop of vanilla ice cream or a drizzle of extra syrup for those with a serious sweet tooth, making it a showstopper at any dinner party.
Tabbouleh with Fresh Herbs
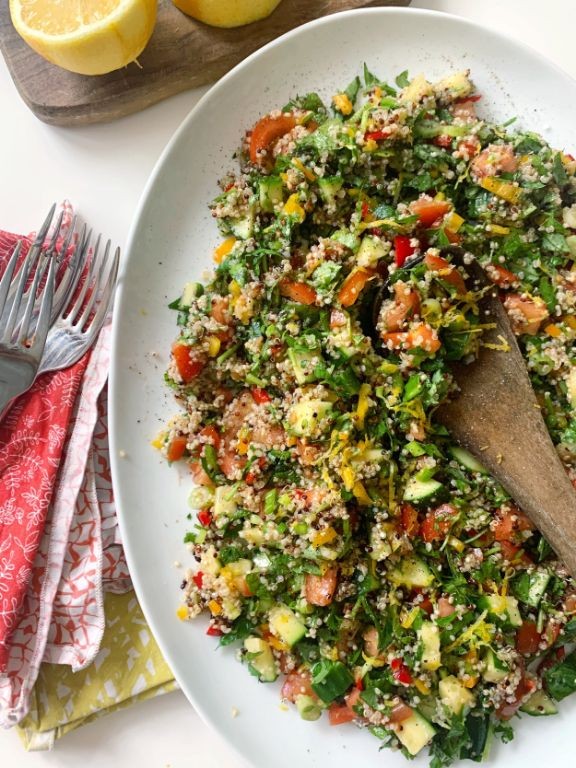
A vibrant, herb-packed tabbouleh is my go-to side dish for summer gatherings—it’s fresh, zesty, and always disappears fast. I love how the parsley and mint shine through, reminding me of sunny afternoons at my aunt’s garden parties. Let’s make this simple, crowd-pleasing version together!
Serving: 4 | Pre Time: 20 minutes | Cooking Time: 0 minutes
Ingredients
– 1 cup fine bulgur wheat
– 1 ½ cups boiling water
– 1 cup finely chopped fresh parsley, stems removed for better texture
– ½ cup finely chopped fresh mint
– 2 medium tomatoes, diced (about 1 cup)
– ½ cup diced cucumber
– ¼ cup finely chopped red onion, soaked in cold water for 5 minutes to mellow the bite
– ⅓ cup extra-virgin olive oil, or any neutral oil
– ¼ cup freshly squeezed lemon juice (about 2 lemons)
– 1 teaspoon salt
– ½ teaspoon black pepper
Instructions
1. Place 1 cup fine bulgur wheat in a large bowl.
2. Pour 1 ½ cups boiling water over the bulgur, cover the bowl with a plate, and let it soak for 15 minutes until tender and water is absorbed.
3. While the bulgur soaks, finely chop 1 cup fresh parsley and ½ cup fresh mint, removing any tough stems for a smoother bite.
4. Dice 2 medium tomatoes and ½ cup cucumber into small, even pieces.
5. Finely chop ¼ cup red onion and soak it in cold water for 5 minutes to reduce sharpness, then drain well.
6. In a small bowl, whisk together ⅓ cup extra-virgin olive oil, ¼ cup lemon juice, 1 teaspoon salt, and ½ teaspoon black pepper until emulsified.
7. Fluff the soaked bulgur with a fork to separate the grains.
8. Add the chopped parsley, mint, tomatoes, cucumber, and drained red onion to the bulgur.
9. Pour the dressing over the mixture and toss gently until everything is evenly coated.
10. Let the tabbouleh sit at room temperature for 10 minutes to allow the flavors to meld.
11. Taste and adjust seasoning if needed, adding more lemon juice or salt sparingly.
12. Serve immediately or chill in the refrigerator for up to 1 hour for a cooler dish.
Here’s the result: this tabbouleh bursts with a crisp, confetti-like texture from all those fresh herbs and veggies, balanced by the tangy lemon dressing. I love scooping it up with warm pita bread or pairing it with grilled chicken for a light meal—it’s refreshingly bright and always a hit!
Summary
Mouthwatering and authentic, these 20 Syrian recipes bring vibrant flavors and rich traditions right to your kitchen. We hope you feel inspired to try a few, discover a new favorite, and share the joy of cooking with others. Don’t forget to leave a comment telling us which dish you loved most, and pin this article on Pinterest to spread the deliciousness!


