Mornings are hectic, evenings are packed, and you’re craving something delicious without the fuss. Enter the Instant Pot—your kitchen superhero for whipping up mouthwatering meals in minutes. From cozy comfort foods to vibrant weeknight dinners, we’ve gathered 20 top recipes that make busy days a breeze. Ready to transform your cooking routine? Let’s dive into these flavorful favorites!
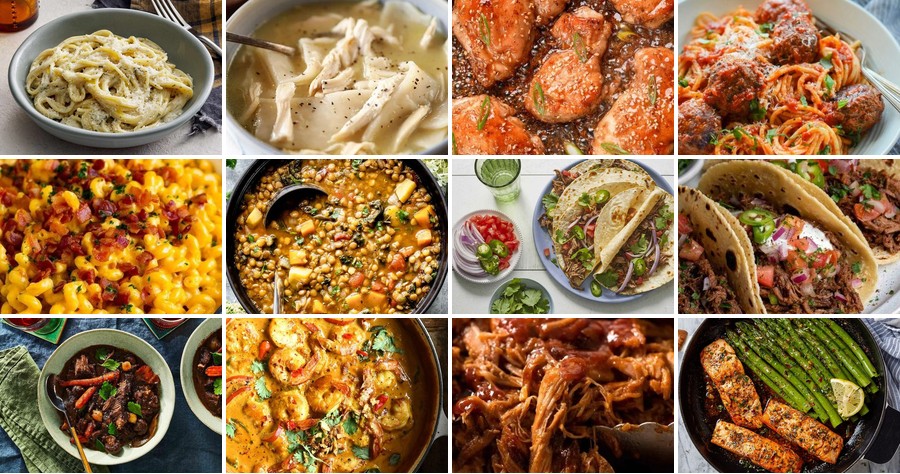
Pulled Pork with BBQ Sauce
Cooking pulled pork always reminds me of summer barbecues at my uncle’s backyard—there’s something magical about that slow-cooked, tender meat smothered in tangy BBQ sauce. I’ve tweaked this recipe over the years to make it foolproof for busy weeknights, and now it’s my go-to for feeding a crowd without fuss. Let’s dive in and get that pork shoulder ready to shine!
Serving: 8 | Pre Time: 15 minutes | Cooking Time: 8 hours
Ingredients
– For the pork rub:
– 1 (4-pound) pork shoulder
– 2 tbsp brown sugar
– 1 tbsp smoked paprika
– 1 tsp garlic powder
– 1 tsp salt
– 1/2 tsp black pepper
– For the BBQ sauce:
– 1 cup ketchup
– 1/4 cup apple cider vinegar
– 2 tbsp Worcestershire sauce
– 1 tbsp Dijon mustard
– 1/4 cup brown sugar
Instructions
1. Preheat your oven to 300°F.
2. Pat the 4-pound pork shoulder dry with paper towels to help the rub stick better.
3. In a small bowl, combine 2 tbsp brown sugar, 1 tbsp smoked paprika, 1 tsp garlic powder, 1 tsp salt, and 1/2 tsp black pepper to make the rub.
4. Rub the spice mixture evenly all over the pork shoulder, covering it completely.
5. Place the seasoned pork shoulder in a large Dutch oven or roasting pan.
6. Cover the pan tightly with a lid or aluminum foil to trap moisture during cooking.
7. Cook the pork in the preheated oven at 300°F for 6 hours until it’s fork-tender and easily shreds.
8. While the pork cooks, make the BBQ sauce by whisking together 1 cup ketchup, 1/4 cup apple cider vinegar, 2 tbsp Worcestershire sauce, 1 tbsp Dijon mustard, and 1/4 cup brown sugar in a saucepan over medium heat.
9. Bring the sauce to a simmer, then reduce the heat to low and let it cook for 10 minutes, stirring occasionally, until it thickens slightly.
10. Remove the pork from the oven and let it rest for 15 minutes to allow the juices to redistribute.
11. Use two forks to shred the pork directly in the pan, discarding any large fat pieces.
12. Pour the prepared BBQ sauce over the shredded pork and stir to coat it evenly.
13. Return the sauced pork to the oven, uncovered, and bake at 300°F for an additional 30 minutes to let the flavors meld.
14. Remove from the oven and let it cool for 5 minutes before serving.
Heavenly and hearty, this pulled pork boasts a melt-in-your-mouth texture with a smoky-sweet kick from the homemade BBQ sauce. I love piling it high on soft buns with a side of coleslaw, or for a fun twist, try it stuffed into baked potatoes or over nachos for game day—it’s versatile enough to steal the show at any meal!
Cheesy Chicken and Rice Casserole

Kicking off the holiday cooking marathon with a dish that’s become my go-to for feeding a crowd without fuss—this cheesy chicken and rice casserole is the ultimate comfort food that practically makes itself. I love how it fills the house with a cozy aroma while I wrap gifts or chat with family, and it’s forgiving enough that even my most distracted cooking moments turn out delicious. Trust me, it’s a lifesaver on busy days like today!
Serving: 6 | Pre Time: 15 minutes | Cooking Time: 45 minutes
Ingredients
For the base:
– 2 cups cooked white rice
– 2 cups cooked chicken, shredded
– 1 cup frozen peas
For the sauce:
– 2 tbsp unsalted butter
– 2 tbsp all-purpose flour
– 1 ½ cups whole milk
– 1 cup chicken broth
– 1 tsp garlic powder
– ½ tsp black pepper
For topping:
– 2 cups shredded cheddar cheese
Instructions
1. Preheat your oven to 375°F and lightly grease a 9×13-inch baking dish.
2. In a large bowl, combine the cooked white rice, shredded chicken, and frozen peas, mixing gently with a spoon.
3. Melt the unsalted butter in a medium saucepan over medium heat, which should take about 2 minutes until bubbly.
4. Whisk in the all-purpose flour and cook for 1 minute to form a roux, stirring constantly to prevent burning—this removes the raw flour taste.
5. Gradually pour in the whole milk and chicken broth while whisking continuously to avoid lumps, a tip for a smooth sauce every time.
6. Add the garlic powder and black pepper, then simmer the sauce for 5 minutes until thickened, stirring occasionally.
7. Pour the sauce over the rice mixture in the bowl and stir until everything is evenly coated.
8. Transfer the mixture to the prepared baking dish and spread it into an even layer with a spatula.
9. Sprinkle the shredded cheddar cheese evenly over the top, covering it completely for a golden crust.
10. Bake in the preheated oven for 30 minutes, then broil on high for 2–3 minutes until the cheese is bubbly and lightly browned—watch closely to avoid burning.
11. Remove from the oven and let it rest for 5 minutes before serving, which helps the casserole set for cleaner slices.
Out of the oven, this casserole boasts a creamy, tender texture with pops of sweet peas, all hugged by that irresistible melted cheese. I love serving it with a crisp green salad to balance the richness, or scooping leftovers into bowls for a cozy next-day lunch—it reheats beautifully!
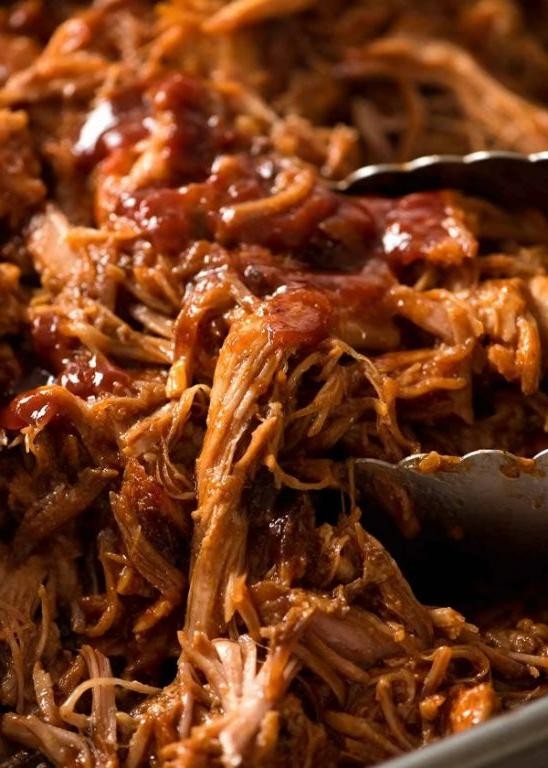
Spaghetti and Meatballs
Many of my favorite childhood memories revolve around the dinner table, and nothing says comfort quite like a big pot of spaghetti and meatballs simmering on the stove. I still make my sauce the way my grandma taught me, letting it bubble away for hours until the whole house smells incredible. It’s the kind of meal that feels like a warm hug, perfect for gathering friends or enjoying a cozy night in.
Serving: 6 | Pre Time: 30 minutes | Cooking Time: 90 minutes
Ingredients
For the Meatballs:
– 1 lb ground beef (80/20 blend)
– 1/2 cup plain breadcrumbs
– 1/4 cup grated Parmesan cheese
– 1 large egg
– 2 tbsp chopped fresh parsley
– 1 tsp garlic powder
– 1/2 tsp salt
– 1/4 tsp black pepper
– 2 tbsp olive oil
For the Sauce:
– 2 tbsp olive oil
– 1 medium yellow onion, finely diced
– 4 cloves garlic, minced
– 1 (28 oz) can crushed tomatoes
– 1 (6 oz) can tomato paste
– 2 cups water
– 1 tsp dried oregano
– 1 tsp salt
– 1/2 tsp black pepper
– 1 tbsp granulated sugar
For Serving:
– 1 lb dried spaghetti
– Fresh basil leaves for garnish
– Grated Parmesan cheese for serving
Instructions
1. In a large bowl, combine 1 lb ground beef, 1/2 cup breadcrumbs, 1/4 cup Parmesan, 1 egg, 2 tbsp parsley, 1 tsp garlic powder, 1/2 tsp salt, and 1/4 tsp black pepper.
2. Mix the ingredients with your hands until just combined, being careful not to overwork the meat, which can make the meatballs tough.
3. Shape the mixture into 18 meatballs, each about 1.5 inches in diameter.
4. Heat 2 tbsp olive oil in a large Dutch oven or heavy-bottomed pot over medium-high heat.
5. Working in batches to avoid crowding, brown the meatballs for 2-3 minutes per side until a golden crust forms, then transfer them to a plate. They do not need to be cooked through at this stage.
6. In the same pot, add 2 tbsp olive oil and the diced onion, cooking for 5 minutes until softened and translucent.
7. Add the 4 cloves of minced garlic and cook for 1 more minute until fragrant.
8. Stir in the 28 oz can of crushed tomatoes, 6 oz can of tomato paste, 2 cups water, 1 tsp oregano, 1 tsp salt, 1/2 tsp black pepper, and 1 tbsp sugar.
9. Bring the sauce to a simmer, then reduce the heat to low.
10. Gently place the browned meatballs into the sauce, submerging them.
11. Cover the pot and let the sauce and meatballs simmer on low heat for 1 hour, stirring occasionally to prevent sticking on the bottom.
12. About 20 minutes before the sauce is done, bring a large pot of salted water to a rolling boil.
13. Add 1 lb of spaghetti and cook according to package directions, usually 8-10 minutes, until al dente (tender but still firm to the bite).
14. Drain the spaghetti and return it to the pot.
15. Using a slotted spoon, carefully remove the meatballs from the sauce and set them aside on a plate.
16. Add about 2 cups of the finished sauce to the pot with the drained spaghetti and toss to coat the pasta evenly.
17. Divide the sauced spaghetti among bowls, top with meatballs, and spoon over more sauce.
18. Garnish with fresh basil leaves and serve immediately with extra grated Parmesan cheese on the side.
Just look at that glossy sauce clinging to every strand of pasta! The meatballs are incredibly tender and juicy, having soaked up all the rich, sweet-tangy flavors from the slow-simmered tomato base. For a fun twist, try stuffing a meatball into a garlic bread slider or crumbling leftovers over a crispy pizza crust the next day.
Honey Garlic Chicken Thighs

Remember those cozy winter evenings when you just want something warm, sticky, and satisfying without a ton of fuss? That’s exactly where these Honey Garlic Chicken Thighs come in—they’ve become my go-to weeknight hero, and I love how the sweet and savory glaze makes the whole kitchen smell incredible.
Serving: 4 | Pre Time: 10 minutes | Cooking Time: 25 minutes
Ingredients
For the Chicken:
– 8 bone-in, skin-on chicken thighs (about 2.5 lbs total)
– 1 tbsp olive oil
– 1 tsp kosher salt
– 1/2 tsp black pepper
For the Honey Garlic Sauce:
– 1/3 cup honey
– 1/4 cup low-sodium soy sauce
– 4 cloves garlic, minced
– 1 tbsp rice vinegar
– 1 tsp grated fresh ginger
– 1/2 tsp red pepper flakes (optional)
Instructions
1. Pat the chicken thighs completely dry with paper towels—this helps the skin get super crispy later.
2. Season both sides of the chicken thighs evenly with the kosher salt and black pepper.
3. Heat the olive oil in a large oven-safe skillet over medium-high heat until it shimmers, about 2 minutes.
4. Place the chicken thighs in the skillet skin-side down and cook without moving for 6-8 minutes until the skin is deeply golden brown and crispy.
5. Flip the chicken thighs and cook for another 4 minutes on the other side. Transfer them to a plate.
6. Preheat your oven to 400°F while you make the sauce.
7. In a small bowl, whisk together the honey, low-sodium soy sauce, minced garlic, rice vinegar, grated ginger, and red pepper flakes (if using) until fully combined.
8. Pour off all but about 1 tablespoon of fat from the skillet, then pour in the sauce mixture. Tip: Scrape up any browned bits from the pan—that’s flavor!
9. Let the sauce simmer over medium heat for 2-3 minutes until it slightly thickens.
10. Return the chicken thighs to the skillet, skin-side up, and spoon some of the sauce over each piece.
11. Transfer the skillet to the preheated oven and bake for 12-15 minutes, or until the internal temperature of the chicken reaches 165°F when checked with an instant-read thermometer.
12. Remove the skillet from the oven and let the chicken rest in the sauce for 5 minutes before serving. Tip: This resting time allows the juices to redistribute so the meat stays juicy.
13. Spoon the glossy sauce from the pan over the chicken when plating.
Nothing beats the contrast of that crackly skin against the tender, juicy meat, all coated in that sticky-sweet garlicky glaze. I love serving these thighs over a bed of fluffy jasmine rice to soak up every last drop of sauce, or with a simple side of roasted broccoli for a complete, comforting meal.
Potato and Corn Chowder

Cozying up with a warm bowl of chowder is my favorite way to unwind after a busy day, and this Potato and Corn Chowder is the ultimate comfort food. I love making it on chilly evenings when I want something hearty but not too heavy, and it always reminds me of family dinners growing up. It’s incredibly simple to throw together, yet the flavors are deep and satisfying, making it a staple in my kitchen all winter long.
Serving: 6 | Pre Time: 15 minutes | Cooking Time: 30 minutes
Ingredients
For the base:
– 4 slices thick-cut bacon, chopped
– 1 medium yellow onion, diced
– 2 cloves garlic, minced
– 3 tablespoons all-purpose flour
For the chowder:
– 4 cups low-sodium chicken broth
– 1 1/2 pounds Yukon Gold potatoes, peeled and diced into 1/2-inch cubes
– 1 teaspoon dried thyme
– 1 bay leaf
– 1/2 teaspoon black pepper
To finish:
– 2 cups frozen corn kernels
– 1 cup heavy cream
– 1/2 cup shredded sharp cheddar cheese
– 2 tablespoons chopped fresh parsley
Instructions
1. In a large Dutch oven or heavy-bottomed pot over medium heat, cook the chopped bacon until crispy, about 5-7 minutes, stirring occasionally. Use a slotted spoon to transfer the bacon to a paper towel-lined plate, leaving the rendered fat in the pot.
2. Add the diced onion to the bacon fat and cook, stirring frequently, until softened and translucent, about 5 minutes. Tip: Don’t rush this step—sweating the onions properly builds a flavorful foundation.
3. Stir in the minced garlic and cook for 1 minute until fragrant.
4. Sprinkle the flour over the onion mixture and cook, stirring constantly, for 2 minutes to form a roux and eliminate the raw flour taste.
5. Gradually whisk in the chicken broth until smooth and no lumps remain.
6. Add the diced potatoes, dried thyme, bay leaf, and black pepper to the pot. Bring the mixture to a boil over high heat.
7. Once boiling, reduce the heat to medium-low, cover the pot, and simmer for 15-20 minutes, or until the potatoes are fork-tender. Tip: Check the potatoes at 15 minutes to avoid overcooking them into mush.
8. Stir in the frozen corn kernels and heavy cream, and simmer uncovered for 5 minutes to heat through.
9. Remove the pot from the heat, discard the bay leaf, and stir in the shredded cheddar cheese until melted and smooth. Tip: Adding the cheese off the heat prevents it from separating or becoming grainy.
10. Ladle the chowder into bowls and top with the reserved crispy bacon and chopped fresh parsley.
You’ll love the creamy, velvety texture of this chowder, with tender potatoes and sweet corn in every spoonful. The smoky bacon and sharp cheddar add a rich, savory depth that makes it utterly irresistible. For a fun twist, try serving it in a hollowed-out bread bowl or with a side of crusty sourdough for dipping.
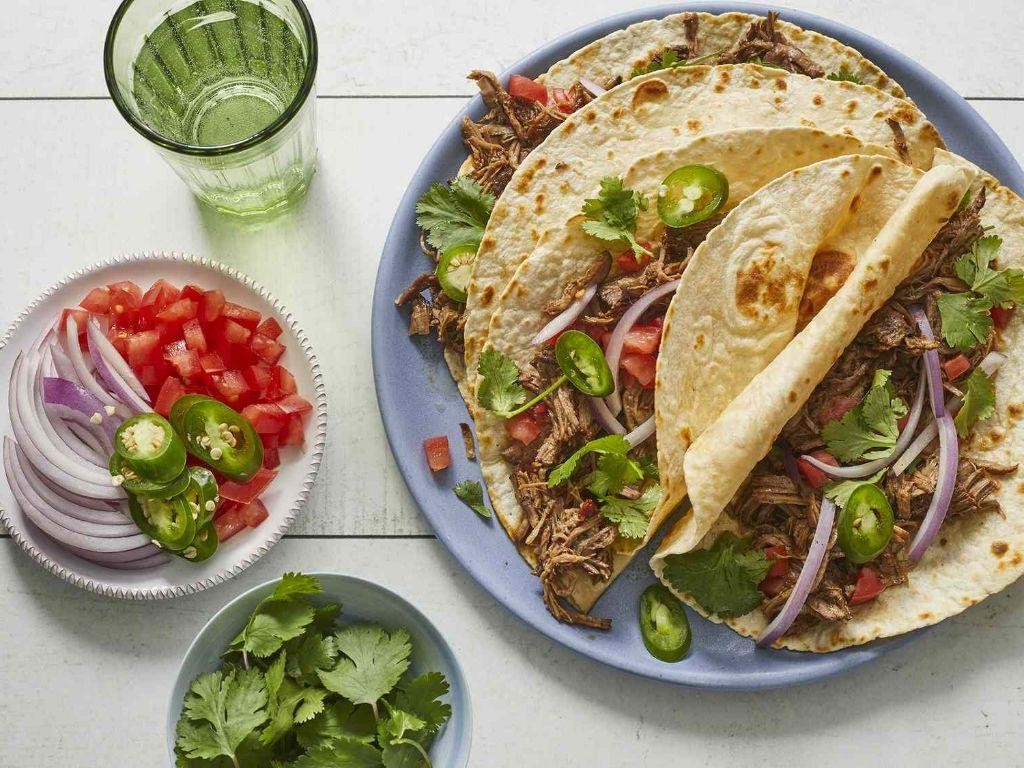
Mexican Shredded Beef Tacos

Wondering what to make for your next taco Tuesday? I’ve been perfecting this Mexican shredded beef recipe for years—it’s become my go-to for feeding a crowd or just treating myself after a long week. The slow-cooked beef is so tender it practically falls apart, and the spices create this incredible depth of flavor that makes every bite unforgettable.
Serving: 6 | Pre Time: 15 minutes | Cooking Time: 3 hours 30 minutes
Ingredients
For the beef and braising liquid:
– 3 pounds beef chuck roast, trimmed of excess fat
– 1 tablespoon vegetable oil
– 1 large yellow onion, diced
– 4 cloves garlic, minced
– 2 cups beef broth
– 1 (14.5-ounce) can diced tomatoes, undrained
– 2 tablespoons tomato paste
– 2 chipotle peppers in adobo sauce, minced
– 1 tablespoon adobo sauce from the can
For the spice blend:
– 1 tablespoon chili powder
– 2 teaspoons ground cumin
– 1 teaspoon dried oregano
– 1 teaspoon smoked paprika
– 1/2 teaspoon ground black pepper
– 1 teaspoon kosher salt
For serving (optional but recommended):
– 12 corn tortillas
– 1/2 cup chopped fresh cilantro
– 1/2 cup diced white onion
– 1 lime, cut into wedges
Instructions
1. Pat the beef chuck roast dry with paper towels, then rub it evenly with the spice blend (chili powder, cumin, oregano, smoked paprika, black pepper, and kosher salt).
2. Heat the vegetable oil in a large Dutch oven or heavy pot over medium-high heat until it shimmers, about 2 minutes.
3. Sear the beef for 4-5 minutes per side until deeply browned all over, then transfer it to a plate. Tip: Don’t rush this step—a good sear locks in juices and adds rich flavor.
4. Reduce the heat to medium, add the diced yellow onion to the pot, and cook for 5 minutes until softened, stirring occasionally.
5. Add the minced garlic and cook for 1 minute until fragrant, stirring constantly to prevent burning.
6. Pour in the beef broth, diced tomatoes, tomato paste, minced chipotle peppers, and adobo sauce, stirring to combine and scrape up any browned bits from the bottom of the pot.
7. Return the seared beef to the pot, nestling it into the liquid, and bring to a simmer over medium-high heat.
8. Cover the pot, reduce the heat to low, and simmer for 3 hours until the beef is fork-tender. Tip: Check after 2.5 hours—the beef should shred easily with two forks.
9. Remove the beef from the pot, place it on a cutting board, and use two forks to shred it into bite-sized pieces, discarding any large fat pieces.
10. Return the shredded beef to the pot, stir to coat with the sauce, and simmer uncovered for 10 minutes to thicken slightly. Tip: For a saucier texture, simmer for 5 minutes; for drier beef, go up to 15 minutes.
11. Warm the corn tortillas in a dry skillet over medium heat for 30 seconds per side until pliable, or wrap them in a damp towel and microwave for 30 seconds.
12. Serve the shredded beef in the warmed tortillas, topped with chopped cilantro, diced white onion, and a squeeze of lime juice from the wedges.
Zesty and satisfying, this shredded beef melts in your mouth with a smoky kick from the chipotles, balanced by the bright lime and fresh cilantro. I love piling it high on tortillas for tacos, but it’s also fantastic over rice or stuffed into burritos for a hearty meal that always gets rave reviews.
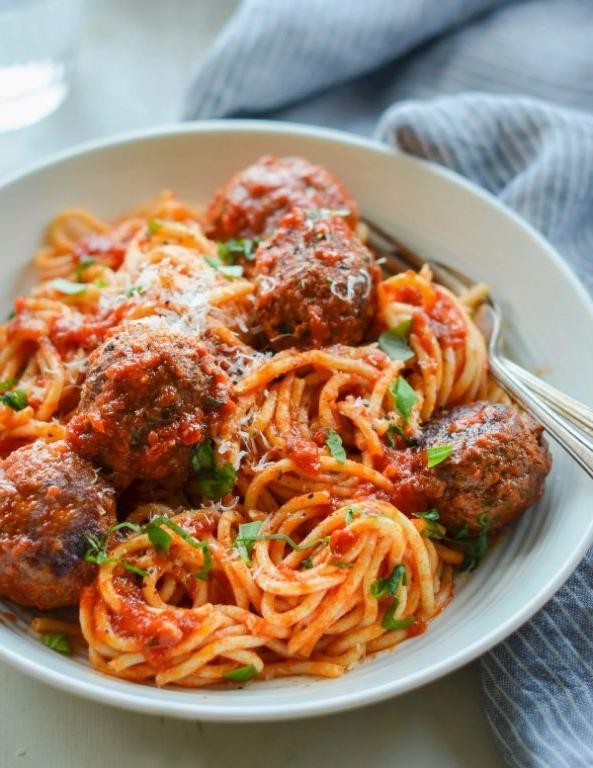
Thai Coconut Curry with Shrimp
Last night, as the winter chill crept in, I found myself craving something that could warm both my kitchen and my soul—a vibrant Thai coconut curry with shrimp, a dish that always reminds me of a cozy dinner party I hosted years ago where it stole the show. It’s surprisingly simple to whip up, even on a busy weeknight, and the rich, aromatic flavors make it feel like a special treat without the fuss. I love how the creamy coconut milk melds with the spicy curry paste, creating a comforting bowl that’s perfect for sharing or savoring solo.
Serving: 4 | Pre Time: 15 minutes | Cooking Time: 20 minutes
Ingredients
For the curry base:
– 1 tablespoon vegetable oil
– 1 medium onion, thinly sliced
– 2 cloves garlic, minced
– 1 tablespoon fresh ginger, grated
– 2 tablespoons red curry paste
For the sauce:
– 1 (13.5-ounce) can coconut milk
– 1 cup chicken broth
– 1 tablespoon fish sauce
– 1 tablespoon brown sugar
– 1 tablespoon lime juice
For the shrimp and vegetables:
– 1 pound large shrimp, peeled and deveined
– 1 red bell pepper, sliced
– 1 cup snap peas
– Fresh cilantro, chopped (for garnish)
Instructions
1. Heat 1 tablespoon vegetable oil in a large skillet over medium-high heat until it shimmers, about 1 minute.
2. Add 1 thinly sliced onion and cook, stirring frequently, until softened and translucent, about 5 minutes.
3. Stir in 2 minced garlic cloves and 1 tablespoon grated ginger, cooking for 1 minute until fragrant to prevent burning.
4. Mix in 2 tablespoons red curry paste, coating the onions evenly, and cook for 30 seconds to toast the spices and deepen the flavor.
5. Pour in 1 can coconut milk and 1 cup chicken broth, scraping the bottom of the skillet to incorporate any browned bits for extra richness.
6. Add 1 tablespoon fish sauce, 1 tablespoon brown sugar, and 1 tablespoon lime juice, then bring the mixture to a gentle simmer over medium heat.
7. Reduce the heat to medium-low and let the sauce simmer uncovered for 10 minutes, stirring occasionally, until it thickens slightly.
8. Add 1 sliced red bell pepper and 1 cup snap peas, cooking for 3 minutes until the vegetables are tender-crisp.
9. Gently stir in 1 pound shrimp and cook for 2–3 minutes, flipping once, until they turn pink and opaque to avoid overcooking.
10. Remove the skillet from the heat and garnish with fresh chopped cilantro.
Perfectly creamy with a hint of heat, this curry boasts tender shrimp and crisp vegetables that soak up the aromatic sauce. Serve it over steamed jasmine rice or with a side of crusty bread to mop up every last drop—it’s a dish that’s as satisfying to eat as it is to make, bringing a taste of Thailand right to your table.
Mac and Cheese with Bacon

Holiday season or not, there’s never a bad time for a cozy, indulgent bowl of mac and cheese—especially when it’s loaded with crispy bacon. I’ve been tweaking this recipe for years, and I finally landed on a version that’s creamy, rich, and has just the right amount of salty, smoky crunch from the bacon. It’s become my go‑in for potlucks and lazy Sunday dinners alike.
Serving: 6 | Pre Time: 15 minutes | Cooking Time: 25 minutes
Ingredients
For the bacon and pasta:
– 8 oz bacon, chopped
– 1 lb elbow macaroni
– 1 tsp salt (for pasta water)
For the cheese sauce:
– 4 tbsp unsalted butter
– ¼ cup all‑purpose flour
– 3 cups whole milk, warmed to about 110°F
– 2 cups shredded sharp cheddar cheese
– 1 cup shredded Gruyère cheese
– ½ tsp black pepper
– ¼ tsp ground mustard
For the topping:
– ½ cup panko breadcrumbs
– 2 tbsp melted butter
Instructions
1. Preheat your oven to 375°F and grease a 9×13‑inch baking dish.
2. Bring a large pot of water to a rolling boil, add 1 tsp salt, and cook the elbow macaroni for 1 minute less than the package directions (it will finish cooking in the oven).
3. While the pasta cooks, place the chopped bacon in a cold skillet and turn the heat to medium. Cook, stirring occasionally, until the bacon is crispy and browned, about 8–10 minutes. Tip: Starting bacon in a cold pan helps render the fat evenly for crispier results.
4. Use a slotted spoon to transfer the bacon to a paper‑towel‑lined plate, leaving about 2 tbsp of bacon fat in the skillet.
5. Drain the pasta and set aside.
6. In the same skillet with the bacon fat, melt 4 tbsp butter over medium heat. Whisk in ¼ cup flour and cook, stirring constantly, for 2 minutes until the mixture is lightly golden and smells nutty.
7. Gradually whisk in the warmed milk, about ½ cup at a time, ensuring each addition is fully incorporated before adding more. Bring the sauce to a gentle simmer and cook, whisking frequently, until it thickens enough to coat the back of a spoon, about 5–7 minutes. Tip: Warming the milk prevents the sauce from becoming lumpy.
8. Remove the skillet from the heat and stir in the shredded cheddar, Gruyère, black pepper, and ground mustard until the cheese is completely melted and the sauce is smooth.
9. Fold the cooked pasta and crispy bacon into the cheese sauce until everything is evenly coated, then transfer the mixture to the prepared baking dish.
10. In a small bowl, mix ½ cup panko breadcrumbs with 2 tbsp melted butter, then sprinkle the mixture evenly over the mac and cheese. Tip: Panko gives a lighter, crunchier topping compared to regular breadcrumbs.
11. Bake at 375°F for 20–25 minutes, until the topping is golden brown and the edges are bubbly.
Every bite delivers that perfect contrast—the creamy, velvety cheese sauce clings to the tender pasta, while the crispy bacon and buttery panko topping add a satisfying crunch. I love serving this straight from the oven with a simple green salad to cut through the richness, or even scooping leftovers into a skillet the next day for a quick, crispy‑bottomed treat.
Beef Stew with Red Wine
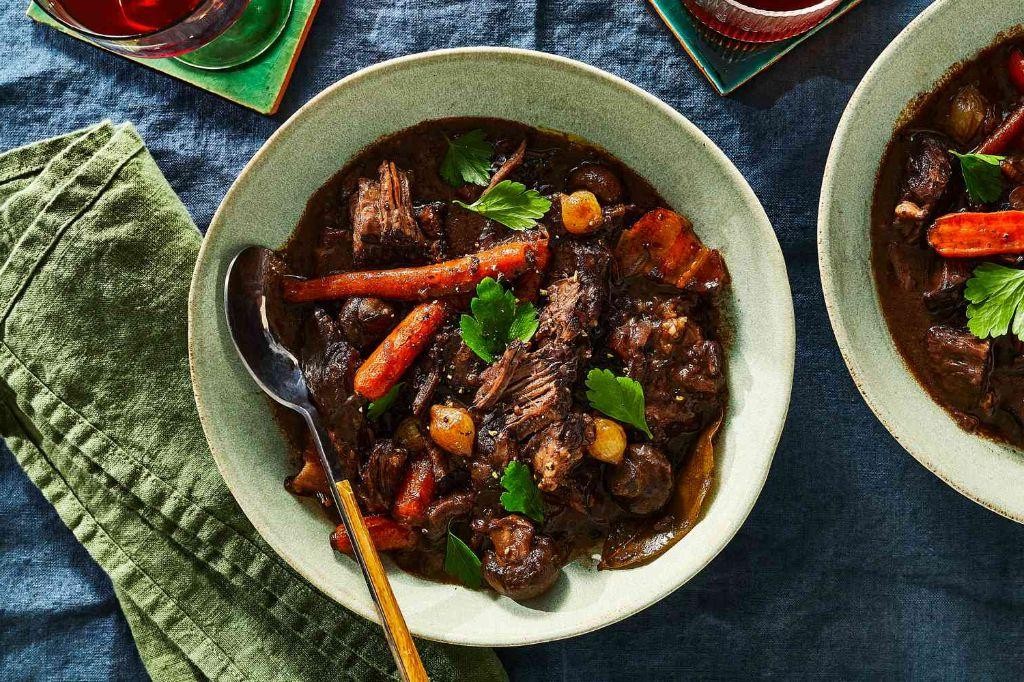
Just when the winter chill sets in and you crave something hearty, I find myself reaching for my Dutch oven to make this comforting beef stew with red wine. It’s the kind of meal that fills the house with incredible aromas and brings everyone to the table—perfect for cozy holiday gatherings or a simple weeknight dinner when you need a little extra warmth. I love how the red wine adds such rich depth, transforming basic ingredients into something truly special.
Serving: 6 | Pre Time: 20 minutes | Cooking Time: 2 hours 30 minutes
Ingredients
For the beef and vegetables:
– 2 lbs beef chuck, cut into 1-inch cubes
– 2 tbsp olive oil
– 1 large yellow onion, chopped
– 3 carrots, peeled and sliced into 1/2-inch rounds
– 3 celery stalks, chopped
– 4 garlic cloves, minced
– 1 tbsp tomato paste
For the sauce:
– 1 cup dry red wine (like Cabernet Sauvignon)
– 4 cups beef broth
– 2 tbsp all-purpose flour
– 2 bay leaves
– 1 tsp dried thyme
– 1 tsp salt
– 1/2 tsp black pepper
– 1 lb baby potatoes, halved
Instructions
1. Pat the beef chuck cubes dry with paper towels to ensure a good sear.
2. Heat 1 tbsp olive oil in a large Dutch oven over medium-high heat until shimmering, about 2 minutes.
3. Add half the beef cubes in a single layer, searing until browned on all sides, about 5-7 minutes total.
4. Transfer the seared beef to a plate and repeat with the remaining beef and 1 tbsp olive oil.
5. Reduce heat to medium and add the chopped onion, carrots, and celery to the pot, cooking until softened, about 8 minutes.
6. Stir in the minced garlic and tomato paste, cooking for 1 minute until fragrant.
7. Sprinkle the flour over the vegetables, stirring constantly for 2 minutes to cook off the raw flour taste.
8. Pour in the red wine, scraping up any browned bits from the bottom of the pot with a wooden spoon.
9. Add the beef broth, bay leaves, dried thyme, salt, and black pepper, stirring to combine.
10. Return the seared beef and any accumulated juices to the pot, bringing the mixture to a simmer.
11. Cover the Dutch oven and reduce heat to low, simmering gently for 1 hour 30 minutes.
12. Add the halved baby potatoes to the stew, submerging them in the liquid.
13. Cover and continue simmering for another 45 minutes, or until the beef is fork-tender and potatoes are cooked through.
14. Remove the bay leaves before serving.
When you ladle this stew into bowls, you’ll notice how the beef practically melts in your mouth while the potatoes hold their shape perfectly. The red wine creates a luxurious, velvety sauce that clings to every bite—I love serving it over creamy mashed potatoes or with crusty bread to soak up every last drop.
Lemon Butter Salmon with Asparagus
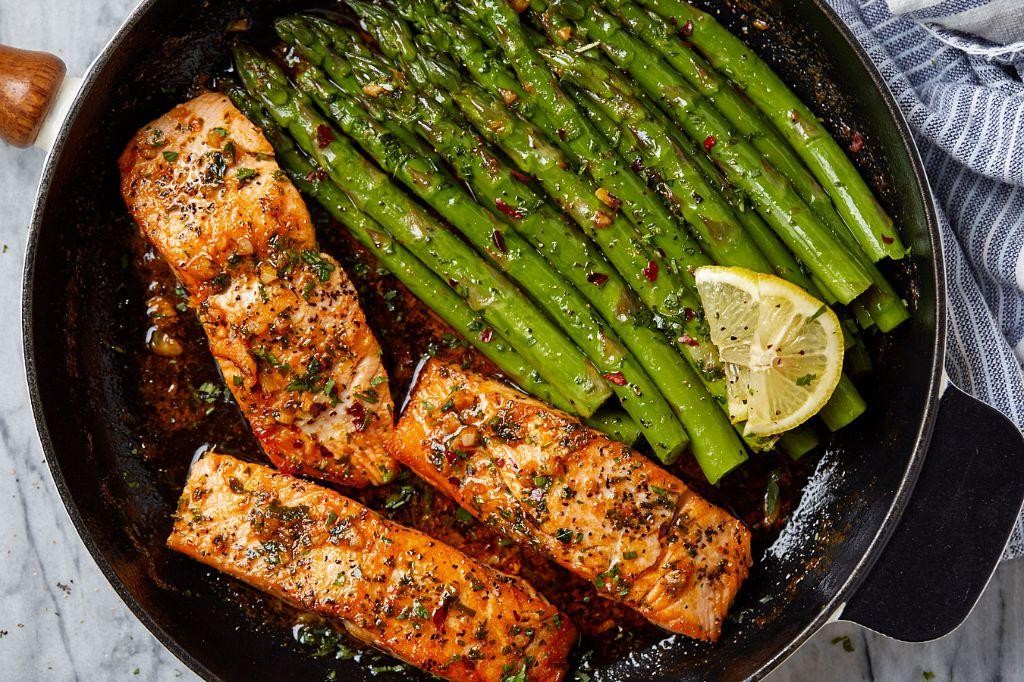
Dinner tonight? Let’s make it special with this easy, elegant Lemon Butter Salmon with Asparagus—a one-pan wonder that’s become my go-to for busy weeknights when I crave something fresh and flavorful without a mountain of dishes. I love how the bright lemon and rich butter complement the salmon’s natural richness, and roasting the asparagus alongside means everything’s ready at once, just like those cozy meals I whip up after a long day.
Serving: 4 | Pre Time: 10 minutes | Cooking Time: 15 minutes
Ingredients
For the salmon and asparagus:
– 4 salmon fillets (about 6 ounces each)
– 1 pound asparagus, trimmed
– 2 tablespoons olive oil
– 1 teaspoon salt
– 1/2 teaspoon black pepper
For the lemon butter sauce:
– 4 tablespoons unsalted butter
– 2 cloves garlic, minced
– 1/4 cup fresh lemon juice
– 1 tablespoon fresh parsley, chopped
Instructions
1. Preheat your oven to 400°F and line a baking sheet with parchment paper for easy cleanup—this tip saves me from scrubbing pans later!
2. Place the salmon fillets and asparagus on the prepared baking sheet in a single layer, ensuring they aren’t crowded to allow even cooking.
3. Drizzle the olive oil evenly over the salmon and asparagus, then sprinkle with the salt and black pepper, rubbing gently to coat.
4. Roast in the preheated oven for 12-15 minutes, checking at 12 minutes; the salmon should flake easily with a fork, and the asparagus should be tender-crisp—don’t overcook, or the salmon can dry out.
5. While the salmon roasts, melt the butter in a small saucepan over medium heat, stirring constantly to prevent burning, about 2-3 minutes until bubbly.
6. Add the minced garlic to the melted butter and cook for 1 minute until fragrant, being careful not to let it brown, which can make it bitter.
7. Remove the saucepan from heat and stir in the fresh lemon juice and chopped parsley until well combined.
8. Once the salmon and asparagus are done, transfer them to a serving platter and drizzle the warm lemon butter sauce over the top.
Zesty and buttery, this dish delights with its flaky, moist salmon and crisp-tender asparagus, all bathed in that vibrant sauce. I love serving it over a bed of quinoa or with crusty bread to soak up every last drop—it’s a simple yet impressive meal that always feels like a treat.
Pumpkin Spice Oatmeal

Bundled up on a chilly December morning like today, I found myself craving something warm and nostalgic—the kind of breakfast that feels like a hug in a bowl. That’s when I remembered my go-to pumpkin spice oatmeal, a recipe I’ve tweaked over the years to get just the right balance of cozy spices and creamy texture. It’s become my favorite way to use up leftover pumpkin puree after the holidays, and I love how it makes the whole kitchen smell like autumn, even in winter.
Serving: 2 | Pre Time: 5 minutes | Cooking Time: 10 minutes
Ingredients
For the oatmeal base:
– 1 cup old-fashioned rolled oats
– 2 cups water
– 1/4 teaspoon salt
For the pumpkin spice mixture:
– 1/2 cup pumpkin puree (canned or homemade)
– 1/4 cup milk (any type, I use whole milk for creaminess)
– 2 tablespoons maple syrup
– 1 teaspoon pumpkin pie spice
– 1/2 teaspoon vanilla extract
For topping (optional):
– 2 tablespoons chopped pecans
– A drizzle of extra maple syrup
Instructions
1. In a medium saucepan, combine 1 cup old-fashioned rolled oats, 2 cups water, and 1/4 teaspoon salt over medium-high heat. 2. Bring the mixture to a boil, then reduce the heat to low and simmer for 5 minutes, stirring occasionally to prevent sticking—this helps the oats absorb the liquid evenly. 3. While the oats cook, in a small bowl, whisk together 1/2 cup pumpkin puree, 1/4 cup milk, 2 tablespoons maple syrup, 1 teaspoon pumpkin pie spice, and 1/2 teaspoon vanilla extract until smooth. 4. After the oats have simmered for 5 minutes, stir in the pumpkin spice mixture until fully incorporated. 5. Continue cooking on low heat for another 3–4 minutes, stirring constantly, until the oatmeal thickens to your desired consistency—I like it when it coats the back of a spoon. 6. Remove the saucepan from the heat and let it sit for 1 minute to allow the flavors to meld; this resting time makes it creamier. 7. Divide the oatmeal between two bowls and top with 2 tablespoons chopped pecans and a drizzle of extra maple syrup if desired.
Oatmeal emerges silky and rich, with the pumpkin puree lending a subtle sweetness that pairs perfectly with the warm spices. I often serve it with a dollop of Greek yogurt for extra protein or sprinkle it with cinnamon for a festive touch—it’s versatile enough to enjoy straight from the pot or dressed up for a cozy brunch.
Barbacoa-Style Beef
Craving something cozy and flavorful for a chilly December evening? I recently made this barbacoa-style beef for a holiday potluck, and it was such a hit that my friends begged for the recipe. It’s my go-to when I want to feed a crowd with minimal fuss, and the aroma alone is worth the effort.
Serving: 8 | Pre Time: 20 minutes | Cooking Time: 8 hours
Ingredients
For the Beef and Base:
– 4 lbs beef chuck roast, trimmed and cut into 2-inch chunks
– 1 tbsp vegetable oil
– 1 cup beef broth
– 1 large white onion, chopped
– 4 cloves garlic, minced
For the Sauce:
– 3 chipotle peppers in adobo sauce, minced
– 2 tbsp adobo sauce from the can
– 1 tbsp ground cumin
– 2 tsp dried oregano
– 1 tsp ground cloves
– 1/2 cup fresh lime juice
– 1/4 cup apple cider vinegar
– 2 bay leaves
– 1 tbsp kosher salt
Instructions
1. Pat the beef chuck roast chunks dry with paper towels to ensure a good sear.
2. Heat the vegetable oil in a large skillet over medium-high heat until shimmering, about 2 minutes.
3. Sear the beef chunks in batches for 3-4 minutes per side until deeply browned, transferring them to a slow cooker as you go.
4. In the same skillet, add the chopped onion and cook for 5 minutes until softened, then stir in the minced garlic for 1 minute until fragrant.
5. Pour the beef broth into the skillet to deglaze, scraping up any browned bits with a wooden spoon, and simmer for 2 minutes.
6. Transfer the onion mixture to the slow cooker with the beef.
7. In a medium bowl, combine the minced chipotle peppers, adobo sauce, ground cumin, dried oregano, ground cloves, fresh lime juice, apple cider vinegar, bay leaves, and kosher salt.
8. Pour the sauce mixture over the beef in the slow cooker, stirring gently to coat everything evenly.
9. Cover the slow cooker and cook on low heat for 8 hours, until the beef shreds easily with a fork.
10. Remove the bay leaves and discard them.
11. Use two forks to shred the beef directly in the slow cooker, mixing it with the cooking liquid.
12. Let the barbacoa rest for 10 minutes before serving to allow the flavors to meld.
Every bite of this barbacoa is incredibly tender and packed with smoky, tangy warmth from the chipotle and lime. I love serving it in warm corn tortillas with a sprinkle of fresh cilantro and diced onions, but it’s also fantastic over rice or in a hearty bowl with avocado and sour cream.
Chocolate Lava Cake
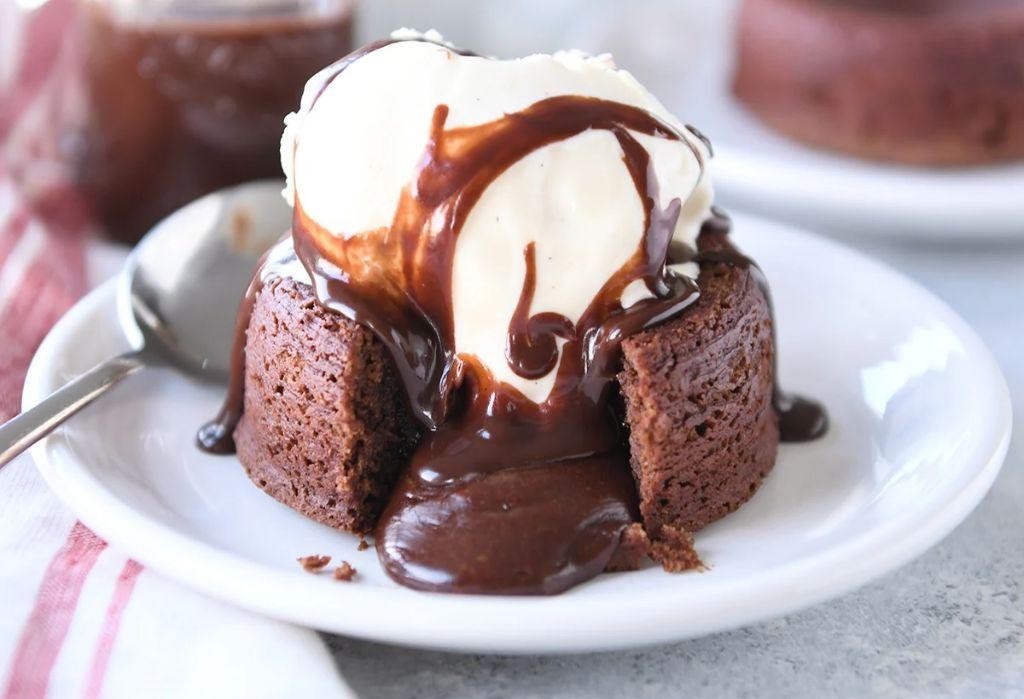
Remember that time I tried to impress my in-laws with a fancy dessert and ended up with a chocolate brick? That was my first attempt at lava cake, but after years of tweaking, I’ve perfected this foolproof version that always oozes with molten chocolate goodness. It’s become my go-to for special occasions, especially during the holiday season when everyone craves something decadent and warm.
Serving: 4 | Pre Time: 15 minutes | Cooking Time: 12 minutes
Ingredients
For the batter:
– 4 oz semi-sweet chocolate, chopped
– 1/2 cup unsalted butter
– 1 cup powdered sugar
– 2 large eggs
– 2 large egg yolks
– 1 tsp vanilla extract
– 6 tbsp all-purpose flour
For greasing:
– 1 tbsp unsalted butter, softened
– 2 tbsp cocoa powder
Instructions
1. Preheat your oven to 425°F and place a baking sheet on the middle rack to heat up—this helps the cakes cook evenly from the bottom.
2. Grease four 6-ounce ramekins thoroughly with the 1 tbsp softened butter, then dust them with the 2 tbsp cocoa powder, tapping out any excess to prevent sticking.
3. In a microwave-safe bowl, combine the 4 oz chopped chocolate and 1/2 cup butter, then microwave in 30-second intervals, stirring after each, until fully melted and smooth (about 1-2 minutes total).
4. Whisk the 1 cup powdered sugar into the melted chocolate mixture until well combined, then let it cool for 2 minutes to avoid cooking the eggs.
5. Add the 2 whole eggs, 2 egg yolks, and 1 tsp vanilla extract to the bowl, whisking vigorously until the batter is glossy and uniform in color.
6. Gently fold in the 6 tbsp all-purpose flour with a spatula until just incorporated—overmixing can make the cakes dense, so stop as soon as no dry streaks remain.
7. Divide the batter evenly among the prepared ramekins, filling each about 3/4 full, then place them on the preheated baking sheet.
8. Bake for 12 minutes exactly; the edges should be set and firm to the touch, but the centers will still jiggle slightly when shaken, which ensures that molten core.
9. Remove from the oven and let the cakes rest for 1 minute to set slightly, then run a knife around the edges to loosen them.
10. Invert each ramekin onto a serving plate, tap gently to release the cake, and serve immediately while warm.
Perfectly baked, these cakes boast a rich, fudgy exterior that gives way to a river of warm chocolate lava—it’s like a hug in dessert form. I love pairing them with a scoop of vanilla ice cream to balance the sweetness, or dusting them with powdered sugar for a simple, elegant finish that always wows guests.
Summary
Overall, these 20 Instant Pot recipes are your secret weapon for getting delicious, homemade meals on the table in no time. We hope you find some new family favorites! Don’t forget to leave a comment telling us which recipe you loved most, and if you found this roundup helpful, please share it on Pinterest to help other busy cooks like you. Happy cooking!


