
Looking for inspiration to spice up your meals? You’re in the right place! Twinadime recipes are all about delicious, versatile dishes perfect for any occasion—from quick weeknight dinners to cozy comfort food and seasonal celebrations. We’ve gathered 18 mouthwatering ideas that’ll make cooking a joy. Dive in and discover your next favorite meal!
Spicy Twinadime Chicken Stir-Fry

Ever have one of those nights where you want something bold and satisfying without spending hours in the kitchen? That’s exactly where this Spicy Twinadime Chicken Stir-Fry comes in—it’s my go-to for a quick, flavor-packed dinner that always hits the spot.
Serving: 4 | Pre Time: 15 minutes | Cooking Time: 15 minutes
Ingredients
– 1.5 lbs boneless, skinless chicken breasts, cut into 1-inch cubes (I find this size cooks evenly)
– 3 tbsp soy sauce (I use low-sodium to control the salt)
– 2 tbsp sriracha sauce (adjust if you’re sensitive to heat—this gives it a nice kick)
– 1 tbsp honey (for a touch of sweetness to balance the spice)
– 2 tbsp vegetable oil (my go-to for high-heat cooking)
– 1 red bell pepper, thinly sliced (adds a sweet crunch)
– 1 cup broccoli florets (fresh is best for that crisp texture)
– 3 cloves garlic, minced (don’t skimp—it’s key for aroma)
– 1 tsp grated ginger (I keep a knob in the freezer for easy grating)
– 2 green onions, sliced (for a fresh finish)
Instructions
1. In a medium bowl, combine the chicken cubes, soy sauce, sriracha, and honey. Let it marinate for 10 minutes at room temperature—this helps the flavors soak in.
2. Heat the vegetable oil in a large skillet or wok over medium-high heat until it shimmers, about 2 minutes.
3. Add the marinated chicken to the skillet in a single layer. Cook for 5-7 minutes, stirring occasionally, until the chicken is browned and cooked through (internal temperature should reach 165°F).
4. Tip: Don’t overcrowd the pan—cook in batches if needed to ensure even browning.
5. Push the chicken to one side of the skillet. Add the bell pepper and broccoli to the empty space. Cook for 3-4 minutes, stirring occasionally, until the vegetables are tender-crisp.
6. Add the minced garlic and grated ginger to the skillet. Stir everything together and cook for 1 minute until fragrant—be careful not to burn the garlic.
7. Tip: Have all your ingredients prepped and ready before you start cooking (mise en place) to keep things smooth.
8. Return the chicken to the center of the skillet and toss everything together. Cook for another 2 minutes to let the flavors meld.
9. Tip: Taste and adjust seasoning with a splash more soy sauce if needed, but the marinade usually does the trick.
10. Remove from heat and garnish with sliced green onions.
Zesty and vibrant, this stir-fry delivers a perfect balance of spicy, sweet, and savory with tender chicken and crisp veggies. Serve it over steamed rice or noodles to soak up the delicious sauce, or wrap it in lettuce cups for a lighter twist—it’s versatile enough for any mood!
Creamy Twinadime Pasta Salad
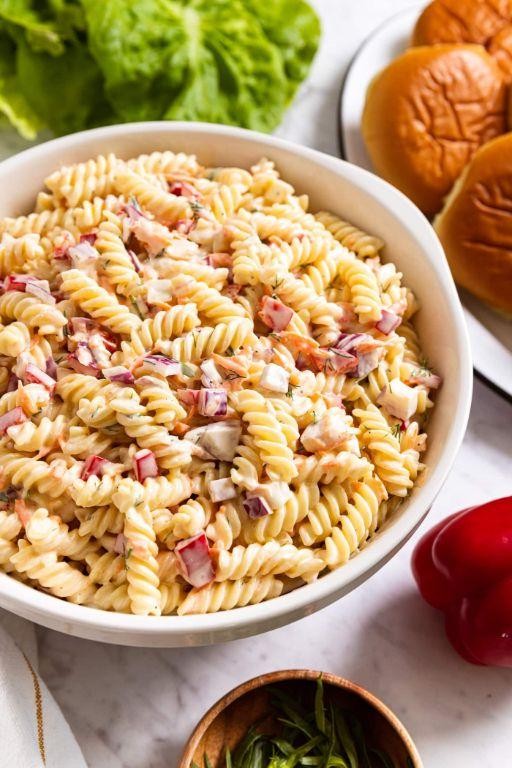
Now, picture this: you’re craving something creamy and satisfying, but you don’t want to spend all evening in the kitchen. This Creamy Twinadime Pasta Salad is your answer—it’s a quick, no-fuss dish that feels indulgent without the effort. Perfect for potlucks, weeknight dinners, or just because you deserve a tasty treat.
Serving: 6 | Pre Time: 15 minutes | Cooking Time: 10 minutes
Ingredients
– 1 pound rotini pasta (I love how the spirals hold the sauce)
– 1 cup mayonnaise (full-fat gives the best creaminess)
– 1/2 cup sour cream (it adds a lovely tang)
– 1/4 cup grated Parmesan cheese (freshly grated melts in better)
– 2 tbsp lemon juice (freshly squeezed brightens everything up)
– 1 tsp garlic powder (a pantry staple for quick flavor)
– 1/2 tsp salt (I use sea salt for a cleaner taste)
– 1/4 tsp black pepper (freshly ground if you have it)
– 1 cup cherry tomatoes, halved (they burst with sweetness)
– 1/2 cup sliced black olives (optional, but I always add them for a briny kick)
– 1/4 cup chopped fresh parsley (it adds a pop of color and freshness)
Instructions
1. Bring a large pot of salted water to a boil over high heat.
2. Add the rotini pasta to the boiling water and cook for 8-10 minutes, stirring occasionally, until al dente (check a piece by biting it—it should be tender but firm).
3. While the pasta cooks, in a large mixing bowl, whisk together the mayonnaise, sour cream, grated Parmesan cheese, lemon juice, garlic powder, salt, and black pepper until smooth and well combined.
4. Drain the cooked pasta in a colander and rinse it briefly under cold water to stop the cooking process and cool it down.
5. Add the drained pasta to the bowl with the creamy sauce and toss gently to coat every piece evenly.
6. Fold in the halved cherry tomatoes, sliced black olives, and chopped fresh parsley until everything is distributed throughout the salad.
7. Cover the bowl with plastic wrap and refrigerate for at least 30 minutes to let the flavors meld together and the salad chill.
Just serve this pasta salad chilled—it’s wonderfully creamy with a hint of tang from the lemon and Parmesan, and the tomatoes add a juicy burst. Try it as a side at your next barbecue or pack it for a picnic; it’s versatile and always a crowd-pleaser!
Garlic Butter Twinadime Shrimp Skewers

Finally, a shrimp recipe that’s as fun to make as it is to eat—these Garlic Butter Twinadime Shrimp Skewers are your new go-to for easy entertaining or a quick weeknight treat. You’ll love how the garlic butter soaks into every bite, and the skewers make them perfect for sharing. Trust me, once you try these, you’ll be making them all season long.
Serving: 4 | Pre Time: 15 minutes | Cooking Time: 10 minutes
Ingredients
– 1 pound large raw shrimp, peeled and deveined (I like leaving the tails on for easy handling)
– 4 wooden skewers, soaked in water for 30 minutes to prevent burning
– 4 tablespoons unsalted butter, melted (use the good stuff—it makes a difference!)
– 3 cloves garlic, minced (fresh is best here for that punchy flavor)
– 1 tablespoon fresh lemon juice, squeezed right before using
– 1 teaspoon paprika, for a hint of smokiness
– ½ teaspoon salt, to season everything evenly
– ¼ teaspoon black pepper, freshly ground if you can
– 2 tablespoons chopped fresh parsley, for garnish (it adds a bright, herby finish)
Instructions
1. Preheat your grill or grill pan to medium-high heat, about 400°F.
2. Thread the shrimp onto the soaked skewers, placing 4-5 shrimp per skewer evenly.
3. In a small bowl, combine the melted butter, minced garlic, lemon juice, paprika, salt, and black pepper, whisking until smooth.
4. Brush the garlic butter mixture generously over both sides of the shrimp skewers, coating them completely.
5. Place the skewers on the preheated grill and cook for 3-4 minutes per side, flipping once, until the shrimp turn pink and opaque.
6. Remove the skewers from the grill and immediately brush with any remaining garlic butter mixture for extra flavor.
7. Sprinkle the chopped parsley over the skewers as a garnish before serving.
8. Serve the shrimp skewers hot off the grill.
Vibrant and juicy, these skewers have a tender texture with a rich, buttery garlic flavor that’s balanced by the zesty lemon. Try serving them over a bed of rice or with a side of grilled veggies for a complete meal—they’re so good, you might just skip the fork and eat them right off the skewer!
Sweet and Sour Twinadime Meatballs

You know those nights when you want something comforting but also a little exciting? These Sweet and Sour Twinadime Meatballs are your answer—they’re tangy, sweet, and totally satisfying. Perfect for a cozy dinner or a fun party appetizer.
Serving: 4 | Pre Time: 15 minutes | Cooking Time: 25 minutes
Ingredients
– 1 lb ground beef (I like 80/20 for juiciness)
– 1/2 cup breadcrumbs (panko adds a nice crunch)
– 1 large egg, at room temp (it blends better with the meat)
– 2 cloves garlic, minced (fresh is best for that punchy flavor)
– 1/2 tsp salt
– 1/4 tsp black pepper
– 1 tbsp vegetable oil (for frying, but you can bake if preferred)
– 1/2 cup ketchup (my go-to for that classic sweet base)
– 1/4 cup brown sugar (pack it lightly for consistent sweetness)
– 2 tbsp apple cider vinegar (adds the perfect tang)
– 1 tbsp soy sauce (for a savory depth)
– 1/2 cup pineapple chunks, drained (canned works great here)
– 1/2 green bell pepper, chopped (for a fresh crunch)
Instructions
1. In a large bowl, combine the ground beef, breadcrumbs, egg, minced garlic, salt, and black pepper. Tip: Mix gently with your hands to avoid overworking the meat, which keeps the meatballs tender.
2. Shape the mixture into 1-inch meatballs, placing them on a plate. You should get about 20 meatballs.
3. Heat the vegetable oil in a large skillet over medium-high heat until it shimmers, about 2 minutes.
4. Add the meatballs to the skillet in a single layer, cooking for 3-4 minutes per side until browned all over. Tip: Don’t overcrowd the pan—cook in batches if needed for even browning.
5. Remove the meatballs from the skillet and set them aside on a plate.
6. In the same skillet, reduce the heat to medium and add the ketchup, brown sugar, apple cider vinegar, and soy sauce. Stir until the sugar dissolves, about 1 minute.
7. Add the pineapple chunks and chopped green bell pepper to the sauce, stirring to coat.
8. Return the meatballs to the skillet, spooning the sauce over them. Cover and simmer for 10 minutes, stirring occasionally. Tip: The sauce should thicken slightly and coat the meatballs—if it gets too thick, add a splash of water.
9. Uncover and cook for an additional 2 minutes to let the flavors meld.
10. Serve immediately. Unbelievably tender, these meatballs have a sticky-sweet glaze with a zesty kick from the vinegar. Try them over steamed rice or as sliders with soft buns for a fun twist—they’re sure to disappear fast!
Herbed Twinadime Roasted Vegetables
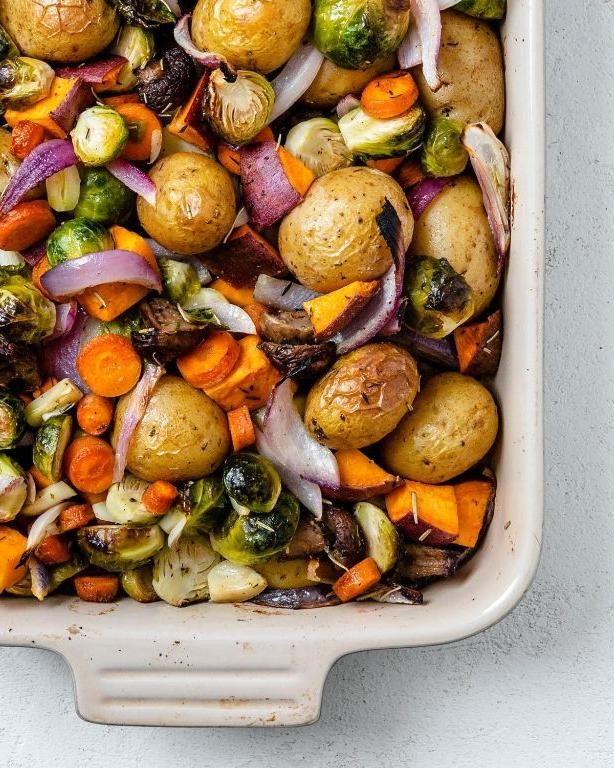
Zesty roasted vegetables are the perfect way to brighten up any winter meal, and this herbed twinadime version is my absolute favorite. You get a gorgeous mix of tender, caramelized veggies with a fragrant, savory kick that makes the whole house smell amazing. It’s seriously simple to throw together, even on a busy weeknight.
Serving: 4 | Pre Time: 15 minutes | Cooking Time: 35 minutes
Ingredients
– 1 large sweet potato, peeled and cut into 1-inch cubes (I like leaving the skin on for extra texture, but peeling gives a smoother finish)
– 2 medium carrots, cut into ½-inch thick rounds (the fresher, the sweeter they roast!)
– 1 small red onion, cut into 1-inch wedges (this adds a nice bite and beautiful color)
– 1 red bell pepper, seeded and cut into 1-inch strips
– 3 tbsp extra virgin olive oil (my go-to for roasting—it has a lovely fruity note)
– 1 tbsp dried twinadime herb blend (a mix I love with thyme, rosemary, and a hint of sage)
– ½ tsp kosher salt (I prefer this over table salt for even seasoning)
– ¼ tsp freshly ground black pepper
Instructions
1. Preheat your oven to 425°F (218°C) and line a large baking sheet with parchment paper for easy cleanup.
2. In a large mixing bowl, combine the sweet potato cubes, carrot rounds, red onion wedges, and red bell pepper strips.
3. Drizzle the extra virgin olive oil over the vegetables and toss thoroughly to coat every piece evenly.
4. Sprinkle the dried twinadime herb blend, kosher salt, and black pepper over the oiled vegetables, then toss again until the seasonings are well distributed.
5. Tip: Spread the vegetables in a single layer on the prepared baking sheet, leaving a little space between pieces to ensure they roast instead of steam.
6. Place the baking sheet in the preheated oven and roast for 20 minutes.
7. After 20 minutes, remove the baking sheet and use a spatula to flip and stir the vegetables for even browning.
8. Tip: Check that the sweet potatoes are fork-tender at this point—if not, they’ll soften more in the next step.
9. Return the baking sheet to the oven and roast for another 15 minutes, or until the vegetables are caramelized at the edges and tender when pierced with a fork.
10. Tip: Let the roasted vegetables rest for 5 minutes after removing them from the oven; this helps the flavors meld and prevents burning your mouth.
11. Transfer the roasted vegetables to a serving dish.
Now, dig into this vibrant dish! The sweet potatoes turn buttery and soft, while the carrots and onions get a delightful caramelized crunch, all wrapped in that aromatic herbed twinadime flavor. I love serving it over a bed of quinoa or alongside grilled chicken for a complete, cozy meal that feels special without any fuss.
Twinadime-infused Lemon Garlic Salmon

Bored of the same old salmon recipes? You’re in for a treat. This Twinadime-infused Lemon Garlic Salmon is a total game-changer—it’s bright, flavorful, and comes together with minimal fuss. Perfect for a cozy weeknight or a fancy-ish dinner with friends.
Serving: 4 | Pre Time: 15 minutes | Cooking Time: 12 minutes
Ingredients
– 4 (6-ounce) salmon fillets, skin-on or off—I like skin-on for extra crispiness!
– 2 tablespoons extra virgin olive oil, my go-to for its fruity flavor
– 4 cloves garlic, minced (fresh is best, but jarred works in a pinch)
– 1 lemon, zested and juiced—save a few slices for garnish
– 1 teaspoon dried Twinadime, a fragrant herb that adds a unique, slightly peppery kick
– ½ teaspoon kosher salt, for even seasoning
– ¼ teaspoon freshly ground black pepper, because freshly cracked makes all the difference
– 2 tablespoons unsalted butter, cut into small pieces for quick melting
– Fresh parsley, chopped, for a pop of color at the end
Instructions
1. Preheat your oven to 400°F (200°C) and line a baking sheet with parchment paper for easy cleanup.
2. Pat the salmon fillets completely dry with paper towels—this helps them get a nice sear instead of steaming.
3. In a small bowl, whisk together the olive oil, minced garlic, lemon zest, lemon juice, Twinadime, salt, and black pepper until well combined.
4. Place the salmon fillets on the prepared baking sheet, skin-side down if using skin-on.
5. Spoon the garlic-lemon-Twinadime mixture evenly over the top of each salmon fillet, coating them thoroughly.
6. Dot the top of each fillet with the small pieces of unsalted butter.
7. Bake the salmon in the preheated oven for 10–12 minutes, until the flesh flakes easily with a fork and reaches an internal temperature of 145°F (63°C).
8. Remove the baking sheet from the oven and let the salmon rest for 3 minutes—this allows the juices to redistribute for a moister result.
9. Sprinkle the chopped fresh parsley over the salmon just before serving.
Kick back and enjoy! The salmon turns out incredibly tender and flaky, with the Twinadime and garlic creating a savory, aromatic crust. Serve it over a bed of fluffy quinoa or with roasted asparagus for a complete meal that feels special without the stress.
Savory Twinadime Beef Stew

Remember those chilly evenings when you just crave something hearty and comforting? This savory twinadime beef stew is exactly what you need—it’s rich, flavorful, and simmers to perfection while you relax. You’ll love how the tender beef and veggies come together in one cozy pot.
Serving: 6 | Pre Time: 20 minutes | Cooking Time: 2 hours 30 minutes
Ingredients
– 2 lbs beef chuck, cut into 1-inch cubes (I like to trim excess fat for a cleaner stew)
– 2 tbsp extra virgin olive oil (my go-to for its fruity depth)
– 1 large yellow onion, diced (sweet varieties work best here)
– 3 cloves garlic, minced (fresh is key for that punchy aroma)
– 4 carrots, peeled and sliced into 1/2-inch rounds (they add a lovely sweetness)
– 3 celery stalks, chopped (for a subtle earthy crunch)
– 4 cups beef broth (low-sodium lets you control the salt)
– 1 cup red wine (a dry cabernet sauvignon is my favorite for richness)
– 2 tbsp tomato paste (it deepens the color and flavor beautifully)
– 2 bay leaves (don’t skip these—they’re the secret to that classic stew aroma)
– 1 tsp dried thyme (I prefer it over fresh for a more even distribution)
– Salt and black pepper (to season as you go, but I’ll specify amounts in the steps)
– 2 tbsp all-purpose flour (for thickening—it creates a velvety sauce)
– 1 lb baby potatoes, halved (they hold their shape nicely during the long cook)
Instructions
1. Pat the beef cubes dry with paper towels to ensure a good sear.
2. Heat the olive oil in a large Dutch oven over medium-high heat until it shimmers, about 2 minutes.
3. Season the beef with 1 tsp salt and 1/2 tsp black pepper, then add half to the pot in a single layer.
4. Sear the beef for 3–4 minutes per side until deeply browned, then transfer to a plate and repeat with the remaining beef.
5. Tip: Don’t overcrowd the pot—this prevents steaming and gives you that caramelized crust.
6. Reduce heat to medium and add the onion, cooking for 5 minutes until softened.
7. Stir in the garlic and cook for 1 minute until fragrant.
8. Sprinkle the flour over the onions and garlic, stirring constantly for 2 minutes to cook out the raw taste.
9. Pour in the red wine, scraping up any browned bits from the bottom of the pot—this adds tons of flavor.
10. Add the tomato paste, beef broth, bay leaves, thyme, and seared beef with any juices.
11. Bring to a boil, then reduce heat to low, cover, and simmer for 1 hour 30 minutes.
12. Tip: Keep the lid slightly ajar to let steam escape and prevent the stew from becoming watery.
13. Add the carrots, celery, and potatoes, stirring to combine.
14. Cover and simmer for another 45–60 minutes until the beef is fork-tender and vegetables are soft.
15. Tip: Test doneness by piercing a potato with a fork—it should slide in easily.
16. Remove the bay leaves and discard them.
17. Season with additional salt and pepper if needed, then let rest for 10 minutes off the heat.
Finally, this stew turns out luxuriously thick with melt-in-your-mouth beef and veggies that soak up all the savory goodness. For a fun twist, serve it over creamy mashed potatoes or with a crusty baguette to scoop up every last bit of that rich sauce.
Crispy Twinadime Fried Rice
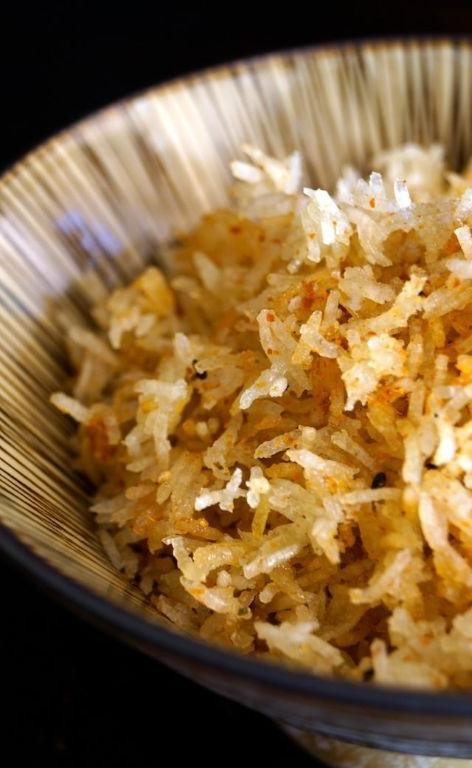
Hey, you know those nights when you’re staring at leftovers and craving something crispy and satisfying? Here’s a fun twist on fried rice that’s become my go-to comfort food—it’s quick, customizable, and always hits the spot.
Serving: 4 | Pre Time: 15 minutes | Cooking Time: 20 minutes
Ingredients
– 3 cups cooked jasmine rice (day-old works best for that perfect texture—I stash leftovers in the fridge just for this)
– 2 large eggs (I prefer room temp eggs here; they scramble more evenly)
– 1 cup frozen mixed veggies (peas and carrots are my favorite, straight from the freezer)
– ½ cup diced onion (yellow onions add a sweet kick)
– 2 cloves garlic, minced (freshly minced makes all the difference)
– 3 tbsp soy sauce (I use low-sodium to control the saltiness)
– 2 tbsp vegetable oil (extra virgin olive oil is my go-to for a light flavor)
– 1 tsp sesame oil (a drizzle at the end adds that authentic aroma)
– Salt and pepper to taste (I keep it simple, but adjust as you like)
Instructions
1. Heat a large skillet or wok over medium-high heat and add 1 tbsp vegetable oil.
2. Crack the eggs into a bowl, whisk lightly, and pour into the hot skillet—scramble them for about 1-2 minutes until just set, then remove and set aside on a plate.
3. Add the remaining 1 tbsp vegetable oil to the same skillet, then toss in the diced onion—sauté for 3-4 minutes until translucent and slightly golden.
4. Stir in the minced garlic and cook for 30 seconds until fragrant, being careful not to burn it (tip: keep the heat medium to avoid bitterness).
5. Add the frozen mixed veggies to the skillet and cook for 4-5 minutes, stirring occasionally, until thawed and tender.
6. Crumble the day-old jasmine rice into the skillet, breaking up any clumps with a spatula—cook for 5 minutes, stirring frequently, until the rice starts to crisp up (tip: press it down lightly for extra crunch).
7. Pour in the soy sauce and stir to coat everything evenly, cooking for another 2 minutes to let the flavors meld.
8. Return the scrambled eggs to the skillet, add the sesame oil, and mix gently—season with salt and pepper, then cook for 1 final minute to heat through (tip: taste and adjust seasoning before serving).
9. Remove from heat and let it sit for 2 minutes to allow the textures to set.
Zesty and satisfying, this fried rice boasts a delightful contrast of crispy edges and fluffy grains, with the sesame oil adding a nutty depth that makes it irresistible. Try topping it with a fried egg or serving it alongside grilled chicken for a heartier meal—it’s versatile enough to become your new weeknight staple.
Cheesy Twinadime Stuffed Peppers

Ugh, you know those nights when you want something comforting but don’t want to spend hours in the kitchen? These Cheesy Twinadime Stuffed Peppers are your answer—they’re hearty, cheesy, and surprisingly simple to throw together.
Serving: 4 | Pre Time: 15 minutes | Cooking Time: 25 minutes
Ingredients
– 4 large bell peppers (any color you like—I’m partial to red for sweetness)
– 1 lb ground beef (80/20 works great for flavor)
– 1 cup cooked white rice (leftover rice is perfect here)
– 1 cup Twinadime cheese, shredded (it melts like a dream)
– 1/2 cup marinara sauce (I use my favorite jarred kind to save time)
– 1 small onion, finely diced (yellow onions add a nice bite)
– 2 cloves garlic, minced (fresh is best for that punch)
– 1 tbsp olive oil (extra virgin is my go-to for sautéing)
– 1 tsp dried oregano
– Salt and black pepper (to season as you go)
Instructions
1. Preheat your oven to 375°F (190°C) and line a baking sheet with parchment paper.
2. Cut the tops off the bell peppers and remove the seeds and membranes, then set them aside.
3. Heat the olive oil in a large skillet over medium heat until it shimmers, about 1 minute.
4. Add the diced onion to the skillet and cook until softened, about 3-4 minutes, stirring occasionally.
5. Stir in the minced garlic and cook for another 30 seconds until fragrant—don’t let it burn!
6. Add the ground beef to the skillet, breaking it up with a spoon, and cook until no longer pink, about 5-7 minutes.
7. Drain any excess grease from the skillet, then stir in the cooked rice, marinara sauce, oregano, salt, and black pepper.
8. Remove the skillet from heat and fold in half of the shredded Twinadime cheese until well combined.
9. Spoon the beef mixture evenly into the prepared bell peppers, packing it down lightly.
10. Place the stuffed peppers on the baking sheet and top with the remaining Twinadime cheese.
11. Bake in the preheated oven for 20-25 minutes, until the peppers are tender and the cheese is bubbly and golden.
12. Let the peppers cool for 5 minutes before serving to set the filling.
But the best part? That gooey Twinadime cheese melds with the savory beef and sweet peppers for a burst of flavor in every bite. Serve them with a simple side salad for a complete meal, or enjoy them straight from the oven—they’re so satisfyingly cheesy!
Tangy Twinadime BBQ Ribs
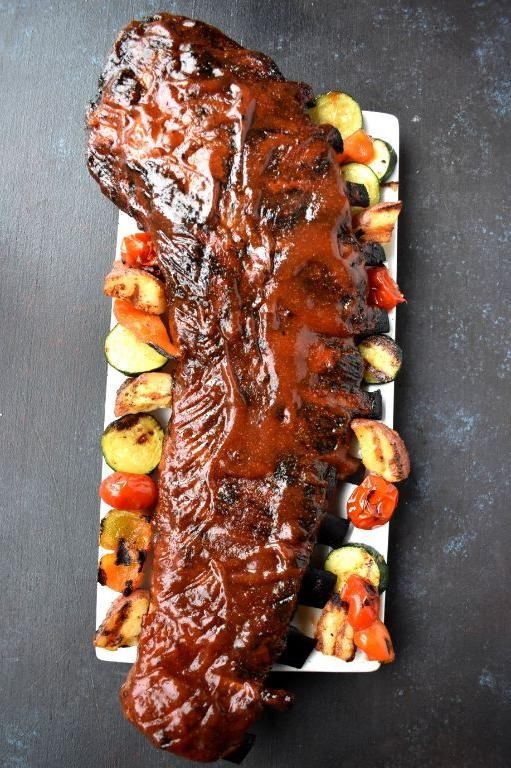
Savor those sticky, finger-licking ribs you dream about—this recipe delivers just that. You get fall-off-the-bone meat with a sweet, tangy kick that’s perfect for your next backyard bash or cozy night in. Trust me, once you try these, you’ll be making them all season long.
Serving: 4 | Pre Time: 15 minutes | Cooking Time: 3 hours
Ingredients
– 2 racks of baby back ribs (about 4 pounds total)—I always look for ones with good marbling.
– 1 cup ketchup (the classic American kind works best here).
– ½ cup apple cider vinegar—this gives the sauce its signature tang.
– ⅓ cup packed brown sugar (light or dark, your choice—I like dark for a deeper flavor).
– 2 tbsp Worcestershire sauce (Lea & Perrins is my pantry staple).
– 1 tbsp smoked paprika (this adds that lovely smoky hint without a grill).
– 1 tsp garlic powder (fresh minced works too, but powder blends in smoothly).
– 1 tsp onion powder.
– ½ tsp cayenne pepper (adjust if you’re sensitive to heat—I add a pinch extra for kick).
– 1 tbsp vegetable oil (any neutral oil like canola will do).
– Salt and black pepper to taste (I use about 1 tsp salt and ½ tsp pepper).
Instructions
1. Preheat your oven to 300°F (150°C) and line a large baking sheet with aluminum foil for easy cleanup.
2. Pat the baby back ribs dry with paper towels, then rub them all over with salt and black pepper.
3. Place the ribs meat-side up on the prepared baking sheet and cover tightly with more foil. Tip: Wrapping them well keeps the moisture in for tender results.
4. Bake the ribs in the preheated oven for 2 hours and 30 minutes until the meat is fork-tender.
5. While the ribs bake, make the BBQ sauce. In a medium saucepan over medium heat, combine ketchup, apple cider vinegar, brown sugar, Worcestershire sauce, smoked paprika, garlic powder, onion powder, cayenne pepper, and vegetable oil.
6. Whisk the sauce ingredients together and bring to a simmer. Tip: Let it bubble gently for 5–7 minutes, stirring occasionally, until it thickens slightly—you’ll see it coat the back of a spoon.
7. Remove the saucepan from the heat and set the sauce aside to cool slightly.
8. After baking, carefully remove the ribs from the oven and discard the top foil layer. Brush a generous layer of the BBQ sauce over both sides of the ribs. Tip: Save some sauce for serving—it’s great for dipping!
9. Increase the oven temperature to 400°F (200°C) and return the sauced ribs to the oven, uncovered.
10. Bake for an additional 15–20 minutes until the sauce is caramelized and sticky, watching closely to avoid burning.
11. Remove the ribs from the oven and let them rest for 5–10 minutes before slicing between the bones.
Really, the texture is everything—succulent meat that pulls apart easily, glazed with that glossy, tangy-sweet sauce. Serve these ribs with extra sauce on the side, maybe with coleslaw and cornbread to soak up all the goodness. They’re messy in the best way, so don’t forget the napkins!
Twinadime and Herb Roasted Chicken
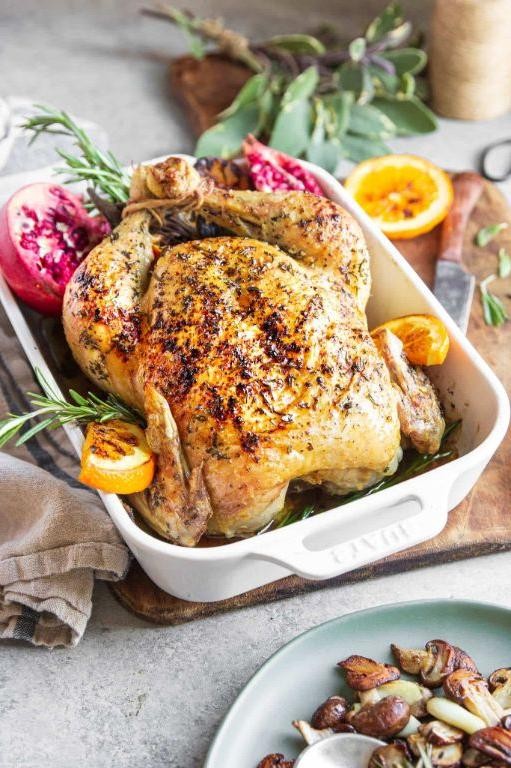
Venturing into the kitchen for a cozy dinner? This recipe is your ticket to a flavorful, fuss-free main dish that feels special without the stress. It’s the kind of meal that fills your home with the most incredible aroma while you relax.
Serving: 4 | Pre Time: 15 minutes | Cooking Time: 75 minutes
Ingredients
– 1 whole chicken (about 4 lbs)—I like to pat it super dry with paper towels for the crispiest skin.
– 2 tbsp extra virgin olive oil—my go-to for its rich flavor.
– 1 tbsp Twinadime spice blend—trust me, this secret mix makes all the difference.
– 1 tsp kosher salt—I prefer this over table salt for better seasoning control.
– 1 tsp freshly ground black pepper—freshly cracked gives the best punch.
– 3 sprigs fresh rosemary—plucked from my little herb garden if I’m lucky!
– 3 sprigs fresh thyme—the woody stems add great aroma.
– 1 lemon, halved—room temp works best to release more juice.
– 4 cloves garlic, smashed—no need to peel, they mellow beautifully.
Instructions
1. Preheat your oven to 425°F—a hot start ensures a golden crust.
2. Place the dried chicken in a large roasting pan or oven-safe skillet.
3. Drizzle the olive oil all over the chicken, rubbing it evenly into the skin.
4. In a small bowl, mix the Twinadime, salt, and pepper.
5. Sprinkle the spice mixture generously over the entire chicken, including inside the cavity.
6. Stuff the cavity with the rosemary, thyme, lemon halves, and garlic cloves.
7. Tie the chicken legs together with kitchen twine—this helps it cook evenly.
8. Roast the chicken in the preheated oven for 20 minutes.
9. After 20 minutes, reduce the oven temperature to 375°F.
10. Continue roasting for about 55 minutes, or until a meat thermometer inserted into the thickest part of the thigh reads 165°F.
11. Remove the chicken from the oven and let it rest on a cutting board for 10 minutes—this keeps the juices inside.
12. Carve the chicken and serve immediately.
What you’ll love is how the skin turns out irresistibly crispy while the meat stays juicy and infused with herbaceous notes from the stuffing. Try shredding any leftovers into tacos the next day, or slice it thin for a hearty sandwich with a swipe of aioli.
Zesty Twinadime Lime Shrimp Tacos

You know those days when you want something fresh, zesty, and ready in a flash? These Zesty Twinadime Lime Shrimp Tacos are exactly that—a bright, tangy dinner that feels like a mini vacation on a plate.
Serving: 4 | Pre Time: 15 minutes | Cooking Time: 10 minutes
Ingredients
– 1 lb medium shrimp, peeled and deveined (I like wild-caught for better flavor)
– 2 tbsp olive oil (extra virgin is my go-to for that fruity kick)
– 3 cloves garlic, minced (freshly minced makes all the difference)
– 2 limes, juiced (about ¼ cup—roll them first to get more juice!)
– 1 tsp chili powder
– ½ tsp cumin
– ½ tsp salt
– 8 small corn tortillas (warmed up, they’re so much better)
– 1 cup shredded purple cabbage (for that crunchy texture)
– ½ cup chopped cilantro (don’t skip it—it adds a fresh pop)
– ¼ cup diced red onion (soak in cold water for 5 minutes to mellow the bite)
Instructions
1. In a medium bowl, combine the shrimp, olive oil, garlic, lime juice, chili powder, cumin, and salt. Toss until the shrimp are evenly coated. Let it marinate for 10 minutes at room temperature—this helps the flavors sink in.
2. Heat a large skillet over medium-high heat until a drop of water sizzles, about 2 minutes.
3. Add the shrimp to the skillet in a single layer. Cook for 2 minutes per side, until they turn pink and opaque. Tip: Don’t overcrowd the pan, or they’ll steam instead of sear.
4. While the shrimp cook, warm the tortillas. Place them directly on a gas burner over low flame for 10 seconds per side, or wrap in a damp paper towel and microwave for 30 seconds. Tip: Keep them covered with a towel to stay soft.
5. Assemble the tacos: Place a few shrimp on each warm tortilla. Top with shredded cabbage, cilantro, and red onion. Tip: Layer the cabbage first to create a barrier and prevent soggy tortillas.
6. Serve immediately. The shrimp are juicy with a tangy lime kick, while the cabbage adds a crisp crunch. For a fun twist, drizzle with a quick crema or serve with extra lime wedges on the side—perfect for a casual dinner or a festive gathering.
Twinadime-glazed Carrots with Honey

Wondering how to make those boring carrots exciting? You’re in the right place. This twinadime-glazed version with honey is sweet, savory, and so easy you’ll make it all season long.
Serving: 4 | Pre Time: 10 minutes | Cooking Time: 20 minutes
Ingredients
- 1 pound carrots, peeled and sliced into ½-inch coins (I like to keep them rustic and uneven for texture)
- 2 tablespoons unsalted butter (salted works too, but I prefer controlling the salt myself)
- 2 tablespoons twinadime syrup (that’s my secret sweet-tangy glaze base—find it near maple syrup)
- 1 tablespoon honey (local raw honey adds the best floral notes)
- 1 tablespoon olive oil (extra virgin is my go-to for a fruity kick)
- ½ teaspoon salt (kosher salt dissolves evenly)
- ¼ teaspoon black pepper (freshly ground packs more punch)
Instructions
- Preheat your oven to 400°F (200°C) and line a baking sheet with parchment paper for easy cleanup.
- Toss the carrot coins with olive oil, salt, and pepper in a large bowl until evenly coated.
- Spread the carrots in a single layer on the baking sheet—crowding them steams instead of roasts.
- Roast for 15 minutes at 400°F, until the edges start to caramelize and turn golden brown.
- While roasting, melt the butter in a small saucepan over medium heat until foamy, about 2 minutes.
- Whisk in the twinadime syrup and honey until smooth and bubbly, then remove from heat.
- Tip: Let the glaze cool slightly to thicken—it’ll cling better to the carrots.
- Remove the carrots from the oven and drizzle the warm glaze over them, tossing gently to coat.
- Return the glazed carrots to the oven and roast for 5 more minutes at 400°F until shiny and sticky.
- Tip: Check at 4 minutes to prevent burning—the glaze caramelizes quickly.
- Transfer the carrots to a serving dish and let them rest for 2 minutes to set the glaze.
- Tip: Sprinkle with extra pepper or fresh herbs like thyme right before serving for a pop of color.
Finally, dig into carrots that are tender with a slight bite, coated in a glossy, sweet-tangy glaze. The honey balances the twinadime’s depth perfectly—try them alongside roasted chicken or over a grain bowl for a cozy twist.
Rich Twinadime Chocolate Mousse

Now, picture this: you’re craving something decadent but don’t want to spend hours in the kitchen. That’s where this Rich Twinadime Chocolate Mousse comes in—it’s impossibly smooth, intensely chocolatey, and comes together with minimal fuss. You’ll be spooning into dessert heaven in no time.
Serving: 6 | Pre Time: 20 minutes | Cooking Time: 0 minutes
Ingredients
– 8 ounces of high-quality dark chocolate, chopped (I like 70% cacao for a rich, not-too-sweet base)
– 3 large eggs, separated (let them sit out for 15 minutes to reach room temp—it helps the whites whip up better)
– 1/4 cup of granulated sugar
– 1 cup of heavy cream, chilled (straight from the fridge for best results)
– 1 teaspoon of pure vanilla extract (the real stuff makes all the difference)
– A pinch of salt (just a tiny bit to balance the sweetness)
Instructions
1. Place the chopped dark chocolate in a heatproof bowl. Set the bowl over a saucepan with 1 inch of simmering water (not boiling) to create a double boiler, making sure the bowl doesn’t touch the water. Stir constantly with a rubber spatula until the chocolate is completely melted and smooth, about 3-4 minutes. Remove from heat and let it cool slightly for 5 minutes—this prevents the eggs from scrambling. Tip: Keep the heat low to avoid seizing the chocolate.
2. In a large, clean mixing bowl, use an electric mixer on medium speed to beat the 3 egg whites until foamy, about 1 minute. Gradually add the 1/4 cup of granulated sugar while continuing to beat on high speed until stiff, glossy peaks form, about 3-4 minutes. Set aside.
3. In another bowl, beat the 3 egg yolks with the 1 teaspoon of vanilla extract and a pinch of salt on medium speed until pale and slightly thickened, about 2 minutes. Tip: Room-temperature yolks blend more smoothly.
4. Gently fold the cooled melted chocolate into the egg yolk mixture with a spatula until fully combined and no streaks remain.
5. In a separate chilled bowl, whip the 1 cup of heavy cream on medium-high speed until soft peaks form, about 2-3 minutes—be careful not to overbeat. Tip: Chill your bowl and beaters beforehand for faster whipping.
6. Fold one-third of the whipped cream into the chocolate mixture to lighten it, then gently fold in the remaining whipped cream until just incorporated.
7. Gently fold in the beaten egg whites in two additions, using a folding motion to keep the mixture airy and avoid deflating it, until no white streaks are visible.
8. Divide the mousse evenly among 6 serving glasses or bowls. Cover with plastic wrap and refrigerate for at least 4 hours, or ideally overnight, to set completely.
Just imagine that first spoonful: it’s luxuriously creamy with a deep chocolate flavor that melts on your tongue. Serve it chilled with a sprinkle of sea salt or fresh berries for a bright contrast—it’s perfect for impressing guests or treating yourself after a long day.
Twinadime-spiced Lentil Soup

Nothing warms you up on a chilly evening quite like a hearty bowl of soup. Now, imagine that cozy feeling but with a unique, warming kick from a special spice blend—that’s what this Twinadime-spiced lentil soup is all about. You’re going to love how simple it is to throw together, and the aroma alone will have everyone asking what’s for dinner.
Serving: 6 | Pre Time: 15 minutes | Cooking Time: 45 minutes
Ingredients
– 2 tbsp extra virgin olive oil (my go-to for its rich flavor)
– 1 large yellow onion, diced (I like mine finely chopped so it melts into the soup)
– 3 cloves garlic, minced (fresh is best here for that punchy aroma)
– 2 medium carrots, peeled and diced into 1/4-inch pieces
– 2 celery stalks, diced (the crunch adds nice texture)
– 1 1/2 cups brown lentils, rinsed and drained (no need to soak—they cook up perfectly in the broth)
– 6 cups vegetable broth (I use low-sodium so I can control the salt)
– 1 (14.5 oz) can diced tomatoes, undrained (they add a touch of acidity)
– 2 tsp Twinadime spice blend (a homemade mix of cumin, coriander, and a pinch of cayenne—trust me, it’s magic)
– 1 tsp salt (adjust later if needed)
– 1/2 tsp black pepper
– Fresh parsley for garnish (a handful chopped right before serving brightens it all up)
Instructions
1. Heat the extra virgin olive oil in a large pot over medium heat for about 1 minute until it shimmers.
2. Add the diced yellow onion and cook, stirring occasionally, for 5-7 minutes until softened and translucent.
3. Stir in the minced garlic and cook for 1 minute until fragrant—be careful not to let it burn.
4. Add the diced carrots and celery, cooking for another 5 minutes until they start to soften.
5. Tip: Toasting the spices enhances their flavor, so sprinkle in the Twinadime spice blend and stir for 30 seconds until aromatic.
6. Pour in the rinsed brown lentils and vegetable broth, scraping any bits from the bottom of the pot.
7. Add the can of diced tomatoes with their juices, salt, and black pepper, then give everything a good stir.
8. Bring the soup to a boil over high heat, which should take about 3-4 minutes.
9. Once boiling, reduce the heat to low, cover the pot with a lid, and let it simmer for 30-35 minutes until the lentils are tender but not mushy.
10. Tip: Check the soup halfway through and give it a stir to prevent sticking—if it looks too thick, add a splash of water or broth.
11. After simmering, remove the pot from the heat and let it sit uncovered for 5 minutes to thicken slightly.
12. Taste and adjust seasoning if needed, then ladle into bowls.
13. Tip: For extra freshness, garnish each bowl with chopped fresh parsley just before serving.
Everything about this soup is comforting, from its thick, velvety texture to the deep, earthy flavors from the lentils and spices. Enjoy it with a slice of crusty bread for dipping, or get creative by topping it with a dollop of yogurt or a squeeze of lemon to brighten things up. Either way, it’s a meal that feels like a warm hug in a bowl.
Fresh Twinadime Cucumber Salad

A perfect side dish for any summer gathering, this Fresh Twinadime Cucumber Salad is crisp, refreshing, and incredibly easy to pull together. You’ll love how the cool cucumbers pair with the tangy dressing—it’s the kind of recipe you’ll want to make again and again. Let’s get started!
Serving: 4 | Pre Time: 15 minutes | Cooking Time: 0 minutes
Ingredients
– 2 large English cucumbers, thinly sliced (I like using a mandoline for perfectly even slices)
– 1/2 cup sour cream (full-fat gives the best creamy texture)
– 2 tbsp white vinegar
– 1 tbsp fresh dill, finely chopped (dried works in a pinch, but fresh is worth it!)
– 1 tsp granulated sugar
– 1/2 tsp kosher salt
– 1/4 tsp freshly ground black pepper
Instructions
1. Place the thinly sliced cucumbers in a large mixing bowl.
2. In a separate small bowl, whisk together the sour cream and white vinegar until completely smooth—this prevents any lumps in your dressing.
3. Add the fresh dill, granulated sugar, kosher salt, and black pepper to the sour cream mixture.
4. Whisk all ingredients vigorously for about 30 seconds until the sugar and salt are fully dissolved and the dressing is well combined.
5. Pour the dressing over the sliced cucumbers in the large bowl.
6. Using a large spoon or spatula, gently toss the cucumbers until every slice is evenly coated with the dressing. Tip: Avoid over-mixing to keep the cucumbers crisp.
7. Cover the bowl with plastic wrap and refrigerate for at least 1 hour to allow the flavors to meld. Tip: Chilling also helps the cucumbers release a bit of liquid, creating a more flavorful dressing.
8. After chilling, give the salad one final gentle toss before serving. Tip: If any excess liquid has pooled at the bottom, you can drain it off for a less watery texture.
Gorgeously crisp and cool, this salad delivers a perfect balance of tangy and creamy with every bite. The cucumbers stay wonderfully crunchy, making it ideal for picnics or as a light side with grilled meats. Try serving it in individual mason jars for a fun, portable presentation at your next barbecue!
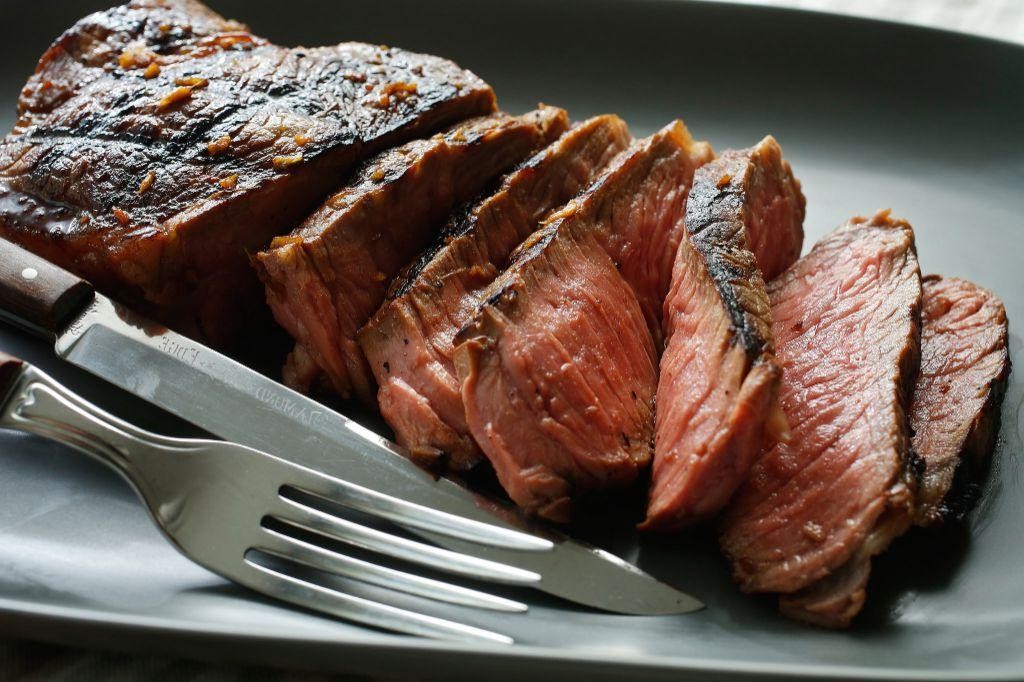
Twinadime Marinated Grilled Steak
Venturing into grilling season? You’ve got to try this Twinadime Marinated Grilled Steak—it’s a flavor-packed, juicy cut that’s surprisingly simple to pull off, perfect for a laid-back dinner or a weekend cookout with friends.
Serving: 4 | Pre Time: 30 minutes | Cooking Time: 15 minutes
Ingredients
– 2 lbs ribeye steak (I go for a nice thick cut, about 1.5 inches, for that perfect sear)
– 1/2 cup Twinadime sauce (this tangy, slightly sweet sauce is my secret weapon—grab it from the condiment aisle)
– 2 tbsp extra virgin olive oil (my go-to for a rich base)
– 3 cloves garlic, minced (fresh is best here for that punchy aroma)
– 1 tsp kosher salt (I prefer it over table salt for better texture)
– 1/2 tsp black pepper, freshly ground (it makes all the difference)
– 1 tbsp fresh rosemary, chopped (from my garden if I’m lucky, but dried works in a pinch)
Instructions
1. In a medium bowl, whisk together 1/2 cup Twinadime sauce, 2 tbsp extra virgin olive oil, 3 cloves minced garlic, 1 tsp kosher salt, 1/2 tsp black pepper, and 1 tbsp chopped fresh rosemary until well combined.
2. Place 2 lbs ribeye steak in a large resealable bag or shallow dish, and pour the marinade over it, coating the steak evenly.
3. Seal the bag or cover the dish, and refrigerate for at least 30 minutes—I let mine sit for up to 2 hours for deeper flavor, but don’t overdo it to avoid mushiness.
4. Preheat your grill to high heat, aiming for about 450°F, and lightly oil the grates to prevent sticking.
5. Remove the steak from the marinade, letting any excess drip off, and discard the used marinade for safety.
6. Place the steak on the hot grill and cook for 5-7 minutes per side for medium-rare, using a meat thermometer to check for an internal temperature of 135°F—this ensures perfect doneness without guessing.
7. For those beautiful grill marks, avoid moving the steak too early; let it sear undisturbed for the first few minutes.
8. Transfer the grilled steak to a cutting board and let it rest for 5-10 minutes to allow the juices to redistribute, keeping it tender.
9. Slice the steak against the grain into thin strips before serving.
10. Plate the slices and drizzle with any accumulated juices from the board for extra moisture.
Perfectly grilled, this steak boasts a caramelized crust from the Twinadime marinade and a tender, pink interior that melts in your mouth. Serve it over a bed of creamy mashed potatoes or slice it up for tacos—it’s versatile enough to shine in any casual meal.
Fluffy Twinadime Pancakes with Syrup

Nothin’ says cozy weekend morning like a stack of warm, homemade pancakes. You’re gonna love these Fluffy Twinadime Pancakes—they’re light as air and soak up syrup perfectly. Let’s get flipping!
Serving: 4 | Pre Time: 10 minutes | Cooking Time: 15 minutes
Ingredients
– 1 ½ cups all-purpose flour (I always sift mine first for extra fluff)
– 3 ½ tsp baking powder (fresh is key—check the date!)
– 1 tsp salt (a pinch of fine sea salt works wonders)
– 1 tbsp white sugar (just a touch for a hint of sweetness)
– 1 ¼ cups whole milk (room temp is best for even mixing)
– 1 large egg (I crack mine into a small bowl first to avoid shells)
– 3 tbsp melted unsalted butter (cooled slightly so it doesn’t cook the egg)
– 1 tsp pure vanilla extract (the real stuff makes all the difference)
– Vegetable oil for the griddle (about 1 tbsp total)
– Maple syrup for serving (warm it up—it’s a game-changer)
Instructions
1. In a large bowl, whisk together the all-purpose flour, baking powder, salt, and white sugar until fully combined.
2. In a separate medium bowl, whisk the whole milk, large egg, melted unsalted butter, and pure vanilla extract until smooth.
3. Pour the wet ingredients into the dry ingredients and gently stir with a spatula until just combined—it’s okay if there are a few lumps; overmixing makes pancakes tough.
4. Let the batter rest for 5 minutes at room temperature; this allows the baking powder to activate for maximum fluffiness.
5. Heat a non-stick griddle or large skillet over medium heat (350°F if using an electric griddle) and lightly brush with vegetable oil.
6. Pour ¼ cup of batter onto the griddle for each pancake, leaving space between them.
7. Cook for 2–3 minutes until bubbles form on the surface and the edges look set.
8. Flip each pancake carefully with a spatula and cook for another 1–2 minutes until golden brown on the bottom.
9. Transfer cooked pancakes to a plate and cover loosely with foil to keep warm; repeat with remaining batter, adding more vegetable oil as needed.
10. Serve immediately with warm maple syrup drizzled over the top.
Airy and tender, these pancakes have a delicate crumb that melts in your mouth with every bite. For a fun twist, try stacking them with fresh berries between the layers or a dollop of whipped cream on top—they’re practically begging for creativity!
Summary
Eager to elevate your meals? This collection of 18 Twinadime recipes offers delicious inspiration for any event. We hope you find a new favorite to try in your kitchen! Don’t forget to leave a comment telling us which dish you loved most and share this roundup with fellow food lovers on Pinterest. Happy cooking!


