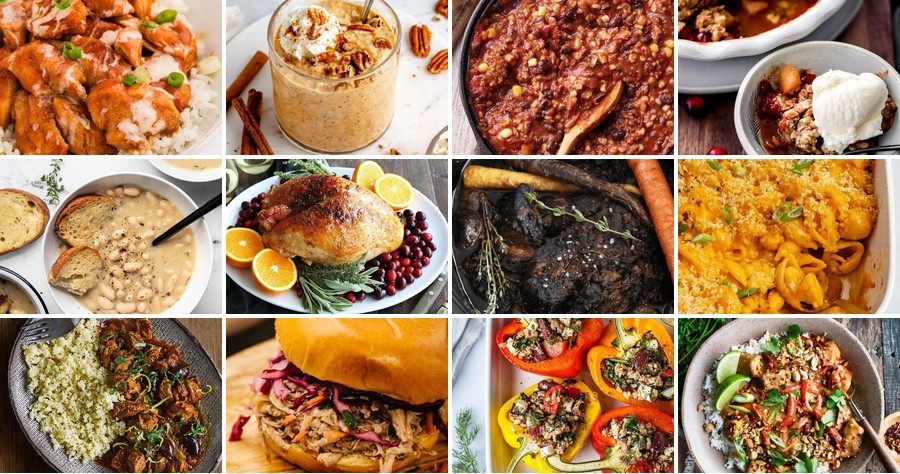
Aren’t we all craving delicious, fuss-free dinners after a long day? Your trusty crock pot is about to become your weeknight superhero. We’ve gathered 20 uniquely flavorful recipes that promise maximum taste with minimal effort. From cozy comfort classics to exciting global twists, get ready to transform simple ingredients into extraordinary meals. Let’s make those busy evenings deliciously effortless—your next favorite dinner is just a scroll away!
Slow Cooker Honey Sriracha Chicken

Kick off your weeknight dinner with this sweet-spicy chicken that practically cooks itself. Just toss everything in the slow cooker and let it work its magic while you’re busy. You’ll have tender, flavorful chicken ready to go in a few hours.
Serving: 6 | Pre Time: 10 minutes | Cooking Time: 4 hours
Ingredients
– About 2 pounds of boneless, skinless chicken thighs
– A good 1/2 cup of honey
– A generous 1/3 cup of soy sauce
– A big splash of sriracha (around 1/4 cup)
– A couple of tablespoons of rice vinegar
– A few cloves of minced garlic
– A thumb-sized piece of fresh ginger, grated
– A tablespoon of cornstarch
– A couple of tablespoons of cold water
Instructions
1. Place the chicken thighs in the bottom of your slow cooker in a single layer.
2. In a medium bowl, whisk together the honey, soy sauce, sriracha, rice vinegar, minced garlic, and grated ginger until smooth.
3. Pour the sauce mixture evenly over the chicken in the slow cooker, making sure all pieces are coated.
4. Cover the slow cooker with the lid and cook on LOW for 4 hours. Tip: For best results, avoid opening the lid during cooking to maintain temperature.
5. After 4 hours, carefully remove the chicken thighs from the slow cooker and place them on a cutting board.
6. Use two forks to shred the chicken into bite-sized pieces.
7. In a small bowl, whisk the cornstarch with the cold water until no lumps remain to create a slurry.
8. Pour the slurry into the sauce remaining in the slow cooker and whisk to combine. Tip: The slurry will thicken the sauce; whisk constantly for 30 seconds to prevent clumping.
9. Turn the slow cooker to HIGH, cover, and let the sauce cook for 15 minutes until thickened.
10. Return the shredded chicken to the slow cooker and stir to coat it thoroughly in the thickened sauce. Tip: Let it sit for 5 minutes off heat to allow the flavors to meld before serving.
11. Serve the chicken hot. Zesty and sticky, the chicken has a perfect pull-apart texture with a glossy, caramelized glaze. Pile it high on fluffy rice, stuff it into warm tortillas for tacos, or top a crisp green salad for a hearty meal.
Crock Pot Moroccan Lamb Stew

Melt-in-your-mouth lamb meets warm Moroccan spices in this hands-off slow cooker stew. Just dump everything in your Crock Pot and let it work its magic while you tackle holiday prep or relax. You’ll get tender meat and rich flavors without any fuss.
Serving: 6 | Pre Time: 15 minutes | Cooking Time: 8 hours
Ingredients
– 2 pounds of lamb shoulder, cut into 1-inch chunks
– A couple of carrots, sliced into coins
– One yellow onion, diced
– A couple of cloves of garlic, minced
– A 15-ounce can of chickpeas, drained and rinsed
– A 28-ounce can of crushed tomatoes
– 2 cups of beef broth
– A tablespoon of olive oil
– A tablespoon of ground cumin
– A teaspoon of ground cinnamon
– A teaspoon of smoked paprika
– A pinch of cayenne pepper
– A splash of lemon juice
– A handful of fresh cilantro, chopped
– Salt and black pepper
Instructions
1. Pat the lamb chunks dry with paper towels—this helps them brown better.
2. Heat the olive oil in a large skillet over medium-high heat until shimmering.
3. Add the lamb in a single layer, working in batches if needed, and sear for 3–4 minutes per side until browned.
4. Transfer the seared lamb to your slow cooker insert.
5. In the same skillet, add the diced onion and cook for 5 minutes until softened, scraping up any browned bits from the lamb.
6. Add the minced garlic and cook for 1 more minute until fragrant.
7. Pour the onion-garlic mixture over the lamb in the slow cooker.
8. Add the sliced carrots, drained chickpeas, crushed tomatoes, and beef broth to the slow cooker.
9. Sprinkle in the ground cumin, ground cinnamon, smoked paprika, cayenne pepper, 1 teaspoon of salt, and ½ teaspoon of black pepper.
10. Stir everything gently to combine, ensuring the lamb is mostly submerged.
11. Cover and cook on LOW for 8 hours—the lamb should be fork-tender when done.
12. Stir in the lemon juice and half of the chopped cilantro just before serving.
13. Taste and adjust seasoning with more salt or pepper if needed.
Dish it up over couscous or with crusty bread to soak up the fragrant broth. The lamb shreds effortlessly, and the chickpeas add a creamy contrast to the tender vegetables. For a fresh twist, top with the remaining cilantro and a dollop of yogurt.
Pineapple Teriyaki Pork Ribs
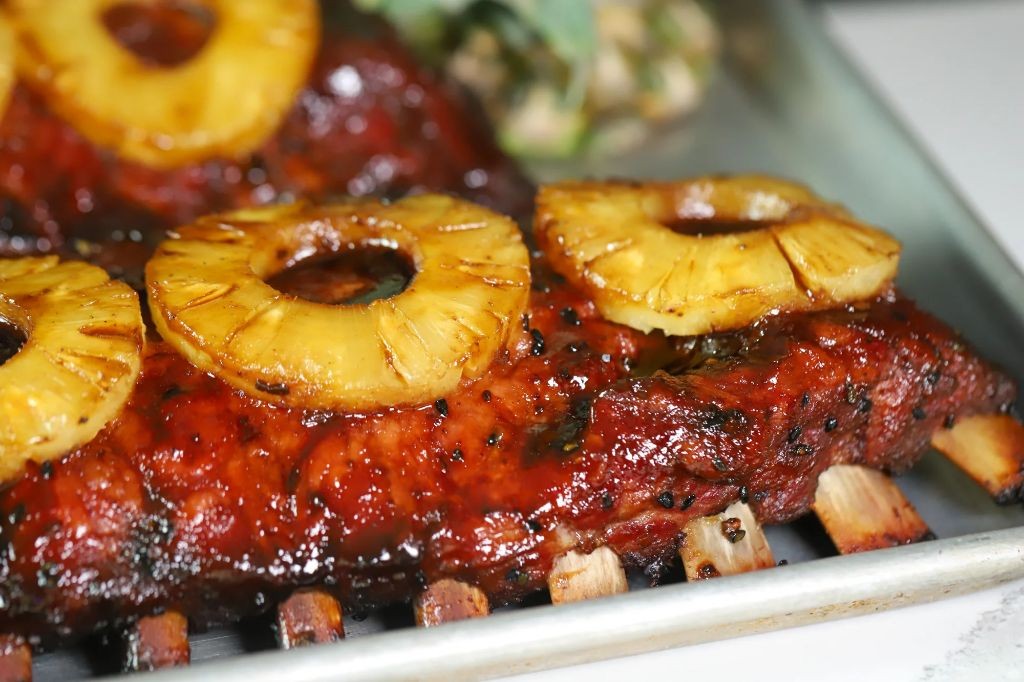
Venture beyond basic barbecue with these sweet-savory ribs. The pineapple teriyaki glaze caramelizes beautifully while keeping the pork tender. You’ll get restaurant-quality results with minimal fuss.
Serving: 4 | Pre Time: 15 minutes | Cooking Time: 2 hours 30 minutes
Ingredients
– 2 racks of pork baby back ribs
– A generous cup of pineapple juice
– A half cup of soy sauce
– A quarter cup of brown sugar
– A couple of tablespoons of rice vinegar
– A tablespoon of minced garlic
– A teaspoon of grated ginger
– A splash of sesame oil
– A tablespoon of cornstarch mixed with 2 tablespoons of water
Instructions
1. Preheat your oven to 275°F.
2. Pat the pork baby back ribs completely dry with paper towels.
3. Place the ribs on a large sheet of heavy-duty aluminum foil, meat-side up.
4. Combine the pineapple juice, soy sauce, brown sugar, rice vinegar, minced garlic, grated ginger, and sesame oil in a saucepan.
5. Bring the saucepan mixture to a simmer over medium heat, stirring until the sugar dissolves.
6. Whisk the cornstarch slurry into the simmering sauce and cook for 2 minutes until thickened. (Tip: This slurry prevents a runny glaze.)
7. Brush a thick layer of the teriyaki glaze over the top of both racks of ribs.
8. Wrap the ribs tightly in the foil to create a sealed packet.
9. Place the foil packet on a baking sheet and bake at 275°F for 2 hours.
10. Carefully open the foil packet and drain any accumulated liquid.
11. Increase the oven temperature to 400°F.
12. Brush the ribs with another layer of the remaining teriyaki glaze.
13. Return the ribs to the oven, uncovered, and bake for 25-30 minutes until the glaze is sticky and caramelized. (Tip: Watch closely to prevent burning.)
14. Let the ribs rest for 10 minutes before slicing between the bones. (Tip: Resting keeps them juicy.)
15. Serve the sliced ribs with any extra glaze on the side.
You’ll love the sticky, lacquered exterior that gives way to fall-off-the-bone meat. The pineapple adds a bright, fruity sweetness that perfectly balances the salty soy. Try serving them over a bed of coconut rice with a sprinkle of green onions for a complete tropical meal.
Buffalo Cauliflower Mac and Cheese

Get ready for a spicy, creamy twist on a classic comfort food. This Buffalo Cauliflower Mac and Cheese combines tender pasta, crispy roasted cauliflower, and a tangy, cheesy sauce for a satisfying meal. It’s perfect for game day or a cozy weeknight dinner.
Serving: 4 | Pre Time: 15 minutes | Cooking Time: 30 minutes
Ingredients
– A box of elbow macaroni
– A head of cauliflower, cut into florets
– A couple of tablespoons of olive oil
– A splash of buffalo sauce
– A cup of shredded cheddar cheese
– A cup of milk
– Two tablespoons of butter
– A tablespoon of all-purpose flour
– A pinch of salt and black pepper
Instructions
1. Preheat your oven to 425°F.
2. Toss the cauliflower florets with a tablespoon of olive oil and a pinch of salt on a baking sheet.
3. Roast the cauliflower in the oven for 20 minutes, until the edges are golden brown and crispy.
4. While the cauliflower roasts, bring a large pot of salted water to a boil.
5. Cook the elbow macaroni according to the package instructions until al dente, then drain it.
6. In a saucepan over medium heat, melt the butter.
7. Whisk in the flour and cook for 1 minute to form a roux, stirring constantly to prevent burning.
8. Gradually pour in the milk, whisking continuously until the mixture thickens, about 3-5 minutes.
9. Remove the saucepan from the heat and stir in the shredded cheddar cheese until melted and smooth.
10. Mix in the buffalo sauce and a pinch of black pepper.
11. Combine the cooked macaroni and roasted cauliflower in a large bowl.
12. Pour the cheese sauce over the mixture and toss everything together until evenly coated.
13. Transfer the mixture to a baking dish and bake at 425°F for 10 minutes, until bubbly and lightly browned on top.
Now, you’ve got a dish with a creamy, velvety texture from the cheese sauce, contrasted by the crispy, spicy kick of the buffalo cauliflower. The flavors meld together for a hearty bite that’s both comforting and exciting. Serve it hot with extra buffalo sauce on the side for dipping, or top it with chopped green onions for a fresh garnish.
Korean BBQ Beef Tacos

Merging Korean BBQ flavors with taco night just got easy. These Korean BBQ Beef Tacos deliver sweet, savory, and spicy notes in a handheld package. They come together fast for a weeknight win.
Serving: 4 | Pre Time: 15 minutes | Cooking Time: 10 minutes
Ingredients
– A pound of flank steak, thinly sliced
– A couple of tablespoons of soy sauce
– A tablespoon of brown sugar
– A tablespoon of gochujang (Korean chili paste)
– A couple of cloves of garlic, minced
– A teaspoon of grated ginger
– A splash of sesame oil
– A tablespoon of vegetable oil
– Eight small flour tortillas
– A cup of shredded red cabbage
– A couple of green onions, thinly sliced
– A handful of fresh cilantro leaves
– A lime, cut into wedges
Instructions
1. In a medium bowl, whisk together the soy sauce, brown sugar, gochujang, minced garlic, grated ginger, and sesame oil until the sugar dissolves completely.
2. Add the thinly sliced flank steak to the bowl and toss until every piece is evenly coated in the marinade. Let it sit for 10 minutes at room temperature.
3. While the beef marinates, heat the vegetable oil in a large skillet or wok over high heat until it shimmers, about 1 minute.
4. Add the marinated beef to the hot skillet in a single layer, reserving any excess marinade in the bowl. Tip: Don’t overcrowd the pan to ensure a good sear instead of steaming.
5. Cook the beef without moving it for 2 minutes to develop a caramelized crust.
6. Stir the beef and continue cooking for another 2-3 minutes until it is browned and cooked through, with no pink remaining.
7. Pour the reserved marinade into the skillet and cook, stirring constantly, for 1 minute until it thickens into a glossy sauce that coats the beef. Tip: Boiling the marinade ensures it’s safe to eat.
8. Warm the flour tortillas in a dry skillet over medium heat for about 30 seconds per side, or until soft and pliable.
9. To assemble, place a warm tortilla on a plate and top it with a portion of the cooked Korean BBQ beef.
10. Add a small handful of shredded red cabbage on top of the beef.
11. Garnish with sliced green onions and fresh cilantro leaves.
12. Serve immediately with lime wedges on the side for squeezing over the tacos. Tip: The lime juice brightens all the flavors and cuts through the richness.
Just cooked, the beef is tender with a sticky, sweet-spicy glaze that clings to every bite. The cool, crunchy cabbage and fresh herbs provide the perfect contrast. For a fun twist, serve them with a side of kimchi or swap the tortillas for crispy lettuce cups.
Mediterranean Stuffed Peppers
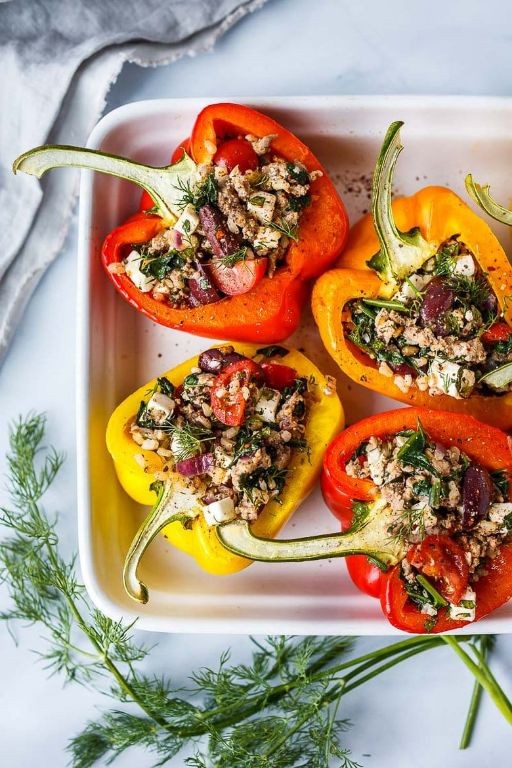
Bursting with vibrant colors and bold flavors, these Mediterranean stuffed peppers transform simple ingredients into a showstopping meal. They’re perfect for weeknight dinners or casual entertaining, delivering restaurant-quality taste with minimal fuss. You’ll love how the filling stays moist while the peppers get tender-crisp.
Serving: 4 | Pre Time: 15 minutes | Cooking Time: 35 minutes
Ingredients
– 4 large bell peppers (any color you like)
– 1 lb ground lamb or beef
– 1 cup cooked quinoa
– 1/2 cup crumbled feta cheese
– 1/4 cup chopped Kalamata olives
– 2 tbsp olive oil
– 1 small onion, diced
– 2 cloves garlic, minced
– 1 tsp dried oregano
– 1/2 tsp ground cumin
– A splash of lemon juice
– A couple of fresh basil leaves for garnish
– Salt and pepper to season
Instructions
1. Preheat your oven to 375°F and line a baking dish with parchment paper.
2. Slice the tops off the bell peppers and remove all seeds and membranes.
3. Heat 1 tbsp olive oil in a large skillet over medium-high heat.
4. Add the diced onion and cook for 3-4 minutes until translucent.
5. Stir in the minced garlic and cook for 1 more minute until fragrant.
6. Add the ground meat, breaking it up with a spatula, and cook for 5-6 minutes until browned.
7. Mix in the cooked quinoa, oregano, cumin, salt, and pepper, then remove from heat.
8. Fold in the feta cheese, Kalamata olives, and a splash of lemon juice.
9. Stuff each pepper generously with the filling, pressing it down lightly.
10. Place the stuffed peppers upright in the prepared baking dish.
11. Drizzle the remaining 1 tbsp olive oil over the peppers.
12. Bake at 375°F for 30-35 minutes until the peppers are tender and slightly charred at the edges.
13. Remove from oven and let rest for 5 minutes before serving.
14. Garnish with fresh basil leaves.
Delightfully tender peppers cradle a savory, spiced filling that’s both hearty and fresh. The feta adds a creamy tang while the olives provide briny pops of flavor. Try serving them over a bed of lemony couscous or with a dollop of tzatziki for extra Mediterranean flair.
Coconut Curry Lentil Soup

Nothing beats a warming bowl of soup on a chilly evening. This coconut curry lentil soup is packed with flavor and comes together quickly. It’s perfect for a weeknight dinner or meal prep.
Serving: 4 | Pre Time: 10 minutes | Cooking Time: 30 minutes
Ingredients
– A couple of tablespoons of olive oil
– One yellow onion, chopped
– Three cloves of garlic, minced
– A tablespoon of fresh ginger, grated
– A couple of tablespoons of red curry paste
– A cup of red lentils, rinsed
– A 14-ounce can of coconut milk
– Four cups of vegetable broth
– A splash of lime juice
– A handful of fresh cilantro, chopped
Instructions
1. Heat the olive oil in a large pot over medium heat for 1 minute.
2. Add the chopped onion and cook for 5 minutes, stirring occasionally, until softened.
3. Stir in the minced garlic and grated ginger, cooking for 1 minute until fragrant.
4. Add the red curry paste and cook for 1 minute, stirring constantly to toast it slightly.
5. Pour in the rinsed red lentils, coconut milk, and vegetable broth, stirring to combine.
6. Bring the mixture to a boil, then reduce heat to low and simmer for 20 minutes, uncovered, stirring occasionally.
7. After 20 minutes, check that the lentils are tender by pressing one with a spoon—it should mash easily.
8. Remove the pot from heat and stir in the lime juice and chopped cilantro.
9. Ladle the soup into bowls and serve immediately.
Expect a creamy, hearty texture with a rich coconut flavor balanced by the tangy lime. The lentils add a satisfying thickness, making it feel indulgent yet healthy. Try topping it with extra cilantro or a dollop of yogurt for a cool contrast.
Maple Dijon Glazed Turkey Breast
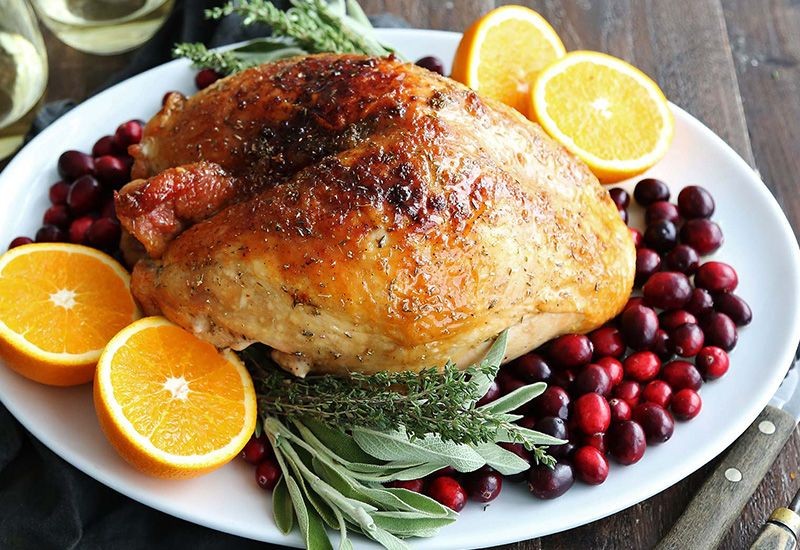
Nothing beats a juicy turkey breast with a sweet-savory glaze for holiday dinners or easy weeknight meals. Need a showstopper that doesn’t require roasting a whole bird? This maple Dijon version delivers big flavor with minimal fuss.
Serving: 4 | Pre Time: 15 minutes | Cooking Time: 60 minutes
Ingredients
– One boneless, skin-on turkey breast (about 2 pounds)
– A couple of tablespoons of olive oil
– A good sprinkle of kosher salt and black pepper
– Half a cup of pure maple syrup
– A quarter cup of Dijon mustard
– Two cloves of garlic, minced
– A splash of apple cider vinegar
– A pinch of dried thyme
Instructions
1. Preheat your oven to 375°F.
2. Pat the turkey breast completely dry with paper towels—this helps the skin get crispy.
3. Rub the breast all over with the olive oil.
4. Season the turkey generously on all sides with the kosher salt and black pepper.
5. Place the turkey breast, skin-side up, in a roasting pan or oven-safe skillet.
6. Roast the turkey in the preheated oven for 30 minutes.
7. While the turkey roasts, whisk together the maple syrup, Dijon mustard, minced garlic, apple cider vinegar, and dried thyme in a small bowl until smooth.
8. After 30 minutes, remove the turkey from the oven and brush half of the maple Dijon glaze evenly over the top and sides.
9. Tip: For deeper flavor, gently lift the skin and brush a little glaze directly onto the meat.
10. Return the turkey to the oven and continue roasting for another 20 minutes.
11. Remove the turkey again and brush with the remaining glaze.
12. Tip: Use a meat thermometer to check for doneness—insert it into the thickest part; it should read 165°F.
13. Roast for a final 5-10 minutes, or until the internal temperature reaches 165°F and the glaze is sticky and caramelized.
14. Transfer the turkey to a cutting board and let it rest for 10 minutes before slicing. Tip: Resting allows the juices to redistribute, keeping the meat moist.
15. Slice the turkey against the grain and serve.
Buttery, tender meat with a crisp, sticky-sweet crust makes this a winner. The glaze caramelizes into a glossy coating that balances maple sweetness with Dijon’s tang. Serve slices over a bed of creamy mashed potatoes or shred leftovers for next-day sandwiches.
Smoky Chipotle Black Bean Chili
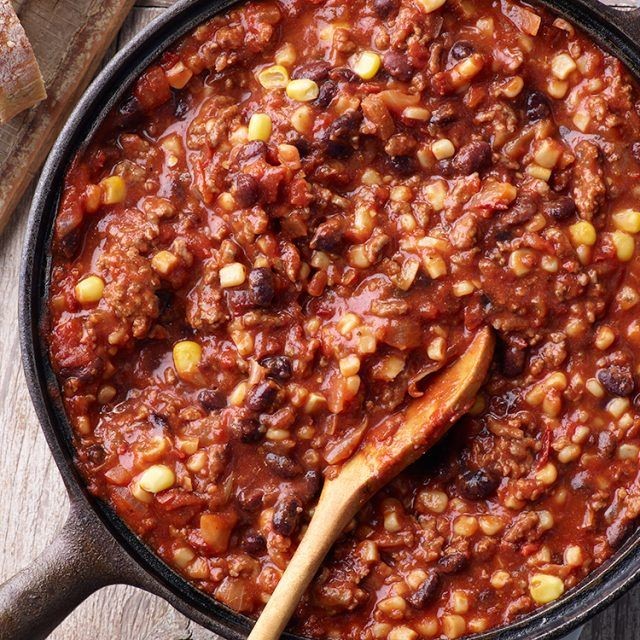
Venture beyond basic chili with this smoky, satisfying bowl that comes together with minimal fuss. Chipotle peppers add a deep, complex heat while black beans keep it hearty and vegetarian-friendly. Perfect for chilly nights or meal prep.
Serving: 6 | Pre Time: 15 minutes | Cooking Time: 45 minutes
Ingredients
– A couple of tablespoons of olive oil
– One large yellow onion, diced
– Three cloves of garlic, minced
– Two tablespoons of chili powder
– One tablespoon of ground cumin
– Two chipotle peppers in adobo sauce, minced, plus a splash of that sauce
– Two 15-ounce cans of black beans, rinsed and drained
– One 28-ounce can of crushed tomatoes
– Two cups of vegetable broth
– A teaspoon of salt
– Half a teaspoon of black pepper
– Optional toppings: a handful of shredded cheese, a dollop of sour cream, some chopped cilantro
Instructions
1. Heat the olive oil in a large pot or Dutch oven over medium heat for 1 minute.
2. Add the diced onion and cook for 5–7 minutes, stirring occasionally, until softened and translucent.
3. Stir in the minced garlic and cook for 1 minute until fragrant.
4. Add the chili powder and ground cumin, toasting the spices with the onions for 30 seconds to deepen their flavor.
5. Mix in the minced chipotle peppers and a splash of adobo sauce.
6. Pour in the rinsed black beans, crushed tomatoes, and vegetable broth.
7. Season with the salt and black pepper, stirring to combine everything.
8. Bring the chili to a boil, then reduce the heat to low.
9. Simmer uncovered for 30–35 minutes, stirring occasionally, until slightly thickened.
10. Taste and adjust seasoning if needed, but avoid over-salting as flavors concentrate while cooking.
11. Ladle into bowls and top with optional shredded cheese, sour cream, or chopped cilantro.
Grab a spoon and dig into this thick, chunky chili where the smokiness from the chipotle balances the sweetness of the tomatoes. It’s even better the next day after the flavors meld overnight. Try serving it over baked potatoes or with cornbread for a comforting twist.
Greek Yogurt Chicken Tikka Masala

Bold flavors meet creamy comfort in this Greek yogurt chicken tikka masala. It’s a lighter, tangy twist on the classic that’s perfect for busy weeknights. You’ll have dinner ready in under an hour with minimal fuss.
Serving: 4 | Pre Time: 15 minutes | Cooking Time: 25 minutes
Ingredients
– A couple of boneless, skinless chicken breasts, cut into 1-inch cubes
– A generous cup of plain Greek yogurt
– A splash of lemon juice
– A couple of tablespoons of olive oil
– One large onion, finely chopped
– Three cloves of garlic, minced
– A tablespoon of grated fresh ginger
– A tablespoon of garam masala
– A teaspoon of ground cumin
– A teaspoon of paprika
– A pinch of cayenne pepper
– A can (14.5 oz) of crushed tomatoes
– A half cup of heavy cream
– A handful of fresh cilantro, chopped
– Salt to season
Instructions
1. In a medium bowl, combine the chicken cubes, Greek yogurt, lemon juice, and a pinch of salt. Mix well to coat evenly, then let it marinate at room temperature for 10 minutes. Tip: Marinating at room temperature helps the yogurt penetrate the chicken faster for more flavor.
2. Heat one tablespoon of olive oil in a large skillet over medium-high heat until shimmering, about 2 minutes.
3. Add the marinated chicken to the skillet in a single layer, cooking for 5-7 minutes until browned on all sides and cooked through. Remove the chicken from the skillet and set aside on a plate.
4. In the same skillet, add the remaining tablespoon of olive oil and reduce the heat to medium.
5. Add the chopped onion and cook for 5 minutes, stirring occasionally, until softened and translucent.
6. Stir in the minced garlic and grated ginger, cooking for 1 minute until fragrant.
7. Add the garam masala, cumin, paprika, and cayenne pepper to the skillet, toasting the spices for 30 seconds to release their oils. Tip: Toasting spices briefly enhances their depth and aroma in the dish.
8. Pour in the crushed tomatoes, stirring to combine with the onion and spice mixture.
9. Bring the sauce to a simmer, then reduce the heat to low and let it cook for 10 minutes, stirring occasionally, until slightly thickened.
10. Stir in the heavy cream until fully incorporated into the sauce.
11. Return the cooked chicken to the skillet, stirring to coat it in the sauce. Simmer for 5 minutes to heat through and allow the flavors to meld. Tip: Simmering the chicken in the sauce for a few minutes helps it absorb the creamy, spiced flavors without overcooking.
12. Remove the skillet from the heat and stir in half of the chopped cilantro.
13. Serve the chicken tikka masala hot, garnished with the remaining cilantro.
Unbelievably creamy yet light, this dish has a velvety texture from the yogurt and cream with a subtle tang. The spices meld into a rich, aromatic sauce that clings perfectly to the tender chicken. Try it over fluffy basmati rice or with warm naan for scooping up every last bit.
Apple Cider Pulled Pork Sliders
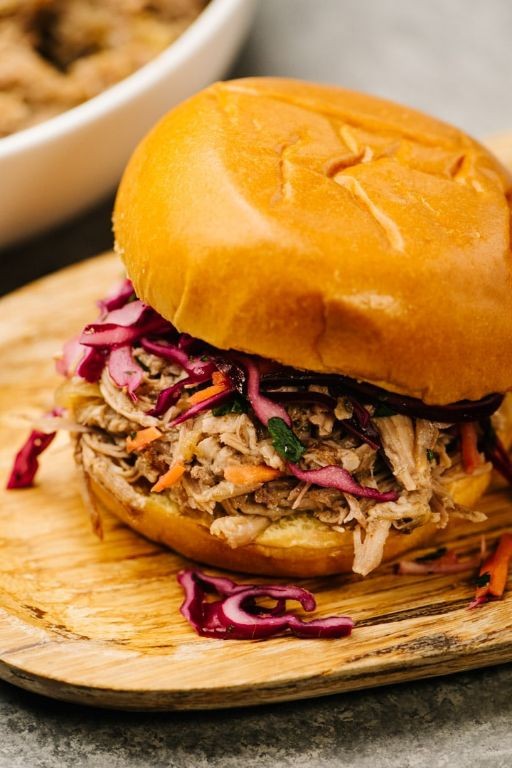
Savor tender pulled pork with a sweet apple cider twist in these easy sliders. Perfect for game day or casual gatherings, they come together with minimal effort for maximum flavor. Just pile the meat on soft buns and dig in.
Serving: 8 | Pre Time: 15 minutes | Cooking Time: 8 hours
Ingredients
– A 3-pound pork shoulder roast
– A couple of cups of apple cider
– A splash of apple cider vinegar
– A generous glug of olive oil
– A couple of tablespoons of brown sugar
– A tablespoon of smoked paprika
– A teaspoon of garlic powder
– A teaspoon of onion powder
– A teaspoon of salt
– Half a teaspoon of black pepper
– A pack of slider buns
– A cup of your favorite BBQ sauce
Instructions
1. Pat the pork shoulder dry with paper towels to help the seasoning stick better.
2. Rub the pork all over with olive oil.
3. In a small bowl, mix brown sugar, smoked paprika, garlic powder, onion powder, salt, and black pepper.
4. Massage the spice mix evenly onto the pork, covering every surface.
5. Place the pork in a slow cooker.
6. Pour apple cider and apple cider vinegar around the pork, not over the top, to keep the crust intact.
7. Cover and cook on low for 8 hours until the pork shreds easily with a fork.
8. Remove the pork from the slow cooker and transfer to a cutting board, reserving the cooking liquid.
9. Use two forks to shred the pork completely, discarding any large fat pieces.
10. Skim excess fat from the reserved cooking liquid, then mix a half-cup of it with BBQ sauce in a bowl.
11. Toss the shredded pork with the BBQ sauce mixture until well-coated, adding more liquid if it seems dry.
12. Toast the slider buns lightly in a 350°F oven for 5 minutes for extra crunch.
13. Pile the pulled pork onto the buns and serve immediately.
Glazed with that sweet-tangy sauce, the pork stays juicy and packs a smoky depth from the paprika. Try topping with crunchy coleslaw or pickled onions for a fresh contrast, making these sliders a crowd-pleaser every time.
Thai Peanut Butter Chicken
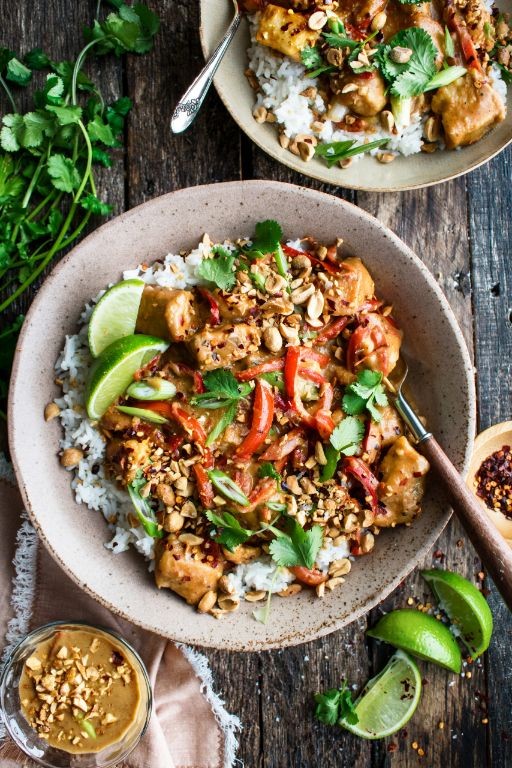
Get ready for a flavor-packed weeknight dinner that comes together in under 30 minutes. This Thai-inspired peanut butter chicken is creamy, savory, and just a little spicy. It’s the perfect way to jazz up your usual chicken routine.
Serving: 4 | Pre Time: 10 minutes | Cooking Time: 20 minutes
Ingredients
– A couple of boneless, skinless chicken breasts, cut into 1-inch cubes
– A good glug of vegetable oil
– 1/2 cup of creamy peanut butter
– 1 can (13.5 oz) of coconut milk
– A couple of tablespoons of soy sauce
– A tablespoon of honey
– A tablespoon of lime juice
– A couple of cloves of garlic, minced
– A teaspoon of grated fresh ginger
– A pinch of red pepper flakes
– A handful of chopped cilantro for garnish
– Cooked white rice for serving
Instructions
1. Heat a large skillet or wok over medium-high heat and add a good glug of vegetable oil.
2. Add the cubed chicken to the hot skillet in a single layer, cooking for 5-7 minutes until golden brown on all sides and cooked through. Tip: Don’t overcrowd the pan—cook in batches if needed for a better sear.
3. Remove the cooked chicken from the skillet and set it aside on a plate.
4. In the same skillet, reduce the heat to medium and add the minced garlic and grated ginger. Cook for 1 minute until fragrant, stirring constantly to prevent burning.
5. Whisk in the peanut butter, coconut milk, soy sauce, honey, lime juice, and red pepper flakes until smooth and combined.
6. Bring the sauce to a gentle simmer and let it cook for 3-5 minutes, stirring occasionally, until it thickens slightly. Tip: If the sauce gets too thick, thin it with a splash of water or chicken broth.
7. Return the cooked chicken to the skillet, stirring to coat it evenly in the sauce. Let it simmer together for 2-3 minutes to heat through.
8. Taste the sauce and adjust seasoning if needed, but the soy sauce and peanut butter usually provide enough saltiness. Tip: For extra freshness, stir in half the chopped cilantro right at the end.
9. Serve the chicken and sauce immediately over cooked white rice, garnished with the remaining chopped cilantro.
Perfectly creamy with a nutty depth from the peanut butter, this dish has a velvety texture that clings to every grain of rice. The hint of lime and ginger cuts through the richness beautifully. Try serving it in lettuce cups for a low-carb option or with a side of quick-pickled vegetables for extra crunch.
Balsamic Fig Pot Roast
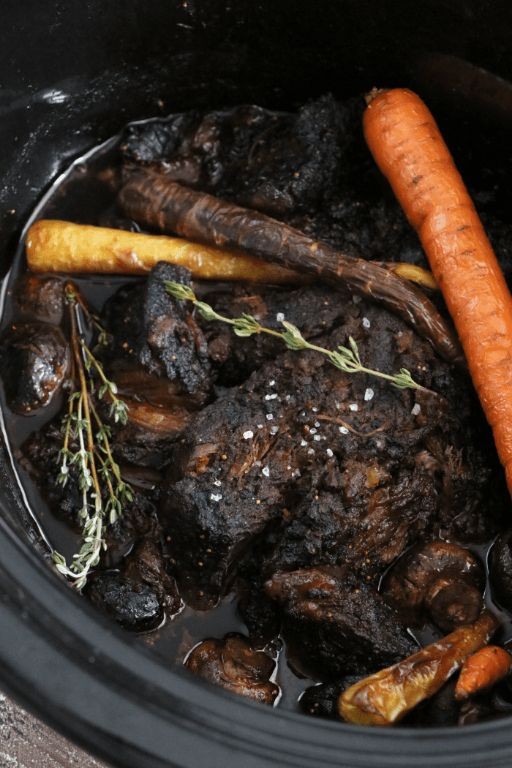
Just imagine coming home to a pot roast that’s both savory and sweet. Juicy beef simmers with balsamic and figs until it’s fall-apart tender. This dish is perfect for a cozy winter dinner.
Serving: 6 | Pre Time: 20 minutes | Cooking Time: 3 hours 30 minutes
Ingredients
– A 3-pound chuck roast
– A couple of tablespoons of olive oil
– A large yellow onion, chopped
– 4 cloves of garlic, minced
– A cup of beef broth
– A half cup of balsamic vinegar
– A quarter cup of brown sugar
– A tablespoon of tomato paste
– A teaspoon of dried thyme
– A teaspoon of salt
– A half teaspoon of black pepper
– 8 dried figs, halved
– A couple of carrots, chopped into chunks
– A couple of stalks of celery, chopped
Instructions
1. Preheat your oven to 325°F.
2. Pat the chuck roast dry with paper towels—this helps it brown better.
3. Heat the olive oil in a large Dutch oven over medium-high heat until shimmering.
4. Sear the roast for 4-5 minutes per side until deeply browned, then transfer to a plate.
5. Add the onion to the pot and cook for 5 minutes until softened.
6. Stir in the garlic and cook for 1 minute until fragrant.
7. Pour in the beef broth to deglaze, scraping up any browned bits from the bottom.
8. Whisk in the balsamic vinegar, brown sugar, tomato paste, thyme, salt, and pepper until combined.
9. Return the roast to the pot, nestling it into the liquid.
10. Scatter the figs, carrots, and celery around the roast.
11. Cover the pot and transfer it to the preheated oven.
12. Braise for 3 hours, checking once halfway to ensure the liquid is simmering gently.
13. Remove the pot from the oven and let the roast rest for 15 minutes before slicing—this keeps it juicy.
14. Skim any excess fat from the sauce with a spoon.
15. Serve the sliced roast and vegetables with the sauce spooned over the top.
Perfectly tender beef shreds easily with a fork, soaked in a rich, tangy-sweet sauce. The figs melt into the gravy, adding subtle fruitiness. Try it over creamy polenta or with crusty bread to soak up every last drop.
Pumpkin Spice Oatmeal Overnight

Holiday mornings don’t have to be hectic. This pumpkin spice oatmeal overnight is your make-ahead secret for a cozy, flavorful breakfast. Just mix, chill, and wake up to a ready-to-eat treat.
Serving: 2 | Pre Time: 10 minutes | Cooking Time: 0 minutes
Ingredients
– 1 cup of old-fashioned rolled oats
– 1 cup of milk (any kind you like)
– 1/2 cup of pumpkin puree (not pie filling)
– a couple of tablespoons of maple syrup
– a splash of vanilla extract
– 1 teaspoon of pumpkin pie spice
– a pinch of salt
– your favorite toppings, like chopped pecans or a dollop of Greek yogurt
Instructions
1. Grab a medium-sized mixing bowl.
2. Add 1 cup of old-fashioned rolled oats to the bowl.
3. Pour in 1 cup of milk.
4. Spoon in 1/2 cup of pumpkin puree.
5. Drizzle a couple of tablespoons of maple syrup over the mixture.
6. Add a splash of vanilla extract.
7. Sprinkle 1 teaspoon of pumpkin pie spice evenly.
8. Toss in a pinch of salt.
9. Stir everything together vigorously for about 1 minute until fully combined and no dry spots remain.
10. Divide the mixture evenly between two jars or airtight containers.
11. Seal the containers tightly with lids.
12. Place the containers in the refrigerator for at least 8 hours, or overnight.
13. After chilling, remove the containers from the refrigerator.
14. Stir the oatmeal well to incorporate any separated liquid.
15. Top with your favorite toppings, such as chopped pecans or a dollop of Greek yogurt, just before serving.
Dive into a creamy, spiced breakfast that’s effortlessly ready. The oats soften into a pudding-like texture, with the pumpkin and spices melding for a warm, autumnal flavor. For a fun twist, layer it with granola or fresh apple slices to add crunch.
Garlic Parmesan Mushroom Risotto
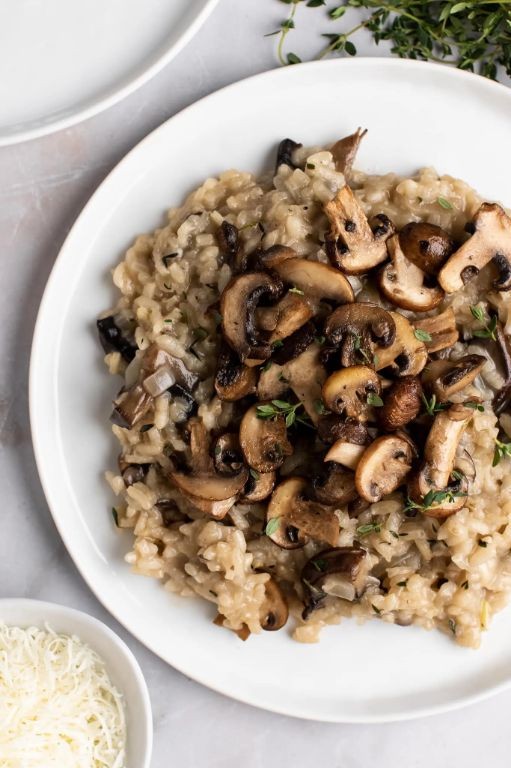
Venture into creamy comfort with this garlic parmesan mushroom risotto. It transforms simple ingredients into a rich, satisfying meal that’s perfect for cozy nights. You’ll love the deep umami from mushrooms paired with sharp parmesan.
Serving: 4 | Pre Time: 10 minutes | Cooking Time: 30 minutes
Ingredients
– A couple of tablespoons of olive oil
– 1 cup of Arborio rice
– 8 ounces of cremini mushrooms, sliced
– 4 cloves of garlic, minced
– 4 cups of chicken or vegetable broth, kept warm
– A splash of dry white wine
– A handful of grated parmesan cheese
– A pat of butter
– Salt and pepper
Instructions
1. Heat 2 tablespoons of olive oil in a large skillet or Dutch oven over medium heat.
2. Add the sliced mushrooms and cook for 5-7 minutes until they release their liquid and turn golden brown.
3. Stir in the minced garlic and cook for 1 minute until fragrant.
4. Add the Arborio rice to the skillet and toast for 2 minutes, stirring constantly to coat in oil.
5. Pour in the splash of white wine and cook until fully absorbed, about 1 minute.
6. Ladle in 1 cup of warm broth and simmer, stirring frequently, until the liquid is mostly absorbed.
7. Repeat adding broth 1 cup at a time, stirring after each addition until absorbed, for about 20-25 minutes total. Tip: Keep the broth warm to maintain even cooking temperature.
8. Test the rice—it should be tender but slightly firm in the center.
9. Remove from heat and stir in the grated parmesan cheese and pat of butter until melted and creamy.
10. Season with salt and pepper to taste. Tip: Add the cheese off the heat to prevent clumping.
11. Let the risotto rest for 2 minutes before serving. Tip: This allows the flavors to meld and the texture to set perfectly.
The risotto should be luxuriously creamy with a slight bite from the al dente rice. Its earthy mushroom and garlic notes shine through the rich parmesan base. Try topping it with extra cheese or fresh herbs for a vibrant finish.
Caramelized Onion French Dip Sandwiches

Picture this: a sandwich so rich and savory it feels like a warm hug. Caramelized onions add sweet depth to the classic French dip, making it a standout meal. You’ll want to make extra because these disappear fast.
Serving: 4 | Pre Time: 15 minutes | Cooking Time: 60 minutes
Ingredients
- 2 large yellow onions, thinly sliced
- 2 tablespoons olive oil
- 1 teaspoon granulated sugar
- 1/4 cup dry red wine
- 2 cups beef broth
- 1 pound thinly sliced roast beef
- 4 hoagie rolls
- 4 slices provolone cheese
- A couple of tablespoons of butter
- A splash of Worcestershire sauce
Instructions
- Heat olive oil in a large skillet over medium-low heat.
- Add the sliced onions and cook, stirring occasionally, for 10 minutes until softened.
- Sprinkle sugar over the onions and continue cooking for 30-40 minutes, stirring every 5-10 minutes, until deeply golden brown and caramelized. Tip: Low and slow is key for perfect caramelization without burning.
- Pour in the red wine to deglaze the pan, scraping up any browned bits, and cook for 2 minutes until reduced.
- Add beef broth and Worcestershire sauce, bring to a simmer, and cook for 10 minutes to develop flavor.
- Preheat your oven’s broiler to 500°F.
- Split the hoagie rolls and spread butter lightly on the cut sides.
- Toast the rolls under the broiler for 1-2 minutes until golden, watching closely to prevent burning. Tip: Keep the oven door ajar to monitor browning.
- Pile roast beef onto the toasted rolls, then top with caramelized onions and a slice of provolone cheese.
- Return sandwiches to the broiler for 1-2 minutes until the cheese is melted and bubbly.
- Strain the cooking liquid from the skillet into small bowls for dipping, discarding solids. Tip: For a richer au jus, skim off any excess fat after straining.
- Serve the sandwiches immediately with the warm dipping broth on the side.
These sandwiches boast a tender, juicy filling with onions that are sweet and sticky. The provolone melts into a creamy blanket, while the broth adds a savory, umami punch. Try serving them with crispy potato wedges for a satisfying crunch alongside the dip.
Lemon Garlic Butter Shrimp Pasta

A quick, vibrant pasta dish that’s perfect for busy weeknights. Lemon garlic butter shrimp pasta comes together in under 30 minutes, delivering bright, savory flavors with minimal effort. It’s a restaurant-quality meal you can make at home.
Serving: 4 | Pre Time: 10 minutes | Cooking Time: 15 minutes
Ingredients
– 12 ounces of your favorite pasta, like linguine or fettuccine
– 1 pound of large shrimp, peeled and deveined
– 4 tablespoons of butter
– 4 cloves of garlic, minced
– A big splash of dry white wine, about 1/4 cup
– The zest and juice from 1 lemon
– A couple of tablespoons of fresh parsley, chopped
– A pinch of red pepper flakes, if you like a little heat
– Salt and freshly ground black pepper
Instructions
1. Bring a large pot of salted water to a rolling boil over high heat.
2. Add the pasta and cook according to package directions until al dente, usually 8–10 minutes. Tip: Reserve about 1 cup of the starchy pasta water before draining.
3. While the pasta cooks, pat the shrimp completely dry with paper towels. Season them generously with salt and pepper.
4. Heat 2 tablespoons of butter in a large skillet over medium-high heat until melted and foamy.
5. Add the shrimp in a single layer and cook for 1–2 minutes per side, until they turn pink and opaque. Transfer them to a plate.
6. In the same skillet, reduce the heat to medium and add the remaining 2 tablespoons of butter.
7. Add the minced garlic and cook for about 30 seconds, just until fragrant—be careful not to let it burn.
8. Pour in the white wine to deglaze the pan, scraping up any browned bits from the bottom with a wooden spoon. Let it simmer for 1–2 minutes to reduce slightly.
9. Stir in the lemon zest and lemon juice.
10. Add the drained pasta and cooked shrimp back to the skillet. Toss everything to coat evenly in the sauce.
11. If the sauce seems too thick, add a splash of the reserved pasta water, a little at a time, until it reaches your desired consistency. Tip: The starchy water helps the sauce cling to the pasta.
12. Remove the skillet from the heat and stir in the chopped parsley and red pepper flakes (if using). Tip: Adding herbs off the heat preserves their fresh flavor and vibrant color.
13. Taste and adjust seasoning with more salt or pepper if needed.
Dinner is ready. The pasta should be perfectly al dente, coated in a glossy, buttery sauce with a bright kick from the lemon. The shrimp remain tender and juicy, adding a savory depth. For a fresh twist, serve it with a simple arugula salad on the side or top with extra lemon zest right at the table.
Spiced Pear and Cranberry Crumble
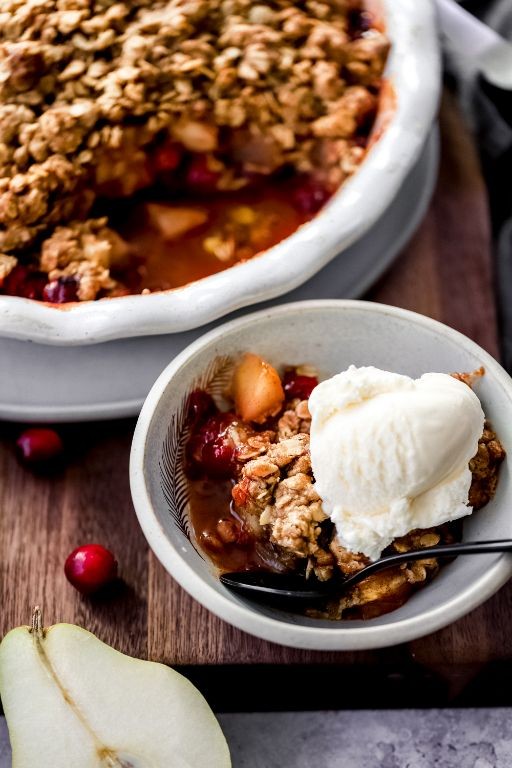
Kick off the holiday season with this warm, comforting dessert. It combines sweet pears with tart cranberries under a buttery, spiced topping. Perfect for feeding a crowd with minimal effort.
Serving: 6 | Pre Time: 15 minutes | Cooking Time: 40 minutes
Ingredients
– 4 ripe pears, peeled and sliced
– a cup of fresh cranberries
– a quarter cup of granulated sugar
– a tablespoon of lemon juice
– a teaspoon of ground cinnamon
– a half teaspoon of ground ginger
– a cup of all-purpose flour
– three-quarters cup of rolled oats
– a half cup of packed brown sugar
– a pinch of salt
– a half cup of cold unsalted butter, cubed
– a splash of vanilla extract
Instructions
1. Preheat your oven to 375°F.
2. In a large bowl, toss the sliced pears and cranberries with the granulated sugar, lemon juice, cinnamon, and ginger until evenly coated.
3. Transfer the fruit mixture to a 9-inch baking dish, spreading it out evenly.
4. In a separate bowl, combine the flour, oats, brown sugar, and salt.
5. Add the cold cubed butter to the dry ingredients.
6. Use your fingers or a pastry cutter to work the butter into the mixture until it resembles coarse crumbs, with some pea-sized pieces remaining for texture.
7. Stir in the vanilla extract until just incorporated.
8. Sprinkle the crumble topping evenly over the fruit in the baking dish.
9. Bake in the preheated oven for 35-40 minutes, or until the topping is golden brown and the fruit is bubbling around the edges.
10. Remove from the oven and let it cool on a wire rack for at least 10 minutes before serving to allow the juices to thicken slightly.
Now, dig into this cozy treat. The topping stays crisp while the fruit softens into a jammy, spiced filling. Serve it warm with a scoop of vanilla ice cream for the ultimate contrast.
Jalapeño Popper Stuffed Chicken

Zesty and satisfying, this Jalapeño Popper Stuffed Chicken combines creamy, spicy filling with juicy chicken. It’s perfect for a weeknight dinner that feels special. You’ll love the crispy bacon topping and gooey cheese center.
Serving: 4 | Pre Time: 15 minutes | Cooking Time: 25 minutes
Ingredients
– 4 boneless, skinless chicken breasts
– 4 slices of bacon, chopped
– 4 ounces of cream cheese, softened
– 1/2 cup of shredded cheddar cheese
– 2 jalapeños, seeds removed and finely diced
– 1/4 cup of breadcrumbs
– 1 tablespoon of olive oil
– A pinch of salt and black pepper
– A splash of milk to thin the filling if needed
Instructions
1. Preheat your oven to 400°F and line a baking sheet with parchment paper.
2. In a skillet over medium heat, cook the chopped bacon until crispy, about 5-7 minutes, then drain on paper towels.
3. In a bowl, mix the softened cream cheese, shredded cheddar, diced jalapeños, and cooked bacon until well combined; add a splash of milk if the mixture seems too thick.
4. Using a sharp knife, cut a pocket into each chicken breast by slicing horizontally, being careful not to cut all the way through.
5. Stuff each chicken pocket with about 2 tablespoons of the jalapeño mixture, pressing gently to seal.
6. Season the outside of the chicken breasts with a pinch of salt and black pepper.
7. In a small bowl, toss the breadcrumbs with the olive oil until coated.
8. Press the breadcrumb mixture onto the top of each stuffed chicken breast to form a crust.
9. Place the chicken on the prepared baking sheet and bake at 400°F for 20-25 minutes, or until the internal temperature reaches 165°F and the top is golden brown.
10. Let the chicken rest for 5 minutes before slicing to keep the juices inside.
Golden and crispy on the outside, the chicken stays moist with a molten cheese center that oozes with each bite. Serve it sliced over a bed of greens or with roasted veggies for a complete meal that’s sure to impress.
Rosemary Garlic White Bean Stew
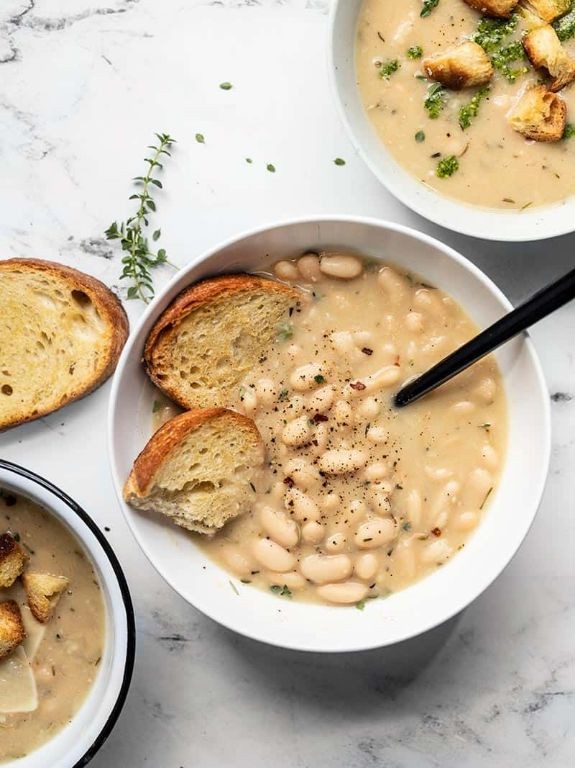
Cozy up with this hearty stew that comes together in one pot. Rosemary and garlic infuse creamy white beans with earthy flavor, while vegetables add texture. It’s perfect for chilly evenings when you want something satisfying without much fuss.
Serving: 4 | Pre Time: 10 minutes | Cooking Time: 25 minutes
Ingredients
– A couple of tablespoons of olive oil
– 4 cloves of garlic, minced
– 1 yellow onion, diced
– 2 carrots, chopped into half-inch pieces
– 2 stalks of celery, chopped
– A splash of dry white wine (about ¼ cup)
– 4 cups of vegetable broth
– 2 (15-ounce) cans of cannellini beans, drained and rinsed
– 1 tablespoon of fresh rosemary, finely chopped
– Salt and black pepper
Instructions
1. Heat olive oil in a large pot over medium heat for 1 minute.
2. Add garlic and onion, sautéing for 3–4 minutes until fragrant and translucent.
3. Stir in carrots and celery, cooking for another 5 minutes until slightly softened.
4. Pour in white wine, scraping the bottom of the pot to deglaze, and simmer for 2 minutes until reduced by half.
5. Add vegetable broth, cannellini beans, and rosemary, bringing to a boil.
6. Reduce heat to low, cover, and simmer for 15 minutes until vegetables are tender.
7. Season with salt and black pepper, stirring to combine.
8. Remove from heat and let sit for 5 minutes to thicken slightly.
Buttery beans soak up the aromatic broth, creating a creamy texture without dairy. Serve it over crusty bread to soak up every last drop, or top with a sprinkle of red pepper flakes for a spicy kick. This stew tastes even better the next day as flavors meld together.
Summary
Busy weeknights just got easier and tastier with these 20 unique Crock Pot recipes! We hope this list inspires you to try something new, saves you precious time, and fills your home with delicious aromas. Give a recipe a spin, then let us know your favorite in the comments below. If you found this helpful, please share it with your fellow busy cooks on Pinterest!