Moment by moment, the world outside fades, leaving only the quiet promise of shared sweetness. My love, let me guide you in crafting a dessert that feels less like a recipe and more like a whispered secret—a vanilla panna cotta so ethereally smooth, it will melt upon your tongue like a tender memory. This is an edible caress, a delicate finale to an evening meant for lingering glances and soft laughter.
Why This Recipe Works
- Using gelatin sheets instead of powder yields a silkier, cleaner texture without any rubbery chew.
- A touch of high-quality honey balances the cream’s richness with a floral whisper, far superior to plain sugar.
- Infusing the cream with a whole vanilla bean pod, not just extract, creates a profoundly aromatic and complex flavor base.
- Chilling in elegant, individual ramekins ensures a perfect, personal presentation that feels intimately special.
Ingredients
- 2 cups heavy cream (preferably not ultra-pasteurized)
- 1/2 cup whole milk
- 1/3 cup mild honey (such as clover or orange blossom)
- 1 whole vanilla bean pod
- 1/8 teaspoon fine sea salt
- 4 sheets (about 8 grams) platinum-grade gelatin
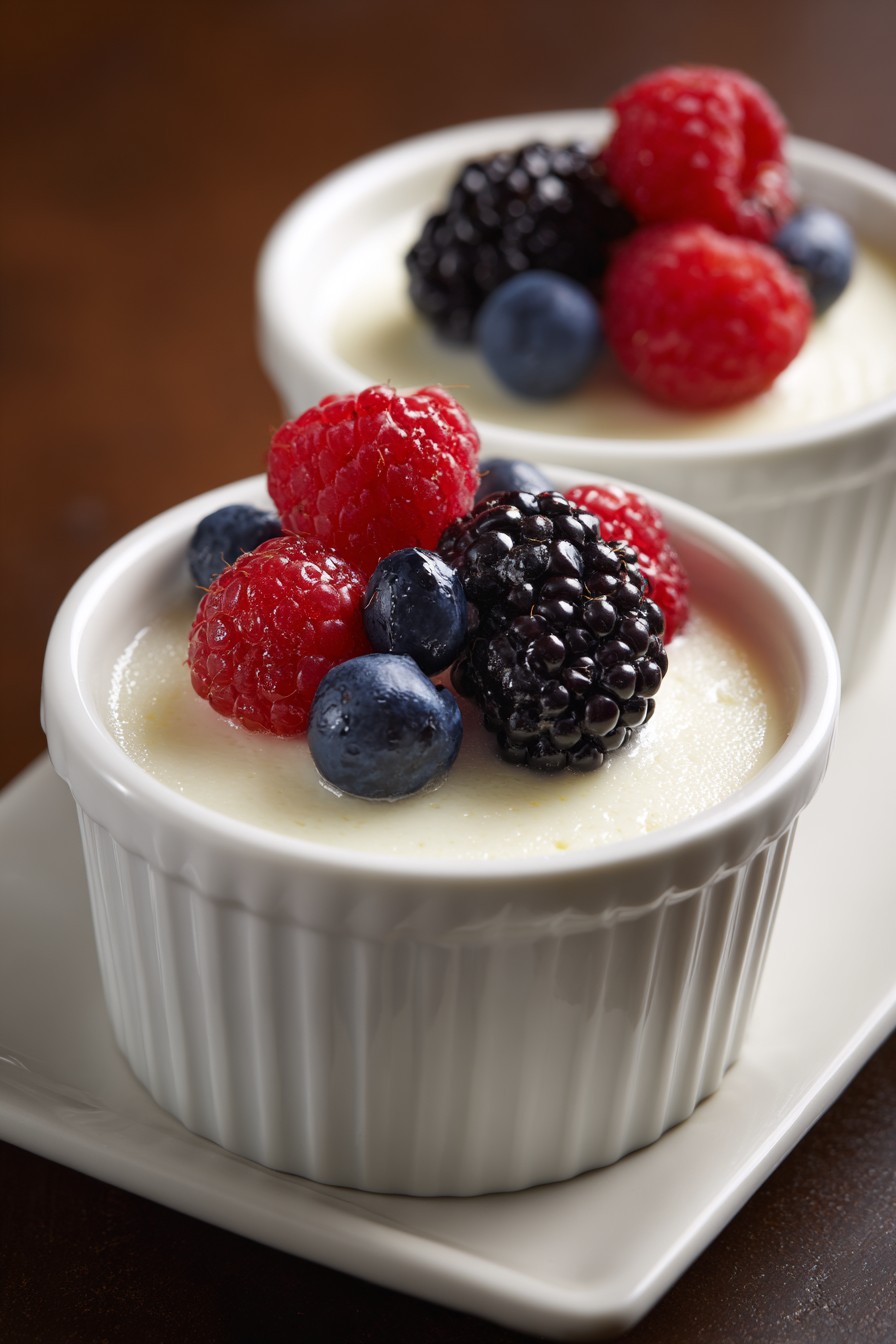
- Fresh berries, for serving (optional)
Equipment Needed
- Small saucepan
- 4 (6-ounce) ramekins or small dessert cups
- Fine-mesh strainer
- Whisk
- Sharp paring knife
- Medium mixing bowl
Instructions
Step 1: Awaken the Vanilla’s Soul
Begin by pouring the 2 cups of heavy cream and 1/2 cup of whole milk into your small saucepan. With your sharp paring knife, carefully split the vanilla bean pod lengthwise. Use the back of the knife to scrape out every last one of the fragrant, black seeds inside. Add both the scraped seeds and the empty pod husk directly into the cream mixture. This is where the magic starts—the tiny seeds will disperse like stardust, promising their flavor to every molecule of cream. Gently stir in the 1/3 cup of honey and the 1/8 teaspoon of fine sea salt. Do not turn on the heat yet. Simply let the ingredients become acquainted, the vanilla beginning to perfume the cold liquid. This patient start is the first secret to a deeply infused flavor. Tip: To get the most from your vanilla bean, save the scraped pod. Once dry, it can be buried in a jar of sugar to create beautifully scented vanilla sugar for your morning coffee.
Step 2: The Gentle Infusion
Now, place the saucepan over medium-low heat. We are not aiming for a boil, but for a slow, loving warmth. Your goal is to heat the mixture until small bubbles just begin to form around the very edges of the pan and steam rises steadily—this should take about 8 to 10 minutes, reaching a temperature of approximately 170°F. Stir occasionally with a whisk, not to incorporate air, but to ensure the honey dissolves completely and the vanilla seeds are evenly distributed. You will see the cream thicken slightly and the kitchen will fill with the most heavenly, comforting aroma. This slow heating coaxes out the vanilla’s full, round flavor without scalding the delicate cream. Once it reaches that steamy, just-bubbling stage, remove the pan from the heat, cover it, and let it steep and dream for a full 25 minutes. This resting period is non-negotiable for depth of flavor.
Step 3: Preparing the Silken Embrace
While your infused cream rests, prepare the gelatin, the element that will give our dessert its signature, trembling texture. Fill your medium mixing bowl with very cold water. Submerge the 4 sheets of gelatin completely, one by one, ensuring they are fully covered. They will soften and become limp and translucent in about 5 to 7 minutes—they should feel supple, like a soft piece of cloth. Once softened, carefully lift each sheet from the water and gently squeeze it between your palms to remove the excess liquid. The gelatin is now ready to melt seamlessly into our warm cream, acting as a gentle scaffold rather than a firm cage. Tip: If you must use powdered gelatin, use 2 1/4 teaspoons. Sprinkle it evenly over 1/4 cup of cold water in a small bowl and let it “bloom” for 5 minutes until it becomes a solid, spongy mass.
Step 4: The Marriage of Cream and Gelatin
After the 25-minute steep, return the saucepan with the infused cream to the stove. Warm it over low heat just until it is hot to the touch again, about 2-3 minutes; we do not need to bring it back to a simmer. Remove the pan from the heat. Using tongs or a fork, fish out the spent vanilla bean pod and discard it (or save it for that vanilla sugar). Add the handful of softened, squeezed gelatin sheets directly into the warm cream. Whisk gently but thoroughly and continuously for a full 2 minutes, until you are absolutely certain not a single speck of gelatin remains. The mixture should be perfectly smooth and homogeneous. Tip: To test if the gelatin is fully dissolved, dip a spoon into the mixture and look at its back. It should be utterly clear, with no visible granules or strands.
Step 5: The Final Rest and Unveiling
Place your fine-mesh strainer over a large measuring cup or bowl with a spout. Carefully pour the creamy gelatin mixture through the strainer. This catches any potential stray vanilla seed clumps or undissolved gelatin bits, guaranteeing that flawless, satiny texture we desire. Divide the strained liquid evenly among your 4 prepared ramekins. Gently tap each ramekin on the counter to release any air bubbles. Cover each ramekin loosely with plastic wrap and refrigerate them for a minimum of 6 hours, though overnight is ideal for the most perfect, unwavering set. To serve, you may run a thin knife around the edge and invert onto a plate, or simply present them in their charming vessels, topped with a few fresh berries. The first spoonful should yield without resistance, a cool, creamy cloud perfumed with pure vanilla.
Tips and Tricks
For an even more luxurious mouthfeel, consider replacing 1/4 cup of the heavy cream with full-fat sour cream or crème fraîche, adding it when you whisk in the gelatin; it introduces a delightful, subtle tang. If unmolding, briefly dip the bottom of each ramekin in a bowl of hot water for 5-10 seconds to loosen the edges perfectly. For the clearest, purest flavor, seek out cream that is not ultra-pasteurized, as the high-heat processing can impart a slightly “cooked” taste. When measuring honey, lightly coat your measuring cup with a neutral oil first—the honey will slide right out, leaving none wasted. Finally, the perfect panna cotta should shimmer and jiggle like a tranquil pond when nudged; if it quivers violently, it may be over-set, but is still delicious.
Recipe Variations
- Honey-Lavender: Add 1 teaspoon of culinary-grade dried lavender buds to the cream during the initial infusion. Strain them out with the vanilla pod for a floral, romantic twist.
- Toasted Coconut: Replace the 1/2 cup of whole milk with well-stirred, full-fat coconut milk. Toast 1/4 cup of unsweetened shredded coconut and sprinkle it over the set desserts for texture.
- Espresso Affogato: Infuse the cream with the vanilla bean as directed, but omit the honey and stir in 1/4 cup of fine granulated sugar instead. Serve the set panna cotta with a shot of hot, freshly brewed espresso poured over the top at the very last moment.
- Berry Swirl: Before chilling, spoon a teaspoon of vibrant, seedless berry coulis (made from simmered and strained raspberries or strawberries) into the bottom of each ramekin. Gently pour the vanilla cream over it for a beautiful layered effect.
Frequently Asked Questions
Q: Can I make this recipe ahead of time?
A: Absolutely, and I encourage it. Panna cotta’s flavor and texture improve with time. Prepare it up to two full days in advance. Keep the ramekins covered with plastic wrap in the refrigerator until you are ready to serve your intimate dessert.
Q: My panna cotta didn’t set firmly. What went wrong?
A: This usually means the gelatin wasn’t fully dissolved or the mixture wasn’t chilled long enough. Ensure you whisk the gelatin into warm (not hot) cream for a full 2 minutes until completely smooth, and always chill for at least 6 hours, undisturbed, in the coldest part of your fridge.
Q: Is there a non-dairy version I can try?
A: For a lovely alternative, replace the heavy cream and milk with 2 1/2 cups of full-fat, canned coconut milk. The process is identical, and the result is a beautifully rich, tropical-infused dessert that is just as silken and dreamy.
Q: Why use a vanilla bean instead of extract?
A: The bean provides thousands of tiny flavor compounds that extract simply cannot replicate. It gives a deeper, more perfumed aroma and those beautiful, authentic black specks that speak of quality and care, making the dessert feel truly special.
Summary
This vanilla panna cotta is a testament to simplicity and elegance, transforming a few exquisite ingredients into a dessert that feels like a whispered endearment. It is the perfect, silken punctuation to an evening meant for connection.
Vanilla Bean Panna Cotta
4
servings20
minutes15
minutesIngredients
Instructions
- 1 In a small saucepan, combine cream, milk, honey, and salt. Split vanilla bean, scrape seeds into pan, and add pod. Heat over medium-low until steaming with small bubbles at edges (~170°F), about 8-10 min. Remove from heat, cover, and steep 25 min.
- 2 Soften gelatin sheets in a bowl of cold water for 5-7 min. Squeeze out excess water.
- 3 Re-warm infused cream over low heat for 2-3 min. Remove vanilla pod. Add softened gelatin and whisk constantly for 2 min until fully dissolved.
- 4 Strain mixture through a fine-mesh sieve into a pourable vessel. Divide evenly among 4 (6-oz) ramekins.
- 5 Tap ramekins to release air bubbles. Cover loosely with plastic wrap and refrigerate at least 6 hours, or overnight, until fully set. Serve chilled, optionally topped with fresh berries.