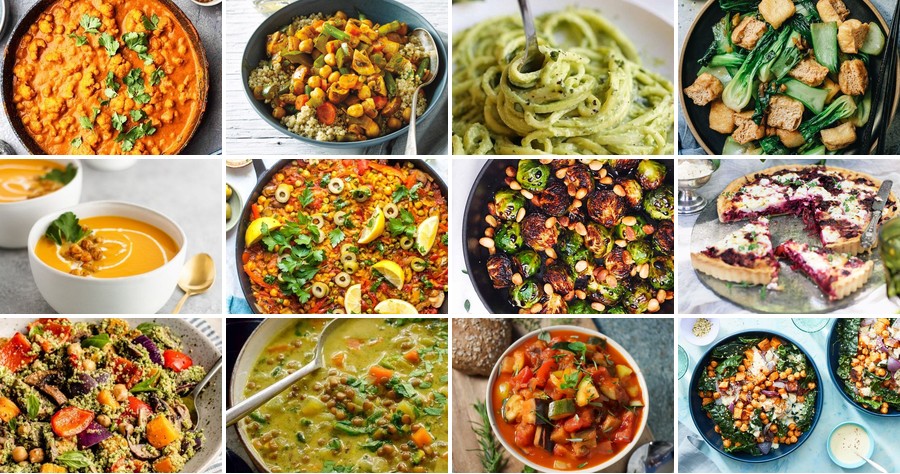
Kickstart your journey to healthier eating with these 18 vibrant, veggie-packed recipes! Whether you’re craving quick weeknight dinners, seasonal favorites, or simply want to add more color to your plate, this roundup is your go-to guide for delicious, vegetable-forward meals that nourish both body and soul. Dive in and discover your next kitchen favorite!
Roasted Vegetable Medley with Herb Dressing
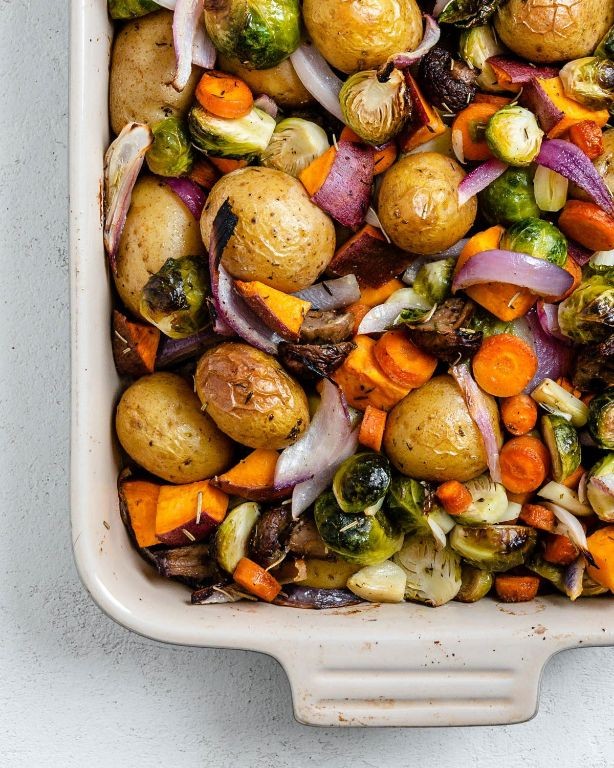
Ever had a vegetable rebellion in your fridge? This roasted medley is your delicious peace treaty—a vibrant, herb-kissed parade of veggies that even the pickiest eaters will surrender to. It’s the kind of dish that makes you feel fancy without the fuss, perfect for a holiday side or a weeknight win.
Serving: 4 | Pre Time: 15 minutes | Cooking Time: 25 minutes
Ingredients
– 1 pound mixed vegetables (like bell peppers, zucchini, and carrots), chopped into 1-inch pieces
– 2 tablespoons olive oil (or any neutral oil)
– 1 teaspoon salt (adjust to taste)
– 1/2 teaspoon black pepper
– 2 cloves garlic, minced
– 1 tablespoon fresh herbs (like rosemary or thyme), chopped
– 2 tablespoons lemon juice
– 1 tablespoon honey (optional, for a touch of sweetness)
Instructions
1. Preheat your oven to 425°F (218°C) to ensure it’s hot and ready for roasting.
2. In a large bowl, toss the chopped vegetables with olive oil, salt, and black pepper until evenly coated.
3. Spread the vegetables in a single layer on a baking sheet lined with parchment paper to prevent sticking.
4. Roast the vegetables in the preheated oven for 20 minutes, or until they are tender and lightly browned at the edges.
5. While the vegetables roast, in a small bowl, whisk together minced garlic, chopped herbs, lemon juice, and honey (if using) to create the dressing.
6. Remove the baking sheet from the oven and drizzle the herb dressing over the roasted vegetables.
7. Toss the vegetables gently with the dressing to coat them evenly, then return to the oven for an additional 5 minutes to let the flavors meld.
8. Transfer the roasted vegetable medley to a serving dish and let it cool slightly before serving.
Buttery-soft veggies with a crispy edge meet that zesty herb punch, creating a texture party in every bite. Serve it warm over quinoa for a hearty bowl, or chill it and toss into salads—this medley’s versatility is its secret superpower!
Grilled Eggplant and Tomato Stack
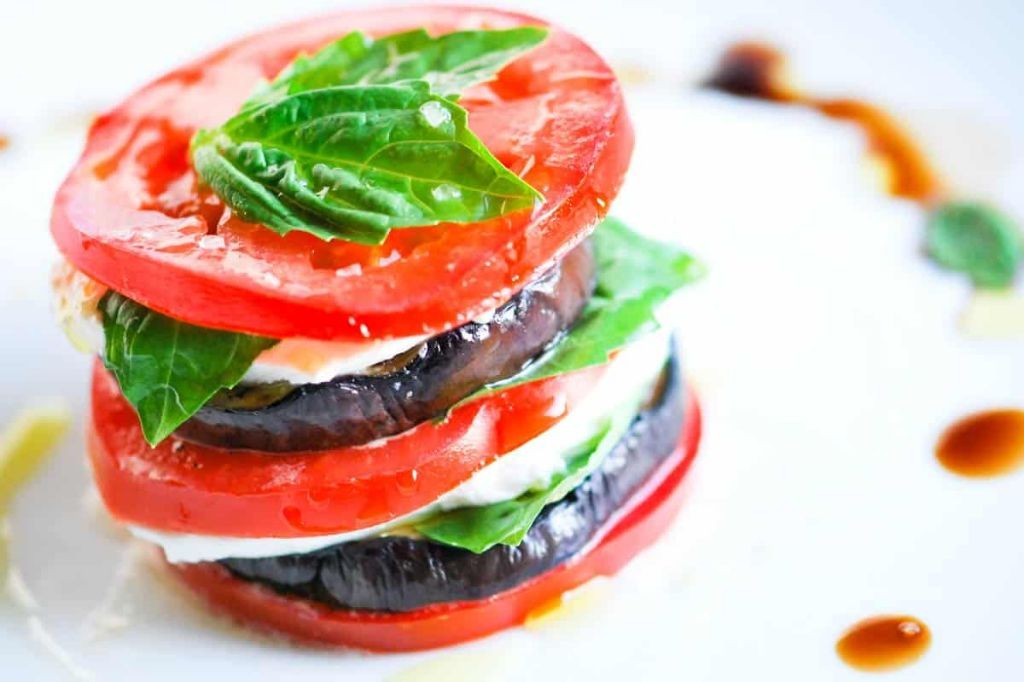
Gather ’round, grill masters and veggie lovers—today we’re stacking up summer’s finest in a dish so pretty, it might just upstage your main course! This grilled eggplant and tomato stack is a vibrant, smoky tower of goodness that’s surprisingly simple to whip up, perfect for when you want to impress without the stress.
Serving: 4 | Pre Time: 15 minutes | Cooking Time: 20 minutes
Ingredients
– 2 medium eggplants, sliced into ½-inch rounds (look for firm, glossy skins)
– 4 large beefsteak tomatoes, sliced into ½-inch rounds (ripe but not mushy)
– ¼ cup extra-virgin olive oil, plus extra for drizzling (or any neutral oil)
– 2 tbsp balsamic vinegar (adjust to taste)
– 2 cloves garlic, minced (fresh is best, but jarred works in a pinch)
– ½ tsp dried oregano (or 1 tbsp fresh, chopped)
– ½ tsp salt (kosher or sea salt preferred)
– ¼ tsp black pepper (freshly ground for more flavor)
– ½ cup fresh basil leaves, torn (for garnish)
– 4 oz fresh mozzarella cheese, sliced (optional, for a creamy twist)
Instructions
1. Preheat your grill to medium-high heat (about 400°F) or heat a grill pan on the stovetop over medium-high.
2. In a small bowl, whisk together ¼ cup olive oil, 2 tbsp balsamic vinegar, 2 minced garlic cloves, ½ tsp oregano, ½ tsp salt, and ¼ tsp black pepper to create a marinade.
3. Brush both sides of the 2 medium eggplant slices and 4 large tomato slices evenly with the marinade using a pastry brush, reserving any leftover marinade.
4. Place the eggplant slices on the preheated grill and cook for 5–7 minutes per side, until they have distinct grill marks and are tender when pierced with a fork.
5. Transfer the grilled eggplant to a plate and immediately grill the tomato slices for 2–3 minutes per side, just until slightly softened but still holding their shape.
6. Remove the tomatoes from the grill and let all grilled vegetables cool for 5 minutes to make handling easier.
7. On a serving platter, layer one eggplant slice, one tomato slice, and optionally one mozzarella slice, repeating to form 4 stacks.
8. Drizzle the stacks with any reserved marinade and a little extra olive oil for shine.
9. Garnish each stack with torn fresh basil leaves scattered on top.
10. Serve immediately while warm, or let sit for 10 minutes to allow flavors to meld.
You’ll love the smoky char from the eggplant paired with the juicy sweetness of the tomatoes, creating a melt-in-your-mouth texture that’s both hearty and refreshing. Try serving these stacks over a bed of arugula for a light lunch or alongside grilled chicken to make it a full meal—either way, they’re sure to disappear fast!
Spinach and Mushroom Stuffed Bell Peppers
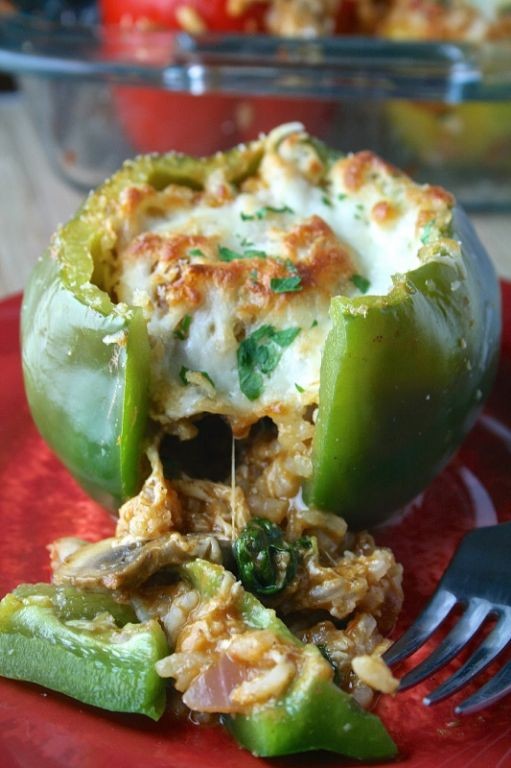
Zesty, vibrant, and packed with personality, these Spinach and Mushroom Stuffed Bell Peppers are the ultimate weeknight hero—they’re like a cozy, edible hug that’s secretly loaded with veggies, ready to rescue you from another boring dinner. Trust me, your taste buds will throw a party, and your oven does all the heavy lifting!
Serving: 4 | Pre Time: 15 minutes | Cooking Time: 30 minutes
Ingredients
– 4 large bell peppers, any color (halved and seeded)
– 1 tbsp olive oil (or any neutral oil)
– 8 oz cremini mushrooms, diced
– 2 cups fresh spinach, chopped
– 1 cup cooked quinoa (or rice for a swap)
– 1/2 cup shredded mozzarella cheese
– 1/4 cup grated Parmesan cheese
– 1 tsp garlic powder
– 1/2 tsp salt (adjust to taste)
– 1/4 tsp black pepper
Instructions
1. Preheat your oven to 375°F and line a baking sheet with parchment paper.
2. Slice each bell pepper in half lengthwise and remove the seeds and membranes.
3. Heat olive oil in a large skillet over medium heat for 1 minute until shimmering.
4. Add diced mushrooms to the skillet and cook for 5–7 minutes until browned and tender.
5. Stir in chopped spinach and cook for 2 minutes until wilted.
6. Remove the skillet from heat and mix in cooked quinoa, mozzarella, Parmesan, garlic powder, salt, and black pepper.
7. Spoon the filling evenly into the bell pepper halves, packing it down lightly.
8. Place the stuffed peppers on the prepared baking sheet and bake for 25–30 minutes until the peppers are soft and the cheese is bubbly.
9. Let the peppers cool for 5 minutes before serving to set the filling.
10. Garnish with extra Parmesan if desired.
Yield a tender, savory bite where the peppers soften into sweet pockets cradling that earthy mushroom and spinach mix, with a gooey cheese pull that’s pure magic. Try topping them with a dollop of Greek yogurt or a sprinkle of red pepper flakes for an extra kick—they’re versatile enough to shine as a main dish or a standout side!
Carrot and Ginger Soup with Coconut Milk

Fancy a soup that’s basically a cozy hug in a bowl? This carrot and ginger soup with coconut milk is the vibrant, velvety answer to chilly days—and it’s so easy, you’ll wonder why you ever settled for canned stuff. Let’s get simmering!
Serving: 4 | Pre Time: 10 minutes | Cooking Time: 25 minutes
Ingredients
– 1 tablespoon olive oil (or any neutral oil)
– 1 medium yellow onion, diced
– 3 cloves garlic, minced
– 1 tablespoon fresh ginger, grated (peeled first for less fiber)
– 1 pound carrots, peeled and chopped into 1-inch pieces
– 4 cups vegetable broth (low-sodium if preferred)
– 1 (13.5-ounce) can full-fat coconut milk, shaken well
– 1 teaspoon salt (adjust to taste)
– ½ teaspoon black pepper
– Fresh cilantro or lime wedges for garnish (optional)
Instructions
1. Heat the olive oil in a large pot over medium heat until it shimmers, about 1 minute.
2. Add the diced onion and cook, stirring occasionally, until softened and translucent, about 5 minutes.
3. Stir in the minced garlic and grated ginger, cooking for 1 minute until fragrant—don’t let it burn!
4. Tip in the chopped carrots and pour in the vegetable broth, ensuring the carrots are mostly submerged.
5. Bring the mixture to a boil, then reduce the heat to low, cover the pot, and simmer for 20 minutes until the carrots are fork-tender.
6. Carefully transfer the hot soup to a blender (or use an immersion blender in the pot) and blend until completely smooth, about 1–2 minutes.
7. Return the blended soup to the pot over low heat and stir in the coconut milk, salt, and black pepper.
8. Heat gently for 3–5 minutes, stirring occasionally, until warmed through—avoid boiling to keep the coconut milk from separating.
9. Ladle the soup into bowls and garnish with fresh cilantro or a squeeze of lime if desired.
This soup boasts a luxuriously creamy texture from the coconut milk, with a sweet carrot base perfectly balanced by the zingy ginger kick. Try topping it with toasted coconut flakes or a dollop of Greek yogurt for an extra twist—it’s so good, you might just lick the bowl!
Ratatouille with Fresh Herbs
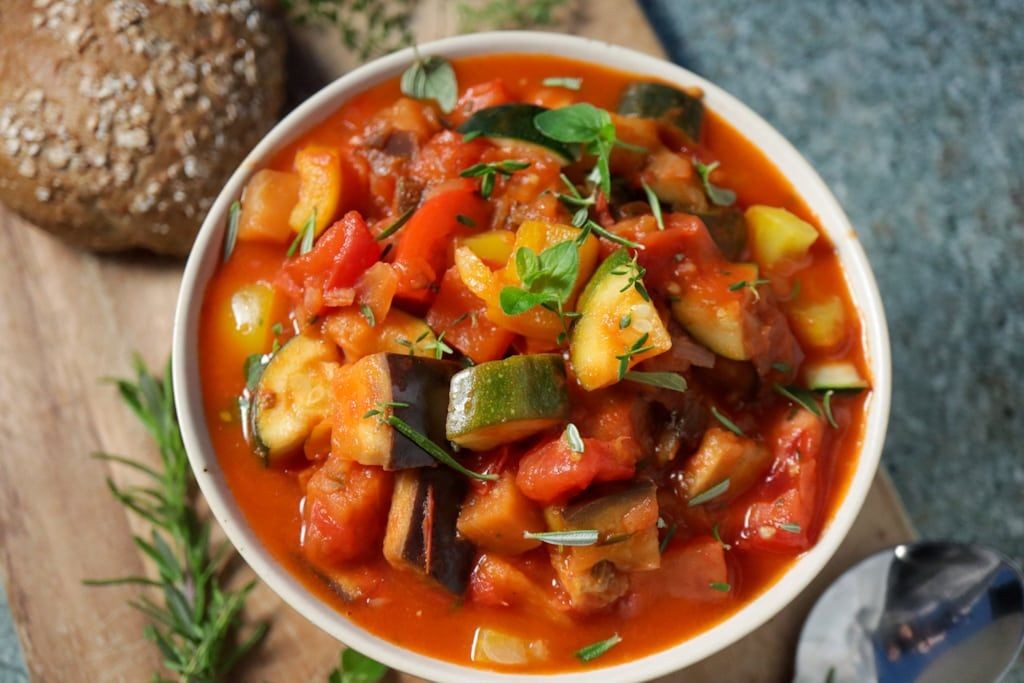
Veggie lovers, rejoice! This isn’t your average, mushy vegetable stew—it’s a vibrant, herb-kissed Ratatouille that’s about to become your new go-to for impressing guests (or just treating yourself). Picture this: a colorful medley of summer veggies, all roasted to perfection and tossed with a generous handful of fresh herbs, creating a dish that’s as beautiful as it is delicious. Trust me, even the pickiest eaters won’t be able to resist a second helping!
Serving: 4 | Pre Time: 20 minutes | Cooking Time: 40 minutes
Ingredients
– 1 large eggplant, cut into 1-inch cubes (about 4 cups)
– 2 medium zucchinis, sliced into ½-inch rounds (about 3 cups)
– 1 large red bell pepper, chopped into 1-inch pieces (about 2 cups)
– 1 large yellow onion, thinly sliced (about 2 cups)
– 3 cloves garlic, minced
– ¼ cup olive oil (or any neutral oil)
– 1 (28-ounce) can crushed tomatoes
– ¼ cup fresh basil, chopped
– 2 tablespoons fresh thyme leaves
– 1 teaspoon salt (adjust to taste)
– ½ teaspoon black pepper
Instructions
1. Preheat your oven to 400°F (200°C) and line a large baking sheet with parchment paper.
2. In a large bowl, combine the eggplant, zucchinis, red bell pepper, onion, and garlic.
3. Drizzle the olive oil over the vegetables and toss until evenly coated.
4. Spread the vegetables in a single layer on the prepared baking sheet.
5. Roast the vegetables in the preheated oven for 25 minutes, or until they are tender and lightly browned at the edges.
6. While the vegetables roast, pour the crushed tomatoes into a large skillet or Dutch oven and heat over medium heat.
7. Simmer the tomatoes for 10 minutes, stirring occasionally, until slightly thickened.
8. Remove the roasted vegetables from the oven and carefully add them to the skillet with the tomatoes.
9. Gently stir in the fresh basil, thyme, salt, and black pepper until everything is well combined.
10. Reduce the heat to low and let the ratatouille simmer for an additional 5 minutes to allow the flavors to meld.
11. Remove the skillet from the heat and let it sit for 5 minutes before serving.
12. Enjoy your Ratatouille with Fresh Herbs warm, garnished with extra fresh herbs if desired.
Every bite of this ratatouille bursts with a delightful mix of tender, caramelized veggies and the bright, aromatic punch of fresh herbs. Serve it over a bed of creamy polenta or alongside crusty bread to soak up every last drop of that savory tomato sauce—it’s a meal that feels fancy but is surprisingly simple to pull off!
Spicy Stir-Fried Bok Choy and Tofu

Nervous about bland tofu? Not today! This Spicy Stir-Fried Bok Choy and Tofu is a flavor-packed, 20-minute miracle that’ll make your taste buds do a happy dance—perfect for when you need a veggie-forward kick without the kitchen drama.
Serving: 4 | Pre Time: 10 minutes | Cooking Time: 10 minutes
Ingredients
– 1 (14-ounce) block extra-firm tofu, pressed and cubed
– 1 pound bok choy, chopped into 1-inch pieces (stems and leaves separated)
– 2 tablespoons vegetable oil (or any neutral oil)
– 3 cloves garlic, minced
– 1 tablespoon fresh ginger, grated
– 2 tablespoons soy sauce
– 1 tablespoon rice vinegar
– 1 teaspoon sesame oil
– 1-2 teaspoons red pepper flakes (adjust for spice level)
– 1 teaspoon cornstarch mixed with 2 tablespoons water (for thickening)
– 2 green onions, sliced (for garnish)
Instructions
1. Press the tofu block between paper towels with a heavy pan for 10 minutes to remove excess water, then cut into 1-inch cubes.
2. Heat 1 tablespoon vegetable oil in a large skillet or wok over medium-high heat until shimmering, about 1 minute.
3. Add tofu cubes in a single layer and cook undisturbed for 3-4 minutes until golden brown on one side, then flip and cook for another 3 minutes until crispy on all sides. Tip: Don’t overcrowd the pan to ensure even browning!
4. Transfer tofu to a plate and set aside.
5. In the same skillet, add remaining 1 tablespoon vegetable oil and heat over medium-high for 30 seconds.
6. Add minced garlic and grated ginger, stirring constantly for 30 seconds until fragrant but not burned.
7. Add bok choy stems and cook for 2 minutes, stirring occasionally, until slightly tender.
8. Add bok choy leaves and cook for 1 more minute until wilted. Tip: Add leaves last to prevent them from becoming soggy.
9. Return tofu to the skillet with the bok choy.
10. Pour in soy sauce, rice vinegar, sesame oil, and red pepper flakes, stirring to coat everything evenly for 1 minute.
11. Give the cornstarch-water mixture a quick stir and add it to the skillet, cooking for 1-2 minutes until the sauce thickens and coats the ingredients. Tip: Stir constantly here to avoid lumps in the sauce.
12. Remove from heat and garnish with sliced green onions.
Ready to dig in? The tofu gets delightfully crispy against the tender-crunchy bok choy, all wrapped in a spicy, savory sauce that’s just bold enough without overwhelming. Serve it over steamed rice for a complete meal, or toss it with noodles for a fun twist—either way, it’s a veggie dish that actually satisfies.
Beet and Goat Cheese Tart
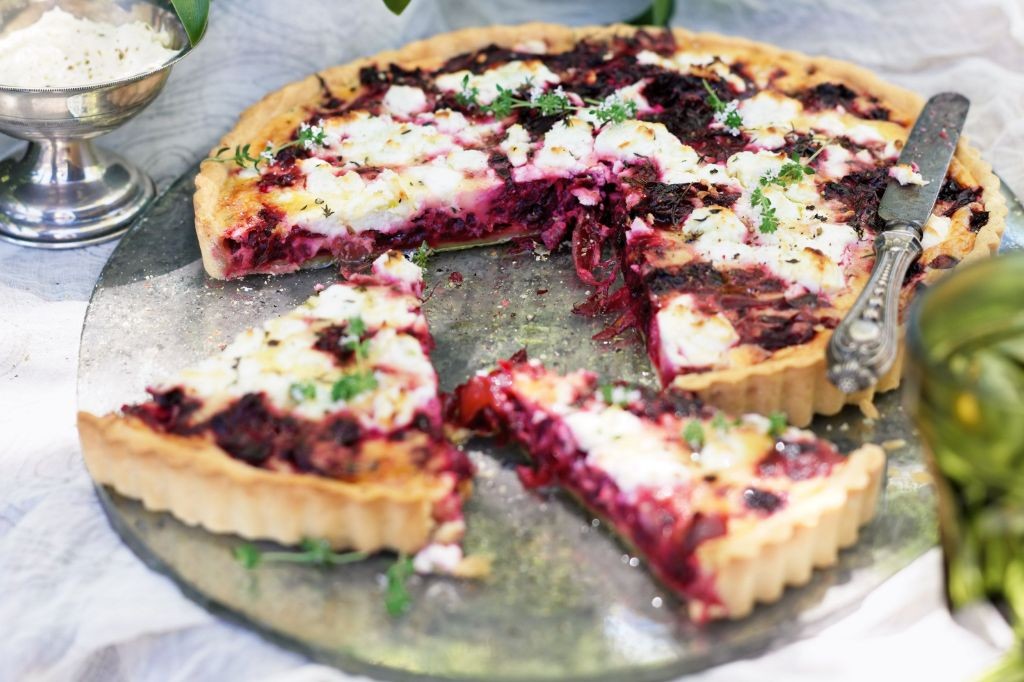
Aren’t you tired of the same old holiday appetizers? This vibrant beet and goat cheese tart is here to rescue your taste buds from a sea of bland crackers—it’s like a party on a pastry crust, and everyone’s invited!
Serving: 6 | Pre Time: 20 minutes | Cooking Time: 45 minutes
Ingredients
– 1 sheet frozen puff pastry, thawed (keep it cold until ready to use)
– 3 medium red beets, peeled and thinly sliced (about 1/8-inch thick for even cooking)
– 4 oz goat cheese, crumbled (softened at room temperature for easier spreading)
– 2 tbsp olive oil (or any neutral oil)
– 1 tbsp balsamic vinegar
– 1 tsp fresh thyme leaves (dried works in a pinch, use 1/2 tsp)
– 1/4 tsp salt
– 1/4 tsp black pepper
– 1 egg, beaten (for that golden, glossy crust)
Instructions
1. Preheat your oven to 400°F and line a baking sheet with parchment paper.
2. Unfold the puff pastry sheet on the prepared baking sheet, gently pressing out any creases with your fingers.
3. In a medium bowl, toss the sliced beets with olive oil, balsamic vinegar, thyme, salt, and pepper until evenly coated.
4. Spread the goat cheese crumbles over the puff pastry, leaving a 1-inch border around the edges.
5. Arrange the beet slices in a single, overlapping layer on top of the goat cheese, covering the surface.
6. Fold the edges of the pastry over the beets to create a rustic border, pressing lightly to seal.
7. Brush the pastry edges with the beaten egg using a pastry brush for a shiny, golden finish.
8. Bake the tart at 400°F for 40-45 minutes, until the crust is puffed and deep golden brown and the beets are tender when pierced with a fork.
9. Remove the tart from the oven and let it cool on the baking sheet for 10 minutes before slicing.
Glory be to this tart! The flaky, buttery crust gives way to sweet, earthy beets and tangy goat cheese in every bite—serve it warm with a drizzle of honey for a sweet-savory kick or slice it into squares for an easy, eye-catching centerpiece at your next gathering.
Vegetable Paella with Saffron
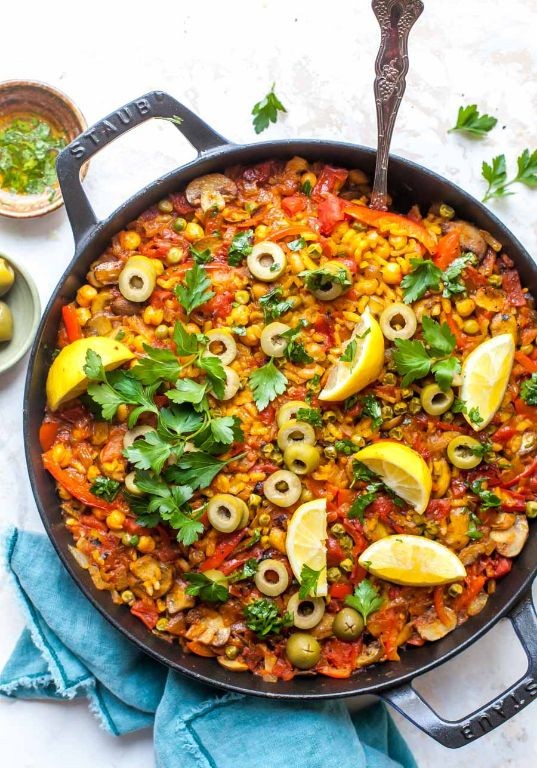
Gather ’round, hungry friends, because we’re about to transform your kitchen into a Spanish fiesta with a veggie-packed twist on a classic! Forget the plane ticket—this Vegetable Paella with Saffron brings the vibrant flavors of Valencia straight to your table, proving that a one-pan wonder can be both stunningly delicious and deceptively simple to master. Let’s get that saffron working its golden magic!
Serving: 4 | Pre Time: 15 minutes | Cooking Time: 40 minutes
Ingredients
– 2 tbsp olive oil (or any neutral oil)
– 1 medium yellow onion, diced
– 1 red bell pepper, sliced into strips
– 3 cloves garlic, minced
– 1 ½ cups Arborio rice (or any short-grain rice)
– ½ tsp saffron threads, crushed
– 4 cups vegetable broth, warmed
– 1 cup frozen peas
– 1 cup artichoke hearts, quartered (canned or jarred, drained)
– 1 lemon, cut into wedges for serving
– Salt, to season throughout
Instructions
1. Heat the olive oil in a large, wide skillet or paella pan over medium-high heat until it shimmers, about 2 minutes.
2. Add the diced onion and sliced red bell pepper to the hot oil, stirring occasionally until softened and slightly caramelized, about 8-10 minutes.
3. Stir in the minced garlic and cook until fragrant, about 30 seconds, being careful not to let it burn.
4. Add the Arborio rice to the pan, toasting it with the vegetables for 2 minutes until the grains turn slightly translucent at the edges.
5. Sprinkle the crushed saffron threads over the rice, stirring to distribute the threads evenly for that signature golden hue.
6. Pour in the warmed vegetable broth all at once—it should sizzle dramatically!
7. Bring the mixture to a boil, then immediately reduce the heat to low, cover the pan, and let it simmer undisturbed for 20 minutes. Tip: Resist the urge to stir here to develop that coveted crispy bottom layer, known as ‘socarrat.’
8. After 20 minutes, uncover the pan and gently fold in the frozen peas and quartered artichoke hearts.
9. Re-cover the pan and continue cooking on low heat until the liquid is fully absorbed and the rice is tender, about 10 more minutes. Tip: If the rice seems dry before it’s cooked, add a splash more broth or water.
10. Remove the pan from the heat and let it rest, covered, for 5 minutes to allow the flavors to meld. Tip: This resting time is crucial for perfect texture—don’t skip it!
11. Fluff the paella gently with a fork, season with salt as needed, and serve immediately with lemon wedges on the side.
What emerges is a dish with a delightful contrast: fluffy, saffron-infused rice gives way to a subtly crispy, caramelized bottom that’s pure gold. Each forkful bursts with the sweet pop of peas and the tender bite of artichokes, all brightened by a squeeze of fresh lemon. For a fun twist, serve it straight from the pan at the table with a side of crusty bread to scoop up every last savory bit!
Stuffed Portobello Mushrooms with Spinach and Feta

Let’s be real: sometimes you want a dinner that feels fancy but doesn’t require summoning a chef’s ghost. These stuffed portobello mushrooms are your weeknight superhero—savory, satisfying, and secretly easy to pull off. They’re like a cozy, edible hug for your taste buds.
Serving: 4 | Pre Time: 15 minutes | Cooking Time: 25 minutes
Ingredients
– 4 large portobello mushroom caps, stems removed
– 1 tbsp olive oil (or any neutral oil)
– 1/2 tsp salt, plus extra for seasoning
– 1/4 tsp black pepper
– 5 oz fresh spinach
– 2 cloves garlic, minced
– 4 oz feta cheese, crumbled
– 1/4 cup breadcrumbs
– 1 tbsp grated Parmesan cheese
– 1 tsp dried oregano
– Cooking spray or extra oil for baking
Instructions
1. Preheat your oven to 400°F and line a baking sheet with parchment paper.
2. Place the portobello caps gill-side up on the sheet, drizzle with olive oil, and sprinkle with salt and pepper.
3. Roast the mushrooms in the oven for 10 minutes to soften them—this prevents a soggy filling later.
4. While the mushrooms roast, heat a skillet over medium heat and add the spinach, stirring until wilted, about 3 minutes.
5. Push the spinach to the side, add the minced garlic to the skillet, and cook for 1 minute until fragrant.
6. Transfer the spinach and garlic to a bowl and let it cool slightly, then squeeze out any excess liquid with your hands.
7. In the same bowl, mix the spinach with crumbled feta, breadcrumbs, Parmesan, oregano, and the remaining salt and pepper.
8. Remove the mushrooms from the oven and carefully spoon the filling into each cap, pressing it down gently.
9. Lightly spray or brush the tops with oil and bake for another 15 minutes at 400°F until the filling is golden and the mushrooms are tender.
10. Let the mushrooms rest for 5 minutes before serving to allow the flavors to meld.
Bite into these beauties for a delightful contrast: the meaty mushroom gives a juicy base, while the filling offers a creamy, tangy kick from the feta. Serve them over a bed of quinoa for a hearty meal, or slice them up as a show-stopping appetizer at your next gathering—they’re guaranteed to disappear faster than you can say “more please!”
Curried Lentil and Vegetable Stew

Zesty winter days call for cozy bowls, and this Curried Lentil and Vegetable Stew is here to save you from the cold with its vibrant spices and hearty veggies—think of it as a hug in a pot that’s ready to warm your soul and your kitchen. It’s the ultimate one-pot wonder that’ll make you forget you ever considered ordering takeout, because why settle for bland when you can have bold?
Serving: 6 | Pre Time: 15 minutes | Cooking Time: 35 minutes
Ingredients
– 2 tbsp olive oil (or any neutral oil, like avocado oil)
– 1 large onion, diced
– 3 cloves garlic, minced
– 1 tbsp fresh ginger, grated (peel it first for easier grating)
– 2 tbsp curry powder (use a blend you love, or mix your own)
– 1 tsp ground cumin
– 1/2 tsp turmeric
– 1/4 tsp cayenne pepper (adjust to your heat preference)
– 1 cup dried brown lentils, rinsed and drained
– 4 cups vegetable broth (low-sodium if you’re watching salt)
– 2 large carrots, peeled and chopped into 1/2-inch pieces
– 2 medium potatoes, peeled and diced into 1-inch cubes
– 1 cup canned diced tomatoes, with juices
– 1 cup frozen peas (thawed or straight from the freezer)
– Salt and black pepper, to season as needed
– Fresh cilantro, chopped, for garnish (optional, but adds a bright finish)
Instructions
1. Heat the olive oil in a large pot or Dutch oven over medium heat until shimmering, about 2 minutes.
2. Add the diced onion and cook, stirring occasionally, until softened and translucent, 5–7 minutes.
3. Stir in the minced garlic and grated ginger, cooking for 1 minute until fragrant—don’t let it burn!
4. Sprinkle in the curry powder, cumin, turmeric, and cayenne pepper, toasting the spices for 30 seconds to unlock their flavors.
5. Add the rinsed lentils and vegetable broth, scraping the bottom of the pot to deglaze any browned bits for extra depth.
6. Bring the mixture to a boil, then reduce the heat to low, cover, and simmer for 15 minutes to start softening the lentils.
7. Stir in the chopped carrots, diced potatoes, and canned tomatoes with their juices, ensuring everything is submerged.
8. Cover again and simmer for another 15–20 minutes, or until the lentils and vegetables are tender when pierced with a fork.
9. Tip: Check the stew halfway through and add a splash of water if it looks too thick—lentils love to soak up liquid!
10. Stir in the frozen peas and cook for 3–5 minutes, just until heated through and vibrant green.
11. Season with salt and black pepper to taste, starting with 1/2 tsp salt and adjusting as needed.
12. Tip: Let the stew sit off the heat for 5 minutes before serving; it thickens up beautifully and melds the flavors.
13. Ladle into bowls and garnish with fresh cilantro if using, for a pop of color and freshness.
14. Tip: Serve it over fluffy rice or with crusty bread to soak up every last drop—no spoon left behind!
Yum, this stew boasts a velvety texture with tender lentils and veggies that melt in your mouth, all wrapped in a warmly spiced curry broth that’s just bold enough without overwhelming. Get creative by topping it with a dollop of yogurt or a squeeze of lime for a tangy twist, or pack it for lunch—it tastes even better the next day as the flavors deepen into a cozy masterpiece.
Grilled Asparagus with Lemon Zest
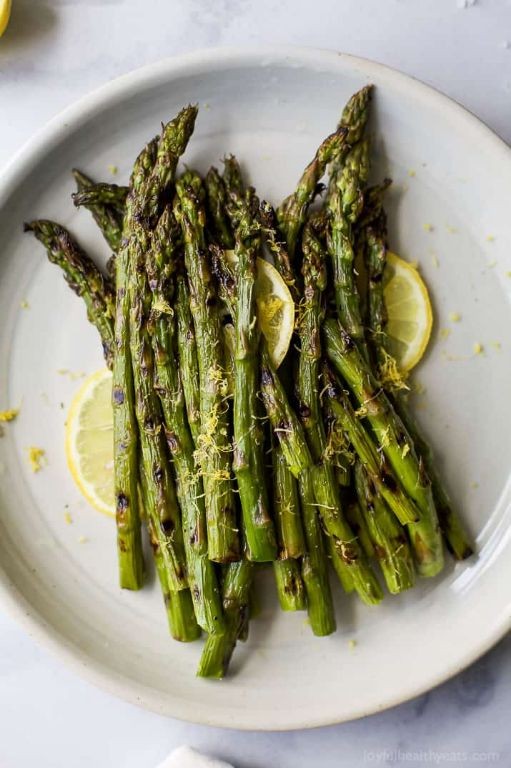
Oh, the humble asparagus—often relegated to side-dish obscurity, but today, we’re giving it the star treatment it deserves with a zesty, grill-kissed makeover that’ll have your taste buds doing a happy dance. This Grilled Asparagus with Lemon Zest is the ultimate veggie glow-up, turning those green spears into a vibrant, tangy masterpiece that’s perfect for everything from weeknight dinners to fancy gatherings. Trust me, once you try this, you’ll never look at asparagus the same way again—it’s like a flavor party in your mouth, and everyone’s invited!
Serving: 4 | Pre Time: 10 minutes | Cooking Time: 10 minutes
Ingredients
– 1 pound fresh asparagus, trimmed (look for firm, bright green spears)
– 2 tablespoons olive oil (or any neutral oil, like avocado oil)
– 1 teaspoon kosher salt (adjust to taste, but don’t skimp—it helps draw out moisture)
– ½ teaspoon black pepper, freshly ground (pre-ground works in a pinch)
– 1 lemon, zested and juiced (about 2 tablespoons juice; zest adds a bright pop)
– 2 cloves garlic, minced (or ½ teaspoon garlic powder for a quicker option)
Instructions
1. Preheat your grill to medium-high heat, around 400°F, ensuring the grates are clean and lightly oiled to prevent sticking.
2. In a large bowl, toss the trimmed asparagus with olive oil, coating each spear evenly for that perfect grill char.
3. Sprinkle kosher salt and black pepper over the asparagus, mixing gently to distribute the seasonings—this step helps enhance flavor and texture.
4. Place the asparagus on the preheated grill in a single layer, perpendicular to the grates to avoid falling through, and cook for 5-7 minutes.
5. Flip the asparagus using tongs halfway through cooking, until it’s tender-crisp and has visible grill marks, about another 5-7 minutes; avoid overcooking to keep it vibrant.
6. While the asparagus grills, zest the lemon to get about 1 tablespoon of zest and juice it to yield 2 tablespoons of fresh juice in a small bowl.
7. Mince the garlic cloves finely and add them to the lemon juice, stirring to combine for a zesty dressing.
8. Once the asparagus is off the grill, immediately drizzle the lemon-garlic mixture over it, tossing to coat while still hot for maximum flavor absorption.
9. Sprinkle the reserved lemon zest on top as a final garnish, adding a burst of citrus aroma and visual appeal.
10. Serve the grilled asparagus warm, either as a standalone side or alongside grilled meats for a complete meal.
Delightfully crisp with a smoky undertone from the grill, this asparagus boasts a tangy kick from the lemon that cuts through the richness. The garlic adds a savory depth, making each bite a harmonious blend of earthy and bright flavors—perfect for piling onto a platter at your next barbecue or tossing into salads for an extra veggie boost. Honestly, it’s so good, you might just find yourself sneaking spears straight from the tray!
Vegetable and Chickpea Tagine

Ready to ditch the holiday cookie coma and dive into something that’ll actually make your taste buds do a happy dance? This Vegetable and Chickpea Tagine is your ticket to a cozy, flavor-packed dinner that’s easier than explaining your weird uncle’s holiday sweater. Let’s get simmering!
Serving: 4 | Pre Time: 15 minutes | Cooking Time: 35 minutes
Ingredients
– 2 tbsp olive oil (or any neutral oil)
– 1 medium yellow onion, diced
– 3 cloves garlic, minced
– 1 tbsp tomato paste
– 1 tsp ground cumin
– 1 tsp smoked paprika
– 1/2 tsp ground cinnamon
– 1/4 tsp cayenne pepper (adjust to heat preference)
– 1 (15 oz) can chickpeas, drained and rinsed
– 1 medium sweet potato, peeled and cut into 1-inch cubes
– 1 red bell pepper, chopped
– 1 (14.5 oz) can diced tomatoes, undrained
– 1 1/2 cups vegetable broth
– 1/2 cup dried apricots, chopped
– Salt, to season throughout
– Fresh cilantro, chopped, for garnish
Instructions
1. Heat 2 tbsp olive oil in a large pot or Dutch oven over medium heat until shimmering, about 2 minutes.
2. Add 1 diced yellow onion and cook, stirring occasionally, until softened and translucent, about 5 minutes.
3. Stir in 3 minced garlic cloves and cook until fragrant, about 30 seconds—don’t let it burn!
4. Add 1 tbsp tomato paste, 1 tsp ground cumin, 1 tsp smoked paprika, 1/2 tsp ground cinnamon, and 1/4 tsp cayenne pepper; toast the spices with the onion mixture for 1 minute to deepen flavors.
5. Tip: Toasting spices unlocks their aroma, so give them a quick sizzle!
6. Pour in 1 can drained chickpeas, 1 cubed sweet potato, and 1 chopped red bell pepper; stir to coat everything in the spiced base.
7. Add 1 can undrained diced tomatoes and 1 1/2 cups vegetable broth, then season with a pinch of salt.
8. Bring the mixture to a boil over high heat, then reduce to a simmer and cover the pot.
9. Simmer for 25 minutes, stirring halfway through, until the sweet potato is fork-tender.
10. Tip: If the liquid reduces too much, add a splash more broth to keep it saucy.
11. Stir in 1/2 cup chopped dried apricots and cook uncovered for 5 more minutes to soften them slightly.
12. Taste and adjust salt if needed, then remove from heat.
13. Tip: Let it sit for 5 minutes off the heat—the flavors will meld beautifully!
14. Garnish with fresh chopped cilantro before serving.
Zesty and aromatic, this tagine boasts tender sweet potatoes and chickpeas swimming in a warmly spiced, slightly sweet broth. Serve it over fluffy couscous or with crusty bread to soak up every last drop, and maybe even pretend you’re on a Moroccan getaway—holiday stress, who?
Summary
Packed with flavor and nutrition, this collection proves healthy eating can be delicious and exciting. We hope these 18 vibrant recipes inspire your kitchen adventures! Give them a try, leave a comment with your favorite, and share the article on Pinterest to spread the veggie love.