
Vibrant, sun-drenched flavors await in these vegetarian Mediterranean recipes! Whether you’re craving a quick weeknight dinner or a healthy meal that feels indulgent, this roundup brings the region’s fresh ingredients and bold spices to your kitchen. From zesty salads to hearty mains, discover 20 dishes that make eating well deliciously easy. Let’s dive in and find your new favorite!
Roasted Eggplant with Tahini and Pomegranate
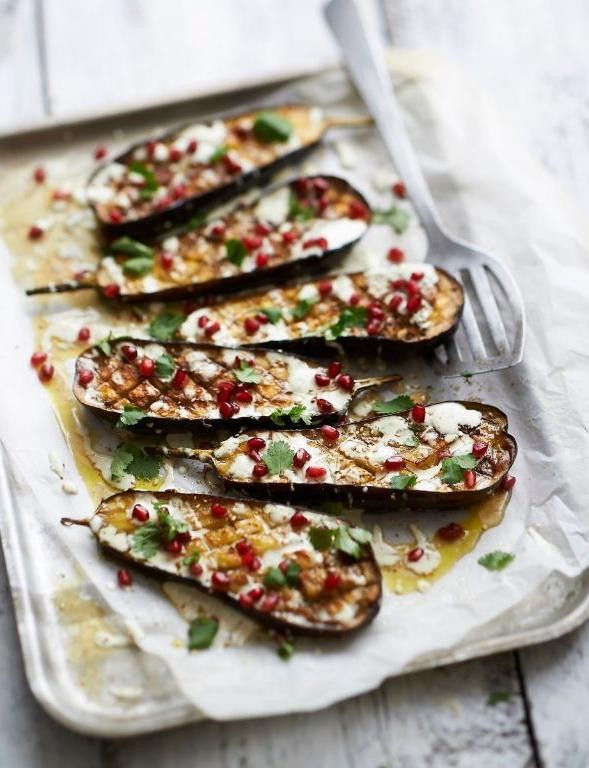
Perfect for a festive gathering or a cozy weeknight, this roasted eggplant dish combines smoky, creamy, and tangy flavors in a stunning, colorful presentation that’s surprisingly simple to master. Let’s walk through each step together to ensure your success.
Serving: 4 | Pre Time: 15 minutes | Cooking Time: 30 minutes
Ingredients
- A couple of medium eggplants (about 2 pounds total)
- A generous drizzle of olive oil (about 3 tablespoons)
- A good pinch of kosher salt
- A few grinds of black pepper
- Half a cup of tahini
- A splash of fresh lemon juice (about 2 tablespoons)
- A clove of garlic, minced
- A quarter cup of warm water
- A handful of fresh parsley, chopped
- A third of a cup of pomegranate seeds
Instructions
- Preheat your oven to 425°F and line a baking sheet with parchment paper.
- Slice the eggplants lengthwise into 1-inch thick planks. Tip: Salting the slices lightly and letting them sit for 10 minutes draws out excess moisture for better browning—just pat them dry before roasting.
- Arrange the eggplant slices in a single layer on the prepared baking sheet.
- Drizzle the olive oil evenly over the eggplant slices.
- Sprinkle the kosher salt and black pepper over the oiled eggplant.
- Roast in the preheated oven for 25-30 minutes, flipping the slices halfway through, until they are golden brown and tender when pierced with a fork.
- While the eggplant roasts, make the tahini sauce by whisking together the tahini, lemon juice, and minced garlic in a small bowl. Tip: If the sauce seizes up, gradually whisk in the warm water until it reaches a smooth, pourable consistency.
- Spread the tahini sauce evenly over a serving platter.
- Arrange the roasted eggplant slices on top of the tahini sauce.
- Sprinkle the chopped parsley over the eggplant.
- Scatter the pomegranate seeds over the dish. Tip: For extra crunch, toast a tablespoon of pine nuts and sprinkle them on at this stage.
Delight in the contrast of the creamy, garlicky tahini against the smoky, tender eggplant, punctuated by the juicy burst of pomegranate seeds. Serve it warm as a vibrant centerpiece with crusty bread to scoop up every last bit, or alongside grilled chicken for a complete meal.
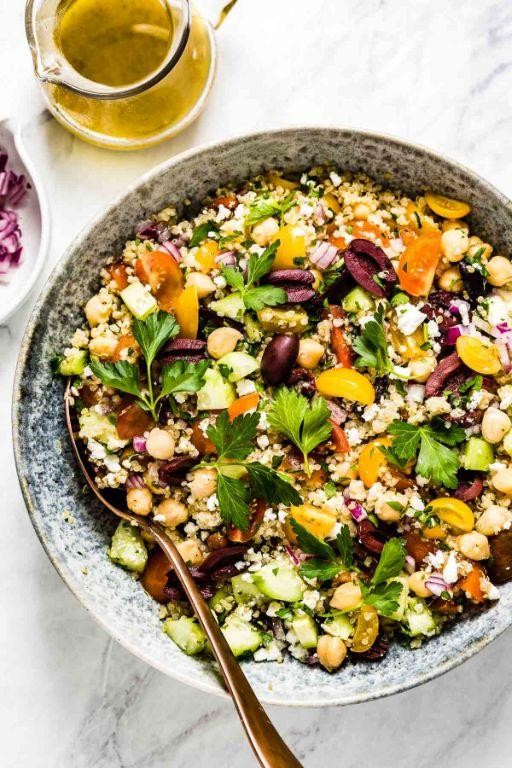
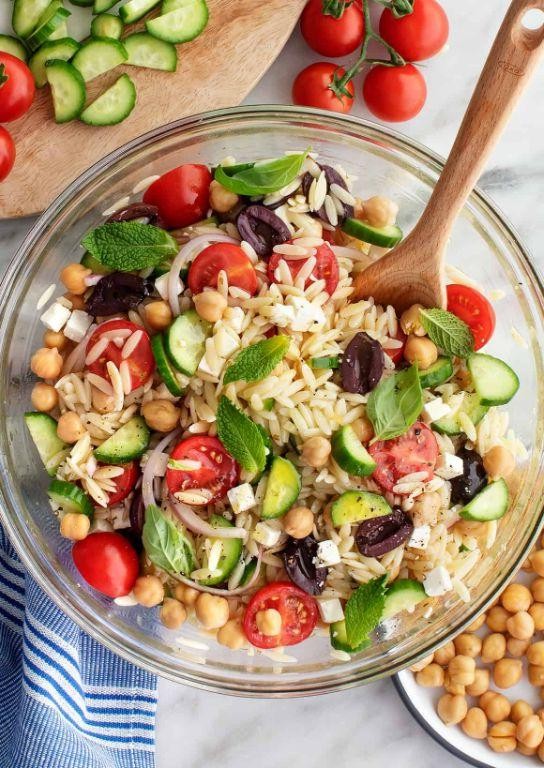
Mediterranean Quinoa Salad with Chickpeas and Feta
Gathering ingredients for a fresh, healthy meal doesn’t have to be complicated—this Mediterranean quinoa salad with chickpeas and feta is a vibrant, protein-packed dish that comes together in about 30 minutes, perfect for meal prep or a quick weeknight dinner. Let’s walk through each step methodically so you can confidently assemble this colorful bowl.
Serving: 4 | Pre Time: 15 minutes | Cooking Time: 15 minutes
Ingredients
– 1 cup of quinoa
– 2 cups of water
– A 15-ounce can of chickpeas, drained and rinsed
– A couple of cups of chopped cucumber
– A couple of cups of halved cherry tomatoes
– A handful of chopped red onion
– A big handful of crumbled feta cheese
– A generous ¼ cup of extra-virgin olive oil
– A splash of lemon juice (about 2 tablespoons)
– A pinch of salt and black pepper
– A sprinkle of dried oregano
Instructions
1. Rinse 1 cup of quinoa under cold water in a fine-mesh strainer for about 30 seconds to remove any bitterness.
2. In a medium saucepan, combine the rinsed quinoa and 2 cups of water, then bring to a boil over high heat.
3. Once boiling, reduce the heat to low, cover the saucepan, and simmer for exactly 15 minutes until the quinoa is tender and the water is absorbed.
4. Remove the saucepan from the heat, fluff the quinoa with a fork, and let it cool uncovered for 10 minutes to prevent it from becoming mushy in the salad.
5. While the quinoa cools, drain and rinse a 15-ounce can of chickpeas, then pat them dry with a paper towel to help them crisp up slightly.
6. In a large mixing bowl, combine the cooled quinoa, chickpeas, 2 cups of chopped cucumber, 2 cups of halved cherry tomatoes, and a handful of chopped red onion.
7. In a small bowl, whisk together ¼ cup of extra-virgin olive oil, 2 tablespoons of lemon juice, a pinch of salt, a pinch of black pepper, and a sprinkle of dried oregano until emulsified.
8. Pour the dressing over the quinoa mixture and toss gently to coat everything evenly without crushing the ingredients.
9. Fold in a big handful of crumbled feta cheese just before serving to keep it from dissolving into the salad.
10. Taste and adjust seasoning if needed, but avoid over-mixing to maintain the salad’s texture.
Knowing how this salad comes together, you’ll appreciate the fluffy quinoa paired with the creamy chickpeas and tangy feta, all brightened by that zesty lemon dressing. Serve it chilled over greens for a light lunch or alongside grilled chicken for a heartier meal—it’s versatile enough to shine on its own or as a vibrant side dish.
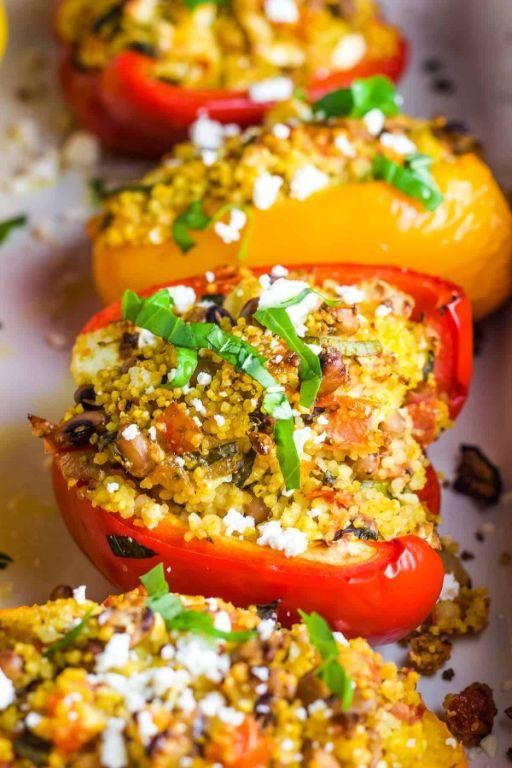
Stuffed Bell Peppers with Couscous and Herbs
Whether you’re looking for a vibrant vegetarian main or a make-ahead meal prep star, these stuffed bell peppers are a fuss-free way to pack flavor and nutrition into one colorful package. We’ll walk through each step together, so you end up with perfectly tender peppers and a fluffy, herb-packed filling every single time.
Serving: 4 | Pre Time: 20 minutes | Cooking Time: 35 minutes
Ingredients
– 4 large bell peppers (any color you like!)
– A cup of dry couscous
– A couple of cups of vegetable broth
– A good glug of olive oil (about 2 tablespoons)
– One small yellow onion, finely diced
– Two cloves of garlic, minced
– A big handful of fresh parsley, chopped
– A smaller handful of fresh dill, chopped
– A splash of lemon juice (about a tablespoon)
– Salt and black pepper
Instructions
1. Preheat your oven to 375°F (190°C).
2. Slice the tops off the bell peppers and carefully remove all the seeds and white ribs from the inside. Tip: Keep the pepper tops—you can chop and sauté them with the onion for zero waste!
3. Place the hollowed peppers upright in a baking dish just large enough to hold them snugly.
4. Heat the olive oil in a medium saucepan over medium heat for about 1 minute until it shimmers.
5. Add the diced onion to the hot oil and cook, stirring often, for 5-7 minutes until it turns soft and translucent.
6. Stir in the minced garlic and cook for just 1 more minute until fragrant.
7. Pour in the vegetable broth and bring the mixture to a full boil.
8. Immediately remove the saucepan from the heat and stir in the dry couscous. Cover the pan tightly with a lid and let it sit, untouched, for exactly 5 minutes. Tip: This “off the heat” method is key for perfectly fluffy couscous that isn’t gummy.
9. After 5 minutes, fluff the couscous with a fork.
10. Stir the chopped parsley, chopped dill, lemon juice, and a generous pinch of salt and black pepper into the couscous mixture until everything is well combined.
11. Evenly divide the herbed couscous filling among the 4 prepared bell peppers, packing it in gently.
12. Pour about a quarter-inch of water into the bottom of the baking dish around the peppers.
13. Cover the dish tightly with aluminum foil and bake for 25 minutes. Tip: The steam from the water helps cook the peppers through without drying them out.
14. Remove the foil and bake for another 10 minutes, or until the pepper skins look slightly puckered and the filling is hot.
15. Let the stuffed peppers rest in the dish for 5 minutes before serving.
Perfectly tender yet still holding their shape, these peppers offer a delightful contrast to the light, citrusy couscous inside. Present them whole for a stunning centerpiece, or slice them into thick rounds to show off the colorful layers. The fresh herbs really sing against the sweet pepper, making this a dish that tastes as bright as it looks.
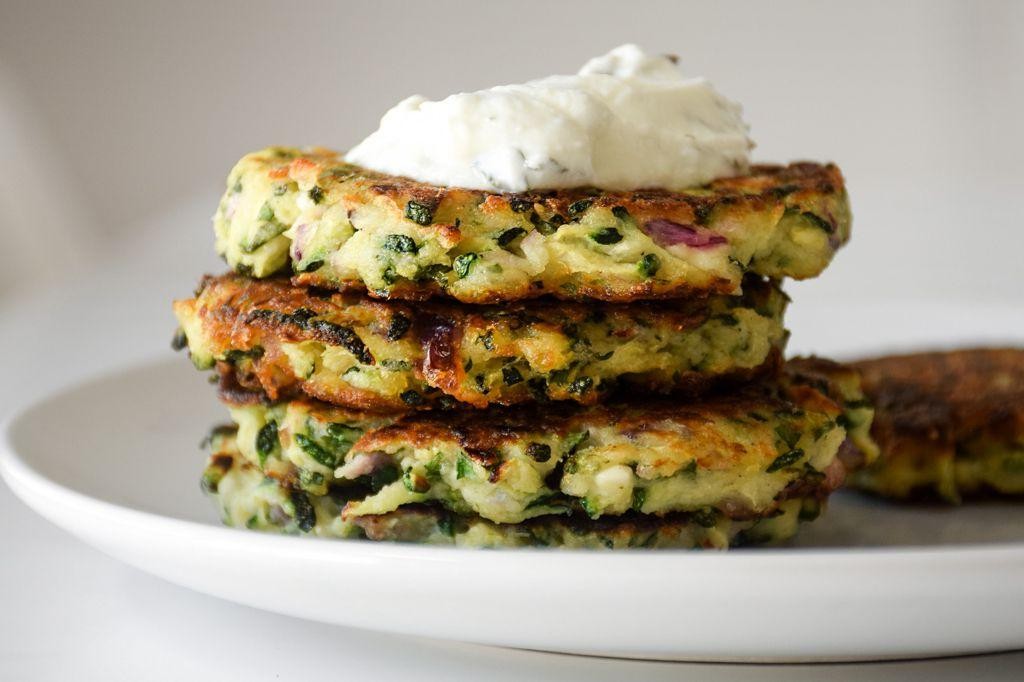
Zucchini Fritters with Tzatziki Sauce
You’ve probably stared at that pile of summer zucchini wondering what to do beyond another batch of bread—well, let’s turn them into crispy, savory fritters paired with a cool, herby tzatziki sauce. This recipe breaks everything down into simple, foolproof steps so you can nail it on your first try, even if you’re new to frying. We’ll walk through grating, mixing, frying, and saucing together, just like I would in a hands-on cooking class.
Serving: 4 | Pre Time: 20 minutes | Cooking Time: 15 minutes
Ingredients
– About 2 medium zucchinis, grated (you’ll squeeze out the water)
– A couple of large eggs
– A heaping ½ cup of all-purpose flour
– A small handful of fresh dill, chopped (about 2 tablespoons)
– A couple of cloves of garlic, minced
– A splash of olive oil for frying (around ¼ cup)
– For the tzatziki: 1 cup of plain Greek yogurt, half a cucumber grated and squeezed, that same minced garlic and chopped dill from above, and a squeeze of lemon juice (about 1 tablespoon)
– A pinch of salt and black pepper to season everything
Instructions
1. Grate the zucchinis using a box grater into a clean kitchen towel or cheesecloth.
2. Twist the towel tightly over the sink to squeeze out as much liquid as possible—this keeps the fritters from getting soggy.
3. In a large bowl, whisk the eggs until smooth.
4. Add the squeezed zucchini, flour, dill, half of the minced garlic, a pinch of salt, and a pinch of black pepper to the bowl.
5. Stir everything together until just combined; don’t overmix to avoid tough fritters.
6. Heat the olive oil in a large skillet over medium heat until it shimmers (about 350°F if you have a thermometer).
7. Scoop about ¼ cup of the batter per fritter into the hot oil, gently flattening each with a spatula.
8. Fry for 3–4 minutes per side, or until golden brown and crispy; work in batches to avoid crowding the pan.
9. Transfer the cooked fritters to a paper towel-lined plate to drain excess oil.
10. While the fritters fry, make the tzatziki: in a small bowl, mix the Greek yogurt, grated and squeezed cucumber, remaining minced garlic, remaining dill, lemon juice, a pinch of salt, and a pinch of black pepper.
11. Stir the tzatziki until smooth and refrigerate until ready to serve.
12. Serve the warm fritters immediately with the chilled tzatziki sauce on the side.
So, you’ll get a fantastic contrast: the fritters are crispy on the outside with a tender, savory interior, while the tzatziki adds a creamy, tangy kick that cuts through the richness. Stack them high on a platter for a casual appetizer, or tuck them into pita pockets with extra sauce and veggies for a hearty meal—either way, they’re sure to disappear fast.
Lentil and Spinach Stuffed Grape Leaves

Grape leaves might seem intimidating at first, but this vegetarian version with lentils and spinach is surprisingly approachable and packed with flavor. Let’s walk through each step together to create these little bundles of goodness. You’ll find the rolling technique becomes second nature with practice.
Serving: 4 | Pre Time: 30 minutes | Cooking Time: 45 minutes
Ingredients
– A jar of grape leaves (about 30 leaves), rinsed well to remove brine
– 1 cup of brown lentils
– A big handful of fresh spinach, roughly chopped
– 1 medium yellow onion, finely diced
– 2 cloves of garlic, minced
– A couple of tablespoons of olive oil
– A splash of lemon juice (about 2 tablespoons)
– 1 teaspoon of dried oregano
– ½ teaspoon of ground cumin
– 4 cups of vegetable broth
– A pinch of salt and black pepper
Instructions
1. Rinse 1 cup of brown lentils under cold water in a fine-mesh strainer until the water runs clear.
2. Heat 2 tablespoons of olive oil in a large pot over medium heat for about 1 minute until shimmering.
3. Add 1 finely diced yellow onion and cook for 5-7 minutes, stirring occasionally, until translucent and soft.
4. Stir in 2 minced garlic cloves and cook for 1 minute until fragrant, being careful not to let it burn.
5. Add the rinsed lentils, 1 teaspoon of dried oregano, ½ teaspoon of ground cumin, a pinch of salt, and black pepper to the pot, stirring to coat everything in the oil.
6. Pour in 4 cups of vegetable broth, bring to a boil, then reduce heat to low, cover, and simmer for 20 minutes until lentils are tender but still hold their shape.
7. Remove the pot from heat, stir in a big handful of roughly chopped fresh spinach and 2 tablespoons of lemon juice, letting the residual heat wilt the spinach completely.
8. Lay a grape leaf shiny-side down on a clean surface, place 1 tablespoon of the lentil-spinach mixture near the stem end, fold the sides over the filling, and roll tightly into a cigar shape, repeating with all leaves and filling.
9. Arrange the rolled grape leaves seam-side down in a single layer in the same pot, add enough water to cover them by ½ inch, bring to a boil, then reduce to a simmer, cover, and cook for 25 minutes.
10. Carefully remove the grape leaves with a slotted spoon and let them cool for 10 minutes before serving to allow the flavors to meld and prevent burning your mouth.
Oozing with savory depth from the lentils and a bright hint of lemon, these stuffed grape leaves have a tender, slightly chewy texture that’s utterly satisfying. Serve them warm or at room temperature with a dollop of yogurt or tzatziki for a creamy contrast, or pack them for a picnic—they travel beautifully and taste even better the next day.
Greek-Style Orzo with Tomatoes and Olives
Every time I crave a Mediterranean escape but don’t want to spend hours in the kitchen, this vibrant Greek-style orzo is my go-to. It’s a one-pot wonder that’s packed with bright, tangy flavors and comes together with minimal fuss—perfect for a busy weeknight or a relaxed weekend lunch.
Serving: 4 | Pre Time: 10 minutes | Cooking Time: 20 minutes
Ingredients
– 1 cup of orzo pasta
– 2 tablespoons of olive oil
– 1 small yellow onion, finely chopped
– 2 cloves of garlic, minced
– 1 (14.5-ounce) can of diced tomatoes, with their juices
– 1 cup of vegetable broth
– A generous handful of Kalamata olives, pitted and halved
– A couple of tablespoons of fresh lemon juice
– A big pinch of dried oregano
– A splash of red wine vinegar
– A handful of fresh parsley, chopped
– 4 ounces of feta cheese, crumbled
Instructions
1. Heat the olive oil in a large skillet or Dutch oven over medium heat until it shimmers, about 1 minute.
2. Add the chopped onion and cook, stirring occasionally, until it turns soft and translucent, about 5 minutes.
3. Stir in the minced garlic and cook for just 30 seconds until fragrant—be careful not to let it burn.
4. Pour in the diced tomatoes with their juices and the vegetable broth, then bring the mixture to a gentle boil.
5. Add the orzo pasta, dried oregano, and a pinch of salt, stirring to combine everything evenly.
6. Reduce the heat to low, cover the skillet, and let it simmer for 10 minutes, stirring once halfway through to prevent sticking.
7. Uncover and stir in the halved Kalamata olives, lemon juice, and red wine vinegar, then cook for another 2–3 minutes until the orzo is tender and has absorbed most of the liquid.
8. Remove the skillet from the heat and gently fold in the chopped parsley and crumbled feta cheese until just combined.
Vibrant and satisfying, this dish boasts a lovely al dente texture from the orzo, balanced by the briny olives and creamy feta. For a creative twist, serve it warm with grilled chicken or spoon it into lettuce cups for a light, refreshing meal—it’s versatile enough to shine on its own or as a hearty side.
Herbed Falafel with Garlic Yogurt Dip
Falafel doesn’t have to be complicated to be delicious—this herbed version comes together with pantry staples and delivers crispy, flavorful bites perfect for dipping. Follow these simple steps for a foolproof batch that’s sure to impress.
Serving: 4 | Pre Time: 15 minutes | Cooking Time: 15 minutes
Ingredients
– A couple of 15-ounce cans of chickpeas, drained and rinsed
– A big handful of fresh parsley leaves
– A small handful of fresh cilantro leaves
– 3 cloves of garlic
– 1 teaspoon of ground cumin
– ½ teaspoon of baking powder
– A splash of olive oil for frying
– 1 cup of plain Greek yogurt
– A drizzle of olive oil for the dip
– A pinch of salt
Instructions
1. Add the drained chickpeas, parsley, cilantro, 2 cloves of garlic, cumin, baking powder, and a pinch of salt to a food processor.
2. Pulse the mixture until it’s finely chopped but not pureed—it should hold together when pressed, which prevents soggy falafel.
3. Shape the mixture into 12 small balls, about 1½ inches in diameter, and set them aside on a plate.
4. Heat a splash of olive oil in a large skillet over medium-high heat until it shimmers, about 350°F.
5. Carefully place the falafel balls in the skillet, leaving space between them to ensure even browning.
6. Fry the falafel for 3–4 minutes per side until golden brown and crispy, then transfer to a paper towel-lined plate to drain.
7. While the falafel cooks, mince the remaining clove of garlic and mix it with the Greek yogurt and a drizzle of olive oil in a small bowl.
8. Let the garlic yogurt dip sit for 5 minutes to allow the flavors to meld, enhancing the creamy texture.
9. Serve the hot falafel immediately with the garlic yogurt dip on the side.
Golden and crisp on the outside with a tender, herb-packed center, these falafel pair beautifully with the tangy garlic dip. Try stuffing them into pita with fresh veggies for a quick meal, or serve as an appetizer at your next gathering—they’re versatile and always a hit.
Mediterranean Lentil Soup with Lemon

Gathering around a warm bowl of soup is one of winter’s simplest pleasures, and this Mediterranean lentil soup with lemon delivers both comfort and brightness. It’s a straightforward recipe that builds layers of flavor with minimal effort, perfect for a cozy weeknight meal. Let’s walk through each step together.
Serving: 4 | Pre Time: 15 minutes | Cooking Time: 40 minutes
Ingredients
– 1 tablespoon of olive oil
– 1 medium yellow onion, diced
– 2 cloves of garlic, minced
– 2 medium carrots, chopped into small pieces
– 1 cup of brown lentils, rinsed
– 4 cups of vegetable broth
– 1 bay leaf
– A pinch of salt
– A pinch of black pepper
– Juice from 1 lemon
– A handful of fresh parsley, chopped
Instructions
1. Heat 1 tablespoon of olive oil in a large pot over medium heat until it shimmers, about 1 minute.
2. Add 1 diced yellow onion and cook, stirring occasionally, until softened and translucent, about 5 minutes.
3. Stir in 2 minced garlic cloves and cook for 30 seconds until fragrant, being careful not to burn them.
4. Add 2 chopped carrots and cook for 3 minutes to soften slightly.
5. Pour in 1 cup of rinsed brown lentils, 4 cups of vegetable broth, and 1 bay leaf, then bring to a boil.
6. Reduce the heat to low, cover the pot, and simmer for 30 minutes until the lentils are tender but not mushy.
7. Remove the bay leaf and discard it.
8. Season with a pinch of salt and a pinch of black pepper, stirring to combine.
9. Squeeze in the juice from 1 lemon and stir well.
10. Ladle the soup into bowls and top with a handful of chopped fresh parsley.
During simmering, the lentils absorb the broth for a hearty, thick texture, while the lemon adds a zesty kick that brightens the earthy flavors. Serve it with crusty bread for dipping, or stir in a dollop of Greek yogurt for extra creaminess—it’s versatile enough to enjoy as a light lunch or a satisfying dinner centerpiece.
Grilled Halloumi and Vegetable Skewers
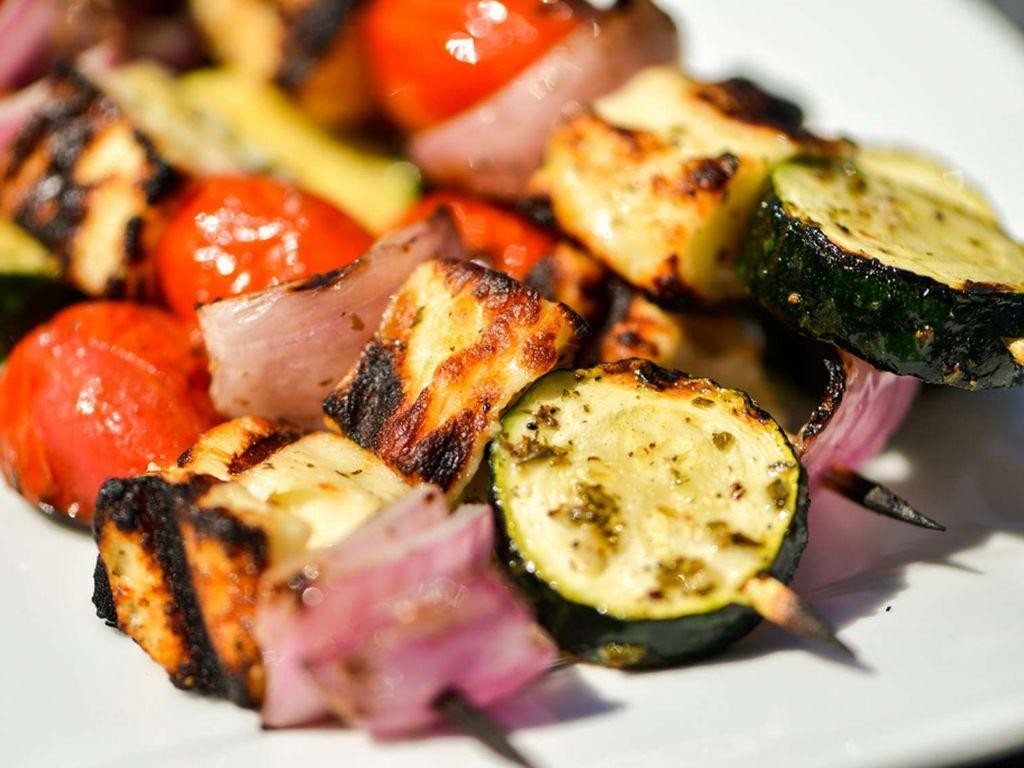
Venture into a simple yet satisfying summer meal with these grilled halloumi and vegetable skewers—perfect for beginners who want to impress at a barbecue. I’ll walk you through each step methodically, ensuring your skewers turn out beautifully charred and flavorful every time. Let’s get those skewers ready for the grill!
Serving: 4 | Pre Time: 15 minutes | Cooking Time: 10 minutes
Ingredients
– 1 block of halloumi cheese (about 8 ounces), cut into 1-inch cubes
– 2 bell peppers (any color), cut into 1-inch pieces
– 1 zucchini, sliced into ½-inch rounds
– 1 red onion, cut into 1-inch chunks
– 2 tablespoons of olive oil
– A splash of lemon juice (about 1 tablespoon)
– A couple of wooden skewers, soaked in water for 30 minutes
Instructions
1. Soak 8 wooden skewers in water for 30 minutes to prevent burning on the grill—this is a key tip for even cooking.
2. Preheat your grill to medium-high heat, aiming for about 400°F, which helps achieve those nice grill marks without overcooking.
3. Cut the halloumi into 1-inch cubes, bell peppers and red onion into 1-inch pieces, and zucchini into ½-inch rounds, keeping sizes uniform for even grilling.
4. Thread the halloumi cubes, bell pepper pieces, zucchini rounds, and red onion chunks alternately onto the soaked skewers, leaving a little space between items for heat circulation.
5. In a small bowl, whisk together 2 tablespoons of olive oil and 1 tablespoon of lemon juice to create a simple marinade.
6. Brush the skewers generously with the olive oil and lemon juice mixture on all sides to add flavor and prevent sticking.
7. Place the skewers on the preheated grill and cook for 4-5 minutes per side, turning once, until the vegetables are tender with charred edges and the halloumi is golden brown—watch for those visual cues to avoid burning.
8. Remove the skewers from the grill and let them rest for 2 minutes before serving to allow the flavors to meld, another pro tip for better texture.
Eagerly serve these skewers hot off the grill, where the halloumi offers a satisfying squeak against the smoky, tender veggies. The charred bits add a delightful crunch, making them perfect as a main dish or paired with a fresh salad for a light meal—try drizzling with extra lemon juice for a zesty kick!
Tomato and Cucumber Salad with Sumac
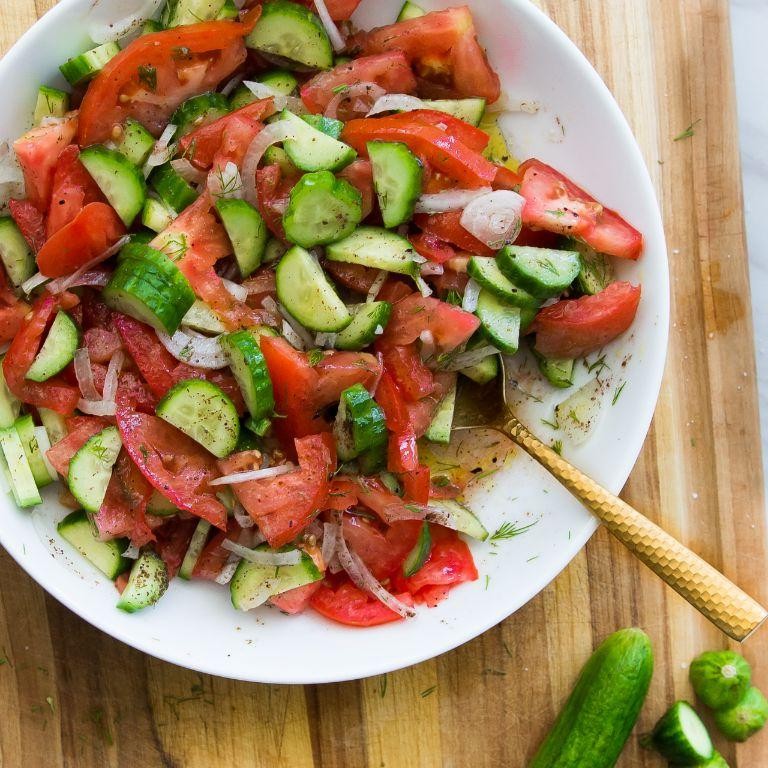
Just when you need a refreshing side dish that comes together in minutes, this Tomato and Cucumber Salad with Sumac delivers bright flavors and crisp textures. Join me as we walk through each simple step to create this vibrant salad that’s perfect for any gathering or a quick weeknight meal.
Serving: 4 | Pre Time: 15 minutes | Cooking Time: 0 minutes
Ingredients
– 2 large ripe tomatoes, chopped into bite-sized chunks
– 1 English cucumber, sliced into thin half-moons
– 1/4 cup of finely chopped red onion
– A couple of tablespoons of extra-virgin olive oil
– A splash of fresh lemon juice (about 2 tablespoons)
– 1 teaspoon of sumac, plus a little extra for sprinkling
– A pinch of salt and freshly ground black pepper
– A small handful of fresh parsley, roughly chopped
Instructions
1. Place the chopped tomatoes, sliced cucumber, and finely chopped red onion in a large mixing bowl.
2. Drizzle the extra-virgin olive oil and fresh lemon juice over the vegetables in the bowl.
3. Sprinkle 1 teaspoon of sumac, a pinch of salt, and a few grinds of black pepper evenly across the mixture.
4. Gently toss all the ingredients together with clean hands or a large spoon until everything is well coated, being careful not to crush the tomatoes.
5. Add the roughly chopped fresh parsley to the bowl and give it one more light toss to incorporate it.
6. Transfer the salad to a serving platter or individual plates immediately after mixing.
7. Finish by sprinkling a little extra sumac on top for a vibrant color and an extra burst of tangy flavor.
During the final toss, you’ll notice the sumac infusing the vegetables with its citrusy depth, while the olive oil and lemon juice create a simple, glossy dressing. This salad offers a delightful crunch from the cucumber, juicy bursts from the tomatoes, and a zesty kick that makes it a standout side—try serving it alongside grilled chicken or as a topping for toasted pita bread for a quick, satisfying meal.
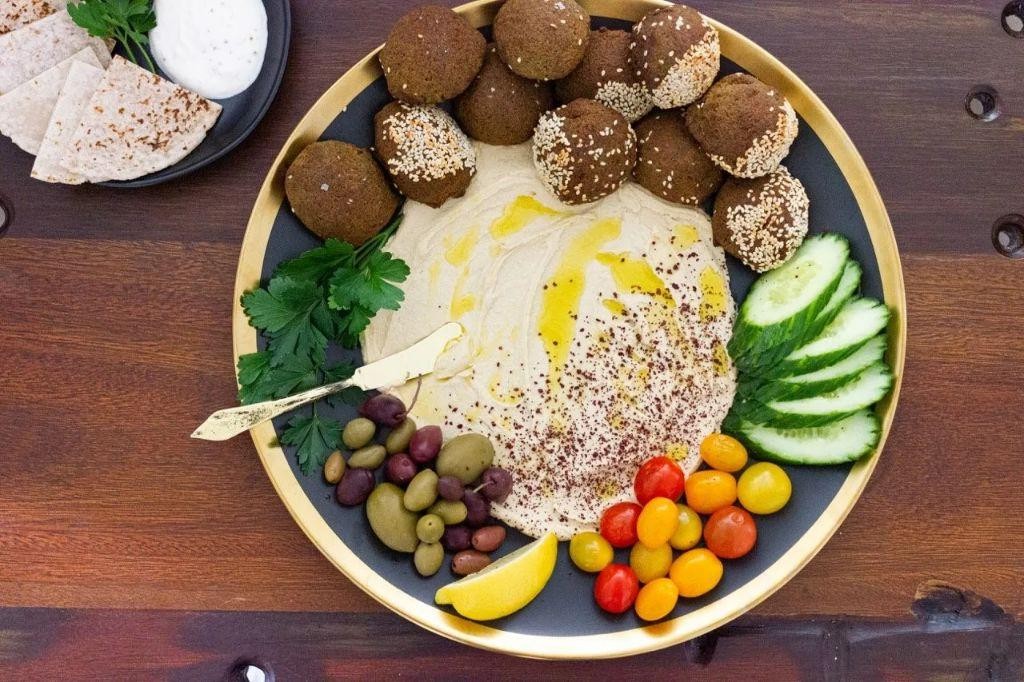
Roasted Red Pepper Hummus with Pita

Holiday gatherings call for effortless yet impressive appetizers, and this roasted red pepper hummus with pita fits the bill perfectly. It’s a vibrant, creamy dip that comes together in minutes, making it ideal for last-minute entertaining or a quick snack.
Serving: 6 | Pre Time: 10 minutes | Cooking Time: 0 minutes
Ingredients
– A couple of 15-ounce cans of chickpeas, drained and rinsed
– A jar (about 12 ounces) of roasted red peppers, drained
– A generous 1/4 cup of tahini
– A couple of tablespoons of fresh lemon juice
– A couple of cloves of garlic, peeled
– A splash of extra-virgin olive oil, plus more for drizzling
– A teaspoon of ground cumin
– A half teaspoon of salt
– A package of pita bread, cut into wedges
Instructions
1. Drain and rinse two 15-ounce cans of chickpeas under cold water to remove excess sodium.
2. Drain a 12-ounce jar of roasted red peppers, gently squeezing out any excess liquid with your hands.
3. In a food processor, combine the chickpeas, roasted red peppers, 1/4 cup of tahini, 2 tablespoons of fresh lemon juice, 2 peeled garlic cloves, 1 teaspoon of ground cumin, and 1/2 teaspoon of salt.
4. Pulse the mixture for 30 seconds to break down the ingredients.
5. With the food processor running on low, slowly drizzle in a splash of extra-virgin olive oil through the feed tube until the hummus is smooth, about 1-2 minutes.
6. Taste the hummus and adjust seasoning if needed, but avoid over-processing as it can become gummy.
7. Transfer the hummus to a serving bowl and use the back of a spoon to create swirls on the surface.
8. Drizzle a little extra-virgin olive oil over the top for a glossy finish.
9. Cut a package of pita bread into wedges and arrange them around the bowl for dipping.
Smooth and velvety with a subtle smoky sweetness from the peppers, this hummus pairs wonderfully with the warm, chewy pita. For a creative twist, try serving it alongside crisp vegetable sticks or as a spread in sandwiches for added flavor.
Mediterranean Stuffed Portobello Mushrooms
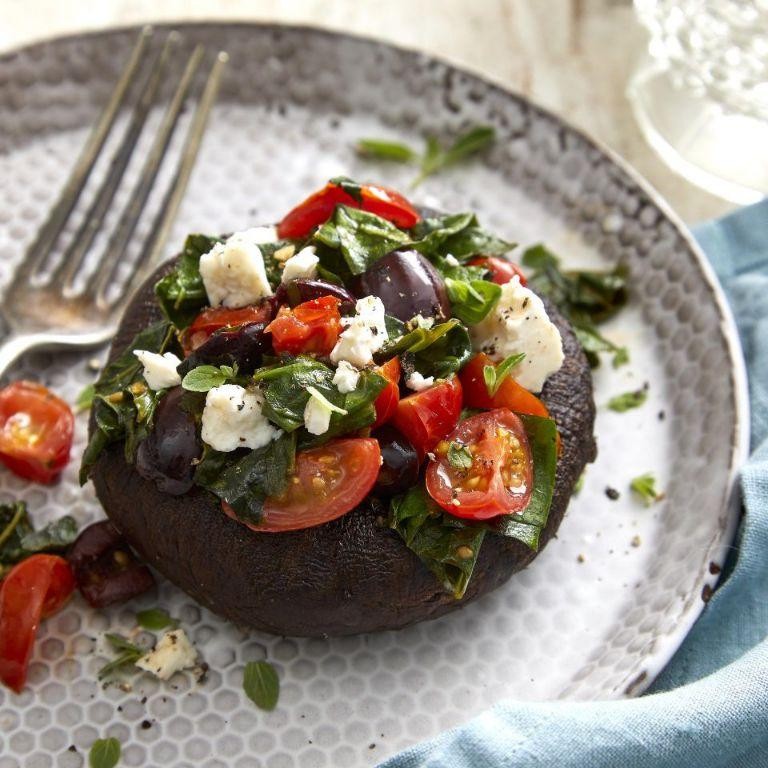
Ready to elevate your weeknight dinner? These Mediterranean stuffed portobello mushrooms are a flavorful, satisfying meal that comes together with minimal fuss. Let’s walk through each step together to ensure perfect results.
Serving: 4 | Pre Time: 15 minutes | Cooking Time: 25 minutes
Ingredients
– 4 large portobello mushroom caps, stems removed
– A couple of tablespoons of olive oil
– A pinch of salt and black pepper
– 1 cup of cooked quinoa
– A half cup of crumbled feta cheese
– A quarter cup of chopped sun-dried tomatoes
– A couple of tablespoons of chopped fresh parsley
– A splash of lemon juice
– A teaspoon of dried oregano
Instructions
1. Preheat your oven to 400°F (200°C) and line a baking sheet with parchment paper.
2. Place the portobello mushroom caps gill-side up on the baking sheet.
3. Drizzle the olive oil evenly over the mushroom caps, using about a tablespoon total.
4. Sprinkle the salt and black pepper over the mushrooms.
5. Roast the mushrooms in the preheated oven for 10 minutes to soften them slightly.
6. While the mushrooms roast, combine the cooked quinoa, crumbled feta cheese, chopped sun-dried tomatoes, chopped fresh parsley, lemon juice, and dried oregano in a medium bowl. Tip: If your sun-dried tomatoes are packed in oil, drain them well to prevent the filling from becoming greasy.
7. Remove the mushrooms from the oven after 10 minutes—they should be tender but still hold their shape.
8. Divide the quinoa mixture evenly among the mushroom caps, pressing it gently into the cavities.
9. Return the baking sheet to the oven and bake for 15 minutes, or until the filling is heated through and the mushrooms are fully tender. Tip: For a golden top, broil for the final 1-2 minutes, watching closely to avoid burning.
10. Let the stuffed mushrooms rest for 5 minutes before serving to allow the flavors to meld. Tip: This resting time helps the filling set, making them easier to handle.
Mouthwatering and hearty, these mushrooms offer a juicy texture from the roasted caps contrasted with the fluffy, tangy quinoa filling. Serve them over a bed of fresh arugula for a light lunch, or pair with a simple Greek salad to complete the Mediterranean theme.
Chickpea and Avocado Wrap with Tahini Dressing

Ever find yourself staring into the fridge at 4:47 PM on a pre-holiday Wednesday, craving something fresh, filling, and fast? This chickpea and avocado wrap is your answer—a vibrant, no-cook meal that comes together in minutes, perfect for a quick lunch or a light, healthy dinner. Let’s get started.
Serving: 2 | Pre Time: 15 minutes | Cooking Time: 0 minutes
Ingredients
– A 15-ounce can of chickpeas, drained and rinsed
– One ripe avocado, pitted and peeled
– A couple of large flour tortillas (about 10-inch size)
– A big handful of fresh baby spinach
– A quarter of a red onion, thinly sliced
– For the tahini dressing: a quarter cup of tahini, a couple of tablespoons of fresh lemon juice, a splash of water (about 2 tablespoons), and a pinch of salt
Instructions
1. Place the drained chickpeas in a medium bowl and use a fork or potato masher to mash them roughly until about half are broken down—this creates a great texture that holds the wrap together.
2. Add the avocado to the bowl with the chickpeas and mash everything together until well combined but still a bit chunky.
3. In a small bowl, whisk together the tahini, fresh lemon juice, water, and a pinch of salt until smooth and creamy; if it’s too thick, add another splash of water, one teaspoon at a time, until it reaches a drizzle-able consistency.
4. Lay a flour tortilla flat on your work surface.
5. Spread half of the chickpea-avocado mixture evenly over the center of the tortilla, leaving about a 2-inch border on all sides.
6. Top the mixture with a handful of baby spinach and a few slices of red onion.
7. Drizzle about two tablespoons of the tahini dressing over the fillings.
8. Fold the bottom edge of the tortilla up over the fillings, then fold in the sides, and roll tightly from the bottom to form a secure wrap. Repeat with the second tortilla and remaining ingredients.
9. Slice each wrap in half diagonally for easier serving.
You’ll love the creamy, hearty mash against the crisp spinach and sharp onion, all brought together by that nutty, tangy tahini drizzle. Try serving these with extra dressing on the side for dipping, or pack them whole for a mess-free lunch on the go—they hold up beautifully for a few hours.
Baked Feta with Cherry Tomatoes and Basil

Ever find yourself staring at the fridge, craving something warm and comforting but short on time? Enter this ridiculously easy baked feta with cherry tomatoes and basil—a one-pan wonder that transforms simple ingredients into a showstopper with minimal effort. Perfect for busy weeknights or last-minute gatherings, it’s a dish that feels fancy without the fuss.
Serving: 4 | Pre Time: 10 minutes | Cooking Time: 25 minutes
Ingredients
– One 8-ounce block of feta cheese
– A couple of cups of cherry tomatoes
– A big handful of fresh basil leaves
– A generous glug of extra virgin olive oil (about 1/4 cup)
– A couple of cloves of garlic, minced
– A pinch of red pepper flakes
– A splash of balsamic vinegar (about 1 tablespoon)
– Salt and freshly ground black pepper
Instructions
1. Preheat your oven to 400°F (200°C) to ensure it’s hot and ready for baking.
2. Place the block of feta cheese in the center of a small baking dish or oven-safe skillet.
3. Scatter the cherry tomatoes and minced garlic cloves evenly around the feta in the dish.
4. Drizzle the extra virgin olive oil over the feta and tomatoes, coating them lightly.
5. Sprinkle the red pepper flakes, salt, and freshly ground black pepper over everything for a bit of heat and seasoning.
6. Bake in the preheated oven for 20–25 minutes, until the tomatoes are bursting and the feta is soft and slightly golden on top.
7. Remove the dish from the oven and immediately drizzle the balsamic vinegar over the hot ingredients to enhance the flavors.
8. Tear the fresh basil leaves by hand and scatter them over the baked feta and tomatoes just before serving.
Pro tip: For the best texture, let the dish sit for 5 minutes after baking so the flavors meld together. The result is a creamy, tangy feta paired with sweet, juicy tomatoes and aromatic basil—ideal for scooping onto crusty bread or tossing with pasta for a quick, satisfying meal.
Eggplant Parmesan with Fresh Mozzarella
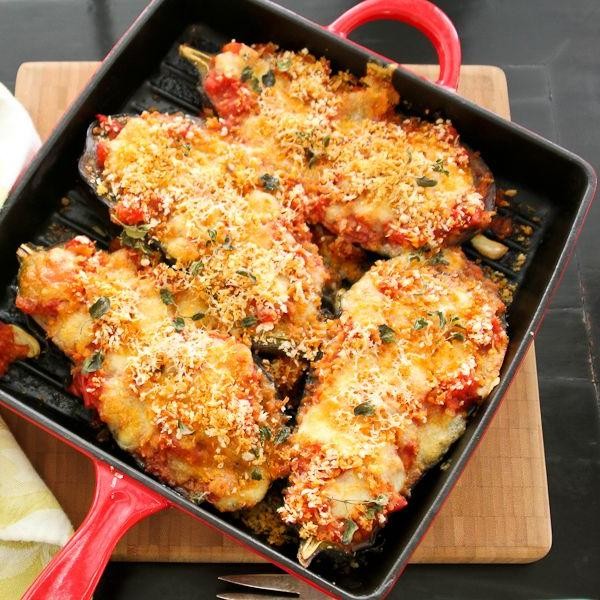
Perfect for a cozy winter evening, this Eggplant Parmesan with Fresh Mozzarella delivers crispy, golden eggplant layered with rich tomato sauce and creamy cheese. Preparing it step-by-step ensures each component shines, making it a satisfying project for any home cook.
Serving: 4 | Pre Time: 20 minutes | Cooking Time: 40 minutes
Ingredients
– 2 medium eggplants, sliced into 1/2-inch rounds
– 1 cup all-purpose flour
– 3 large eggs, beaten
– 2 cups Italian-style breadcrumbs
– 1/2 cup grated Parmesan cheese
– 2 cups marinara sauce
– 8 ounces fresh mozzarella cheese, sliced
– A splash of olive oil for frying
– A couple of fresh basil leaves for garnish
Instructions
1. Preheat your oven to 375°F (190°C).
2. Arrange the eggplant slices on a baking sheet and sprinkle them lightly with salt; let them sit for 10 minutes to draw out moisture, then pat them dry with paper towels—this helps prevent sogginess.
3. Set up three shallow bowls: one with the flour, one with the beaten eggs, and one with the breadcrumbs mixed with the grated Parmesan.
4. Dredge each eggplant slice first in the flour, shaking off any excess, then dip it into the eggs, and finally coat it thoroughly in the breadcrumb mixture, pressing gently to adhere.
5. Heat a splash of olive oil in a large skillet over medium-high heat until it shimmers, about 350°F (175°C).
6. Fry the coated eggplant slices in batches for 2–3 minutes per side, until they are golden brown and crispy; transfer them to a paper towel-lined plate to drain excess oil.
7. Spread a thin layer of marinara sauce on the bottom of a 9×13-inch baking dish.
8. Arrange a single layer of fried eggplant slices over the sauce, then top with more marinara sauce and a layer of fresh mozzarella slices.
9. Repeat the layering process until all ingredients are used, finishing with a final layer of mozzarella on top.
10. Bake the assembled dish in the preheated oven for 25–30 minutes, until the cheese is melted and bubbly with golden edges.
11. Remove from the oven and let it rest for 5 minutes before serving to allow the layers to set—this makes slicing easier.
12. Garnish with a couple of fresh basil leaves just before serving.
Vibrant and comforting, this dish offers a delightful contrast between the crispy eggplant exterior and the soft, gooey cheese inside. For a creative twist, serve it over a bed of spaghetti or alongside a simple green salad to balance the richness.
Mediterranean Farro Salad with Roasted Vegetables
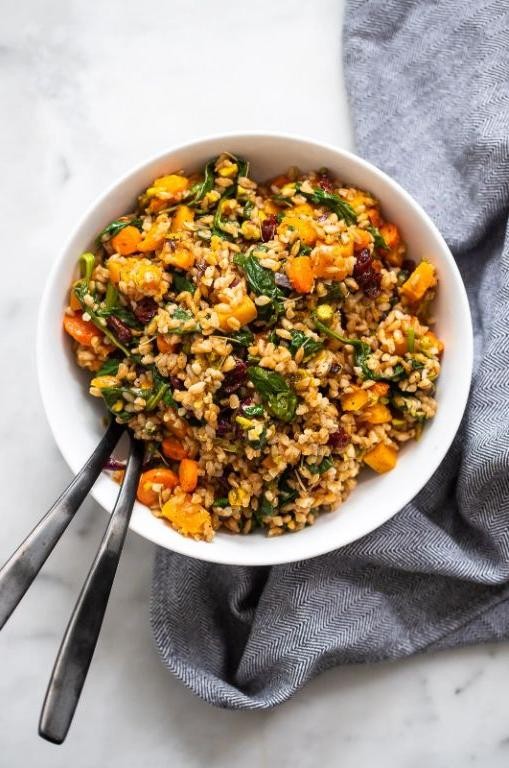
Keeping your kitchen adventures both nutritious and delicious doesn’t have to be complicated. This Mediterranean farro salad with roasted vegetables is a perfect example—a hearty, make-ahead dish that’s packed with flavor and texture, ideal for meal prep or a simple weeknight dinner. Let’s walk through it together, step by step.
Serving: 4 | Pre Time: 15 minutes | Cooking Time: 30 minutes
Ingredients
– 1 cup of pearled farro
– 2 cups of water
– A couple of bell peppers (one red, one yellow), chopped into 1-inch pieces
– A medium zucchini, sliced into half-moons
– A red onion, cut into wedges
– 3 tablespoons of olive oil, divided
– A big pinch of salt and a few cracks of black pepper
– A 15-ounce can of chickpeas, drained and rinsed
– A handful of fresh parsley, roughly chopped
– The juice of one lemon
– A splash of red wine vinegar
– A couple of ounces of crumbled feta cheese
Instructions
1. Preheat your oven to 425°F (218°C) and line a large baking sheet with parchment paper for easy cleanup.
2. Rinse 1 cup of pearled farro under cold water in a fine-mesh strainer to remove any excess starch.
3. In a medium saucepan, combine the rinsed farro with 2 cups of water and bring it to a boil over high heat.
4. Once boiling, reduce the heat to low, cover the saucepan, and let the farro simmer for 25 minutes until it’s tender but still chewy—tip: check it at 20 minutes to avoid overcooking.
5. While the farro cooks, chop 2 bell peppers (one red, one yellow) into 1-inch pieces, slice 1 medium zucchini into half-moons, and cut 1 red onion into wedges.
6. Toss the chopped vegetables and 1 can of drained chickpeas on the prepared baking sheet with 2 tablespoons of olive oil, a big pinch of salt, and a few cracks of black pepper.
7. Spread everything in a single layer on the baking sheet and roast in the preheated oven for 20-25 minutes, stirring halfway through, until the vegetables are caramelized and tender—tip: don’t overcrowd the pan to ensure even roasting.
8. Drain any excess water from the cooked farro and transfer it to a large mixing bowl to cool slightly.
9. In a small bowl, whisk together the juice of 1 lemon, 1 tablespoon of olive oil, and a splash of red wine vinegar to make the dressing.
10. Add the roasted vegetables and chickpeas to the bowl with the farro, along with a handful of chopped parsley and a couple of ounces of crumbled feta cheese.
11. Pour the dressing over the salad and toss everything gently to combine—tip: let it sit for 10 minutes before serving to allow the flavors to meld.
12. Taste and adjust seasoning if needed, but the salt from the feta and roasting should be just right.
Unbelievably satisfying, this salad offers a delightful mix of chewy farro, tender roasted veggies, and creamy feta, with a bright lemon kick. Serve it warm or chilled—it’s fantastic stuffed into pita pockets for a portable lunch or topped with grilled chicken for a heartier meal.
Garlicky White Bean Dip with Crudités

Zesty yet comforting, this garlicky white bean dip transforms simple pantry staples into a crowd-pleasing appetizer perfect for holiday gatherings or casual snacking. Let’s walk through each step together—think of me as your cooking coach guiding you through this easy, flavorful recipe.
Serving: 6 | Pre Time: 10 minutes | Cooking Time: 0 minutes
Ingredients
– A couple of 15-ounce cans of cannellini beans, drained and rinsed
– 3 large cloves of garlic, peeled
– A generous ¼ cup of extra-virgin olive oil
– A splash of fresh lemon juice (about 2 tablespoons)
– A pinch of salt
– A handful of fresh parsley leaves
– A dash of red pepper flakes
– Your favorite crudités for dipping, like carrot sticks, cucumber slices, and bell pepper strips
Instructions
1. Drain and rinse both cans of cannellini beans thoroughly in a colander to remove any excess sodium from the canned liquid.
2. Peel 3 large cloves of garlic and roughly chop them into smaller pieces to help your food processor blend them smoothly.
3. In a food processor, combine the drained beans, chopped garlic, ¼ cup of extra-virgin olive oil, 2 tablespoons of fresh lemon juice, and a pinch of salt.
4. Pulse the mixture on low speed for about 30 seconds, then scrape down the sides with a spatula to ensure everything is evenly incorporated.
5. Add a handful of fresh parsley leaves and a dash of red pepper flakes to the food processor.
6. Blend on high speed for 1–2 minutes until the dip is completely smooth and creamy, with no visible chunks of beans or garlic.
7. Taste the dip and adjust the seasoning with an extra pinch of salt if needed, but avoid over-salting since the beans already have some salt from the can.
8. Transfer the dip to a serving bowl and drizzle a little extra olive oil on top for a glossy finish.
9. Arrange your crudités—such as carrot sticks, cucumber slices, and bell pepper strips—around the bowl on a platter for dipping.
10. Serve immediately, or cover and refrigerate for up to 2 days if making ahead; the flavors will meld and intensify over time.
This dip boasts a velvety, spreadable texture with a robust garlic kick balanced by the bright acidity of lemon. Try spreading it on toasted baguette slices or using it as a sandwich condiment for a flavorful twist.
Artichoke and Olive Tapenade Bruschetta

You’ve probably seen bruschetta on menus, but this artichoke and olive version brings a Mediterranean twist that’s both elegant and easy to make at home. Let’s walk through the simple steps to create this flavorful appetizer that’s perfect for gatherings or a quick snack.
Serving: 6 | Pre Time: 15 minutes | Cooking Time: 10 minutes
Ingredients
– A 14-ounce can of artichoke hearts, drained and roughly chopped
– A half cup of pitted Kalamata olives, chopped
– A quarter cup of extra virgin olive oil
– A couple of cloves of garlic, minced
– A tablespoon of fresh lemon juice
– A splash of red wine vinegar
– A baguette, sliced into half-inch thick pieces
– A pinch of salt and black pepper
Instructions
1. Preheat your oven to 375°F (190°C) to toast the bread evenly.
2. Place the baguette slices on a baking sheet in a single layer.
3. Brush each slice lightly with about a tablespoon of the olive oil to help them crisp up.
4. Bake the slices for 8-10 minutes, or until they turn golden brown and crispy at the edges.
5. While the bread is toasting, combine the chopped artichoke hearts and Kalamata olives in a medium bowl.
6. Add the minced garlic, lemon juice, red wine vinegar, and the remaining olive oil to the bowl.
7. Mix everything together gently until well combined, seasoning with a pinch of salt and black pepper.
8. Once the bread slices are done, remove them from the oven and let them cool for 2 minutes to avoid burning your fingers.
9. Spoon the artichoke and olive mixture generously onto each toasted slice, spreading it evenly.
10. Serve immediately while the bread is still warm for the best texture.
Resulting in a delightful crunch from the toasted bread paired with the briny, tangy tapenade, this bruschetta offers a burst of Mediterranean flavors in every bite. For a creative twist, try adding a sprinkle of crumbled feta or a drizzle of balsamic glaze before serving to enhance the savory notes.
Lemon Herb Roasted Cauliflower with Capers
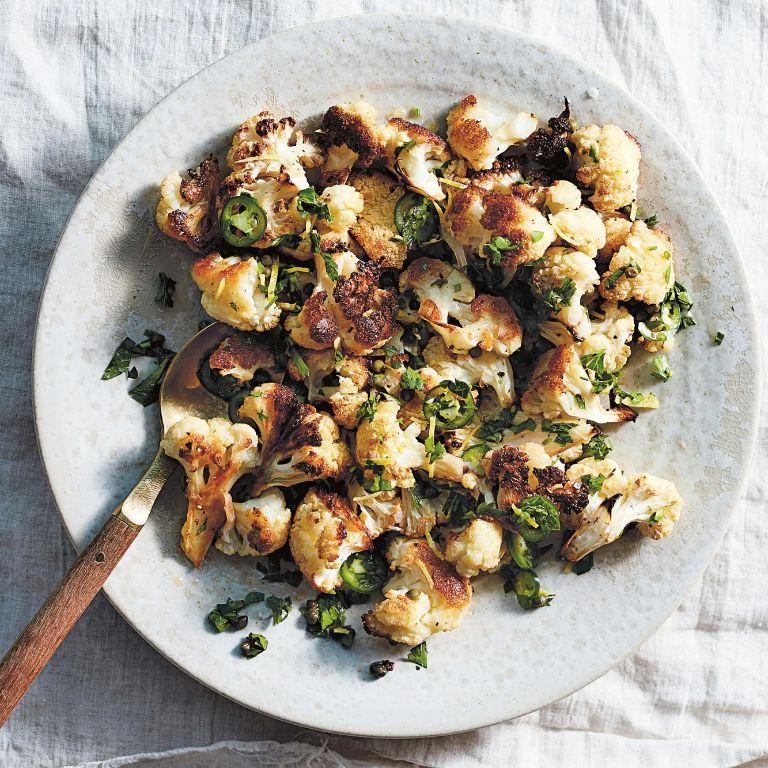
Here’s a simple, elegant side dish that transforms humble cauliflower into something special with bright lemon, fragrant herbs, and briny capers. It’s perfect for a holiday spread or a cozy weeknight dinner, and even beginners can nail it with these clear steps.
Serving: 4 | Pre Time: 10 minutes | Cooking Time: 30 minutes
Ingredients
– 1 large head of cauliflower, cut into florets
– 3 tablespoons of olive oil
– 2 tablespoons of fresh lemon juice
– 2 cloves of garlic, minced
– 1 teaspoon of dried oregano
– A pinch of salt and black pepper
– 2 tablespoons of capers, drained
– A handful of fresh parsley, chopped
Instructions
1. Preheat your oven to 425°F (220°C) and line a baking sheet with parchment paper for easy cleanup.
2. In a large bowl, toss the cauliflower florets with 3 tablespoons of olive oil, ensuring they’re evenly coated.
3. Add 2 tablespoons of fresh lemon juice, 2 minced garlic cloves, 1 teaspoon of dried oregano, a pinch of salt, and a pinch of black pepper to the bowl, mixing everything thoroughly.
4. Spread the cauliflower in a single layer on the prepared baking sheet, avoiding overcrowding to help it roast evenly and get crispy.
5. Roast in the preheated oven for 25 minutes, then sprinkle 2 tablespoons of drained capers over the cauliflower.
6. Continue roasting for another 5 minutes, until the edges are golden brown and the cauliflower is tender when pierced with a fork.
7. Remove from the oven and immediately toss with a handful of chopped fresh parsley for a fresh, herby finish.
Crunchy on the outside and tender within, this cauliflower boasts a zesty lemon kick balanced by the salty pop of capers. Try serving it over creamy polenta or as a vibrant topping for grain bowls to make it a meal.
Summary
Savory, simple, and satisfying—these 20 vegetarian Mediterranean recipes prove healthy eating can be delicious. We hope you’re inspired to try a few! Share your favorites in the comments below, and if you loved this roundup, pin it to your Pinterest board to save for later. Happy cooking!