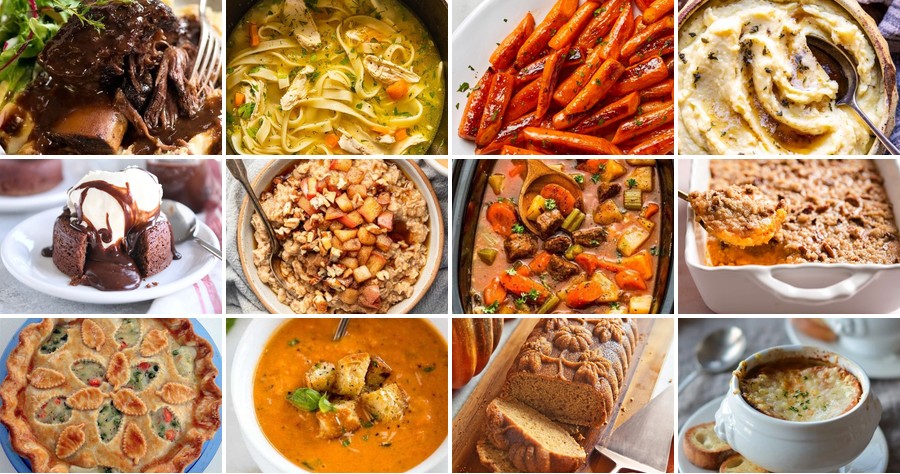
You know those chilly winter nights when all you crave is a warm, comforting meal? We’ve gathered 20 cozy recipes perfect for just that—from hearty stews to baked pastas and seasonal favorites. Whether you’re cooking for family or treating yourself, these dishes promise to warm you up from the inside out. Let’s dive into these delicious, soul-satisfying options!
Creamy Butternut Squash Soup

Escape the winter chill with a bowl of this velvety, soul-warming soup that’s basically a hug in a mug—or a bowl, we’re not picky. It’s the cozy, no-fuss hero your weeknight dinner deserves, turning humble squash into a creamy dream with minimal effort and maximum flavor payoff.
Serving: 4 | Pre Time: 15 minutes | Cooking Time: 35 minutes
Ingredients
– 1 medium butternut squash (about 2 lbs), peeled, seeded, and cubed
– 1 tbsp olive oil
– 1 medium yellow onion, diced
– 2 cloves garlic, minced
– 4 cups vegetable broth
– 1/2 cup heavy cream
– 1/2 tsp ground nutmeg
– 1/2 tsp salt
– 1/4 tsp black pepper
– 2 tbsp unsalted butter
Instructions
1. Preheat your oven to 400°F and line a baking sheet with parchment paper.
2. Toss the cubed butternut squash with 1 tbsp olive oil and spread it in a single layer on the baking sheet.
3. Roast the squash for 25 minutes, or until the edges are caramelized and a fork pierces it easily.
4. While the squash roasts, melt 2 tbsp unsalted butter in a large pot over medium heat.
5. Add the diced onion to the pot and sauté for 5–7 minutes, stirring occasionally, until it turns translucent and soft.
6. Stir in the minced garlic and cook for 1 minute, just until fragrant—don’t let it burn!
7. Pour in 4 cups vegetable broth and add the roasted squash cubes to the pot.
8. Bring the mixture to a boil, then reduce the heat to low, cover, and simmer for 10 minutes to let the flavors meld.
9. Remove the pot from the heat and carefully blend the soup until smooth using an immersion blender or a countertop blender in batches.
10. Return the blended soup to the pot over low heat and stir in 1/2 cup heavy cream, 1/2 tsp ground nutmeg, 1/2 tsp salt, and 1/4 tsp black pepper.
11. Heat the soup for 3–5 minutes, stirring constantly, until it’s warmed through but not boiling.
12. Ladle the soup into bowls and serve immediately.
Zesty and silky, this soup boasts a rich, sweet-savory depth with a hint of nutmeg warmth. For a fun twist, top it with crispy bacon crumbles or a swirl of sour cream, or pair it with crusty bread for the ultimate cozy meal.
Baked Macaroni and Cheese
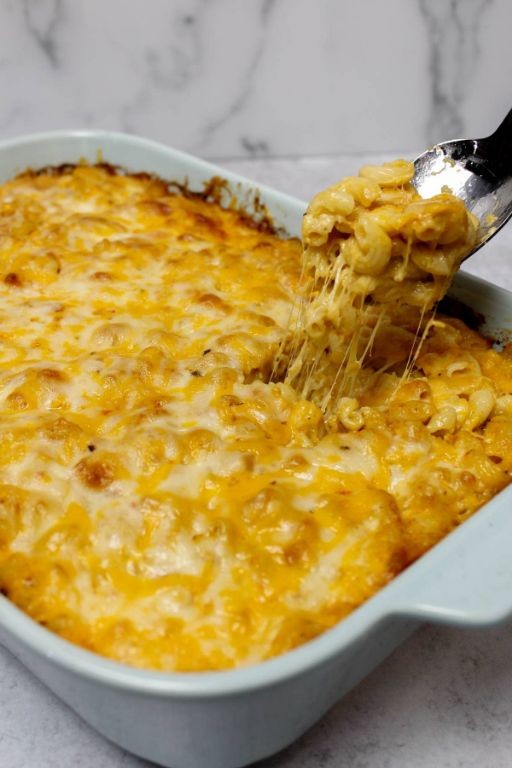
Ever had one of those days where only a giant, gooey, soul-hugging bowl of cheesy pasta will do? Well, my friend, you’ve hit the culinary jackpot. This isn’t your average boxed stuff—this is a golden, bubbling masterpiece of pure comfort.
Serving: 6 | Pre Time: 15 minutes | Cooking Time: 45 minutes
Ingredients
– 1 lb elbow macaroni
– 4 tbsp unsalted butter
– 1/4 cup all-purpose flour
– 3 cups whole milk, warmed
– 1 tsp dry mustard powder
– 1/2 tsp paprika
– 1/2 tsp garlic powder
– 1/2 tsp onion powder
– 1/4 tsp cayenne pepper (optional)
– 4 cups shredded sharp cheddar cheese, divided
– 1 cup shredded Gruyère cheese
– 1 tsp kosher salt
– 1/2 tsp black pepper
– 1 cup panko breadcrumbs
– 2 tbsp melted butter
Instructions
1. Preheat your oven to 375°F and grease a 9×13-inch baking dish.
2. Bring a large pot of salted water to a rolling boil and cook the elbow macaroni for 2 minutes less than the package directions for al dente pasta, about 6-8 minutes.
3. Drain the pasta in a colander and set it aside; do not rinse it, as the starch helps the sauce cling.
4. In the same pot, melt 4 tablespoons of unsalted butter over medium heat.
5. Whisk in 1/4 cup of all-purpose flour and cook for 1-2 minutes until it forms a smooth, golden paste (a roux).
6. Gradually pour in 3 cups of warmed whole milk while whisking constantly to prevent lumps.
7. Bring the mixture to a gentle simmer and cook for 3-5 minutes, stirring frequently, until it thickens enough to coat the back of a spoon.
8. Remove the pot from the heat and stir in 1 teaspoon of dry mustard powder, 1/2 teaspoon of paprika, 1/2 teaspoon of garlic powder, 1/2 teaspoon of onion powder, and 1/4 teaspoon of cayenne pepper (if using).
9. Add 3 cups of the shredded sharp cheddar cheese and 1 cup of shredded Gruyère cheese, stirring until fully melted and smooth.
10. Season the cheese sauce with 1 teaspoon of kosher salt and 1/2 teaspoon of black pepper.
11. Tip: For an extra creamy texture, let the sauce cool slightly before adding the pasta to prevent graininess.
12. Fold the drained elbow macaroni into the cheese sauce until evenly coated.
13. Transfer the macaroni and cheese mixture to the greased baking dish and spread it into an even layer.
14. In a small bowl, combine 1 cup of panko breadcrumbs with 2 tablespoons of melted butter.
15. Sprinkle the remaining 1 cup of shredded sharp cheddar cheese evenly over the top of the pasta.
16. Evenly scatter the buttered panko breadcrumbs over the cheese layer.
17. Tip: Press the breadcrumbs down lightly with your hand to help them form a crispier crust during baking.
18. Bake in the preheated oven at 375°F for 25-30 minutes, or until the top is golden brown and the edges are bubbling.
19. Tip: For the best results, let the baked macaroni and cheese rest for 10 minutes before serving to allow the sauce to set slightly.
20. Remove from the oven and let it cool on a wire rack for 10 minutes.
Delightfully decadent, this bake emerges with a crackly, golden lid giving way to a luxuriously creamy interior. The sharp cheddar and nutty Gruyère create a rich, complex flavor that’s far from one-note. Serve it straight from the dish with a crisp green salad to cut through the richness, or get creative by topping individual portions with crispy bacon or a drizzle of hot honey for a sweet-heat twist.
Hearty Chicken Pot Pie
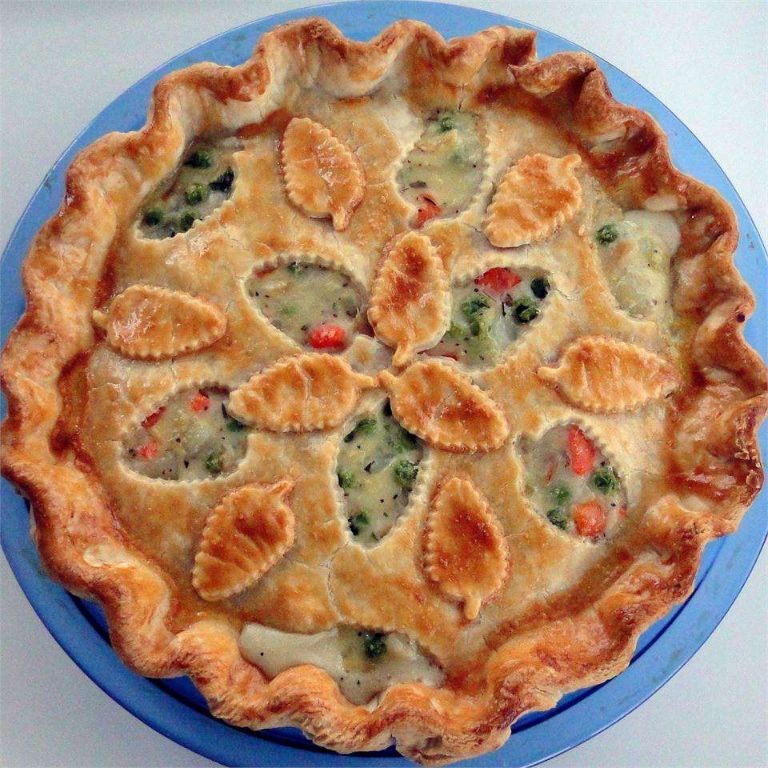
Tired of the same old dinner routine? Let’s shake things up with a cozy classic that’s basically a hug in a dish—Hearty Chicken Pot Pie. This flaky-topped wonder is the ultimate comfort food fix, guaranteed to banish those winter blues (or any Tuesday-night blahs).
Serving: 6 | Pre Time: 25 minutes | Cooking Time: 45 minutes
Ingredients
– 2 tbsp unsalted butter
– 1 medium yellow onion, diced
– 2 medium carrots, peeled and diced
– 2 celery stalks, diced
– 3 cloves garlic, minced
– 1/3 cup all-purpose flour
– 2 cups chicken broth
– 1 cup whole milk
– 3 cups cooked shredded chicken
– 1 cup frozen peas
– 1 tsp dried thyme
– 1/2 tsp salt
– 1/4 tsp black pepper
– 1 package (14 oz) refrigerated pie crust
– 1 large egg, beaten
Instructions
1. Preheat your oven to 400°F (200°C).
2. Melt 2 tbsp unsalted butter in a large skillet over medium heat.
3. Add 1 diced yellow onion, 2 diced carrots, and 2 diced celery stalks to the skillet; cook for 8–10 minutes until softened.
4. Stir in 3 minced garlic cloves and cook for 1 minute until fragrant.
5. Sprinkle 1/3 cup all-purpose flour over the vegetables and stir constantly for 2 minutes to cook off the raw flour taste.
6. Gradually whisk in 2 cups chicken broth and 1 cup whole milk until the mixture is smooth and begins to thicken, about 5 minutes.
7. Add 3 cups shredded chicken, 1 cup frozen peas, 1 tsp dried thyme, 1/2 tsp salt, and 1/4 tsp black pepper; stir to combine and simmer for 3 minutes.
8. Transfer the filling to a 9-inch pie dish and let it cool slightly for 5 minutes.
9. Unroll 1 refrigerated pie crust and place it over the filling, trimming any excess dough and crimping the edges with a fork to seal.
10. Cut 4 small slits in the top crust to allow steam to escape.
11. Brush the crust evenly with 1 beaten egg for a golden finish.
12. Bake at 400°F for 30–35 minutes, until the crust is deeply golden brown and the filling is bubbling.
13. Let the pot pie rest for 10 minutes before serving to allow the filling to set.
Oh, that first forkful! The flaky, buttery crust gives way to a creamy, savory filling packed with tender chicken and sweet peas. Serve it straight from the dish for a rustic family-style meal, or pair it with a crisp green salad to cut through the richness—either way, it’s pure comfort on a plate.
Dutch Oven Lamb Shanks
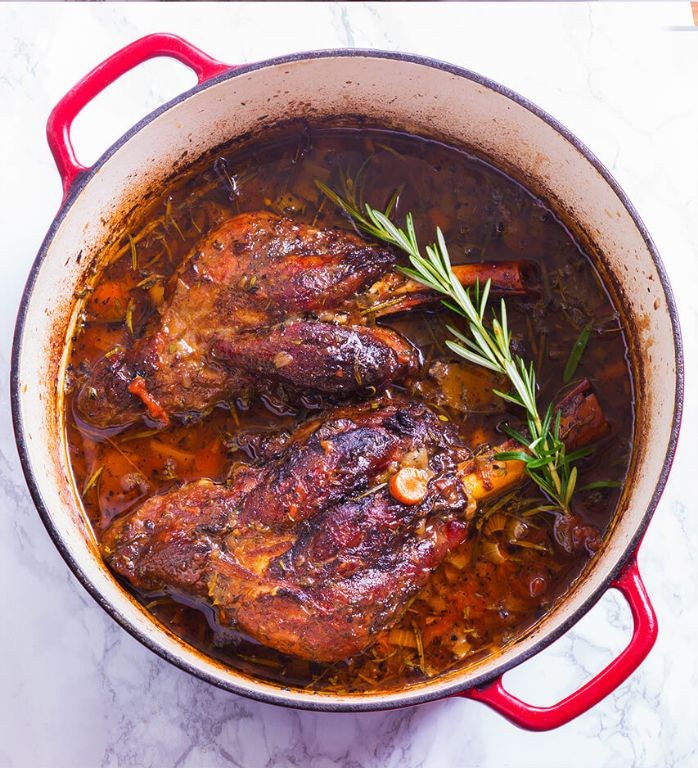
Kick off your winter with a dish that’s so cozy, it practically knits its own blanket—Dutch Oven Lamb Shanks, where low-and-slow magic turns tough cuts into tender, fall-off-the-bone perfection. Picture this: succulent meat braised in a rich, aromatic bath until it’s begging to be devoured, all while your kitchen smells like a five-star bistro (minus the fuss!). Trust me, this recipe is a game-changer for chilly nights when you want to impress without the stress.
Serving: 4 | Pre Time: 20 minutes | Cooking Time: 3 hours
Ingredients
– 4 lamb shanks (about 1 lb each)
– 2 tbsp olive oil
– 1 tsp salt
– 1 tsp black pepper
– 1 large onion, chopped
– 4 cloves garlic, minced
– 2 carrots, chopped
– 2 cups beef broth
– 1 cup red wine
– 2 tbsp tomato paste
– 2 sprigs rosemary
– 2 sprigs thyme
Instructions
1. Preheat your oven to 325°F.
2. Pat the lamb shanks dry with paper towels to ensure a good sear.
3. Season the lamb shanks evenly with salt and black pepper.
4. Heat olive oil in a Dutch oven over medium-high heat until shimmering, about 2 minutes.
5. Sear the lamb shanks for 4-5 minutes per side until deeply browned, working in batches if needed to avoid crowding.
6. Remove the lamb shanks and set aside on a plate.
7. Add chopped onion to the Dutch oven and cook for 5 minutes until softened.
8. Stir in minced garlic and chopped carrots, cooking for 2 more minutes until fragrant.
9. Pour in red wine to deglaze, scraping up any browned bits from the bottom with a wooden spoon for extra flavor.
10. Add beef broth, tomato paste, rosemary, and thyme, stirring to combine.
11. Return the lamb shanks to the Dutch oven, nestling them into the liquid.
12. Cover the Dutch oven with its lid and transfer it to the preheated oven.
13. Braise for 2.5 to 3 hours until the meat is fork-tender and easily pulls away from the bone.
14. Remove the Dutch oven from the oven and let it rest for 10 minutes before serving.
15. Skim off any excess fat from the surface with a spoon for a cleaner sauce.
16. Serve the lamb shanks hot, spooning the braising liquid over the top.
Buttery soft and infused with herbs, these lamb shanks melt in your mouth with a savory depth that’s pure comfort. Pair them with creamy mashed potatoes or crusty bread to soak up every drop of that rich sauce, or get creative by shredding the meat into tacos for a twist—either way, it’s a showstopper that’ll have everyone asking for seconds!
Classic French Onion Soup
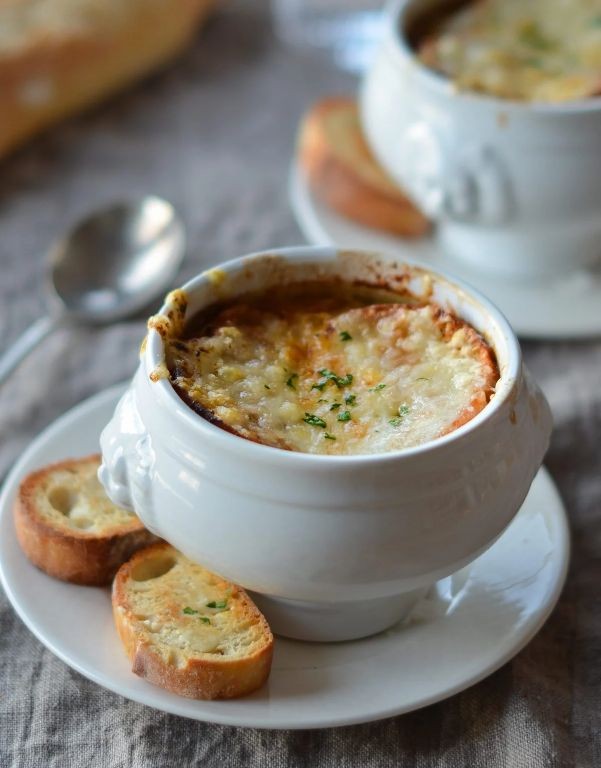
Venture into the cozy, caramelized world of French onion soup, where patience is a virtue and the reward is a bowl of pure, cheesy, brothy bliss that’s basically a hug for your soul. This isn’t just soup; it’s a slow-cooked symphony of sweet onions and rich beef broth, crowned with a glorious, molten cheese cap that’s worth every single tear (and we’re not just talking about the onions).
Serving: 4 | Pre Time: 15 minutes | Cooking Time: 90 minutes
Ingredients
– 4 large yellow onions
– 3 tbsp unsalted butter
– 1 tbsp olive oil
– 1 tsp granulated sugar
– 2 cloves garlic, minced
– 1/2 cup dry white wine
– 6 cups beef broth
– 2 sprigs fresh thyme
– 1 bay leaf
– 1 tsp Worcestershire sauce
– Salt and black pepper
– 4 slices French baguette
– 1 1/2 cups shredded Gruyère cheese
Instructions
1. Peel and thinly slice 4 large yellow onions into half-moons.
2. In a large, heavy-bottomed pot or Dutch oven, melt 3 tbsp unsalted butter with 1 tbsp olive oil over medium-low heat.
3. Add all the sliced onions to the pot and stir to coat them in the fat.
4. Cook the onions, stirring occasionally, for 20 minutes until they begin to soften and wilt.
5. Sprinkle 1 tsp granulated sugar over the onions and stir to combine.
6. Continue cooking the onions, stirring every 5-10 minutes to prevent burning, for 40-50 minutes total until they turn a deep, golden-brown caramel color. Tip: Low and slow is key here—don’t rush the caramelization, or you’ll miss out on that signature sweet flavor.
7. Add 2 cloves minced garlic to the pot and cook for 1 minute until fragrant.
8. Pour in 1/2 cup dry white wine to deglaze the pot, scraping up any browned bits from the bottom with a wooden spoon.
9. Let the wine simmer for 3-4 minutes until it reduces by half.
10. Add 6 cups beef broth, 2 sprigs fresh thyme, 1 bay leaf, and 1 tsp Worcestershire sauce to the pot.
11. Bring the soup to a boil, then reduce the heat to low and let it simmer uncovered for 30 minutes. Tip: Simmering melds the flavors—if the broth reduces too much, just add a splash of water.
12. While the soup simmers, preheat your oven’s broiler to high (about 500°F).
13. Place 4 slices of French baguette on a baking sheet and toast them under the broiler for 1-2 minutes per side until golden and crisp.
14. After 30 minutes, remove the thyme sprigs and bay leaf from the soup, then season with salt and black pepper to taste.
15. Ladle the hot soup into 4 oven-safe bowls placed on a baking sheet.
16. Top each bowl with 1 toasted baguette slice and evenly sprinkle 1 1/2 cups shredded Gruyère cheese over the bread. Tip: For an extra-crispy cheese crust, broil the bowls one at a time for better heat control.
17. Carefully place the baking sheet under the broiler and broil for 2-3 minutes until the cheese is bubbly and golden brown.
18. Remove the bowls from the oven using oven mitts and let them cool for 5 minutes before serving.
Perfectly balanced, this soup delivers a velvety, umami-rich broth with tender, sweet onions in every spoonful. The crowning glory is that stretchy, savory cheese blanket atop the crunchy bread—serve it with a crisp green salad to cut through the richness, or just dive in and embrace the delicious mess.
Braised Short Ribs with Red Wine Sauce
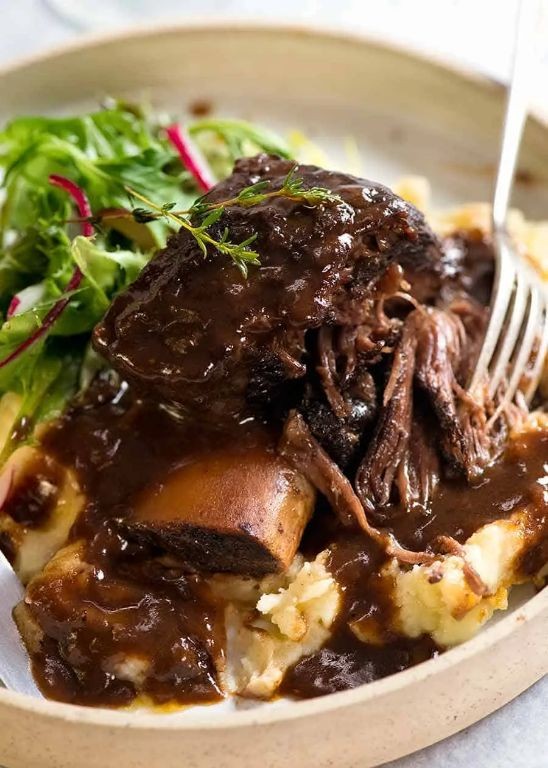
Whew, is there anything cozier than a dish that basically hugs you from the inside? Welcome to the ultimate winter warmer, where tough ribs get a long, luxurious bath in red wine until they surrender into utter, fall-off-the-bone deliciousness. It’s the kind of meal that makes you want to cancel all plans and just be one with your couch.
Serving: 4 | Pre Time: 25 minutes | Cooking Time: 3 hours 30 minutes
Ingredients
– 4 pounds beef short ribs
– 1 teaspoon kosher salt
– 1/2 teaspoon black pepper
– 2 tablespoons olive oil
– 1 large yellow onion, chopped
– 2 large carrots, chopped
– 3 cloves garlic, minced
– 2 tablespoons tomato paste
– 2 cups dry red wine (like Cabernet Sauvignon)
– 2 cups beef broth
– 2 sprigs fresh thyme
– 2 sprigs fresh rosemary
– 2 tablespoons unsalted butter, cold
Instructions
1. Preheat your oven to 325°F.
2. Pat the 4 pounds of beef short ribs completely dry with paper towels, then season all over with 1 teaspoon of kosher salt and 1/2 teaspoon of black pepper.
3. Heat 2 tablespoons of olive oil in a large, oven-safe Dutch oven over medium-high heat until shimmering.
4. Sear the short ribs in batches for 4-5 minutes per side until deeply browned, transferring them to a plate once seared. Tip: Don’t crowd the pot, or they’ll steam instead of sear!
5. In the same pot, add the chopped large yellow onion and 2 large chopped carrots, cooking for 6-8 minutes until softened.
6. Add 3 minced cloves of garlic and cook for 1 minute until fragrant.
7. Stir in 2 tablespoons of tomato paste and cook for 2 minutes to deepen its flavor.
8. Pour in 2 cups of dry red wine, scraping up any browned bits from the bottom of the pot with a wooden spoon.
9. Let the wine simmer for 5-7 minutes until reduced by about half.
10. Add 2 cups of beef broth, 2 sprigs of fresh thyme, and 2 sprigs of fresh rosemary, then bring the liquid to a simmer.
11. Return the seared short ribs and any accumulated juices to the pot, nestling them into the liquid. Tip: The liquid should come about halfway up the ribs.
12. Cover the pot with a tight-fitting lid and transfer it to the preheated 325°F oven.
13. Braise for 3 hours until the meat is extremely tender and easily pulls away from the bone.
14. Carefully remove the pot from the oven and transfer the short ribs to a serving platter, tenting them loosely with foil to keep warm.
15. Strain the braising liquid through a fine-mesh sieve into a saucepan, pressing on the solids to extract all the flavor.
16. Bring the strained sauce to a simmer over medium heat and cook for 10-15 minutes until slightly thickened.
17. Remove the saucepan from the heat and whisk in 2 tablespoons of cold, unsalted butter until the sauce is glossy and smooth. Tip: Adding cold butter off the heat creates a richer, silkier sauce.
18. Spoon the red wine sauce over the plated short ribs.
Absolutely magical, right? The meat is so tender it practically dissolves on your tongue, while that glossy, reduced wine sauce packs a deep, savory punch that clings to every bite. Serve this beauty over a heap of creamy mashed potatoes or a pile of buttery polenta to soak up every last drop of that luxurious sauce.
Warm Chocolate Lava Cake
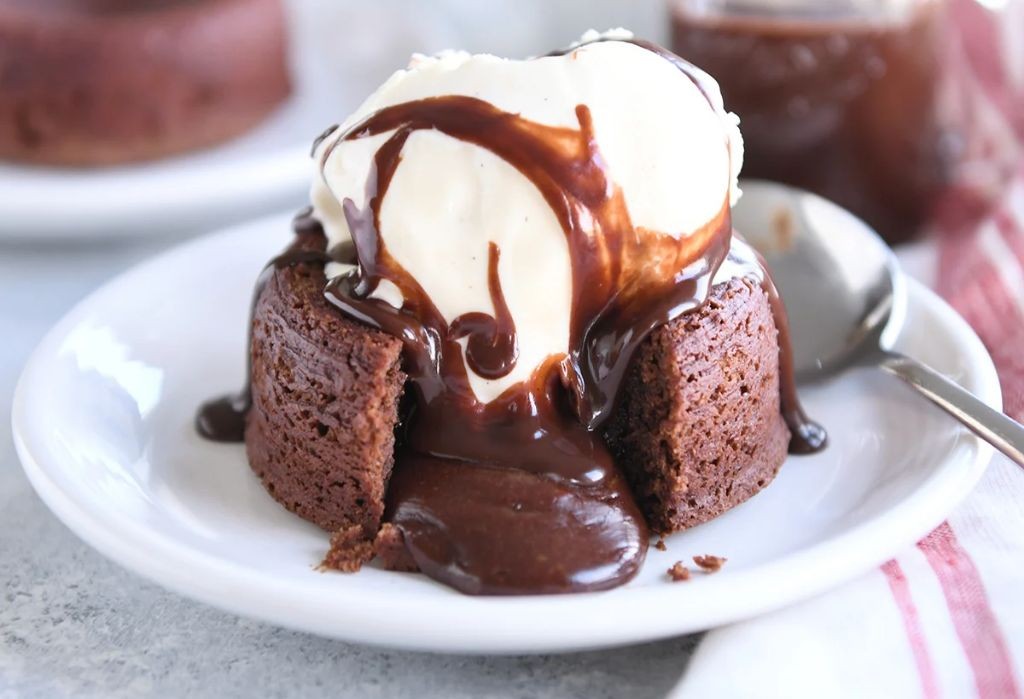
Visions of chocolatey goodness dancing in your head? Let’s make them a reality with this warm, gooey delight that’s basically a hug for your taste buds—perfect for when you need a little indulgence (or a lot, no judgment here!). Serving: 4 | Pre Time: 15 minutes | Cooking Time: 12 minutes
Ingredients
– 4 ounces semisweet chocolate
– 1/2 cup unsalted butter
– 1 cup powdered sugar
– 2 large eggs
– 2 large egg yolks
– 1 teaspoon vanilla extract
– 1/2 cup all-purpose flour
– 1/4 teaspoon salt
– Butter for greasing
– Cocoa powder for dusting
Instructions
1. Preheat your oven to 425°F and grease four 6-ounce ramekins with butter, then dust them lightly with cocoa powder to prevent sticking.
2. Chop the 4 ounces of semisweet chocolate into small pieces for even melting.
3. In a microwave-safe bowl, melt the 1/2 cup unsalted butter and chopped chocolate together in 30-second intervals, stirring between each until smooth—tip: don’t overheat to avoid burning.
4. In a separate bowl, whisk together 1 cup powdered sugar, 2 large eggs, 2 large egg yolks, and 1 teaspoon vanilla extract until well combined.
5. Gradually pour the melted chocolate mixture into the egg mixture, whisking constantly to temper the eggs and prevent curdling.
6. Sift in 1/2 cup all-purpose flour and 1/4 teaspoon salt, then fold gently until just combined—tip: overmixing can make the cake dense.
7. Divide the batter evenly among the prepared ramekins, filling each about three-quarters full.
8. Bake in the preheated oven for exactly 12 minutes, until the edges are set but the centers are still soft and jiggly—tip: check at 10 minutes to avoid overbaking.
9. Remove from the oven and let cool for 1 minute before running a knife around the edges.
10. Invert each ramekin onto a plate, tap gently, and lift to reveal the cake.
The result is a decadent treat with a crisp outer shell giving way to a molten chocolate center that oozes with rich, velvety flavor. Try serving it with a scoop of vanilla ice cream for a hot-and-cold contrast, or sprinkle with sea salt to balance the sweetness—it’s guaranteed to make any day feel like a celebration!
Garlic Rosemary Roast Chicken
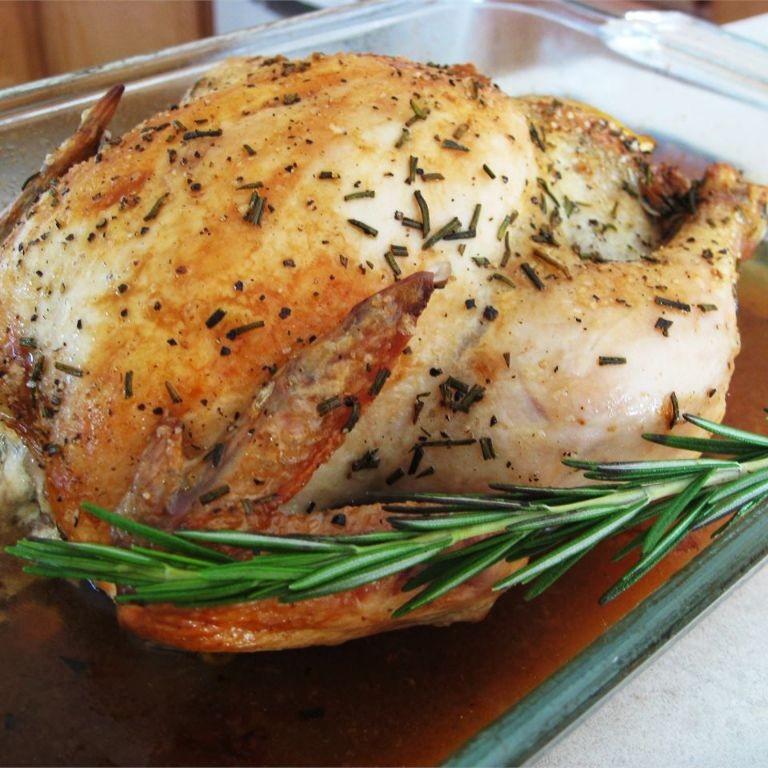
Drumroll, please! If you’ve ever wanted your kitchen to smell like a cozy, herb-scented hug, this garlic rosemary roast chicken is your golden ticket. It’s the kind of fuss-free, flavor-packed hero that turns a regular Tuesday into a mini celebration, with crispy skin and juicy meat that’ll have everyone fighting for the last piece.
Serving: 4 | Pre Time: 15 minutes | Cooking Time: 90 minutes
Ingredients
– 1 whole chicken (about 4 pounds)
– 3 tablespoons olive oil
– 6 cloves garlic, minced
– 2 tablespoons fresh rosemary, chopped
– 1 teaspoon salt
– 1/2 teaspoon black pepper
– 1 lemon, halved
– 1 onion, quartered
Instructions
1. Preheat your oven to 425°F and place a rack in the middle position.
2. Pat the whole chicken completely dry with paper towels—this is key for crispy skin!
3. In a small bowl, combine 3 tablespoons olive oil, 6 cloves minced garlic, 2 tablespoons chopped rosemary, 1 teaspoon salt, and 1/2 teaspoon black pepper.
4. Rub the olive oil mixture evenly all over the chicken, including under the skin.
5. Place 1 halved lemon and 1 quartered onion inside the chicken cavity to add moisture and flavor.
6. Tie the chicken legs together with kitchen twine for even cooking.
7. Place the chicken breast-side up in a roasting pan or oven-safe skillet.
8. Roast the chicken at 425°F for 15 minutes to start crisping the skin.
9. Reduce the oven temperature to 375°F and continue roasting for 60-75 minutes, or until a meat thermometer inserted into the thickest part of the thigh reads 165°F.
10. Let the chicken rest on a cutting board for 15 minutes before carving to keep the juices locked in.
11. Carve the chicken and serve immediately.
Venture into a plate where the skin crackles with each bite, giving way to tender, herb-infused meat that’s subtly brightened by lemon. Try shredding leftovers into a hearty grain bowl or piling slices onto crusty bread with a swipe of aioli for a next-day sandwich that’s anything but boring.
Maple Glazed Brussels Sprouts
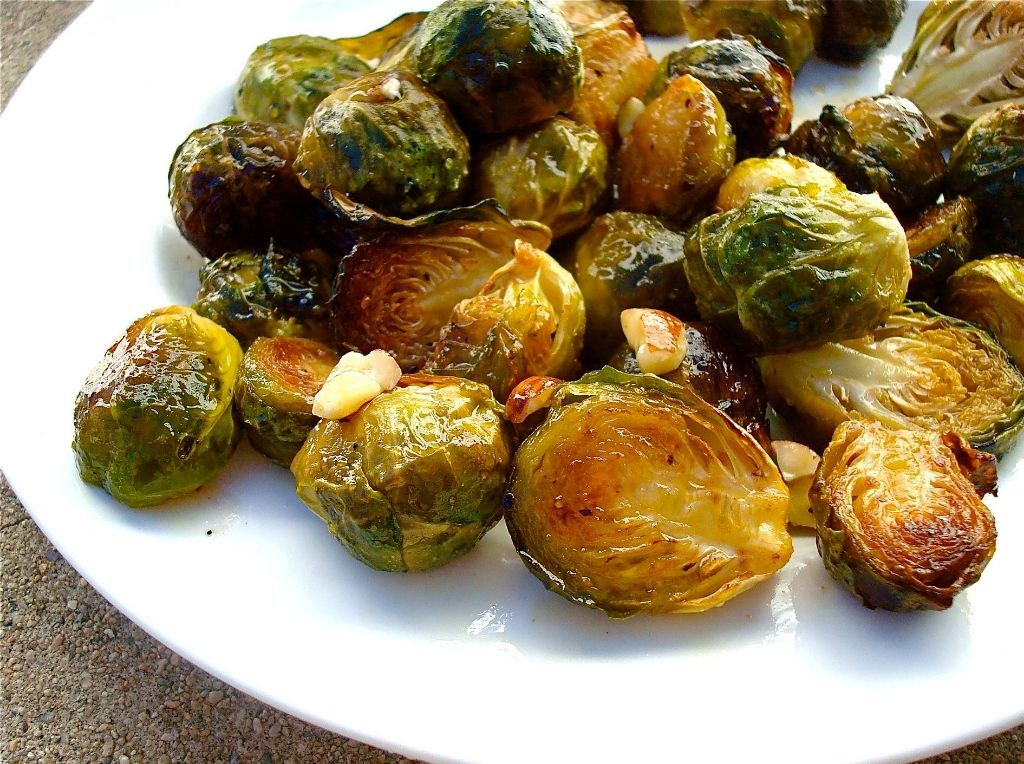
Zesty as a holiday surprise and sweeter than your aunt’s compliments, these Maple Glazed Brussels Sprouts are the side dish that steals the spotlight. Roasted to crispy perfection and drenched in a sticky-sweet maple glaze, they’ll make even the sprout skeptics at your table ask for seconds—no bribes required.
Serving: 4 | Pre Time: 10 minutes | Cooking Time: 25 minutes
Ingredients
– 1.5 pounds Brussels sprouts, trimmed and halved
– 2 tablespoons olive oil
– 0.5 teaspoon salt
– 0.25 teaspoon black pepper
– 0.25 cup pure maple syrup
– 2 tablespoons balsamic vinegar
– 1 tablespoon unsalted butter
– 2 cloves garlic, minced
Instructions
1. Preheat your oven to 400°F and line a large baking sheet with parchment paper for easy cleanup.
2. In a large bowl, toss the Brussels sprouts with olive oil, salt, and black pepper until evenly coated.
3. Spread the sprouts in a single layer on the prepared baking sheet, cut-side down, to maximize caramelization.
4. Roast for 20 minutes at 400°F, or until the edges are golden brown and crispy.
5. While roasting, combine maple syrup, balsamic vinegar, butter, and minced garlic in a small saucepan over medium heat.
6. Simmer the glaze for 3–5 minutes, stirring frequently, until it thickens slightly and coats the back of a spoon.
7. Remove the roasted Brussels sprouts from the oven and drizzle the warm maple glaze over them, tossing gently to coat evenly.
8. Return the glazed sprouts to the oven and roast for an additional 3–5 minutes at 400°F, until the glaze is sticky and bubbly.
9. Transfer the sprouts to a serving dish and let them cool for 2 minutes before serving to avoid burning mouths.
Wondering how to elevate this dish? The caramelized edges offer a satisfying crunch that contrasts beautifully with the tender centers, while the maple glaze adds a rich, sweet-tangy flavor that pairs perfectly with roasted meats or as a festive holiday side. Try sprinkling with toasted pecans or crispy bacon bits for an extra layer of texture and indulgence.
Hot Cocoa with Marshmallows
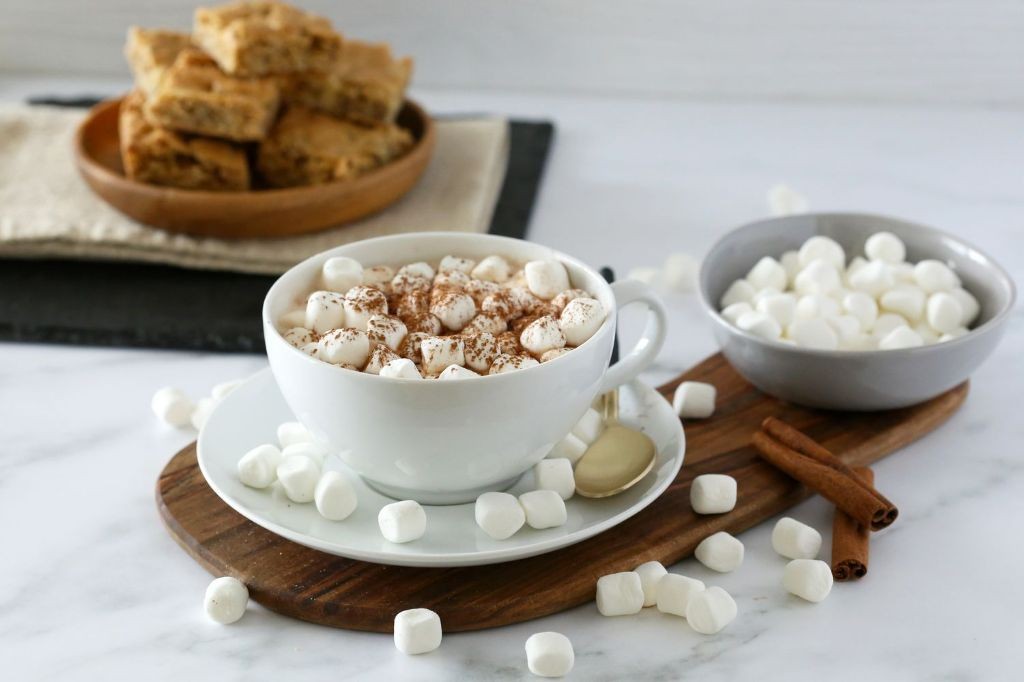
Cocoa connoisseurs, unite! As the holiday season wraps us in its chilly embrace, there’s no better way to combat the frosty gloom than with a mug of pure, unadulterated joy. Let’s ditch the sad, powdery packets and whip up a batch of real-deal hot cocoa that’ll make your taste buds do a happy dance.
Serving: 2 | Pre Time: 5 minutes | Cooking Time: 10 minutes
Ingredients
– 2 cups whole milk
– 1/4 cup granulated sugar
– 3 tbsp unsweetened cocoa powder
– 1/4 tsp vanilla extract
– 1/4 cup mini marshmallows
– 1 pinch salt
Instructions
1. Pour 2 cups of whole milk into a small saucepan.
2. Place the saucepan over medium-low heat.
3. Whisk in 1/4 cup of granulated sugar and 3 tablespoons of unsweetened cocoa powder until no dry lumps remain. Tip: Sifting the cocoa powder first prevents clumps for a silky-smooth texture.
4. Add 1 pinch of salt to the mixture and whisk to combine.
5. Heat the mixture, whisking frequently, until it reaches 160°F on a kitchen thermometer and is steaming hot but not boiling. Tip: Heating slowly and avoiding a boil prevents the milk from scalding or developing a skin.
6. Remove the saucepan from the heat.
7. Stir in 1/4 teaspoon of vanilla extract.
8. Divide the hot cocoa evenly between two mugs.
9. Top each mug with 2 tablespoons (1/4 cup total) of mini marshmallows. Tip: For a toasted marshmallow flavor, briefly broil the topped mugs for 1-2 minutes until the marshmallows are golden brown.
Velvety and rich, this cocoa boasts a deep chocolate flavor perfectly balanced by the sweet, creamy marshmallows. Serve it alongside a plate of peppermint-striped cookies for a festive twist, or spike it with a splash of peppermint schnapps for the grown-ups in the room.
Summary
Mmm, these 20 cozy winter recipes are your ticket to delicious comfort all season long. From hearty stews to sweet treats, there’s something to warm every soul. We’d love to hear which dish becomes your new favorite—drop a comment below! If you enjoyed this roundup, please share it on Pinterest to spread the warmth. Happy cooking!


